

Agria 3600 Operating Instructions Manual
6089_01, 6089_2
Engine: EH17
Before commissioning the machine, read operating
instructions and observe warnings and safety instructions!
Operating Instructions No. 998 422GB 11.12
&
Two-Wheel Tractor
3600
Operating Instructions
Translation of the original operating instructions
2 Two-wheel tractor agria 3600
Symbols, Name Plate
Please complete:
Machine Type No .: ........................
Identification No.:
..........................................................
Engine Type: ................................
Engine No.: ..................................
Date of Purchase: ......................
For name plate, refer to p3/fig. A/16.
For engine type and number, refer to
pages 58/fig. E/8.
Please state these data when order-
ing spare parts to avoid wrong deliveries.
Only use original Agria spare
parts!
Specifications, figures and dimensions stated in these instructions are
not binding. No claims can be deriv ed
from them. We reserve the right for
improvements without changing
these instructions.
This delivery comprises:
l
Operating instructions machine
l
Operating instructions engine
l
Two-wheel tractor
– Basic machine
– Steering handle
l
Tool kit
Symbols
è
- Serviceç= contact
your Agria workshop
Warning – Danger
Caution
Important information
Fuel
Engine Start
Engine Stop
Engine oil Engine oil level
Speed control
Air filter Air cooling
Clutch PTO
Wheel drive
Forward
Reverse
Fast Slow
Differential lock
Brake
Park brake
Open (unlocked)
Closed (locked)
Transmission oil
Transmission oil level
Oiling
Greasing point
Lifting point Visual check
Wear protective gloves
Wear safety shoes
Two-wheel tractor agria 3600 3
A
B
Version 2F2R:
rigid hexagonal wheel
shaft
C
Version 3F2R,
differential, steering brake
Designation of Parts
6
1
7 13 9
5 43
6
1
2
3 8 4
7 13 9
5
11 12
10

4 Two-wheel tractor agria 3600
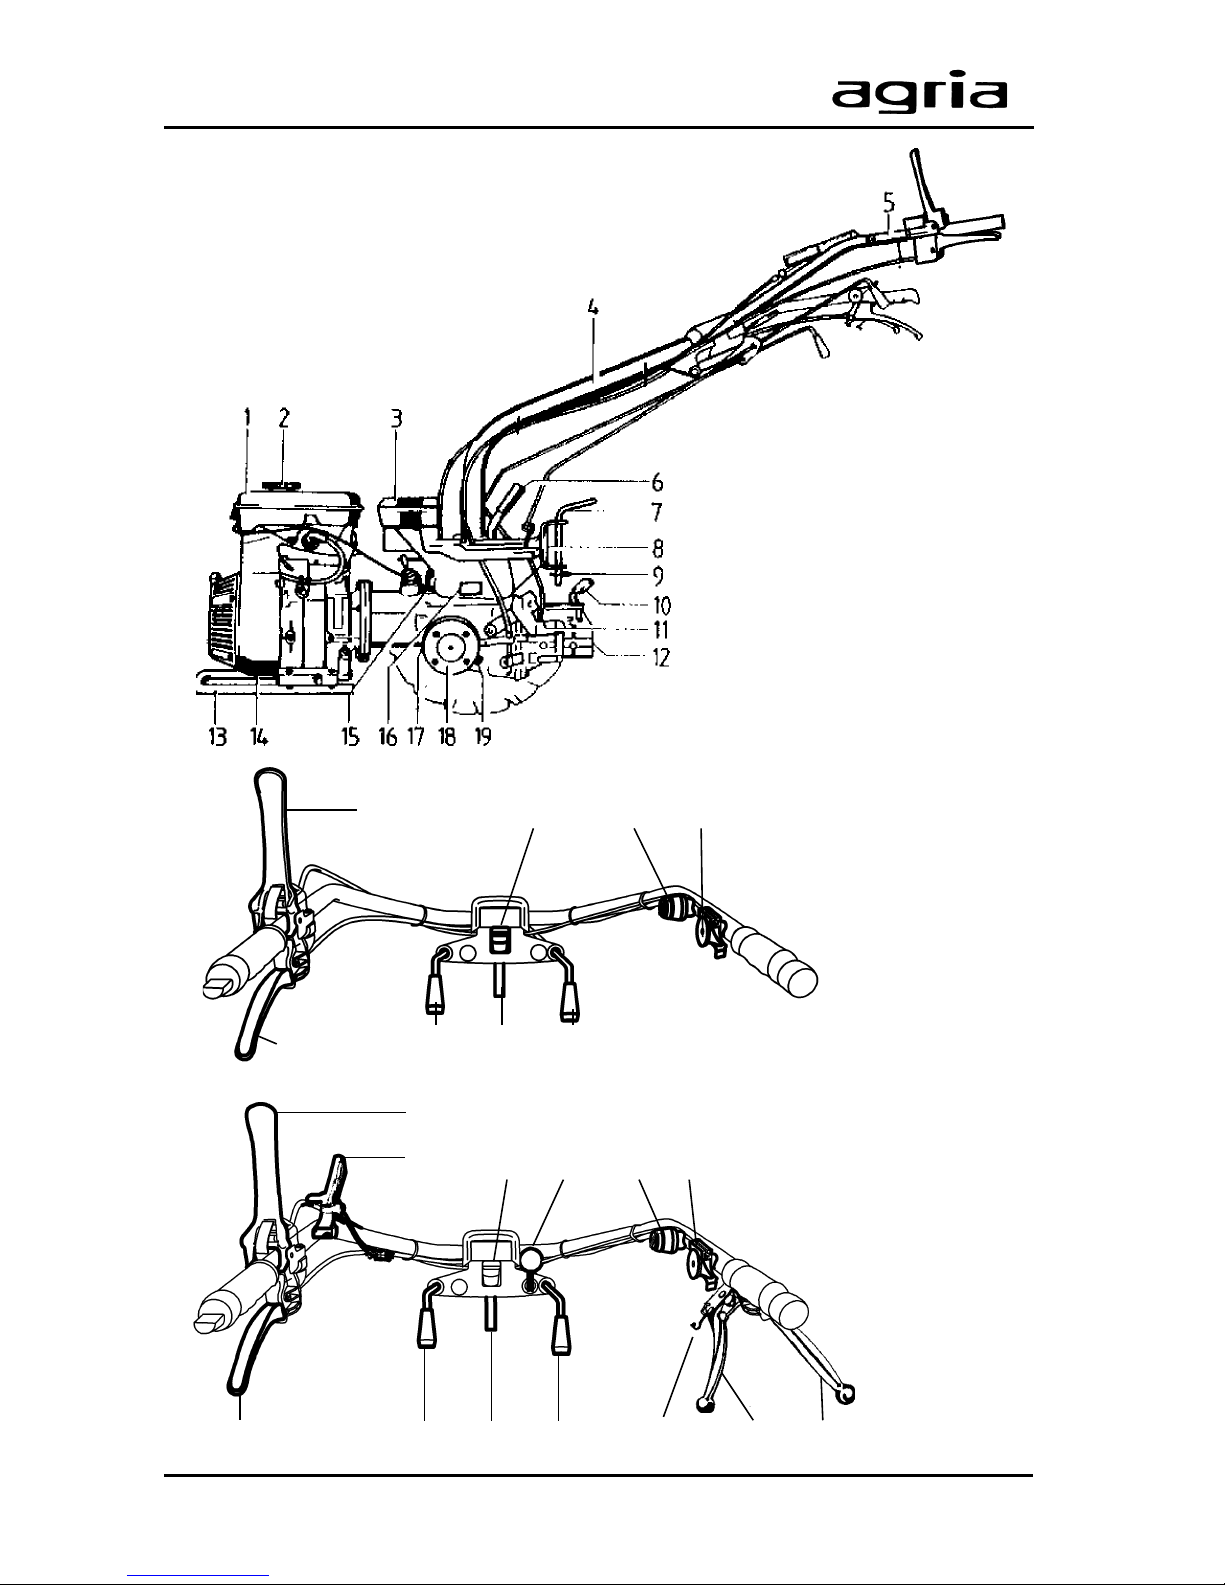
Designation of Parts
Fig. A:
1 Fuel tank
2 Fuel tank cap
3 Tool kit
4 Steering bar
5 Handlebar
6 Locking lever for steering handle side adjustment and swivel
7 Coupler pin
8 Hitch
9 W-clip
10 Locking lever for coupling attachment
11 Reversing lock bolt (safety bolt)
12 Coupling flange with integrated PTO
13 Weight mounting device and engine guard
14 Engine
15 Transmission oil filling opening and dipstick of basic machine
16 Name plate (Identification No.)
(right, in travel direction)
17 Single-wheel brake drum
18 Wheel flange
19 Transmission oil drain plug
Figure B and C
1 Safety shifting lever
2 Hand lever for differential lock
3 Locking lever for steering handle height adjustment
4 Speed control lever
5 Engine shut-off switch
6 Hand lever for engine clutch
7 PTO speed shifter = for rear attachment
(gear shifter) = for front attachment
8 Fast speed shifter
9 Gear shifter = for rear attachment
(PTO speed shifter) = for front attachment
10 Pawl for single-wheel brake (for driving with mounted trailer)
11 Hand lever for single-wheel brake left = for rear attachment
(Hand lever for single-wheel brake right) = for front attachment
12 Hand lever for single-wheel brake right = for rear attachment
(Hand lever for single-wheel brake left) = for front attachment
13 Locking lever for steering handle side adjustment and swivel

Two-wheel tractor agria 3600 5
Index
Amount of Delivery ........................... 2
Designation
of Parts.................................... 3, 58
Assembly Instructions..........6–8
1. Safety Instructions........ 9 - 15
Due Use ............................................ 9
2. Specifications
Dimensions ..................................... 16
Machine .......................................... 17
Vibration Acceleration Value........... 17
Engine............................................. 18
Noise Levels ................................... 18
Operation on Slopes....................... 18
3. Devices and
Operating Elements
Engine............................................. 19
Safety Circuit .................................. 20
Clutch.............................................. 21
Gearbox .......................................... 22
Single-Wheel Brake........................ 24
Differential Gear .............................. 25
PTO ................................................. 25
Reversing Lock ............................... 25
Loading Belt, Fixing Points............. 26
Steering Handle ........................ 26, 27
Drive-Wheels ............................ 28, 29
Snow Chains................................... 29
Wheel Fastening Screws................ 29
Front Weights and
Wheel Weights................................ 30
Coupling and
Decoupling Implements.................. 31
4. Commissioning and
Operation
Commissioning the Machine .......... 35
Starting the Engine ......................... 37
Switching off the Engine................. 38
Operations ...................................... 39
Danger Zone................................... 40
Driving with Mounted Trailer ........... 41
Safety References, Handling.......... 42
5. Maintenance
Engine........................................ 43-45
Air Filter .......................................... 44
Machine ..................................... 46-47
Gearbox .......................................... 46
Drive-Wheels .................................. 46
Instant adapter device .................... 47
Steering Handle .............................. 47
Brake............................................... 47
Clutch Play...................................... 48
Safety Circuit .................................. 48
Engine Shut-off Switch ................... 48
General Maintenance ..................... 49
Storage ........................................... 50
Recommendations
Lubricants ....................................... 51
Maintenance and Repair ................ 51
Fuel ................................................. 51
Varnishes, Wear Parts ............. 52
6. Troubleshooting.............. 54-55
Diagram: Electric Diagram .... 56
Lubrication Chart ................... 56
Inspection and
Maintenance Chart ................... 57
Conformity Declaration ........... 59
Fig. A; B; C .................................... 3
Fig. D + E .....................................58
1
3
5
6
4
2
6 Two-wheel tractor agria 3600
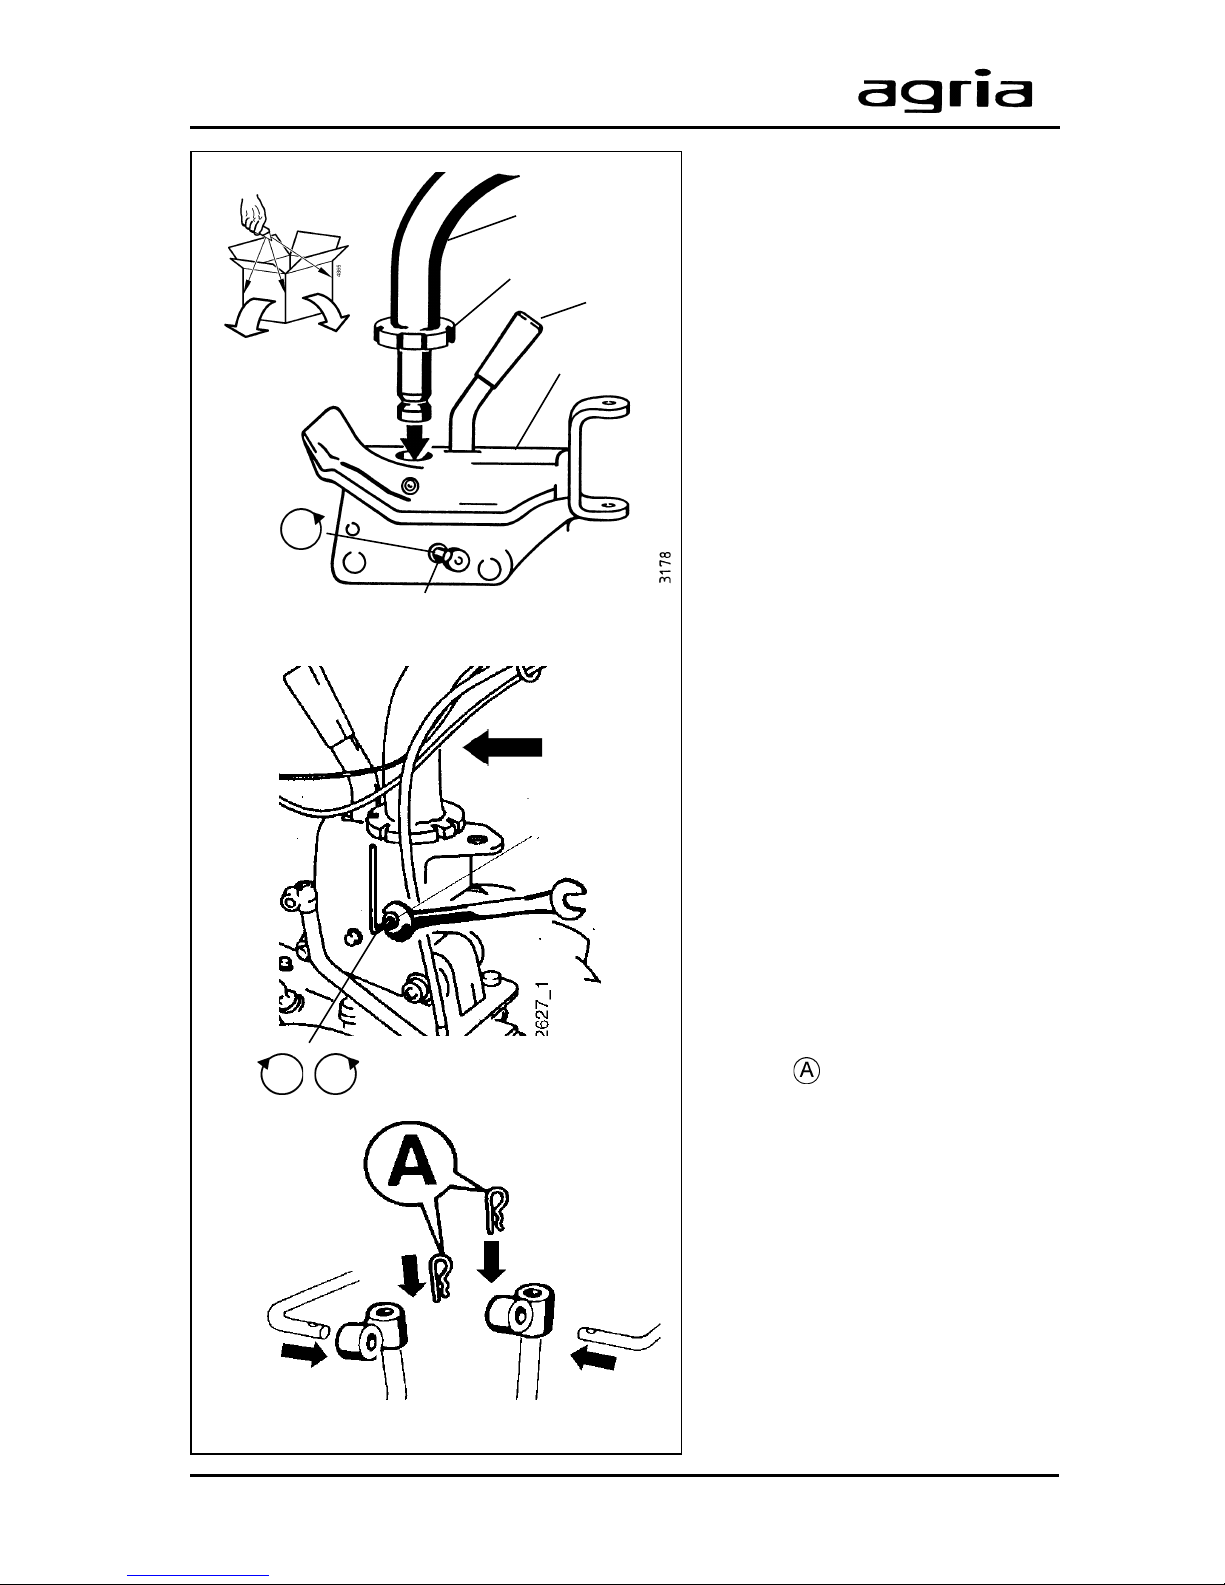
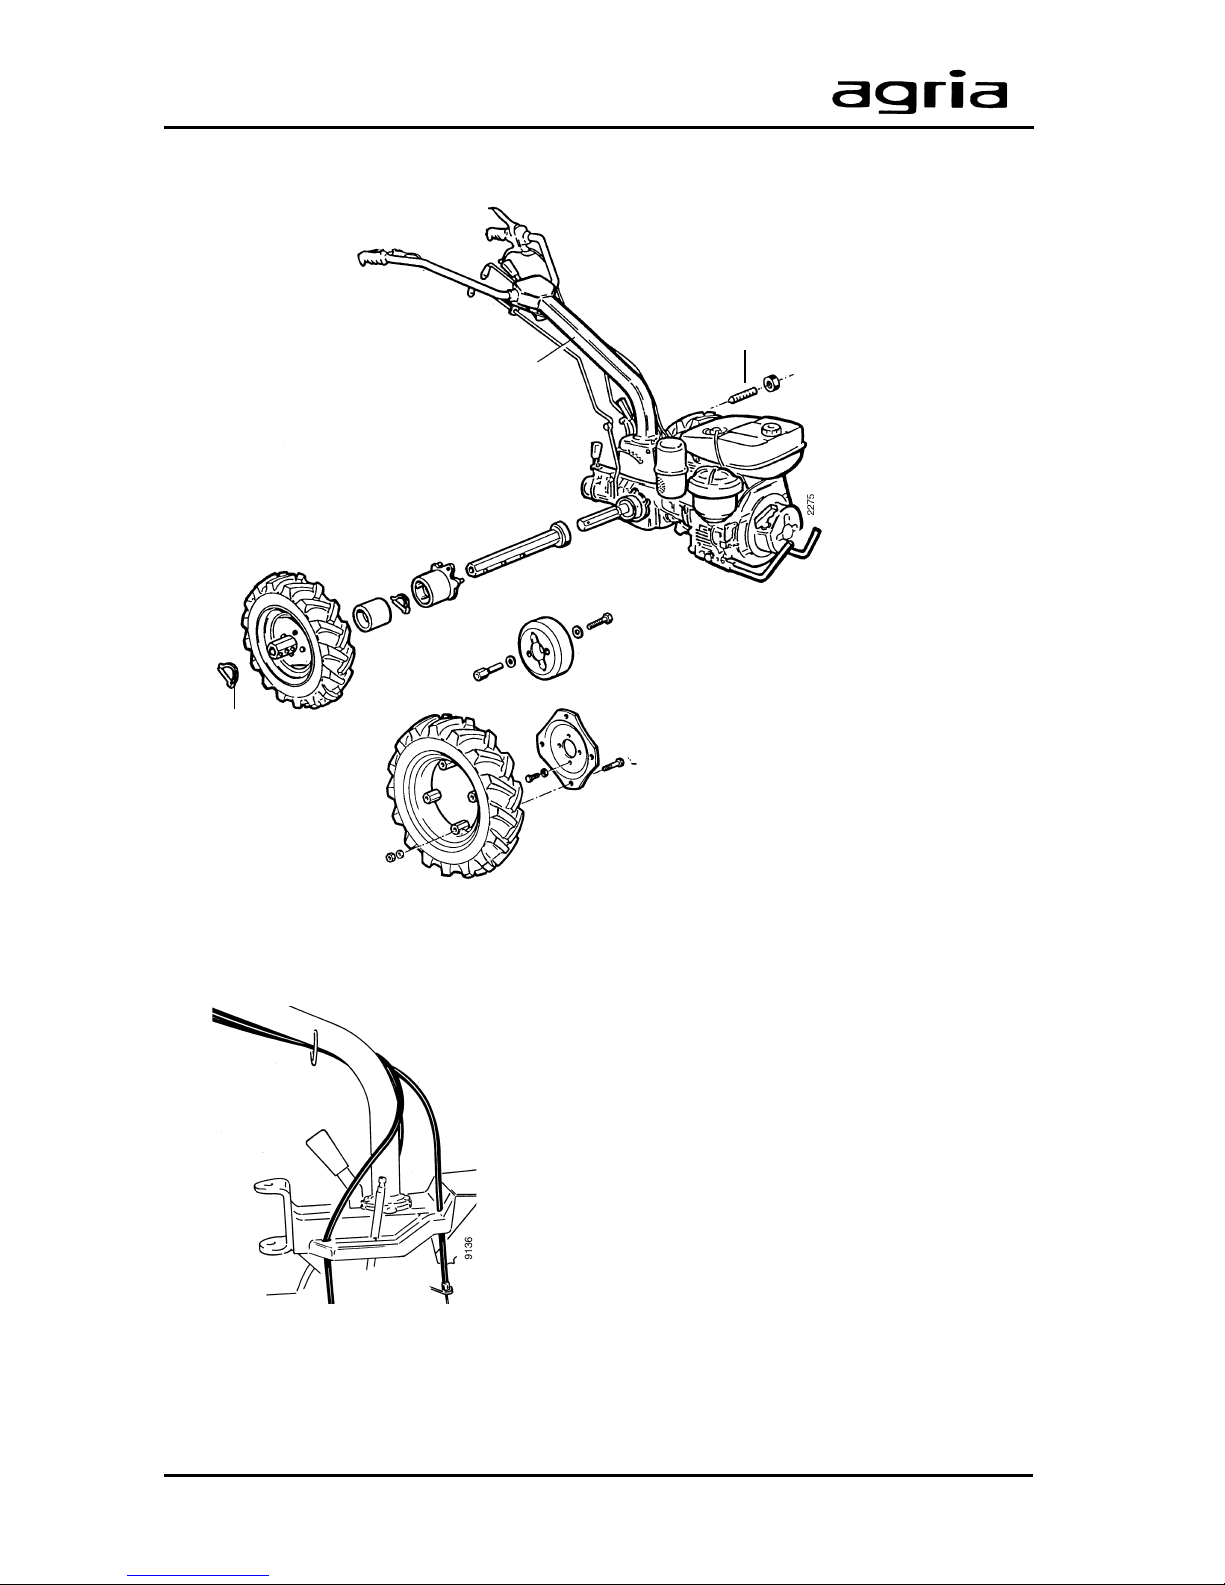
ΠUnpack the two-wheel tractor ,
fit the steering handle into the
steering column:
•Screw out set screw and hex-
agonal nut (lock nut) until steering handle can fit into steering
column.
ŽFit steering handle into steer-
ing column – lev er (A/6) must lock
into toothed ring of steering handle.
•Screw in set screw until you
feel slight resistance – then
loosen set screw a quarter turn
and lock with hexagonal nut.
•Place Bowden cables (hoeing/
tilling attachment) on the left side
(in travel direction) of steering
handle and as depicted on pages
7 and 8.
l
Steering handle must swivel
easily.
‘Assemble shifters. For this pur-
pose, insert shifters for PTO and
gear shifters into joints of shift levers on gearbox and secure with
W-clips
.
Assembly Instructions
Set screw and hexagonal nut
Assembly of shifters
Steering
handle
Steering
column
Tighten with
lock nut
Œ
•
‘
1/4
•
•
Ž
Toothed r ing
A/6
Two-wheel tractor agria 3600 7
Assembly Instructions
Version 2F2R: rigid hexagonal wheel shaft
Drive-wheel 4.008 with wheel
flange
Wheel weights
Drive-wheel 4.00-10
with wheel adapter
flange
Set screw and
hexagonal nut
Arrangement of Bowden cables
l
Mounting drive-wheels:
– 4.00-8: Mount drive-wheels onto wheel
flanges using wheel screws and washers. Slide
wheels onto hexagonal wheel shaft in such a
way that the arrow tread profile points in travel
direction. Insert linch pin in holes of wheel hub
and shaft. Then turn spring band around the
axle.
– 4.00-10: Screw wheel adapter flanges onto
drive-wheels. Mount drive-wheels onto wheel
flanges using wheel screws and washers. Slide
wheels onto hexagonal wheel shaft in such a
way that the arrow tread profile points in travel
direction. Insert linch pin in holes of wheel hub
and shaft. Then turn spring band around the
axle.
Steering handle
Linch pin
8 Two-wheel tractor agria 3600
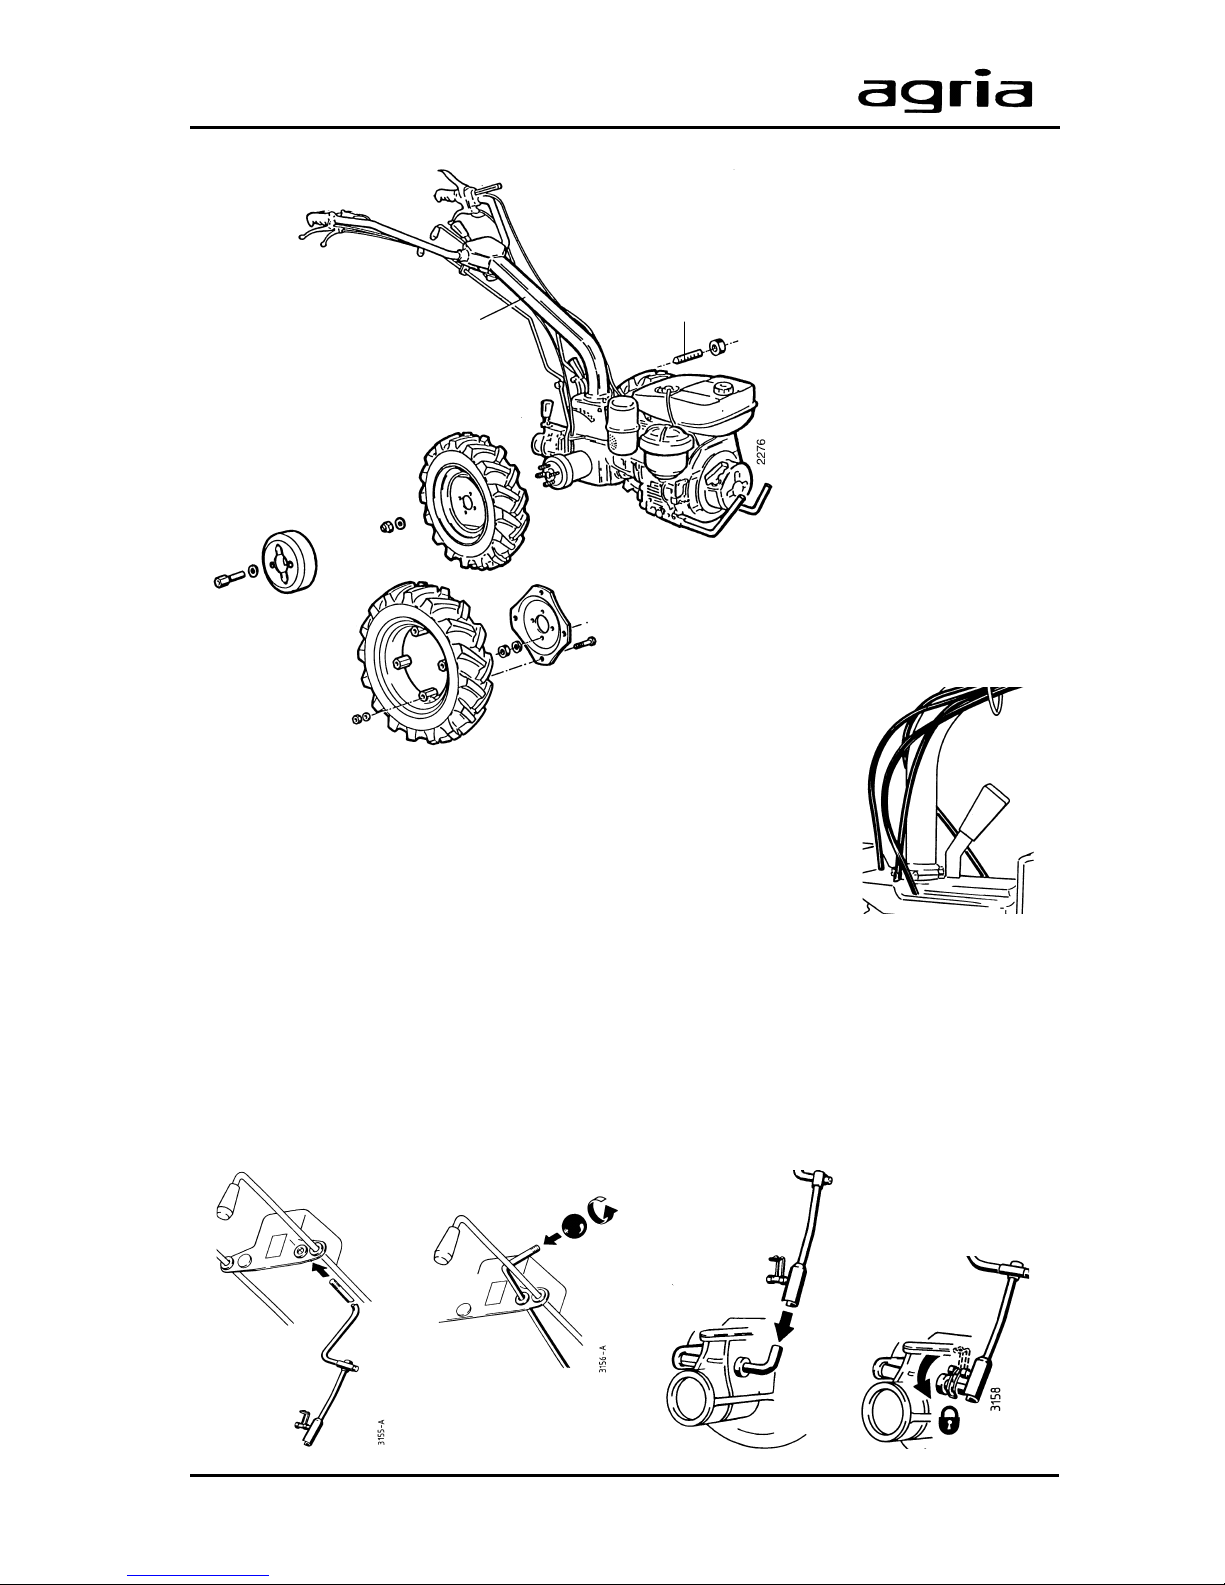
Assembly Instructions
Version 3F2R,
differential, steering brake
Set screw and
hexagonal nut
l
Mounting drive-wheels:
– 4.00-8: Mount drive-wheels on wheel flanges using wheel screws and washers. Mount in such a way
that the arrow tread profile points in travel direction.
Drive-wheel 4.00-8
Wheel weights
– 4.00-10: Screw wheel adapter flanges onto drive-wheels. Then mount drivewheels onto wheel flanges using wheel screws and washers in such a way
that the arrow tread profile points in travel direction.
l
Assembly of fast speed shifter:
Push shifter upwards through shifter guide ring (I), screw on ball handle (II),
stick shifter onto gearbox shift lever (III) and secure with spring band (IV).
Steering handle
Drive-wheels 4.00-10
with wheel adapter flange
Arrangement of
Bowden cables
I II III IV

Two-wheel tractor agria 3600 9
Before starting the engine, read the operating instructions and note:
Warning
This symbol marks all paragraphs in
these operating instructions which affect your safety. Pass all safety instructions to other users and operators.
Due Use
The two-wheel tractor is a hand-controlled automatic single-axle machine which
can power and/or pull various implements approved by the manufacturer.
Areas of application are for such as turning over the ground, mowing grass and
meadowland, snow clearance and
sweeping (due use).
Any other type of operation is considered undue. The manufacturer is not liable for any damages resulting from
undue use, for which the risk lies with
the user alone.
When the single-axle tractor/the all-purpose machine is used on public roads,
the local national road traffic rules must
be observed, e.g. reflectors, lights.
The single-axle tractor/The all-purpose
machine is not intended for use with a
trailer on public roads or as as a tractor
unit without implements.
Due use includes compliance with
manufacturer’s instructions on operation, maintenance and repair.
Any unauthorized changes to the twowheel tractor render manufacturer liability null and void.
1. Safety Instructions
General Instructions on
Safety and Accident
Prevention
Basic Rule:
The standard accident prev ention regulations must be adhered to, as well as
all other generally accepted rules governing operational safety, occupational
health and road traffic regulations.
For drives on public roads, the current
traffic code applies.
Accordingly, check the two-wheel tractor for road and operational saf ety each
time you take up operation.
Only persons familiar with the tractor
and instructed on the hazards of operation are allowed to use, maintain and
repair the tractor.
Teenagers of 16 years or younger may
not operate the two-wheel tractor!
Only work in good light and visibility.
Operator’s clothes should fit tight. Avoid
wearing loose fitting clothes. Wear
safety shoes.
Note the warning and instruction signs
on the tractor for safe operation. Compliance is for your own safety.
When transporting the tractor on vehicles or trailers outside the area to be
cultivated, ensure that the engine is
turned off.
Careful with rotating tools – keep at a
safe distance!
1

10 Two-wheel tractor agria 3600
Beware of coasting tools. Before you
start any maintenance or repair on them,
wait until tools have come to a complete
stop.
Foreign powered parts shear and crush!
Riding on the attachment during opera-
tion is not permitted.
Implements and their weight affect the
driving, steering, braking, and tip-over
characteristics of the tractor. Therefore,
ensure steering and braking functions
are sufficient. Match operating speed to
conditions.
Do not change settings of governor . High
engine speed increases risk of accidents.
Working Area and
Dangerous Area
The user is liable to third parties working within the tractor’s working range.
Staying in hazardous area is not permitted.
Check the immediate surroundings of
the tractor before y ou start it. W atch out
for children and animals.
Before you start work, clear the area
from any foreign object. Dur ing operation, always w atch out for further objects
and remove them in time.
For operation in enclosed areas , ensure
that a safety distance is kept to enclosures to prevent damage to tools.
Operation and
Safety Devices
Before you start the engine
Become familiar with the devices and
operating elements and their functions.
Above all, learn how to turn the engine
off quickly and safely in an emergency.
Ensure that all protective devices are
mounted and positioned to provide protection.
With no implement mounted, make sure
PTO-shaft is covered with the protective cap.
Starting the engine
Do not start engine in closed rooms. The
carbon monoxide contained in the exhaust fume is extremely toxic when inhaled.
Before you start the engine set all operating elements to neutral or idling position.
For starting the engine, do not step in
front of the two-wheel tractor and the
implement.
Do not use assist-starting liquids when
using electrical assist-starting devices
(jumper cable). Danger of explosion.
Operation
Never leave the operator’s position at
the steering handle while tractor is at
work.
Never adjust the oper ating handles during work – danger!
1. Safety Instructions
1

Two-wheel tractor agria 3600 11
During operation do not leave the operator’s position at the steering handle,
especially not when you turn the machine.
Riding on the implement during operation or in transport is not permitted.
If clogging occurs in the implement, turn
off the engine and clean the implement
with an appropriate tool.
In case of damage to the two-wheel tractor or to the implement, immediately turn
off the engine and have it repaired.
If steering causes problems, immediately bring the two-wheel tractor to a halt
and turn it off. Have the malfunction removed without delay.
To prevent the tractor from sliding on
slopes make sure it is secured by another person using a bar or a rope. This
person must be located at a higher position than the vehicle at a saf e distance
from the attachment at work.
If possible, always work diagonally to
the slope.
End of Operation
Never leave the tw o-wheel tractor unattended with the engine running.
Before you leave the two-wheel tractor,
turn off the engine. Then close fuel taps.
Secure two-wheel tractor against unauthorized use. If tractor is equipped with
ignition key, remove the ke y . F or all other
versions, remov e spark plug connector .
Implements
Only mount implements with the engine
and PTO switched off.
Always use appropriate tools and wear
gloves when changing implements and
parts thereof.
For mounting and removing implements
bring support leg into proper position
and ensure stability.
Secure two-wheel tractor and implements against rolling off (parking brake,
wheel chocks).
Beware of injuries while coupling implements.
Hitch implements as specified and only
couple at specified points.
Secure two-wheel tractor and implement
against unauthorized use and rolling off
when you leave the machine. If necessary, install transport or security devices
and secure.
Hoeing Attachment
When hoeing and tilling on difficult
ground (stony, hard etc.) the machine
may giv e sudden jerking movements in
an upward and forward direction and
therefore extra care should be taken
under these conditions.
Adjust protective cov er of hoeing attachment so that only those parts of tools
which penetrate the soil are not covered.
When hoeing, make sure hoeing skid is
adjusted properly.
1. Safety Instructions
1

12 Two-wheel tractor agria 3600
Mowing Implement
Handle with care! Sharp blades of the
cutter bar may cause injuries! Remove
protective knife strips only for mowing
and refit immediately after work has finished.
For transport and storage always mount
the protective knife strips. Secure finger bars additionally with tension
springs.
Do not transport the removed cutter bar
without protective strips.
When mounting and removing the cutter bar, make sure all blades are protected by the knife strip.
To exchange the knife and to mount/remove the knif e head, make sure that you
turn screws away from cutting blades.
For grinding the mowing kniv es , alwa ys
wear safety goggles and gloves.
Trailer
Make sure to not exceed permissible
tongue load of trailer coupling, floating
drawbar or hitch.
When coupling the drawbar, make sure
manoeuvrability at coupling point is sufficient.
Do not exceed gross axle weight rating,
towing capacity and gross weights.
Before driving, check brak e function and
rear lighting for proper operation.
Regularly check brake systems closely.
Have adjustments and repairs on the
brake system carried out by a professional workshop or an authorized brake
service station only.
When driving with mounted trailer, do
not use single-wheel braking.
On tractors equipped with single-wheel
transmission do not engage singlewheel transmission. Single-wheel transmission must be locked!
For tractors equipped with differential
lock; do not use differential lock when
driving in curves.
Only one passenger may ride on the
trailer, provided a safe passenger seat
is available.
No additional passengers may be carried.
When driving downhill, shift into lower
gears in time. On slopes nev er de-clutch
to change gears.
Weights
Fit weights properly and at specified
points.
1. Safety Instructions
1

Two-wheel tractor agria 3600 13
Maintenance
Never carry out any maintenance or
cleaning with the engine running.
Before you work on the engine, always
remove spark plug connector (petrol
engine only).
Check regularly and, if necessary, replace all protecting devices and tools
subject to wear and tear.
Replace damaged cutting tools.
Always wear safety gloves and use
proper tools when exchanging cutting
tools.
Do not carry out repairs like welding,
grinding, drilling, etc. on structural and
safety-relevant parts (e.g. steering handle, coupling devices)!
Keep two-wheel tractor and implement
clean to avoid risk of fire.
Check nuts and screws regularly f or tight
fit and re-tighten, if necessary.
Ensure that you re-install all safety and
protective devices and adjust them properly after maintenance and cleaning.
Only use original agria spare parts. All
other commercial spare parts must correspond to quality and technical requirements specified by agria.
1. Safety Instructions
Storage
It is not allowed to store the two-wheel
tractor in rooms with open heating.
Never park the two-wheel tractor in
closed rooms with fuel left in tank. Fuel
vapours are hazardous.
Engine, Fuel, and Oil
Never let the engine run in closed rooms.
Extreme danger of intoxication! For the
same reason, also replace damaged
exhaust parts immediately.
Caution with hot engine parts!
The exhaust and other engine parts
become very hot, if the engine runs and
immediately after turning off. Hold for
sufficient distance from hot surfaces and
keep children away from the running
engine.
Be careful when dealing with fuel. Great
danger of fire! Never refill fuel close to
open fire, inflammable sparks or hot
engine parts. Do not refill fuel in closed
rooms. Do not smoke when refilling!
Refill only with the engine switched off
and cooled down.
Do not spill any fuel, use a proper filling
device (e.g. funnel).
In case of fuel-spillage, pull the twowheel tractor away from the spillage
before you start the engine.
Make sure fuel is of specified quality.
Store fuel in approved cans only.
For safety reasons the petrol tank and
fuel cap should be replaced regularly.
1

14 Two-wheel tractor agria 3600
Store anti-corrosive agents and stabilizing liquids out of reach of children. If
sickness and vomiting occur , see a doctor. If fuel has contacted eyes, rinse
them thoroughly, avoid inhaling of vapours.
Read and observe enclosed instructions.
Before you dispose of opened and
seemingly empty pressurised tins (e.g.
of assist-starting liquids) make sure they
are completely empty. Empty them in
ventilated places safe from spark formation or flames. If necessary, dispose
of tins in hazardous waste deposits.
Be careful when draining hot oil, danger of burns.
Make sure oil used is of specified quality. Storage is in approved cans only.
Dispose of oil, greases, and filters
seperately and properly.
Tyres and
Tyre Air Pressure
When working on tyres, make sure twowheel tractor is parked properly and secured against rolling off.
Any repairs are to be carried out by
trained mechanics only and with the
appropriate tools.
Regularly check tyre air pressure. Excessive pressure may cause bursts.
Use appropriate tyre air pressure for
operation with implements.
Re-tighten fastening screws of drivewheels or check tightness when doing
maintenance work.
Electrical System
Persons having a pacemaker may not
touch live parts of the ignition system
when the engine is running.
1. Safety Instructions
1
Two-wheel tractor agria 3600 15
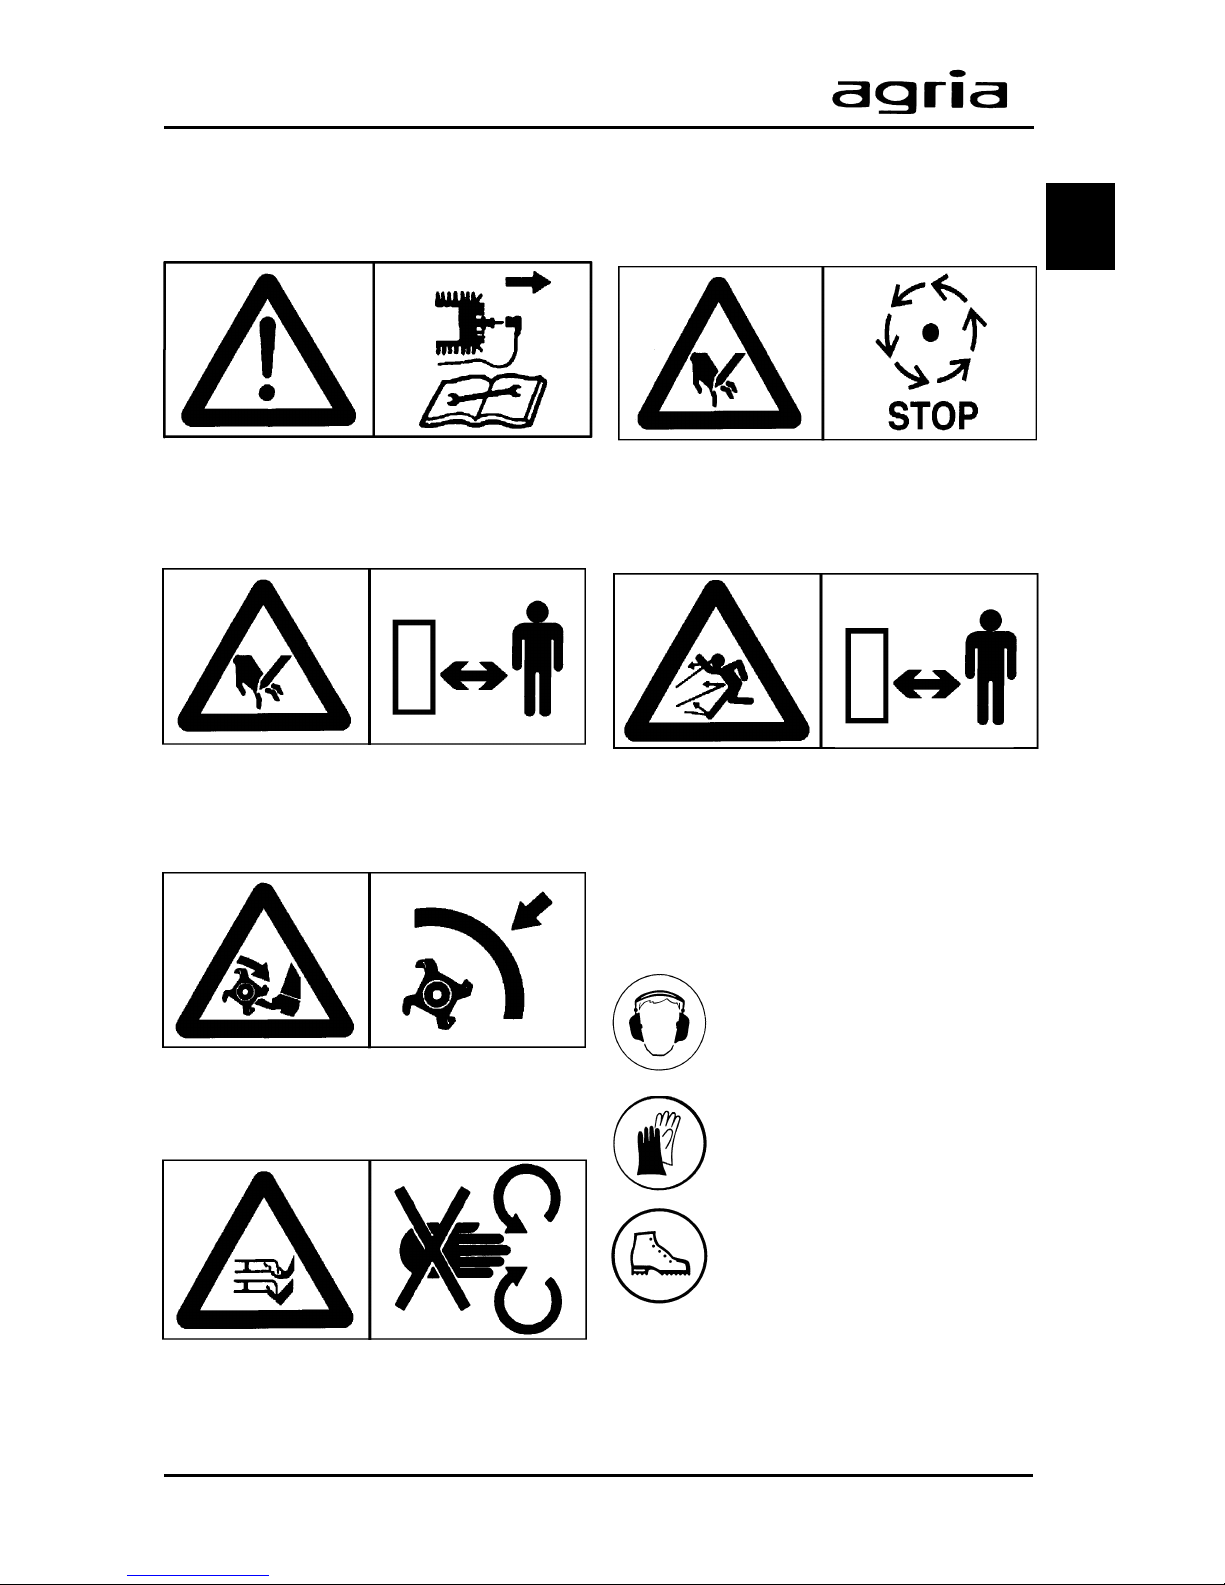
Explanation of
Warning Signs
Before any cleaning, maintenance , and
repair work switch off the engine and
pull spark plug connector.
With engine running, keep at a safe distance from cutting or hoeing tools.
Do not work without protective covers
mounted. Before starting the engine,
bring covers in proper position.
With engine running, keep at a safe distance from cutting knife.
1. Safety Instructions
Do not touch moving machinery par ts.
Wait until the y have come to a complete
stop.
With engine running, keep at a safe distance from tractor.
Signs
When working with the machine, wear individual protective ear plugs.
Wear protective gloves.
Wear safety shoes.
1
16 Two-wheel tractor agria 3600
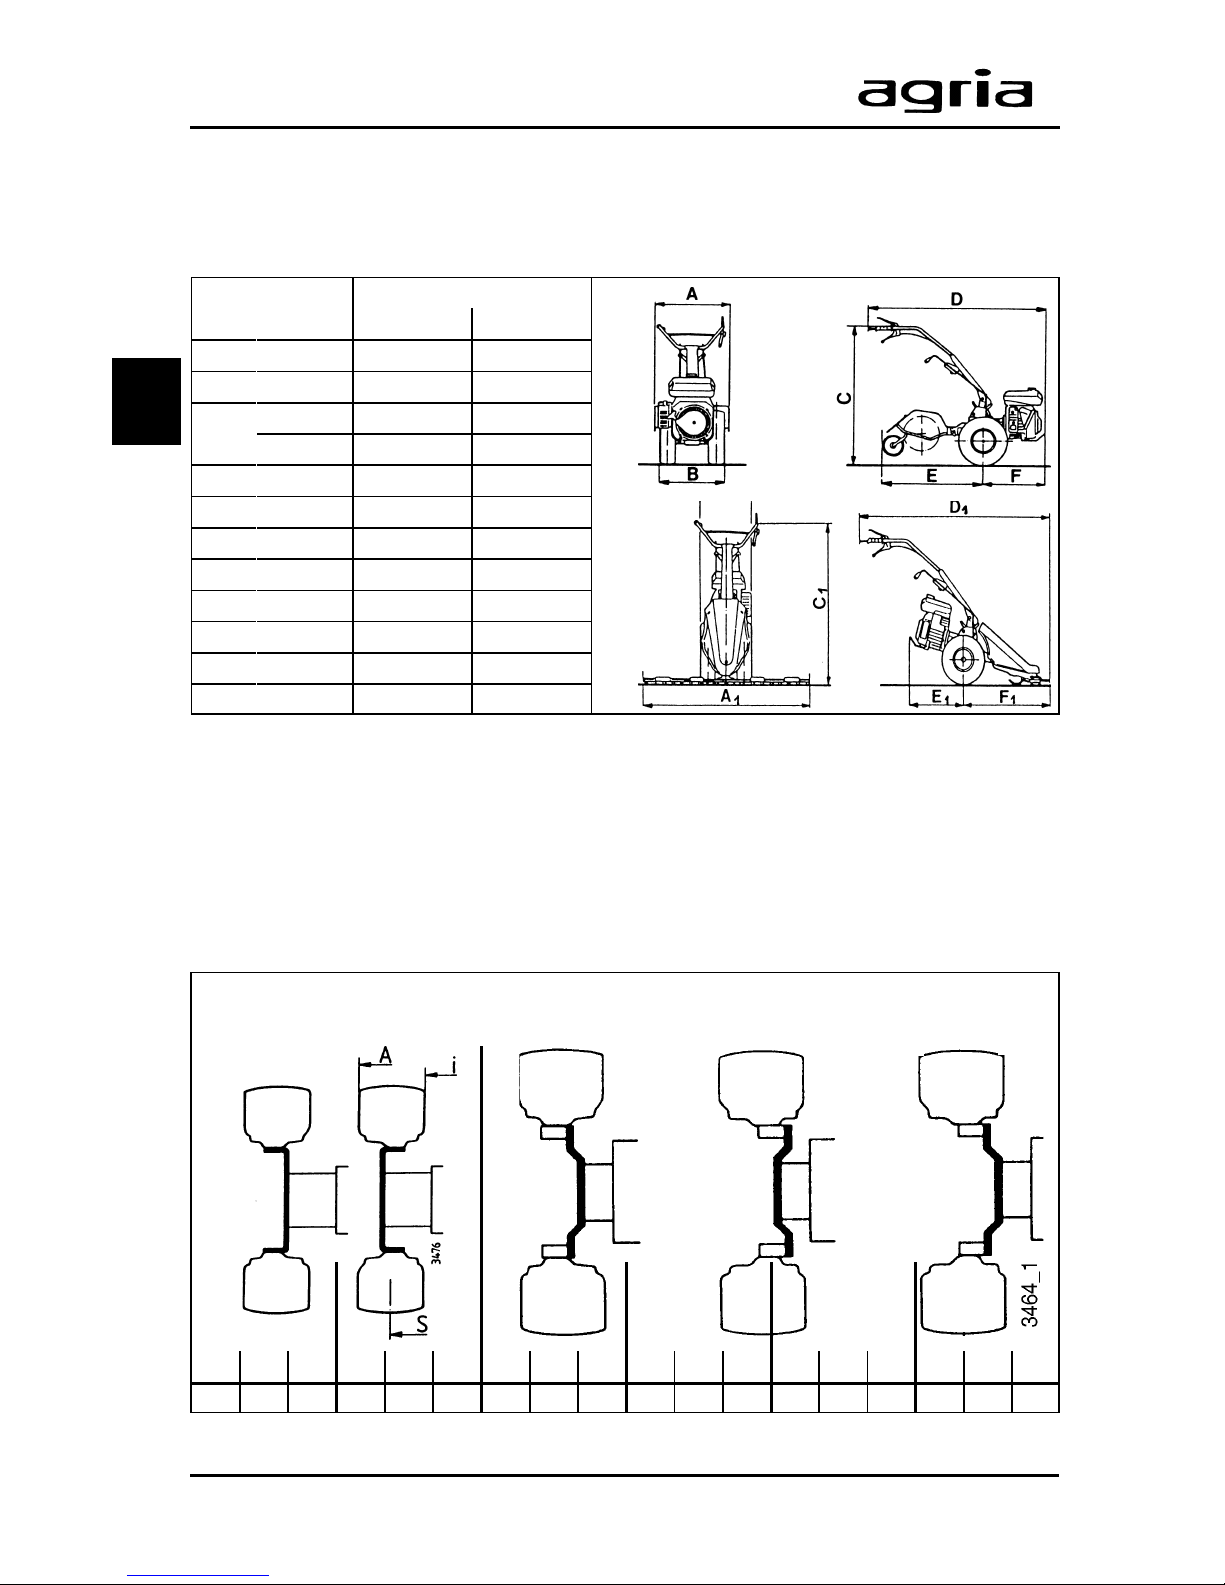
2. Specifications
Two-Wheel Tractor
Dimensions: (mm)
Dimension Version
2V2R 3V2R
A 605 605
A
1
1170 1170
B
4.00-8 450-730 395-495
4-00-10 480-710 440-550
C 800-1000 800-1000
C
1
760-1010 760-1010
D 1650 1650
D
1
1715 1715
E 790 790
E
1
575 575
F 595 595
F
1
755 755
Tyres:
.................................4.00-8 (field tyre)
......................... or 4.00 -10 (field tyre)
Tyre air pressure ...................... 1.2 bar
Track width, version 2F2R: [mm]
4.00-8..................................... 352-632
4.00-10................................... 380-610
To adjust track width slide wheel hub
on hexagonal wheel shaft accordingly
and mount drive-wheels on their inner
or outer side as required.
A S i A S i A S i A S i A S i A S i
495 392 290 395 292 190 550 440 330 520 410 300 490 380 270 440 330 220
Track width version 3F2R: [mm]
Tyre: 4.00-8 Tyre: 4.00-10
2

Two-wheel tractor agria 3600 17
Clutch:........................ Disc dry clutch
Gearbox:
Version 2F2R .... Mechanical gearbox,
2 forward and 2 reverse speeds
Version 3F2R .... Mechanical gearbox,
3 forward and 2 reverse speeds
(3rd gear with rear attachment only)
single-wheel brake on both wheels
differential, lockable
Transmission oil:
Filling quantity approx. ................ 1.5 l
Transmission oil ...SAE 90 - API - GL5
(e.g. BP Energear Hypo)
2. Specifications
PTO:..................................... 1028 rpm
at engine speed of 3600 rpm
gear independent
(integrated in coupling flange)
direction of rotation: right-hand
(clockwise), looking on PTO,
constant in forward and reverse
20 mm tooth profile
Attachment coupling:........ Ø 47 mm
Steering handle: .......height and side
adjustable without tools
swivels 180° for front attachment
Vibration acceleration values:
on handlebar:................ ahw < 2.5 m/s
2
in accordance with ISO 5349 at 85% of
rated engine speed with tool at work.
Weights:
Curb Weight: with drive-wheels
Version 2F2R .......................... 61.5 kg
Version 3F2R .......................... 69.5 kg
Permissible total weight........... 150 kg
Permissible tongue load
on coupling point: ...................... 55 kg
Travel Speeds [km/h]
Rear
attachment
Front
attachment
Tyre Gear Gear
1 2 1 2
4.00-8 forward 1.3 2.4 2.1 3.9
4.00-8 reverse 2.1 3.9 1.3 2.4
4.00-10 forward 1.5 2.7 2.5 4.1
4.00-10 reverse 2.5 4.1 1.5 2.7
Travel Speeds [km/h]
Rear
attachment
Front
attachment
Tyre Gear Gear
1 2 3 1 2
4.00-8 forward 1.3 2.4 7.0 2.1 3.9
4.00-8 reverse 2.1 3.9 1.3 2.4
4.00-10 forward 1.5 2.7 7.8 2.5 4.1
4.00-10 reverse 2.5 4.1 1.5 2.7
2

18 Two-wheel tractor agria 3600
Engine
Manufacturer:...........................Robin
Type:..................................... EH 17 D
Version:.......... Fan-cooled 1-cylinder-
4-stroke engine (petrol)
Bore:........................................ 67 mm
Stroke:..................................... 49 mm
Cubic capacity: ................... 172 ccm
Output: .................................... 4.0 kW
at 3600 rpm
Torque: .............................max 11 Nm
at 2600 rpm
Spark plug: ................ Bosch WR7AC
NGK BR 6 HS
Electrode gap: ................. 0.6–0.7 mm
Ingnition system:
Contactless electronic magnet ignition,
ignition point is pre-set, radio remote
screened according to VDE 0879
Valve lash (engine cold)
Intake: ..........................0.08–0.11 mm
Outlet: .......................... 0.08–0.11 mm
Starter: ..........................Recoil star ter
Fuel tank capacity: ....... approx. 3.6 l
Fuel: ...................... Commercial petrol
octane number min. 90 RON
(refer to fuel recommendations)
Air filter: ..................Dr y filter element
with foamed preliminary filter
Carburetor: ....Horizontal throttle float
carburetor
Mix Control Screw:
Base setting approx. 1 3/8 revs. open
Main jet: ........................................ 105
Idle jet: ............................................ 50
Rated speed: ......................3600 r pm
Top no-load speed:............3800 rpm
Idling speed:.......................1200 r pm
Engine oil:
Filling quantity............... approx. 0.65 l
Multi-grade oil SAE 10W-40 API-SC or
higher quality
Operability on Slopes:
Engine is suited for use on slopes (with
oil level at “max” = upper level mark)
Continuous operation
possible.. up to 45° inclination (100%)
Noise level:
Noise level
at operator’s ear...................... 80 dBA
(in accordance with EN 709)
2. Specifications
2
 Loading...