

Page 1
Seahorse XF HS Mini Extracellular Flux Analyzer
User Manual
Page 2

Notices
CAUTION
WARNING
© Agilent Technologies, Inc. 2020
No part of this manual may be reproduced in
any form or by any means (including electronic
storage and retrieval or translation into a foreign language) without prior agreement and
written consent from Agilent Technologies,
Inc. as governed by United States and international copyright laws.
Manual Part Number
5994-1961EN
Edition
First edition, May 2020
Printed in USA
Agilent Technologies, Inc.
121 Hartwell Ave.
Lexington, MA 02466
Manufactured by:
Agilent Technologies, Inc.
300 Griffith Rd,
Chicopee, MA 01022
Warranty
The material contained in this document is
provided “as is,” and is subject to being
changed, without notice, in future editions.
Further, to the maximum extent permitted by
applicable law, Agilent disclaims all warranties, either express or implied, with regard to
this manual and any information contained
herein, including but not limited to the implied
warranties of merchantability and fitness for
a particular purpose. Agilent shall not be liable for errors or for incidental or consequential damages in connection with the
furnishing, use, or performance of this document or of any information contained herein.
Should Agilent and the user have a separate
written agreement with warranty terms covering the material in this document that conflict with these terms, the warranty terms in
the separate agreement shall control.
Technology Licenses
The hardware and/or software described in this
document are furnished under a license and
may be used or copied only in accordance with
the terms of such license.
Restricted Rights Legend
U.S. Government Restricted Rights. Software
and technical data rights granted to the federal
government include only those rights customarily provided to end user customers. Agilent
provides this customary commercial license in
Software and technical data pursuant to FAR
12.211 (Technical Data) and 12.212 (Computer
Software) and, for the Department of Defense,
DFARS 252.227-7015 (Technical Data -Commercial Items) and DFARS 227.7202-3 (Rights
in Commercial Computer Software or Computer Software Documentation).
Safety Notices
A CAUTION notice denotes a
hazard. It calls attention to an
operating procedure, practice, or the
like that, if not correctly performed
or adhered to, could result in
damage to the product or loss of
important data. Do not proceed
beyond a CAUTION notice until the
indicated conditions are fully
understood and met.
A WARNING notice denotes a
hazard. It calls attention to an
operating procedure, practice, or the
like that, if not correctly performed
or adhered to, could result in
personal injury or death. Do not
proceed beyond a WARNING notice
until the indicated conditions are
fully understood and met.
Page 3

Contents
1Introduction
Safety Considerations 5
Overview 6
Technical Specifications 7
2 Installation
Unpacking and Component Identification 9
Suitable Locations for the XF HS Mini Analyzer 10
3 Basic Operations
Power and Warm Up 11
Power up 11
Welcome screen on first time power up 11
XF HS Mini Analyzer Communications and Network Connection Setup 12
Turning the XF HS Mini Analyzer Off 12
4 Navigating the XF HS Mini Analyzer
Setting Up an XF HS Mini Assay 14
Running an XF HS Mini Assay 18
Modifying XF HS Mini Analyzer Settings 22
XF HS Mini Analyzer system files 23
System files 23
Diagnostics tests 24
System settings 26
Assay results 31
Template management 33
Help 33
Using Safe Lock (Trend Micro) 35
Cleaning and Routine Maintenance 36
Air filter replacement 36
Analyzing XF HS Mini Analyzer Data Using Seahorse Analytics 37
5 XF HS Mini Analyzer Network Setup
Introduction 42
Why should I network my XF HS Mini Analyzer? 42
Network access features on the XF HS Mini Analyzer 43
XF HS Mini Analyzer System Information 44
Seahorse XF HS Mini Extracellular Flux Analyzer User Manual 3
Page 4

Required materials 44
Wired Network Setup 45
Wired connection 45
Wireless Network Setup 46
Wireless connection 46
Joining a wireless network 47
Shared folder setup 48
Email configuration 49
Network Checklist 52
6Support
Troubleshooting Guide 53
Technical Support and Ordering Information 54
Worldwide technical support 54
Ordering 54
Online help and support 55
Additional Resources 56
4 Seahorse XF HS Mini Extracellular Flux Analyzer User Manual
Page 5

1 Introduction
WARNING
Safety Considerations 5
Overview 6
Technical Specifications 7
Safety Considerations
WARNING
The protection provided by this instrument may be compromised if it is used in a manner not
specified by Agilent.
Safe operation of the Agilent Seahorse XF HS Mini Analyzer requires all covers to be securely
attached and the plate tray door to be closed. This also prevents heat loss and system cooling,
which can affect data quality.
The door opens automatically when the tray is extended, allowing the operator to insert or remove
the assay consumables. Exercise caution when loading the miniplate/cartridge to avoid the
possibility of a pinch hazard. After the miniplate/cartridge is placed securely on the tray, the
remove your hand from the tray area before continuing the assay. After the command is given to
continue the assay through the user interface, the tray will move slowly back into the instrument,
and the door will close. An optical sensor is used to determine the status of the door.
The XF HS Mini Analyzer has heaters around the miniplate that maintain a stable tray
temperature. The tray temperature is maintained at 37 °C, and monitored by temperature sensors
and controllers embedded above the tray. A thermal fuse disables the heater when it reaches an
abnormally high tray temperature.
Do not replace the power cord provided with any other power cord that is rated at less than what
is specified in “Technical Specifications” on page 7. This depends on the power mains of the
country where the instrument will be used.
Seahorse XF HS Mini Extracellular Flux Analyzer User Manual 5
Page 6

Introduction
Overview
The XF HS Mini Analyzer measures the rate of change in dissolved oxygen and pH in the media
immediately surrounding living cells cultured in a miniplate. Changes in the extracellular media are
caused by cell consumption or production of analytes. A sensitive measurement of the media flux
can be used to determine rates of cellular metabolism with precision and in a noninvasive,
label-free manner.
A unique feature of XF technology is its ability to make accurate and repeatable measurements in
as little as five minutes. This is accomplished by isolating an extremely small volume
(approximately 2 µL) of media above the cell monolayer. Cellular metabolism causes rapid, easily
measured changes to the microenvironment in this small volume.
A measurement cycle is performed in six minutes. The media is gently mixed and the analyte
levels are then measured until the oxygen concentration drops approximately 20 to 30%, and
media pH declines approximately 0.1 to 0.2 pH units. The measurement is performed using
optical fluorescent biosensors embedded in a disposable cartridge. The cartridge is placed into
the XF HS Mini Analyzer cell culture miniplate.
Baseline metabolic rates are typically measured three to four times, and are reported in pmol/min
for oxygen consumption rate (OCR) and in mpH/min for extracellular acidification rate (ECAR).
The compound is then added to the media and mixed, and then the post-treatment OCR and
ECAR measurements are made and repeated. As cells shift metabolic pathways, the relationship
between OCR and ECAR changes.
The XF HS Mini Analyzer system includes:
• Benchtop analyzer
• Disposable sensor/compound
• Delivery cartridges
• Tissue-culture treated miniplates for seeding cells for analysis
• Calibration solution
• Seahorse Analytics for XF data analysis
Consumables are sold separately and include FluxPaks (sensor cartridges, cell plates, and
calibrant) as well as various assay kits, reagents, and media. Seahorse XF HS Mini sensor
cartridges are available exclusively from Agilent.
6 Seahorse XF HS Mini Extracellular Flux Analyzer User Manual
Page 7
Introduction
S7852A
Technical Specifications
Model Seahorse XF HS Mini Analyzer (model number S7852A)
Dimensions Width × height × depth
12 in × 17 in × 23 in
30 cm × 43 cm × 58 cm
Weight 33 lb/15 kg
Power requirements 100-240 VAC 50/60 Hz
6 A/3 A
Power cord rating 3-wire (grounded) AC power cord rated 10 A or greater
Power fuse ratings 250 V/5 A time lag (two fuses) 5 mm × 20 mm
Environmental operating range +39 °F - 86 °F/+4 °C - 30 °C
No direct sunlight
Humidity 20 to 70% RH, noncondensing
Sample temperature and
environment
Data interface TCP/IP (external)
Software OS Windows 10 embedded
Controlled to user-selected temperature between 16 and 40 °C, but at least 10 °C above
ambient temperature
No gas or humidity control
USB type A (one in front, two in back)
Seahorse XF HS Mini Extracellular Flux Analyzer User Manual 7
Page 8

Introduction
8 Seahorse XF HS Mini Extracellular Flux Analyzer User Manual
Page 9
2 Installation
Unpacking and Component Identification 9
Suitable Locations for the XF HS Mini Analyzer 10
This chapter provides unpacking and installation instructions for the Agilent Seahorse XF HS Mini
Analyzer.
Unpacking and Component Identification
After receiving the package, immediately check each box for damage. Report any shipping
damage to the transportation company, and Agilent using “Technical Support and Ordering
Information” on page 54. Table 1 shows the Seahorse XF HS Mini Analyzer system components.
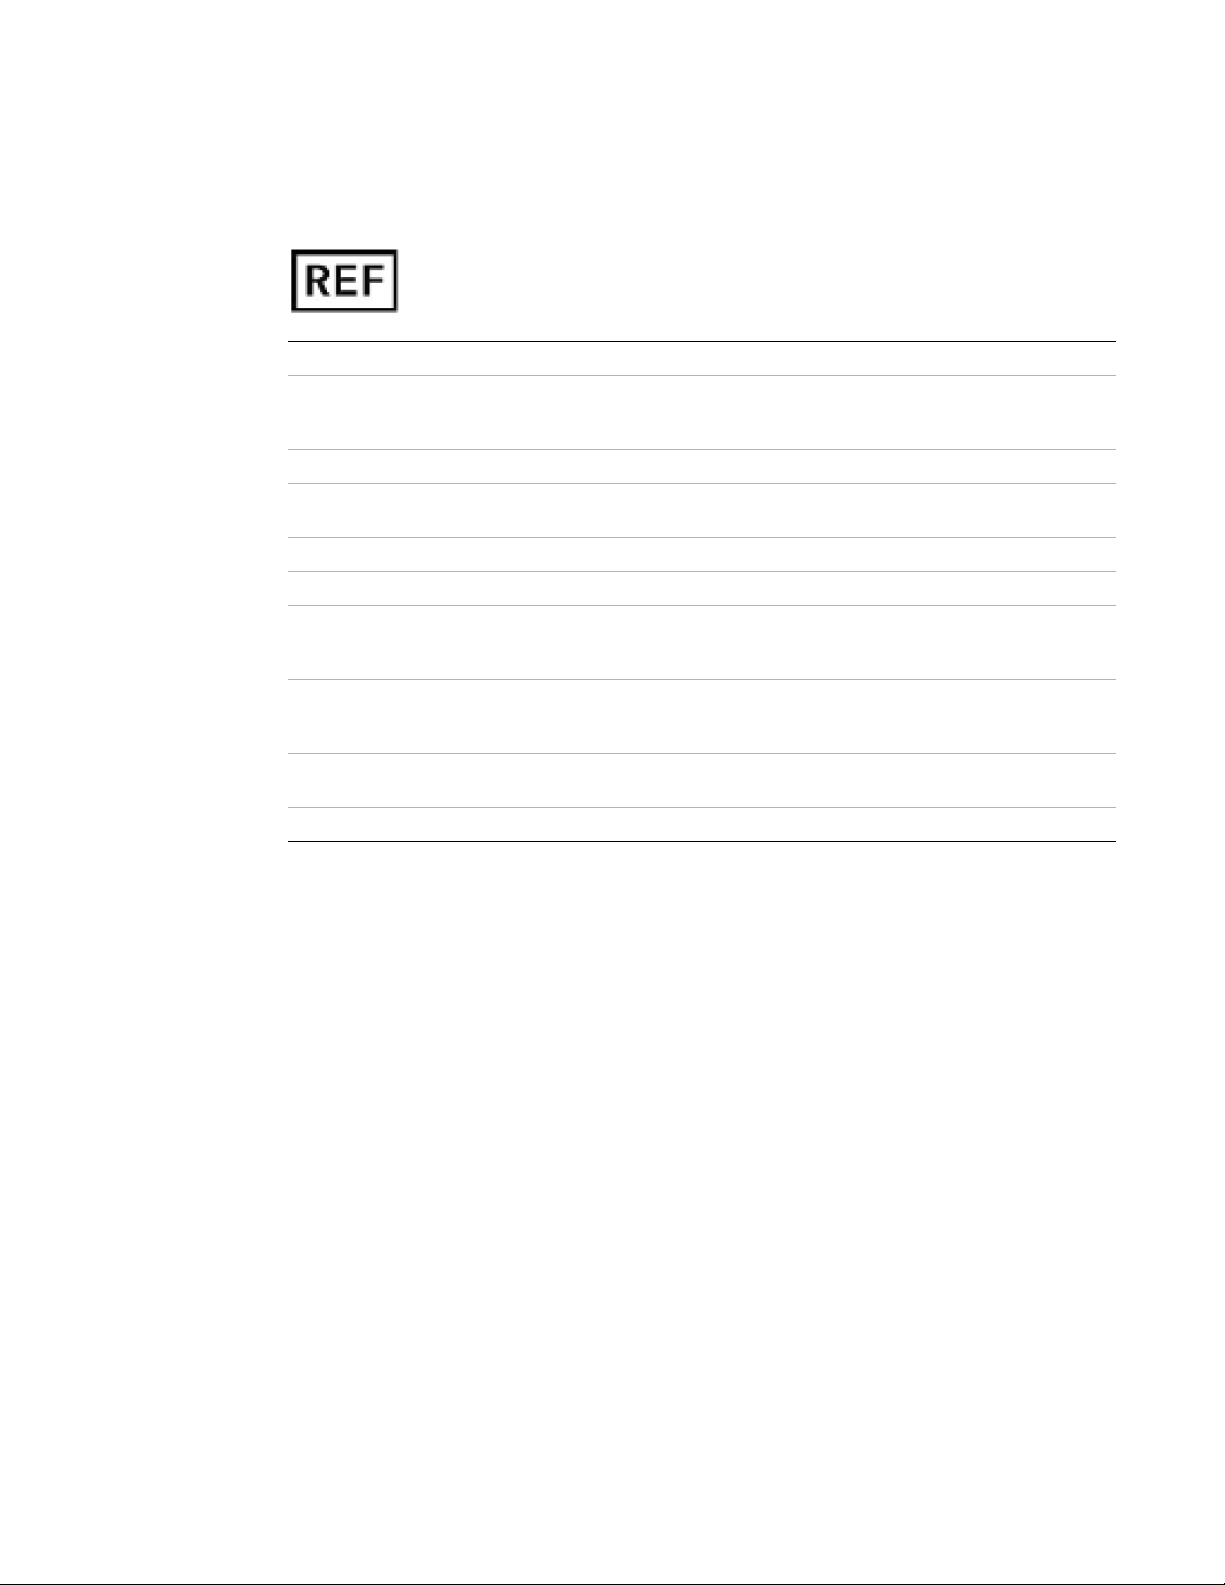
Table 1 Seahorse XF HS Mini Analyzer system components
Instrument/Controller Quantity Image
XF HS Mini Analyzer 1
Power cord (region specific) 1
Wireless Micro USB adapter
(p/n S7802-80000)
1
Seahorse XF HS Mini Extracellular Flux Analyzer User Manual 9
Page 10

Installation
Suitable Locations for the XF HS Mini Analyzer
The XF HS Mini Analyzer is designed for laboratory use. The internal environment for the
XF HS Mini Analyzer cell culture miniplate is controlled to a preset tray temperature. The
laboratory room temperature must therefore be maintained within the range listed in “Technical
Specifications” on page 7. The miniplate tray temperature can be monitored using the status
display in the upper right portion of the user interface.
The XF HS Mini Analyzer uses optical detection technology to measure extremely low levels of
fluorescent emission from analyte sensors. Although the instrument has been designed to shield
room light, avoid excessive light (such as direct sunlight).
10 Seahorse XF HS Mini Extracellular Flux Analyzer User Manual
Page 11
3 Basic Operations
Power and Warm Up 11
XF HS Mini Analyzer Communications and Network Connection Setup 12
Turning the XF HS Mini Analyzer Off 12
This chapter provides basic operating procedures for the Agilent Seahorse XF HS Mini Analyzer.
Power and Warm Up
Power up
To power on the XF HS Mini Analyzer:
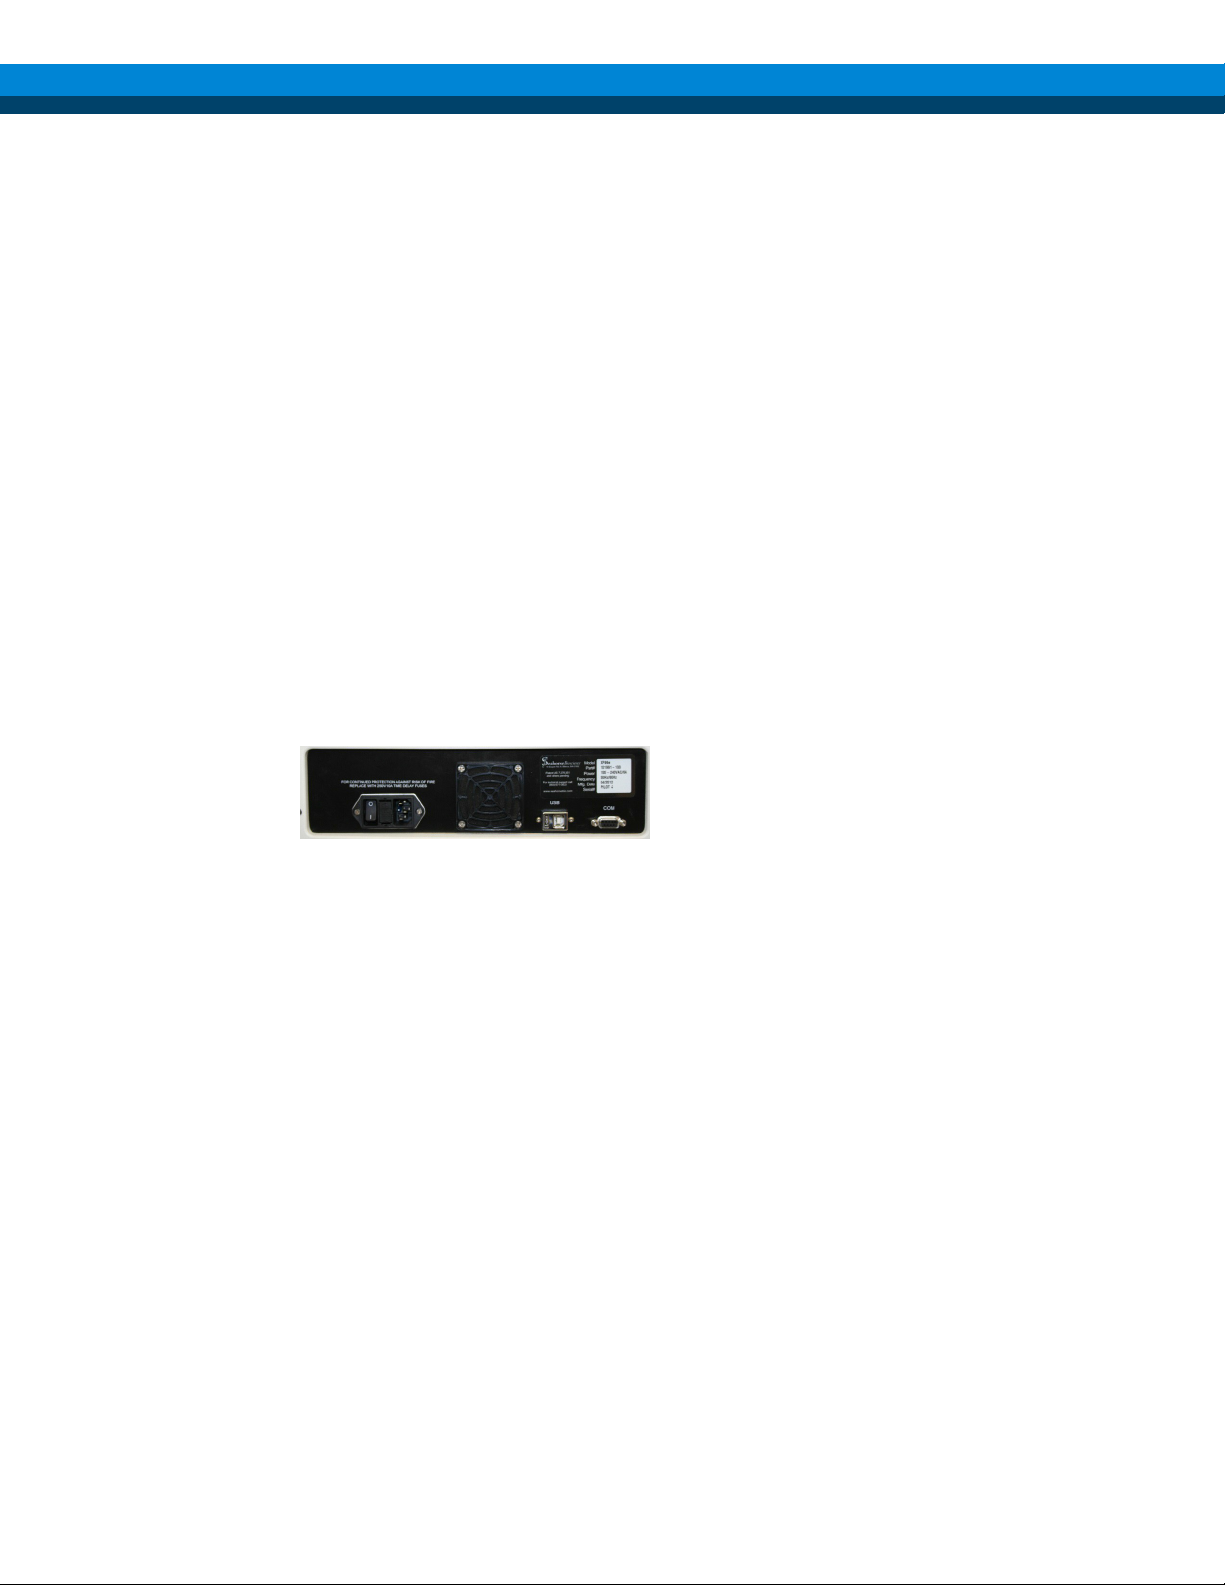
1 Press the power switch on the back of the instrument. (Figure 1)
Figure 1. XF HS Mini Analyzer power switch.
2 Allow at least 20 minutes for the instrument to fully warm and equilibrate to the set
temperature.
3 Check the status icon in the upper right corner of the screen. When ready the tray temperature
and a green check mark is displayed.
Welcome screen on first time power up
During the first power up, a welcome screen displays initial diagnostic tests on the instrument.
Follow the on-screen directions to run them.
Run these tests at any time using the Diagnostics menu selection on the instrument user
interface. For more details, see “Navigating the XF HS Mini Analyzer” on page 13.
Seahorse XF HS Mini Extracellular Flux Analyzer User Manual 11
Page 12

Basic Operations
NOTE
NOTE
XF HS Mini Analyzer Communications and Network Connection Setup
The USB connectors on the instrument transfer template and result files between the XF HS Mini
Analyzer and a computer running Seahorse Analytics. Agilent recommends connecting the XF HS
Mini Analyzer to a local network directory to ease file movement and aid Cell Analysis Technical
Support in servicing the instrument. Please contact Cell Analysis Technical Support, “Worldwide
technical support” on page 54, with any questions.
For instructions on setting up a wired network connection, see “Wired Network Setup” on
page 45. For instructions on setting up a wireless network connection using the included wireless
adapter, see “Wireless Network Setup” on page 46.
NOTE
Only the included wireless adapter has been qualified to work with the XF HS Mini Analyzer.
?
Turning the XF HS Mini Analyzer Off
To turn off the instrument, press the power button in the lower-left corner of the Home screen to
first shut down the XF HS Mini Analyzer screen. After the screen turns black, use the power switch
on the back of the instrument to completely shut down power.
NOTE
Shut down the software before powering off using the rear power switch.
12 Seahorse XF HS Mini Extracellular Flux Analyzer User Manual
Page 13

4 Navigating the XF HS Mini Analyzer
Setting Up an XF HS Mini Assay 14
Running an XF HS Mini Assay 18
Modifying XF HS Mini Analyzer Settings 22
XF HS Mini Analyzer system files 23
Help 33
Using Safe Lock (Trend Micro) 35
Cleaning and Routine Maintenance 36
Analyzing XF HS Mini Analyzer Data Using Seahorse Analytics 37
This chapter provides navigation information for the Agilent Seahorse XF HS Mini Analyzer.
Seahorse XF HS Mini Extracellular Flux Analyzer User Manual 13
Page 14
Navigating the XF HS Mini Analyzer
Setting Up an XF HS Mini Assay
Select a template from local, USB, or network drive
Agilent provides default templates for most Seahorse XF assay kits. Templates can also be
created in Wave desktop on a desktop or laptop computer and then transferred to the XF HS Mini
Analyzer through a network connection or USB flash drive.
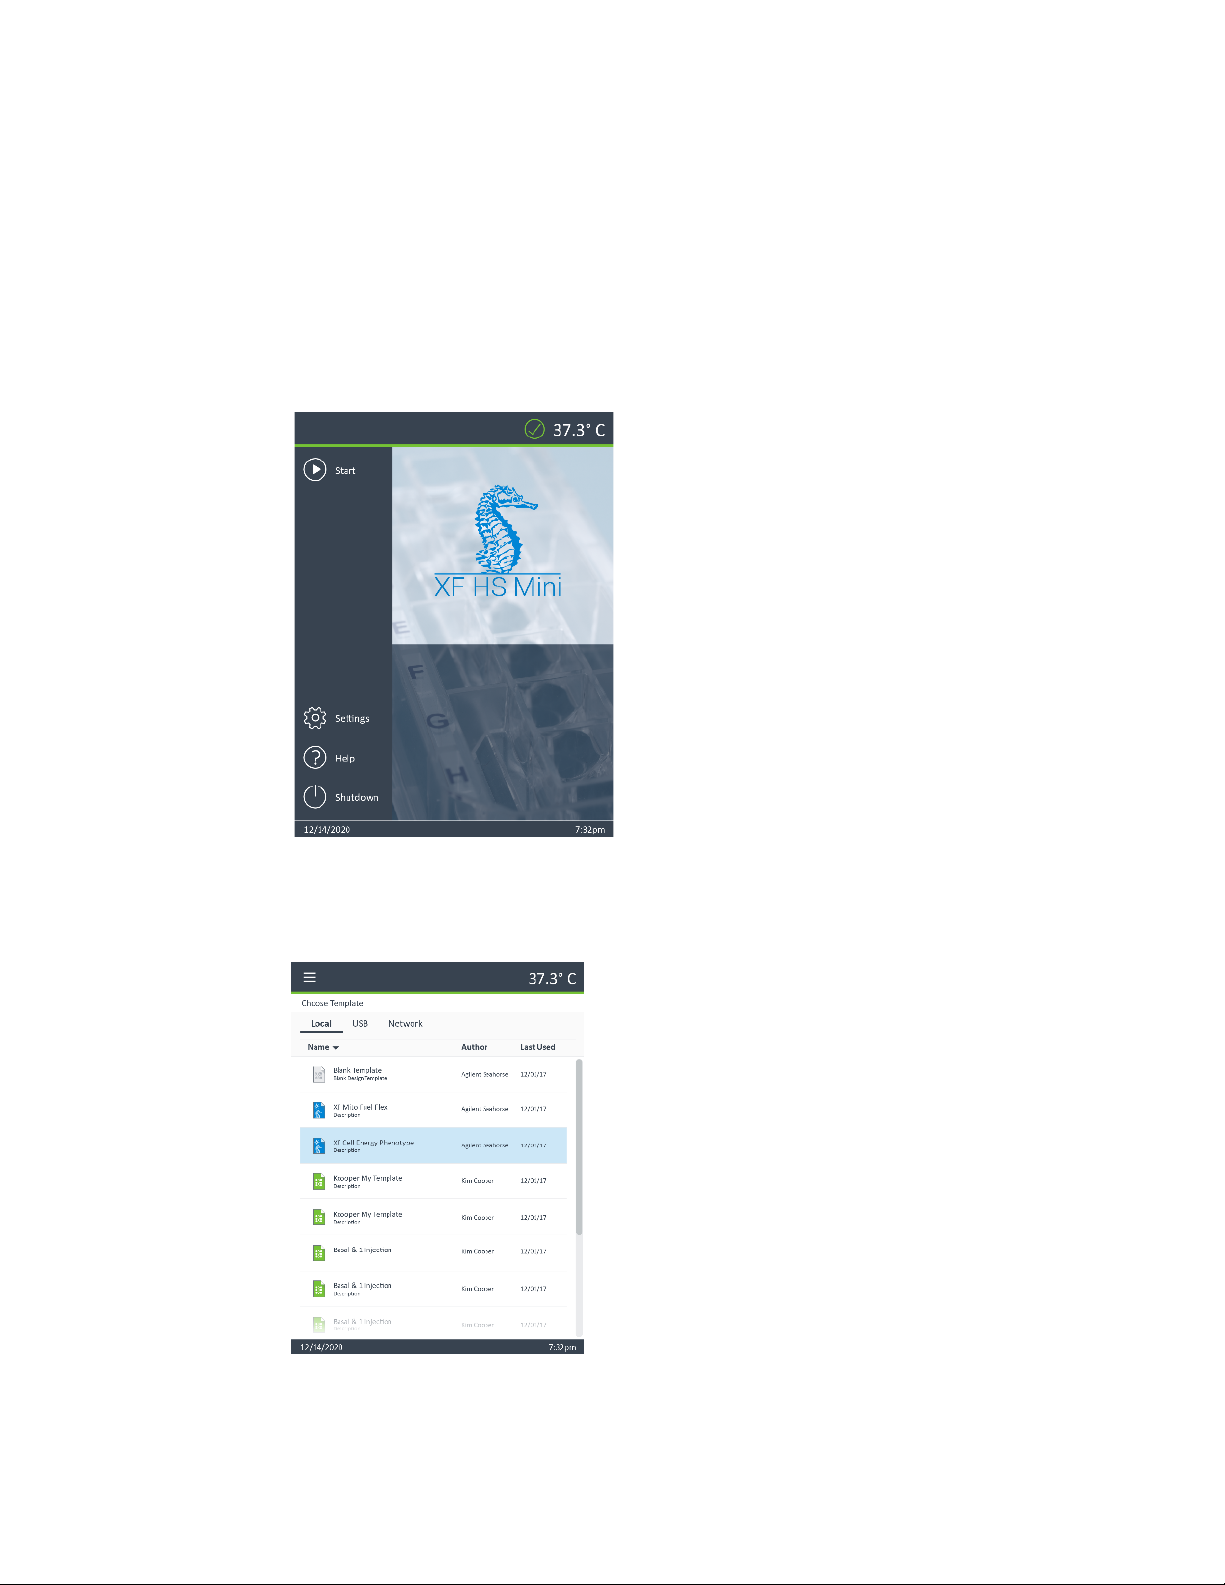
1 Click Start from the Home screen. See Figure 2.
Figure 2. Home screen.
2 Select a template provided by Agilent to perform a specific assay. These templates can be
found in the Local tab. See Figure 3.
Figure 3. Local tab.
14 Seahorse XF HS Mini Extracellular Flux Analyzer User Manual
Page 15
Navigating the XF HS Mini Analyzer
NOTE
3 Templates designed in Wave can be transferred to the XF HS Mini Analyzer through a USB or
network location.
• If the instrument is networked, click the Network tab, select and run the template from the
networked location.
• If a USB drive containing a valid XF HS Mini Analyzer template is inserted into the
instrument, click the USB tab, select and run the template directly from the USB drive.
NOTE
Only XF HS Mini Analyzer assay template files (*.asyt) are recognized by the XF HS Mini
Analyzer. Templates must reside on the root of the USB flash drive and not in a subfolder.
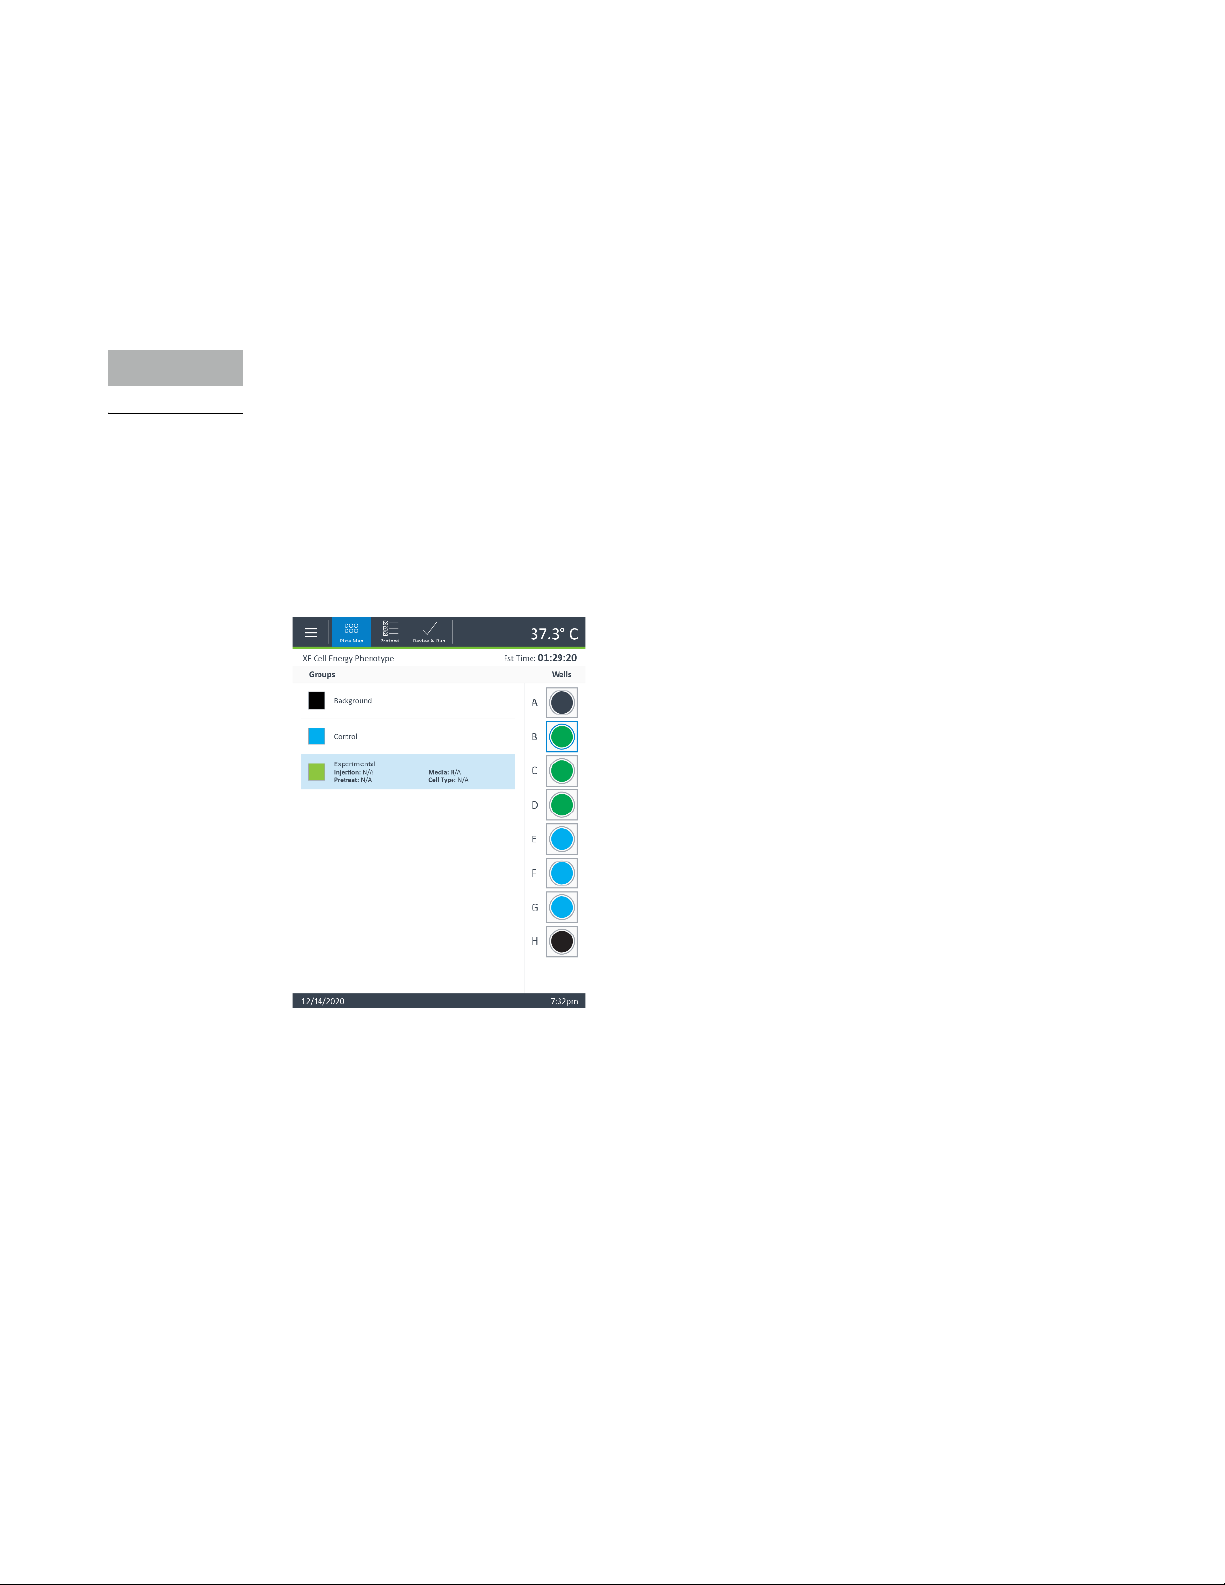
Verify groups and plate map
After selecting the template file, make any necessary modifications to the plate map and groups
to be analyzed.
1 To see the conditions defined for a group, click the group name and look at the header
information, as shown in Figure 4.
Figure 4. Groups.
2 To change the wells assigned to each group, click the group name followed by the well or
wells to be included.
3 For all other changes to Groups, use Seahorse Analytics.
Seahorse XF HS Mini Extracellular Flux Analyzer User Manual 15
Page 16
Navigating the XF HS Mini Analyzer
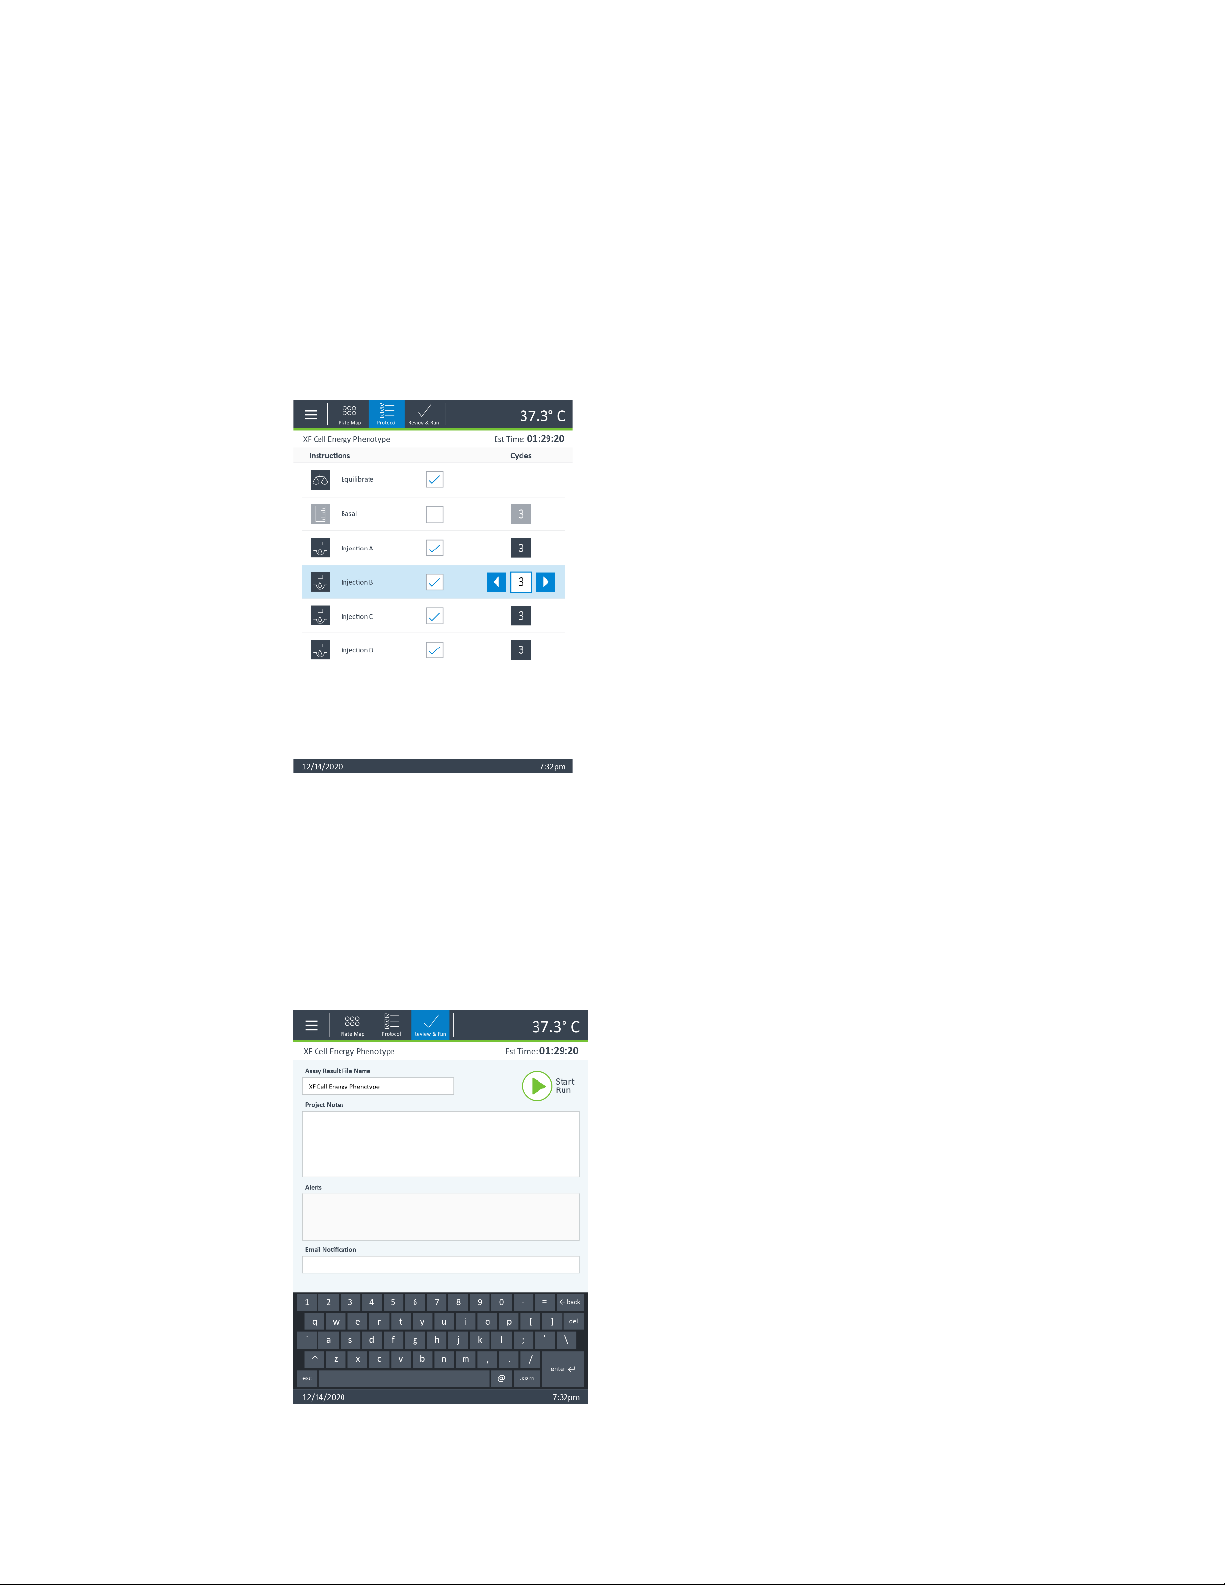
Review/edit instrument protocol
1 Check that all desired steps are selected, check boxes checked (Figure 5). Agilent strongly
recommends performing equilibration for all cell-based XF assays.
2 If needed, increase or decrease the number of measurements that will be performed during
the assay on the Instrument Protocol page.
a Click the number in the cycle column that corresponds with the step to modify.
b Use the arrows to adjust the number of cycles up or down. See Figure 5.
Figure 5. Instrument protocol page.
Review summary and start assay
1 Review the “Safety Considerations” on page 5 to verify the desired settings.
2 Before beginning an assay, the following optional steps may be taken:
a Click the Assay Result File Name text box to customize the name of the assay result file.
See Figure 6.
Figure 6. Assay name.
b Click Project Notes to add any notes related to the assay or protocol being performed.
16 Seahorse XF HS Mini Extracellular Flux Analyzer User Manual
Page 17

Navigating the XF HS Mini Analyzer
NOTE
c Click Email Notification to add email addresses for recipients to be notified when the
assay is complete (requires an active network connection).
3 Click Start Run then follow the onscreen instructions.
NOTE
The XF HS Mini Analyzer will save assay results to a USB flash drive by default (if available).
Agilent recommends inserting a USB flash drive into the instrument at the beginning of assay
setup so that results will automatically be saved. If the XF HS Mini Analyzer does not detect a
USB flash drive after completing an assay, the system will prompt the user to insert a USB to
save their assay result file.
Seahorse XF HS Mini Extracellular Flux Analyzer User Manual 17
Page 18
Navigating the XF HS Mini Analyzer
NOTE
Running an XF HS Mini Assay
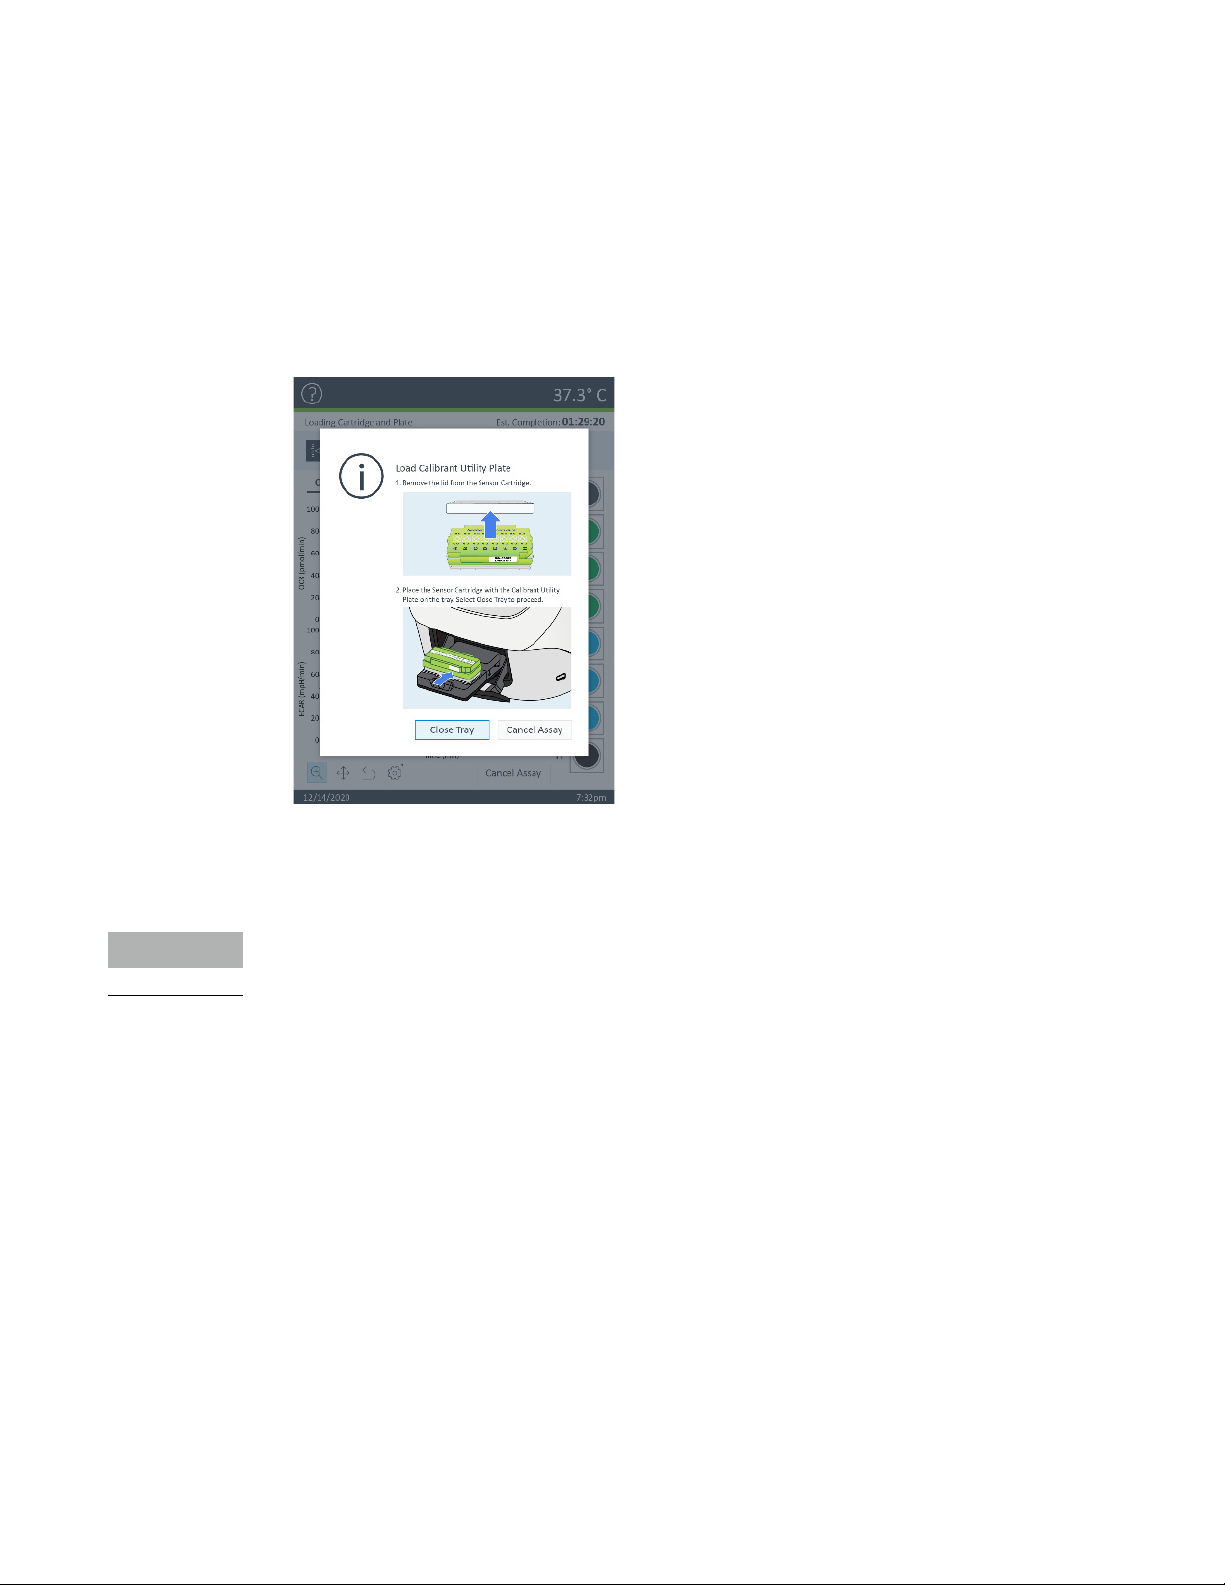
1 Load the cartridge (hydrated and loaded with compounds) and utility plate onto the tray when
prompted.
2 Ensure the cartridge fits properly on the utility plate, the lid is removed from the cartridge, and
the direction of the cartridge matches the image on the screen. See Figure 7.
Figure 7. Load cartridge screen.
3 The XF HS Mini Analyzer will perform calibration of the sensor cartridge. This takes
approximately 20 minutes.
NOTE
Although the sensor calibration may appear complete after 15 minutes, the instrument will be
busy for a few more minutes. Wait for the user prompt to appear.
4 The XF HS Mini Analyzer tray will open and present the utility plate. Remove the utility plate
and load the cell plate. Ensure the lid is removed from the cell plate before loading onto the XF
HS Mini Analyzer tray.
5 Click Continue to begin the equilibration step. The progress bar in the upper-left area of the
screen displays the progress of the equilibration step.
6 Click either the Overview or OCR vs. ECAR tab to toggle between the views during the assay.
See Figure 8 on page 19. Overview and OCR versus ECAR are the two run-time views available
as data is acquired by the XF HS Mini Analyzer.
18 Seahorse XF HS Mini Extracellular Flux Analyzer User Manual
Page 19

Navigating the XF HS Mini Analyzer
Overview
The Overview tab displays both OCR and ECAR as a function of time. Red vertical lines indicate
the injections and are labeled by injection port letter. See Figure 8.
Figure 8. Overview tab.
In this view the charts can be zoomed and scaled by choosing one of the tools below the charts:
• Zoom
• Move
• Reset
• Options. By default, rate data is displayed in Group mode. Click the Options icon to change
display modes and turn on error bars. See Figure 9.
Figure 9. Options icon
•Show StdDev turns on display of error bars for each Group.
•Level Data shows the concentration data from which the rate data is derived.
• Well Mode shows the data from the individual wells instead of the average of the wells in each
group.
Seahorse XF HS Mini Extracellular Flux Analyzer User Manual 19
Page 20

Navigating the XF HS Mini Analyzer
NOTE
OCR versus ECAR
The OCR vs. ECAR tab displays OCR on the Y-axis and ECAR on the X-axis.
Choose a single time point at which to examine OCR versus ECAR using the Measurement
selector below the chart in Figure 10. Data is displayed in Group mode with standard deviations.
The scale of this chart is fixed to allow easy comparison of values across measurements.
Quadrants are labeled Aerobic, Energetic, Glycolytic, or Quiescent to show the energy preference
of the cell during the assay at a given measurement. See Figure 10.
Figure 10. OCR vs. ECAR tab
NOTE
In both the Overview and OCR vs. ECAR views, the display of individual wells can be turned off by
touching the well graphic on the right. Background correction is always performed while the
experiment is running.
20 Seahorse XF HS Mini Extracellular Flux Analyzer User Manual
Page 21

Navigating the XF HS Mini Analyzer
NOTE
7 Once the assay has finished, the XF HS Mini Analyzer prompts the user to eject the cartridge
and remove the cartridge and cell plate. See Figure 11.
Figure 11. Remove cartridge and cell plate prompt.
8 After the assay is complete, the data is automatically saved to a USB flash drive (if inserted),
the local drive, or the networked drive (if configured). A message appears indicating the
location of the save assay result File (*.xflr). See Figure 12.
Figure 12. Save results.
NOTE
Canceling during an assay may cause the XF HS Mini Analyzer to stall. If this occurs, shut down
the instrument by pressing the power switch on the back. Use the same power switch to turn the
instrument ON.
9 After the assay is complete, data is automatically saved on the assay result file format to the
location specified at the start of your assay (USB flash drive, network location, or locally). It is
mandatory to save result data in the assay result file format after completing the assay and
will always be checked ON. You can also save result data as an Excel file (.xlsx) and GraphPad
Prism file (.pzfx) directly from the XF HS Mini Analyzer as well. Check the box next to the
desired file formats and click OK (Figure 12).
Assay result files saved locally on the XF HS Mini Analyzer will be stored for 60 days after the
assay. Saving assay result files to a USB or network drive is encouraged.
Seahorse XF HS Mini Extracellular Flux Analyzer User Manual 21
Page 22

Navigating the XF HS Mini Analyzer
Modifying XF HS Mini Analyzer Settings
From the Start page, click Settings to access the XF HS Mini Analyzer settings, see Figure 13. The
XF HS Mini Analyzer settings page contains:
• System Files
• Diagnostic Tests
• System Settings
• Assay Results
• Template Management
Figure 13. XF HS Mini Analyzer settings page.
22 Seahorse XF HS Mini Extracellular Flux Analyzer User Manual
Page 23

Navigating the XF HS Mini Analyzer
NOTE
XF HS Mini Analyzer system files
System files
To access the System Files page, go to the Home page and select Settings > System Files.
(Figure 14) Cell Analysis Technical Support routinely requests that System Files be sent if an XF
HS Mini Analyzer encounters an error.
Figure 14. Send system files.
Option 1 - Send system files to a USB flash drive
Save System Files to a USB flash drive as a compressed (zipped) folder. This can then be
attached to an email to Cell Analysis Technical Support. Save will become active after a USB is
connected to one of the three USB ports.(Figure 14)
NOTE
The file will be named: Diagnostic Report_Date_Time (Example: Diagnostic
Report_2020_05_19_15_34_14.zip.
Option 2 - Send system files directly to Cell Analysis Technical Support
The diagnostic report compressed folder may also be emailed directly to Cell Analysis Technical
Support from the XF HS Mini Analyzer. The XF HS Mini Analyzer must have an active wired or
wireless network connection to directly send system files to Cell Analysis Technical Support.
Seahorse XF HS Mini Extracellular Flux Analyzer User Manual 23
Page 24

Navigating the XF HS Mini Analyzer
Diagnostics tests
The XF HS Mini Analyzer Diagnostic Tests page contains various functions that assist Cell
Analysis Technical Support in debugging any issues or errors encountered during normal
operation. Perform the System Check diagnostic function at the initial start of the XF HS Mini
Analyzer and when Cell Analysis Technical Support request.
To access the Diagnostic Tests page, go to the Home page and select Settings > Diagnostic
Tests. (Figure 15)
Figure 15. Diagnostic tests.
The Diagnostic Tests page has the following sections:
• System Check
• Consumable Check
• Maintenance
System check
Overall system
•Communication test - Verifies all system modules are communicating appropriately.
• Voltage test - Ensures voltage levels are within specified ranges for operation.
• Motor test - Verifies the movements and positions of the tray and probes.
•Holding pressure test - Ensures the injection system does not have any leaks.
• Injection zero test - Ensures function of the zero pressure sensor.
• Injection solenoid test - Verifies proper open/close operation of internal valves.
Measurement system
• LED reference test - Verifies that the system records LED intensity signal when ON.
•Autozero test - Analyze and record any offset values found within the channels on each board.
•Noise test - Analyze and record the amplitude of the noise level on each channel.
• High-Gain rise time test - Conduct an amplifier rise time test.
Thermal performance
•Thermal test - Verifies that the temperature remains within tolerance after a “Wait” period.
24 Seahorse XF HS Mini Extracellular Flux Analyzer User Manual
Page 25

Navigating the XF HS Mini Analyzer
NOTE
Consumable check
•Barcode test - Verifies XF HS Mini Analyzer can read barcodes (requires user interaction to
complete).
• Calibration test - Performs calibration procedure and will verify that all wells are calibrated
correctly.
• Injection test - Verifies proper performance of injection step.
Maintenance
The XF HS Mini Analyzer is designed to require minimal cleaning and maintenance. All
consumables are disposable, and none of the instrument components are exposed to the
cell plate at any time, preventing cross-contamination of biological or chemical materials.
However, it may be necessary to perform some tasks. (Figure 16)
Figure 16. Maintenance window.
•Tray - Press Tray Out to open the door and eject the tray. Press Tray In to return the tray inside
the XF HS Mini Analyzer.
•Probes - Probe movement will adjust the probes within the XF HS Mini Analyzer up or down.
•Cartridge - Use this function to take a Cartridge Out or put a Cartridge In the XF HS Mini
Analyzer.
NOTE
If a cartridge is suspected to be inside the XF HS Mini Analyzer, use this function to remove the
cartridge before beginning another assay.
Seahorse XF HS Mini Extracellular Flux Analyzer User Manual 25
Page 26

Navigating the XF HS Mini Analyzer
System settings
The XF HS Mini Analyzer System Settings page contains various functions that permit assay
customizations and IT integration options.
To access the System Settings page, go to the Home page and select Settings > System Settings.
(Figure 18)
The System Settings page has the following sections:
• Environmental Settings
• Auto Assay Naming
• Wired Network Connection
• Wireless Network Connection
• Network Directory
• Email
• Date and Time (plus TimeZone)
• Admin
Figure 17. System Setting page.
Environmental settings
Temperature target: Adjust the tray temperature on the XF HS Mini Analyzer. See Figure 18.
Figure 18. Temperature target setting.
26 Seahorse XF HS Mini Extracellular Flux Analyzer User Manual
Page 27

Navigating the XF HS Mini Analyzer
Temperature Control on XF HS Mini Analyzer: Users may adjust the tray temperature of the XF HS
Mini Analyzer for a wider array of assays and applications. The validated tray temperature range
of the XF HS Mini Analyzer is 16 to 40 °C. See Figure 19 for complete details of the environmental
settings required to accurately achieve the desired tray temperature setting.
Temperature specifications: Users can change the sample (tray) temperature to 16 to 40 °C; there
is no internal cooling function.
• Lower tray temperatures require the instrument to be placed in a cold room or refrigerated unit
that is 8 to 20 °C cooler than the desired sample tray temperature.
• Users can set the tray temperature to any value (in increments of 0.1 °C) within the allowed
range. Figure 19 shows the range of supported ambient and sample tray temperatures.
Figure 19. Ambient room temperature (yellow) required to achieve the desired XF HS Mini
Analyzer tray temperature setting (green).
Seahorse XF HS Mini Extracellular Flux Analyzer User Manual 27
Page 28

Navigating the XF HS Mini Analyzer
Cartridge hydration and equilibration steps for temperatures of 28 °C and below
Day before assay:
Hydrate the XF HS Mini Cartridge In a non-CO
Day of Assay:
The utility plate + cartridge require 40 minutes of equilibration time inside the XF HS Mini when
running at temperatures below 20 °C. Approximately 40 minutes before starting the assay:
1 Place the cell plate in an incubator at the desired XF HS Mini operational temperature.
2 Bring the hydrated cartridge loaded with compounds and paired with the utility plate (with
calibrant solution) to the XF HS Mini Analyzer
3 Click Diagnostics, then click Maintenance.
4 Press Tray Out.
5 Once the tray fully extends, remove the lid from the cartridge and place the utility plate and
cartridge on the tray.
6 Press Tray In, then click the lower-left arrow twice to return to the Home screen.
7 Wait 40 minutes.
8 Click Start on the home screen, then select the Assay Template to run.
9 Click the lower-right arrow twice to navigate to the Summary screen, then click Start Assay.
10 The Load Cartridge message appears and the tray extends with the utility plate and cartridge.
Do not remove the utility plate and cartridge (but ensure the lid is removed from the cartridge).
11 Click Continue to start calibration.
37 °C incubator overnight.
2
12 After completing calibration, the XF HS Mini will prompt the user for the cell plate. Load the cell
plate and begin assay.
Returning the XF HS Mini Analyzer to room temperature after cold room use
To use the XF HS Mini Analyzer at room temperature after use in the cold room, complete the
following steps:
1 Unplug the analyzer and move it to the desired location.
2 Leave the instrument unplugged in the destination overnight.
3 Resume normal use.
aAdjust tolerance: The temperature tolerance can be set from 0.2 to 9.9 °C. The tolerance
defines the acceptable range in which the tray temperature may deviate from the target
tray temperature.
b Temperature alarm: When enabled, the XF HS Mini Analyzer will automatically notify users
(Figure 20 on page 29) when the tray temperature of the XF HS Mini Analyzer is out of the
acceptable range, as specified by the temperature tolerance above (only while running an
assay on the XF HS Mini Analyzer).
Example: At a target tray temperature of 37 °C and a tolerance of 0.3 °C, the acceptable
tray temperature range is 36.7 to 37.3 °C.
c Atmospheric pressure: Customize the atmospheric pressure set on the XF HS Mini
Analyzer to match that of the lab where the instrument is located. This value must be
entered manually, the local atmospheric pressure is not automatically detected by the XF
HS Mini Analyzer.
28 Seahorse XF HS Mini Extracellular Flux Analyzer User Manual
Page 29

Navigating the XF HS Mini Analyzer
Figure 20. Temperature alarm window.
Auto assay naming
Auto assay naming allows users to specify the default name for each Assay Result File (*.xflr) that
is created on the XF HS Mini Analyzer. See Figure 21.
1 Adjust the order of each variable by dragging and dropping the selection in the order desired.
Figure 21 shows the configuration (template name) - (Timestamp).
2 The Custom field can be used to add a keyword, instrument name, or other items to all assay
results files.
3 Click Apply to complete the process of setting up a custom name.
Figure 21. Auto assay naming window.
Seahorse XF HS Mini Extracellular Flux Analyzer User Manual 29
Page 30

Navigating the XF HS Mini Analyzer
NOTE
Wired network
An ethernet cable is required to set up wired network access. The ethernet cable port is located on
the lower backside of the XF HS Mini Analyzer.
Figure 22. Wired network.
NOTE
Agilent recommends that the device settings be configured by the institution IT department
using the “XF HS Mini Analyzer Network Setup” on page 41 as a reference.
Wireless network
A wireless USB adapter can be plugged into one of the available USB ports (recommended on
lower back side of XF HS Mini Analyzer) to gain wireless access. Once finished, select an available
SSID from the list and click Connect. If there are no visible networks available, click Refresh.
Figure 23. Wireless network.
30 Seahorse XF HS Mini Extracellular Flux Analyzer User Manual
Page 31

Navigating the XF HS Mini Analyzer
NOTE
NOTE
NOTE
The XF HS Mini Analyzer must be restarted after the wireless USB adapter is plugged in.
NOTE
Saving assay template or result files to a shared network directory requires an active wired or
wireless network connection.
Network directory
Network configuration is covered in “XF HS Mini Analyzer Network Setup” on page 41.
Email configuration
Configure an email account to automatically send 'Assay Complete' email notification as well as
the Assay Result file to specified email addresses entered before starting an assay (see “Review
summary and start assay” on page 16 for more information).
Date and Time (plus Time Zone)
Adjust the date or time. This can be done automatically by connecting to a time server (requires
an active network connection) or set manually.
Set the time zone for the XF HS Mini Analyzer. Once set, the correct time will be visible on the
screen as well as when using the time stamp function for auto assay naming.
Admin
Exit and re-enter Kiosk mode to perform Windows Updates or install security software such as
Trend Micro's Safe Lock application. The Using Safe Lock section provides the steps to reach the
Windows desktop and return to XF HS Mini application.
Assay results
The XF HS Mini Analyzer Assay Results page contains a copy of each assay performed within the
previous 60 days on the local storage within the XF HS Mini Analyzer. After 60 days, Assay Result
files are deleted from the XF HS Mini Analyzer.
To access the System Settings page, go to the Home page, then select Settings > Assay Results.
Seahorse XF HS Mini Extracellular Flux Analyzer User Manual 31
Page 32

Navigating the XF HS Mini Analyzer
1 Assay results: Individual assay results can be viewed by clicking the small check box next to
the result file to view and click View. See Figure 24.
As
Figure 24. Assay results view.
2 Export options: Assay result files may be exported to Microsoft Excel or GraphPad Prism file
formats (requires a USB flash drive or shared network directory). See Figure 25. To export
these files (either individually or collectively) to a network location or USB, click the individual
check box or click Select All, and then click Export.
Figure 25. Export options dialog box.
3Delete: To remove assay result files from the XF HS Mini Analyzer, click the check boxes next
to all result files to remove, and click Delete.
32 Seahorse XF HS Mini Extracellular Flux Analyzer User Manual
Page 33

Navigating the XF HS Mini Analyzer
Template management
Template management provides a simple way to import or export assay template files to/from
the XF HS Mini Analyzer.
Import assay template file (or files):
1 First, transfer assay template file to a USB flash drive or shared network directory location.
2 On the XF HS Mini Analyzer, select the location where the assay template file will be imported
from (insert the USB flash drive, then select the tab when it appears).
3 Check the box next to an individual assay template or click Select All to select all the assay
template files.
4 To import assay template files to the Local tab, click Import.
5 A successful assay template import results in an Import Complete message, click OK.
Export assay template files:
1 On the Local tab, click the check box next to the assay template file to be exported.
2 Select the desired location to export the assay template file (USB flash drive or shared network
directory).
3 If the assay template has exported successfully, an Export Complete message will appear.
Click OK.
Help
From the Home page Click Help. The Help page has the following sections:
• Support (see “Support” on page 53)
• Software version (see “Support” on page 53)
• Getting started
• License agreement (see “Support” on page 53)
• Remote assistance
Getting started
Provides useful tips and information regarding the setup and operation of the XF HS Mini.
Remote assistance
Cell Analysis Technical Support has the ability to remotely access each XF HS Mini Analyzer that
has an active network connection.
To access the Remote Assistance page, go to the Home page, then select
Help > Remote Assistance. See Figure 26 on page 34.
Seahorse XF HS Mini Extracellular Flux Analyzer User Manual 33
Page 34

Navigating the XF HS Mini Analyzer
Figure 26. Remote assistance window.
1 To begin a remote session with Cell Analysis Technical Support, call the appropriate
geographically located support line then click Start.
2 An ID and password will be presented, Cell Analysis Technical Support will request this
information to connect to the XF HS Mini Analyzer.
34 Seahorse XF HS Mini Extracellular Flux Analyzer User Manual
Page 35

Navigating the XF HS Mini Analyzer
Using Safe Lock (Trend Micro)
The computer security application Safe Lock by Trend Micro has been validated on the XF HS Mini
Analyzer. Safe Lock provides several levels of security while allowing the XF HS Mini Analyzer to
perform its functions. More information can be found at www.trendmicro.com. To reach the
Windows 10 desktop to install application, follow the steps below:
1 From the Home page tap Settings > System Settings > Admin.
2 Click Exit Kiosk Mode.
3 The Windows 10 desktop is now available
4 Follow the installation instructions for the Safe Lock application
5 Once all the steps and configurations are complete, double-click the Exit Maintenance Mode
icon on the XF HS Mini Desktop
6 The system will reboot and start the XF HS Mini controller application
Seahorse XF HS Mini Extracellular Flux Analyzer User Manual 35
Page 36

Navigating the XF HS Mini Analyzer
Cleaning and Routine Maintenance
The XF HS Mini Analyzer is designed to require minimal cleaning and maintenance. All
consumables are disposable and none of the instrument components are exposed to the cell
plate at any time, preventing cross-contamination of biological or chemical materials.
Air filter replacement
At approximately one-year intervals, the air filter at the upper rear of the analyzer should be
replaced. The filter retainer is held in place by magnets and can be pulled away from the housing
by hand. (Replacement filters can be ordered using part number: 102799-000.)
36 Seahorse XF HS Mini Extracellular Flux Analyzer User Manual
Page 37

Navigating the XF HS Mini Analyzer
Analyzing XF HS Mini Analyzer Data Using Seahorse Analytics
Agilent Seahorse Analytics is a web-based analysis and file management software application for
XF HS Mini assay data. Use the integrated assay kit companion analysis views to quickly report
and share result data, or create a custom analysis view using the 30+ graphing options available.
Create a Seahorse Analytics account: https://seahorseanalytics.agilent.com
Basic data analysis:
1 After the assay is completed, transfer your assay result file to your personal computer using a
USB drive or network drive.
2 Go to https://seahorseanalytics.agilent.com to register or log in to your Seahorse Analytics
account.
3 From the home view, import your XF HS Mini assay result file to your account.
Seahorse XF HS Mini Extracellular Flux Analyzer User Manual 37
Page 38

Navigating the XF HS Mini Analyzer
4 Click the file to open it. You will be presented with various analysis view options that you can
apply to your data file, including kinetic graphs or bar charts as well as analysis specific for an
assay kit.
38 Seahorse XF HS Mini Extracellular Flux Analyzer User Manual
Page 39

Navigating the XF HS Mini Analyzer
5 Once you add an analysis view, you can add extra graphs - called widgets - to your analysis
view and customize how those widgets appear on the analysis view by moving and resizing
them.
6 Use the embedded help seen on each software screen to learn about other features available.
Seahorse XF HS Mini Extracellular Flux Analyzer User Manual 39
Page 40

Navigating the XF HS Mini Analyzer
40 Seahorse XF HS Mini Extracellular Flux Analyzer User Manual
Page 41

5 XF HS Mini Analyzer Network Setup
Introduction 42
XF HS Mini Analyzer System Information 44
Wired Network Setup 45
Wireless Network Setup 46
Network Checklist 52
This guide provides network setup information for the Agilent Seahorse XF HS Mini Analyzer.
Seahorse XF HS Mini Extracellular Flux Analyzer User Manual 41
Page 42

XF HS Mini Analyzer Network Setup
Introduction
Why should I network my XF HS Mini Analyzer?
Connecting your XF HS Mini Analyzer to a network provides unique workflow advantages to users,
such as:
• Immediate acquisition of Assay Results.
• Simple File Transfer for Assay Templates and Results, no need for USB drives.
• Remote access for Cell Analysis Technical Support.
The XF HS Mini Analyzer supports two types of network connections:
• Wide Area Network (WAN): A computer network that covers a broad area, such as the
internet.
• Local Area Network (LAN): Typically found in offices or schools, a computer network the
connects multiple devices (computers, printers, lab devices, etc.) to enable file sharing
between those networked devices in addition to internet access. LANs also have some level of
security to access the shared file directories.
Both a WAN and LAN can be configured through a wired (Ethernet cable) or wireless (USB WiFi
adapter) connection on the XF HS Mini Analyzer. Depending on your company’s IT infrastructure,
configuring WAN or LAN access may require additional support from your local IT department to
complete set up.
Give the “Network Checklist” on page 52 to your IT department to use during the network setup
of the XF HS Mini Analyzer.
Figure 27. Networked XF HS Mini Analyzer
42 Seahorse XF HS Mini Extracellular Flux Analyzer User Manual
Page 43

XF HS Mini Analyzer Network Setup
Network access features on the XF HS Mini Analyzer
Immediate data delivery
Before starting an assay, users enter in one or multiple email addresses to receive a
copy of the Assay Result file (*.xflr) for data analysis. The email service also informs
users when they can begin another assay.
File transfer made simple
Use a shared network directory to simplify data transfer to and from the XF HS Mini
Analyzer. A shared network directory allows users to easily transfer Assay Template
files to the XF HS Mini Analyzer to perform an assay, then retrieve the Assay Results
for analysis using Agilent Seahorse Analytics.
Rapid remote assistance
An active network connection on the XF HS Mini Analyzer allows a Cell Analysis
Technical Support representative to diagnose and troubleshoot potential issues
quickly by allowing remote access to view and control the XF HS Mini Analyzer.
Send ‘System Files’ directly to cell analysis technical support
When an issue is encountered, Cell Analysis Technical Support routinely requests
System Files from the XF HS Mini Analyzer. System Files assist Cell Analysis Technical
Support in identifying the root cause of an issue. With network access, users are able
to send System Files directly to Cell Analysis Technical Support.
Seahorse XF HS Mini Extracellular Flux Analyzer User Manual 43
Page 44

XF HS Mini Analyzer Network Setup
NOTE
NOTE
XF HS Mini Analyzer System Information
Required materials
• Approved wireless USB adapter or wired connection (Ethernet cable)
• IT department network connection settings
XF HS Mini Analyzer instruments use Windows Defender with default settings. These include
Quick Scan, real-time protection and cloud-protection turned on.
• The XF HS Mini Analyzer can be connected to any Microsoft Windows compatible network
and the Local Area connections can be configured as required by the network.
• Complete the “Network Checklist” on page 52 to ensure you have everything needed to
successfully connect to a new network.
• The XF HS Mini Analyzer ships with an integrated 100Mbps Ethernet network adapter. The XF
HS Mini Analyzer ships with a Netgear Wireless AC Adapter AC600 Dual Band (only the
provided adapter is qualified for use). See Figure 28.
The software required to use the USB WiFi Adapter is installed on the XF HS Mini Analyzer by
default.
• There is no internal WiFi adapter in the XF HS Mini Analyzer.
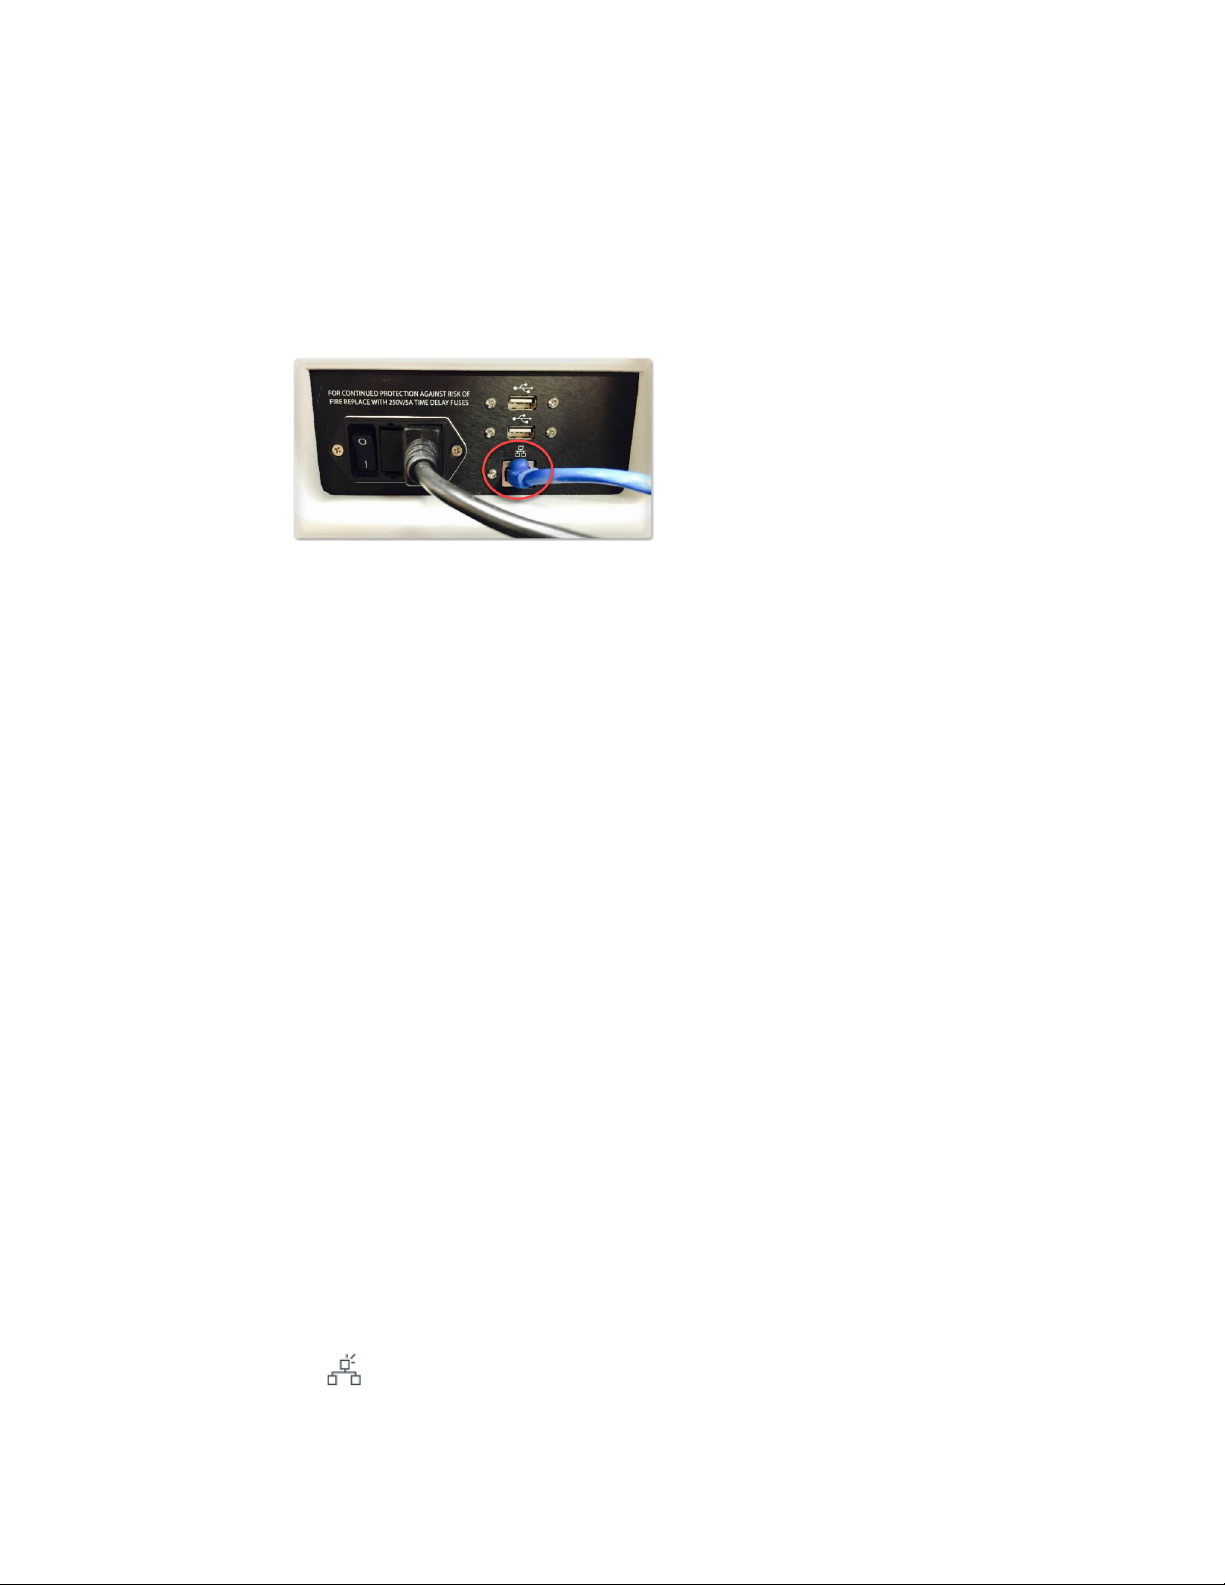
• An Ethernet cable is using a wired network setup. The Ethernet (RJ-45) jack is located at the
base of the instrument in the back. See Figure 29.
Figure 28. USB WiFi adapter for the XF HS Mini Analyzer. Part number S7802-80000
Figure 29. Ethernet (RJ-45) jack location outlined in red
44 Seahorse XF HS Mini Extracellular Flux Analyzer User Manual
Page 45
XF HS Mini Analyzer Network Setup
Wired Network Setup
Wired connection
1 Plug the wired network connection (Ethernet cable) into the Ethernet port (Figure 30), located
on the back of the XF HS Mini Analyzer. Ensure that the connection is firmly seated.
Figure 30. Ethernet port with wired network connection cable
2 Power XF HS Mini Analyzer OFF.
3 Power XF HS Mini Analyzer ON.
4 Wait for the temperature to display in the upper-right corner of the home screen before
proceeding with the Wired Setup instructions, see “Option 2: Manual IP address assignment”.
5 From the Home screen, click Settings.
6 Click System Settings to access the Wired Network Connection Settings screen.
There are two options depending on the network settings required by your facility’s IT department:
Option 1: Automatic IP address assignment (DHCP)
Dynamic Host Configuration Protocol (DHCP) is enabled by default on the XF HS Mini Analyzer
and automatically uses a DHCP server on the network to retrieve IP address values. The XF HS
Mini Analyzer is set to obtain the IP address and subsequent information (Subnet mask, Default
gateway, etc.). If these fields do not automatically populate, follow the steps in “Option 2: Manual
IP address assignment” or contact your local IT administrator.
Option 2: Manual IP address assignment
1 In the Wired Network Connection screen, switch the toggle from Auto to Manual.
2 Manually enter the information provided by the local IT department in each field.
3 After setting the IP options, click Save.
4 Power XF HS Mini Analyzer OFF.
5 Power XF HS Mini Analyzer ON.
6 Once the temperature is displayed in the upper-right corner, click Settings, and then click
Settings.
7 To ensure you have a working connection, click Ping. A Pass message appears if the setting
are working and the connection is active.
8 If the connection fails, reconfirm the IP address setting with the IT department, and confirm
the information in the hardware setup steps.
9 Use the left right arrow to continue editing instrument settings or exit the settings options.
Seahorse XF HS Mini Extracellular Flux Analyzer User Manual 45
Page 46

XF HS Mini Analyzer Network Setup
Wireless Network Setup
Wireless connection
1 Plug the USB WiFi Adapter into one of the available USB ports on the back of the XF HS Mini
Analyzer. See Figure 31.
2 Power XF HS Mini Analyzer OFF.
3 Power XF HS Mini Analyzer ON.
4 Wait for the temperature to display in the upper-right corner of the home screen before
proceeding with the Wireless Setup instructions.
Figure 31. USB WiFi adapter inserted into an available USB port on the back of the XF HS Mini Analyzer
46 Seahorse XF HS Mini Extracellular Flux Analyzer User Manual
Page 47

XF HS Mini Analyzer Network Setup
NOTE
NOTE
Joining a wireless network
1 From the Home screen click Settings.
2 Click System Settings.
3 Click the right arrow (bottom right) once to access the Wireless Network Connection Settings
screen shown in Figure 32.
4 Select the network you want to connect to, and click Connect.
If you do not see your wireless network on the list of available networks, click Refresh.
Figure 32. Example wireless network selection table
5 Enter the password when prompted by the system.
6 If no errors are received, select the desired network again and verify that the connect button
now displays disconnect.
7 Power XF HS Mini Analyzer OFF.
8 Power XF HS Mini Analyzer ON.
9 After the XF HS Mini Analyzer starts up and the temperature value in the upper-right corner is
displayed, click System Settings.
10 Click Ping in the Wired Network Connection Settings screen.
11 If you received a Pass message and icon, your wireless setup is complete. If not, confirm the
information in the wireless networking setup steps and reattempt connecting to a wireless
network.
12 Use the left right arrow to continue editing instrument settings or exit the settings options.
An active Internet connection is required for this feature.
Seahorse XF HS Mini Extracellular Flux Analyzer User Manual 47
Page 48

XF HS Mini Analyzer Network Setup
NOTE
Shared folder setup
This procedure requires an active wired or wireless network connection.
1 From the Home screen, click Settings, then System Settings.
2 Select the Network Directory tab.
3 Enter the information for the shared network drive into the dialogue boxes. Refer to the
“Shared directory settings” on page 52 in the “Network Checklist” for the correct information.
(IT should provide this information.)
• Shared Directory: The desired location on the LAN where all Assay Template and Assay
Result files will be saved for access.
•Domain: Name of the LAN.
•User Name: User name of the Windows account that has read/write permission to
access the shared directory location.
• Password: Password for the Windows account.
Figure 33. Example of a complete Network Directory configured on the XF HS Mini Analyzer
Accuracy is essential, double check your entry before checking access.
4 Once all information has been entered, click Enable. Successfully configuring a LAN results in
a CONNECTED message on the XF HS Mini Analyzer.
Figure 34. Successful network connection status
5 Use the left right arrow to continue editing instrument settings or exit the settings options.
48 Seahorse XF HS Mini Extracellular Flux Analyzer User Manual
Page 49

XF HS Mini Analyzer Network Setup
Email configuration
1 From the Home screen, click Settings, then System Settings.
2 Select the Email Configuration tab.
Figure 35. Example of a completed Email Configuration setup
3 Enter the information below:
•Mail From: The email address that will send Assay Result files to email recipients.
• Password: Password for the email address account in the Mail From field.
•Port: Contact your local IT administrator for the correct port.
•Enable SSL: Typically required by email providers, SSL protects data transmission
between devices.
4 Verify the email configuration is completed by entering an email address to send a test email
message from the XF HS Mini Analyzer. Click Test once an email address has been entered
into the field. If an email is not received, ensure the information provided is correct.
5 Use the left right arrow to continue editing instrument settings or exit the settings options.
Seahorse XF HS Mini Extracellular Flux Analyzer User Manual 49
Page 50

XF HS Mini Analyzer Network Setup
Time zone setup
Time can be set manually, or if your are connected to a network, it can be auto set. First, you must
choose a Time Zone.
1 From the Home screen click Settings, then click Go to Setup.
2 Select the Date & Time tab. (Figure 36)
3 Select the Time Zone from the list provided.
Optional: Check the box 24 Hour Clock to activate the 24 hour clock setting.
Figure 36. Select the local time zone for your XF HS Mini Analyzer
Setting the time
1 From the Home screen click Settings > System Settings > Data & Time ( + TimeZone).
2 Select the Date and Time settings tab. (Figure 37)
3 Manually enter the appropriate date and time.
Figure 37. Configure date and time for the XF HS Mini Analyzer
50 Seahorse XF HS Mini Extracellular Flux Analyzer User Manual
Page 51

XF HS Mini Analyzer Network Setup
Time server (optional)
For XF HS Mini Analyzers with an active network connection, the XF HS Mini Analyzer can sync to
a network’s time server, if provided. (Figure 38)
Figure 38. Configuring a time server on the XF HS Mini Analyzer
Optional: A national time server (example: time.nist.gov) can be used to automatically set the time
and account for daylight savings adjustments, or any time server provided by your local
IT department. Once entered, click Sync, then click Apply for the changes to take place. Use the
top left menu button to exit the settings options and return to Home screen.
Seahorse XF HS Mini Extracellular Flux Analyzer User Manual 51
Page 52

XF HS Mini Analyzer Network Setup
Network Checklist
Only complete the section that pertains to the desired network connection type.
Wired network settings
IP address
Subnet mask
DNS server
Computer name
Wireless network settings
Wireless network name
Wireless network password
Email settings
Email address
Password
SMTP address
Email port
SSL required
Shared directory settings
Shared directory address
Shared directory domain
Shared directory user name
Shared directory password
Time server address
52 Seahorse XF HS Mini Extracellular Flux Analyzer User Manual
Page 53

6 Support
Troubleshooting Guide 53
Technical Support and Ordering Information 54
Additional Resources 56
This chapter provides support and troubleshooting information for the Agilent Seahorse XF HS
Mini Analyzer.
Troubleshooting Guide
Problem Possible cause Solution
Instrument gives a “load error
message” and it is not clear whether a
cartridge has already been loaded
Intermittent barcode read errors USB Wi-Fi adapter plugged into back
USB port not actively being used
Low rates Not enough cells • Consult the Cell Reference Database to identify a working range
“An error has occurred” window pops
up and displays the message: “A Task’s
Exception(s) were not observed.”
Instrument was not shut down
properly. See “Turning the XF HS
Mini Analyzer Off” on page 12.
• Click Settings from Home Screen.
• Click Diagnostic tests.
• Click Maintenance.
• Click Cartridge out.
• The XF HS Mini Analyzer will eject a cartridge if one is left inside the
instrument
• Unplug the USB Wi-Fi adapter from the XF HS Mini Analyzer and
store in a safe location
or perform a dilution series of your cell type. The wells of the XF HS
Mini miniplate are the same dimensions as those of the
XFe96 standard plate.
• Contact technical support. See “Technical Support and Ordering
Information” on page 54.
Seahorse XF HS Mini Extracellular Flux Analyzer User Manual 53
Page 54

Support
Technical Support and Ordering Information
Worldwide technical support
For questions about XF technology, the XF HS Mini Analyzer, XF experimental design, data
analysis, troubleshooting, and other information, contact Agilent Cell Analysis Technical Support:
Email: cellanalysis.support@agilent.com
Phone: • Global/United States +1 719 528 7500
• United States (toll free) +1 800 227 9770
• United Kingdom 0800 096 7632
• Germany 0800 180 6678
• Europe +45 31 36 98 78
• China (toll free) 800 820 3278
Ordering
Link to online store: https://www.chem.agilent.com/store/
US direct ordering:
• Email: css_afo_fax@agilent.com
• Phone: 1.800.227.9770 option #1 #1
• Fax purchase orders to: 302.633.8901
• Europe:
Contact your local Customer Care Center https://www.agilent.com/en-us/contact-us/page
54 Seahorse XF HS Mini Extracellular Flux Analyzer User Manual
Page 55

Support
Online help and support
To access the Help page, go to the Home screen then click Help.
Figure 39. Help window.
Support
Worldwide Agilent Support contact information.
Version of software/hardware
Currently installed software and firmware versions on XF HS Mini Analyzer are displayed on this
screen. If the XF HS Mini Analyzer is networked, software updates (Product Update Available) or
firmware updates (Firmware Update Available) will be selectable. See Figure 40.
Figure 40. Software version
Seahorse XF HS Mini Extracellular Flux Analyzer User Manual 55
Page 56

Support
“Help” text info
Most screens on the XF HS Mini Analyzer have a small Help button that will display help text
related to the current screen. See Figure 41.
Figure 41. Help button.
Additional Resources
XF HS Mini data analysis software
registration
XF HS Mini Consumables webpage https://www.agilent.com/en/products/cell-analysis/seahorse-xfp-consum
Cell Reference Database https://www.agilent.com/cell-reference-database/
Links to other useful information https://www.agilent.com/en/promotions/cell-analysis-technology
https://www.agilent.com/en/products/cell-analysis/cell-analysis-software/
data-analysis/seahorse-analytics
ables
56 Seahorse XF HS Mini Extracellular Flux Analyzer User Manual
Page 57

Seahorse XF HS Mini Extracellular Flux Analyzer User Manual 57
Page 58

www.agilent.com
For Research Use Only. Not for use in diagnostic procedures.
DE.4990046296
Agilent Technologies, Inc. 2020
First edition, May 2020
*5994-1961EN*
5994-1961EN
Rev A
 Loading...