

Keysight_DigitalTestApps_Programming_Guide Keysight Automated DigitalTest Applications Programming Guide c20140925 [138]
Table of contents
 Loading...
Agilent Keysight_DigitalTestApps_Programming_Guide Keysight Automated DigitalTest Applications Programming Guide c20140925 [138] Datasheet
Page 1

Keysight DigitalTestApps
Programming
Guide
Page 2

Notices
CAUTION
WARNING
© Keysight Technologies, Inc. 2008-2014
No part of this manual may be reproduced in
any form or by any means (includ ing electronic storage and retrieval or translation
into a foreign language) without prior agreement and written consent from Keysight
Technologies, Inc. as governed by United
States and international copyright laws.
Manual Part Number
Version 03.30.0000
Edition
October 1, 2014
Available in electronic format only
Published by:
Keysight Technologies, Inc.
1900 Garden of the Gods Road
Colorado Springs, CO 80907 USA
Warranty
The material contained in this document is provided “as is,” and is subject
to being changed, without notice, in
future editions. Further, to the maximum extent permitted by applicable
law, Keysight disclaims all warranties,
either express or implied, with regard
to this manual and any information
contained herein, includ ing but not
limited to the implied warranties of
merchantability and fitness for a particular purpose. Keysight shall not be
liable for errors or for incidental or
consequential damages in connection
with the furnishing, use, or performance of this document or of any information contained herein. Should
Keysight and the user have a separate
written agreement with warranty terms
covering the material in this document
that conflict with these terms, the warranty terms in the separate agreement
shall control.
Technology Licenses
The hardware and/or software described in
this document are furnished under a license
and may be used or copied only in accordance with the terms of such license.
2.101(a) or as “Restricted computer software” as defined in FAR 52.227-19 (June
1987) or any equivalent agency regulation or
contract clause. Use, duplication or disclosure of Software is subject to Keysight Technologies’ standard commercial license
terms, and non-DOD Departments and
Agencies of the U.S. Government will receive
no greater than Restricted Rights as defined
in FAR 52.227-19(c)(1-2) (June 1987). U.S.
Government users will receive no greater
than Limited Rights as defined in FAR
52.227-14 (June 1987) or DFAR
252.227-7015 (b)(2) (November 1995), as
applicable in any technical data.
Safety Notices
A CAUTION notice denotes a hazard.
It calls attention to an operating
procedure, practice, or the like that,
if not correctly performed or
adhered to, could result in damage
to the product or loss of important
data. Do not proceed beyond a CAU-
TION notice until the indicated conditions are fully understood and
met.
A WARNING notice denotes a hazard. It calls attention to an operating procedure, practice, or the like
that, if not correctly performed or
adhered to, could result in personal
injury or death. Do not proceed
beyond a WARNING notice until the
indicated conditions are fully
understood and met.
Restricted Rights Legend
If software is for use in the performance of a
U.S. Government prime contract or subcontract, Software is delivered and licensed as
“Commercial computer software” as defined
in DFAR 252.227-7014 (June 1995), or as a
“commercial item” as defined in FAR
Page 3

In This Book
This book is your guide to programming Keysight DigitalTestApps.
• Chapters 1-4 describe how to use an existing remote client:
• Chapter 1, “Keysight DigitalTestApps Remote Interface,” starting on page 9.
• Chapter 2, “Using Sample Remote Clients,” starting on page 15.
• Chapter 3, “Remote Programming Languages and Sample Code,” starting
on page 37.
• Chapter 4, “Recommended Remote Programming Practices,” starting on
page 71.
• Chapter 5, “Developing a Remote Client,” starting on page 77, describes how
to create new remote clients.
• Chapter 6, “Troubleshooting,” starting on page 125, lists common problems
and resolutions.
How to use this
book
Start by reading the Keysight DigitalTestApps Programming Getting Started guide;
then, read all the chapters in this guide in order.
Keysight DigitalTestApps Programming Guide 3
Page 4

4 Keysight DigitalTestApps Programming Guide
Page 5

Contents
1 Keysight DigitalTestApps Remote Interface
2 Using Sample Remote Clients
In This Book / 3
Remote Interface Documentation / 10
.NET Interface / 12
Keysight.DigitalTestApps.Framework.Remote / 12
Keysight.DigitalTestApps.Framework.Remote.Advanced / 12
Keysight.DigitalTestApps.Framework.Remote.Exceptions / 13
LabVIEW Interface / 14
ARSL Command Line Utility / 16
Simple GUI Remote Client / 18
Simple Message Handling Remote Client / 20
Message Handling Remote Client / 22
LabVIEW Simple Remote Client / 25
LabVIEW Demo Remote Client / 29
Connecting to the Automated Test Application / 31
Selecting/Running Tests / 32
Set/Get Configuration / 33
Obtaining Results / 34
Deleting Results / 35
Saving/Loading Projects / 35
ARSL / 36
Compliance Limit Set / 36
3 Remote Programming Languages and Sample Code
The Automated Test Remote Scripting Language (ARSL) / 38
Example Code / 39
Common Tasks / 40
Example Program / 43
Advanced Topic: Switch Matrix / 44
Keysight DigitalTestApps Programming Guide 5
Page 6

Microsoft .NET / 46
Example Code / 46
Common Tasks / 47
Example Programs / 50
Advanced Topic: Event Handling / 52
Advanced Topic: Switch Matrix / 52
Advanced Topic: Parallel Testing / 53
Python / 55
Using the Python Visa Package / 55
Using the Python for .NET Package / 55
Example Code / 56
Common Tasks / 57
Example Programs / 63
Advanced Topic: Event Handling / 65
Advanced Topic: Switch Matrix / 68
4 Recommended Remote Programming Practices
Determine required tasks by first using the graphical user interface / 72
Verify the remote commands one at a time / 73
Check the log / 74
5 Developing a Remote Client
Simple Remote Client / 78
File description / 80
Source code description / 80
ARSL Command Line Utility Implementation / 82
Simple GUI Remote Client Implementation / 85
Simple Message Handling Remote Client Implementation / 89
Message Handling Remote Client Implementation / 92
LabVIEW Simple Remote Client / 100
6 Keysight DigitalTestApps Programming Guide
Page 7

LabVIEW Demo Client Construction / 112
Creating a Remote Client / 112
Registering an Event / 113
TestList Event / 113
SimpleMessage Event / 114
DataInput Event / 114
Loading a Project / 115
Discarding Unsaved Changes / 115
Saving a Project / 116
Setting a Config / 117
Overwriting an Existing Project / 117
Getting a Config / 117
Connection Prompt Action / 118
Signal Check Fail Action / 118
Running Tests / 118
Increasing Number of Trials / 119
Enabling Test Plan Feature / 120
Skipping Completed Permutations / 120
Execute ARSL / 120
Connect / 121
Appending/Replacing Test Results / 121
Getting Results / 121
Delete Results / 122
Refreshing the Test List / 123
Updating Your Automated Test Application / 123
6 Troubleshooting
How to Manage the App Migration to Keysight / 126
Error Messages and Resolution / 127
How to Check Which Port an Application is Using / 130
How to Configure a Remote Interface User Port / 132
If your PC Has Two Network Interface Cards / 134
How To Test Two-way .NET Remoting Between Your PC and Your Scope / 135
Index
Keysight DigitalTestApps Programming Guide 7
Page 8

8 Keysight DigitalTestApps Programming Guide
Page 9

Keysight DigitalTestApps
Programming Guide
1 Keysight DigitalTestApps
Remote Interface
Remote Interface Documentation / 10
.NET Interface / 12
LabVIEW Interface / 14
This chapter describes the fundamentals of the Keysight DigitalTestApps Remote
Interface. If you haven't done this already, please read the Getting Started guide
for important information needed to use this Programming Guide more effectively.
Whether you're using an existing remote client or developing your own, you need
the following information to understand how to send instructions to the
automated test application.
There are two basic types of commands: properties and methods.
• Properties represent data values in the automated test application. They can be
read (query value) and in some cases written to (set value).
• Methods are functions which the automated test application can execute. They
may require input parameters and/or provide return values.
In addition, some property actions and method calls use custom types defined by
the automated test application. Custom types are classes containing the required
data.
9
Page 10

1 Keysight DigitalTestApps Remote Interface
NOTE
NOTE
Remote Interface Documentation
Besides the Guide you are currently reading, there are other important documents
which describe aspects of the Keysight DigitalTestApps Remote Interface:
In the Toolkit The following document is located in the base folder of the Automated Test
Application Remote Development Toolkit:
• Keysight_DigitalTestApps_Programming_Getting_Started.pdf
The following documents are located in the two "Documents" subfolders of the
Automated Test Application Remote Development Toolkit:
• Keysight DigitalTestApps Remote Interface for .NET.chm.
• Keysight DigitalTestApps Remote Interface for LabVIEW.chm.
Please see the readme.txt files located in the "Agilent-Keysight Transition" and "Keysight Apps
Only" subfolders for guidance on which location to use.
The .chm files describe each of the elements of the remote interface, including
properties, methods, types, etc.
On the Server The following application-specific document is located in the "help" folder of the
automated test application's installation directory. For automated test apps that
run directly on an oscilloscope, this folder may be found in either of these
locations:
c:\Program Files\Agilent _or_ Keysight\Infiniium _or_
FlexDCA\Apps\(application name)\help\(application
name)_Remote_Prog_Ref.chm (or .pdf)
-Or-
(Infiniium real-time on WinXP only) c:\scope\apps\(application
name)\help\(application name)_Remote_Prog_Ref.chm (or .pdf)
For automated test applications that run on a separate PC, this folder may be
found in:
c:\Program Files\Agilent _or_ Keysight\Infiniium _or_
FlexDCA\Apps\(application name)\help\(application
name)_Remote_Prog_Ref.chm (or .pdf)
-Or-
(Infiniium real-time only)
c:\Program Files\Keysight\Scope\Apps\(application
name)\help\(application name)_Remote_Prog_Ref.chm (or .pdf)
For Windows 7, substitute "Program Files (x86)" for "Program Files".
10 Keysight DigitalTestApps Programming Guide
Page 11
Keysight DigitalTestApps Remote Interface 1
NOTE
TIP
This help file (.chm or .pdf) describes application-specific configuration variable
names and values, test names and IDs, and external instrument names. These are
used as parameters or returned as results by various elements of the Keysight
DigitalTestApps Remote Interface. The .Net.chm and LabVIEW.chm help files
(described above) refer you to this application-specific document in their
descriptions of remote interface elements that require application-specific values.
You may view the remote interface help file(s) through the application's Help >
Remote Interface menu (applications supporting remote interface version 2.00 or
later, only).
The LabVIEW remote interface is a wrapper around the .NET remote interface. The help topics
in the LabVIEW.chm contain links to their associated .NET.chm topics, which often provide
additional information about the feature. When using the LabVIEW.chm, keep in mind that the
elements designed for LabVIEW use are located in namespace
Keysight.DigitalTestApps.RemoteTestClient, while those found in the
Keysight.DigitalTestApps.Framework namespaces are for .NET cross-reference use.
In the User
Interface
You may also obtain remote interface help directly from the application's user
interface (applications supporting remote interface version 1.20 or later, only).
Simply enable the "show remote interface hints" user preference (menu:
View->Preferences :: Remote tab). If there is a remote command that can be used to
accomplish an element's function, it can be found this way:
User Interface Element Hint Location
Toolbar Click a toolbar button.
Set Up tab
Run Tests tab
Results tab
Various run-time dialogs
Select Tests tab Select a test (by clicking on its name) and check the description
Configure tab Select a configuration item and check the description pane on the
To find out what version of the remote interface an application supports, check its Help >
About screen (if it does not appear there, the version is older than 1.20).
Right click a control and select Remote Interface Hint.
pane at the bottom of the tab.
right side of the tab.
Keysight DigitalTestApps Programming Guide 11
Page 12

1 Keysight DigitalTestApps Remote Interface
.NET Interface
The elements of the .NET interface are contained in a library named
Keysight.DigitalTestApps.Framework.Remote.dll and are divided into three
namespaces:
• “Keysight.DigitalTestApps.Framework.Remote" on page 12
• “Keysight.DigitalTestApps.Framework.Remote.Advanced" on page 12
• “Keysight.DigitalTestApps.Framework.Remote.Exceptions" on page 13
Keysight.DigitalTestApps.Framework.Remote
This namespace contains the core remote interface features. A good starting place
to look at is the RemoteAteUtilities class, which contains the methods used to
connect to the automated test application, and the IRemoteAte interface, where
most of the commands you will use are found.
The features in this namespace involve the remote client initiating some action and
the automated test application responding, making use of the "remote client ->
automated test app path" of the remote interface.
For example, to execute a remote interface method:
1 The client computer initiates the action (the method call).
2 The .NET Remoting layer transports the request to the server (the application
running on oscilloscope or PC).
3 The application executes the method and generates the return value.
4 The .NET Remoting layer transports the return value to the client.
Keysight.DigitalTestApps.Framework.Remote.Advanced
This namespace contains advanced programming features. The most important
member is the AteEventSink, where most of the advanced commands you will use
are found.
Some of the features in this namespace involve the automated test application
initiating some action and the remote client responding, making use of the
"automated test app -> remote client callback path" of the remote interface.
For example, one of the advanced features involves the ability to force dialogs that
would normally display on the oscilloscope to display on the client instead. In this
case:
1 The server (the application running on oscilloscope or PC) initiates the action
(generates a message).
2 The .NET Remoting layer transports the message to the client computer.
3 The client displays the message and generates a response ("OK", "Cancel", etc.)
12 Keysight DigitalTestApps Programming Guide
Page 13

Keysight DigitalTestApps Remote Interface 1
4 The .NET Remoting layer transports the response to the server.
Keysight.DigitalTestApps.Framework.Remote.Exceptions
This namespace contains remote interface-specific exception types that may be
thrown during a remote operation.
Keysight DigitalTestApps Programming Guide 13
Page 14

1 Keysight DigitalTestApps Remote Interface
LabVIEW Interface
The elements of the LabVIEW interface are contained in a library named
Keysight.DigitalTestApps.RemoteTestClient.dll. This library contains methods that
wrap access to the properties and methods of the .NET interface.
14 Keysight DigitalTestApps Programming Guide
Page 15

Keysight DigitalTestApps
Programming Guide
2 Using Sample Remote Clients
ARSL Command Line Utility / 16
Simple GUI Remote Client / 18
Message Handling Remote Client / 22
Simple Message Handling Remote Client / 20
LabVIEW Simple Remote Client / 25
LabVIEW Demo Remote Client / 29
This chapter describes a set of ready-to-run sample remote clients that you can
use to explore the Keysight DigitalTestApps Remote Interface.
15
Page 16
2 Using Sample Remote Clients
NOTE
ARSL Command Line Utility
The easiest way to try out the remote interface is by using a simple command-line
remote client. This client lets you use plain text to execute the commands found in
the .NET remote interface, which is described in Chapter 1, “Keysight
DigitalTestApps Remote Interface,” starting on page 9.
To use this utility:
1 Using Windows Explorer, browse to the toolkit installation directory.
2 In the desired "Tools\C#" subdirectory, locate the "ARSL Command Line Utility"
folder. Copy its contents to a new folder on your computer.
Please see the readme.txt file found in the "Agilent-Keysight Transition" or "Keysight Apps
only" subdirectories for guidance on the files to use for your remote client.
3 Copy the application file Keysight.DigitalTestApps.Framework.Remote.dll (or
Agilent.Infiniium.AppFW.Remote.dll, see "On the Client" in the Keysight
DigitalTestApps Programming Getting Started guide) to this new folder as well.
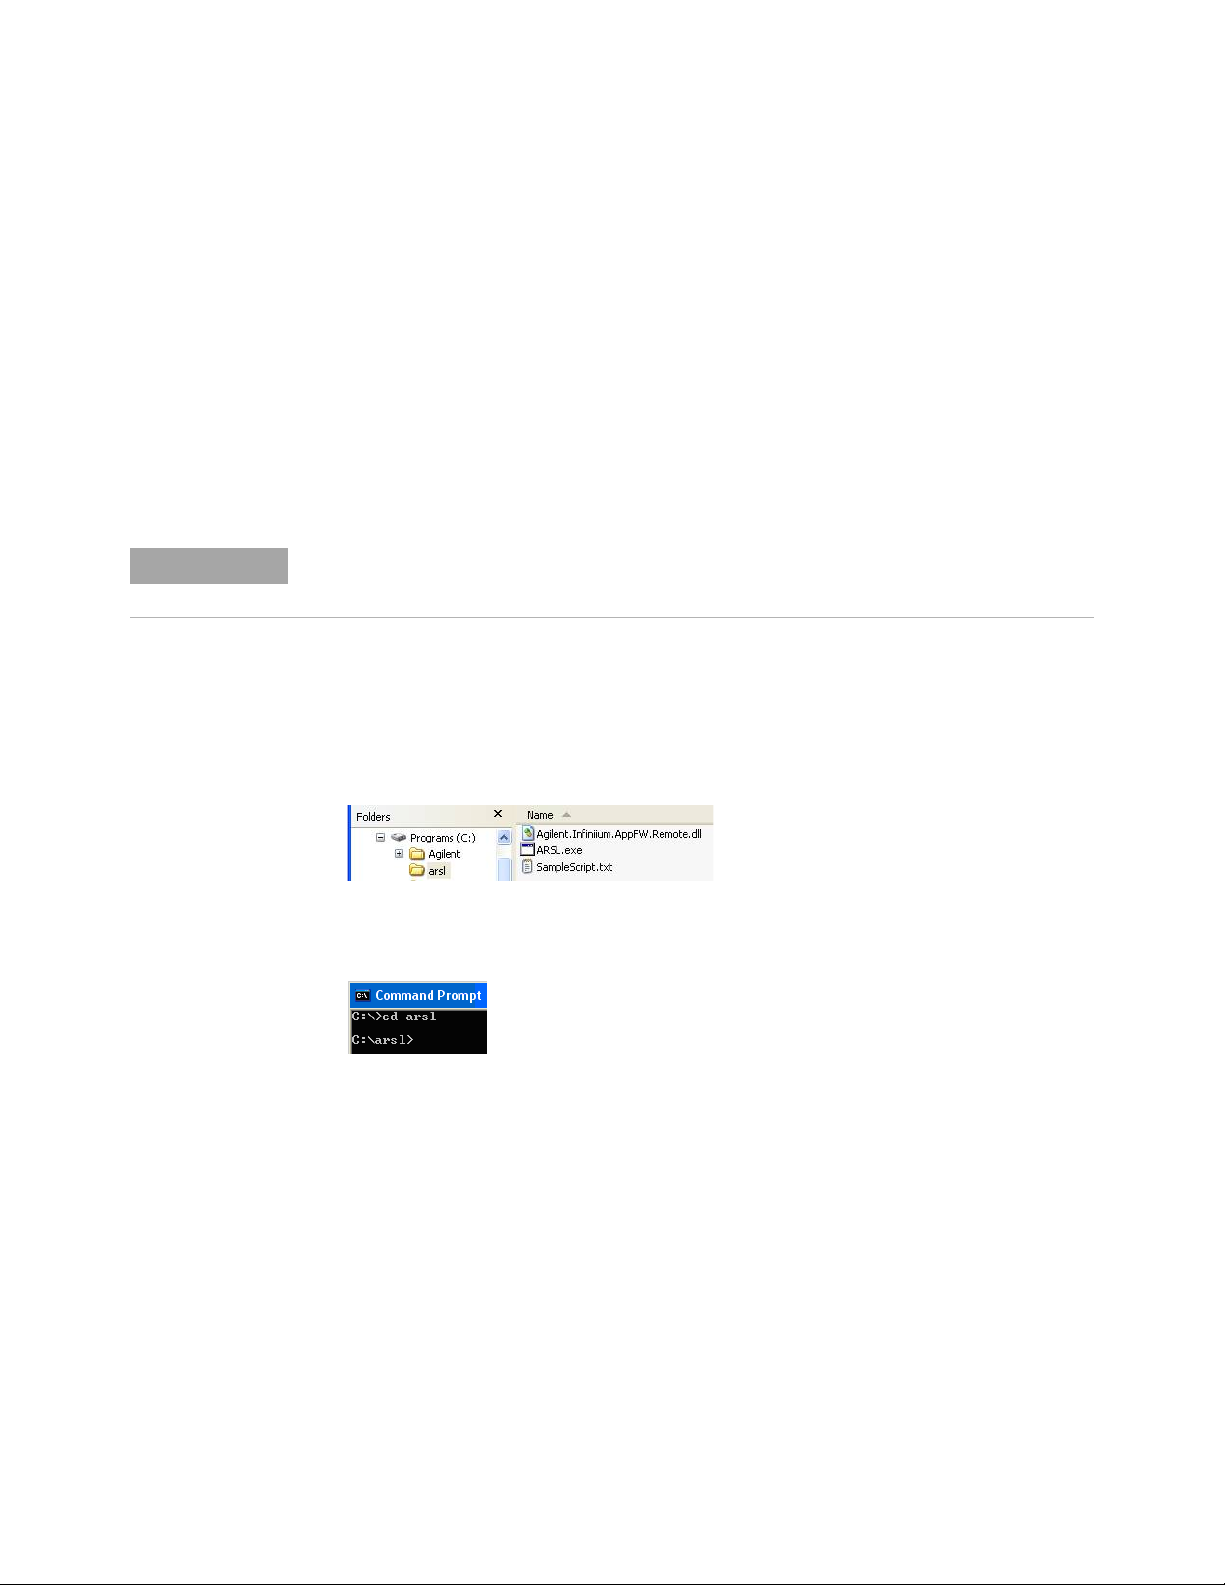
4 The folder on your computer should now look like this:
5 Now open a Windows command prompt and browse to the folder you created:
6 Ensure your configuration meets the requirements listed in "On the Server" in
the Keysight DigitalTestApps Programming Getting Started guide, including
launching the automated test application on the server.
7 Get the IP address of the target machine running the automated test
application (oscilloscope or PC). On Windows-based machines, this may be
obtained by typing "ipconfig" in a Command Prompt window.
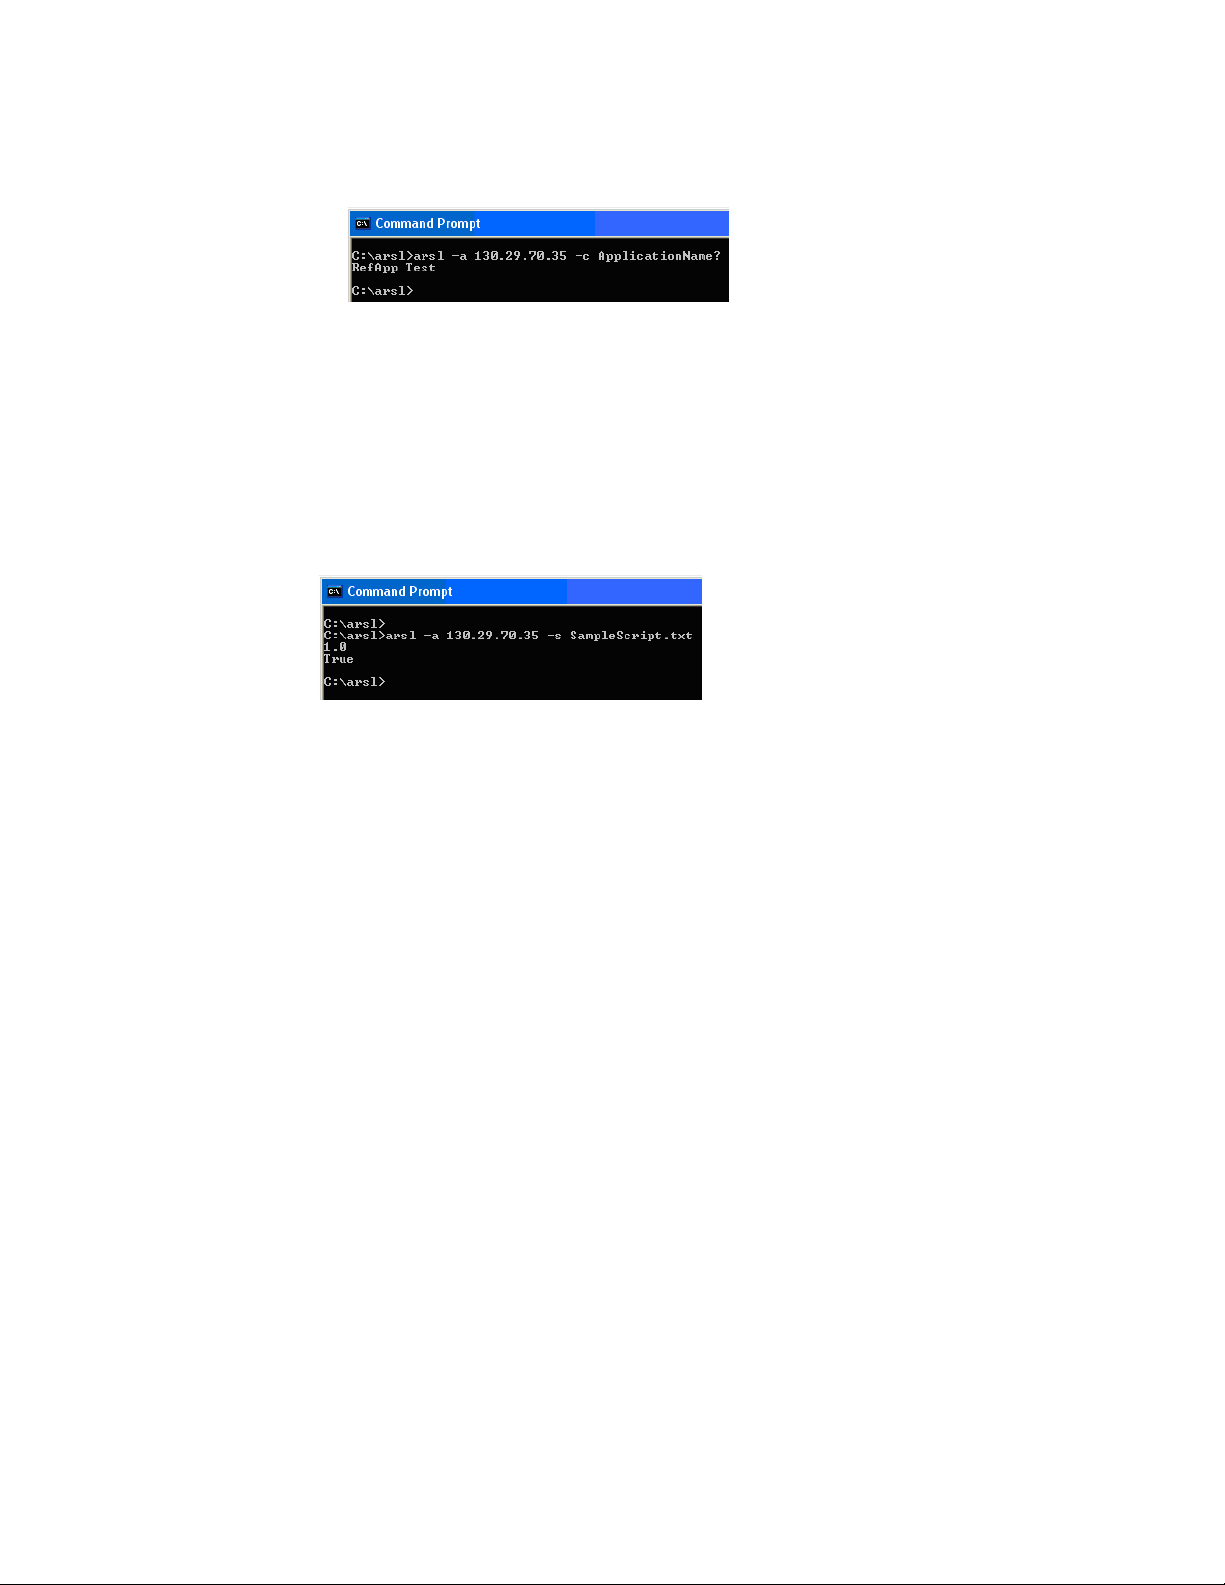
8 Enter this in your Command Prompt window and press <enter>:
arsl -a 123.45.67.89 -c ApplicationName?
(substitute your actual IP address for 123.45.67.89)
16 Keysight DigitalTestApps Programming Guide
Page 17
Using Sample Remote Clients 2
9 Observe the automated test application's response. In the example above, an
application named Reference Application responded with "RefApp Test".
You may also use this utility to execute scripts. An example, "SampleScript.txt" is
included with the executable. Execute the script by entering this:
arsl -a 123.45.67.89 -s SampleScript.txt
(substitute your actual IP address for 123.45.67.89)
The command "ApplicationName?" and the contents of the file "SampleScript.txt"
are examples of Keysight Automated Test Engine Remote Scripting Language
(ARSL) commands. ARSL is described in more detail in "The Automated Test
Remote Scripting Language (ARSL)" on page 38.
Note: To see all available options, enter this:
arsl -h
Keysight DigitalTestApps Programming Guide 17
Page 18
2 Using Sample Remote Clients
NOTE
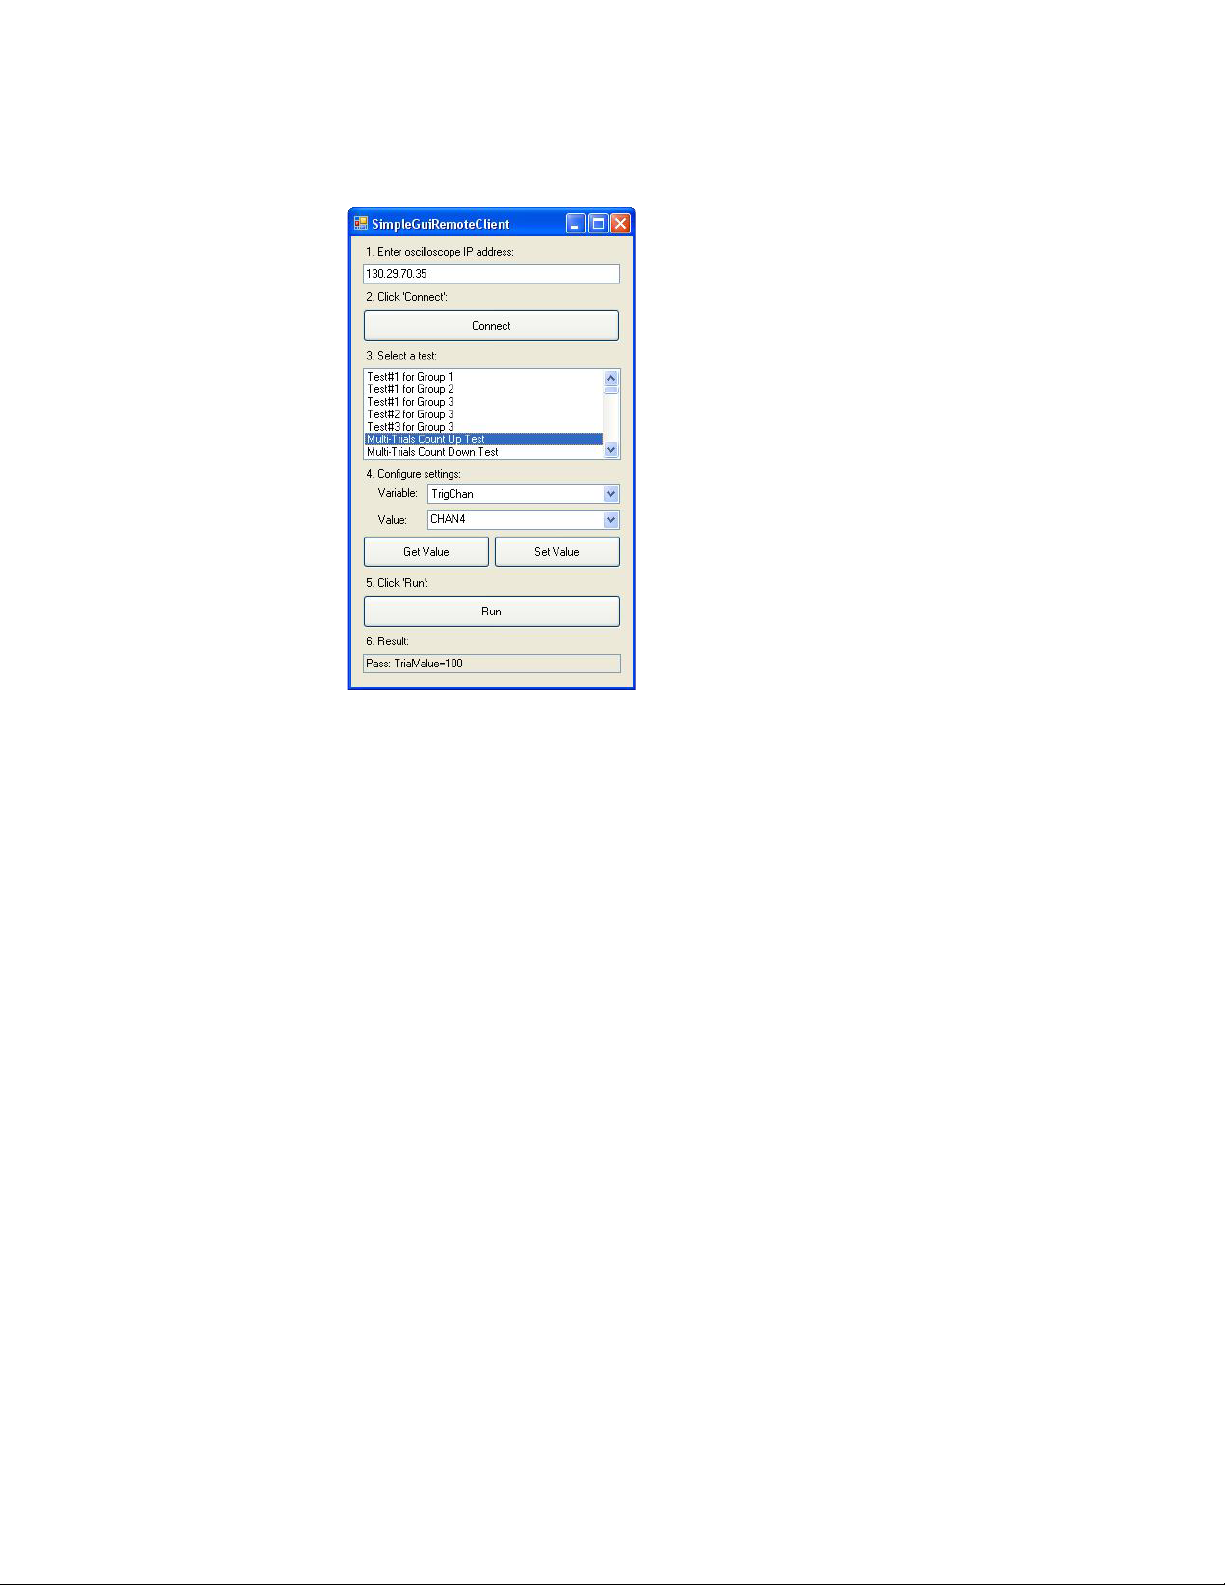
Simple GUI Remote Client
To see how a graphical user interface-based approach can work, try this client.
To use the simple GUI remote client:
1 Using Windows Explorer, browse to the toolkit installation directory.
2 In the desired "Tools\C#" subdirectory, locate the folder named "Simple GUI
Remote Client". Copy its contents to a new folder on your computer.
Please see the readme.txt file found in the "Agilent-Keysight Transition" or "Keysight Apps
only" subdirectories for guidance on the files to use for your remote client.
3 Copy the file Keysight.DigitalTestApps.Framework.Remote.dll (or
Agilent.Infiniium.AppFW.Remote.dll, see "On the Client" in the Keysight
DigitalTestApps Programming Getting Started guide) to this new folder as well.
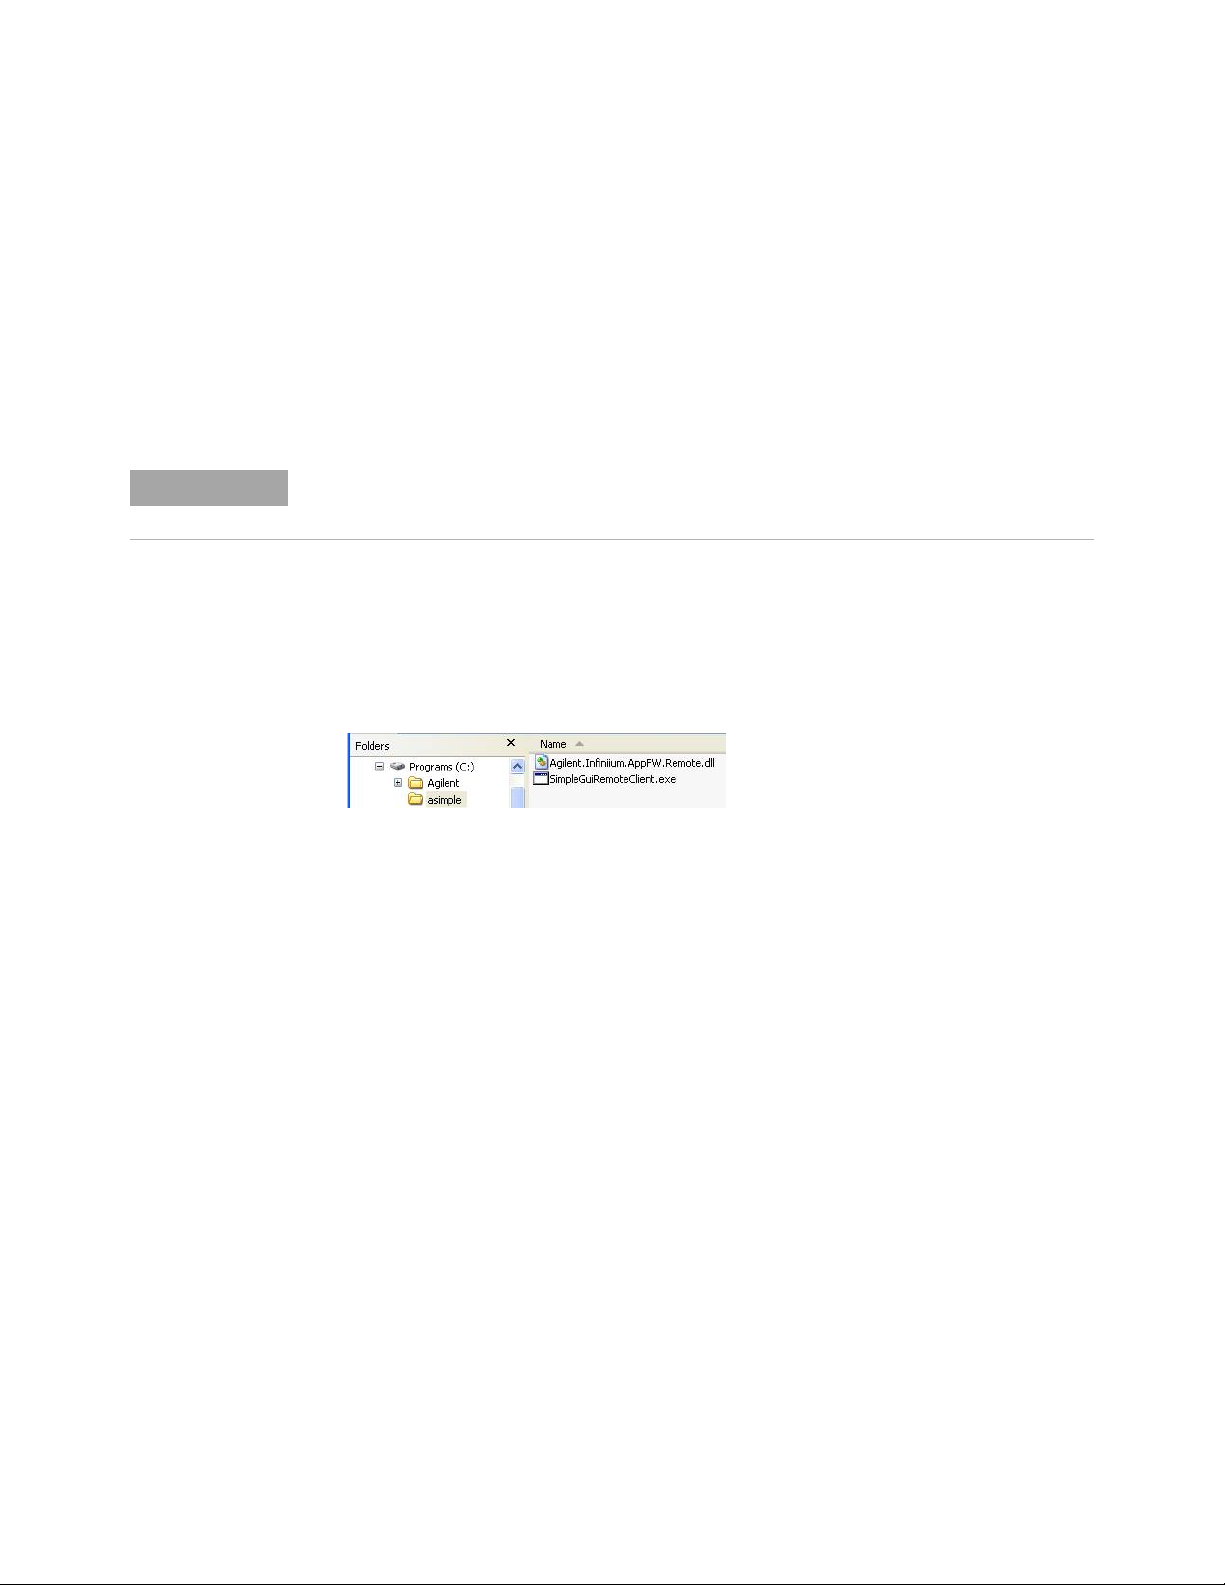
The folder on your computer should now look like this:
4 Ensure your configuration meets the minimum requirements listed in "On the
Server" in the Keysight DigitalTestApps Programming Getting Started guide.
5 Get the IP address of the target machine running the automated test
application (oscilloscope or PC). On Windows-based machines, this may be
obtained by typing "ipconfig" in a Command Prompt window.
6 Now execute the file SimpleGuiRemoteClient.exe. When the main dialog
displays, follow the steps to run a test.
18 Keysight DigitalTestApps Programming Guide
Page 19
Using Sample Remote Clients 2
Keysight DigitalTestApps Programming Guide 19
Page 20
2 Using Sample Remote Clients
NOTE
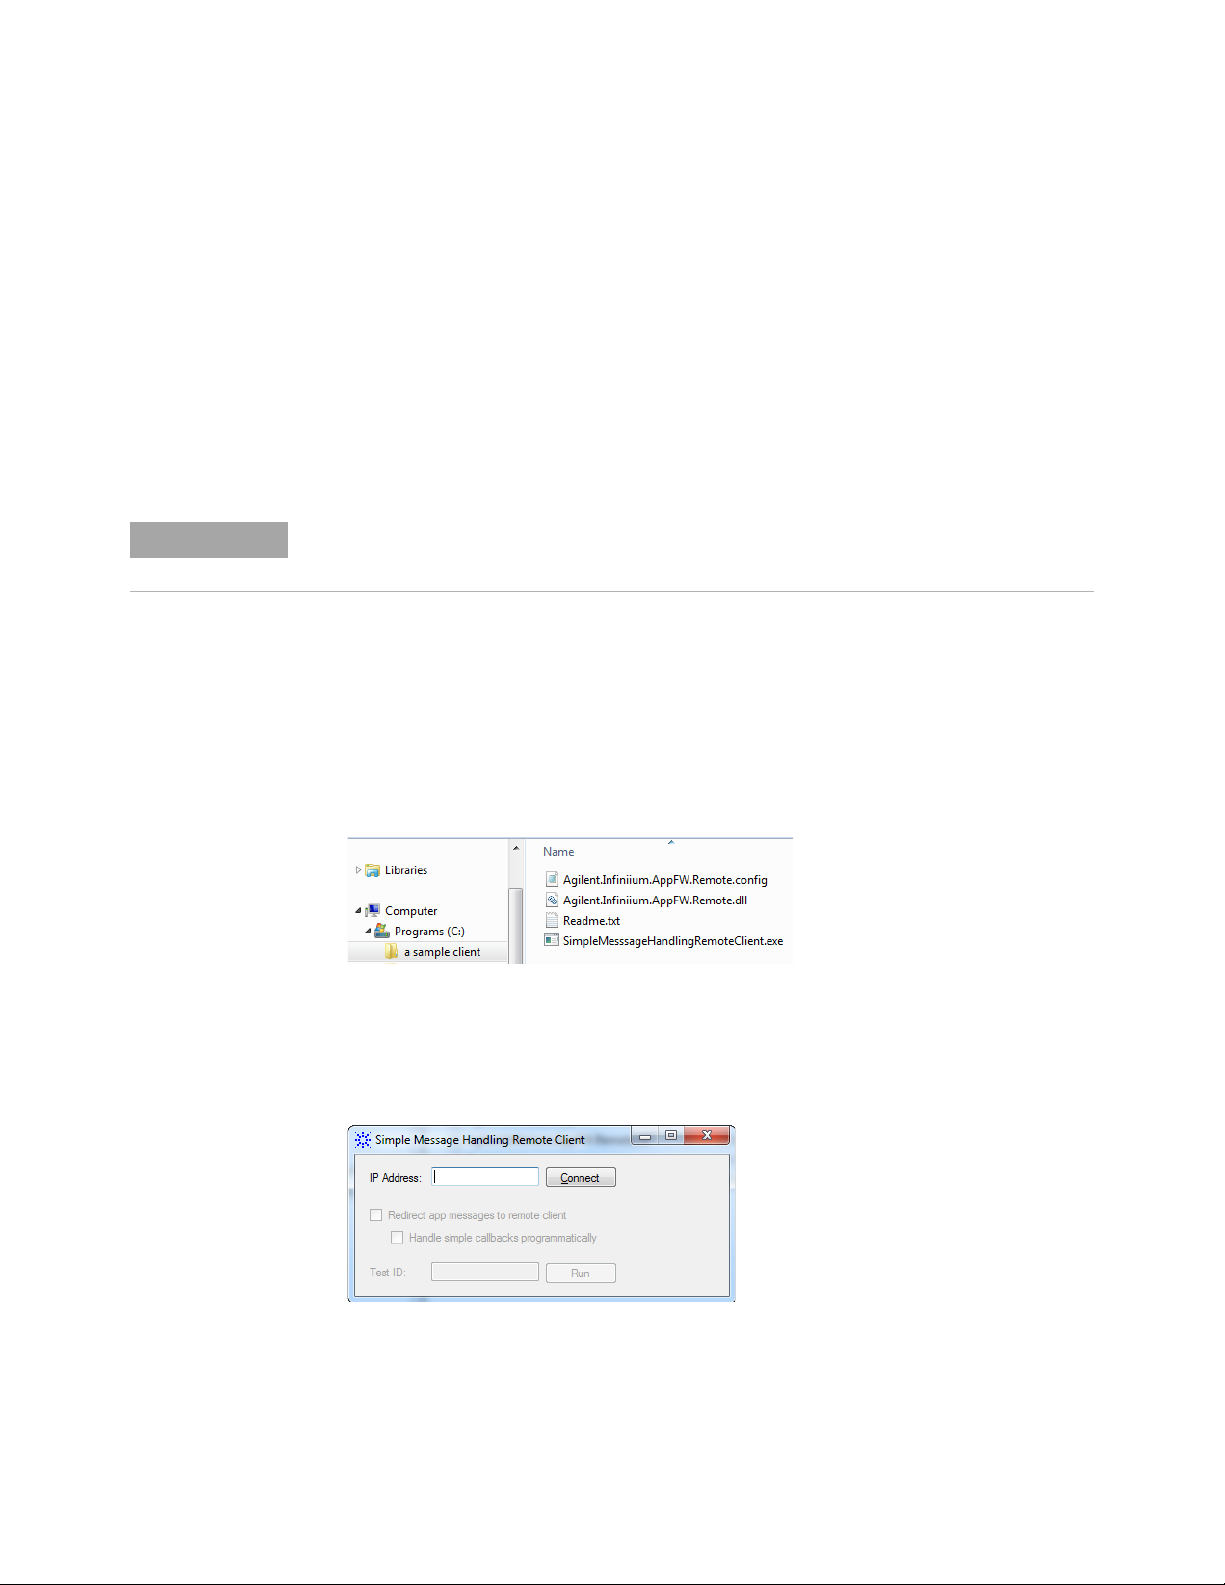
Simple Message Handling Remote Client
Now take a look at a client that demonstrates basic message handling capabilities
of the remote interface.
To use the simple message handling remote client:
1 Using Windows Explorer, browse to the toolkit installation directory.
2 In the desired "Tools\C#" subdirectory, locate the folder named "Simple
Message Handling Remote Client". Copy its contents to a new folder on your
computer.
Please see the readme.txt file found in the "Agilent-Keysight Transition" or "Keysight Apps
only" subdirectories for guidance on the files to use for your remote client.
3 Copy the files Keysight.DigitalTestApps.Framework.Remote.dll and
Keysight.DigitalTestApps.Framework.Remote.config (or
Agilent.Infiniium.AppFW.Remote.dll and
Agilent.Infiniium.AppFW.Remote.config, see "On the Client" in the Keysight
DigitalTestApps Programming Getting Started guide) to this new folder as well.
The folder on your computer should now look like this:
4 Ensure your configuration meets the minimum requirements listed in "On the
Server" in the Keysight DigitalTestApps Programming Getting Started guide.
5 Now execute the file SimpleMessageHandlingRemoteClient.exe:
6 When the main dialog displays, enter the IP address of the target machine
running the automated test application (oscilloscope or PC). On
Windows-based machines, this may be obtained by typing "ipconfig" in a
Command Prompt window.
20 Keysight DigitalTestApps Programming Guide
Page 21

Using Sample Remote Clients 2
NOTE
7 Click "Connect".
8 Enter a test ID. See Chapter 1, "Remote Interface Documentation" on page 10,
for more information on getting your application's test IDs.
9 Click "Run".
The rest of the dialog presents options for using the remote interface to manage
messages that the remote application displays:
• Redirect app messages to remote client
When checked, the automated test application will not display messages on
the oscilloscope. Instead, messages will be displayed on the client PC using a
default display algorithm provided by the
Keysight.DigitalTestApps.Framework.Remote DLL.
• Handle simple callbacks programmatically
When checked, the default algorithm used in the "Redirect" option above will
be replaced by a custom algorithm defined in the Simple Message Handling
Remote Client program for "simple" messages (those not requiring value entry).
If you close and relaunch the automated test application, it will initialize with default settings,
such as Redirect=false. In this case, you should close and relaunch the simple message
handling client to reinitialize it as well.
Keysight DigitalTestApps Programming Guide 21
Page 22
2 Using Sample Remote Clients
NOTE
Message Handling Remote Client
Now take a look at a client that demonstrates advanced message handling
capabilities of the remote interface.
To use the message handling remote client:
1 Using Windows Explorer, browse to the toolkit installation directory.
2 In the desired "Tools\C#" subdirectory, locate the folder named "Message
Handling Remote Client". Copy its contents to a new folder on your computer.
Please see the readme.txt file found in the "Agilent-Keysight Transition" or "Keysight Apps
only" subdirectories for guidance on the files to use for your remote client.
3 Copy the files Keysight.DigitalTestApps.Framework.Remote.dll and
Keysight.DigitalTestApps.Framework.Remote.config (or
Agilent.Infiniium.AppFW.Remote.dll and
Agilent.Infiniium.AppFW.Remote.config, see "On the Client" in the Keysight
DigitalTestApps Programming Getting Started guide) to this new folder as well.
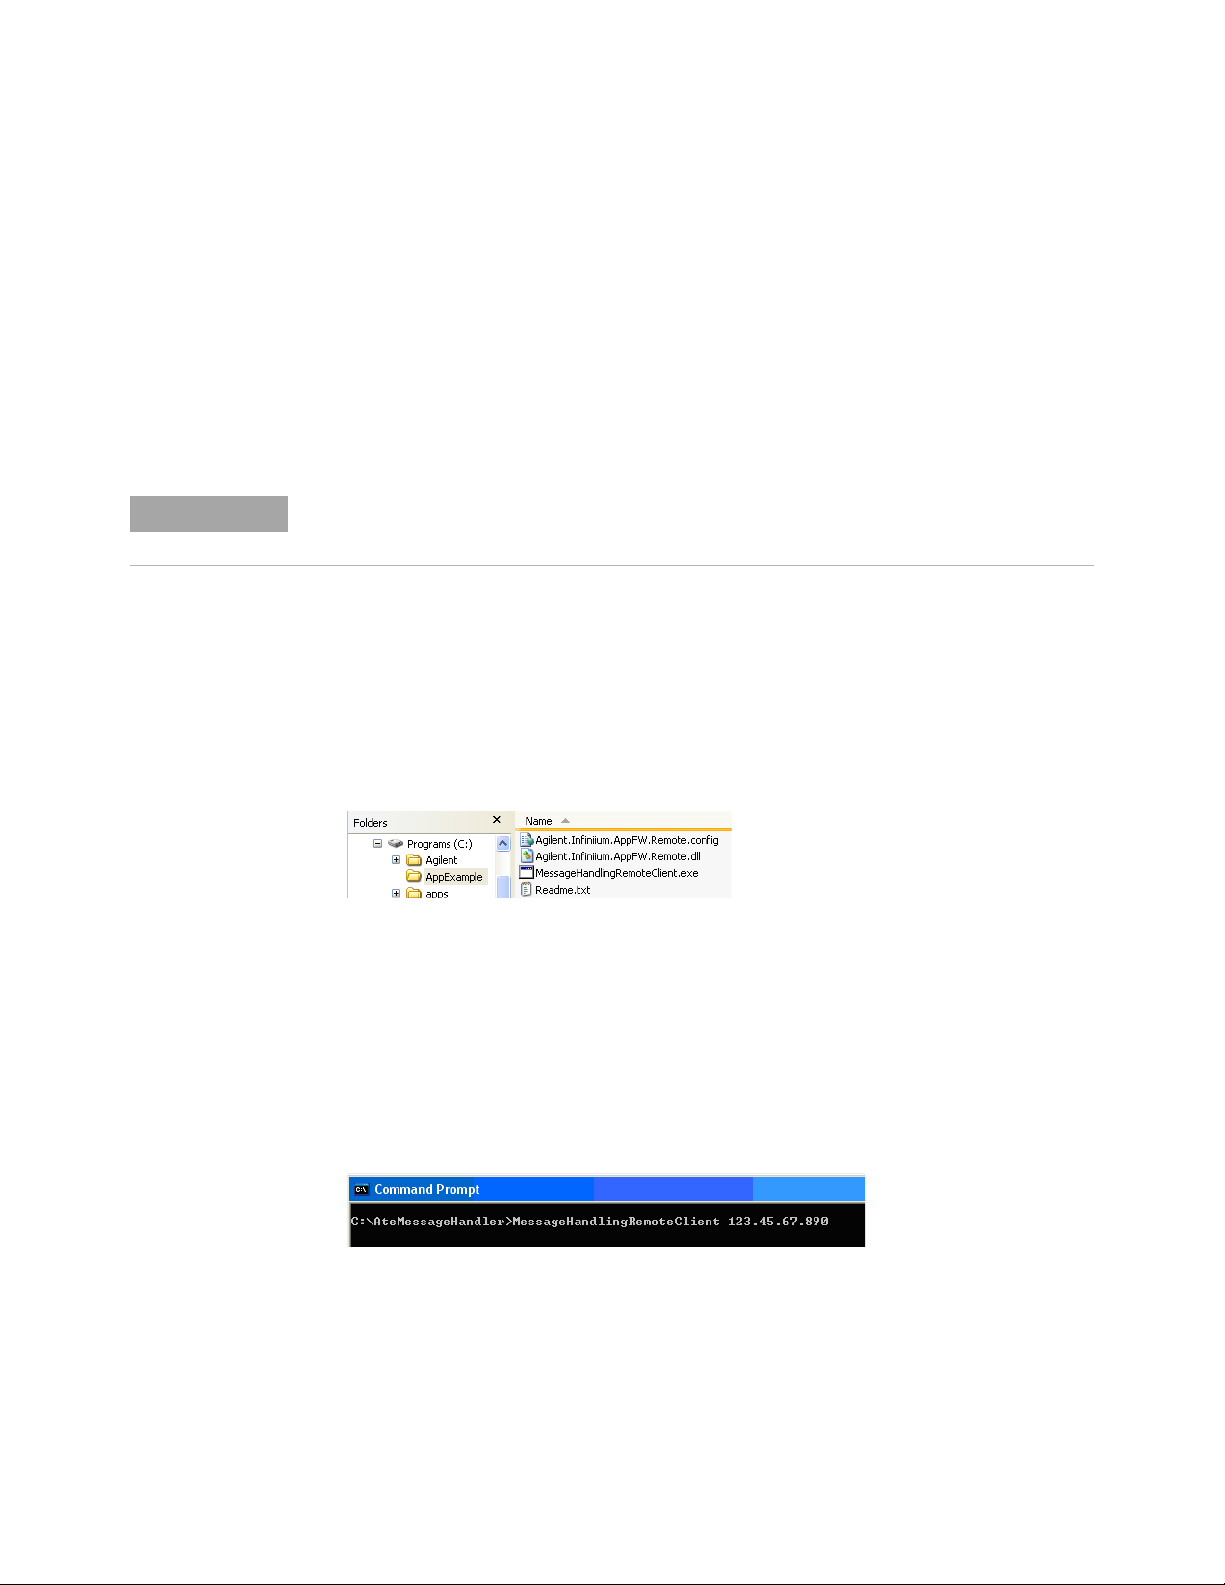
The folder on your computer should now look like this:
4 Ensure your configuration meets the minimum requirements listed in "On the
Server" in the Keysight DigitalTestApps Programming Getting Started guide.
5 Get the IP address of the target machine running the automated test
application (oscilloscope or PC). On Windows-based machines, this may be
obtained by typing "ipconfig" in a Command Prompt window.
6 Now execute the file MessageHandlingRemoteClient.exe, passing in the IP
address of the remote application as the first parameter:
7 When the main dialog displays, enter a test ID. See Chapter 1, "Remote
Interface Documentation" on page 10, for more information on getting your
application's test IDs.
22 Keysight DigitalTestApps Programming Guide
Page 23
Using Sample Remote Clients 2
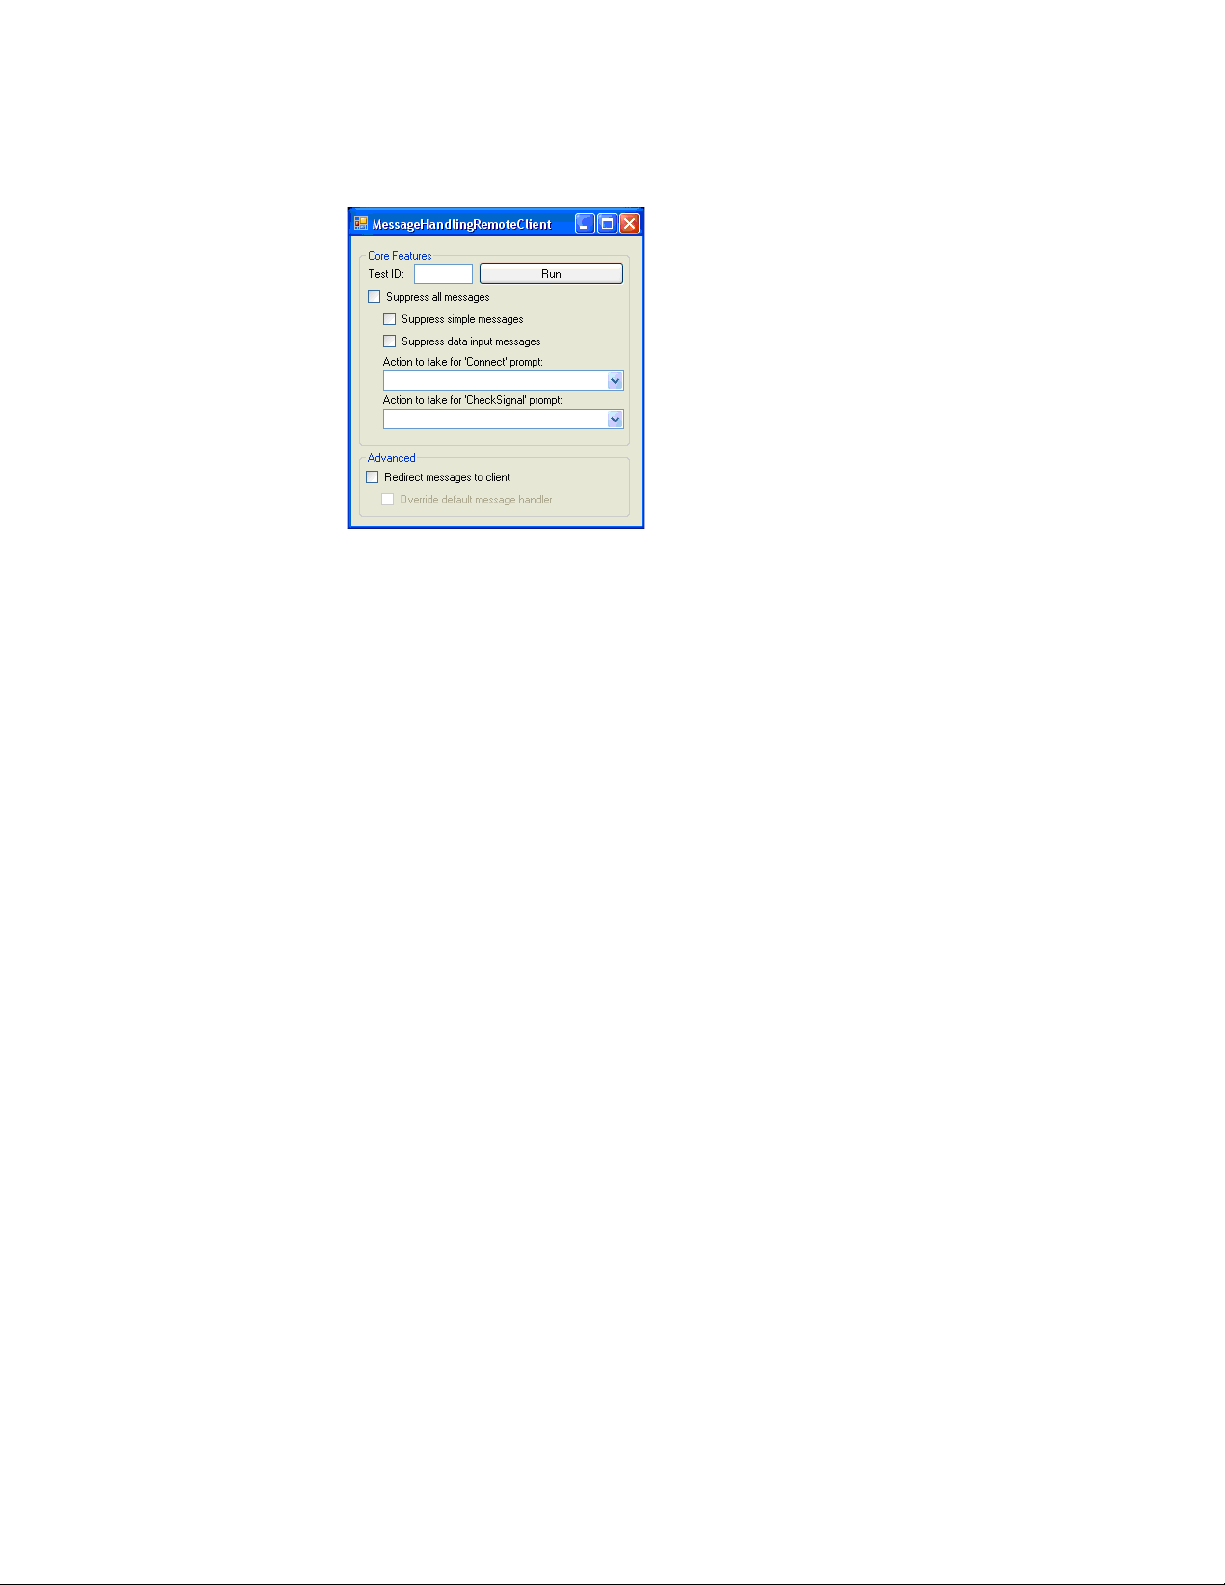
8 Click "Run".
The rest of the dialog presents options for using the remote interface to manage
messages that the remote application displays:
The following options use core remote interface features:
• Suppress simple messages
When checked, the remote application will not display application-specific
"simple messages". These are defined as messages that use only the standard
Microsoft button responses, for example, OK/Cancel, Yes/No, etc., and do not
require the user to enter any values. When the application needs to display a
simple message, it will instead automatically respond to it with a
predetermined default button selection.
• Suppress data input messages
When checked, the remote application will not display application-specific
"data input" messages. These are defined as messages that require the user to
enter a single alphanumeric value. When the application needs to display a
data input message, it will instead attempt to automatically respond to it with a
predetermined value. In cases where the automated test application has no
automatic response, the test will abort.
• Action to take for "Connect" prompt:
This combo box presents three options that affect what happens when the
remote application needs to display the standard "Change Physical
Connection/Setup" dialog:
• Abort — When this option is selected, the remote application will throw an
exception.
• AutoRespond — When this option is selected, the remote application
suppresses the dialog and assumes you have made the connection.
• Display — When this option is selected, the remote application will display
the dialog.
Keysight DigitalTestApps Programming Guide 23
Page 24

2 Using Sample Remote Clients
NOTE
• Action to take for "CheckSignal" prompt:
This combo box presents three options that affect what happens when the
remote application needs to display the standard "Check Signal" dialog:
• Abort — When this option is selected, the remote application will throw an
exception.
• AutoRespond — When this option is selected, the remote application
suppresses the dialog and assumes the signal is acceptable.
• Display — When this option is selected, the remote application will display
the dialog.
The following options use advanced remote interface features:
• Redirect messages to client
When checked, the remote application will not display any of the above
message types on the oscilloscope. Instead, the message will be displayed on
the client PC using a default display algorithm provided by the
Keysight.DigitalTestApps.Framework.Remote DLL.
• Override default message handler
When checked, the default algorithm used in the "Redirect" option above will
be replaced by a custom algorithm defined in the Message Handling Remote
Client program.
The Core Feature options override the Advanced options. Thus, the application will
not redirect simple messages to the client if they are being suppressed.
If you close and relaunch the automated test application, it will initialize with default settings,
such as suppress=false. In this case, you should close and relaunch the message handling
client to reinitialize it as well.
24 Keysight DigitalTestApps Programming Guide
Page 25
LabVIEW Simple Remote Client
Now take a look at a simple remote client that demonstrates the use of the
LabVIEW programming environment to control an automated test application. See
"On the Client" in the Keysight DigitalTestApps Programming Getting Started
guide for a list of minimum requirements.
1 Using Windows Explorer, browse to the toolkit installation directory that
corresponds to the remote interface version supported by the automated test
application you wish to control.
2 In the "Agilent-Keysight Transition\Source" subdirectory, locate the "LabView\
Simple Client" folder. Copy its contents to "C:\LabView" on your computer.
3 In the "Agilent-Keysight Transition\Tools" subdirectory, locate the "LabView
Remote Adapter" folder. Copy its contents to "C:\LabView".
4 Copy the application file Agilent.Infiniium.AppFW.Remote.dll (see "On the
Client" in the Keysight DigitalTestApps Programming Getting Started guide) to
"C:\LabView".
Using Sample Remote Clients 2
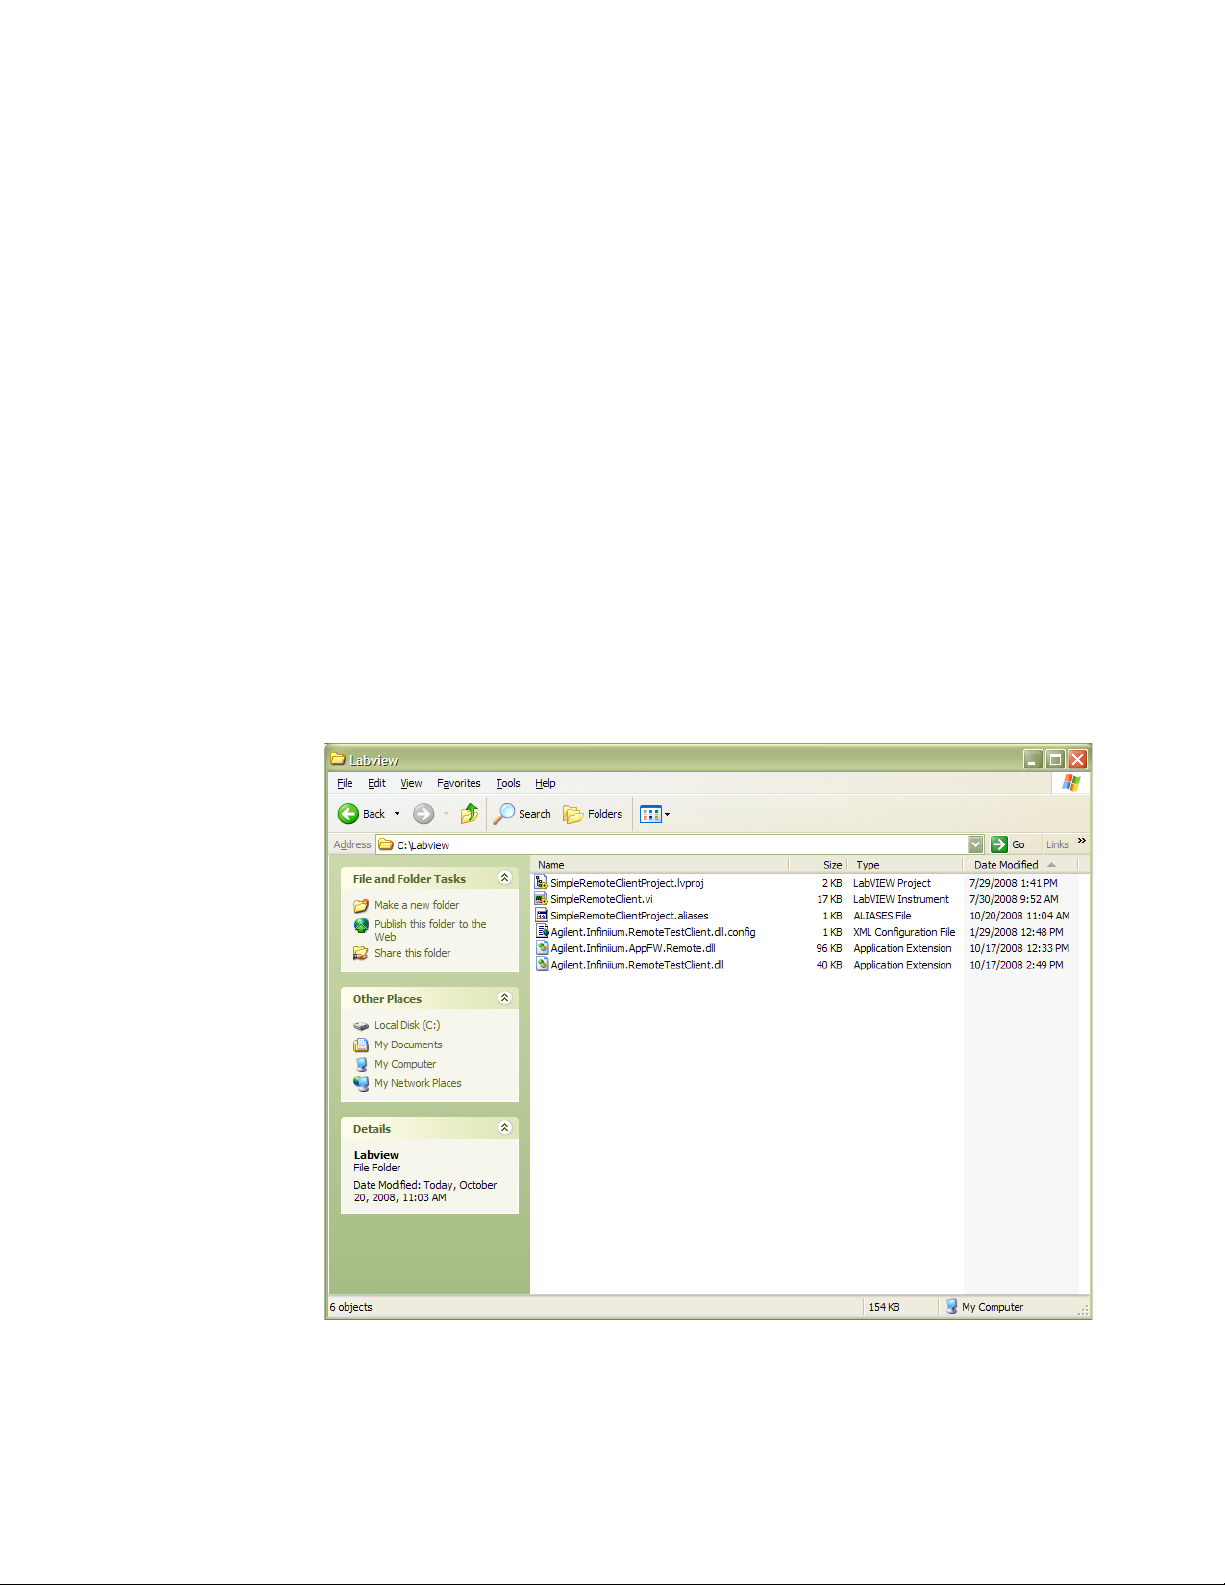
5 The folder on your computer should now look like this:
6 Ensure your configuration meets the minimum requirements listed in "On the
Server" in the Keysight DigitalTestApps Programming Getting Started guide.
Keysight DigitalTestApps Programming Guide 25
Page 26
2 Using Sample Remote Clients
7 Get the IP address of the target machine running the automated test
application (oscilloscope or PC). On Windows-based machines, this may be
obtained by typing "ipconfig" in a Command Prompt window.
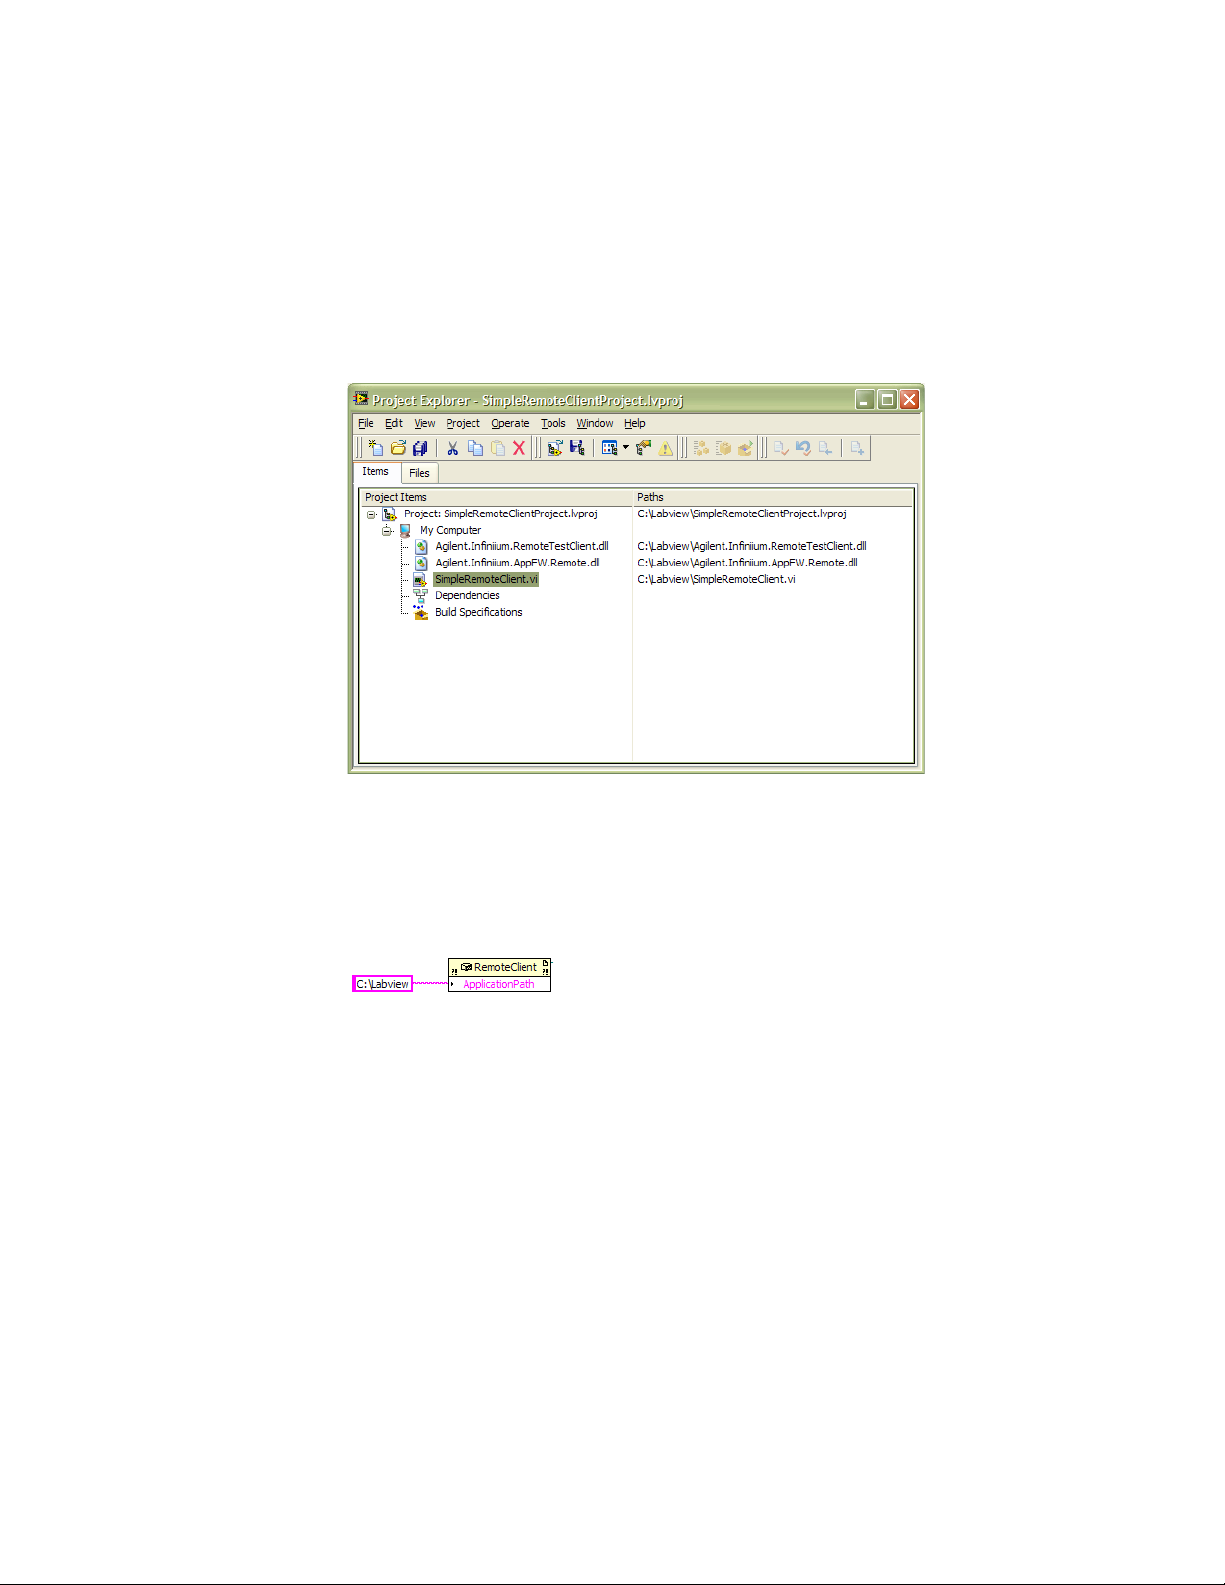
8 Open the file "SimpleRemoteClientProject.lvproj".
9 In the LabView Project Explorer, open the file "SimpleRemoteClient.vi".
10 Before launching the example program, the path for the working directory
needs to be changed. Change the path to point to the directory where both the
Agilent.Infiniium.AppFW.Remote.dll and Agilent.Infiniium.RemoteTestClient.dll
are located.
11 Change the IP to point to the scope where the automated test application is
running.
26 Keysight DigitalTestApps Programming Guide
Page 27
Using Sample Remote Clients 2
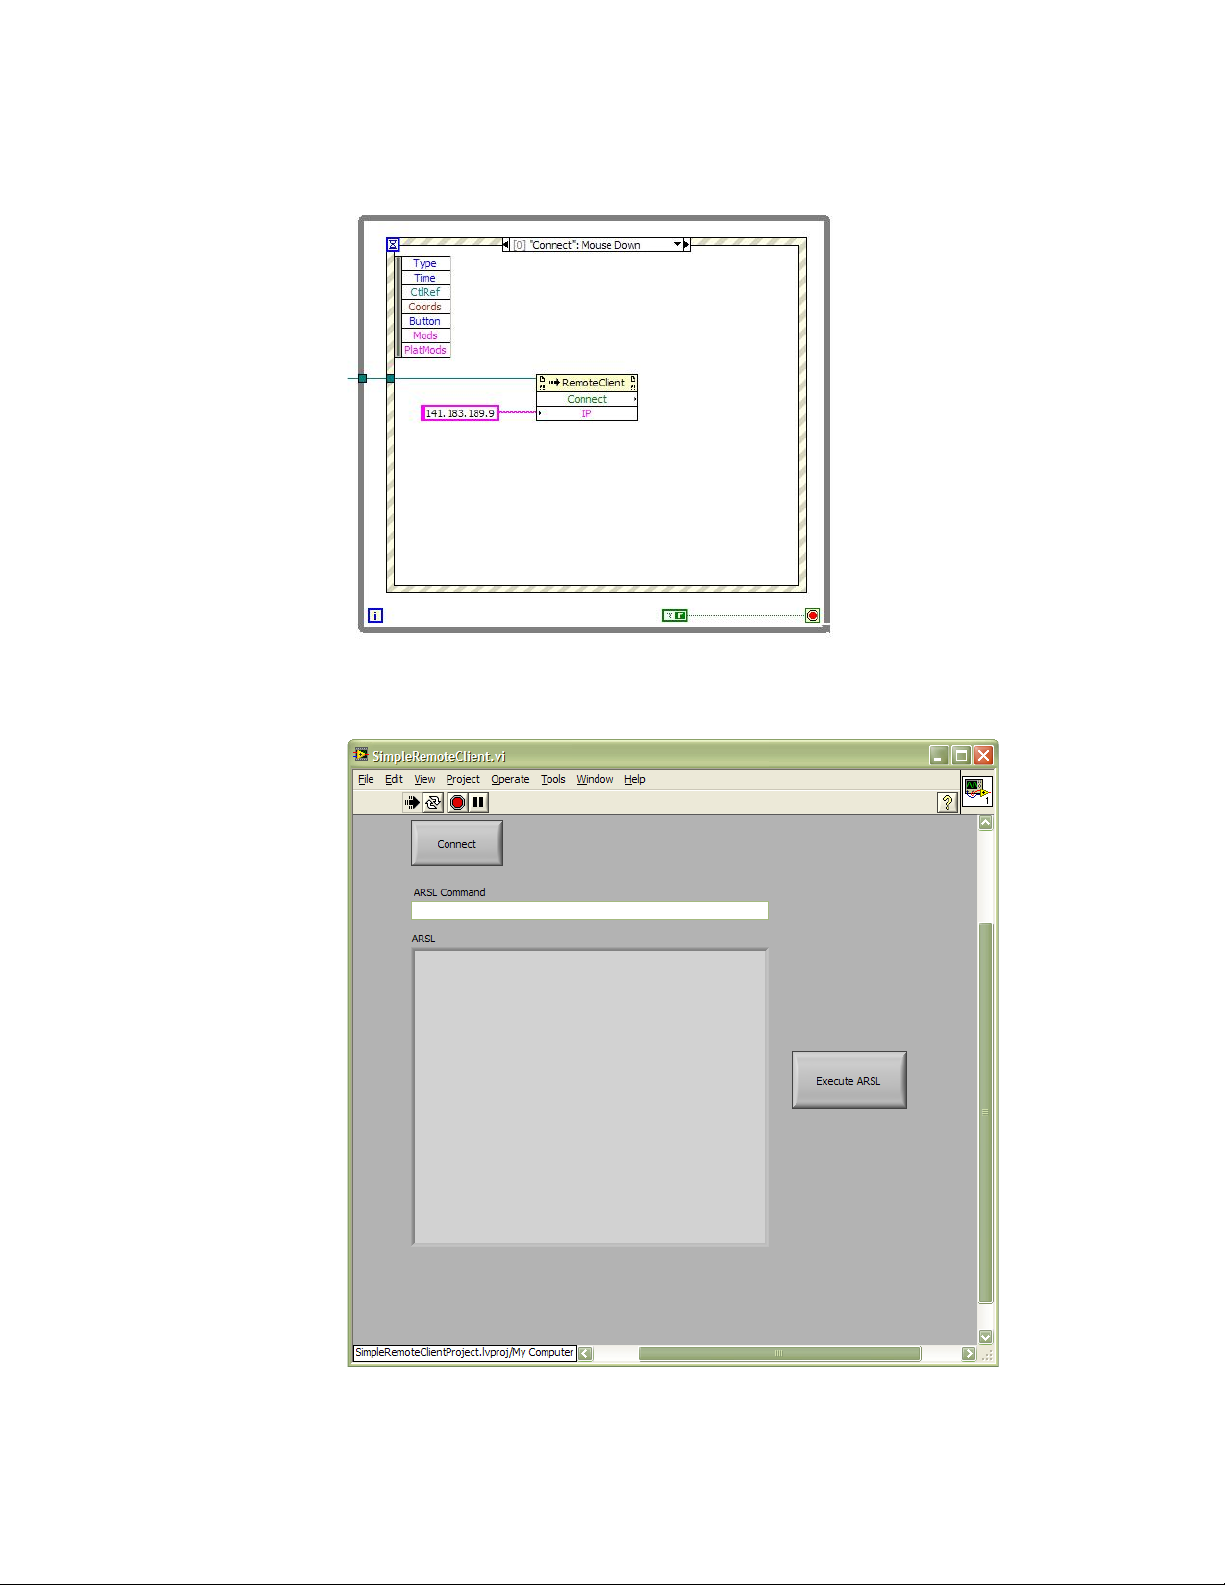
12 Launch the program. You should see the following screen:
13 Click Connect.
Keysight DigitalTestApps Programming Guide 27
Page 28

2 Using Sample Remote Clients
14 Enter the ARSL Command string.
15 Click Execute ARSL.
Observe the indicator for the status/return value of the ARSL Command
executed.
28 Keysight DigitalTestApps Programming Guide
Page 29
LabVIEW Demo Remote Client
Now take a look at a more advanced client that demonstrates the use of the
LabVIEW programming environment to control an automated test application. See
"On the Client" in the Keysight DigitalTestApps Programming Getting Started
guide for a list of minimum requirements.
1 Using Windows Explorer, browse to the toolkit installation directory that
corresponds to the remote interface version supported by the automated test
application you wish to control.
2 In the "Agilent-Keysight Transition\Source" subdirectory, locate the "LabView\
Demo Client" folder. Copy its contents to "c:\LabView" on your computer.
3 In the "Agilent-Keysight Transition\Tools" subdirectory, locate the "LabView
Remote Adapter" folder. Copy its contents to "c:\LabView".
4 Copy the application file Agilent.Infiniium.AppFW.Remote.dll (see "On the
Client" in the Keysight DigitalTestApps Programming Getting Started guide) to
"c:\LabView".
Using Sample Remote Clients 2
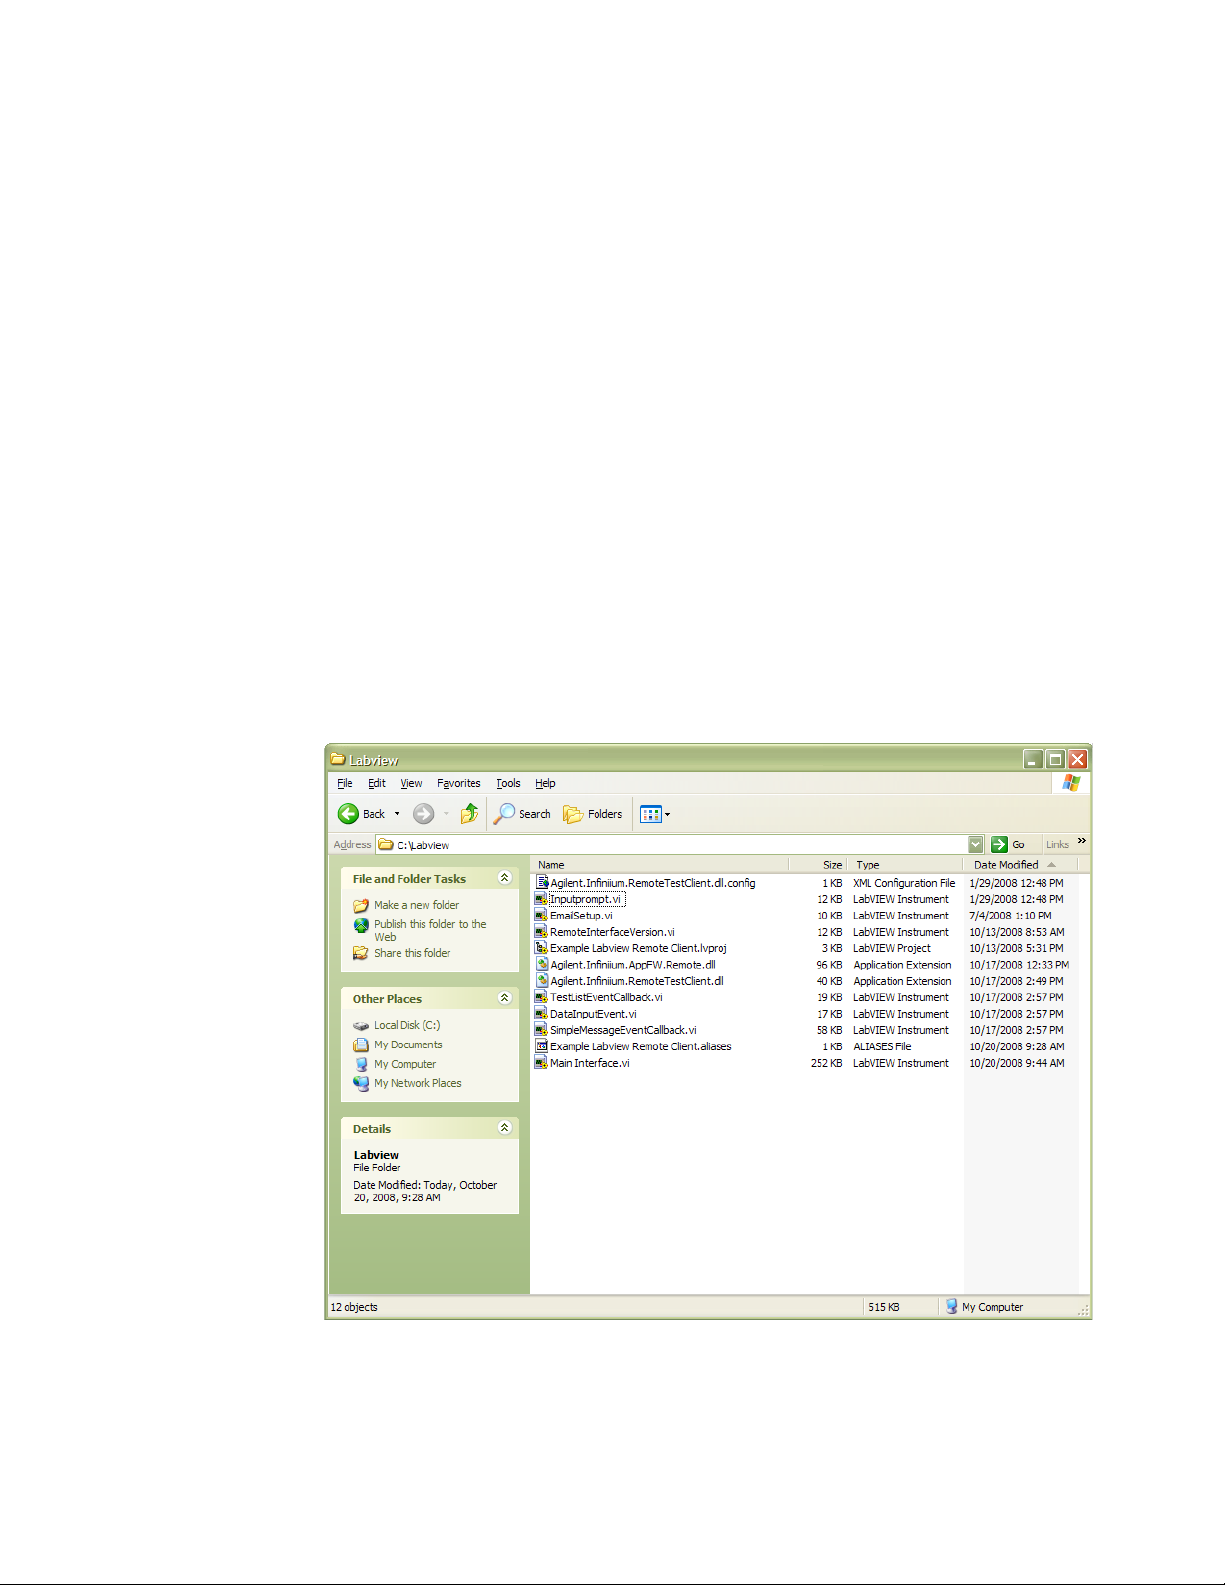
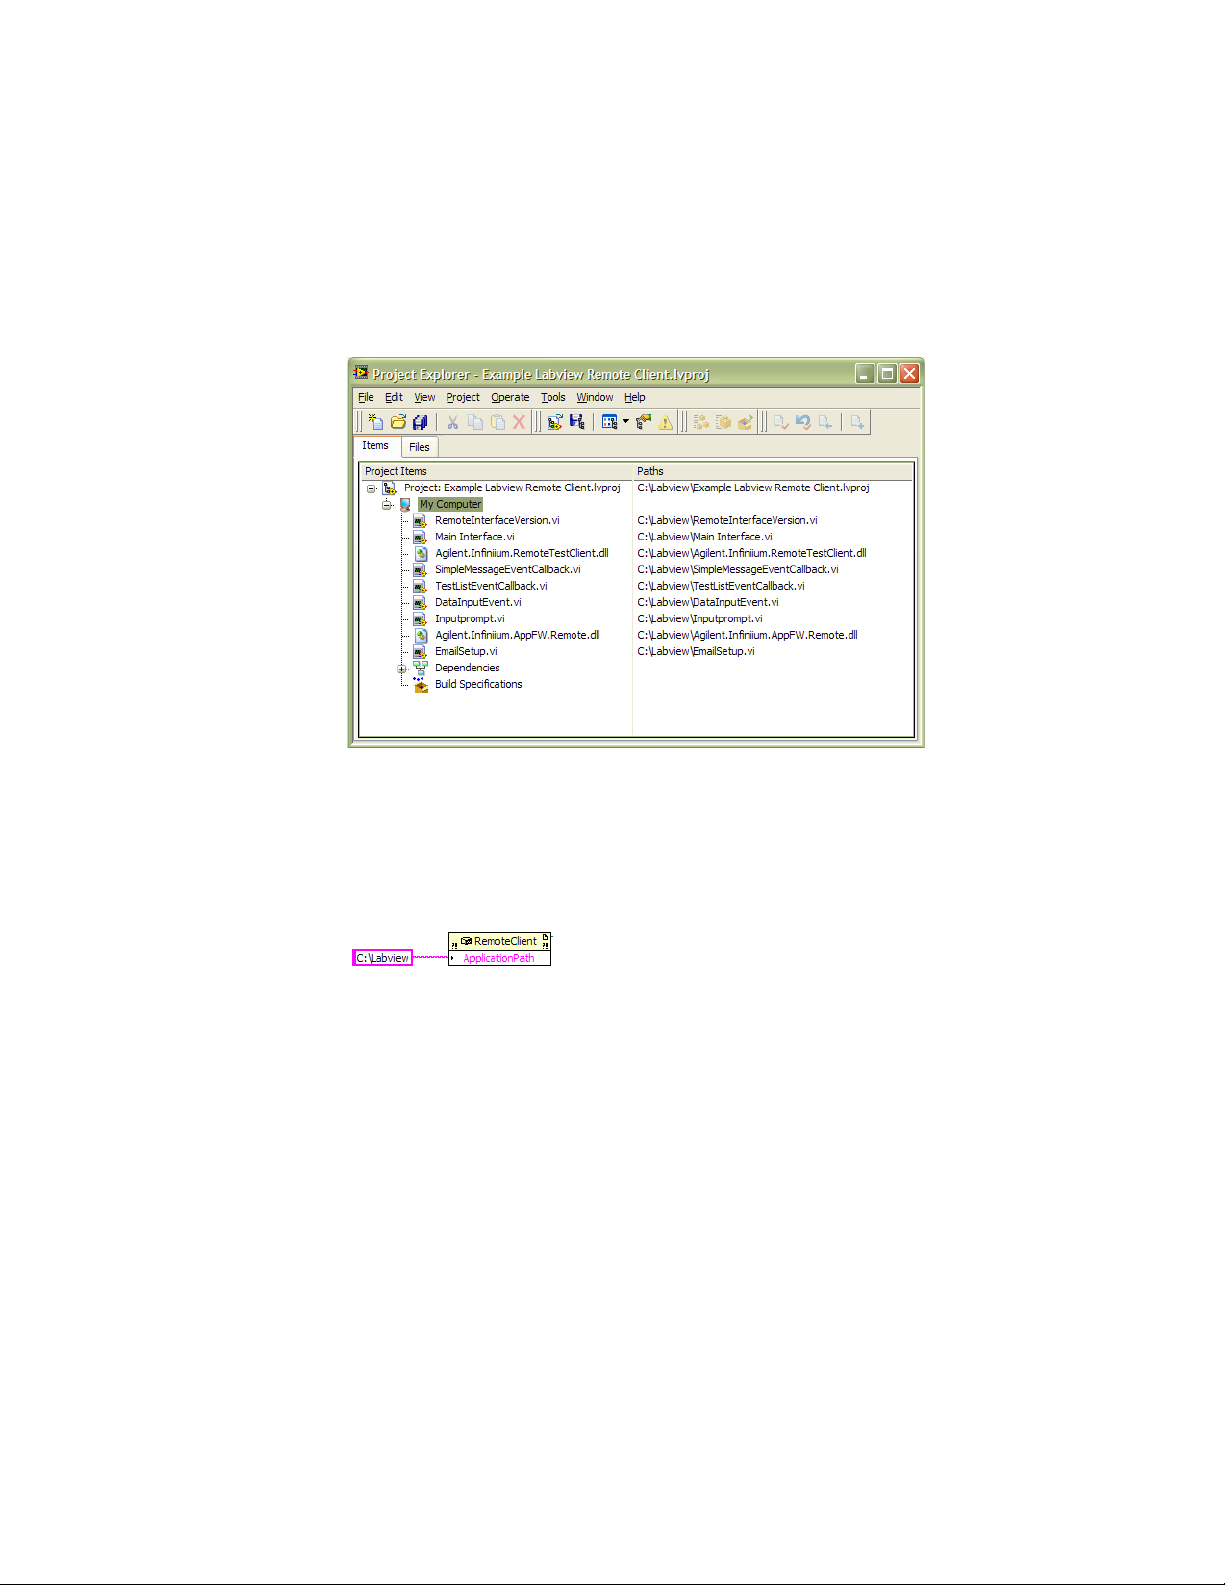
5 The folder on your computer should now look like this:
6 Ensure your configuration meets the minimum requirements listed in "On the
Server" in the Keysight DigitalTestApps Programming Getting Started guide.
Keysight DigitalTestApps Programming Guide 29
Page 30
2 Using Sample Remote Clients
7 Get the IP address of your oscilloscope. This may be obtained by displaying the
"GPIB Setup" dialog via the "Utilities" menu on the oscilloscope.
8 Open the file "Example Labview Remote Client.lvproj".
9 In the LabView Project Explorer, open the file "Main Interface.vi".
10 Before launching the example program, the path for the working directory
needs to be changed. Change the path to point to the directory where both the
Agilent.Infiniium.AppFW.Remote.dll and Agilent.Infiniium.RemoteTestClient.dll
are located.
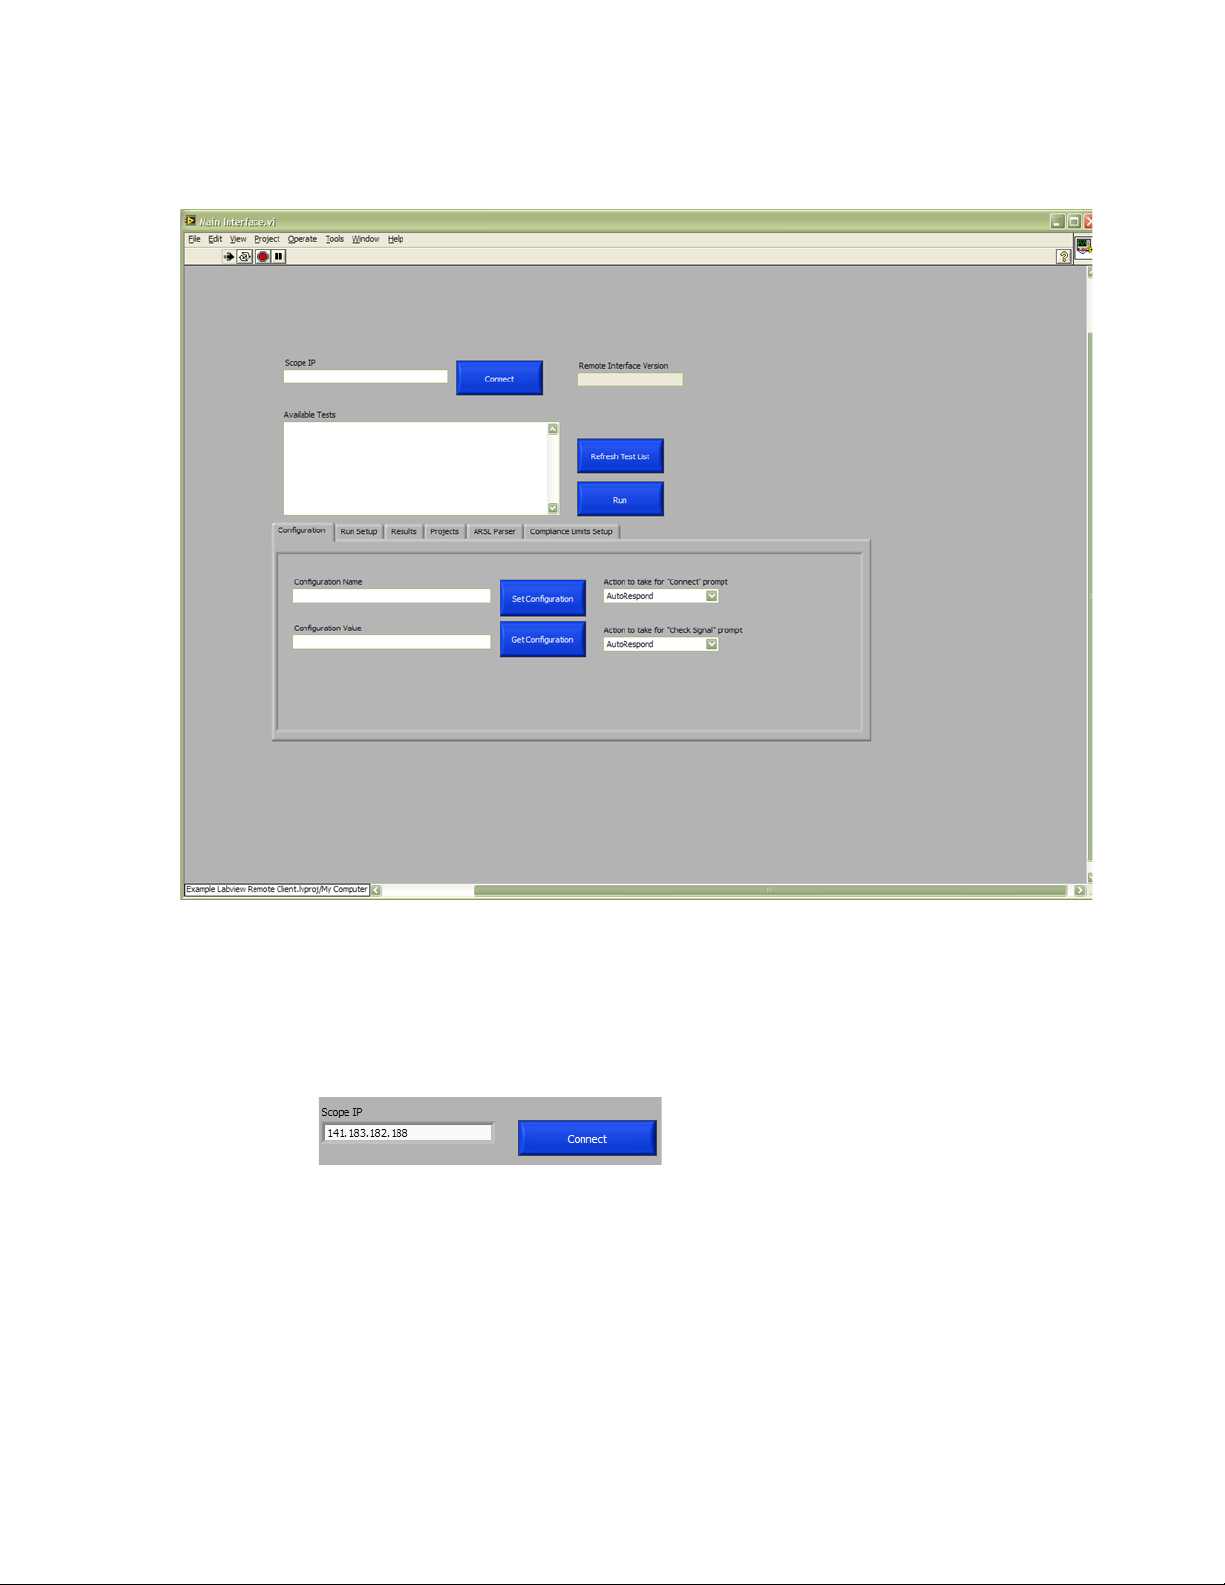
11 Launch the program. You should see the following screen:
30 Keysight DigitalTestApps Programming Guide
Page 31
Using Sample Remote Clients 2
Connecting to the Automated Test Application
Enter the IP address of the oscilloscope where the Automated Test Application is
running; then, click Connect.
Keysight DigitalTestApps Programming Guide 31
Page 32
2 Using Sample Remote Clients
Selecting/Running Tests
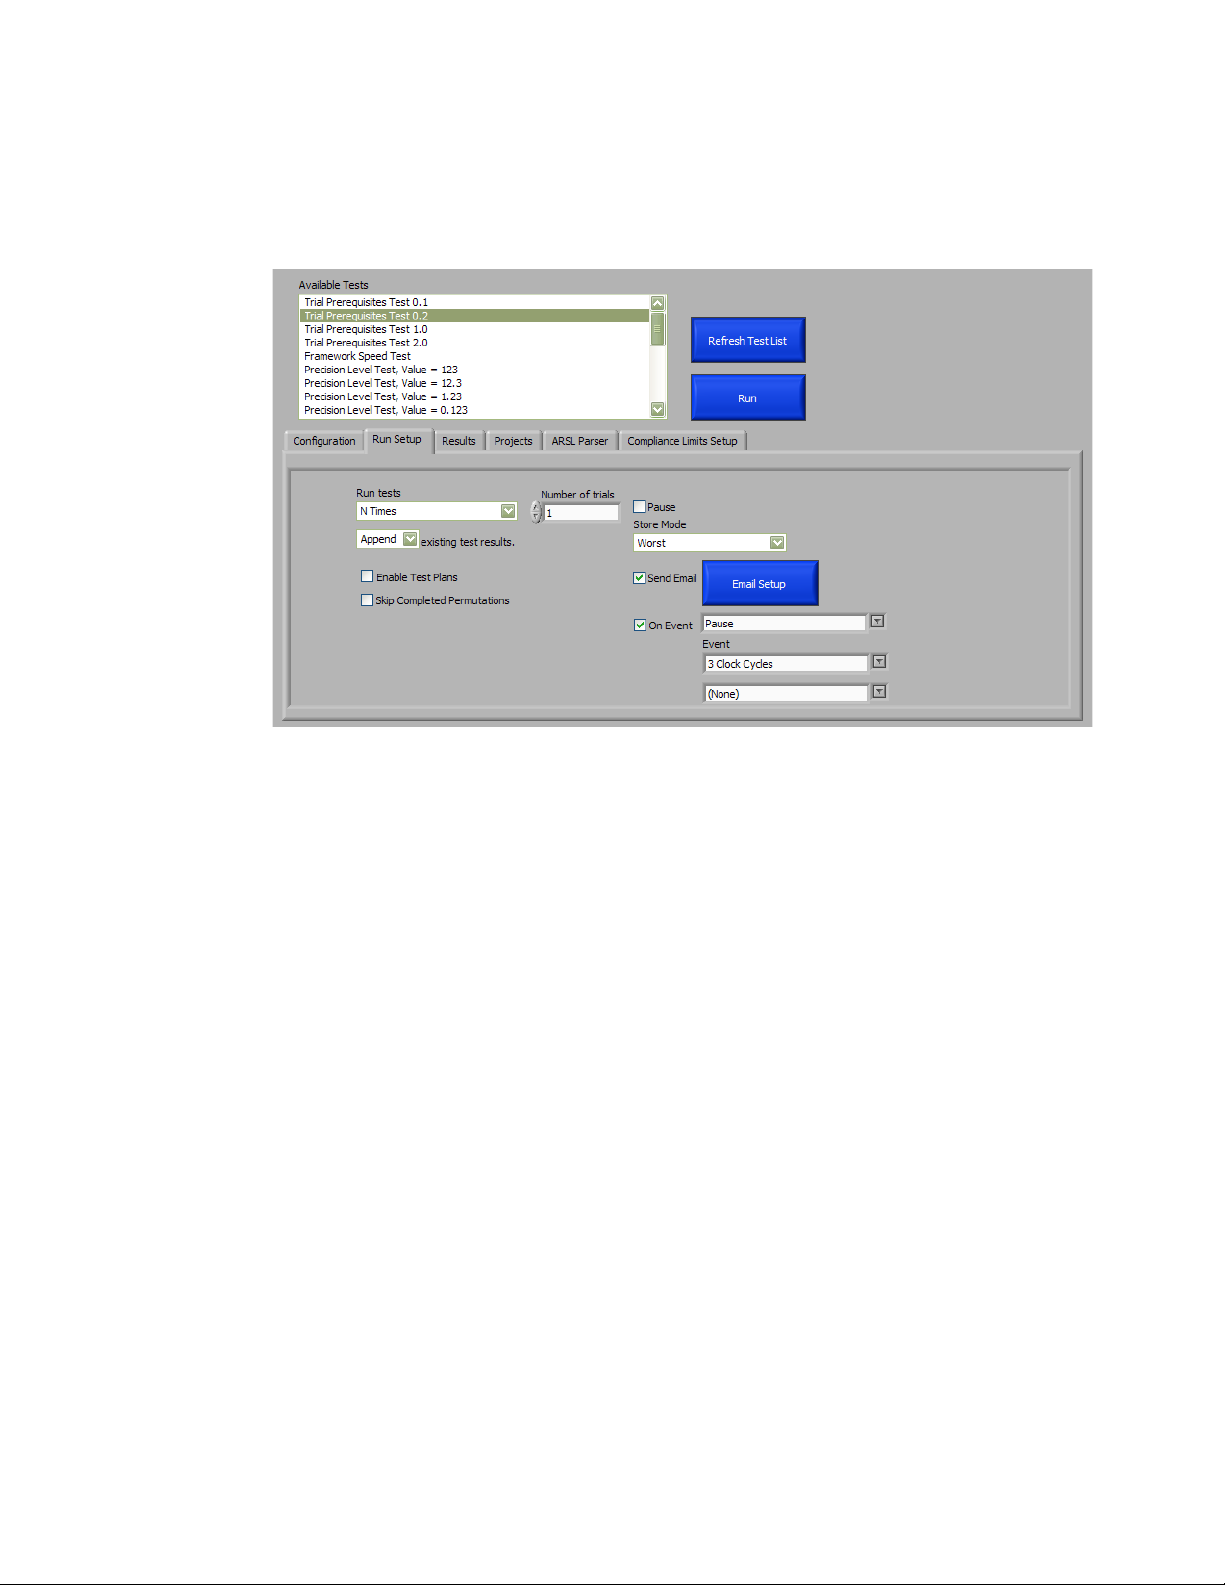
Select the tests to run from the list box; then, click Run to start the tests. If you
select multiple tests, they will run one after another. The list of available tests
Test Plans When a remote application supports the Test Plan feature, check Enable Test Plans
Results Select the preferred Store Mode for keeping track of the test results such as worst
Events In order for the application to react to a particular event of interest, check On Event
E-mail Check Send Email to enable email sending when tests have completed execution or
depends on the current configuration setting.
The number of trials to run for the selected tests can be changed via the spinner
control.
Click Refresh Test List to update the choice of tests available.
to run the tests with it. Check Skip Completed Permutations to skip all completed
permutations of the Test Plan feature.
trials, best trials, last N trials, and events. Existing test results may be Replaced or
have new results Appended to them. Refer to "Keysight DigitalTestApps Remote
Interface for .NET.chm" for more details on the different store modes available.
and select the action to be taken when that event occurs. Select the Event of
interest, there can be up to 2 events at a time. The choice of the 1st event would
affect what is available as the 2nd choice. Note that certain events are only
applicable to specific automated test applications.
aborted.
32 Keysight DigitalTestApps Programming Guide
Page 33
Set/Get Configuration
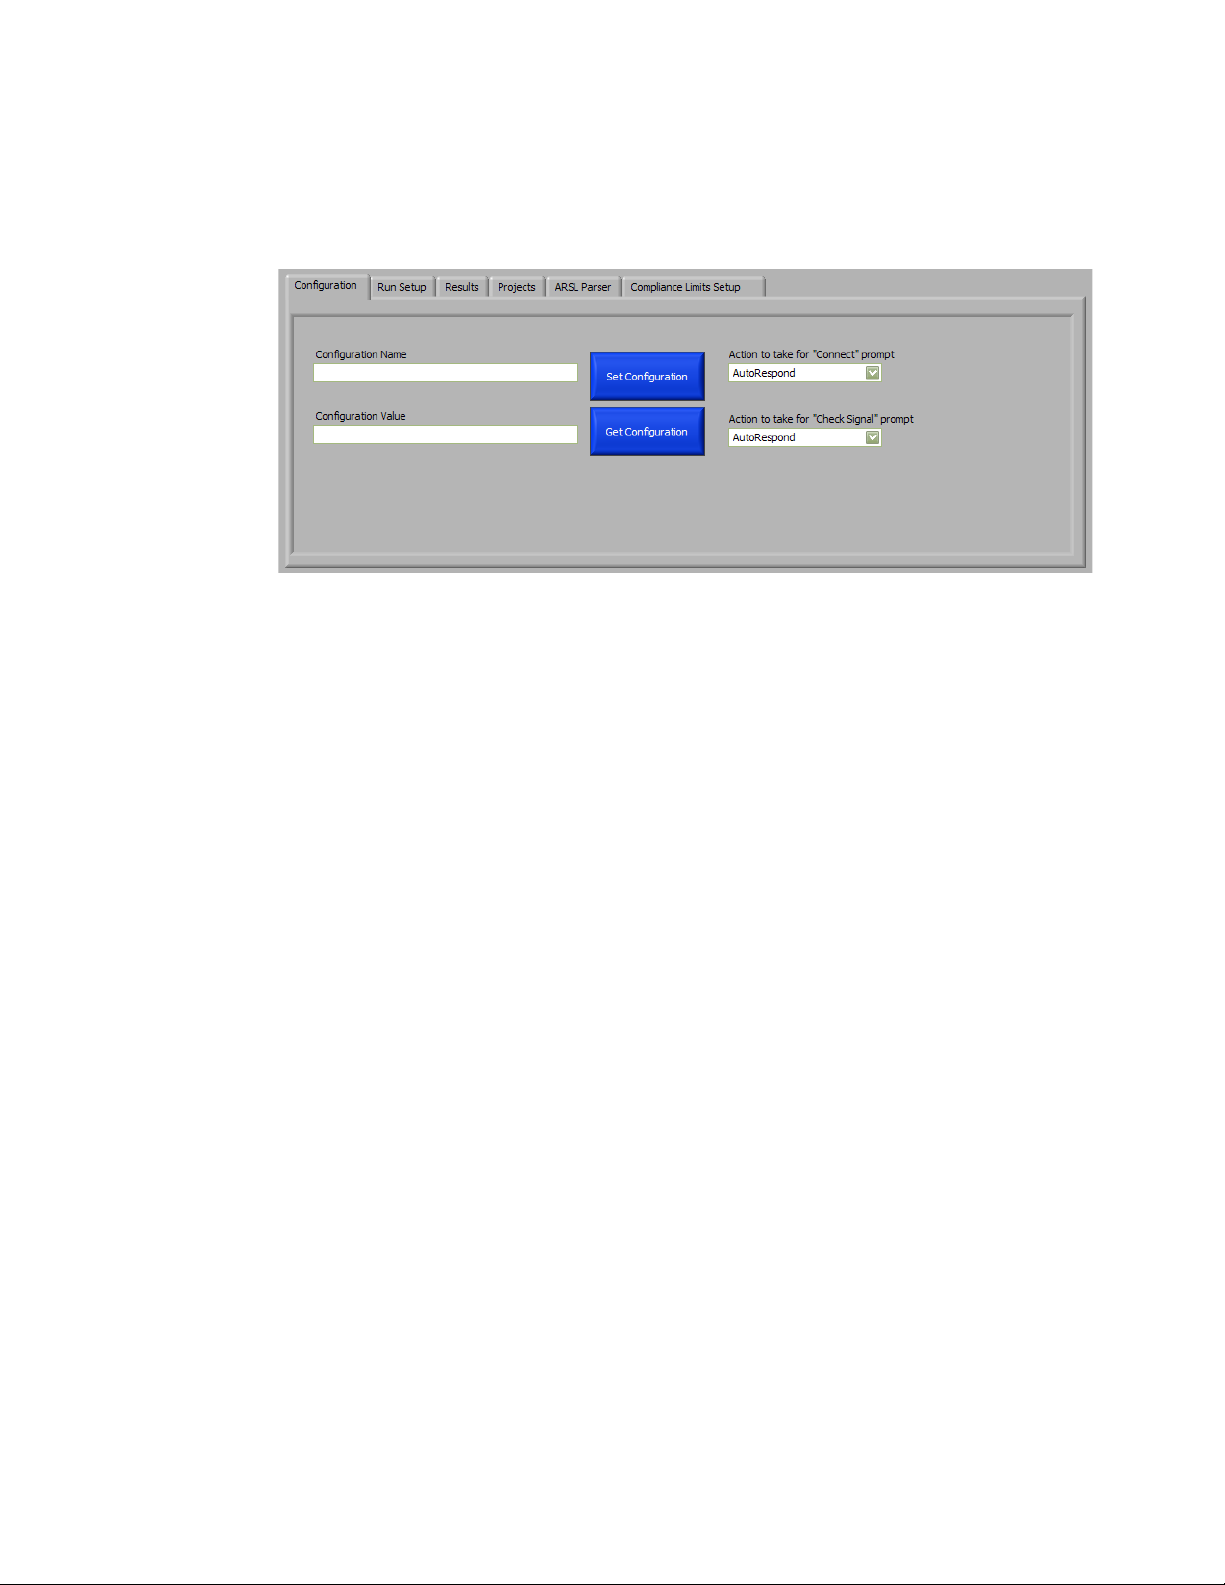
To set an automated test application configuration value, enter the "Configuration
Name" and "Configuration Value" in the appropriate text boxes and click Set
Configuration.
Using Sample Remote Clients 2
To get a configuration value from the automated test application, enter the
Configuration Name in to the appropriate text box and click Get Configuration. The
value for that variable will be displayed in the "Configuration Value" text box.
Refer to the individual automated test applications and framework guide for the
available configurations.
Select the preferred action to be taken whenever the application requests for a
change in the physical set up. Refer to "Keysight DigitalTestApps Remote Interface
for .NET.chm" for more details on the individual actions.
Select the preferred action to be taken whenever the application checks the signal
before execution of a test. Refer to "Keysight DigitalTestApps Remote Interface for
.NET.chm" for more details on the individual actions.
Keysight DigitalTestApps Programming Guide 33
Page 34
2 Using Sample Remote Clients
Obtaining Results
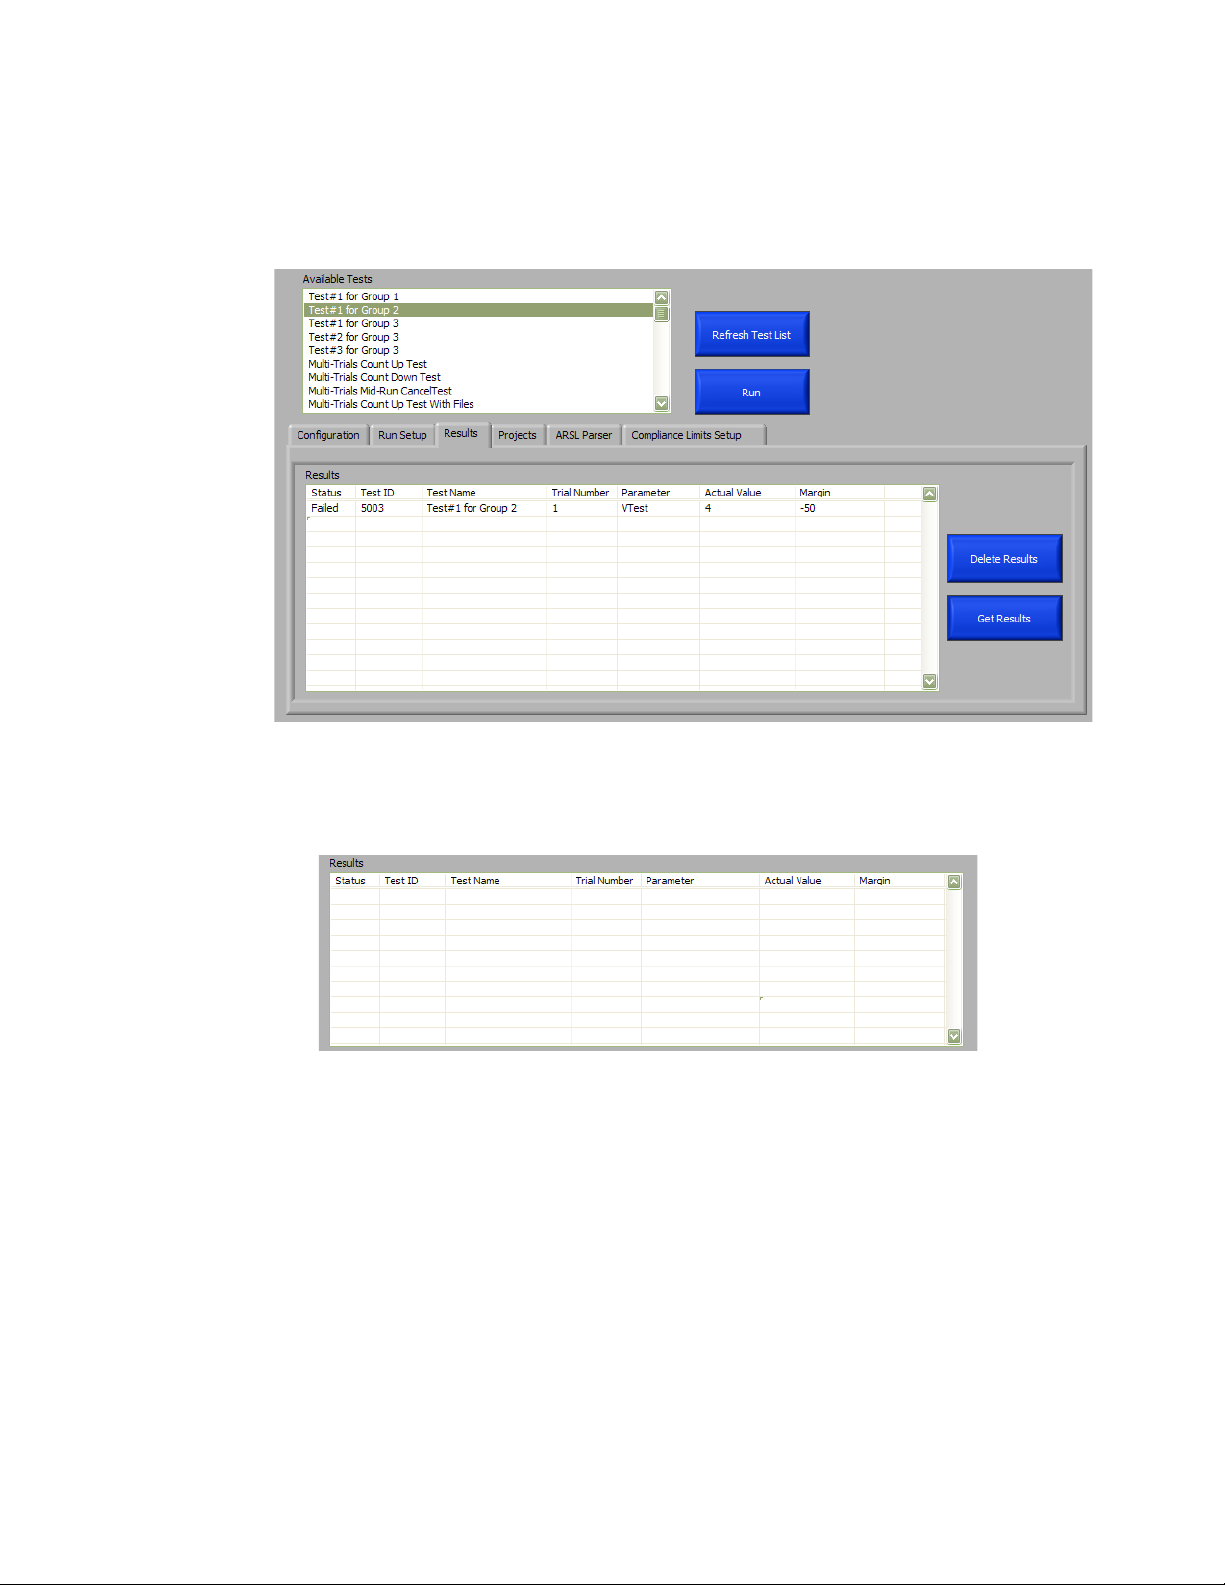
Select the tests from the list box, and click Get Test Resul ts to view the results. The
results will be displayed in the following table:
The following attributes are displayed for each selected test:
1 Status – Pass / Fail.
2 Test Name.
3 Test ID.
4 Trial Number.
5 Parameter that was measured.
6 Value of the measurement.
7 Passing margin.
If a test with no result is selected, the "Parameter Name" column displays "No
Results".
34 Keysight DigitalTestApps Programming Guide
Page 35
Deleting Results
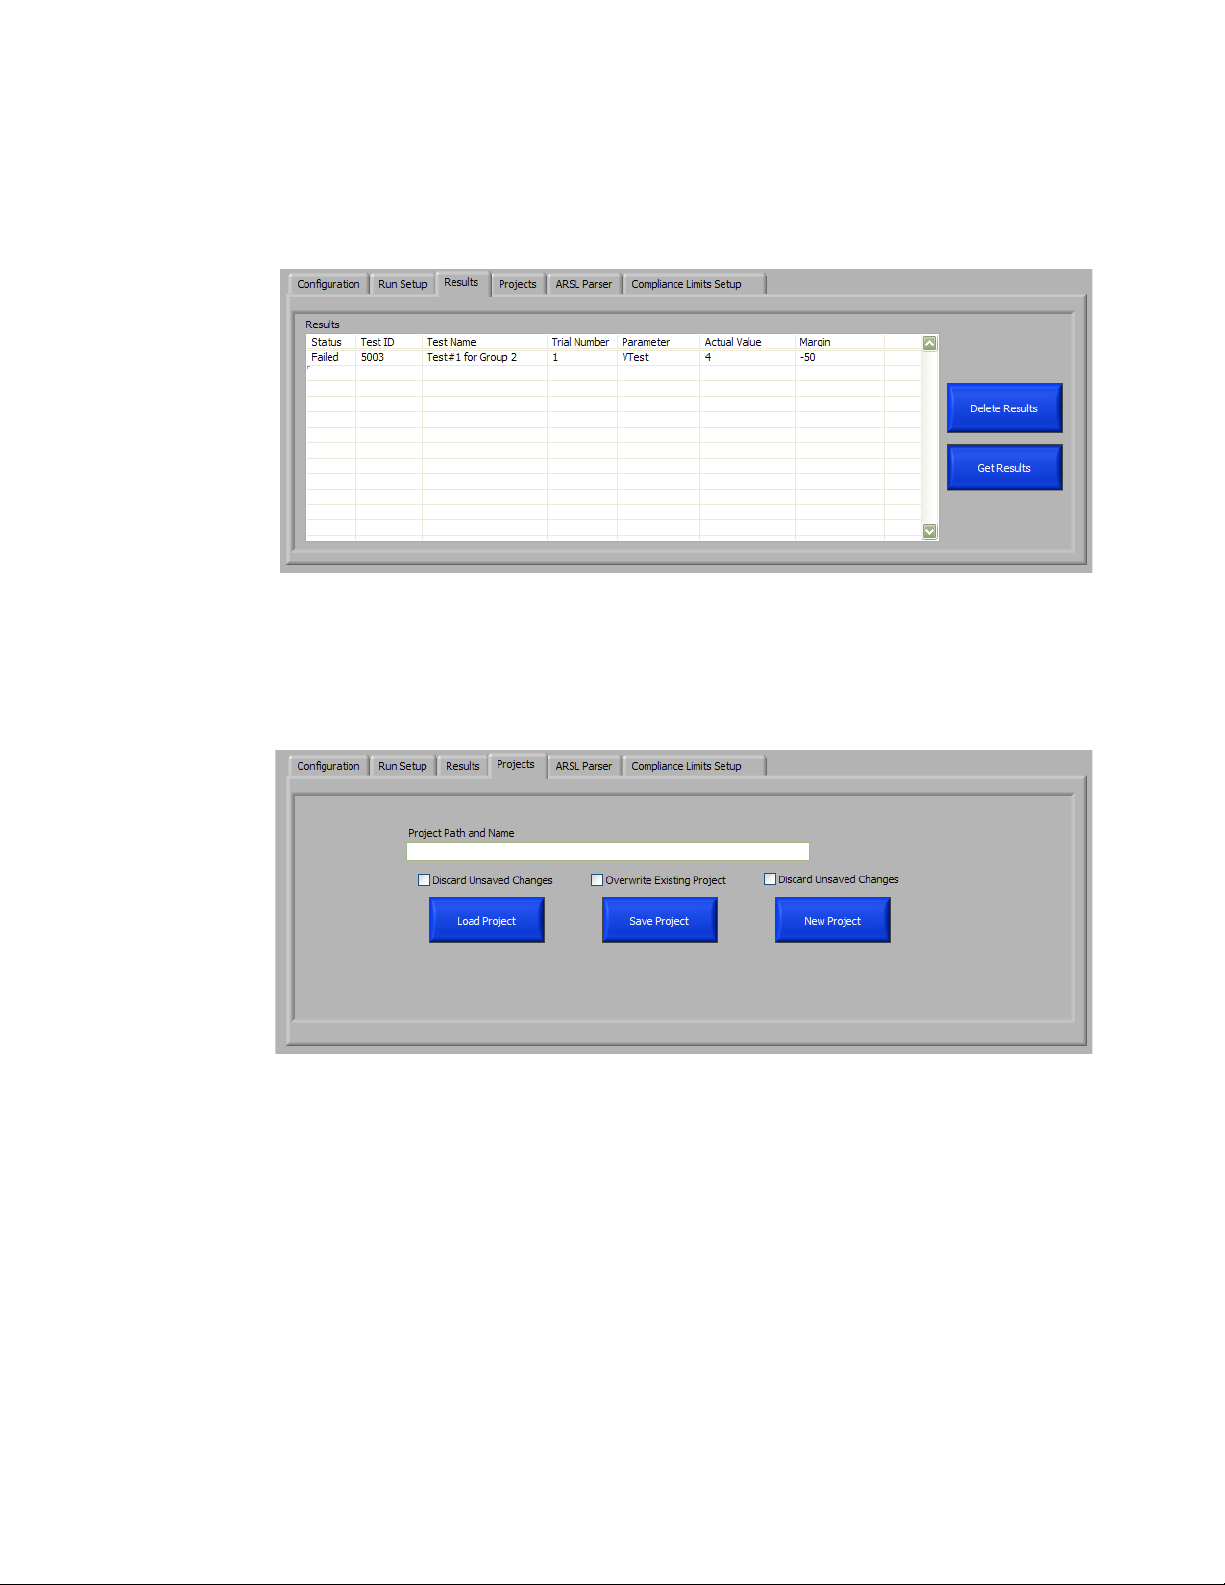
To delete all the results for all tests, click Delete Resul ts.
Using Sample Remote Clients 2
Saving/Loading Projects
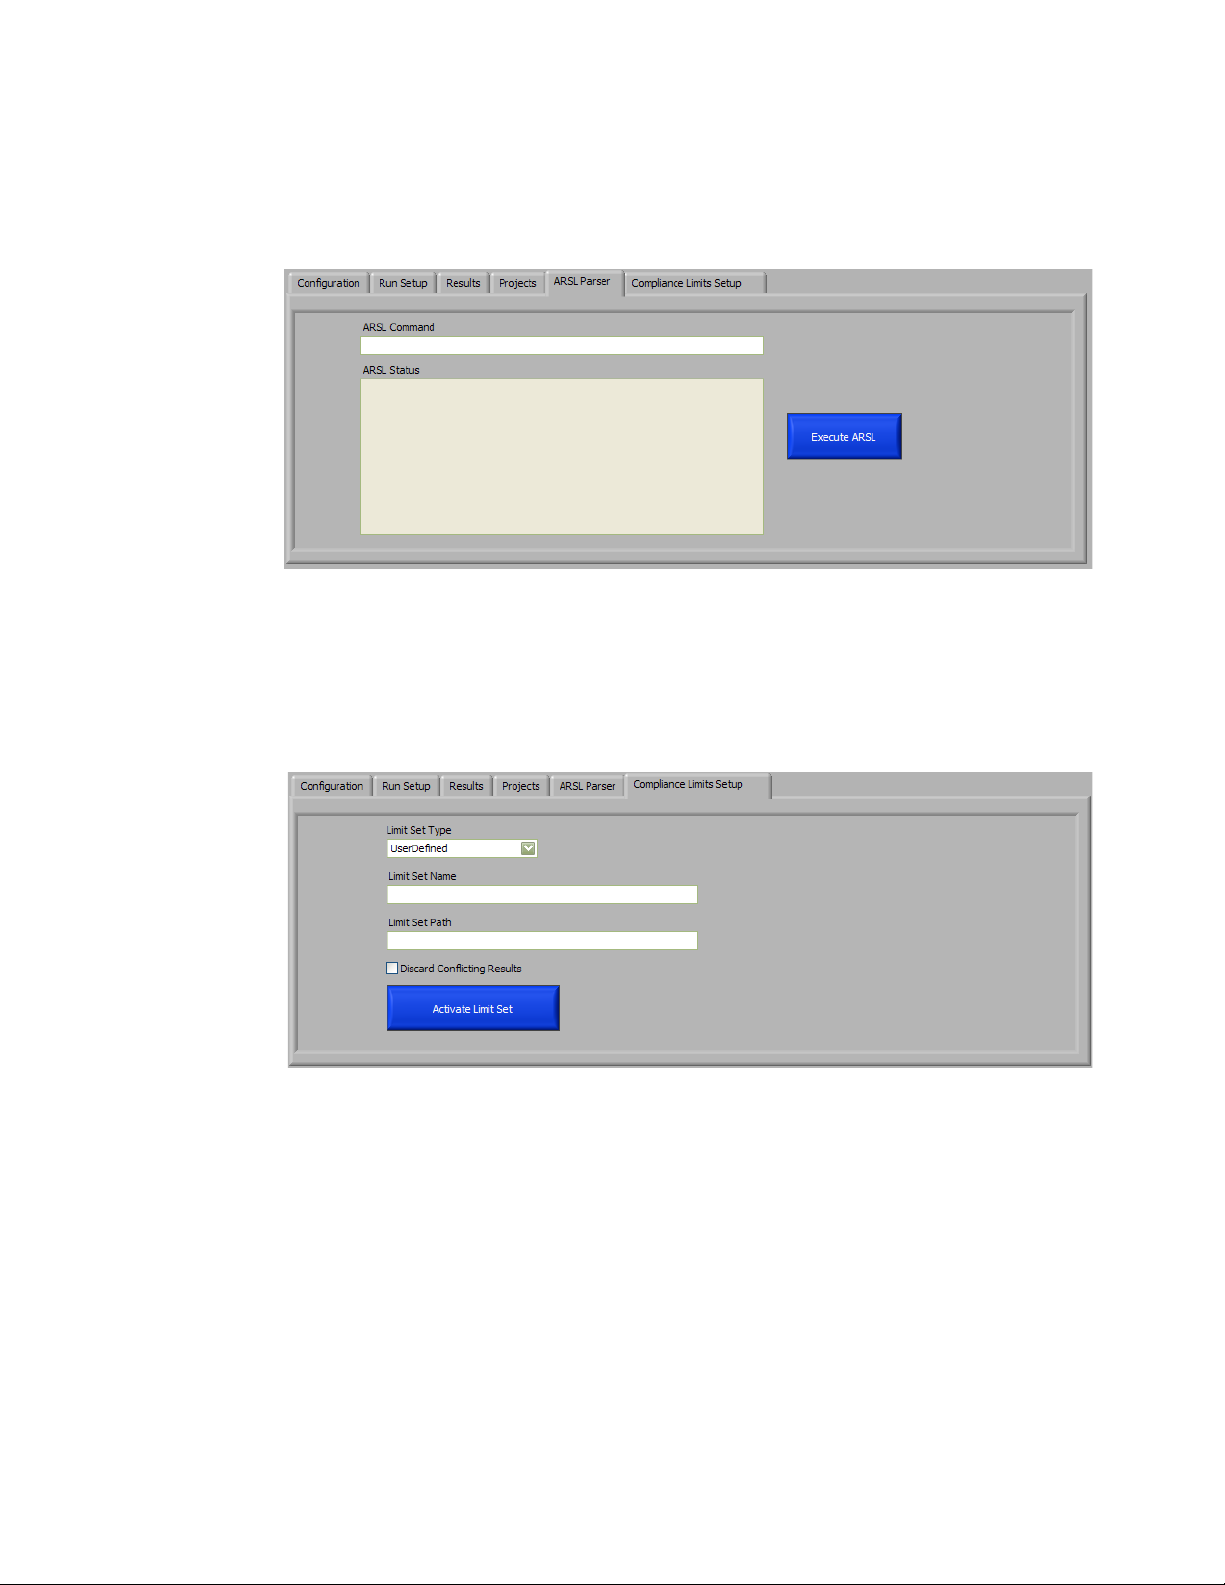
To save a project, enter the full path of the location on the oscilloscope, for
example, C:\TestData\USB\GenericHubDevice; then, click Save Project. The project
is called "GenericHubDevice" and saved at "C:\TestData\USB\
GenericHubDevice". Note that this saves the project on the oscilloscope. Checking
Overwrite Existing Project causes a project already saved with the same name to be
overwritten.
To load the project saved in the example above, the path would be "C:\TestData\
USB\GenericHubDevice\GenericHubDevice". Click Load Project to load a previously
saved project. Checking Discard Unsaved Changes loads the selected project,
ignoring all previously unsaved changes for the current project.
To create a new project, click New Project. Checking Discard Unsaved Changes creates
a new project ignoring all the previously unsaved changes for the current project.
Keysight DigitalTestApps Programming Guide 35
Page 36
2 Using Sample Remote Clients
ARSL
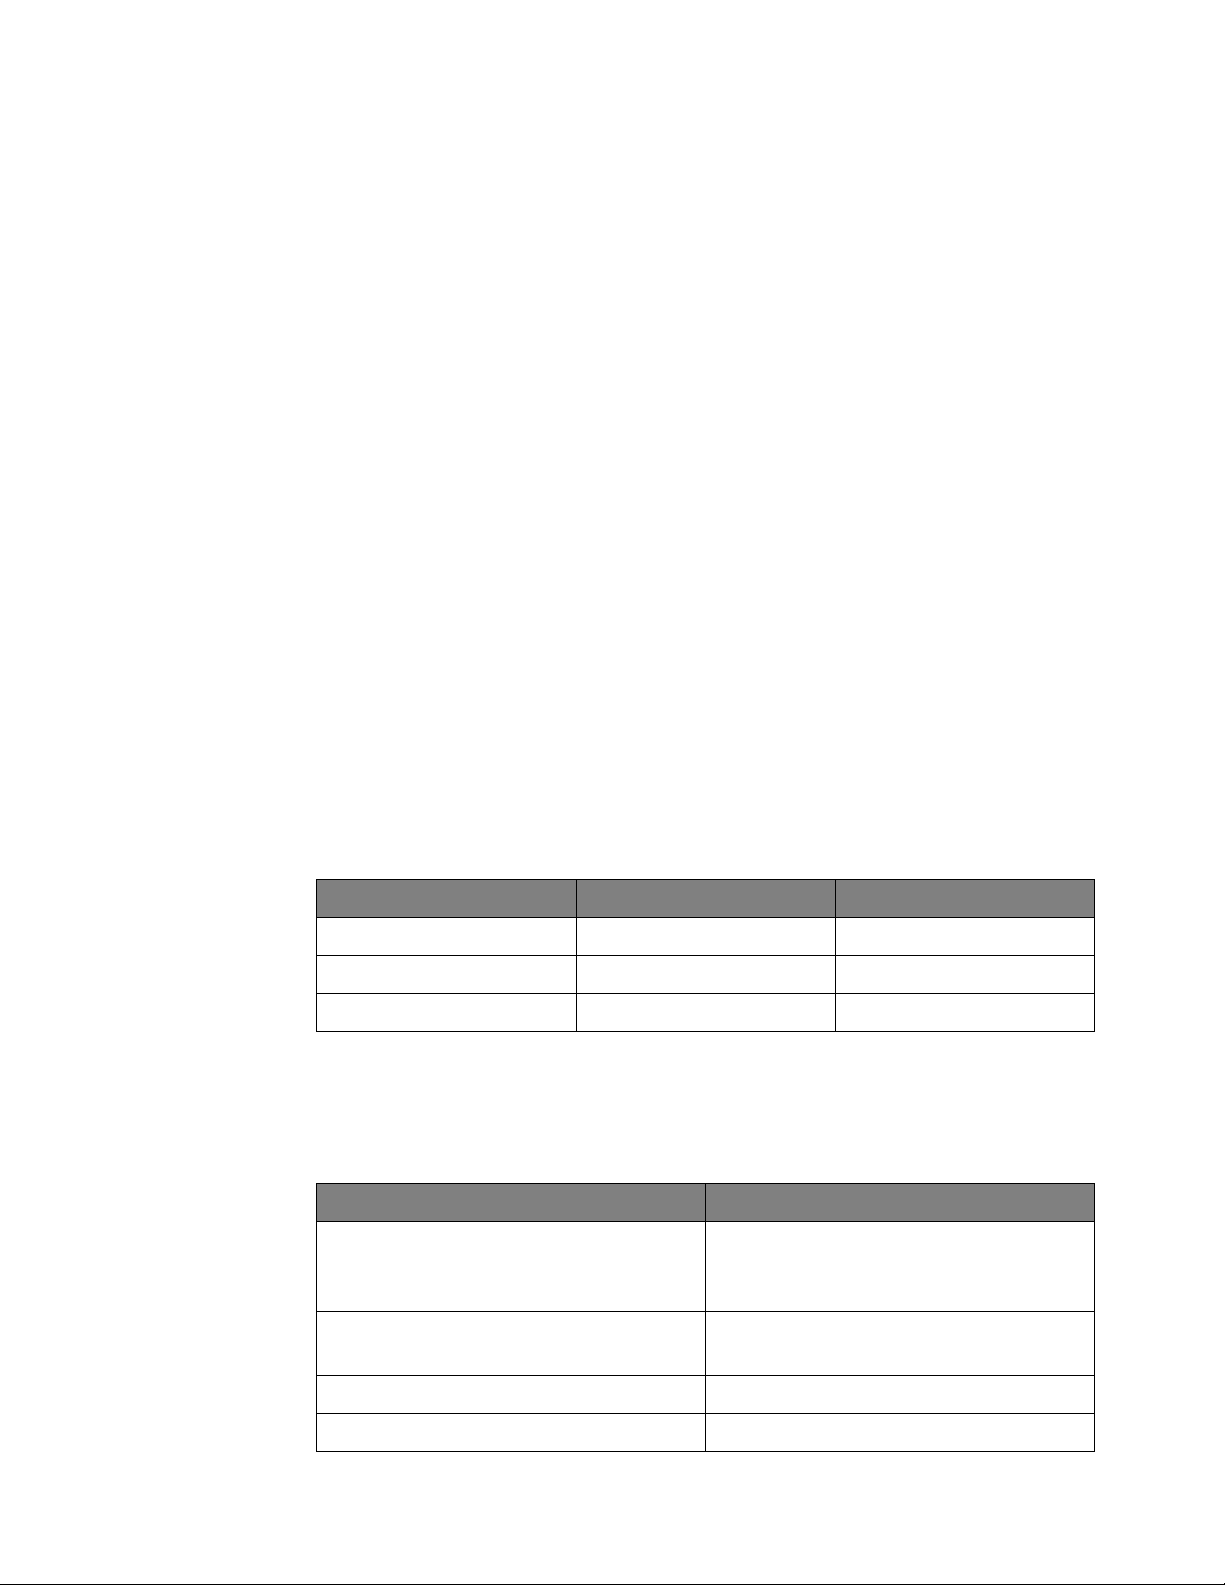
Enter the ARSL command and click Execute ARSL. The results are displayed in the
ARSL Status box.
Compliance Limit Set
Select the Limit Set Type of choice and provide the Limit Set Name and Limit Set Path
(the path setting is only applicable for UserDefined limits). Check Discard Conflicting
Results to remove all conflicting results when a limits set is activated.
36 Keysight DigitalTestApps Programming Guide
Page 37

Keysight DigitalTestApps
Programming Guide
3 Remote Programming
Languages and Sample Code
The Automated Test Remote Scripting Language (ARSL) / 38
Microsoft .NET / 46
Python / 55
This chapter describes some of the languages you may use to program an
automated test application, and provides code snippets to demonstrate language
use.
37
Page 38
3 Remote Programming Languages and Sample Code
The Automated Test Remote Scripting Language (ARSL)
Sometimes it is more convenient to access the automated test application remote
interface using a textual syntax rather than the standard property/method call
syntax. This is possible by using a command language called the Automated Test
Engine (ATE) Remote Scripting Language, or "ARSL". The ARSL Command Line
Utility (described in "ARSL Command Line Utility" on page 16) takes advantage of
this capability to present an easy-to-use textual interface to an automated test
application.
The ARSL interface is implemented by using a method provided by the standard
.NET remote interface: "ExecuteArsl()". This method takes one parameter: the
textual remote interface command.
Here are some C# examples:
// Get ATE remote interface object
IRemoteAte remoteAte = RemoteAteUtilities.GetRemoteAte(ipAddress);
// Perform the property query "ApplicationName"
string appName = remoteAte.ExecuteArsl("ApplicationName?");
// Perform the method call "SetConfig(variable,value)"
remoteAte.ExecuteArsl("SetConfig Speed Fast");
The argument in the ExecuteArsl call is the ARSL command. Remote interface
members may be translated into ARSL using the following conversion rule map:
Action .NET Syntax ARSL Syntax
Property query var = PropertyName; PropertyName?
Property set PropertyName = val; PropertyName val
Method call MethodName(arg1,arg2); MethodName arg1 arg2
In ARSL, property set and method call arguments are separated by spaces. If the
argument contains reserved characters (spaces, single quotes, or double quotes),
you must surround the value accordingly:
Argument Legal ARSL formats
Ab Ab
'Ab'
"Ab"
A b 'A b'
"A b"
A'b "A'b"
A"b 'A"b'
38 Keysight DigitalTestApps Programming Guide
Page 39

Remote Programming Languages and Sample Code 3
You can also use ARSL to set properties whose types are custom types and to call
methods that take custom type parameters:
PropertyName "property1=value;property2=value"
MethodName "property1=value;property2=value"
This technique results in the following:
1 An object of the type required by the property or method is created
2 The object is modified by setting the its specified properties to the specified
values
3 The modified object is then used to set the property or is passed to the method.
The following examples should make this more clear:
.NET Syntax
------------------
SomeOptions options = new SomeOptions();
options.Option1 = "a";
options.Option2 = "b";
remoteAte.Foo(options);
ARSL Syntax
-------------------
Foo Option1=a;Option2=b
The ARSL parser will automatically detect that Foo requires a parameter of type
SomeOptions and will then construct one. It will then set the two specified
properties on the SomeOptions object and finally pass this object as a parameter
to the Foo method.
Note that, in this syntax, multiple property sets are separated by a semicolon. In
the example above, the option set statements did not contain any spaces, so the
pair did not need to be enclosed in quotes.
In the examples below, the option set statements contain a space and thus need to
be enclosed in quotes:
Foo 'Option3=A b'
Foo "Option3=A b"
Foo "Option1=A b;Option2=c"
Example Code
The following ARSL code snippets demonstrate property actions and method
invocations:
# Property actions
# ----------------
# Read the remote interface version
RemoteInterfaceVersion?
# Prevent these dialogs from displaying during run
SuppressSimpleMessages true
Keysight DigitalTestApps Programming Guide 39
Page 40
3 Remote Programming Languages and Sample Code
NOTE
# Method invocations
# ------------------
# Set one of the application's user-configurable options
SetConfig speed fast
# Save the current configuration
SaveProject myProjectName
In addition, some property actions and method calls use custom types defined by
the automated test application. Custom types are classes containing the required
data. The following code snippets are examples of this:
# Custom property types
# ---------------------
# Query
ExistingResultsAction?
#Set
ConnectionPromptAction AutoRespond
# Custom types used in methods
# ---------------------------SaveProjectCustom "Name=MyProject;BaseDirectory=d:\
MyProjects;OverwriteExisting=true"
GetResults
Common Tasks
Here are common tasks you may want to perform in your programs. When there is
more than one way to accomplish the task, alternatives are listed with a usage
hint. For more information on each of the commands mentioned below, see the
help file, "Keysight DigitalTestApps Remote Interface for .NET", located in the
same directory as this programming guide.
If a method demonstrated below does not enable you to customize the action as desired,
check the command help file to see if there is a similarly named "XxxCustom" method that
provides more flexibility.
• "Launching the automated test app" on page 41
• "Suppressing message prompts" on page 41
• "Configure settings found on the application's 'Set Up' and 'Configure' tabs"
on page 41
• "Select tests to be run" on page 42
• "Run Tests" on page 42
• "Get Results" on page 42
40 Keysight DigitalTestApps Programming Guide
Page 41

Remote Programming Languages and Sample Code 3
• "Save the project" on page 42
• "Start a new project" on page 43
• "Open a project" on page 43
• "Exiting the automated test app" on page 43
Launching the automated test app
• Manually. Use any time.
Infiniium automated test apps: Use the oscilloscope menu: Analyze > Automated
Test Apps > (AppName)
FlexDCA automated test apps: Use the oscilloscope menu: Apps > Automated
Test Apps > (AppName)
Automated test apps: On your PC, launch the app using the Start menu or a
shortcut.
• Using remote command. Send this SCPI command to Infiniium or FlexDCA:
:SYSTEM:LAUNCH 'AppName'
Where AppName is the name exactly as it appears in the menu system (see
alternative above).
Suppressing message prompts
• Suppress "OK button" message prompts of type "Info", "Warning", or "Error".
Use any time.
SuppressSimpleMessages true
• Suppress "OK/Cancel button" messages that ask you to enter a value. Use only
if the application has defined a default value for that prompt; otherwise test will
be aborted.
SuppressDataInputMessages true
• Suppress connection prompts. Use any time.
ConnectionPromptAction AutoRespond
• Suppress "Signal Missing" prompts. Use any time.
SignalCheckFailAction AutoRespond
• Suppress all of the above. See above for appropriate usage.
SuppressMessages true
Configure settings found on the application's 'Set Up' and 'Configure' tabs
SetConfig 'variableName1' 'value1'
Keysight DigitalTestApps Programming Guide 41
Page 42

3 Remote Programming Languages and Sample Code
Select tests to be run
• Select all of the tests currently shown on the application's 'Select Tests' tab.
Use any time.
SelectAllTests
• Select a subset of the available tests. Use any time.
SelectedTests = 123,456,etc.
Run Tests
• With defaults. Use any time.
Run
• With options. Use when you want to override the user preferences currently
active in the target application.
RunCustom 'StopRunIfTestAborts=true'
Get Results
• Quick overall result. Use any time.
Passed?
• Get full details for all existing test results. Use any time.
GetResults
• Get a subset of all available results. Use any time.
GetResultsCustom 'TestIds=123,456;IncludeCsvData=true'
• CSV report. Use when you want CSV results in a separate file. File "results.csv"
will be located inside the project.
ExportResultsCsv
SaveProject 'Project1'
• CSV text. Use when you want to see the CSV results on the remote client.
GetResultsCustom 'IncludeCsvData=true'
•HTML Report.
The .html file is located in the saved project.
Save the project
• Using default location property. Use when that location does not already have a
project by the same name (although re-saves to the same location are allowed).
SaveProject 'Project1'
• Using options. Use any time.
42 Keysight DigitalTestApps Programming Guide
Page 43

Remote Programming Languages and Sample Code 3
NOTE
SaveProjectCustom Name=Project1;BaseDirectory=c:\...\
MyProjectDir;OverwriteExisting=true'
Start a new project
• Checking method. Use when you want to be warned when unsaved results
exist.
NewProject false
• Forced method. Use when you always want this command to complete
(unsaved results will be discarded).
NewProject true
Open a project
• Using default location. Use when you want to be warned when unsaved results
exist.
OpenProject 'Project1'
• Using options. Use any time.
OpenProjectCustom 'FullPath=c:\...\MyProjectDir\
Project1;DiscardUnsaved=true'
Exiting the automated test app
• Safer method. Use when you do not want to risk losing unsaved results (action
will fail if unsaved results exist).
Exit false true
• Forced method. Use when you always want this command to complete
(unsaved results will be discarded).
Exit true true
Example Program
SuppressMessages true
NewProject true
ExistingResultsAction Append
SelectedTests 123
Run
SaveProjectCustom 'Name=MyProjectName;OverwriteExisting=true'
Replace 123 with actual test ID for your application.
See Chapter 1, "Remote Interface Documentation" on page 10, for more
information on getting your application's test IDs.
Keysight DigitalTestApps Programming Guide 43
Page 44
3 Remote Programming Languages and Sample Code
NOTE
NOTE
Advanced Topic: Switch Matrix
The following ARSL code snippets demonstrate how to configure the Switch Matrix
controller.
Using Automatic Mode
SwitchMatrixOn true
SwitchMatrixSelectModeAuto 'Keysight U3020A S26'
SwitchMatrixConnectToInstrument 1 'lan[123.456.7890]:inst0'
If additional drivers were created by the app during execution of
SwitchMatrixSelectModeAuto, simply execute
SwitchMatrixConnectToInstrument again for each driver ID and instrument
address. Each driver must be connected to a separate switch matrix instrument.
Replace 123.456.7890 with the full SICL address or VISA alias of your switch instrument.
Using Manual Mode
SwitchMatrixOn true
SwitchMatrixSelectModeManual
SwitchMatrixAddDriver 'Keysight U3020A S26'
SwitchMatrixConnectToInstrument 1 'lan[123.456.7890]:inst0'
To create an additional driver, simply add these lines:
SwitchMatrixAddDriver 'Keysight U3020A S26'
SwitchMatrixConnectToInstrument 2 'lan[123.456.7890]:inst0'
Each driver must be connected to a separate switch matrix instrument.
Replace 123.456.7890 with the full SICL address or VISA alias of your switch instrument.
Now you need to manually define each signal path, each one starting from the test
point on the Device Under Test, through the switch, and ending with the scope
channel.
Here is an example of a single-ended signal going into scope channel 3:
SwitchMatrixDefineSignalPath 'CLK' 'Driver=1;Slot=1;Input=1' '3'
Here is an example of a differential signal going into a differential probe connected
to scope channel 4:
SwitchMatrixDefineSignalPath 'Strobe+' 'Driver=1;Slot=1;Input=1' '4+'
SwitchMatrixDefineSignalPath 'Strobe-' 'Driver=1;Slot=2;Input=1' '4-'
44 Keysight DigitalTestApps Programming Guide
Page 45
Remote Programming Languages and Sample Code 3
NOTE
Using Either Mode
All that remains is to assign a correction method to each signal path. This is
optional but highly recommended.
Here is an example for one signal path that is using a single-ended probe:
SwitchMatrixSetPathPrecisionProbe 'CLK' '3' 'On=True;Mode=Probe;Calibrat
ion=MyCalName'
Here is an example for one signal path that is using a differential probe:
SwitchMatrixSetPathPrecisionProbe 'Strobe+' '4+' 'On=True;Mode=Probe;Cal
ibration=MyCalName'
With differential probes, you do not separately assign correction to the negative half of the
signal.
Keysight DigitalTestApps Programming Guide 45
Page 46

3 Remote Programming Languages and Sample Code
Microsoft .NET
When you need to access the full capabilities of the remote interface, use a .NET
programming language. This enables your programs to make use of conditional
statements, looping, event subscriptions, return value analysis, and more.
Example Code
The following C# code snippets demonstrate property actions and method
invocations:
// Property actions
// ----------------
// Read the remote interface version
string version = remoteApp.RemoteInterfaceVersion;
// Prevent these dialogs from displaying during run
remoteApp.SuppressSimpleMessages = true;
// Method invocations
// ------------------
// Set one of the applications user-configurable options
remoteApp.SetConfig("speed", "fast");
// Save the current configuration
string fullPath = remoteApp.SaveProject("myProject");
// Custom property types
// ---------------------
// Query
ExistingResultsAction action = remoteApp.ExistingResultsAction;
// Set
remoteApp.ConnectionPromptAction = CustomPromptAction.AutoRespond;
// Custom types used in methods.
SaveProjectOptions options = new SaveProjectOptions();
options.Name = "MyProject";
options.BaseDirectory = "d:\MyProjects";
options.OverwriteExisting = true;
string fullPath = remoteApp.SaveProjectCustom(options);
ResultContainer results = remoteApp.GetResults();
MeasurementResult worstResult = results.WorstResults[0];
46 Keysight DigitalTestApps Programming Guide
Page 47
Common Tasks
NOTE
Here are common tasks you may want to perform in your programs. When there is
more than one way to accomplish the task, alternatives are listed with a usage
hint. For more information on each of the commands mentioned below, see the
help file, "Keysight DigitalTestApps Remote Interface for .NET", located in the
same directory as this programming guide.
If a method demonstrated below does not enable you to customize the action as desired,
check the command help file to see if there is a similarly named "XxxCustom" method that
provides more flexibility.
• "Launching the automated test app" on page 47
• "Suppressing message prompts" on page 48
• "Configure settings found on the application's 'Set Up' and 'Configure' tabs"
on page 48
• "Select tests to be run" on page 48
Remote Programming Languages and Sample Code 3
• "Run Tests" on page 48
• "Get Results" on page 48
• "Save the project" on page 49
• "Start a new project" on page 49
• "Open a project" on page 50
• "Exiting the automated test app" on page 50
Launching the automated test app
• Manually. Use any time.
Infiniium automated test apps: Use the oscilloscope menu: Analyze > Automated
Test Apps > (AppName)
FlexDCA automated test apps: Use the oscilloscope menu: Apps > Automated
Test Apps > (AppName)
Automated test apps: On your PC, launch the app using the Start menu or a
shortcut.
• Using remote command. Send this SCPI command to Infiniium or FlexDCA:
:SYSTEM:LAUNCH 'AppName'
Where AppName is the name exactly as it appears in the menu system (see
alternative above).
Keysight DigitalTestApps Programming Guide 47
Page 48

3 Remote Programming Languages and Sample Code
Suppressing message prompts
• Suppress "OK button" message prompts of type "Info", "Warning", or "Error".
Use any time.
remoteAte.SuppressSimpleMessages = true;
• Suppress "OK/Cancel button" messages that ask you to enter a value. Use only
if the application has defined a default value for that prompt; otherwise test will
be aborted.
remoteAte.SuppressDataInputMessages = true;
• Suppress connection prompts. Use any time.
remoteAte.ConnectionPromptAction = CustomPromptAction.AutoRespond;
• Suppress "Signal Missing" prompts. Use any time.
remoteAte.SignalCheckFailAction = CustomPromptAction.AutoRespond;
• Suppress all of the above. See above for appropriate usage.
remoteAte.SuppressMessages = true;
Configure settings found on the application's 'Set Up' and 'Configure' tabs
remoteAte.SetConfig("variableName1", "value1");
Select tests to be run
• Select all of the tests currently shown on the application's 'Select Tests' tab.
Use any time.
remoteAte.SelectAllTests();
• Select a subset of the available tests. Use any time.
remoteAte.SelectedTests = new int[]{123,456,etc.};
Run Tests
• With defaults. Use any time.
remoteAte.Run();
• With options. Use when you want to override the user preferences currently
active in the target application.
RunOptions options = new RunOptions();
options.StopRunIfTestAborts = true;
remoteAte.RunCustom(options);
Get Results
• Quick overall result. Use any time.
bool passed = remoteAte.Passed;
48 Keysight DigitalTestApps Programming Guide
Page 49

Remote Programming Languages and Sample Code 3
• Get full details for all existing test results. Use any time.
ResultContainer results = remoteAte.GetResults();
• Get a subset of all available results. Use any time.
ResultOptions options = new ResultOptions();
options.TestIds = new int[]{123,456};
remoteAte.GetResultsCustom(options);
• CSV report. Use when you want CSV results in a separate file. File "results.csv"
will be located inside the project.
remoteAte.ExportResultsCsv();
remoteAte.SaveProject("Project1");
• CSV text. Use when you want to see the CSV results on the remote client.
ResultOptions options = new ResultOptions();
options.TestIds = new int[]{123,456};
options.IncludeCsvData = true;
remoteAte.GetResultsCustom(options);
•HTML Report.
The .html file is located in the saved project.
Save the project
• Using default location property. Use when that location does not already have a
project by the same name (although re-saves to the same location are allowed).
Otherwise, save will be aborted.
remoteAte.SaveProject("Project1");
• Using options. Use any time.
SaveProjectOptions options = new SaveProjectOptions();
options.Name = "Project1";
options.BaseDirectory = @"c:\...\MyProjectDir";
options.OverwriteExisting = true;
remoteAte.SaveProjectCustom (options);
Start a new project
• Checking method. Use when you want to be warned when unsaved results
exist.
remoteAte.NewProject(false);
• Forced method. Use when you always want this command to complete
(unsaved results will be discarded).
remoteAte.NewProject(true);
Keysight DigitalTestApps Programming Guide 49
Page 50

3 Remote Programming Languages and Sample Code
Open a project
• Using default location. Use when you want to be warned when unsaved results
exist.
remoteAte.OpenProject("Project1");
• Using options. Use any time.
OpenProjectOptions options = new OpenProjectOptions();
options.FullPath = "c:\\...\\MyProjectDir\\Project1";
options.DiscardUnsaved = true;
remoteAte.OpenProjectCustom(options);
Exiting the automated test app
• Safer method. Use when you do not want to risk losing unsaved results (action
will fail if unsaved results exist).
remoteAte.Exit(false, true);
• Forced method. Use when you always want this command to complete
(unsaved results will be discarded).
remoteAte.Exit(true, true);
Example Programs
The following example:
1 Loads an existing project.
2 Executes multiple tests one at a time, giving you an opportunity to modify the
device under test in between tests.
3 At the end of the run, saves the resulting project.
4 Exports the tests results to a .csv file for post processing.
using System;
using System.IO;
using Keysight.DigitalTestApps.Framework.Remote;
...
IRemoteAte remoteAte =
RemoteAteUtilities.GetRemoteAte("123.45.67.890");
remoteAte.SuppressMessages = true;
// TODO: Read/write share directory "c:\Automated Test Apps" on the
// PC that will be running this automation program (directory name
// is arbitrary).
const string baseDirectory = "Automated Test Apps";
// Tell the app to load the starting project from the PC this
// automation program is running on.
OpenProjectOptions openProjectOptions = new OpenProjectOptions();
openProjectOptions.DiscardUnsaved = true;
openProjectOptions.FullPath = "\\\\MyPCName\\" + baseDirectory +
50 Keysight DigitalTestApps Programming Guide
Page 51

Remote Programming Languages and Sample Code 3
NOTE
"\\DDR3\\Base Project\\Base Project.proj";
remoteAte.OpenProjectCustom(openProjectOptions);
// Run the first test
remoteAte.SelectedTests = new int[] {123};
remoteAte.Run();
// Modify DUT/switch, etc. here
// Run the second test
// This unselects test 123.
remoteAte.SelectedTests = new int[] {456};
// This appends 456 results to the existing results for test 123.
remoteAte.Run();
// Tell the app to save the entire project to the PC this automation
// program is running on.
SaveProjectOptions saveProjectOptions = new SaveProjectOptions();
saveProjectOptions.BaseDirectory = "\\\\MyPCName\\" + baseDirectory +
"\\DDR3";
saveProjectOptions.Name = "My DDR3 Device";
saveProjectOptions.OverwriteExisting = true;
remoteAte.SaveProjectCustom(saveProjectOptions);
// Export CSV results.
ResultOptions resultOptions = new ResultOptions();
resultOptions.IncludeCsvData = true;
ResultContainer resultContainer =
remoteAte.GetResultsCustom(resultOptions);
StreamWriter writer = null;
try
{
// Because this file is being created by this automation program
// which is running on the PC, use the local, not network, path.
// For convenience sake, this example saves it to the directory
// which contains the entire project; file name is arbitrary.
writer = new StreamWriter("c:\\" + baseDirectory + "\\DDR3\\" +
saveProjectOptions.Name + "\\AllResults.csv");
writer.WriteLine(resultContainer.CsvResults);
}
finally
{
if (writer != null) writer.Close();
}
...
Replace "123.45.67.890" with the actual IP address of the oscilloscope running your
automated test application, and replace "123" with an actual test ID for the application.
See Chapter 1, "Remote Interface Documentation" on page 10, for more
information on getting your application's test IDs.
Keysight DigitalTestApps Programming Guide 51
Page 52
3 Remote Programming Languages and Sample Code
NOTE
NOTE
Advanced Topic: Event Handling
The above examples demonstrate how to use the "forward facing" (remote client
-> automated test application) direction of the remote interface. The remote
interface also has a "callback" (automated test application -> remote client)
direction, described in "Keysight.DigitalTestApps.Framework.Remote.Advanced"
on page 12. A sample implementation using this capability can be found in:
"Message Handling Remote Client Implementation" on page 92.
Advanced Topic: Switch Matrix
The following C# code snippets demonstrate how to configure the Switch Matrix
controller.
Using Automatic Mode
remoteAte.SwitchMatrixOn = true;
remoteAte.SwitchMatrixSelectModeAuto("Keysight U3020A S26");
remoteAte.SwitchMatrixConnectToInstrument(1, "lan[123.456.7890]:inst0");
If additional drivers were created by the app during execution of
SwitchMatrixSelectModeAuto, simply execute
SwitchMatrixConnectToInstrument again for each driver ID and instrument
address. Each driver must be connected to a separate switch matrix instrument.
Replace 123.456.7890 with the full SICL address or VISA alias of your switch instrument.
Using Manual Mode
remoteAte.SwitchMatrixOn = true;
remoteAte.SwitchMatrixSelectModeManual();
remoteAte.SwitchMatrixAddDriver("Keysight U3020A S26");
remoteAte.SwitchMatrixConnectToInstrument(1,"lan[123.456.7890]:inst0");
To create an additional driver, simply add these lines:
remoteAte.SwitchMatrixAddDriver("Keysight U3020A S26");
remoteAte.SwitchMatrixConnectToInstrument(2,"lan[123.456.7890]:inst0");
Each driver must be connected to a separate switch matrix instrument.
Replace 123.456.7890 with the full SICL address or VISA alias of your switch instrument.
Now you need to manually define each signal path, each one starting from the test
point on the Device Under Test, through the switch, and ending with the scope
channel.
52 Keysight DigitalTestApps Programming Guide
Page 53
Remote Programming Languages and Sample Code 3
NOTE
Here is an example of a single-ended signal going into scope channel 3:
SwitchInfo info = new SwitchInfo();
info.Driver = 1;
info.Slot = 1;
info.Input = 1;
remoteAte.SwitchMatrixDefineSignalPath("CLK",info,"3");
Here is an example of a differential signal going into a differential probe connected
to scope channel 4:
SwitchInfo info = new SwitchInfo();
info.Driver = 1;
info.Slot = 1;
info.Input = 1;
remoteAte.SwitchMatrixDefineSignalPath("Strobe+",info,"4+");
info = new SwitchInfo();
info.Driver = 1;
info.Slot = 2;
info.Input = 1;
remoteAte.SwitchMatrixDefineSignalPath("Strobe-",info,"4-");
Using Either Mode
All that remains is to assign a correction method to each signal path. This is
optional but highly recommended.
Here is an example for one signal path that is using a single-ended probe:
PrecisionProbeOptions options = new PrecisionProbeOptions();
options.On = true;
options.Mode = PrecisionProbeOptions.PrecisionProbeMode.Probe;
options.Calibration = "MyCalName";
remoteAte.SwitchMatrixSetPathPrecisionProbe("CLK", "3", options);
Here is an example for one signal path that is using a differential probe:
PrecisionProbeOptions options = new PrecisionProbeOptions();
options.On = true;
options.Mode = PrecisionProbeOptions.PrecisionProbeMode.Probe;
options.Calibration = "MyCalName";
remoteAte.SwitchMatrixSetPathPrecisionProbe("Strobe+","4+",options);
With differential probes, you do not separately assign correction to the negative half of the
signal.
Advanced Topic: Parallel Testing
To accelerate testing of multiple devices, you may control multiple automated test
applications (running on different scopes) in parallel using the multi-threading
capabilities available in .NET. For example:
public void DoMultiScopeTesting()
{
Keysight DigitalTestApps Programming Guide 53
Page 54

3 Remote Programming Languages and Sample Code
NOTE
Thread t1 = _StartTestingOnScope("<IP address 1>");
Thread t2 = _StartTestingOnScope("<IP address 2>");
t1.Join();
t2.Join();
}
private Thread _StartTestingOnScope(string ipAddress)
{
vart=newThread(() => _Execute(ipAddress));
t.Start();
return t;
}
private static void _Execute(string ipAddress)
{
IRemoteAte remoteAte = RemoteAteUtilities.GetRemoteAte(ipAddress);
...
}
This program will let both automated test applications run without waiting for each
other. The calls to _StartTestingOnScope are not blocking, so the program starts
both apps running and then proceeds to the first Join statement, where it waits for
the first app to complete. Then, the program moves on to the second Join where it
waits for the second app to complete (it's okay if it finished first).
This solution requires .NET 3.5 or newer on the remote client. Mul ti-threading is also possible
with older .NET versions using less robust techniques.
54 Keysight DigitalTestApps Programming Guide
Page 55

Python
Using the Python Visa Package
Remote Programming Languages and Sample Code 3
You can combine the ease of text-based programming with the depth of the .NET
API by choosing an interpreted language with .NET compatibility, such as
CPython. By installing the Python for .NET package, you gain access to the power
of multi-paradigm programming: You can choose to write traditional "function
call" code utilizing the .NET API or you can choose to write SCPI-like "text-based"
code which takes advantage of the ARSL syntax. Both of these are demonstrated
below.
Furthermore, using the Python Visa package, you can even launch the automated
test app from the same script that controls it.
The Python VISA package, or PyVISA, is free open source software available from:
"http://pyvisa.sourceforge.net/". When you install this package you will be able to
connect to an Keysight oscilloscope or FlexDCA and launch an automated test
application using code as simple as:
import visa
infiniium = visa.instrument("<VISA>")
# Where <VISA> is the VISA address of the oscilloscope, for example,
# visa.instrument("TCPIP0::123.45.67.890::inst0:INSTR")
infiniium.write(":SYSTEM:LAUNCH '<application name>'")
# Where <application name> is the exact text that appears in the
# scope or FlexDCA applications menu, for example,
# infiniium.write(":SYSTEM:LAUNCH 'N5393C PCIExpress Test App'")
Using the Python for .NET Package
The Python for .NET package is free open source software available from:
"http://pythonnet.sourceforge.net/". When you install a CLR 2.0 package you will
be able to connect to and control a launched Keysight automated test application
using code as simple as:
import clr
clr AddReference("Keysight.DigitalTestApps.Framework.Remote")
from Keysight.DigitalTestApps.Framework.Remote import *
remoteObj = RemoteAteUtilities.GetRemoteAte("<ip>")
# Where <ip> is the oscilloscope's IP address, for example,
# RemoteAteUtilities.GetRemoteAte("123.45.67.890")
remoteApp = IRemoteAte(remoteObj)
remoteApp.<method or property>
# Where <method or property> is any method or property found in
# the application's .NET interface, described in Chapter 1.
# For example,
# remoteApp.Run()
To make this work, you need to copy a few files to your Python installation
directory, for example, c:\Python27\DLLs\:
Keysight DigitalTestApps Programming Guide 55
Page 56
3 Remote Programming Languages and Sample Code
NOTE
• From the Python for .NET package:
clr.pyd
Python.Runtime.dll
• From the Keysight N5452A Remote Toolkit:
Keysight.DigitalTestApps.Framework.Remote.dll
Keysight.DigitalTestApps.Framework.Remote.config
Be sure to keep these files together in the same directory.
Example Code
The following Python code snippets demonstrate property actions and method
invocations:
# Property actions
# ---------------# Read the remote interface version
version = remoteApp.RemoteInterfaceVersion
# Prevent these dialogs from displaying during run
remoteApp.SuppressSimpleMessages = True
# Method invocations
# -----------------# Set one of the applications user-configurable options
remoteApp.SetConfig("speed", "fast")
# Save the current configuration
fullPath = remoteApp.SaveProject("myProject")
# Custom property types
# --------------------# Query
action = remoteApp.ExistingResultsAction
#Set
remoteApp.ConnectionPromptAction = CustomPromptAction.AutoRespond
# Custom types used in methods.
options = SaveProjectOptions()
options.Name = "MyProject"
options.BaseDirectory = "d:\\MyProjects"
options.OverwriteExisting = True
fullPath = remoteApp.SaveProjectCustom(options)
results = remoteApp.GetResults()
extremeResult = results.ExtremeResults[0];
The following Python code snippets demonstrate the equivalent actions using
SCPI-like ARSL-formatted strings:
# Property actions
# ---------------# Read the remote interface version
56 Keysight DigitalTestApps Programming Guide
Page 57

Remote Programming Languages and Sample Code 3
NOTE
version = remoteApp.ExecuteArsl("RemoteInterfaceVersion?")
remoteApp.ExecuteArsl("SuppressSimpleMessages True")
# Method invocations
# -----------------# Set one of the applications user-configurable options
remoteApp.ExecuteArsl("SetConfig 'speed' 'fast'")
# Save the current configuration
fullPath = remoteApp.ExecuteArsl("SaveProject 'myProject'")
# Custom property types
# --------------------# Query
action = remoteApp.ExecuteArsl("ExistingResultsAction?")
#Set
remoteApp.ExecuteArsl("ConnectionPromptAction AutoRespond")
# Custom types used in methods.
fullPath = remoteApp.ExecuteArsl("SaveProjectCustom " + \
"'Name=MyProject;BaseDirectory=" + \
"d:\\MyProjects;OverwriteExisting=True'")
results = remoteApp.ExecuteArsl("GetResults")
Common Tasks
Here are common tasks you may want to perform in your programs. When there is
more than one way to accomplish the task, alternatives are listed with a usage
hint. Both method call and ARSL-formatted text paradigms are presented. For
more information on each of the commands mentioned below, see the help file,
"Keysight DigitalTestApps Remote Interface for .NET", located in the same
directory as this programming guide.
If a method demonstrated below does not enable you to customize the action as desired,
check the command help file to see if there is a similarly named "XxxCustom" method that
provides more flexibility.
• "Launching the automated test app" on page 58
• "Suppressing message prompts" on page 58
• "Configure settings found on the application's 'Set Up' and 'Configure' tabs"
on page 59
• "Select tests to be run" on page 59
• "Run Tests" on page 59
• "Get Results" on page 60
• "Save the project" on page 61
• "Start a new project" on page 61
• "Open a project" on page 62
• "Exiting the automated test app" on page 62
Keysight DigitalTestApps Programming Guide 57
Page 58

3 Remote Programming Languages and Sample Code
Launching the automated test app
• Manually. Use any time.
Infiniium automated test apps: Use the oscilloscope menu: Analyze > Automated
Test Apps > (AppName)
FlexDCA automated test apps: Use the oscilloscope menu: Apps > Automated
Test Apps > (AppName)
Automated test apps: On your PC, launch the app using the Start menu or a
shortcut.
• Using remote command. Send this SCPI command to Infiniium or FlexDCA:
:SYSTEM:LAUNCH 'AppName'
Where AppName is the name exactly as it appears in the menu system (see
alternative above).
Suppressing message prompts
• Suppress "OK button" message prompts of type "Info", "Warning", or "Error".
Use any time.
Method call:
remoteApp.SuppressSimpleMessages = True
Text:
remoteApp.ExecuteArsl("SuppressSimpleMessages True")
• Suppress "OK/Cancel button" messages that ask you to enter a value. Use only
if the application has defined a default value for that prompt; otherwise test will
be aborted.
Method call:
remoteApp.SuppressDataInputMessages = True
Text:
remoteApp.ExecuteArsl("SuppressDataInputMessages True")
• Suppress connection prompts. Use any time.
Method call:
remoteApp.ConnectionPromptAction = CustomPromptAction.AutoRespond
Text:
remoteApp.ExecuteArsl("ConnectionPromptAction AutoRespond")
• Suppress "Signal Missing" prompts. Use any time.
Method call:
58 Keysight DigitalTestApps Programming Guide
Page 59

Remote Programming Languages and Sample Code 3
remoteApp.SignalCheckFailAction = CustomPromptAction.AutoRespond
Text:
remoteApp.ExecuteArsl("SignalCheckFailAction AutoRespond")
• Suppress all of the above. See above for appropriate usage.
Method call:
remoteApp.SuppressMessages = True
Text:
remoteApp.ExecuteArsl("SuppressMessages True")
Configure settings found on the application's 'Set Up' and 'Configure' tabs
Method call:
remoteApp.SetConfig("variableName1", "value1")
Text:
remoteApp.ExecuteArsl("SetConfig 'variableName1' 'value1'")
Select tests to be run
• Select all of the tests currently shown on the application's 'Select Tests' tab.
Use any time.
Method call:
remoteApp.SelectAllTests()
Text:
remoteApp.ExecuteArsl("SelectAllTests")
• Select a subset of the available tests. Use any time.
Method call:
remoteApp.SelectedTests = [123,456,etc.]
Text:
remoteApp.ExecuteArsl("SelectedTests 123,456,etc.")
Run Tests
• With defaults. Use any time.
Method call:
remoteApp.Run()
Text:
remoteApp.ExecuteArsl("Run")
Keysight DigitalTestApps Programming Guide 59
Page 60

3 Remote Programming Languages and Sample Code
• With options. Use when you want to override the user preferences currently
active in the target application.
Method call:
runOptions = RunOptions()
runOptions.StopRunIfTestAborts = True
remoteApp.RunCustom(runOptions)
Text:
remoteApp.ExecuteArsl("RunCustom 'StopRunIfTestAborts=True'")
Get Results
• Quick overall result. Use any time.
Method call:
passed = remoteAte.Passed
Text:
remoteApp.ExecuteArsl("Passed?")
• Get full details for all existing test results. Use any time.
Method call:
results = remoteAte.GetResults()
Text:
remoteApp.ExecuteArsl("GetResults")
• Get a subset of all available results. Use any time.
Method call:
resultOptions = ResultOptions()
resultOptions.TestIds = [123,456]
remoteApp.GetResultsCustom(resultOptions)
Text:
remoteApp.ExecuteArsl("GetResultsCustom 'TestIds=123,456'")
• CSV report. Use when you want CSV results in a separate file. File "results.csv"
will be located inside the project.
Method call:
remoteApp.ExportResultsCsv()
remoteApp.SaveProject("Project1")
Text:
remoteApp.ExecuteArsl("ExportResultsCsv")
remoteApp.ExecuteArsl("SaveProject 'Project1'")
• CSV text. Use when you want to see the CSV results on the remote client.
60 Keysight DigitalTestApps Programming Guide
Page 61

Remote Programming Languages and Sample Code 3
Method call:
resultOptions = ResultOptions()
resultOptions.TestIds = [123,456]
resultOptions.IncludeCsvData = True
remoteApp.GetResultsCustom(resultOptions)
Text:
remoteApp.ExecuteArsl("GetResultsCustom 'TestIds=123,456;IncludeCsvDa
ta=True'")
•HTML Report.
The .html file is located in the saved project.
Save the project
• Using default location property. Use when that location does not already have a
project by the same name (although re-saves to the same location are allowed).
Otherwise, save will be aborted.
Method call:
remoteApp.SaveProject("Project1")
Text:
remoteApp.ExecuteArsl("SaveProject 'Project1'")
• Using options. Use any time.
Method call:
saveProjectOptions = SaveProjectOptions()
saveProjectOptions.Name = "Project1"
saveProjectOptions.BaseDirectory = "c:\\...\\MyProjectDir"
saveProjectOptions.OverwriteExisting = True
remoteApp.SaveProjectCustom(saveProjectOptions)
Text:
remoteApp.ExecuteArsl("SaveProjectCustom 'Name=Project1;BaseDirectory
=c:\\...\\MyProjectDir;OverwriteExisting=True'")
Start a new project
• Checking method. Use when you want to be warned when unsaved results
exist.
Method call:
remoteApp.NewProject(False)
Text:
remoteApp.ExecuteArsl("NewProject False")
Keysight DigitalTestApps Programming Guide 61
Page 62

3 Remote Programming Languages and Sample Code
• Forced method. Use when you always want this command to complete
(unsaved results will be discarded).
Method call:
remoteApp.NewProject(True)
Text:
remoteApp.ExecuteArsl("NewProject True")
Open a project
• Using default location. Use when you want to be warned when unsaved results
exist.
Method call:
remoteApp.OpenProject("Project1")
Text:
remoteApp.ExecuteArsl("OpenProject 'Project1'")
• Using options. Use any time.
Method call:
openProjectOptions = OpenProjectOptions()
openProjectOptions.FullPath = "c:\\...\\MyProjectDir\\Project1"
openProjectOptions.DiscardUnsaved = True
remoteApp.OpenProjectCustom(openProjectOptions)
Text:
remoteApp.ExecuteArsl("OpenProjectCustom 'FullPath=c:\\...\\
MyProjectDir\\Project1;DiscardUnsaved=True'")
Exiting the automated test app
• Safer method. Use when you do not want to risk losing unsaved results (action
will fail if unsaved results exist).
Method call:
remoteApp.Exit(False, True)
Text:
remoteApp.ExecuteArsl("Exit False True")
• Forced method. Use when you always want this command to complete
(unsaved results will be discarded).
Method call:
remoteApp.Exit(True, True)
Text:
62 Keysight DigitalTestApps Programming Guide
Page 63

remoteApp.ExecuteArsl("Exit True True")
Example Programs
The following example:
1 Launches the DDR3 automated test application.
2 Loads an existing project.
3 Executes multiple tests one at a time, giving you an opportunity to modify the
device under test in between tests.
4 At the end of the run, saves the resulting project.
5 Exports the tests results to a .csv file for post processing.
The example is presented in both method call and text paradigms.
Remote Programming Languages and Sample Code 3
Using Method
Calls
"""Import the compiled Python Visa module"""
import visa
"""Connect to the scope"""
remoteScope = visa.instrument("enter scope's VISA address here")
"""Launch the DDR3 application"""
remoteScope.write(":SYSTEM:LAUNCH 'DDR3 Test'")
"""Import the compiled Python for .Net module"""
import clr
"""Import the Keysight automated test app remote library DLL"""
clr.AddReference("Keysight.DigitalTestApps.Framework.Remote")
from Keysight.DigitalTestApps.Framework.Remote import *
"""Connect to the automated test application running on the scope
This will wait for the application to be fully launched and ready
before proceeding"""
scopeIpAddress = "123.45.67.890"
remoteObj = RemoteAteUtilities.GetRemoteAte(scopeIpAddress)
remoteApp = IRemoteAte(remoteObj)
"""Prevent dialogs from displaying during the run"""
remoteApp.SuppressMessages = True
"""Ensure app settings are in a known state"""
remoteApp.NewProject(True)
"""Select the tests to be run
Use commas to separate multiple IDs"""
remoteApp.SelectedTests = [50000]
"""Set a variable found on the app's 'Configure' tab
Get variable name and valid options from app's remote help file
or from GUI hints"""
remoteApp.SetConfig("TrigChan","CHAN4")
Keysight DigitalTestApps Programming Guide 63
Page 64

3 Remote Programming Languages and Sample Code
"""Start the run. This is a blocking call...
program will wait until app is finished."""
remoteApp.Run()
"""Save the project"""
saveOptions = SaveProjectOptions()
saveOptions.BaseDirectory = "c:\\temp"
saveOptions.Name = "Demo"
saveOptions.OverwriteExisting = True
projectFullPath = remoteApp.SaveProjectCustom(saveOptions)
print projectFullPath
"""This will print the extreme results to the console window
in which this script is running."""
results = remoteApp.GetResults()
"""This will get all results in csv format"""
resultOptions = ResultOptions()
resultOptions.TestIds = [123]
resultOptions.IncludeCsvData = True
customResults = remoteApp.GetResultsCustom(resultOptions)
print customResults.CsvResults
ARSL-Formatted
Using
Text
"""Import the compiled Python Visa module"""
import visa
"""Connect to the scope"""
remoteScope = visa.instrument("enter scope's VISA address here")
"""Launch the DDR3 application"""
remoteScope.write(":SYSTEM:LAUNCH 'DDR3 Test'")
"""Import the compiled Python for .Net module"""
import clr
"""Import the Keysight automated test app remote library DLL"""
clr.AddReference("Keysight.DigitalTestApps.Framework.Remote")
from Keysight.DigitalTestApps.Framework.Remote import *
"""Connect to the automated test application running on the scope
This will wait for the application to be fully launched and ready
before proceeding"""
scopeIpAddress = "123.45.67.890"
remoteObj = RemoteAteUtilities.GetRemoteAte(scopeIpAddress)
remoteApp = IRemoteAte(remoteObj)
"""Prevent dialogs from displaying during the run"""
remoteApp.ExecuteArsl("SuppressMessages True")
"""Ensure app settings are in a known state"""
remoteApp.ExecuteArsl("NewProject True")
"""Select the tests to be run
Use commas to separate multiple IDs"""
64 Keysight DigitalTestApps Programming Guide
Page 65
Remote Programming Languages and Sample Code 3
NOTE
remoteApp.ExecuteArsl("SelectedTests 123")
"""Set a variable found on the app's 'Configure' tab
Get variable name and valid options from app's remote help file
or from GUI hints"""
remoteApp.ExecuteArsl("SetConfig 'TrigChan' 'CHAN4'")
"""Start the run. This is a blocking call...
program will wait until app is finished."""
remoteApp.ExecuteArsl("Run")
"""Save the project"""
print remoteApp.ExecuteArsl("SaveProjectCustom 'BaseDirectory=" + \
"c:\\temp;Name=Demo;OverwriteExisting=True'")
"""This will print the extreme results to the console window in which
this script is running."""
print remoteApp.ExecuteArsl("GetResults")
"""This will get all results in csv format"""
print remoteApp.ExecuteArsl("GetResultsCustom"+\
"'TestIds=50000;IncludeCsvData=True'")
Replace "123.45.67.890" with the actual IP address of the oscilloscope running your
automated test application, and replace "123" with an actual test ID for the application.
See Chapter 1, "Remote Interface Documentation" on page 10, for more
information on getting your application's test IDs.
Advanced Topic: Event Handling
The above examples demonstrate how to use the "forward facing" (remote client
-> automated test application) direction of the remote interface. The remote
interface also has a "callback" (automated test application -> remote client)
direction, described here
"Keysight.DigitalTestApps.Framework.Remote.Advanced" on page 12. A sample
implementation using this capability follows.
The Python script shown below accomplishes the following tasks:
• Connects to an automated test application.
• Establishes the callback pipe.
• Redirects messages (prompts) to the remote client machine.
• Programmatically responds to a message (without displaying it).
"""Import the compiled Python for .Net module"""
import clr
"""Import .NET types"""
from System.Runtime.Remoting import *
from System.Windows.Forms import *
Keysight DigitalTestApps Programming Guide 65
Page 66

3 Remote Programming Languages and Sample Code
NOTE
"""Import the Keysight automated test app remote library DLL"""
clr.AddReference("Keysight.DigitalTestApps.Framework.Remote")
from Keysight.DigitalTestApps.Framework.Remote import *
"""Define the event callback handler"""
def SimpleMessageEventHandler(source, args):
print 'Received message:'+args.Message
if args.Message.find("All selected tests completed") >= 0:
args.Response = DialogResult.OK
else:
print 'Message not handled'
"""Connect to the automated test application running on the scope
This will wait for the application to be fully launched and ready
before proceeding"""
scopeIpAddress = "123.45.67.890"
remoteObj = RemoteAteUtilities.GetRemoteAte(scopeIpAddress)
remoteApp = IRemoteAte(remoteObj)
"""Verify Connection"""
print remoteApp.ApplicationName
"""Establish callback path"""
configFileFullPath = "c:\Python27\DLLs\
Keysight.Infiniium.AppFw.Remote.config";
RemotingConfiguration.Configure(configFileFullPath, False);
eventSink = RemoteAteUtilities.CreateAteEventSink(remoteApp, None, scope
IpAddress)
"""Subscribe to message events"""
eventSink.RedirectMessagesToClient = True
eventSink.SimpleMessageEvent += SimpleMessageEventHandler
"""Run tests"""
try:
remoteApp.SelectedTests = [123]
remoteApp.Run()
except Exception, e:
print e.Message
"""Unsubscribe from message events and clean up"""
eventSink.SimpleMessageEvent -= SimpleMessageEventHandler
eventSink.Dispose()
Replace "c:\Python27\DLLs\" with the actual location of the configuration file, replace
"123.45.67.890" with the actual IP address of the oscilloscope running your automated test
application, and replace "123" with an actual test ID for the application.
66 Keysight DigitalTestApps Programming Guide
Page 67
Remote Programming Languages and Sample Code 3
CAUTION
NOTE
Compliance apps generate messages having Unicode encoding. Therefore, if you print
messages received from the automated test application you may encounter a
UnicodeEncodeError exception if the messages contain certain characters, for
example, single quote characters U+2018 and U+2019. Please see your Python
documentation for instructions on how to handle Unicode text.
Tips:
1 Use of the remote interface's callback path requires a .NET Remoting
configuration file, Keysight.DigitalTestApps.Framework.Remote.config, which
contains settings for the callback pipe. This file may be found in the remote
toolkit in the Tools subdirectory.
2 The example script only handles the prompt that appears at the end of a run,
because of this line:
if args.Message.find("All selected tests completed") >= 0:
To handle other prompts, add another case to the function, for example:
if args.Message.find("All selected tests completed") >= 0:
args.Response = DialogResult.OK
elif args.Message.find("Some other message") >= 0:
args.Response = DialogResult.Yes
else:
print 'Message not handled'
Replace "Yes" with the actual name of a button that appears on the prompt.
Note that code located inside an automated test app event handler, such as the
SimpleMessageEventHandler, is executing in a "dummy" thread, which are threads
of control started outside the Python threading module that have limited
functionality. Certain actions cannot succeed inside a dummy thread, such as
making a DDE (Dynamic Data Exchange) call. To handle this limitation, you need
to use a mechanism that can reassign such actions to Python's main thread.
The remote toolkit contains a class named CrossThreadFunctionInvoker that
enables you to do this, along with two programs that demonstrate usage of the
class. These are contained in the Source\Python subdirectory:
File Description
CrossThreadFunctionInvoker.py Contains the CrossThreadFunctionInvoker class and a
simple program to demonstrate its usage
CrossThreadFunctionInvokerAppExample
.py
Keysight DigitalTestApps Programming Guide 67
Contains a sample automated test app automation
program that uses the CrossThreadFunctionInvoker
class
Page 68
3 Remote Programming Languages and Sample Code
NOTE
NOTE
Advanced Topic: Switch Matrix
The following Python code snippets demonstrate how to configure the Switch
Matrix controller.
Using Automatic Mode
remoteApp.SwitchMatrixOn = True
remoteApp.SwitchMatrixSelectModeAuto("Keysight U3020A S26")
remoteApp.SwitchMatrixConnectToInstrument(1, "lan[123.456.7890]:inst0")
If additional drivers were created by the app during execution of
SwitchMatrixSelectModeAuto, simply execute
SwitchMatrixConnectToInstrument again for each driver ID and instrument
address. Each driver must be connected to a separate switch matrix instrument.
Replace 123.456.7890 with the full SICL address or VISA alias of your switch instrument
Using Manual Mode
remoteApp.SwitchMatrixOn = True
remoteApp.SwitchMatrixSelectModeManual()
remoteApp.SwitchMatrixAddDriver("Keysight U3020A S26")
remoteApp.SwitchMatrixConnectToInstrument(1,"lan[123.456.7890]:inst0")
To create an additional driver, simply add these lines:
remoteApp.SwitchMatrixAddDriver("Keysight U3020A S26");
remoteApp.SwitchMatrixConnectToInstrument(2,"lan[123.456.7890]:inst0")
Each driver must be connected to a separate switch matrix instrument.
Replace 123.456.7890 with the full SICL address or VISA alias of your switch instrument.
Now you need to manually define each signal path, each one starting from the test
point on the Device Under Test, through the switch, and ending with the scope
channel.
Here is an example of a single-ended signal going into scope channel 3:
info = SwitchInfo()
info.Driver = 1
info.Slot = 1
info.Input = 1
remoteApp.SwitchMatrixDefineSignalPath("CLK",info,"3")
Here is an example of a differential signal going into a differential probe connected
to scope channel 4:
68 Keysight DigitalTestApps Programming Guide
Page 69

Remote Programming Languages and Sample Code 3
NOTE
info = SwitchInfo()
info.Driver = 1
info.Slot = 1
info.Input = 1
remoteApp.SwitchMatrixDefineSignalPath("Strobe+",info,"4+")
info = SwitchInfo()
info.Driver = 1
info.Slot = 2
info.Input = 1
remoteApp.SwitchMatrixDefineSignalPath("Strobe-",info,"4-")
Using Either Mode
All that remains is to assign a correction method to each signal path. This is
optional but highly recommended.
Here is an example for one signal path that is using a single-ended probe:
options = PrecisionProbeOptions()
options.On = True
options.Mode = PrecisionProbeOptions.PrecisionProbeMode.Probe
options.Calibration = "MyCalName"
remoteApp.SwitchMatrixSetPathPrecisionProbe("CLK", "3", options)
Here is an example for one signal path that is using a differential probe:
options = PrecisionProbeOptions()
options.On = True
options.Mode = PrecisionProbeOptions.PrecisionProbeMode.Probe
options.Calibration = "MyCalName"
remoteApp.SwitchMatrixSetPathPrecisionProbe("Strobe+","4+",options)
With differential probes, you do not separately assign correction to the negative half of the
signal.
Keysight DigitalTestApps Programming Guide 69
Page 70

3 Remote Programming Languages and Sample Code
70 Keysight DigitalTestApps Programming Guide
Page 71

Keysight DigitalTestApps
Programming Guide
4 Recommended Remote
Programming Practices
Determine required tasks by first using the graphical user interface / 72
Verify the remote commands one at a time / 73
Check the log / 74
71
Page 72

4 Recommended Remote Programming Practices
Determine required tasks by first using the graphical user interface
Before you write remote programming code to perform a task, it is often best to
begin by determining the steps required to execute the task via the user interface
on the oscilloscope. This will often help you avoid problems caused by incorrect
step sequencing.
For example, automated test applications often manage large list of tests by
providing a test filter. This is usually presented as a radio button group on the "Set
Up" tab that determines which tests are visible on the "Select Tests" tab. Suppose
these were your options:
"Set Up" tab:
• Speed: o Low o High
Imagine that when "Low" is selected, a configuration variable named "Speed" is
set to value "Low" and the "Select Tests" tab is populated with three low-speed
tests:
"Select Tests" tab:
•All Tests
• Low Speed Test #1
• Low Speed Test #2
• Low Speed Test #3
Similarly, when "High" is selected on the "Set Up" tab, variable "Speed" is set to
"High" and a different set of tests are shown:
"Select Tests" tab:
•All Tests
• High Speed Test #1
• High Speed Test #2
• High Speed Test #3
Using the application's user interface, it is impossible to cause an invalid situation
because only the currently available tests are displayed for you to select. However,
via the remote interface you can request any test by setting the SelectedTests
property. If you ask for an unavailable test, such as asking for High Speed Test #1
when "Speed" = "Low", the automated test application will throw an exception
across the remote interface that your client will need to handle.
By first exploring the task via the user interface, though, you can avoid this
exception by realizing you must first call SetConfig("Speed", "High") before calling
RunTests() for a high-speed test.
72 Keysight DigitalTestApps Programming Guide
Page 73

Recommended Remote Programming Practices 4
Verify the remote commands one at a time
After you've converted some of the manual steps into remote interface commands
(see "Determine required tasks by first using the graphical user interface" on
page 72), execute them one at a time, either in the debugger or by sending them
using the ARSL Command Line Utility. In many cases, you will be able to verify
their success by visually inspecting the application on the oscilloscope.
Keysight DigitalTestApps Programming Guide 73
Page 74

4 Recommended Remote Programming Practices
Check the log
The automated test application logs all incoming remote commands to a file. You
can visually inspect this file to see how your remote commands executed in
relation to other events that get logged.
The log file is named message_#.log and may be found in one of these locations:
• For automated test apps that run directly on an oscilloscope:
• Remote Interface Versions 1.10 and earlier: C:\scope\apps\(application
name)\Scratchpad\
• Remote Interface Version 1.20 and later: C:\Documents and Settings\All
Users\Application Data\Keysight\Infiniium\Apps\(application name)\
Project\
• Remote Interface Version 1.40 and later:
• WinXP: C:\Documents and Settings\All Users\Application Data\Agilent\
Infiniium _or_ FlexDCA\Apps\(application name)\Log\
• Win7: C:\ProgramData\Agilent _or_ Keysight\Infiniium _or_ FlexDCA\
Apps\(application name)\Log\
• For automated test apps that run on a separate PC:
• WinXP: C:\Documents and Settings\All Users\Application Data\Agilent\
Infiniium _or_ FlexDCA\Apps\(application name)\Project\
- Or -
C:\Documents and Settings\All Users\Application Data\Agilent\Scope\
Apps\(application name)\Log
• Win7: C:\ProgramData\Agilent _or_ Keysight\Infiniium _or_ FlexDCA\Apps\
(application name)\Project\
A standard .NET command gets logged this way:
1/8/2008 11:20:39 AM RPIC 55 RemoteInterfaceVersion?
1/8/2008 11:20:39 AM RPIR 55 <1.0>
The fields contain the following information:
1/8/2008 11:20:39 AM RPIC 55 RemoteInterfaceVersion?
-------------------- ---- -- ----------------------1234
1 Timestamp.
2 Remote command log code.
3 Remote command sequence number.
4 Remote command.
A unique sequence number identifies command/response pairs. The remote
command log code types are:
74 Keysight DigitalTestApps Programming Guide
Page 75
Recommended Remote Programming Practices 4
RPIC Remote Programming Interface Command.
RPIR Remote Programming Interface Response.
Here's another example. An ARSL command looks like this:
1/8/2008 11:22:36 AM RPIC 72 ExecuteArsl RemoteInterfaceVersion?
1/8/2008 11:22:36 AM RPIC 73 RemoteInterfaceVersion?
1/8/2008 11:22:36 AM RPIR 73 <1.0>
1/8/2008 11:22:36 AM RPIR 72 <>
Here you see that the ARSL command is translated into its .NET equivalent and
then executed.
If the remote command results in user messages being generated, these will
appear in the log as well. For example:
1/8/2008 11:25:22 AM RPIC 74 SelectedTests 50000
1/8/2008 11:25:22 AM RPIR 74 <>
1/8/2008 11:25:24 AM RPIC 75 Run
1/8/2008 11:25:35 AM TLCL Information All Tests Complete
Total Test Time: 0.1093743 sec
Multi-Trials Count Up Test: 0.1093743s
1/8/2008 11:25:35 AM RPIR 75 <>
In this example, a test named "Multi-Trials Count Up Test" is selected and run. The
"all tests complete" message is logged as well. Here are the field descriptions for
user message log entries:
1/8/2008 11:25:35 AM TLCL Information All Tests Complete
-------------------- ---- ------------------------------
12 3
1 Timestamp.
2 User Message log code.
3 User Message.
Messages are grouped into three categories:
Tell Errors, warnings, and info messages that have only an OK button.
Ask Messages include other response types such as "Retry/Cancel" or "Yes/No".
AskForData Messages that require the user to enter a value.
Here is the complete list of user message log codes you may encounter during
remote operation:
ALCL Ask message displayed locally (on oscilloscope).
ARMT Ask message redirected to remote client.
Keysight DigitalTestApps Programming Guide 75
Page 76
4 Recommended Remote Programming Practices
ASPR Ask message suppressed by remote client.
DLCL AskForData message displayed locally (on oscilloscope).
DRMT AskForData message redirected to remote client.
DSPR AskForData message suppressed by remote cl ient.
TLCL Tell message displayed locally (on oscilloscope).
TRMT Tell messages redirected to remote client.
TSPR Tell messages suppressed by remote client.
76 Keysight DigitalTestApps Programming Guide
Page 77

Keysight DigitalTestApps
Programming Guide
5 Developing a Remote Client
Simple Remote Client / 78
ARSL Command Line Utility Implementation / 82
Simple GUI Remote Client Implementation / 85
Simple Message Handling Remote Client Implementation / 89
Message Handling Remote Client Implementation / 92
LabVIEW Simple Remote Client / 100
LabVIEW Demo Client Construction / 112
This chapter shows you how to develop remote client executables using the .NET
language C# and the graphical LabVIEW 8.5 programming environment. The
Automated Test Application Remote Development Toolkit provides sample
projects to enable you to experiment with the remote client development by
starting with existing code. C# and LabVIEW implementations are provided.
77
Page 78

5 Developing a Remote Client
NOTE
Simple Remote Client
The easiest way to begin is to start with the "Simple Remote Client" demo
program.
1 On the computer, browse to the location where the toolkit is installed. In the
desired "Source\C#\" subdirectory, locate the "SimpleRemoteClient" folder. It
contains a C# implementation of the client. Copy this folder to another location
on your computer so you can modify the copy without losing the original files.
2 Copy the Keysight.DigitalTestApps.Framework.Remote.dll application file (or
Agilent.Infiniium.AppFW.Remote.dll, see "On the Client" in the Keysight
DigitalTestApps Programming Getting Started guide) to the "distrib" directory
in the new "SimpleRemoteClient" folder.
Please see the readme.txt file found in the "Agilent-Keysight Transition" or "Keysight Apps
only" subdirectories for guidance on the files to use for your remote client.
3 Using Visual Studio 2008 or newer, open the file "SimpleRemoteClient.sln".
4 In Visual Studio, display the properties page for the SimpleRemoteClient
project and go to the "Debug" tab. Enter the IP address of the oscilloscope in
the "Command line arguments field":
78 Keysight DigitalTestApps Programming Guide
Page 79
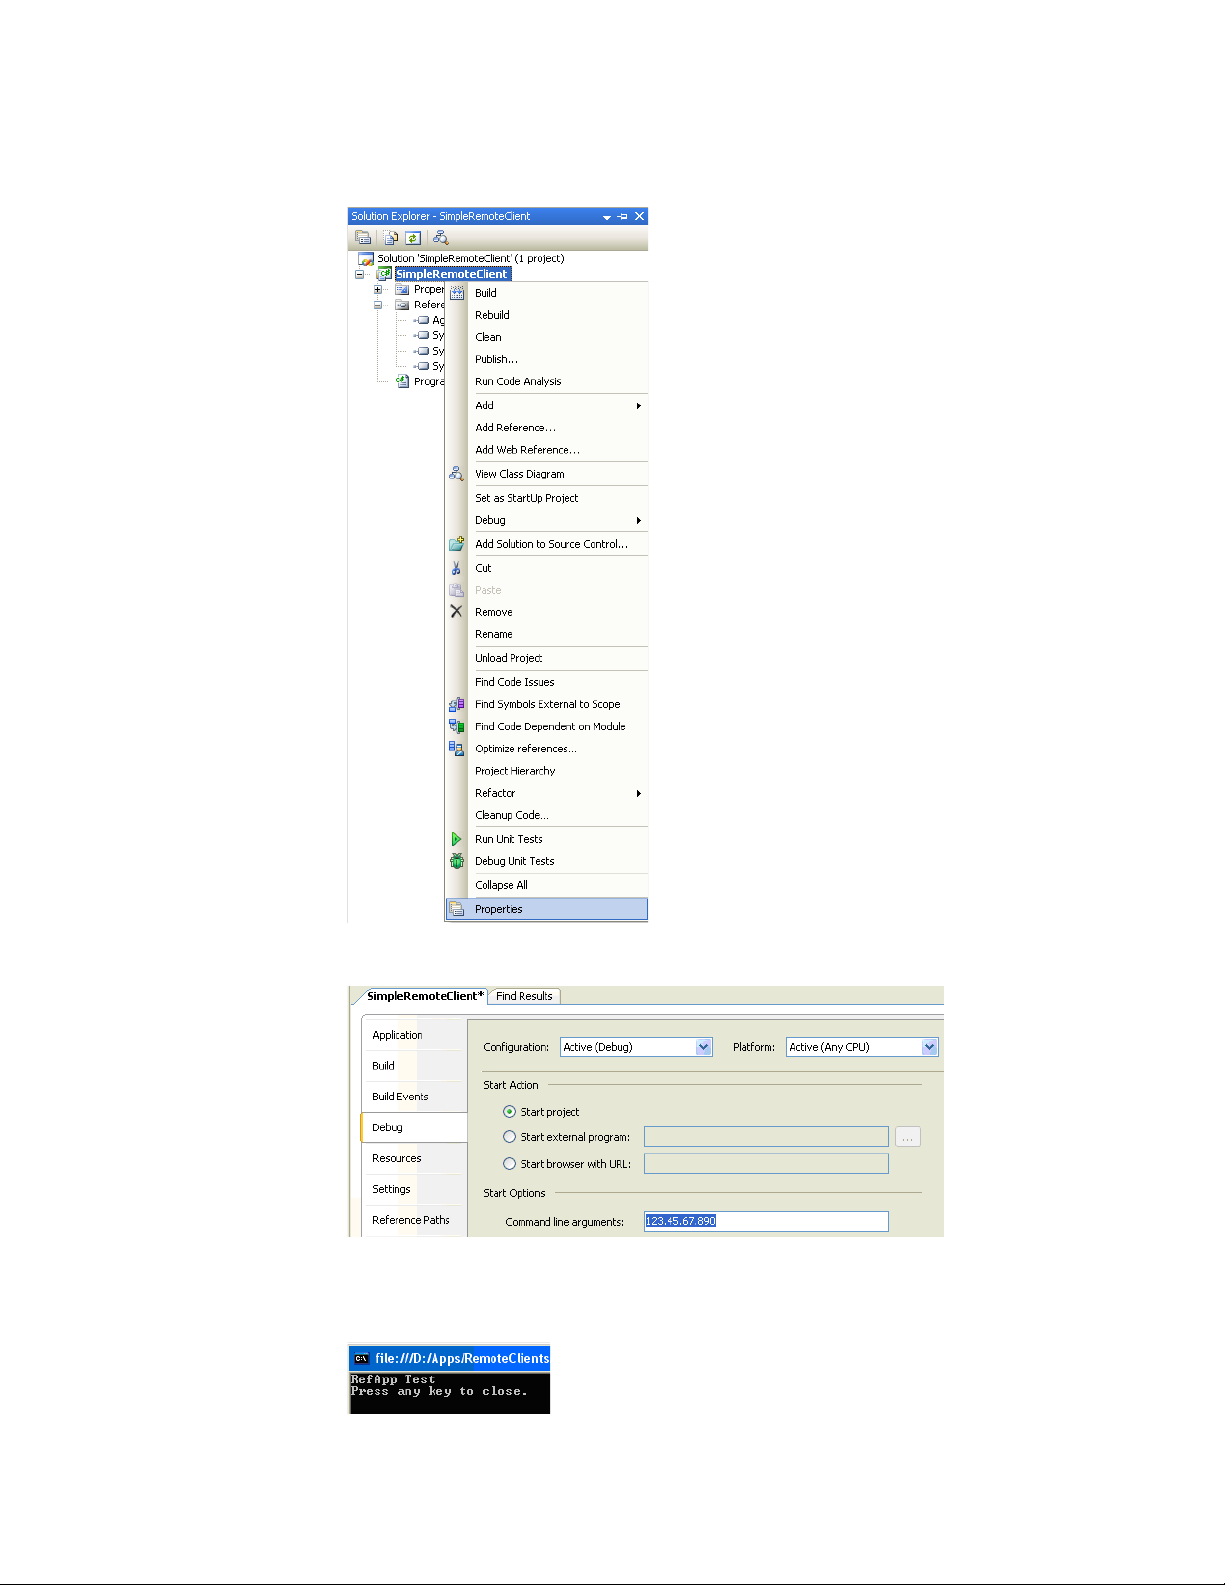
Developing a Remote Client 5
Build and run. You should see output similar to this:
Keysight DigitalTestApps Programming Guide 79
Page 80
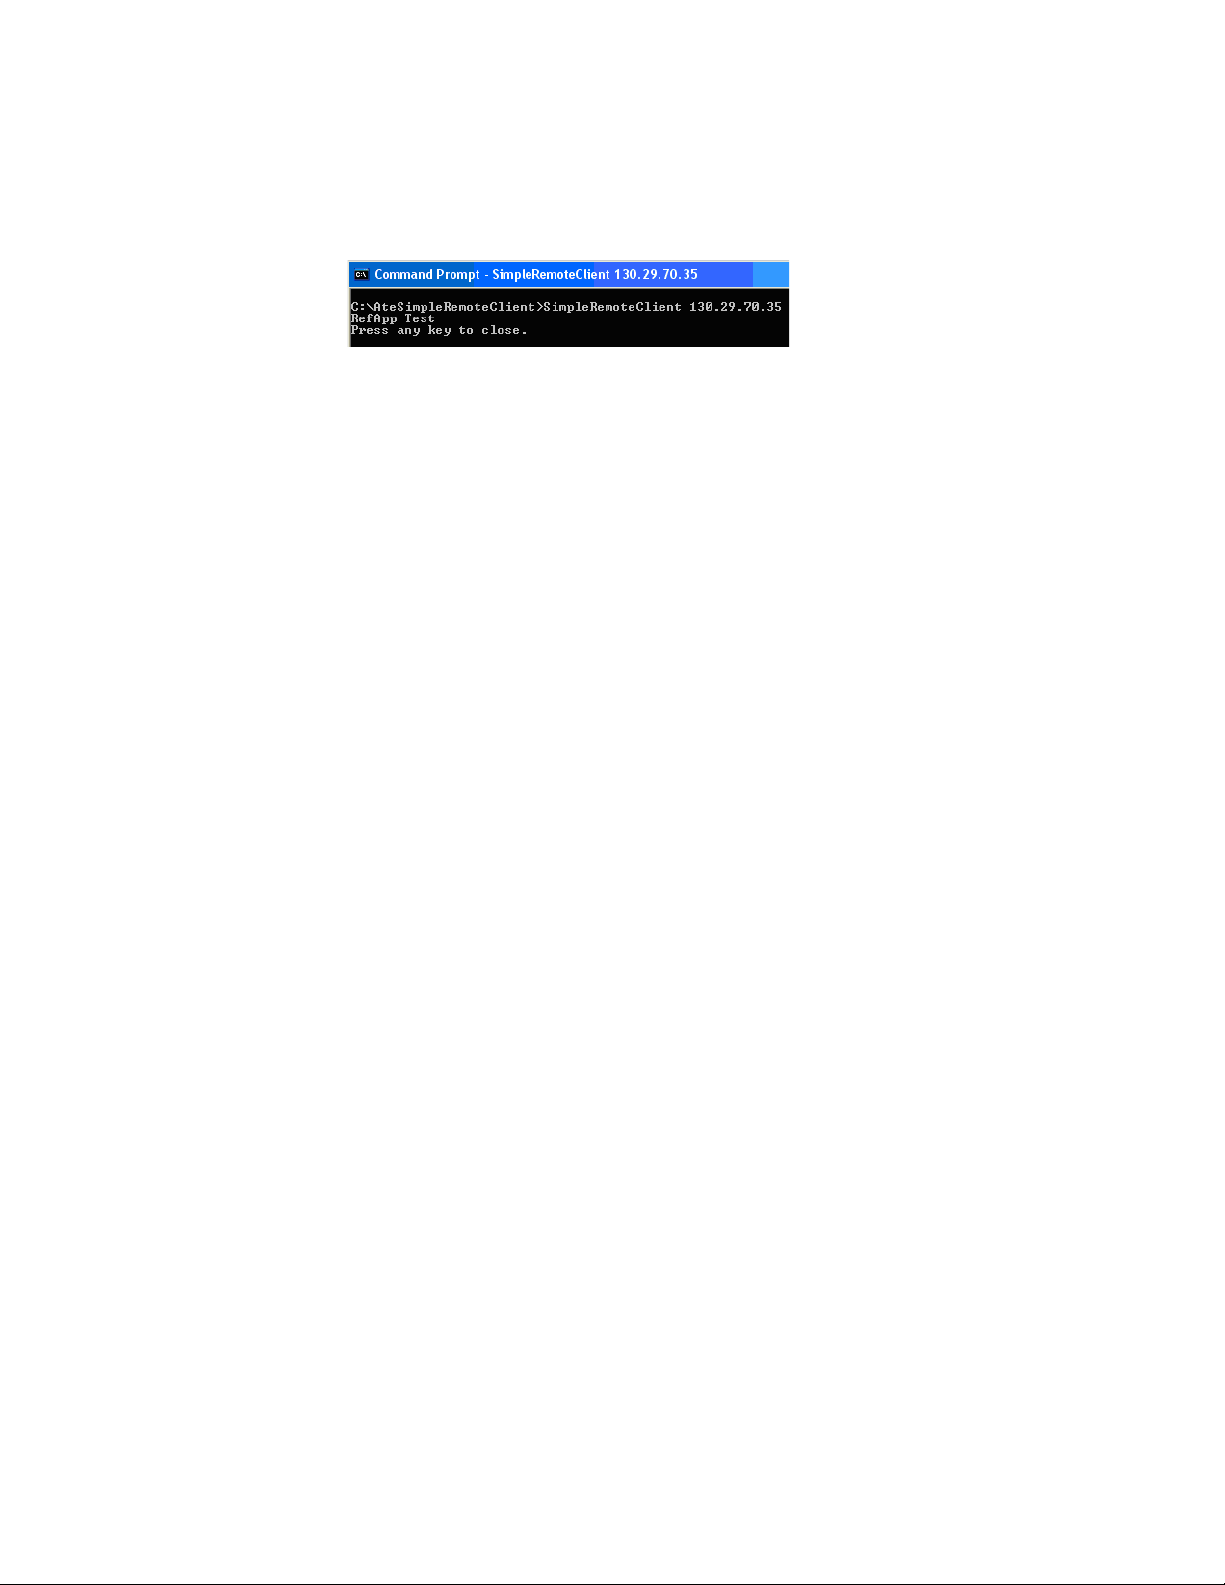
5 Developing a Remote Client
You can also run this from the command line:
File description
These are the key folders and files in the project directory:
• SimpleRemoteClient.sln — Visual Studio solution file
• SimpleRemoteClient\
• SimpleRemoteClient.csproj — Visual Studio project file
• Program.cs — C# source file containing the entire program
• distrib\ — Directory where build outputs are copied to.
Source code description
Here is the function of each of the lines in the program:
1 This defines the namespace the program lives in:
namespace SimpleRemoteClient
2 This names the class the program lives in:
internal class Program
3 This is the method that gets executed when the program is run:
private static void Main(string[] args)
4 This establishes a connection to the application running on the oscilloscope:
Keysight.DigitalTestApps.Framework.Remote.IRemoteAte remoteAte =
Keysight.DigitalTestApps.Framework.Remote.RemoteAteUtilities.GetRemot
eAte(args[0]);
The "Keysight.DigitalTestApps.Framework.Remote." prefix indicates that
IRemoteAte and RemoteAteUtilities are defined in the
Keysight.DigitalTestApps.Framework.Remote.dll.
5 This sends a remote command to the oscilloscope to execute a property query
in the automated test application:
string appName = remoteAte.ApplicationName;
This particular property contains the application's name. Please see Chapter 1,
Chapter 1, “Keysight DigitalTestApps Remote Interface,” starting on page 9, for
information on other properties and methods available in the automated test
application's remote interface.
80 Keysight DigitalTestApps Programming Guide
Page 81

Developing a Remote Client 5
6 This prints the result in the command window:
System.Console.WriteLine(appName + "\nPress any key to finish.");
System.Console.ReadKey();
The Simple Remote Client is intended for use as a remote programming learning
and experimentation platform. For more realistic (and interesting)
implementations, see the sections that follow.
Keysight DigitalTestApps Programming Guide 81
Page 82

5 Developing a Remote Client
NOTE
ARSL Command Line Utility Implementation
You may also examine the implementation for, modify, and build the ARSL
Command Line Utility.
As with the Simple Remote Client, you will need to copy the file
Keysight.DigitalTestApps.Framework.Remote.dll (or
Agilent.Infiniium.AppFW.Remote.dll) to the distrib directory of the project.
Please see the readme.txt file found in the "Agilent-Keysight Transition" or "Keysight Apps
only" subdirectories for guidance on the files to use for your remote client.
Here are some of the differences from the Simple Remote Client:
•Design
This is more complex, so the implementation uses multiple components: the
Program, a type to hold the runtime options, an argument parser and an Arsl
executor as summarized in the diagram below:
82 Keysight DigitalTestApps Programming Guide
Page 83
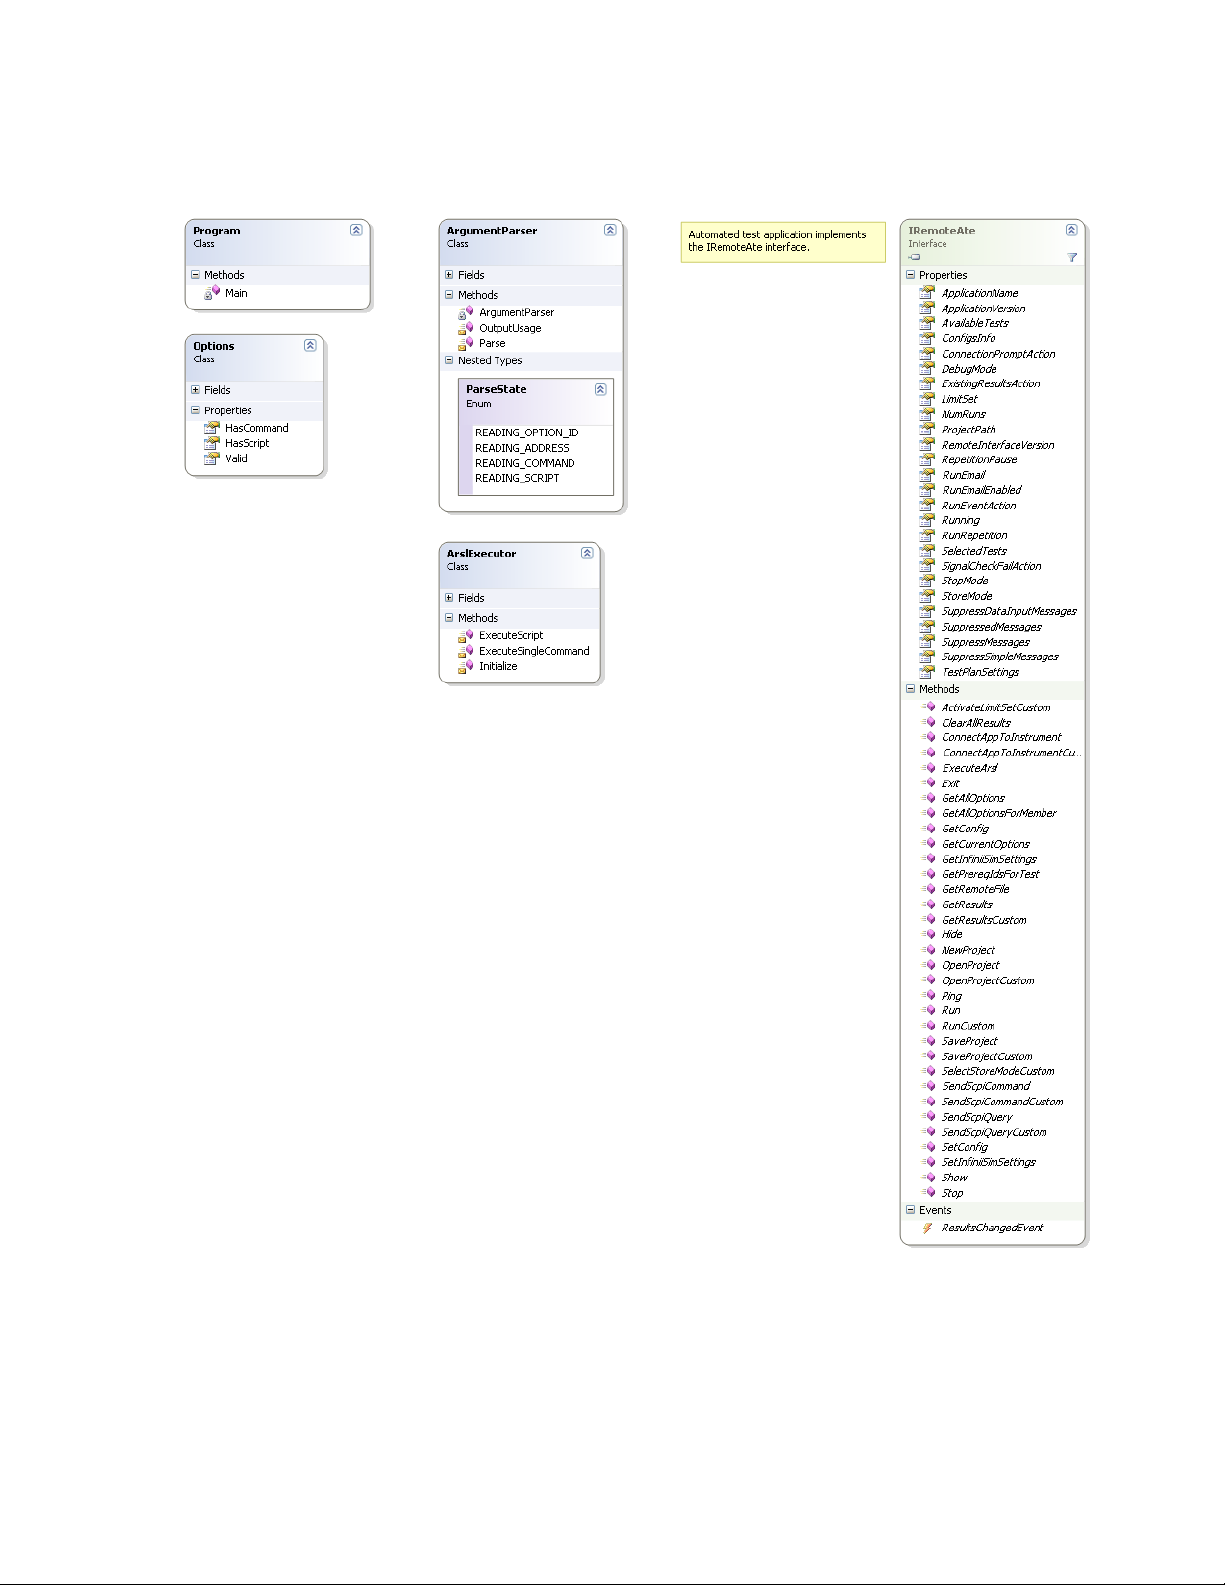
Developing a Remote Client 5
Notice that all of the interaction with the remote application is contained within
the ArslExecutor.
• The ArslExecutor (ArslExecutor.cs) makes the connection to the remote
application:
Keysight DigitalTestApps Programming Guide 83
Page 84

5 Developing a Remote Client
internal void Initialize(string ipAddress, bool useCustomPort,
{
}
• The ArslExecutor (ArslExecutor.cs) makes all the calls to the remote
application. Even though the ARSL utility enables you to execute many different
remote interface property and method actions, it only uses one member of the
remote interface to accomplish this:
bool verbose)
if (useCustomPort)
{
GetRemoteAteOptions options = new GetRemoteAteOptions();
options.IpAddress = ipAddress;
options.UseCustomPort = true;
mRemoteAte = RemoteAteUtilities.GetRemoteAteCustom(options);
…
}
else
{
mRemoteAte = RemoteAteUtilities.GetRemoteAte(ipAddress);
…
}
…
internal void ExecuteSingleCommand(string command)
{
string result = mRemoteAte.ExecuteArsl(command);
…
}
This particular method enables passing the utility a string representation of a
property or method action and having it get executed as a real property or
method action.
The rest of program is not specific to remote interface programming and is
concerned only with parsing and validating the user input and generating the
output.
84 Keysight DigitalTestApps Programming Guide
Page 85

Simple GUI Remote Client Implementation
NOTE
You may examine the implementation for, modify, and build the Simple GUI
Remote Client.
As with the Simple Remote Client, you will need to copy the file
Keysight.DigitalTestApps.Framework.Remote.dll (or
Agilent.Infiniium.AppFW.Remote.dll) to the distrib directory of the project.
Please see the readme.txt file found in the "Agilent-Keysight Transition" or "Keysight Apps
only" subdirectories for guidance on the files to use for your remote client.
The design of this application is summarized in the diagram below.
Developing a Remote Client 5
Keysight DigitalTestApps Programming Guide 85
Page 86

5 Developing a Remote Client
There are two primary design patterns in use: Observer and State. The Observer
pattern leads us to place business logic (interaction with the remote application) in
a separate module from the main dialog. The State pattern leads us to implement
well-structured transitions as the user performs the various steps described in the
main dialog.
86 Keysight DigitalTestApps Programming Guide
Page 87

Developing a Remote Client 5
Here are some remote interface-related highlights from the code:
• The Model (Model.cs) configures the .NET Remoting Interface:
Internal void Initialize()
{
string path =
Path.getDirectoryName(Assembly.GetExecutingAssembly().Location);
string configFullPath =
Path.Combine(path,
"Keysight.DigitalTestAps.Framework.Remote.config");
RemotingConfiguration.Configure(configFullPath, false);
}
• The Model (Model.cs) makes the connection to the remote application:
internal void Connect(string ipAddress)
{
try
{
…
mRemoteAte = RemoteAteUtilities.GetRemoteAte(ipAddress);
mRemoteAte.Ping();
}
catch (Exception e)
{
MessageBox.Show("Could not connect to an application running at "
+ "IP Address:"+ipAddress + "\n\n" + "Reason: "
+ e.Message);
…
return;
}
}
The Ping method is called because the GetRemoteAte method will always
return successfully, even if there is no application at the specified address,
while Ping (and all the other properties and methods of the remote interface)
can only work if the connection is valid.
• The Model (Model.cs) makes all other calls to the remote application
• Determining Available Tests
As mentioned in "Determine required tasks by first using the graphical user
interface" on page 72, you may only execute a test via the remote interface
if the automated test application is in such a state that the test is available
on the "Select Tests" tab of the user interface. Fortunately, the remote
interface provides a property that tells you exactly which tests are available
at any given time. The Simple GUI Remote Client uses this to build the test
list that it presents to the user. Again, in the Connect method:
internal void Connect(string ipAddress)
{
…
mAvailableTests = mRemoteAte.AvailableTests;
}
Keysight DigitalTestApps Programming Guide 87
Page 88

5 Developing a Remote Client
• Test execution
This stores the test availability information in the model so it will be
accessible by the dialog.
Tests are executed in the Run method (Model.cs) by setting the remote
interface property 'SelectedTests' and calling the method 'Run':
internal void Run(int testIndex)
{
try
{
int[] testToSelect =
new int[] { mAvailableTests[testIndex].ID };
mRemoteAte.SelectedTests = testToSelect;
mRemoteAte.Run();
…
}
catch (Exception e)
{
MessageBox.Show("An error occurred during the run:\n\n" +
"Detail: " + e.Message);
}
…
}
• Result access
The result of the test is accessed in the Run method (Model.cs) by calling
the remote interface GetResults method:
internal void Run(int testIndex)
{
…
ResultContainer results = mRemoteAte.GetResults();
// Remote Interface Versions 1.10 and prior (deprecated in 1.20)
:
//mWorstResult = results.WorstResults[0];
// Remote Interface Versions 1.20 and later only:
mWorstResult = results.ExtremeResults[0];
…
}
This returns a ResultContainer object which contains various details
concerning the result.
The rest of program is not specific to remote interface programming and is
concerned only with managing the graphical user interface.
88 Keysight DigitalTestApps Programming Guide
Page 89
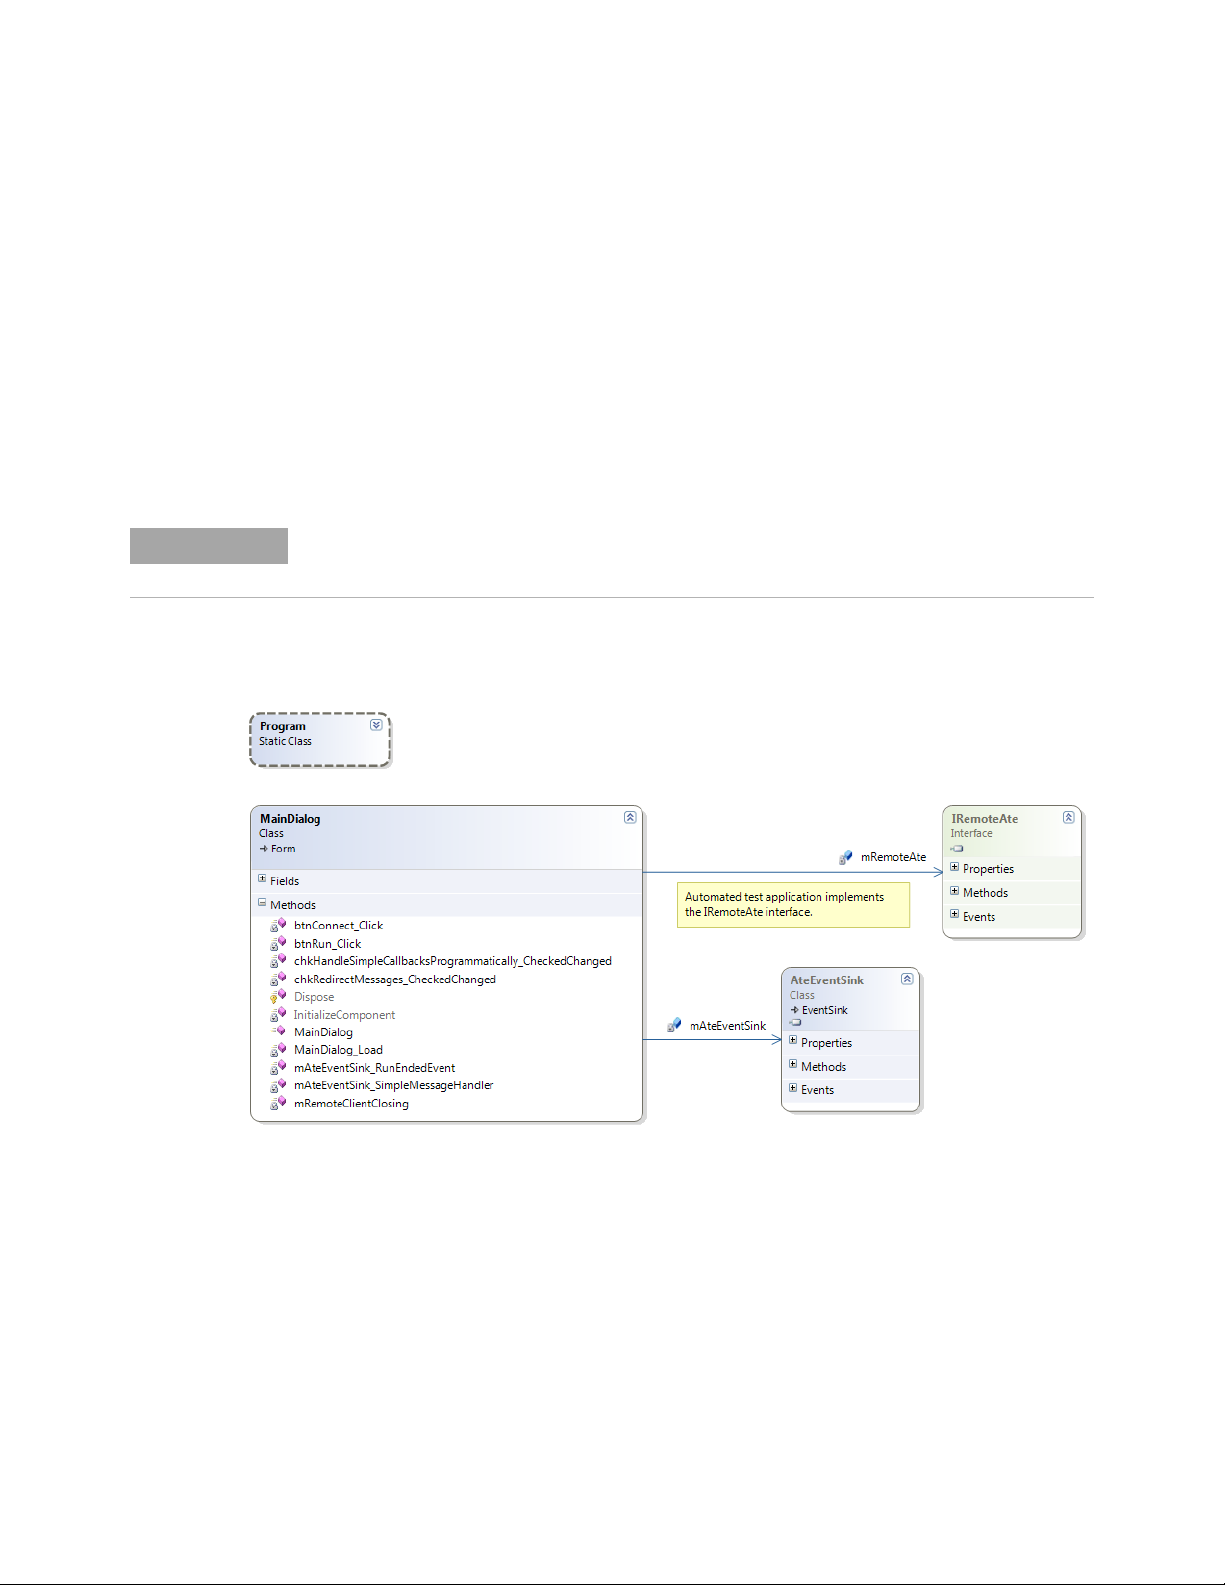
Developing a Remote Client 5
NOTE
Simple Message Handling Remote Client Implementation
You may examine the implementation for, modify and build the Simple Message
Handling Remote Client.
As with the Simple Remote Client, you will need to copy the file
Keysight.DigitalTestApps.Framework.Remote.dll (or
Agilent.Infiniium.AppFW.Remote.dll) to the distrib directory of the project. You will
also need to copy this additional file:
Keysight.DigitalTestApps.Framework.Remote.config (or
Agilent.Infiniium.AppFW.Remote.config).
Please see the readme.txt file found in the "Agilent-Keysight Transition" or "Keysight Apps
only" subdirectories for guidance on the files to use for your remote client.
The design of this application is summarized in the diagram below:
Note that the model-view pattern is not used in this application in order to more
clearly highlight the message-handling elements. All relevant code is in the file
MainDialog.cs. Here are some remote interface-related highlights from the code:
•Initialization occurs when you click the "Connect" button:
private void btnConnect_Click(object sender, EventArgs e)
{
…
// Enable forward remote interface
// (remote client -> automated test app)
mRemoteAte = RemoteAteUtilities.GetRemoteAte(ipAddress);
Keysight DigitalTestApps Programming Guide 89
Page 90

5 Developing a Remote Client
fig");
}
• The AteEventSink object is the key to managing callback activity. It has
properties for specifying whether you want prompts issued by the automated
test app to be:
• allowed to display on the scope
• transported to the remote client PC and displayed there
// Enable asynchronous callbacks
// (automated test app -> remote client)
// User must place the .config file in the same location as the
// remote client's .exe
string path =
Path.GetDirectoryName(Assembly.GetExecutingAssembly().Location);
string configFullPath =
Path.Combine(path, "Keysight.DigitalTestApps.Framework.Remote.con
RemotingConfiguration.Configure(configFullPath, false);
mAteEventSink =
RemoteAteUtilities.CreateAteEventSink(mRemoteAte, this,
ipAddress);
• never displayed (programmatically responded to by the remote client via an
event handler)
private void chkRedirectMessages_CheckedChanged(
object sender, EventArgs e)
{
// Tell my AteEventSink to coordinate with app regarding message
// redirection
mAteEventSink.RedirectMessagesToClient =
chkRedirectMessages.Checked;
…
}
private void chkHandleSimpleCallbacksProgrammatically_CheckedChanged(
object sender, EventArgs e)
{
if (chkHandleSimpleCallbacksProgrammatically.Checked)
{
// Tell my AteEventSink to let me handle simple message callbacks
// from the app myself
mAteEventSink.SimpleMessageEvent +=
mAteEventSink_SimpleMessageHandler;
}
else
{
// Tell my AteEventSink to automatically handle (display) simple
// message callbacks from the app
mAteEventSink.SimpleMessageEvent -=
mAteEventSink_SimpleMessageHandler;
}
}
• To programmatically respond to a prompt from the automated test application,
the event handler sets a property corresponding to the button on the prompt
that is to be "clicked", for example "OK":
90 Keysight DigitalTestApps Programming Guide
Page 91

Developing a Remote Client 5
private void mAteEventSink_SimpleMessageHandler(
object sender, MessageEventArgs e)
{
if (e.Message.Contains("completed")) // This is the prompt the app
// displays at the end of a run
{
e.Response = DialogResult.OK; // Be sure to respond using a
// DialgResult that is valid for the message being handled
return;
}
…
}
• At the start of a run, the demo program chooses which thread to make the
request in:
• If no callbacks from the app can occur, the Run command may be safely
executed in the main thread.
• If callbacks are enabled, the Run command must be executed in a worker
thread. For more details, please see the "multithreading (see page 96)"
discussion.
private void btnRun_Click(object sender, EventArgs e)
{
…
if (mAteEventSink.RedirectMessagesToClient)
{
…
// Must use worker thread to prevent deadlock when receiving
// asynchronous callbacks from app during a run
new Thread(mRemoteAte.Run).Start(); // This demo program will
// immediately proceed to the next line of code regardless
// of the state of the run
}
else
{
// No callbacks will be sent to the remote client, so it is
// safe to call Run() in the main thread
mRemoteAte.Run(); // This demo program will block at this line
// of code until the run is complete
}
}
• An automated test app will only allow one remote client to be registered to
handle callbacks. Therefore, when the remote client exits it performs this
cleanup action:
private void mRemoteClientClosing()
{
if (mAteEventSink != null)
{
// Tell my AteEventSink to notify the app that I am no longer
// the receiver for callbacks (so another remote client can
// register with the app)
mAteEventSink.Dispose();
}
}
Keysight DigitalTestApps Programming Guide 91
Page 92

5 Developing a Remote Client
NOTE
Message Handling Remote Client Implementation
You may examine the implementation for, modify and build the Message Handling
Remote Client.
As with the Simple Remote Client, you will need to copy the file
Keysight.DigitalTestApps.Framework.Remote.dll (or
Agilent.Infiniium.AppFW.Remote.dll) to the distrib directory of the project. You will
also need to copy this additional file:
Keysight.DigitalTestApps.Framework.Remote.config.
Please see the readme.txt file found in the "Agilent-Keysight Transition" or "Keysight Apps
only" subdirectories for guidance on the files to use for your remote client.
The design of this application is summarized in the diagram below:
92 Keysight DigitalTestApps Programming Guide
Page 93
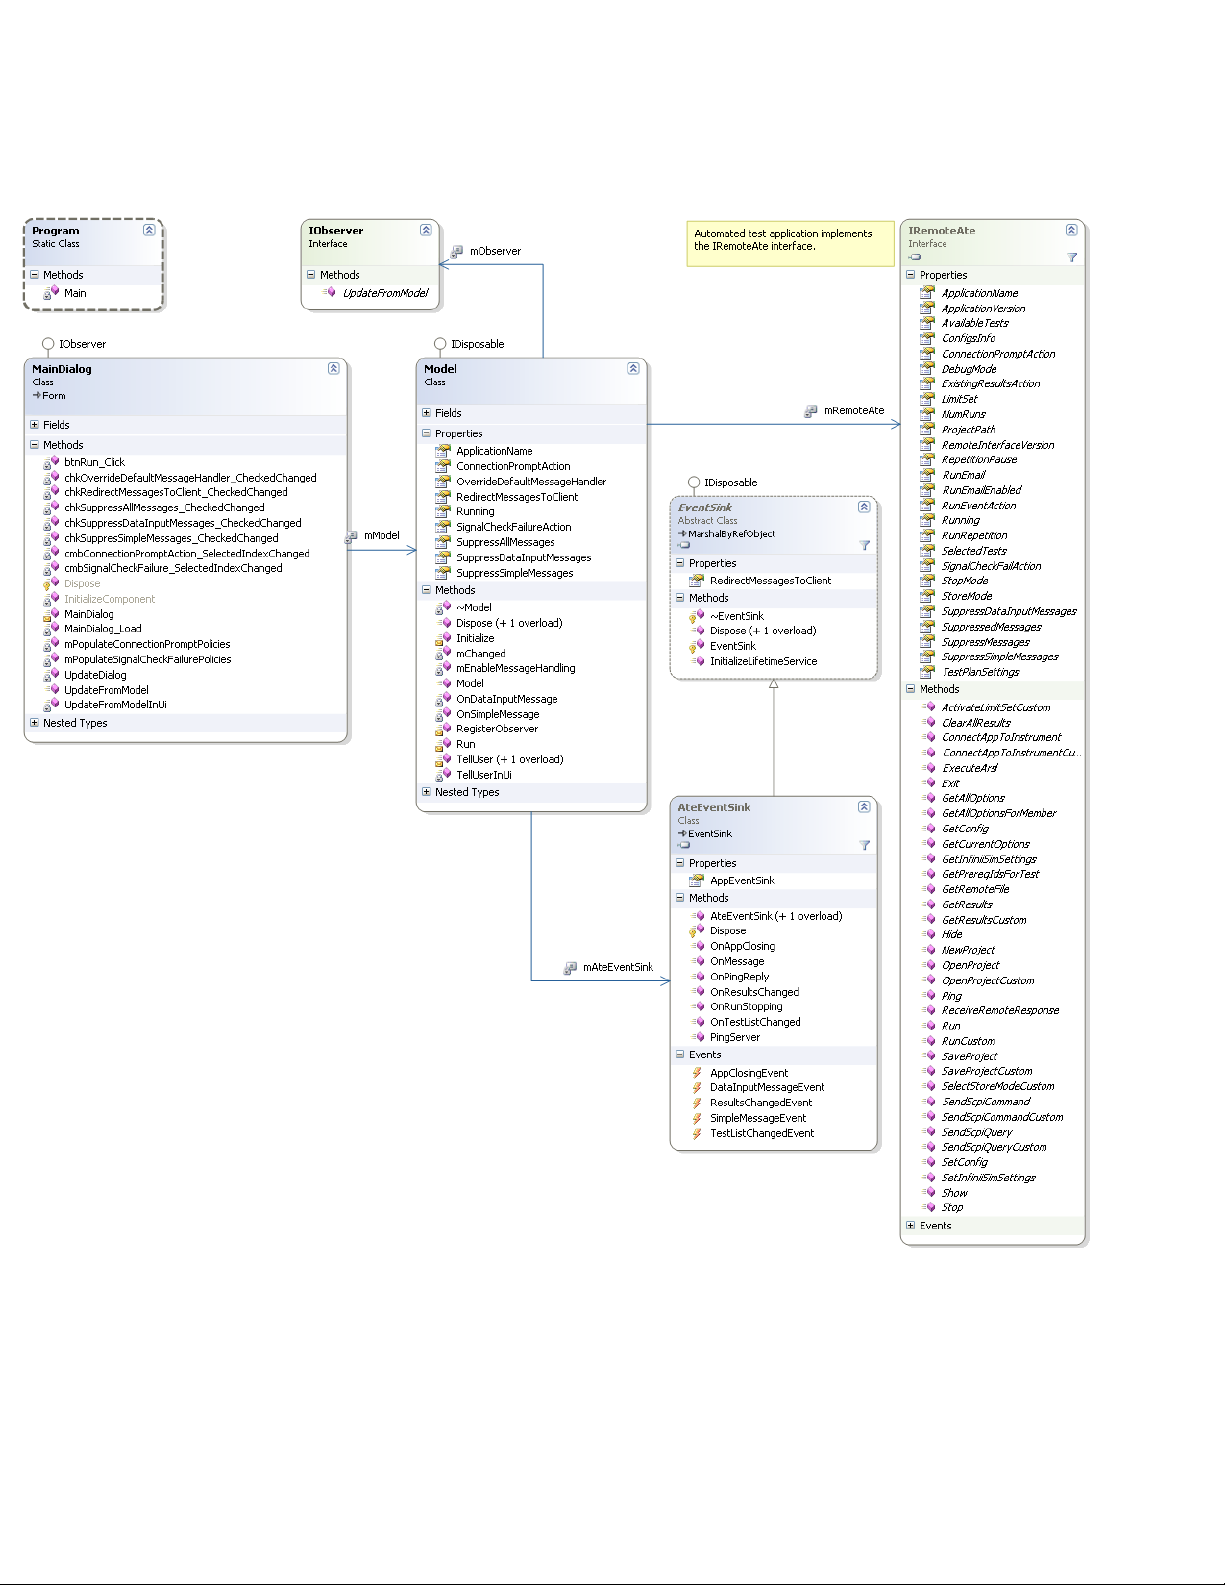
Developing a Remote Client 5
There is one primary design pattern in use: Observer. The Observer pattern leads
us to place business logic (interaction with the remote application) in a separate
module from the main dialog.
Here are some remote interface-related highlights from the code:
•.NET Remoting
Keysight DigitalTestApps Programming Guide 93
Page 94

5 Developing a Remote Client
NOTE
The Model (Model.cs) configures the .NET Remoting Interface to enable the
callback path (scope->client):
internal void Initialize(...)
{
fig");
}
The configuration file's contents are standard and may be used for any remote client requiring
callback capability.
• Groups and Namespaces
All of the controls in the "Core Features" group use remote interface members
contained in the basic namespace,
Keysight.DigitalTestApps.Framework.Remote:
string path =
Path.GetDirectoryName(Assembly.GetExecutingAssembly().Location);
string configFullPath =
Path.Combine(path, "Keysight.DigitalTestApps.Framework.Remote.Con
RemotingConfiguration.Configure(configFullPath, false);
...
• Run: mRemoteAte.Run();
• Suppress All Messages: mRemoteAte.SuppressMessages = value;
• Suppress Simple Messages: mRemoteAte.SuppressSimpleMessages =
value;
• Suppress Data Input Messages: mRemoteAte.SuppressDataInputMessages=
value;
• Connect Prompt Action: mRemoteAte.ConnectionPromptAction = value;
• Check Signal Prompt Action: mRemoteAte.SignalCheckFailAction= value;
All of the controls in the "Advanced" group use remote interface members
contained in the advanced namespace,
Keysight.DigitalTestApps.Framework.Remote.Advanced:
• Redirect Messages: mAteEventSink.RedirectMessagesToClient = value;
• Override Default Handler: mAteEventSink.SimpleMessageEvent +=
OnSimpleMessage;
• Event Sink
Both of the advanced features require the automated test application running
on the oscilloscope to be able to call a function on the remote client. This is
enabled by use of a class called "AteEventSink" (contained in the
Keysight.DigitalTestApps.Framework.Remote.dll assembly). All the remote
client has to do is instantiate an AteEventSink and keep it alive until the remote
client closes:
94 Keysight DigitalTestApps Programming Guide
Page 95

Developing a Remote Client 5
NOTE
mAteEventSink = RemoteAteUtilities.CreateAteEventSink(
mRemoteAte,
mMainDialog,
mIpAddress);
The event sink uses its constructor parameters to establish a two-way link
between the remote client and the application running on the oscilloscope. It
also exposes properties and events that enable the remote client to activate
advanced communication features, such as:
• Redirecting dialogs to the client:
mAteEventSink.RedirectMessagesToClient = true;
This property tells the EventSink to configure the application running on the
oscilloscope to send user messages to the EventSink instead of displaying
them on the oscilloscope. Then the EventSink will use a default algorithm to
display the message on the client.
• Overriding the default message handler:
mAteEventSink.SimpleMessageEvent += OnSimpleMessage;
This event enables the remote client to register a client-defined method for
EventSink to use instead of its default algorithm. So, when
RedirectMessagesToClient is set to true and a handler is subscribed to the
SimpleMessageEvent event, the EventSink will forward on messages
received from the application running on the oscilloscope to your client to
do with as you please. In the example program, the client simply appends
some text to the original message and displays it:
private void OnSimpleMessage(object sender, MessageEventArgs e)
{
e.Response = TellUser("Local handler processed this simple " +
"message:\n\n" + e.Message + "\n\nClick one of the " +
"buttons provided by the message sender:",
e.Buttons,
e.Icon,
e.DefaultButton);
}
If you need to detect a certain message in order to perform a related task, you could examine
the e.Message property for words that appear in the message. However, this approach is
fragile because the application may change the message slightly over time. Instead, use the
e.ID property, which is stable over time.
•Mutlithreading
Keysight DigitalTestApps Programming Guide 95
Page 96

5 Developing a Remote Client
Message redirection is a powerful capability, but it adds complexity to the
design of the remote client. In particular, while message redirection is enabled,
you run the risk of deadlock. Here are two such scenarios (remember, these
apply only when message redirection is enabled):
a Executing a remote interface property action or method call in the GUI
b Updating the GUI directly from the remote interface. If you follow the design
thread. When the client sets a property or calls a method in the automated
test application's remote interface, if the remote action leads the automated
test application to issue a redirectable message, then deadlock will ensue:
• The client's GUI thread is occupied waiting for the property action or
method call to return. It will not process the incoming redirected
message.
• The automated test application's GUI thread is occupied waiting for the
redirected message to get answered.
To prevent this scenario, execute in a worker thread any remote interface
property action or method call that may result in a redirected message.
guideline from the previous step and execute remote actions from within a
worker thread, you may still run into a similar deadlock situation. For
example, consider this GUI code:
// GUI code
private void
chkRedirectMessagesToClient_CheckedChanged(object sender,
EventArgs e)
{
mModel.RedirectMessagesToClient =
chkRedirectMessagesToClient.Checked;
UpdateDialog();
}
private void UpdateDialog()
{
chkSuppresSimpleMessages.Checked =
mModel.SuppressSimpleMessages;
…
}
// Model code
public bool RedirectMessagesToClient
{
set { return mRemoteAte. RedirectMessagesToClient = value; }
}
public bool SuppressSimpleMessages
{
get { return mRemoteAte.SuppressSimpleMessages; }
}
96 Keysight DigitalTestApps Programming Guide
Page 97

Developing a Remote Client 5
This sequence of events may lead to deadlock:
i If the application currently has a dialog displayed locally on the
oscilloscope (for example "all tests completed").
ii On the remote client, the user clicks the RedirectMessagesToClient
checkbox to enable this mode.
iii The callback code in chkRedirectMessagesToClient_CheckedChanged
begins.
iv A RedirectMessagesToClient property set is sent to the automated test
application and control returns to the client.
v The client begins its UpdateDialog method.
vi Asynchronously, the dialog that was being displayed on the oscilloscope
at the beginning of this scenario is redirected to the client.
vii The client attempts to query the automated test application during
UpdateDialog.
This would result in deadlock:
• The automated test application cannot respond to the client's query
because it is busy waiting for a response from the client for the redirected
message.
• The client will not display the redirected message because it is busy
waiting for a response from the automated test application for the remote
query.
To prevent this scenario, do not send remote commands to the automated
test application while a redirected message needs attention on the remote
client. In the above scenario, you would resolve the design problem by
replacing the model's SuppressSimpleMessage getter implementation with
one that caches the automated test application's state in a field and returns
this field instead of querying the oscilloscope.
Here is actual message handling remote client implementation that
demonstrates how design can avoid both of the above scenarios:
In MainDialog.cs:
// Define a delegate for a method that takes a single string
// parameter and returns void
private delegate void VoidStringDelegate(string s);
// Executed when the user clicks "Run"
private void btnRun_Click(object sender, EventArgs e)
{
…
// Call the Model's version of Run in a worker thread
VoidStringDelegate dlgtRun = mModel.Run;
dlgtRun.BeginInvoke(txtTestID.Text, null, null);
// BeginInvoke immediately returns even though the run is not
// completed.
Keysight DigitalTestApps Programming Guide 97
Page 98

5 Developing a Remote Client
// Now the GUI is ready to handle any callbacks from the
// automated test application that may occur during the run.
…
}
In Model.cs:
internal void Run(string testId)
{
// Executing in a worker thread
…
mRemoteAte.RunTests(testId);
…
}
public bool SuppressSimpleMessages
{
get
{
// Return a field…don't query the oscilloscope
return mSuppressSimpleMessages;
}
set
{
mSuppressSimpleMessages = value;
mRemoteAte.SuppressSimpleMessages = mSuppressSimpleMessages;
}
}
•Disposal
To facilitate proper resource cleanup, always dispose of the event sink. The
Model class (Model.cs) implements this using a standard pattern:
private bool mAlreadyDisposed;
public void Dispose()
{
Dispose(true);
GC.SuppressFinalize(this);
}
~Model()
{
Dispose(false);
}
protected virtual void Dispose(bool isDisposing) {
if (mAlreadyDisposed)
{
return;
}
if (isDisposing)
{
mAteEventSink.Dispose();
}
98 Keysight DigitalTestApps Programming Guide
Page 99

mAlreadyDisposed = true;
}
Developing a Remote Client 5
Keysight DigitalTestApps Programming Guide 99
Page 100
5 Developing a Remote Client
NOTE
NOTE
LabVIEW Simple Remote Client
This section describes how to create your own remote client using the LabVIEW
programming environment. In addition to requiring the
Keysight.DigitalTestApps.Framework.Remote.dll file ( (or
Agilent.Infiniium.AppFW.Remote.dll, see "On the Client" in the Keysight
DigitalTestApps Programming Getting Started guide for a list of minimum
requirements), LabVIEW clients use an interface adapter assembly,
"Keysight.DigitalTestApps.RemoteTestClient.dll" (or
Agilent.Infiniium.RemoteTestClient.dll). This file is also provided in this Toolkit in
the desired Tools\LabVIEW\LabVIEW Remote Adapter subdirectory.
Please see the readme.txt file found in the "Agilent-Keysight Transition" or "Keysight Apps
only" subdirectories for guidance on the files to use for your remote client.
1 Create a new folder in C:\Labview.
2 Copy the following files to the folder created:
a Keysight.DigitalTestApps.Framework.Remote.dll (or
Agilent.Infiniium.AppFW.Remote.dll, see "On the Client" in the Keysight
DigitalTestApps Programming Getting Started guide).
b On the computer, browse to the location where the toolkit is installed.
From the desired "Tools\LabVIEW\LabVIEW Remote Adapter" subdirectory
copy Keysight.DigitalTestApps.RemoteTestClient.dll (or
Agilent.Infiniium.RemoteTestClient.dll) and
Keysight.DigitalTestApps.RemoteTestClient.dll.config (or
Agilent.Infiniium.RemoteTestClient.dll.config).
Please see the readme.txt file found in the "Agilent-Keysight Transition" or "Keysight Apps
only" subdirectories for guidance on the files to use for your remote client.
3 Launch Labview and create an empty project.
100 Keysight DigitalTestApps Programming Guide
Loading...