

DDR_Post_Process_Compliance_Tool_User_Guide DDR Post Process Compliance Tool User Guide [56]
Table of contents
 Loading...
Agilent DDR_Post_Process_Compliance_Tool_User_Guide DDR Post Process Compliance Tool User Guide [56] Datasheet
Page 1
DDR Post Process
Compliance Tool
User’s Guide
Page 2

Notices
CAUTION
WARNING
© Keysight Technologies 2008-2014
No part of this manual may be reproduced in
any form or by any means (includ ing electronic storage and retrieval or translation
into a foreign language) without prior agreement and written consent from Keysight
Technologies as governed by United States
and international copyright laws.
Trademarks
UNIX is a registered trademark of UNIX System Laboratories in the U.S.A. and other
countries. Target is copyrighted by Thru-Put
Systems, Inc.
Software Release
06.00.0000
Edition
August 2014
Available in electronic format only
Keysight Technologies
1900 Garden of the Gods Road
Colorado Springs, CO 80907 USA
Warranty
THE MATERIAL CONTAINED IN THIS
DOCUMENT IS PROVIDED "AS IS," AND IS
SUBJECT TO BEING CHANGED, WITHOUT
NOTICE, IN FUTURE EDITIONS. FURTHER,
TO THE MAXIMUM EXTENT PERMITTED BY
APPLICABLE LAW, KEYSIGHT DISCLAIMS
ALL WARRANTIES, EITHER EXPRESS OR
IMPLIED WITH REGARD TO THIS MANUAL
AND ANY INFORMATION CONTAINED
HEREIN, INCLUDING BUT NOT LIMITED TO
THE IMPLIED WARRANTIES OF
MERCHANTABILITY AND FITNESS FOR A
PARTICULAR PURPOSE. KEYSIGHT SHALL
NOT BE LIABLE FOR ERRORS OR FOR
INCIDENTAL OR CONSEQUENTIAL
DAMAGES IN CONNECTION WITH THE
FURNISHING, USE, OR PERFORMANCE OF
THIS DOCUMENT OR ANY INFORMATION
CONTAINED HEREIN. SHOULD KEYSIGHT
AND THE USER HAVE A SEPARATE WRITTEN
AGREEMENT WITH WARRANTY TERMS
COVERING THE MATERIAL IN THIS
DOCUMENT THAT CONFLICT WITH THESE
TERMS, THE WARRANTY TERMS IN THE
SEPARATE AGREEMENT WILL CONTROL.
Technology Licenses
The hardware and/or software described in
this document are furnished under a license
and may be used or copied only in accordance with the terms of such license.
52.227-14 (June 1987) or DFAR
252.227-7015 (b)(2) (November 1995), as
applicable in any technical data.
Safety Notices
A CAUTION notice denotes a hazard. It
calls attention to an operating procedure, practice, or the like that, if not
correctly performed or adhered to,
could result in d amage to the prod uct
or loss of important data. Do not proceed beyond a CAUTION notice until
the indicated conditions are fully
understood and met.
A WARNING notice denotes a hazard.
It calls attention to an operating procedure, practice, or the like that, if not
correctly performed or adhered to,
could result in personal injury or
death. Do not proceed beyond a
WARNING notice until the indicated
conditions are fully understood and
met.
Restricted Rights Legend
If software is for use in the performance of a
U.S. Government prime contract or subcontract, Software is delivered and licensed as
"Commercial computer software" as defined
in DFAR 252.227-7014 (June 1995), or as a
"commercial item" as defined in FAR
2.101(a) or as "Restricted computer software" as defined in FAR 52.227-19 (June
1987) or any equivalent agency regulation or
contract clause. Use, duplication or disclosure of Software is subject to Keysight Technologies’ standard commercial license
terms, and non-DOD Departments and
Agencies of the U.S. Government will receive
no greater than Restricted Rights as defined
in FAR 52.227-19(c)(1-2) (June 1987). U.S.
Government users will receive no greater
than Limited Rights as defined in FAR
2 DDR Post Process Compliance Tool User Guide
Page 3

Safety Summary
CAUTION
WARNING
General Do not use this product in any manner not specified by the manufacturer. The protective features of
The following general safety precautions must be observed during all phases of operation of this
instrument. Failure to comply with these precautions or with specific warnings or operating
instructions in the product manuals violates safety standards of design, manufacture, and intended
use of the instrument. Keysight Technologies assumes no liability for the customer's failure to comply
with these requirements. Product manuals are provided with your instrument on CD-ROM and/or in
printed form. Printed manuals are an option for many products. Manuals may also be available on
the Web. Go to www.keysight.com and type in your product number in the Search field at the top of
the page.
this product may be impaired if it is used in a manner not specified in the operation instructions.
Before Applying
Power
Ground the
Instrument
Fuses See the user's guide or operator's manual for information about line-fuse replacement. Some
Do Not Operate in
an Explosive
Atmosphere
Do Not Remove the
Instrument Cover
Cleaning Clean the outside of the instrument with a soft, lint-free, slightly dampened cloth. Do not use
Do Not Modify the
Instrument
Verify that all safety precautions are taken. Make all connections to the unit before applying power.
Note the instrument's external markings described in “Safety Symbols”.
If your product is provided with a grounding type power plug, the instrument chassis and cover must
be connected to an electrical ground to minimize shock hazard. The ground pin must be firmly
connected to an electrical ground (safety ground) terminal at the power outlet. Any interruption of
the protective (grounding) conductor or disconnection of the protective earth terminal will cause a
potential shock hazard that could result in personal injury.
instruments contain an internal fuse, which is not user accessible.
Do not operate the instrument in the presence of flammable gases or fumes.
Only qualified, service-trained personnel who are aware of the hazards involved should remove
instrument covers. Always disconnect the power cable and any external circuits before removing the
instrument cover.
detergent or chemical solvents.
Do not install substitute parts or perform any unauthorized modification to the product. Return the
product to an Keysight Sales and Service Office for service and repair to ensure that safety features
are maintained.
In Case of Damage Instruments that appear damaged or defective should be made inoperative and secured against
unintended operation until they can be repaired by qualified service personnel.
A CAUTION notice denotes a hazard. It calls attention to an operating procedure, practice,
or the like that, if not correctly performed or adhered to, could result in damage to the
product or loss of important data. Do not proceed beyond a CAUTION notice until the
indicated conditions are fully understood and met.
A WARNING notice denotes a hazard. It calls attention to an operating procedure,
practice, or the like that, if not correctly performed or adhered to, could result in
personal injury or death. Do not proceed beyond a WARNING notice until the indicated
conditions are fully understood and met.
DDR Post Process Compliance Tool User Guide 3
Page 4
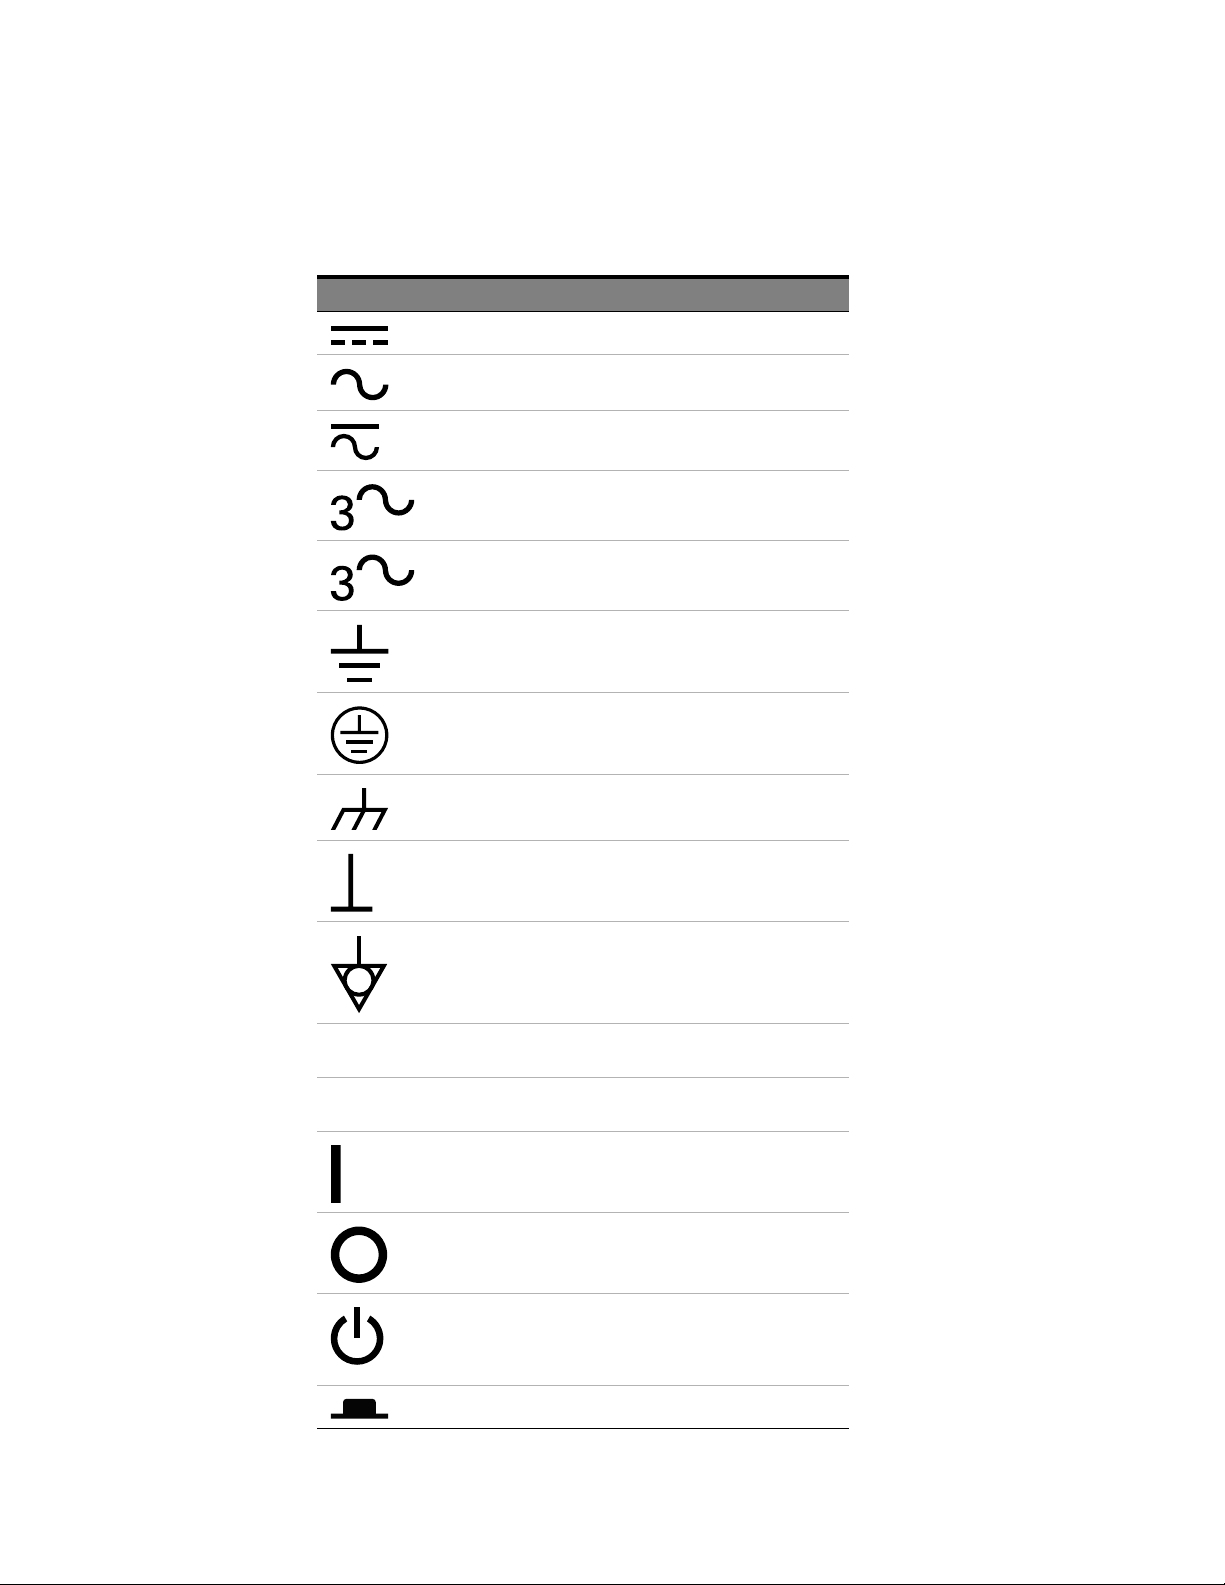
Safety Symbols
Table 1 Safety Symbol
Symbol Description
Direct current
Alternating current
Both direct and alternating current
Three phase alternating current
Three phase alternating current
Earth ground terminal
Protective earth ground terminal
Frame or chassis ground terminal
N Neutral conductor on permanently
L Line conductor on permanently installed
Terminal is at earth potential
Equipotentiality
installed equipment
equipment
On (mains supply)
Off (mains supply)
Standby (mains supply). The instrument is
not completely disconnected from the
mains supply when the power switch is in
the standby position
In position of a bi-stable push switch
4 DDR Post Process Compliance Tool User Guide
Page 5
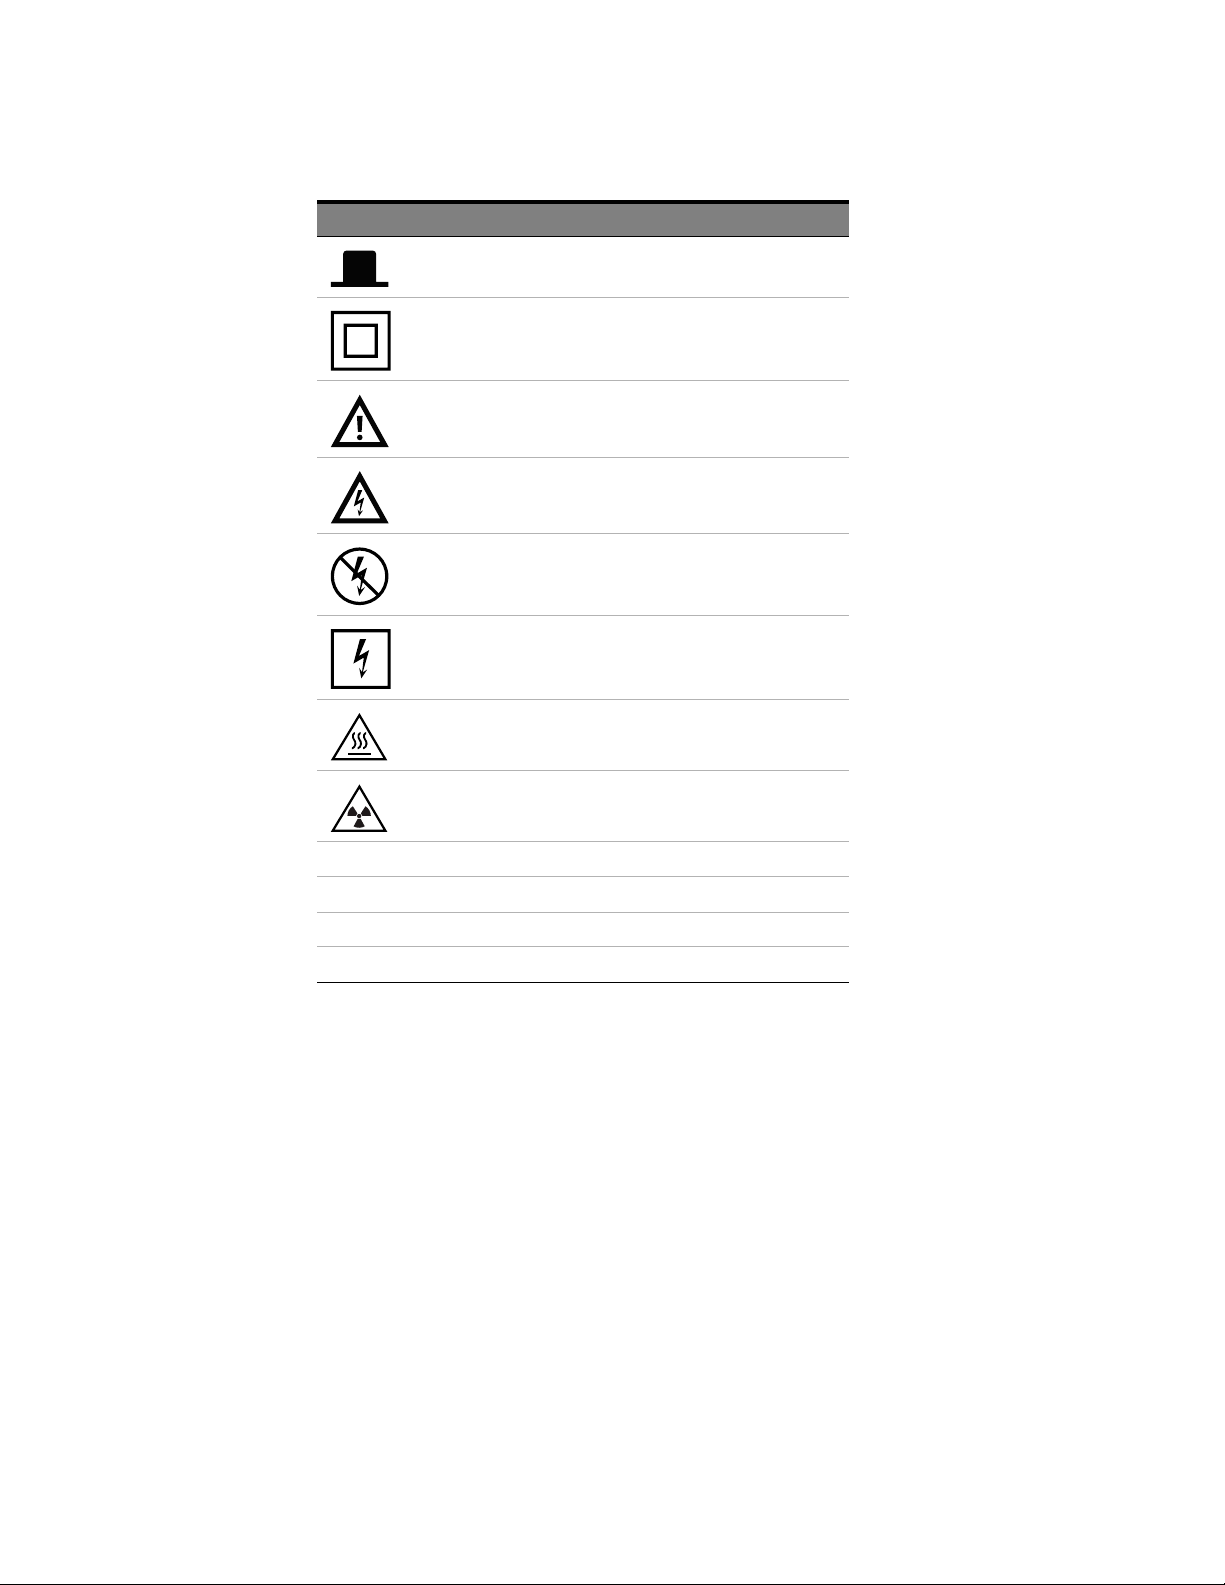
Symbol Description
Out position of a bi-stable push switch
Equipment protected throughout by
DOUBLE INSULATION or REINFORCED
INSULATION
Caution, refer to accompanying
documentation
Caution, risk of electric shock
Do not apply around or remove from
HAZARDOUS LIVE conductors
Application around and removal from
HAZARDOUS LIVE conductors is
permitted
Caution, hot surface
Ionizing radiation
CAT I IEC Measurement Category I
CAT II Measurement Category II
CAT III Measurement Category III
CAT IV Measurement Category IV
DDR Post Process Compliance Tool User Guide 5
Page 6
Compliance and Environmental Information
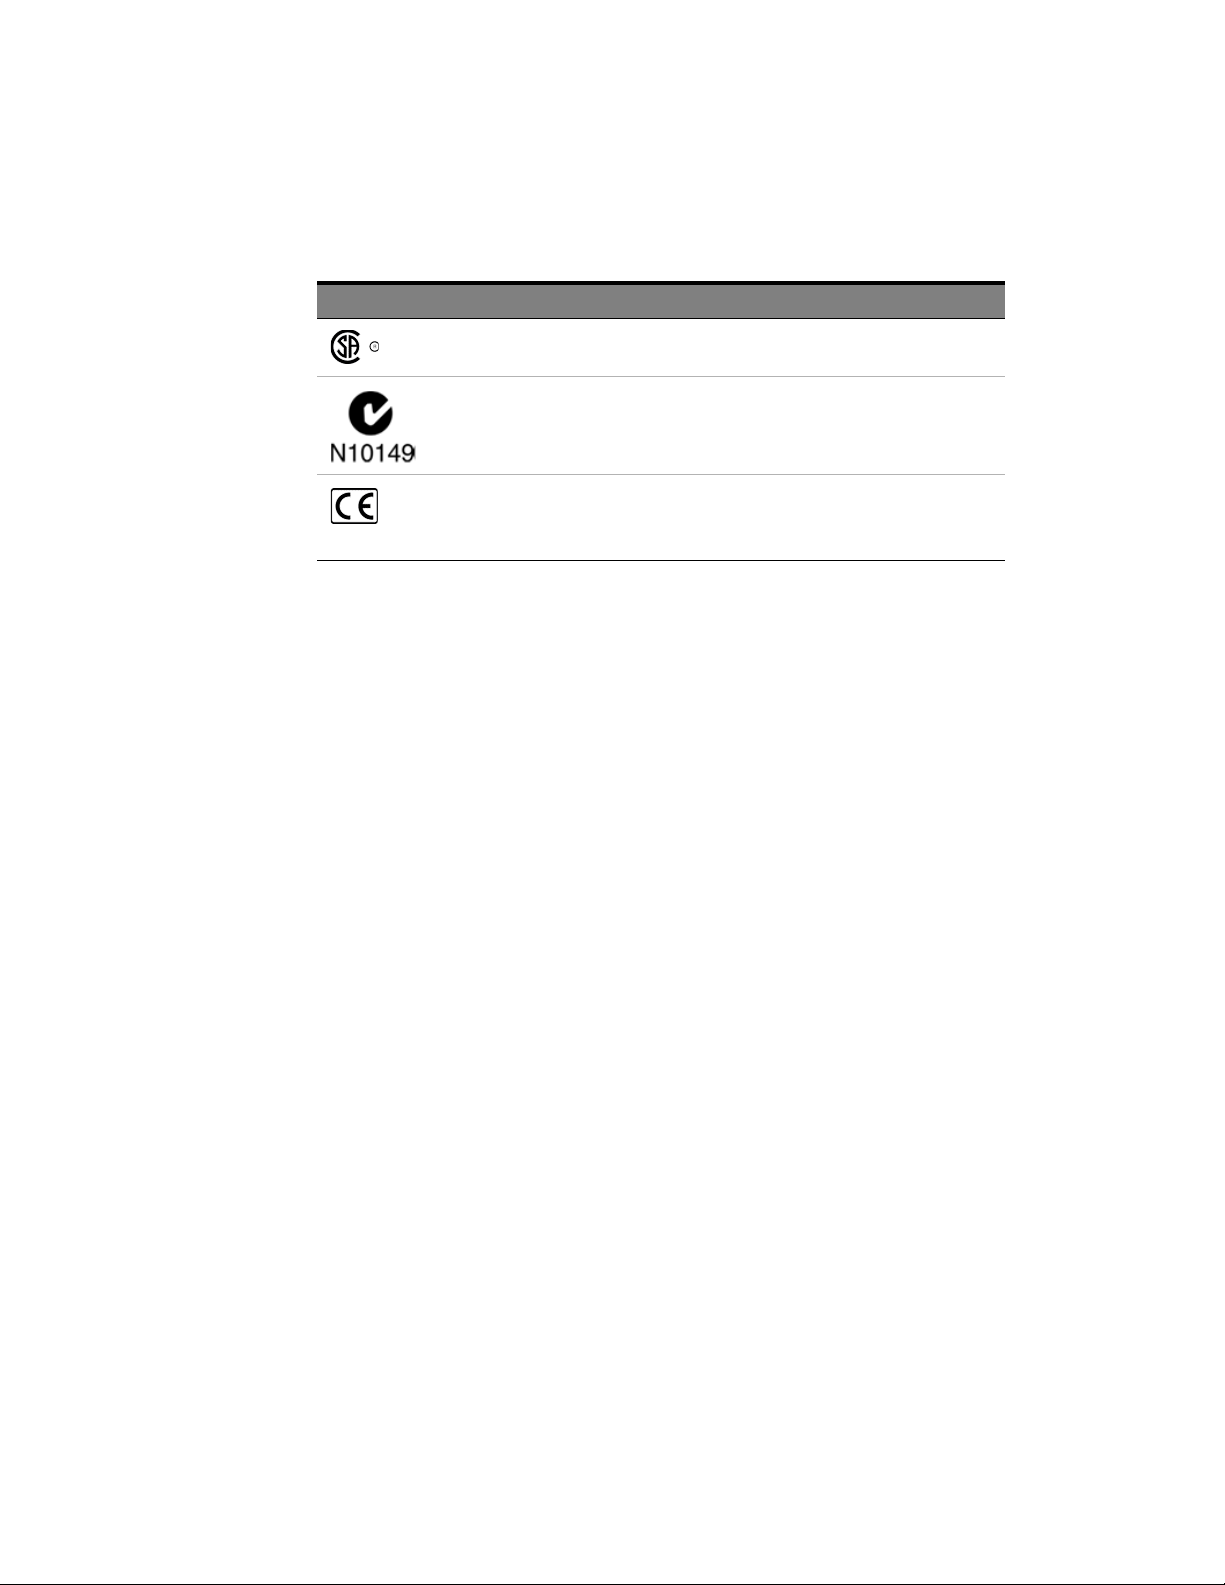
Table 2 Compliance and Environmental Information
Safety Symbol Description
CSA is the Canadian certification mark to demonstrate compliance with the Safety
requirements.
The C-tick mark is a registered trademark of the Spectrum Management
Agency of Australia. This signifies compliance with the Australia EMC
Framework regulations under the terms of the Radio Communication Act
of 1992.
CE compliance marking to the EU Safety and EMC Directives.
ISM GRP-1A classification accord ing to the international EMC stand ard.
ICES/NMB-001 compliance marking to the Canadian EMC standard.
6 DDR Post Process Compliance Tool User Guide
Page 7

DDR Post Process Compliance—At a Glance
The DDR Post Process Compliance tool evaluates the captured DDR/LPDDR data against a set of
user-defined limits to help you validate that a memory system is operating properly. The bus types
supported by this tool are:
With B4622A license
- DDR1/2/3
- LPDDR1/2
With B4622B upgrade license
- DDR1/2/3/4
- LPDDR1/2/3
The automated test application guides you through the process of selecting and configuring tests,
running tests, and evaluating the test results.
The application assumes that the Keysight logic analysis system has already been set up to properly
capture DDR data.
To use the automated test application, see:
•Chapter 2, "What's New" on page 13
•Chapter 3, "Starting the DDR Post Process Compliance Tool" on page 15
•Chapter 4, "Configuring Tests" on page 19
•Chapter 5, "Setting Up the Test Environment" on page 31
•Chapter 6, "Selecting Tests" on page 35
•Chapter 7, "Running Tests" on page 39
•Chapter 8, "Viewing Results" on page 43
•Chapter 9, "Viewing/Exporting/Printing the Report" on page 47
•Chapter 10, "Saving Test Projects" on page 51
•Chapter 11, "Creating or Opening a Test Project" on page 53
DDR Post Process Compliance Tool User Guide 7
Page 8

8 DDR Post Process Compliance Tool User Guide
Page 9

Contents
Safety Summary 3
Compliance and Environmental Information 6
DDR Post Process Compliance—At a Glance 7
1 About the Tool
2What's New
3 Starting the DDR Post Process Compliance Tool
To view/hide the toolbar 17
4 Configuring Tests
To set the test limits 20
To create/edit limit sets 25
To split a combined limit 26
To combine limits 27
To activate/refresh limit sets 29
5 Setting Up the Test Environment
6 Selecting Tests
7 Running Tests
To set the display preferences 42
8 Viewing Results
To change margin thresholds 45
9 Viewing/Exporting/Printing the Report
To export the report 48
To print the report 50
10 Saving Test Projects
To set AutoRecovery preferences 52
DDR Post Process Compliance Tool User Guide 9
Page 10

11 Creating or Opening a Test Project
To set load preferences 54
Index
10 DDR Post Process Compliance Tool User Guide
Page 11
DDR Post Process Compliance Tool
User Guide
1
About the Tool
Overview of the
tests
There are two types of tests:
• Tests which check for timing violations
• Tests which check for illegal DDR state transitions
The test limits can be (and must be) configured by the user.
The provided timing violation tests include:
Table 3 Timing violation tests
ParameterDescription Test
tRAS
max
tRAS
min
tRP PRECHARGE to any other command (same bank) must be > tRP
tCCD Time between any read or write command must be > tCCD
tRRD ACTIVATE to ACTIVATE (any bank) must be >= tRRD
Row Active time ACTIVATE to
PRECHARGE/Auto-PRECHARGE
Row Active time ACTIVATE to
PRECHARGE/Auto-PRECHARGE
must be < tRASmax
must be > tRASmin
tFAW Time for four ACTIVATEs (any bank) must be >= tFAW
tRFC REFRESH to REFRESH or ACTIVATE must be > tRFC
tDARW ACTIVATE to external READ/WRITE must be > tDARW
tDRP Read to Precharge/AutoPrecharge must be > tDRP
tDRW Read to Write must be > tDRW
tDWP Write to Precharge/AutoPrecharge must be > tDWP
tDWR Write to Read must be > tDWR
11
Page 12

1 About the Tool
Table 4 State machine violation tests
Description
READ or WRITE to an inactive row
REFRESH to an active bank
ACTIVATE to an active bank
Compatibility The DDR Post Process Compliance tool works for most DDR, DDR2, DDR3, DDR4,
LPDDR, LPDDR2, and LPDDR3 systems.
The tool is not able to fully model systems which use the following optional DDR
features:
• Partial Array Self-Refresh (PASR)
• Auto Self-Refresh (ASR)
• On-the-fly Burst Length switching
About the
software
The DDR Post Process Compliance tool is part of the Keysight B4622B Protocol
Compliance and Analysis Toolset package.
The application uses the same software framework which is used by Keysight Infiniium
oscilloscopes.
12 DDR Post Process Compliance Tool User Guide
Page 13

DDR Post Process Compliance Tool
User Guide
2
What's New
With this release, the tool supports DDR, DDR2, DDR3, DDR4, LPDDR, LPDDR2, and
LPDDR3. Several new tests have been added for DDR3/4 and LPDDR2/3.
The DDR4 and LPDDR3 support is available only with the upgrade license - B4622B of
the tool.
13
Page 14

2 What's New
14 DDR Post Process Compliance Tool User Guide
Page 15
DDR Post Process Compliance Tool
User Guide
3
Starting the DDR Post Process
Compliance Tool
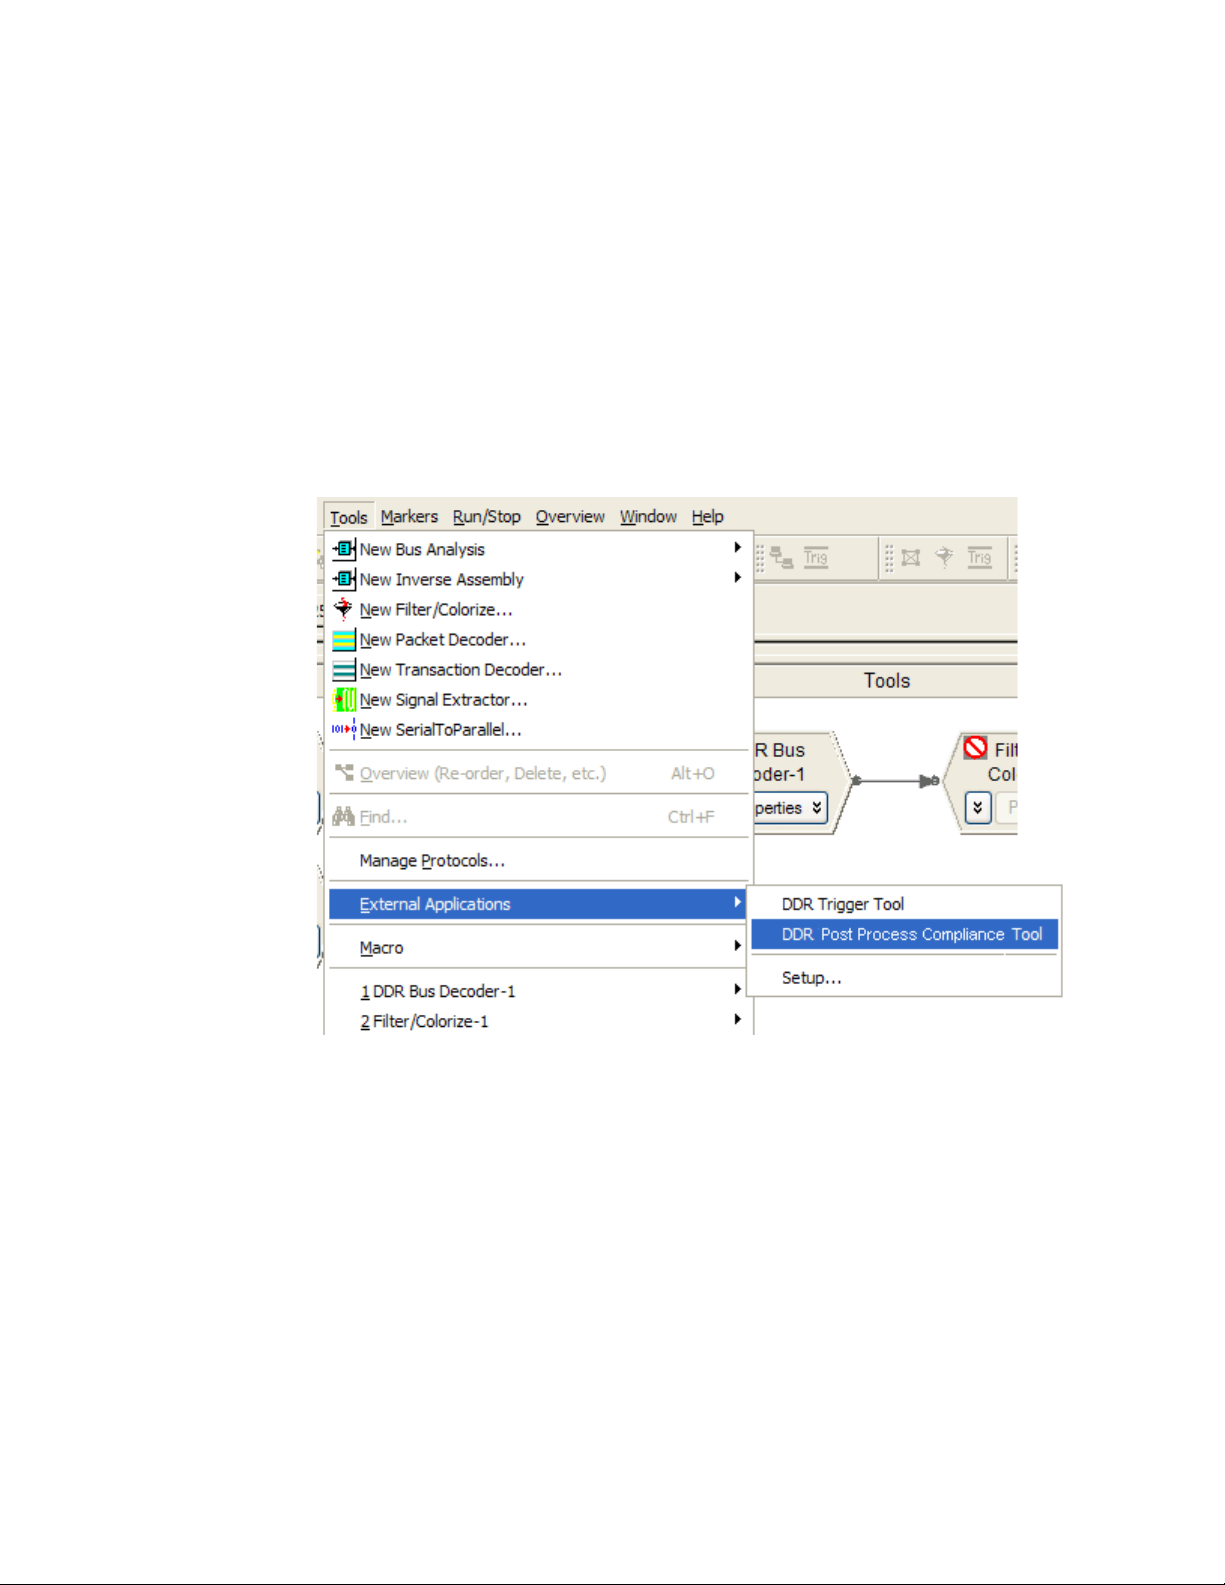
1 From the logic analysis system's main menu, choose Tools>External
Applications>DDR Post Process Compliance Tool.
The DDR Post Process Compliance tool window appears.
15
Page 16
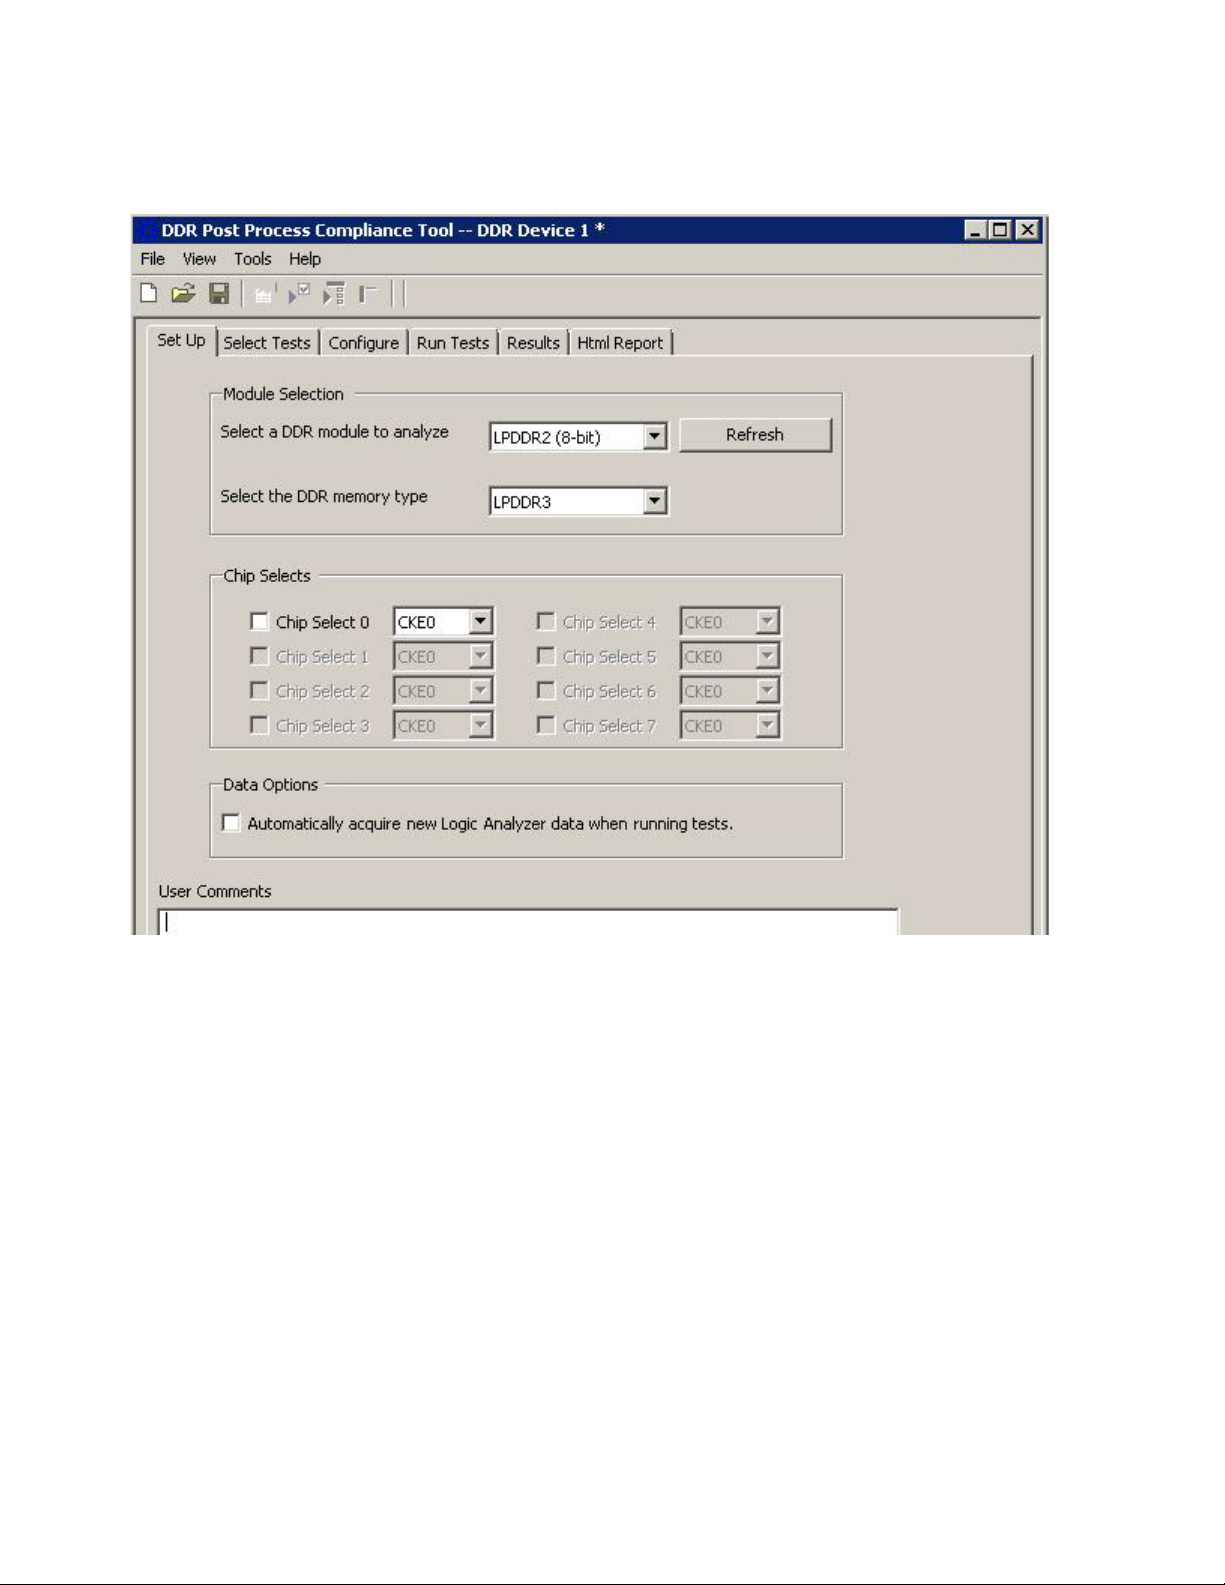
3 Starting the DDR Post Process Compliance Tool
See Also • "To view/hide the toolbar" on page 17
Next • "Creating or Opening a Test Project" on page 53
16 DDR Post Process Compliance Tool User Guide
Page 17

To view/hide the toolbar
• To toggle between a hidden and visible toolbar, choose View>Toolbar from the
menu.
Starting the DDR Post Process Compliance Tool 3
DDR Post Process Compliance Tool User Guide 17
Page 18

3 Starting the DDR Post Process Compliance Tool
18 DDR Post Process Compliance Tool User Guide
Page 19

DDR Post Process Compliance Tool
User Guide
4
Configuring Tests
You must configure a set of limits before you can run any tests.
These limits describe the memory part you are using and certain characteristics of the
memory bus.
You can load, edit, and save limits from the Tools>Compliance limits menu.
See Also
• "To set the test limits" on page 20 (for information on how to calculate the limits)
• "To create/edit limit sets" on page 25 (for information on how to enter and save the limits)
• "To activate/refresh limit sets" on page 29 (for information on how to load a limit set which you
have saved)
19
Page 20

4 Configuring Tests
To set the test limits
All timing violation tests are based on compliance limits that are specified by the user.
Specify these limits based on the specific DDR memory parts you are using. Limits will
vary depending on:
• Memory technology (DDR2, DDR3)
•Speed grade
•Clock speed
• Part density
• User selected options such as Additive Latency and burst length
Units Some times must be entered in seconds (s). If the data sheet expresses these limits in
terms of clock cycles, you will need to convert those limits to seconds.
Each logic analyzer sample has a timestamp. Results will be calculated by subtracting
the time stamp of the first event from the timestamp of the second event. Note that the
time stamps are only as good as the time stamp resolution of the logic analyzer card
being used (this resolution may be as coarse as 2ns; see the Specifications and
Characteristics in the logic analyzer's online help for details). The elapsed time includes
time during which the DDR clock is inactive.
Definitions of
the limits
Other times must be entered as a number of clock cycles (CK). Results will be calculated
by counting the number of logic analyzer samples between the two events.
Additive latency (AL) is normally expressed as a number of clocks (CK). For some
calculations, you will need to convert AL to seconds (s) by dividing by the clock rate.
Burst length (BL) is simply an integer (4 or 8).
You will need to look up some of the limits from the part data sheet. You will then
calculate values for the derived limits.
Keysight suggests using the formulas here to compute the derived limits. However, it is
entirely the responsibility of the user to choose limits that are appropriate for the
intended application.
Here are the limits you need to specify:
20 DDR Post Process Compliance Tool User Guide
Page 21
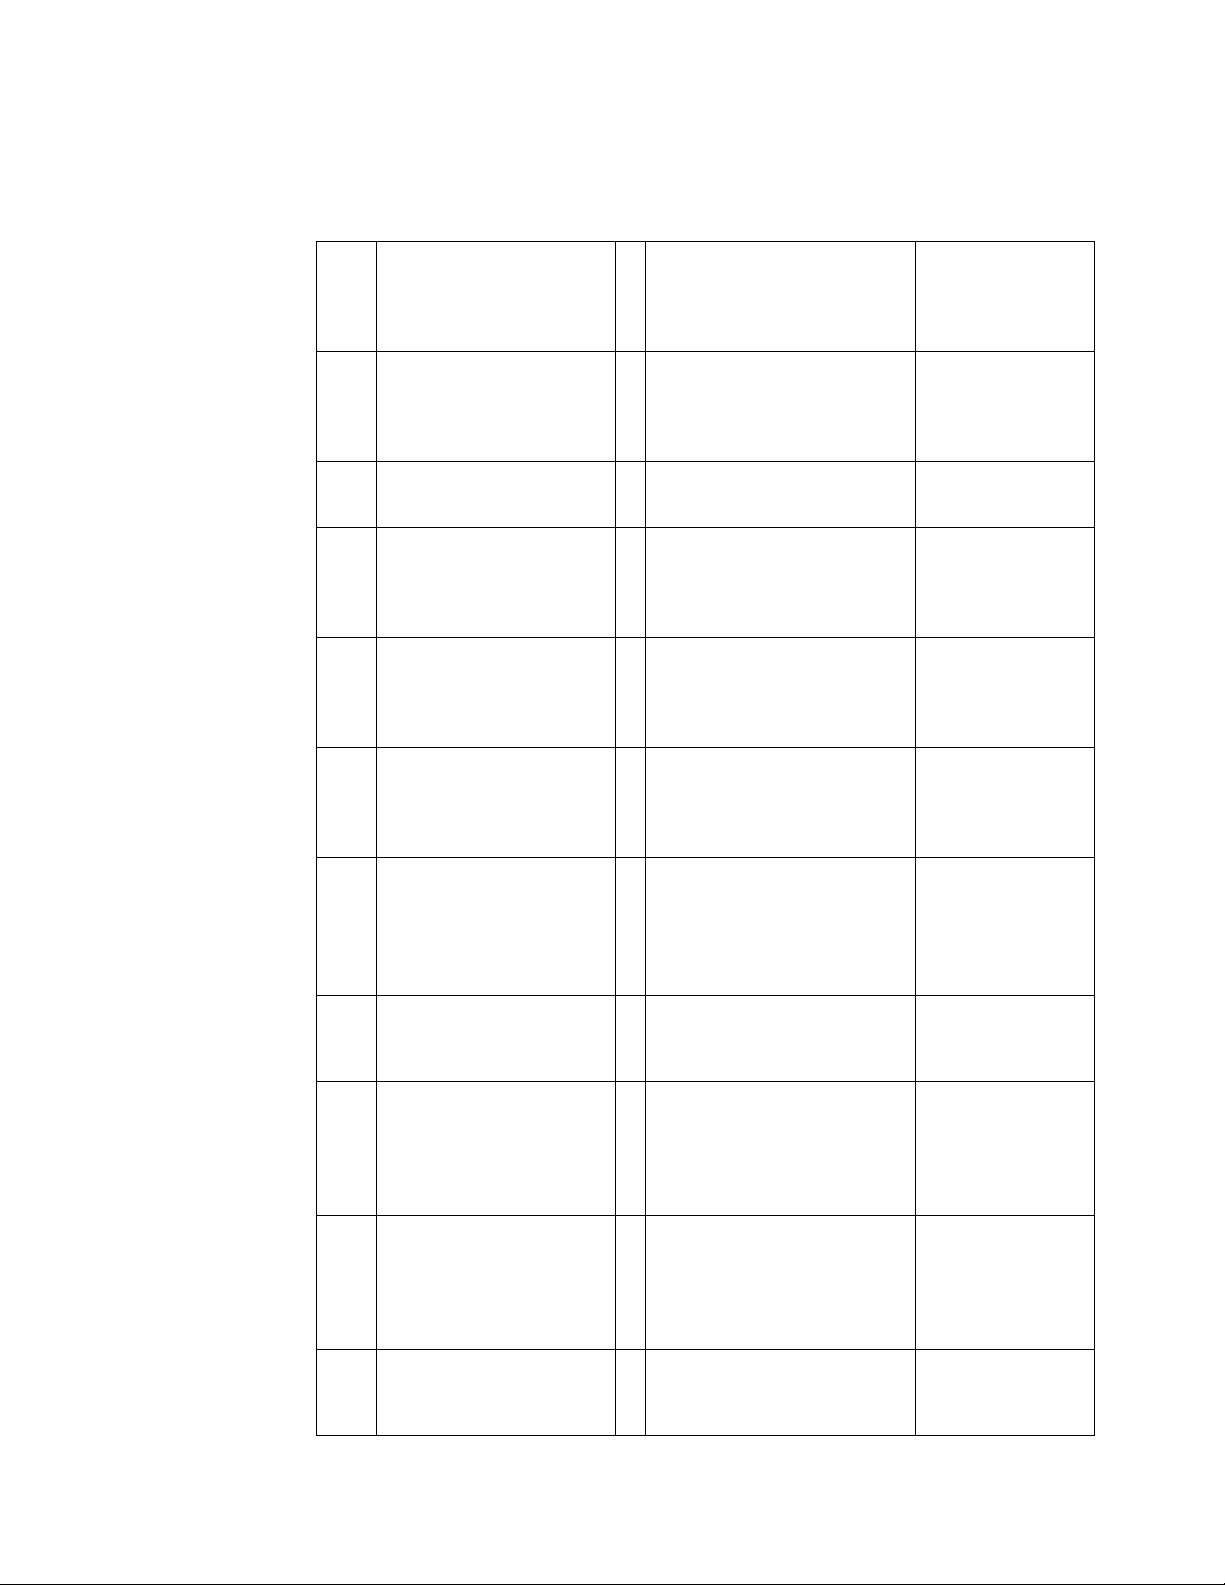
Table 5 Limits used by the tests
Configuring Tests 4
Par
Description U
ame
ter
Suggested Definition Reference
n
i
t
tRA
Row Active time ACTIVE
S
to PRECHARGE
ma
x
tRA
Row Active time ACTIVE
S
to PRECHARGE
min
tDARWMin ACT to external
s Part depend ent (9 * tREFI) Data Sheet
s Part dependent Data Sheet
s tRCD-AL DDR2 (see
READ/WRITE
tRP Row Precharge time min
s Part dependent Data Sheet
PRECHARGE to any
other command (same
bank)
tDRPMin Read to Precharge CKDDR2: AL + BL/2 + max
(tRTP, 2CK) -2CK
DDR3: AL + tRTP
tDRWMin Read to Write CKDDR2: BL/2 + 2CK
DDR3: BL4: RL + CCD/2 +
2CK – WL
DDR3: BL8: RL + CCD +
2CK - WL
(tREFI). See DDR3
(see
page 25) page
147.
page 24) 3.5 /
DDR3 (see
page 25) 12.3
DDR2 (see
page 24) 3.7.1 /
DDR3 (see
page 25) 4.13.3
DDR2 (see
page 24) figure 35 /
DDR3 (see
page 25) figure 35,
36
tRFCREFRESH command time.
s Part dependent Data Sheet
min time REFRESH to
REFRESH or ACTIVATE
tDWPMin Write to Precharge CKWL + BL/2 + tWR DDR2 (see
page 24) 3.7.2 /
DDR3 (see
page 25) Figure 49,
50
tDWRMin Write to Read CKDDR2: CL -1 + BL/2 + tWTR
DDR3: WL + BL/2 + tWTR
DDR2 (see
page 24) Figure 41
/ DDR3 (see
page 25) Figure 53,
56
tCCDCAS to CAS delay min
CKPart dependent Data Sheet
time between any read or
write command
DDR Post Process Compliance Tool User Guide 21
Page 22
4 Configuring Tests
Table 5 Limits used by the tests (continued)
Values used to
calculate the
limits
Par
Description U
ame
ter
tRRDMin time between two
ACTIVATE commans
(different banks)
tFAWMin time for four
ACTIVATE commands
(different banks)
Suggested Definition Reference
n
i
t
s Part dependent Data Sheet
s Part dependent Data Sheet
To calculate the limits, you will need to look up or calculate the following values:
Table 6 Values used to calculate the limits
Par
Description U
ame
ter
AL Additive Latency C
Suggested Definition Reference
n
i
t
User selection System Design
K
,
s
BL Burst Length User selection System Design
CL CAS (Read) Latency CKPart dependent Data Sheet
CWLCAS Write Latency CKPart dependent Data Sheet
RL Read Latency CKAL + CL DDR3 (see
page 25) 3.4.3.4
WL Write latency CKAL + CWL DDR3 (see
page 25) 3.4.3.4
tRCDRAS to CAS Delay (ACT
to internal R/W)
tREFIRefresh Interval; average
time between Refresh
commands
tRTPInternal Read to Precharge s Part dependent (max 4CK or
s Part dependent Data Sheet
s Part dependent Data Sheet
Data Sheet
7.5ns)
22 DDR Post Process Compliance Tool User Guide
Page 23
Table 6 Values used to calculate the limits (continued)
Configuring Tests 4
Naming
conventions
Customizing the
limits
Par
Description U
ame
ter
tWR Internal Write Recovery s Part dependent Data Sheet
tWTRInternal Write to internal
Read
Suggested Definition Reference
n
i
t
s Part dependent (max 4CK or
7.5ns)
Data Sheet
External Read/Write + AL = Internal Read/Write
Limits which are normally expressed as maximum or minimum times have names
beginning with 't'.
The names of derived timing limits begin with 'tD'. Derived limits are not usually
specified directly in the part data sheet. In general, you will compute these from the
standard timing parameters.
Limits which are normally expressed as a number of clock cycles have no prefix. In
some cases, you may need to convert these to seconds for use by the tool.
The definitions are suggestions based on the DDR2/3 standards. There is no requirement
that the user must set the limits to those specified in the data sheet or in the JEDEC
standard. You can set the limits however you like, depending on the goals of your
testing.
Example limits An example limit set is supplied with the validation tool. The example is based on a
DDR800 part with 6-6-6 timing.
To load and view the example limits, select Tools>Compliance Limits>Create/Edit
Limit Set, then select Load Limit Set..., select Official limit sets, then select DDR
Example.
Example part:
• Data sheet: MICRON DDR3 MT41J256-32 Me x 4 x 8 Banks PDF: 09005aef82f1e6e2 Rev. M 9/08
EN
• Speed Grade 25 (6-6-6)
• Clock 400 MHz (2.5ns)
• Data Rate 800 MT/s
• Temperature 0-85C
DDR Post Process Compliance Tool User Guide 23
Page 24
4 Configuring Tests
Table 7 Standard parameters used for example limit set
Parameter Value Reference
tREFI 7.8 us (low temp) Data Sheet, page 71
tRAS
max
tRAS
min
tRP 15ns D ata Sheet, page 30
tCCD 4CK (10ns) Data Sheet, page 70
tRRD 10ns Data Sheet, page 30
tFAW 50ns Data Sheet, page 30
tRFC 110ns Data Sheet, page 30
tRCD 15ns Data Sheet, page 30
tRTP 10ns Data Sheet, page 70
tWR 15ns Data Sheet, page 70
tWTR 10ns Data Sheet, page 70
AL 0ns (0CK) User selected (MR1, 0 means no additive latency)
BL 10ns (8 bursts) User selected (MR0)
CL 6CK (15ns) Data Sheet, page 30 (MR0)
CWL 5CK (12.5ns) Data Sheet, page 116 (MR2)
70.2us Data Sheet (tREFI), page 63
37.5ns Data Sheet, page 30
Table 8 Derived values used for example limit set
Parameter Value
RL 6CK (15ns)
WL 5CK (12.5ns)
tDARW 15ns
tDRP 10ns
tDRW 17.5ns
tDWP 32.5ns
tDWR 27.5ns
References • DDR2 JEDEC Standard 79-2E, April 2008
• DDR3 JEDEC Standard 79-3C, November 2008
24 DDR Post Process Compliance Tool User Guide
Page 25
To create/edit limit sets
You can create new limit sets by modifying existing limit sets and saving them to new
files.
1 From the DDR Post Process Compliance tool's menu, choose Tools>Compliance
limits>Create/Edit limit set....
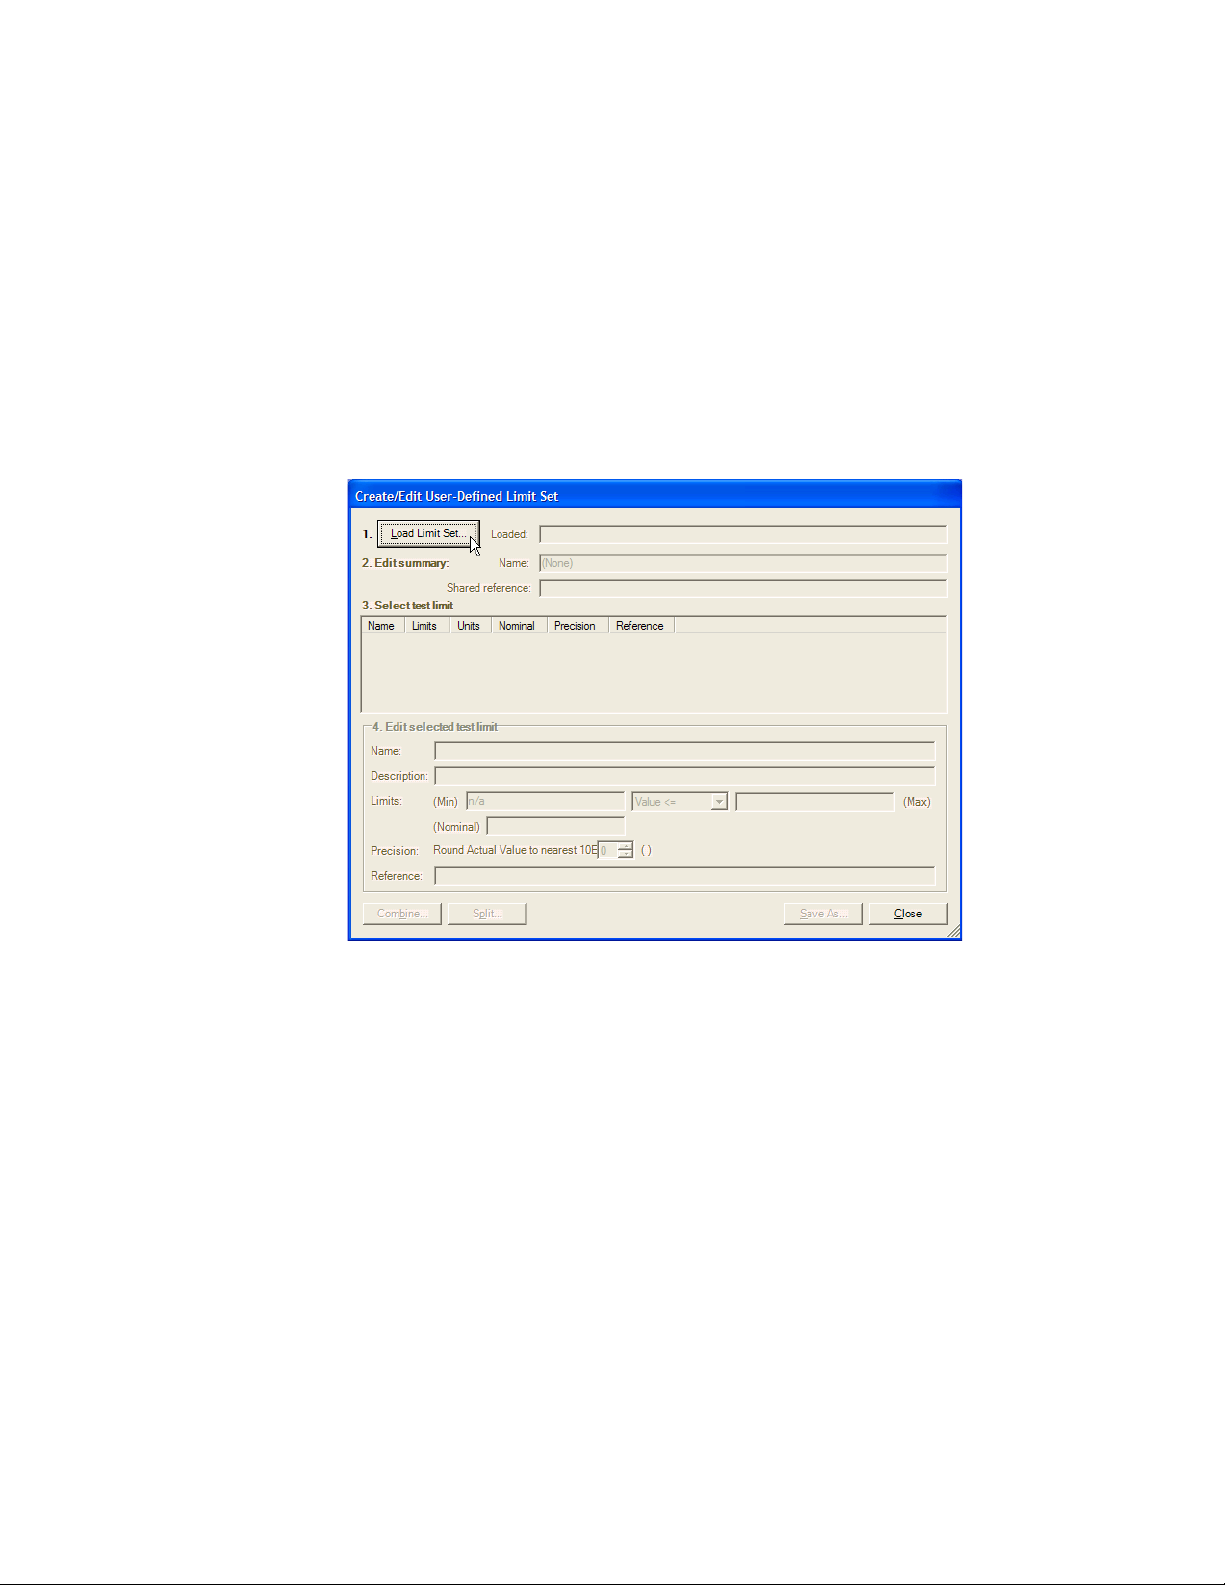
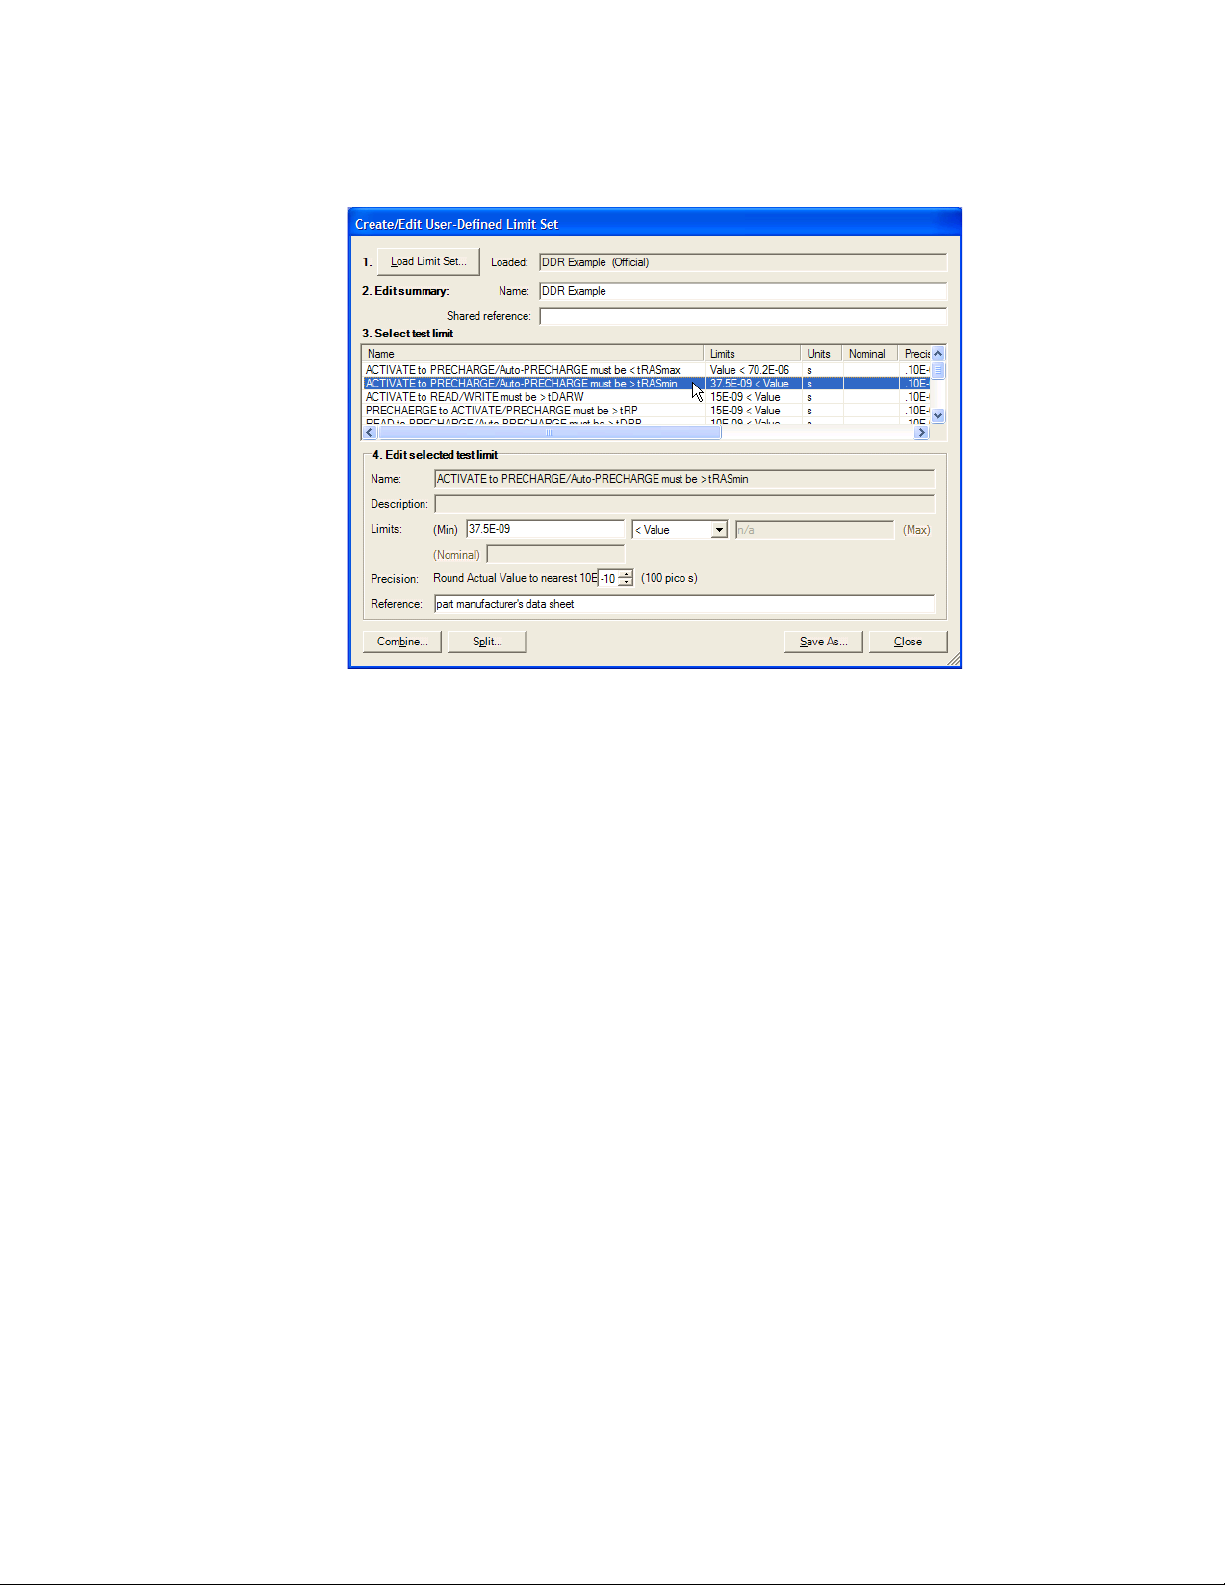
2 In the Create/Edit User-Defined Limit Set dialog, click Load Limit Set... to pre-load
the dialog with the supplied example limit set (or a user-defined limit set).
Configuring Tests 4
3 Give the new limit set a unique name. If all of the tests come from the same
reference, you can enter a base description (for example, document name) in the
Shared Reference field and then add test-specific references (for example, page
number) down below.
4 Select a limit to modify.
DDR Post Process Compliance Tool User Guide 25
Page 26
4 Configuring Tests
When Loading
5 Modify the limit as desired. See also:
• "To split a combined limit" on page 26
• "To combine limits" on page 27
6 Repeat the last two steps until all limits requiring change are modified.
7 Click Save As... to save your custom limit set to a file. Enter the file name in the Save
File As dialog.
• Now, you can activate your newly-created limit set for use in the next run. See "To
activate/refresh limit sets" on page 29.
When you load a project, the application will attempt to restore the limit set that was in
Projects
See Also
use at the time the project was saved.
• "To set the test limits" on page 20 (for information on how to calculate the limits)
To split a combined limit
If a limit covers more than one test ID, you can split it into two limits.
• In the Create/Edit User-Defined Limit Set dialog (see "To create/edit limit sets" on page 25),
select the limit that covers multiple tests, and click Split....
26 DDR Post Process Compliance Tool User Guide
Page 27

Configuring Tests 4
See Also
In this case, we are splitting a 2-test limit into two single-test limits.
8 In the Split Test Limit dialog, assign one of the tests to the new limit by selecting it
and clicking the --> button.
9 Click Finish.
• "To combine limits" on page 27
To combine limits
• In the Create/Edit User-Defined Limit Set dialog (see "To create/edit limit sets" on page 25),
select the limits you want to combine, and click Combine....
DDR Post Process Compliance Tool User Guide 27
Page 28

4 Configuring Tests
10 In the Combine Multiple Test Limits dialog, select which limit to copy values from
and provide summary names and descriptions.
11 Click Finish.
See Also
• "To split a combined limit" on page 26
28 DDR Post Process Compliance Tool User Guide
Page 29
To activate/refresh limit sets
NOTE
To load a previously defined limit set:
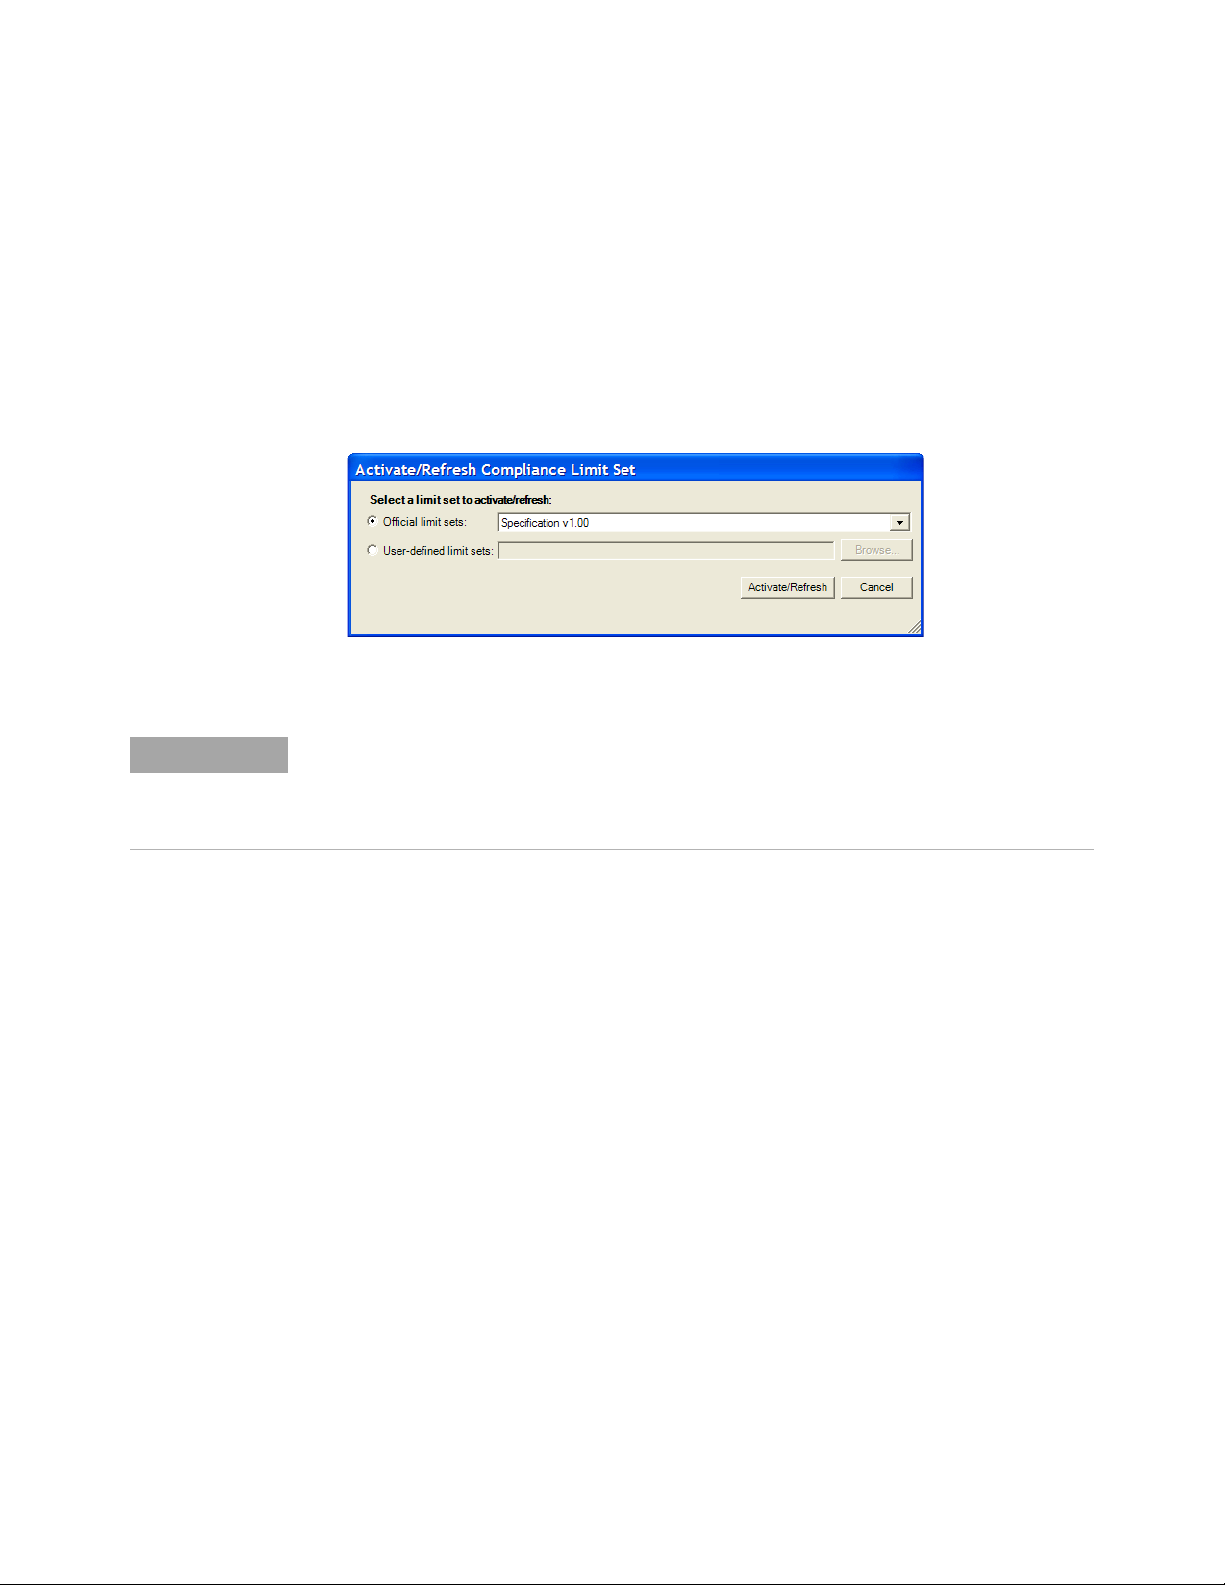
1 From the DDR Post Process Compliance tool's menu, choose Tools>Compliance
limits>Activate/Refresh limit set....
2 In the Activate/Refresh Compliance Limit Set dialog, select one of the official limit
sets or a user-defined limit set.
3 Click Activate/Refresh.
Configuring Tests 4
See Also
If you have existing test results when you activate a different limit set, the application
examines your results to see if any of them would experience a limit change when the
different limit set is loaded. If any results would be affected in this way, the application
tells you which ones they are and warns that they must be deleted.
• "To combine limits" on page 27
DDR Post Process Compliance Tool User Guide 29
Page 30

4 Configuring Tests
30 DDR Post Process Compliance Tool User Guide
Page 31

DDR Post Process Compliance Tool
User Guide
5
Setting Up the Test Environment
1 Click the Set Up tab.
2 If more than one DDR bus decoder exists in the logic analysis system setup, select
which one to use for the compliance tests from the Select a DDR module to analyze
listbox.
If only one decoder exists, it will be selected automatically.
If needed, click Refresh to update the list. You may need to refresh the list and select
a new decoder if you load a new logic analyzer configuration file, or whenever you
add or remove a decoder .
3 Select the DDR memory type. The DDR Post Process Compliance tool can work with
any of the following memory bus standards (depending on which license of the
B4622 software is installed).
With B4622A license -
- DDR1/2/3
- LPDDR1/2
With B4622B upgrade license -
- DDR1/2/3/4
- LPDDR1/2/3
License Error - If you have only the B4622A license and you try to select DDR4 or
LPDDR3 as the DDR memory type in the DDR Post Process Compliance tool, the
following error messages are displayed.
31
Page 32

5 Setting Up the Test Environment
To get DDR4 and LPDDR3 support, you must purchase the B4622B license.
4 From the Data Options section, select whether or not you want the tool to
automatically acquire new data when compliance tests are run. Whether you plan to
run tests once or multiple times, the selection of this checkbox instructs the tool to
first run the logic analyzer for data acquisition. When the data acquisition run is
complete, the tool starts post processing the newly acquired data by running the
selected tests. If you plan to run the tests multiple times or forever, then you must
select this checkbox to ensure that the tool runs the logic analyzer repetitively for
data acquisition and then acquires the new data automatically for post processing.
Deselecting this checkbox instructs the tool to use the already acquired data for post
processing. The tool does not run the logic analyzer for data acquisition in this case.
Therefore, when you deselect this checkbox, you can run the tests only once on
existing data.
5 (optional) Describe the test for future reference. The specified User Comments will
appear on the HTML report which is generated for the test.
32 DDR Post Process Compliance Tool User Guide
Page 33

Setting Up the Test Environment 5
Next • "Selecting Tests" on page 35
DDR Post Process Compliance Tool User Guide 33
Page 34

5 Setting Up the Test Environment
34 DDR Post Process Compliance Tool User Guide
Page 35
DDR Post Process Compliance Tool
User Guide
6
Selecting Tests
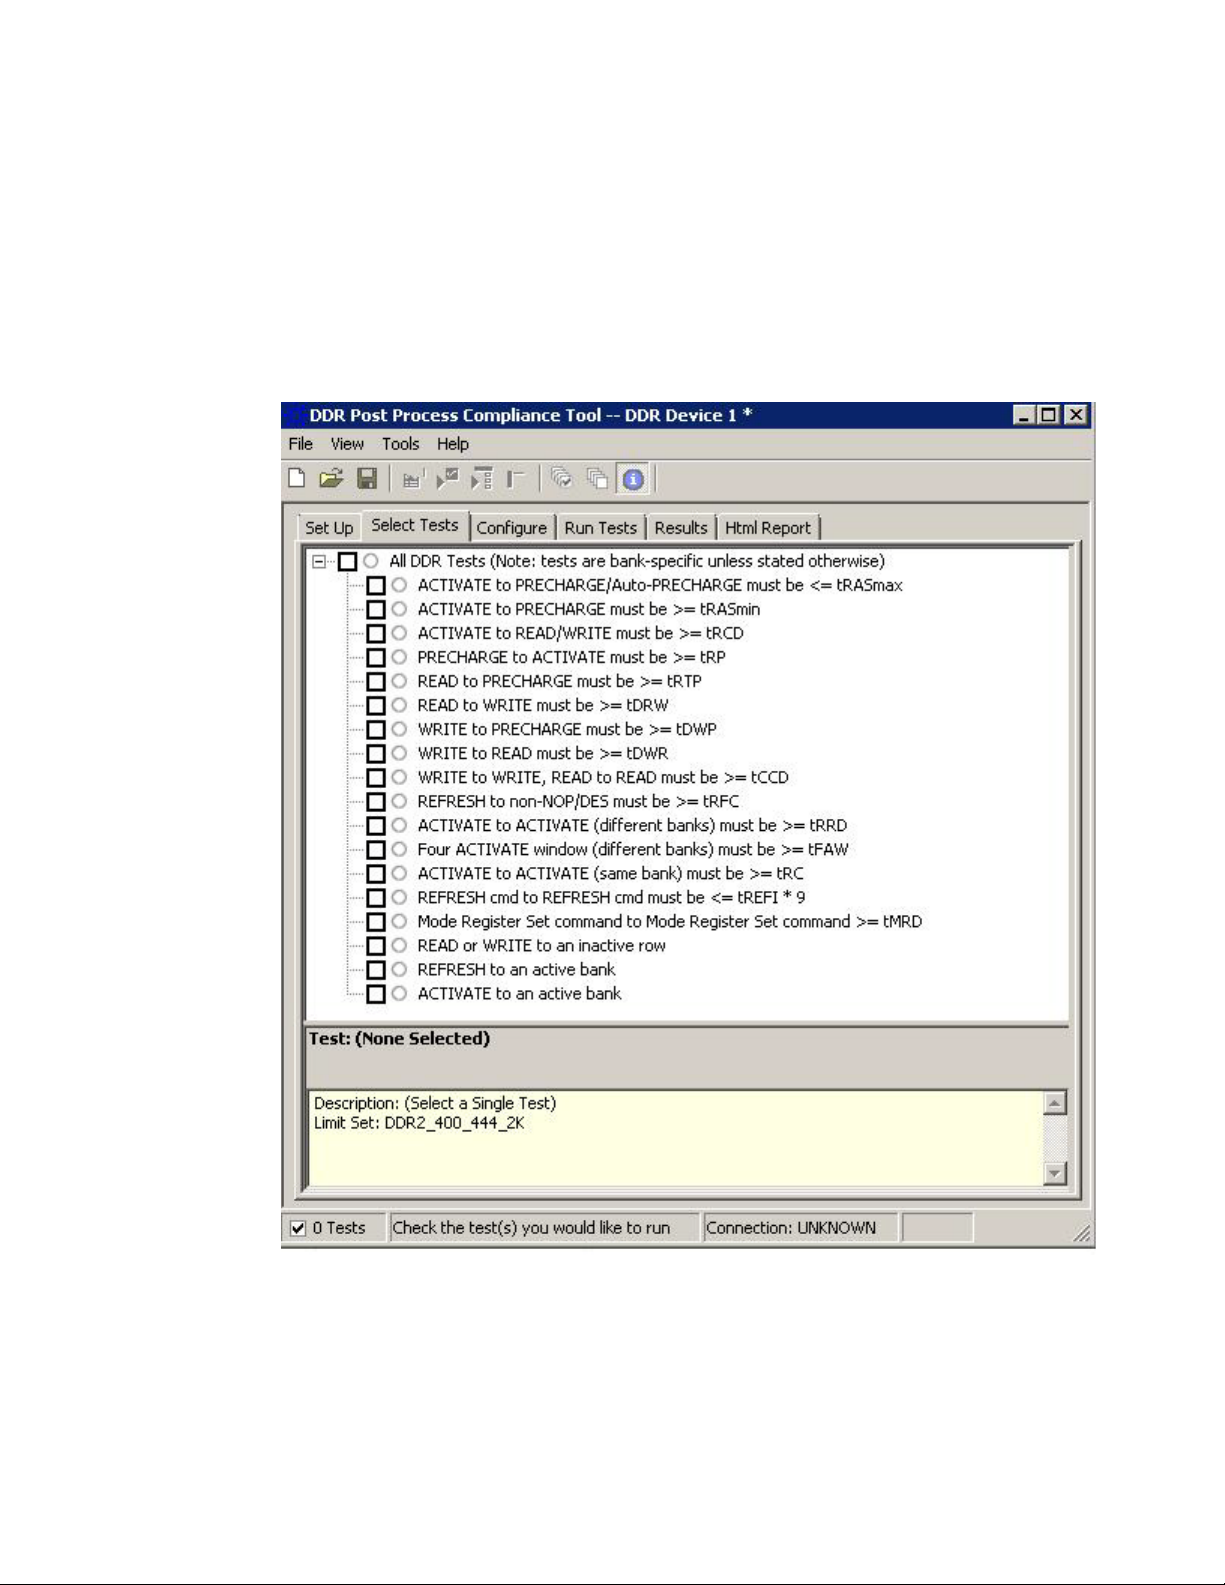
1 Click the Select Tests tab and then select the tests you want to run.
The tests displayed in this tab vary depending on the memory bus type that you
selected in the Set Up tab and the type of software license installed for the B4622
toolset. (The DDR Post Process Compliance tool is a part of this toolset.)
35
Page 36
6 Selecting Tests
With B4622A license
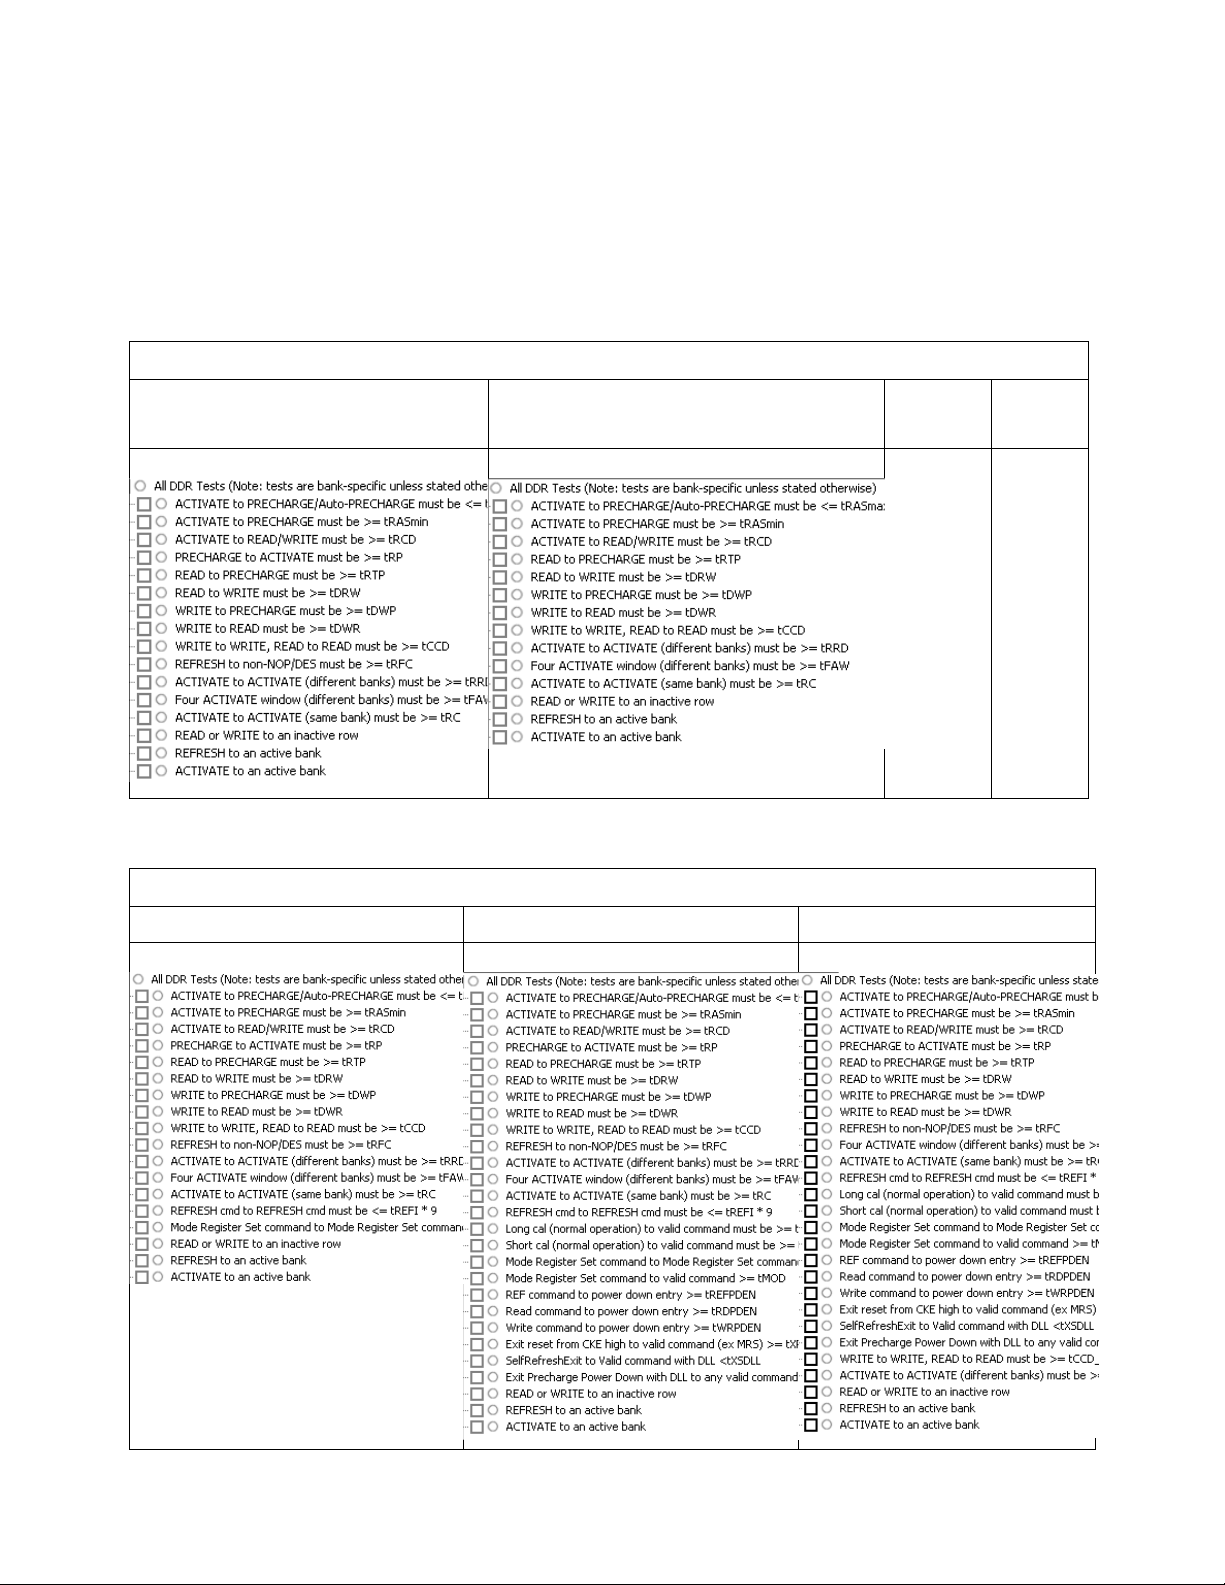
There are two license versions available for B4622 - B4622A and B4622B. With
B4622B, you get additional tests for each memory bus type as well as tests for DDR4
and LPDDR3 (which are not available with B4622A license). The following table
lists the tests available for memory bus types with each of these two licenses.
With B4622B license
DDR1, 2, 3 tests LPDDR, LPDDR2 tests DDR4
tests
Not
available
DDR1, 2 tests DDR3 tests DDR4 tests
LPDDR3
tests
Not
available
36 DDR Post Process Compliance Tool User Guide
Page 37
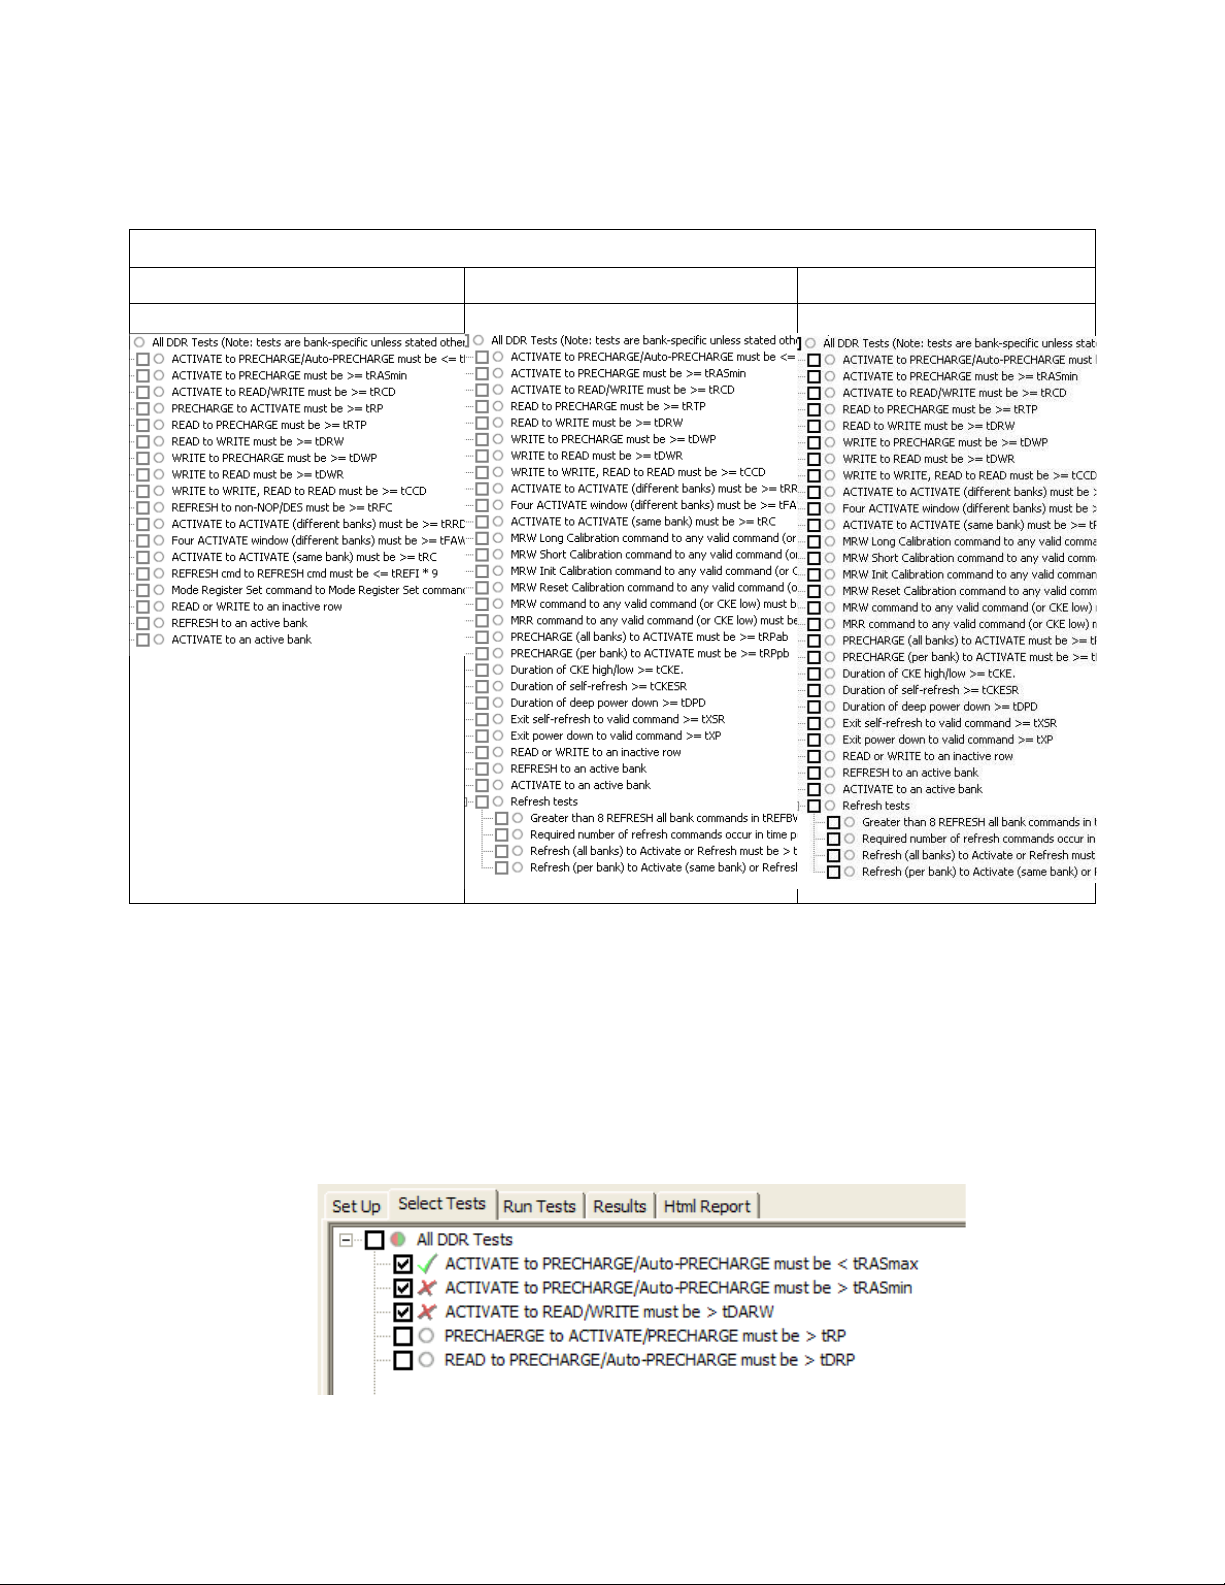
With B4622B license
LPDDR tests LPDDR2 tests LPDDR3 tests
Selecting Tests 6
When Tests
Have Already
Been Run
Some things to consider while selecting tests:
• Some tests might not make sense for your system. Do not select those tests.
• Checking a parent node/group will check all available sub-groups/tests.
• Unchecking a parent node/group will uncheck all sub-groups/tests.
• A parent node is checked if all subgroups are checked.
• A parent node is unchecked if ANY subgroup is unchecked.
DDR Post Process Compliance Tool User Guide 37
Page 38
6 Selecting Tests
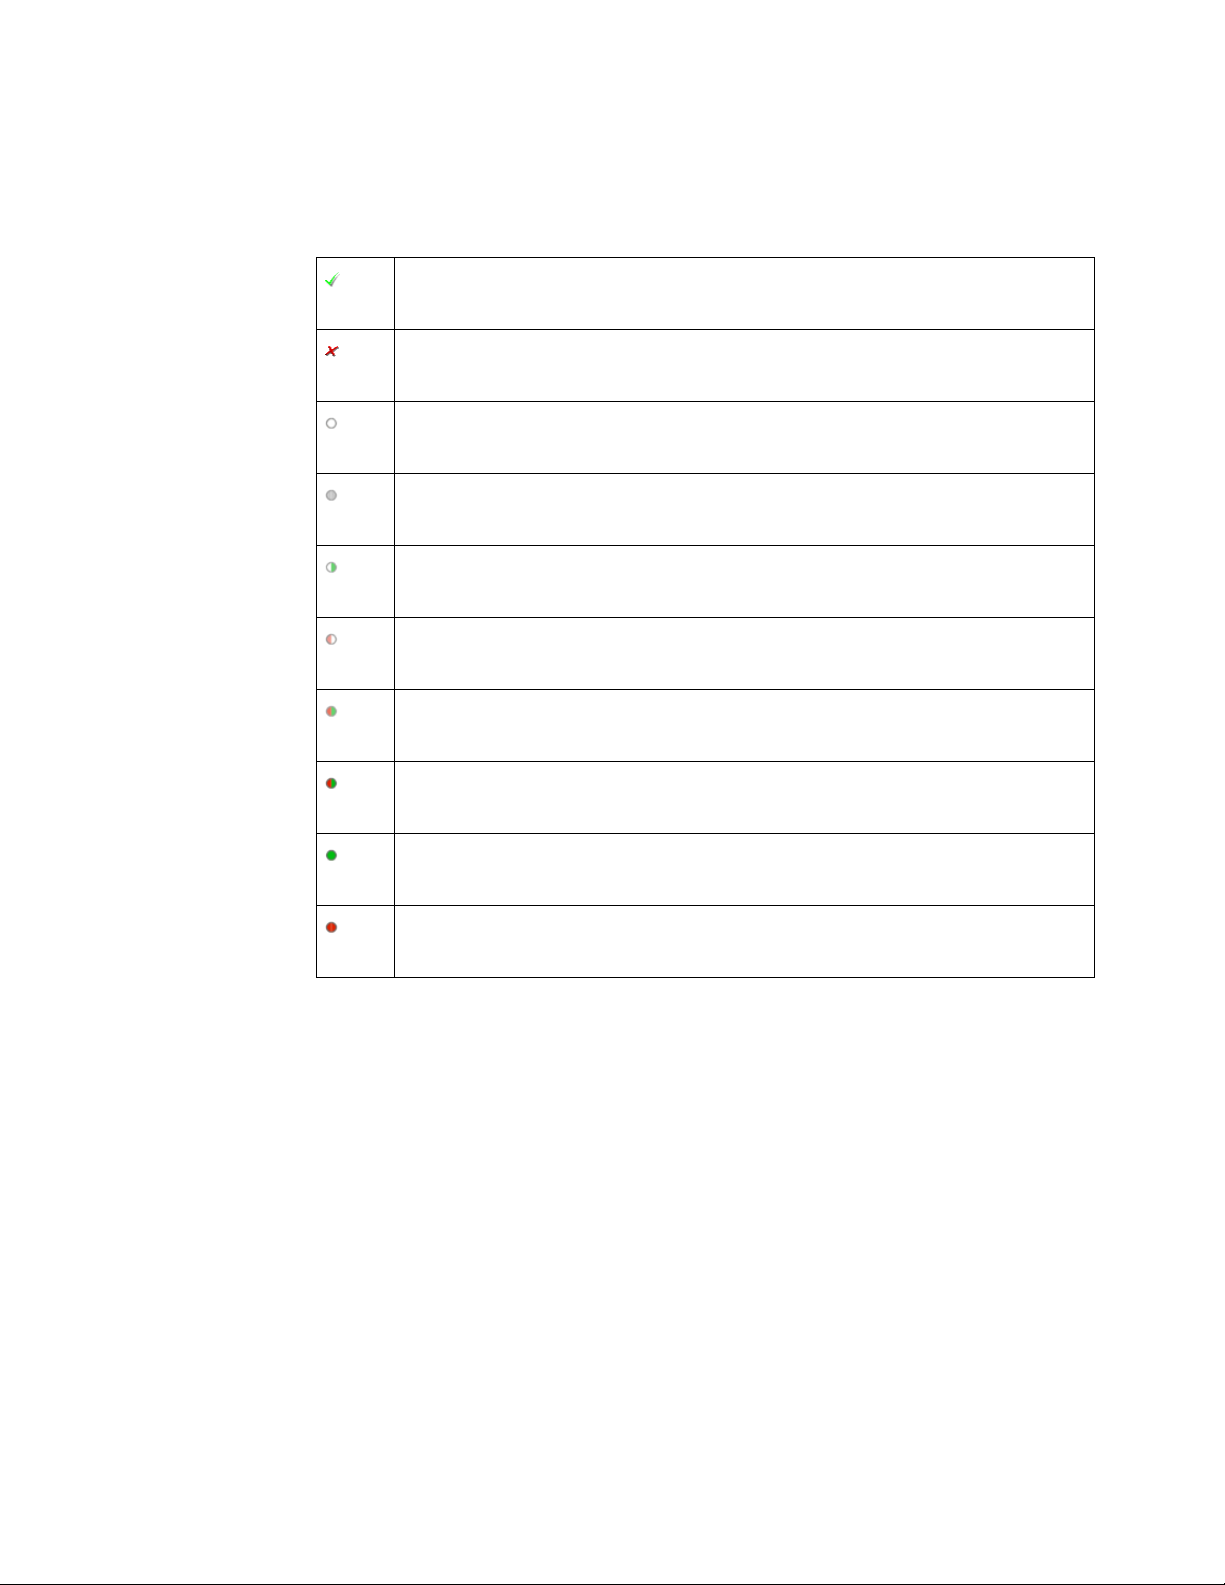
The marks have the following meanings:
The test passed.
The test failed.
The test has not been run, or no tests in the group have been run.
The test is currently running.
Some tests in the group have run and passed.
Some tests in the group have run and failed.
Some tests in the group have passed and some have failed; not all of the tests have
been run.
Some tests in the group have passed and some have failed; all of the tests have run.
See Also
• "To set the test limits" on page 20 (for information on how to calculate the limits)
• "About the Tool" on page 11 (for an overview of the tests performed)
All tests in the group have run and passed.
All tests in the group have run and failed.
Next • "Configuring Tests" on page 19
38 DDR Post Process Compliance Tool User Guide
Page 39
DDR Post Process Compliance Tool
User Guide
7
Running Tests
You can use the Run Tests tab to specify how the tests should be run and then run the
tests as per these settings.
You can run the tests once or repetitively.
39
Page 40

7 Running Tests
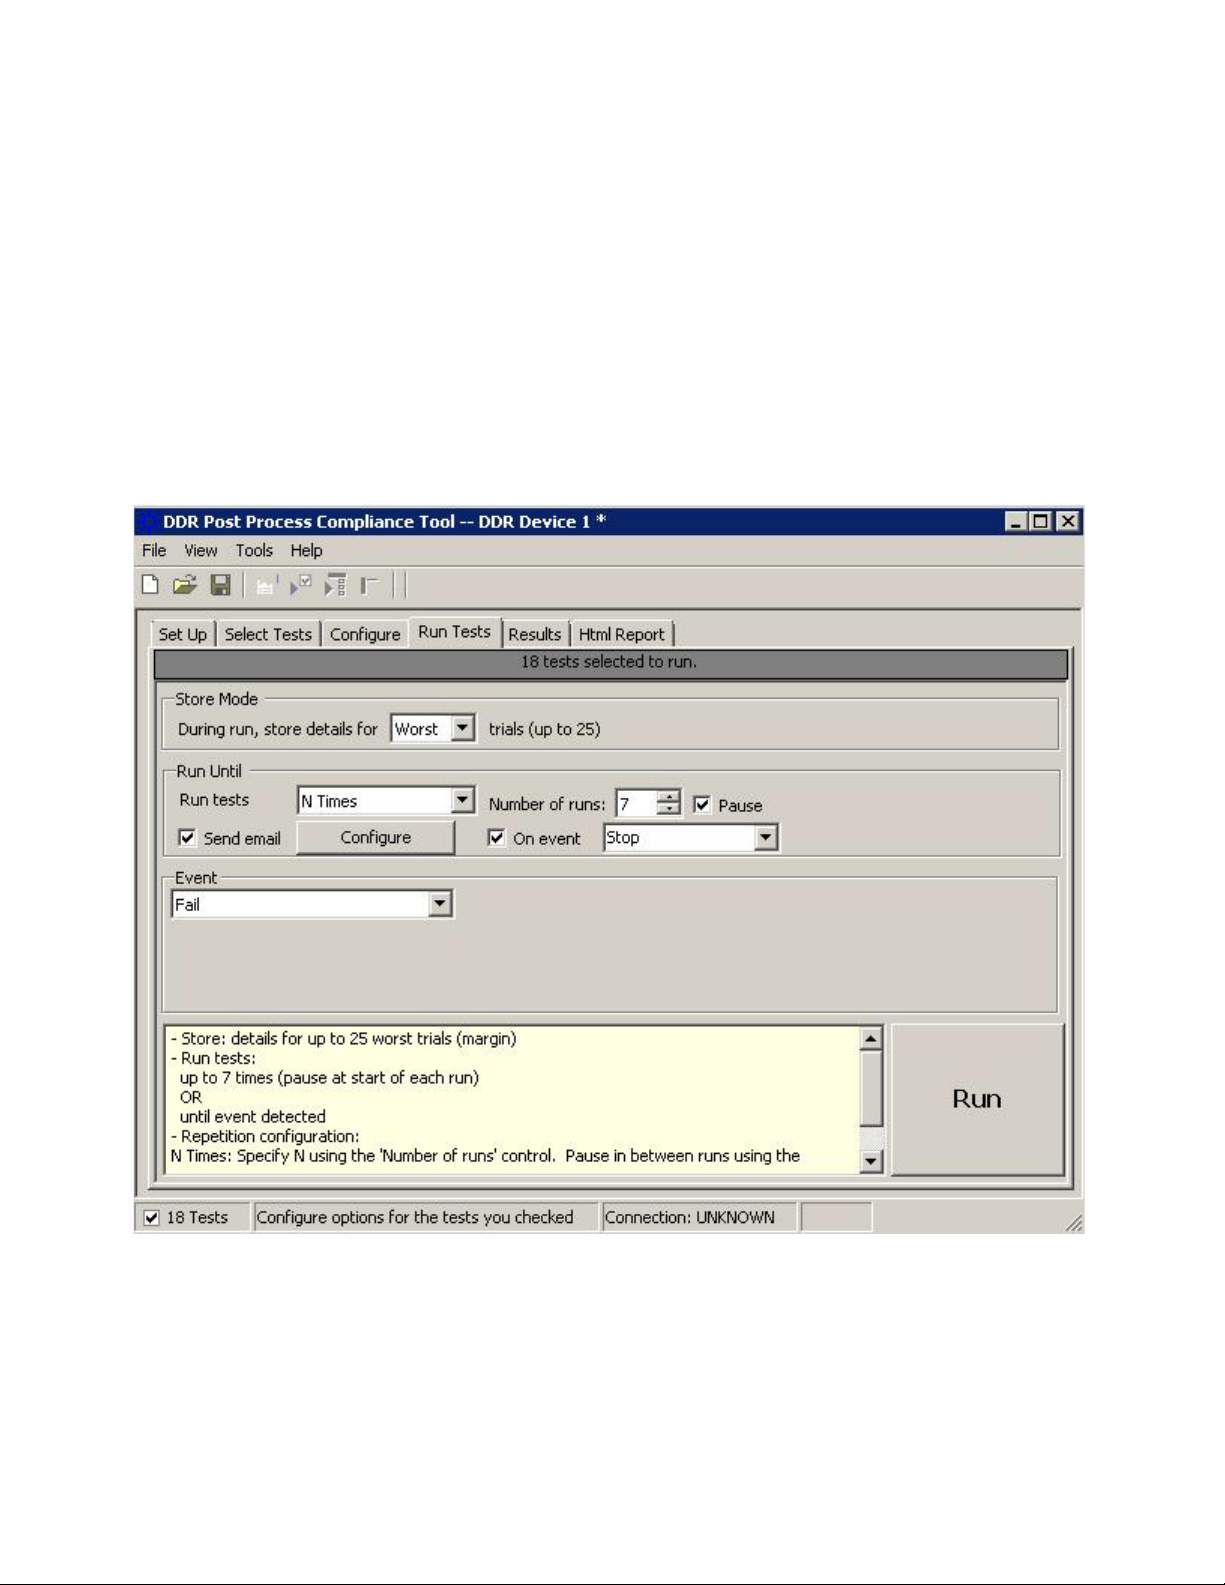
To run the selected tests
1 Click the Run Tests tab.
2 Configure the settings for running the tests.
a From the Store Mode section, select which trial results from the test run(s) you
want to store. You can store results for a maximum of 25 trials.
b From the Run Until section, select the number of times you want to run the tests.
Following options are available:
• Once - The tests are run once.
• N Times- The tests are run repetitively for the number of times specified in the
Number of Runs field.
• Forever- The tests are run repetitively until you press the Stop button.
If you select N Times or Forever, make sure you select the Automatically
acquire new logic analyzer data when running tests checkbox in the Set up tab.
c On selecting the N Times option, the Pause checkbox is displayed. Select this
checkbox to instruct the tool to pause the test run after the completion of each run
in the repetitive run.
d Select the Send email checkbox to instruct the tool to send a notification email
with the information about the test run when the test run completes or pauses. You
can specify the email address to which email should be sent by clicking the
Configure button displayed when this checkbox is selected.
e Select the On Event checkbox to instruct the tool to perform a specified action
when the specified event is detected in the test run. On selecting this checkbox, a
listbox is displayed with this checkbox. From this listbox, you can select either
Pause or Stop to pause or stop the test run when the selected event is detected
during a test run.
f When you select Event in the St ore Mo de section or select the On Event
checkbox, the Event listbox is displayed to allow you to select the event. When
the selected event occurs in the test run, the specified action is performed if the On
Event checkbox is selected or the details for the event are stored if the Store Mode
is set to Event. You can select from the following events:
• Pass - Perform the event action or store the event details when a test passes.
• Fail - Perform the event action or store the event details when a test fails.
• Margin < N - Perform the event action or store the event details when a test
result margin is less than the specified minimum required margin percentage.
At times, you may receive warning messages when the selected event does not
logically matches with the selected Store Mode. For instance, if the Store Mode is
Best, then you can only use Pass as the event. Similarly, if the store mode is
Worst, you cannot use Pass as the event. The tool automatically corrects the event
selection in such cases.
While you select the test configurations, the tool automatically keeps documenting
the test configurations for your reference in the open listbox in this tab.
40 DDR Post Process Compliance Tool User Guide
Page 41
Running Tests 7
3 Run the tests. There are several ways to run the selected tests:
• Click in the toolbar. to run all the selected tests.
• Select a branch in the Select Tests tab and then click in the toolbar to run only
the tests of the selected branch.
• Click the big Run button in the Run Tests tab.
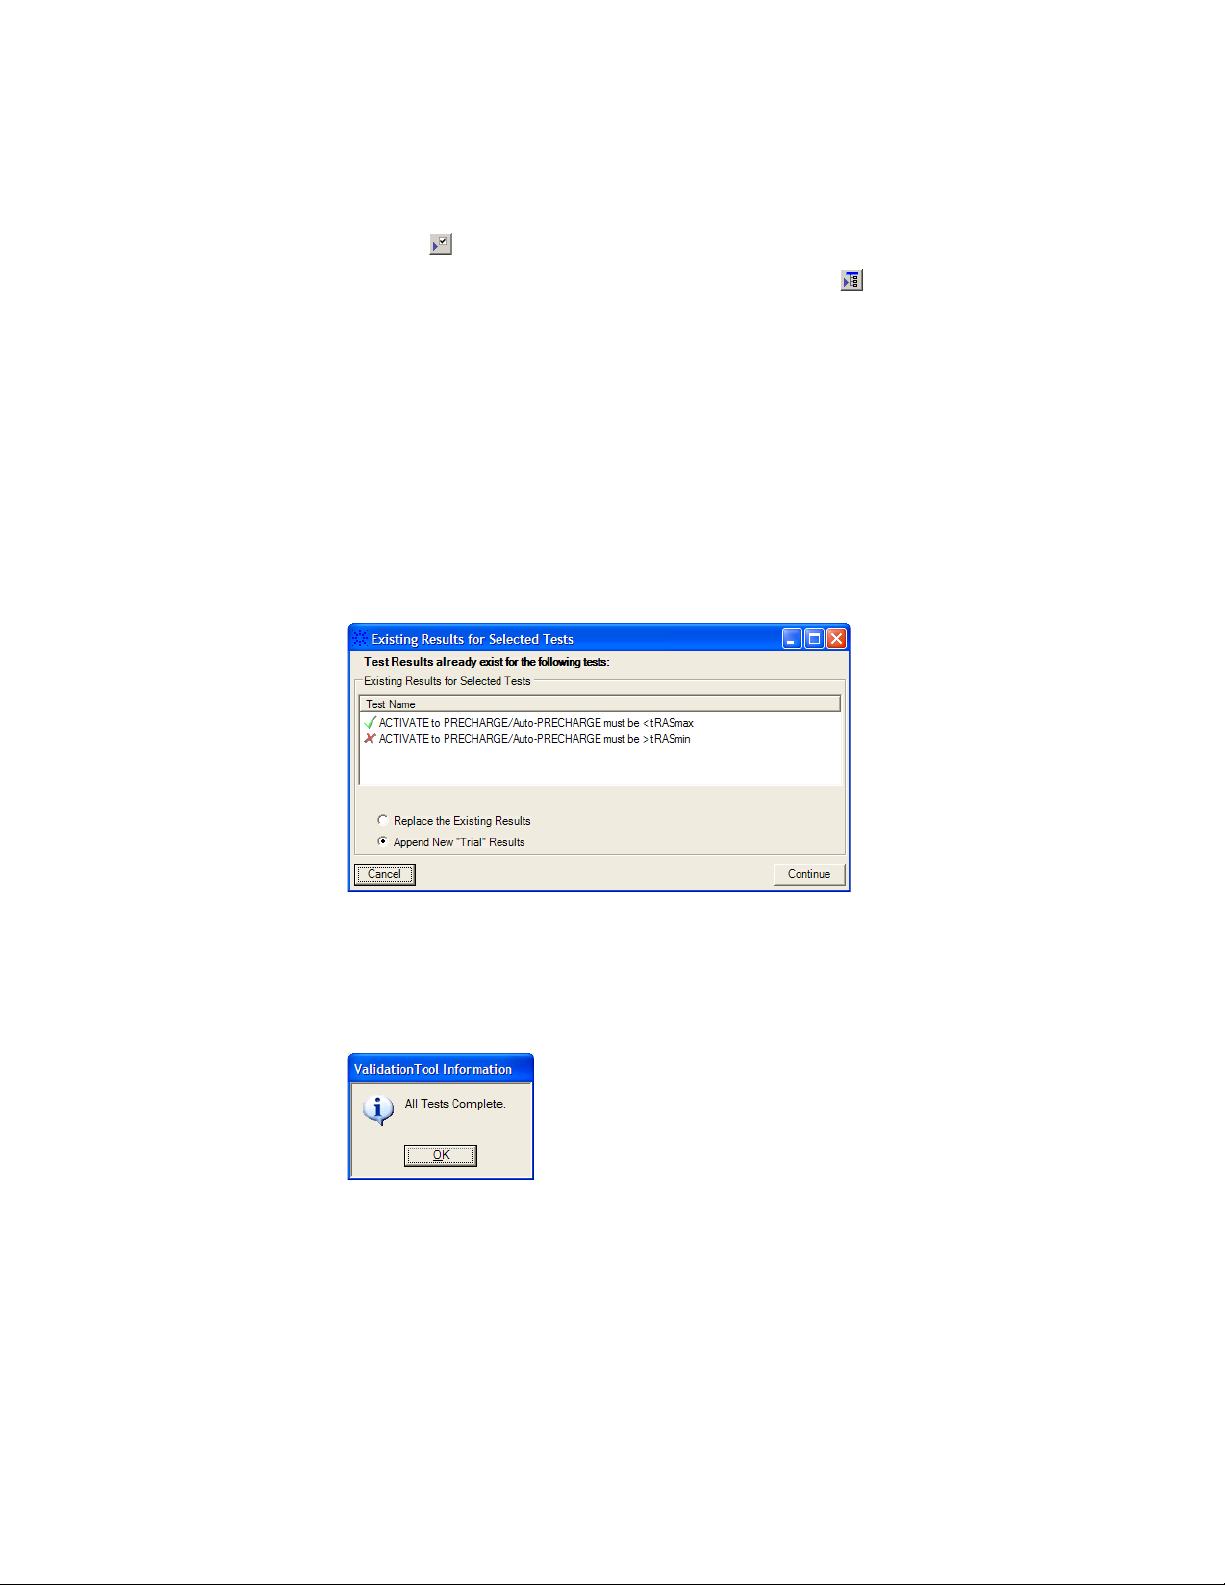
4 If there are existing test results, you are asked if you would like to keep them or
re-test (delete) them.
If you would like to keep the existing test results to compare against new results,
select Append New "Trial" Results.
Select Replace the Existing Results if you would like to delete the existing test
results.
5 While the tests are running, status dialogs appear to inform you about the test
progress.
6 When the tests are complete, click OK.
See Also • "To set the display preferences" on page 42
Next • "Viewing Results" on page 43
DDR Post Process Compliance Tool User Guide 41
Page 42
7 Running Tests
NOTE
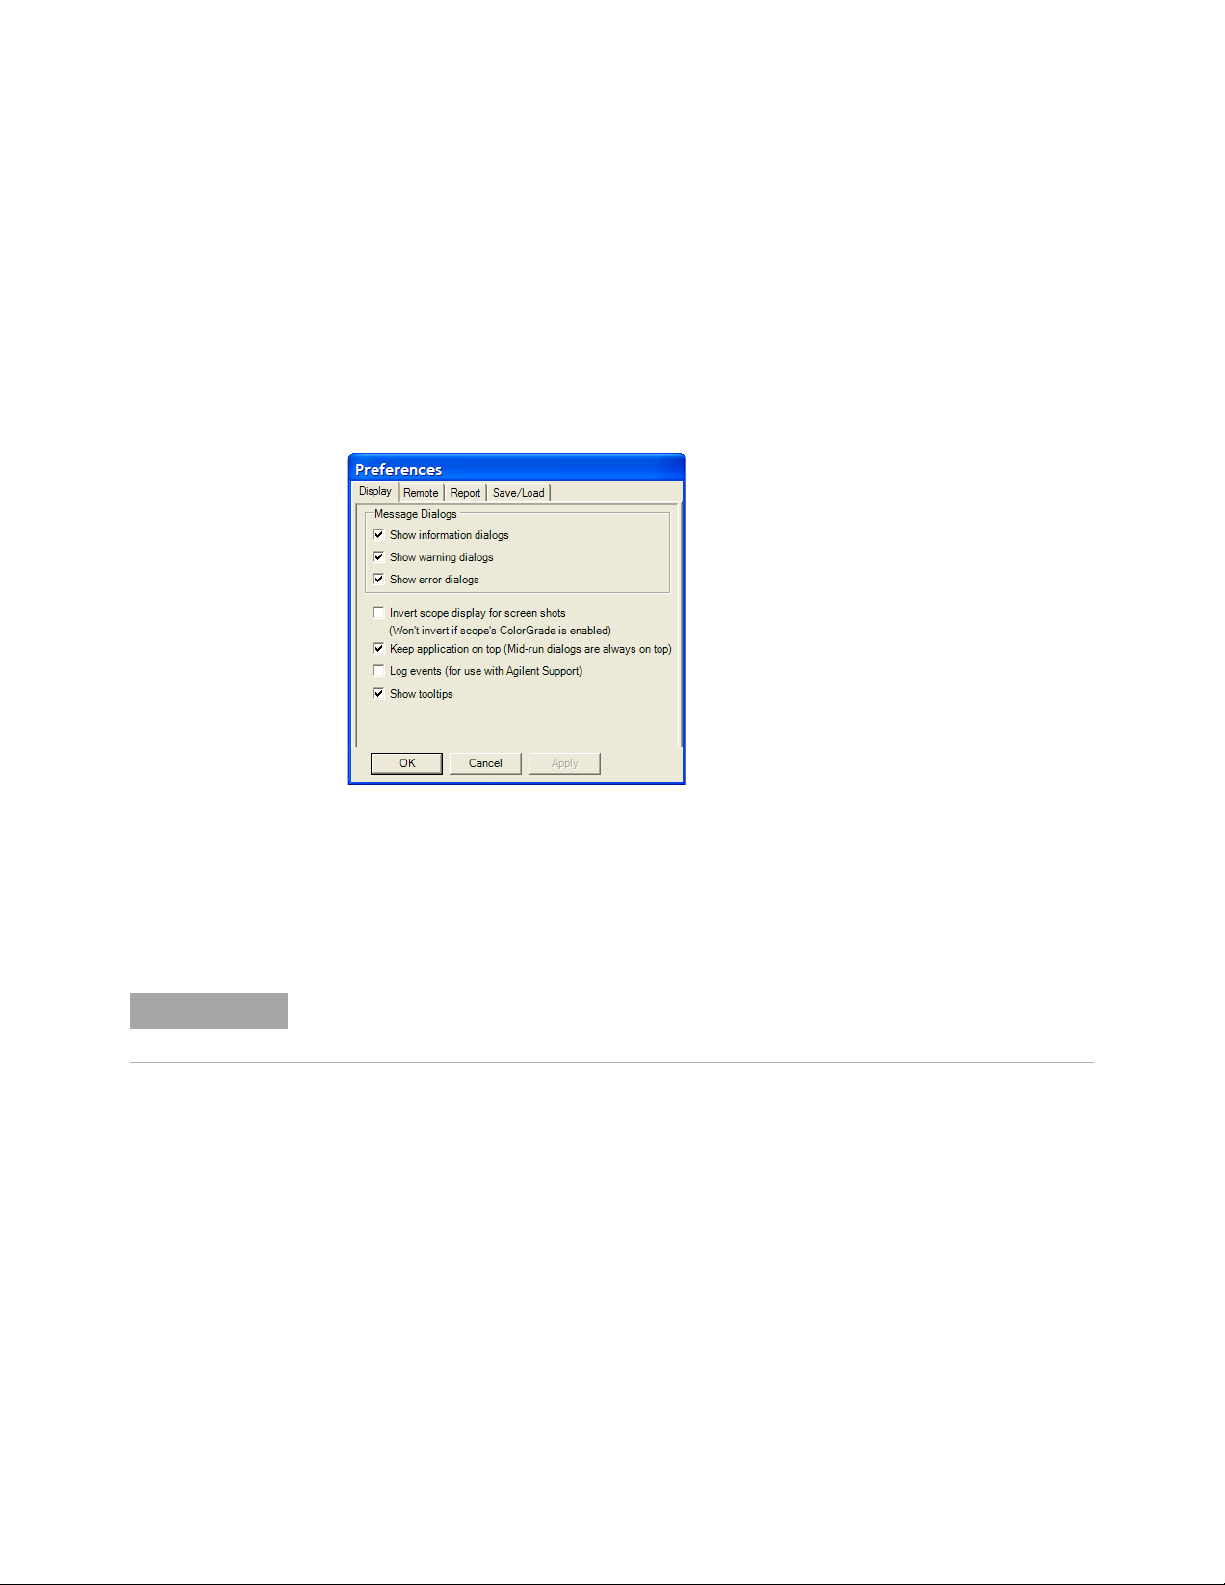
To set the display preferences
Information, warning, and error conditions can occur while running tests. The display
preferences let you choose whether message dialogs are shown. And, there are other
display preferences that affect what happens as tests are run.
1 From the DDR Post Process Compliance tool's menu, choose View>Preferences....
2 In the Preferences dialog, select the Display tab.
3 In the Display tab, you can choose to show the following types of message dialogs:
• Information dialogs.
• Warning dialogs.
• Error dialogs.
Messages that require you to make a choice, such as "OK/Cancel" and "Yes/No" are
always enabled.
4 Also, you can choose to:
• Invert scope display — (Not used) Use a white background when the application
captures the screen shots.
• Keep application on top — Always keep the application's main dialog on the top
of the logic analyzer application. Note that the mid-run dialogs are always
displayed on the top.
• Log events — Use this option only when directed to by Keysight Support (Note
that this option degrades the runtime performance).
• Show tooltips — By enabling this option, the tooltips appear as you move the
pointer over various controls in the application.
5 Click Apply to save the changes and click OK to close the Preferences dialog.
42 DDR Post Process Compliance Tool User Guide
Page 43
DDR Post Process Compliance Tool
TIP
User Guide
8
Viewing Results
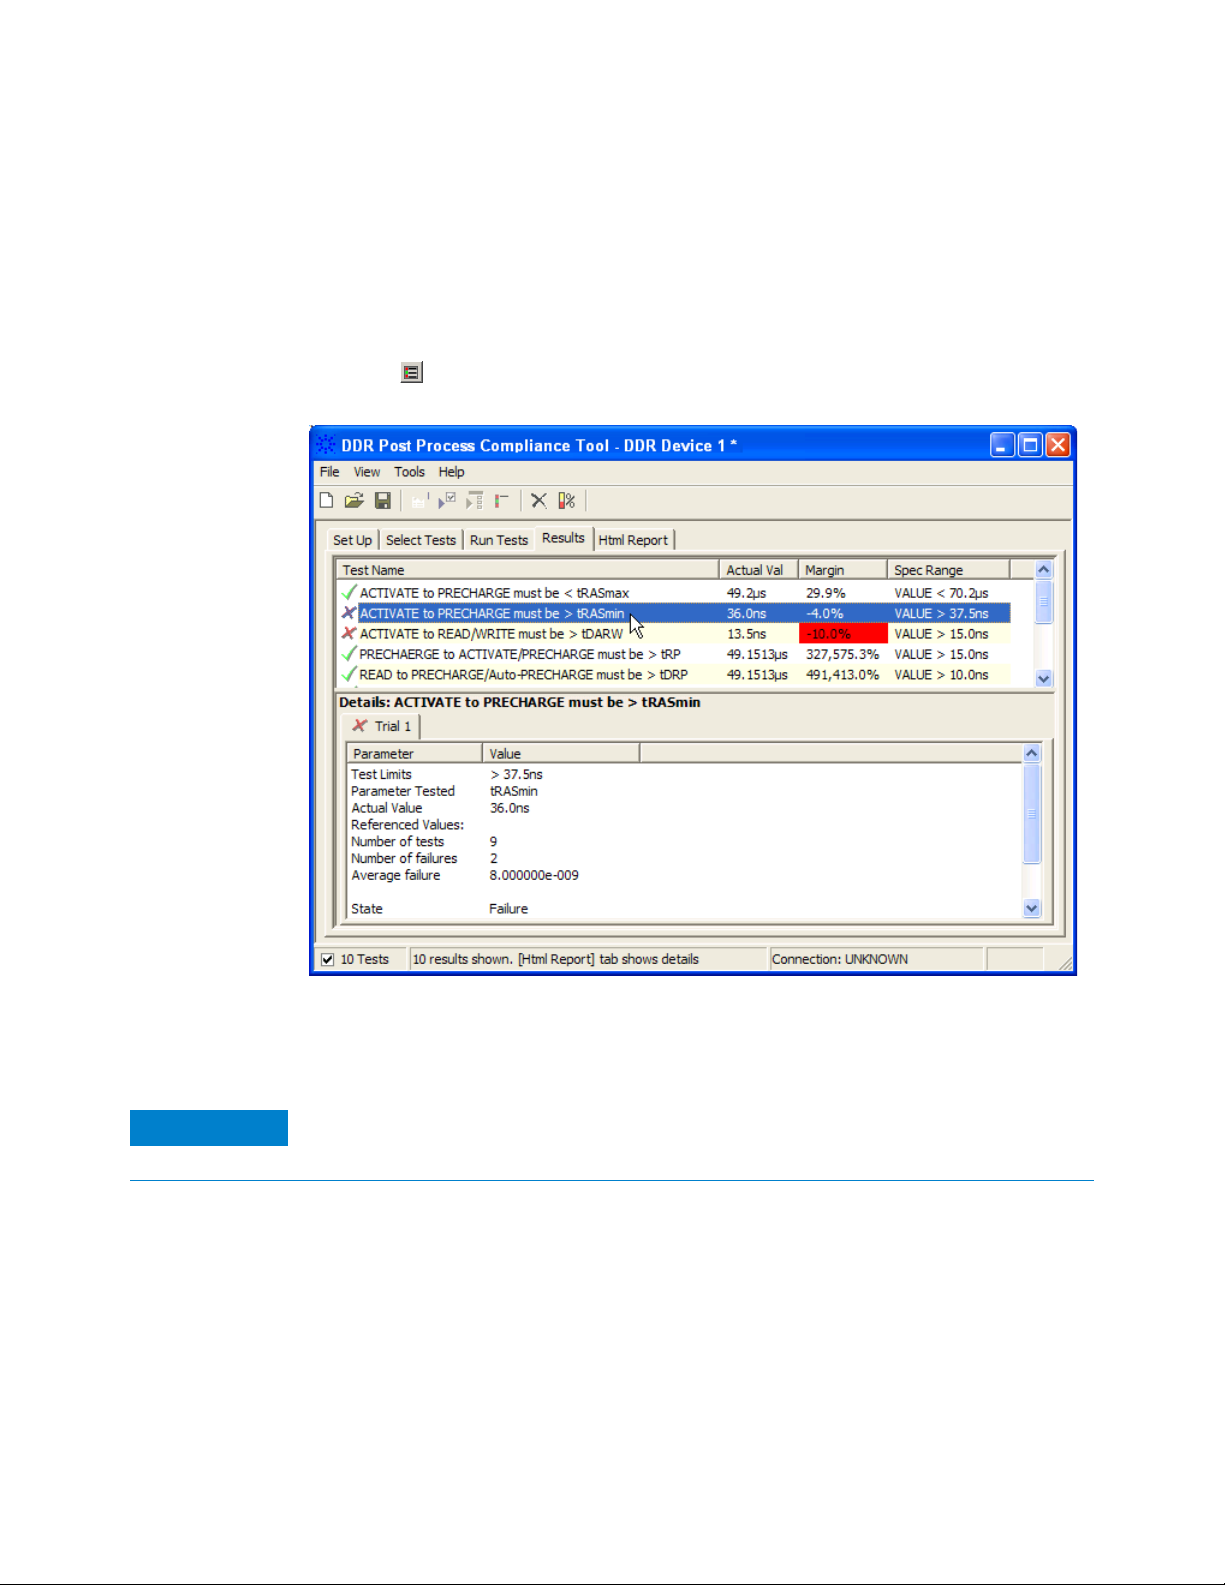
1 Click in the toolbar, or click the Results tab.
The Results tab contains three resizable panes for test results information. If you
select one of the tests in the top pane, details and reference images (if any) are shown
in the lower panes.
A quick way to reset all configuration options and delete all test results is to create
a new project (see
For each individual test that you selected to run, the tool reports the total number of
failures that occurred for that specific test. It can show up to a maximum of 250 failures
in the Details screen for an individual test.
Each limit is measured as the time between two states. Each logic analyzer state has a
number and a timestamp. In case of a failure, the numbers of the two states will be
reported. Note that the time stamps are only as good as the time stamp resolution of the
logic analyzer card being used (this resolution may be as coarse as 2ns; see the
Specifications and Characteristics in the logic analyzer's online help for details).
page 53). The new project will have default configuration options.
43
Page 44

8 Viewing Results
If a test case is not encountered in the logic analyzer trace:
• In the details for the test, the number of tests will be 0.
• For limit tests, the "Actual Value" column will display "N/A."
• For pass/fail tests, the "Actual Value" column will display "Pass."
See Also
Next • "Viewing/Exporting/Printing the Report" on page 47
• "To change margin thresholds" on page 45
44 DDR Post Process Compliance Tool User Guide
Page 45
To change margin thresholds
NOTE
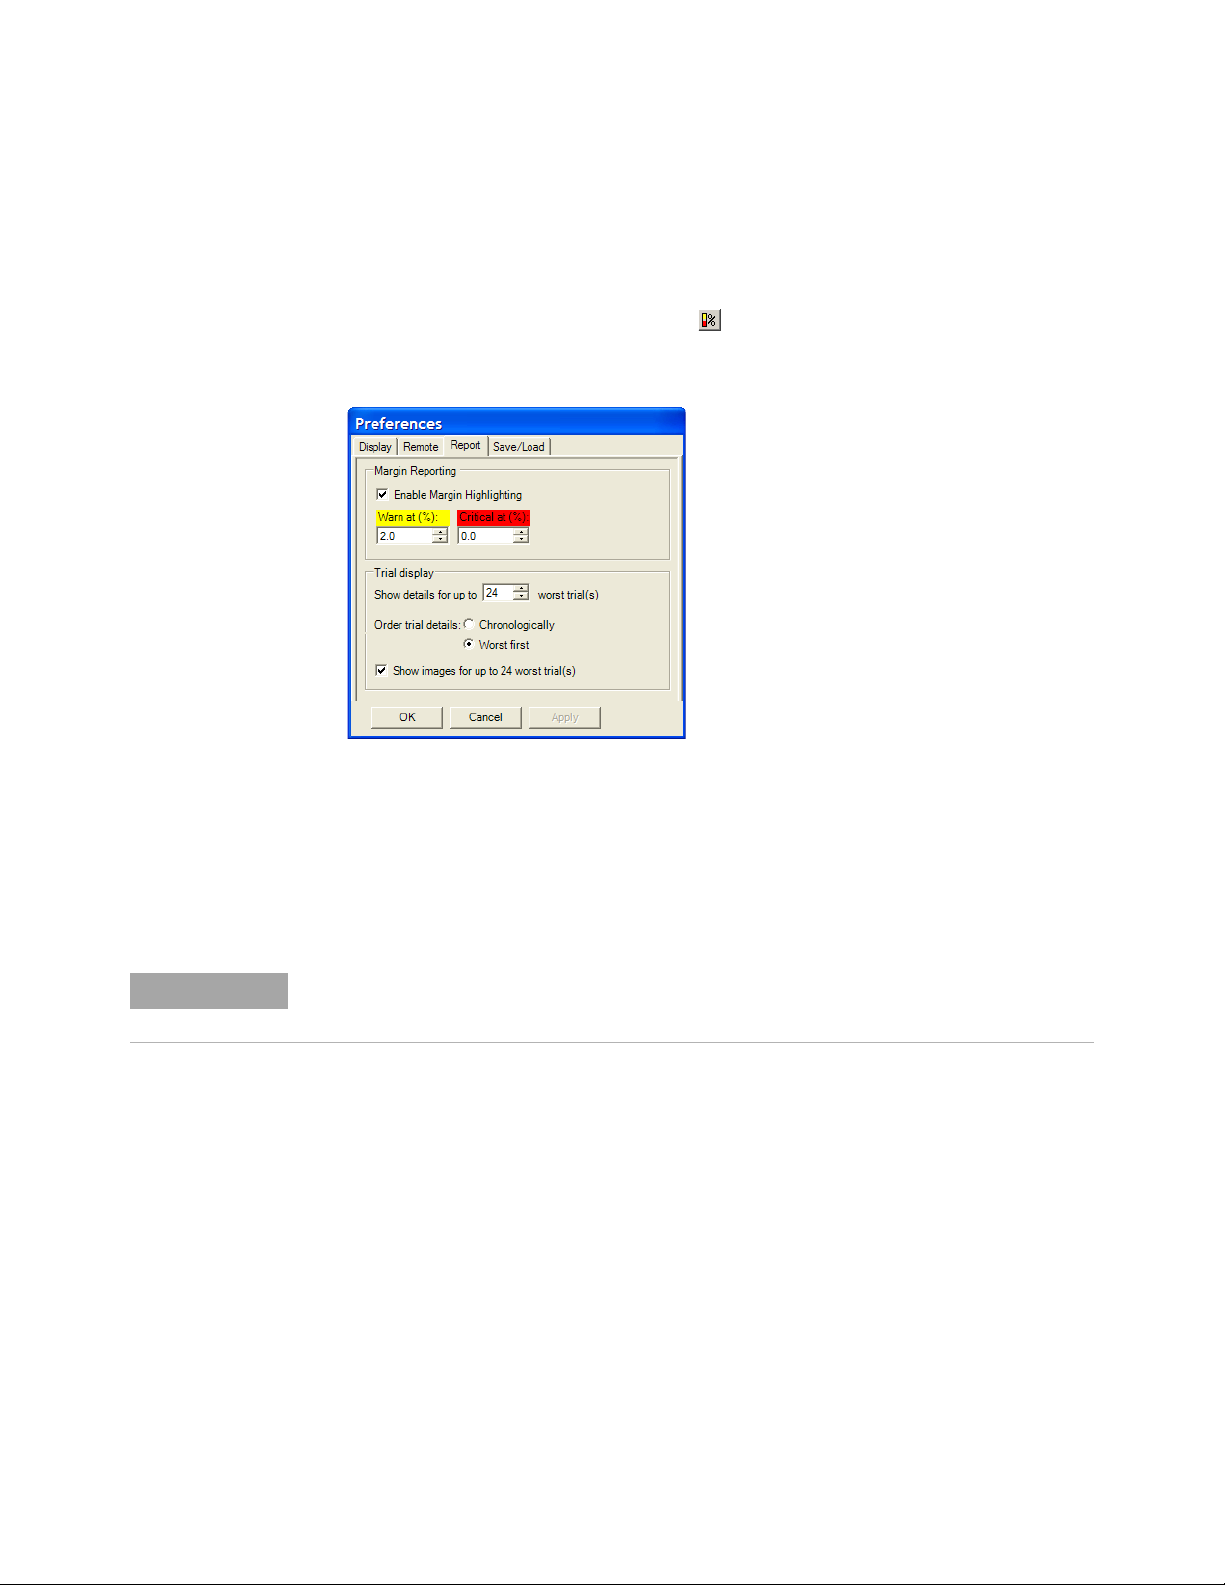
1 From the DDR Post Process Compliance tool's menu, choose View>Preferences....
Or, when viewing the Results tab, click in the toolbar .
2 In the Preferences dialog, select the Report tab.
Viewing Results 8
3 In the Margin Reporting area, you can:
• Enable or disable margin highlighting.
• You can change the percent of margin at which to give warnings or critical
failures.
4 Click OK to close the Preferences dialog.
The DDR Post Process Compliance tool runs the tests one time, so the Trial display
options do not apply.
DDR Post Process Compliance Tool User Guide 45
Page 46

8 Viewing Results
46 DDR Post Process Compliance Tool User Guide
Page 47
DDR Post Process Compliance Tool
User Guide
9
Viewing/Exporting/Printing the
Report
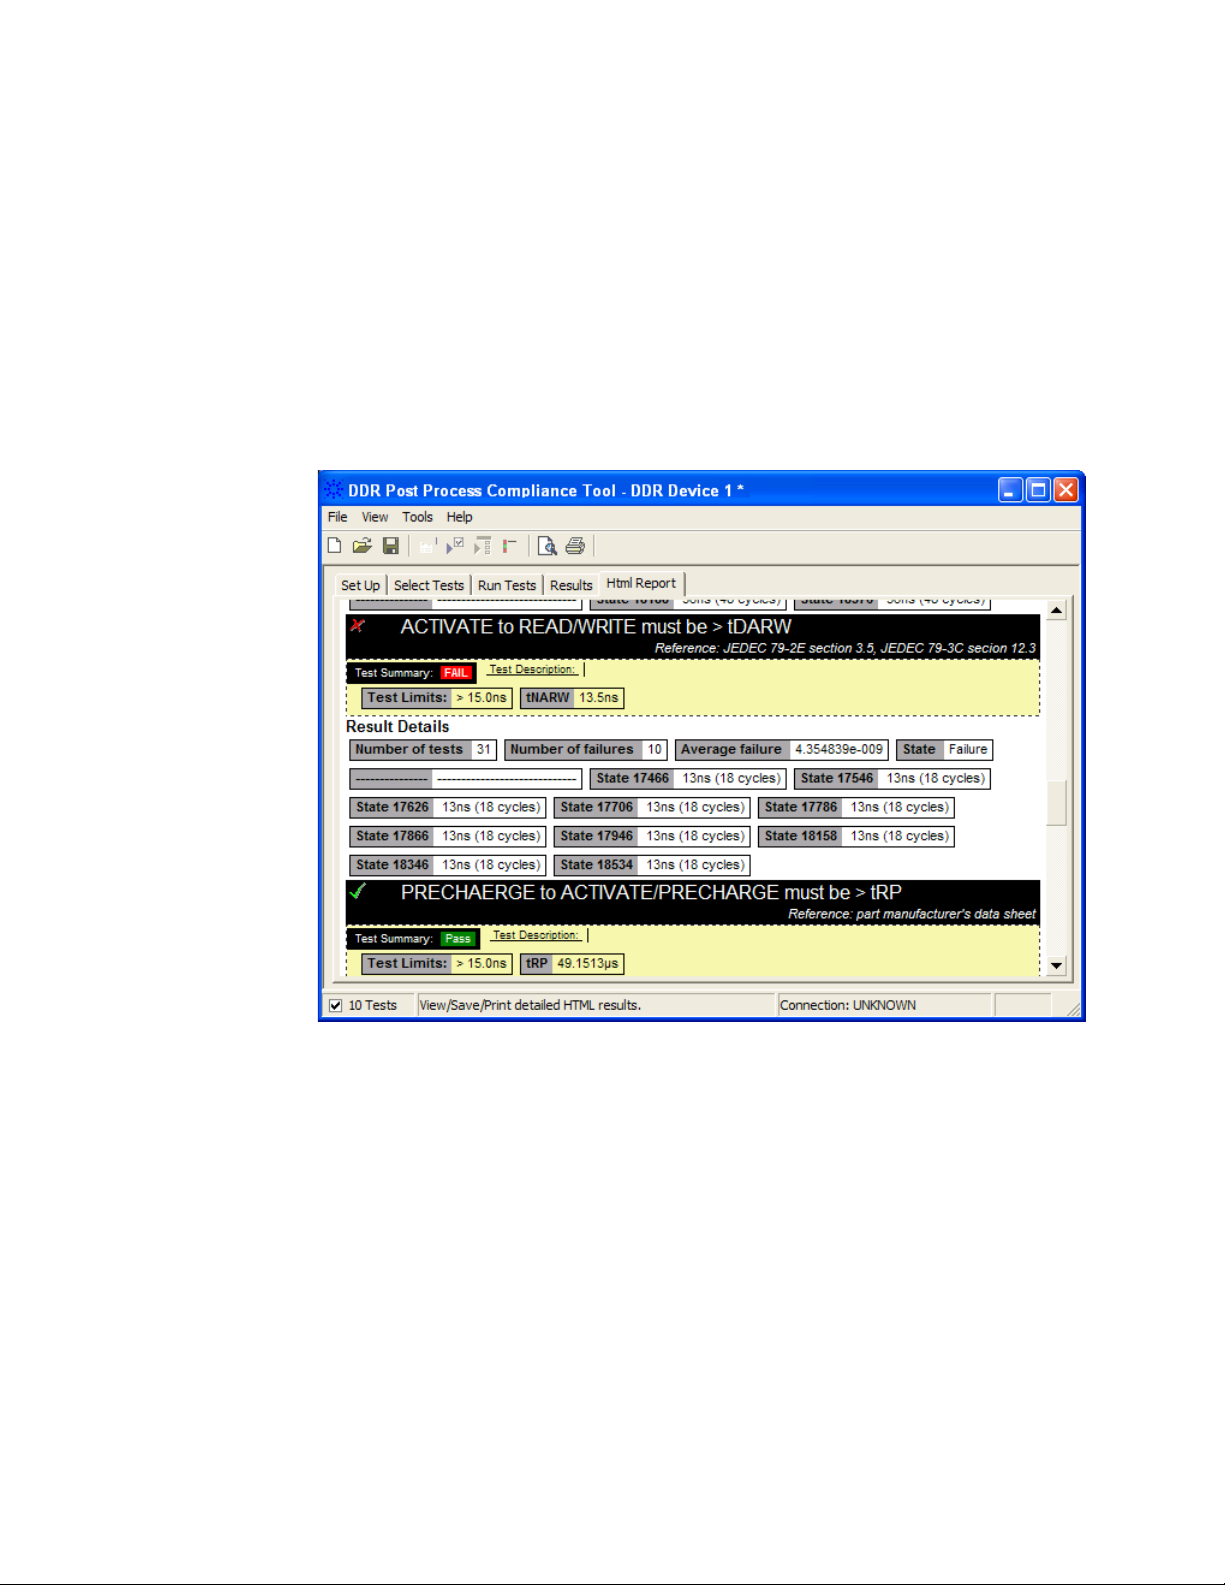
• To view the HTML test report, click the Html Report tab.
See Also
Next • "Saving Test Projects" on page 51
• "Viewing/Exporting/Printing the Report" on page 47
• "To export the report" on page 48
• "To print the report" on page 50
47
Page 48

9 Viewing/Exporting/Printing the Report
To export the report
1 From the DDR Post Process Compliance tool's menu, choose File>Export Results>
from the menu.
There are two options for exporting the HTML test report: CSV or HTML.
To export results
(comma-separat
ed values)
Select the CSV option to export the results as a comma-separated list of values.
in CSV
format
The data format is shown in the first line of the exported *.csv file.
Test ID, Test Name, Measured Item, Trial 1 Value
100,"ACTIVATE to PRECHARGE/Auto-PRECHARGE must be < tRASmax",Number of t
ests ,"9"
100,"ACTIVATE to PRECHARGE/Auto-PRECHARGE must be < tRASmax",Number of f
ailures ,"0"
100,"ACTIVATE to PRECHARGE/Auto-PRECHARGE must be < tRASmax",Actual Valu
e,"4.92E-05"
100,"ACTIVATE to PRECHARGE/Auto-PRECHARGE must be < tRASmax",Margin,"29.
9"
To export the
report in HTML
format
48 DDR Post Process Compliance Tool User Guide
Page 49
Viewing/Exporting/Printing the Report 9
NOTE
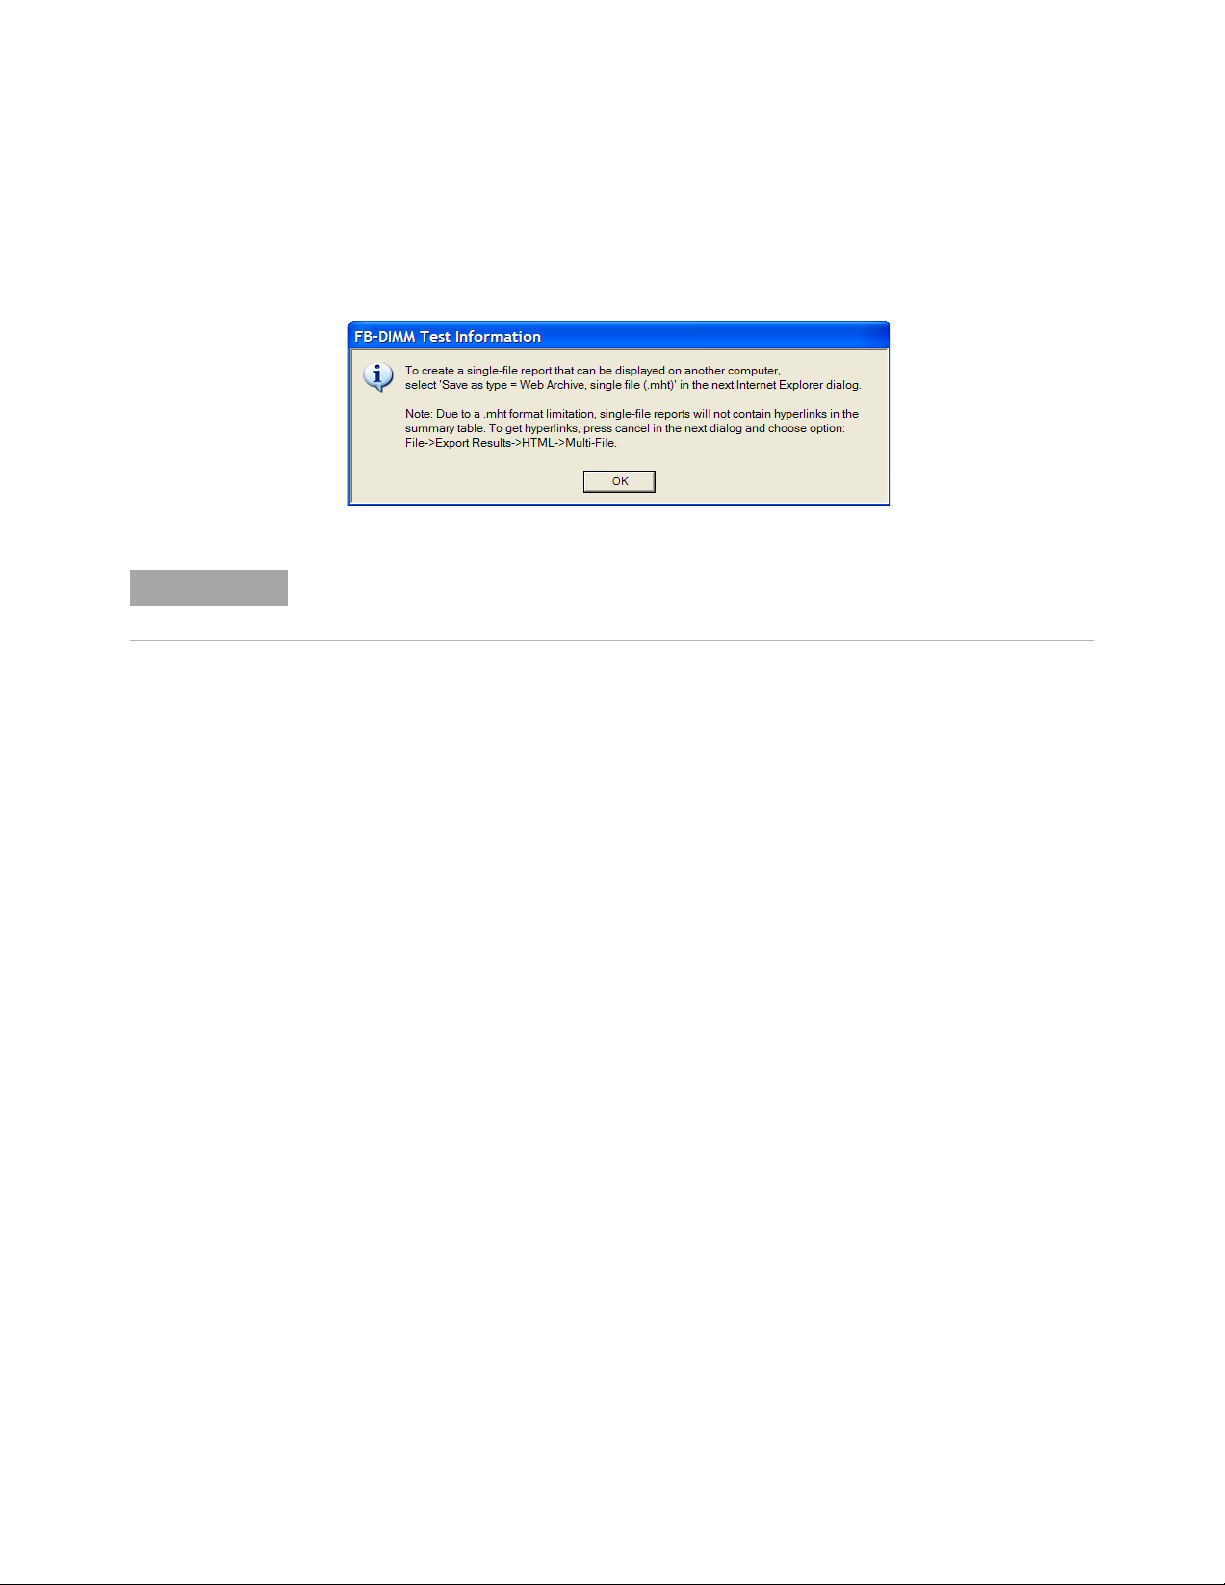
There are two options for exporting HTML format test reports:
• Single-File — To save a single-file report, use the "save as" type "Web Archive,
single file (.mht)".
Single-file reports will not contain hyperlinks in the summary table (due to a .mht format
limitation). If you want these hyperlinks, use the multi-file format.
• Multi-File — If your report is large and you would like to use links within the report,
select the HTML>Multi-File option. Selecting the multi-file option exports the
results as a set of separate image and HTML files. It creates a folder with the
specified name that may be copied to any computer.
To view the exported report, open the HTML file stored in the folder.
DDR Post Process Compliance Tool User Guide 49
Page 50

9 Viewing/Exporting/Printing the Report
To print the report
• To preview the HTML test report printout, click or choose File>Print Preview...
from the menu.
• To print the HTML test report, click or choose File>Print... from the menu.
50 DDR Post Process Compliance Tool User Guide
Page 51

DDR Post Process Compliance Tool
User Guide
10
Saving Test Projects
To save test settings and results to the current project directory:
1 Choose File>Save Project from the menu.
To save test settings and results to a new project directory:
1 Choose File>Save Project As... from the menu.
2 In the Save Project As... dialog, enter the device name and location.
Project files will be saved in a directory whose name is the device name.
3 Click OK.
See Also
• "To set AutoRecovery preferences" on page 52
51
Page 52
10 Saving Test Projects
To set AutoRecovery preferences
1 From the DDR Post Process Compliance tool's menu, choose View>Preferences....
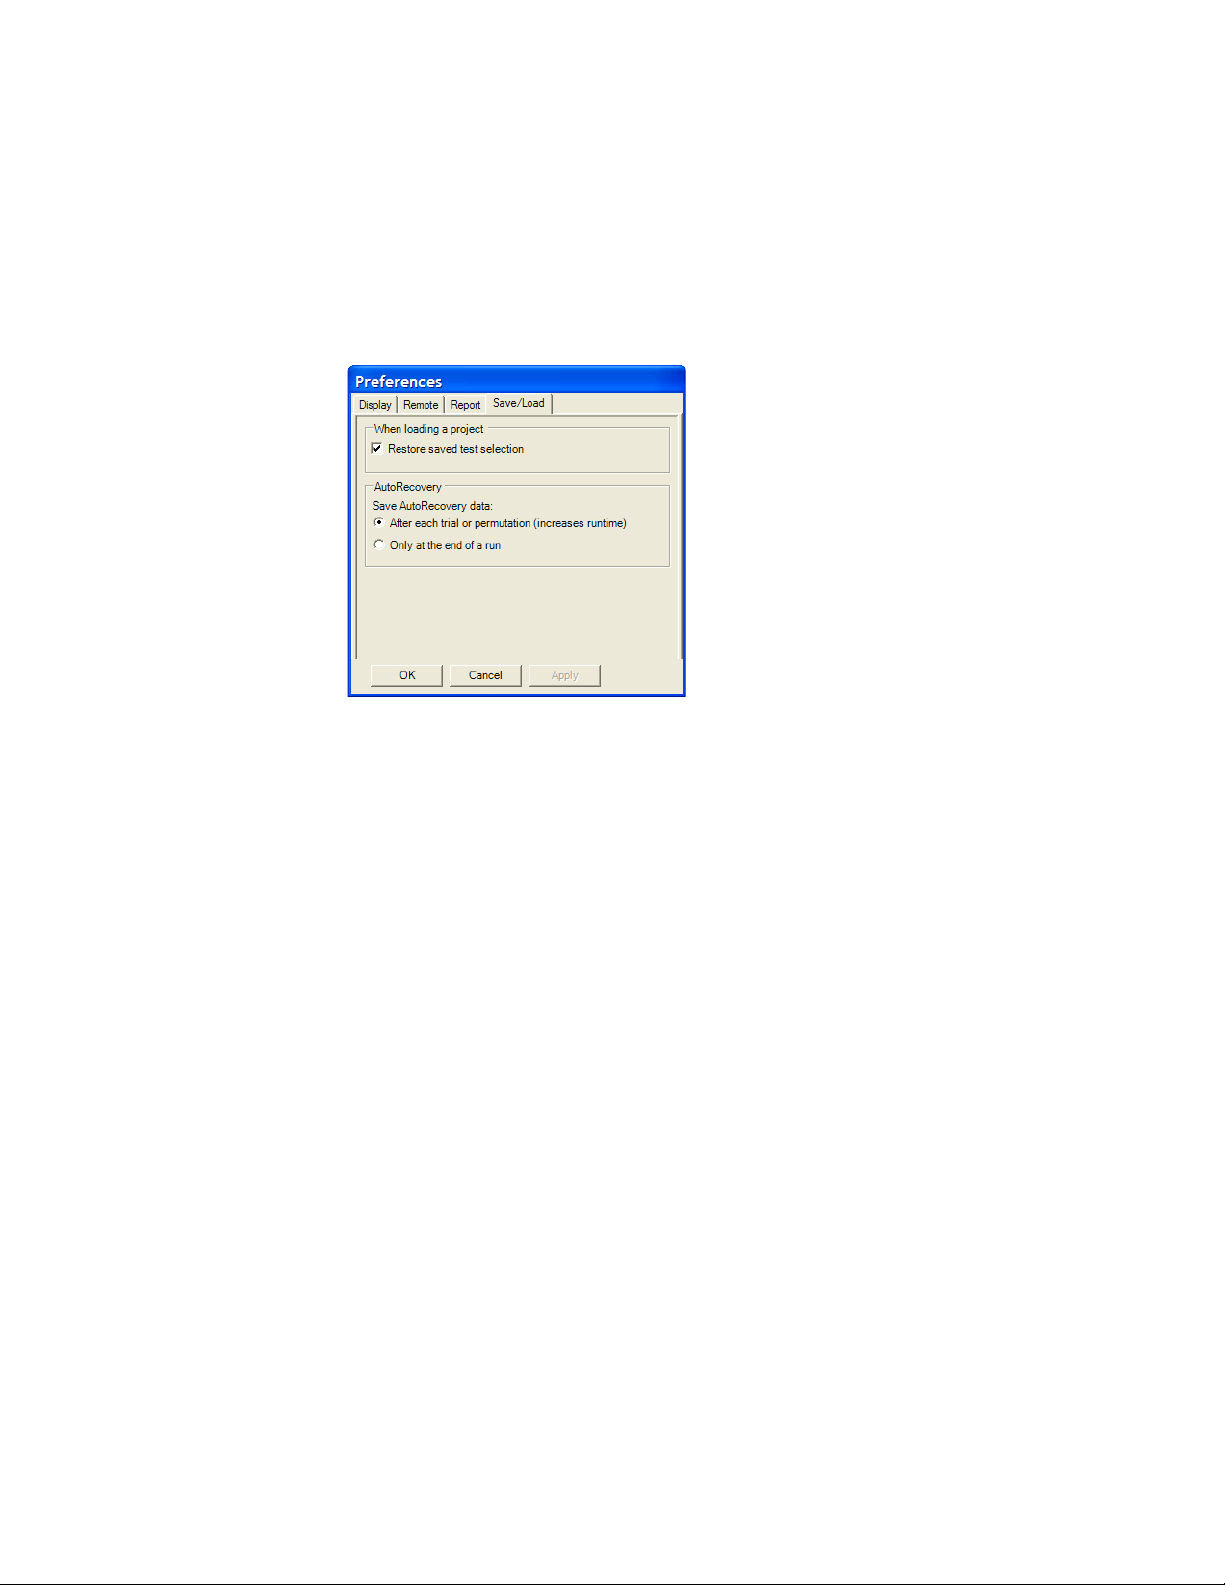
2 In the Preferences dialog, select the Save/Load tab.
3 In the AutoRecovery area, you can choose:
• To auto-save results after each trial or permutation even if the entire multi-trial is
not completed. This option enables full recovery.
• To auto-save results only upon the completion of the entire multi-trial.
4 Click Apply to save the changes and click OK to close the Preferences dialog.
52 DDR Post Process Compliance Tool User Guide
Page 53

DDR Post Process Compliance Tool
User Guide
11
Creating or Opening a Test Project
To create a new test project:
1 Choose File>New Project... from the menu.
A new, empty project, with all the default settings is created.
To open an existing test project:
1 Choose File>Open Project... from the menu.
2 In the Open dialog, browse to a test project directory and select the desired ".proj"
file.
3 Click Open.
See Also
Next • "Setting Up the Test Environment" on page 31
• "To set load preferences" on page 54
53
Page 54

11 Creating or Opening a Test Project
To set load preferences
1 From the DDR Post Process Compliance tool's menu, choose View>Preferences....
2 In the Preferences dialog, select the Save/Load tab.
3 In the Save/Load tab, you can choose to restore saved test selections when loading a
project.
4 Click Apply to save the changes and click OK to close the Preferences dialog.
54 DDR Post Process Compliance Tool User Guide
Page 55

Index
A
about, 11
activate limit set, 29
ASR, 12
AutoRecovery preferences, 52
C
clock speed, 31
combine limits, 27
comma-separated value (CSV) format,
export results, 48
configuring tests, 19
create limit set, 25
creating test project, 53
critical at percent of margin, 45
CSV (comma-separated value) format,
export results, 48
CTC commands, 31
D
display preferences, 42
E
edit limit set, 25
enable margin reporting, 45
error dialogs, 42
event log, 42
exporting the report, 48
H
HTML format, export results, 48
HTML test report,
viewing/exporting/printing, 47
I
information dialogs, 42
invert scope display, 42
K
keep application on top, 42
L
limit set, activate/refresh, 29
limit set, create/edit, 25
limit set, restore, 26
limit, split combined, 26
limitations, 11
limits, combine, 27
load preferences, 54
log events, 42
M
margin thresholds, changing, 45
multi-file HTML, export results, 49
O
on-the-fly burst length, 12
opening test project, 53
P
PASR, 12
preferences, display, 42
preferences, report, 45
preferences, save/load, 52, 54
preview print, 50
printing HTML test report, 50
project, creating or opening, 53
project, saving, 51
R
refresh limit set, 29
report (HTML),
viewing/exporting/printing, 47
report preferences, 45
report, exporting, 48
report, printing, 50
results, viewing test, 43
running tests, 39
S
save/load preferences, 52, 54
saving test project, 51
selecting tests, 35
self refresh, 12
set up, 31
show tooltips, 42
single-file HTML, export results, 49
split combined limit, 26
starting DDR post process compliance
tool, 15
T
test project, creating or opening, 53
test project, saving, 51
test report (HTML),
viewing/exporting/printing, 47
tests, configuring, 19
tests, running, 39
tests, selecting, 35
tests, viewing results, 43
toolbar, viewing/hiding, 17
tooltips, show, 42
U
unavailable tests, 35
V
viewing HTML test report, 47
viewing test results, 43
W
warn at percent of margin, 45
warning dialogs, 42
what's new, 13
DDR Post Process Compliance Tool User Guide 55
Page 56

Index
56 DDR Post Process Compliance Tool User Guide
Loading...