

Page 1
AriaMx Real-Time PCR System
Setup and User Guide
For Research Use Only. Not for use in diagnostic procedures.
Version M0, March 2021
Page 2

Notices
© Agilent Technologies, Inc. 2014–2018. 2021
No part of this manual may be reproduced in any
form or by any means (including electronic
storage and retrieval or translation into a foreign
language) without prior agreement and written
consent from Agilent Technologies, Inc. as
governed by United States and international
copyright laws.
Manual Part Number
G8830-90001
Edition
Version M0, March 2021
Agilent Technologies, Inc.
5301 Stevens Creek Blvd
Santa Clara, CA 95051 USA
SYBR® is a registered trademark of
Molecular Probes, Inc.
Technical Support
For US and Canada
Call 800-227-9770 (option 3, 4, 3).
Or send an email to
qpcr.support@agilent.com
For all other regions
Agilent’s world-wide Sales and Support
Center contact details for your location
can be obtained at
www.agilent.com/en/contact-us/page
Warranty
The material contained in this document is
provided “as is,” and is subject to being changed,
without notice, in future editions. Further, to the
maximum extent permitted by applicable law,
Agilent disclaims all warranties, either express or
implied, with regard to this manual and any
information contained herein, including but not
limited to the implied warranties of
merchantability and fitness for a particular
purpose. Agilent shall not be liable for errors or
for incidental or consequential damages in
connection with the furnishing, use, or
performance of this document or of any
information contained herein. Should Agilent and
the user have a separate written agreement with
warranty terms covering the material in this
document that conflict with these terms, the
warranty terms in the separate agreement shall
control.
Technology Licenses
The hardware and/or software described in this
document are furnished under a license and may
be used or copied only in accordance with the
terms of such license.
Restricted Rights Legend
U.S. Government Restricted Rights. Software
and technical data rights granted to the federal
government include only those rights
customarily provided to end user customers.
Agilent provides this customary commercial
license in Software and technical data pursuant
to FAR 12.211 (Technical Data) and 12.212
(Computer Software) and, for the Department of
Defense, DFARS 252.227-7015 (Technical Data Commercial Items) and DFARS 227.7202-3
(Rights in Commercial Computer Software or
Computer Software Documentation).
Safety Notices
CAUTION
A CAUTION notice denotes a hazard. It calls attention to an operating
procedure, practice, or the like that,
if not correctly performed or
adhered to, could result in damage
to the product or loss of important
data. Do not proceed beyond a CAU-
TION notice until the indicated conditions are fully understood and
met.
WARNING
A WARNING notice denotes a hazard. It calls attention to an operating procedure, practice, or the like
that, if not correctly performed or
adhered to, could result in personal
injury or death. Do not proceed
beyond a WARNING notice until the
indicated conditions are fully
understood and met.
AriaMx Real-Time PCR System Setup and User Guide
Page 3

South Korean Class A EMC Declaration
A 급 기기 ( 업무용 방송통신기자재 )
This equipment is Class A suitable for professional use and is for use in
electromagnetic environments outside of the home.
이 기기는 업무용 (A 급 ) 전자파적합기기로서 판 매자 또는 사용자는 이 점을 주
의하시기 바라 며 , 가정외의 지역에서 사용하는 것을 목적으 로 합니다 .
Document Part Number: 5061-7383
*5061-7383*
© Agilent Technologies 2012
s1
Page 4

Contents
1 Before You Begin 6
Overview of the AriaMx Real-Time PCR System 7
Materials provided with the AriaMx Real-Time PCR System 7
Hardware specifications 8
Recommended plasticware 8
Safety precautions 9
Indicator LED light 11
Agilent Technical Support 12
2 Installing and Setting Up the Instrument 13
Installing the AriaMx Instrument 14
Step 1. Select a location for the instrument 14
Step 2. Unpack the shipping containers 14
Step 3. Install the optical modules 16
Step 4. Clean the thermal block 19
Step 5. Connect the instrument to a power supply 20
Step 6. Connect a keyboard or mouse to the instrument (optional) 20
Step 7. Connect the instrument to a network or directly to a PC 20
Setting Up the AriaMx Instrument 23
Step 1. Turn on the instrument and calibrate the background for the optical modules 23
Step 2. Set the instrument date and time 24
Step 3. Run a diagnostic check 24
Logging In and Creating User Accounts 26
Step 1. Log in to the instrument using an Administrator account 26
Step 2. Add user accounts 27
Step 3. Log in to your personal user account 27
Customizing Instrument Settings 28
3 Installation of the Aria Software 29
Minimum requirements for running the Aria software 30
Installing the Standard Aria Software 31
Download the Aria software 31
Install the Aria software 31
Launch the Aria software 37
Installing the Aria ET (Electronic Tracking) Software 38
Download the Aria software and Microsoft SQL Server 2012 38
AriaMx Real-Time PCR System Setup and User Guide 4
Page 5

Install Microsoft SQL Server 2012 38
Install the Aria ET software 43
Configure and start Microsoft Distributed Transaction Coordinator (MSDTC) service 49
Launch the Aria ET software 51
Installing Microsoft .NET Framework 4.0 53
Download Microsoft .NET Framework 4.0 53
Install Microsoft .NET Framework 4.0 53
4 Running Experiments 56
Preparing and Loading PCR Samples 57
Prepare samples 57
Load samples 57
Setting Up and Running Experiments 58
Use the touchscreen to set up and run an experiment 58
Use the PC software to set up and run an experiment 58
Managing Saved Experiments 60
Locate saved experiment files 60
Create a subfolder 60
Copy and paste experiments 61
Transfer experiments to a USB drive 61
5 Troubleshooting, Maintenance, and Updates 62
Troubleshooting Instrument Error Messages 63
View error messages 63
Open the diagnostic report 63
Maintaining the Instrument 64
Service the instrument 64
Clean the instrument 64
Clean the optical modules 64
Updating the Instrument Software 66
Cybersecurity Guidance 67
AriaMx Real-Time PCR System Setup and User Guide 5
Page 6

AriaMx Real-Time PCR System
Setup and User Guide
1 Before You Begin
Overview of the AriaMx Real-Time PCR System 7
Materials provided with the AriaMx Real-Time PCR System 7
Hardware specifications 8
Recommended plasticware 8
Safety precautions 9
Indicator LED light 11
Agilent Technical Support 12
This chapter contains information for you to read and understand before you start setting up the instrument.
6
Page 7

Overview of the AriaMx Real-Time PCR System
The AriaMx Real-Time PCR System is a fully integrated quantitative PCR amplification, detection,
and data analysis system. The system design combines a state-of-the-art thermal cycler, an
advanced optical system with an LED excitation source, and complete data analysis software.
The instrument can hold up to six optics modules, and the scanning optics design delivers
optimal separation between the dyes and between samples. The instrument provides a
closed-tube PCR detection format that can be used with a variety of fluorescence detection
chemistries including SYBR® Green and EvaGreen dyes as well as fluorogenic probe systems
including TaqMan probes.
Materials provided with the AriaMx Real-Time PCR System
Table 1 Materials provided
Materials provided Quantity
AriaMx instrument 1
Certificate of Conformance 1
AriaMx installation poster 1
Power cord 1
Optical modules Up to 6 optical modules, as selected by the user
The AriaMx instrument, the Certificate of Conformance, and the AriaMx installation poster are all
shipped together in the same shipping container. The power cord and optical modules are each
shipped in their own packaging.
Table 2 Materials offered as options at time of purchase
Options Quantity
Electronic tracking (ET) software 1 seat
Notebook PC 1
AriaMx Real-Time PCR System Setup and User Guide 7
Page 8

Hardware specifications
Table 3 Hardware specifications for the AriaMx Real-Time PCR System
Feature Specification
Excitation source Eight dye-specific LEDs per optical module
Detection Eight photodiodes per optical module
Dyes ROX, FAM, HEX, CY5, CY3, ATTO 425
Electrical power (input) 100–240 VAC, 50/60 Hz, 1100VA
Thermal system Peltier-based, 96-well block
Six slots, swappable cartridges, no reference channel needed
Thermal system
temperature range
Cycling speeds 40 cycle protocol in 43 minutes
Storage environment 10–43°C (50–109°F); 10–90% non-condensing humidity
Operating environment 20–30°C (68–86°F); 20–80% non-condensing humidity;
Weight 50 lbs (23 kg)
Dimensions 19.7" W × 18.1" D × 16.5" H (50 cm × 46cm × 42cm)
On board quality checks Instrument QC checks:
Warranty One-year warranty
Plastic consumables Low-profile 0.2-ml tubes, strip tubes, and 96-well plates
25.0–99.9°C
Max Heating: >6°C/sec
Max Cooling: >2.5°C/sec
Accuracy: ±0.2°C or better at typical annealing, amplification, and
denaturation temperatures
maximum altitude of 2000 m
All checks: 30 minutes; Selected checks: 10–30 minutes
Calibration: 1-minute background calibration
Data loss prevention:
Data captured from all channels on each scan
Ability to store up to 5 GB on the instrument
See “Recommended plasticware” on page 8 for part numbers
Recommended plasticware
Table Table 4 lists the part numbers of Agilent plates, tubes, and other plastic consumables for
use in the AriaMx instrument.
AriaMx Real-Time PCR System Setup and User Guide 8
Page 9

Table 4 QPCR plasticware for use in the AriaMx instrument
Agilent Part
Number
401490 96-well plate, fully skirted, low profile
401491 96-well plate, rigid, fully skirted, low profile
401494 96-well plate, non-skirted, low profile
401493 8x strip tubes, without caps, low profile, 120 strips (10 packs of 12 strips)
401425 8x strip tube optical caps, 120 strips (10 packs of 12 strips)
401427 8x strip tube optical caps, 60 strips (5 packs of 12 strips)
401492 Adhesive seal for 96-well plates, 50-pack
Safety precautions
Electrical
Standard electrical safety precautions should be applied, including the following:
• Always put the instrument in a location where, if needed, the power supply can be immediately
disconnected.
• Proper voltage (100–240 VAC) must be supplied before you turn on the instrument for the first
time.
• The device must be connected to a grounded socket. Do not operate the instrument from a
power outlet that has no ground connection.
• Do not touch any switches or outlets with wet hands.
• Turn off the instrument before you disconnect the power cord.
• Unplug the instrument before you clean any major liquid spills and before you service any of
the electrical or internal components.
• Do not connect the instrument to the same power strip as other high power-draw appliances
(e.g., refrigerators and centrifuges).
• Do not service the electrical components unless you are qualified to do so.
Description
When sealing plates with adhesive seals, Agilent recommends using
MicroAmp Optical Film Compression Pads (Thermo Scientific, part number
4312639).
Fluids and Reagents
• Fill reaction vessels outside the instrument so that no fluids penetrate the instrument.
• Never cycle or incubate explosive, flammable and reactive substances in the instrument.
• You must observe the relevant safety regulations when handling pathogenic material,
radioactive substances or other substances hazardous to health.
• Do not submerge the instrument in any liquid.
AriaMx Real-Time PCR System Setup and User Guide 9
Page 10

Danger of Burns
• Do not touch the thermal block, inner side of heated lid and reaction vessels. These areas
quickly attain temperatures of greater than 50°C. Keep the heated lid closed until temperatures
of 30°C or lower are reached.
• Do not use any materials (plates, sealings, foils, mats) which are not sufficiently
temperature-stable (up to 120°C).
Operating Environment
• The ventilation slots of the device must remain free to vent at all times. Leave at least 10 cm of
space around the instrument.
• Keep the ambient temperature between 20°C and 30°C with humidity levels between 20% and
80% non-condensing.
• Do not operate the instrument in a hazardous or potentially explosive environment.
• Do not attempt to open the instrument door when the instrument is running an experiment.
Equipment Ratings
• Pollution degree 2
• Installation category II
• Altitude 2000 m
• Humidity 20 to 80%, non-condensing
• Electrical supply 100-240 VAC, 50/60 Hz, 1100VA
• Temperature 20°C to 30°C
• For Indoor Use Only
Electrostatic Discharge
The instrument is static sensitive. Electrostatic discharges greater than 8000 volts may interfere
with the normal operation of the USB ports on the instrument. Handling precautions are required
when working in high static environments. Wear a grounded wrist strap and take other antistatic
precautions prior to making contact with the device in high static environments. ESD
STM5.1-1998 Class 3B.
Safety Symbols
The electrical/safety symbols described below may be displayed on the instrument.
AriaMx Real-Time PCR System Setup and User Guide 10
Page 11
Indicator LED light
On the front of the instrument (top right corner) is a status indicator LED. Table 5 summarizes the
status codes for this LED light.
Power on
Power off
Caution
Caution, hot surfaces
Table 5 Appearance of the status indicator LED
Appearance Instrument Status
Off The instrument is idle.
Blinking green The instrument is running.
Solid green The instrument is paused.
Blinking red The instrument has detected an error. Check the display for an error message
containing further details.
AriaMx Real-Time PCR System Setup and User Guide 11
Page 12

Agilent Technical Support
Agilent Technical Support is available worldwide.
For US and Canada
Call (800)227-9770 (option 3,4,3)
Or send an e-mail to qPCR.support@agilent.com.
For all other regions
Agilent’s world-wide Sales and Support Center contact details for your location can be obtained at
www.agilent.com/en/contact-us/page.
AriaMx Real-Time PCR System Setup and User Guide 12
Page 13

AriaMx Real-Time PCR System
Setup and User Guide
2 Installing and Setting Up the Instrument
Installing the AriaMx Instrument 14
Step 1. Select a location for the instrument 14
Step 2. Unpack the shipping containers 14
Step 3. Install the optical modules 16
Step 4. Clean the thermal block 19
Step 5. Connect the instrument to a power supply 20
Step 6. Connect a keyboard or mouse to the instrument (optional) 20
Step 7. Connect the instrument to a network or directly to a PC 20
Setting Up the AriaMx Instrument 23
Step 1. Turn on the instrument and calibrate the background for the optical modules 23
Step 2. Set the instrument date and time 24
Step 3. Run a diagnostic check 24
Logging In and Creating User Accounts 26
Step 1. Log in to the instrument using an Administrator account 26
Step 2. Add user accounts 27
Step 3. Log in to your personal user account 27
Customizing Instrument Settings 28
This chapter contains instructions for installing and setting up the AriaMx instrument.
13
Page 14

Installing the AriaMx Instrument
Step 1. Select a location for the instrument
• Locate a solid, flat clean surface for the instrument. Make sure that:
• The instrument can stand completely stable.
• The rear air slots will not be covered.
• The instrument has at least 10 cm (approximately 4 inches) to the next wall or neighboring
instrument.
• The instrument is not located near anything that could be a source of vibrations.
• The temperature (normal ambient) is between 20°C and 30°C with humidity levels between
20% and 80% non-condensing.
• The atmosphere is not explosive.
Step 2. Unpack the shipping containers
NOTE
1 Open the small shipping container that holds the power cord. Remove the power cord and set
it aside for now.
2 Make sure that the large shipping container is in the upright position (Figure 1), then cut the
four plastic straps that hold the container together.
The AriaMx instrument is shipped in two separate containers. The small container holds the power cord. The large container holds the instrument and accessory tray.
Any optical modules that you ordered with the instrument are each packed and shipped separately in their own box.
AriaMx Real-Time PCR System Setup and User Guide 14
Page 15
Figure 1 AriaMx instrument shipping container
3 Open the top flaps of the large container.
Inside the container is an accessory tray (see Figure 2), which contains the Certificate of
Conformance and the installation poster.
Figure 2 Opened shipping container with accessory tray sitting on top
4 Remove the accessory tray. Unpack the installation poster from the accessory tray and use it
to guide you through the remainder of the unpacking process.
5 Remove the foam support that sits on top of the instrument in the shipping container.
6 Grip a handle on each side of the shipping container and lift up to remove the box sleeve that
surrounds the instrument.
The instrument sits on the base of the shipping container, as shown in Figure 3.
AriaMx Real-Time PCR System Setup and User Guide 15
Page 16
Figure 3 Instrument on shipping container base, with box sleeve removed
7 Remove the plastic wrapping from the instrument.
8 Lift the instrument off of the shipping container base and set it down on its selected location
(see “Step 1. Select a location for the instrument”).
Agilent recommends that two people lift the instrument together.
Step 3. Install the optical modules
1 Open the instrument door by lifting up on the handle on the top of the instrument. Lift the door
all the way up and back.
2 Remove the piece of foam and then remove the strip of cardboard from around the thermal
block assembly (see Figure 4). Remember to retain these pieces, along with all other packaging
materials, in the event that you need to ship the instrument for service.
The optical module housing carrier is positioned to the left of the thermal block assembly.
Figure 4 Foam insert (left) and underlying cardboard strip (right).
3 Slide the optical module housing carrier to the right until it is centered in the opening of the
instrument door (as shown in Figure 5). Use the indentation on the top of the carrier to help
slide it.
AriaMx Real-Time PCR System Setup and User Guide 16
Page 17
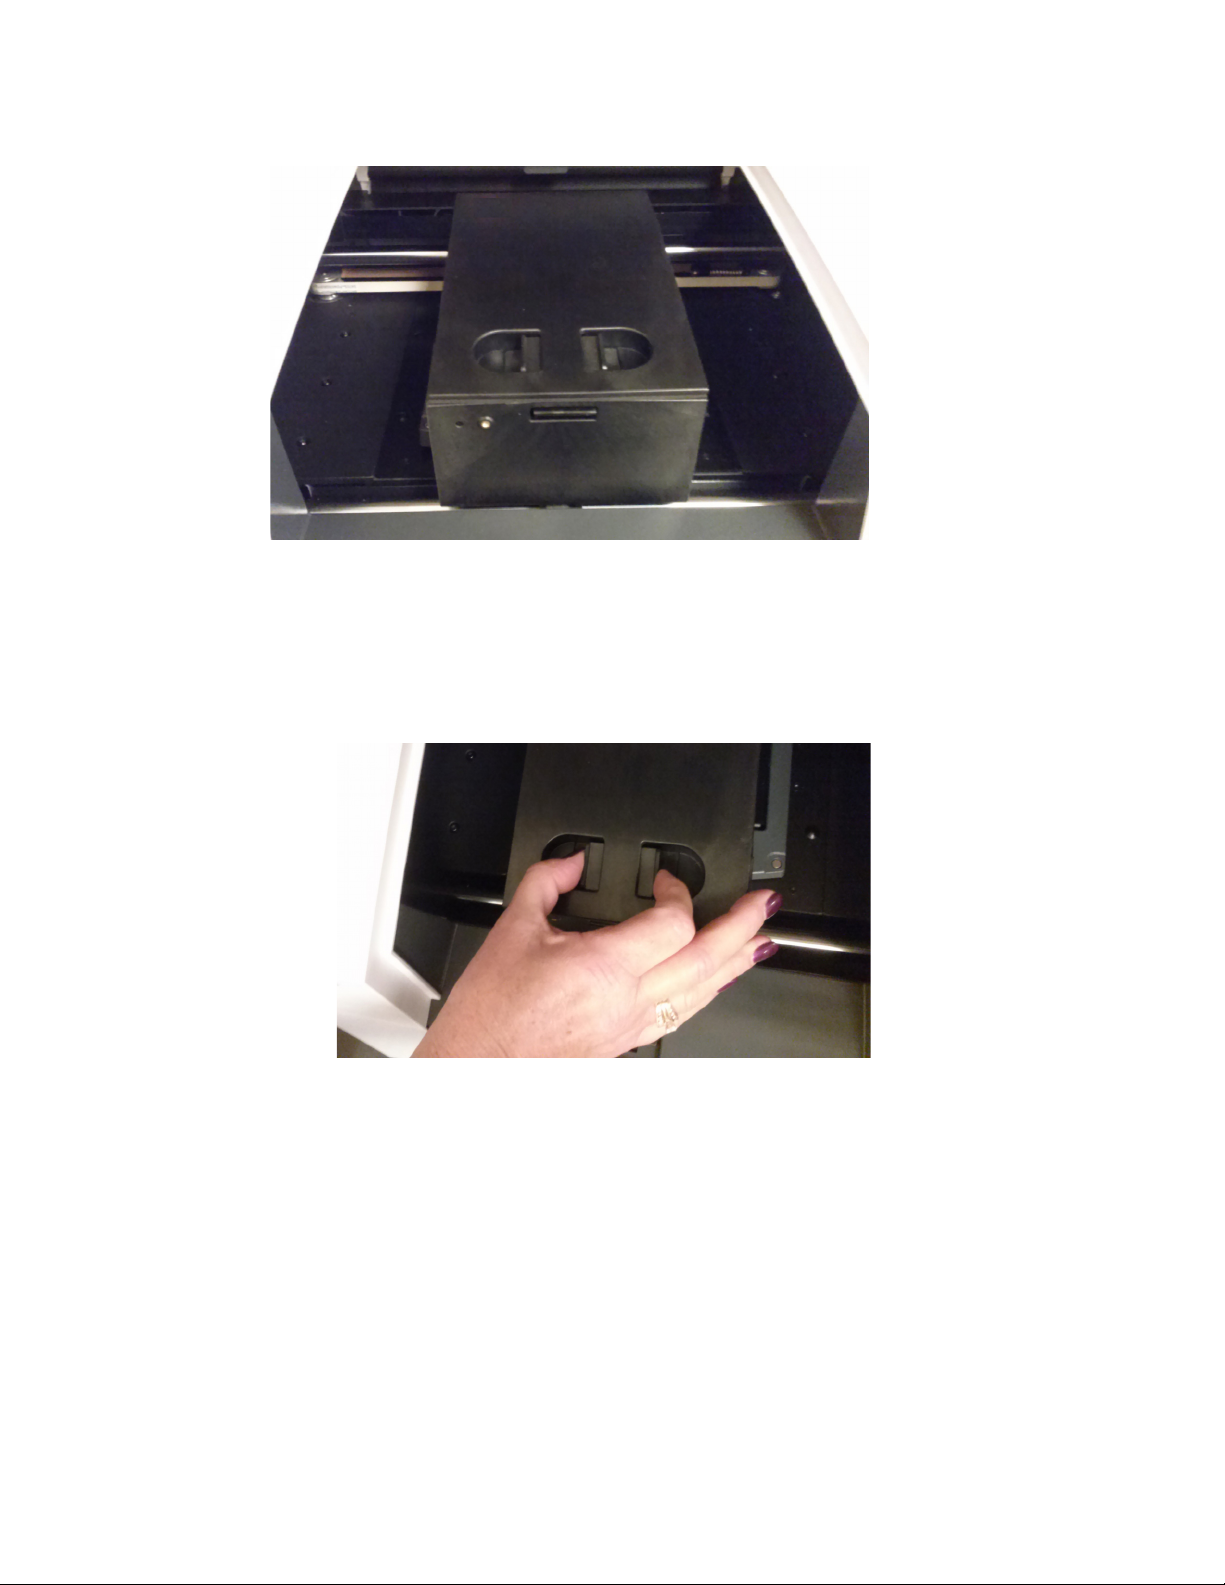
Figure 5 Optical module housing carrier, centered in the instrument door opening
4 Open the lid on the optical module housing carrier.
a With your thumb and index finger, pinch together the two pieces of plastic in the indentation
on the top of the carrier (see Figure 6).
b Lift the lid all the way back to reveal the six slots for the optical modules (see Figure 7).
Figure 6 Opening of the optical module housing
AriaMx Real-Time PCR System Setup and User Guide 17
Page 18
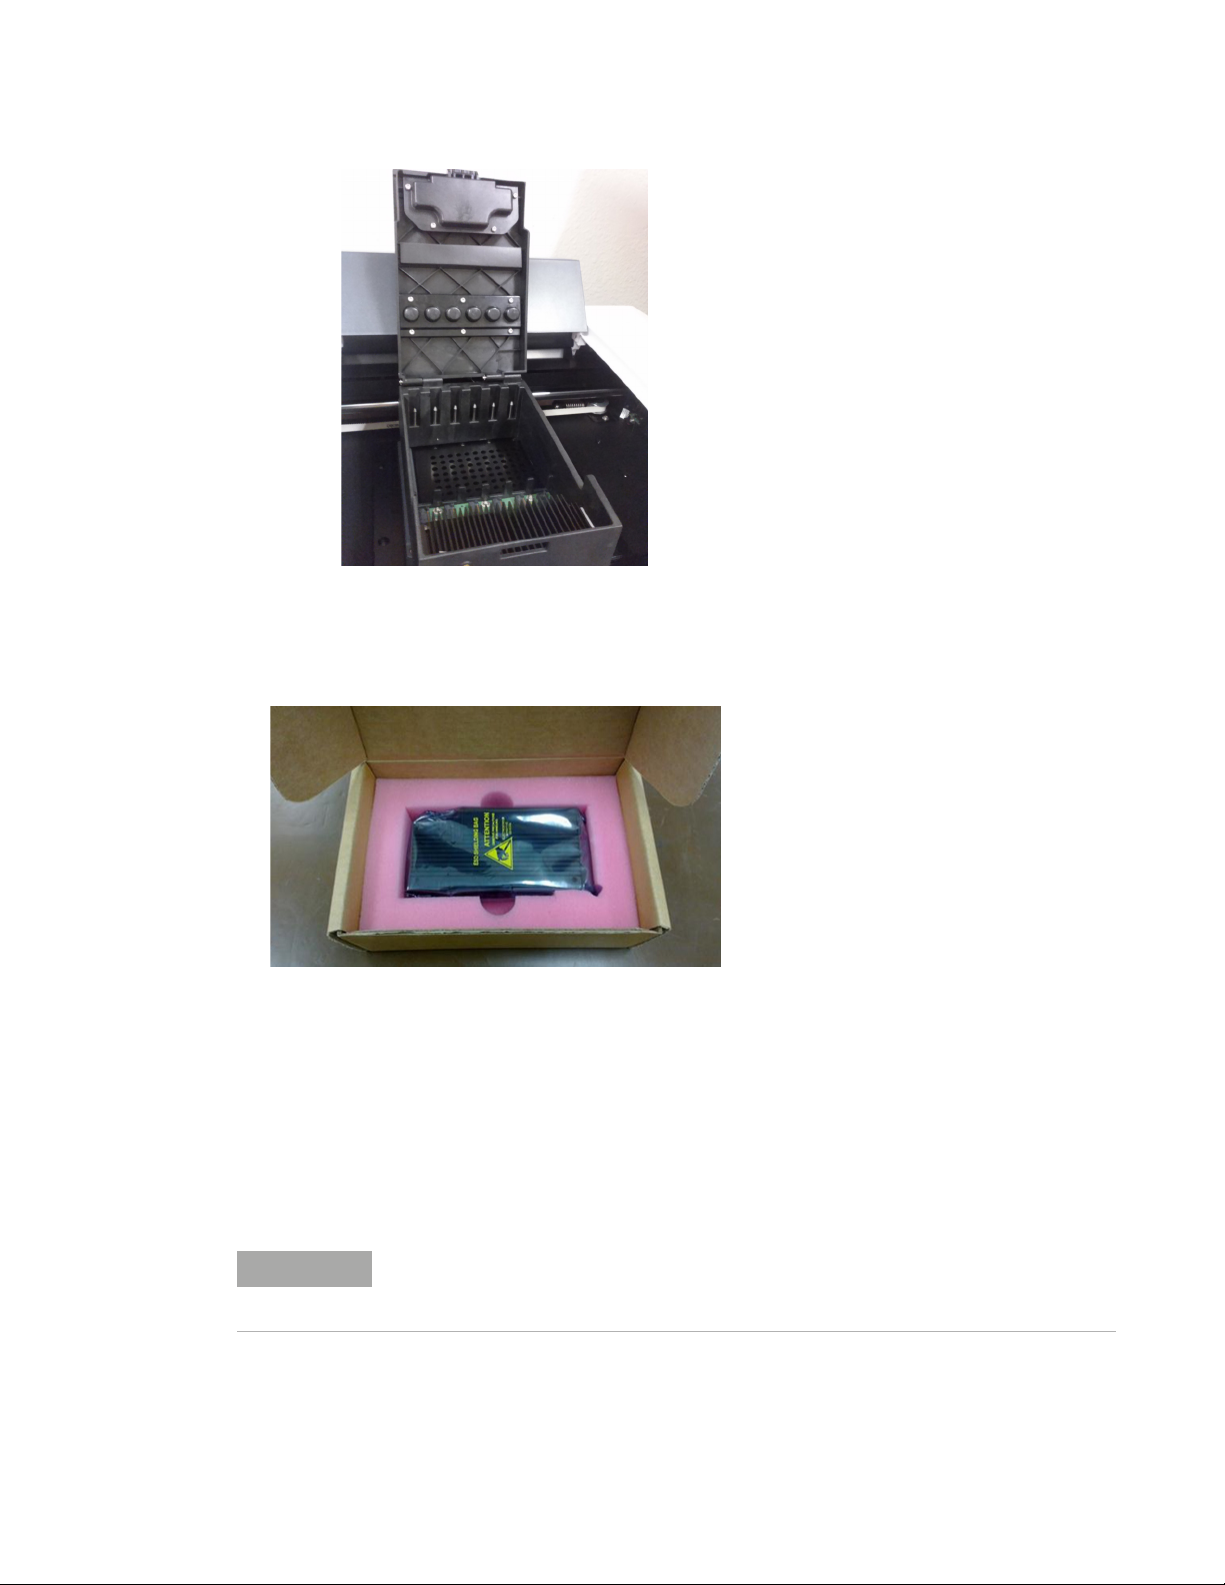
Figure 7 Slots for the optical modules
5 Open the boxes containing the optical modules. Remove the top piece of foam from each box
(Figure 8) then remove the plastic bag containing the optical module.
Figure 8 Optical module shipping box – top piece of foam removed
6 Install the optical modules into the slots.
a Open the plastic bag and remove the optical module.
b Peel off the plastic film from the edge of the optical module (see Figure 9). Once the film is
removed, do not to touch the exposed edge.
c Put the optical module into an available slot in the optical module housing. The correct
orientation for the optical module is label side up with the Agilent spark closer to the front of
the instrument (see Figure 10).
NOTE
AriaMx Real-Time PCR System Setup and User Guide 18
If you are installing fewer than six optical modules, one or more of the slots in the optical module housing will be empty. In such cases, make sure that the empty slots are on the left-most side of the housing.
Page 19
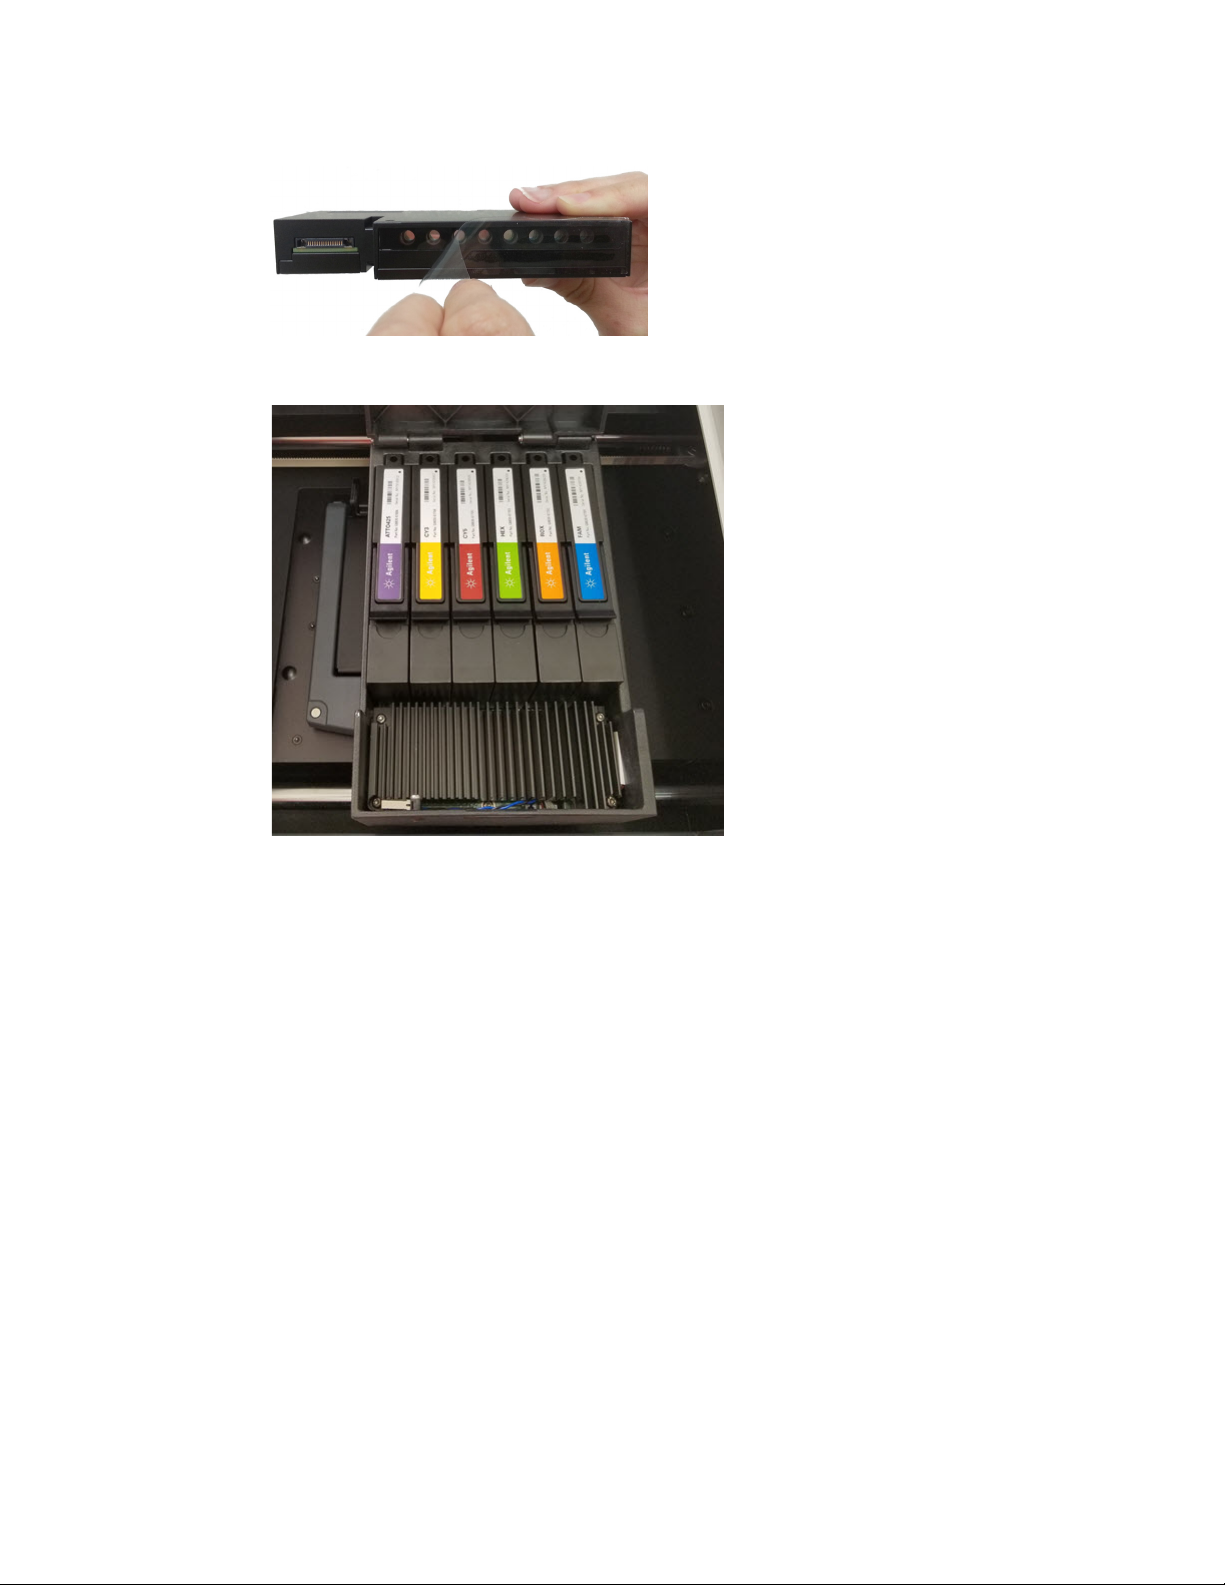
Figure 9 Removal of plastic film from optical module
Figure 10 Installed optical modules
7 Lower the lid on the optical module housing until it clicks shut.
When you turn on the instrument for the first time, it will prompt you to calibrate the
background for the optical modules. Calibration is described in “Step 1. Turn on the instrument
and calibrate the background for the optical modules” on page 23.
Step 4. Clean the thermal block
With the instrument door still open, clean the outside and inside surfaces of the thermal block.
1 Lift the lid of the thermal block by pulling forward on the handle of the lid and then lifting the lid
up and away from the thermal block.
2 Using an aerosol can of compressed air, clean out the wells of the thermal block. Hold the can
3–4 inches away from the thermal block as you press the trigger.
3 Moisten a lint-free cleansing tissue with dH20, and gently wipe down the thermal block and the
underside of the lid. Then, close the lid of the thermal block and wipe down the top of the lid.
4 Close the instrument door.
AriaMx Real-Time PCR System Setup and User Guide 19
Page 20

Step 5. Connect the instrument to a power supply
You must connect the instrument to a grounded AC outlet.
1 Plug the power cord into the power connector at the rear of the instrument.
See “Electrical” on page 9 for information on electrical safety precautions.
2 Connect the cable plug to the outlet.
Step 6. Connect a keyboard or mouse to the instrument (optional)
If desired, you can connect a keyboard or mouse to the instrument via the USB ports on the front
and back of the instrument.
• Plug the USB cable of the device into a USB port on the instrument.
Multimedia keyboards are not supported.
Step 7. Connect the instrument to a network or directly to a PC
Connecting your instrument to a PC, either directly or though a network, allows you to remotely
retrieve data from the instrument to your PC through the AriaMx PC software. If you do not
connect your instrument to a PC or network, you must transfer post-run experiment data by
copying it from the instrument to a USB drive (FAT format), and then from the USB drive to your
PC.
To connect the instrument to a network
1 Plug one end of an ethernet cable into the ethernet port on the back of the instrument. Use a
standard Cat 6 straight/crossover ethernet cable.
2 Plug the other end of the cable into a network port.
To connect the instrument directly to a PC
1 Plug one end of an ethernet cable into the ethernet port on the back of the instrument. Use a
standard Cat 6 straight/crossover ethernet cable.
2 Plug the other end of the cable into the PC.
3 After you turn on the AriaMx instrument, set a static IP address, subnet mask, and default
gateway on the instrument using the instructions below.
You will need to wait to complete these steps until after you complete “Step 1. Turn on the
instrument and calibrate the background for the optical modules” on page 23.
a On the Home screen of the AriaMx touchscreen, press Settings.
b Press Connection Settings. If you see an error message that no network connection is
detected, press OK to close the error message.
c On the Connection Settings screen, select Use Manual Configuration.
d In the IP Address, Subnet Mask, and Default Gateway fields, enter the values shown in
Figure 11. Press OK.
AriaMx Real-Time PCR System Setup and User Guide 20
Page 21
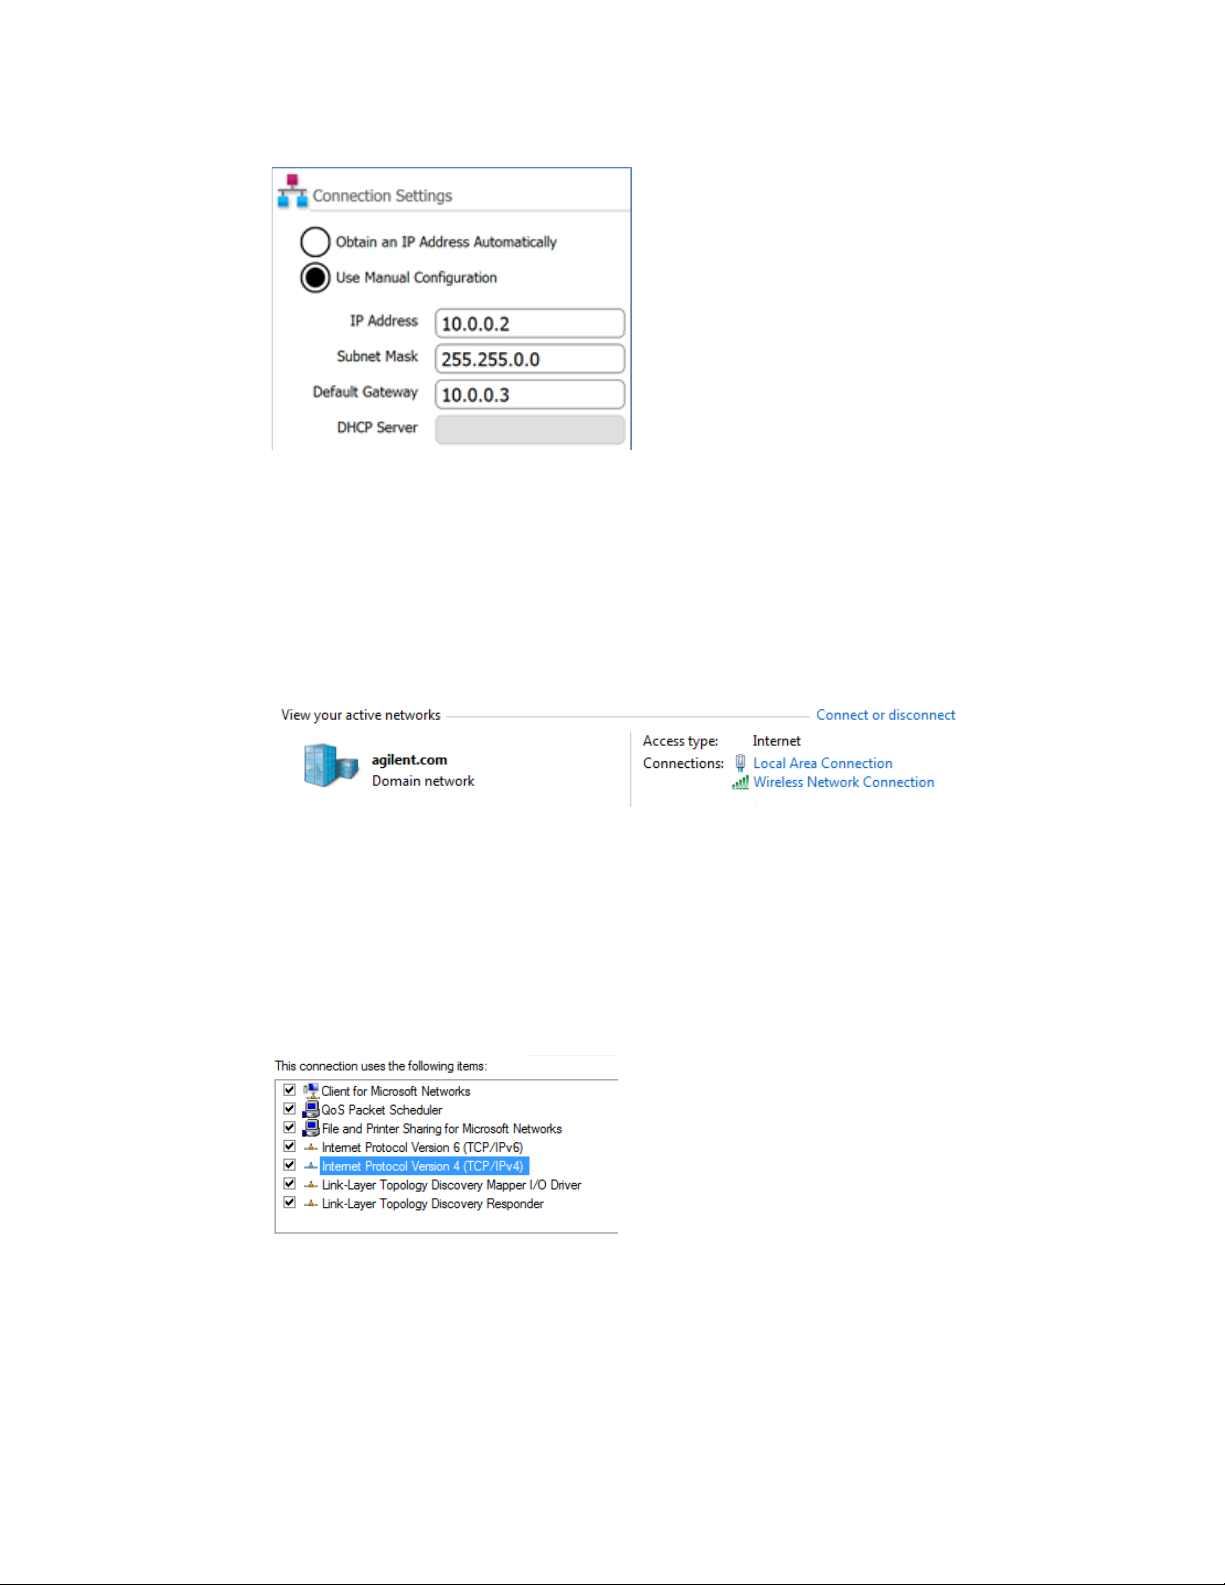
Figure 11 Connection Settings
4 On the PC, set a static IP address, subnet mask, and default gateway using the instructions
below.
a Open the Control Panel to the Network and Sharing Center.
b Under View your active networks, click Local Area Connection (Figure 12). Note that the
appearance of the Network and Sharing Center screen may differ slightly from that shown
in Figure 12 depending on your current network setup.
Figure 12 Network and Sharing Center – View your active networks
The Local Area Connection Status dialog box opens.
c In the Local Area Connection Status dialog box, click Properties.
The Local Area Connection Properties dialog box opens
d In the list of items under This connection uses the following items, double-click Internet
Protocol Version 4 (TCP/IPv4) (Figure 13).
Figure 13 Local Area Connection Properties dialog box – Internet Protocol Version 4
The Internet Protocol Version 4 (TCP/IPv4) Properties dialog box opens.
e On the General tab of the dialog box, select Use the following IP address and set the IP
address, subnet mask, and default gateway to the values shown in Figure 14. Click OK to
close the dialog box.
AriaMx Real-Time PCR System Setup and User Guide 21
Page 22

Figure 14 Internet Protocol Version 4 dialog box – Use the following IP address
AriaMx Real-Time PCR System Setup and User Guide 22
Page 23

Setting Up the AriaMx Instrument
Step 1. Turn on the instrument and calibrate the background for the optical modules
1 Press the power button located near the bottom left corner on the front of the instrument.
The instrument performs a series of health checks to ensure basic hardware functionality. If
the health checks reveal an instrument error, record the error and then perform a more detailed
diagnostic check (see “Step 3. Run a diagnostic check” on page 24). The instrument performs
the health checks each time it is powered on. When the tests are complete, the instrument
touchscreen opens to the Home screen.
Anytime you install new optical modules, a message box opens prompting you to calibrate the
background for the optical modules.
2 Press OK in the message box.
The Background Calibration screen opens.
3 Press Calibrate.
A message box opens instructing you to load a 96-well QPCR plate containing 20 l of dH20 or
TE buffer in each well onto the thermal block.
4 Prepare the plate and load it into the thermal block. Close the instrument door and press OK in
the message box.
See “Load samples” on page 57 for instructions on plate loading. See “Recommended
plasticware” on page 8 for ordering information on 96-well plates.
The instrument runs the calibration. At the end of calibration, a message box opens on the
touchscreen notifying you that the calibration was successful.
5 Click OK in the message box to close it.
The touchscreen returns to the Home screen. You are logged in to the Guest account.
AriaMx Real-Time PCR System Setup and User Guide 23
Page 24

Figure 15 Touchscreen display – Home screen
The color touchscreen on the AriaMx instrument allows you to operate the instrument by touching
the buttons on the screen. If a mouse has been connected to the instrument, you may select
buttons by clicking. When software functions require data input from a keyboard, the touchscreen
automatically displays a virtual keyboard. You can also type in data input using a USB-connected
keyboard.
Step 2. Set the instrument date and time
1 In the bottom right corner of the touchscreen, press the time and date this is currently
displayed.
2 In the menu that opens, press Change Date & Time.
The Date & Time Settings screen opens.
3 Use the fields to set the date and time to the correct values. Press the help icon for detailed
instructions on setting the date and time on this screen.
Step 3. Run a diagnostic check
1 On the Home screen of the touchscreen, press Settings.
2 Press Instrument Diagnostic.
3 Press Run Diagnostics.
4 Mark the check box at the top of the screen labeled All Test.
5 Press Run.
AriaMx Real-Time PCR System Setup and User Guide 24
Page 25

A message box opens prompting you to make sure that no plate is loaded on the thermal
block.
6 Press OK to continue.
A dialog box opens displaying a schematic of the optical modules installed in the housing.
7 Mark the check boxes for all slots in the housing that contain an optical module. For empty
slots, leave the check box clear. Press OK.
The instrument begins running the diagnostic check. The first set of tests is the user
interaction tests.
8 During the user interaction tests, perform all actions and answer questions as prompted on the
touchscreen.
After the user interaction tests, the instrument runs the diagnostic tests. No user input is
required during this set of tests.
At the end of the diagnostic check, the touchscreen opens to the Diagnostic Report screen.
Figure 16 Diagnostic report banner, with the test results circled in red
9 Check the diagnostic report. The banner at the top of the report lists the number of tests that
passed out of the total number of test performed (see Figure 16).
• If all tests passed, you can close the diagnostic report.
• If any of the tests failed, contact Agilent Technical Support. See page 12 for contact
information.
AriaMx Real-Time PCR System Setup and User Guide 25
Page 26

Logging In and Creating User Accounts
The AriaMx instrument offers individualized user accounts, allowing each AriaMx user to log in to
the instrument with their own account and save experiments to their own user folder. Three
different access levels are available for user accounts: Administrator, User, and Guest. Each level
has specific user rights as described in Table 6.
Table 6 Access levels
Access Level Functions allowed
Guest • Access rights to the Guest folder
User • Access rights to the Guest and personal user folder
Administrator • Access rights to the Guest folder and all user folders
• Creation and management of user accounts
• Installation of instrument software updates
• Access rights to the instrument diagnostic reports
Each time you turn on the instrument, you are automatically logged in to the Guest account. Use
of the Guest account is not recommended for organizations that prioritize file security.
Step 1. Log in to the instrument using an Administrator account
1 From the Home screen of the touchscreen, press User Login. Alternatively, from any screen of
the touchscreen, press Current User at the bottom of the screen, then press Open Login Page.
The User Login screen opens.
2 In the User Name drop-down, select the user name for an account that has Administrator
access level.
The instrument comes preloaded with a default Administrator account that you can select
here.
3 In the Password field, type the password for the account.
The default password for the Administrator user name is ADMIN.
4 Press Login.
A message box opens confirming that you logged in to the instrument. Press OK to close the
message box.
5 (Optional) Change the default password for the Administrator account.
a From the Home screen, press Settings.
b Press User Management.
c On the User Management screen, select the Administrator account and press Edit.
d In the Password and Confirm Password fields, type a new password for the account.
e Press OK to save the new password.
AriaMx Real-Time PCR System Setup and User Guide 26
Page 27

Step 2. Add user accounts
1 From the Home screen, press Settings.
2 Press User Management.
The User Management screen opens listing the available user names and corresponding
access levels.
3 Press Add.
The Add User screen opens.
Figure 17 Add User screen
4 In the User Name field, type a user name.
5 In the Access Level drop-down list, select an access level for the account. The options are
Administrator and User.
See Table 6 on page 26 for a description of access levels.
6 In the Password and Confirm Password fields, type a password for the account.
7 Press OK to save the account.
A message box opens confirming the creation of the new account. Click OK to close the
message box. You are returned to the User Management screen.
8 Repeat step 3 through step 7 for any additional user accounts that you want to create.
Step 3. Log in to your personal user account
Logging in to your personal account allows you to access your user folder. If you are logged in as
Guest, you must save the experiment to the Guest folder.
1 From the Home screen of the touchscreen, press User Login. Alternatively, from any screen of
the touchscreen, press Current User at the bottom of the screen, then press Open Login Page.
The User Login screen opens.
2 In the User Name drop-down, select your user name. In the Password field, type the password
for the account.
3 Press Login.
A message box opens confirming that you logged in to the instrument. Press OK to close the
message box.
To log out, press Current User at the bottom of any screen, then press Log Out.
AriaMx Real-Time PCR System Setup and User Guide 27
Page 28

Customizing Instrument Settings
You can access a variety of instrument settings using the buttons on the Settings screen of the
touchscreen. Each button takes you to a different screen in the touchscreen software. From each
screen, press the Help icon for more information on the settings available.
Table 7 Buttons on the Settings screen
Button Description
User Management – Opens the User Management screen, which has tools for
creating and managing user accounts. This screen can only be accessed when an
Administrator user is logged in to the instrument.
System Settings – Opens the System Settings screen, which has tools for accessing
and managing instrument settings including date/time, optical module information,
PC connections, experiment resumption, instrument name and calibration processes.
Software Updates – Displays software version information for the instrument. An
Administrator user can use this screen to update the AriaMx instrument software.
Hot Top Settings – Use this button to enable or disable the instrument hot top.
Connection Settings – Displays the IP address and other network information for the
instrument.
Instrument Diagnostic – Opens the Diagnostic Test screen, which contains buttons
for running instrument troubleshooting tests and viewing and reporting the results.
See “Open the diagnostic report” on page 63.
Calibrate Touch – Use this button to calibrate the touchscreen. The calibration
screen instructs you to touch a marker (+) appearing on the screen in order to
calibrate the touchscreen response functions.
AriaMx Real-Time PCR System Setup and User Guide 28
Page 29

AriaMx Real-Time PCR System
Setup and User Guide
3 Installation of the Aria Software
Minimum requirements for running the Aria software 30
Installing the Standard Aria Software 31
Download the Aria software 31
Install the Aria software 31
Launch the Aria software 37
Installing the Aria ET (Electronic Tracking) Software 38
Download the Aria software and Microsoft SQL Server 2012 38
Install Microsoft SQL Server 2012 38
Install the Aria ET software 43
Configure and start Microsoft Distributed Transaction Coordinator (MSDTC) service 49
Launch the Aria ET software 51
Installing Microsoft .NET Framework 4.0 53
Download Microsoft .NET Framework 4.0 53
Install Microsoft .NET Framework 4.0 53
This chapter contains installation instructions for installing the Aria software on your PC.
29
Page 30

Minimum requirements for running the Aria software
Before installing the Aria software, see Table 8 for the minimum PC requirements needed to run
the software.
Table 8 Minimum requirements for running the Aria software
Operating system Windows 10 – with regional format set to English (United States)
Supported architectures ×64 (64 bit) supported on Windows 10
Programs* Microsoft .NET Framework 4.0
Microsoft SQL Server 2012 (required for ET software only)
Runtime components of Microsoft Visual C++ 2010 Libraries
Processor 2 GHz Dual Core Processor
Working memory (RAM) 2 GB (more is recommended)
Hard disk space 40 GB
Display resolution 1024 × 768 (1280 × 1024 is recommended)
* Installers for Microsoft .NET Framework 4.0 and Microsoft SQL Server 2012 are provided on the
AriaMx Software Download page of the Agilent website (see “Installing Microsoft .NET
Framework 4.0” on page 53 and “Install Microsoft SQL Server 2012” on page 38). If you do not
have the needed Microsoft Visual C++ 2010 components, then the Aria installer will
automatically install them to your PC when you initiate installation of the Aria software.
AriaMx Real-Time PCR System Setup and User Guide 30
Page 31

Installing the Standard Aria Software
NOTE
If you connected your instrument directly to a PC, install the software on that PC. If you connected
your instrument to a network, install the software on a network PC. You can install the standard
Aria software on an unlimited number of PCs.
Before starting the installation, make sure your PC meets the minimum requirements needed to
run the Aria software. See Table 8 on page 30 for a list of the minimum requirements.
The instructions in this chapter are for the installation of the standard Aria
software. If you purchased the optional 21 CFR Part 11-compatible features –
which include user authentication, database data storage, and audit trail support
– use the instructions in “Installing the Aria ET (Electronic Tracking) Software” on
page 38.
Download the Aria software
To download the installer for the Aria software:
1 Go to the AriaMx Software Download website at
www.genomics.agilent.com/article.jsp?id=12100024.
2 Under Aria Software Download, click the link for the latest version of the software.
The software request page opens in a new tab or window of your internet browser.
3 Complete the fields on the page and click Submit.
The page updates to provide a link for downloading the firmware software and a link for
downloading the Aria software.
4 Click the link to download the Aria software.
5 Save the Installer to your computer. The Installer is named Agilent Aria Software Setup X.X.exe
(where X.X is the software version).
Install the Aria software
To install the Aria software:
1 Double-click the file called Agilent Aria Software Setup X.X.exe (where X.X is the software
version).
The Aria software installation wizard starts. Following the file extraction process, the wizard
opens to the Welcome window.
AriaMx Real-Time PCR System Setup and User Guide 31
Page 32

NOTE
If you receive an error message stating that Microsoft .NET Framework 4.0 needs
to be installed, you must cancel the installation and install Microsoft .NET
Framework 4.0 first. To cancel the AriaMx installation, click OK in the error
message box, then click Finish in the installation wizard.
See “Installing Microsoft .NET Framework 4.0” on page 53 for instructions on installing Microsoft .NET Framework 4.0.
Figure 18 Agilent Aria installation wizard – Welcome window
1 Click Next to continue with the installation.
The License Agreement window opens.
Figure 19 Agilent Aria installation wizard – License Agreement window
AriaMx Real-Time PCR System Setup and User Guide 32
Page 33

2 If you accept the terms of this agreement, select I agree to the terms in the license agreement
and click Next. (If desired, click Print before clicking Next to print a copy of the license
agreement.)
The Application Mode window opens.
Figure 20 Agilent Aria installation wizard – Application Mode window
3 In the Application Mode window, select AriaMx, then click Next.
The Setup Type window opens.
NOTE
The AriaMx mode of the software is only compatible with the AriaMx instrument. The AriaDx mode of the software is only compatible with the AriaDx instrument.
AriaMx Real-Time PCR System Setup and User Guide 33
Page 34

Figure 21 Agilent Aria installation wizard – Setup Type window
4 In the Setup Type window, Standard is selected by default. Leave this default selection in place.
5 Make a selection for the software’s HRM features. The HRM features allow full access to the
graphical displays for experiments that use high resolution melt (HRM) analysis. Enabling the
HRM features requires a separate license that can be purchased from Agilent.
• If you have purchased an HRM license and want to enable the HRM features in the Aria
software, mark the check box labeled Enabled HRM Features and click Next. The Software
Activation window opens. Proceed to step 6 below.
• If you do not want to enable the HRM features in the Aria software, do not mark the check
box labeled Enabled HRM Features. Click Next. The Destination Folder window opens.
Proceed to step 8.
Figure 22 Agilent Aria installation wizard – Software Activation window
AriaMx Real-Time PCR System Setup and User Guide 34
Page 35

6 The Software Activation window displays the Licensing Host ID. Follow the instructions
provided on your Software Entitlement Certificate to use this Licensing Host ID to redeem your
HRM license and save the file to your PC. Then, in the Software Activation window, click
Browse to open a dialog box where you can browse to the folder containing the HRM license
file. Select the file and click Open.
The dialog box closes and you are returned to the Software Activation window.
7 Click Next.
The Destination Folder window opens.
Figure 23 Agilent Aria installation wizard – Destination Folder window
8 Designate a folder for the software files. The default folder is
C:\Program Files (x86)\Agilent\Agilent Aria.
• If you want to install the software to the default folder, click Next to continue.
• If you want to designate a different folder, click Change in the Destination Folder window. In
the dialog box that opens, browse to the desired folder, select the folder, and click Open.
Then, in the Destination Folder window, click Next to continue.
The Ready to Install window opens.
AriaMx Real-Time PCR System Setup and User Guide 35
Page 36

Figure 24 Agilent Aria installation wizard – Ready to Install window
9 Click Install.
The wizard installs the Aria software to the folder designated in step 8. When installation is
complete, the InstallShield Wizard Completed window opens.
Figure 25 Agilent Aria installation wizard – InstallShield Wizard Completed window
10 Click Finish to close the wizard.
AriaMx Real-Time PCR System Setup and User Guide 36
Page 37

Launch the Aria software
After installation is complete, the software is ready to launch.
To launch the Aria software:
• From the Start menu, click All Programs > Agilent > Agilent AriaMx > Agilent AriaMx X.X
(where X.X is the software version).
The software opens to the Getting Started screen.
NOTE
During installation, a set of sample experiments (*.amxd) and sample templates (*.amxt) were saved to the following folders.
C:\Users\Public\Public Documents\Agilent Aria\Sample Experiments C:\Users\Public\Public Documents\Agilent Aria\Experiment Templates
You can now open these files in the Aria software.
AriaMx Real-Time PCR System Setup and User Guide 37
Page 38

Installing the Aria ET (Electronic Tracking) Software
NOTE
Make sure your PC meets the minimum requirements needed to run the Aria software. See
Table 8 on page 30 for a list of the minimum requirements.
Note for MxPro users The database system used by Aria ET (Microsoft SQL Server 2012) and
the database system used by MxPro ET (Microsoft Server Desktop Engine) are known to have
incompatibility issues. For this reason, Aria ET users need to make sure to install SQL Server on a
PC that is not already running Microsoft Server Desktop Engine.
The instructions in this chapter are only suitable if you purchased the Aria ET
(electronic tracking) software, which includes the optional 21 CFR Part
11-compatible features. If you did not purchase the ET version of the software,
see the installation instructions in “Installing the Standard Aria Software” on
page 31.
Download the Aria software and Microsoft SQL Server 2012
To download the installers for the Aria software and the Microsoft SQL Server 2012 software:
1 Go to the AriaMx Software Download website at
www.genomics.agilent.com/article.jsp?id=12100024.
2 Under Aria PC Software requirements, click Server set up software for Electronic Tracking
software upgrade.
3 Save the Installer to your computer. The Installer is named
Agilent.Aria.SQLServer2012Setup.exe.
4 Under Aria Software Download, click the link for the latest version of the software.
The software request page opens in a new tab or window of your internet browser.
5 Complete the fields on the page and click Submit.
The page updates to provide a link for downloading the firmware software and a link for
downloading the Aria software.
6 Click the link to download the Aria software.
7 Save the Installer to your computer. The Installer is named Agilent Aria Software Setup X.X.exe
(where X.X is the software version).
Install Microsoft SQL Server 2012
The Aria ET software uses SQL Server for storage of the databases. Install SQL Server prior to
installing the Aria ET software.
AriaMx Real-Time PCR System Setup and User Guide 38
Page 39

NOTE
To install SQL Server:
8 Double-click the file called Agilent.AriaMx.SQLServer2012Setup.exe.
The AriaMx SQL Server installation wizard opens.
You can install SQL Server on a different PC than the Aria ET software provided
that the two PCs are on the same network domain. Importantly, the Aria ET PC
and the SQL Server PC need to be joined to the same domain prior to installation
of the Aria ET software. Your network administrator can help you join the PCs to
the same domain.
Figure 26 AriaMx Microsoft SQL Server 2012 installation wizard
9 Click Next to continue.
The License Agreement window opens.
AriaMx Real-Time PCR System Setup and User Guide 39
Page 40

Figure 27 AriaMx Microsoft SQL Server 2012 installation wizard – License Agreement window
10 If you accept the terms of this agreement, select I accept the terms in the license agreement
and click Next. (If desired, click Print before clicking Next to print a copy of the license
agreement.)
The Instance Configuration window opens.
Figure 28 AriaMx Microsoft SQL Server 2012 installation wizard – Instance Configuration win-
dow
AriaMx Real-Time PCR System Setup and User Guide 40
Page 41

11 In the Instance Name field of the Instance Configuration window, type a name for the server
instance you want to install. Hover your cursor over the Information icon next to the field to see
guidelines on selecting a valid instance name.
12 In the Enter Password field, type a password for the server instance. Hover your cursor over
the Information icon next to the field to see guidelines on selecting a valid password. Type the
password again in the Confirm Password field.
13 Click Next in the Instance Configuration window.
The Ready to Install window opens.
Figure 29 AriaMx Microsoft SQL Server 2012 installation wizard – Ready to Install window
14 Click Install.
The Installing window opens and remains open until installation is complete.
AriaMx Real-Time PCR System Setup and User Guide 41
Page 42

Figure 30 AriaMx Microsoft SQL Server 2012 installation wizard – Installing window
When installation is complete, the SQL Server 2012 Installation Completed window opens.
Figure 31 AriaMx Microsoft SQL Server 2012 installation wizard – SQL Server 2012 Installation
Completed window
15 Click Finish to close the wizard.
AriaMx Real-Time PCR System Setup and User Guide 42
Page 43

Install the Aria ET software
To install the Aria ET software:
1 Double-click the file called Agilent Aria Software Setup X.X.exe (where X.X is the software
version).
The Aria software installation wizard starts. Following the file extraction process, the wizard
opens to the Welcome window.
NOTE
If you receive an error message stating that Microsoft .NET Framework 4.0 needs to be installed, cancel the installation of the Aria software and install Microsoft .NET Framework 4.0 first. See “Installing Microsoft .NET Framework 4.0” on page 53.
Figure 32 Agilent Aria installation wizard – Welcome window
1 Click Next to continue with the installation.
The License Agreement window opens.
AriaMx Real-Time PCR System Setup and User Guide 43
Page 44

Figure 33 Agilent Aria installation wizard – License Agreement window
2 If you accept the terms of this agreement, select I agree to the terms in the license agreement
and click Next. (If desired, click Print before clicking Next to print a copy of the license
agreement.)
The Application Mode window opens.
Figure 34 Agilent Aria installation wizard – Application Mode window
3 In the Application Mode window, select AriaMx, then click Next.
The Setup Type window opens.
NOTE
AriaMx Real-Time PCR System Setup and User Guide 44
The AriaMx mode of the software is only compatible with the AriaMx instrument. The AriaDx mode of the software is only compatible with the AriaDx instrument.
Page 45

Figure 35 Agilent Aria installation wizard – Setup Type window
4 In the Setup Type window, select Electronic Tracking.
5 Make a selection for the software’s HRM features. The HRM features allow full access to the
graphical displays for experiments that use high resolution melt (HRM) analysis. Enabling the
HRM features requires a separate license that can be purchased from Agilent.
• If you have purchased an HRM license and want to enable the HRM features in the Aria
software, mark the check box labeled Enabled HRM Features.
• If you do not want to enable the HRM features in the Aria software, do not mark the check
box labeled Enabled HRM Features.
6 Click Next.
The Software Activation window opens.
AriaMx Real-Time PCR System Setup and User Guide 45
Page 46

Figure 36 Agilent Aria installation wizard – Software Activation window
7 The Software Activation window displays the Licensing Host ID. Follow the instructions
provided on your Software Entitlement Certificate to use this Licensing Host ID to redeem your
software license and save the file to your PC. Then, in the Software Activation window, click
Browse to open a dialog box where you can browse to the folder containing the license file.
Select the file and click Open.
The dialog box closes and you are returned to the Software Activation window.
8 Click Next.
The Database Server window opens.
Figure 37 Agilent Aria installation wizard – Database Server window
AriaMx Real-Time PCR System Setup and User Guide 46
Page 47

9 In the drop-down list at the top of the Database Server window, select the database server
instance that you set up while installing SQL Server (see step 11 on page 41).
10 In the Password field, type the password for the database server instance that you entered
while installing SQL Server (see step 12 on page 41).
11 Select a database to use as the primary database when you log in to the Aria ET software.
• To create a new database, select Create new database. Type a name for the database into
the adjacent field or use the default database name.
• To select an existing database, select Select existing database. Click Browse, and in the
dialog box that opens, select the database that you want to use and click OK. The dialog
box closes.
After you make your selection, click Next in the Database Server window.
The Destination Folder window opens.
Figure 38 Agilent Aria installation wizard – Destination Folder window
12 Designate a folder for the software files. The default folder is
C:\Program Files (x86)\Agilent\Agilent Aria.
• If you want to install the software to the default folder, click Next to continue.
• If you want to designate a different folder, click Change in the Destination Folder window. In
the dialog box that opens, browse to the desired folder, select the folder, and click Open.
Then, in the Destination Folder window, click Next to continue.
The Ready to Install window opens.
AriaMx Real-Time PCR System Setup and User Guide 47
Page 48

Figure 39 Agilent Aria installation wizard – Ready to Install window
13 Click Install.
The wizard installs the Aria software to the folder designated in step 12. When installation is
complete, the InstallShield Wizard Completed window opens.
Figure 40 Agilent Aria installation wizard – InstallShield Wizard Completed window
14 Click Finish to close the wizard.
AriaMx Real-Time PCR System Setup and User Guide 48
Page 49

Configure and start Microsoft Distributed Transaction Coordinator (MSDTC) service
In order to archive and restore experiments to and from a database in the Aria ET software, your
PC must be running MSDTC service.
Start MSDTC service
To start MSDTC service:
1 Open the Control Panel on your PC. Make sure you are viewing the Control Panel by category.
2 Click System and Security, then click Administrative Tools.
The Administrative Tools folder opens in Windows Explorer.
3 Double-click Services.
The Services window opens.
4 In the Name column of the Services window, double-click Distributed Transaction
Coordinator.
The Distributed Transaction Coordinator Properties dialog box opens.
5 Click the Log On tab of the Distributed Transaction Coordinator Properties dialog box. Make
sure that This account is selected and that the adjacent field reads “Network Service.”
Figure 41 Distributed Transaction Coordinator Properties dialog box – Log On tab
6 On the General tab of the Distributed Transaction Coordinator Properties dialog box, set the
Startup type to Automatic, then click Start.
AriaMx Real-Time PCR System Setup and User Guide 49
Page 50

Figure 42 Distributed Transaction Coordinator Properties dialog box – General tab
7 Click OK to close the Distributed Transaction Coordinator Properties dialog box.
Configure Network Distributed Transaction Coordinator (DTC) access
1 Open the Windows Start menu and click Run.
The Run dialog box opens.
2 In the Open field, type dcomcnfg.exe and click OK.
The Component Services window opens.
3 In panel on the right side of the Component Services window, expand Component Services >
Computers > My Computer > Distributed Transaction Coordinator.
4 Right-click on Local DTC. In the pop-up menu click Properties.
The Local DTC Properties dialog box opens.
5 Click the Security tab. Under Security Settings mark Network DTC Access.
6 Under Transaction Manager Communication mark Allow Inbound and Allow Outbound, and
select No Authentication Required.
AriaMx Real-Time PCR System Setup and User Guide 50
Page 51

Figure 43 Local DTC Properties dialog box – Security tab
7 Click OK.
The Local DTC Properties dialog box closes and the MSDTC service starts or restarts.
8 Close the Component Services window.
Launch the Aria ET software
After installation is complete, the software is ready to launch.
To launch the Aria software:
1 From the Start menu, click All Programs > Agilent > Agilent Aria > Agilent Aria X.X (where X.X
is the software version).
The Login dialog box opens, prompting you to log in to the primary database that you set up
during installation the Aria ET software (see step 11 on page 47).
2 Log in using the default administrator account.
a In the Username field, type admin.
b In the Password field, type Password.
c Click Login or press Enter.
The Change Password dialog box opens.
3 Select a new password for the account.
a In the Old Password field, type Password.
AriaMx Real-Time PCR System Setup and User Guide 51
Page 52

b In the New Password field, type a new password of your choosing. The password must be
6–15 characters in length and include at least one number.
c Retype the new password into the Confirm Password field.
d Click OK.
The dialog box closes. The software opens to the Getting Started screen.
NOTE
During installation, a set of sample experiments (*.amxd) and sample templates (*.amxt) were saved to the following folders.
C:\Users\Public\Public Documents\Agilent Aria\Sample Experiments C:\Users\Public\Public Documents\Agilent Aria\Experiment Templates
You can now open these files in the Aria software.
AriaMx Real-Time PCR System Setup and User Guide 52
Page 53

Installing Microsoft .NET Framework 4.0
In order to install the Aria software, you must have Microsoft .NET Framework 4.0 or greater
installed on your PC. If you attempted to install the Aria software and received an error message
stating that Microsoft .NET Framework 4.0 is needed, follow the instructions in this section to
install this software.
Download Microsoft .NET Framework 4.0
To download the installer for the Aria software:
1 Go to the AriaMx Software Download website at
www.genomics.agilent.com/article.jsp?id=12100024.
2 Under Aria PC Software requirements, click Microsoft .NET Framework 4.0 Installer.
3 Save the Installer to your computer. The Installer is named dotnetfx40_full_x86_x64.exe.
Install Microsoft .NET Framework 4.0
4 Double-click the dotnetfx40_full_x86_x64.exe file.
The Microsoft .NET Framework 4 Setup window opens, displaying the software license.
AriaMx Real-Time PCR System Setup and User Guide 53
Page 54

Figure 44 Microsoft .NET FrameWork 4 Setup – License window
5 If you accept the terms of this agreement, select I have read and accept the license terms and
click Install. (If desired, click the Print icon or Save icon before clicking Install to print or save a
copy of the license agreement.)
The installer installs Microsoft .NET FrameWork 4.0. During installation, the Microsoft .NET
FrameWork 4 Setup window remains open and displays progress bars for the installation
tasks. When installation is complete, the Installation Is Complete window opens.
AriaMx Real-Time PCR System Setup and User Guide 54
Page 55

Figure 45 Microsoft .NET FrameWork 4 Setup – Installation Is Complete window
6 Click Finish to close the Microsoft .NET FrameWork 4 Setup window.
You can now install the Aria software. See “Installing the Standard Aria Software” on page 31.
AriaMx Real-Time PCR System Setup and User Guide 55
Page 56

AriaMx Real-Time PCR System
Setup and User Guide
4 Running Experiments
Preparing and Loading PCR Samples 57
Prepare samples 57
Load samples 57
Setting Up and Running Experiments 58
Use the touchscreen to set up and run an experiment 58
Use the PC software to set up and run an experiment 58
Managing Saved Experiments 60
Locate saved experiment files 60
Create a subfolder 60
Copy and paste experiments 61
Transfer experiments to a USB drive 61
This chapter contains instructions on preparing and running experiments and managing experiment files on the instrument.
56
Page 57

Preparing and Loading PCR Samples
Prepare samples
When preparing the PCR reactions, follow the guidelines below for optimal results.
• Use only temperature-stable PCR tubes and plates. See “Recommended plasticware” on
page 8 for a list of recommended tubes and plates.
• Place caps on tubes before loading samples into the thermal block.
• Spin samples briefly in a centrifuge immediately before loading them into the thermal block.
Load samples
The instrument can be loaded with individual PCR tubes or strip tubes or one 96-well PCR plate.
1 Open the instrument door that covers the thermal block assembly by lifting up on the handle
on the top of the instrument. Lift the door all the way up and back.
2 Lift the heated lid by pulling forward on the handle of the lid and then lifting the lid up and away
from the thermal block.
3 Put your plate or tubes on the block and check that they are correctly positioned.
4 Close the heated lid until so that it latches into place.
5 Close the instrument door so that it latches into place.
WARNING
Danger of Burns: The thermal block, sample tubes and plates may reach temperatures
as high as 100°C. Keep hands away until temperature is 30°C or less.
AriaMx Real-Time PCR System Setup and User Guide 57
Page 58

Setting Up and Running Experiments
You can set up the plate and thermal profile for an experiment on either the instrument
touchscreen software or on the Aria software on your PC. The instructions below provide the
basic steps required to set up an experiment and start running the experiment. For more detailed
information about setting up and running experiments, see the help system in the AriaMx PC
software.
Use the touchscreen to set up and run an experiment
1 (Optional) Log in the instrument. See “Step 3. Log in to your personal user account” on page 27.
Logging in to your personal account allows you to save the experiment to your user folder. If
you are logged in as Guest, you must save the experiment to the Guest folder.
2 On the Home screen, press New Experiment.
The Experiment Types screen opens.
3 Create the experiment using one of the following approaches.
• Press the desired experiment type. The Plate Setup screen opens.
• Press Open Template. The Template screen opens. Press a template file to select it then
press Open. The Plate Setup screen opens.
4 On the Plate Setup screen, set up the wells of the plate. Press the help icon for help with
working on the Plate Setup screen.
5 Press the Thermal Profile tab.
The Thermal Profile screen opens.
6 Set up the thermal profile for the experiment. Press the help icon for help with working on the
Thermal Profile screen.
7 Load the samples onto the thermal block (see “Load samples” on page 57), and press Run
Experiment on the Thermal Profile screen.
A message box opens asking you to save the experiment. Click OK to open the Save
Experiment screen.
8 Select a folder for the experiment file and press Save.
The Raw Data Plots screen opens, allowing you to monitor the progress of the run.
Use the PC software to set up and run an experiment
1 On the Getting Started screen, create the experiment using one of the following approaches.
• Click Experiment Types. The screen displays the experiment types. Click the desired
experiment type to select it. Type a name for the experiment and click Create. The Plate
Setup screen opens.
• Click My Templates. The screen displays the templates in the default template folder. Click
the desired template to select it. Type a name for the experiment and click Create. The
Plate Setup screen opens.
AriaMx Real-Time PCR System Setup and User Guide 58
Page 59

• Click From LIMS file. The screen displays a wizard for importing a LIMS data file. Use the
wizard to import a saved LIMS data file and describe the new experiment. Upon completing
the wizard, the Plate Setup screen opens.
2 On the Plate Setup screen, set up the wells of the plate. See the software help system for help
with setting up the plate.
3 Click Thermal Profile in the Experiment Area on the left side of the screen.
The Thermal Profile screen opens.
4 Set up the thermal profile for the experiment. See the software help system for help with
setting up the thermal profile.
5 Click Run.
The Instrument Explorer dialog box opens.
6 In the dialog box, locate the instrument and click Send Config.
• If you have not already logged in to the selected instrument, you will be prompted to log in
before continuing.
• If you have not already saved the experiment you will be prompted to save it before
continuing.
7 Load your samples onto the thermal block (see “Load samples” on page 57).
8 At the bottom of the instrument touchscreen, press the icon shown below.
In the pop-up menu that opens, press Open Primed Experiment.
The experiment opens on the touchscreen.
9 On the Thermal Profile screen of the touchscreen, press Run Experiment.
The Raw Data Plots screen opens, allowing you to monitor the progress of the run.
AriaMx Real-Time PCR System Setup and User Guide 59
Page 60

Managing Saved Experiments
Each user account, including the Guest account, has its own user folder on the AriaMx instrument.
Users can save and retrieve experiment files to and from the folders to which they have access.
(All users have access to the Guest folder and the folder for their account. Administrator accounts
have access to all folders on the instrument. Users logged in as Guest can only access the Guest
folder and the HRM Calibration folder.)
Locate saved experiment files
1 If necessary, log in the instrument. See “Step 3. Log in to your personal user account” on
page 27.
Logging in to your personal account allows you to access experiment files in your user folder.
If you are logged in as Guest, you can only access experiment files in the Guest folder and the
HRM Calibration folder (which only contains HRM calibration experiments).
2 On the Home screen of the touchscreen, press Saved Experiment.
The Experiment Explorer screen opens. The left side of the screen lists the folders to which you
have access.
3 Press directly on a folder to select it.
The right side of the screen lists the experiment files and any subfolders in the selected folder.
Experiment files have the file extension amxd.
4 To open a subfolder, double-press the subfolder on the right side of the screen.
The subfolder expands to display the experiment files and subfolders contained within.
Create a subfolder
1 On the Experiment Explorer screen, locate the folder in which you want to create a subfolder.
Press the folder to select it.
See “Locate saved experiment files”, above, for instructions on opening and navigating the
Experiment Explorer screen.
2 Press New Folder.
The virtual keyboard appears.
3 In the New Folder Name field, type a name for the subfolder. Press Create Folder.
The new subfolder appears on the Saved Experiment screen.
AriaMx Real-Time PCR System Setup and User Guide 60
Page 61

Copy and paste experiments
1 On the Experiment Explorer screen, locate the experiment that you want to copy. Press the
experiment to select it.
See “Locate saved experiment files” on page 60 for instructions on opening and navigating the
Saved Experiment screen.
2 Press Copy.
3 Browse to the folder to which you want to paste the experiment file. Press the folder to select
it.
4 Press Paste.
The experiment file is pasted to the selected folder.
Transfer experiments to a USB drive
1 Insert a FAT format USB drive into the USB port on the front of the instrument.
2 On the Experiment Explorer screen, locate the experiment that you want to copy. Press the
experiment to select it.
See “Locate saved experiment files” on page 60 for instructions on opening and navigating the
Saved Experiment screen.
3 Press Copy.
4 On the left side of the Experiment Explorer screen, press the folder for the USB drive (called
USBDisk).
5 Press Paste.
A copy of the experiment file is saved to the USB drive.
NOTE
You can also transfer experiments from the instrument to the Aria PC software
by connecting the instrument directly to the PC or a network. See page 20 for
instructions setting up PC or network connections. See the help system for the
Aria PC software for instructions on retrieving experiments from a connected
instrument.
AriaMx Real-Time PCR System Setup and User Guide 61
Page 62

AriaMx Real-Time PCR System
Setup and User Guide
5 Troubleshooting, Maintenance, and Updates
Troubleshooting Instrument Error Messages 63
View error messages 63
Open the diagnostic report 63
Maintaining the Instrument 64
Service the instrument 64
Clean the instrument 64
Clean the optical modules 64
Updating the Instrument Software 66
Cybersecurity Guidance 67
This chapter contains instructions for maintaining the instrument and uploading software updates.
62
Page 63

Troubleshooting Instrument Error Messages
When the instrument detects issues with the hardware, firmware, or optical modules, it notifies
you with an error message. Error messages are also prompted when the instrument encounters
an issue while running the scanning application feature or while performing diagnostic tests.
View error messages
When the AriaMx instrument encounters an error, it notifies you by displaying an error icon at the
bottom of the touchscreen.
1 Press the error icon at the bottom of the touchscreen.
2 In the pop-up menu that opens, press Count X, where X is the number of error messages to be
read.
A table opens displaying the following information.
• Type - The type of message (Error or Warning). Warning messages are used for errors that
do not prevent you from running experiments on the instrument.
• ID - The error code ID number.
• Description - A description of the error with instructions on how to resolve it.
3 Press OK to close the table.
Open the diagnostic report
Some error messages may instruct you to refer to the diagnostics report for further details about
the cause of an error.
1 Log in using an Administrator account.
See “Step 1. Log in to the instrument using an Administrator account” on page 26.
2 On the Home screen, press Settings.
The Settings screen opens.
3 Press Instrument Diagnostic.
The Diagnostic Test screen opens.
4 Press View Result.
The Diagnostic Report screen opens. The table lists each category of diagnostic test included
on the report.
5 Double-press a category to expand its contents.
The table displays the tests within that category. The Results column indicates if the test
passed or failed. The Run Date column lists the date and time of the test.
AriaMx Real-Time PCR System Setup and User Guide 63
Page 64

Maintaining the Instrument
The AriaMx instrument is designed to require a minimum amount of maintenance by the user.
Service the instrument
As preventative maintenance, Agilent recommends having your AriaMx instrument serviced by an
Agilent service engineer every 12 months. Contact Agilent technical support for information on
instrument service. See “Agilent Technical Support” on page 12 for contact information.
Clean the instrument
To clean the exterior of the AriaMx instrument:
1 Turn off and disconnect the instrument from the power supply.
2 Using laboratory wipes moistened with 70% isopropyl alcohol, clean the exterior surfaces of
the instrument listed below. Do not let liquid enter the instrument.
• All surfaces of the door including the depression at the top that is used to open the door
• The surface of the touchscreen
• Both sides of the instrument
• The power button and adjacent area
• The front panels of the instrument
3 Allow isopropyl alcohol to evaporate before reconnecting the instrument to the power supply.
Clean the optical modules
To clean an optical module:
1 Remove the optical module from its slot in the optical module housing.
a Open the lid on the optical module housing carrier.
b Lift the hinged tab on the top of the optical module (see Figure 46), then use the tab to lift
the optical module out of its slot.
AriaMx Real-Time PCR System Setup and User Guide 64
Page 65

Figure 46 Lifting the hinged tab on an optical module
2 Using an aerosol can of compressed air, clean the bottom surface of the optical module (the
surface opposite of the label). Hold the can 3–4 inches away from the surface as you press the
trigger.
3 (Optional) Wipe the bottom surface with a lens cloth or lens tissue moistened with
reagent-grade isopropyl alcohol or reagent-grade acetone.
4 Re-install the optical module into the housing. Lower the hinged tab until it snaps into place.
5 Close the lid on the housing carrier.
AriaMx Real-Time PCR System Setup and User Guide 65
Page 66

Updating the Instrument Software
You will be notified by Agilent when a new version of the instrument software is available. This
notification includes a web address where you can download the software files. Save these files
to an external USB drive and then upload them to your instrument using the instructions below.
1 Login to one of the Administrator user accounts. See “Step 1. Log in to the instrument using an
Administrator account” on page 26.
2 From the Home screen, press Settings and then press Software Update.
3 Insert the USB drive (FAT format) into the USB port on the front of the instrument.
4 Press Browse to open a browser that allows you to navigate to the folder containing the
software files. Select the appropriate folder and press OK to return to the Software Update
screen.
5 Press Update.
The instrument begins the update. When the update is complete, the instrument automatically
reboots.
6 When the reboot is complete, you may return to the Software Update screen to confirm the
new version of the software is running.
AriaMx Real-Time PCR System Setup and User Guide 66
Page 67

Cybersecurity Guidance
The Electronic Tracking (ET) option for the Aria software provides the ability for user account
management including creating, changing, safeguarding, and terminating accounts. The
HealthCare Organization shall create corresponding internal procedures to address the following
items:
1 All the network equipment, computer hardware, software, databases etc. must be protected by
user authentication (ID and password).
2 System should be accessible though domain as well as local user.
3 System should use Windows and/or Hospital Information (IT) infrastructure password policy.
4 System should support role management access. Access to files and drives should be given
for appropriate role.
5 System should allow appropriate users to
• Create new users
• Add/remove privileges to user
• Terminate/disable user
• Create groups with defined privileges
• Add/remove users to/from group.
6 System should be locked after predefined time of inactivity.
7 All systems should have anti-virus and anti- spyware software installed.
8 The anti-virus and anti-spyware software should be updated regularly.
9 Important data should be secured using Cryptography or encryption- decryption equipment.
10 Data transmitted to and from devices must be encrypted.
11 Unauthorized devices trying to connect to the network must be blocked.
12 Unused ports should be blocked to minimize risk of tampering.
13 Firewall should be set to prevent unauthorized access from internet/intranet.
14 The use of mobile devices must follow mobile device management policy.
15 Documented procedures for addressing security breaches must beavailable.
16 Authorized user accounts must be regularly audited.
17 Database backup must be performed on a regular basis and must be performed before
installing any software upgrades.
18 Employees must be educated on privacy and security policies through a strict training process.
19 The number of remote computers, portable devices and ports used to connect to IVD systems
should be kept to a minimum.
20 Software must be kept up- to- date and any available patches promptly installed.
21 A documented security plan for disposal of unwanted data must be available.
22 Policies and processes for data security must be regularly reviewed and updated.
AriaMx Real-Time PCR System Setup and User Guide 67
Page 68

www.agilent.com
In This Book
This document describes how to program
and user the Agilent AriaMx Real- Time
PCR System.
AriaMx Real-Time PCR System
Manufactured by
Agilent Technologies LDA Malaysia Sdn. Bhd.
Bayan Lepas Free Industrial Zone
11900 Penang, Malaysia
For
Agilent Technologies Singapore (International) Pte. Ltd.
No. 1, Yishun Avenue 7,
Singapore 768923
www.agilent.com
Version M0, March 2021
*G8830-90001*
G8830-90001
 Loading...