

Page 1

User's Guide
AC Power Solutions
HP Models 6811B, 6812B, and 6813B
For instruments with Serial Numbers:
HP 6811B: US38390101-up
HP 6812B: US38390101-up
HP 6813B: US38390101-up
HP Part No. 5962-0829 Printed in U.S.A.
Microfiche No 5962-0830 December, 1998
1
Page 2

Warranty Information
CERTIFICATION
Hewlett-Packard Company certifies that this product met its published specifications at time of shipment from the
factory. Hewlett-Packard further certifies that its calibration measurements are traceable to the United States
National Bureau of Standards, to the extent allowed by the Bureau's calibration facility, and to the calibration facilities
of other International Standards Organization members.
WARRANTY
This Hewlett-Packard hardware product is warranted against defects in material and workmanship for a period of
three years from date of delivery. HP software and firmware products, which are designated by HP for use with a
hardware product and when properly installed on that hardware product, are warranted not to fail to execute their
programming instructions due to defects in material and workmanship for a period of 90 days from date of delivery.
During the warranty period Hewlett-Packard Company will, at its option, either repair or replace products which
prove to be defective. HP does not warrant that the operation for the software firmware, or hardware shall be
uninterrupted or error free.
For warranty service, with the exception of warranty options, this product must be returned to a service facility
designated by HP. Customer shall prepay shipping charges by (and shall pay all duty and taxes) for products
returned to HP for warranty service. Except for products returned to Customer from another country, HP shall pay
for return of products to Customer.
Warranty services outside the country of initial purchase are included in HP's product price, only if Customer pays
HP international prices (defined as destination local currency price, or U.S. or Geneva Export price).
If HP is unable, within a reasonable time to repair or replace any product to condition as warranted, the Customer
shall be entitled to a refund of the purchase price upon return of the product to HP.
LIMITATION OF WARRANTY
The foregoing warranty shall not apply to defects resulting from improper or inadequate maintenance by the
Customer, Customer-supplied software or interfacing, unauthorized modification or misuse, operation outside of the
environmental specifications for the product, or improper site preparation and maintenance. NO OTHER
WARRANTY IS EXPRESSED OR IMPLIED. HP SPECIFICALLY DISCLAIMS THE IMPLIED WARRANTIES OF
MERCHANTABILITY AND FITNESS FOR A PARTICULAR PURPOSE.
EXCLUSIVE REMEDIES
THE REMEDIES PROVIDED HEREIN ARE THE CUSTOMER'S SOLE AND EXCLUSIVE REMEDIES. HP SHALL
NOT BE LIABLE FOR ANY DIRECT, INDIRECT, SPECIAL, INCIDENTAL, OR CONSEQUENTIAL DAMAGES,
WHETHER BASED ON CONTRACT, TORT, OR ANY OTHER LEGAL THEORY.
ASSISTANCE
The above statements apply only to the standard product warranty. Warranty options, extended support contacts,
product maintenance agreements and customer assistance agreements are also available. Contact your nearest
Hewlett-Packard Sales and Service office for further information on HP's full line of Support Programs.
2
Page 3

Safety Summary
The following general safety precautions must be observed during all phases of operation of this instrument.
Failure to comply with these precautions or with specific warnings elsewhere in this manual violates safety
standards of design, manufacture, and intended use of the instrument. Hewlett-Packard Company assumes no
liability for the customer's failure to comply with these requirements.
WARNING: LETHAL VOLTAGES
Ac sources can supply 425 V peak at their output. DEATH on contact may result if the output terminals or
circuits connected to the output are touched when power is applied.
GENERAL
This product is a Safety Class 1 instrument (provided with a protective earth terminal). The protective features of
this product may be impaired if it is used in a manner not specified in the operation instructions.
Any LEDs used in this product are Class 1 LEDs as per IEC 825-1.
ENVIRONMENTAL CONDITONS
This instrument is intended for indoor use in an installation category II, pollution degree 2 environment. It is
designed to operate at a maximum relative humidity of 95% and at altitudes of up to 2000 meters. Refer to the
specifications tables for the ac mains voltage requirements and ambient operating temperature range.
BEFORE APPLYING POWER
Verify that the product is set to match the available line voltage, the correct fuse is installed, and all safety
precautions are taken. Note the instrument's external markings described under "Safety Symbols".
GROUND THE INSTRUMENT
To minimize shock hazard, the instrument chassis and cover must be connected to an electrical ground. The
instrument must be connected to the ac power mains through a grounded power cable, with the ground wire
firmly connected to an electrical ground (safety ground) at the power outlet. Any interruption of the protective
(grounding) conductor or disconnection of the protective earth terminal will cause a potential shock hazard that
could result in personal injury.
ATTENTION: Un circuit de terre continu est essentiel en vue du fonctionnement sécuritaire de l'appareil.
Ne jamais mettre l'appareil en marche lorsque le conducteur de mise … la terre est d‚branch‚.
FUSES
Only fuses with the required rated current, voltage, and specified type (normal blow, time delay, etc.) should be
used. Do not use repaired fuses or short-circuited fuseholders. To do so could cause a shock or fire hazard.
DO NOT OPERATE IN AN EXPLOSIVE ATMOSPHERE
Do not operate the instrument in the presence of flammable gases or fumes.
DO NOT REMOVE THE INSTRUMENT COVER
Operating personnel must not remove instrument covers. Component replacement and internal adjustments must
be made only by qualified service personnel.
Instruments that appear damaged or defective should be made inoperative and secured against unintended
operation until they can be repaired by qualified service personnel.
3
Page 4
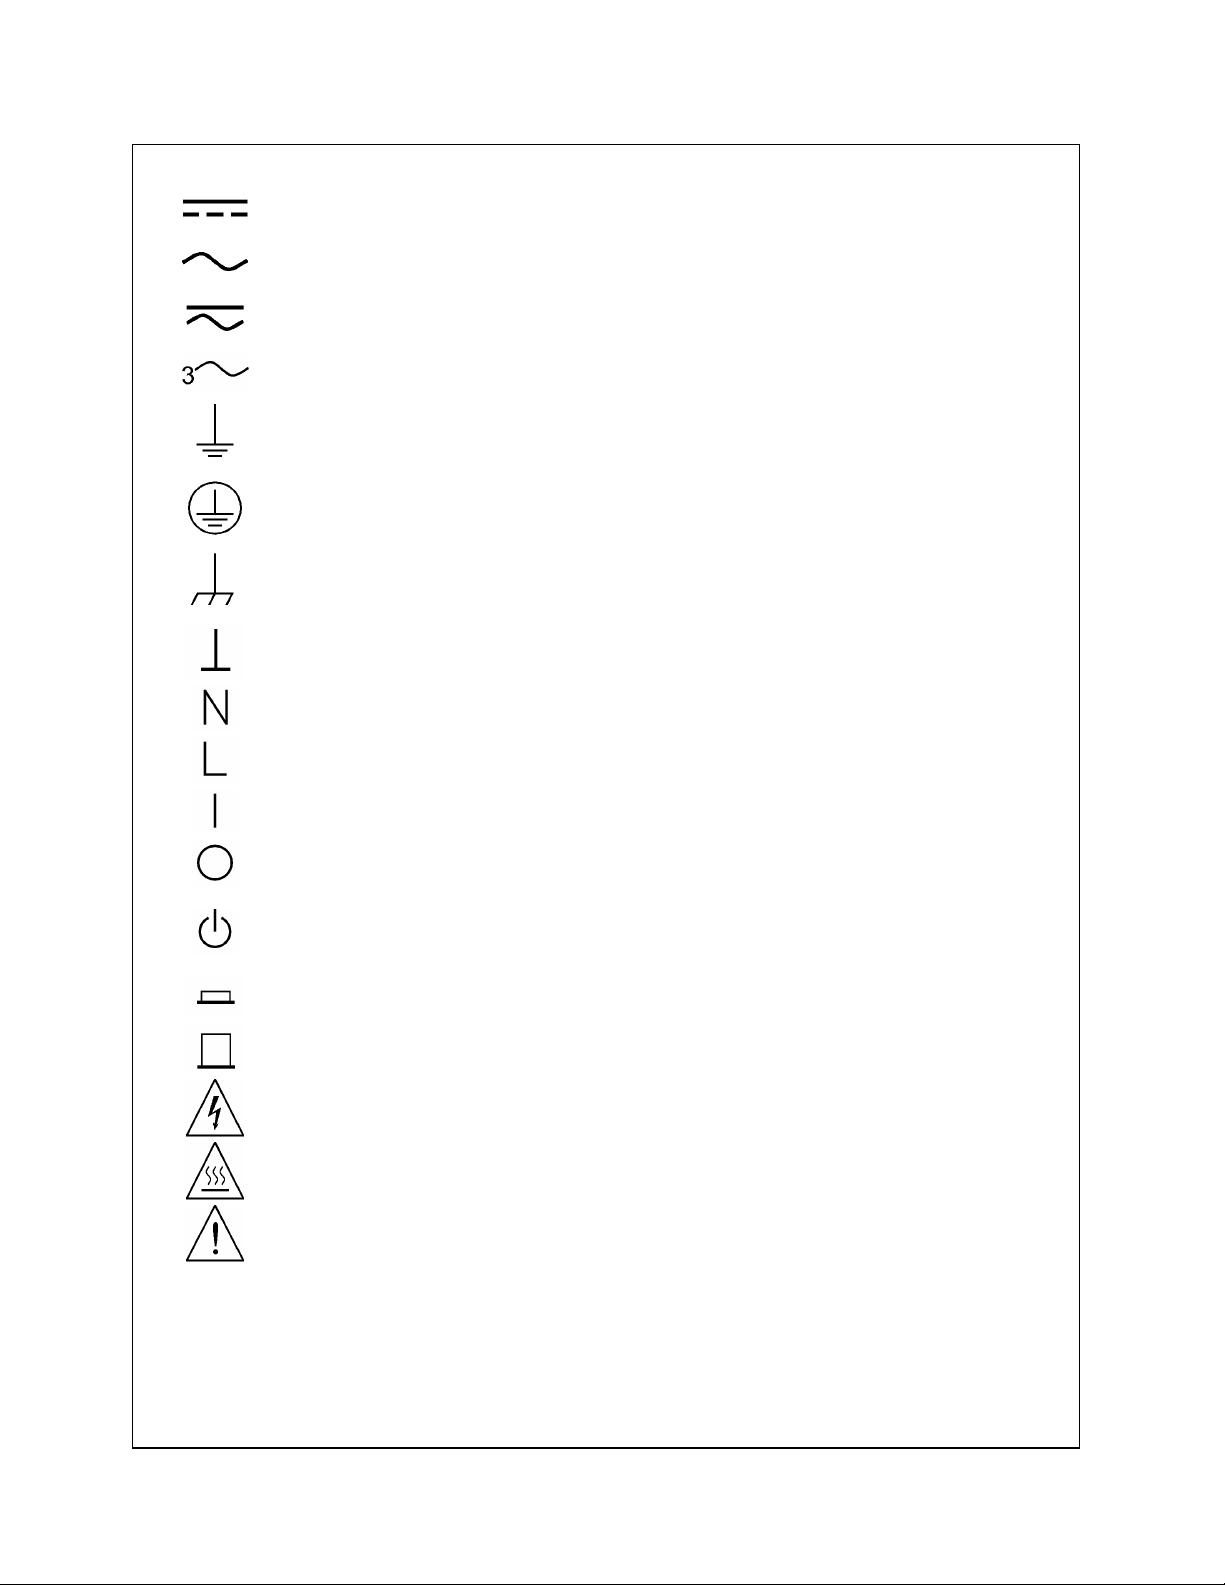
SAFETY SYMBOLS
Direct current
Alternating current
Both direct and alternating current
Three-phase alternating current
Earth (ground) terminal
Protective earth (ground) terminal
Frame or chassis terminal
Terminal is at earth potential. Used for measurement and control circuits designed to be
operated with one terminal at earth potential.
Terminal for Neutral conductor on permanently installed equipment
WARNING
Caution
Terminal for Line conductor on permanently installed equipment
On (supply)
Off (supply)
Standby (supply). Units with this symbol are not completely disconnected from ac mains
when this switch is off. To completely disconnect the unit from ac mains, either disconnect
the power cord or have a qualified electrician install an external switch.
In position of a bi-stable push control
Out position of a bi-stable push control
Caution, risk of electric shock
Caution, hot surface
Caution (refer to accompanying documents)
The WARNING sign denotes a hazard. It calls attention to a procedure, practice, or the like,
which, if not correctly performed or adhered to, could result in personal injury. Do not
proceed beyond a WARNING sign until the indicated conditions are fully understood and
met.
The CAUTION sign denotes a hazard. It calls attention to an operating procedure, or the like,
which, if not correctly performed or adhered to, could result in damage to or destruction of
part or all of the product. Do not proceed beyond a CAUTION sign until the indicated
conditions are fully understood and met.
4
Page 5

Declaration Page
Manufacturer's Name: Hewlett-Packard Company
Manufacturer's Address: 150 Green Pond Road
declares that the Product
Product Name: a) AC Power Source/Analyzer
Model Number(s): a) HP 6811B, 6813B, 6812B, 6811A, 6812A, 6813A
DECLARATION OF CONFORMITY
according to ISO/IEC Guide 22 and EN 45014
Rockaway, New Jersey 07866
U.S.A.
b) Harmonic/Flicker Test System
b) HP 6841A, 6842A
conforms to the following Product Specifications:
Safety: IEC 1010-1:1990+A1(1992) / EN 61010-1:1993
EMC: CISPR 11:1990 / EN 55011:1991 - Group 1 Class A
IEC 801-2:1991 / EN 50082-1:1992 - 4 kV CD, 8 kV AD
IEC 801-3:1984 / EN 50082-1:1992 - 3 V / m
IEC 801-4:1988 / EN 50082-1:1992 - 0.5 kV Signal Lines
1 kV Power Lines
Supplementary Information:
The product herewith complies with the requirements of the Low Voltage Directive
73/23/EEC and the EMC Directive 89/336/EEC and carries the CE-marking accordingly.
New Jersey January 1997 __ __
Location Date Bruce Krueger / Quality Manager
European Contact: Your local Hewlett-Packard Sales and Service Office or Hewlett-Packard GmbH,
Department TRE, Herrenberger Strasse 130, D-71034 Boeblingen (FAX:+49-7031-14-3143)
5
Page 6

Acoustic Noise Information
Herstellerbescheinigung
Diese Information steht im Zusammenhang mit den Anforderungen der
Maschinenläminformationsverordnung vom 18 Januar 1991.
* Schalldruckpegel Lp <70 dB(A)
* Am Arbeitsplatz
* Normaler Betrieb
* Nach EN 27779 (Typprüfung).
Manufacturer's Declaration
This statement is provided to comply with the requirements of the German Sound Emission Directive,
from 18 January 1991.
* Sound Pressure Lp <70 dB(A)
* At Operator Position
* Normal Operation
* According to EN 27779 (Type Test).
Printing History
The edition and current revision of this manual are indicated below. Reprints of this manual containing
minor corrections and updates may have the same printing date. Revised editions are identified by a new
printing date. A revised edition incorporates all new or corrected material since the previous printing date.
Changes to the manual occurring between revisions are covered by change sheets shipped with the manual.
In some cases, the manual change applies only to specific instruments. Instructions provided on the change
sheet will indicate if a particular change applies only to certain instruments.
This document contains proprietary information protected by copyright. All rights are reserved. No part of
this document may be photocopied, reproduced, or translated into another language without the prior
consent of Hewlett-Packard Company. The information contained in this document is subject to change
without notice.
Copyright 1995, 1997, 1998 Hewlett-Packard Company Edition 1 _________August, 1995
Edition 2 _________February, 1997
Edition 3 _________March, 1998
Edition 4 _________December 1998
6
Page 7

Table of Contents
Warranty Information 2
Safety Summary 3
Declaration of Conformity 5
Acoustic Noise Information 6
Printing History 6
Table of Contents 7
1 GENERAL INFORMATION 11
Document Orientation 11
Earlier AC Source Models 12
Safety Considerations 12
Options and Parts 12
Description 13
Capabilities 14
Front Panel/Remote Operation 14
Steady-state Output Characteristic 15
Peak Current/Dynamic Power Capability 16
Peak Current Limit 16
Peak Inrush Example 16
RMS Current Limit Circuit 18
Voltage Regulation 18
Real Time Regulation 18
RMS Regulation 18
Output Impedance 18
Output Coupling 19
2 INSTALLATION 21
Inspection 21
Damage 21
Packaging Material 21
Items Supplied 21
Cleaning 21
Location 22
Bench Operation 22
Rack Mounting 22
Input Connections 23
Input Source and Line Fuse 23
Installing the Power Cord 23
Output Connections 24
Wire Considerations 25
Voltage Drops 25
Remote Sense Connections 25
Remote Sensing and OVP Considerations 27
Trigger Connections 27
Digital Connections 27
Controller Connections 28
HP-IB Connector 28
RS-232 Interface 29
7
Page 8

3 TURN-ON CHECKOUT 31
Introduction 31
Preliminary Checkout 31
Using the Keypad 32
Checkout Procedure 32
In Case of Trouble 34
Error Messages 34
Line Fuse 35
4 FRONT PANEL OPERATION 37
Introduction 37
Front Panel Description 37
System Keys 39
Function Keys 40
Immediate Action Keys 40
Scrolling Keys 40
Meter Display Keys 41
Output Control Keys 42
Protection and Status Control Keys 44
Trigger and List Control Keys 45
Entry Keys 46
Examples of Front Panel Programming 47
1 - Setting the Output Voltage Amplitude 47
2 - Setting the Output Frequency 48
3 - Setting the DC Offset 48
4 - Setting a Protection Feature 49
5 - Clearing Protection Conditions 49
6 - Using Transient Voltage Modes 50
7 - Trigger Delays and Phase Synchronization 53
8 - Using Slew Rates to Generate Waveforms 55
9 - Measuring Peak Inrush Current 57
10 - Setting the HP-IB Address and RS-232 Parameters 58
11 - Saving and Recalling Operating States 58
A SPECIFICATIONS 59
Specifications 59
Supplemental Characteristics 61
Operation Below 45 Hz 63
B VERIFICATION AND CALIBRATION 65
Introduction 65
Equipment Required 65
Test Setup 66
Performing the Verification Tests 67
Turn-On Checkout Procedure 67
AC Voltage Programming and Measurement Accuracy 67
DC Voltage Programming and Measurement Accuracy 68
RMS Current Accuracy Test 68
Performing the Calibration Procedure 71
Front Panel Calibration Menu 71
8
Page 9

Front Panel Calibration 72
Enable Calibration Mode 72
Calibrating and Entering Voltage Offset Values 72
Calibrating and Entering DC Voltage Gain Values 73
Calibrating and Entering AC rms Voltage Gain Values 73
Calibrating the OVP Trip Point 74
Calibrating and Entering rms Current Values 74
Calibrating and Entering rms Current Measurement Values 75
Calibrating the Output Impedance 75
Saving the Calibration Constants 75
Changing the Calibration Password 76
Calibration Error Messages 76
Calibration Over the HP-IB 76
HP Calibration Program Listing 76
C ERROR MESSAGES 81
Error Number List 81
D LINE VOLTAGE CONVERSION 85
Open the Unit 85
Check the Jumper Wire (Model HP 6811B/6812B only) 85
Check the Line Jumpers (all Models) 85
Check the Power Transformer Connector (all Models) 85
Close the Unit 86
INDEX 87
9
Page 10

Page 11

1
General Information
Document Orientation
This manual describes the operation of the HP 6811B/6812B/6813B AC Power Solutions. These units will
be referred to as "ac sources" throughout this manual. The following documents are shipped with your ac
source:
♦ a Quick-Start Guide, to help you quickly get started using the ac source
♦ a User's Guide, containing detailed installation, checkout, and front panel information
♦ a Programming Guide, containing detailed HP-IB programming information
♦ a Quick Reference Card, designed as a memory jogger for the experienced user
You will find information on the following tasks in these guides. Refer to the table of contents of each guide
for a complete list of the topics.
Topic Location
Accessories and Options Chapter 1 - this guide
Calibrating the ac source Appendix B - this guide
Front panel keys Chapter 4 - this guide
Front panel programming examples Chapter 4 - this guide
Line voltage connections Chapter 2 - this guide
Line voltage ratings Appendix A - this guide
Line voltage conversion Appendix D - this guide
Operator replaceable parts Chapter 1 - this guide
Operator troubleshooting Chapter 3 - this guide
Operating characteristics Appendix A - this guide
Performance specifications Appendix A - this guide
Quick operating checkout Chapter 3 - this guide
Rack mounting Chapter 2 - this guide
RS-232 operation Chapter 2 - this guide
SCPI programming examples Chapter 3 - Programming Guide
SCPI programming commands Chapter 4 - Programming Guide
Turn-on/checkout Chapter 3 - this guide
Wiring - discrete fault indicator (DFI) Chapter 2 - this guide
- HP-IB controller Chapter 2 - this guide
- load or loads Chapter 2 - this guide
- voltage sensing (local and remote) Chapter 2 - this guide
- remote inhibit (RI) Chapter 2 - this guide
11
Page 12

1 - General Information
Earlier AC Source Models
With the exception of some minor readback specification differences, information in this manual also
applies to the following earlier ac source models:
Information about this
current model
HP 6811B HP 6811A AC Power Source/Analyzer
HP 6812B HP 6812A AC Power Source/Analyzer
HP 6813B HP 6813A AC Power Source/Analyzer
also applies to the following earlier models:
HP 6841A Harmonic/Flicker Test System in
normal mode
HP 6842A Harmonic/Flicker Test System in
normal mode
Safety Considerations
This ac source is a Safety Class 1 instrument, which means it has a protective earth terminal. That terminal
must be connected to earth ground through a power source equipped with a ground receptacle. Refer to the
Safety Summary page at the beginning of this guide for general safety information. Before installation or
operation, check the ac source and review this guide for safety warnings and instructions. Safety warnings
for specific procedures are located at appropriate places in the guide.
Options and Parts
Table 1-1. Options
Option Model Description
0BN All Extra documentation
1CM All Rack mount kit (HP p/n 5062-3977)
1CP All Rack mount kit with handles (HP p/n 5062-3983)
100 HP 6811B/6812B 87-106 Vac, 48-63 Hz (Japan only)
200 HP 6813B 174-106 Vac, 48-63 Hz (Japan only)
230 HP 6811B/6812B 191-254 Vac, 48-63 Hz
831 HP 6812B/6813B 12 AWG, 200 to 240 Vac, unterminated
832 HP 6813B 4-mm2 wire size, unterminated
833 HP 6812B 1.5-mm2 wire size, 200 to 240 Vac, unterminated
834 HP 6812B 10 AWG, 100 to 120 Vac, unterminated
841 HP 6812B/6813B Line cord with NEMA 6-20P; 20A, 250 V plug
842 HP 6813B Line cord with IEC 309; 32A, 220 V plug
844 HP 6813B Line cord with NEMA 6-30P; 30A, 250 V locking plug
845 HP 6812B Line cord with IEC 309; 16 A, 220 V plug
846 HP 6812B Line cord with NEMA L5-30P; 30 A, 120 V plug
847 HP 6812B Line cord with CEE 7/7; 16 A, 220 V plug
848 HP 6812B Line cord with BS 546; 15 A, 240 V plug
Support rails (HP p/n 1494-0059) are required when rack mounting units with options 1CM and 1CP.
HP 6811B units are shipped with the correct line cord for the destination country.
12
Page 13

The following table lists some common user-replaceable parts:
Table 1-2. Operator Replaceable Parts
Item HP Part Number
Power cord assembly see "Options"
Rack mount kit see "Options"
4-terminal digital connector plug 1252-1488
Ac input safety cover (with strain relief and bushing) 5040-1676
Screw (3), ac input barrier block (6-32 x 5/16in) N/A
Ac output safety cover 5040-1704
Line fuse for HP 6812B (30 A) 2110-0910
Line fuse for HP 6813B (25 A) 2110-0849
Line fuse for HP 6811B (20 A) 2110-0098
Screw (2), ac output safety cover (m4 x 0.7in) 0515-0053
Screw (5), ac output barrier block (6-32 x 5/16 in) N/A
User's Guide (this manual) 5962-0829
Programming Guide 5962-0889
Quick Start Guide 5962-0883
Quick Reference Card 5962-0885
General Information - 1
Description
The ac source combines three instruments in one unit as shown in the following figure. The function
generator produces waveforms with programmable amplitude, frequency, and shape. The power amplifier
amplifies the function generator signal to produce the ac power for your application. The measurement
functions range from a simple readback of rms voltage and current, to sophisticated capabilities such as
waveform analysis.
DAC
WAVEFORM
GENERATOR
SOURCE
BIPOLAR
AMPLIFIER
shunt
MEASUREMENT
BLOCK
POWERMETER
FFT ANALYZER
Figure 1-1. AC Source Functional Elements
13
Page 14

1 - General Information
The following model ac power sources are described in this User's Guide:
Model Description
HP 6811B 0-300 V rms; 375 VA (425 V peak; 40 A peak)
HP 6812B 0-300 V rms; 750 VA (425 V peak; 40 A peak)
HP 6813B 0-300 V rms; 1750 VA (425 V peak; 80 A peak)
Capabilities
♦ Programmable ac voltage, dc voltage, frequency, phase, and current limit.
♦ Sine, square, clipped sine, and user-definable waveforms.
♦ Programmable output impedance.
♦ Voltage and frequency slew control.
♦ Synthesized waveform generation for high resolution and accuracy in frequency, low waveform
distortion, and glitch-free phase transitions.
♦ Step and pulse output transients for generating surge, sag, dropout, and other line disturbance
simulations.
♦ Nonvolatile list programming for generating complex output transients or test sequences.
♦ Nonvolatile state and waveform storage and recall.
♦ Extensive measurement capability:
Ac rms, dc, ac+dc voltage and current and peak current.
Real, reactive, and apparent power.
Harmonic analysis of voltage and current waveforms gives amplitude, phase, and total
harmonic distortion results up to the 50th harmonic.
Triggered acquisition of digitized voltage and current with extensive post-acquisition
calculations.
All measurements made with 16-bit resolution.
♦ Trigger In and Trigger Out for synchronizing transient events or measurements with external
signals.
♦ Front panel control with 14-character vacuum flourescent display, keypad, and rotary pulse
generators for voltage and frequency settings.
♦ Built-in HP-IB and RS-232 interface programming with SCPI command language.
♦ Over-voltage, over-power, over-current, over-temperature, and RI/DFI protection features.
♦ Built-in output and sense disconnect relays.
♦ Output terminals floating with respect to chassis ground.
♦ Extensive selftest, status reporting, and software calibration.
Front Panel/Remote Operation
The front panel has both rotary (RPG) and keypad controls for setting the output voltage and frequency.
The panel display provides digital readouts of a number of output measurements. Annunciators display the
operating status of the ac source. System keys let you perform system functions such as setting the HP-IB
address and recalling operating states. Front panel Function keys access the ac source function menus.
Front panel Entry keys let you select and enter parameter values. Refer to chapter 4 for a complete
description of the front panel controls.
Remotely programming is accomplished from either the HP-IB bus or from an RS-232 serial port. HP-IB
and RS-232 programming uses SCPI commands (Standard Commands for Programmable Instruments) that
make the ac source programs compatible with those of other instruments. AC source status registers permit
remote monitoring of a wide variety of ac source operating conditions
14
Page 15
General Information - 1
Vdc
NOTE: Refer to the ac source Programming Guide for further information about remotely
programming the ac source.
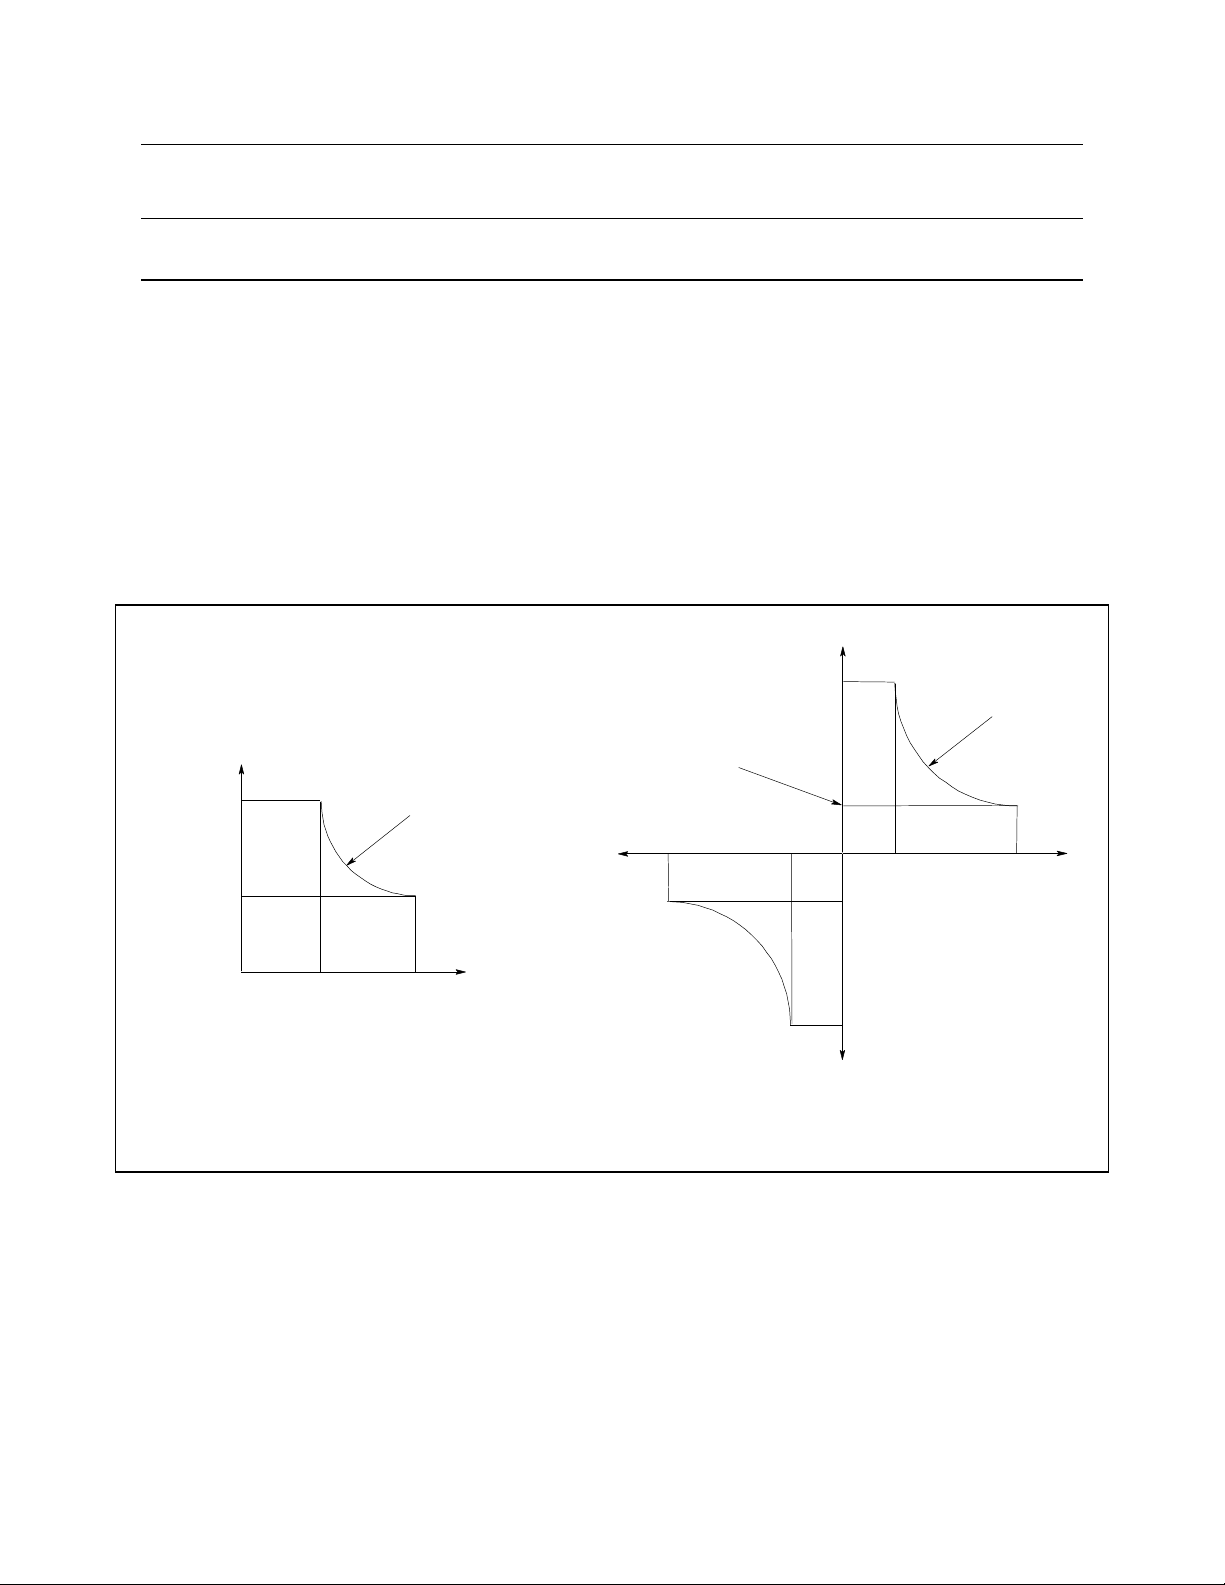
Steady-state Output Characteristic
The ac source's steady-state output characteristic is shown in the following figure. Steady-state
characteristics are defined as those output ratings that will be maintained by the ac source for an indefinite
time. (The section "Peak Current Capability" describes the dynamic output capability of the unit.) The
figure shows both the ac and the dc characteristics. With programmable output coupling, the ac source can
supply dc as well as ac output voltages.
Ac source operation is specified from 45 to 1000 Hz (see Appendix A). However, you can operate the unit
at frequencies less that 45 Hz. The operating characteristics of the ac source at autput frequencies below 45
Hz are documented in Table A-3 of Appendix A.
300 V
115V (6811B/6812B)
135V (6813B)
424 V
Vrms
0
1.25A (6811B)
2.5A (6812B)
5.8A (6813B)
375VA (6811B)
750VA (6812B)
1750VA (6813B)
3.25A (6811B)
6.5A (6812B)
13A (6813B)
Irms
-Idc
-2.5A (6811B)
-5A (6812B)
-10A (6813B)
115V (6811B/6812B)
135V (6813B)
0
-Vdc
AC CHARACTERISTIC
DC CHARACTERISTIC
(45Hz - 1kHz sinewave)
Figure 1-2. Steady-state Output Characteristic (in real-time mode)
285W (6811B)
575W (6812B)
1350W (6813B)
0.67A (6811B) 2.5A (6811B)
1.35A (6812B)
3.17A (6813B)
-424 V
5A (6812B)
10A (6813B)
Idc
15
Page 16

1 - General Information
Peak Current/Dynamic Power Capability
The ac source can generate peak currents that exceed the rms current capability of the unit. This not only
applies when operating in ac mode, but also when programming output pulses in dc mode. Although the
unit will generate peak output currents up to 40A (HP 6811B/6812B) or 80A (HP 6813B), the unit can
only maintain this output for a limited time. If the output of the unit exceeds the limit of the safe operating
area (SOA), the unit will activate its internal protection mode and turn its output off. This SOA limit is
based on output voltage, output current, output duration, and heatsink temperature.
NOTE: Refer to chapter 4 on how to clear the unit when the internal protection mode has been
activated.
Peak Current Limit
By programming the peak current limit, you can prevent the unit from exceeding the safe operating area,
activating its internal protection mode, and turning the output off. The peak current limit circuit limits the
instantaneous output current. It functions by reducing the instantaneous output voltage to keep the output
peak current within the programmed limit. Because the circuit acts instantly, the effect is that it will clip the
peaks of the output voltage waveform. Additionally, with fast and/or large voltage transitions, the unit may
momentarily go into CC operating mode due to current in the output capacitor. This serves to limit the rate
of change of output voltage.
The following table gives approximate indications of how long the unit will tolerate peak output currents
before the SOA limits are exceeded. Because these values are voltage dependent, the table includes various
equivalent dc voltages along with the peak current values. The voltages shown in the table are NOT the
programmed voltages, but the average voltage values that will appear at the output when the indicated high
current condition exists. The SOA circuit becomes active at higher voltage and current values as well as at
longer duration times.
Table 1-3. Typical Peak Current Output Capacities
HP 6813B HP 6811B equivalent dc voltage when current is flowing
1
HP 6812B 25 75 125 190 250 360
20 A 10 A >100 ms >100 ms >100 ms >100 ms >100 ms >100 ms
30 A 15 A >100 ms 100 ms 30 ms 24 ms 19 ms 15 ms
40 A 20 A 12 ms 9.2 ms 8.4 ms 7.6 ms 6.8 ms 5.9 ms
50 A 25 A 5.6 ms 5.1 ms 4.7 ms 4.4 ms 4 ms 3.5 ms
60 A 30 A 3.7 ms 3.4 ms 3.1 ms 2.9 ms 2.6 ms 2.3 ms
70 A 35 A 2.6 ms 2.4 ms 2.2 ms 2.1 ms 1.9 ms 1.7 ms
80 A 40 A 2 ms 1.8 ms 1.7 ms 1.6 ms 1.4 ms 1.3 ms
1
Based on 25C ambient temperature, with heatsink temperature less than 50C.
Peak Inrush Example
The following table gives the recommended initial I
254 Vac 60 Hz sine wave, as a function of load capacitance. The load on the output is a full-wave bridge
along with the indicated capacitor. The load resistance across the capacitor is infinite. The recommended
I
will change as a function of changes in input as follows:
peak
settings when the ac source output is a 127 Vac or
peak
16
Page 17

General Information - 1
♦ as voltage increases, the I
♦ as frequency increases, the I
♦ as load resistance decreases, the I
Note that the purpose of programming the I
setting needs to be decreased.
peak
setting can be increased.
peak
setting needs to be decreased.
peak
current is to prevent the unit from activating its internal
peak
protection mode as a result of exceeding the SOA limits, and turning the output off. These initial settings
may have to be reduced if the SOA circuit trips when the output is turned on. Sometimes trial and error
must be used to arrive at the proper values of I
Table 1-4. Recommended I
peak
Capacitance in µF
.
peak
Settings as a Function of Loop Capacitance
I
setting
peak
127 V 254 V
≤ 1100
500 80 A
1200 - 60 A
1700 700 50 A
5000 1000 45 A
> 5000 > 1000 < 45 A
The following waveform illustrates the inrush current capability of the ac source. The peak current is
limited during inrush in accord with table 1-3 to keep the ac source from turning its output off. Note that
the output current waveform returns to its normal shape when the current drops below the peak current
limit setting.
I PEAK=45A
VOLTAGE IS
UNDISTORTED
(115 Vrms)
CURRENT
WAVEFORM
VOLTAGE
WAVEFORM
PEAK CURRENT
< 45 A
0
Figure 1-3. Peak Inrush Current Example
17
Page 18

1 - General Information
RMS Current Limit Circuit
The output rms current limit is adjustable to any value within the range of the unit. If the load attempts to
draw more current than the programmed limit, the output voltage is reduced to keep the rms current within
the limit. When the output voltage is reduced, the waveform shape is preserved. In other words, all parts of
the voltage cycle are reduced -- not just the peaks.
NOTE: The speed at which the rms current circuit operates depends on the output voltage setting
and the load impedance. The circuit responds more slowly at low output voltages and at
high output impedances. With constant power or negative resistance loads, the rms current
limit circuit causes the output voltage to go to zero.
Voltage Regulation
Real Time Regulation
The default method of output regulation used by the ac source is real-time voltage regulation. Real-time
voltage regulation tries to provide the actual programmed waveform at the output of the ac source. It offers
the best overall programming response and fastest settling times. It does not have any limitations for
waveforms and transients with frequency content below 45 Hz.
RMS Regulation
Rms voltage regulation assists real-time regulation to level out or stabilize the rms value of the ac
component of the output voltage. Use rms voltage regulation in the following situations:
♦ If you experience load regulation effects with heavy loads.
♦ If you experience frequency regulation problems with heavy loads and you require flatter
programming accuracy at higher frequencies.
♦ In conjunction with programmable output impedance, if you wish to maintain the rms level of
output voltage as the source impedance is increases. (Refer to Output Impedance for more
information.)
The command to specify voltage regulation is VOLT:ALC:DET RTIM | RMS.
NOTE: Do not use rms voltage regulation when operating at frequencies less than 45 Hz.
Output Impedance
You can program the real and/or reactive (resistive and/or inductive) part of the output impedance of the ac
source. Inductive output impedances can be programmed in the range of 20 to 1000 microhenries. Resistive
load impedances can be programmed in the range of 0 to 1 ohms.
When programming output impedances, the lower your load impedance, the LESS programmed impedance
you can use and still maintain output voltage stability. This applies particularly for load impedances less
than 1 ohm.
18
Page 19

General Information - 1
CAUTION: Programming the ac source output impedance into a load with a low impedance can
cause output voltage instability, which may damage the ac source. Stability MUST be
maintained when operating the ac source with programmable resistance or
inductance.
To check for stability, monitor the output voltage with an oscilloscope. Instability exists if
a 5kHz to 20kHz oscillation, which is dependent upon the ac source's programmed
inductance and the capacitance of the load, is present at any time during the following
procedure.
1. When programming inductance, it is recommended that you first add a series
resistance either by programming the output resistance to 1 ohm or by adding an
equivalent external resistor.
2. Slowly program the inductance to the desired level while monitoring the output for
any voltage instability. Do not proceed any further if the output shows any signs of
instability.
3. If less output resistance is required, slowly start lowering the resistance while
monitoring the output for any voltage instability. Do not proceed any further if the
output shows any signs of instability.
If you cannot achieve satisfactory results with this procedure, disable the output
impedance control and use an external impedance network.
Rms voltage regulation can be used in conjunction with programmable output impedance to regulate the
rms value of the ac component of the output voltage when programmed impedances cause distortion with
nonlinear loads or reduced output voltage due to regulation effects.
Note that real-time voltage regulation will permit the load current to cause output voltage degradation
based on the programmed impedance and current drawn from the source, whereas rms regulation will
reestablish the rms value at the programmed level.
Output Coupling
Ac output coupling mode mimics a transformer-coupled output, working to maintain zero average output
voltage. This means that the output tries to remove any dc content on the output, whether the dc content is
generated from a programmed offset or results from transients with dc content. The ac output coupling has
a corner frequency of about 2 Hz, which will not prevent transient waveforms that may have short-term dc
content, but will regulate the waveform back to an average value of zero volts in the steady state.
Dc output coupling mode is used to generate dc offset voltages or output transients that have net dc
components. In either mode of operation, the maximum voltage that the ac source can output is limited to
425 V peak.
The ac capability of the output is limited by VA (volt-amperes) rather than power (watts). The amount of
VA available to a load can be determined by examining figure 1-2. Full output VA is available with no
limitations except for the boundaries imposed by the maximum rms voltage of 300V, and the maximum
rms current, which is model-dependent. Note that large peak power transients can be delivered by the ac
source as earlier described under "Peak Current Capability"(Appendix A documents the ac source's
specifications and supplemental characteristics.)
19
Page 20

Page 21

2
Installation
Inspection
Damage
When you receive your ac source, inspect it for any obvious damage that may have occurred during
shipment. If there is damage, notify the shipping carrier and the nearest HP Sales and Support Office
immediately. The list of HP Sales and Support Offices is at the back of this guide. Warranty information
is printed in the front of this guide.
Packaging Material
Until you have checked out the ac source, save the shipping carton and packing materials in case the unit
has to be returned. If you return the ac source for service, attach a tag identifying the model number and the
owner. Also include a brief description of the problem.
Items Supplied
Check that the following items are included with your ac source. Some items are installed in the unit.
Power Cord
Digital connector
Safety covers
Manuals
Change page
A power cord appropriate for your location. The cord may or may not be
terminated in a power plug (see "Options" in chapter 1). If the cord is not
included, contact your nearest HP Sales and Support Office (refer to the list at
the back of this guide).
4-terminal digital plug that connects to the back of the unit.
Ac input cover with strain relief
Ac output cover
User’s Guide
Programming Guide
Quick Start Guide
Quick Reference Card
If applicable, change sheets may be included with this guide. If there are change
sheets, make the indicated corrections in this guide.
Cleaning
Use a dry cloth or one slightly dampened with water to clean the external case parts. Do not attempt to
clean internally.
WARNING: To prevent electric shock, unplug the unit before cleaning.
21
Page 22

2 - Installation
Location
Refer to the Safety Summary page at the beginning of this manual for safety-related information about
environmental conditions.
CAUTION: HP 6811B/6812B units weigh 28.2 kg (62 lbs).
HP 6813B units weigh 32.7 kg (72 lbs).
Obtain adequate help when moving or mounting the unit in the rack.
Bench Operation
The outline diagram in figure 2-1 gives the dimensions of your ac source. The feet may be removed for
rack mounting. Your ac source must be installed in a location that allows sufficient space at the sides and
back of the unit for adequate air circulation. Minimum clearances are 1 inch (25 mm) along the sides. Do
not block the fan exhaust at the rear of the unit.
Rack Mounting
The ac source can be mounted in a standard 19-inch rack panel or cabinet. Rack mounting kits are
available as Option 1CM or 1CP. Installation instructions are included with each rack mounting kit. HP ac
sources also require instrument support rails in addition to the rack mount kit. Support rails are
normally ordered with the cabinet and are not included with the rack mounting kits.
12.7mm
0.5"
REAR
128mm
5.04"
50.8mm
2.0"
TOP
574.7mm
22.6"
SIDE
425.5mm
16.75"
132.6mm
5.25"
22
Figure 2-1. Outline Diagram
Page 23

Installation - 2
(HP 6811A)
(HP 6811A)
(HP 6811A)
(HP 6811A)
Input Connections
Input Source and Line Fuse
You can operate your ac source from a single-phase ac power source as indicated on the rear panel Line
Rating label. See "ac Input Voltage Range" in Table A-2 of Appendix A for details.
NOTE: The power ac source must be on a dedicated line with no other devices consuming current
from it.
The line fuse is located inside the ac source. Refer to "In case of Trouble" in Chapter 3 for instructions on
fuse replacement.
Installing the Power Cord
The power cord supplied with the ac source may or may not include a power plug at one end of the cord.
Figure 2-2 shows the various power plugs. Terminating connections are attached to the other end of the
cord.
Option 841
8120-8605
(HP 6811A)
Option 842
8120-8106
Option 831,832,833,834
Option 844
8120-8607
8120-8609
#8 Ring Terminals
Option 846Option 845
8120-8610
(HP 6811A)
Option 847
8120-8608
(HP 6811A)
Option 848
8120-8611
Figure 2-2. Power Cord Plug Configurations
WARNING: Installation of the power cord must be done by a qualified and licensed electrician and
must be in accordance with local electrical codes.
See Figure 2-3 while performing the following procedure.
a. If they are not already in place, position the strain relief connector (9), safety cover (5), rubber
boot (8) and connector nut (7) on the power cord (6).
b. Secure the ground wire (2) to the chassis earth ground stud.
c. Connect the neutral wire (1) to the N power input terminal.
d. Connect the line (3) to the L1 power input terminal.
e. Position the safety cover over the power input terminals and tighten the cover and strain relief
connector screws.
23
Page 24

2 - Installation
L1 L2(N)
1
2
3
4
5
6
7
1. GROUND CONNECTION (GRN/YEL OR GRN)
2. LINE CONNECTION (BROWN OR BLACK)
3. NEUTRAL CONNECTION (BLUE OR WHITE)
4. POWER CORD
8
5. CONNECTOR NUT
6. RUBBER BOOT
7. POWER SAFETY COVER
8. STRAIN RELIEF CONNECTOR
Figure 2-3. Connecting the Power Cord
Output Connections
The power output terminal block has a floating output terminal connection and a floating neutral line for
the return connection. A separate earth ground terminal is located on the extreme right of the terminal
block.
!
SENSE
01 01 COM COM
24
300 VAC MAX TO
01 PHASE 1 OUTPUT CONNECTION
COM PHASE RETURN CONNECTION
GROUND CONNECTION
Figure 2-4. Output Connections
Page 25

Installation - 2
Wire Considerations
NOTE: To minimize the possibility of instability on the output, keep load leads as short as possible
bundle or twist the leads tightly together to minimize inductance
Current Ratings
Fire Hazard To satisfy safety requirements, load wires must be large enough not to overheat when
carrying the maximum short-circuit current of the ac source. If there is more than one
load, then any pair of load wires must be capable of safely carrying the full-rated
current of the ac source.
Table 2-1 lists the characteristics of AWG (American Wire Gage) copper wire.
Table 2-1. Ampacity and Resistance of Stranded Copper Conductors
AWG No. Ampacity
14 25 0.0103 6 80 0.0016
12 30 0.0065 4 105 0.0010
10 40 0.0041 2 140 0.00064
8 60 0.0025 1/0 195 0.00040
1. Ampacity is based on 30°C ambient temperature with conductor rated at 60°C. For ambient
temperature other than 30°C, multiply the above ampacities by the following constants:
Temp. (°C)
21-25 1.08 41-45 0.71
26-30 1.00 46-50 0.58
31-35 0.91 51-55 0.41
36-40 0.82
2. Resistance is nominal at 75 °C wire temperature.
1
Resistance
(Ω/m)
Constant
2
NOTES:
AWG No. Ampacity
Temp. (°C) Temp. (°C)
1
Resistance
(Ω/m)
2
Voltage Drops
The load wires must also be large enough to avoid excessive voltage drops due to the impedance of the
wires. In general, if the wires are heavy enough to carry the maximum short circuit current without
overheating, excessive voltage drops will not be a problem. Refer to Table 2-1 to calculate the voltage drop
for some commonly used AWG copper wire. If load regulation becomes a problem refer to the section
"Remote Sense Connections".
Remote Sense Connections
Under normal operation, the ac source senses the output voltage at the output terminals on the back of the
unit. External sense terminals are available on the back of the unit that allow the output voltages to be
sensed at the load, compensating for impedance losses in the load wiring. As shown in the following figure:
25
Page 26

2 - Installation
♦ Connect the phase 1 (1) sense terminals to the side of the load that connects to the corresponding
output terminal.
♦ Connect the Neutral (COM) sense terminal connector to the neutral side of the load.
♦ Twist and shield all signal wires to and from the sense connectors.
The sense leads are part of the ac source's feedback path and must be kept at a low resistance in order to
maintain optimal performance. Connect the sense leads carefully so that they do not become open-circuited.
CAUTION: If the sense leads are left unconnected or become open during operation, the ac source will
regulate at the output terminals, but with a 40% increase in output voltage over the
programmed limit. The meter circuit cannot read back this increase in output voltage when
the sense lead is disconnected.
Set the ALC command to EXT (external) to enable remote sensing. The ALC command is located under
the Voltage key as explained in chapter 4. Set the ALC command to INT (internal) to disable remote
sensing.
NOTE: If you are using external relays to connect and disconnect the load and sense connections,
do NOT permit the sense connections to open when remote sensing is enabled. First disable
remote sensing, then open the sense and load connections.
!
SENSE
01
Figure 2-5. Remote Sense Connections
01
LOAD
COM COM
26
Page 27

Installation - 2
Remote Sensing and OVP Considerations
In remote sense applications, the voltage drop in the load leads subtracts from the available load voltage
(see "Remote Sensing Capability" in appendix A). As the ac source increases its output to overcome this
voltage drop, the sum of the programmed voltage and the load-lead drop may exceed the ac source's
maximum voltage rating. This may trip the OV protection circuit, which senses the voltage at the output
terminals, not at the load. When using remote sensing, you must program the OVP trip voltage high enough
to compensate for the voltage drop between the output terminals and the load.
NOTE: If the load causes the peak current limit circuit to become active, voltage transitions on the
output may cause nuisance tripping of the OVP circuit.
Trigger Connections
The BNC trigger connectors on the rear panel let you apply trigger signals to the ac source as well as
generate trigger signals from the ac source. The electrical characteristics of the trigger connectors are
described in appendix A. More information on programming external triggers is found in chapter 4 of the
ac source Programming Guide.
Trigger IN Allows negative-going external trigger signals to trigger the ac source.
Trigger OUT Generates a negative-going pulse when the selected transient output has occurred.
Digital Connections
This connector, which is on the rear panel, is for connecting the fault and the inhibit signals. The fault
(FLT) signal is also referred to as the DFI signal in the front panel and SCPI commands. The inhibit (INH)
signal is also referred to as the RI signal in the front panel and SCPI commands.
The connector accepts wires sizes from AWG 22 to AWG 12. Disconnect the mating plug to make your
wire connections. The electrical characteristics of the digital connectors are described in appendix A. More
information on programming the digital connectors is found in chapter 4 of the ac source Programming
Guide.
NOTE: It is good engineering practice to twist and shield all signal wires to and from the digital
connectors
The following examples show how you can connect the FLT/INH circuits of the ac source.
In example A, the INH input connects to a switch that shorts pin + to pin ⊥ whenever it is necessary to
disable output of the unit. This activates the remote inhibit (RI) circuit, which turns off the ac output. The
front panel Prot annunciator comes on and the RI bit is set in the Questionable Status Event register. To reenable the unit, first open the connection between pins + and ⊥ and then clear the protection circuit. This
can be done either from the front panel or over the HP-IB/RS-232.
27
Page 28

2 - Installation
In example B, the FLT output of one unit is connected to the INH input of another unit. A fault condition
in one of the units will disable all of them without intervention either by the controller or external circuitry.
The controller can be made aware of the fault via a service request (SRQ) generated by the Questionable
Status summary bit.
FLT INH
+
I
-
+
-
NOTE: Connectors
are removable
FLT INH
+
-
+
I
-
INH Common
Switch
(Normally
Open)
+
INH Input
A) INH Example with One Unit
Figure 2-6. FLT/INH Examples
-
+
. . . .
-
+
INH Input
-
+
I
-
I
-
INH Input
+
FLT Output
I
-
+
FLT Output
B) FLT Example with Multiple Units
. . . .
Controller Connections
The ac source connects to a controller either through an HP-IB or an RS-232 connector.
HP-IB Connector
Each ac source has its own HP-IB bus address. AC sources may be connected to the bus in series
configuration, star configuration, or a combination of the two. You may connect from 1 to 15 ac sources to
a controller HP-IB interface.
NOTE: The ac source is shipped from the factory with its HP-IB address set to 5. This address can
be changed as described in chapter 4 of this guide.
28
Page 29

Installation - 2
RS-232 Interface
The ac source provides an RS-232 programming interface, which is activated by commands located under
the front panel Address key. When the RS-232 interface is selected, the HP-IB interface is disabled.
NOTE: Sending or receiving data over the RS-232 interface when not configured for REMOTE
operation can cause unpredictable results. Always make sure the ac source is configured
for remote operation when using the RS-232 interface.
Interface Commands
All SCPI commands are available through RS-232 programming. The SYSTem:LOCal,
SYSTem:REMote, and SYSTem:RWLock commands are only available through the RS-232 interface.
SYSTem:LOCal Places the ac source in local mode during RS-232 operation.The front panel keys
are functional.
SYSTem:REMote Places the ac source in remote mode during RS-232 operation. All front panel
keys except the LOCAL key are disabled.
SYSTem:RWLock Places the ac source in remote mode during RS-232 operation. All front panel
keys including the LOCAL key are disabled.
RS-232 Data Format
♦ constant 11-bit data format
♦ one start bit
♦ seven data bits plus a parity bit (even or odd parity), or eight data bits without parity (parity bit is
"0")
♦ two stop bits
You can specify one of the following baud rates: 300 600 1200 2400 4800 9600
NOTE: The ac source always uses one start bit and two stop bits regardless of the baud rate. The
number of start and stop bits is not programmable.
RS-232 Connector
The RS-232 connector is a DB-9, male connector. You can connect the ac source to any computer or
terminal with a properly configured DB-25 connector. You can use a standard HP 24542G or 24542H
interface cable.
Table 2-2. RS-232 Connector
1 2 3 4 5
6 7 8 9
Pin
1
2
3
4
5
6
7
8
9
Input/Output
Output
Input
Output
Output
Common
Input
Output
Description
Reserved for service use
Receive Data (RxD)
Transmit Data (TxD)
Data Terminal Ready
(DTR)
Signal ground
Data Set Ready (DSR)
no connection
no connection
Reserved for service use
29
Page 30

2 - Installation
Hardware Handshake
The RS-232 interface uses the DTR (data terminal ready) line as a holdoff signal to the bus controller.
When DTR is true, the bus controller may send data to the ac source. When DTR goes false, the bus
controller must stop sending data within 10 characters, and must not send any more data until DTR goes
true again. The ac source sets DTR false under two conditions.
1. When the input buffer is full (approximately 100 characters have been received), it will set DTR
false. When enough characters have been removed to make space in the input buffer, DTR will be
set to true, unless condition 2 (see below) prevents this.
2. When the ac source wants to "talk", which means that it has processed a query, and has seen a
<newline> message terminator, it will set DTR false. This implies that once a query has been sent
to the power source, the bus controller should read the response before attempting to send more
data. It also means that a <newline> must terminate the command string. After the response has
been output, the ac source will set DTR true again, unless condition #1 prevents this.
The ac source monitors the DSR (data set ready) line to determine when the bus controller is ready to
accept data. It checks this line before each character is sent, and the output is suspended if DSR is false.
When DSR goes true, transmission will resume. The ac source will leave DTR false while output is
suspended. A form of deadlock exists until the bus controller asserts DSR true to allow the ac source to
complete the transmission.
Control-C is the equivalent to the HP-IB device clear command. It clears the operation in progress and
discards any pending output. For the control-C character to be recognized by the power source while it
holds DTR false, the bus controller must first set DSR false.
Null modem RS-232 interface cables swap the DTR and DSR lines as shown in the following figure. For
other bus controllers or languages, you must determine what form of hardware handshake is used. You may
have to build a customized cable to connect the holdoff lines as necessary. If your bus controller does not
use hardware handshaking, tie the DSR input to the ac source to a signal that is always true. This implies
that your bus controller must always be ready to accept data. You may want to set the baud rate to either
2400 or 4800 baud to ensure that this is true.
bus controller
TxD (3)
RxD (2)
*DTR (4)
*DSR (6)
Ground (5)
ac source
TxD (3)
RxD (2)
DTR (4)
DSR (6)
Ground (5)
Figure 2-7. Null Modem Interface Lines
Response Data Terminator
All RS-232 response data sent by the ac source is terminated by the ASCII character pair <carriage
return><newline>. This differs from HP-IB response data which is terminated by the single character
<newline>.
30
Page 31

3
Turn-On Checkout
Introduction
Successful tests in this chapter provide a high degree of confidence that the ac source is operating properly.
For verification tests, see appendix B. Complete performance tests are given in the Service Guide.
NOTE: This chapter provides a preliminary introduction to the ac source front panel. See chapter
4 for more details.
Preliminary Checkout
WARNING: LETHAL VOLTAGES. Ac sources can supply 425 V peak at their output. DEATH on
contact may result if the output terminals or circuits connected to the output are
touched when power is applied.
1. If you have not already done so, connect the power cord to the ac source and plug it in.
2. Turn the front panel power switch to ON (1).
3. The ac source undergoes a self-test when you turn it on. The following items appear on the display:
a. A brief pattern that lights all display segments, followed by the model number and the software
revision number.
b. The display then goes into the meter mode with the Dis annunciator on, and all others off.
"Meter mode" means that the VOLTS digits indicate the output voltage and the FREQ digits
indicate the output frequency. The voltage will be at or near zero and the frequency will be at 60
Hertz.
Note: If the ac source detects an error during self-test, the Err anunciator on the display will be
lit. Pressing the Shift and Error keys will show the error number. Go to "In Case of Trouble" at
the end of this chapter.
4. Check that the ac source fan is on. You should be able to hear the fan and feel the air coming from
the unit.
5. Press Output on/off once. The Dis annunciator will go off and the CV annunciator will go on.
6. Turn the unit off.
31
Page 32

3 - Turn-On Checkout
á
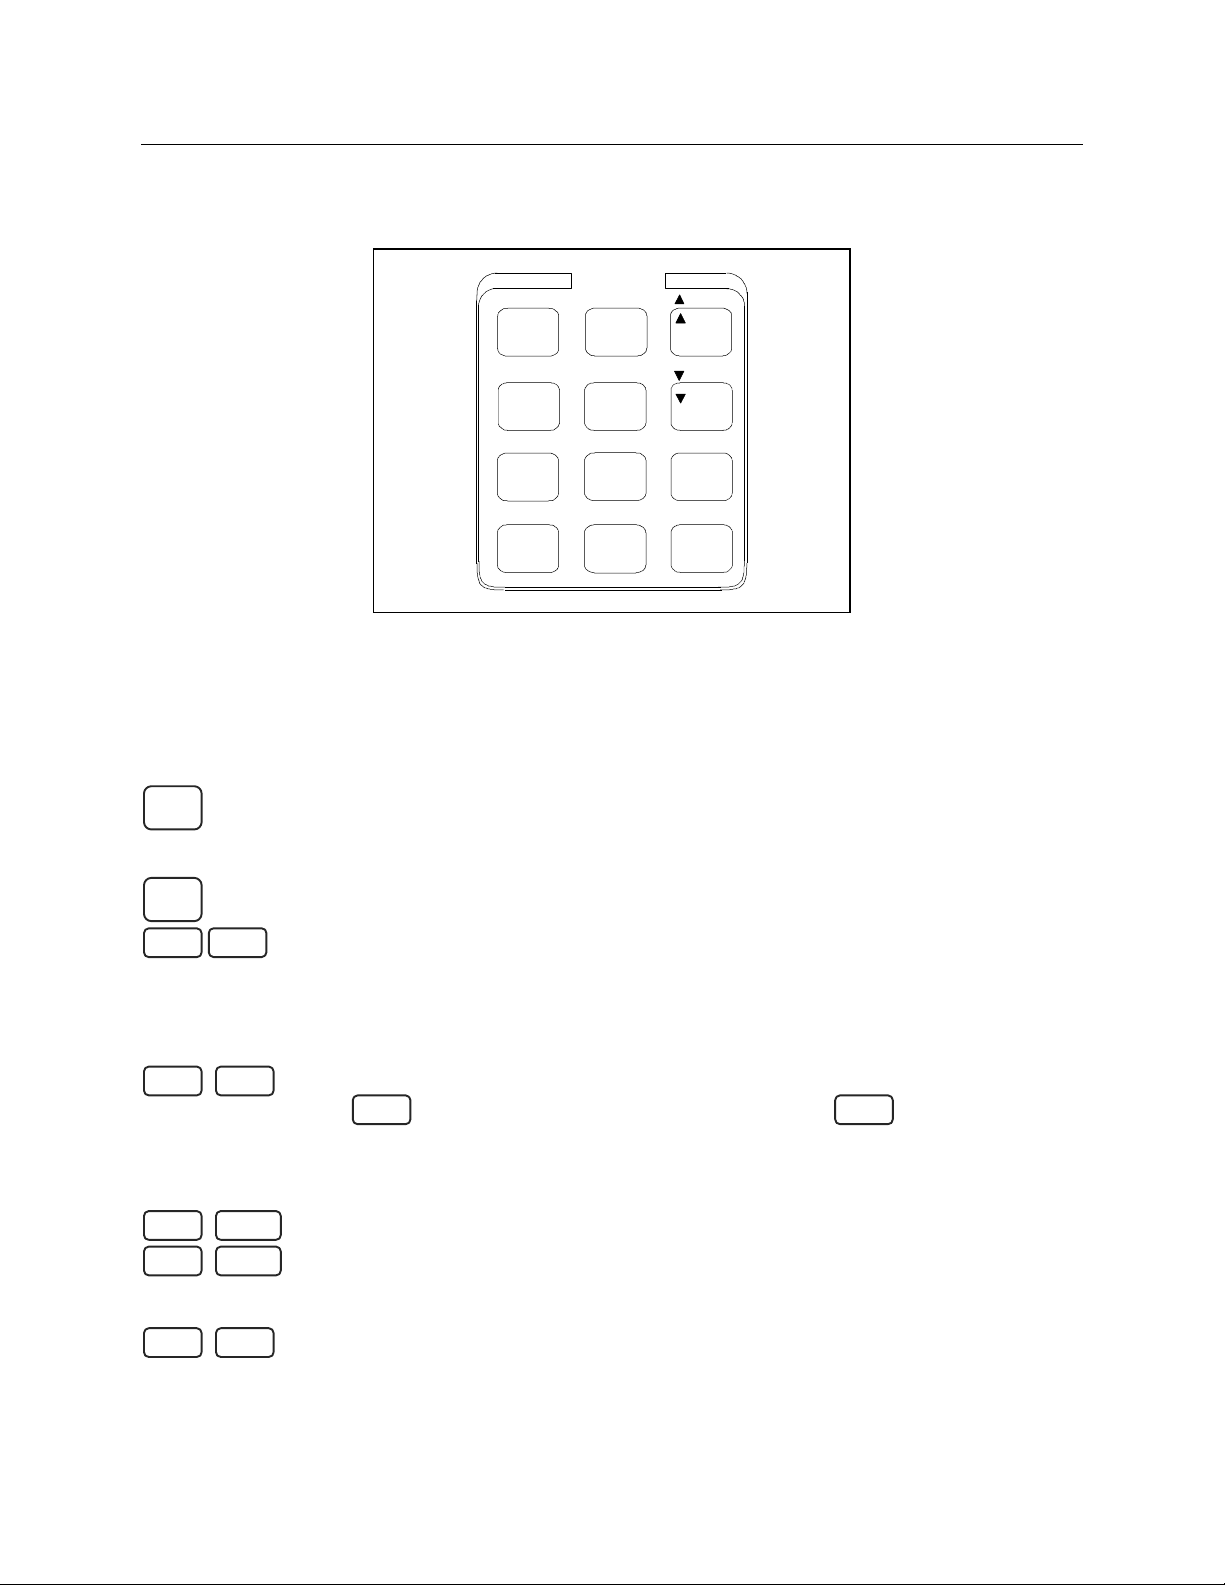
Using the Keypad
(shift) Some of the front panel keys perform two functions, one labeled in black and
the other in blue. You access the blue function by first pressing the blue
shift key. Release the key after you press it. The Shift annunciator will be on,
indicating that you have access to any key's shifted function.
p
and These keys let you scroll up and down through the choices in the presently
and These keys let you select the previous or the next parameter for a specific
Enter
q
selected function menu. All menu lists are circular; you can return to the
starting position by continuously pressing either key.
äã
command. If the command has a numeric range, these keys increment or
decrement the existing value.
The backspace key is an erase key. If you make a mistake entering a digit and
have not yet pressed Enter, you can delete the digit by pressing Å. Delete more
digits by repeatedly pressing this key.
Executes the entered value or parameter of the presently accessed command.
Until you press this key, the parameters you enter with the other keys are
displayed but not entered into the ac source. After pressing Enter, the ac source
returns to Meter mode in most cases. In Harmonic or List mode, the ac source
displays the next point in the list.
Checkout Procedure
WARNING: LETHAL VOLTAGES. Ac sources can supply 425 V peak at their output. DEATH on
contact may result if the output terminals or circuits connected to the output are
touched when power is applied.
The output test requires that you connect light bulbs to the output of the unit and apply a
potentially hazardous voltage of 120 Vac. Properly shield all connections and wires.
The test in this section checks for output voltage and current on the ac source by having you connect light
bulbs to the output of the unit. The following equipment is recommended for performing this output
checkout procedure:
♦ 1 - 100 W light bulb
♦ 1 - light bulb socket
♦ wires for connecting socket to the unit
NOTE: When the ac source is turned on as shipped from the factory, it asserts the *RST state.
You can subsequently program the unit to turn on according to the state stored in *RCL
location 0, as explained in chapter 4. The following procedures assume that the unit turns
on in the *RST state.
32
Page 33

Turn-On Checkout - 3
Make sure that the unit is turned off, and make the following connections to the output.
!
SENSE
01 01 COM COM
100 W
Figure 3-1.Verification Connections
Procedure Display Explanation
1. Turn the unit on. Meter mode
2.
Press the Voltage key.
3.
Press 1, 2, 0, Enter
4.
Press Output On/Off
5.
Press Protect
6. Press • or ‚ and
VOLT 0.00 Display indicates the default settings.
VOLT 120 Programs the output voltage to 120 Vrms. After the
120 V 60 Hz Turns the output on and applies 120 volts to the
PROT:CLEAR Display accesses the protection menu list.
VOLT:PROT 500 Display shows the overvoltage protection trip
scroll to the
VOLT:PROT item
7.
Press 1, 6, 0, Enter
VOLT:PROT 160 Programs the OVP to 160 Vpeak, the rms value of
0 V 60 Hz Because the peak OVP voltage entered was less
Meter mode is active and the Dis annunciator
should be on.
value is entered, the display returns to Meter mode,
which indicates that no voltage is applied to the
output.
light bulb. The Dis annunciator should be off and
CV should be on.
voltage for your unit. The overvoltage protection
voltage is programmed in peak, not rms volts.
which is less than the previously set rms voltage.
than the rms output voltage, the OVP circuit
tripped. The output dropped to zero, CV turned off,
and Prot turned on.
8.
Press Protect, scroll
to the VOLT:PROT
item, and press 3, 2, 0,
Enter
9.
Press Protect, and
Enter
VOLT:PROT 320 Programs the OVP to a peak value that is greater
than the rms output voltage value.
Note: You cannot clear an OVP trip until you have
first removed the cause of the condition.
120 V 60 Hz Executes the PROT:CLEAR command, restoring
the output. Prot turns off and CV turns on.
33
Page 34

3 - Turn-On Checkout
Procedure Display Explanation
10. Press Shift, and
Current
11.
Press . 5 Enter
CURR:LEV 5 Indicates the default output current limit setting.
CURR:LEV .5
Sets the current limit to .5 amperes. The CC
annunciator is on, indicating that the unit is in
current limit mode and the light bulbs are dimmer
because the output voltage has dropped in its
attempt to limit output current.
12. Press Protect, scroll to
the CURR:PROT item,
and press È to select
ON. Then press Enter.
CURR:PROT ON You have enabled the overcurrent protection
circuit. The circuit then tripped because of the
output short. The CC annunciator turns off and the
OCP and Prot annuciators come on. The output
current is near zero.
13. Press Output On/Off 0.5 V 60 Hz
14. Press Protect, scroll to
the CURR:PROT item,
CURR:PROT
OFF
The output is off and the Dis annunciator turns on.
You have disabled the overcurrent protection
circuit. The Prot annunciator turns off.
press È to select OFF,
then press Enter.
15. Turn the unit off. The next time the unit turns on it will be restored to
the *RST or factory default state
In Case of Trouble
Error Messages
Ac source failure may occur during power-on selftest or during operation. In either case, the display may
show an error message that indicates the reason for the failure.
Selftest Errors
Pressing the Shift and Error keys will show the error number. Selftest error messages appear as:
ERROR <n>, where "n" is a number listed in the following table. If this occurs, turn the power off and then
back on to see if the error persists. If the error message persists, the ac source requires service.
Table 3-1. Power-On Selftest Errors
Error No. Failed Test
Error 0 No error
Error 1 Non-volatile RAM RD0 section checksum failed
Error 2 Non-volatile RAM CONFIG section checksum failed
Error 3 Non-volatile RAM CAL section checksum failed
Error 4 Non-volatile RAM WAVEFORM section checksum failed
Error 5 Non-volatile RAM STATE section checksum failed
Error 6 Non-volatile RAM LIST section checksum failed
Error 10 RAM selftest
Error 11 to 18 DAC selftest 1 to 8
34
Page 35
Turn-On Checkout - 3
Runtime Error Messages
Under unusual operating conditions, the front panel display may show OVLD. This indicates that the
output voltage or current is beyond the range of the meter readback circuit. If the front panel display
indicates -- -- -- -- -- -- , an HP-IB measurement is in progress. Appendix C lists other error messages that
may appear at runtime.
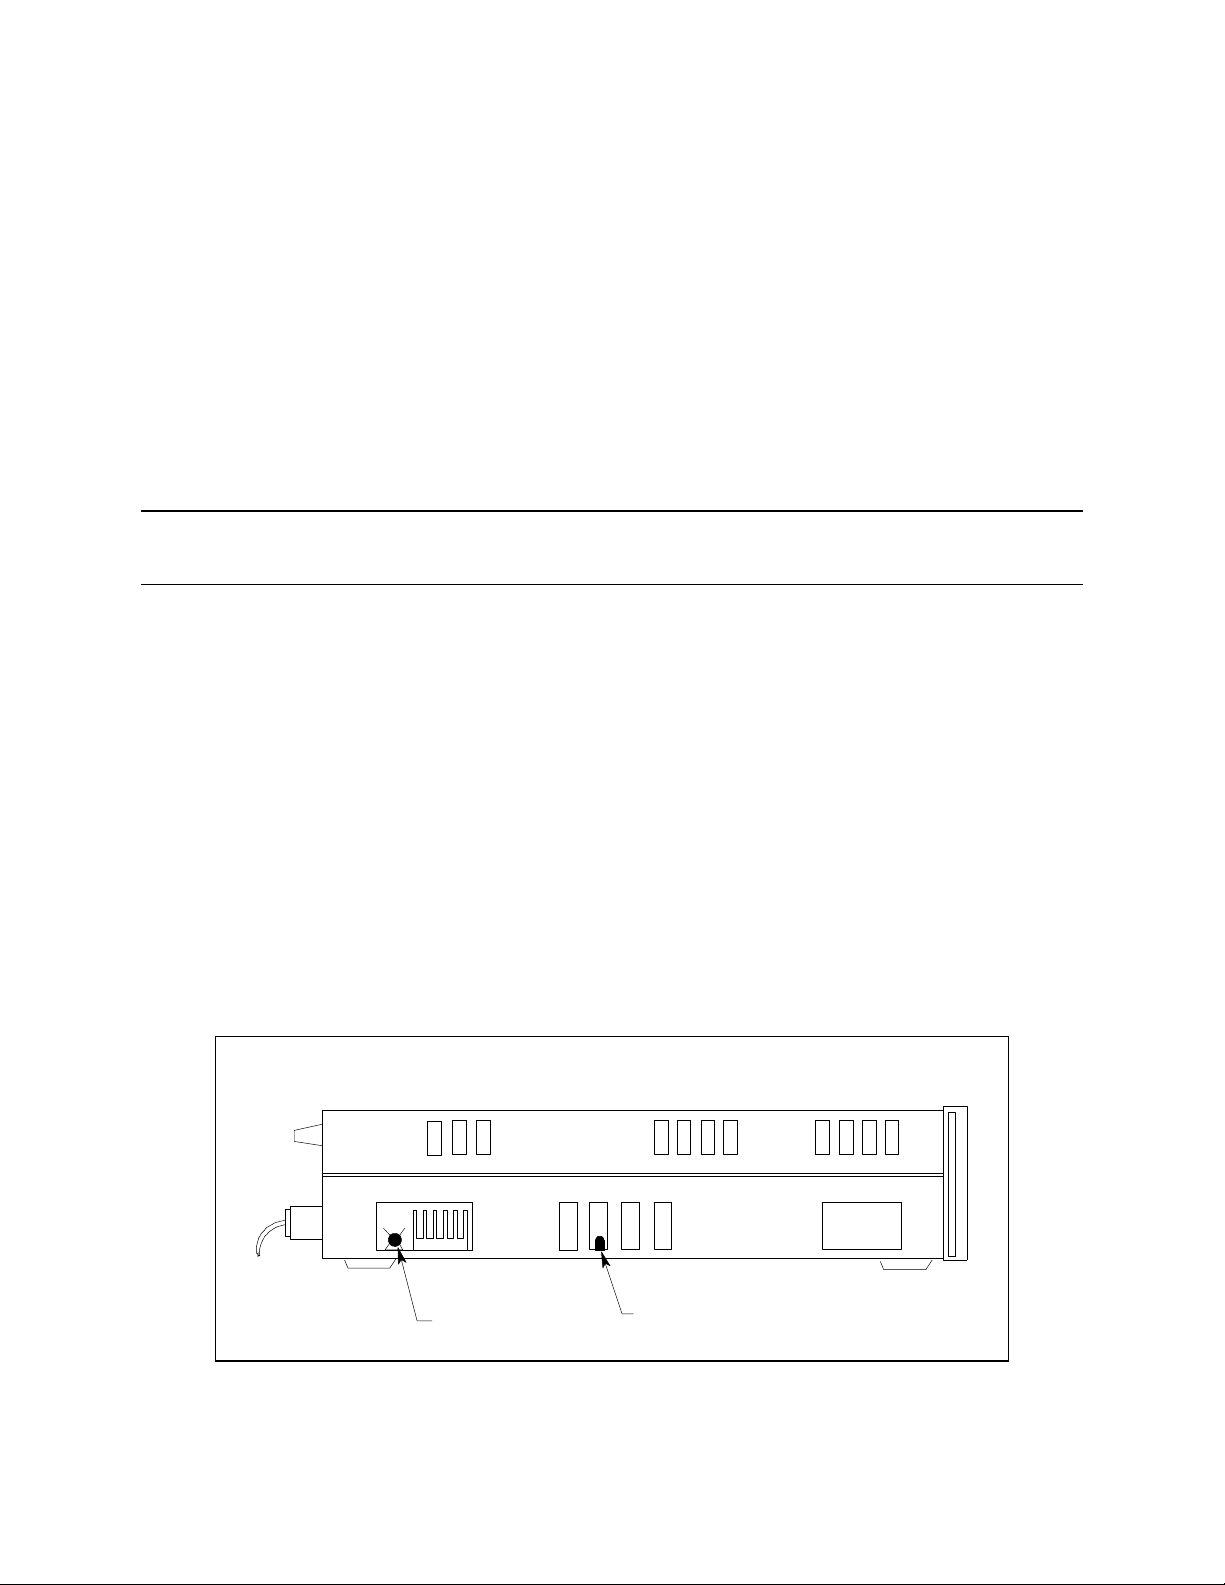
Line Fuse
If the ac source appears "dead" with a blank display and the fan not running, first check your power source
to be certain line voltage is being supplied to the ac source. If the power source is normal, the ac source line
fuse may be defective. If the ac source has a defective fuse, replace it only once. If it fails again, investigate
the reason for the failure. Proceed as follows:
WARNING: Hazardous voltages can remain active inside the ac source even after it has been
turned off. Fuse replacement should be done only by a qualified electronics technician.
The line fuse is located inside the ac source. To change it, refer to Figure 3-2 and proceed as follows:
1. Turn off the front panel power switch and unplug the line cord from the ac source.
2. Remove the ac cover as follows:
a. Remove the four screws securing the carrying straps and dustcover (use a T25 Torx drive).
b. Spread the bottom rear of the cover and pull it back to remove it.
3. Observe the two LEDs on each side of the unit. If either LED is ON, there is still hazardous
voltages present inside the ac source. Wait until the LEDs are out before proceeding (it may take
several minutes for the LEDs to go out.)
4. Replace the fuse with one of the same type. Do not use a slow-blow type fuse
5. Replace the cover.
6. Connect the line cord to the ac source.
7. Turn on power and verify operation.
SIDE VIEW (WITH COVER REMOVED)
FUSE
LED
Figure 3-2. AC Source Fuse Location
35
Page 36

Page 37

Front panel Operation
Introduction
Here is what you will find in this chapter:
♦ a complete description of the front panel controls
♦ front panel programming examples that describe:
how to program the output voltage and frequency
how to measure the output
how to program the output pulses and lists
how to trigger output changes
Front Panel Description
4
1
HEWLETT
PACKARD
1
LINE
On
4
300 V rms 50 VA 1
6812A
AC POWER SOURCE / ANALYZER
115.0V 60.0HZ
CV CC CR CP Unr Dis Tran OCP Prot Cal Shift Rmt Addr Err SRQ
VOLTAGE FREQUENCY
Off
3
2 5 6 7
METER
OUTPUT
SYSTEM
Local
Error
Address
Save
Recall
FUNCTION
Harmonic
Current
Index
Voltage
Meter
Output
Phase
Input
Status
Protect
Trigger
Trigger
Control
Index
Freq
Shape
Phase
Select
List
Pulse
Output
on/off
ENTRY
Calibration
7 8 9
5 6
4
E
-
.
0
Enter
321
Clear Entry
Figure 4-1. Front Panel, Overall View
37
Page 38

4 - Front Panel Operation
ϕ Display
κ Annunciators
λ Voltage/
Frequency
ν Line
ο System Keys
π Function Keys
θ Entry Keys
14-character vacuum fluorescent display for showing programmed commands and
measured values.
Annunciators light to indicate operating modes and status conditions:
φ1 Phase 1 is being controlled or metered.
CV The ac source output is in constant-voltage mode.
CC The ac source output is in constant-current mode.
Unr The ac source output is in an unregulated state.
Dis The ac source output is disabled (off).
Tran The ac source output is initialized to output a transient.
OCP The overcurrent protection state is enabled.
Prot One of the ac source's output protection features is activated.
Cal The ac source is in calibration mode.
Shift The Shift key is pressed to access an alternate key function.
Rmt The selected interface (HP-IB or RS-232) is in a remote state.
Addr The interface is addressed to talk or to listen.
Err There is a message in the SCPI error queue.
SRQ The interface is requesting service from the controller.
Meter Front panel measurement functions are: ac only, dc only, or ac+dc
AC+DC
Output The ac source output coupling is: ac only, or ac+dc
AC+DC
The rotary pulse generators let you set the output voltage and frequency when the
ac source is in local mode. Their response is rate sensitive.
Turning a control rapidly provides coarse control of the value.
Turning a control slowly provides fine control of the value.
This turns the ac source on or off.
The system keys let you:
Return to Local mode (front panel control)
Set the ac source HP-IB address
Set the RS-232 interface communication baud rate and parity bit
Display SCPI error codes and clear the error queue
Save and recall up to 4 instrument operating configurations
Function access command menus that let you:
Program output voltage, current limit, frequency, and output waveforms
Turn the ouput on and off
Select metering functions
Send immediate triggers from the front panel
Program transient output functions
Set and clear protection functions
Select output phases
Select the coupling for output and meter functions
Monitor instrument status
Entry keys let you:
Enter programming values
Increment or decrement programming values
Calibrate the ac source
38
Page 39
Front Panel Operation - 4
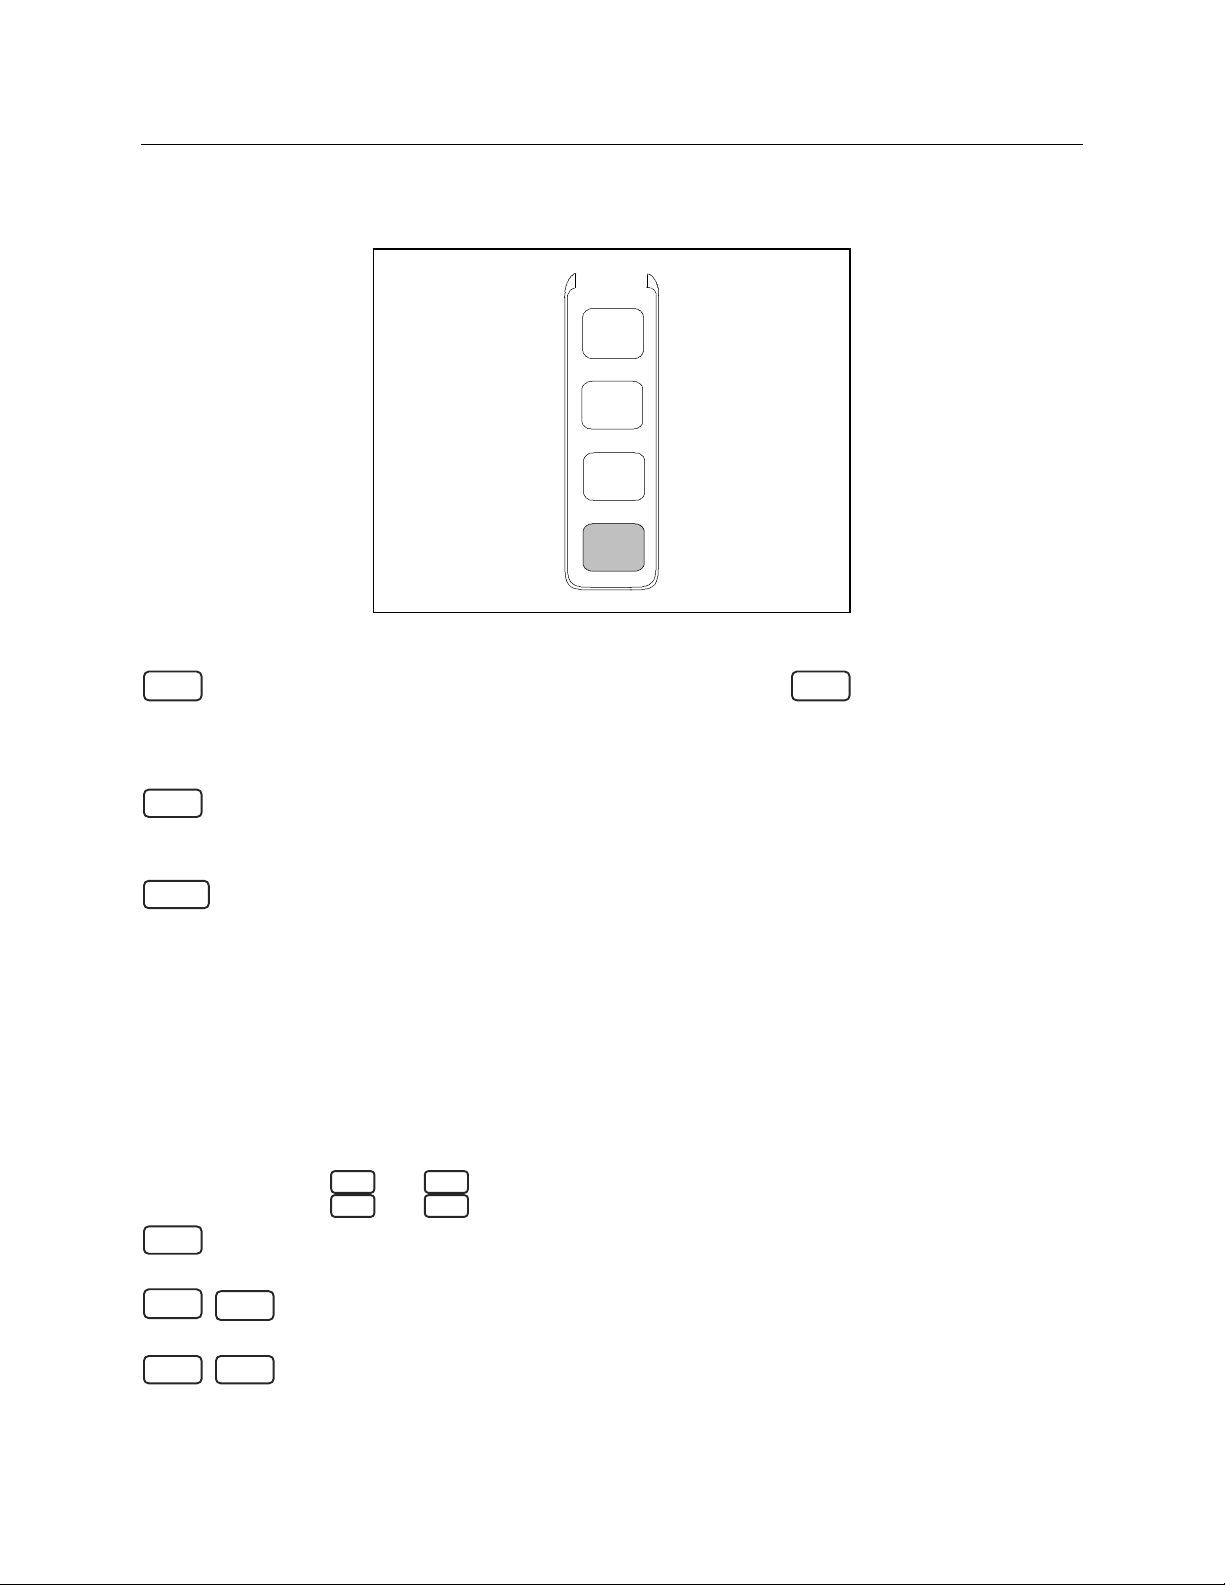
System Keys
Refer to the examples later in this chapter for more details on the use of these keys.
SYSTEM
Local
Error
Address
Save
Recall
Figure 4-2. System Keys
Local
Address
Recall
Shift
Error
SaveShift
This is the blue, unlabeled key, which is also shown as in this guide.
Shift
Pressing this key accesses the alternate or shifted function of a key (such as
ERROR ). Release the key after you press it. The Shift annunciator is lit,
indicating that the shifted keys are active.
Press to change the ac source's selected interface from remote operation to local
(front panel) operation. Pressing the key will have no effect if the interface state is
already Local, Local-with-Lockout, or Remote-with-Lockout.
Press to access the system address menu. This menu lets you configure the ac
source's interface. Address Menu entries are stored in non-volatile memory.
Display Command Function
ADDRESS <value> Sets the HP-IB Address
INTF <char> Selects an interface (HPIB or RS232)
BAUDRATE<value> Selects baud rate (300, 600, 1200, 2400, 4800, 9600)
PARITY <char> Message parity (NONE, EVEN, ODD, MARK, SPACE)
LANG <char> Selects language (SCPI or E9012)
value = a numeric value
char = a character string parameter
Use and to scroll through the command list.
ã ä
Use and to scroll through the parameter list.
qp
Press to place the ac source into a previously stored state. You can recall up to 16
(0 through 15) previously stored states.
Press to display the system error codes stored in the SCPI error queue. This action
also clears the queue. If there is no error in the queue, 0 is displayed.
Press to store an existing ac source state in non-volatile memory. The parameters
saved are listed under *SAV in the ac source Programming Guide. You can save
up to 16 states (0 through 15).
39
Page 40
4 - Front Panel Operation
On/Off
Select
Ç
È
Function Keys
Refer to the examples later in this chapter for more details on the use of these keys.
Harmonic
Meter
Output
Input
Status
Protect
Trigger
Trigger
Control
FUNCTION
Current
Voltage
Phase
Freq
Shape
List
Pulse
Phase
Select
Output
on/off
Index
Index
Figure 4-3. Function Keys
Immediate Action Keys
Immediate action keys immediately execute their corresponding function when pressed. Other function
keys have commands underneath them that are accessed when the key is pressed.
Output
Phase
This key toggles the output of the ac source between the on and off states. It
immediately executes its function as soon as you press it. When off, the ac source
output is disabled and the Dis annunciator is on.
This key only applies to three-phase ac sources
TriggerShift
Sends an immediate trigger to the ac source
Scrolling Keys
Scrolling keys let you move through the commands in the presently selected function menu.
• ‚
pIndexShift
Shift qIndex
40
These scroll keys let you move through the choices in a command list.
Press to bring up the next command in the list. Press to go back
pq
to the previous command in the list. Function menus are circular; you can return
to the starting position by continuously pressing either key. The following
example shows the commands in the Input function menu:
These shifted scroll keys apply only to the Harmonic and List functions.
Press these keys to step through integers 0 through 50 when specifying the
desired harmonic number, or 0 through 99 when specifying the desired list point.
Hold down these keys to rapidly access any harmonic or list point.
These Entry keys let you scroll through choices in a parameter list that apply to
a specific command. Parameter lists are circular; you can return to the starting
position by continuously pressing either key. If the command has a numeric
range, these keys increment or decrement the existing value.
Page 41

Meter Display Keys
Enter
qpÇÈp
IndexqIndex
Metering keys control the metering functions of the ac source.
Front Panel Operation - 4
Meter
Input
Press this key to access the meter menu list.
Display Measurement
<reading>V <reading>Hz rms voltage and frequency (the default)
<reading>V <reading>A rms voltage and rms current
<reading>A <reading>Hz rms current and frequency (the default)
<reading>V <reading>W rms voltage and power
<reading> CREST F current crest factor
<reading>A PK REP peak current, repetitive
<reading>A PK NR peak current, nonrepetitive
1
<reading> VA apparent power
<reading> VAR reactive power
<reading> PFACTOR power factor
Press this key to specify the following metering functions.
Display Command Function
INP:COUP <char> Choose meter coupling (AC, DC or ACDC)
CURR:RANGE <char> Current measurement range (HIGH or LOW)
HIGH = for measuring rms currents > 5.7 A
LOW = for measuring rms currents < 5.7 A
WINDOW <char> Select harmonic measurement window meter
(KBESSEL, RECT)
Shift Harmoni
Press this key to access the harmonic menu list
Display Measurement
<reading>A I:MAG: <index> current harmonic magnitude
<reading>° I:PHASE: <index>
<reading>V V:MAG: <index> voltage harmonic magnitude
<reading>° V:PHASE: <index>
<reading> N:MAG: <index> neutral current harmonic magnitude
<reading>° N:PHASE: <index>
<reading>° CURR:THD
<reading>° VOLT:THD
Notes:
1
Displays the highest peak current since it was last cleared.The value is cleared when
you scroll into this selection or press or
reading = the returned measurement
index = a numeric value that represents the harmonic number from 0 to 50
char = a character string parameter
and scroll through the command list.
and scroll through the parameter list.
and specify the desired harmonic.
current harmonic phase
voltage harmonic phase
neutral current harmonic phase
current total % harmonic distortion
voltage total % harmonic distortion
Clear Entry
41
Page 42

4 - Front Panel Operation
Current
qpÇ
È
Output Control Keys
Output control keys control the output functions of the ac source.
Voltage
Shift
Press this key to access the voltage menu list.
Display Command Function
VOLT <value> Set immediate rms output voltage
VOLT:T<value> Set triggered rms output voltage
VOLT:M <char> Select the voltage mode (FIXED, STEP, PULSE or LIST)
OFFSET <value> Set immediate dc offset voltage
OFFSET:T<value> Set triggered dc offset voltage
OFFSET:M <char> Select the dc offset voltage mode (FIXED, STEP, PULSE
or LIST)
SLEW <value> Set immediate voltage slew rate in volts/second
SLEW:T<value> Set triggered voltage slew rate in volts/second
SLEW:M <char> Select the voltage slew mode (FIXED, STEP, PULSE or
LIST)
OFF:SLW <value> Set immediate dc offset voltage slew in volts/second
OFF:SLW:T<value> Set triggered dc offset voltage slew in volts/second
OFF:SLW:M <char> Select the dc offset voltage slew mode (FIXED, STEP,
PULSE or LIST)
ALC <char> Select the voltage sense source (INT or EXT)
ALC:DET <char> Select the voltage sense detector (RTIME or RMS)
Press this key to access the current menu list.
Freq
Display Command Function
CURR:LEV <value> Set immediate rms output current limit
CURR:PEAK <value> Set immediate peak output current limit
CURR:PEAK:T <value> Set triggered peak output current limit
CURR:PEAK:M <value> Select the peak output current limit mode (FIXED, STEP,
PULSE or LIST)
Press this key to access the frequency menu list.
Display Command Function
FREQ <value> Set immediate output frequency
FREQ:T<value> Set triggered output frequency
FREQ:M <char> Select the frequency mode (FIXED, STEP, PULSE or
LIST)
SLEW <value> Set immediate frequency slew rate in volts/second
SLEW:T<value> Set triggered frequency slew rate in volts/second
SLEW:M <char> Select the frequency slew mode (FIXED, STEP, PULSE
or LIST)
Notes:
value = a numeric value
char = a character string parameter
and scroll through the command list.
and scroll through the parameter list.
42
Page 43

Front Panel Operation - 4
qpÇ
È
Shift
Shape
Pulse
Phase
Press this key to access the phase menu list.
Display Command Function
PHASE <value> Set immediate output phase
PHASE:T <value> Set triggered output phase
PHASE:M <char> Select the phase mode (FIXED, STEP, PULSE or LIST)
Press this key to access the shape menu list.
Display Command Function
SHAPE <char> Select the immediate output wave shape (SINE,
SQUARE, or CSINE) CSIN = clipped sine wave
SHAPE:T <char> Select the triggered output wave shape (SINE, SQUARE,
or CSINE) CSIN = clipped sine wave
SHAPE:M <char> Select the shape mode (FIXED, STEP, PULSE or LIST)
CLIP <value> Set the clipping level of the CSIN wave shape. This
specifies the point where clipping starts as a percentage of
the peak amplitude or percentage of THD.
Press this key to access the pulse menu list.
Display Command Function
WIDTH <value> Set the pulse width
COUNT <value> Set the number of output pulses
DCYCLE <value> Set the pulse duty cycle as a percentage of the pulse
period
PER <value> Set the pulse period
HOLD <char> Set the parameter that will be held constant as the other
parameters change (WIDTH or DCYCLE)
Shift
Output
Press this key to access the output menu list.
Display Command Function
OUTP:COUP <char> Select output coupling (AC or DC)
*RST Execute *RST command to place the ac source in the
factory-default state
TTLT:SOUR <char> Select Trigger Out source coupling (BOT, EOT or LIST)
BOT = beginning of trensient
EOT = end of transient
LIST = TTLT trigger (see Programming Guide)
TTLT:STATE <value> Set Trigger Out state (ON or OFF)
IMP:STATE <value> Set output impedance programming (ON or OFF)
IMP:REAL <value> Set real part of output impedance
IMP:REAC <value> Set reactive part of output impedance
PON:STATE <char> Select power-on state command (RST or RCL0)
RI <char> Sets remote inhibit mode (LATCHING, LIVE, or OFF)
DFI <char> Sets discrete fault indicator state (ON or OFF)
DFI:SOUR <char> Select the DFI source (QUES, OPER, ESB, RQS, or OFF)
(see chapter 4 of Programming Guide)
Notes:
value = a numeric value
char = a character string parameter
and scroll through the command list.
and scroll through the parameter list.
43
Page 44

4 - Front Panel Operation
qpÇ
È
Protection and Status Control Keys
The Protect and Status keys control the protection functions and status registers of the ac source. Refer to
chapter 4 of the Programming guide for more information on the status registers.
Protect
Press this key to access the protection menu list.
Display Command Function
PROT:CLEAR Clear the status registers of all activated protection signals.
The fault causing a signal must be corrected or removed
before the register can be cleared.
CURR:PROT <char> Set overcurrent protection function (ON or OFF).
VOLT:PROT <value> Set the overvoltage protection level
1
DELAY <value> Set the time delay for activating a protection fault after
programming the output
StatusShift
Press this key to access the status menu list. Note that in the following list, commands
ending in ? clear the registers when they are read. For this reason the registers are read
only after you press , not when you scroll to the command
Enter
Display Command Function
*CLS Executes the clear status (*CLS) command
STATUS:PRESET Execute the STATus:PRESet command
*ESR? <value> Return Event Status register value
*STB <value> Return Status Byte register value
OPER:EVEN? <value> Return STAT:OPER:EVENT? value
OPER:COND <value> Return STAT:OPER:COND? value
QUES:EVEN? <value> Return STAT:QUES:EVENT? value
QUES:COND <value> Return STAT:QUES:COND? value
44
Notes:
1
Programmed in peak volts. (Other voltage parameters are programmed in rms volts)
value = a numeric value
char = a character string parameter
and scroll through the command list.
and scroll through the parameter list.
Page 45

Front Panel Operation - 4
Control
qpÇ
È
Clear Entry
p
IndexqIndex
Trigger and List Control Keys
The Trigger Control key controls output transient triggers. The List key controls the generation of output
lists. A list can contain up to 100 points, each of which can specify an output change (or transient). Refer
to chapter 4 of the Programming Guide for more information about programming triggers and lists.
Trigger
Press this key to access the trigger control menu list.
Display Command Function
INIT:IMMED Initiate the transient trigger sequence immediately.
INIT:CONT <char> Set continuous trigger initiation (ON or OFF).
TRIG:SOUR <char> Select transient trigger source (BUS, EXT, TTLT or
IMM).
DELAY <value> Set trigger delay in seconds.
ABORT Abort all trigger sequences.
SYNC:SOUR <char> Select trigger sync source (PHASE or IMM).
SYNC:PHASE <value> Set synchronous phase reference angle in degrees.
ListShift
Press this key to access the list commands
Display Command Function
COUNT <value> Specifies the number of times a list repeats.
DWEL:<index> <value> List of output dwell times.
FREQ:<index> <value> List of output frequencies.
FSLW:<index> <value> List of output frequency slew rates
IPK:<index> <value> List of output peak current limits.
OFFS:<index> <value> List of dc output voltages.
OSLW:<index> <value> Dc offset voltage slew rate list
PHASE:<index> <value> List of output voltage phase angles.
SHAP:<index> <char> List of output waveform shapes.
(SINE, SQUARE or CSIN) CSIN = clipped sine wave
STEP<char> Response of list to triggers (ONCE or AUTO).
TTLT:<index> <value> List of Trigger Out pulses (0=no pulse; 1=pulse).
VOLT:<index> <value> List of ac output voltages.
VSLW:<index> <value> List of output voltage slew rates.
1
Notes:
1
User-defined waveshapes will also appear in this list when created.
value = a numeric value
char = a character string parameter
index = a numeric value that represents a list point from 0 to 99
and scroll through the command list.
and scroll through the parameter list.
and scroll through the desired list points. EOL is displayed when the
end of the list is reached. When a value is edited, pressing automatically
Enter
advances to the next list point. Pressing truncates or clears the list at the
presently displayed list point.
45
Page 46

4 - Front Panel Operation
Å
Entry Keys
Refer to the examples later in this chapter for more details on the use of these keys.
−
.
Calibration
7 8 9
4
E
0
ENTRY
5 6
-
.
321
Clear Entry
Enter
Figure 4-4. Entry Keys
äã
These keys let you scroll through choices in a parameter list that apply to a
specific command. Parameter lists are circular; you can return to the starting
position by continuously pressing either key. If the command has a numeric
range, these keys increment or decrement the existing value.
90
through are used for entering numeric values. is the decimal
.90
point. For example, to enter 33.6 press: 3 3 . 6 Enter.
Enter
Shift
Shift
Clear Entry
Shift
Calibration
The backspace key deletes the last digit entered from the keypad. This key lets
you correct one or more wrong digits before they are entered.
This key executes the entered value or parameter of the presently accessed
command. Until you press this key, the parameters you enter with the other Entry
keys are displayed but not entered into the ac source. Before pressing
Enter
you can change or abort anything previously entered into the display.
After Enter is pressed, the ac source returns to Meter mode in most cases. In
Harmonic or List mode, the ac sourse displays the next point in the list.
EShift
This key specifies an exponential power of 10. For example, the the value for
100µs can be entered as either . 0 0 0 1 , or as 1 E − 4
−
This key − is the minus sign.
This key aborts a keypad entry by clearing the value. This key is convenient for
correcting a wrong value or aborting a value entry. The display then returns to
the previously set function. When editing a list, pressing truncates or
Clear Entry
clears the list at the presently displayed list point.
This key accesses the calibration menu (Refer to Appendix B to calibrate your ac
source).
46
Page 47

Front Panel Operation - 4
Examples of Front Panel Programming
You will find these examples on the following pages:
1 Setting the output voltage amplitude
2 Setting the output frequency
3 Setting the dc offset
4 Setting a protection feature
5 Clearing a protection feature
6 Generating step, pulse, and list transients
7 Programming trigger delays and phase synchronization
8 Programming slew rates
9 Measuring peak inrush current
10 Setting the HP-IB address or RS-232 parameters
11 Saving and recalling operating states
The examples in the ac source Programming Guide are similar to the ones in this section, except that they
use SCPI commands.
1 - Setting the Output Voltage Amplitude
NOTE: The maximum voltage that the ac source can output is limited by the peak value of the
waveform, which is 425 V
. Since the output is programmed in units of rms volts, the
peak
maximum value that can be programmed is dependent on the peak-to-rms ratio of the
selected waveform. For a sinewave, the maximum ac voltage that can be programmed is
300 V
. For other waveforms the maximum may be different.
rms
When you turn on the ac source, the default output shape is a 60 Hz sinewave at 0 Vrms. There is no
output from the ac source because the default output state is OFF, as indicated by the Dis annunciator. Set
the output to 120 V rms as follows:
Action Display
You can set the voltage in any of three ways:
1.
On the Function keypad, press Voltage. On the Entry keypad, press 1 2 0 Enter.
This is the easiest way to enter an accurate value.
2. On the Function keypad, press Voltage. On the Entry keypad, press Ç or È to
increment or decrement the existing value. This technique is useful when you are
making minor changes to an existing value.
3
Rotate the front panel Voltage knob to obtain 120 V. This method is best when you
want to enter a value without using the voltage menu.
Note: You will not see the new voltage on the front panel meter unless the output is
enabled.
VOLT 120
VOLT 127
120 V 60 Hz
To enable the output:
4.
On the Function keypad, press Output On/Off. The Dis annunciator will go off,
indicating that the voltage is now applied to the output terminals.
120 V 60 Hz
47
Page 48

4 - Front Panel Operation
2 - Setting the Output Frequency
When you turn on the ac source, the default output frequency is a 60 Hz. Assuming the voltage output from
example 1 is in effect (120 Vrms sinewave), change the frequency to 50 Hz as follows:
Action Display
You can set the frequency in the same way that you set the voltage:
1. On the Function keypad, press Freq. On the Entry keypad, press 5 0 Enter. FREQ 50
2. On the Function keypad, press Freq. On the Entry keypad, press Ç or È to
increment or decrement the existing value.
3.
Rotate the front panel Frequency knob to obtain 50 Hz.
To verify the output, use the meter menu:
4. The Meter menu is presently displaying the measured voltage and frequency of the
selected output phase. Press • and ‚ to scroll through all of the measurement
functions in the Meter Menu.
FREQ 50
FREQ 50
120 V 50 Hz
3 - Setting the DC Offset
NOTE: Because the maximum voltage that the ac source can output is limited to 425 V
cannot program a dc offset that will cause a previously programmed ac voltage to exceed
the 425 V
limit (ac
peak
+ offset ≤ 425 V).
peak
The dc output capability of the ac source lets you independently control the dc and ac components of the
output voltage. Program a dc offset of 100 V as follows:
Action Display
1. On the Function keypad, press Voltage and then press ‚ until you access the
OFFSET command.
2.
On the Entry keypad, press 1 0 0 Enter. OFFSET 100
OFFSET 0
peak
, you
3. On the Function keypad, press Shift Output to access the output coupling
command.
Note: When the output coupling is set to ac, the ac source regulates the dc output
voltage to 0, regardless of any programmed voltage offset.
4. Press È and Enter to change the output coupling to DC. OUTP:COUP DC
5. The ac source output now combines the previously programmed ac rms voltage and
the dc offset voltage. This is indicated by the OUTPUT AC+DC annunciator. The
front panel meter is measuring a 120 Vrms sinewave offset by 100 Vdc. This is
indicated by the METER AC+DC annunciator.
To measure just the ac or just the dc portion of the output:
6. On the Function keypad, press Input to access the metering functions.
Press È until you access the DC parameter and press Enter. This changes the
7.
metering function to dc, which measures just the dc portion of the output in volts.
The meter annunciator indicates METER AC
Press Input again. Press È until you access AC and press Enter. This changes the
8.
metering function to ac, which measures just the ac portion of the output in rms
volts.
The meter annunciator indicates METER DC
OUTP:COUP AC
156 V 50 Hz
INP:COUP ACDC
INP:COUP DC
100 V 50 Hz
INP:COUP AC
120 V 50 Hz
48
Page 49

Front Panel Operation - 4
4 - Setting a Protection Feature
You can set the ac source to disable its output if it detects an overvoltage or overcurrent fault condition.
Other automatic fault conditions (such as overtemperature) also will disable the output. Set the
overcurrent protection feature as follows:
Action Display
On the Function keypad, press Protect. PROT:CLEAR
1.
2. Press È to obtain the overcurrent command. CURR:PROT OFF
3. On the Entry keypad, press once to scroll to the ON parameter and press Enter.
The OCP annunciator will light, indicating that the overcurrent protection circuit is
on. CURR:PROT ON
If you wish to set a time delay between the detection of the fault and the disabling
of the output, scroll to the delay command on the protection menu. The default
delay is 100 milliseconds.
Enter the delay from the Entry keypad, such as . 2 5 0 Enter.
4.
When you want to restore normal operation after the cause of the overcurrent
condition has been removed, scroll to the protection clear command and press
Enter. The OCP annunciator then will go off.
CURR:PROT ON
DELAY .1
DELAY .250
PROT:CLEAR
5 - Clearing Protection Conditions
When the output Prot annunciator is on, the output of the ac source has turned off due to one or more of
the following conditions:
Annunciator Description Bit Number Bit Weight
OV overvoltage protection has tripped 0 1
OCP rms overcurrent protection has tripped 1 2
SOA safe operating area has tripped 2 4
OT overtemperature protection has tripped 4 16
RI an external remote inhibit signal has occurred 9 512
Rail rail protection has tripped 11 2048
Action Display
1. You must first identify the cause of the protection shutdown, and then eliminate its
cause before you can continue operating the unit.
2. To identify the problem, press Shift Status. *CLS
3. Press ‚ to obtain the Questionable Event command. QUES:EVEN?
4. Press Enter to find out which bits have been set in the Event Register.
Note: The value returned is the sum of all of the binary weights of the bits that have
been set. For example, a value of 20 indicates that bit 2 (bit weight=4) and bit 4 (bit
weight=16) have been set. Refer to the previous table for the bits and bit weights that
are assigned to the protection conditions. Refer to the following table for information
on eliminating the couse of the protection condition. Refer to chapter 4 in the ac
source Programming Guide for a complete discussion of the status system.
QUES:EVEN 20
49
Page 50

4 - Front Panel Operation
Condition Action
OV Condition
OCP Condition
SOA Condition
OT Condition
Usually overvoltage conditions are caused by an external source forcing voltage into the output
of the ac source. Remove this external source to eliminate the overvoltage. You can also
program the overvoltage level to a higher value, or turn the overvoltage protection off.
In other cases the output voltage may have exceeded the user-programmed overvoltage level.
In this case the unit may have inadvertently been programmed to a voltage that exceeded the
programmed overvoltage level. The VOLTage:PROTection command sets the overvoltage
protection level.
Note: The overvoltage protection level is programmed in peak, not rms volts.
If the CURRent:PROTection:STATe command has been programmed to to disable the output
when rms current limit is activated, the unit will shut down. The rms current limit threshold is
set by the CURRent command. In this case you must check to see why the load is drawing
more current than the limit that has been programmed by the CURRent command.
Protection circuits in the ac source let the load draw peak currents for short periods of time that
exceed the continuous capability of the unit. This allows loads that require large inrush
currents to turn on. The ac source will shut down if a combination of peak current duration and
internal component temperature exceeds a predetermined limit.
When this occurs, it means that the load has been drawing peak output currents that are
beyond the capability of the ac source to supply for extended periods. Slower output slew rates
and reduced peak current limit settings can be used to control the conditions that cause SOA
shutdowns.
When the internal operating temperatures of the ac source exceed predetermined thresholds,
the output turns off. If this happens, you must let the unit cool down before continuing
operation.
RI Condition
Rail Condition
If the Remote Inhibit input has been programmed to to disable the output when it receives an
external signal, the unit will shut down. The Remote Inhibit input is set by the
OUTPut:RI:MODE command. In this case you must check to what external event produced a
signal on the RI input.
The internal high voltage rail that provides power for the ac source's output is continuously
monitored for proper voltage level. If this voltage is not maintained within predetermined
levels, the output will shut down. This can happen if an extenal source forces too much power
into the ac source or if too much power is drawn from the ac source.
Remove the external source to eliminate the rail condition. Slower output slew rates and
reduced peak current limit settings can also be used to control the conditions that cause rail
shutdowns.
6 - Using Transient Voltage Modes
The ac source voltage can be programmed in the following transient operating modes:
STEP causes the output to permanently change to its triggered value.
PULSE causes the output to change to its triggered value for a specific time, as determined by the
Pulse menu parameters.
LIST causes the output to sequence through a number of values, as determined by points entered
in the List menu.
FIXED disables transient operation for the selected function.
50
Page 51

Front Panel Operation - 4
Step Transient
The Voltage Menu lets you specify an alternate or triggered voltage level that the ac source will apply to
the output when it receives a trigger. Because the default transient voltage level is zero volts, you must first
enter a triggered voltage before you can trigger the ac source to change the output amplitude. Refer to
chapter 4 of the Programming Guide for more information about programming triggers.
In the following example, the voltage output is set to 120 Vrms and then stepped down to 102 Vrms.
Action Display
1.
On the Function keypad, press Output On/Off to enable the output. The Dis
annunciator will go off.
2. Press Voltage to access the Voltage Menu. On the Entry keypad, press 1 2 0
Enter.
3. Access the Voltage Menu again and press ‚ to access the triggered voltage
command.
4. On the Entry kepad, press 1 0 2 Enter. VOLT:T 102
5. Access the Voltage Menu again and press ‚ to access the voltage mode command. It
should be in the default FIXED mode. An ac source function in the FIXED mode
does not respond to triggers. On the Entry keypad, press Ç or È to scroll through
the mode parameters. When you have STEP, press Enter.
6. Press Trigger Control and Enter. This initiates (or enables) one immediate
trigger action.
7. Press Shift Trigger. This sends the ac source an immediate trigger signal to change
the output voltage. The triggered voltage value now becomes the VOLT value.
0 V 60 Hz
VOLT 120
VOLT:T 0
VOLT:M STEP
INIT:IMMED
102 V 60 HZ
Pulse Transient
In the following example, the output is four 83.3-millisecond, 120 Vrms pulses at 60 Hz. The figure shows
the trigger, pulse count, pulse period, and duty cycle.
NOTE: From the Output Menu, execute the *RST command to reset the ac source. This is
necessary because any previously programmed functions remain in effect until cleared.
Trigger
count = 4
120Vrms
102Vrms
83.3ms
250ms
Figure 4-5. Pulse Transients
51
Page 52
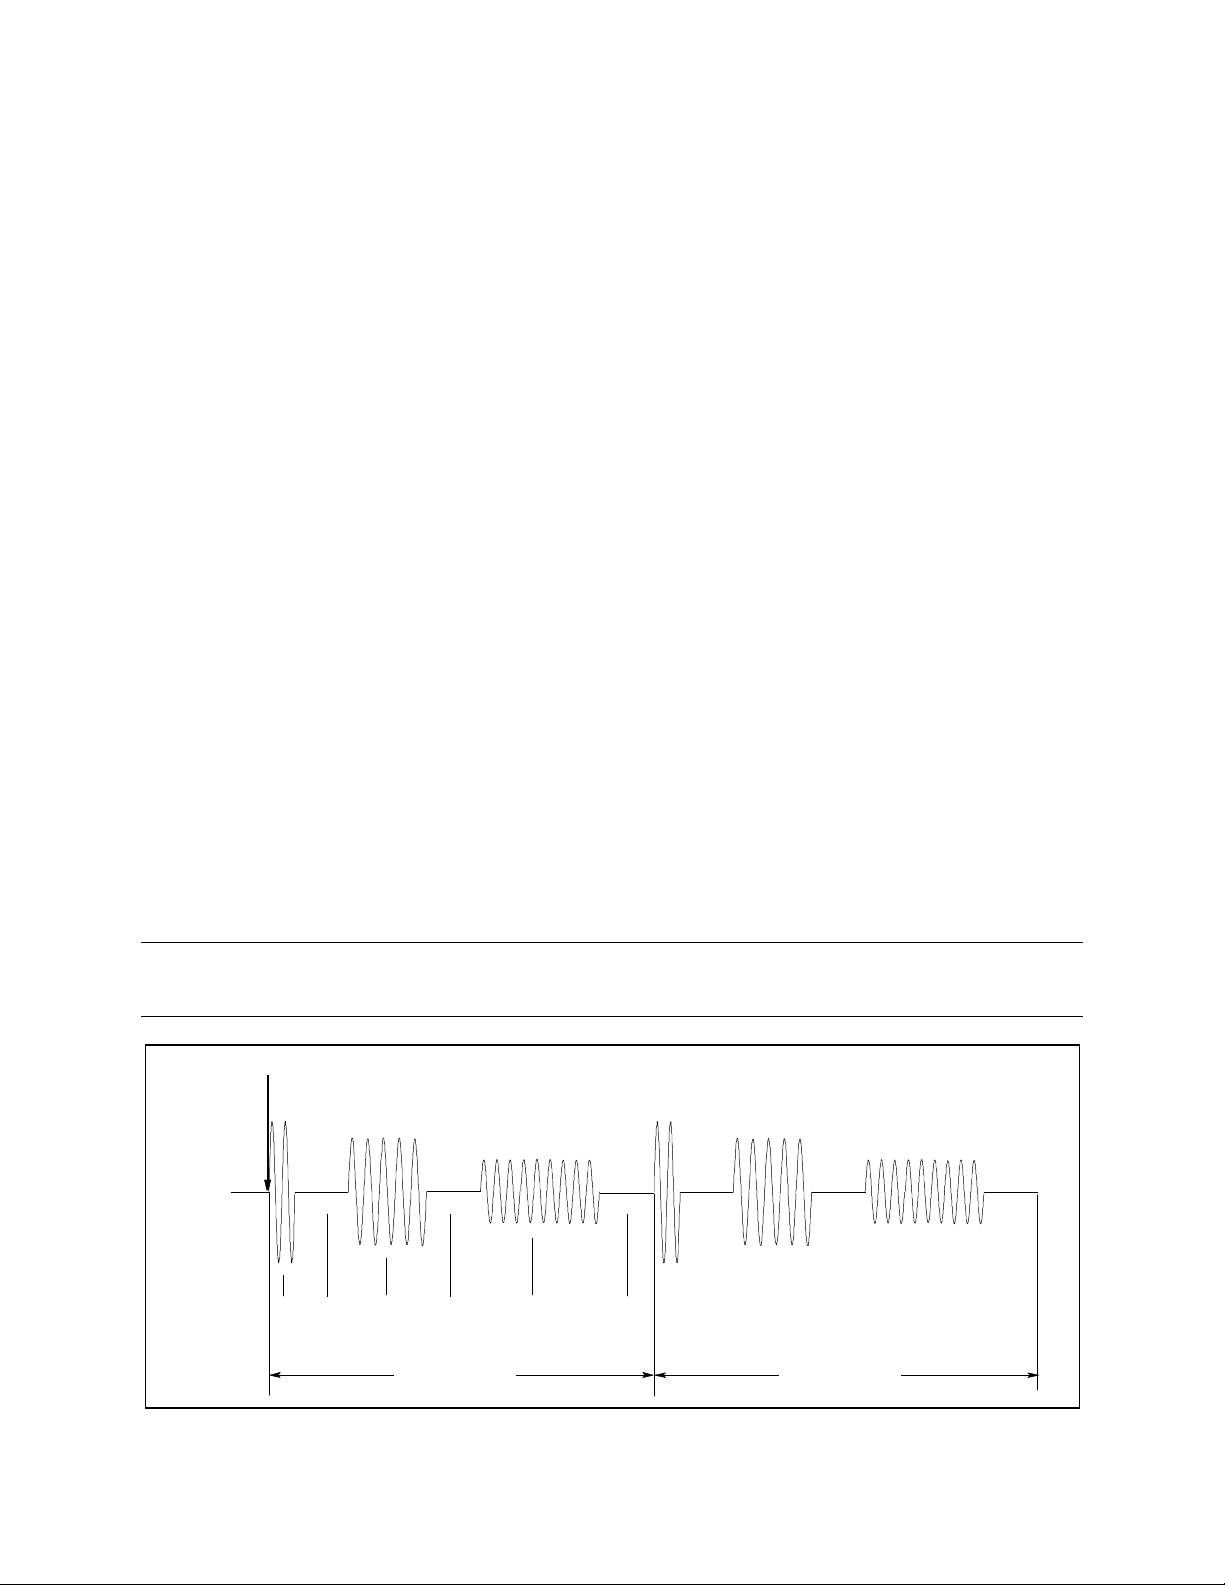
4 - Front Panel Operation
Action Display
1. Press Voltage to access the Voltage Menu. On the Entry keypad, press 1 0 2 Enter. VOLT 102
2. Press ‚ to access the triggered voltage command. On the Entry keypad, press 1 2 0
VOLT 120
Enter.
3. Access the Voltage Menu again and press ‚ to access the voltage mode command.
VOLT:M PULSE
On the Entry keypad, press Ç or È to scroll through the mode parameters to obtain
PULSE and press Enter.
4. Press Pulse to access the Pulse Menu. From the Entry keypad, press
WIDTH .0833
. 0 8 3 3 Enter to enter a pulse width of 83.3 milliseconds.
5. Access the Pulse Menu and press ‚ to access the duty cycle command. From the
DCYCLE 33
Entry keypad, press 3 3 Enter to change the duty cycle to 33%.
6. Access the Pulse Menu and press ‚ to access the pulse count. On the Entry keypad,
COUNT 4
press 4 and Enter.
7. Press Trigger Control and Enter to initiate the transient trigger sequence. INIT:IMMED
8. Press Shift Trigger. This sends the ac source an immediate trigger signal to
102 V 60 HZ
generate the four output pulses.
Note: The ac source output returns to 102 V at the completion of the output pulses.
List Transient
Lists are the most flexible means of generating multiple or synchronized transient outputs. The following
figure shows a voltage output generated from a list. The output shown represents three different ac voltage
pulses (160 volts for 33 milliseconds, 120 volts for 83 milliseconds, and 80 volts for 150 milliseconds)
separated by 67-millisecond, 0-volt intervals.
The list specifies the pulses as three voltage points (point 0, 2, and 4), each with its corresponding dwell
point. The intervals are three zero-voltage points (point 1, 3, and 5) of equal intervals. The count
parameter causes the list to execute twice when started by a single trigger.
NOTE: From the Output Menu, execute the *RST command to reset the ac source. This is
necessary because any previously programmed functions remain in effect until cleared.
Trigger
160 Vrms
0 1
2
3 4 5
List Count = 1 List Count = 2
Figure 4-6. List Transients
52
Page 53

Front Panel Operation - 4
Action Display
1. Press Voltage to access the Voltage Menu. Then press ‚ to access the voltage mode
command.
VOLT:M
FIXED
2. On the Entry keypad, press Ç or È to scroll through the mode parameters to obtain
LIST and press Enter.
3. Access the List Menu by pressing Shift List. The first menu command is the count.
From the Entry keypad, change the list count from the default (1) to 2. Press Enter.
4. Access the List menu again and press ‚ until you access the dwell time. This specifies
the "on" time for each voltage point, which is effectively the output pulse width. The
first dwell point (0) appears in the display. On the Entry keypad, press . 0 3 3 and
Enter.
5. Pressing the Enter key automatically advances to the step in the list. Enter the following
values for dwell list points 1 through 5: .067, .083, .067, .150, .067. Press Enter to
enter each value. When you finish, you will be at point 6, which is the end of the list.
Note: Press Shift •Index or Shift ‚Index to access and edit any list point.
6. Press ‚ until you access the voltage list. This specifies the amplitude of each output
point during its corresponding dwell period. The first voltage list point (0) appears in
the display. On the Entry keypad, press 1 6 0 and Enter.
7. Pressing the Enter key automatically advances to the step in the list. Enter the following
values for voltage list points 1 through 5: 0, 120, 0, 80, 0. Press Enter to enter each
value. When you finish, you will be at point 6, which is the end of the list.
Note: Press Shift •Index or Shift ‚Index to access and edit any list point.
VOLT:M LIST
COUNT 2
DWEL 0 .033
DWEL 1 .067
DWEL 2 .083
DWEL 3 .067
DWEL 4 .150
DWEL 5 .067
DWEL 6 EOL
VOLT 0 160
VOLT 1 0
VOLT 2 120
VOLT 3 0
VOLT 4 80
VOLT 5 0
VOLT 6 EOL
8. Press ‚ until you access the step command. Check that it is at the default mode
(AUTO). This lets a single trigger run your list for the specified count.
9.
Press Output On/Off to enable the output. The Dis annunciator will go off.
10. Press Trigger Control and Enter to initiate the transient trigger sequence. INIT:IMMED
11. Press Shift Trigger. This sends the ac source an immediate trigger to generate the four
output pulses. The output returns to the immediate value at the end of the list.
Note: To clear a list, press Clear Entry. This truncates or clears the list at the
presently displayed list point. Each list must be accessed and cleared separately.
STEP AUTO
0 V 60 Hz
0 V 60 Hz
7 - Trigger Delays and Phase Synchronization
The ac source trigger system also lets you program trigger delays as well as synchronize output changes to
a specific phase angle of the output waveform.
In example ϕ, the output transient is triggered immediately at the receipt of the trigger signal. In example
‚, a delay time of approximately 16.7 milliseconds elapses between the occurence of the trigger and the
start of the output transient. In example ƒ, the trigger source is programmed for phase synchronization,
which means that the transient occurs at the first occurrence of the specified phase angle after the trigger
signal is received.
Note that phase synchronization is referenced to an internal phase signal. The output of the unit is normally
offset by 0° with respect to this internal reference. Because synchronized transient events always occur
53
Page 54

4 - Front Panel Operation
with respect to the internal reference, the output will normally be in phase with the value programmed for
phase synchronization. (The Phase command can be used to change the offset of the output with respect to
the internal phase reference.)
Trigger
VOLT T level
1
VOLT level
VOLT T level
2
3
VOLT level
VOLT T level
VOLT level
0.000
0.0167
0
90
Figure 4-7. Trigger Delays and Phase Synchronization
Example Display
This example uses the default trigger parameters. First, access the Voltage
ϕ
menu and program the immediate and triggered voltage levels, followed by
the voltage transient mode.
Then press Trigger Control and Enter, followed by Shift Trigger.
In this example, you will set a trigger delay. First, access the Voltage menu
‚
and program the immediate and triggered voltage levels, followed by the
voltage transient mode.
VOLT 120
VOLT:T 150
VOLT:M STEP
INIT:IMMED
VOLT 120
VOLT:T 150
VOLT:M STEP
Press Trigger Control. Then press ‚ until you access the delay parameter.
On the Entry keypad, press . 0 1 6 7 Enter.
Then press Trigger Control and Enter, followed by Shift Trigger.
This example uses the phase sync mode with no delay, but synchronized at
ƒ
90. First, access the Voltage menu and program the immediate and
triggered voltage levels, followed by the voltage transient mode.
Press Trigger Control. Press ‚ until you access the delay parameter. If
necessary, set it to 0. Press ‚ until you access the sync source command. On
the Entry keypad, press È to obtain PHASE. Press Enter.
Access the Trigger Control menu again and press ‚ to access the sync phase
reference parameter. On the Entry keypad, program a 90° phase reference by
entering 9 0 Enter.
Then press Trigger Control and Enter, followed by Shift Trigger.
54
DELAY 0
DELAY .0167
INIT:IMMED
VOLT 120
VOLT:T 150
VOLT:M STEP
DELAY 0
SYNC:SOUR PHASE
SYNC:PHAS 90
INIT:IMMED
Page 55
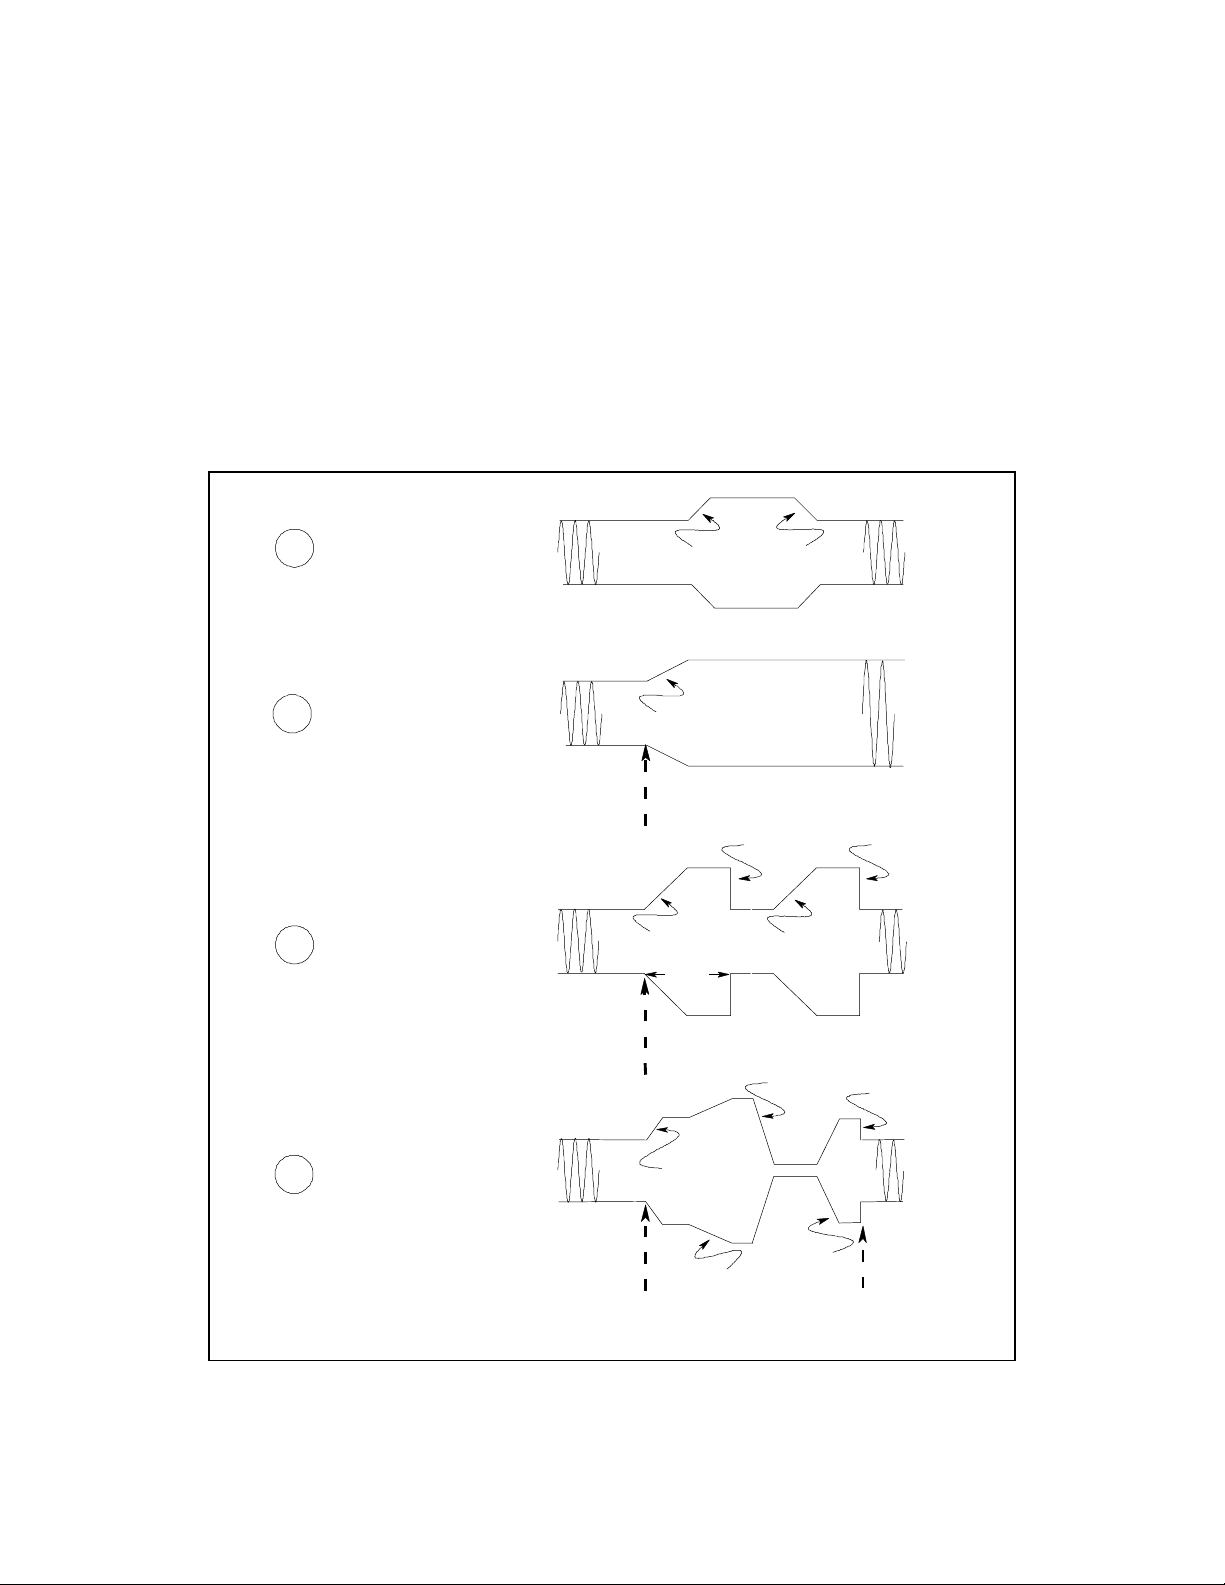
Front Panel Operation - 4
New VOLT level
TRIGGER
VOLT:T level
SLEW [0]
SLEW [1]
APPLIED
LIST
COMPLETE
width
SLEW rate
SLEW:T rate
VOLT:T level
SLEW:T rate
SLEW rate
SLEW rate
SLEW:T
rate
SLEW rate
SLEW [3]
SLEW [2]
VOLT level
8 - Using Slew Rates to Generate Waveforms
As shown in the previous examples there are a number of ways that you can generate custom waveforms.
Programmable slew rates provide additional flexibility when customizing waveforms. The following figure
illustrates how programmable slew rates are applied in the transient operating modes.
In example •, an immediate slew rate of 50 volts/second is used whenever a new output voltage is
programmed. In example ‚, a triggered slew rate of 50 volts/second steps the voltage level to its new
value. 50 volts/second becomes the new immediate slew rate in step mode. In example ƒ, a triggered slew
rate of 50 volts/second is used at the start of the pulse. The immediate slew rate of infinity applies at the
trailing edge of the pulse. In example „, the slew rates are set by the values in the voltage slew list.
1 SLEW:MODE FIXED
2 SLEW:MODE STEP
3 SLEW:MODE PULSE
4 SLEW:MODE LIST
Figure 4-8. Programming Slew Rates
55
Page 56

4 - Front Panel Operation
Example Display
This example uses the immediate slew rate. First, access the Voltage menu
ϕ
and press ‚ until you access the mode command. On the Entry keypad,
press È to obtain FIXED. Press Enter.
Access the voltage menu and press ‚ until you access the slew command.
On the Entry keypad, press 5 0 Enter to program a slew rate of 50
volts/second.
Whenever a new immediate voltage value is entered, the output will slew to
the new level at 50 volts/second.
Step mode uses the triggered slew rate. First, access the Voltage menu,
‚
program the immediate and triggered voltage levels, and set the slew mode
to STEP.
Access the Voltage menu and press ‚ to access the immediate slew
command. On the Entry keypad, enter a value that equals infinity.
Access the Voltage menu and press ‚ until you access the triggered slew
command. On the Entry keypad, enter a value such as 5 0 Enter, which sets
the triggered slew rate to 50 volts/second.
Then press Trigger Control and Enter, followed by Shift Trigger.
After the trigger has been sent, in step mode, the triggered value becomes the
new immediate value.
Pulse mode uses the triggered slew rate at the leading edge of the pulse, and
ƒ
the immediate slew rate at the trailing edge of the pulse. First, access the
Voltage menu, program the immediate and triggered voltage levels, and set
the slew mode to PULSE.
VOLT:M FIXED
SLEW 50
VOLT 120
VOLT:T 150
SLEW:M STEP
SLEW: 9.9+E37
SLEW:T 50
INIT:IMMED
VOLT 120
VOLT:T 150
SLEW:M PULSE
Access the Pulse menu and program the pulse count, duty cycle, and pulse
period.
Access the Voltage menu and press ‚ to access the immediate slew
command. On the Entry keypad, enter a value that equals infinity.
Access the Voltage menu and press ‚ until you access the triggered slew
command. On the Entry keypad, enter a value such as 5 0 Enter, which sets
the triggered slew rate to 50 volts/second.
Then press Trigger Control and Enter, followed by Shift Trigger.
When the voltage slew mode is set to LIST, the slew rates are set by the
„
values in the voltage slew list. Refer to the List Transient example for more
information on how to program lists. You must program the voltage values
and dwell times as explaied in that example. You must also program a slew
rate for each point in the list (even if it is 9.9+E37).
COUNT 2
DCYCLE 33
PER .0166
SLEW: 9.9+E37
SLEW:T 50
INIT:IMMED
NOTE: When specifying a dwell time, you must take the slew time into consideration. If the dwell
time at any given list point is less than the slew time at the same point, the voltage will
never reach its programmed level before the next list point becomes active.
56
Page 57

Front Panel Operation - 4
9 - Measuring Peak Inrush Current
Peak inrush current is a non-repetitive measurement in the sense that peak inrush current occurs only when
the unit under test is first turned on. In order to repeat the measurement, you must turn the unit off and wait
for any input filter capacitors to discharge completely.
This example shows you how you can measure the peak inrush current using the front panel meter. The
voltage is set to 120 V rms and the output is triggered at an output phase of 75°, which optimizes the
conditions under which inrush current is applied to the unit under test.
Action Display
1. Set the immediate voltage to 0. Press Voltage, then press 0 and Enter. VOLT 0
2. Set the triggered voltage to 120 V rms. In the Voltage menu, press ‚ to
access the triggered voltage command. Then press 1 2 0 Enter.
3. Set the voltage mode to step. In the Voltage menu, press ‚ to access the
mode command. Press È to scroll to STEP and press Enter.
4. Make sure the triggered voltage slew rate is set to the fastest possible speed.
In the Voltage menu, access the triggered slew command. If necessary, reset
the slew rate to a faster speed.
5. Make sure the peak current and rms current limits are set to high values. In
the Current menu, access the rms current limit and then the peak current
limit commands. If necessary, reset the rms current and the peak current
limits to higher values.
(HP 6811B units have an rms current limit of 3.25 A. HP 6813B units have
an rms current limit of 13 A and a peak current limit of 80 A)
6. Synchronize the trigger source with a reference phase angle. In the Trigger
Control menu, press ‚ to access the sync source command. Press È to
obtain PHASE and press Enter.
7.
Set the reference phase angle to 75°. In the Trigger Control menu, press ‚
to access the sync phase command. Then press 7 5 Enter.
8. Initiate (or enable) the unit for one immediate trigger from the front panel.
Press Trigger Control and Enter.
9. Set the meter function to measure nonrepetitive peak inrush current. In the
Meter menu, press ‚ to access the peak inrush current display.
VOLT:T 120
VOLT:M STEP
SLEW:T 9.9000+E37
CURR:LEV 6.5
CURR:PEAK 40
SYNC:SOUR PHASE
SYNC:PHAS 75
INIT:IMMED
0 A PK NR
10. Enable the output by pressing Output On/Off. 0 V 60 HZ
11. Send the trigger to step the output from 0 V to 120 V. Press Shift Trigger.
The inrush current is displayed on the Meter.
48 A PK NR
NOTE: With fast and/or large voltage transitions, the CC annunciator may turn on due to current
in the output capacitor. This is normal and will limit the rate of change of output voltage.
To prevent the CC operating mode from limiting the rate of change of output voltage,
program the peak current limit to a higher value.
57
Page 58

4 - Front Panel Operation
10 - Setting the HP-IB Address and RS-232 Parameters
Your ac source is shipped with the HP-IB address set to 5 This address can only be changed from the front
panel using the Address menu located under the Address key. This menu is also used to select the RS-232
interface and specify RS-232 parameters such baud rate and parity.
Action Display
To set the HP-IB address, proceed as follows:
1. On the System keypad, press Address. ADDRESS 5
2. Enter the new address. For example, Press 7, Enter. ADDRESS 7
To configure the RS-232 interface, proceed as follows:
1. On the System keypad, press Address. ADDRESS 5
2. Scroll through the Address menu by pressing ‚ . The interface command
lets you select the RS-232 interface. The baudrate command lets you
select the baudrate. The parity command lets you select the parity.
3. The Ç and È keys let you select the command parameters.
INTF RS232
BAUDRATE 600
PARITY EVEN
11 - Saving and Recalling Operating States
You can save up to 16 states (from location 0 to location 15) in non-volatile memory and recall them from
the front panel. All programmable settings are saved.
Action Display
To save an operating state in location 1, proceed as follows:
1. Set the instrument to the operating state that you want to save.
2. Save this state to location 1. Press Shift Save 1 Enter. *SAV 1
To recall a saved state in location 1, proceed as follows:
1. Recall the state saved in location 1 by pressing Recall 1 Enter *RCL 1
To select the power-on state of the ac source, proceed as follows:
1. On the Function keypad, press Shift Output, and scroll through the Output
menu until you get to the PON state command.
2. Use the Ç and È keys to select either RST or RCL0. RST sets the power-on
state of the unit as defined by the *RST command. RCL0 sets the power-on
state of the unit to the state saved in *RCL location 0.
PON:STATE RST
To clear the non-volatile memory of the ac source, proceed as follows:
1. On the Function keypad, press Shift Output and scroll to the *RST com-
mand. Then press Enter. This returns the unit to the factory-default settings.
2. Save these settings to location 1. Press Shift Save 1 Enter. *SAV 1
3. Repeat step #2 for memory locations 2 through 16.. *SAV 2
*RST
*SAV 3
*SAV 4
.
.
...*SAV 16
58
Page 59

A
2
Specifications
Specifications
Table A-1 lists the specifications of the ac source. Performance specifications are warranted over the
ambient temperature range of 0 to 40 oC. Unless otherwise noted, specifications are for a sinewave with a
resistive load at an output frequency range of 45 Hz to 1 kHz, in ac-coupled mode after a 30-minute
warmup. Refer to table A-3 for ac source operation with output frequencies from dc to 45 Hz.
Table A-1. Performance Specifications
Parameter HP 6811B HP 6812B HP 6813B
Phases:
Maximum Output Ratings Power (VA):
dc Power (Watts):
rms Voltage:
dc Voltage:
rms Current (in real-time mode):
dc Current:
Repetitive peak Current2:
Non-repetitive peak Current
(inrush):
Crest Factor2 (current):
Output Frequency
Range3:
Constant Voltage Ripple rms relative to full scale:
and Noise
(20 kHz−10 MHz):
Regulation: Load (rms detection mode):
Maximum Total Harmonic
Distortion:
Load Power Factor
Capability:
Maximum Fixed dc Offset
Voltage (ac coupled):
Programming Accuracy
(rms detection mode @
25oC ±5oC), ±(% of
output+offset)
Measurement Accuracy
(@25oC ±5oC), ± (% of
output + offset)
rms Voltage (45−100 Hz):
(>100−500 Hz):
(>500 Hz−1 kHz):
rms Voltage (45−100 Hz):
(>100−500 Hz):
(>500 Hz−1 kHz):
rms:
Line:
Frequency:
dc Voltage:
Frequency:
dc Voltage:
1
1 1 1
375 VA 750 VA 1750 VA
285 W 575 W 1350 W
300 V 300 V 300 V
± 425 V ± 425 V ± 425 V
3.25 A 6.5 A 13 A
2.5 A 5 A 10 A
40 A 40 A 80 A
40 A 40 A 80 A
12 6 6
dc; 45 Hz−1 kHz
−60 dB
300 mV
0.5% of full scale
0.1% of full scale
0.25% at 50 Hz/60 Hz
1% worst-case 45 Hz−1 kHz
0−1
100 mV
0.15% + 0.3 V
0.5% + 0.3 V
1% + 0.3 V)
0.01% + 10 µHz
0.1% + 0.5 V 0.1% + 0.5 V 0.5% + 0.3 V
0.03% + 100 mV
0.1% + 100 mV
0.2% + 100 mV
0.01% + 0.01 Hz
0.03% + 150 mV
59
Page 60

A - Specifications
Table A-1. Performance Specifications (continued)
Parameter HP 6811B/6812B/6813B
Measurement Accuracy
(continued)
Harmonic Measurement
Accuracy
(50/60 Hz, @25oC ±5oC),
± (% of output + offset)
Current Magnitude (High Range)
1
Specifications subject to change without notice.
2
These specifications are subject to the restrictions of Table 1-3.
3
Product may be operated between dc and 45 Hz subject to operating conditions described in Table A-3.
rms Current High Range
(45−100 Hz):
(>100−500 Hz):
(>500 Hz−1 kHz):
rms Current Low Range
(45−100 Hz):
(>100−500 Hz):
(>500 Hz−1 kHz):
repetitive pk current High
Range
(45 Hz−1 kHz):
repetitive pk current Low Range
(45 Hz−1 kHz):
Power (VA) Low Range
(45−100 Hz):
(>100−500 Hz):
(>500 Hz-1 kHz):
Power (VA) High Range
(45−100 Hz):
(>100−500 Hz):
(>500 Hz−1 kHz):
Power (Watts) Low Range
(45−100 Hz):
(>100−500 Hz):
(>500 Hz−1 kHz):
Power (Watts) High Range
(45−100 Hz):
(>100−500 Hz):
(>500 Hz−1 kHz):
Power Factor:
Voltage Magnitude:
Current Magnitude (Low Range)
Fundamental:
Harmonics 2−49:
Fundamental:
Harmonics 2−49:
0.05% + 10 mA
0.05% + 15 mA
0.05% + 30 mA
0.05% + 1.5 mA
0.05% + 8 mA
0.05% + 25 mA
0.05% + 150 mA
0.03% + 150 mA
0.1% + 1.5 VA + 1.2 mVA/V
0.1% + 2 VA + 1.2 mVA/V
0.1% + 6 VA + 1.2 mVA/V
0.1% + 1.5 VA + 12 mVA/V
0.1% + 2 VA + 12 mVA/V
0.1% + 6 VA + 12 mVA/V
0.1% + 0.3 W + 1.2 mW/V
0.1% + 1.2 W + 1.2 mW/V
0.1% + 2.5 W + 1.2 mW/V
0.1% + 0.3 W + 12 mW/V
0.1% + 1.2 W + 12 mW/V
0.1% + 2.5 W + 12 mW/V
0.01
0.03% + 100 mV + 0.2%/kHz
0.03% + 1.5 mA
0.03% + 1 mA + 0.2%/kHz
0.05% + 5 mA
0.03% + 3 mA + 0.2%/kHz
60
Page 61

Specifications - A
Supplemental Characteristics
Table A-2 lists the supplemental characteristics, which are not warranted but are descriptions of typical
performance determined either by design or type testing.
Table A-2. Supplemental Characteristics
Parameter HP 6811B HP 6812B HP 6813B
ac Input Voltage Range (Vac):
Maximum Input Current (rms):
7.5 A (200/208 Vac),
Maximum Input Power:
ac Input Frequency:
Isolation to Ground:
Output Voltage Risetime:
(output change from 10 to 90% or 90 to 10% of its total
excursion with full resistive load)
Remote Inhibit Response Time:
Remote Sense Capability:
Programmable Output Impedance Ranges
Resistance:
Inductance:
Average Programming Accuracy
rms Current:
OVP:
ac Voltage Slew Rate (rms):
Frequency Slew Rate:
Average Programming Resolution
rms Voltage:
dc Voltage:
ac Voltage Slew Rate (rms):
dc Voltage Slew Rate:
Frequency Slew Rate:
Overvoltage Programming (OVP):
rms Current:
peak Current:
Output Frequency:
Output Impedance
Resistive Component:
Inductive Component:
Average Measurement Resolution
rms Voltage:
rms Current:
THD (for a fundamental amplitude ≥ 5% of full scale):
Measurement System
Measurement Buffer Length:
Measurement/Generation Synchronization:
Measurement Acquisition Sampling Rate
Range:
Voltage/Current Digitization Accuracy:
Voltage/Current Digitization Resolution:
Harmonic Measurement Time (amplitude):
Meas:Curr:Harm? <n>
Meas:Array:Curr:Harm?
87−106 Vac (100 Vac nom.)
104−127 Vac (120 Vac nom.)
174−220 Vac (200/208 Vac nom.)
191−254 Vac (230 Vac nom.)
12 A (100 Vac),
10 A (120 Vac),
6.5 A (230 Vac)
1000 VA/700 W 2500 VA/1400 W 3800 VA/2600 W
Up to 1 Vrms can be dropped across each load lead.
2 mA 4 mA 4 mA
12.5 mA 25 mA 25 mA
28 A (100 Vac),
24 A (120 Vac),
15 A (200/208 Vac),
13A (230 Vac)
47−63 Hz
300 Vrms/425 Vdc
50 µs
15 ms
0−1 Ω
20 µH−1 mH
1.2% of output + 50 mA
2% of output + 5 Vpeak
0.1 V/s
± 0.01%
125 mV
250 mV
6 mV/s
20 mV/s
0.05 Hz/s
2 Vpeak
10 µHz
0.01 Ω
10 µH
10 mV
2 mA
5% of reading + 0.1%
4096 points
≤ 50 µs
25−250 µs
12 bits
16 bts
400 ms
10 s
174−220 Vac
(200/208 Vac nom.)
191−254 Vac
(230 Vac nom.)
20 A (230 Vac)
22 A (200/208 Vac)
61
Page 62

A - Specifications
Table A-2. Supplemental Characteristics (continued)
Parameter HP 6811B HP 6812B HP 6813B
Transient System
Phase Synchronization:
Pulse Width Range:
Pulse/Dwell Timing Accuracy:
Pulse Duty Cycle Range:
Pulse Count Range:
LIST Length:
Minimum LIST Dwell Time:
LIST Count Range:
External Trigger Response Time:
Maximum External Trigger Rate:
Waveform Table Voltage Resolution:
RS-232 Interface Capabilities
Baud Rates:
Data Format:
Language:
Trig In/Trig Out Characteristics
Trig Out (HC TTL output):
Trig In (10k pullup):
INH/FLT Characteristics
Maximum Ratings:
INH Terminals:
FLT Terminals:
Saveable Data (nonvolatile)
Instrument States:
User-defined waveforms
List data:
HP-IB Interface Capabilities
Language:
Interface:
Programming Time:
Recommended Calibration Interval:
Regulatory Compliance
Listed to:
Certified to:
Conforms to:
RFI Suppression Complies with:
Dimensions
Height (add 12.7 mm or 0.5 in. for feet)
Width:
Depth:
Net Weight:
Shipping Weight:
± 100 µs
200 µs to 4.3 x 10⁵ seconds
± 0.01%
0 to 100 %
1 to Infinity Pulses
1 to 100 steps
200 µs
1 to Infinity LIST repeats
200 µs
1 kHz
1024 points
300, 600, 1200, 2400, 4800, 9600
7 bits even or odd parity; 8 bits without parity
SCPI (Standard Commands for Programmable Instruments),
Elgar 9012 PIP
Vol = 0.8 max. @ 1.25 mA
Voh = 3.3 V max. @ 1.25 mA
Vil = 0.8 V max.
Vih = 2 V max.
16.5 Vdc between INH terminals; FLT terminals; and from INH
terminals to chassis ground
I
= 1.25 mA max.
ol
Vol = 0.5 Vmax.
Vil = 0.8 V max.
Vih = 2 V min.
tw = 100 µs min.
td = 4 ms typical
16 (0 to 15)
12 (with 1024 data points in each)
1 to 100 steps (for each list function)
SCPI, Elgar 9012 PIP
AH1, C0, DC1, DT1, E2, LE1, PP0, RL1, SH1, SR1, TE6
10 ms
1 year
UL 3111-1
CSA 22.2 No. 1010-1
IEC 1010
CISPR-11, Group 1, Class A
132.6 mm (5.25 in.)
425.5 mm (16.75 in.)
574.7 mm (22.6 in.)
28.2 kg (62 lb) 32.7 kg (72 lb)
31.8 kg (70 lb) 36.4 kg (80 lb)
62
Page 63

Specifications - A
10
10 Hz
246810
10 Hz
1
110100
Frequency
1.75
45 Hz05 Hz
0
020304010
5
2% error at 10 Hz
10
.
1
100
Frequency
110
0.1%error @ 40Hz
1%error @ 10Hz
Operation Below 45 Hz
The following operating characteristics apply for output frequencies between 45Hz and 1Hz. Below 1 Hz,
instantaneous values meet the dc specifications. The ac source output is set to: sinewave, dc coupled, realtime regulation, and is connected to a linear load.
Table A-3. Operation Below 45 Hz
Real Power (watts)
1750
750
375
675
287
142
5 Hz
Reactive power (VA)
1750
750
375
0
2
1
4
Frequency (linear scale)
RMS current derating (A)
13
6.5
3.75
7
3.5
AC coupled frequency response (dB)
0
30% error @ 2Hz (-3dB point)
-10
-20
slope of 1 (20dB/decade)
6 8
0
Frequency (linear scale)
RMS current programming accuracy (% error)
Frequency
Meets Measurement Accuracy specifications under the following
conditions:
Minimum Maximum allowable
measured frequency component
Sample rate frequency to avoid aliasing
25 µs 45 Hz 20 kHz
50 µs 22.5 Hz 10 kHz
100 µs 11.25 Hz 50 kHz
200 µs 5.625 Hz 2.5 kHz
250 µs 4.5 Hz 2 kHz
(Anti aliasing filters have a corner frequency of 12.5 kHz.)
63
Page 64

Page 65

B
Verification and Calibration
Introduction
This appendix includes verification and calibration procedures for the HP 6811B/6812B/6813B AC Power
Solutions. Instructions are given for performing the procedures either from the front panel or from a
controller over the HP-IB.
The verification procedures do not check all the operating parameters, but verify that the ac source is
performing properly. Performance Tests, which check all the specifications of the ac source, are given in
the applicable ac source Service Manual.
Because the output of the ac source must be enabled during verification or calibration, proceed with
caution, since voltages and currents will be active at the output terminals.
Important Perform the verification procedures before calibrating your ac source. If the ac source
passes the verification procedures, the unit is operating within its calibration limits and
does not need to be recalibrated.
WARNING LETHAL VOLTAGES. Ac sources can supply 424 V peak at their output. DEATH
on contact may result if the output terminals or circuits connected to the output are
touched when power is applied. These procedures must be performed by a qualified
electronics technician or engineer trained on this equipment.
Equipment Required
The equipment listed in the following table, or the equivalent to this equipment, is required for verification
and calibration.
65
Page 66
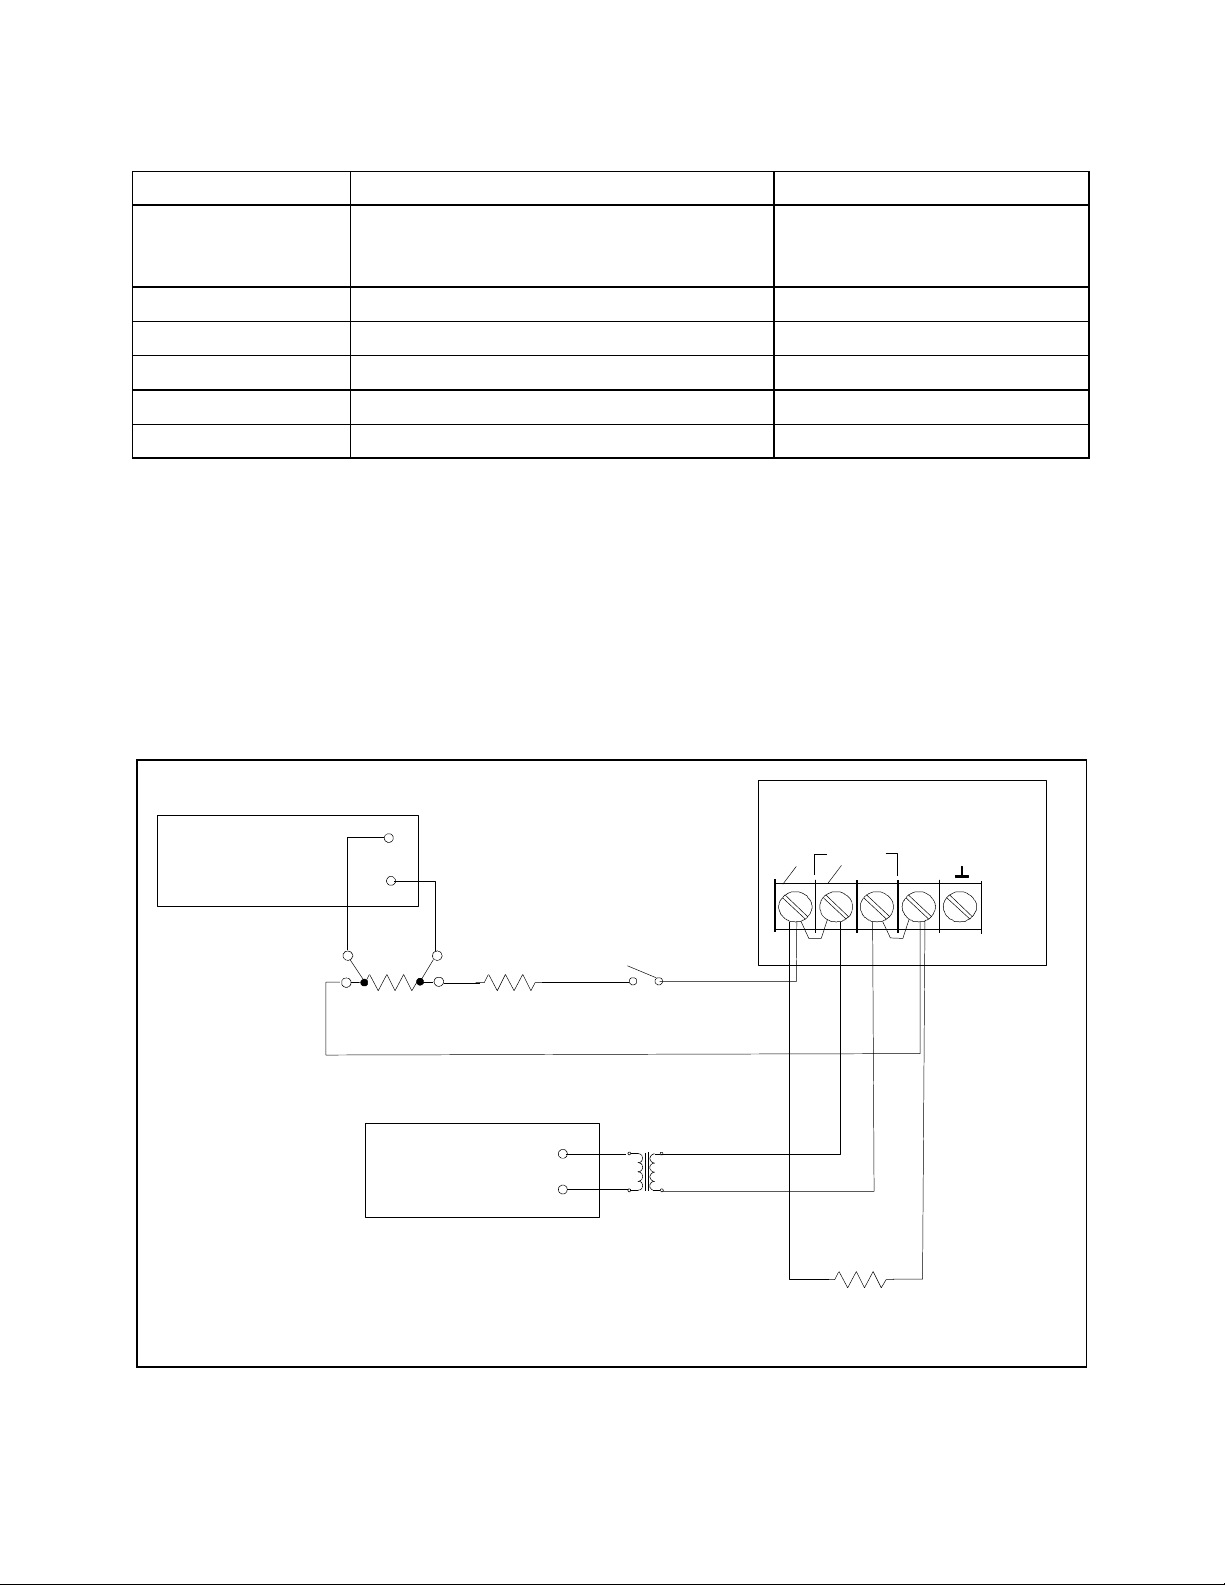
B - Verification and Calibration
Table B-1. Equipment Required
Equipment Characteristics Recommended Model
Digital Voltmeter
Current Monitor
1
Ratio Transformer
Resolution: 10 nV @ 1 V
Readout: 8.5 digits
Accuracy: >20 ppm
0.01 Ω, ±200 ppm, 10 Watts
2
30:1 ratio, 50 ppm, 45 Hz to 1 kHz
HP 3458A
Guildline 7320/0.01
Load Resistor
Impedance Resistor
HP-IB Controller
1
The 4- terminal current shunt is used to eliminate output current measurement error caused by voltage drops in
20 Ω, 10 A, 1800 Watts min.
1 Ω, 100 Watts min.
Full HP-IB capabilities HP Series 200/300 or equivalent
the load leads and connections. It has special current-monitoring terminals inside the load connection terminals.
Connect the voltmeter directly to these current-monitoring terminals.
2
A ratio transformer is required only when verifying output voltage readback to MIL-STD-45662A 4:1 test
equipment ratio requirements.
Test Setup
Figure B-1 shows the setup for the tests. Be certain to use load leads of sufficient wire gauge to carry the
full output current (see chapter 2).
HP 6811B/6812B/6813B
HP3458A
DMM
Rs
R
L
S1
SENSE
COM
01
01
COM
66
HP3458A
DMM
R = Load resistor for CC test (8 ohms)
L
Rs = Current Monitor resistor ( 0.01 ohms )
Rz = Impedance resistor ( 1 ohm )
S1 = Switch is for convenience (not required).
Figure B-1. Verification & Calibration Test Setup
1
30
R
Z
Page 67

Verification and Calibration - B
Performing the Verification Tests
The following procedures assume you understand how to operate the ac source from the front panel as
explained in chapter 4.
When performing the verification tests from an HP-IB controller, you may have to consider the relatively
slow settling times and slew rates of the ac source as compared to computer and system voltmeters.
Suitable WAIT statements can be inserted into the test program to give the ac source time to respond to the
test commands.
Perform the following tests for operation verification in the order indicated.
1. Turn-On Checkout
2. Voltage Programming and Measurement Accuracy
3. Current Measurement Accuracy
Turn-On Checkout Procedure
Perform the Turn-On Checkout as directed in chapter 3.
NOTE: The ac source must pass turn-on selftest before you can proceed with the verification tests.
AC Voltage Programming and Measurement Accuracy
This test verifies the voltage programming, HP-IB measurement, and front panel meter functions. Values
read back over the HP-IB should be the same as those displayed on the front panel.
If more than one meter or if a meter and an oscilloscope are used, connect each to the sense terminals by
separate leads to avoid mutual coupling effects.
Action Normal Result
1. Make sure the ac source is turned off. Connect the DVM and
ratio transformer as shown in the test setup in Figure B-1.
2. Turn on the ac source with no load. In the Output menu, execute
the *RST command to reset the unit. Enable the output by
pressing Output On/Off. Program the output voltage as follows:
VOLT 300, FREQ 45, SHAPE:SIN, CURR 1
3. Record voltage readings at the DVM1 and on the front panel
display.
4. Program FREQ 400
5. Record voltage readings at the DVM1 and on the front panel
display.
4. Program FREQ 1000, CURR:PEAK 40
7. Record voltage readings at the DVM1 and on the front panel
display.
1
Multiply the DVM reading by the transformer ratio if a ratio transformer is used.
CV annunciator on.
Output current near 0.
Readings within specified High
range limits (300 V/45 Hz).
Readings within specified High
range limits (300 V/400 Hz).
Readings within specified High
range limits (300 V/1 kHz).
67
Page 68

B - Verification and Calibration
DC Voltage Programming and Measurement Accuracy
CAUTION: Disconnect the ratio transformer for this test.
This test verifies the dc voltage programming, HP-IB readback, and front panel meter functions. Values
read back over the HP-IB should be the same as those displayed on the front panel. Connect the negative
terminal of the DVM to the COM output terminal to determine the ± dc offset voltages.
Action Normal Result
1. Make sure the ac source is turned off. Connect the DVM directly
to the sense terminals.
2. Turn on the ac source with no load. In the Output menu, execute
the *RST command to reset the unit. Enable the output by
pressing Output On/Off. Program the output voltage as follows:
VOLT 0, OUTP:COUP DC, OFFSET 425
3. Record DC voltage readings at the DVM and on the front panel
display.
4.
Program OFFSET −425 Output voltage at −425 Vdc
5. Record DC voltage readings at the DVM and on the front panel
display.
Output voltage at +425 Vdc
Output current near 0.
Readings within specified dc
voltage programming and readback
limits.
Readings within specified dc
voltage programming and readback
limits.
RMS Current Accuracy Test
This test verifies the accuracy of the current measurement in rms detection mode.
Action Normal Result
1. Turn off the ac source and connect the DVM, the 20 ohm load
resistor and current shunt as shown in Figure B-1 with S1 closed.
Connect the DVM across the current shunt.
2. Turn on the ac source. In the Output menu, execute the *RST
command to reset the unit. Enable the output by pressing
Output On/Off. Program the output as follows:
For HP 6811B:
VOLT 50, CURR:RANGE LOW, CURR:LEV 3.00
For all other models:
VOLT 50, CURR:RANGE LOW, CURR:LEV 5.00
3. Record the DVM voltage reading and calculate the rms current. Readings within specified limits.
4. Program CURR:RANGE HIGH
5. Record the DVM voltage reading and calculate the rms current. Readings within specified limits.
CC annunciator on
Output current at 3.0 (HP 6811B)
or 5.0 A (all other models).
CC annunciator on
Output current at 3.0 (HP 6811B)
or 5.0 A (all other models).
68
Page 69

Verification and Calibration - B
Table B-2. HP 6811B Verification Test Record
Model HP 6811B Report No.____________ Date_____________
Test Description Minimum
Voltage Programming and Measurement Accuracy
300 Vrms accuracy at 45 Hz
Front Panel Measurement
300 Vrms accuracy at 400 Hz
Front Panel Measurement
300 Vrms accuracy at 1 kHz
Front Panel Measurement
DC Programming and Measurement Accuracy
425 Vdc accuracy
Front Panel Measurement
−425 Vdc accuracy
Front Panel Measurement
Low Range
High Range
(Iout = calculated output current @
60Hz)
Recorded Results Maximum
Specification
299.250 V
Vrms −190 mV
298.200 V
Vrms −190 mV
296.700 V
Vrms −400 mV
424.075 V
Vdc −0.277 V
−424.075 V
Vdc −0.277 V
RMS Current Measurement Accuracy
Iout −0.0039 A
Iout −0.0095 A
_______V
_______V
_______V
_______V
_______V
_______V
_______V
_______V
_______V
_______V
_______A
_______A
Specification
300.750 V
Vrms +190 mV
301.800 V
Vrms +190 mV
303.300 V
Vrms +400 mV
425.925 V
Vrms +0.277 V
−425.925 V
Vrms +0.277 V
Iout +0.0039 A
Iout +0.0095 A
Model HP ______________________ Report No.____________ Date_____________
Test Description Minimum
300 Vrms accuracy at 45 Hz
Front Panel Measurement
300 Vrms accuracy at 400 Hz
Front Panel Measurement
300 Vrms accuracy at 1 kHz
Front Panel Measurement
Table B-3. HP 6812B Verification Test Record
Recorded Results Maximum
Specification
Voltage Programming and Measurement Accuracy
299.250 V
Vrms −190 mV
298.200 V
Vrms −190 mV
296.700 V
Vrms −400 mV
_______V
_______V
_______V
_______V
_______V
_______V
Specification
300.750 V
Vrms +190 mV
301.800 V
Vrms +190 mV
303.300 V
Vrms +400 mV
69
Page 70

B - Verification and Calibration
DC Programming and Measurement Accuracy
Table B-3 (continued)
425 Vdc accuracy
Front Panel Measurement
−425 Vdc accuracy
Front Panel Measurement
Low Range
High Range
(Iout = calculated output current @
60Hz)
Table B-4. HP 6813B Verification Test Record
Model HP ______________________ Report No.____________ Date_____________
Test Description Minimum
Voltage Programming and Measurement Accuracy
424.075 V
Vdc −0.277 V
−424.075 V
Vdc −0.277 V
RMS Current Measurement Accuracy
Iout −0.0045 A
Iout −0.0175 A
Specification
_______V
_______V
_______V
_______V
_______A
_______A
Recorded Results Maximum
425.925 V
Vrms +0.277 V
−425.925 V
Vrms +0.277 V
Iout +0.0045 A
Iout +0.0175 A
Specification
300 Vrms accuracy at 45 Hz
Front Panel Measurement
300 Vrms accuracy at 400 Hz
Front Panel Measurement
300 Vrms accuracy at 1 kHz
Front Panel Measurement
DC Programming and Measurement Accuracy
425 Vdc accuracy
Front Panel Measurement
−425 Vdc accuracy
Front Panel Measurement
Low Range
High Range
(Iout = calculated output current @
60Hz)
299.250 V
Vrms −190 mV
298.200 V
Vrms −190 mV
296.700 V
Vrms −400 mV
422.575 V
Vdc −0.277 V
−422.575 V
Vdc −0.277 V
RMS Current Measurement Accuracy
Iout −0.0045 A
Iout −0.0175 A
_______V
_______V
_______V
_______V
_______V
_______V
_______V
_______V
_______V
_______V
_______A
_______A
300.750 V
Vrms +190 mV
301.800 V
Vrms +190 mV
303.300 V
Vrms +400 mV
427.425 V
Vrms +0.277 V
−427.425 V
Vrms +0.277 V
Iout +0.0045 A
Iout +0.0175 A
70
Page 71

Verification and Calibration - B
qpã
ä
Performing the Calibration Procedure
Table B-1 lists the equipment required for calibration. Figure B-1 shows the test setup.
NOTE: You do not have to do a complete calibration each time. You may calibrate only the
voltage or current and proceed to "Saving the Calibration Constants." However, before
you calibrate OVP, you must first calibrate the output voltage.
The following parameters may be calibrated:
♦ ac output voltage
♦ output voltage measurement
♦ overvoltage protection (OVP)
♦ ac output current
♦ output current measurement
♦ output impedance
Before calibrating the output impedance, you must first calibrate the output voltage and the output curent.
Front Panel Calibration Menu
The Entry keypad is used for calibration functions.
CalShift
Press this key to access the calibration menu.
Display Command Function
CAL ON <value> Turns calibration mode on when the correct password
value is entered.
CAL OFF Turns calibration mode off
CAL:LEV <char> Advance to next step in sequence (P1, P2, P3, or P4).
CAL:DATA <value> Input a calibration measurement.
CAL:VOLT:OFFSET Begin voltage offset calibration
CAL:VOLT:DC Begin dc voltage calibration sequence
CAL:VOLT:AC Begin ac voltage calibration sequence
CAL:VOLT:PROT Begin voltage protection calibration
CAL:CURR:AC Begin ac current calibration sequence
CAL:CURR:MEAS Begin current measurement calibration sequence
CAL:IMP Begin output impedance calibration sequence
CAL:SAVE Saves the calibration constants in non-volatile memory.
CAL:PASS <value> Set new calibration password.
Notes:
value = a numeric value
char = a character string parameter
Use and to scroll through the command list.
Use and to scroll through the parameter list.
71
Page 72

B - Verification and Calibration
Front Panel Calibration
WARNING LETHAL VOLTAGES. Ac sources can supply 424 V peak at their output. DEATH
on contact may result if the output terminals or circuits connected to the output are
touched when power is applied. These procedures must be performed by a qualified
electronics technician or engineer trained on this equipment.
The following procedures assume you understand how to operate front panel keys (see chapter 4).
Enable Calibration Mode
Action Display
1. Reset the unit by selecting Output, scrolling to the *RST command and
pressing Enter.
2. To begin calibration press Shift Cal, scroll to CAL ON and press Enter. CAL ON 0.0
3. Enter the calibration password from Entry keypad and press Enter. lf the
password is correct the Cal annunciator will come on.
If CAL DENIED appears, then an internal switch has been set to prevent
the calibration from being changed. (See the Service Manual.)
lf the password is incorrect, an error occurs. If the active password is lost,
the calibration function can be recovered by setting an internal switch that
defeats password protection. (See the Service Manual.)
*RST
CAL DENIED
OUT OF RANGE
Calibrating and Entering Voltage Offset Values
Connect the negative terminal of the DVM to the COM output terminal. Note that some calibration points
are negative; be sure to enter the CAL:DATA as negative values when required.
Action Display
4. Connect the DVM (dc volts mode) directly to the ac source. Do not
connect the ratio transformer or load resistor shown in Figure B-1.
5. Press Shift Calibration, scroll to the CAL VOLT OFFSET command,
and press Enter.
CAL:VOLT:OFFSET
6. Press Shift Calibration, scroll to the CAL LEV P1 command, and press
Enter to select the first calibration point.
7. Press Shift Calibration, scroll to CAL DATA 0.00, and use the Entry
keypad to enter the dc voltage value displayed on the DVM.
8. Press Shift Calibration, scroll to the CAL LEV P1 command, use È to
scroll to the P2 parameter, and press Enter. This selects the second
calibration point.
9. Press Shift Calibration, scroll to CAL DATA 0.00, and use the Entry
keypad to enter the dc voltage value displayed on the DVM.
10. Press Shift Calibration, scroll to the CAL LEV P1 command, use È to
scroll to the P3 parameter, and press Enter.
72
CAL:LEV P1
CAL:DATA 0.00
CAL:LEV P2
CAL:DATA 0.00
CAL:LEV P3
Page 73

Verification and Calibration - B
11. Press Shift Calibration, scroll to CAL DATA 0.00, and use the Entry
keypad to enter the dc voltage value displayed on the DVM.
12. Press Shift Calibration, scroll to the CAL LEV P1 command, use È to
scroll to the P4 parameter, and press Enter.
13. Press Shift Calibration, scroll to CAL DATA 0.00, and use the Entry
keypad to enter the dc voltage value displayed on the DVM.
CAL:DATA 0.00
CAL:LEV P4
CAL:DATA 0.00
The ac source is now holding the new voltage offset calibration constants in RAM.
Calibrating and Entering DC Voltage Gain Values
Connect the negative terminal of the DVM to the COM output terminal. Note that some calibration points
are negative; be sure to enter the CAL:DATA as negative values when required.
Action Display
14. Connect the DVM (dc volts mode) directly to the ac source. Do not
connect the ratio transformer or load resistor shown in Figure B-1.
15. Press Shift Calibration, scroll to the CAL VOLT DC command, and
press Enter.
16. Press Shift Calibration, scroll to the CAL LEV P1 command, and press
Enter to select the first calibration point.
17. Press Shift Calibration, scroll to CAL DATA 0.00, and use the Entry
keypad to enter the dc voltage value displayed on the DVM.
CAL:VOLT:DC
CAL:LEV P1
CAL:DATA 0.00
18. Press Shift Calibration, scroll to the CAL LEV P1 command, use È to
scroll to the P2 parameter, and press Enter. This selects the second
calibration point.
19. Press Shift Calibration, scroll to CAL DATA 0.00, and use the Entry
keypad to enter the dc voltage value displayed on the DVM.
20. Press Shift Calibration, scroll to the CAL LEV P1 command, use È to
scroll to the P3 parameter, and press Enter.
21. Press Shift Calibration, scroll to CAL DATA 0.00, and use the Entry
keypad to enter the dc voltage value displayed on the DVM.
The ac source is now holding the new dc voltage gain calibration constants in RAM.
Calibrating and Entering AC rms Voltage Gain Values
Action Display
22. Connect the DVM (ac volts mode) to the ac source using the ratio
transformer shown in Figure B-1.
23. Press Shift Calibration, scroll to the CAL VOLT AC command, and
press Enter.
24. Press Shift Calibration, scroll to the CAL LEV P1 command, and press
Enter to select the first calibration point.
25. Press Shift Calibration, scroll to CAL DATA 0.00, and use the Entry
keypad to enter the product of the transformer ratio times the ac voltage
value displayed on the DVM.
CAL:LEV P2
CAL:DATA 0.00
CAL:LEV P3
CAL:DATA 0.00
CAL:VOLT:AC
CAL:LEV P1
CAL:DATA 0.00
73
Page 74

B - Verification and Calibration
26. Press Shift Calibration, scroll to the CAL LEV P1 command, use È to
scroll to the P2 parameter, and press Enter. This selects the second
calibration point.
27. Press Shift Calibration, scroll to CAL DATA 0.00, and use the Entry
keypad to enter the product of the transformer ratio times the ac voltage
value displayed on the DVM.
28. Press Shift Calibration, scroll to the CAL LEV P1 command, use È to
scroll to the P3 parameter, and press Enter.
29. Press Shift Calibration, scroll to CAL DATA 0.00, and use the Entry
keypad to enter the product of the transformer ratio times the ac voltage
value displayed on the DVM.
30. Press Shift Calibration, scroll to the CAL LEV P1 command, use È to
scroll to the P4 parameter, and press Enter.
31. Press Shift Calibration, scroll to CAL DATA 0.00, and use the Entry
keypad to enter the product of the transformer ratio times the ac voltage
value displayed on the DVM.
The ac source is now holding the new ac rms voltage calibration constants in RAM.
Calibrating the OVP Trip Point
Action Display
CAL:LEV P2
CAL:DATA 0.00
CAL:LEV P3
CAL:DATA 0.00
CAL:LEV P4
CAL:DATA 0.00
32. Press Shift Calibration, scroll to CAL VOLT PROT, and press Enter. CAL:VOLT:PROT
33. Wait for the ac source to compute the OVP calibration constant. The
display returns to Meter mode when the OVP calculation is complete.
The ac source is now holding the new OVP calibration constants in RAM.
Calibrating and Entering rms Current Values
Action Display
34. Connect the DVM (ac rms mode), current shunt, and load resistor as
shown in figure B-1 with S1 closed.
35. Press Shift Calibration, scroll to the CAL CURR AC command, and
press Enter.
36. Press Shift Calibration, scroll to the CAL LEV P1 command, and press
Enter.
37. Press Shift Calibration, scroll to the CAL DATA 0.00 command.
Calculate the rms current value (DVM ac rms voltage/shunt resistance),
and use the Entry keypad to enter the rms current.
38. Press Shift Calibration, scroll to the CAL LEV P1 command, use È to
scroll to the P2 parameter, and press Enter.
39. Press Shift Calibration, scroll to the CAL DATA 0.00 command.
Calculate the rms current value (DVM ac rms voltage/shunt resistance),
and use the Entry keypad to enter the rms current.
CAL:CURR:AC
CAL:LEV P1
CAL:DATA 0.00
CAL:LEV P2
CAL:DATA 0.00
The ac source is now holding the new rms current calibration constants in RAM.
74
Page 75

Verification and Calibration - B
Calibrating and Entering rms Current Measurement Values
Action Display
40. Connect the DVM (ac rms mode), current shunt, and load resistor as
shown in figure B-1 with S1 closed.
41. Press Shift Calibration, scroll to the CAL CURR MEAS command, and
press Enter.
42. Press Shift Calibration, scroll to the CAL LEV P1 command, and press
Enter.
43. Press Shift Calibration, scroll to the CAL DATA 0.00 command.
Calculate the rms current value (DVM ac rms voltage/shunt resistance),
and use the Entry keypad to enter the rms current.
44. Press Shift Calibration, scroll to CAL LEV P1 command, use È to
scroll to the P2 parameter, and press Enter.
45. Press Shift Calibration, scroll to the CAL DATA 0.00 command.
Calculate the rms current value (DVM ac rms voltage/shunt resistance),
and use the Entry keypad to enter the rms current.
CAL:CURR:MEAS
CAL:LEV P1
CAL:DATA 0.00
CAL:LEV P2
CAL:DATA 0.00
The ac source is now holding the new rms current measurement calibration constants in RAM.
Calibrating the Output Impedance
Action Display
46. Connect only the output impedance resistor across the output of the ac
source. Do not connect any other equipment.
47. Press Shift Calibration, scroll to the CAL IMP command, and press
Enter.
CAL:IMP
48. Wait for the ac source to compute the output impedance calibration
constant. The display returns to Meter mode when the calculation is
complete.
The ac source is now holding the new output impedance calibration constants in RAM.
Saving the Calibration Constants
CAUTION: Storing calibration constants overwrites the existing ones in non-volatile memory. If you
are not sure you want to permanently store the new constants, omit this step. The ac source
calibration will then remain unchanged.
Action Display
49. Press Shift Calibration, scroll to CAL SAVE, and press Enter. CAL:SAVE
50. Press Shift Calibration, select CAL OFF, and press Enter to exit
Calibration mode. *RST and *RCL will also set the calibration state to
OFF.
CAL OFF
75
Page 76

B - Verification and Calibration
Changing the Calibration Password
The factory default password is 0. You can change the password when the ac source is in calibration mode
(which requires you to enter the existing password). Proceed as follows:
Action Display
1. Begin by pressing Shift Cal and scrolling to the CAL ON command. CAL ON 0.0
2. Enter the existing password from Entry keypad and press Enter
3. Press Shift Cal and scroll to the CAL PASS command. CAL:PASS 0
4. Enter the new password from the keypad. You can use any number with up
to six digits and an optional decimal point. If you want the calibration
function to operate without requiring any password, change the password to
0 (zero).
NOTE: If you want the calibration function to operate without requiring any password, change the
password to 0 (zero).
Calibration Error Messages
Errors that can occur during calibration are shown in the following table.
Table B-5. HP-IB Calibration Error Messages
Error Meaning
401 CAL switch prevents calibration (This is a hardware disable, see the ac source Service
Manual.)
402 CAL password is incorrect
403 CAL not enabled
404 Computed readback cal constants are incorrect
405 Computed programming cal constants are incorrect
406 Incorrect sequence of calibration commands
Calibration Over the HP-IB
You can calibrate the ac source by using SCPI commands within your controller programming statements.
Be sure you are familiar with calibration from the front panel before you calibrate from a controller. Each
front panel calibration command has a corresponding SCPI command.
The SCPI calibration commands are explained in chapter 3 of the ac source Programming Guide.
Calibration error messages that can occur during HP-IB calibration are shown in table B-3.
HP Calibration Program Listing
Figure B-2, Sheets 1 through 3, lists the calibration program. This program can be run on any controller
operating under HP BASIC. The assumed power supply address is 705 and calibration password is 0. If
required, change these parameters in the appropriate statements.
76
Page 77

Verification and Calibration - B
10 !
20 ! AC Source calibration program Rev B.00.00
30 !
40 ASSIGN @Ac TO 705
50 !
60 PRINT TABXY(5,5),"This program will calibrate the 6811B/12B/13B AC Power Solutions."
70 PRINT TABXY(5,7),"Equipment requirements are: HP3458A or equivalent DVM"
80 PRINT TABXY(37,8),"0.01 ohm <200ppm Current Shunt"
90 PRINT TABXY(37,9),"20 ohm >1800 watt power resistor for all models"
100 PRINT TABXY(37,10),"1 ohm >100 watt impedance resistor"
110 PRINT TABXY(37,11),"30:1 <50ppm Ratio Transformer"
120 PRINT TABXY(3,13),"Ratio Transformer is required to when calibrating to MIL-STD-45662A. If the"
130 PRINT TABXY(2,14),"ratio transformer is not used the measurement uncertainty must be recalculated."
140 !
150 DISP "Press CONT to continue"
160 PAUSE
170 CLEAR SCREEN
180 PRINT TABXY(15,5),"1. Turn the AC Source off"
190 PRINT TABXY(15,7),"2. Disconnect all loads"
200 PRINT TABXY(15,9),"3. Connect the 3458A to the rear terminal block"
210 PRINT TABXY(15,11),"4. Set the 3458A to DC VOLTS"
220 PRINT TABXY(15,13),"5. Turn on the AC Source"
230 !
240 DISP "Press CONT to begin DC OFSET and DC GAIN calibration"
250 PAUSE
260 CLEAR SCREEN
270 PRINT TABXY(25,5),"CALIBRATING VOLTAGE OFFSET"
280 PRINT TABXY(20,7),"There are 4 points to be calibrated"
290 OUTPUT @Ac;"CAL:STATE ON"
300 OUTPUT @Ac;"CAL:VOLT:OFFS"
310 OUTPUT @Ac;"CAL:LEV P1"
320 WAIT 10
330 INPUT "Enter DC offset voltage reading from DVM",Off_p1
340 PRINT TABXY(25,9),"Point 1 entered"
350 OUTPUT @Ac;"CAL:DATA";Off_p1
360 OUTPUT @Ac;"CAL:LEV P2"
370 WAIT 10
380 INPUT "Enter DC offset voltage reading from DVM",Off_p2
390 PRINT TABXY(25,11),"Point 2 entered"
400 OUTPUT @Ac;"CAL:DATA";Off_p2
410 OUTPUT @Ac;"CAL:LEV P3"
420 WAIT 10
430 INPUT "Enter DC offset voltage reading from DVM",Off_p3
440 PRINT TABXY(25,13),"Point 3 entered"
450 OUTPUT @Ac;"CAL:DATA";Off_p3
460 OUTPUT @Ac;"CAL:LEV P4"
470 WAIT 10
480 INPUT "Enter DC offset voltage reading from DVM",Off_p4
490 PRINT TABXY(25,15),"Point 4 entered"
500 OUTPUT @Ac;"CAL:DATA";Off_p4
510 WAIT 3
520 CLEAR SCREEN
530 PRINT TABXY(25,5),"CALIBRATING DC VOLTAGE GAIN"
540 PRINT TABXY(20,7),"There are 3 points to be calibrated"
550 OUTPUT @Ac;"CAL:VOLT:DC"
Figure B-2. Calibration Program Listing (Sheet 1 of 3)
77
Page 78

B - Verification and Calibration
560 OUTPUT @Ac;"CAL:LEV P1"
570 WAIT 10
580 INPUT "Enter DC voltage reading from DVM",Dc_p1
590 PRINT TABXY(25,9),"Point 1 entered"
600 OUTPUT @Ac;"CAL:DATA";Dc_p1
610 OUTPUT @Ac;"CAL:LEV P2"
620 WAIT 10
630 INPUT "Enter DC voltage reading from DVM",Dc_p2
640 PRINT TABXY(25,11),"Point 2 entered"
650 OUTPUT @Ac;"CAL:DATA";Dc_p2
660 OUTPUT @Ac;"CAL:LEV P3"
670 WAIT 10
680 INPUT "Enter DC voltage reading from DVM",Dc_p3
690 PRINT TABXY(25,13),"Point 3 entered"
700 OUTPUT @Ac;"CAL:DATA";Dc_p3
710 WAIT 3
720 CLEAR SCREEN
730 PRINT TABXY(5,10),"1. Connect the 3458A to the rear terminals via the ratio transformer"
740 PRINT TABXY(18,12),"2. Set the 3458A to AC VOLTS"
750 !
760 DISP "Press CONT to begin AC PROGRAMMING and MEASUREMENT calibration"
770 PAUSE
780 CLEAR SCREEN
790 PRINT TABXY(18,5),"CALIBRATING AC POGRAMMING and MEASUREMENT"
800 PRINT TABXY(20,7),"There are 4 points to be calibrated"
810 OUTPUT @Ac;"CAL:VOLT:AC"
820 OUTPUT @Ac;"CAL:LEV P1"
830 WAIT 10
840 INPUT "Enter AC rms ( transformer ratio * DVM reading)",Ac_p1
850 PRINT TABXY(25,9),"Point 1 entered"
860 OUTPUT @Ac;"CAL:DATA";Ac_p1
870 OUTPUT @Ac;"CAL:LEV P2"
880 WAIT 10
890 INPUT "Enter AC rms ( transformer ratio * DVM reading)",Ac_p2
900 PRINT TABXY(25,11),"Point 2 entered"
910 OUTPUT @Ac;"CAL:DATA";Ac_p2
920 OUTPUT @Ac;"CAL:LEV P3"
930 WAIT 10
940 INPUT "Enter AC rms ( transformer ratio * DVM reading)",Ac_p3
950 PRINT TABXY(25,13),"Point 3 entered"
960 OUTPUT @Ac;"CAL:DATA";Ac_p3
970 OUTPUT @Ac;"CAL:LEV P4"
980 WAIT 3
990 INPUT "Enter AC rms ( transformer ratio * DVM reading)",Ac_p4
1000 PRINT TABXY(25,15),"Point 4 entered"
1010 OUTPUT @Ac;"CAL:DATA";Ac_p4
1020 WAIT 10
1030 CLEAR SCREEN
1040 PRINT TABXY(15,10),"CALIBRATING OVERVOLTAGE PROTECTION"
1050 OUTPUT @Ac;"CAL:VOLT:PROT"
1060 PRINT TABXY(30,15),"WAIT"
1070 WAIT 30
1071 OUTPUT @Ac;"CAL:SAVE"
1072 OUTPUT @Ac;"CAL:STATE OFF"
1080 CLEAR SCREEN
1090 PRINT TABXY(15,5),"1. Turn off the AC Source"
1100 PRINT TABXY(15,7),"2. Connect the current shunt and 20 ohm load resistor, see fig.B-1"
78
Figure B-2. Calibration Program Listing (Sheet 2 of 3)
Page 79

Verification and Calibration - B
1110 PRINT TABXY(15,9),"3. Connect the 3458A across the current shunt"
1120 PRINT TABXY(15,11),"4. Set the 3458A to AC rms VOLTS"
1130 PRINT TABXY(15,13),"5. Turn on the AC Source"
1140 !
1150 DISP "Press CONT to begin Current Program and Measurement calibration"
1160 PAUSE
1170 CLEAR SCREEN
1180 PRINT TABXY(22,5),"CALIBRATING CURRENT POGRAMMING"
1190 PRINT TABXY(20,7),"There are 2 points to be calibrated"
1191 OUTPUT @Ac;"CAL:STATE ON"
1200 OUTPUT @Ac;"CAL:CURR:AC"
1210 OUTPUT @Ac;"CAL:LEV P1"
1220 WAIT 10
1230 INPUT "Enter AC rms current ( DVM reading divided by shunt resistance )",Ai_p1
1240 PRINT TABXY(25,9),"Point 1 entered"
1250 OUTPUT @Ac;"CAL:DATA";Ai_p1
1260 OUTPUT @Ac;"CAL:LEV P2"
1270 WAIT 10
1280 INPUT "Enter AC rms current ( DVM reading divided by shunt resistance )",Ai_p2
1290 PRINT TABXY(25,11),"Point 2 entered"
1300 OUTPUT @Ac;"CAL:DATA";Ai_p2
1310 WAIT 10
1320 CLEAR SCREEN
1330 PRINT TABXY(22,5),"CALIBRATING CURRENT MEASUREMENT"
1340 PRINT TABXY(20,7),"There are 2 points to be calibrated"
1350 OUTPUT @Ac;"CAL:CURR:MEAS"
1360 OUTPUT @Ac;"CAL:LEV P1"
1370 WAIT 10
1380 INPUT "Enter AC rms current ( DVM reading divided by shunt resistance )",Am_p1
1390 PRINT TABXY(25,9),"Point 1 entered"
1400 OUTPUT @Ac;"CAL:DATA";Am_p1
1410 OUTPUT @Ac;"CAL:LEV P2"
1420 WAIT 10
1430 INPUT "Enter AC rms current ( DVM reading divided by shunt resistance )",Am_p2
1440 PRINT TABXY(25,11),"Point 2 entered"
1450 OUTPUT @Ac;"CAL:DATA";Am_p2
1460 WAIT 10
1470 OUTPUT @Ac;"CAL:SAVE"
1480 OUTPUT @Ac;"CAL:STATE OFF"
1490 CLEAR SCREEN
1500 !
1510 !
1520 PRINT TABXY(15,5),"1. Turn off the AC Source"
1530 PRINT TABXY(15,7),"2. Disconnect all equipment from the AC Source"
1540 PRINT TABXY(15,9),"3. Connect the 1 ohm impedance resistor, see fig.B-1"
1550 PRINT TABXY(15,11),"4. Turn on the AC Source"
1560 !
1570 DISP "Press CONT to begin Output Impedance calibration"
1580 PAUSE
1590 PRINT TABXY(15,10),"CALIBRATING OUTPUT IMPEDANCE"
1600 OUTPUT @Ac;"CAL:STATE ON"
1610 OUTPUT @Ac;"CAL:IMP"
1620 PRINT TABXY(30,15),"WAIT"
1630 WAIT 30
1640 OUTPUT @Ac;"CAL:SAVE"
1650 OUTPUT @Ac;"CAL:STATE OFF"
1660 CLEAR SCREEN
1670 PRINT TABXY(25,10),"CALIBRATION COMPLETE"
1680 END
Figure B-2. Calibration Program Listing (Sheet 3 of 3)
79
Page 80

Page 81

C
Error Messages
Error Number List
This appendix gives the error numbers and descriptions that are returned by the ac source. Error numbers
are returned in two ways:
♦ Error numbers are displayed on the front panel
♦ Error numbers and messages are read back with the SYSTem:ERRor? query. SYSTem:ERRor?
returns the error number into a variable and returns two parameters: an NR1 and a string.
The following table lists the errors that are associated with SCPI syntax errors and interface problems. It
also lists the device dependent errors. Information inside the brackets is not part of the standard error
message, but is included for clarification. When errors occur, the Standard Event Status register records
them in bit 2, 3, 4, or 5:
Table C-1. Error Numbers
Error Number Error String [Description/Explanation/Examples]
Command Errors –100 through –199 (sets Standard Event Status Register bit #5)
–100 Command error [generic]
–101 Invalid character
–102 Syntax error [unrecognized command or data type]
–103 Invalid separator
–104 Data type error [e.g., "numeric or string expected, got block data"]
–105 GET not allowed
–108 Parameter not allowed [too many parameters]
–109 Missing parameter [too few parameters]
–112 Program mnemonic too long [maximum 12 characters]
–113 Undefined header [operation not allowed for this device]
–121 Invalid character in number [includes "9" in octal data, etc.]
–123 Numeric overflow [exponent too large; exponent magnitude >32 k]
–124 Too many digits [number too long; more than 255 digits received]
–128 Numeric data not allowed
–131 Invalid suffix [unrecognized units, or units not appropriate]
–138 Suffix not allowed
–141 Invalid character data [bad character, or unrecognized]
–144 Character data too long
–148 Character data not allowed
–150 String data error
–151 Invalid string data [e.g., END received before close quote]
–158 String data not allowed
–160 Block data error
81
Page 82

C - Error Messages
–161 Invalid block data [e.g., END received before length satisfied]
–168 Block data not allowed
–170 Expression error
–171 Invalid expression
–178 Expression data not allowed
Execution Errors –200 through –299 (sets Standard Event Status Register bit #4)
–200 Execution error [generic]
–221 Settings conflict [check current device state]
–222 Data out of range [e.g., too large for this device]
–223 Too much data [out of memory; block, string, or expression too long]
–224 Illegal parameter value [device-specific]
–225 Out of memory
–270 Macro error
–272 Macro execution error
–273 Illegal macro label
–276 Macro recursion error
–277 Macro redefinition not allowed
System Errors –300 through –399 (sets Standard Event Status Register bit #3)
–310 System error [generic]
–350 Too many errors [errors beyond 9 lost due to queue overflow]
Query Errors –400 through –499 (sets Standard Event Status Register bit #2)
–400 Query error [generic]
–410 Query INTERRUPTED [query followed by DAB or GET before response complete]
–420 Query UNTERMINATED [addressed to talk, incomplete programming message received]
–430 Query DEADLOCKED [too many queries in command string]
–440 Query UNTERMINATED [after indefinite response]
Selftest Errors 0 through 99 (sets Standard Event Status Register bit #3)
0 No error
1 Non-volatile RAM RD0 section checksum failed
2 Non-volatile RAM CONFIG section checksum failed
3 Non-volatile RAM CAL section checksum failed
4 Non-volatile RAM WAVEFORM section checksum failed
5 Non-volatile RAM STATE section checksum failed
6 Non-volatile RAM LIST section checksum failed
7 Non-volatile RAM RST section checksum failed
10 RAM selftest
11 - 31 DAC selftest error, expected <n>, read <reading>
Errors 11, 12, 13, 14, 15 apply to DAC12 1A and 1B
Errors 16, 17, 18 apply to DAC12 2A
Errors 19, 20, 21 apply to DAC12 2B
Errors 22, 23 apply to DAC12 4A
Errors 24, 25 apply to DAC12 4B
Errors 26, 27, 28 apply to DAC12 3A and 3B
Errors 29, 30, 31 apply to DAC12 5A and 5B
82
Page 83

Error Messages - C
40 Voltage selftest error, output 1
41 Voltage selftest error, output 2
42 Voltage selftest error, output 3
43 Current selftest error, output 1
44 Current selftest error, output 2
45 Current selftest error, output 3
70 Fan voltage failure
80 Digital I/O selftest error
Device-Dependent Errors 100 through 32767 (sets Standard Event Status Register bit #3)
200 Outgrd not responding
201 Front panel not responding
210 Ingrd receiver framing error
211 Ingrd uart overrun status
212 Ingrd received bad token
213 Ingrd receiver buffer overrun
214 Ingrd input buffer overrun
215 Outgrd output buffer overrun
216 RS-232 receiver framing error
217 RS-232 receiver parity error
218 RS-232 receiver overrun error
219 Ingrd inbuf count sync error
220 Front panel uart overrun
221 Front panel uart framing
222 Front panel uart parity
223 Front panel buffer overrun
224 Front panel timeout
401 CAL switch prevents calibration
402 CAL password is incorrect
403 CAL not enabled
404 Computed readback cal constants are incorrect
405 Computed programming cal constants are incorrect
406 Incorrect sequence of calibration commands
600 Systems in mode:list have different list lengths
601 Requested voltage and waveform exceeds peak voltage capability
602 Requested voltage and waveform exceeds transformer volt-second rating
603 Command only applies to RS-232 interface
604 Trigger received before requested number of pre-trigger readings
605 Requested RMS current too high for voltage range
606 Waveform data not defined
607 VOLT, VOLT:SLEW, and FUNC:SHAP modes incompatible
608 Measurement overrange
609 Output buffer overrun
610 Command cannot be given with present SYST:CONF setting
83
Page 84

Page 85

D
Line Voltage Conversion
WARNING: Shock Hazard Hazardous voltage can remain inside the unit even after it has
been turned off. This procedure should only be done by qualified electronics
service personnel.
Open the Unit
♦ Turn off the ac power to the unit and disconnect the power cord from the power outlet.
♦ Remove the four screws that secure the two carrying straps and outer cover (use a T25
Torx drive).
♦ Slightly spread the bottom rear of the cover and pull it back to remove it from the front
panel.
♦ Observe the two LEDs that are visible in the cutouts on each side of the unit. If either
LED is on, there is hazardous voltage inside the unit. Wait until the LED goes out
before proceeding (this may take several minutes).
Check the Jumper Wire (Model HP 6811B/6812B only)
♦ Locate the line voltage jumper wire in the cutout at the side of the unit by the line cord (see
Figure D-1).
♦ For 100 V or 120 V operation, install the jumper on the lug labeled:100/120.
For 200 V, 208 V or 230 V operation, install the jumper on the lug labeled: 200/220.
Check the Line Jumpers (all Models)
♦ Locate the line jumpers in the cutout at the side of the unit by the on/off switch.
♦ Configure the jumpers according to the line voltage shown in the accompanying label.
When configuring a unit for 208 V, use the jumper settings shown for 200 V.
Check the Power Transformer Connector (all Models)
NOTE: This procedure is only required if you are changing the input voltage between 100
V and 120 V or between 200/208 V and 230 V.
♦ Remove the screws securing the inner cover (use a T15 Torx drive).
♦ Remove the inner cover.
♦ Remove the screws securing the pc board behind the front panel (use a T15 Torx drive).
♦ You need only to lift the board out of the way, you do not need to disconnect any cables.
85
Page 86
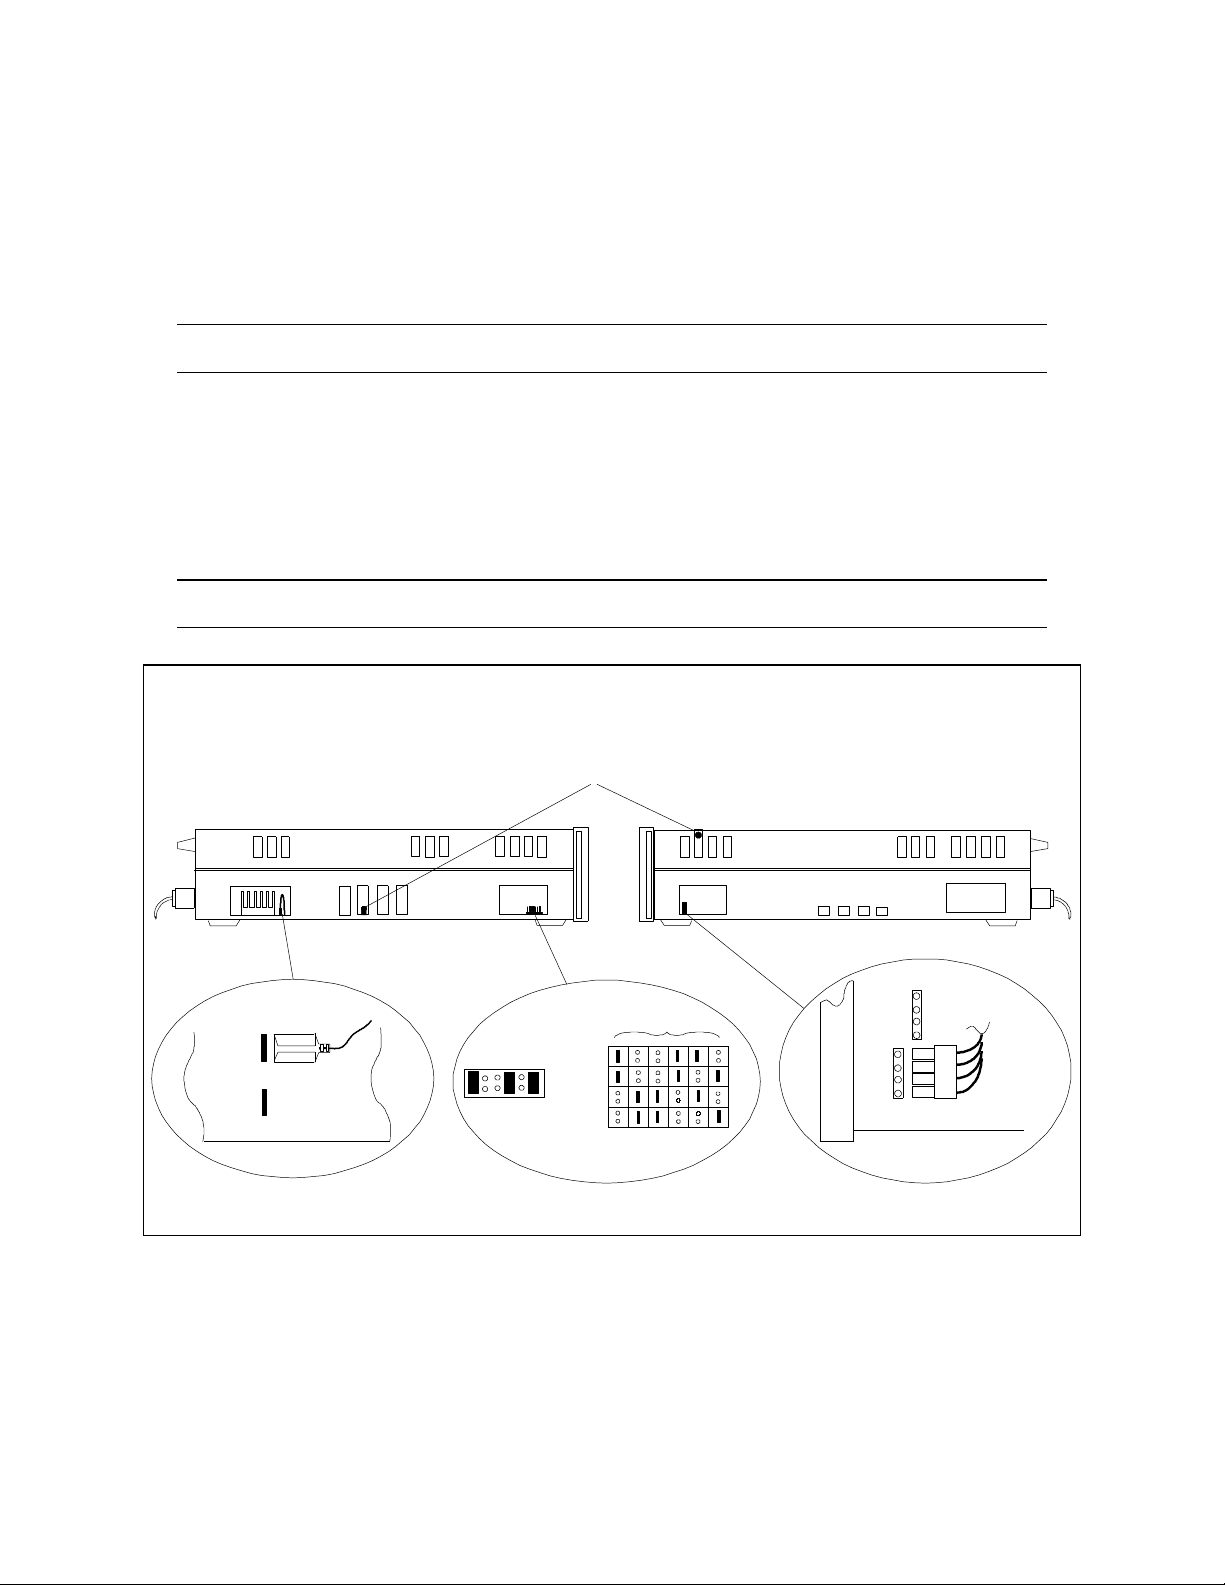
D - Line Voltage Conversion
♦ Locate the connector in front of the power transformer.
♦ For 100 V, 200 V, or 208 V operation, install the plug on the connector labeled: 200 V
input.
For 120 V or 230 V operation, install the plug on the connector labeled: 240 V input.
♦ Replace the pc board and inner cover.
NOTE: Be sure to replace all of the screws removed in steps 9 and 11.
Close the Unit
♦ Replace the outer cover.
♦ Change the label on the rear panel to reflect the changed input voltage rating.
♦ Reconnect the power and turn on the unit.
NOTE: Line voltage conversion does not require any fuse changes.
RIGHT SIDE
(with cover removed)
100/120
200/220
JUMPER WIRE
!! WARNING !!
If LEDs are on,
HAZARDOUS
voltages are present!
Jumper Settings
100
120
J353
200
230
LINE JUMPERS
Figure D-1. Line Voltage Conversion Components
LEFT SIDE
(with cover removed)
INPUT
200V
INPUT
240V
POWER TRANSFORMER
86
Page 87

Index
ac line conversion, 85
accessories, 12
airflow, 22
annunciators
φ1, 38
Addr, 38
Cal, 38
CC, 38
CV, 38
Dis, 38
Err, 38
OCP, 38
Prot, 38
Rmt, 38
Shift, 38
SRQ, 38
Tran, 38
Unr, 38
AWG ratings, 25
cables, 12
calibration, 71
ac rms voltage gain, 73
dc voltage gain, 73
enable, 72
equipment, 65
error messages, 76
menu, 71
output impedance, 75
OVP, 74
password, 76
program listing, 76
rms current, 74, 75
saving, 75
setup, 66
voltage offset, 72
capabilities, 14
cleaning, 21
conversion, ac line, 85
damage, 21
dc offset, 48
digital connections, 27
digital connector, 21
dimensions, 22
—A—
—C—
—D—
—E—
entry keys, 46
Å, 46
0 ... 9, 46
Clear Entry, 46
E, 46
Enter, 46
error messages, 34
error numbers, 81
—F—
features, 13
Fixed, 50
FLT connections, 27
frequency control, 14
front panel, 37
annuncuiators, 38
controls and indicators, 14, 37
keys, 38
function keys, 40
•, 40
•Index, 40
immediate action, 40
Output On/Off, 40
Phase Select, 40
Trigger, 40
fuses, 23
—G—
general information, 11
ground, earth, 12
guide, programming, 11
guide, user’s, 11
—H—
hazardous voltages, 65
history, 6
HP-IB, 58
address, 58
connections, 28
—I—
INH connections, 27
input
connections, 23
power, 12
inrush current capability, 17
inspection, 21
87
Page 88

Index
—L—
lethal voltages, 65
line fuse
replacing, 35
line voltage conversion, 85
List, 50, 52
load regulation, 18
load voltage drops, 25
location, 22
low frequency operation (<45 Hz), 15, 63
—M—
manuals, 11, 21
measure
ac only, 48
ac+dc, 48
dc only, 48
meter
ac, 48
ac+dc, 48
dc, 48
Meter AC+DC, 38
meter display keys
Harmonic, 41
Input, 41
Meter, 41
—N—
non-volatile memory
clearing, 58
storing, 39
—O—
OCP, 49
offset, 48
operating features, 13
options, 12
OT, 49
output
ac+dc, 48
characteristic, 15
clearing output protection, 49
connections, 24
connector, 21
control keys
Output, 43
rating, 15
setting output protection, 49
setting the amplitude, 47
setting the dc offset, 48
setting the frequency, 48
Output AC+DC, 38
output checkout, 32
output control keys
Current, 42
Freq, 42
Phase, 43
Pulse, 43
Shape, 43
Voltage, 42
output coupling
ac, 19, 48
dc, 19, 48
output impedance
<1 ohm, 18
reactive, 18
real, 18
OV, 49
OVLD, 34
—P—
parts - operator replaceable, 13
peak current capability, 16
peak current limit, 16
peak inrush capacitance, 16
Peak Inrush current
measuring, 57
Phase synchronization, 53
power cord, 21
installation, 23
power receptacle, 12
preliminary checkout, 31
print date, 6
program listing
calibration, 76
protection
OCP, 49
OT, 49
OV, 49
Rail, 49
RI, 49
SOA, 49
protection/status keys
Protect, 44
Status, 44
Pulse, 51
—R—
rack mount kit, 12
rack mounting, 22
Rail, 49
real-time voltage regulation, 18
recalling operating states, 58
remote programming, 14
remote sensing, 25
OVP considerations, 27
repacking, 21
RI, 49
rms current limit, 18
rms voltage regulation, 18
RS-232, 58
connections
interface commands, 29
data format, 29
88
Page 89

Index
handshake, 30
interface cable, 30
pinouts, 29
—S—
safety class, 12
safety summary, 3
safety warning, 12
saving operating states, 58
self-test, 31
selftest errors, 34
sense connections, 25
service guide, 12
shift annunciator, 32
shift key, 32
Slew rates
programming, 55
SOA, 49
SOA limit, 16
specifications, 59
Step, 50
supplemental characteristics, 61
SYSTem
LOCal, 29
REMote, 29
RWLock, 29
system errors, 81
system keys, 39
Address, 39
Error, 39
Interface, 39
Local, 39
RCL, 39
Save, 39
Shift, 39
—T—
transient voltage
fixed, 50
list, 50, 52
pulse, 51
step, 50
transient voltage mode, 50
trigger connections, 27
Trigger delays, 53
trigger IN, 27
trigger OUT, 27
trigger/list keys
List, 45
Trigger Control, 45
turn-on checkout, 31, 67
—V—
verification, 32
ac measurement accuracy, 67
ac voltage programming, 67
dc measurement accuracy, 68
dc voltage programming, 68
equipment, 65
rms current accuracy, 68
setup, 66
test record, 69
verification tests, 31
voltage control, 14
voltage regulation
real-time, 18
rms, 18
—W—
warranty, 2
Waveform
generation, 55
wire
current ratings, 25
wiring considerations, 25
89
 Loading...