

Page 1

Copyright Agilent
Technologies 2000
All rights reserved.
Reproduction, a daptio n, or
translation without prior
written permission is
prohibited, except as
allowed under the
copyright laws.
Agilent Part No.
37718-90218
Printed in U.K. Sept ember
2000.
Warranty
The information co ntained
in this document is subject
to change without notice.
Agilent Technologies
makes no warra n t y of any
kind with regard to this
material, including, but
not limited to, the implied
warranties or
merchantab ility and fitness
for a particular purpose.
Agilent T ec hno logies shall
not be liable for errors
contained here in or f or
incidental or consequential
damages in connection
with the furnishing,
performance, or use of this
material.
WARNING
Warning Symbols Used on
the Product
!
The product is marked
with this symbol when the
user should refer to the
instruction manual in order
to protect the apparatus
against damage.
The product is marked
with this symbol to
indicate that hazardous
voltages are present
The product is mar ked
with this symbol to
indicate that a laser is
fitted. The user should
refer to the laser safety
information in the
Verification Manual.
Agilent Technologies UK Limited
Telecommunications Networks Test Divi sion
South Queensferry
West Lothian, Scotland EH30 9TG
Page 2

2DRAFT
Page 3

User Guide DSn/SONET/ATM/POS Operation
OmniBER 718 SONET User Guide
Page 4

About This Book
This book tells you how to select the features that you want to use for your test.
The selections available are presented in the following groups:
• Transmit and receive interfaces
• Test features, for example, the addition of errors and alarms to the test signal
• Measurements including test timing
• Storing, logging and printing results with general printer information
• Using instrument and disk storage
• Using the “Other” features.
The selections available will depend on the options fitted to your instrument. The
examples given in this book cover all options and therefore may include selections
which are not available on your instrument.
4
Page 5

Contents
1 Introduction
Product Description 14
Conventions 15
Connecting to the Network 16
Connecting Accessories 20
Front Panel Soft Recovery (Cold Start) 21
OmniBER 718 Option Guide 22
2 Setting the Interfaces
Setting PDH/DSn Transmit Interface
(Option 012) 26
Setting DSn THRU Mode 28
Setting SONET Transmit Interface 29
Setting Jitter Transmit Interface 33
Setting Wander Transmit Interface 35
Setting SONET THRU Mode 37
Using Smart Test 40
Setting PDH/DSn Receive Interface 45
Setting SONET Receive Interface 47
Setting Jitter Receive Interface 48
Setting Extended Jitter Receive Interface 49
Setting Wander Receive Interface 50
3 Selecting Test Features
Using Transmit Overhead Setup 52
Using Receive Overhead Monitor 54
5
Page 6

Contents
Setting Overhead Trace Messages 56
Setting Overhead Labels 57
Generating Overhead Sequences 58
Using Receive Overhead Capture 60
Adding Frequency Offset to SONET Signal 62
Adding Frequency Offset to the DSn Signal 64
Setting up Signaling Bits 65
Setting Transmit Structured Payload/Test Signal 68
Setting Receive Structured Payload/Test Signal 70
Setting Transmit N x 64 kb/s/N x 56 kb/s
Structured Payload/Test Signal 71
Setting Receive N x 64 kb/s/N x 56 kb/s
Structured Payload/Test Signal 73
Inserting an External DSn Payload/Test Signal 74
Dropping an External Payload/Test Signal 77
Adding Errors and Alarms at the SONET Interface 80
Adding Errors and Alarms to a DSn Signal 81
Using FEAC Codes 82
Setting DSn Spare Bits 84
Adding Pointer Adjustments 85
Using Pointer Graph Test Function 93
Stressing Optical Clock Recovery Circuits 95
Generating Automatic Protection Switch (APS) Messages 97
Inserting and Dropping the Data Communications Channel 102
Using DS1 LOOP Codes 103
4 Making Measurements
Using Overhead BER Test Function 108
Performing a Trouble Scan 109
6
Page 7

Contents
Test Timing 111
Making SONET Analysis Measurements 112
Making DSn Analysis Measurements 113
Measuring Frequency 114
Measuring Optical Power 115
Measuring Round Trip Delay 116
Monitoring Signaling Bits 118
Measuring Service Disruption Time 119
Performing a SONET Tributary Scan 122
Performing a SONET Alarm Scan 125
Performing a DSn Alarm Scan 126
Measuring Jitter 127
Measuring Extended Jitter 129
Measuring Wander 131
Measuring Jitter Tolerance 134
Measuring Jitter Transfer 138
Measuring Pointer Adjustment (Tributary) Jitter 144
5 ATM Operation
Setting up the Transmitter for ATM Payloads 150
Setting up the Convergence Sublayer 153
Setting Foreground Traffic 155
Setting Background Traffic 157
Setting Foreground and Background Distributions 158
Transmitting ATM Alarms 161
Adding ATM Errors 163
Viewing ATM Results 165
Setting up the Receiver for ATM Payloads 166
Setting up the Receiver ATM signal 168
7
Page 8

Contents
Policing ATM Traffic 170
Measuring ATM Delay Performance 172
Measuring ATM Alarms 175
ATM Service Disruption 176
6 Packet over SONET (POS)
POS Protocol Stack 180
Setting up the Transmitter for POS Payloads 181
Setting HDLC Framing, Scrambling and HDLC Frame Check
Sequence 183
Setting IP Packet (Datagram) Length and Inter-Packet Gap 186
Setting IP Header 188
Setting IP Addresses 189
Setting IP Payload 190
Adding POS Alarms 191
Adding POS Errors 192
Setting up the Receiver for POS Operation 193
Setting up the Receiver POS signal 195
Viewing POS Results 196
POS Applications 197
Channelized Testing 198
Fully Exercising POS Hardware Architecture 200
Throughput Testing 204
Continuity Test 208
POS Service Disruption 211
HDLC Frame Stuffing 214
Jitter Tolerance Testing of POS Equipment 217
8
Page 9

Contents
7 Storing, Logging and Printing
Saving Graphics Results to Instrument Store 222
Recalling Stored Graph Results 223
Viewing the Bar Graph Display 225
Viewing the Graphics Error and Alarm Summaries 227
Logging Graph Displays 229
Logging Results 231
Logging on Demand 241
Logging Jitter Tolerance Results 245
Logging Jitter Transfer Results 247
Logging Results to Parallel (Centronics) Printer 249
Logging Results to GP-IB Printer 250
Logging Results to Internal Printer 251
Logging Results to RS-232-C Printer 252
Printing Results from Disk 253
Connecting a Printer to a Parallel Port 254
Changing Internal Printer Paper 255
Cleaning Internal Printer Print Head 258
8 Using Instrument and Disk Storage
Storing Configurations in Instrument Store 260
Titling Configuration in Instrument Store 261
Recalling Configurations from Instrument Store 262
Formatting a Disk 263
Labeling a Disk 264
Managing Files and Directories on Disk 265
Saving a Screen Dump to Disk 272
Saving Graphical Results to Disk 274
9
Page 10

Contents
Saving Data Logging to Disk 276
Saving Configurations to Disk 277
Recalling Configuration from Disk 278
Recalling Graphics Results from Disk 279
Copying Configuration from Instrument Store to Disk 280
Copying Configuration from Disk to Instrument Store 282
Copying Graphics Results from Instrument Store to Disk 284
9 Selecting and Using "Other" Features
Coupling Transmit and Receive Settings 288
Setting Time & Date 289
Enabling Keyboard Lock 290
Enabling Beep on Received Error 291
In-Band DS1 Loopcode 156MTS Compatibility 292
Suspending Test on Signal Loss 293
REI-L Result/Enable 294
AIS-L Result/Enable 295
Graph Storage Resolution 296
Setting Error Threshold Indication 297
Setting Screen Brightness and Color 298
To Generate a New Jitter Mask 299
To change the parameters of a User-defined jitter mask 301
Running Self Test 303
Trigger Output 306
10
Page 11

Contents
10 STS-1 SPE Background Patterns
11 ETSI/ANSI Terminology
ETSI/ANSI Conversion and Equivalent Terms 312
12 Glossary of Terms
11
Page 12

Contents
12
Page 13

1
"Product Description " page 14
"Conventions " page 15
"Connecting to the Network " page 16
"Connecting Accessories " page 20
"Front Panel Soft Recovery (Cold Start) " page 21
"OmniBER 718 Option Guide " page 22
1 Introduction
Page 14

Product Description
Product Description
The OmniBER Communications Performance Analyzer provides all the test
capability you need to fully verify the performance of today’s high-capacity
transmission systems and networks.
The main features of a dual standard (SDH/SONET) instrument are as follows:
• Multi-rate transmission testing from DS0 to OC-48.
• Supports concatenated payloads of VT 1.5 to STS-48c.
• Full PDH/T- carrier testing.
• Direct measurement of protection switching time.
• Powerful thru-mode testing for SONET ring turn-up.
• Comprehensive SONET overhead testing.
• Packet over SONET/SDH (POS) and ATM payloads up to 2.5 Gb/s.
• Fast access to key measurement tasks via Smart Test.
• Optical power and line frequency measurements.
• J0 section trace for DWDM testing
• J1 and J2 path trace for network path testing
• Optional integrated graphical printer.
• Transmit and Receive can be independently configured.
14
Page 15

Conventions
+
Conventions
The conventions used in this manual to illustrate instrument keys and display
information are as follows:
TRANSMIT
PARALLEL
This is an example of a hardkey. Hardkeys (located to the right of the display) are
used to give access to different sets of instrument settings, or select dedicated
instrument functions. The key shown here displays the transmit settings.
This is an example of a softkey. Softkeys (located below the display) are used to
select instrument settings. The values associated with softkeys change as you move
the display cursor from one instrument setting to another.
These are the cursor control keys. They are used to move the display cursor from
one instrument setting to another.
This is an example of a pop-up menu. Pop-up menus are an alternative way of
selecting instruments settings (instead of using softkeys) . To access a pop-up menu,
highlight an instrument setting, then use the key.
This symbol (when it appears next to settings on the display) indicates that there is a
pop-up application associated with the instrument setting. To access a pop-up
application, highlight the instrument setting which has this symbol, then use the
SET
key.
SET
This symbol appears at the bottom right of the display when an optical transmit
module is fitted to the instrument. The symbol’s background changes from black to
yellow when the optical output goes active.
15
Page 16

Connecting to the Network
Connecting to the Network
The network connectors are located on the modules at the side of the instrument.
The connections available depend on the options fitted to your instrument.
Before Connecting, note the Warning and Caution information given.
Removing/Inserting Modules
Modules should only be removed or inserted by trained personnel.
All Connectors
CAUTION When connecting or disconnecting, ensure that you are grounded or,
make contact with the metal surface of the Mainframe with your free hand to bring
you, the module, and the mainframe to the same static potential.
Modules remain susceptible to ESD damage while the module is installed in the
Mainframe
Additional ESD information is required when servicing, see your Verification
manual for further information.
16
Page 17

Connecting to the Network
Optical Interface Connectors
For your protection, review all laser information given in this manual and th e
Verification manual before installing or using the instrument.
WARN IN G To prevent personal injury, avoid use that may be hazardous to others, and
maintain the module in a safe condition En sure the information given below is
reviewed before operating the module.
Laser Product Classification
All optical modules are classified as Class I (non-hazardous) laser product in the
USA which complies with the United States Food and Drug Administration (FDA)
Standard 21 CFR Ch.1 1040.10, and are classified as Class 1 (non-hazardous) laser
products in Europe which complies with EN 60825 -1 (199 4).
T o avoid hazardous expo sure to laser radiation, it is recommen ded that the f ollowing
practices are observed during system operation:
• ALWAYS DEACTIVATE THE LASER BEFORE CONNECTING OR
DISCONNECTING OPTICAL CABLES.
• When connecting or disconnecting optical cables between the module and device-under-test, observe the connection sequences given below.
Connecting: Connect the optical cable to the input of the device-under-test
before connecting to the module’s Optical Out connector.
Disconnecting: Disconnect the optical cable from the module’s Optical Out
connector before disconnecting from the device-under-test.
Always fit the fibre optic connector dust caps over the laser
aperture.
• NEVER examine or stare into the open end of a b roken, severed, or disconn ected
optical cable when it is connected to the module’s Optical Out connector.
• Arrange for service-trained personnel, who are aware of the hazards invo lved, to
repair optical cables.
17
Page 18

Connecting to the Network
CAUTION 1. Use of controls or adjustments or performance of procedures other than those
specified herein may result in hazardous radiation exposure.
2. Always fit the fibre optic connector dust caps on each connecto r when not in us e.
Before connection is made, always clean the connector ferrule tip with acetone or
alcohol and a cotton swab. Dry the connector with compressed air. Failure to
maintain cleanliness of connectors is liable to cause excessive insertion loss.
Laser Warning Symbols
The front p anel of the optical module has the following label:
CLASS 1 LASER PRODUCT
NOTE CLASS 1 LASER PRODUCT translates as follows:
Finnish - LUOKAN 1 LASERLAITE
Finnish/Swedish - KLASS 1 LASER APPARAT
This label indicates that the radiant energy present in this instrument is nonhazardous.
OPTICAL IN Allows connection of an optical si gnal, wavelengt h 1200 to 1600 n m, at a maximum
input power level of -8 dBm. NEVER EXCEED +3 dBm.
Accepts SONET signals OC-1, OC-3, OC-12 and OC-48 and SDH signals STM-0,
STM-1, STM-4 and STM-16 depending on the instrument options fitted.
OPTICAL OUT Provides optical signals OC-1, OC-3, OC-12 or OC-48 at wavelength 1290 nm to
1330 nm, at a typical power level of +1 dBm. Also provides SDH signals STM-0,
STM-1, STM-4 and STM-16 depending on the instrument options fitted.
18
Page 19

Connecting to the Network
Cleaning Optical Connectors
It is recommended that the optical connectors be cleaned at regular intervals using
the following materials:
Description Part Number
Blow Brush 9300-1131
Isopropyl Alcohol 8500-5344
Lens Cleaning Paper 9300-0761
Adhesive T ape Kit 15475-68701
CAUTION Do not insert any tool or object into t he IN or OUT port s of the instrum ent as damage
to or contamination of the optical fibre may result.
1 Recall Default settings (STORED SETTINGS 0) and remove the power from the
OmniBER 718.
2 Remove the adapters from the IN and OUT ports. Use an 11 mm spanner to
slacken the nut securing the adapter. On re-assembly tighten the nut using a
torque spanner to 1.5 Nm.
3 Using the blow brush with the brush removed blow through the ferrule of the
standard flexible connector and the adapter.
CAUTION If the optical fibre of the fixed connector requires further cleaning this entails
disassembly of the modul e which should only be carried out by suitably trained
service personnel.
4 Apply some isopropyl alcohol to a piece of the cleaning paper and clean the barrel
of the adapter. Us ing a new piece of cleaning paper , clean the face of the adapter .
Repeat this operation, using a new piece of cleaning paper each time.
5 Lightly press the adhesive side of the tape provided against the front of the
adapter, then remove it quickly - repeat twice. This removes any parti cles of
cleaning paper which may be present.
6 Replace the adapters on the flexible connector.
19
Page 20

Connecting Accessories
Connecting Accessories
LID Provides the output for the option 602 printer which is fitted in the cover (LID) of
the instrument.
VGA Provides the output for a display monitor.
HANDSET Allows connection of a telephone handset for communication across the network.
Printer
HP-IB (GPIB),
RS232,
PARALLEL ONLY
Remote Control
HP-IB (GPIB),
RS232,
10 BASE -T
The port selected for external printer use is not available for remote control.
See "Connecting a Printer to a Parallel Port " page 254.
Remote control connection is given in the Remote Control Manual.
The port selected for remote control use is not available for an external printer.
10 Base-T Lan Connection Radiated Emissions
To ensure compliance with EN 55011 (1991) a category 5, STP patch lead, RJ45
cable should be used to connect the LAN port on the processor module marked
"10 Base-T".
20
Page 21

Front Panel Soft Recovery (Cold Start )
Front Panel Soft Recovery (Cold Start)
Use the following procedure if you need to perform a front panel soft recovery (i.e.
cold start) of the instrument.
Soft Recovery Procedure
1 Switch off the instrument.
2 On the instrument front panel - press and hold so ftkeys 0 and 4 simultaneously
(the softkeys immediately below the display; key 0 is on the extreme left).
3 Power up the OmniBER 718 while holding the softkeys pressed.
4 When the LOS LED has flashed OFF and then ON again, the keys can be
released.
5 The LOS LED will flash OFF/ON again several times (7), followed by an audible
‘beep’ and the display indicating ‘Initializing Instrument’.
6 Once the initialization is complete the display will indicate:
‘Firmware Revision Update’
‘Default settings assumed’
Hit any key to attempt restart’
7 Hit any key, then wait approximately 10 seconds. The instrument should return
to its default settings and normal operation.
21
Page 22

OmniBER 718 Option Guide
OmniBER 718 Option Guide
This guide explains the features offered with each OmniBER Mainframe and its
associated options. There are three mainframes as follows:
• The 37718A
• The 37718B
• The 37718C
The instrument test interfaces are:
2.5 Gb/s, 622 Mb/s, 155 Mb/s, 52 Mb/s, DS1 (1.5 Mb/s), DS3 (45 Mb/s),
E1 (2 Mb/s), E2 (8Mb/s), E3 (34 Mb/s).
Mainframe test rate capability
Mainframe T est Rate Capability
37718A 2.5 Gb/s, 622 Mb/s, 155 Mb/s and 52
Mb/s
37718B 622 Mb/s, 155 Mb/s and 52 Mb/s
37718C 155 Mb/s and 52 Mb/s
Note that 52 Mb/s and 155 Mb/s electrical testing is included
in the base mainframe.
SDH/SONET Interf a c e
Interface Option
SDH only 001
Dual standard SDH/SONET (ANSI/ITU-
T)
22
002
Page 23

OmniBER 718 Option Guide
Tributary test options
Option
PDH/T-carrier DS1, DS3, 2 Mb/s, 8 Mb/s, 34 Mb/s
and 140 Mb/s
2 Mb/s into DS3 mapping (also requires option 012) 014
Replaces BNC connector with WECO 560 620
Optical interface
An optical interface must be ordered if an 37718A or 37718B is required.
Option
1310 nm only 104
1550 nm only 105
Dual wavelength 1310 nm/1550 nm 106
Replaces FC/PC adapters with SC 610
Replaces FC/PC adapters with ST 611
Jitter
Option
012
Adds jitter to all rates 200
23
Page 24

OmniBER 718 Option Guide
ATM/POS
Option
ATM payloads (requires option
350)
POS payloads (requires option
350)
Advanced payload engine 350
Please note that in earlier versions of the OmniBER the list of AT M options
included options 300, 301 and 302. These options have now been merged into one
ATM option 300 (as listed above). A new Advanced payload engine option 350 has
been added which must be ordered with an ATM or POS option.
Accessory options
Remote Omnibook controller 600
RS-232-C, GPIB and LAN remote control
interfaces
80-column in-lid printer 602
300
310
Option
601
24
Page 25

2
“Setting PDH/DSn Transmit Interface (Option 012)” page 26
“Setting DSn THRU Mode” page 28
“Setting SONET Transmit Interface” page 29
“Setting Jitter Transmit Interface” page 33
“Setting Wander Transmit Interface” page 35
“Setting SONET THRU Mode” page 37
“Using Smart Test” page 40
“Setting PDH/DSn Receive Interface” page 45
“Setting SONET Receive Interface” page 47
“Setting Jitter Receive Interface” page 48
“Setting Extended Jitter Receive Interface” page 49
“Setting Wander Receive Interface” page 50
2 Setting the Interfaces
This chapter tells you how to set the instrument
interfaces to match the network being tested.
Page 26

Setting the Interfaces
Setting PDH/DSn Transmit Interface (Option 012)
Description DSn transmit interface settings should match network equipment settings of R ate,
Termination and Line Code and determine the Payload to be tested.
TIP: To set the Transmitter and Receiver to the same interface settings choose
SETTINGS CONTROL COUPLED
HOW TO: 1 Choose the required SIGNAL rate from 2 Mb/s, 8 Mb/s, 34 Mb/s, 140 Mb/s PDH,
plus DS1, DS3 T-carrier interfaces.
2 Choose the required CLOCK SYNC source, internally generated, externally
generated or recovered from the received PDH/DSn signal. If you select an
external clock source, connect the external source to the appropriate port on the
OmniBER clock module.
.
OTHER
3 If DS1 or DS3 is chosen, choose the required OUTPUT LEVEL.
4 If you have chosen 2 Mb/s as the SIGNAL rate, choose the required
TERMINATION. (At all other signal rates the impedance is fixed).
26
Page 27

Setting the Interfaces
Setting PDH/DSn T ransmit Interface (Option 012)
5 If you have chosen 8 Mb/s, 2 Mb/s or DS1 as the SIGNAL rate, choose the
required LINE CODE. (At 140 Mb/s, 34 Mb/s and DS3 coding is fixed).
6 If required, choose the FREQUENCY OFFSET value.
See “Adding Frequency Offset to the DSn Signal” page 64.
7 Choose the required PAYLOAD TYPE.
If is required must be chosen.
STRUCTURED FRAMED
If is chosen the DSn test signal must be set up. See “Setting
STRUCTURED
Transmit Structured Payload/Test Signal” page 68.
If you have chosen 2 Mb/s, DS1 or DS3 as the DSn SIGNAL rate, the Framed
choice is expanded to provide a menu of framing types.
8 Choose the PATTERN type and the PRBS POLARITY.
Additional Patterns at DS1
9 If you select a DS1 SIGNAL , two 8-bi t pattern s and a 55 Octe t pat tern are ad ded
to the list of available patterns. The 8-bit patterns are as follows:
Table 1 8-Bit Patterns
Type Pattern
1-in-8 F01000000
2-in-8 F01100000
Note 1: F indicates the position of the framing bit with respect to the 8-bit pattern
when the framed data is generated
Note 2: Both 8-bit patterns and the 55 Octet pattern can only be selected as a
payload for the whole DS1, i.e. they can not be selected as a pattern for an
individual 64 kb/s channel.
Note 3: Bit errors can be added to both 8-Bit and 55 Octet test patterns as with the
other avai lable test pat terns.
The 55 Octet pattern uses the Daly pattern as per ANSI T1.403
27
Page 28

Setting the Interfaces
RECEIVE
Setting DSn THRU Mode
Setting DSn THRU Mode
Description THRU mode is used to non-intrusively monitor DSn lines where no protected
monitor points are available.
Note that since THRU mode locks some user settings, you must set SIGNAL RATE
(DS1 or DS3), before selecting THRU mode.
Two modes of operation are possible:
Monitor Mode: This is when the Entire Frame Error Rate field is set to OFF. In this
mode the received signal is passed through or transmitted unchanged, and the
instrument monitors errors and alarms as normal DS1 operation.
Full Frame Overwrite Mode: In this mode any bit in the entire frame can be
errorred at a user defined rate. The bit that is errorred can be any bit in the frame,
including the frame bit (hence the title of “Full Frame Overwrite”). The error rates
available are:
Data error rates: 1.0E-3, 1.0E-4, 1.0E-5, 1.0E-6, 1.0-E-7 and user programmable
in 0.1 steps from 1.1E-3 to 1.0E-9
HOW TO: 1 Make the required SIGNAL RATE cho ice on the PDH/DSn
and displays.
2 Select THRU MODE as shown in the figure above.
3 Select an entire frame error rate from the choices given or us e the USER softkey
to program an error rate.
28
TRANSMIT
Page 29

Setting the Interfaces
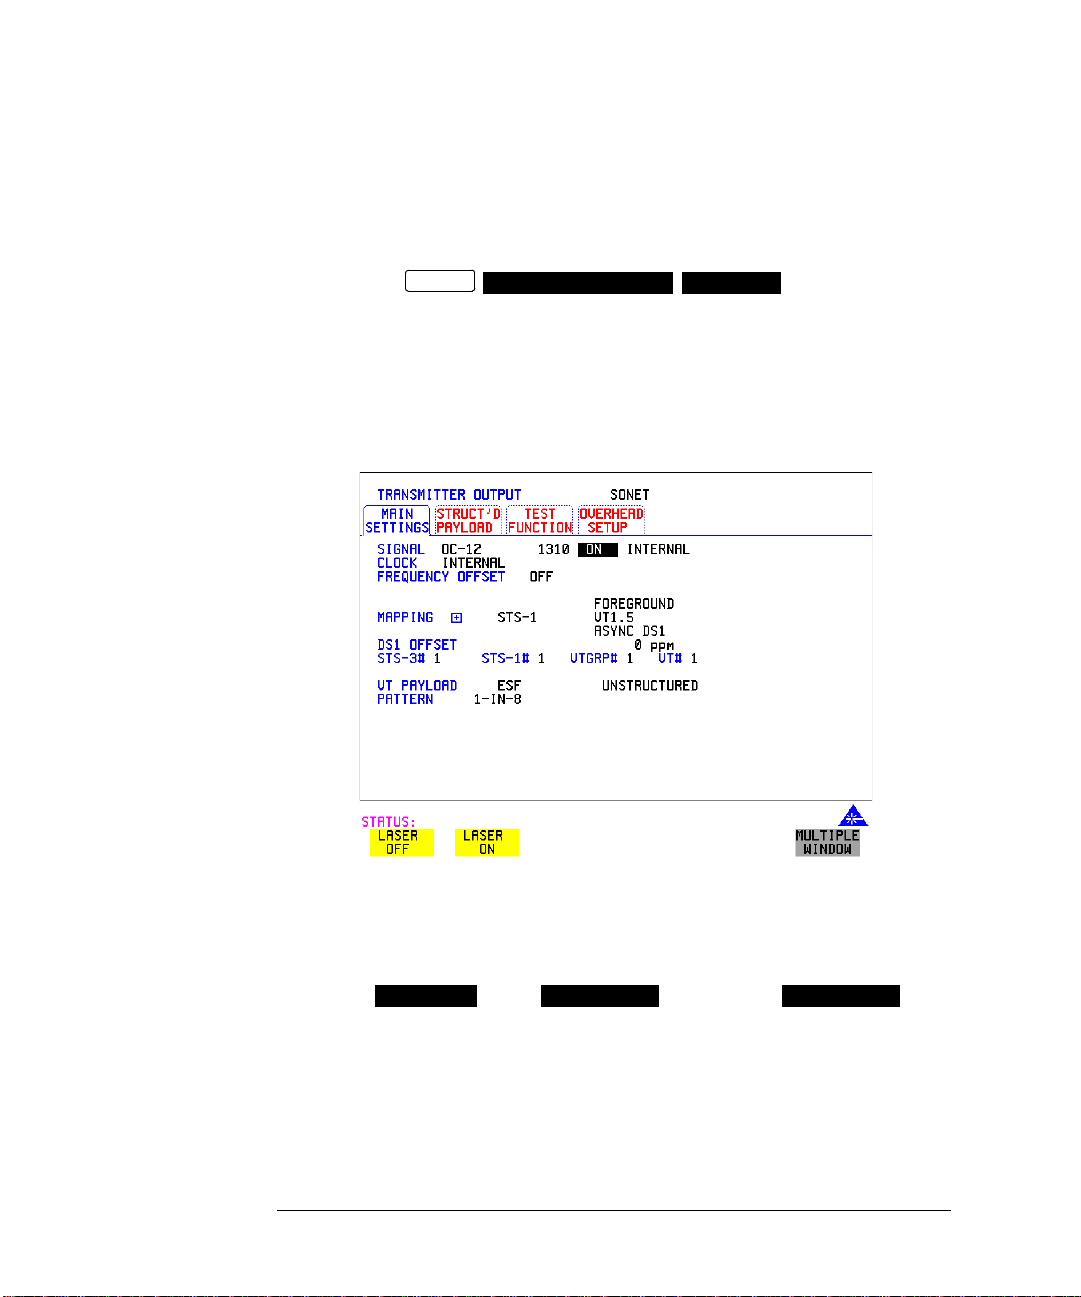
Setting SONET Transmit Interface
Setting SONET Transmit Interface
Payload Selection
One of the key features of the OmniBER 718 is the ability to test concatenated
payloads. The following gives a brief des cri pti on of concatenat ed payl o ads , and the
benefits of using them.
Concatenated Payloads
Bulk filled or contiguous payload structures e.g. (STS-48c) are designed for
carrying broadband services. The entire payload area is used to carry the service
with no structured mapping or channelization.
In the case of a concatenated STS-48 (denoted STS-48c), the virtual container area
is entirely filled by a single STS-48c SPE. This STS-48c SPE consists one Path
Overhead and a single container capable of carrying a tributary signal operating at
rates up to approximately 2.5 Gb/s. Once assembled a STS-48c SPE is multiplexed,
switched and transported through the network as a single entity.
Benefits: Test the entire bandwidth in one go, and reduce test times. The following
table illustrates the reduced test times using concatenated payloads.
Test Time (based on 100
errors)
Performance
test limit
14
10-
13
10-
12
10-
11
10-
10
10-
STS-48c SPE
payload
48 days >2 years
4.8 days 77 days
1 1.6 hou rs 7.7 days
1.2 hour 18.5 hour
7 minutes 1.9 hours
STS-3c SPE
payload
29
Page 30
Setting the Interfaces
Setting SONET Transmit Interface
Description SONET transmit interface settings should match the network equipment settings of
Rate, Wavelength and Mapping, determine the payload to be tested and set
background conditions to prevent alarms while testing.
TIP: If you wish to set the OmniBER 718 transmitter and receiver to the same interface
settings choose
OTHER
SETTINGS CONTROL COUPLED
Laser On/Off Control
If you wish to switch off the laser when connecting/disconnecting cables, set the
field between the wavelength and INTERNAL selections to OFF. When the laser is
on the laser symbol at the bottom right of the display is illumin a ted (yellow).
.
HOW TO: 1 Make your choice of SIGNAL rate.
If Option 106, Dual Wavelength optical module, is fitted and an optical rate is
chosen, choose the required wavelength (1550 or 1310).
If STS-1 is chosen, choose the required interface level.
Choose unless is required. If is
INTERNAL THRU MODE THRU MODE
chosen, see "Setting SONET THRU Mode " page 37.
2 Make your choice of CLOCK synchronization source. The clock can be
internally sourced from the instrument, recovered from the signal at the optical
RECEIVE port or externally sourced from the CLOCK REF IN ports (MTS 64
kb/s, BITS 1.5 Mb/s or 10 MHz REF).
30
Page 31

Setting the Interfaces
Setting SONET Transmit Interface
3 If required choose the FREQUENCY OFFSET value. See “Adding Frequency
Offset to SONET Signal” page 62.
4 Choose the required and PAYLOAD TYPE, then
B/G MAPPING
F/G MAPPING
and BACKGROUND selection. The FOREGROUND
selection is the channel that is chosen for test purposes. The BACKGROUND
patterns are not used for test purposes and are either the same as the test channel
or set to UNEQUIPPED.
Mapping may be selected from a pictorial display by moving the cursor to
MAPPING and pressing .
SET
Use and to move between STS Layer choice, VT Layer choice and
Payload Layer choice. Use and to choose the mapping.
SET
Use to confirm your choice and return to the
SONET MAIN SETTINGS
display.
5 If VT -6 map ping is chosen, VT CONCATENATION selection is enabled, choose
or the tributary at which the concatenation b e gins, VT6 -2C thr oug h VT6 -
OFF
6C.
The BACKGROUND, PATTERN IN OTHER VT-6s is fixed at NUMBERED,
that is, each VT-6 contains a unique number to allow identification in case of
routing problems.
6 If required, choose DS1/2M/34M/DS3 O F FSET value. See “Adding Frequency
Offset to SONET Signal” page 62
31
Page 32

Setting the Interfaces
Setting SONET Transmit Interface
7 If FULL SPE, VT -6, VT-2 or VT-1.5 mapp ing is chosen, choose the tes t tributary ,
including the STS-3 for an OC-12/OC-48 signal.
8 Choose the payload framing under PAYLOAD TYPE or VT PAYLOAD.
If is required must be chosen.
STRUCTURED FRAMED
If is chosen, the Payload test signal must be set up. See “Setting
STRUCTURED
Transmit Structured Payload/Test Signal” page 68.
If is chosen, see “Inserting an External DSn Payload/Test Signal”
INSERT
page 74.
If you have chosen 2 Mb/s, DS1 or DS3 under Mapping, the Framed choice is
expanded to provide a menu of framing types.
9 Choose the PATTERN type and PRBS polarity.
10 Choose the mapping required in the background (non-test) STS’s. Refer to
Appendix A for a table of background patterns for STS-1 SPE.
11 If VT mapping is chosen for the test STS, choose the PATTERN IN OTHER
VT’s.
32
Page 33

Setting the Interfaces
Setting Jitter Transmit Interface
Setting Jitter Transmit Interface
Description:
Option 200 required
for jitter and option
012 for PDH/DSn.
HOW TO: 1 If you are adding jitter to the DSn signal, set up the DSn transmit interface. See
You can add jitter to the transmitted DSn or SONET signal at DS1, DS3, 2 Mb/s,
34 Mb/s, STS-3, OC-3, OC-12, and OC-48. You can source the jitter modulation
internally or from an external source. Jitter measurement up to 2.5 Gb/s is available
when ATM or POS is selected as a payload.
Chapter “Setting PDH/DSn Transmit Interface (Option 012)”.
2 If you are adding jitter to the SONET signal, set up the SONET tran smit interface.
See “Setting SONET Transmit Interface” page 29.
3 Choose JITTER/WANDER .
If you wish to add wander to the DSn or SONET signal, See “Setting Wander
Transmit Interface” page 35.
4 Choose JITTER .
If you wish to perform a Jitter Tolerance measurement, choose
AUTO TOLERANCE
If you wish to perform a Jitter Transfer measurement choose
TRANSFER FUNCTION
ON
JITTER
. See “Measuring Jitter Tolerance” page 134.
. See “Measuring Jitter Transfer” page 138.
33
Page 34

Setting the Interfaces
Setting Jitter Transmit Interface
Choose the modulation source.
If adding jitter to the DSn signal and is chosen, connect the
EXTERNAL
external source to the MOD IN port of the DSn Jitter TX module. Up to 10 UI of
external jitter modulation can be added at the MOD IN port.
If adding jitter to the SONET signal and is chosen, connect the
EXTERNAL
external source to the MOD IN port of the SONET Clock modu le. Up to 20 UI of
external jitter modulation can be added at the MOD IN port.
5 If you have selected an Modulation Source, choose the JITTER
INTERNAL
CONTROL setting required.
You can choose the jitter range, jitter modulating frequency and jitter amplitude
if is chosen.
OFF
If you choose , the OmniBER 718 will "sweep" through the ITU-T jitter
SWEPT
mask (G.823 for PDH, GR-499 or G.824 for DSn, G.958, G.825 or GR-253 for
SONET) adjusting the jitter amplitude according to the jitter frequency . With the
SWEPT
field selected, press SET on t he instrument front panel for a display of
the jitter mask sweep (an example is given below).
If you choose , you can choose the "spot" jitter frequency. The jitter
SPOT
amplitude is adjusted and controlled according to your jitter frequency choice.
TIP: If, when using the SWEPT MASK capability, a problem occurs around a certain
frequency, this may require closer examination. Stop the sweep at that point by
choosing . You can then control the "spot" jitter frequency to make closer
SPOT
examination of the problem.
34
Page 35

Setting the Interfaces
Setting Wander Transmit Interface
Setting Wander Transmit Interface
Description: You can add Wander to the 2 Mb/s DSn signal and the STS-3, OC-3,
OC-12 or OC-48 SONET signal. Wander is also available when you select an ATM
or POS payload.
HOW TO: DSn Wander (2 Mb/s)
1 Set up the PDH transmit interface, choose CLOCK and select the SOURCE
required from the menu. If you select EXTERNAL connect the ex ternal source to
the REF IN port on the CLOCK module. See “Setting PDH/DSn Transmit
Interface (Option 012)” page 26.
2 Choose JITTER/WANDER .
If you wish to add jitter to the DSn signal, See “Setting Jitter Transmit Interface”
page 33.
3 Choose WANDER .
4 Choose the WANDER MASK setting required.
You can choose the wander modulating frequency and wander amplitude if
is chosen.
OFF
If you choose , you can choose the "spot" wander frequen cy. The wander
amplitude is adjusted and controlled according to your wander frequency choice.
SPOT
WANDER
ON
35
Page 36

Setting the Interfaces
Setting Wander Transmit Interface
SONET Wander (STS -3, OC-3, OC -12, OC-48)
5 Set up the SONET transmit interface. See “Setting SONET Transmit Interface”
page 29.
6 Choose JITTER/WANDER .
WANDER
If you wish to add jitter to the SONET signal, see "Setting Jitter Transmit
Interface " page 33.
7 Choose WANDER .
ON
8 Choose the WANDER MASK setting required.
You can choose the wander modulating frequency and wander amplitude if
is chosen.
OFF
If you choose , you can choose the "spot" wander frequen cy. The wander
SPOT
amplitude is adjusted and controlled according to your wander frequency choice.
36
Page 37

Setting the Interfaces
Setting SONET THRU Mode
Setting SONET THRU Mode
Description THRU mode is used to non-intrusively monitor SONET lines where no protected
monitor points are available. To enable THRU mode select the
MAIN SETTINGS
page. Select SIGNAL RATE before selecting THRU mode.
The entire frame can be errorred at a user defined rate if PAYLOAD OVERWRITE
and TOH+POH CHANNEL OVERWRITE are both set to . If either
overwrite is enabled the ENTIRE FRAME ERROR RATE f unctio n is disabled.
There are nominally three modes of operation as follows:
1. Transparent mode: This is the case when the PAYLOAD OVERWRITE field is
set to OFF. The received signal is passed through the transmitter completely
unchanged. The figure below illustrates the settings for this mode.
TRANSMIT
OFF
2. Hitless THRU Mode:
This mode enables you to change the channel under test and the payload mapping
without causing errors in the line signal or any other payload channel, or having to
switch out of THRU mode. When yo u select a Payload Overwrite choice ( other than
OFF) an additional field is displayed which allows you to enable/disable Payload
Overwrite. If Payload Overwrite is disabled the instrument remains transmitting
while you select another channel/tributary (see figure on next page). In this mode
any Section or Line CV errors are recalculated before transmission.
37
Page 38

Setting the Interfaces
TRANSMIT
Setting SONET THRU Mode
3. Payload Overwrite: In this mode you can overwrite the payload as explained in
the following text. Any Path CV errors are recalculated before transmission. Use the
HOW TO procedure to setup your instrument for THRU Mode operation.
OC-1/STS-1, OC-3/STS-3
You can substitute a new payload, Section and Line Overhead (TOH) and Path
overhead (POH) in the received OC-1/STS-1 or OC-3/STS-3 signal for testing.
OC-12, OC-48
The overhead and payload may be overwritten for STS-3c SPE and STS-1.
PAYLOAD OVERWRITE is not available for STS-12C or STS-48C.
TOH+POH CHANNEL overwrite is available for STS-12C and STS-48C.
HOW TO: 1 Make the required SIGNAL RATE choice, and select THRU MODE on the
SONET
page 29.
2 Make the PAYLOAD OVERWRITE choice required.
Hitless Mode: The Payload Overwrite enable/disable field (next to the
PAYLOAD OVERWRITE field) defaults to OFF.
If STS-3c SPE, STS-1 SPE, VT-6, VT-2 or VT-1.5 is chosen, the Section, Line
and Path CVs are recalculated before transmission and the Mapping, Selected
VT, VT Payload, Pattern, Tributa ry Offset and Pattern in other VT’s settings are
displayed. To choose the settings in these, See "Setting SONET Transmit
Interface " page 29, steps 4 through 10.
38
display, See "Setting SONET Transmit Interface "
Page 39

Setting the Interfaces
Setting SONET THRU Mode
3 Switch the P AYLOAD OVERWRITE enable/disable field to ON. Test functions
are available whilst Payload Overwrite is enabled. Select the
TEST FUNCTION
folder and setup as required.
4 Make the TOH+POH CHANNEL OVERWRITE choice required.
The Section, Line and Path CVs are recalculated before transmission.
39
Page 40

Setting the Interfaces
Using Smart Test
Using Smart Test
Smart Setup The Smart Setup feature simplifies instrument operation by:
• Allowing the instrument to auto-configure on the incoming signal. It will attempt
to identify signal structure, and detect mixed payload signal structures and
alarms.
The OmniBER 718 automatically displays all of the J 1 trace identifiers. Once the
received signal has been identified you can select a channel of interest and
explore further into the payload.
Smart Tests Allows you to quickly access the most commonly used instrument features such as:
• Signal quality
• Functional tests
• Jitter tests
• ATM tests
• POS tests
• Settings (stored, logging, Tx/Rx coupling and trigger output en able)
HOW TO: 1 Connect the 37718A to the network an d choose if necessary the required SONET
RECEIVE
SONET, but can not select between SDH and SONET).
2 Press .
40
interface on the 37718A (Smartsetup will select PDH or SDH/
SMART TEST
Page 41

Setting the Interfaces
Using Smart Test
3 With Smartsetup highlighted, press to auto-discover information about
the receive signal.
Or press to exit Smart Tests.
CANCEL
START
An example of a typical display after choosing t o RUN Smartsetup is shown below.
Note: The channel information displayed is the one obtained the last time a SCAN
was performed. If you have changed the input signal since the last Smartsetup you
must perform a RESCAN now. If you have selected a PDH/DSn interface and a
PDH/DSn signal is received, a channel mapping display indicating the framing and
status of each channel is given, see below.
41
Page 42

Setting the Interfaces
Using Smart Test
SET UP RX
key If you select an individual channel using the cursor control keys, and then select
SET UP RX
, the instrument exits smartsetup and sets the receiver to the test
pattern detected in the selected channel.
To run a Smart Test (Signal Quality - Frequency Measurement):
1 Ensure a valid signal is connected to the instrument’s Receive port.
2 Press .
SMART TEST
3 Use the up and down cursor control keys to select Signal quality.
4 Use the left and right cursor control keys to access the tests.
5 Use the up and down cursor control keys to select Frequency Measurement.
6 Press
START
to display the frequency screen. Or press to exit Smart
CANCEL
Tests.
To run an ATM Smart Test
1 Ensure a valid signal is connected to one of the instrument’s Receive ports.
2 Press .
SMART TEST
3 Use the down cursor control key to select ATM payload setup or ATM tests.
4 Use the right cursor control key to access the setups/tests.
42
Page 43

Setting the Interfaces
Using Smart Test
5 Use the down cursor control key to select required setup/test.
Note: It is not possible for OmniBER to find ATM in a PDH payload in Sm art setu p.
43
Page 44

Setting the Interfaces
Using Smart Test
To run a POS Smart Test
1 Ensure a valid signal is connected to one of the instrument’s Receive ports.
2 Press .
SMART TEST
3 Use the down cursor control key to select POS Setup/Tests.
4 Use the right cursor control key to access the setups/tests.
5 Use the down cursor control key to select required setup/test.
6 Press
SELECT
to display the required S etup screen. Or press to exit
CANCEL
Smart Tests.
44
Page 45

Setting the Interfaces
Setting PDH/DSn Receive Interface
Setting PDH/DSn Receive Interface
Description DSn Receive interface settings should match the network equipment settings of
Rate, Termination and Line Code and determine the Payload to be tested.
TIP: To set the transmitter and receiver to the same interface settings choose
SETTINGS CONTROL COUPLED
HOW TO: 1 Choose the required SIGNAL rate.
2 If you have chosen 2 Mb/s as the SIGNAL rate, choose the required
TERMINATION. (At all other rates the impedance is fixed.)
.
OTHER
3 If you have chosen 8 Mb/s, 2 Mb/s or DS1 as the SIGNAL rate, choose the
required LINE CODE. (At 140 Mb/s, 34Mb/s and DS3 coding is fixed.)
4 If you are measuring at the network equipment monitor point, set the LEVEL
field to . In this case the received signal will be 20 to 30 dB below th e
normal leve l.
Choose the GAIN required to return the received signal to normal.
Choose EQUALIZATION to compensa te for cable losses if required.
5 Choose the PAYLOAD TYPE.
MONITOR
ON
45
Page 46

Setting the Interfaces
Setting PDH/DSn Receive Interface
If is required must be chosen.
STRUCTURED FRAMED
If is chosen, the PDH/DSn test signal must be set up. See
STRUCTURED
“Setting Transmit Structured Payload/Test Signal” page 68.
If you chose 2 Mb/s, DS1 or DS3 as the PDH/DSn SIGNAL rate, the FRAMED
choice is expanded to provide a menu of framing types.
6 Choose the PATTERN type and the PRBS POLARITY required.
Additional Patterns at DS1
7 If you select a DS1 SIGNAL, two 8- bit pa tterns and a 55 Octet p attern are ad ded
to the list of available patterns. They are as follows:
Table 2 8-Bit Patterns
Type Pattern
1-in-8 F01000000
2-in-8 F01100000
Note 1: F indicates the position of the framing bit with respect to the 8-bit pattern
when the framed data is generated
Note 2: Both 8-bit patterns and the 55 Octet pattern can only be selected as a
payload for the whole DS1, i.e. they can not be selected as a pattern for an
individual 64 kb/s channel.
The 55 Octet pattern uses Daly pattern as per ANSI T1.403.
46
Page 47

Setting the Interfaces
Setting SONET Receive Interface
Setting SONET Receive Interface
Description SONET Receive interface settings should match the network equipment settings of
Rate and Mapping, and determine the payload to be tested.
TIP: If you wish to set the OmniBER 718 transmitter and receiver to the same interface
settings, choose
receiver to be configured to the same settings as the transmitter.
OTHER
SETTINGS CONTROL COUPLED
. This causes the
HOW TO: 1 Choose the required SIGNAL source either electrical or optical.
If STS-1 or STS-3 is chosen, choose the required LEVEL.
If the LEVEL chosen is choose the required GAIN.
MONITOR
2 Choose mapping and type of payload.
3 If VT-6 mapping is chosen, and CONCATENATION is enabled, choose the
tributary at which the concatenation begins.
If VT-6, VT-2 or VT-1.5 mapping is chosen, choose the test tributary, including
the STS-3 for an OC-12/OC-48 signal.
4 Choose the payload framing under PAYLOAD TYPE or VT PAYLOAD.
If is required must be chosen.
STRUCTURED FRAMED
If is chosen the Payload test signal must be set up. See “Setting
STRUCTURED
Receive Structured Payload/Test Signal” page 70.
If DROP is chosen, see “Dropping an External Payload/Test Signal” page 77 .
5 Choose the PATTERN type and PRBS polarity.
47
Page 48

Setting the Interfaces
Setting Jitter Receive Interface
Setting Jitter Receive Interface
Description:
Option 200 required
for Jitter operation.
Jitter and error measurements are made simultaneously when a jitter option is fitted.
Jitter measurement up to 2.5 Gb/s is also available when ATM or POS is selected as
a payload. The jitter receive interface is selected with
JITTER
or MEASUREMENT TYPE .
RECEIVE
SONET JITTER JITTER
RECEIVE
PDH/DSn
The choices made on the jitter receive interface determine the jitter measurement
range, the threshold level for determining a jitter hit and which filters are used in the
jitter measurement.
HOW TO: 1 Choose the RECEIVER RANGE - the jitter measurement range.
2 Choose the HIT THRESHOLD level - if the received jitter exceeds the value
chosen a jitter hit is recorded.
3 Choose the FILTER you wish to inclu de in th e peak to peak and RMS jitter
measurement. The choices are:
OFF, LP, HP1, HP2, 12kHz HP, LP+HP1, LP+HP2, LP+12kHz HP
4 If you have selected a PDH/DSn Receive Interface you can also select FILTER
VERSION, O.171 or O.172/GR-499. The selection is not available with a
SONET Receive Interface.
48
Page 49

Setting the Interfaces
JITTER
Setting Extended Jitter Receive Interface
Setting Extended Jitter Receive Interface
Description: Extended Jitter measurements are made in a jitter bandwidth of 0.1 Hz to 25 kHz.
These measurements are made at the upper end of the standard wander frequency
range and the lower end of the standard jitter frequency range. The extended jitter
receive interface is selected with
SONET
MEASUREMENT TYPE .
RECEIVE
PDH/DSn JITTER
EXTENDED
The choices made on the jitter receive interface determine the threshold level for
determining a jitter hit. The measurement Range and the Filters are not selectable.
or
RECEIVE
HOW TO: 1 Choose MEASUREMENT TYPE
2 Choose the HIT THRESHOLD level - if the received jitter exceeds the value
chosen a jitter hit is recorded.
EXTENDED
.
49
Page 50

Setting the Interfaces
MAIN SETTINGS
Setting Wander Receive Interface
Setting Wander Receive Interface
Description: You can measure Wan der at all DSn and SONET rates. An external timing r eference
should be selected on the or
TRANSMIT
display to ensure accurate Wander results.
PDH/DSn SONET
HOW TO: 1 Choose an external timing reference on the
SONET
MAIN SETTINGS
TRANSMIT
display . See, “Setting SONET Tran smit Interface” page 29.
2 If you intend to measure wander on a DSn signal, set up the DSn receive
interface. See, “Setting PDH/DSn Receive Interface” page 45.
3 If you intend to measure wander on a SONET signal, set up the SONET receive
interface. See, “Setting SONET Receive Interface” page 47.
4 Choose MEASUREMENT TYPE
WANDER
.
5 Choose the wander HIT THRESHOLD - if the received wander exceeds the value
chosen a wander hit is recorded.
50
Page 51

3
“Using Transmit Overhead Setup” page 52
“Using Receive Overhead Monitor” page 54
“Setting Overhead Trace Messages” page 56
“Setting Overhead Labels” page 57
“Generating Overhead Sequences” page 58
“Using Receive Overhead Capture” page 60
“Adding Frequency Offset to SONET Signal” page 62
“Adding Frequency Offset to the DSn Signal” page 64
“Setting up Signaling Bits” page 65
“Setting Transmit Structured Payload/Test Signal” page 68
“Setting Receive Structured Payload/Test Signal” page 70
“Setting Transmit N x 64 kb/s/N x 56 kb/s Structured Payload/Test Signal”
page 71
“Setting Receive N x 64 kb/s/N x 56 kb/s Structured Payload/Test Signal”
page 73
“Inserting an External DSn Payload/Test Signal” page 74
“Dropping an External Payload/Test Signal” page 77
“Adding Errors and Alarms at the SONET Interface” page 80
“Adding Errors and Alarms to a DSn Signal” page 81
“Using FEAC Codes” page 82
“Setting DSn Spare Bits” page 84
“Adding Pointer Adjustments” page85
“Using Pointer Graph Test Function” page 93
“Stressing Optical Clock Recovery Circuits” page 95
“Generating Automatic Protection Switch (APS) Messages” page 97
“Inserting and Dropping the Data Communications Channel” page 102
“Using DS1 LOOP Codes” page 103
3 Selecting Test Features
Page 52

Selecting Test Features
Using Transmit Overhead Setup
Description You can set an overhead byte to a known static state to aid troubleshooting, for
example to quickly check for "stuck bits" in path ov erhead bytes. Transport
Overhead, Path Overhead, Trace Messages and Labels can be set using this feature.
HOW TO: 1 Set up the SONET transmit interface and payload required. See "Setting SONET
Transmit Interface " page 29.
2 Choose the type of overhead to SETUP.
If OC-12 or OC-48 is chosen as the SONET interface, choose the STS-3# and
STS-1# you wish to set up.
If STS-3 is chosen as the SONET interface, choose the STS-1# yo u wish to set up.
DEFAULT - Use to set all overhead bytes to the standard values defined by
Bellcore/ANSI.
If a test function is active then the overhead byte value i s determined by the
choices made in the Test Function.
If (Transport Overhead) is chosen, choose the STS-1 to be displayed.
TOH
Many bytes in and are unlabeled as the other overhead
functions have not yet been defined.
52
STS-1# 2 STS-1#3
Page 53

Selecting Test Fe atur es
Using Transmit Overhead Setup
If is chosen, the hexadecimal value of all 81 bytes of the STS-3
STS-1# 1,2,3
section & line overhead selected are displayed (all 324 bytes of an OC-12 or
1,296 bytes of an OC-48 are displayed 81 bytes at a time by selecting each STS3 in turn). The value of the bytes can be set using
INCREASE DIGIT
.
If BYTE NAMES is chosen, the labels for the overhead bytes are
DECREASE DIGIT
STS-1# 1,2,3
displayed.
3 If POH (Path Overhead) is chosen, choose the TYPE of overhead within STS-1
under test to be setup.
J1 and J2 bytes can be set under Path Overhead or Trace Messages. H4 byte has
a choice of sequences for VT-2, VT-1.5 and VT-6 mapping:
Full Sequence - 48 byte bi nary sequence .
Reduced Sequence - Binary count sequence of 0 to 3 i.e. 111111(00 to 11).
COC1 Sequence - Binary count sequence of 0 to 3 i.e. 110000(00 to 11).
H4 byte is transmitted as all zero’s for 34 Mb/s and DS3.
4 If TRACE MESSAGES is chosen, see "Setting Overhead Trace Messages "
page 56.
NOTE Any bit of an overhead byte which is displayed as x or s cannot be set at any time.
All other bits can be set to 0 or 1.
TIP: You can set all overhead bytes to the default state by selecting SETUP .
DEFAULT
You can set all overhead bytes and test functions to the default state by recalling
Stored Settings [0] on the display.
OTHER
53
Page 54

Selecting Test Fe atur es
Using Receive Overhead Monitor
Using Receive Overhead Monitor
Description When first connecting to a SONET network, a start up confidence check can be
made by viewing the behavior of all the overhead bytes. If the SONET network
shows alarm indications, some diagnosis of the problem may be gained from
viewing all the overhead bytes.The OVERHEAD MONITOR display is updated
once per second (once per 8000 frames) approximately.
TIP: A snapshot of the received overhead can be logged to the chosen logging device.
See "Logging on Demand " page 241.
HOW TO: 1 Set up the receive SONET interface and payload as required. See “Setting
SONET Receive Interface” page 47.
2 Choose the type of overhead to MONITOR.
3 If (Transport Overhead) is chosen, choose the STS-3 # and
TOH
STS-1# to be displayed.
Many bytes in and are unlabeled because the other
overhead f unctions have not yet been de fined.
If is chosen, the hexadecimal value of all 81 bytes of section
STS-1# 1,2,3
overhead is displayed (al l 324 bytes of an OC-12 o r 1, 296 by tes of an OC- 48 are
displayed 81 bytes at a time by selecting each S TS-3 in turn).
If BYTE NAMES is chosen, the labels for the overhead bytes are
displayed.
54
STS-1# 2 STS-1#3
STS-1# 1,2,3
Page 55

Selecting Test Fe atur es
Using Receive Overhead Monitor
4 If POH (Path Overhead) is chosen, choose the source of the overhead, SPE or
VTSPE.
J1 and J2 bytes can be monitored under Path Overhead or Trace Messages
5 If TRACE MESSAGES is chosen, you can monitor a data message to verify
portions of the network.
If the 16 byte CRC7 message structure is detected, the 15 characters within the
message are displayed.
If the CRC7 structure is not detected in J1, the 64 byte message format is assumed
and displayed.
If the CRC7 structure is not detected for J0 or J2, all 16 bytes are displayed.
6 If LABELS is chosen, the S1 sync status, STS path label (C2) and the VT Path
label (V5) are monitored.
7 If APS MESSAGES is chosen, choose the TOPOLOGY, (GR-253) or
(GR-1230). The K1 and K2 bytes are monitored.
RING
LINEAR
TIP: If an y abno rmal behavior is observed on a particular path or section overhead byte,
or an associated group of bytes (3XA1,3XA2; D1 - D3, D4 - D12), the
TEST FUNCTION
display of can be used to "Zoom" in
OVERHEAD CAPTURE
RECEIVE
on the suspect byte or bytes on a frame by frame basis. See "Using Receive
Overhead Capture " page 60.
55
Page 56

Selecting Test Fe atur es
Setting Overhead Trace Messages
Setting Overhead Trace Messages
Description You can insert a data message to verify portions of the network:
J0 verifies the section overhead.
J1 verifies the STS-1 SPE or STS-3c SPE path connection.
J2 verifies the VT SPE path connection.
HOW TO: 1 Choose the message for insertion in the chosen trace channel.
How to Edit User Messages
There are two ways you can edit a user message as follows;
• Use the edit keys at the bottom of the display JUMP , PREVIOUS CHAR, NEXT
CHAR and
message or:
• Use
56
the POP UP alphanumerical keypad that is displa yed when you pres s the front
pane
l key. Detailed instructions on how to change instrument settings
SET
using the POP UP keypad is given in the Quick Start Guide (page 13) under the
heading “Changing Instrument Settings”.
that are displayed when you position the cursor on a User
Page 57

Selecting Test Fe atur es
Setting Overhead Labels
Setting Overhead Labels
Description Choosing LABELS in TRACE MESSAGES allows the setting of the S1 SYNC
STATUS, STS PATH LABEL (C2) and VT PATH LABEL (V5).
How to Edit User Defined Labels
1 Choose the overhead label that you want to edit.
2 Edit the label using the softkeys at the bottom of the display. If you select USER,
use
the softkeys at the bottom of the display to edit the labe l key , or press , then use
the softkeys and pop- up keyp ad to edit t he label . Deta iled i nstru ctions on how to
change instrument settings using the pop-up keypad is given in the Quick Start
Guide (page 13) under the heading “Changing Instrument Settings”.
SET
57
Page 58

Selecting Test Fe atur es
Generating Overhead Sequences
Generating Overhead Sequences
Description You may insert a sequence of patterns into a functional group of overhead bytes for
testing or troubleshooting purposes.
HOW TO: 1 Set up the SONET transmit interface and payload required. See “Setting SONET
Transmit Interface” page 29.
2 Select , SONET, SEQUEN CES as shown above.
TEST FUNCTION
3 Choose the type of sequence required.
SINGLE RUN - runs the sequence once and then stops.
REPEAT RUN - runs the sequence repeatedly until STOPPED is chosen.
4 Choose the overhead type as required.
SOH- Section Overhead
LOH- Line Overhead
POH - Path Overhead
5 Choose the byte or bytes of overhead required.
6 Set up the required number of data patterns and the number of frames in which
each data pattern should appear.
Your sequence is derived from up to 5 blocks of hexadecimal data. Each block
can be transmitted in up to 64,000 frames.
The data and the number of frames are set using
INCREASE DIGIT
.
DECREASE DIGIT
58
Page 59

Selecting Test Fe atur es
Generating Overhead Sequences
7 Start the sequence by choos ing .
START
NOTE When you start the sequence illustrated, one Out of Frame alarm and one Loss of
Frame alarm should occur every eight seconds.
A1A2 Boundary Function
A1A2 provide a frame alignment pattern (A1=F6 H, A2=28 H). Use A1A2 to test
the 6 framing bytes at the A1A2 boundary in the section overhead (see display on
previous page). The 6 bytes across the boundary are:
STS-n
STS-3 channel: #n-2 #n-1 #n #1 #2 #3
Overhead byte: A1 #3 A1 #3 A1 #3 A2 #1 A2 #1 A2 #1
A network element, typically only uses three of these bytes (which ones are not
defined in the standards, so will vary between manufacturers) to gain and maintain
frame synchronization. In many cases the A1A2 bytes selected are those at the
A1A2 boundary (i.e. the A1 bytes in the last STS-1 channel and the A2 bytes in the
first STS-1 channel). Therefore, the ability to stress test across the boundary is
necessary to verify a correct synchronization algorithm within a network element.
59
Page 60

Selecting Test Fe atur es
ON
Using Receive Overhead Capture
Using Receive Overhead Capture
Description Section, Line and Path overhead provide network support functions, responding
dynamically to network conditions and needs. It is therefore useful to capture
overhead activity on a frame by frame basis.
TIP: The Overhead Capture display can be logged to the chosen logging device. See
"Logging on Demand " page 241.
HOW TO: 1 Set up the receive SONET interface and payload as required. See “Setting
SONET Receive Interface” page 47.
2 Select , SONET, O/H CAPTURE as shown above.
3 Choose the overhead type as required.
4 Choose the Byte or bytes of overhead to be captured.
Choose the TRIGGER to determine the start point of the capture.
OFF
by frame monitor of the chosen byte or bytes.
used for transient detection from a specified expected state.
60
TEST FUNCTION
SOH- Section Overhead
LOH- Line Overhead
POH- Path Overhead
- starts immediately the capture is initiated. Can be used to provide a frame
-captures activity after your specified overhead state has occurred. Can be
Page 61

Selecting Test Fe atur es
Using Receive Overhead Capture
ON NOT
- captures activity after the first occurrence of a deviation from your
specified overhead state. Can be used for transient detection from a specified
expected state.
5 Up to 16 records of overhead state are provided. Each record will represent
between 1 and 64,000 frames. A capture is started by pressing CAPTURE
START
can be terminated earlier by pressing CAPTURE .
and terminates when up to 16 records have been captured. The capture
STOP
61
Page 62

Selecting Test Fe atur es
Adding Frequency Offset to SONET Signal
Adding Frequency Offset to SONET Signal
Description Frequency offset can be added to the SONET interface rate signal and to the payloa d
signal.
HOW TO: SONET Line Rate Offset
1 Choose the amount of frequency offset required.
You can set the Frequency Offset in the range -999 ppm to +999 ppm in 1 ppm
steps using
SET
DECREASE DIGIT INCREASE DIGIT
for a pop-up numerical keypad.
The amount of applied Frequency Offset can be varied while measurements are
taking place.
If the value of the SONET line rate offset chosen is sufficient to cause the
maximum stuff rate to b e exceeded, the asynchronous pay load is offset to prevent
bit errors occurring and the maximum stuff rate is maintained. When Floating
Byte 2 Mb/s is chosen, in conjunction with SONET line rate offset, the chosen
tributary will be offset as the line rate is offset. (No pointer movements).
62
and or press
Page 63

Selecting Test Fe atur es
Adding Frequency Offset to SONET Signal
Tributary Offs et ±100 ppm
1 Choose the amount of tributary offset required.
You can set the Offset in the range -100 ppm to +100 ppm in 1 ppm steps using
DECREASE DIGIT INCREASE DIGIT SET
and or press for a pop-
up numerical keypad.
The amount of applied Frequency Offset can be varied while measurements are
taking place.
Tributary offset affects the stuff rate but does not cause pointer movements and
can be used to test mapping jitter. If the combined value of SONET line rate offset
and tributary offset chosen is sufficient to cause the maximum stuff rate to be
exceeded the payload is offset to prevent bit errors occurring and the maximum
stuff rate is maintained.
63
Page 64

Selecting Test Fe atur es
Adding Frequency Offset to the DSn Signal
Adding Frequency Offset to the DSn Signal
Description
Option 012 required.
You can add frequency offset to the interface DSn SIGNAL at all rates. Frequency
Offset can be added at preset ITU-T/ANSI values or as User defined values in the
range ±100 ppm. The preset values change with the SIGNAL rate chosen as shown:
DS-1 (1.544 Mb/s) ±32 ppm −32 ppm
2 Mb/s (E1) ±50 ppm −50 ppm
8 Mb/s ±30 ppm -30 ppm
34 Mb/s (E3) ±20 ppm −20 ppm
DS-3 (44.736 Mb/s) ±20 ppm −20 ppm
140 Mb/s ±15 ppm -15 ppm
HOW TO: 1 Choose the FREQUENCY OFFSET required.
2 If you choose USER OFFSET, you can set the frequency offset to be between -
100 ppm and +100 ppm in 1 ppm steps.
Select the field immediately below USER OFFSET and use
DECREASE DIGIT INCREASE DIGIT
offset.
(The amount of frequency offset can be varied while measurements are
,
, and to set the frequency
taking place.)
64
Page 65

Selecting Test Fe atur es
Setting up Signaling Bits
Setting up Signaling Bits
Description When transmitting 2.048 Mb/s signals with timeslot-16 CAS (PCM30 or
PCM30CRC) multiframing the state of A,B,C,D signaling bits can be set. The
signaling bits of all timeslots are set to the user-defined 4-bit value.
When transmitting a DS1 framed, structured signal the values of the A,B signaling
bits for D4 and SLC-96 payloads, and A,B, C,D signaling bits for ESF payloads can
be defined.
HOW TO Tran smit a DS1 payl oad signal with user-defined signaling bits
DSn Operation
1 Choose on the display.
Choose SIGNAL or , and PAYLOAD TYPE on
the display
PDH/DSn
DS1 DS3 STRUCTURED
MAIN SETTINGS
2 Choose TEST SIGNAL
SETTINGS
display.
TRANSMIT
56 kb/s Nx56 kb/s STRUCTURED
or on the
3 Set the A,B bits (for D4 and SLC-96) and A,B,C,D bits (for ESF) as required.
SONET Operation
1 Choose
SONET
on the display.
TRANSMIT
2 Set MAPPING to VT-1.5.
3 Choose MAPPING
PAYLOAD on the
STRUCTURED MAIN SETTINGS
FL BYTE DS1 ASYNC DS1 DS3
, or and VT
display. If you choose
65
Page 66

Selecting Test Fe atur es
Setting up Signaling Bits
FL BYTE DS1
4 Choose TEST SIGNAL
SETTINGS
proceed to step 5.
56 kb/s Nx56 kb/s STRUCTURED
display .
or on the
5 Set the A,B bits (for D4 and SLC-96) and A,B,C,D bits (for ESF) as required.
6 Floating Byte DS1 selection: Set th e ABC D bit s for NO-F-BIT or ESF framing
and/or the AB bits for D4 VT PAYLOAD framing as required.
HOW TO Transmit a 2 Mb/s signal with user-defined signaling bits
DSn Operation
1 Choose
PDH/DSn
2 Choose SIGNAL and PA YLOAD TYPE or on
the display.
MAIN SETTINGS
on the display.
2 Mb/s PCM30 PCM30CRC
TRANSMIT
3 If UNSTRUCTURED is chosen set the 2M CAS ABCD bits value on the
MAIN SETTINGS
display.
If STRUCTURED is chosen set the 2M CAS ABCD bits value on the
STRUCTURED SETTINGS
display.
66
Page 67

Selecting Test Fe atur es
Setting up Signaling Bits
SONET Operation
1 Choose on the display.
SONET
TRANSMIT
2 Set MAPPING to VT-2.
3 Choose MAPPING or and VT PAYLOAD
PCM30 PCM30CRC MAIN SETTINGS
or on the
ASYNC 2Mb/s FL BYTE 2Mb/s
display.
4 If UNSTRUCTURED is chosen set the 2M CAS ABCD bits value on the
MAIN SETTINGS
display.
If STRUCTURED is chosen set the 2M CAS ABCD bits value on the
STRUCTURED SETTINGS
display.
67
Page 68

Selecting Test Fe atur es
Setting Transmit Structured Payload/Test Signal
Setting Transmit St ructured Payload/Test Signal
Description Stru ctured DSn Payload/Test Signal settings determine the payload or the DSn test
signal to be tested and set any background (non test) conditions to prevent alarms
while testing.
TIP: If you wish to set the OmniBER 718 transmitter and receiver to the same Payload
settings, choose .
Interested in International Gateway Testing?
If your instrument has option 014 fitted you can map an E1 or 2Mb/s signal into DS3
as shown below:
OTHER
SETTINGS CONTROL COUPLED
HOW TO: 1 Choose the required TEST SIGNAL rate. If Nx64 kb/s or N X 56 kb/s is chosen,
see "Setting Transmit N x 64 kb/s /N x 56 kb/s S truct ured P ayload/ Test Signal "
page 71.
2 Choose the P AYLOAD framing pattern.
If TEST SIGNAL 2Mb/s is chosen is added to the PAYLOAD
menu. See "Inserting an External DSn Payload/Test Signal " page 74.
If TEST SIGNAL DS1 is chosen is added to the menu.
See "Inserting an External DSn Payload/Test Signal " page 74.
3 Choose the test tributary in the structured payload, under 34Mb, 8Mb, 2Mb, 64
kb/s or DS2, DS1, 56 kb/s.
68
INSERT 2 M b/s
INSERT DS1
Page 69

Selecting Test Fe atur es
Setting Transmit Structured Payload/Test Signal
4 Choose the PATTERN type and PRBS POLARITY.
5 Choose the B/G PATTERN. (background)
The B/G P ATTERN in the non test 56/64 kb/s timeslots is fixed as NUMBERED,
that is, each timeslot contains a unique number to allow identification in case of
routing problems.
Signaling
6 If a 2 Mb/s PAYLOAD with PCM30 or PCM30CRC framing, or 56 kb/s or
Nx56kb/s Test Signal is chosen. See, "Setting up Signaling Bits " page 65.
69
Page 70

Selecting Test Fe atur es
Setting Receive Structured Payload/Test Signal
Setting Receive Structured Payload/Test Signal
Description Stru ctured DSn Payload/Test Signal settings determine the payload or the DSn test
signal to be tested.
TIP: If you wish to set the OmniBER 718 transmitter and receiver to the same Payload
settings, choose
OTHER
SETTINGS CONTROL COUPLED
, .
HOW TO: 1 Choose the required Test Signal rate. If N x 64 kb/s or N x 56 kb/s is chosen, see
"Setting Receive N x 64 kb/s/N x 56 kb/s Structur ed Payload/Test Signal "
page 73.
2 Choose the Framing pattern of the PAYLOAD.
If TEST SIGNAL 2 Mb/s is chosen, is added to the menu. See
DROP 2 Mb/s
"Dropping an External Payload/Test Signal " page 77.
If TEST SIGNAL DS1 is chosen, is added to the menu.
DROP DS1
See "Dropping an External Payload/Test Signal " page 77.
3 Choose the test tribu tary within t he str uctured payl oad, u nder 34 Mb, 8Mb, 2Mb,
64 kb or DS2, DS1, 56 kb/s.
4 Choose the PATTERN type and PRBS polarity.
70
Page 71

Selecting Test Fe atur es
Setting Transmit N x 64 k b / s /N x 56 k b /s Structured Paylo ad / Test Signal
Setting Transmit N x 64 kb/s/N x 56 kb/s
Structured Payload/Test Signal
Description Wideband services such as hig h speed data l inks and LA N intercon nection require a
bandwidth greater than 56/64 kb/s but less than DS1/2 Mb/s for example 112 kb/s or
336 kb/s. These wide band signals are sent in a DS1/2 Mb/s frame by sharing the
signal across multiple timeslots.
N x 64kb/s/N x 56 kb/ s structured payload allows a test pattern to be in serted across
a number of timeslots even if the chosen timeslots are non-contiguous.
HOW TO: 1 Choose the required Test Signal rate.
2 If your instrument has option 014 fitted you can map an E1 or 2Mb/s signal into
DS3. Select DS1 or 2M as shown in the figure above.
3 Choose the Framing pattern of the 2M or DS1 PAYLOAD.
4 Choose the test timeslots within the structured payload usin g
DESELECT SELECT
* marks the chosen timeslot.
5 Choose the PATTERN type and PRBS polarity.
6 Choose the B/G PATTERN.
and softkeys. As each timeslot is selected, an
DESELECT ALL
71
Page 72

Selecting Test Fe atur es
Setting Transmit N x 64 k b / s /N x 56 k b /s Structured Paylo ad / Test Signal
7 The B/G P A TTERN in the non-test 56/64 kb/s timeslots is fixed as NUMBERED,
that is, each timeslot contains a unique identification number.
Signaling
8 If a 2 Mb/s PAYLOAD with PCM30 or PCM30CRC framing, or 56 kb/s or
Nx56kb/s Test Signal is chosen. See, "Setting up Signaling Bits " page 65.
72
Page 73

Selecting Test Fe atur es
Setting Receive N x 64 kb/s/N x 56 kb/s Structured Payload/Test Signal
Setting Receive N x 64 kb/s/N x 56 kb/s
Structured Payload/Test Signal
Description Wideband services such as hig h speed data l inks and LA N intercon nection require a
bandwidth greater than 56/64 kb/s but less than DS1/2 Mb/s e.g. 112 kb/s or
336 kb/s. These wide band signals are sent in a DS1/2 Mb/s frame by sharing the
signal across multiple timeslots.
N x 64kb/s and N x 56 kb/s structured payload/test signal allows the test Timeslots
to be chosen for error measurement even when the Timeslots are non contiguous.
HOW TO: 1 Choose the required Test Signal rate.
2 If your instrument has option 014 fitted you can map an E1 or 2Mb/s signal into
DS3. Select DS1 or 2M as shown in the figure above.
3 Choose the Framing pattern of the 2M or DS1 PAYLOAD.
4 Choose the test timeslots within the structured payload usin g
DESELECT SELECT
marks the chosen timeslot. In the example above T imeslots 3, 5 , 9, 21, 22, 23 are
chosen for test.
5 Choose the PATTERN type and PRBS polarity.
and softkeys. As each timeslot is chosen an *
DESELECT ALL
73
Page 74

Selecting Test Fe atur es
TRANSMIT
Inserting an External DSn Payload/Test Signal
Inserting an External DSn Payload/Test Signal
Description You can insert 2 Mb/s 34 Mb/s or 140 Mb/s into an STS-N line signal when option
012 is fitted. DS3, DS1, E3 and E1 can be inserted when option 014 is fitted.
RATE Availability Option
DS3 SDH & SONET 001, 012, 002
34Mb/s SDH & SONET 001, 012,002
2Mb/s PDH, SDH & SONET 001, 012, 002
DS1 DSn, SDH & SONET 001, 012, 002
HOW TO: Insert 34 Mb/s, 140 Mb/s & DS3
1 Press , select
SONET MAIN SETTINGS
and the page.
2 Set up the required transmit SONET interface, set appropriate MAPPING then
choose VT PAYLOAD
INSERT 140 Mb/s
, or
INSERT 34 Mb/s
INSERT DS3
as required. Connect your external source to the appropriate
port as indicated on the instrument display (when you position the cursor on the
PAYLOAD TYPE field and select INSERT).
74
Page 75

Selecting Test Fe atur es
Inserting an External DSn Payload/Test Signal
Insert 2 Mb/s or DS1 (Unstructured SONET Payload)
1 Connect the external payload to the MUX port of the PDH/DSn T ransmit module.
If 2 Mb/s connect to 75
2 Set up the required transmit SONET interface, and choose VT-2 or
VT-1.5 MAPPING and VT PAYLOAD or .
Ω MUX port. If DS1 connect to 100Ω MUX port.
INSERT 2 M b/s
INSERT DS1
Insert 2 Mb/s or DS1 (Structured SONET Payload or Structured DSn)
1 Connect the external payload to the MUX port of the DSn Transmit module.
If 2 Mb/s connect to 75
Ω MUX port. If DS1 connect to 100Ω MUX port.
75
Page 76

Selecting Test Fe atur es
Inserting an External DSn Payload/Test Signal
Structured SONET Payload
2 Set up the required transmit SONET interface. See "Setting SONET Transmit
Interface " page 29.
3 Set up the SONET structured payload. See "Set ting Transmit Structured
Payload/Test Signal " page 68.
4 Choose 2M PAYLOAD/DS1 PAYLOAD or .
INSERT 2 M b/s
INSERT DS1
5 Choose the LINE CODE.
Structured DSn
6 Set up, the required transmit DSn interface, See "Setting PDH/DSn Transmit
Interface (Option 012) " page 26.
7 Set up the DSn Test Signal interface. See "Setting Transmit Structured Payload/
Test Signal " page 68
8 Choose 2M PAYLOAD/DS1 PAYLOAD or .
INSERT 2 M b/s
INSERT DS1
9 Choose the LINE CODE.
76
Page 77

Selecting Test Fe atur es
Dropping an External Payload/Test Signal
Dropping an External Payload/Test Signal
Description You can drop 2Mb/s 34 Mb/s or 140 Mb/s from an STS-N line signal when option
012 is fitted. DS3, DS1, E3 and E1 can be dropped when option 014 is fitted
HOW TO: Drop 34 Mb/s, DS3 and 140 Mb/s
1 Connect the 75
Ω OUT port of the DSn Transmit module to the external
equipment.
2 Set up the receive SONET interface, and choose PAYLOAD
DROP DS3
If is chosen, choose the DS3 output level.
DROP DS3
, or as required.
DROP 140 Mb/s
,
DROP 34 Mb/s
77
Page 78

Selecting Test Fe atur es
Dropping an External Payload/Test Signal
Drop 2 Mb/s /DS1 (Unstructured SONET Payload)
1 Connect the DEMUX port of the DSn module to the external equipment.
2 Set up the required receive SONET interface, and choose VT-2 or
VT-1.5 MAPPING and VT PAYLOAD or .
3 Choose the required LINE CODE.
DROP 2 Mb/s DROP DS1
Drop 2 Mb/s/DS1 (Structured SONET Payload or Structured DSn)
1 Connect the DEMUX port of the Receive DSn module to the external equipment.
If 2 Mb/s connect to 75
78
Ω DEMUX port. If DS1 connect to 100Ω DEMUX port.
Page 79

Selecting Test Fe atur es
Dropping an External Payload/Test Signal
Structured SONET Payload
2 Set up the required receive SONET interface. See "Setting SONET Receive
Interface " page 47.
3 Set up the SONET structured payload. See "Setting Receive Structured Payload/
Test Signal " page 70.
4 Choose 2M PAYLOAD or DS1 PAYLOAD .
DROP 2 Mb/s DROP DS1
5 Choose the LINE CODE.
Structured DSn
6 Set up, the required receive DSn interface, See "Setting PDH /DSn Receive
Interface " page 45.
7 Set up the DSn Test Signal interface. See "Setting Receive Structured Payload/
Test Signal " page 70
8 Choose 2M PAYLOAD or DS1 PAYLOAD .
DROP 2 Mb/s DROP DS1
9 Choose the LINE CODE.
79
Page 80

Selecting Test Fe atur es
Adding Errors and Alarms at the SONET Interface
Adding Errors and Alarms at the SONET Interface
Description Errors and alarms can be added to an SONET signal during testing.
HOW TO: 1 Set up the SONET transmit interface and payload required. See "Setting SONET
Transmit Interface " page 29.
2 Select
TEST FUNCTION
, SONET, ERR & ALARM as shown above.
3 Choose the ERROR ADD TYPE and RATE required.
Errors can be added at preset rates and at USER programmable rate. With the
exception of ENTIRE FRAME, A1A2 FRAME and BIT, errors can be added at
ERROR ALL rate.
If CV-L errors are chosen errors can be added to trigger an APS THRESHOLD.
This takes the form of N errors in T time period. N and T are both selectable.
4 Choose the ALARM TYPE
Errors and Alarms can be added at the same time.
80
Page 81

Selecting Test Fe atur es
Adding Errors and Alarms to a DSn Signal
Adding Errors and Alarms to a DSn Signal
Description Errors and alarms can be added to a DSn signal during testing.
HOW TO: 1 If SONET interface is chosen, set up the SONET transmit interface and paylo ad
required. See “Setting SONET Transmit Interface” page 29.
If DSn interface is chosen, set up the DSn interface and payload required. See
“Setting PDH/DSn Transmit Interface (Option 012)” page 26.
2 Select
TEST FUNCTION
, DSn PAYLD, ERR & ALARM as shown above.
3 Choose the ERROR ADD TYPE and RATE on the Transmitter
TEST FUNCTION
display.
The RATE can be selected from a fixed value or is user programmable. If you
select USER PROGRAM you can select the error rate before enabling the errors.
This feature is useful for error threshold testing.
4 Choose the ALARM TYPE.
Errors and Alarms can be added at the same time.
81
Page 82

Selecting Test Fe atur es
TRANSMIT
Using FEAC Codes
Using FEAC Codes
Description The third C-Bit in subframe 1 is used as a FEAC channel, where alarm or status
information from the far-end terminal can be sent back to the near-end terminal. The
channel is also used to initiate DS3 and DS1 line loopbacks at the far-end terminal
from the near-end terminal.
The codes are six digits long and are embedded in a 16 bit code word; the format is
0XXXXXX011111111.
There are two types of code, Loopback and Alarm Status.
Loopback provides a choice of two DS1 messages and two DS3 Messages . The DS1
Messages can be sent in ALL DS1 channels or in a SINGLE channel. The message
can be repeated up to 15 times.
Alarm Status provides 13 preset codes and a USER programmable code function.
These codes can be transmitted continuously or in bursts.
The new code is transmitted by choosing or
HOW TO: Transmit an FEAC code
1 Choose SIGNAL and PAYLOAD TYPE on the
MAIN SETTINGS
DS3 CBIT
display.
2 Choose , DSn PAYLD and ALARM TYPE
DS3 FEAC
. When a FEAC code is not being transmitted, an all ones pattern is
transmitted.
TEST FUNCTION
BURST ON
.
TRANSMIT
82
Page 83

Selecting Test Fe atur es
Using FEAC Codes
3 Choose the FEAC CODE TYPE.
4 Choose the MESSAGE from the choices displayed.
If you chose a DS1 message an additional field to the right of the DS1 MESSAGE
is displayed. Position the cursor on this field and choose or
SINGLE CHANNEL
If you choose use the EDIT keys to select a channel from
1 to 28. Press when finished.
5 If is chosen, choose the REPEAT (TIMES) LOOP and MESS, in
LOOPBACK
.
SINGLE CHANNEL
END EDIT
ALL
the range 1 to 15.
6 If is chosen, choose the BURST LENGTH (TIMES).
ALARM/ STATUS
7 Choose TRANSMIT NEW CODE or to transm it the selected
FEAC message.
TIP: To View FEAC Messages
The received FEAC message can be viewed on the display.
BURST
ON
RESULTS
83
Page 84

Selecting Test Fe atur es
Setting DSn Spare Bits
Setting DSn Spare Bits
Description Certain Spare Bits will cause the occurrence of a minor alarm when received as a
logical "0".:
8 Mb/s & 34 Mb/s - FAS Bit 12
2 Mb/s - NFAS Timeslot (timeslot 0 of NFAS frame) Bit 0
HOW TO: 1 If SONET interface is chosen, set up the SONET transmit interface and payload
required. See "Setting SONET Transmit Interface " page 29.
If DSn interface is chosen, set up the DSn transmit interface and payload
required. See "Setting PDH/DSn Transmit Interface (Option 012) " page 26.
2 Set the value of the spare bits required for testing.
If a BIT SEQUENCE is required, choose SEND SEQUENCE to transmit
the sequence.
84
ON
Page 85

Selecting Test Fe atur es
Adding Pointer Adjustments
Adding Pointer Adjustments
Introduction Pointers perform a critical role in the error free transmission of payload data
(subscriber data) through a SONET network. They also enable individual payload
channels to be inserted or extracted from a high speed OC-n line signal (for example
the functionality provided by ADMs).
Pointer adjustments are often necessary to compensate for asynchronous operation
between different nodes within an SONET network.Th ese adjustments however can
result in jitter being added to a DSn signal outpu t from a SONET network element.
Jitter caused by Pointer Adjustments
Pointer adjustments are the mechanisms within SONET to compensate for
frequency and phase differences between STS-n SPE channels and the outgoing
SONET frames. These pointer adjustments are byte wide and since they can occur
randomly , they may caus e significant amounts of payload sign al jitter. It is therefore
necessary to control the jitter on payload signals that is due to pointer adjustments.
Pointer adjustment activity within a network can be randomly spaced individual
pointer adjustments, pointer bursts or periodic pointer adjustmen ts.
The Bellcore GR-253 and ANSI T1.105 standard s defines a set of poi nter seque nces
to be used when evaluating an NE’s pointer adjustment jitter performance.
The OmniBER 718 generates a set of test sequences which can be used to simulate
network pointer adjustment activity. This allows the amount of tributary jitter due to
different types of pointer adjustment to be measured in the OmniBER 718.
85
Page 86

Selecting Test Fe atur es
Adding Pointer Adjustments
Description The transmitted SPE or VT pointer value can be adjusted for testing purposes.
HOW TO: 1 Set up the SONET transmit interface and payload required. See "Setting SONET
Transmit Interface " page 29.
2 Choose the POINTER TYPE.
3 Choose the ADJUSTMENT TYPE required.
BURST - You determine the size of the burst by the nu mber of PLACES chosen.
If, for example, you choose 5 PL ACES the poi nter val ue will be st epped 5 tim es
in unit steps e.g. 0 (start value), 1, 2, 3, 4, 5 (final value). The interval between
steps is as follows:
For STS-SPE the minimum spacing between adjustments is 4 frames (500 us).
For VT, the minimum spacing between adjustments is 4 multiframes (2ms).
Choose ADJUST POINTER [ON] to add the chosen burst.
NEW POINTER - You can choose any pointer value in the defined range
(0 to 782 For an STS-1 pointer) with or without a New Data Flag, and transmit it.
The current pointer value is displayed for information purposes.
Choose ADJUST POINTER [ON] to transmit the new pointer value.
OFFSET - You can frequency offset the line rate or the SPE/VT rate, relative to
each other, thus producing pointer movements. If you offset the SPE pointer, an
87:3 sequence of pointer movements is generated. The available configurations
are listed in the following table.
If you are currently adding Frequency Offset to the SONET interface or payload,
pointer OFFSET is not available.
86
Page 87

Selecting Test Fe atur es
Adding Pointer Adjustments
Pointer Type Line Rate SPE Rate VT Rate
SPE Constant Offset Tra cks STS
Payload
SPE Offset Constant Constant
VT Constant Constant Offset
VT Offset Tracks Line Rate Constant
T1.105/GR-253 - Provides pointer movements according to T1.105 and GR-253:
4 Choose the T1.105/GR-253 ADJUSTMENT TYPE.
5 Choose the POLARITY, INTERVAL and PATTERN (where applicable) for the
selected sequence.
6 Choose POINTER SEQUENCES to generate the selected
sequence and to stop the pointer sequences.
STOP INIT
START INIT
T1.105/GR-253 Pointer Sequences Explained
In addition to the BURST, NEW POINTER a nd OFFSET pointer movements
described, the OmniBER 718 can also generate poin ter sequences (pointer
movements) according to T1.105.03 and GR-253.
Before running a pointer sequence you can elect to run an initialization sequence,
followed by a cool down period, and then run the chosen sequence. This is selected
using the START INIT softkey shown in the display on the previous page.
Initialized pointer sequences are made up of three periods : the Initialization Period,
the Cool Down Period, and the Sequence (Measurement) Period, an example is
given in the following figure:
Initialization SequenceNon Periodic Sequence
Periodic Sequence
Initialization
No Pointer Activity
Continuous Sequence
Cool Down
Note: SINGLE (A1), BURST (A2) and PHASE TRANSIENT(A 3) are Non Periodic
Sequences.
Sequence
Time
Measurement
Period
87
Page 88

Selecting Test Fe atur es
Adding Pointer Adjustments
Initialization Period
For SINGLE A1, BURST A2 and PHASE TRANSIENT A3 sequences the
initialization sequence consists of 60 seconds of pointer adjustments applied at a
rate of 2 adjustments per second and in the same direction as the specified pointer
sequence.
Cool Down Period
A period following the initialization period which for SINGLE e), BURST f) and
PHASE TRANSIENT sequences is 30 seconds long when no pointer activity is
present.
Sequence (Measurement) Period
The period following the Cool Down period where the specified pointer sequence
runs continuously.
Periodic Test Sequences
For periodic test sequences (for example PERIODIC ADD) both the 60 second
initialization and 30 second cool down periods consist of the same sequence as used
for the subsequent measurement sequence. If the product of the period T and the
selected Optional background pattern (87+3 or 26+1) exceeds 60 seconds then the
longer period is used for the initialization. For example, if T is set for 10 seconds
then the initialization period may be extended to 900 seconds.
The OmniBER 718 displays a message indicating which phase (initialization, cool
down or measurement) the transmitter is currently generating.
NOTE The following conditions apply for pointer sequence generation:
The sequences can only be applied to the SPE pointer when the SPE do es not contain
a VT structure, otherwise it is applied to the VT pointer. Pointer sequence generation
is not available when a frequency offset is being applied to the Line Rate.
The following figure gives an exam pl e of a T1 .10 5/ GR-2 53, 87-3 Pointer Sequence.
88
Page 89

Selecting Test Fe atur es
Adding Pointer Adjustments
T1.105 A4 and A5, 87-3 Pattern
Pointer Adjustment
No Pointer
Adjustment
Start of Next
87-3 Pattern
87
An Example of a Pointer Sequence
Pointer Sequence Description
T1.105 A1 SINGLE
GR-253 5-29
T1.105 A2 BURST OF
3
GR-253 5-30
T1.105 A3 PHASE
TRANSIENT
GR-253 5031
Periodic Single adjustments, all of the same polarity which is selectable.
Separation between pointer adjustments is fixed at approximat el y 30 seconds .
Periodic bursts of 3 adjustments, all of the same polarity which is selectable.
The interval between bursts is fixed at approximately 3 0 seconds. The in terval
between adjustments within a burst is set to the minimum.
Phase transient pointer adjustment burst test sequence. All adjustments are of
the same polarity, which is selectable. The interval between bursts is fixed at
30 seconds. Each burst consists of 7 pointer movement. The first 3 in each
burst are 0.25 s apart, and the interval between the 3 and 4 movement, and
each remaining movement 0.5 seconds.
3
T1.105 A4 PERIODIC
NORMAL (87-3
Pattern)
GR-253 5-33(b)
T1.105 A4 PERIODIC
NORMAL
(Continuous Pattern)
GR-253 5-34(b)
An 87-3 pattern is selected. The sequence pattern is 87 pointer movements
followed by 3 missing pointer movements. Pointer polar ity is selectable and
the time interval between pointer adjustments settable.
Provides a continuous sequence of pointer adjustments . The polarity of the
adjustments is selectable, and the time interval between adjustments can be set
(see Note 1).
89
Page 90

Selecting Test Fe atur es
Adding Pointer Adjustments
Pointer Sequence Description
GR-253 5-32(b)
PERIODIC NORMAL
(26-1 Pattern)
T1.105 A5 PERIODIC
ADD (87-3 Pattern)
GR-253 5-33(c)
T1.105 A5 PERIODIC
ADD (Continuous
Pattern)
GR-253 5-34(c)
GR-253 5-32(c)
PERIODIC ADD (26-1
Pattern)
This selection is only available if you have selected VT1.5 mapping. The
sequence pattern is 26 pointer movements followed by 1 missing pointer
movement. Pointer polarity is selectable and the time interval between pointer
adjustments programmable t o 200 ms, 500 ms, 1 s, 2 s, 5 s or 10 seconds.
An 87-3 pattern is selected. The sequence pattern is 87 pointer movements
followed by 3 missing pointer movements with an added pointer movement
after the 43rd pointer. The spacing between the added adjustment and the
previous adjustment is set to the minimum. Pointer polarity is selectable. The
time interval between pointer adjustments can be set (see Note 1). Added
adjustments occur every 30 seconds or every repeat of the 87-3 pattern,
whichever is longer.
Periodic Single adjustments, with selectable polarity and added adjustmen t (1
extra). The spacing between the added adjustment and the previous adjustment
is set to the minimum, (see Note 2). The time interval between pointer
adjustments can be set (see Note 1). Added adjustments occur every 30
seconds or every repeat of the 87-3 pattern, whichever is longer.
This selection is only available if you have selected VT1.5 mapping. The
sequence pattern is 26 pointer movements followed by 1 missing pointer
movement. The added adjustment occurs 2 ms after the 13th pointer
adjustment. Pointer polarity is selectable and the time interval between pointer
adjustments programmable t o 200 ms, 500 ms, 1 s, 2 s, 5 s or 10 s. Added
adjustments occur every 30 seconds or every repeat of the 26-1 pattern,
whichever is longer.
T1.105 A5 PERIODIC
CANCEL (87-3
pattern)
GR-253 5-33(d)
An 87-3 pattern is selected. The sequence pattern is 87 pointer movements
followed by 3 missing po in ter movements with a cancelled pointer movement
at the 87th pointer. Pointer polarity is selectable, and the time interval between
pointer adjustments can be set (see Note 1). Cancelled adjustments occur
every 30 seconds or every repeat of the 87-3 pattern, whichever is longer.
90
Page 91

Selecting Test Fe atur es
Adding Pointer Adjustments
Pointer Sequence Description
T1.105 A5 PERIODIC
CANCEL (Continuous
Pattern)
GR-253 5-34(d)
GR-253 5-32(d)
PERIODIC CANCEL
(26-1 pattern)
NOTE For SPE pointers the sequence interval is selectable from 7.5 ms, 10, 20, 30, 34 ms;
Periodic Single adjustments, with selectable polarity and cancelled adjustment
(1 less). The time interval between pointer adjustments can be set (see Note 1).
Cancelled adjustments occur every 30 second s or every repeat of the 87-3
pattern, whichever is longer.
This selection is only available if you have selected VT1.5 mapping. The
sequence pattern is 26 pointer movements followed by 1 missing pointer
movement. The cancelled adjustment is the 26th pointer adjustment, that is the
one before the regular gap of 1. Pointer polarity is selectable and the time
interval between pointer adjustments programmable to 200 ms, 500 ms, 1 s, 2
s, 5 s or 10s. Cancelled adjustme nts occur every 30 seconds or every repeat of
the 26-1 pattern, whichever is longer.
40 to 100 ms in 10 ms steps, 100 to 1000 ms in 100 ms steps, 1, 2, 5, 10 seconds.
For VT pointers the sequence interval is selectable from: 200 ms, 5 00 ms, 1, 2, 5 and
10 seconds.
For SPE pointers the minimum spacing between adjustments is 500 us.
For VT pointers the minimum spacing between adjustments is 2 ms.
Table 3 Pointer Sequences Available with Selected
Mapping
MAPPING
POINTER SEQUENCE
A1 SINGLE
A2 BURST OF 3
A3 PHASE TRANSIENT
A4 PERIODIC NORMAL(87-3)
A4 PERIODIC NORMAL
(Continuous)
SPE VT6, VT2 VT1.5
√ √ √
√ √ 3 √
√ √ √
√
√ √ √
91
Page 92

Selecting Test Fe atur es
Adding Pointer Adjustments
Table 3 Pointer Seque nces Available with Selected
Mapping
MAPPING
POINTER SEQUENCE
PERIODIC NORMAL (26-1)
A5 PERIODIC ADD (87 -3)
A5 PERIODIC ADD
(Continuous)
PERIODIC ADD (26-1)
A5 PERIODIC CANCEL (g) 873
A5 PERIODIC CANCEL
(Continuous)
PERIODIC CANCEL 26-1
SPE VT6, VT2 VT1.5
√
√
√ √ √
√
√
√ √ √
√
92
Page 93

Selecting Test Fe atur es
Using Pointer Graph Test Function
Using Pointer Graph Test Function
Pointer Graph shows the relative offset during the measurement period. This allows
the time relationship of S PE or VT pointer movements to b e ob serv ed. Up to 4 days
of storage allows long term effects such as Wander to be observed. If an alarm
occurs during the measurement period, a new graph starts at the centre of the display
(offset zero) after recovery from the alarm.
TIP: The Pointer Graph display can be logged to the chosen logging device. See
"Logging on Demand " page 241.
TIP: The graph can also be viewed on the
end of the measurement.
HOW TO: 1 Set up the receive SONET interface and payload as required. See “Setting
SONET Receive Interface” page 47.
2 On the RECEIVE Test Function page, select then choose the
CAPTURE INTERVAL required.
The capture interval determines the time between captures. Low valu es of capture
interval should be chosen when a high degree of pointer movements is expected.
High values of capture interval should be chosen when a low degree of pointer
movements is expected, for example W an der over 1 day , u se 5 MINS and Wander
over 4 days, use 20 MINS.
If, during a long term measurement (4 days), an event occurs at a particular time
each day, then the instrument can be set to log the results graph of that event.
RESULTS
display at the
SONET RESULTS
PTR GRAPH
93
Page 94

Selecting Test Fe atur es
Using Pointer Graph Test Function
3 Choose the POINTER UNDER TEST type.
4 Press
TIP: If the event occurs outside normal working hours, a Timed Start measurement can
be made.
The values of capture interval available and the approximate total capture window is
as follows:
1 SEC - display window of approximately 5 minutes.
5 SECS - disp l ay window of approximately 25 minutes.
20 SECS - display window of approximately 1 hour 40 minutes.
1 MIN - display window of approximately 5 hours.
5 MIN - display window of approximately 1 day.
20 MIN - display window of approximately 4 days.
RUN/STOP
to start the measurement.
94
Page 95

Selecting Test Fe atur es
Stressing Optical Clock Recovery Circuits
Stressing Optical Clock Recovery Circuits
Description This test is essentially designed for testing optical clock recovery circuits in the
presence of long runs of zero’s or one’s (after scrambling). The test function page
allows control of the test pattern and the block length. The maximum block length is
2 bytes less than the width of the SPE.
When the test is enabled, the instrument applies the selected pattern immedi ately
after the first row of Section Overhead bytes after scrambling. The location of the
start of the pattern is byte 4 at 52 Mb/s (i.e. after the first three bytes of overhead),
byte 10 at 155 Mb/s, byt e 37 at 62 2 Mb/s an d byt e 145 at 2488 Mb/s. The remainder
of the SPE will contain the signal structure and pattern as defined on the
TRANSMITTER, MAIN SETTINGS page.
The payload is overwritten in such a way that the transmitted B1 and B2 values are
correct.
When using this feature to test network equipment clock recovery, long runs of
zero’s may be inserted at the input of the UUT (unit under test) and by monitoring
B1 and B2 at the UUT output, error free transmission can be verified.
The stress test is available at all optical rates.
HOW TO: 1 Set up the SONET transmit interface and payload required. See "Setting SONET
Transmit Interface " page 29.
95
Page 96

Selecting Test Fe atur es
Stressing Optical Clock Recovery Circuits
Choose the required STRESSING PATTER N.
The G.958 test pattern consists of 7 consecutive blocks of data as follows:
the first row of section overhead bytes, ALL ONES, a PRBS, the first row of
section overhead bytes, ALL ZEROS, a PRBS and the first row of section
overhead bytes.
2 If you choose ALL ONES or ALL ZEROS as the stressing pattern, choose the
number of bytes in the BLOCK LENGTH.
96
Page 97

Selecting Test Fe atur es
Generating Automatic Protection Swi tch (APS ) Messag es
Generating Automatic Protecti on Switch (APS)
Messages
Description You can program the K1 and K2 bytes to exercise the APS functions for both
LINEAR (GR-253) and RING (GR-1230) topologies.
The APS Message types are:-
• PASSIVE
• ACTIVE
The following table shows the APS message type availability.
TX RX TOPOLOGY APS Message Types
SONET PDH/DSn LINEAR PASSIVE
SONET PDH/DSn RING PASSIVE
SONET SONET LINEAR PASSIVE or ACTIVE
GENERAL
HOWTO:
SONET SONET RING PASSIVE
1 Set up the SONET transmit interface and payload required. See "Setting SONET
Transmit Interface " page 29.
2 Choose the TOPOLOGY required.
3 Follow the appropriate HOWTO, listed in the following pages.
97
Page 98

Selecting Test Fe atur es
Generating Automatic Protection Swi tch (APS ) Messag es
PASSIVE APS
HOWTO:
The default APS message type is PASSIVE. The APS message is only transmitted
when the
key is pressed.
DOWNLOAD
Insert sonet_aps1.bmp
HOW TO: 1 Select PASSIVE APS message type.
NOTE This step does not apply t o RING TOPOLOGY.
2 Choose the message to be transmitted.
If LINEAR topology is chosen, choose the CHANNEL, the BRIDGED
CHANNEL NO., the ARCHITECTURE and the RESERVED bits you require.
If RING topology is chosen, choose the DESTINATION NODE ID, the
SOURCE NODE ID, the type of PATH and the status code (K2 Bits 6->8)
The current TX and RX, K1 and K2, values are displayed for reference only.
3 Choose to transmit the new K1/K2 values .
DOWNLOAD
98
Page 99

Selecting Test Fe atur es
Generating Automatic Protection Swi tch (APS ) Messag es
Insert son_aps2.bmp
ACTIVE APS
Message Type
This message type only applies to LINEAR topology.
The ACTIVE APS message type gives real-time response to provide switching
keep-alive capability. The instrument will not initiate any changes, but will respond
to change requests that appear on the input K1/K2 byte values.
The ACTIVE APS message type offers two modes:-
• UNIDIRECTIONAL
• BIDIRECTIONAL
The behavior for each mode is as shown in the following table.
APS MODE
RX K1
(b5-b8)
TX K1
*
(b1-b4)
TX K1
*
(b5-b8)
TX K2
*
(b1-b4)
TX K2
*
(b5)
*
TX K2
(b6-b8)
UNIDIRECTIONAL xxxx 0000 0000 xxxx user 100
BIDIRECTIONAL 0000 0000 0000 0000 user 101
BIDIRECTIONAL yyyy 0010 yyyy yyyy user 101
*
GR bit numbering convention
where:
xxxx = any 4-bit binary value.
user = user programmable bit, corresponding to APS ARCHITECTURE.
*
99
Page 100

Selecting Test Fe atur es
Generating Automatic Protection Swi tch (APS ) Messag es
yyyy = any non-zero 4-bit binary value.
Insert aps_3.bmp
HOW TO: 1 Select ACTIVE APS message type.
2 Select ACTIVE APS message mode.
Insert aps_4.bmp
100
 Loading...