


DC-833s
User manual

Thank you for purchasing this AgfaPhoto digital camera. Please read these operating instructions carefully in order to use the digital camera correctly. Keep the instructions in a safe place after reading so that you can refer to them later.
Precautions
•Do not aim the camera directly into the sun or other intense light sources which could damage your eyesight.
•Do not try to open the case of the camera or attempt to modify this camera in any way. High-voltage internal components create the risk of electric shock when exposed. Maintenance and repairs should be carried out only by authorized service providers.
•Do not press the flash too close to the eyes of animals or young children. Eye damage may result. Please remain at least one meter away from infants when using flash.
•Keep the camera away from water and other liquids. Do not use the camera with wet hands. Never use the camera in the rain or snow. Moisture creates internal danger and may cause electric shock.
•Keep the camera and its accessories out of the reach of children and animals to prevent accidents or damage to the camera.
•If you notice smoke or a strange odor coming from the camera, turn the power off immediately. Take the camera to the nearest authorized service center for repair. Never attempt to repair the camera on your own.
Use only the recommended power accessories. Use of power sources not expressly recommended for this equipment may lead to overheating, distortion of the equipment, fire, electrical shock or other hazards.
Disclaimer
We assume no responsibility over and above the provisions of the Product Liability Law for damages suffered by the user or third parties as a result of inappropriate handling of the product or its accessories, or by their operational failure and by their use. We reserve the right to make changes to this product and its accessories without prior notice.
Warning!
Never disconnect to open the camera or remove any parts of it. This will invalidate all guarantee claims.
i

Using your batteries
For best performance and prolonged battery life, we recommend the use of AA lithium or rechargeable Ni-MH batteries.
Extending battery life
The following functions use up a great deal of battery power and should therefore only be used occasionally:
•Excessive use of flash
•Editing images on the camera display
The battery life can be affected by soiling. Please clean the contacts with a clean and dry cloth before putting the batteries in the camera. Battery performance drops at temperatures below 5° C (41° F). If you use the camera at low temperatures you should have replacement batteries to hand and ensure they do not get too cold. Please note: you should not dispose of cold and seemingly flat batteries because these batteries may work again at room temperature.
ii

Contents
PRECAUTIONS |
I |
DISCLAIMER |
I |
USING YOUR BATTERIES |
II |
EXTENDING BATTERY LIFE |
II |
GETTING STARTED |
1 |
USING THIS MENU |
1 |
SCOPE OF DELIVERY |
2 |
PARTS OF THE CAMERA |
3 |
INSERTING THE BATTERIES |
5 |
LOW BATTERY INDICATOR |
5 |
ABOUT BATTERY TYPE |
5 |
INSERTING THE MEMORY CARD |
6 |
ABOUT CAMERA MEMORY |
6 |
DCF PROTOCOL |
6 |
SETTING THE DISPLAY LANGUAGE / DATE & |
|
TIME |
7 |
SETTING THE DISPLAY LANGUAGE |
7 |
SETTING THE DATE & TIME |
7 |
USING THE LCD MONITOR |
9 |
REC MODE |
9 |
PLAYBACK MODE |
10 |
CHANGING THE LCD STATUS |
11 |
BASIC OPERATION |
12 |
TURNING THE POWER ON AND OFF |
12 |
POWER SAVING FUNCTION |
12 |
CHANGING THE MODE |
13 |
SWITCHING BETWEEN REC MODE AND |
|
PLAYBACK MODE |
13 |
SELECTING THE REC MODE |
13 |
SELECTING THE ASM MODE |
14 |
USING THE MENUS |
15 |
REC MENU |
15 |
SETUP MENU |
17 |
SETUP MENU LIST |
18 |
BASIC RECORDING |
20 |
RECORDING STILL IMAGES |
20 |
USING THE Q MODE |
21 |
SETTING IMAGE SIZE AND QUALITY |
22 |
USING THE ZOOM FUNCTION |
23 |
USING THE FLASH |
24 |
USING THE MACRO |
25 |
USING THE SELF-TIMER & BURST |
26 |
USING THE APERTURE PRIORITY |
27 |
USING THE SHUTTER PRIORITY |
27 |
USING THE MANUAL EXPOSURE |
28 |
RECORDING MOVIE CLIPS |
29 |
SETTING THE MOVIE SIZE |
29 |
RECORDING AUDIO CLIPS |
30 |
PLAYING BACK AUDIO CLIPS |
30 |
RECORDING A VOICE MEMO |
31 |
PLAYING BACK A VOICE MEMO |
31 |
OTHER RECORDING FUNCTIONS |
32 |
SETTING THE METERING |
32 |
SETTING THE WHITE BALANCE |
32 |
SETTING THE ISO |
33 |
SETTING THE EXPOSURE |
33 |
SETTING THE AEB |
33 |
SETTING THE HIGHLIGHT |
33 |
SETTING THE SHARPNESS |
34 |
SETTING THE PHOTO EDIT |
34 |
SETTING DATE STAMP |
34 |
SETTING STABILIZER |
35 |
SETTING FACE TRACKING |
35 |
SETTING PHOTO FRAME |
35 |
PLAYBACK |
36 |
PLAYING BACK IMAGES |
36 |
PLAYING BACK MOVIE CLIPS |
36 |
iii

MAGNIFYING & TRIMMING STILL IMAGES
|
37 |
VIEWING IN THUMBNAIL |
38 |
PLAYING A SLIDE SHOW |
38 |
DELETING FILES |
39 |
DELETING A SINGLE FILE |
39 |
DELETING MULTIPLE FILES |
40 |
DELETING ALL FILES |
40 |
PROTECTING A SINGLE FILE |
41 |
PROTECTING ALL FILES |
41 |
PROTECTING MULTIPLE FILES |
42 |
EDITING IMAGES |
43 |
ROTATING STILL IMAGES |
43 |
CHANGING THE IMAGE SIZE |
43 |
CHANGING THE IMAGE WITH EFFECTS 44 |
|
CHOOSING THE IMAGE WITH PHOTO |
|
FRAME |
44 |
COPYING THE FILES |
45 |
SETTING THE DPOF |
46 |
CHOOSING A STARTUP IMAGE |
47 |
MAKING CONNECTIONS |
48 |
FCC COMPLIANCE AND ADVISORY |
60 |
DECLARATION OF CONFORMITY |
61 |
CONNECTING THE CAMERA TO A TV |
48 |
CONNECTING THE CAMERA TO A PC |
49 |
USING THE CARD READER |
49 |
CONNECTING THE CAMERA TO A |
|
COMPUTER WITH THE USB CABLE |
49 |
APPENDIX |
50 |
ABOUT THE FOLDER & FILE NAME |
50 |
FOLDER STRUCTURE |
50 |
FILE NAMING |
50 |
TROUBLESHOOTING |
51 |
SPECIFICATIONS |
52 |
FUNCTION AVAILABLE LIST |
53 |
CUSTOMER CARE |
59 |
DISPOSAL OF WASTE EQUIPMENT BY |
|
USERS IN PRIVATE HOUSEHOLDS IN THE |
|
EUROPEAN UNION |
60 |
iv

Getting Started
Using This Menu
Getting Started
This section contains information you should know before using this camera.
Basic Operation
This section explains all recording features of this camera.
Basic Recording
This section explains how to record still images, movies, and audio files.
Other Recording Functions
This section explains common operations about recording images.
Playback
This section explains playback, delete, and edit functions of still images, movies and audio files.
Making Connections
This section tells you how to connect this camera to a computer or TV.
Appendix
This section describes the troubleshooting and the camera specification.
The meanings of the symbols used in this user's manual are explained below:
 Caution This indicates cautions that should be read before using these functions.
 Tips This indicates the useful information when using this camera.
This indicates the reference page.
1
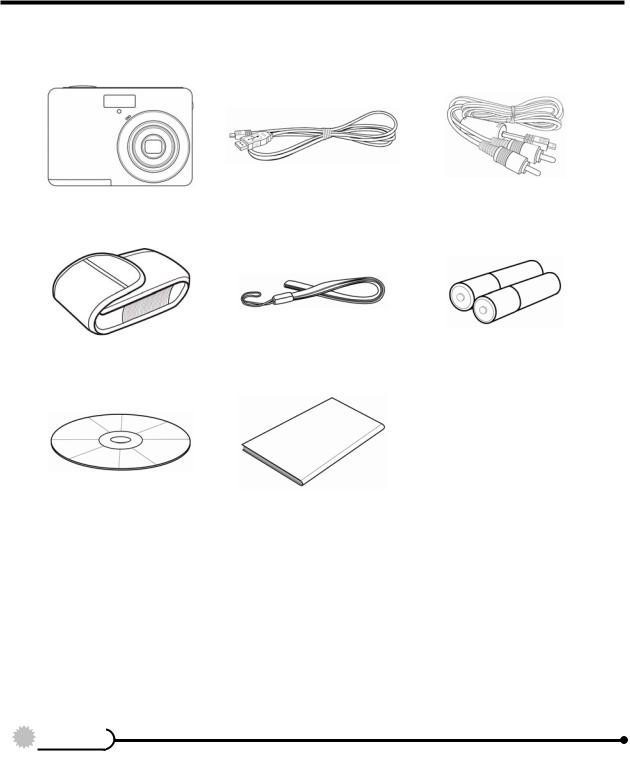
Scope of delivery
AgfaPhoto DC-833s |
USB Cable |
AV Cable |
Soft Case |
Strap |
2 x AA Batteries |
Software Installation
Quick Start Guide
CD-ROM
 Caution
yDo not swing the camera around by the strap.
2

Parts of the Camera
1. |
Flash ( |
page 24) |
2. |
Microphone |
|
3. |
Lens |
|
4. |
Self-timer Lamp |
|
5. |
Zoom Button ( |
page 23) |
y |
Thumbnail ( |
page 38) |
y |
Playback Zoom |
|
( |
page 37) |
|
6. |
Playback Button |
|
( |
page 13) |
|
7. |
Menu Button ( |
page 15) |
8. |
Operation Lamp |
|
9. |
Mode Button ( |
page 13) |
10. ASM Button ( |
page 14) |
|
y |
Delete Button ( |
page 39) |
11. LCD Monitor ( |
page 9) |
|
12. SET/DISP Button |
||
( |
page 11) |
|
13. Flash Button ( |
page 24) |
|
14. Macro Button ( |
page 25) |
|
3
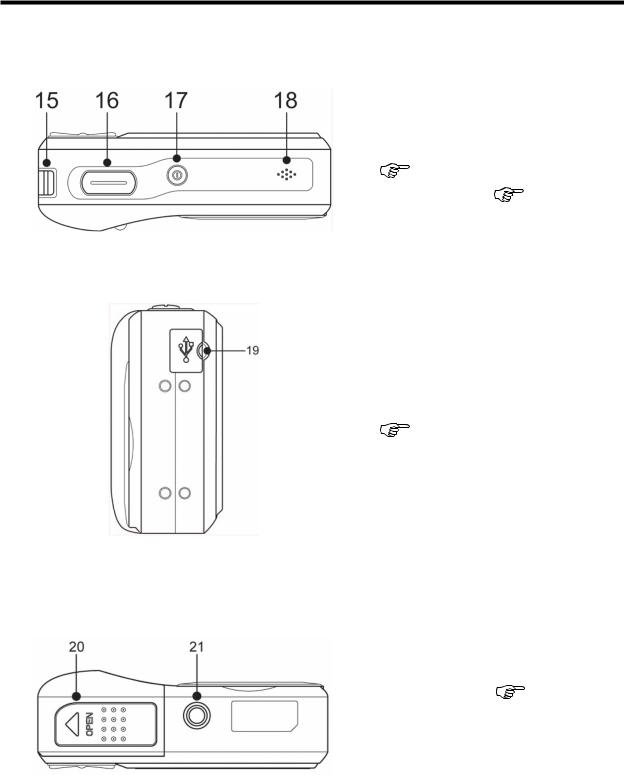
15.Strap Ring
16.Shutter Button
( |
page 20, 29) |
|
17. |
Power Button ( |
page 12) |
18. |
Speaker |
|
19. USB/AV Terminal
( page 19, 49)
20. Battery Cover ( |
page 5) |
21. Tripod Socket |
|
4
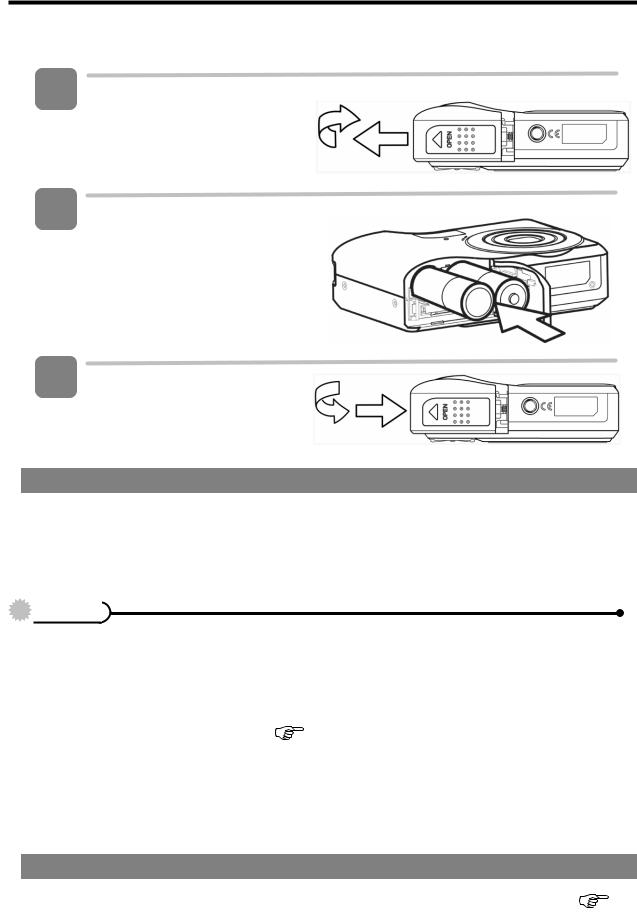
Inserting the Batteries
1 Open the battery cover.
ySlide the battery cover in the direction indicated by the arrow.
2 Insert the batteries.
yInsert two AA-size batteries with the positive (+) and negative (-) poles matching the directions indicated inside the battery room.
3 Close the battery cover.
Low Battery Indicator
A low battery indicator  appears on the LCD screen when the batteries are nearly exhausted. Batteries should be replaced promptly when the low battery indicator appears.
 Caution
yRisk of explosion if battery is replaced by an incorrect type dispose of used batteries according to the instructions.
yBe sure to turn off the camera power before insert or remove batteries.
yIt is recommended to use the provided battery. For other compatible batteries,
please refer to Battery types. ( |
page 19). Use of any other type battery is not |
recommended.
yReplace all batteries at the same time. Never mix old and new batteries.
yRemove batteries if you will not be using them for a long time.
yThe camera body may feel warm after extended use. This is normal.
About Battery Type
After replacing the batteries, please check the Battery Type in the setup menu ( page 19).
5
Inserting the Memory Card
You can use SD cards with this digital camera. The memory card slot is located beneath the battery cover, adjacent to the battery compartment.
1 Open the battery cover.
ySlide the battery cover in the direction indicated by the arrow.
2 Insert the card.
yInsert the card with the label facing up and the arrow pointing in.
Tips
yTo remove the card, gently press on the edge of the card and release it. Pull the card out and close the battery cover.
3 Close the battery cover.
 Caution
yIt may cause damage to the card if removed while the camera is on.
yDo not touch the connection terminals on the back side of the card.
About Camera Memory
This camera is equipped with internal memory. If the memory card is not inserted in the camera, all images and movie clips recorded by the camera will be stored in the internal memory. If the memory card is inserted, images and movie clips are stored on the memory card.
DCF Protocol
The DCF protocol defines the format for image file data as well as the directory structure for the memory card. Images that are taken by a DCF camera can be viewed on DCF-compatible cameras from other manufacturers.
6

Setting the Display Language / Date & Time
When using the camera for the first time after purchasing, be sure to choose a language and set the date & time before using the camera.
Setting the Display Language
1
2
Turn the power on, and set the camera to the Setup Menu ( page 17).
Select [ Language].
yPress  or
or  to select [LANGUAGE] then press
  or the SET button to launch the submenu.
3 Select a language.
yPress  or
or  to select a language and press
  or the SET button to apply the setting.
4 Press the MENU button to close the menu.
Setting the Date & Time
1 |
Turn the power on, and set the camera |
||
|
to the Setup Menu ( |
page 17). |
|
2 |
Select [ |
Date & Time]. |
|
yPress  or
or  to select [Date & Time] then press
  or the SET button to launch the submenu.
3 Set date and time.
yPress  or
or  to change the value of the cursor located. Press
  or
or 
to move the cursor between settings.
Tips
yHolding down  or
or  changes the values continuously.
y For date stamp setting ( |
page 34). |
7

4 Apply the setting.
yAfter adjusting the settings, press the SET or the MENU button to apply the setting.
 Caution
yIf the batteries are removed for longer than 48 hours, the date and time will need to be re-set.
8

Using the LCD Monitor
The LCD monitor is used to compose images while recording, adjust settings and replay images. The following indicators may appear on the LCD monitor while recording or playing back images.
REC mode
1 |
Recording mode ( |
page 13) |
|
2 |
Flash ( |
page 24) |
|
3 |
Macro ( |
page 25) |
|
4 |
Self-timer / Burst ( |
page 26) |
|
5 |
Zoom indicator ( |
page 23) |
|
6 |
Shots remaining |
|
|
7 |
Battery ( |
page 5) |
|
8Storage media
9Stabilizer
10 |
Metering ( |
page 32) |
|
11 |
ISO ( |
page 33) |
|
12 |
Histogram |
|
|
13 |
White balance ( |
page 32) |
||
14 |
Shutter speed ( |
page 20) |
||
15 |
Shake warning ( |
page 20) |
||
16 |
Aperture value ( |
page 20) |
||
17 |
Face tracking ( |
page 35 ) |
||
18 |
Exposure ( |
page 33) |
||
19 |
Focus area ( |
|
page 20) |
|
20 |
Date stamp ( |
|
page 34) |
|
21 |
AEB ( |
page 33) |
||
22 |
Sharpness ( |
|
page 34) |
|
23 |
Quality ( |
|
page 22) |
|
24 |
Resolution ( |
|
page 22) |
|
9
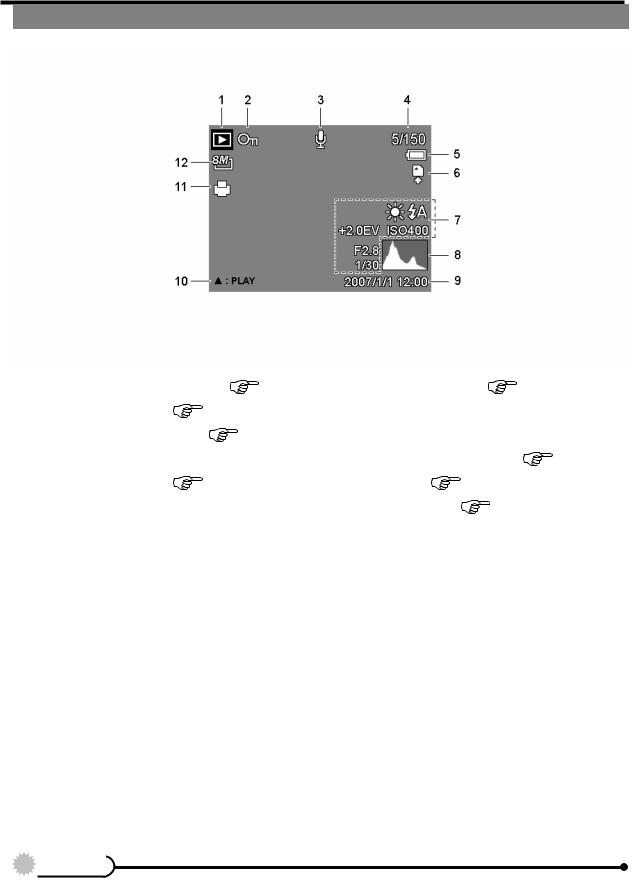
PLAYBACK mode
1 |
Playback mode ( |
page 13) |
7 |
|
2 |
Protect ( |
page 41) |
8 |
|
3 |
Voice memo ( |
page 31) |
9 |
|
4 |
File number / Total |
10 |
||
5 |
Battery ( |
page 5) |
11 |
|
6 |
Storage media |
|
12 |
|
Recording info ( |
page 11) |
||
Histogram |
|
|
|
Captured date & time |
|
||
Voice memo control ( |
page 31) |
||
DPOF ( |
page 46) |
|
|
Resolution ( |
|
page 22) |
|
 Caution
ySome information may not display correctly if you display images captured by other camera model.
10
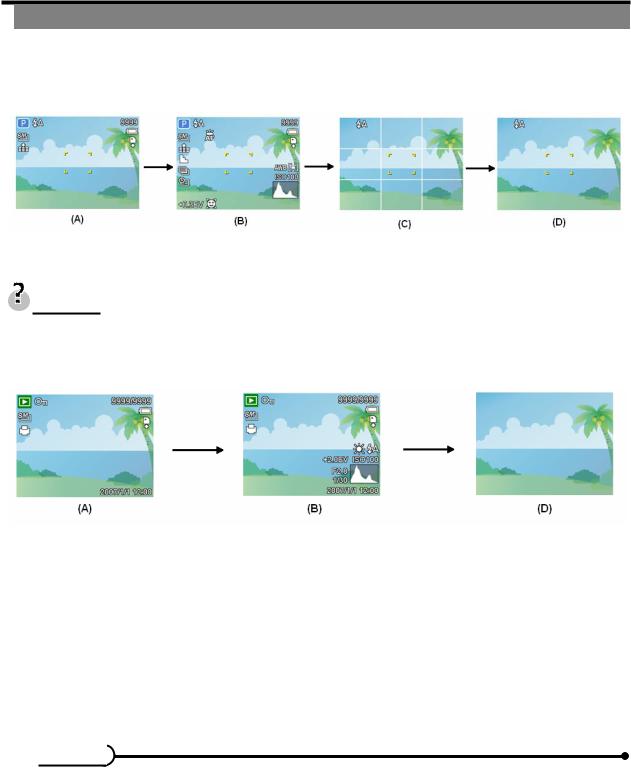
Changing the LCD Status
Press the SET/DISP button changes the LCD status as shown below:
REC mode
(A) OSD on |
(B) Full OSD |
(C)Guide line |
(D) OSD off |
Tips
yUse the “Guide line” to compose images easily before shooting images.
PLAYBACK mode
(A) OSD on |
(B) Full OSD |
(D) OSD off |
 Caution
yYou cannot change the LCD status in the following situation:
Manual exposure
Recording movie clips or audio files
Playing movie clips or audio files
Playing the slideshow
Viewing in thumbnail
Trimming a still image
11
Basic Operation
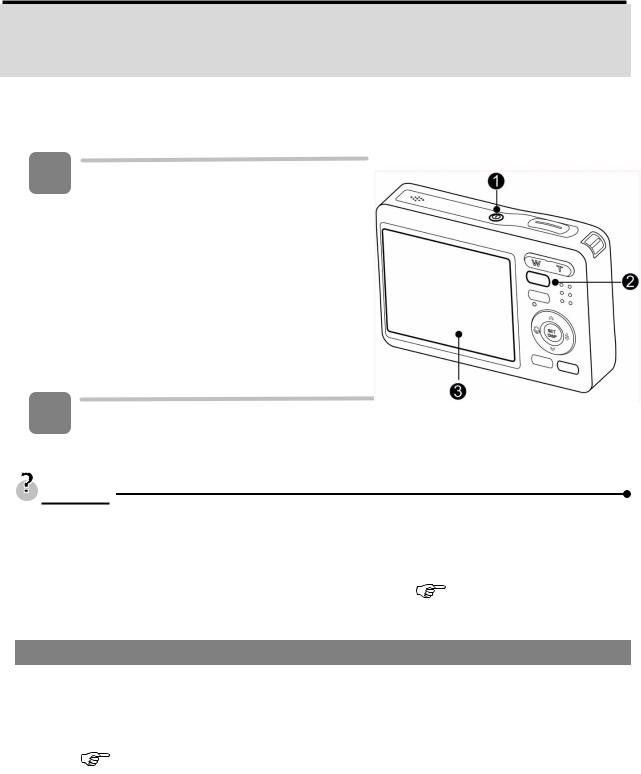
Turning the Power On and Off
1 Press the POWER button (n) to turn on the camera in the REC mode.
yThe power turns on, the lens extends and the LED lights in green.
Press the PLAYBACK button (o) to turn on the camera in the PLAYBACK mode.
yThe power turns on, and an image displays on the LCD monitor (p).
2 Press the POWER button (n) again to turn the power off.
yThe power turns off, the lens retracts and the LED turns off.
Tips
yYou can turn on the camera without the start-up and operating sound by pressing and holding the POWER (n) or the PLAYBACK (o) button over 1.5 seconds.
y Switch between REC mode and PLAYBACK mode ( page 13).
Power Saving Function
For saving the battery power, the LCD monitor automatically turns off 1 minute after the last control accessed (factory-preset setting). Press any button other than the power button to turn on the LCD monitor. You can change the power save setting in Setup menu ( page 18).
After the power saving function has been active for 1 minute, the power will turn off completely. Press the POWER (n) or the PLAYBACK (o) button to restore the power.
The power save feature will not activate in the following situation:
yRecording movie clips or audio files
yPlaying movie clips or audio files
yPlaying a slideshow
yConnecting the camera to a computer or printer with the USB cable
12
Changing the Mode
You can record images and voices in the REC mode and use the PLAYBACK mode to replay, delete, or edit images on the LCD monitor.
Switching between REC mode and PLAYBACK mode
In REC mode, press the PLAYBACK button (n) to switch to the PLAY mode.
In PLAY mode, press the PLAYBACK (n) or the MODE (o) button to switch to the REC mode.
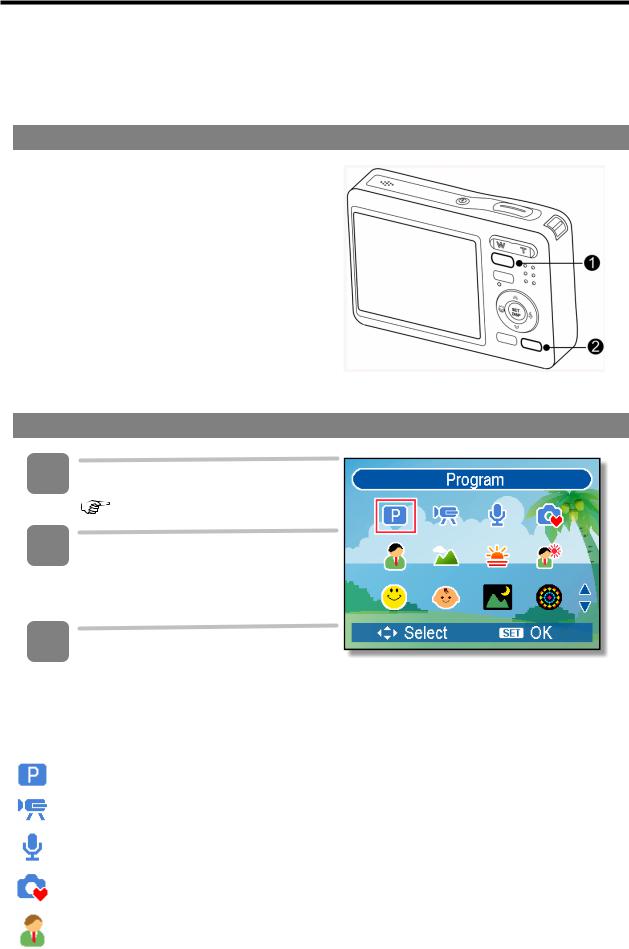
Selecting the REC mode
1 |
Set the camera to the REC mode |
|
( page 13). |
2 |
Launch the mode palette. |
yPress the MODE button (o) to show the scene mode palette.
3 Select a mode.
yUse the four-way control to select a desired mode and press the SET button to confirm the setting.
Display |
Title |
Description |
|
Program |
The camera makes settings suitable for the shooting conditions. |
|
|
|
|
Movie |
For recording movie clips. |
|
|
|
|
Voice REC |
For recording audio. |
|
|
|
|
Q Mode |
Allows beginners to take pictures easily. |
|
|
|
|
Portrait |
Blurring the background to focus on the subject. |
|
|
|
13

|
|
|
Display |
Title |
Description |
|
Landscape |
Used for the wide scenic views. |
|
|
|
|
Sunset |
Enhance the red hue for recording sunset images. |
|
|
|
|
Backlight |
Shooting the image of backlight object by changing metering. |
|
|
|
|
Smile |
Capture the most brilliant smile of characters. |
|
Capture |
|
|
|
|
|
Kids |
Take a still image to capture moving kids. |
|
|
|
|
Night Scene |
Shooting the subject while keeping the background night scenery. |
|
|
|
|
Fireworks |
Slow shutter speed to take fireworks exploding. |
|
|
|
|
Snow |
Used for the beach or snow scenes. |
|
|
|
|
Food |
Higher saturation makes food more appetizing. |
|
|
|
|
Building |
Enhance the edges of the subject. |
|
|
|
|
Text |
Enhance the black & white contrast. |
|
|
|
Selecting the ASM mode
1 Set the camera to the REC mode ( page 13).
yIt cannot be switch to ASM mode while in Movie or Voice REC mode.
2 Launch the ASM mode.
yPress the ASM button (n) to toggle between Aperture Priority, Shutter Priority, Manual Exposure mode.
y For detail operation ( |
page |
26). |
|
14

Using the Menus
When a menu is displayed, the four-way control and the SET button are used to make the desired settings.
REC menu
1
2
3
4
5
Turn the power on, and set the camera to the REC mode
( page 13).
Open the REC menu.
yPress the MENU button (n) to display the menu.
Select an item.
yPress  or
or  (o) to select a menu item.
Change the setting.
yPress  or
or  (o) to change the setting.
Press the MENU (n) or the SET (o) button to save the settings and close the menu.
REC menu list (Still Image)
|
Menu Item |
|
|
|
Available Setting |
|
|
Page |
|
||
|
|
|
|
|
|
|
|
|
|
|
|
|
Resolution |
/ |
/ |
/ |
|
/ |
/ |
/ |
22 |
|
|
|
Quality |
/ |
/ |
|
|
|
|
|
22 |
|
|
|
Metering |
/ |
/ |
|
|
|
|
|
32 |
|
|
|
White Balance |
Auto / |
/ |
/ |
/ |
/ |
|
/ |
32 |
|
|
|
ISO |
|
Auto / ISO 50 / ISO 100 / ISO 200 / ISO 400 / ISO |
33 |
|
||||||
|
|
800 / ISO 1600 |
|
|
|
|
|
|
|||
|
|
|
|
|
|
|
|
|
|
||
|
Exposure |
|
|
... |
|
|
|
|
|
33 |
|
|
Drive Mode |
Off / |
/ |
/ |
/ |
|
|
|
26 |
|
|
|
AEB |
Off / |
|
|
|
|
|
|
33 |
|
|
|
Highlight |
Off / |
/ |
/ |
|
|
|
|
33 |
|
|
15
 Loading...