

Afinia H480 User manual
Afinia
H480 3D Printer
Version 1.0

Afinia H480 3D Printer User’s Manual
2

Afinia H480 3D Printer User’s Manual
TABLE OF CONTENTS
Introduction .............................................................................................................................. 5
Safety Precautions and Protection ...................................................................................... 5
Overview ................................................................................................................................... 6
Unpacking the Afinia H480 3D Printer ................................................................................ 7
Installing the Afinia H480 3D Printer ...................................................................................... 8
Attaching the Material Spool ............................................................................................... 8
Driver and Software Installation .......................................................................................... 9
Installing the Printer ............................................................................................................ 9
Getting Ready to Print ............................................................................................................ 11
Starting the Afinia 3D Program .......................................................................................... 11
Initializing the Printer .......................................................................................................... 11
Preparing the Platform ...................................................................................................... 12
Manually Leveling the Print Platform ................................................................................ 13
Platform Level Calibration ................................................................................................. 13
Calibrating the Nozzle Height ........................................................................................... 16
Loading the Print Material Filament .................................................................................. 18
Other Maintenance Options .............................................................................................. 18
Printing with the H480 3D Printer ......................................................................................... 20
Loading a 3D Model .......................................................................................................... 20
View Options ..................................................................................................................... 22
Model transformations ....................................................................................................... 22
Placing Models onto the Build Platform ............................................................................ 24
Print Setup Options ........................................................................................................... 25
Printing .............................................................................................................................. 28
Print Options ..................................................................................................................... 29
Save as Project ...................................................................................................................... 30
Model Removal ...................................................................................................................... 31
Removing Support Material............................................................................................... 32
Maintenance ........................................................................................................................... 33
Changing the Material ....................................................................................................... 33
Vertical Calibration ............................................................................................................ 33
Cleaning the nozzle ........................................................................................................... 34
Removing / Changing the Nozzle ..................................................................................... 35
Cleaning the Platform ........................................................................................................ 35
Lubrication of bearings ...................................................................................................... 35
Spare parts ........................................................................................................................ 35
Tips & Tricks .......................................................................................................................... 36
Status Indicator ...................................................................................................................... 38
Troubleshooting ..................................................................................................................... 39
Solution for "Winusb.dll not found" problem (Windows) ................................................... 39
Updating the Printer ROM ..................................................................................................... 41
Specifications ........................................................................................................................ 41
Printer Physical Characteristics ........................................................................................ 41
Specifications .................................................................................................................... 41
Environmental specifications............................................................................................. 41
Technical Support .................................................................................................................. 42
3

Afinia H480 3D Printer User’s Manual
Afinia 1-Year Limited Warranty
Below is the one-year limited warranty included with this Afinia product. Afinia prides itself on its outstanding
product line and its technical support. If for some reason, your product fails, Afinia, a division of Microboards
Technology, LLC, stands behind its warranties and assures you the best service possible in a quick and timely
manner.
Afinia warrants to the original purchaser that this product is free from defects in material and workmanship.
Afinia will for one year, at its option, repair or replace at no charge for parts and labor from the date you
purchased the product from an authorized Afinia reseller. Nozzles and Cell/Perf Boards are warranted for
ninety (90) days.
• Warranty registration must be completed within 30 days of receipt of the product in order to validate the
warranty.
• Afinia, a division of Microboards Technology, LLC, reserves the right to determine the validity of all warranty
claims.
• Warranty is void if the product serial number has been altered or removed.
• Warranty is void if the product has been misused or damaged or if evidence is present that the product was
altered, modified, or serviced by unauthorized service people.
The above stated warranty is exclusive and replaces all other warranties, express of implied, including those of
merchantability and fitness for a particular purpose. Afinia, a division of Microboards Technology, LLC, will not
be liable for any other damages or loss, including incidental or consequential damages and loss of profits or
revenues from whatever cause, including breach of warranty or negligence.
This product has been thoroughly tested and inspected at the factory prior to shipment. Nevertheless, inspect
your product completely for any damage or loss of parts that may have occurred during shipment. Notify the
delivering carrier promptly if damage claims are to be filed.
Afinia reserves the right to modify or update its product without obligation to replace any equipment delivered
prior to any such change.
To register your warranty, please visit www.afinia.com/register
FCC ID: 026-H479
This device complies with Part 15 of the FCC Rules. Operation is subject to the following two conditions: (1)
this device may not cause harmful interference, and (2) this device must accept any interference received,
including interference that may cause undesired operation.
Changes or modifications not expressly approved by the party responsible for compliance could void the
user's authority to operate the equipment.
NOTE: This equipment has been tested and found to comply with the limits for a Class B digital device,
pursuant to Part 15 of the FCC Rules. These limits are designed to provide reasonable protection against
harmful interference in a residential installation. This equipment generates, uses, and can radiate radio
frequency energy and, if not installed and used in accordance with the instructions, may cause harmful
interference to radio communications. However, there is no guarantee that interference will not occur in a
particular installation. If this equipment does cause harmful interference to radio or television reception, which
can be determined by turning the equipment off and on, the user is encouraged to try to correct the
interference by one or more of the following measures:
•
Reorient or relocate the receiving antenna.
•
Increase the separation between the equipment and receiver.
•
Connect the equipment into an outlet on a circuit different from that to which the receiver is
connected.
•
Consult the dealer or an experienced radio/TV technician for help.
4
Afinia H480 3D Printer User’s Manual
Introduction
Congratulations on purchasing an Afinia H480-Series 3D Printer. The Afinia H480 3D Printers are
designed with ultimate portability and simplicity in mind. The system and software allow you to
print great models in a few easy steps, even if you have never used a 3D printer before. The
Afinia H480 3D printers combine years of experience and innovation to make printing 3D models
easy through its reliably simple hardware and software design.
Safety Precautions
Please read this section carefully before using the printer.
• The printer can only be used with the power adapters supplied by this company, or the
product may be damaged, with a risk of fire.
• To avoid burning or model deformation, do not touch the model, nozzle, or the platform by
hand or any other part of the body while the printer is working or immediately after it has
finished printing.
• Protective glasses should always be worn when removing support material, especially
PLA.
• The brown sections of the currently supplied gloves melt at around 200º C; please do not
hold the extruder block with the gloves.
• There is a slight smell from ABS when it is being extruded. A well-ventilated room is
recommended; however when printing, keep the printer away from any drafts as this can
affect the warping of ABS prints.
• When ABS is burnt it releases toxic fumes. Never set the nozzle temperature high enough
to burn the material.
The following classifications are used in this manual:
CAUTION: Indicates a potentially hazardous situation which, if not avoided, may
result in minor or moderate injury.
WARNING: Indicates a potentially hazardous situation which, if not avoided, may
result in serious injury.
GLOVES: When performing certain maintenance procedures, the machine may
be hot and gloves are required to avoid burns.
SAFETY GLASSES: Wear safety glasses to avoid injury to your eyes.
Protection
• The printer must not be exposed to water or rain, or damage may occur.
• Do not shut down the Afinia H480 3D System or pull out the USB cable when loading a
digital model or the model data may be lost.
• When using the “Extrude” function, keep at least 50mm between the nozzle and the
platform. If too close, the nozzle may get blocked.
• The printer is designed to work properly at an ambient temperature of between 60°F and
85°F and humidity of between 20% and 50%. Operating outside these limits may result in
low quality models.
5
Afinia H480 3D Printer User’s Manual
Platform
Tube
Overview
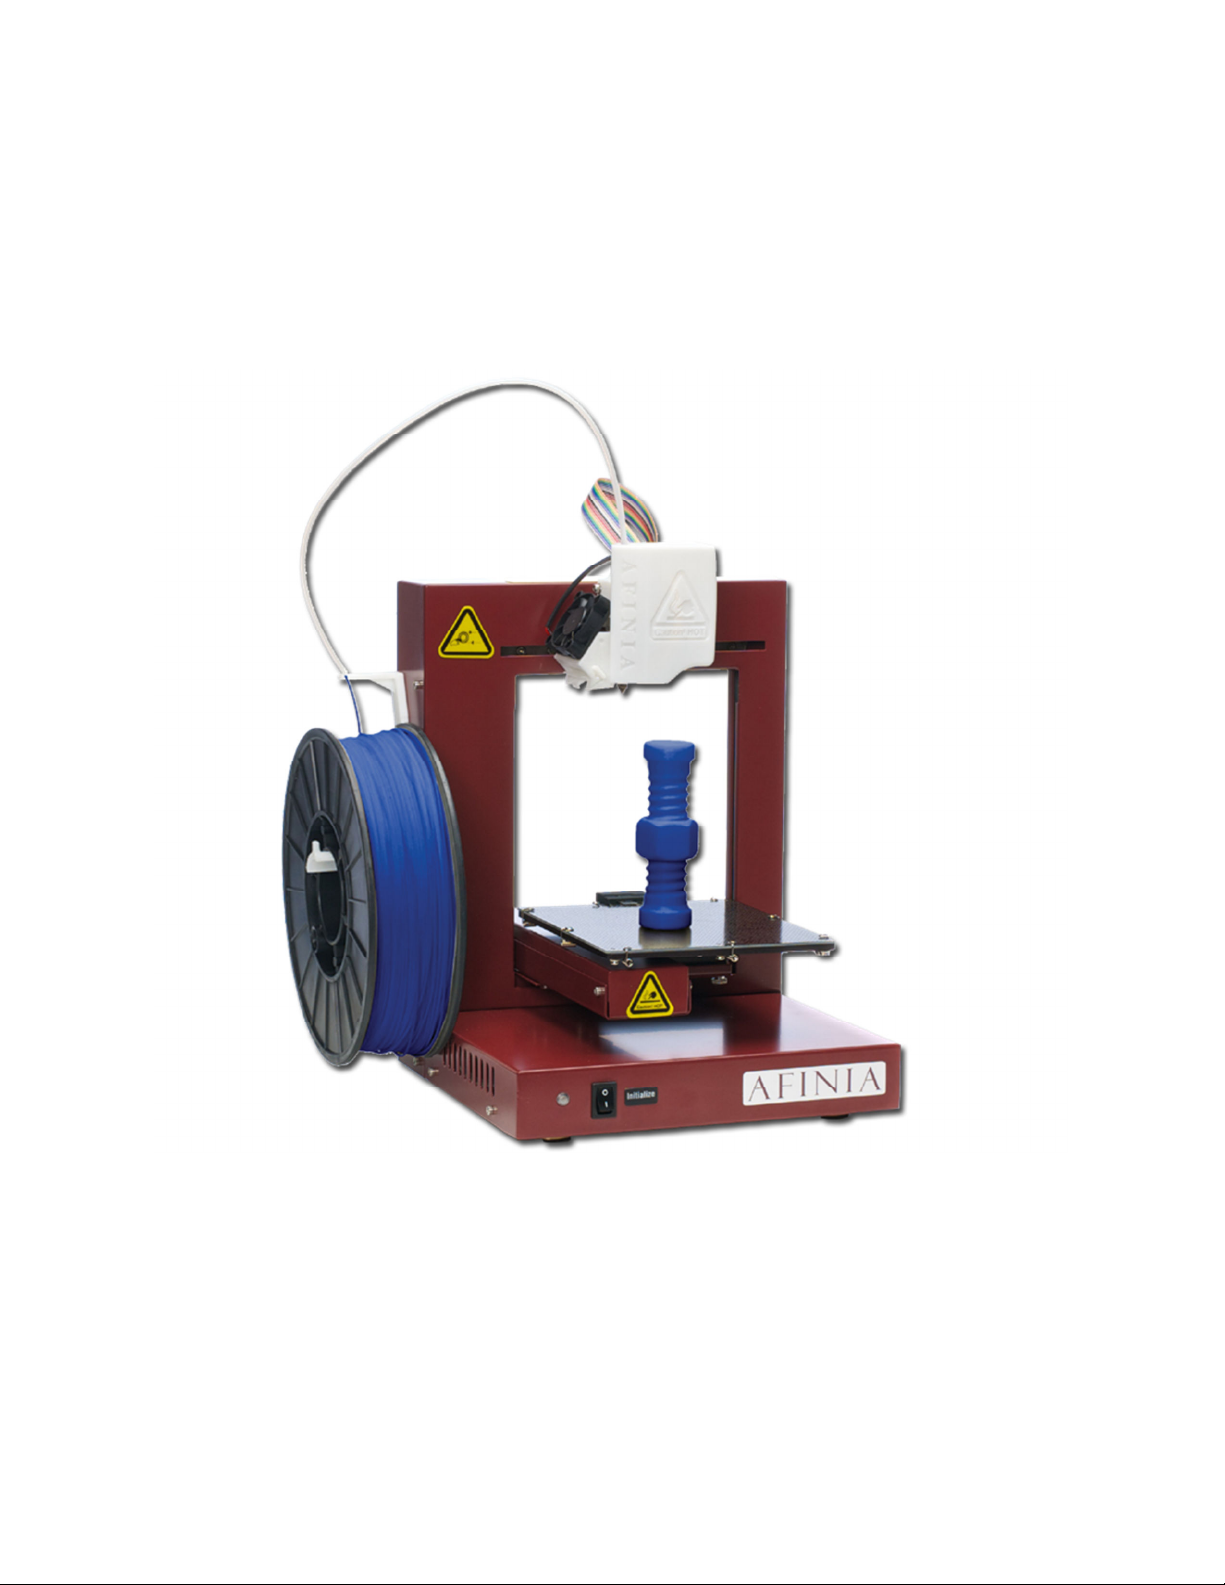
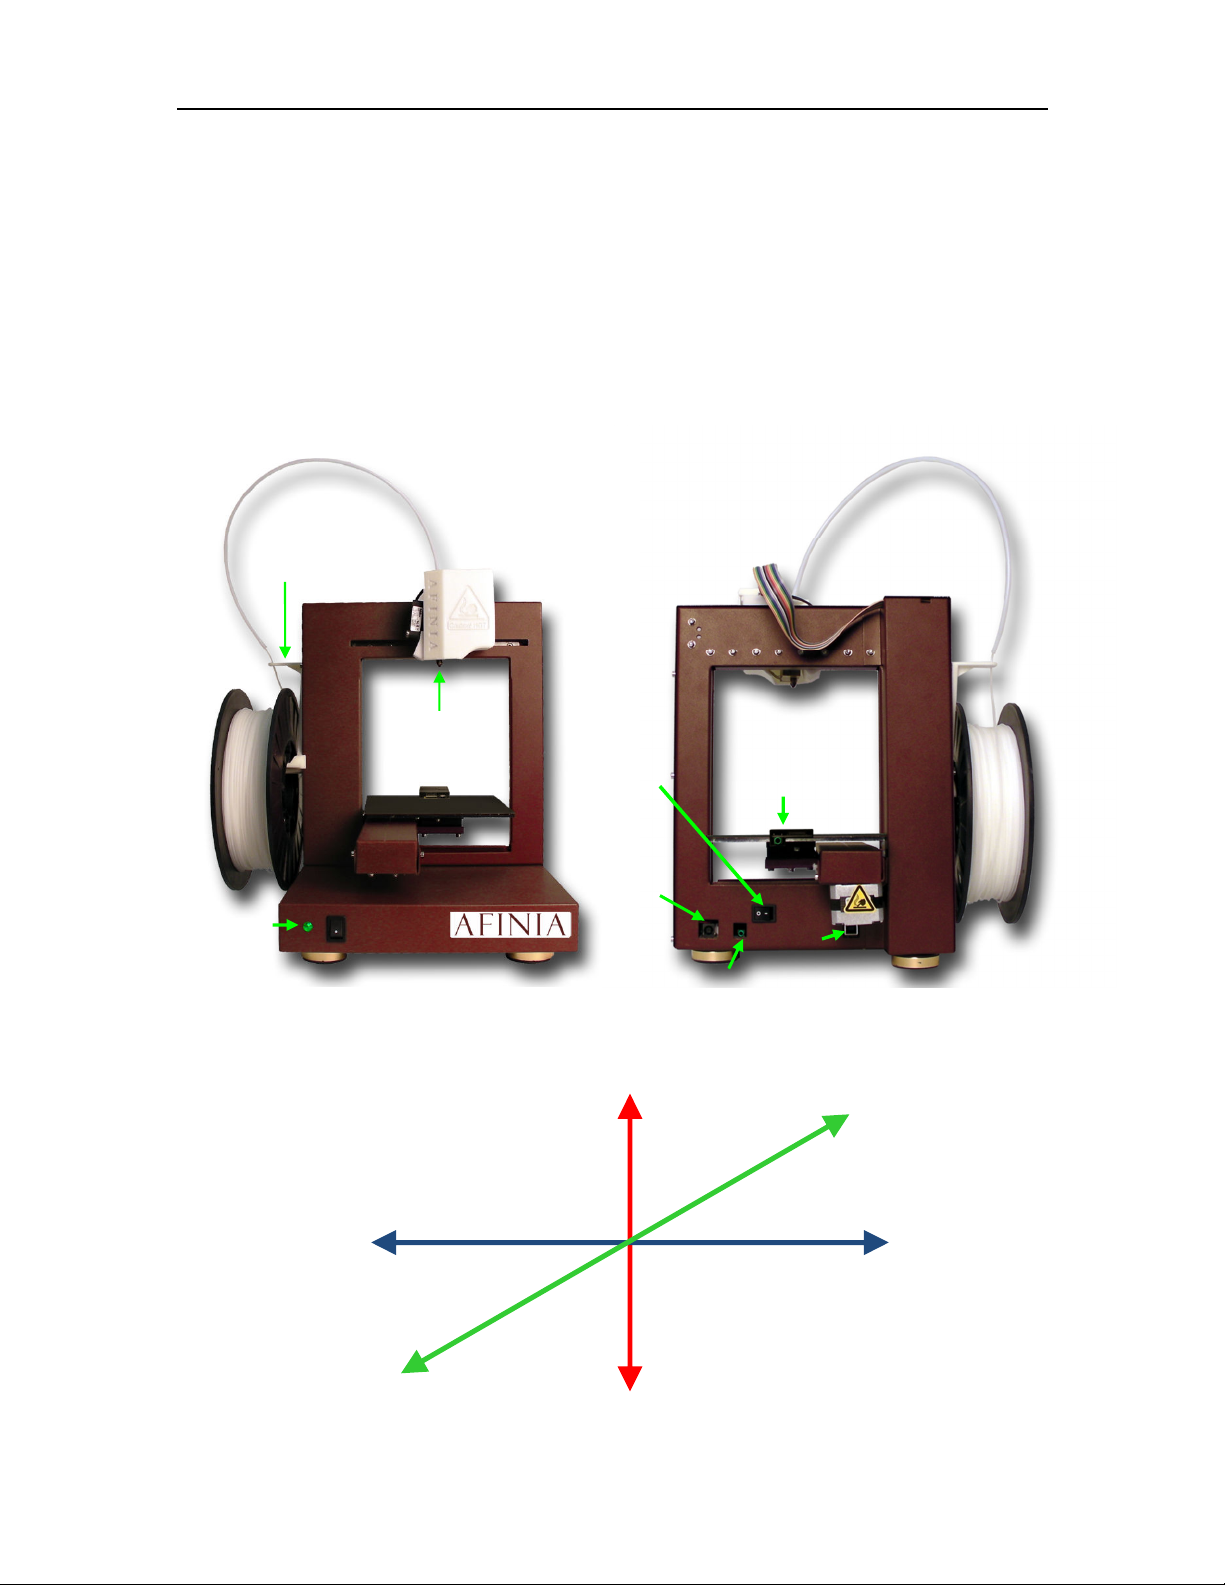
The Afinia H480 3D Printer consists primarily of the Extruder, Print Platform, Material Spool, and
Filament, all supported by the Pedestal. The Printer is initialized with a single switch, and
calibrating the position of the print platform is done using the included Afinia software.
The Afinia 3D software sends the print data from a Mac or PC to the Printer over a single USB
cable. The Print Platform moves both vertically and front-to-back while the Extruder moves
left-to-right, providing the necessary 3 axes of operation (see Figure 2). The Extruder delivers the
Filament from the Material Spool into the Nozzle, which heats the filament to printing temperature
and deposits it on the Platform.
Filament
Plastic
Filament
Material
Spool
Filament
Status
Indicator
Guide
Extruder
Guard
Nozzle
Power
Switch
Power
Initialization
Switch
Figure 1: Front and Back views of the Afinia H480 3D Printer
Pedestal
Figure 2: Axes of Operation
Connection
Data Connection
Nozzle
Sensor
USB
Port
Z Axis:
Vertical
Extruder or Y Axis:
Left to Right
Platform or X Axis:
Front to Back
6

Afinia H480 3D Printer User’s Manual
Unpacking the Afinia H480 3D Printer
Remove the Installation Disc, Manual, Quick Start Guide, and Accessories Pack from the box.
Next, lift the Afinia H480 3D printer from the box. Remove the foam from both sides of the Printer
and set the Printer on its base with the back of the Printer facing you.
There are 2 packaging clips that protect the Printer during shipping
that need to be removed. Both clips should be saved in the event
that you need to ship the Printer in the future!
The first clip to be removed is used to hold the Extruder assembly in
place during shipping. Carefully peel the strapping tape down, and
then slide the clip down and off the Printer.
The second clip is used to help keep the Platform Arm secure during
shipping. To remove the clip, place your hand under the platform X-axis
arm and gently lift. Do not lift the arm by holding onto the platform!
Once the platform arm has been lifted a few inches, rotate the top of the
clip towards the front of the printer. Once in the correct position, the clip
will slip over the Z-axis arm.
Next, open and check the contents of the Accessory Pack:
• Reel of Filament (1, Natural/White)
• Power Supply
• Power Cable
• USB Cable
• FR-4 (Perf) Board
• Filament Guide Tube
• Filament Hanger
• Nozzle Wrench
• Hex Wrenches
You will need the Power Supply and Cable, Hex Wrenches, Filament Spool, Filament Hanger,
Filament Tube, and USB Cable to complete the Afinia H480 3D Printer installation.
• Spare screws & washers
• Gloves (1 pair)
• Putty Knife
• Exacto Knife and blades
• Snipping Pliers
• Tweezers
• Platform and Nozzle Cable
• Platform Calibration Probe
7
Afinia H480 3D Printer User’s Manual
Installing the Afinia H480 3D Printer
Attaching the Material Spool
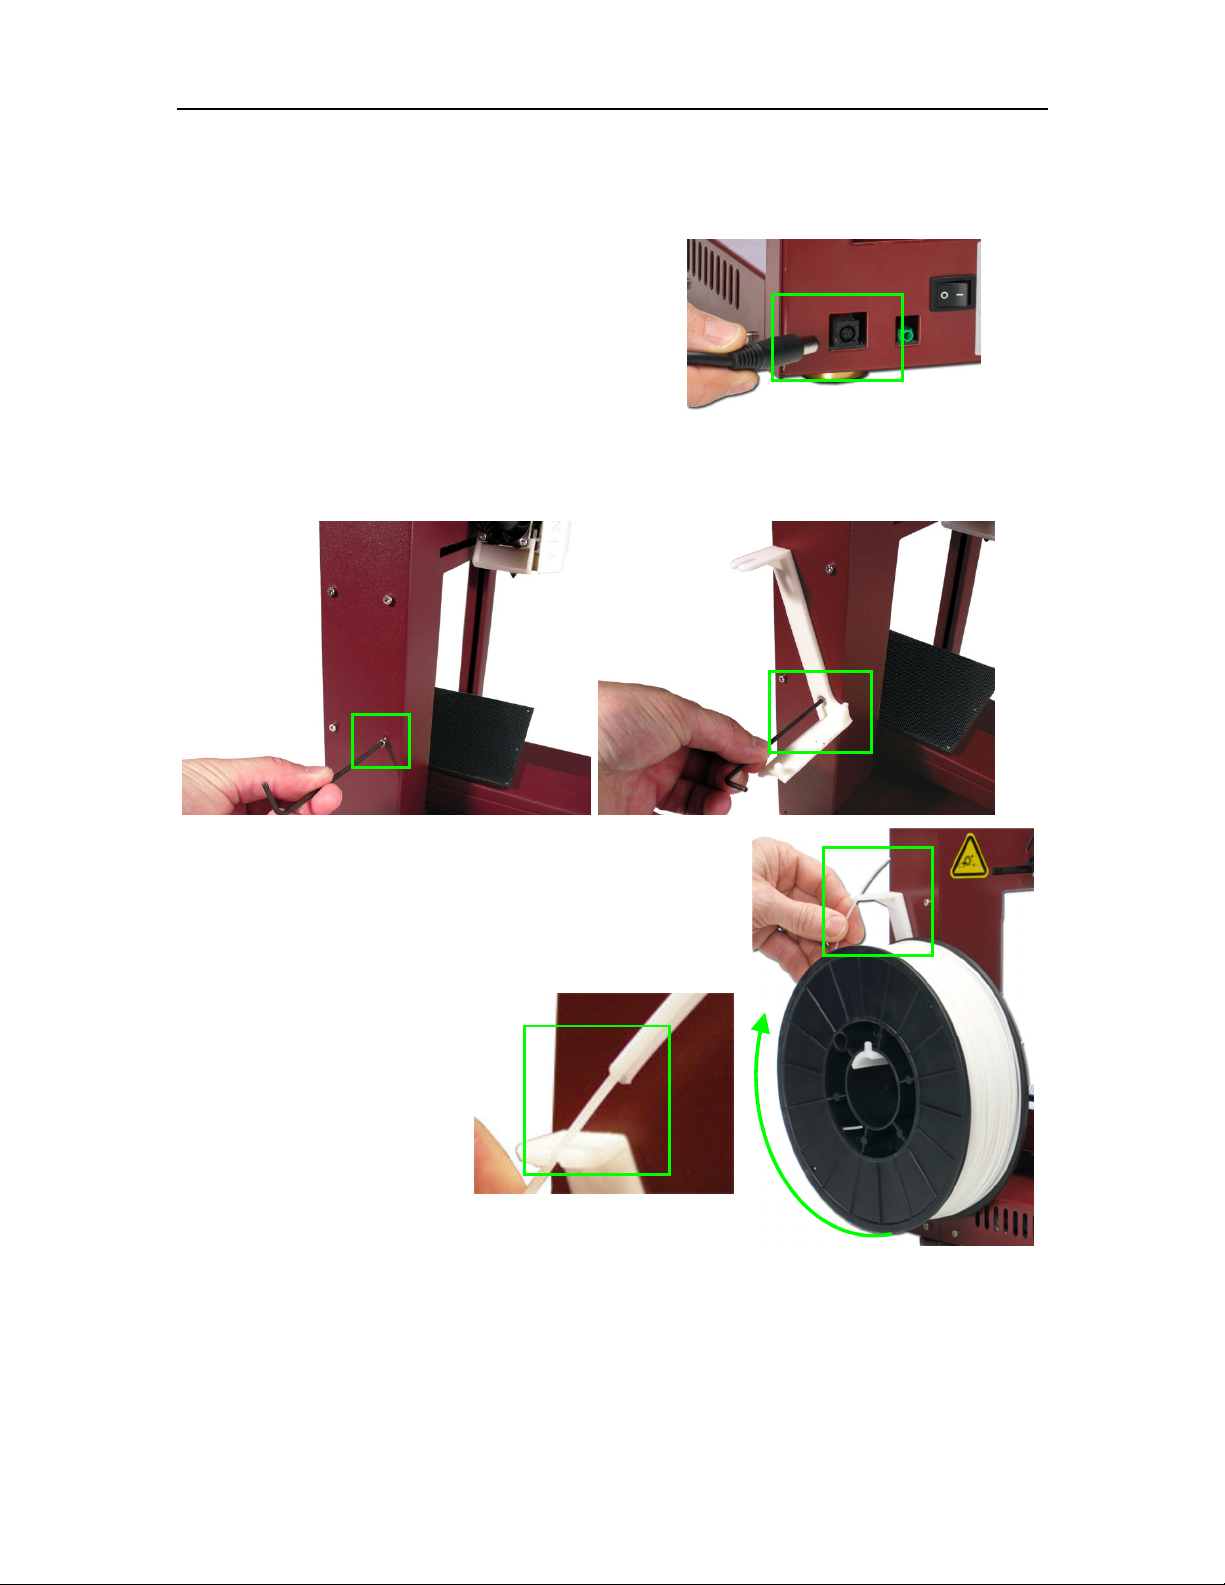
Attach the Material Spool with these steps:
A. Connect the power adapter to the power
interface and turn on the power switch.
B. Install the ABS plastic spool holder and filament guide. Unscrew the lower right screw from
the left side of the Printer. Use this same screw to attach the spool holder with the bottom
right lip of the spool holder locked onto the printer’s corner and the top of the holder
mounted over the upper left screw.
C. Put the ABS Material Spool onto the holder with the
end of the filament pointing up from the back. Thread
the filament through the Filament Guide at the top of
the spool holder.
D. Insert the end of
filament into one end
of the Filament tube.
Feed the filament
through the tube until
about 4 inches of
filament protrudes
from the tube.
The filament will be loaded into the extruder later in the
installation process.
8
Afinia H480 3D Printer User’s Manual
Driver and Software Installation
Mac
Insert the Installation Disc into your Mac. Open the disc, go into the Mac folder, and
double-click the Afinia Mac Setup.pkg icon. Follow the prompts through the installation. The
drivers will be added and the Afinia software will be installed to the Applications folder.
Windows
Insert the Installation Disc into your PC. If the installer does not launch automatically, start the
Afinia H480 3D Printer setup.exe file in the PC directory on the installation disc and install to
the specified directory (default is Program files\Afinia\Afinia 3D Printer).
Note: This installs the Afinia H480 3D Printer software, the Afinia H480 3D Printer drivers, and
the Afinia H480 3D Printer sample files into your Program files\Afinia\Afinia 3D Printer
folder.
Follow the instructions in the Installer to be sure the drivers and software are all in place
before attempting to use the Printer. The instructions below will follow the same order as those
in the Installer.
Installing the Printer
Mac
Simply connect the Printer to your Mac using the USB connection on the back of the Printer.
Windows Vista, Windows 7, and Windows 8
As part of the installation, the 3D Printer drivers are pre-installed and you will be prompted to
connect the Printer to your PC. The Printer will be recognized and automatically installed when it is
connected to your PC.
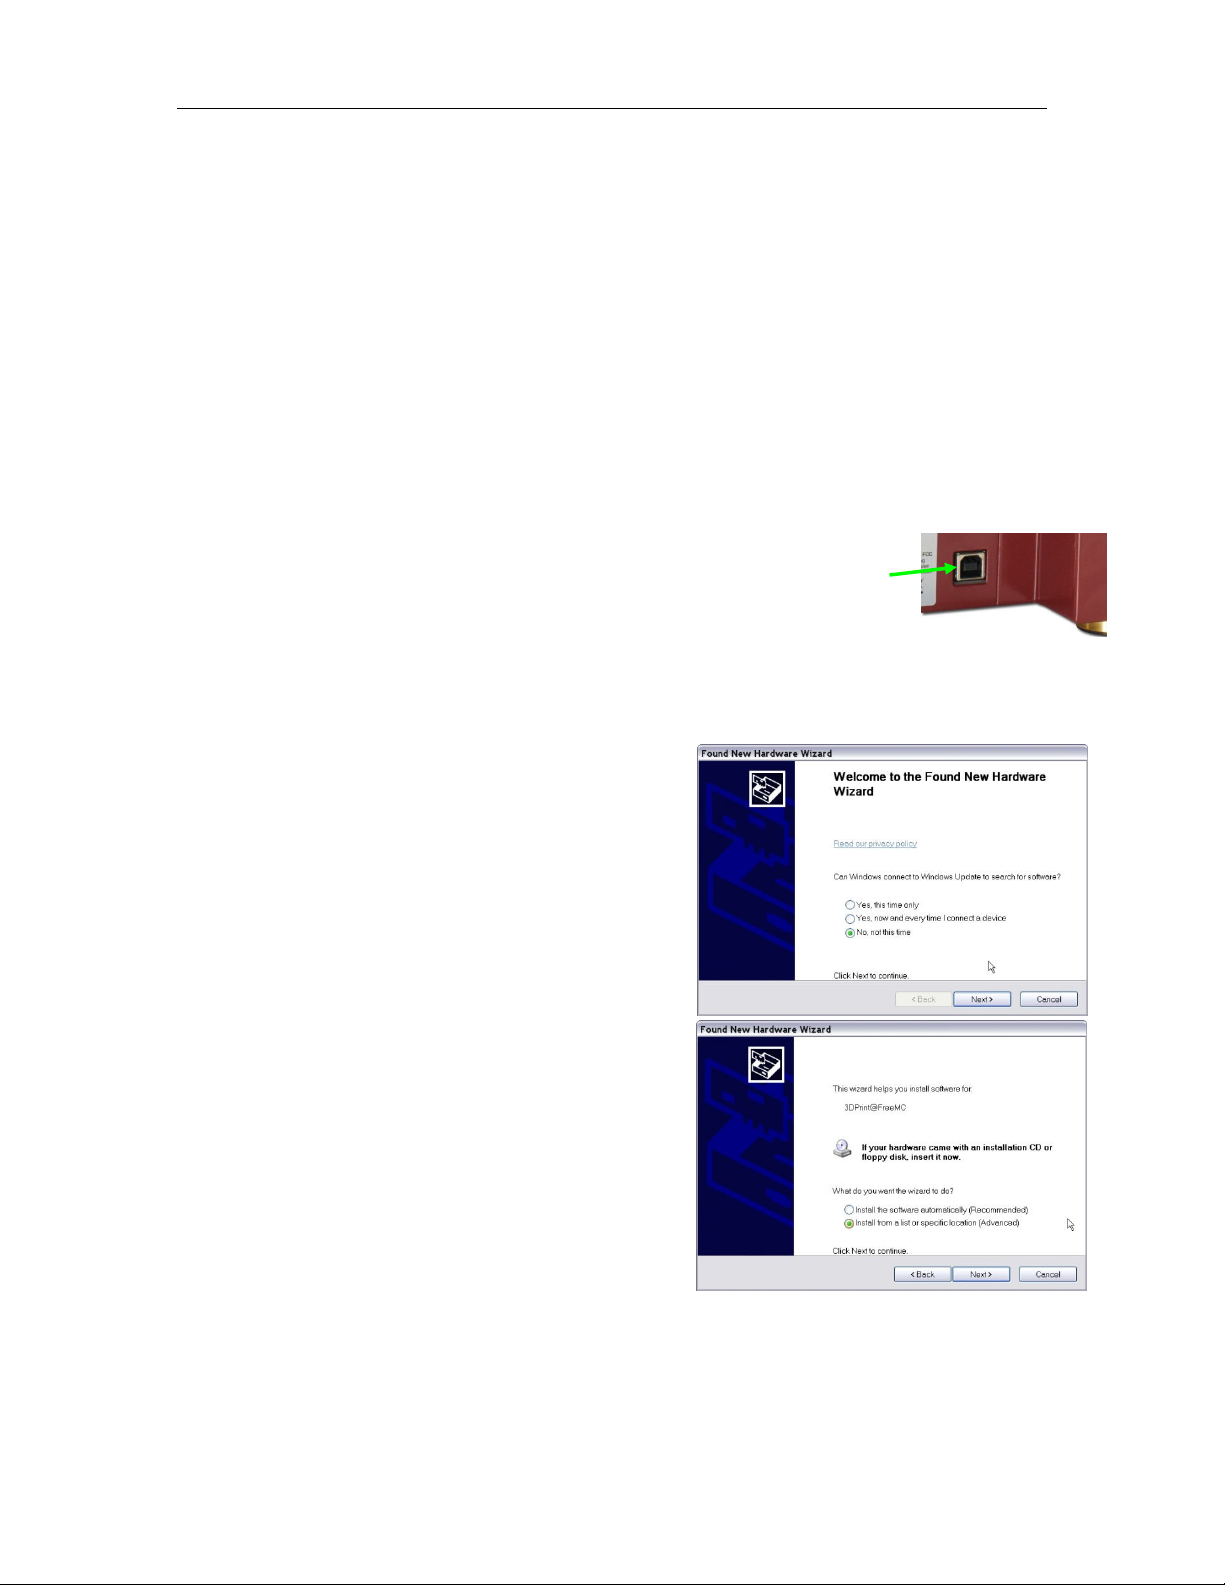
Windows XP
Since XP does not have the driver pre-installation ability,
the drivers must be manually installed when the Printer
is connected to the PC. Follow these steps:
A. Connect the printer to a computer with the USB
cable. If the computer displays the “Found New
Hardware Wizard” window, choose No, not this
time, and click the Next button.
B. Choose Install from a list or specific location
(Advanced) and click Next.
USB Connection
9
Afinia H480 3D Printer User’s Manual
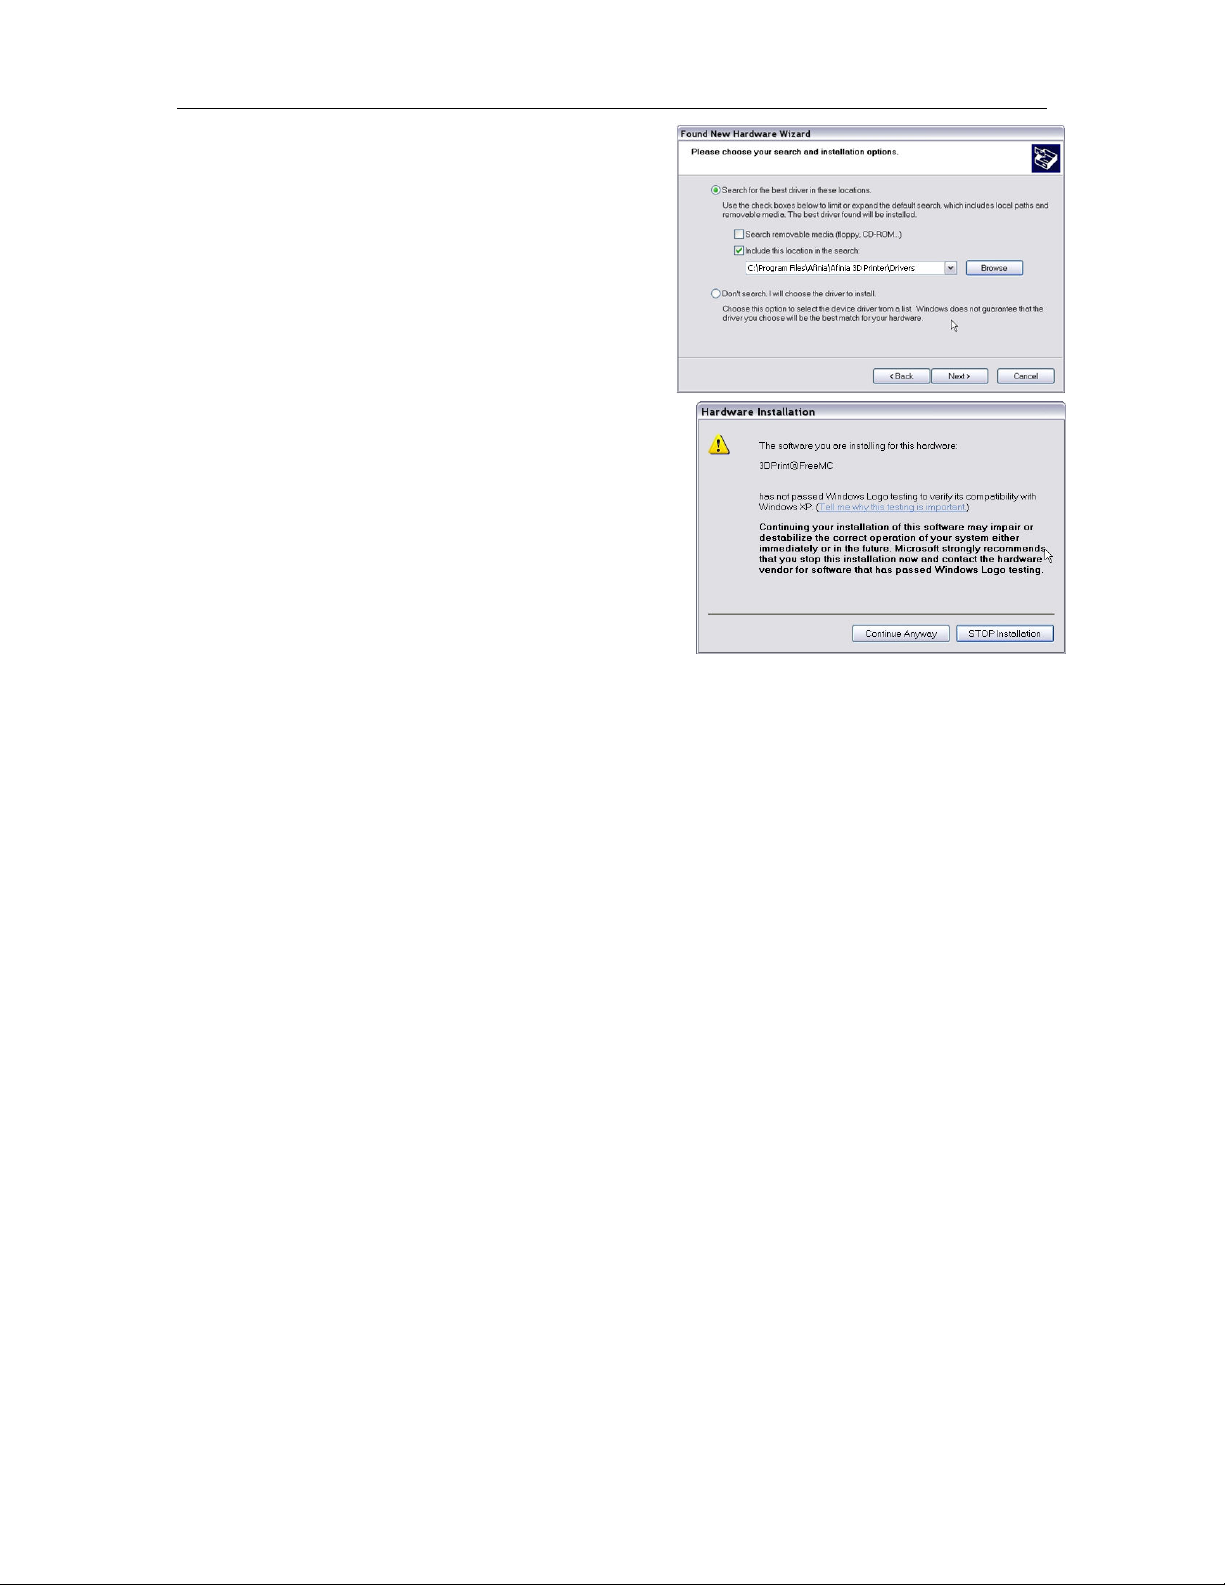
C. Select the option to Search removable
media; the drivers are located on the
installation disc.
If you are installing from a download, click
Browse, then navigate to C:\Program
files\Afinia\Afinia 3D Printer\Driver, then
Next.
D. If the following dialog box appears, click
Continue Anyway, and the drivers will install
automatically.
10
Afinia H480 3D Printer User’s Manual
Getting Ready to Print
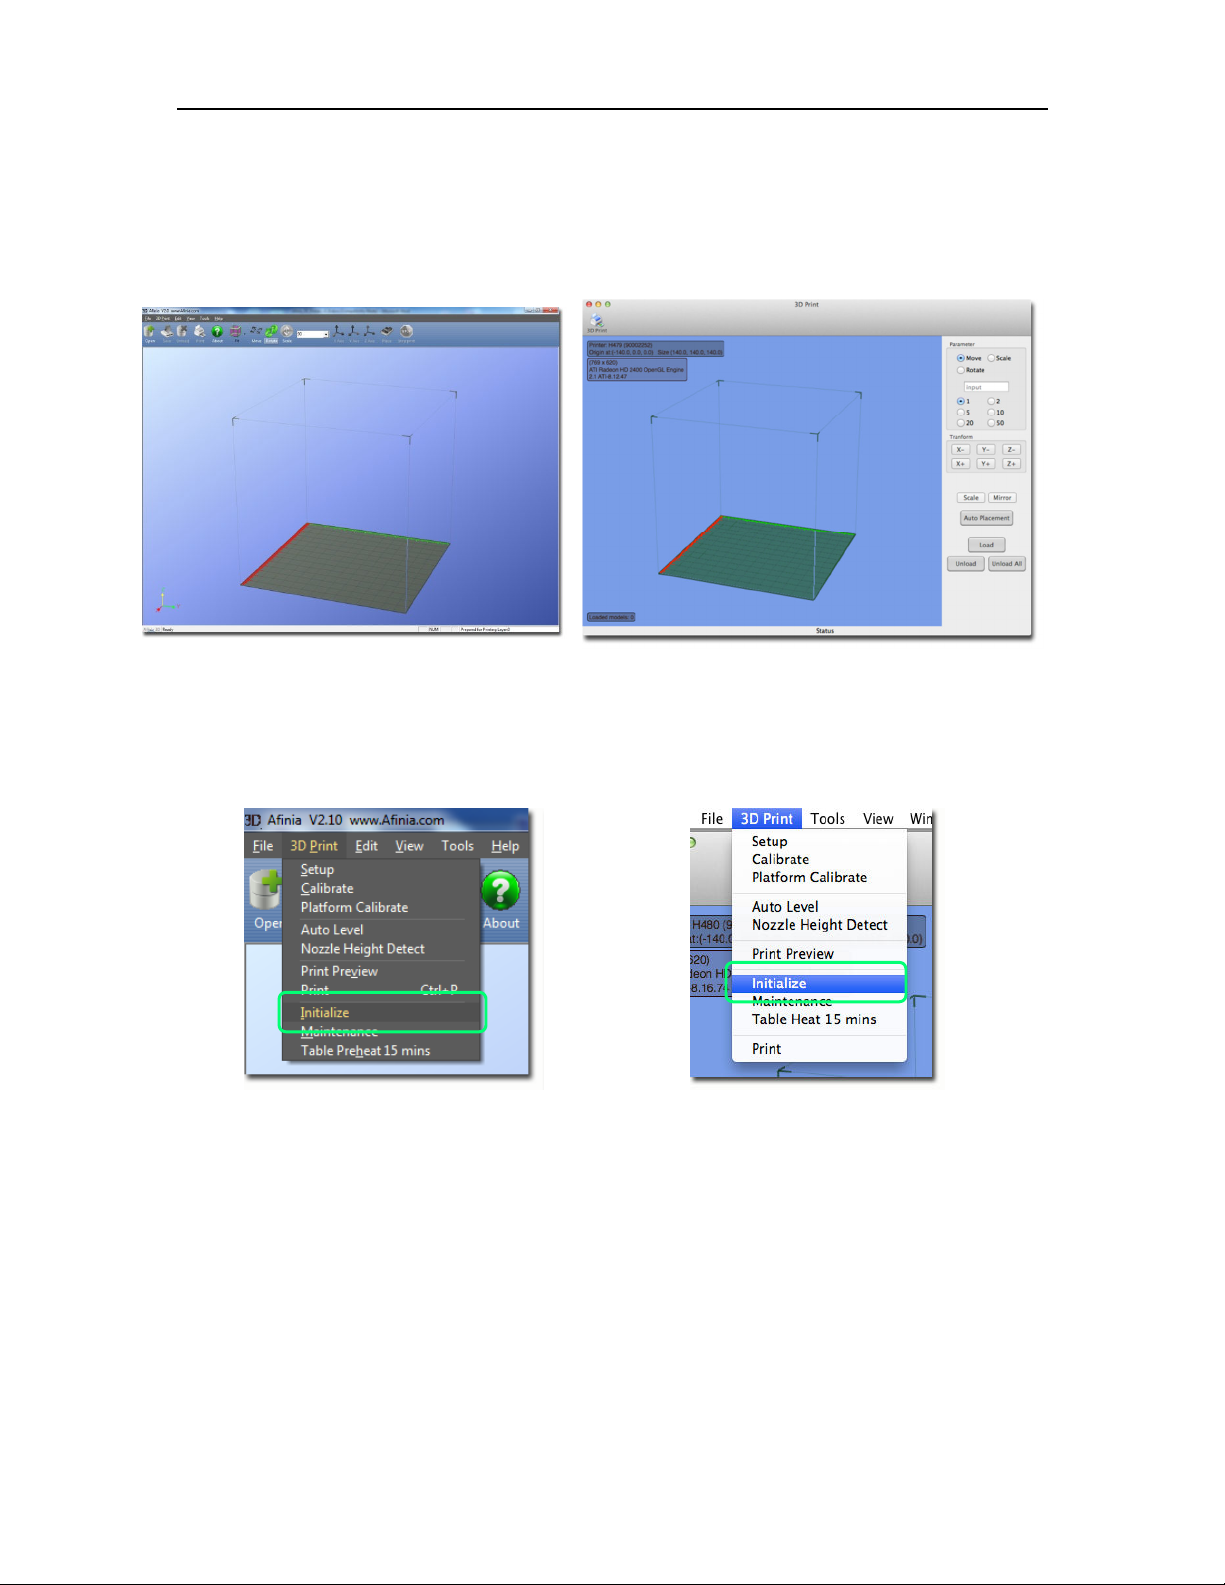
Starting the Afinia 3D Program
If the application is not already open, click the Afinia 3D icon on the desktop (Windows) or in the
Applications folder (Mac). The program should open and appear as shown below:
Windows version Mac version
Initializing the Printer
Before anything can be printed, the printer must be initialized. Click the Initialize option from
the 3D Print menu. The printer will beep and the initialization procedure will begin. The printer will
return the platform and print head to the printer’s origin and beep again when it is ready.
Windows version Mac version
The front Initialization Switch can also be used for initialization. Hold down the Initialization Switch
for one second to trigger the initialization procedure.
TIP: If your printer is not responding properly, the first thing to try is to re-initialize the printer by
clicking the Initialize option from the 3D Print menu.
11
Afinia H480 3D Printer User’s Manual
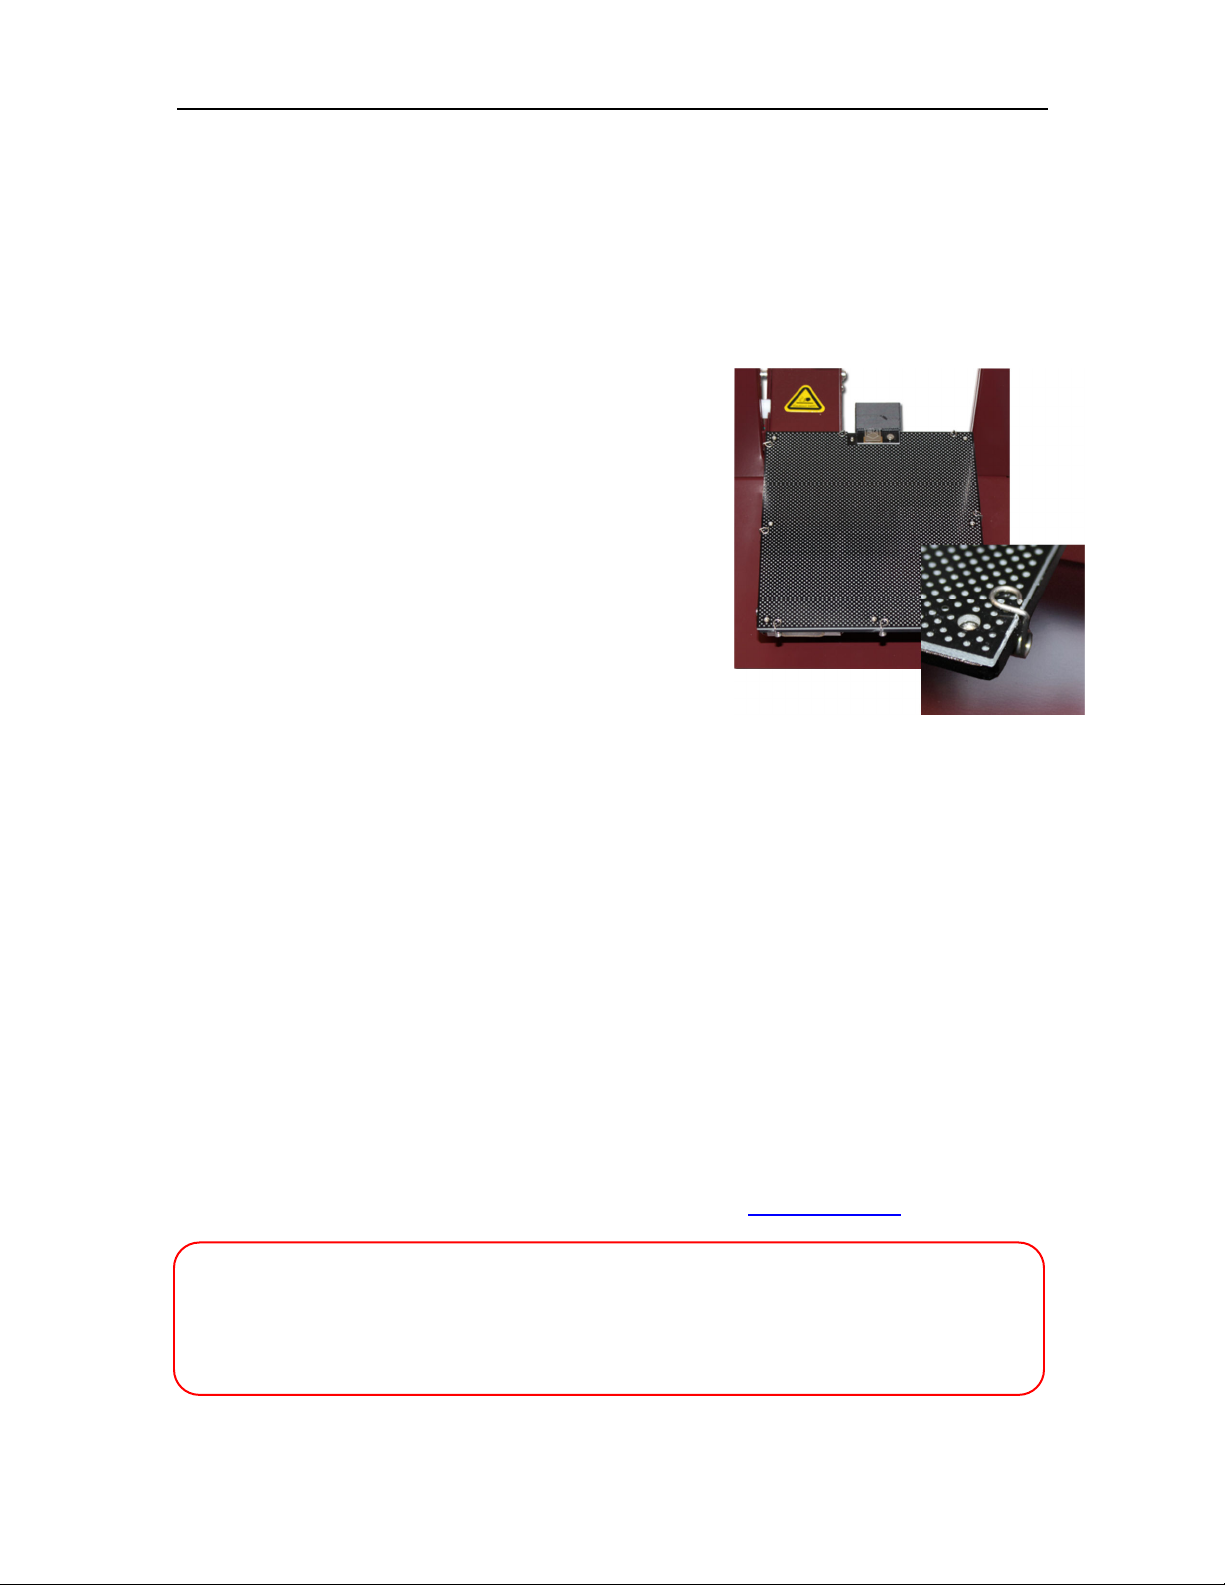
Preparing the Platform
Before you start printing, the platform must be prepared so that the model adheres to the platform
enough to be printed without the model moving. At the same time, you will want the model to be
easy to remove from the platform after printing. There are several options for preparing the
platform:
FR-4 Board (Glass-reinforced Epoxy Laminate)
Many users have reported excellent results by using a piece of FR-4 Board to cover the build
platform. FR-4 Board is a perforated, glass-reinforced epoxy laminate sheet.
When using FR-4 Board, the first layer of the raft pushes
plastic into all the perforations, and this provides a strong
mechanical bond with the surface that prevents it from later
lifting. Attach the FR-4 Board to the platform using the spring
clips installed on the platform as shown in the picture to the
right. Make sure that all eight clips are correctly positioned,
with the top of the clip over the surface of the FR-4 board.
Some FR-4 Boards may work better than others. For
consistent printing, it is recommended that you use the FR-4
Board included with the Printer.
Borofloat Glass
Many users have reported success using Borofloat glass as
the print surface. In this method, an ABS and acetone slurry is made in advance,
which is lightly brushed onto the glass and allowed to dry into a thin film of ABS.
The ABS film will hold the model to the heated glass, and will release from the glass as the glass
cools. If the model does not easily release, spray a small amount of an ammonia-based glass
cleaner around the model.
The same glass cleaner can be used to easily clean the film from the glass.
It is recommended that you clean and recoat the print surface after each print if you will be printing
the next model in the same location. Allow the slurry to dry fully before placing the glass on the
print platform!
You will need to remove the eight spring clips from the platform perimeter and remove the Nozzle
Sensor from the platform. You will need to remove the platform from the printer to remove all of the
spring clips, which can be done by removing the two hex screws underneath the platform. Replace
the platform and use the glass clip models from the Spare Parts folder.
BuildTak Print Surface
BuildTak is a print surface that can be adhered to the FR-4 board or to glass, although when
adhering to glass it is very important to be sure that no air is trapped between the glass and the
BuildTak, as a bubbled surface could lead to printing problems.
Be sure to position the BuildTak surface on the actual print zone – the FR-4 board is longer than
the surface, with the front and back ends of the board not actually within the print zone.
Borofloat glass and BuildTak are available at store.afinia.com.
Whichever platform preparation method you use, the factors that most reduce the risk of
warping on large prints are ensuring that the platform is well leveled, ensuring that the
nozzle height is set correctly, and having a well pre-heated print surface.
The next few pages will step you through correctly leveling the platform and setting the
nozzle height.
12
Afinia H480 3D Printer User’s Manual
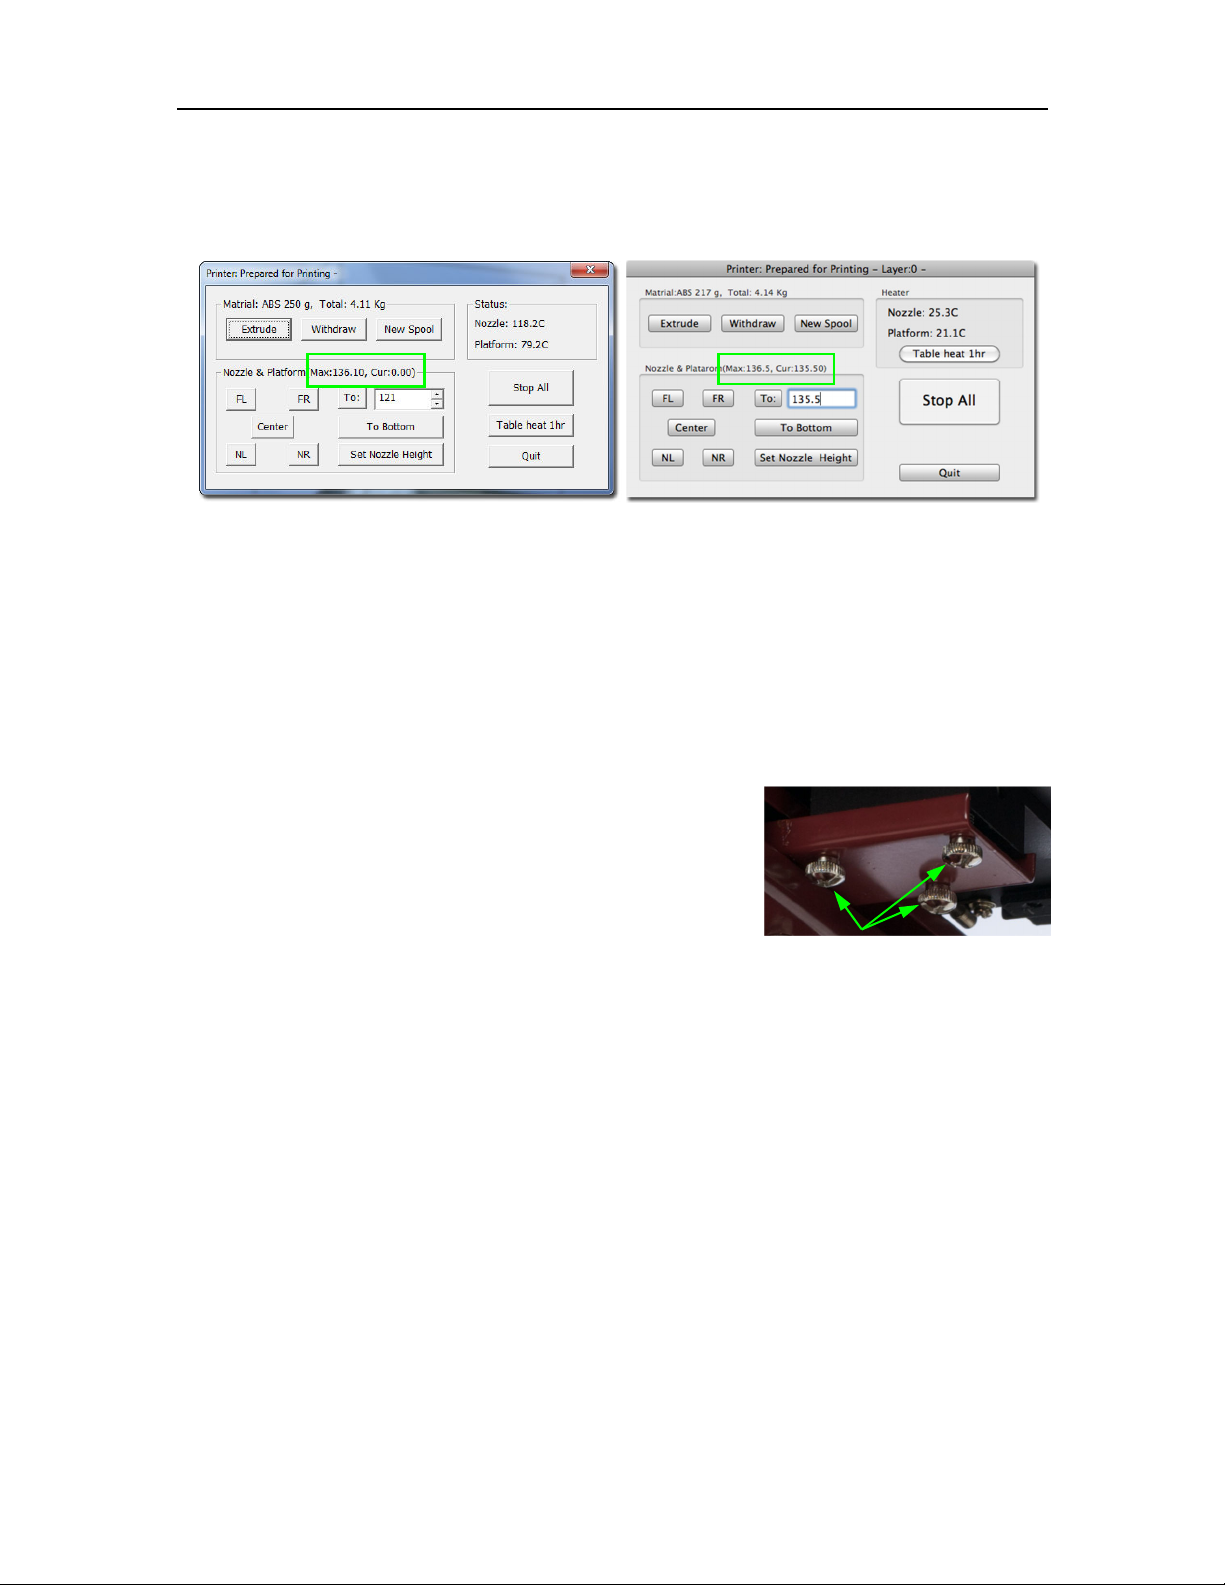
Leveling the Print Platform
Before calibrating the nozzle height, always check the vertical nozzle distance from each corner
and center of the print platform. Open the Maintenance dialog box from the 3D Print menu and
click the Center button to begin the manual leveling process.
If you already know the nozzle height, enter that height minus 2mm in the To: box, then click the
To: button. If your nozzle height is 135.3, for example, enter 133.3.
If you do not yet know the nozzle height, Click the To: button to bring the platform to the displayed
height, then slowly increment the height until the platform is about 2 mm from the nozzle, clicking
To: after each increase.
Use the five position buttons to check that the platform at all four corners and the center are the
same distance from the nozzle.
If the platform is not the same distance from the nozzle at all five points, you will need to adjust the
platform until it is as level as possible. Use the 3 thumbscrews under the platform arm to level the
print platform.
Loosening a thumbscrew will raise the corner or side of the
platform where the screw is, while tightening the thumbscrew
will lower the same part of the platform. Adjust the thumbscrews
as needed until all four corners and center of platform are the
same vertical distance from the nozzle.
The thumbscrews can heat up while the printer is running.
Always recalibrate the nozzle height after leveling the platform.
Windows version
Mac version
Leveling screws
Platform Level Calibration
This process is not intended to replace physically leveling the platform. The Platform Level
Calibration should only be used if your print surface itself cannot be leveled due to warping
or an inconsistent thickness.
If the platform surface cannot be leveled after performing the manual leveling as described above,
there is a utility in the Afinia software that allows you to adjust the printing of the raft to level the
model printing layers by dividing the print platform into several zones and entering adjustments for
each.
Note: The Platform Level Calibration will only affect printing when printing with a raft. If you are
printing without a raft, this utility will not affect print leveling.
There are two methods of calibrating the platform, the first automatically, the second manually.
13
 Loading...