

AFG HRB004400, 4.0AR Owner’s Manual
i ,'
p
i,
II' i
FORMODEL:
"'i _- i __
_ _--S_ _
/
op
i_" _L
\
s/
)
/
i
r
', ,I
_ J
_q
RECUMBENTUSER'S GU! E
.40 AR Rev17ndd 1 7_16/07 .44723PM I
CONGRATULATIONSand THANKYOUforyourpurchaseof thisAFGbike!
Whether your goal is to win races or simply enjoy a fuller, healthier fifestyle, an AFG bike can help
you attain it - adding club-quafity performance to your at-home workouts, with the ergonomics and
innovative features you need toget stronger and healthier, faster, Because we're committed to designing
fitness equipment from the inside out, we use only the highest quafity components, It's a commitment
weback with one of the strongest frame-to-brake warranty packages in the industry,
Youwantexerciseequipment that offers the most comfort,thebest reliability and the highest quality
in its class,
AFGderivers.
il i XI
Important Precautions
Assembly 5
Before YouBegin J6
Bike Operation J7
Conditioning Guidelines 23
Troubleshooting & Maintenance 30
Limited Warranty 34
CONTACTIIVFORMATION Back Panel
4
ii iI
4
7/16/07 4:47:23 PM
i ¸
SAVETNESEINSTRUCtiONS
Read aft instructions before using this bike. When using an electrical product, basic precautions should
always be foflowed, including the following: Read aftinstructions before using this bike. Itis the responsibility
of the owner to ensure that aft users of this bike are adequately inforrned of aft warnings and precautions. If
you have any questions after reading this manual, contact Customer TechSupport at the number listed on
the back panel of this manual
• If you experience chest pains, nausea, dizziness, orshortness of breath, stop exercising immediately and
consult your physician before continuing.
• Maintain a comfortable pace. Do not sprint above 125 rprns on this machine.
• Tomaintain balance, it is recommended to keep a grip on the handlebars while exercising, mounting or
dismounting the machine.
• Do not wear clothes that might catch on any part of the bike.
• Do not turn pedals by hand.
• Make sure seat is secure before each use.
• Do not insert or drop any object into any opening.
• Unplug bike before moving or cleaning it. Toclean, wipe surfaces down with soap and slightly damp cloth
only,,never use solvents. (SeeMAINTENANCE)
,, This bike should not be used by persons weighing more than 325 pounds. Failure to comply will void
the warranty,
,, This bike is intended for in-home use only, Do not use this bike in any commercial, rental, school or
institutional setting. Failure to comply will void the warranty,
o Do not use bike in any location that is not temperature controfled such as but not limited to: garages,
porches, pool rooms, bathrooms, car ports or outdoors. Failure to comply may void the warranty,
o Use the bike only as described in this manual
IMPORTANT..READTHESESAFETYINSTRUCtiONSBEFOREUSE!
ii!iiiillii:i!iilii!!iliiii_/ii /i! 1115/i!iiiiiiiiii!iii_i:i! i_iiii_iiiiii!!:i!51_iii:_iiiiiiiiii!iiiiiifillii
i!iiiiiii!/i_i_iiiii! iiiii!/ii!_!iiiiiiiiiii_ii!iiii_iiiiiiiiillii!iiiiiii_i(ii_iiii:i(iil/iiiiii!il_(i:i!il ;/_i:iiiii_iiiiii!i1111/5111111::i:iii iiiiiiill
Thereareseveralarea_durin_theassemblyprocessofabikethatspecia!attentionm"_t_epaid.!tisvery
important to follow the assembly instructions correct/y and to make sure a// parts are firmly tightened. If the
assembly instructions are not followed correctly, the bike could have frame parts that arenot tightened anfl
damagetothebike,
must be reviewed and corrective actions Should'
UNPACKING
Unpack the product whereyou will be using it. Place the product on a level flat surface. It is recommended
that you place a protective covering on your floor. During each assembly step, ensure that ALL nuts and
bolts are in place and partially threaded in before completely tightening any ONE bolt.
NOTE:A light application of greasemay aid in the installation of hardware,Anygrease,such as lithium
bikegreaseis recommended,
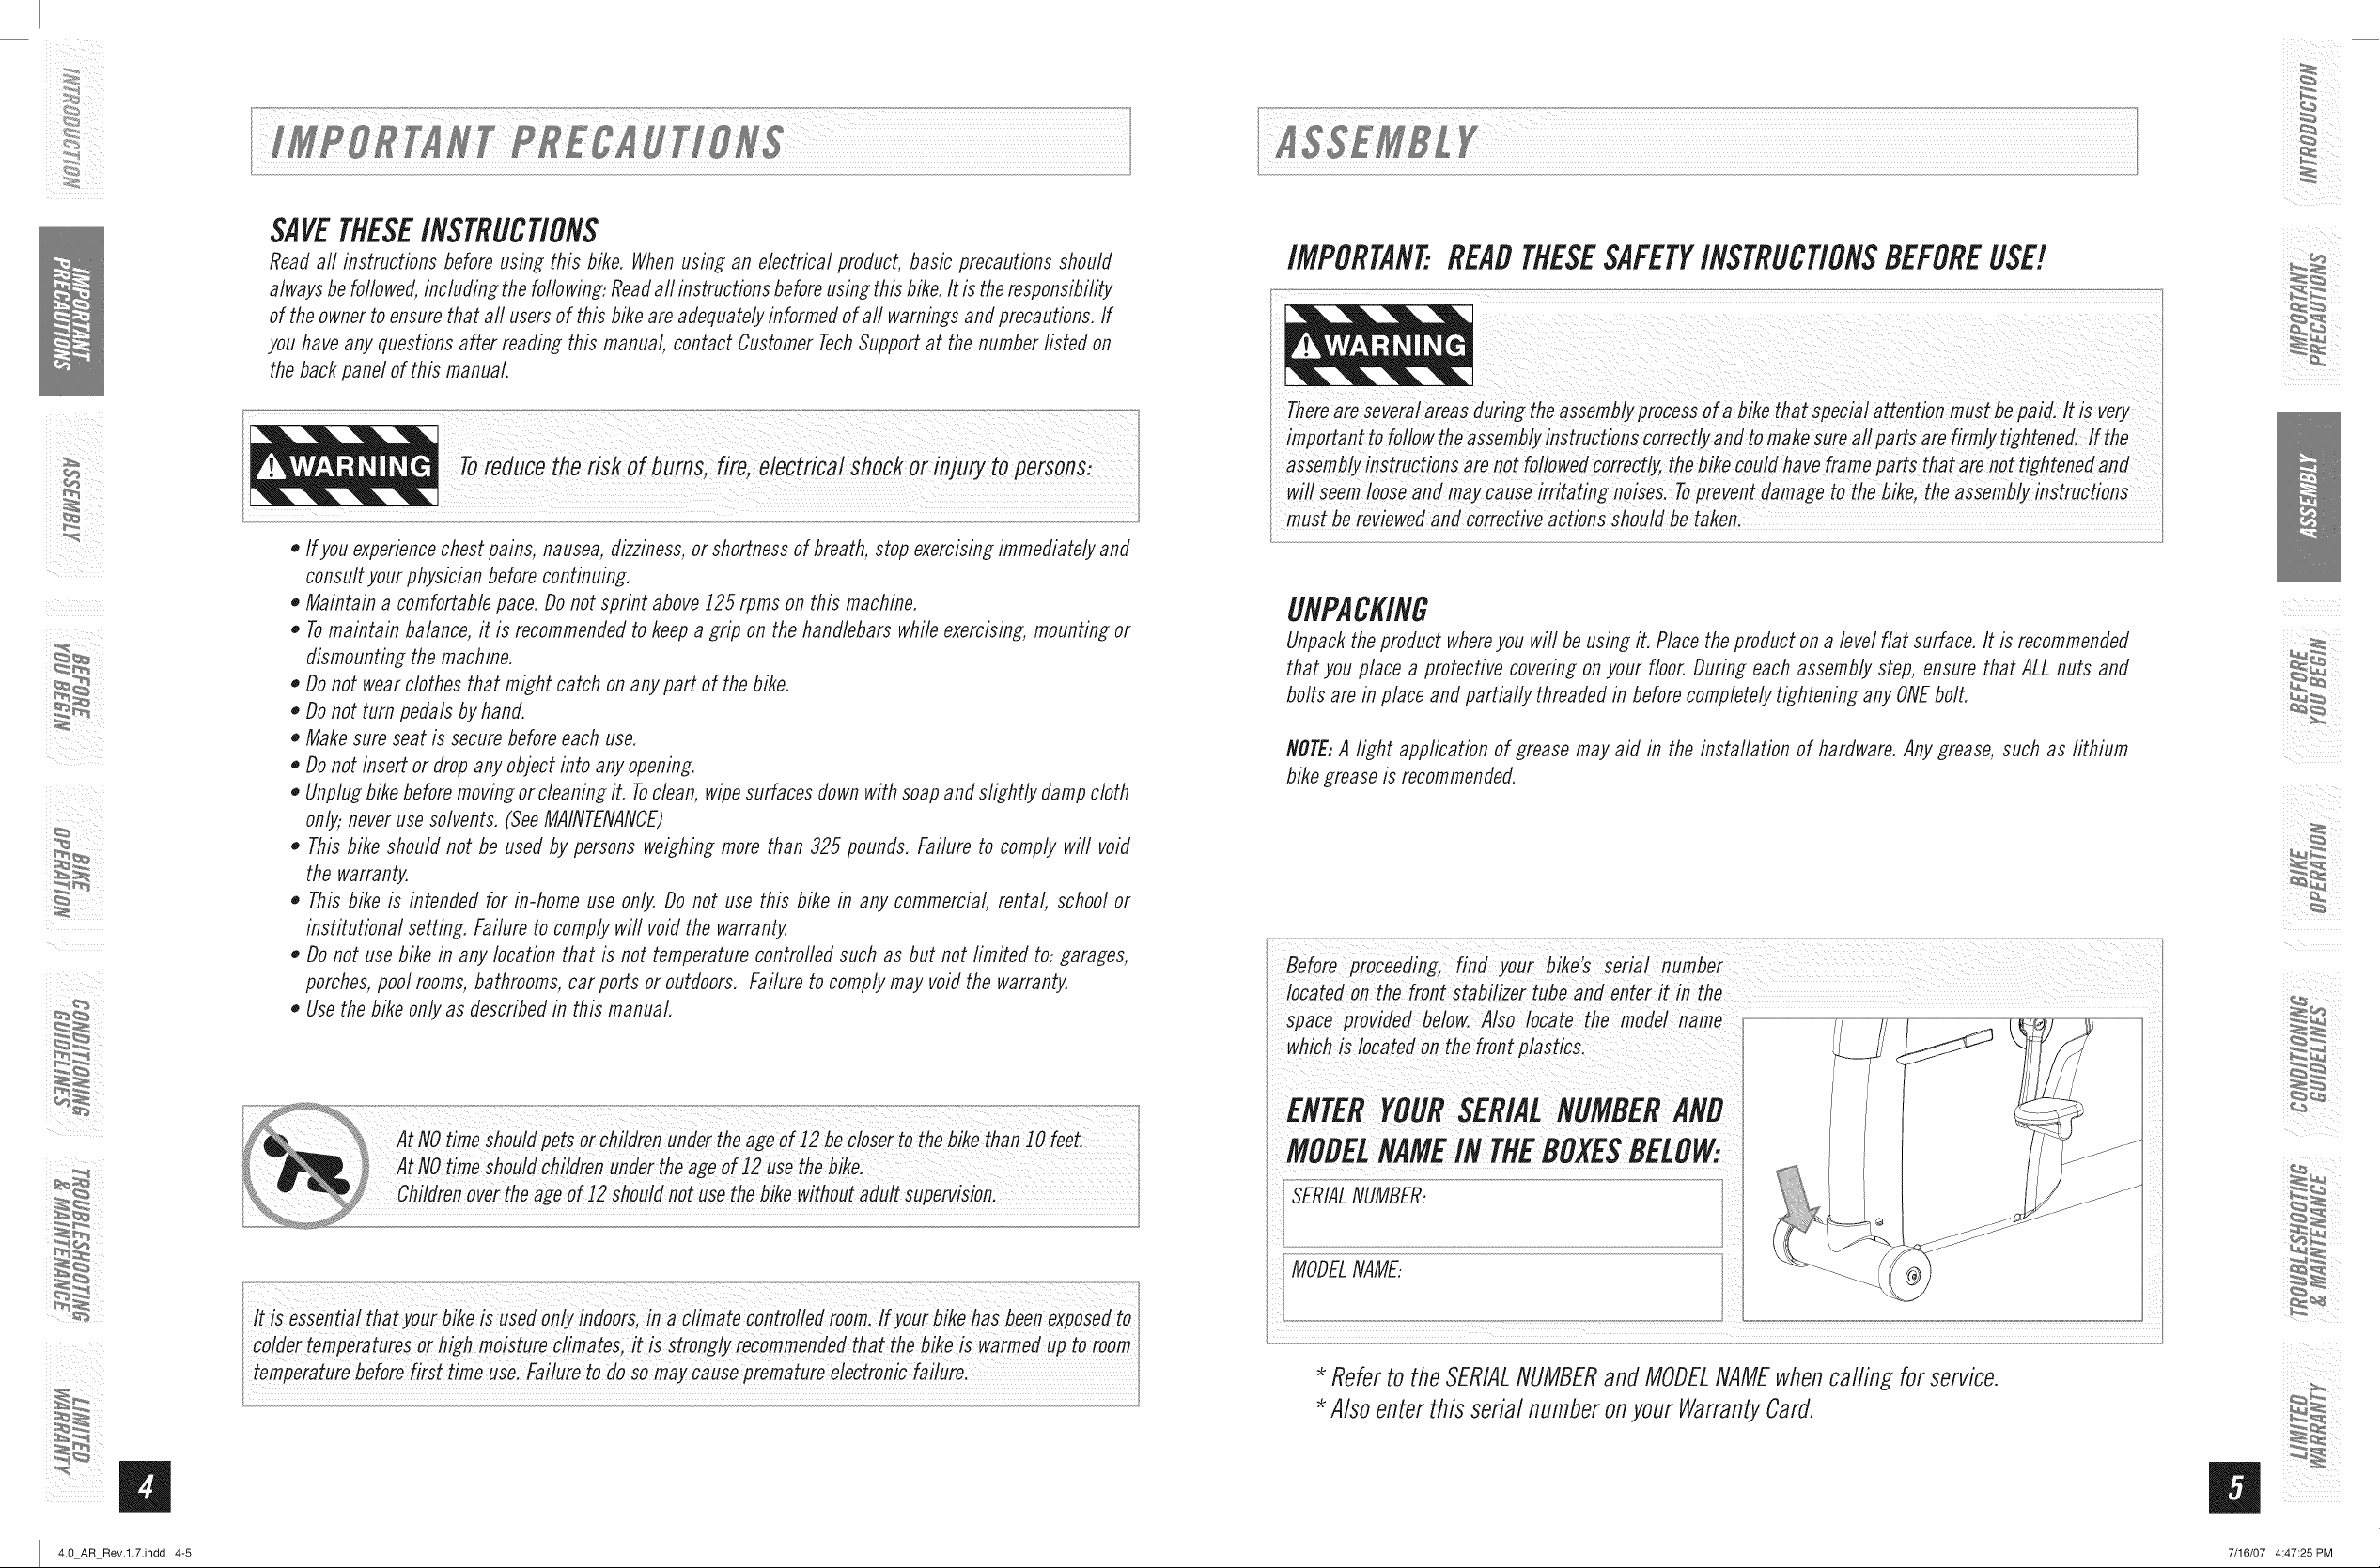
ENTERYOURSERIALNUMBERAND
MODELNAMEINTNEBOXESBELOW:
SERIALNUMBER:
MODELNAME:
itisessentiaithatyour_ikeis,se"onlyindoors,aCiimate_ontroliedroomIfyou__ikehas_ee,exposedto
colder temperatures or high moisture Climates:it is Strongly recommended that warmed room
temperature before first fime usel Failure to
i
Referto the SERIALNUMBERandMODELNAMEwhencalling forservice.
Alsoenterthis serialnumberonyour WarrantyCard.
m
B
4.0 AR Rev.l.7.indd 4-5 7/16/07 4:47:25 PM
i iii_ i
_ii_ii_i_!!IiI_I_!I_II!
%
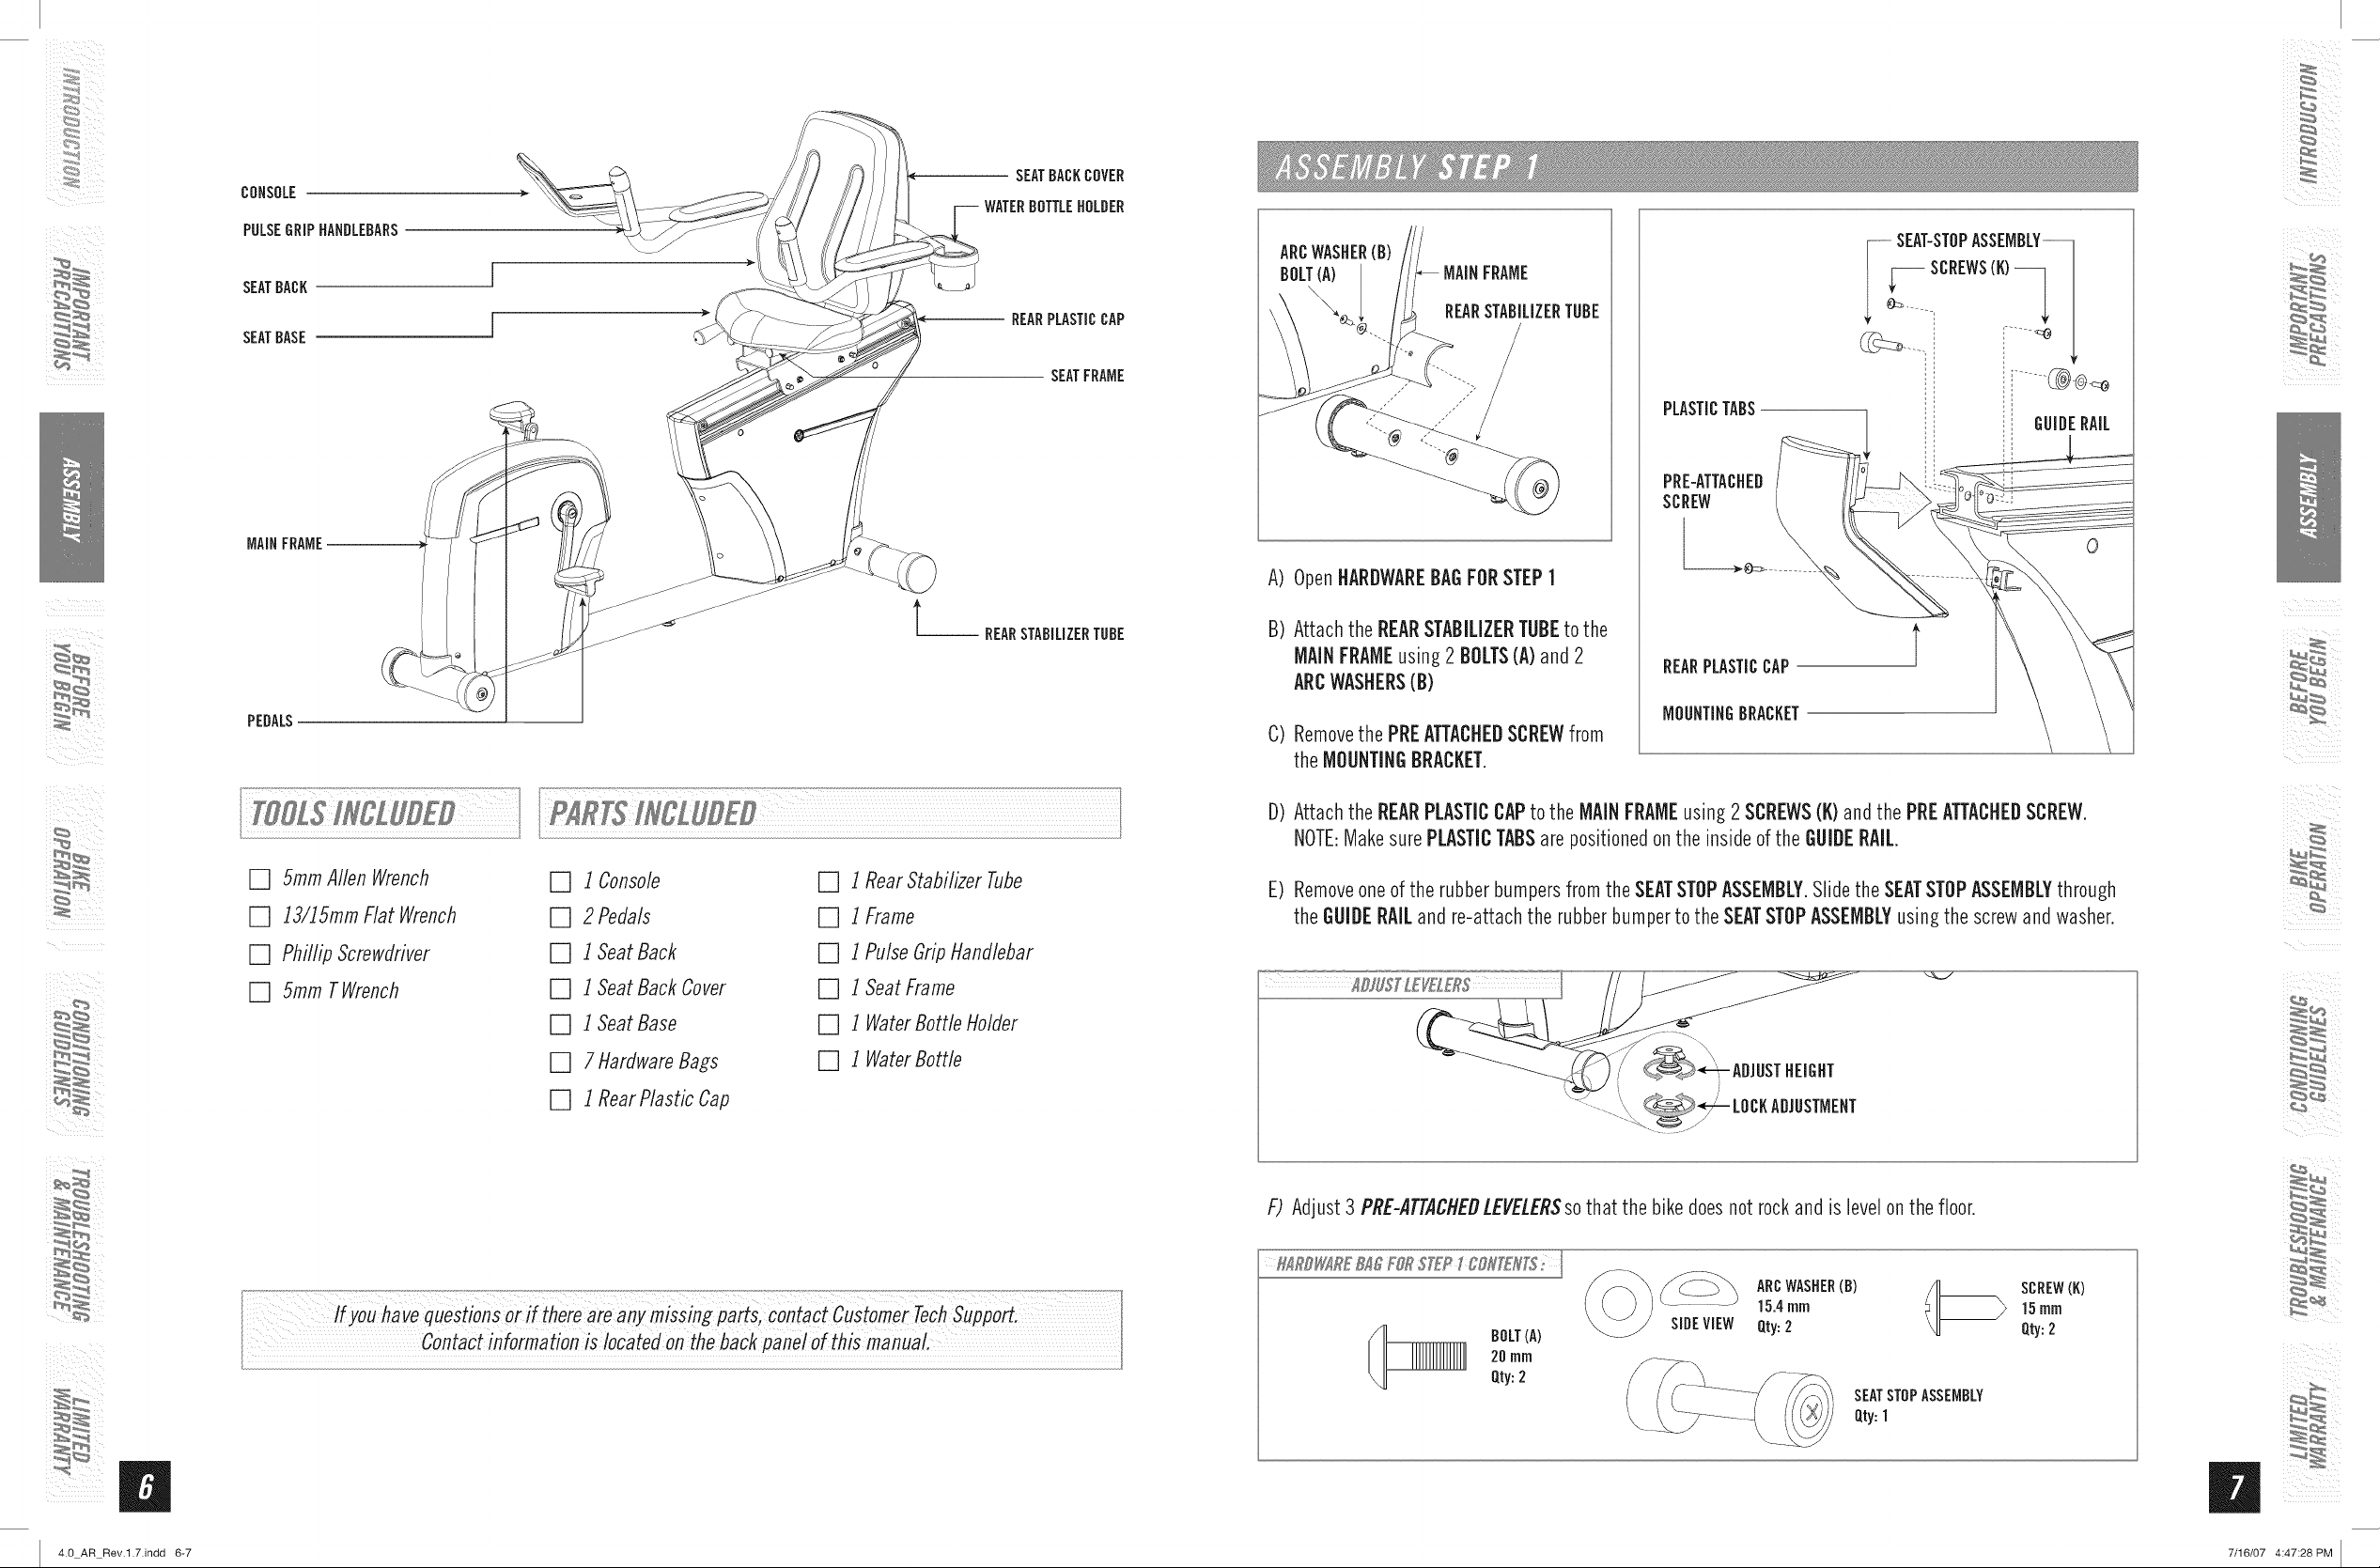
CONSOLE
PULSEGRIPHANDLEBARS
SEATBACH
SEATBASE
MAiNFRAME
PEDALS
SEATBACECOVER
WATERBOTTLEHOLDER
REARPLASTICCAP
SEATFRAME
REARSTABiLiZERTUBE
ARCWASHER(B)
BOLT(A)
A)
OpenHARDWAREBAGFORSTEPI
Attachthe REARSTABiLiZERTUBEto the
B)
MAiNFRAME
REARSTABiLiZERTUBE
MAiNFRAMEusing2 BOLTS(A) and2
ARCWASHERS(B)
Removethe PREATTACHEDSCREWfrom
C)
theMOUNTINGBRACKET.
SEAT-STOPASSEMBLY--
SCREWS(K)--
PLASTICTABS
PRE-ATTACHEB
SCREW
REARPLASTICCAP
MOUNTINGBRACKET
[] 5ramAllen Wrench
[] 13/15mmFlatWrench
[] PhillipScrewdriver
[] 5ramTWrench
[] I Console
[] 2Pedals
[] I SeatBack
[] 1SeatBackCover
[] 1SeatBase
[] 7HardwareBags
[] 1RearPlastic Cap
[] 1 RearStabilizerTube
[] 1 Frame
[] 1 PulseGripHandlebar
[] 1 SeatFrame
[] 1 WaterBottle Holder
[] 1 WaterBottle
D)
Attachthe REARPLASTICCAPtotheMAINFRAMEusing 2SCREWS(K)andthePREATTACHEDSCREW.
NOTE:MakesurePLASTICTABSarepositionedonthe insideofthe GOJBERAIL.
E)
Removeoneof therubberbumpersfromtheSEATSTOPASSEMBLY.SlidetheSEATSTOPASSEMBLYthrough
theGOIBERAiLandre-attachtherubberbumpertotheSEATSTOPASSEMBLYusingthe screwandwasher.
F) Adjust3 PRE-ATTACHEDLEVELERSsothat the bikedoesnotrockand islevelonthefloor.
%_RDW_REB#OFORST[P f 00_7_'_t'S;]
____ ARC15.4WASHERmm(B) _ SCREW15mm(H)
SIUEVIEW Qty:2 Qty:2
20mm
BOLT(A)
Qty:2
SEATSTOPASSEMBLY
Qty:l
i iii_ i
m
U
4.0 AR Rev.l.7.indd 6-7 7/16/07 4:47:28 PM
_ii_ii_i_!!IiI_I_!I_II!

SEAT
ARMRESTBAR CONSOLECABLE BOLTS(C)
SEATSLIDE
CONSOLECABLE
A) OpenHARDWAREBAGFORSTEP2.
B) Attachthe SEATFRAMEtothe SEATSLIDEusing 6 BOLTS(B).
15rnrn
BOLT(C)
Qty:8
A) OpenHARDWAREBAGFORSTEP3.
B) AttachARMRESTto SEATFRAMEusing 4 BOLTS(C).
C) Attachthe CONSOLECABLEfrom the rearofthe recumbentto the CONSOLECABLEfrom the ARMREST
BAR.
Note:Tuckin wiresasshown.Besurethat the POLSEGRiPWIRESwill not becrushedwhenadjusting
theseatbackandforth.
15rnrn
BOLT(C)
Qty:4
i iii_ i
m
U
4.0 AR Rev.l.7.indd 8-9 7/16/07 4:47:31 PM
_ii_ii_i_!!IiI_I_!I_II!
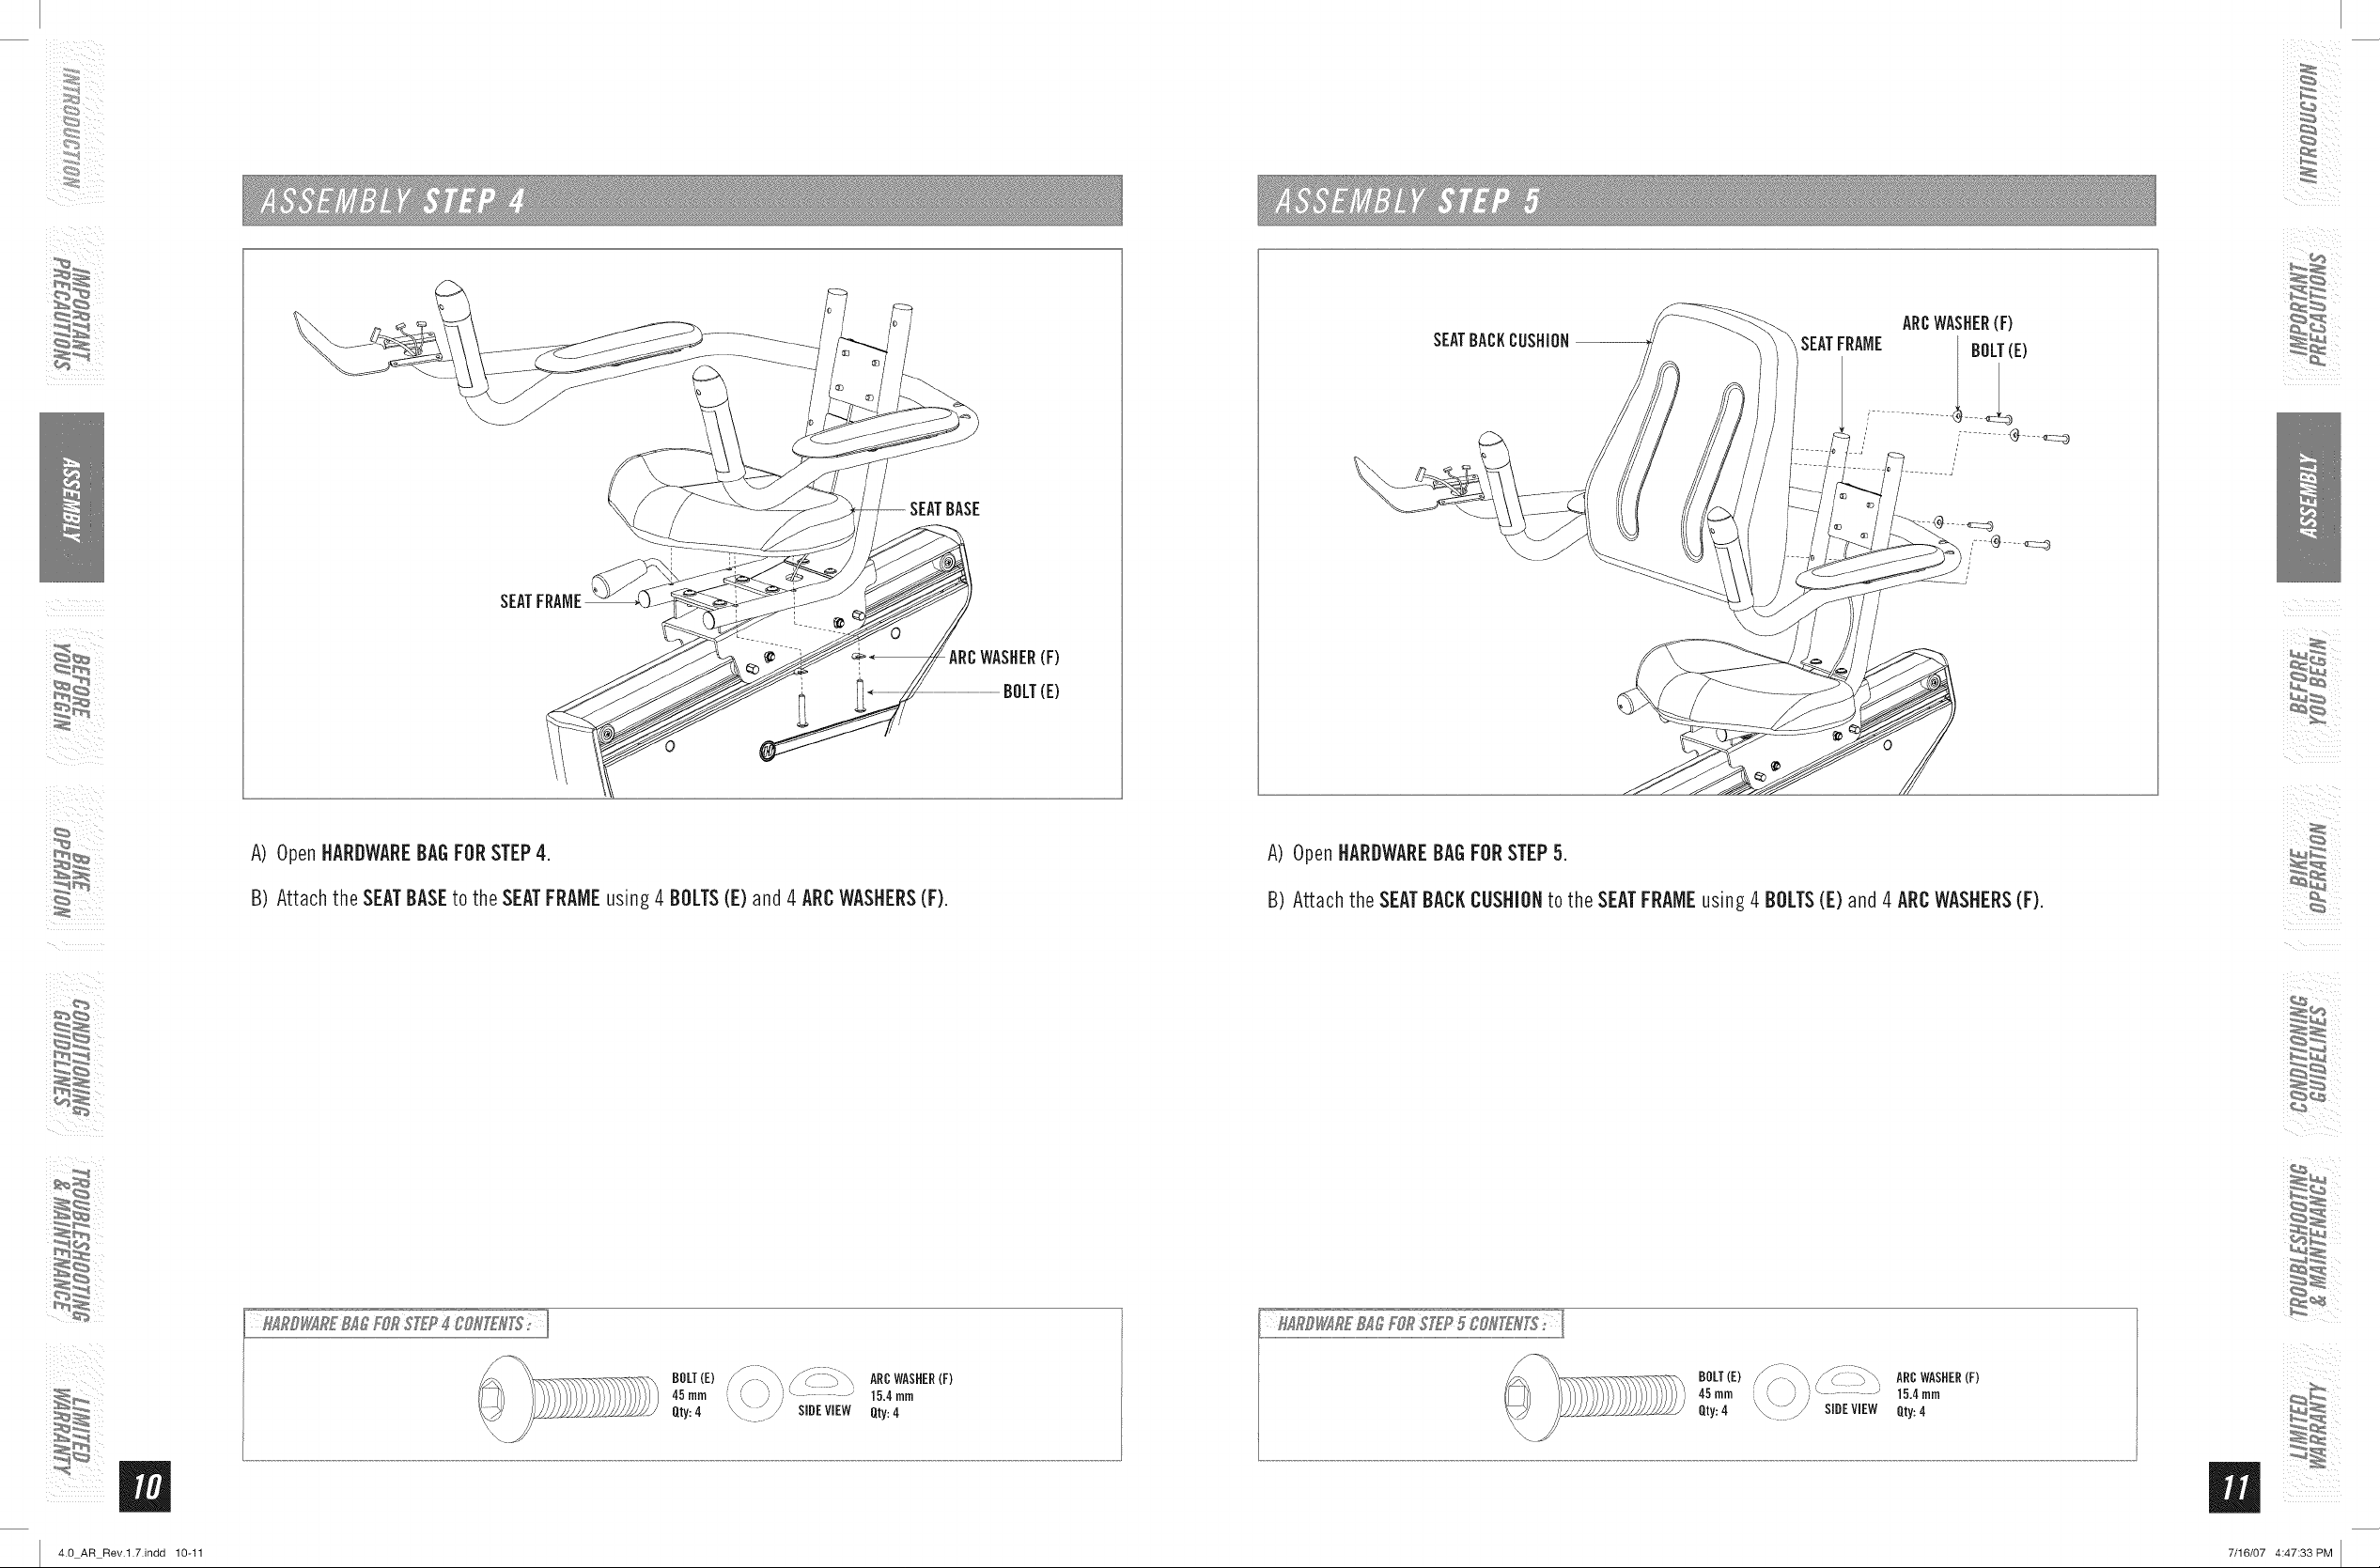
SEATFRAME
SEATBACKCUSHION
ARCWASHER(F)
SEATFRAME i BOi (E)
SEATBASE
ARCWASHER(F)
BOLT(E)
A) OpenHARDWAREBAGFORSTEP4.
B) Attachthe SEATBASEto theSEATFRAMEusing4 BOLTS(E)and4ARCWASHERS(F).
BOLT(E)
45mm
Qty:4
SIDEVlEW Qty:4
ARCWASHER(F)
15.4mrn
A) OpenHARDWAREBAGFORSTEP5.
B) Attachthe SEATBACKCUSHIONto the SEATFRAMEusing 4 BOLTS(E) and4 ARCWASHERS(F).
i iii_ i
Qty:4 " EV Qty:4
m
W
4.0 AR Rev.l.7.indd 10-11 7/16/07 4:47:33 PM
_ii_ii_i_!!IiI_I_!I_II!
 Loading...