

AFG 2.0AT Owner’s Manual

FORMODEL:
2.0AT
MILL USER'S GUIDE
2 OAT Re',, 19 kndd 1 3/3J08 11 12 10 AM I
CONGRATULATIONSand THANKYOUforyourpurchaseof thisAFGtreadmill!
Whether your goal is to win races or simply enjoy a fuller, healthier fifestyle, a AFGtreadmill can help
you attain it - adding club-quafity performance to your at-home workouts, with the ergonomics and
innovative features you need toget stronger and healthier, faster. Because we'recommitted to designing
fitness equipment from the inside out, we use only the highest quality components, It's a commitment
we back with one of the strongest frame-to-motor warranty packages in the industry.
Youwantexerciseequipmentthat offers themostcomfort,the best reliability and the highest quality
in its class,
AFGTreadmillsdeliver.
[IBLE QF OQRTERTS
I I
Important Precautions 4
Assembly 6
Before YouBegin 14
Treadmill Operation J7
Conditioning Guidelines 25
Troubleshooting & Maintenance 31
Limited Warranty 34
CONTACTINFORMATION Back Panel
3/3/08 11:12:10 AM
SAVETHESEINSTRUCtiONS
Read aft instructions before using this treadmill. When using an electrical product, basic precautions
should always be followed, including the following: Readall instructions before using this treadmill. It is the
responsibility of the owner to ensure that aft users of this treadmill are adequately informed of all warnings
and precautions. If you haveany questions after reading this manual, contact Customer TechSupport at the
number listed onthe back panel of this manual
.....................................................................................
-!!!!!!!!!!!!!!!!!!!!!!!!!!!!!!!!!!!!!!!!!!!!!!!!!!!!!!!!!!!!! I
GROUNDINGINSTRUCTIONS
This product must be grounded. If a treadmill should malfunction or breakdown, grounding provides a path
of least resistance for electrical current to reduce the risk of electrical shock. This product is equipped with
a cord having an equipment-grounding conductor and a grounding plug. Theplug must be plugged into an
appropriate outlet that is properly installed and grounded in accordance with local codes and ordinances.
/mProPercOnnection ofthe equipment-grounding conductor can resuit in a risk of
,, Never use the treadmill before securing the safety tether clip toyour clothing.
o Ifyou experience any kind of pain, including but not limited to chest pains, nausea, dizziness, or shortness
of breath, stop exercising immediately and consult your physician before continuing.
o Do not wear clothes that might catch on any part of the treadmill.
o Always wear athletic shoes while using this equipment.
• Do not jump on the treadmill.
o Keeppower cord away from heated surfaces.
o Do not insert or drop any object into any opening.
o Unplug treadmill before moving or cleaning it. Toclean, wipe surfaces down with soap and slightly damp
cloth only; never use solvents. (SeeMAINTENANCE)
o At no time should more than one person be on treadmill while in operation.
,, Thetreadmill should not be used by persons weighing more than 325 pounds. Failure to comply will void
the warranty,
o Thetreadmill is intended for in-home use only,Do not use this treadmill in any commercial, rental, school
or institutional setting. Failure to comply will void the warranty,
o Donot usetreadmill in any location that is not temperature controlled, such as but not limited to garages,
porches, pool rooms, bathrooms, car ports or outdoors. Failure to comply may void the warranty,
o Use the treadmill only as described in this manual
:as
with the product, ff it wifl not fit the out/et, have a proper out/et insta/led by a
qualified electrician'
This product is for use on a nominal JJO-volt circuit
and has a grounding plug that looks like the illustration
to the right. Thisproduct must be used on a dedicated
circuit. Todetermine if you are on a dedicated circuit,
shut off thepower tothat circuit and observe if any other
devices lose power, If so, move devices to a different
circuit. Note- There are usually multiple outlets on one
circuit. It is recommended that the treadmill be used
with a 20 amp circuit for optimal performance.
3-Pole Grounded Outlet
OTHERSAFETYTIPSFORYOURTREADMILL
GROUNDED
TREADMILL
POWERCORD
thewarranty.
a Cfimate contro!/ed room: If your treadmil/ has been
orhighmoistureclimates,it treadmi/iis
warmefl up to room temperature before first time usel Fai/ure to do so may cause premature electronic failure:
2.0AT Rev.l.9Jndd 4-5 3/3/08 11:12:12AM I
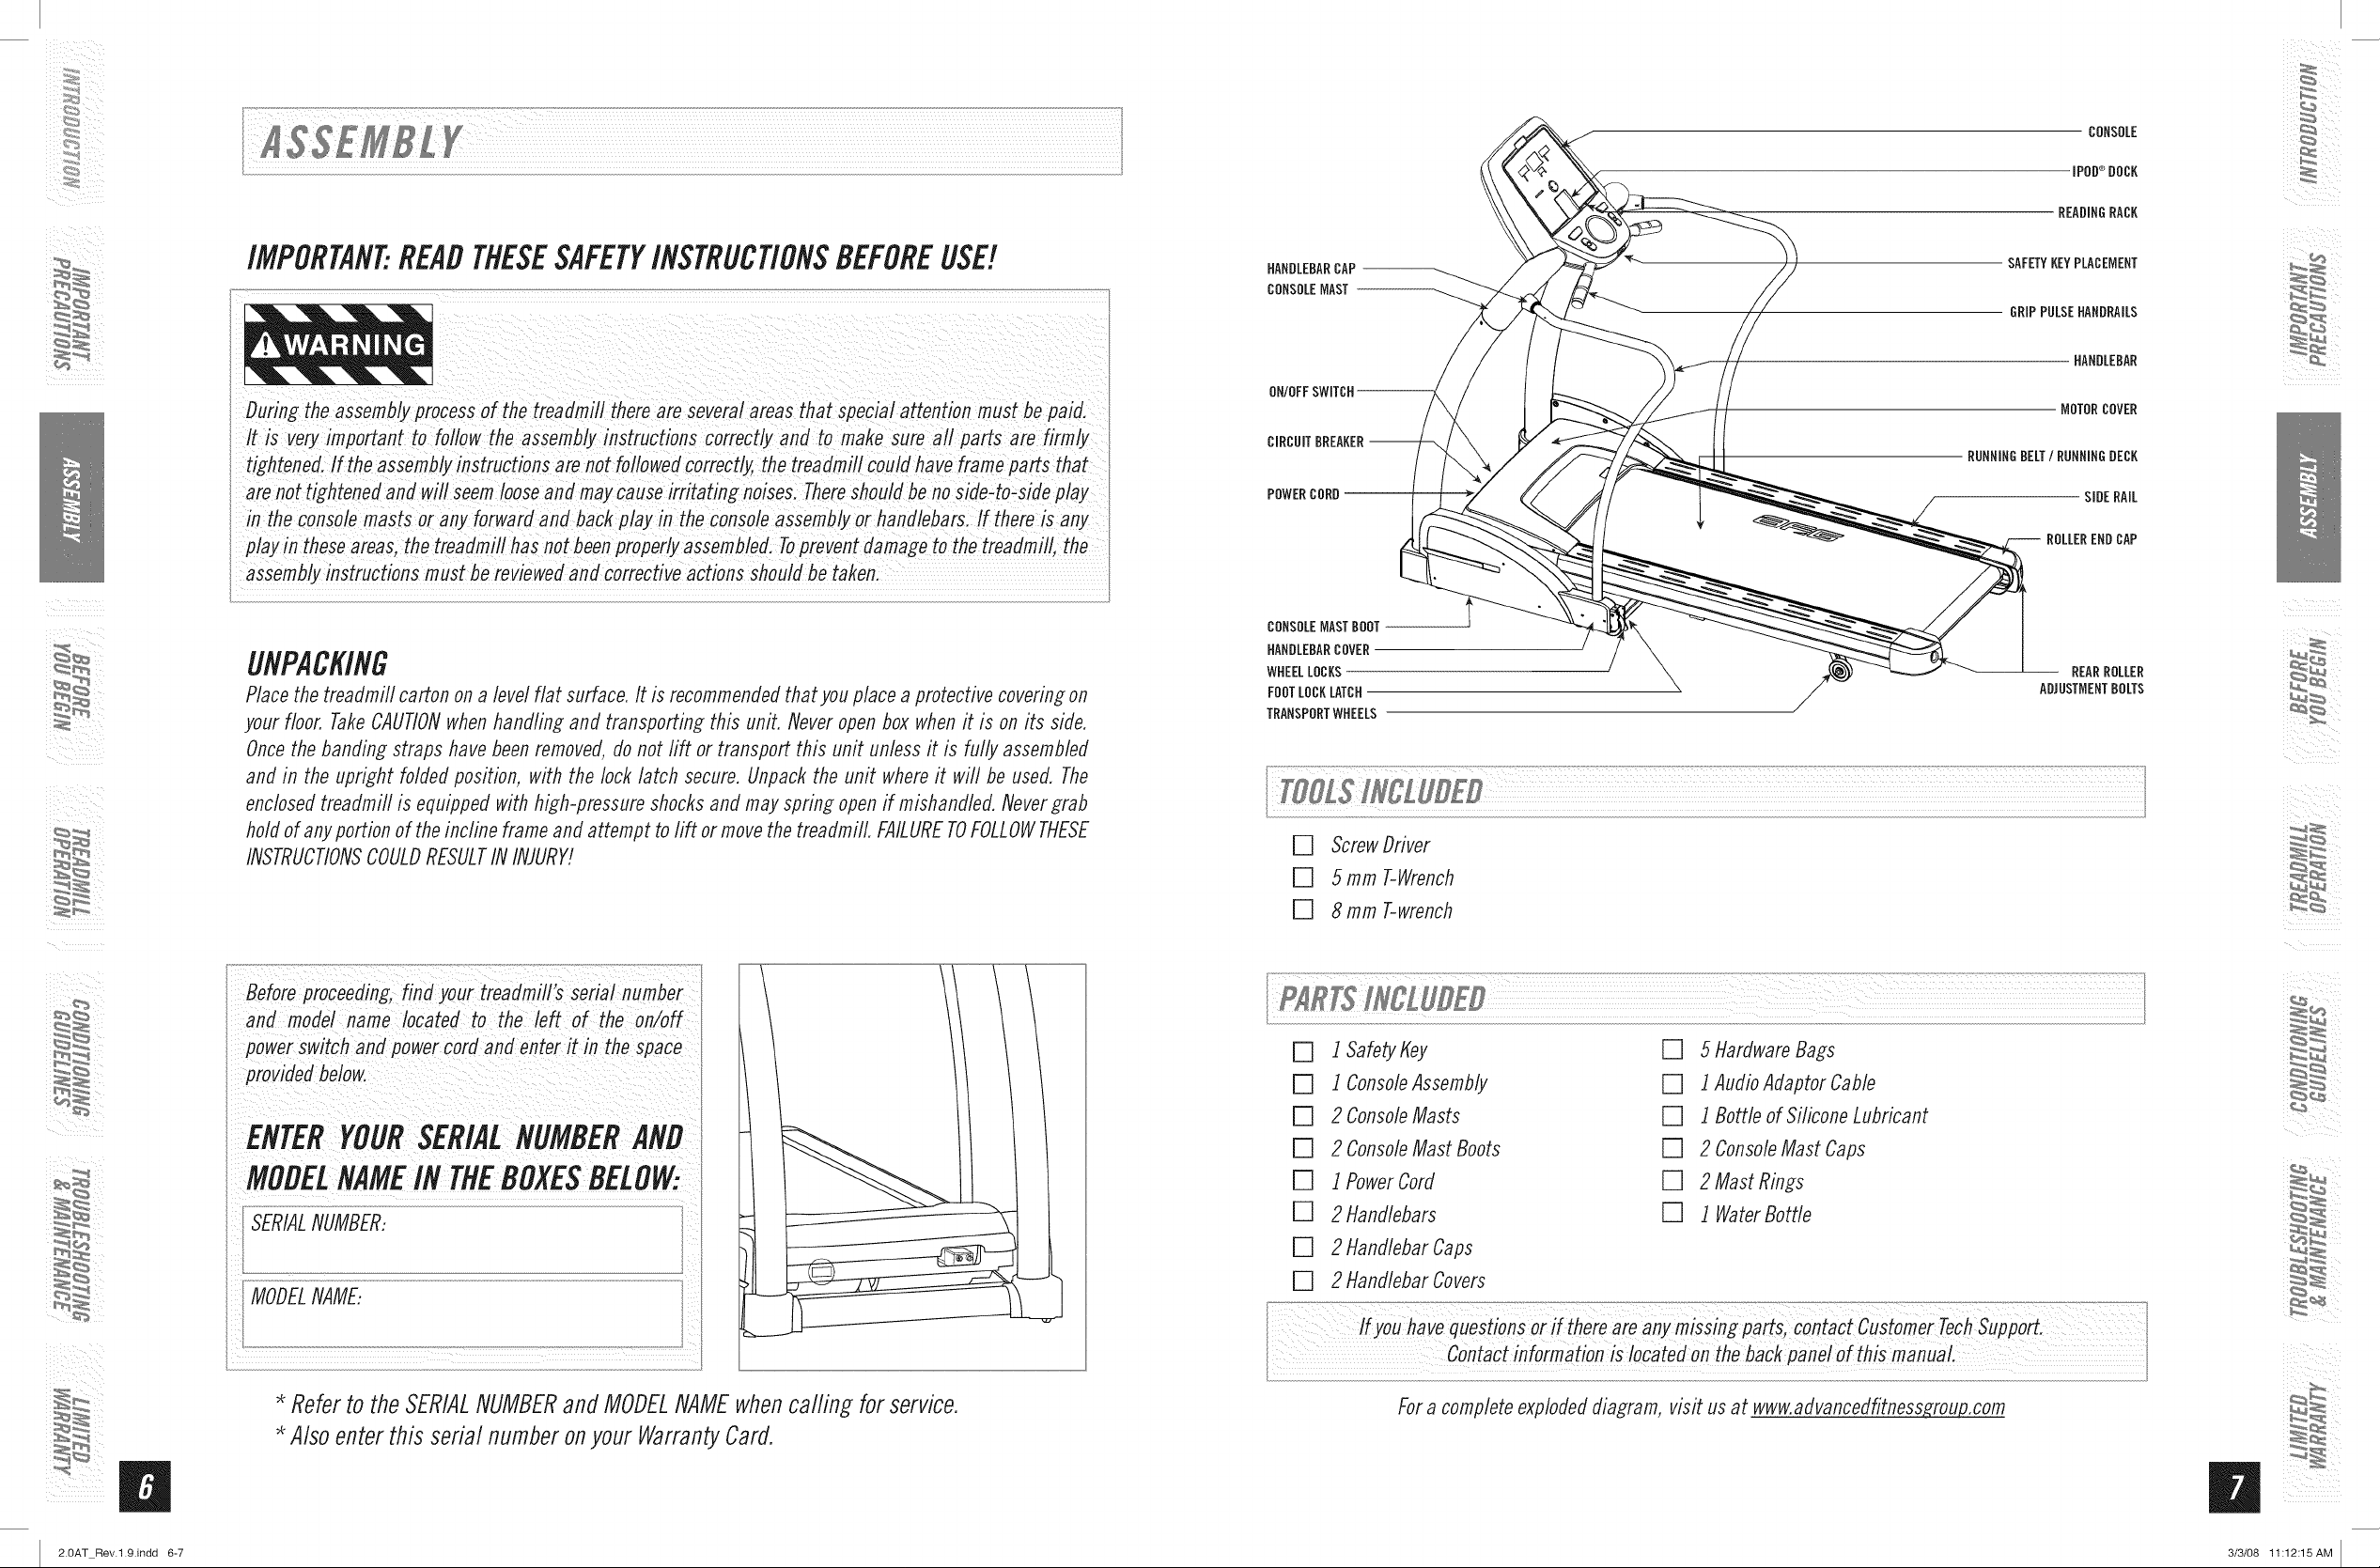
CONSOLE
IPOO®DOCK
READINGRACK
IMPORTANT..READTHESESAFETYINSTRUCTIONSBEFOREUSE!
.mL _, _cessof the treaflrnill there are severa! areas that special attention must be paifl.
It is very important to f°ll°w tfle assembly instructions correctly anfi to make sure a!l parts are f!_.mly
tightenedan_willseemloosea.dmayca.seirritatingnOiseslshouldbe,osidetoisi_eplay
m the COnSole masts or any forward and backplay 117the console assernblyorhandlebars. If there !s any
play m these areas, the treadmfil has not been properly assembled. Toprevent darnage to the treadmill, the
assembly mstructlons must he reviewed and correcfive actions should he taken.
UNPACKING
Place the treadmill carton on a level flat surface. It is recommended that you place a protective covering on
your floor, TakeCAUTIONwhen handling and transporting this unit. Never open box when it is on its side.
Once the banding straps have been removed, do not rift or transport this unit unless it is fully assembled
and in the upright folded position, with the lock latch secure. Unpack the unit where it will be used. The
enclosed treadmill is equipped with high-pressure shocks and may spring open if mishandled. Nevergrab
hold of any portion of the incline frame and attempt to rift or move the treadmill. FAILURETOFOLLOWTHESE
INSTRUCTIONSCOULDRESULTIN INJURY!
arenotfollowedcorrectly,the
HANDLEBARCAP
CONSOLEMAST
ON/OFFSWITCH
CIRCUITBREAKER--
POWERCORD--
CONSOLEMASTBOOT
HANDLEBARCOVER
WHEELLOCKS
FOOTLOCKLATCH
TRANSPORTWHEELS
[] ScrewDriver
[] 5 mm T-Wrench
[] 8 mm T-wrench
SAFETYKEYPLACEMENT
GRIPPULSEHANDRAILS
HANDLEBAR
MOTORCOVER
RUNNINGBELT/RUNNINGDECK
SIDERAIL
-- ROLLERENDCAP
REARROLLER
ADJUSTMENTBOLTS
m
U
Before proceeding, find your treadmill's seria/ number
_?.............! _ i TII_?I__
and model name /ocated to left of On/off
inthespace
_rovided
ENTERYOURSERIALNUMBER
MODELNAMEIN THEBOXESBELOW:
SERIALNUMBER:
iii
ill
ii i i i i i i i i i i i i i i i i i i i i ii
Referto the SERIALNUMBERand MODELNAMEwhencalling for service.
Also enter this serial number onyour WarrantyCard.
[] 1SafetyKey [] 5 HardwareBags
[] 1ConsoleAssembly [] 1AudioAdaptorCable
[] 2ConsoleMasts [] 1 Bottleof SiliconeLubricant
[] 2ConsoleMastBoots [] 2 ConsoleMastCaps
[] 1PowerCord [] 2 MastRings
[] 2Handlebars [] 1 WaterBotfle
[] 2HandlebarCaps
[] 2 Handlebar Covers
i iii_ i
For a complete exploded diagram, visit us at www.aflvancedfitness_roup.com
2.0AT Rev.l.9.indd 6-7 3/3/08 11:12:15AM

Disassemble box and remove the cardboard packaging that is not beneath the treadmill. Do not attempt to
lift the treadmill at this time. Remove plastic wrap from console masts.
*NOTE: During each assembly step, ensure that ALL nuts and bolts are in place and partially threaded in
before completely tightening any ONEbolt. A light application of grease may aid in the installation of hardware.
Any grease, such as lithium bike grease is recommended.
H_RD_/_[_°B_(_f CONTEHTS:
SCREW(A)
25mm
Qty:6
A
OpenHARDWAREBAGL
B
SlideLEFTCONSOLEMASTBOOT
overMAINFRAMEBRACKET.
C
Insert3 SCREWS(A)onthebottom
outsideof themastboot
andsecure.
D Repeaton other side.
LEADWiRE
BOLTS(B)
SPRINGWASHER(C)
ARCWASHER(B)
BOLT(B)
15mm
Qty:6
SPRINGWASHER(C)
8.2 mm
Qty:6
A
B
C
ARCWASHER(B)
8.2 mm
Qty:6
PuffLEADWIREthroughRIGHT
CONSOLEMAST.Afterpulling the
LEADWIREthroughthemast,the
topof theCONSOLEWIREshould
belocatedat the top of the mast.
DetachanddiscardLEADWIRE.
OpenHARDWAREBAG2.
SlideRIGHTCONSOLEMASTover
MAINFRAMEBRACKET.
*Note: Donotpinch CONSOLE
CABLESwhenplacing the mastonto
themain frame.
i ¸ ,,,,_
m
U
MAiNFRAMEBRACKET
D
Insert3 BOLTS(B)onthe bottom
outsideof themastandsecurewith
3 SPRINGWASHERS(C)and3 ARC
WASHERS(D).
E Repeat on other side.
i iii_ i
_iiii_i_!!iiI_i_!i_ii!
2.0AT Rev.l.9.indd 8-9 3/3/08 11:12:18AM

_3
LEFTSIDE
@
lOmm
BOLT(E) (_
Qty:4
RIGHTSlOE
f
CONSOLEMASTCAP
CONSOLE
SPRINGWASHERS(C)---_ @_
BOLTS(E)----_
SPRINGWASHER(C)
8.2ram
Qty:4
A
OpenHARDWAREBAG3.
Attach CONSOLEMASTCAPS
B
ontothebottomof CONSOLE
using2 BOLTS(E)and
2SPRINGWASHERS(C).
C Repeat on other side.
f
BOLT(B)
15 mm
Qty:4
ARCWASHER(D)
SPRINGWASHER
_"_1 __ CONSOLEWIRES
BOLTS(B)_-e® i
" MASTRiNG
SPRINGWASHER(C)
8.2 mm
Qty:4
ARCWASHER(D)
8.2 mm
Qty:4
A OpenHARDWAREBAG4.
B SlideCONSOLEthroughMAST
RINGS.
*Note: Make sure the arrows
on the MASTRINGSarepointing
upward towards the CONSOLE
when slidin_ into place.
i__ i
C Connect CONSOLEWIRES.
*Note: Donotpinch CONSOLE
CABLESwhenplacing the
consoleontothemast.
ii_:_ i_
ii_:_ _i
, ;ONSOLEMAST
ConnectCONSOLEtoRIGHT
D
CONSOLEMASTusing
2 BOLTS(B),2 SPRING
WASHERS(C)and
2ARCWASHERS(D).
E Repeatonotherside.
2.0AT Rev.l.9.indd 10-11
i iiiiii ii i
3/3/08 11:12:22 AM
 Loading...