

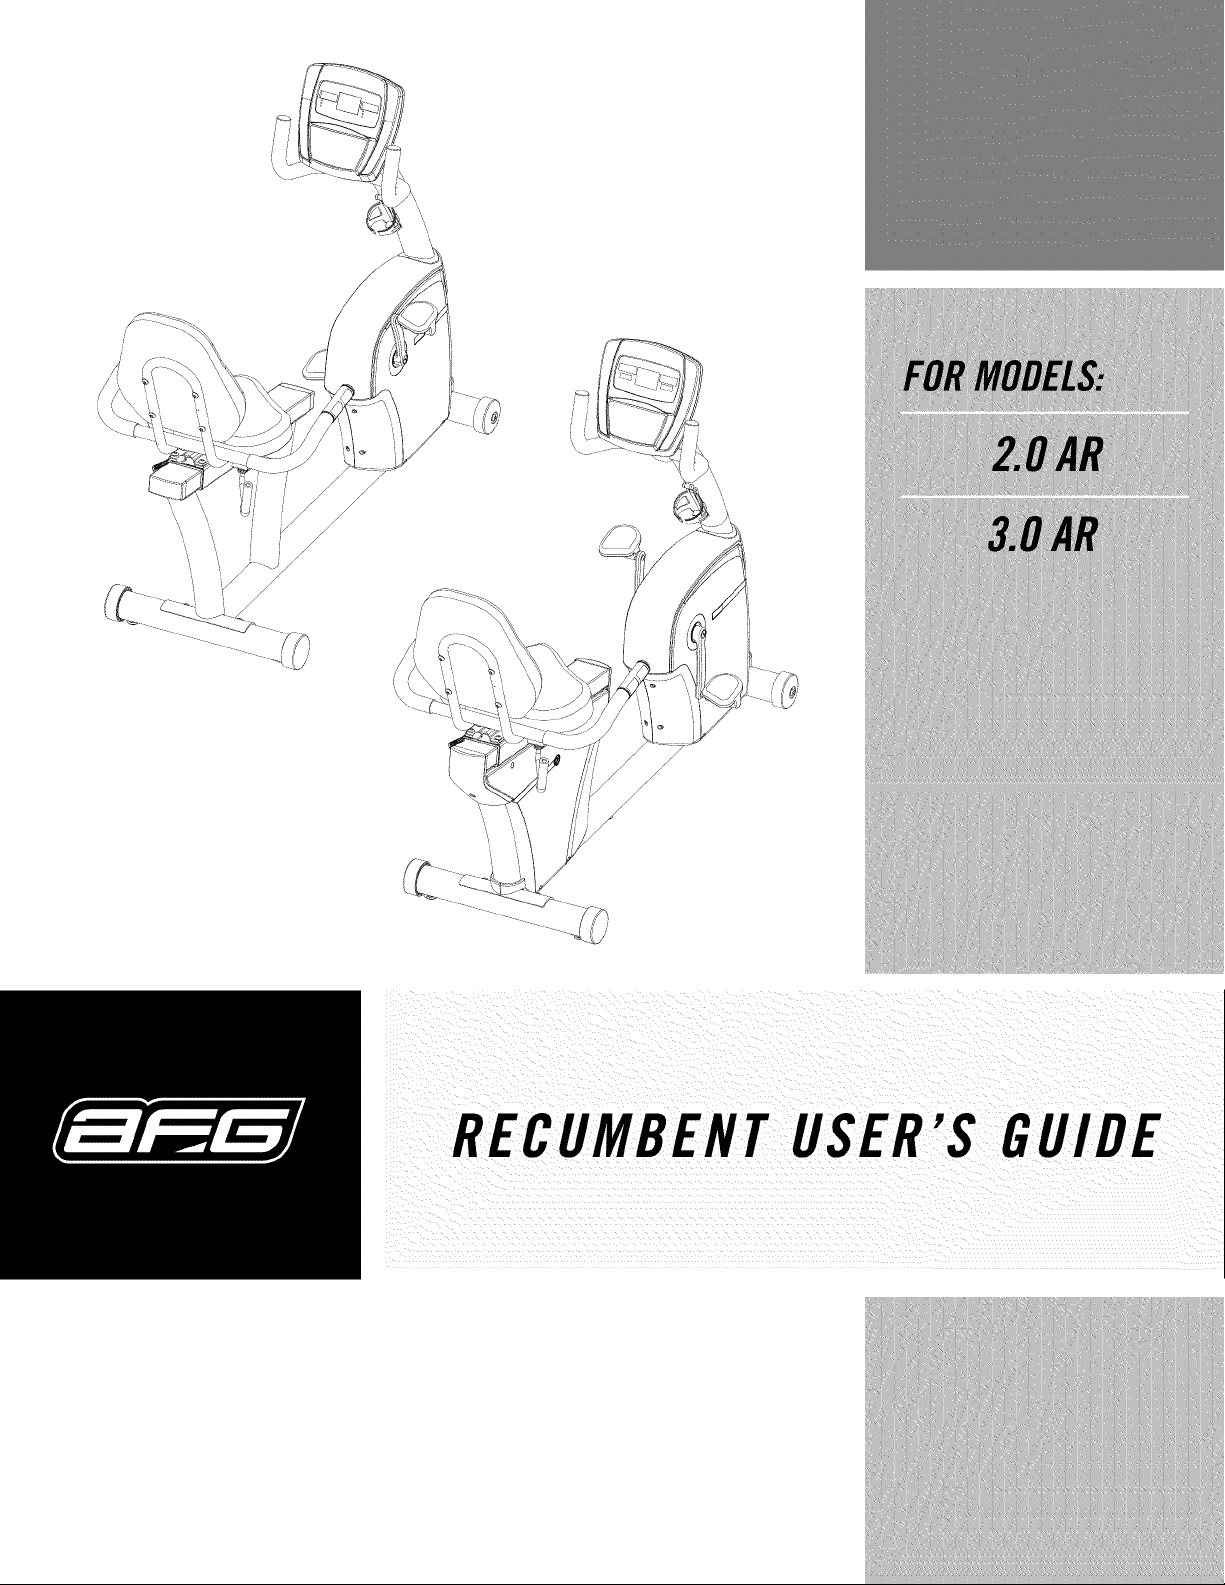
AFG 3.0AR, HRB004700, 2.0AR Owner’s Manual
, s
RECUMBENTUSER'S GUIDE
CONGRATULATIONSand THANKYOUforyourpurchaseof thisAFGbike!
Whether your goal is to win races or simply enjoy a fuller, healthier fifestyle, an AFG bike can help
you attain it - adding club-quafity performance to your at-home workouts, with the ergonomics and
innovative features you need toget stronger and healthier, faster. Because we're committed to designing
fitness equipment from the inside out, we use only the highest quafity components. It's a commitment
weback with one of the strongest frame-to-brake warranty packages in the industry.
Youwant exerciseequipmentthat offers the mostcomfort, the bestreliability and the highest quality
in its class.
AFGdelivers.
Important Precautions
Assembly 5
Before YouBegin 13
Bike Operation 14
Conditioning Guidelines 20
Troubleshooting & Maintenance 26
Limited Warranty 30
CONTACTINFORMATION Back Panel
iii_ i
4
iiI _
SAVETHESEINSTRUCTIONS
Read all instructions before using this bike. When using an electrical product, basic precautions should
always be followed, including the following: Read aftinstructions before using this bike. It is the responsibility
of the owner to ensure that aft users of this bike are adequately informed of aft warnings and precautions. If
you have any questions after reading this manual, contact Customer TechSupport at the number listed on
the back panel of this manual
•/fyou experiencechestpains, nausea,dizziness,orshortnessof breath,stop exercisingimmediatelyand
consu/tyourphysicianbeforecontinuing.
• Maintain a comfortablepace.Donot sprint above125rpms onthis machine.
• Tomaintain balance,it is recommendedtokeepa grip onthe handlebarswhile exercising,mounting or
dismountingthe machine.
• Donot wearclothesthat might catch onanypart of the bike.
• Donot turnpedal armsbyhand.
• Makesureseat is securebeforeeachuse.
• Donot insert or drop anyobjectinto anyopening.
• Unplugbikebeforemovingorcleaningit. Toclean._v/pesurfacesdown_vithsoapandslightly dampcloth
on/y;neveruseso/vents.(SeeMAINTENANCE)
• Thisbike shouldnot beused bypersonsweighingmore than 300 pounds.Failureto cornp/ywi//void
the _varranty.
• This bike is intended for in-home use only.Do not use this bike in any commercial,rental school or
institutional setting. Failureto cornp/y_vi//voidthe warranty.
• Donot usebikein anylocation that is not temperaturecontrol/eftsuch as but notlimited to: garages.
porches,poolrooms,bathrooms,car ports or outdoors. Failureto complymay void the warranty.
• Usethebikeonlyas describedin this manual
AtNOtimeshouldpetsor childrenundertheageof 12becloserto the bikethan10 feet.
AtNOtimeshouldchildrenundertheageof 12usethebike.
Childrenovertheageof 12shouldnotusethe bikewithoutadult supervision.
It is essential thatyour bike is usedonlyindoors,in aclimate controlledroom.If yourbikehas beenexposedto
coldertemperaturesor high moistureclimates, it is stronglyrecommendedthat the bike is warmedup to room
temperaturebeforefirst time use.Failure todo somay causeprematureelectronicfailure.
IMPORTANTREADTHESESAFETYINSTRUCTIONSBEFOREUSE!
Thereareseveralareasduring theassemblyprocessof a bikethat specialattention mustbepaid. It is very
important to followtheassemblyinstructionscorrectlyand to makesureall partsarefirmly tightened. If the
assemblyinstructionsarenot followedcorrectly,the bikecould haveframeparts that arenot tightenedand
will seemlooseand maycauseirritating noises.Topreventdamage tothe bike, the assemblyinstructions
must bereviewedandcorrectiveactions should be taken.
UNPACKING
Unpackthe product whereyou will beusing it. Placetheproductona levelflat surface.It is recommended
that you place a protective coveringonyour floor.During each assemblystep, ensurethat ALLnuts and
bolts arein placeand partially threadedin beforecompletelytightening anyONEbolt.
NOTE:A light application of greasemay aid in the installation of hardware.Anygrease,such as lithium
bikegreaseis recommended.
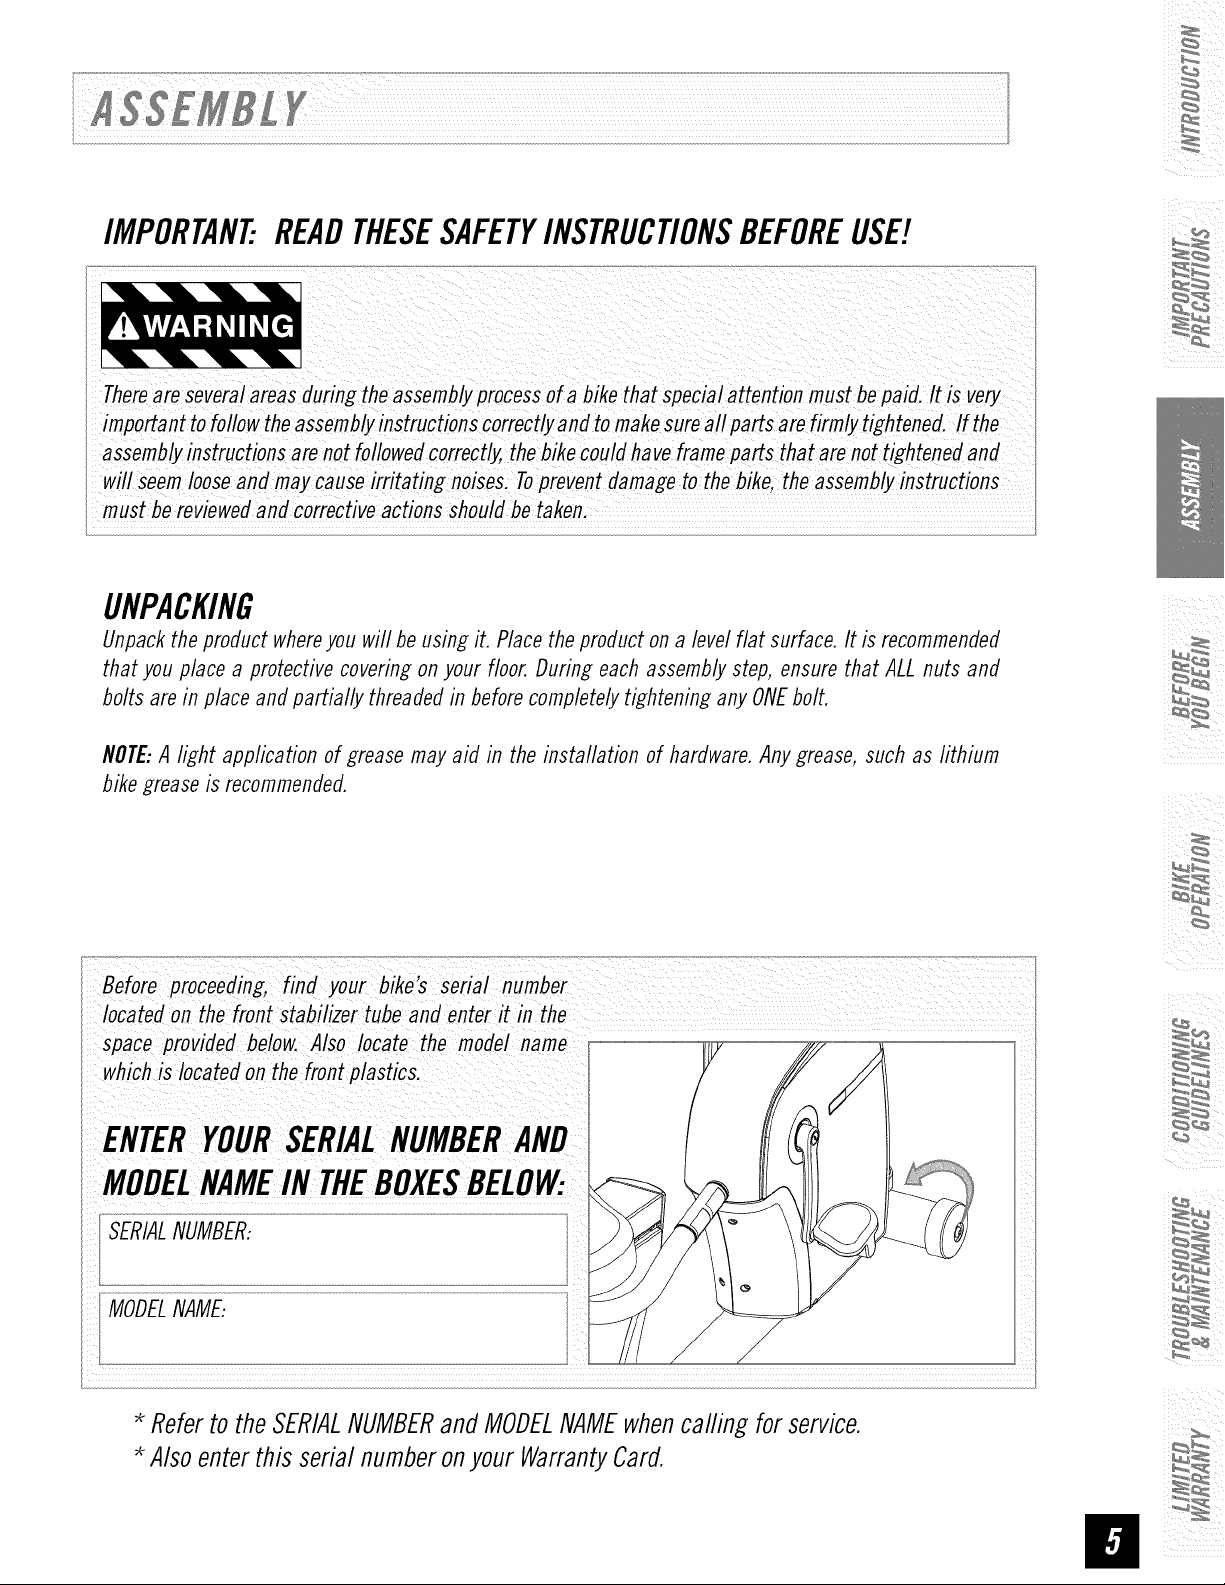
iii_ i
space provided below. Alsolocate the mode! name
whichis Iocatef!on thefront plastics:
I
TERYOURSERIALNUMBERAND
MODELNAMEIN THEBOXESBELOW:
MODELNAME:
* Refer to the SERIALNUMBERand MODELNAMEwhencalling for service.
* Also enter this serial number onyour WarrantyCard.
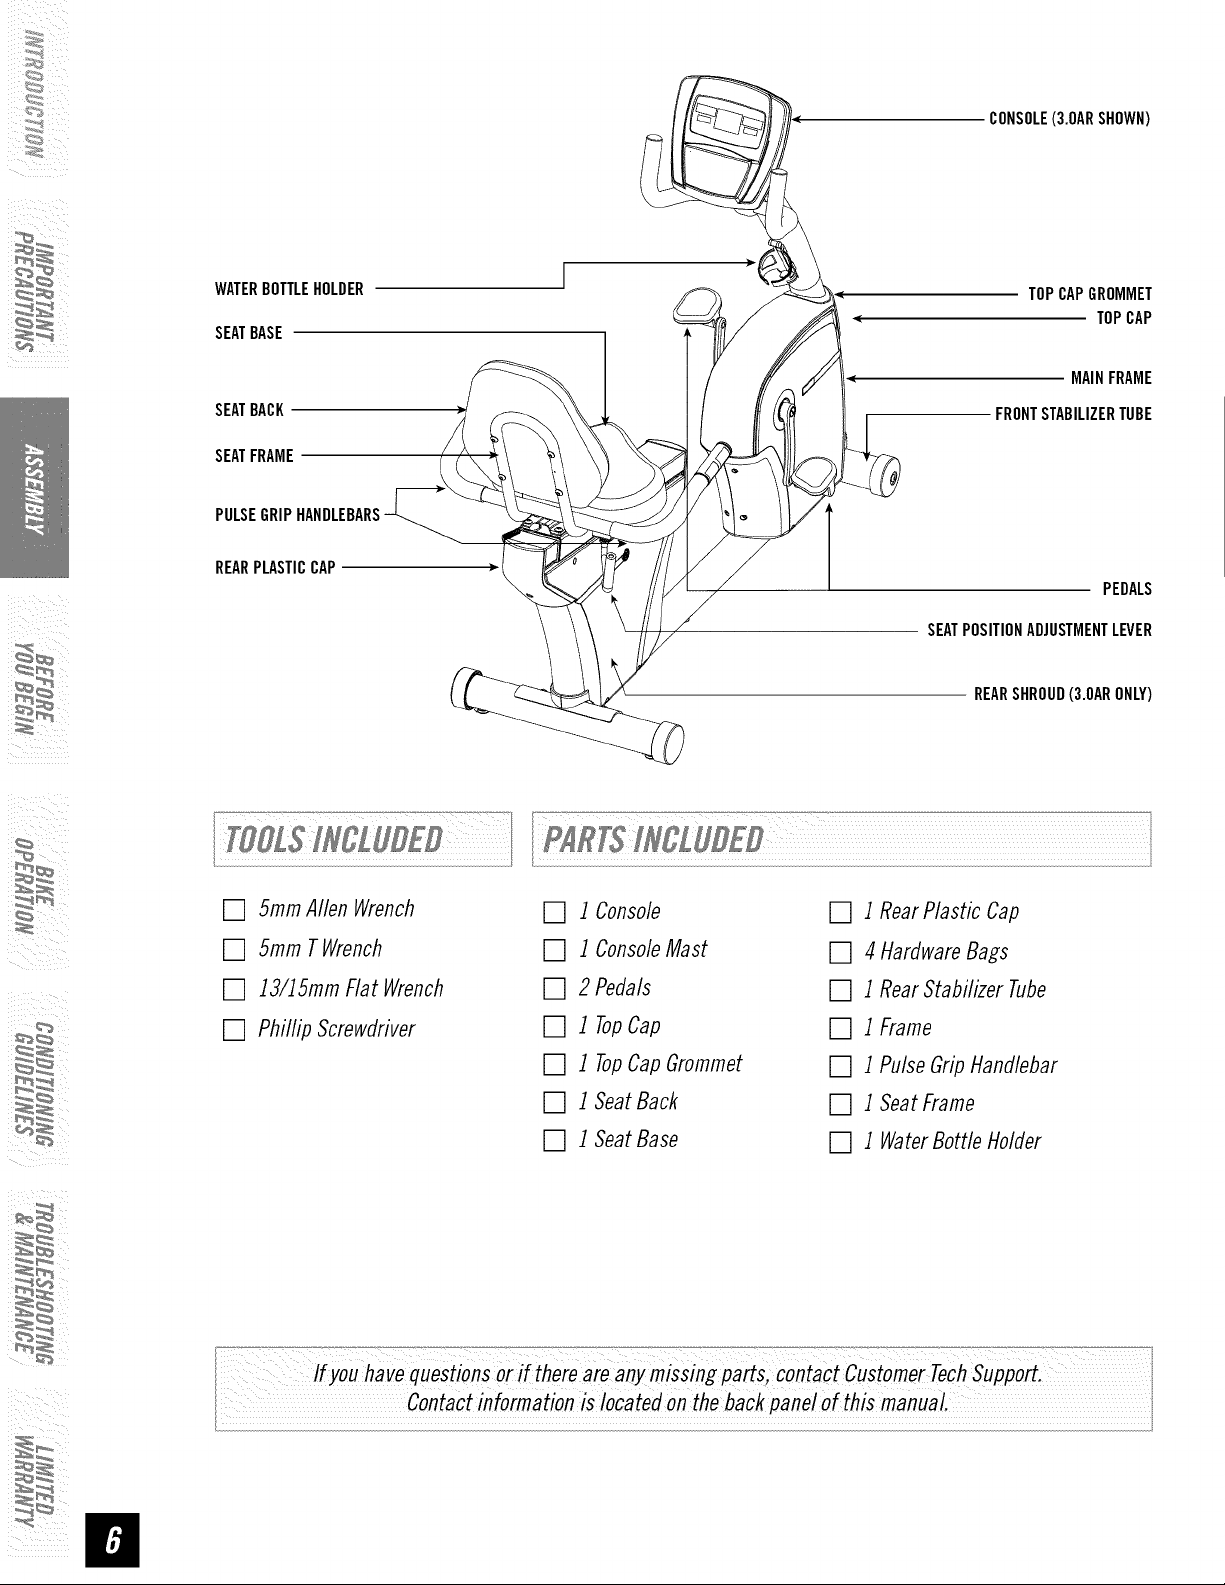
CONSOLE(3.OARSHOWN)
i_ 7
iiI _
WATERBOTTLEHOLDER
SEATBASE
SEATBACK
SEATFRAME
PULSEGRIPHANDLEBARS
REARPLASTICCAP
TOPCAPGROMMET
TOPCAP
MAINFRAME
FRONTSTABILIZERTUBE
PEDALS
SEATPOSITIONADJUSTMENTLEVER
REARSHROUD(3.OARONLY)
[] 5ramAllen Wrench
[] 5ram TWrench
[] 13/15mmFlat Wrench
[] Phillip Screwdriver
ff youhavequestionsorif thereare anymissing parts,ContactCustomet TechSupport.
Contactinformation is locatedon theback pane/of this manual
[] 1 Console
[] 1 ConsoleMast
[] 2Pedals
[] 1 TopCap
[] 1 TopCapGrommet
[] 1 SeatBack
[] 1 SeatBase
[] 1 Rear Plastic Cap
[] 4 Hardware Bags
[] 1 Rear Stabilizer Tube
[] 1 Frame
[] 1 Pulse Grip Handlebar
[] 1 Seat Frame
[] 1 WaterBottle Holder
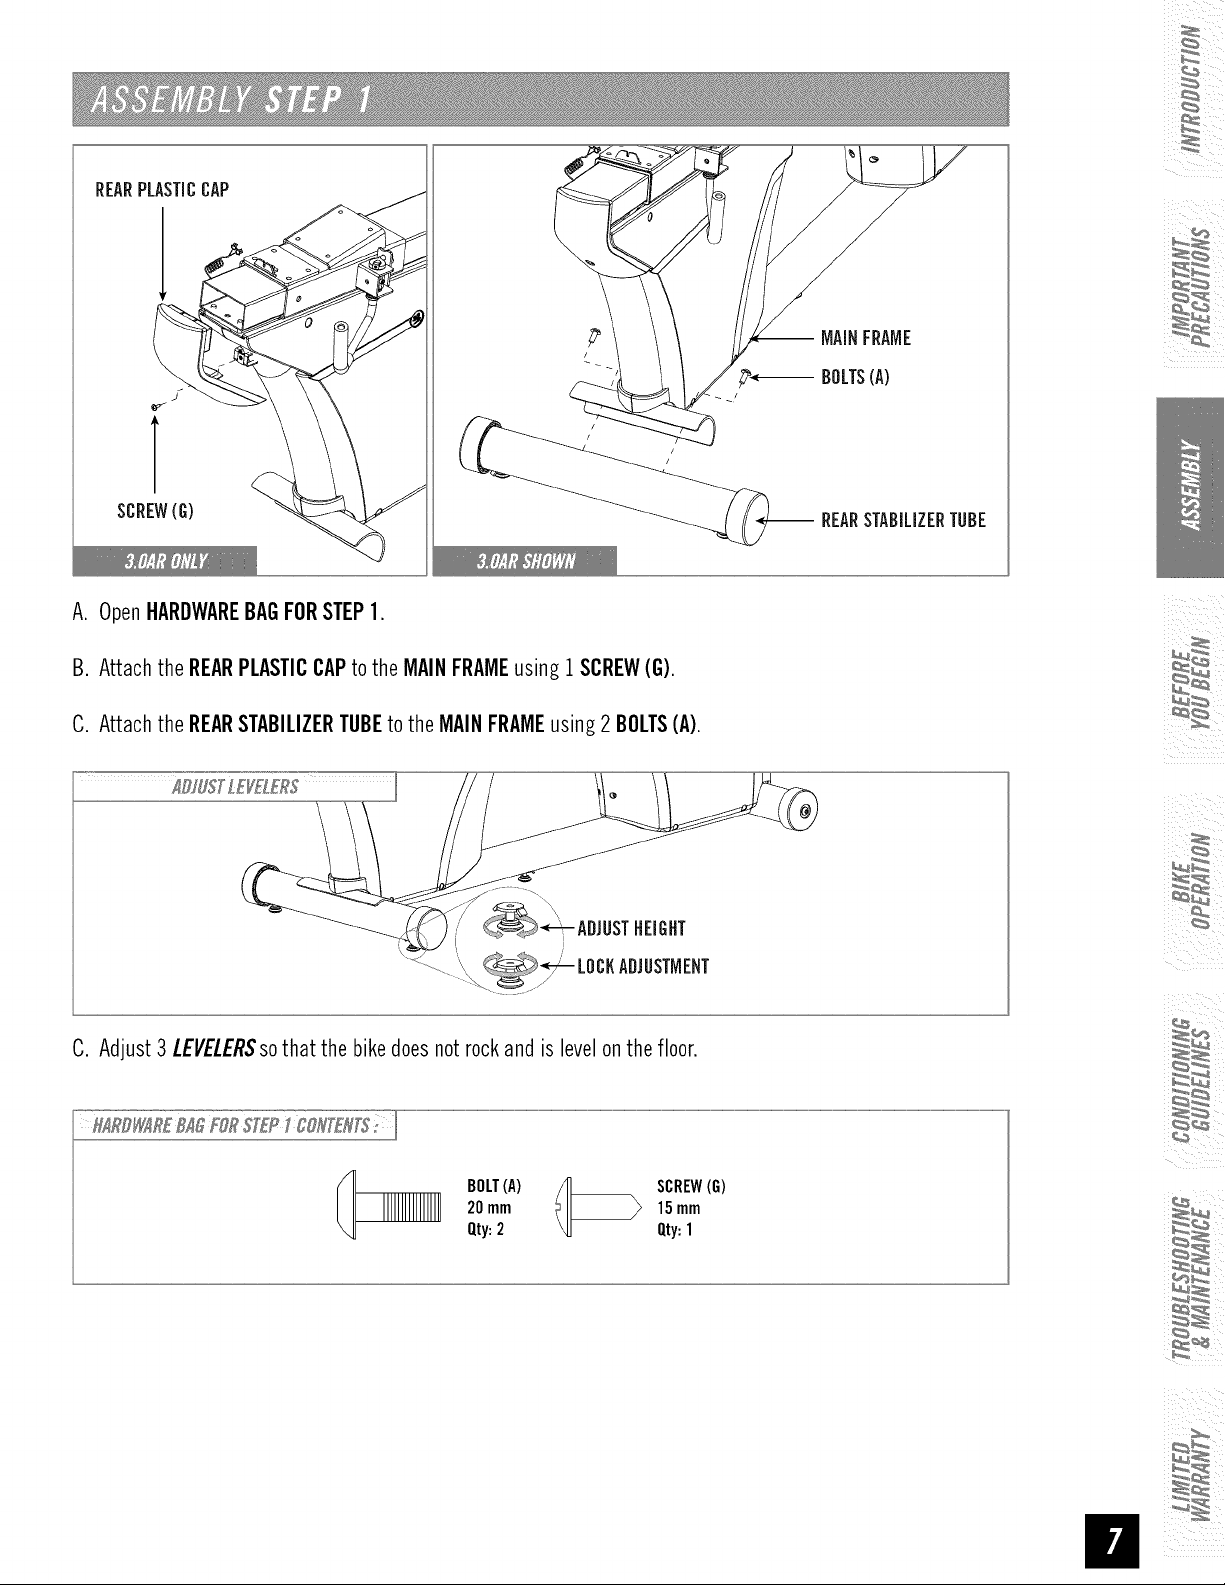
REARPLASTICCAP
J
/
SCREW(G)
A. OpenHARDWAREBAGFORSTEP1.
B. Attachthe REARPLASTICCAPto theMAINFRAMEusing1SCREW(G).
C. Attachthe REARSTABILIZERTUBEto theMAINFRAMEusing2 BOLTS(A).
C. Adjust3 LEVELERSsothatthebikedoesnotrockandislevelonthe floor.
REARSTABILIZERTUBE
iii_ i
20mm 15mm
BOLT(A) _ SCREW(G)
Qty:2 Qty:1
; iiI _
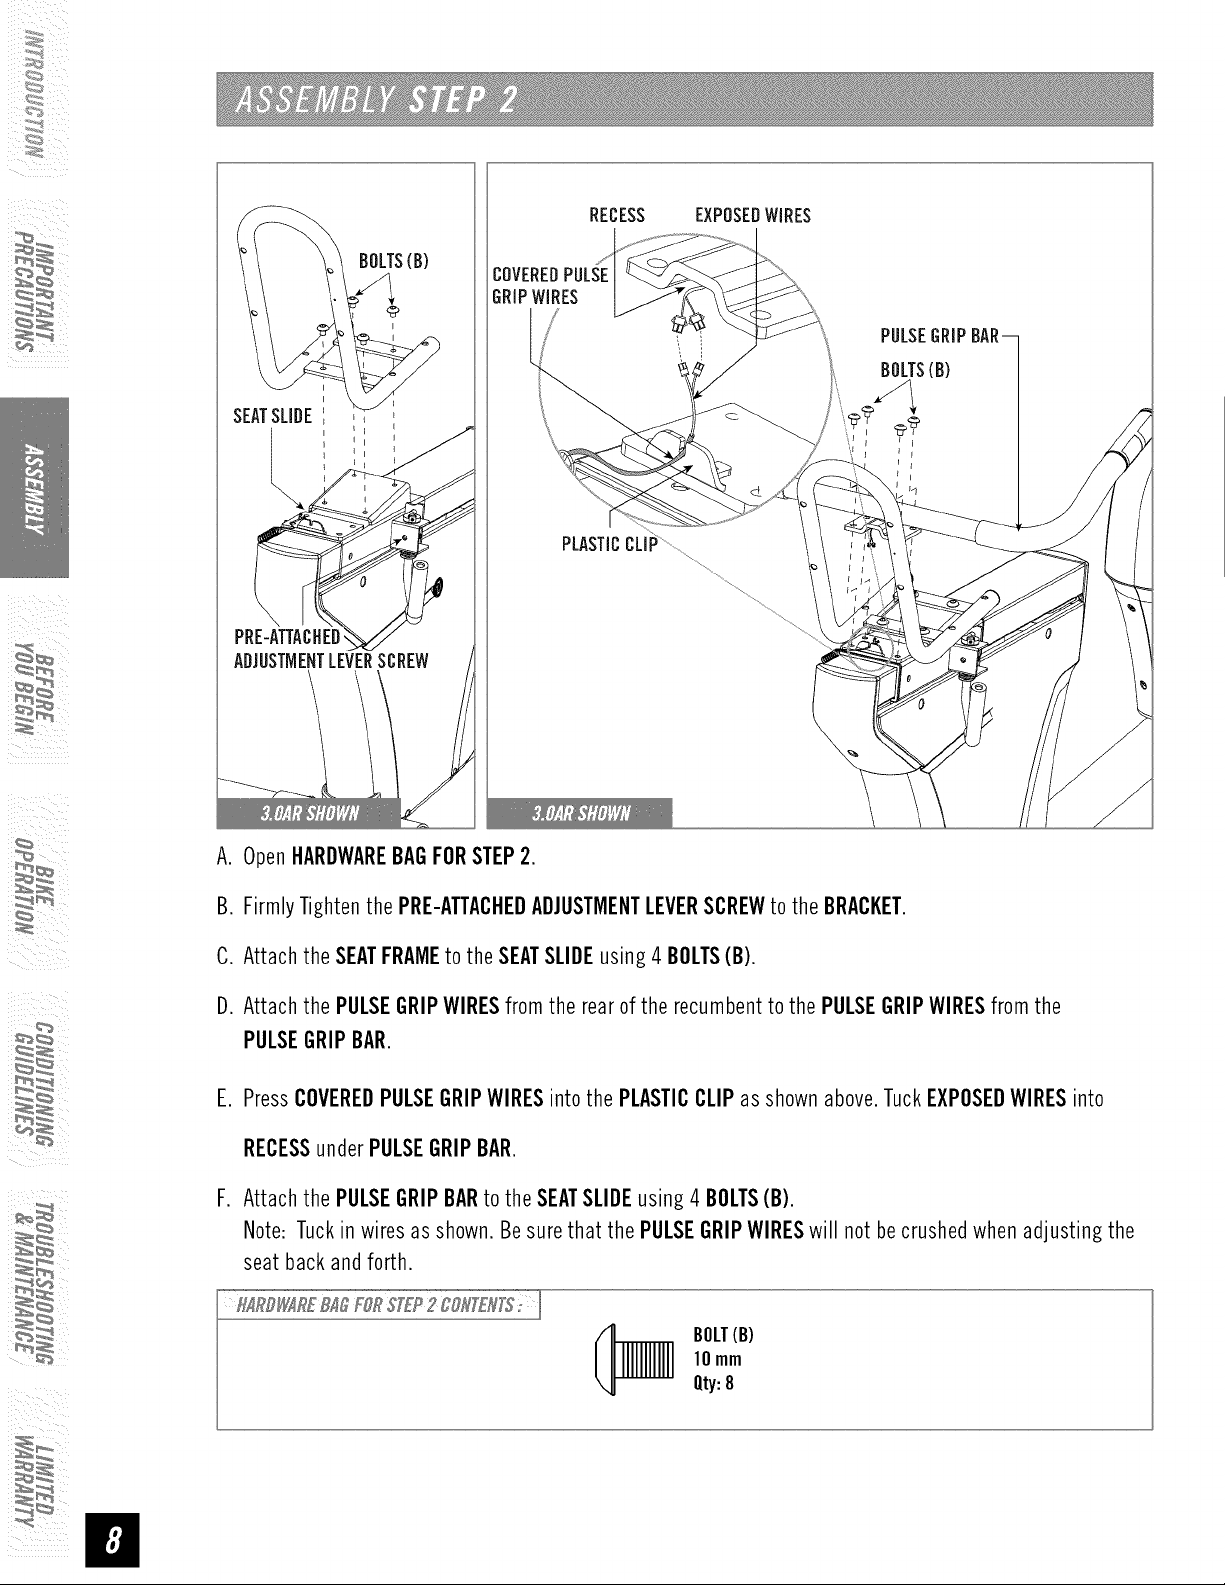
RECESS EXPOSEDWIRES
BOLTS(B)
@
PULSE
BOLTS(B)
SEATSLIDE __
I I
E
PLASTICCLIP
PR
ADJUSTNENTLEVERSCREW
A. OpenHARDWAREBAGFORSTEP2.
B. FirmlyTightenthe PRE-ATTACHEDADJUSTMENTLEVERSCREWto the BRACKET.
C. AttachtheSEATFRAMEto theSEATSLIDEusing4 BOLTS(B).
D. Attachthe PULSEGRIPWIRESfromthe rearof therecumbentto thePULSEGRIPWIRESfromthe
PULSEGRIPBAR.
E. PressCOVEREDPULSEGRIPWIRESintothe PLASTICCLIPasshownabove.TuckEXPOSEDWIRESinto
RECESSunderPULSEGRiPBAR.
F. Attachthe PULSEGRIPBARto theSEATSLIDEusing 4 BOLTS(B).
Note:Tuckin wires asshown.Besurethat the PULSEGRIPWIRESwill notbecrushedwhenadjusting the
seat backandforth.
_]_]] OLT(B)
10nlnl
Qty:8
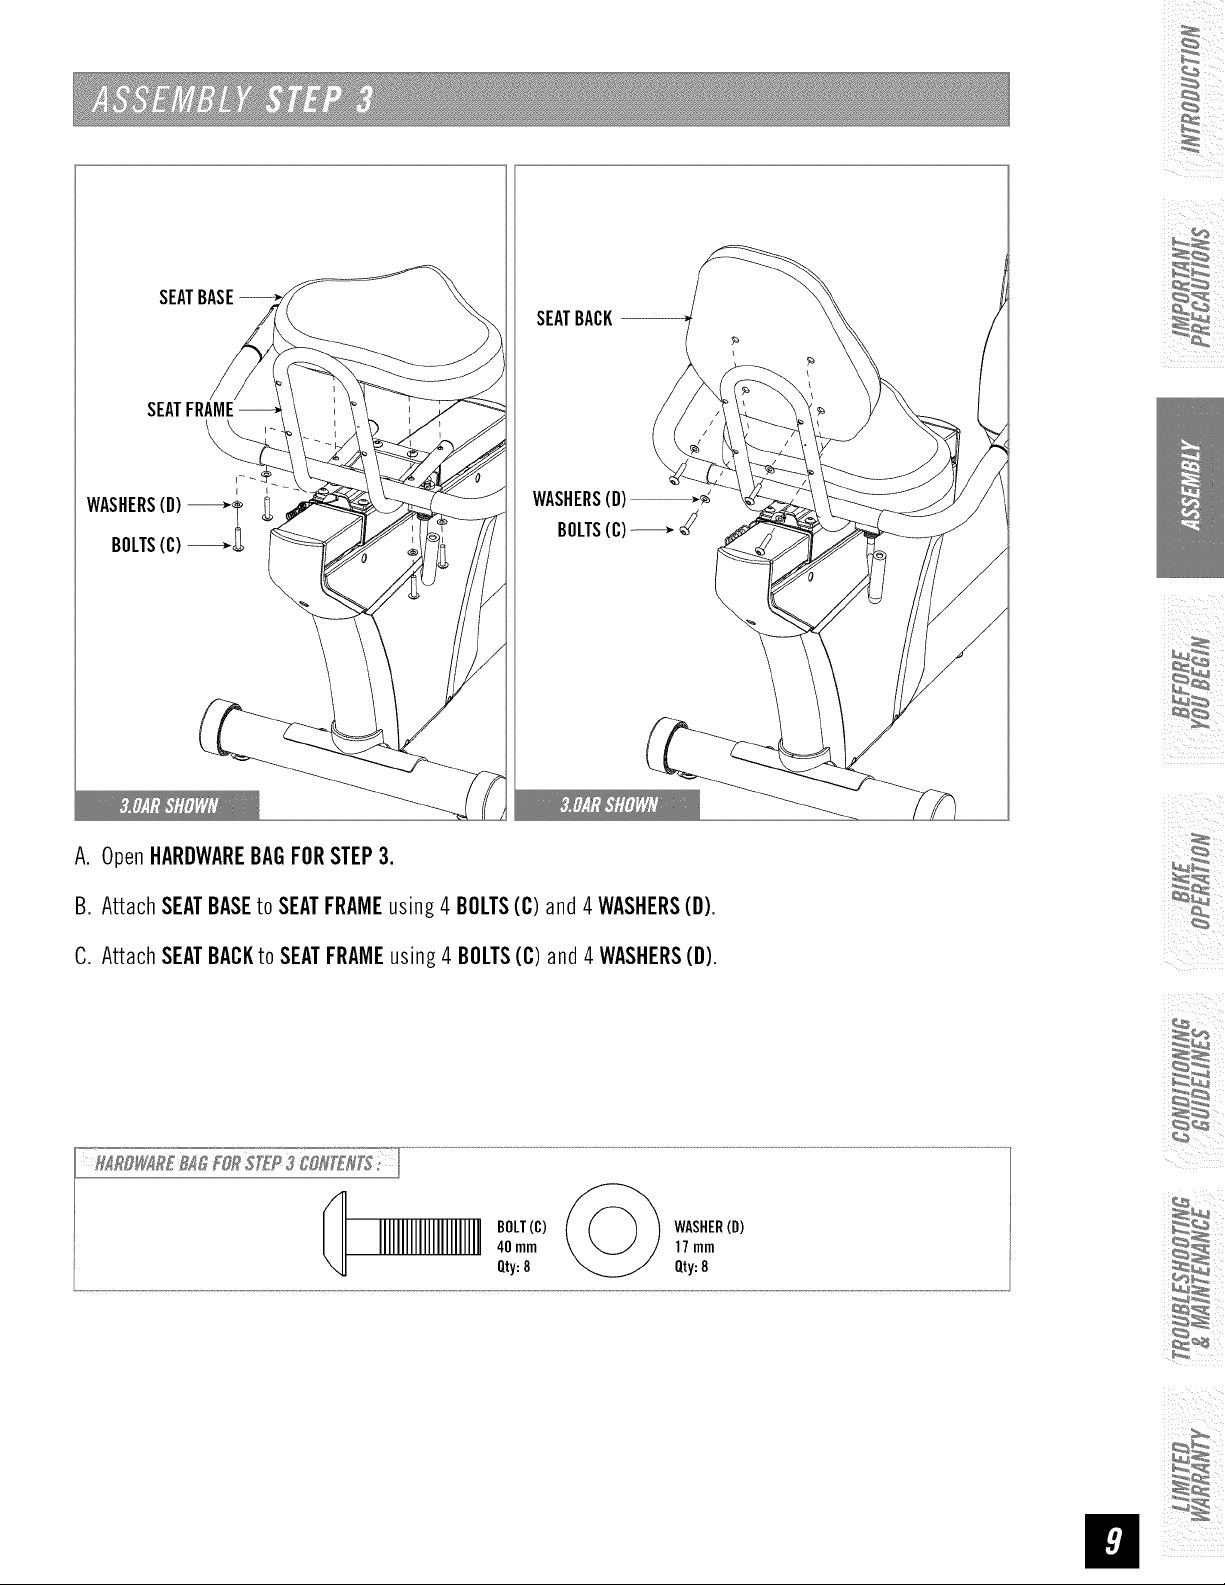
SEATBASE--
A. OpenHARDWAREBAGFORSTEP3.
SEATBACK
WASHERS(O)
BOLTS(C)_
iii_ i
B. Attach SEATBASEto SEATFRAMEusing 4 BOLTS(C)and 4WASHERS(D).
C. AttachSEATBACKtoSEATFRAMEusing4 BOLTS(C) and4 WASHERS(D).
BOLT(C) WASHER(D)
40turn 17rnm
Qty:8 Qty:8

BOLTS(E)
CONSOLEWIRE
CONSOLEMAST
i
f
TOPCAPGROMMET
TOPCAP
\\
\
\
//
//
MAINFRAME
A. OpenHARDWAREBAGFORSTEP4.
B. SlideTOPCAPGROMMETandTOPCAPontothebottomofthe CONSOLEMAST.
C. Carefullypullthe CONSOLEWIREthroufh the CONSOLEMASTusinf the twist tie locatedinsidethe
CONSOLEMAST.
D. Attachthe CONSOLEMASTto theMAINFRAMEusing 8BOLTS(E).
E. SlideTOPCAPGROMMETand TOPCAPdownCONSOLEMASTand carefullysnap TOPCAPintothe
MAINFRAME.
BOLT(E)
10mm
Qty:8
 Loading...