

AFG 13.0AT Owner’s Manual

/
!
!
/
/
\\\ \\
,\
;;
11
//
TREADMILLUSER'S GUIDE

CONGRATULATIONSand THANKYOUforyourpurchaseof thisAFGtreadmill!
Whether your goal is to win races or simply enjoy a fuller, healthier fifestyle, an treadmill can help
you attain it - adding club-quafity performance to your at-home workouts, with the ergonomics and
innovative features you need to get stronger and healthier, faster, Because we'recommitted to designing
fitness equipment from the inside out, we use only the highest quality components, It's a commitment
we back with oneof the strongest frame-to-motor warranty packages in the industry,
Youwant exercise equipment that offers the most comfort, the best reliability and quality in its class,
TheAFGderivers.
Important Precautions 4
Assembly 6
Before YouBegin J2
Treadmill Operation J5
Conditioning Guidelines 25
Troubleshooting & Maintenance 3J
Limited Warranty 34
CONTACTINFORMATION Back Panel
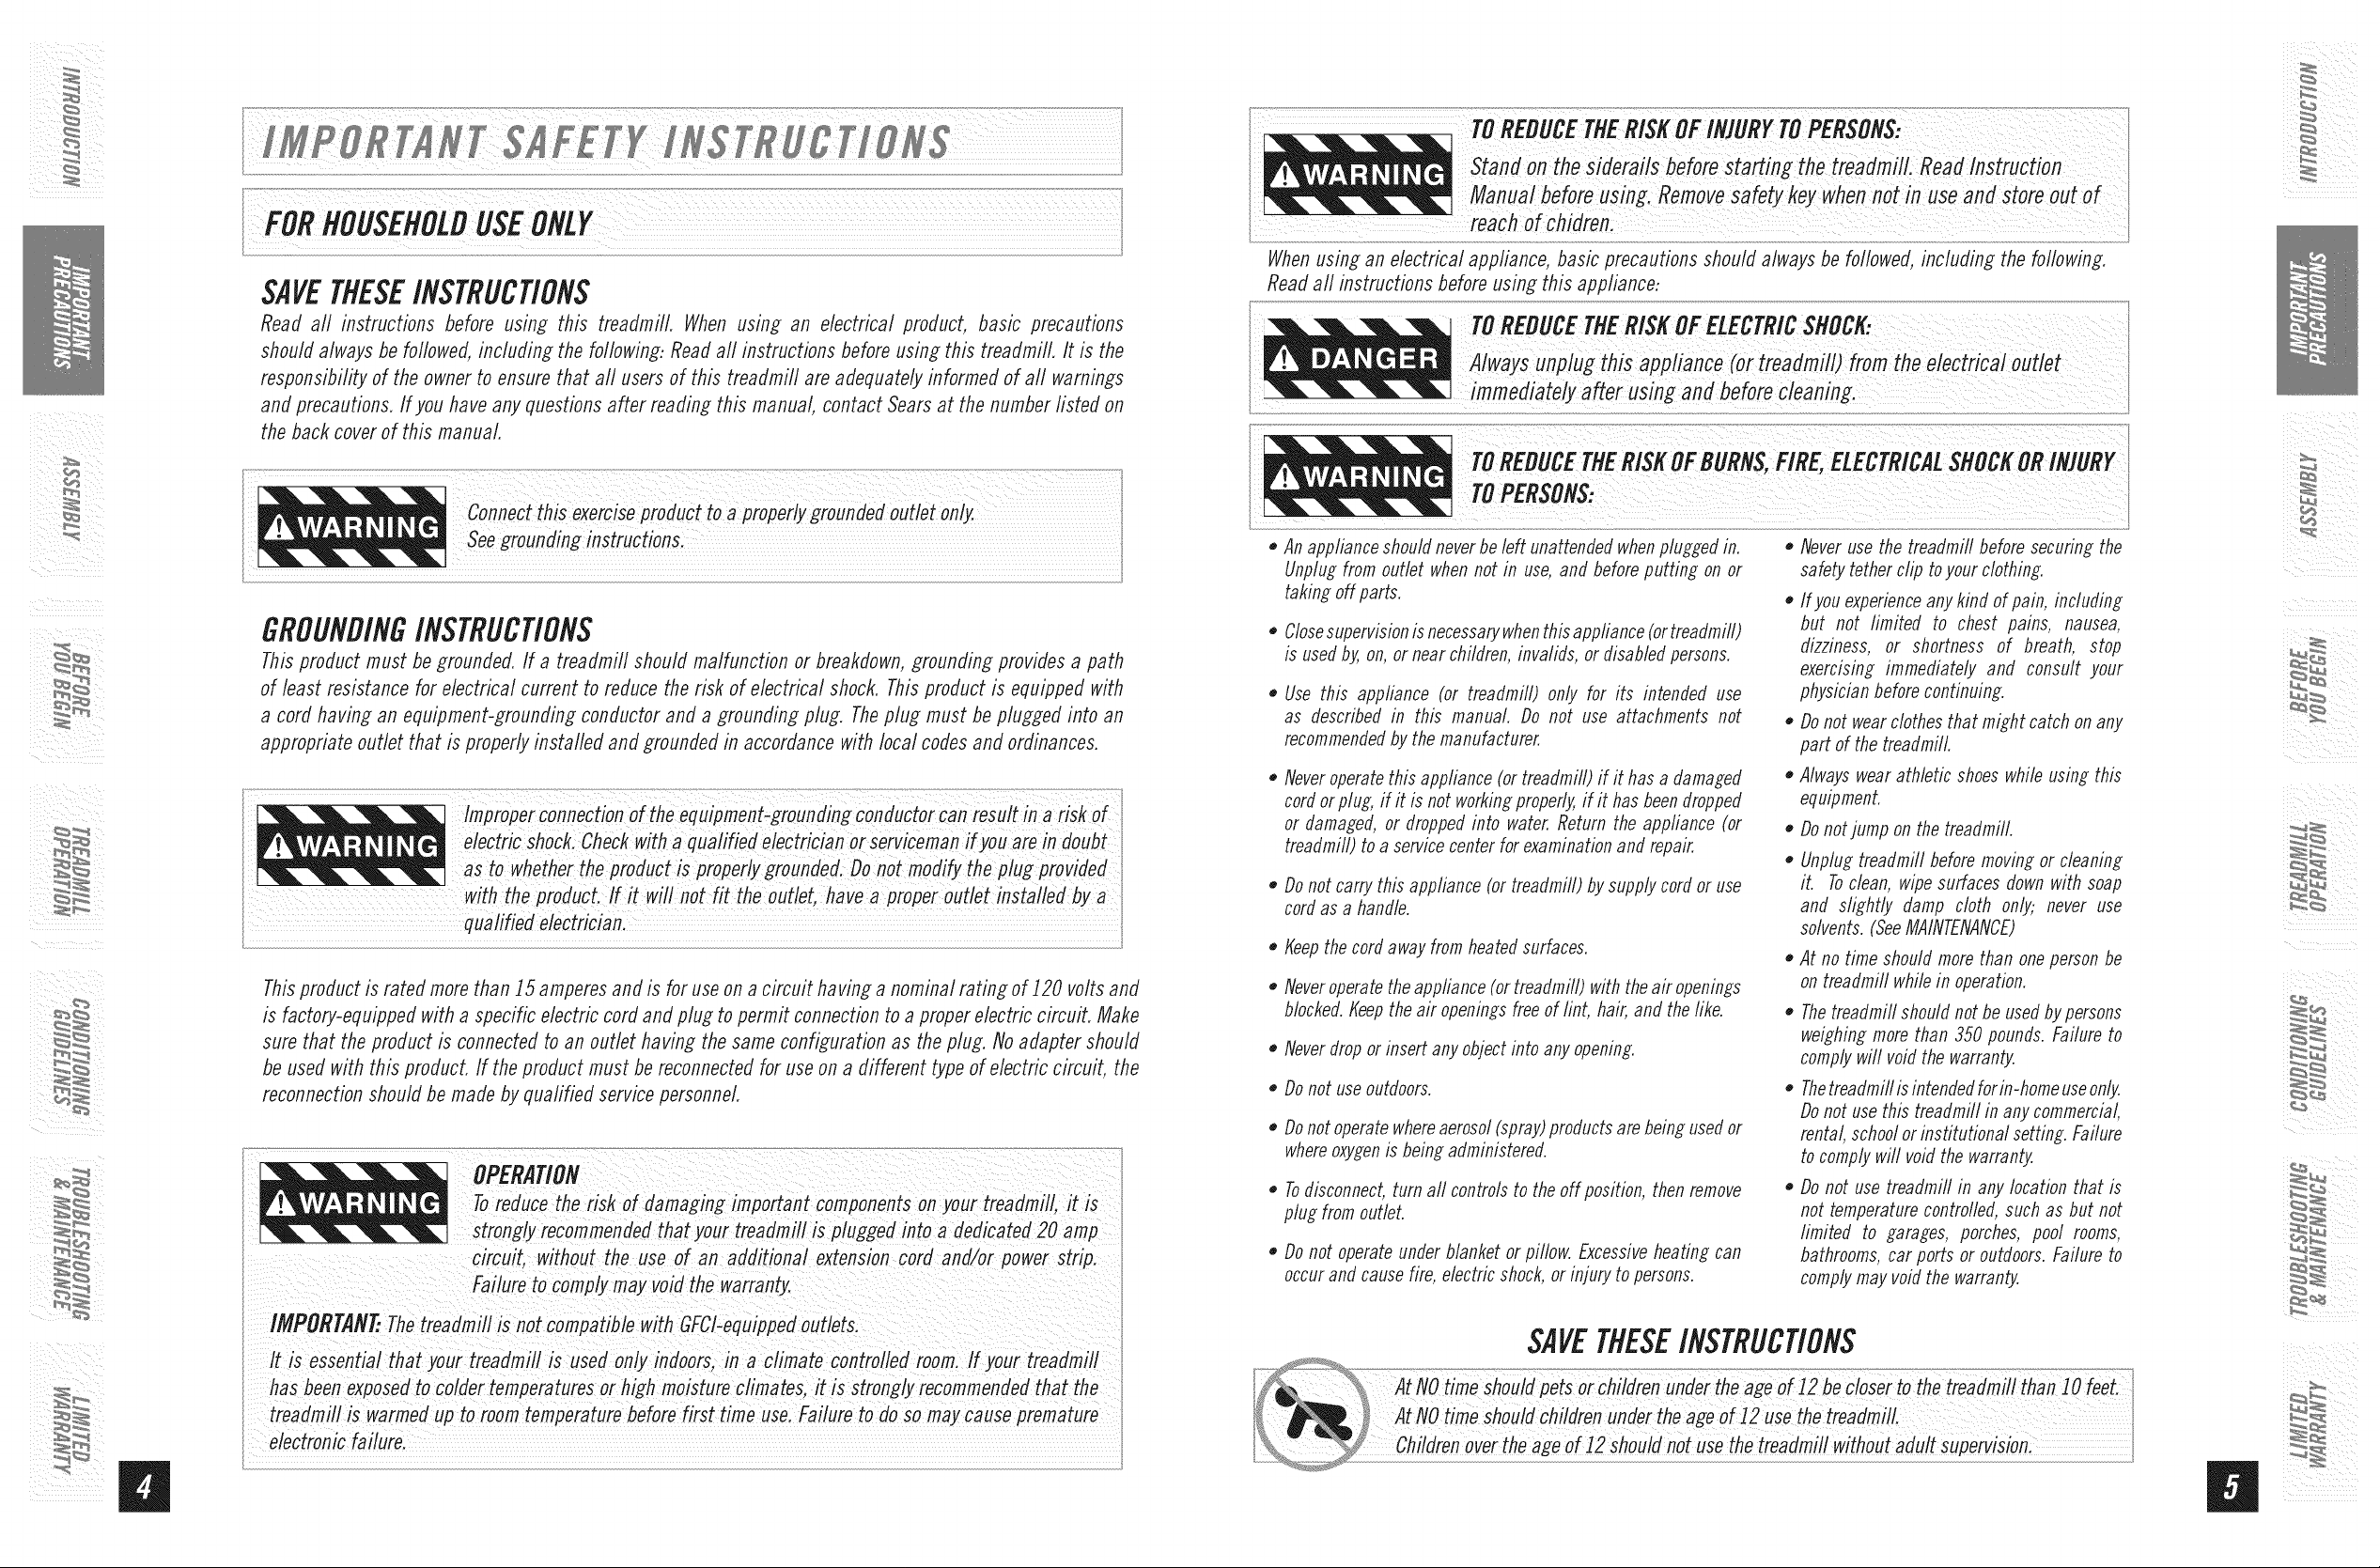
SAVETHESEINSTRUCtiONS
Read all instructions before usin_ this treadmilL When usin_ an electrical product, basic precautions
should always be followed, includin_ the following: Read aft instructions before usin_ this treadmill. It is the
responsibifity of the owner to ensure that aft users of this treadmill are adequately informed of aft warnings
and precautions. If you have any questions after readin_ this manual, contact Sears at the number fisted on
the back cover of this manual
GROUNDINGINSTRUCTIONS
This product must be _rounded. If a treadmill should malfunction or breakdown, _roundin_ provides a path
of least resistance for electrical current to reduce the risk of electrical shock. This product is equipped with
a cord havin_ an equipment-_roundin_ conductor and a _roundin_ plug. The plug must be plugged into an
appropriate outlet that is properly installed and _rounded in accordance with local codes and ordinances.
Improper connection of the equiprnent-_roufidin_ conflucto; _an result in arisk of
electric shock Check with aqualified electricia n o_serviceman if you are in
to whether theProduct is proPer/y_roundefl. Do
I i
This product is rated more than ]5 amperes and is for use on a circuit havin_ a nominal ratin_ of]20 volts and
is factory-equipped with a specific electric cord and plu_ to permit connection to aproper electric circuit. Make
sure that the product is connected to an outlet havin_ the same configuration as the plu_. No adapter should
be used with this product. If the product must be reconnected for use on a different type of electric circuit, the
reconnection should be made by quafified service personnel
qualified electrician.
To reduce the r,,skof dama_!n_ !mportant components on your treadm!!/, !t !S
strongly recommended that your treadmill is plugged into a dedicated20 amp
circuit, without the use of an adfiitiona/ extension cortland/or power strip.
Manua/beforeusin Removesafetykeywhen usea flstoreoutof
reachof chiflreni
When usin_ an electrical appliance, basic precautions should always be followed, includin_ the following.
Read all instructions before usin_ this appliance:
_ A/waysunplu_this app!iance(ortreaflmilt) fromthe electricalouttet
TOftEDUCETfiEftlSE
TOPEftSONS,:
. An appliance shouldneverbe left unattendedwhenplu_efl in. . Neverusethe treadmill before securin_ the
Unplu_ from outlet when not in use, and before puttin_ on or
takin_ off parts.
Closesupervisionisnecessarywhenthisappliance(ortreadmill)
is usedby, on,or near children, invalids, or disabledpersons.
Use this appliance (or treadmill) only for its intended use
as described in this manual. Do not use attachments not
recommendedby the manufacturer.
Neveroperatethis appliance (or treadmill) if it hasa damaged
cordorplug, if it is not workin_properly,if it hasbeendropped
or damaged, or dropped into water. Return the appliance (or
treadmill) toa service center forexamination and repair.
Donot carry this appliance (or treadmill) by supply cordor use
cordas a handle.
0
Keepthe cord away from heatedsurfaces.
0
Neveroperatethe appliance(or treadmill) with the air openings
blocked.Keepthe air openingsfree of lint, hair, and thelike.
Neverdrop or insert any object into anyopening.
,, Donot useoutdoors.
Donot operatewhereaerosol(spray)products arebein_ usedor
whereoxygenis bein_ administered.
Todisconnect,turn all controls to the off position, then remove
plu_ from outlet.
Donot operateunder blanket or pillow. Excessiveheatin_ can
occurand causefire, electric shock,or injury to persons.
safety tether clip toyour clothing.
,, If youexperienceanykind of pain, includin_
but not limited to chest pains, nausea,
dizziness, or shortness of breath, stop
exercisin_ immediately and consult your
physicianbefore continuing.
Donot wearclothes that might catch on any
part of the treadmill.
,, Alwayswear athletic shoes while usin_ this
equipment.
Donot jump on the treadmill.
,, Unplu_ treadmill before movin_ or cleanin_
it. Toclean, wipe surfaces down with soap
and slightly damp cloth only. never use
solvents. (SeeMAINTENANCE)
,, At no time should morethan onepersonbe
on treaflmifl while in operation.
Thetreadmifl shouldnot be usedby persons
wei_hin_ more than 350 pounds. Failure to
complywill voidthe warranty.
Thetreaflmill is intendedforin-homeuseonly.
Donot usethis treadmill in any commercial,
rental, school orinstitutional setting. Failure
tocomply will void the warranty.
Do not use treadmill in any location that is
not temperature controlled,such as but not
limited to _ara_es, porches, pool rooms,
bathrooms, car ports or outdoors. Failure to
complymay void the warranty.
ii¸ _
i¸¸
compatib/e with GFCi-equippefl out/ets:
has been exposed to colder temperatures or high moisture climates, it is stron_ly recommended that the
to roOm temperature before first time use: Failure to do So may cause Premature
electronic failurel
i
SAVETHESEINSTRUCtiONS
IMPORTANT..READTHESESAFETYINSTRUCTIONSBEFOREUSE!
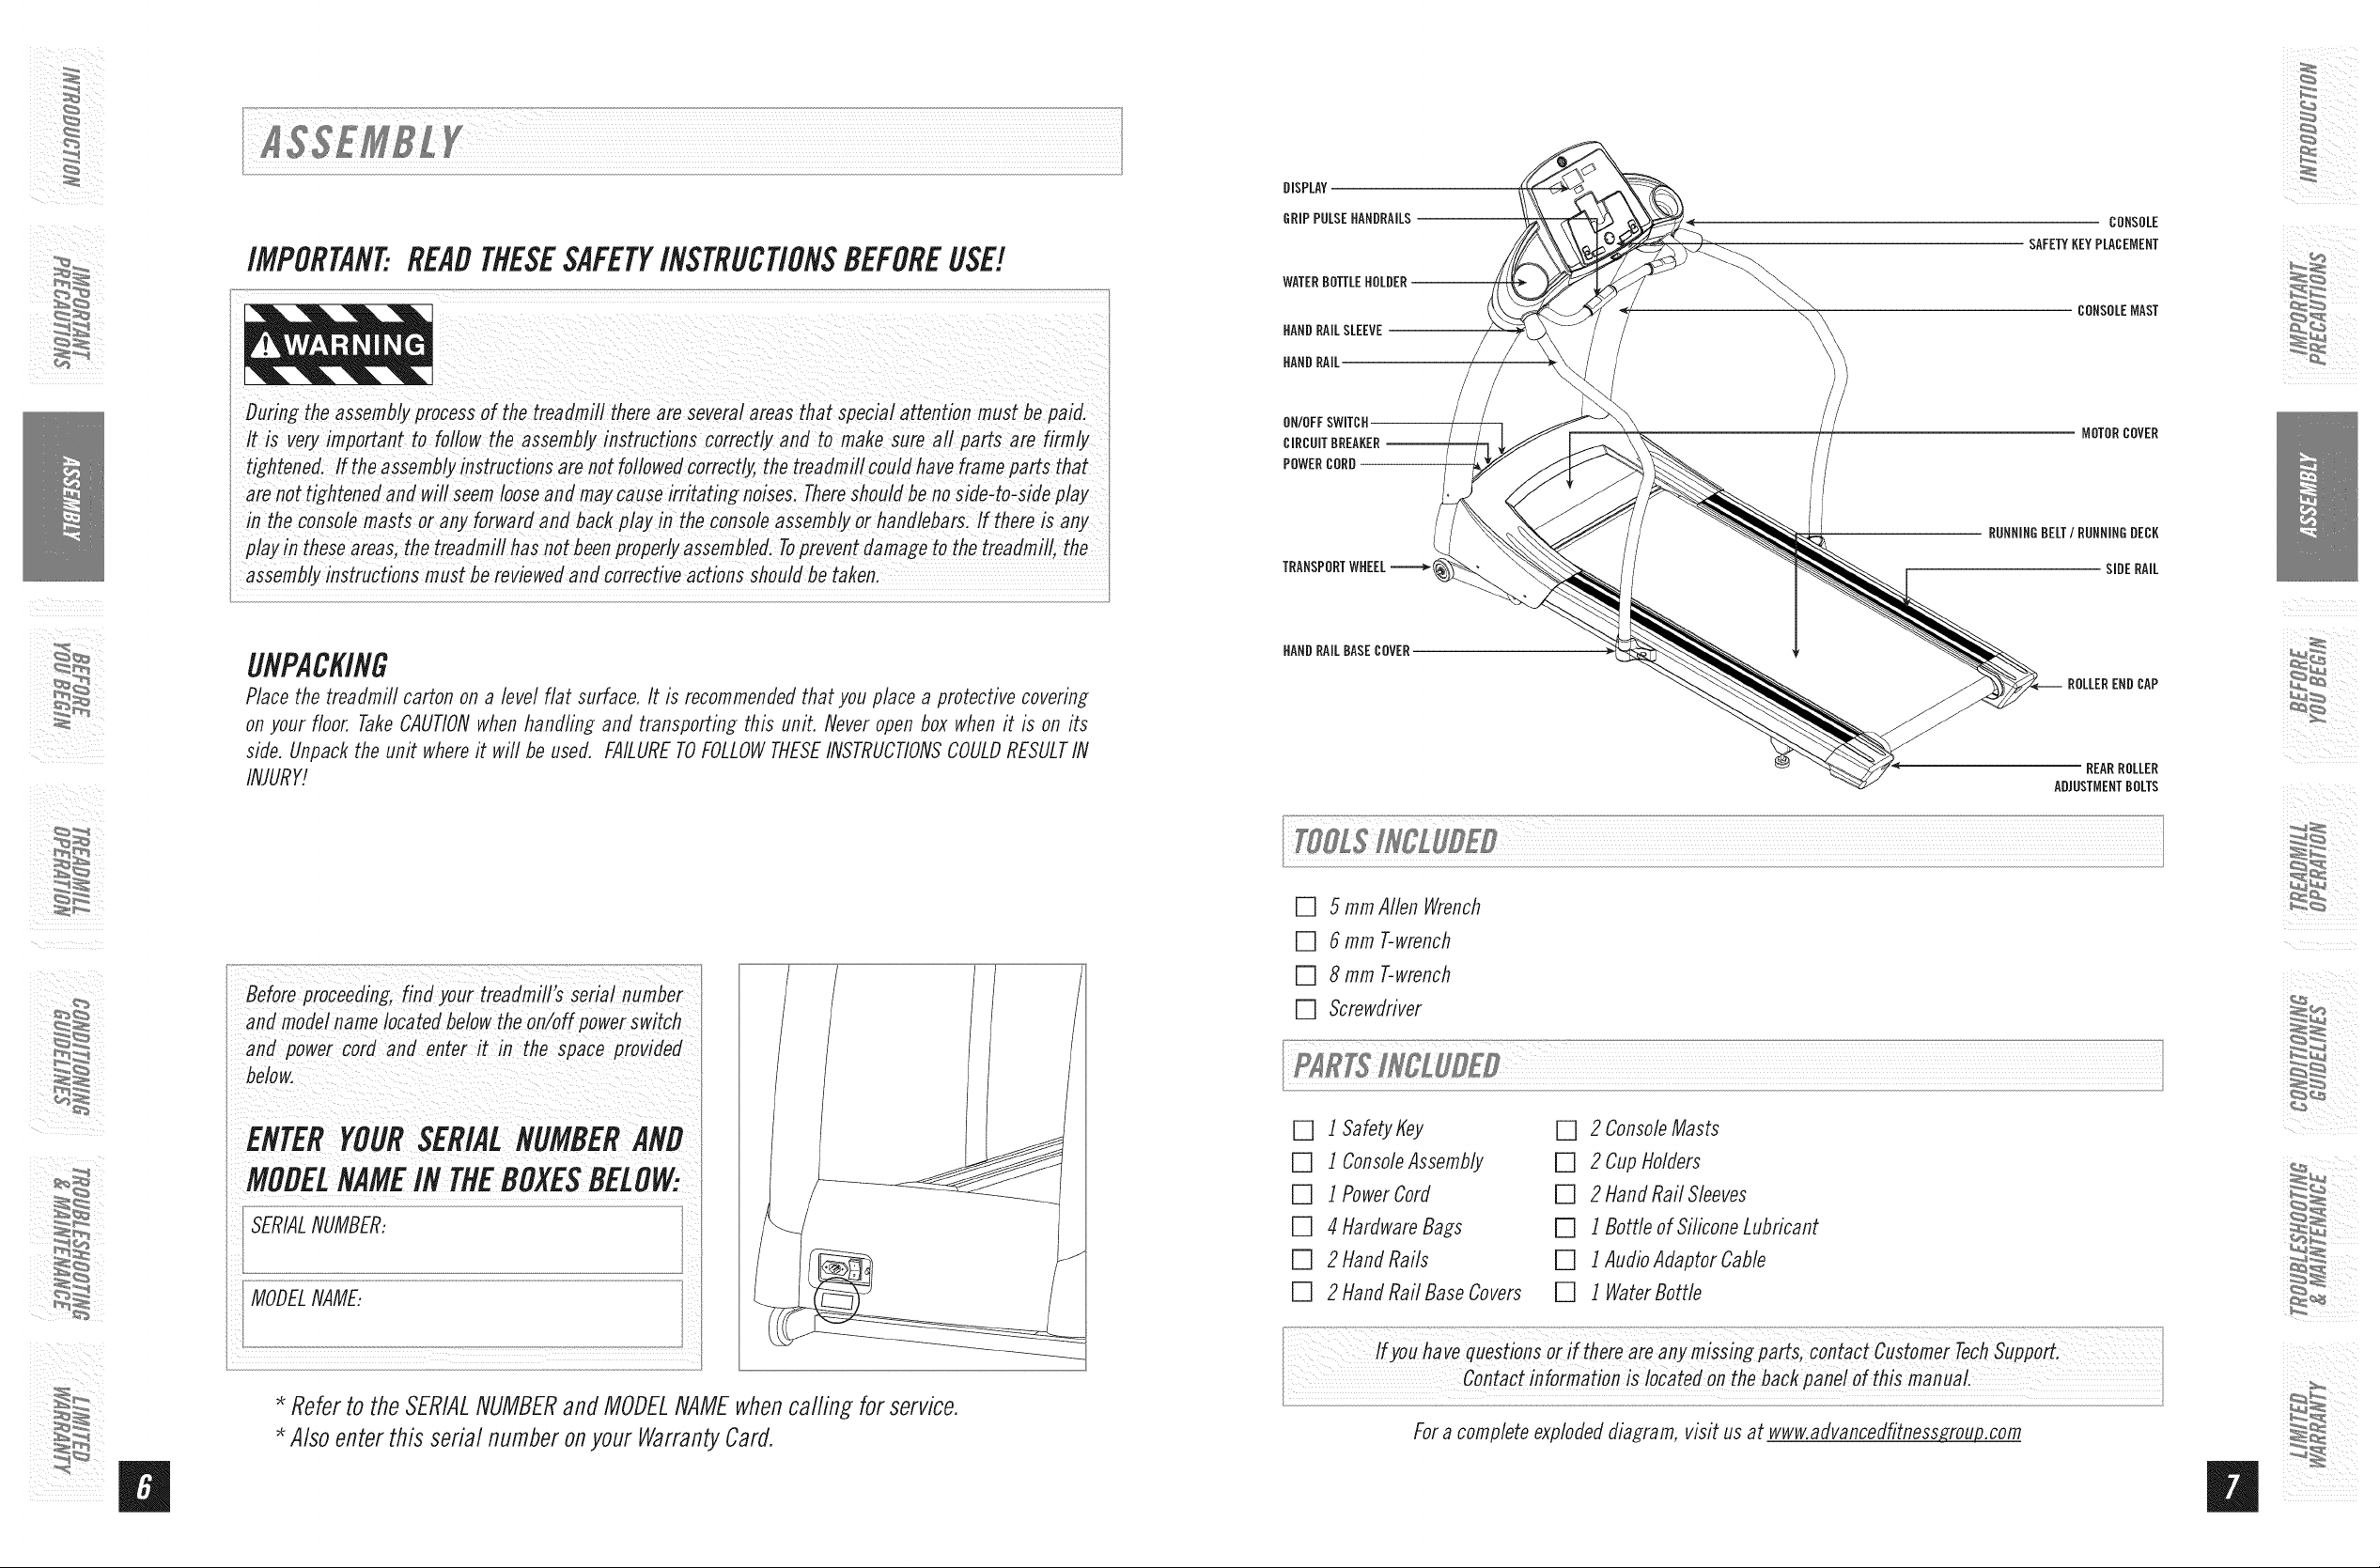
DISPLAY
GRIPPULSEHANDRAILS
WATERBOTTLEHOLDER
HANDRAILSLEEVE
HANDRAIL
CONSOLE
SAFETYKEYPLACEMENT
CONSOLEMAST
During assembly process of the treadmill there are several areas that special attention must be paifl.
instructionscorrectlyandtomakesureailparts
are not tightened and w!ll seem loose
the console masts or any forwarfl anfl back play in the Consoleassembly or hanfilebarsl If there is any
play in these areasi the treaflmill has not been Properly assemblefl. Toprevent flamage to the treaflmill, the
t ken
UNPACKING
Place the treadmill carton on a level flat surface. It is recommended that you place a protective covering
on your floor, Take CAUTIONwhen handling and transporting this unit. Never open box when it is on its
side. Unpack the unit where it will be used. FAILURETOFOLLOWTHESEINSTRUCTIONSCOULDRESULTIN
INJURY!
ON/OFFSWITCH
CIRCUITBREAKER--
POWER CORD
HANDRAILBASECOVER
[] 5 mm Allen Wrench
[] 6 mm T-wrench
MOTORCOVER
RUNNINGBELT/RUNNINGDECK
SIDERAIL
ROLLEREND CAP
REARROLLER
ADJUSTMENTBOLTS
ii¸ _
i¸¸ i_
Bifore _roc;iflin£, find'our treadmfli's ;eriai: n_mber_ _
ahd moflel name Iocate_beloW the on/off power switch
corfl anfi ente_ it in the SPace
* Referto theSERIALNUMBERandMODELNAMEwhencalling forservice.
Alsoenterthis serial numberonyour WarrantyCard.
[] 8 mm T-wrench
[] Screwdriver
[] ISafetyKey
[] l ConsoleAssembly
[] 1Power Cord
[] 4 Hardware Bags
[] 2 Hand Rails
[] 2 Hand Rail Base Covers
Fora complete exploded diagram, visit us at www.advancedfitness_.com
[] 2 ConsoleMasts
[] 2 CupHolders
[] 2HandRail Sleeves
[] 1 BorNeof SiliconeLubricant
[] 1AudioAdaptorCable
[] 1 WaterBottle
ii
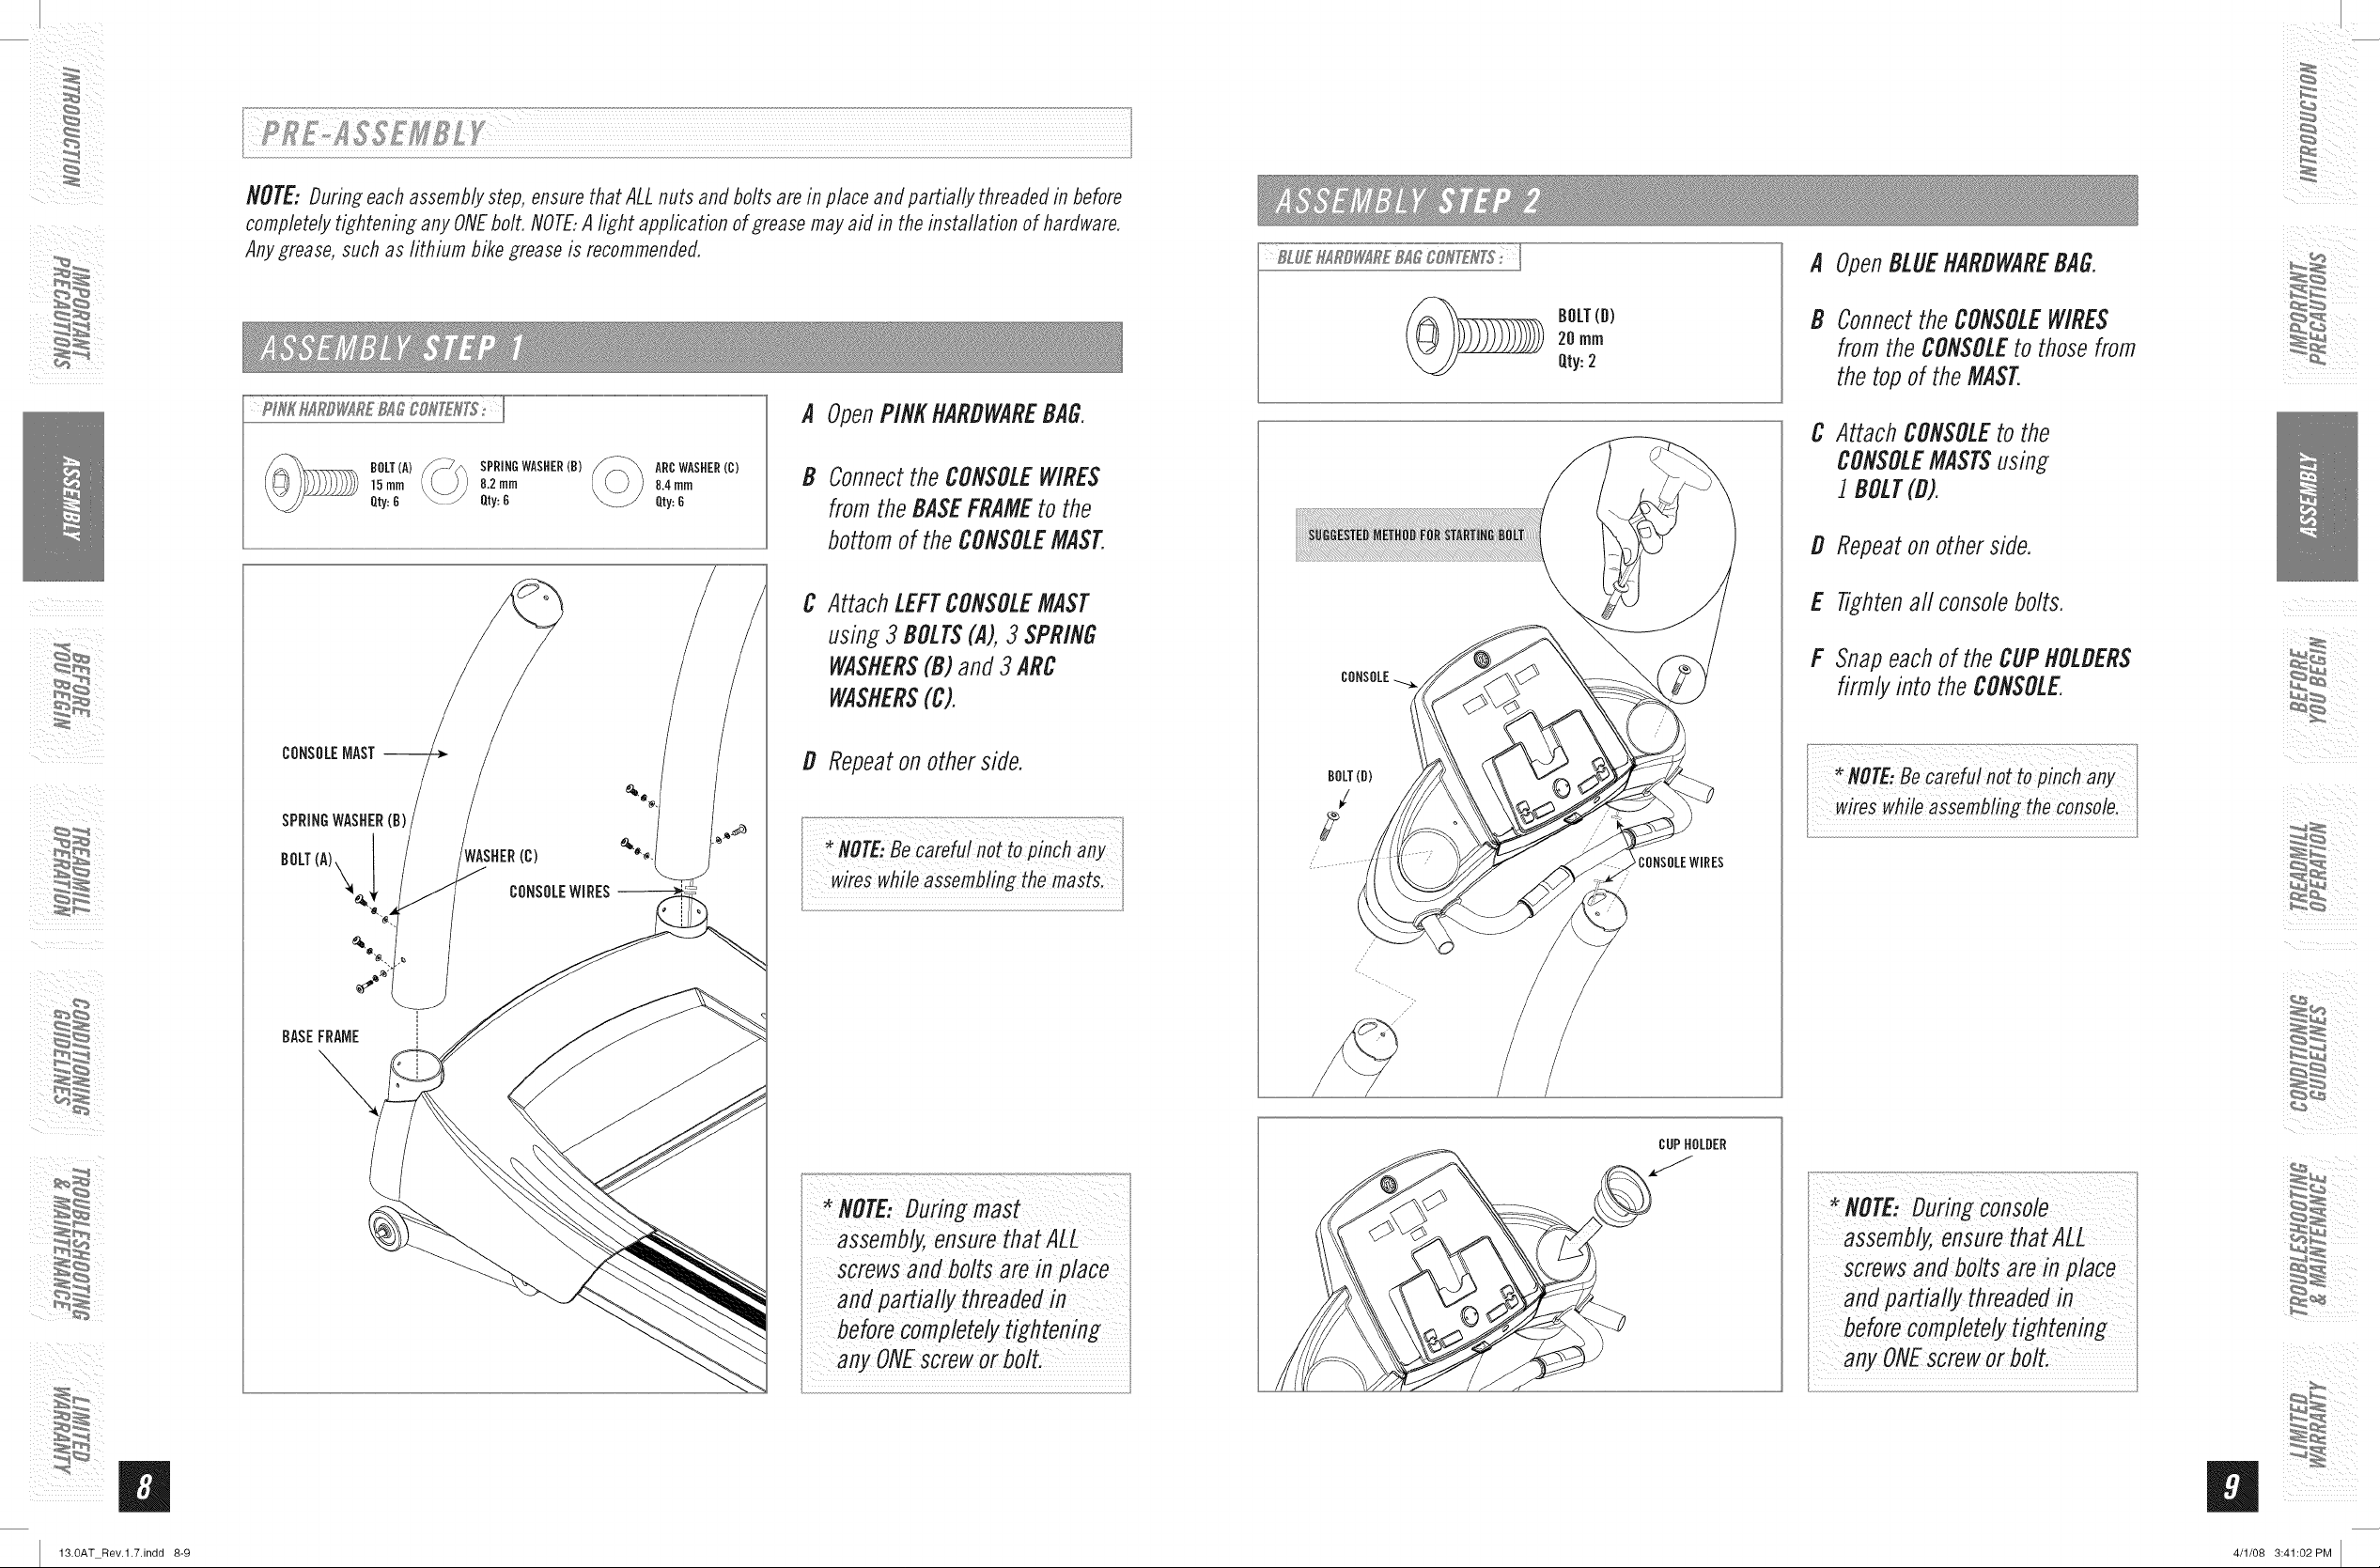
NOTE: During each assembly step, ensure that ALL nuts and bolts are in place and partially threaded in before
completely tightening any ONEbolt. NOTE:A light application of grease may aid in the installation of hardware.
Any grease, such as lithium bike grease is recommended.
A OpenBLUEHARDWAREBAG.
BOLT(A)
15turn
Qty:6
SPRINGWASHER(B)
8.2mm
Qty:6
ARCWASHER(C)
8.4mm
Qty:6
A OpenPINKHARDWAREBAG.
B Connect the CONSOLEWIRES
from the BASEFRAMEto the
bottom of the CONSOLEMAST.
C Attach LEFTCONSOLEMAST
using 3 BOLTS(A), 3 SPRING
WASHERS(B) and 3 ARC
WASHERS(C).
D Repeat on other side.
...................... ..............................................._,_..._..?...._,,:_
MOTE,ee refu/nottopinchany
wireswhileassemblingthemastsl
BOLT(D)
/
2
20 rnrn
BOLT(B)
Qty:2
B Connectthe CONSOLE WIRES
from the CONSOLEto those from
the top of the MAST.
C Attach CONSOLEto the
CONSOLEMASTSusing
1 BOLT(D).
D Repeaton other side.
E Tightenaft console bolts.
F Snap each of the CUPHOLDERS
firmly into the CONSOLE.
NOTE:Becarefu!not topinchany
CONSOLEWIRES
ii¸ _/
i¸¸i_
13.0AT Rev.l.7.indd 8-9
BASEFRAME
Screwsand boltsarein place
andpartiaflythrea
anyONEsCreworbolt.
*NOTE: During console
assernb_ ensure that ALL
screws and bolts are in place
before cornpletely tightening
any ONEscrewor bolt.
B
4/1/08 3:41:02 PM
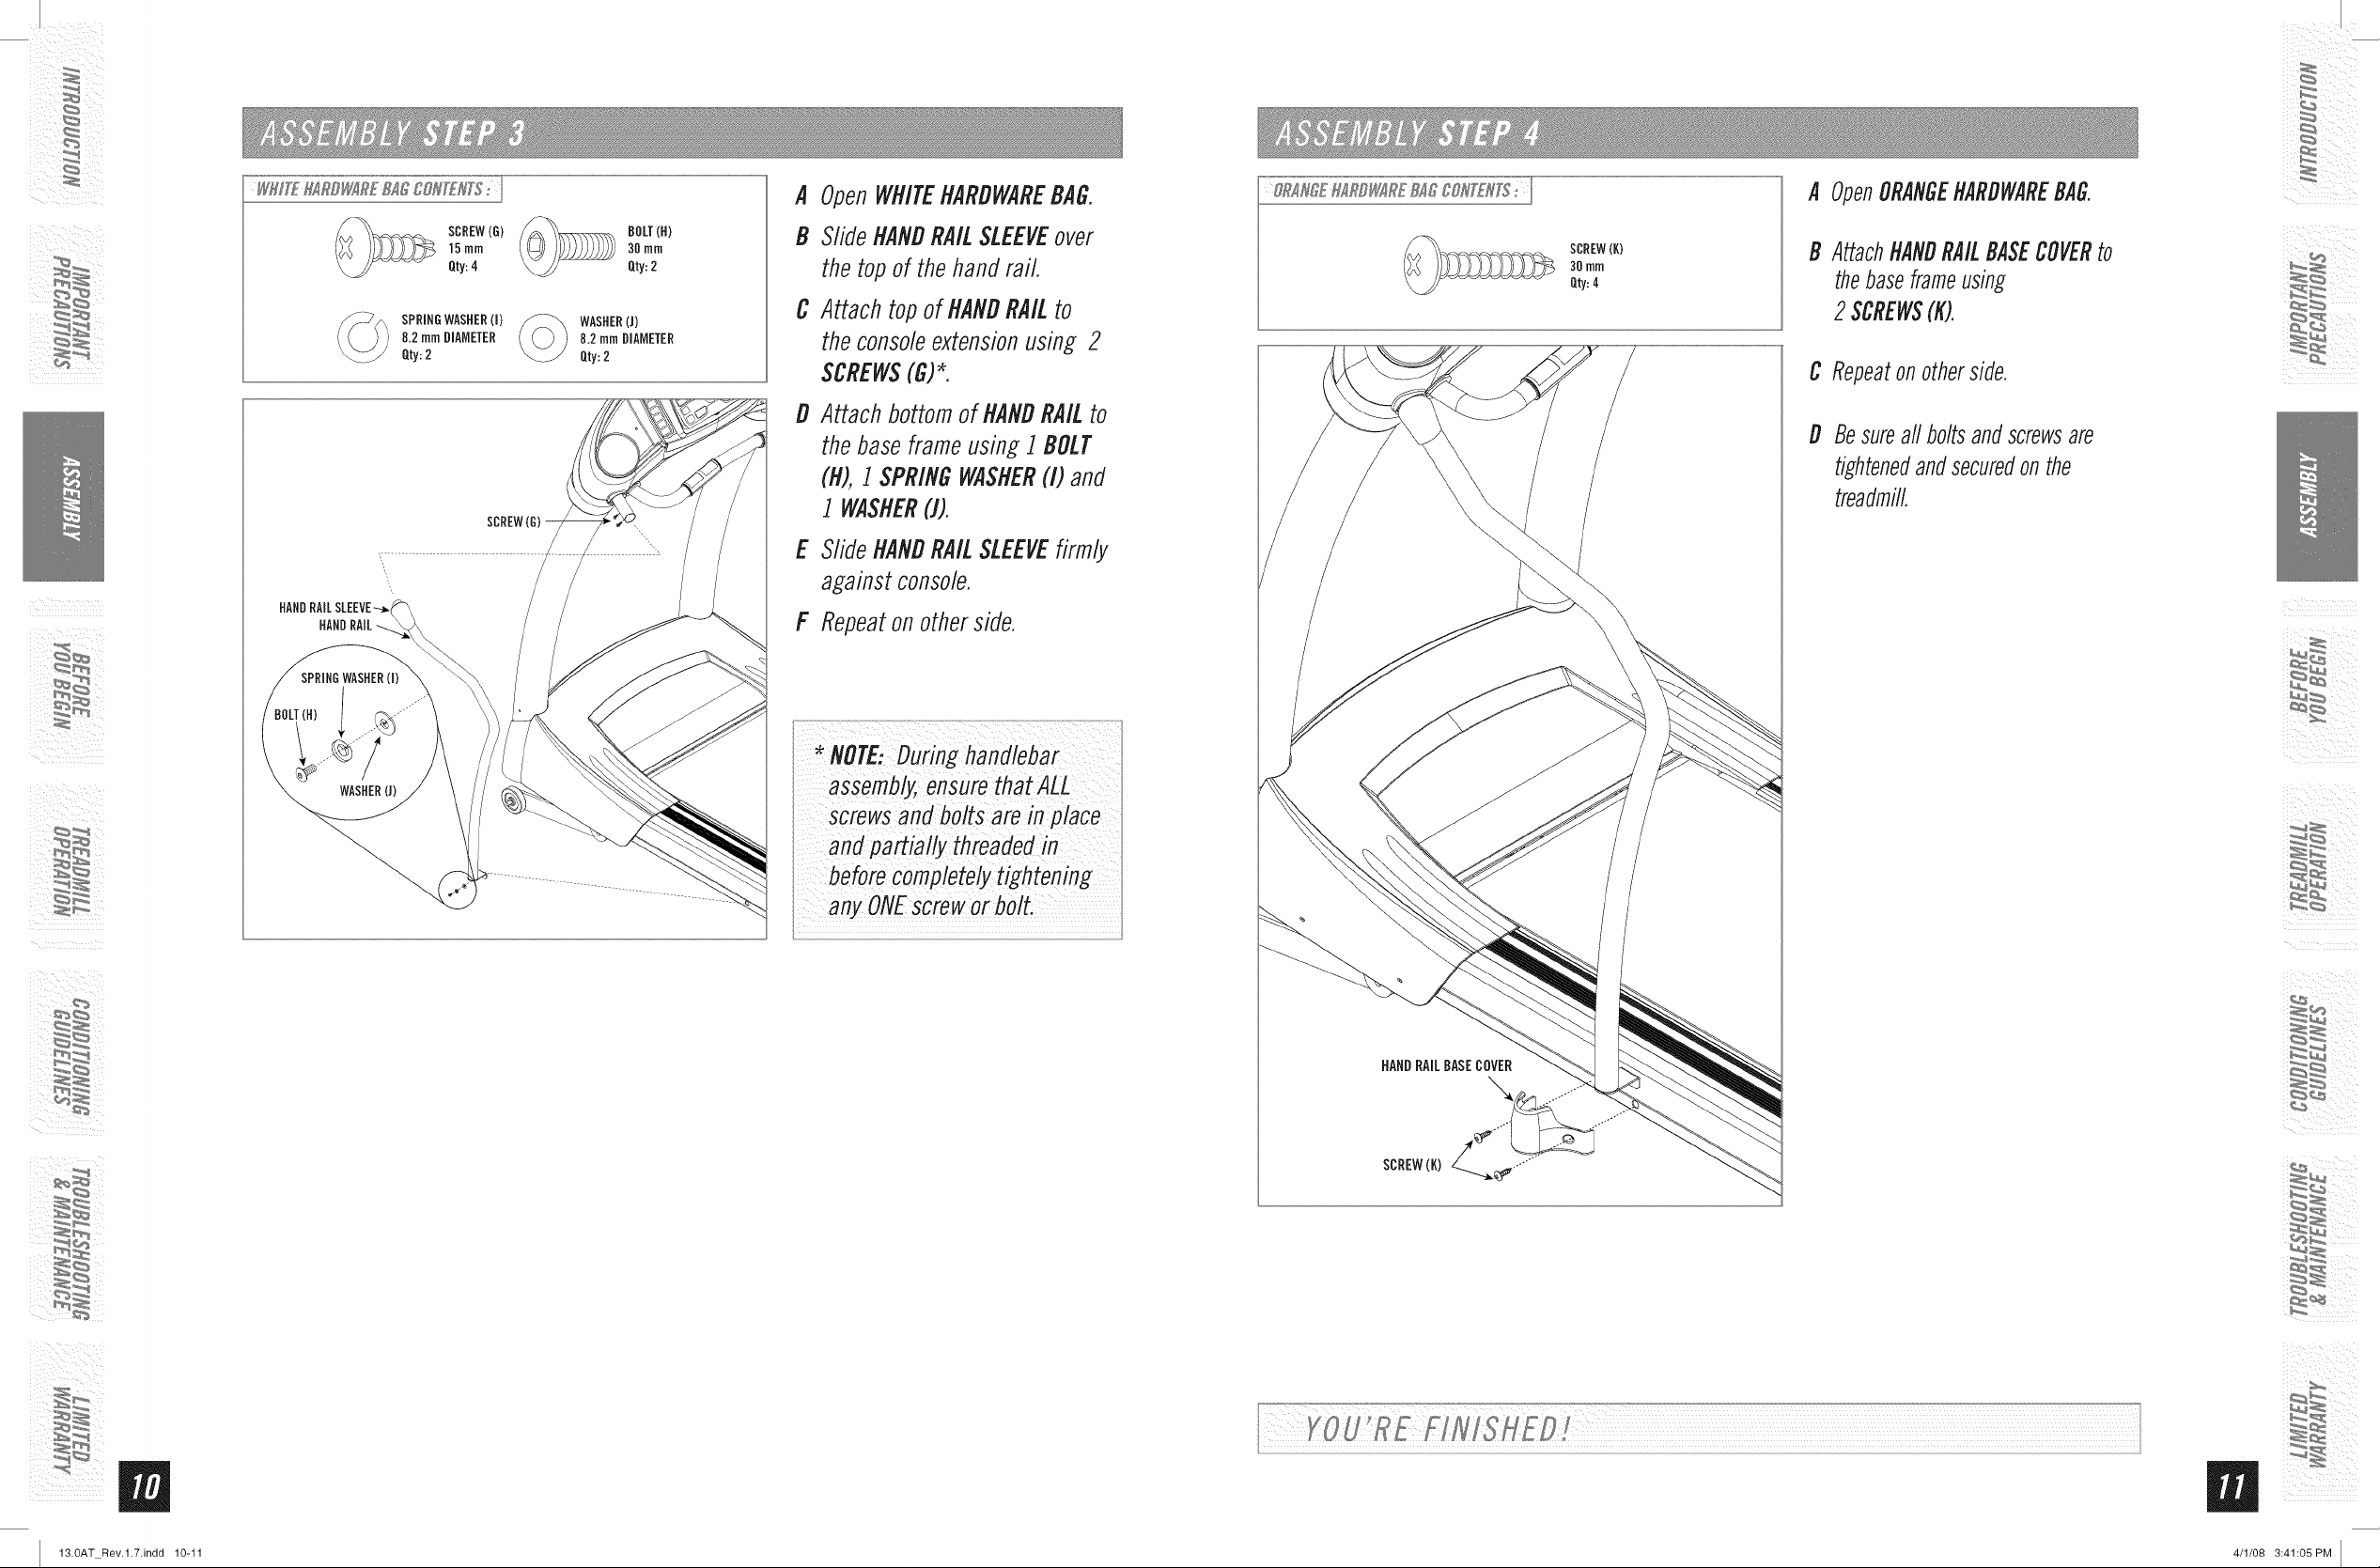
HANDRAILSLEEVE-
HANDRAIL
SCREW(G)
15ram
Qty:4
SPRINDWASHER(I)
8.2 turnDIAMETER
Qty:2
BOLT(H)
30rnrn
Qty:2
WASHER(J)
8.2 FnrnDIAMETER
Qty: 2
A OpenWHITEHARDWAREBAG.
B SlideHANDRAILSLEEVEover
thetopof thehandrail
C Attach topof HANDRAILto
theconsoleextensionusing 2
SCREWS(G)*.
DEAttachbottomofHANDRAILto
thebaseframeusing 1BOLT
(R),1 SPRINGWASHER(I) and
I WASHER(J).
SlideHANDRAILSLEEVEfirmly
againstconsole.
F Repeatonotherside.
SCREW(K)
3Omrn
Qty:4
A OpenORANGEHARDWAREBAG,
B AttachHANDRAILBASECOVERto
thebaseframeusing
2$CREW$(K).
C Repeatonotherside,
D Besureall boltsandscrewsare
tightenedandsecuredonthe
treadmill,
i/assemb ensUre atAL ?L/
screwsandbolts arein place
andpartially threadedin
orbolt.
HANDRAILBASECOVER
ii¸ _/
i¸¸i_
13.0AT Rev.l.7.indd 10-11
4/1/08 3:41:05 PM
 Loading...