

Aerovent IM-125 User Manual
ROOF CURB
ROOF CURB
6" MIN.
4"
Flashing
Caulk
Seam
Caulk
Seam
New Roof
New Roof
STD. CURB BASE
FLAT TYPE
CURB BASE
ROOF CURB
Caulk
Seam
New Roof
STD. CURB BASE
®
IM-125
June 1997
General Installation, Operation and Maintenance Instructions For Aerovent Products
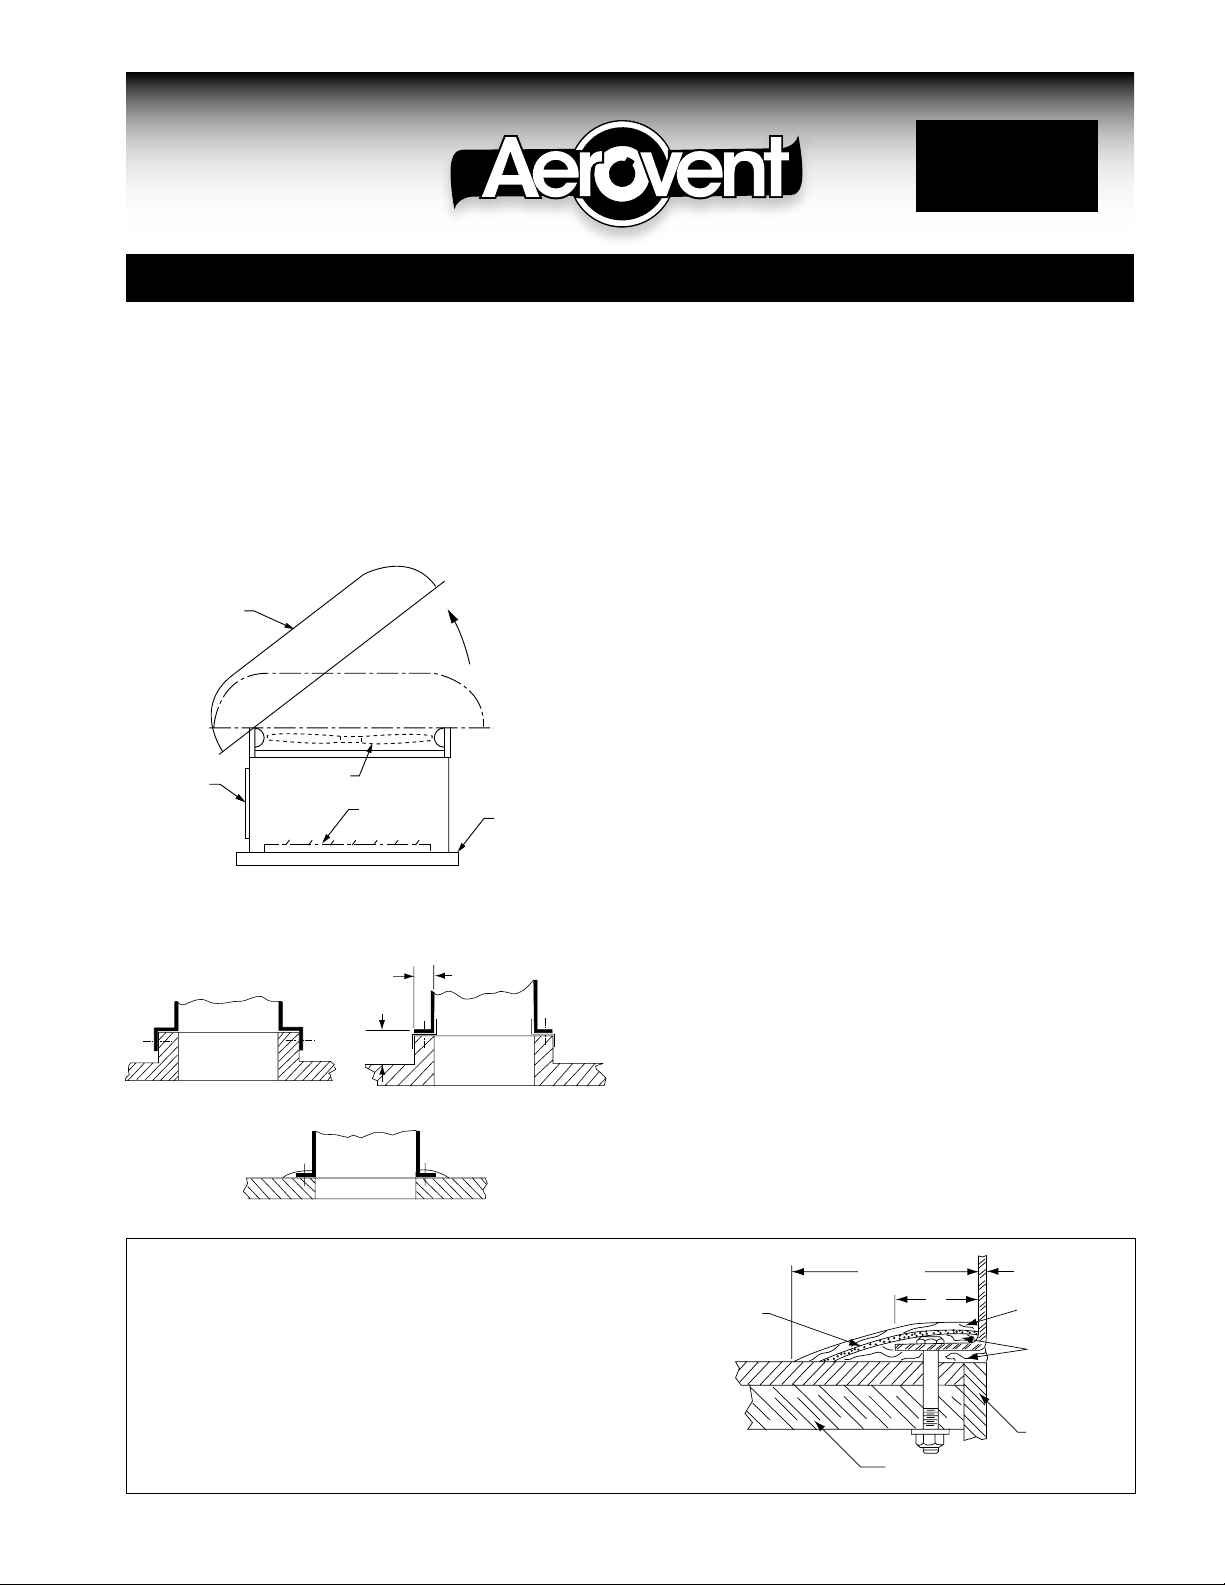
Tu-WAY™ Roof Ventilator
The Tu-WAY™ Roof Ventilator is specifically designed for
either exhaust or supply. The assembly consists of a hood and
base with the fan being an integral part of the base. The unit
is constructed to allow the hood to be raised for easy access to
propeller and motor. An access door in the base provides a
convenient method of servicing the shutter.
Hinged
Hood
Access
Door
Tu-Way
Prop
Shutter
Curb
Base
Suggested Mounting For
Curb and Flat Type Bases
STD. CURB BASE
ROOF CURB
New Roof
Caulk
Seam
6" MIN.
4"
FLAT TYPE
CURB BASE
ROOF CURB
New Roof
Caulk
Seam
Flashing
Care and Maintenance
Good fan maintenance requires regular and systematic inspection of all fan parts. Severity of the application should determine frequency of inspection.
Regular fan maintenance should include the following:
1. Propeller — The propeller in an axial flow fan must be
kept reasonably clean if it is to perform properly. Fans
handling fresh air for ventilating purposes will seldom need
cleaning. Fans exhausting process air should be cleaned as
required. Dirt or chemical deposits will usually build up on
a propeller evenly, and they present no problem to performance or operation until they become thick enough to
break away in crust-like pieces. When this happens, the
propeller may be thrown out of balance and the resulting
vibration could be serious. The dirt or chemical deposits
should be removed by solvent cleaning or scraping. If the
propeller has been coated, be careful not to cut through
this protective covering.
2. V-Belt Drive — Check V-belt drive for proper alignment
and tension. See General Installation and Maintenance
IM-101 for instructions.
3. Fan and Motor Bearings — Lubricate the bearings (if
belt driven). Bearing lubrication instructions are detailed in
IM-100.
4. Shutters — Periodically check damper blades and remove
dirt accumulation. Bronze damper bearings should be
checked for smooth operation.
5. Screws and Bolts — Check for tightness throughout the
assembly.
FLAT TYPE
Detail of Mounting Flat Type
Curb Base on Existing Roof
Use Hydro Shield and heavy-duty glass membrane —
Addex Corporation (or equal).
1. Set ventilator curb base in mastic.
2. Apply mastic over curb base flange.
3. Work membrane into mastic.
4. Trowel mastic over membrane and work in.
1 IM-125
CURB BASE
Existing Roof
©1997 Aerovent
Membrane
8" Min.
Roof Structure
Ventilator
4"
Base
Mastic
Mastic
Existing
Roofing
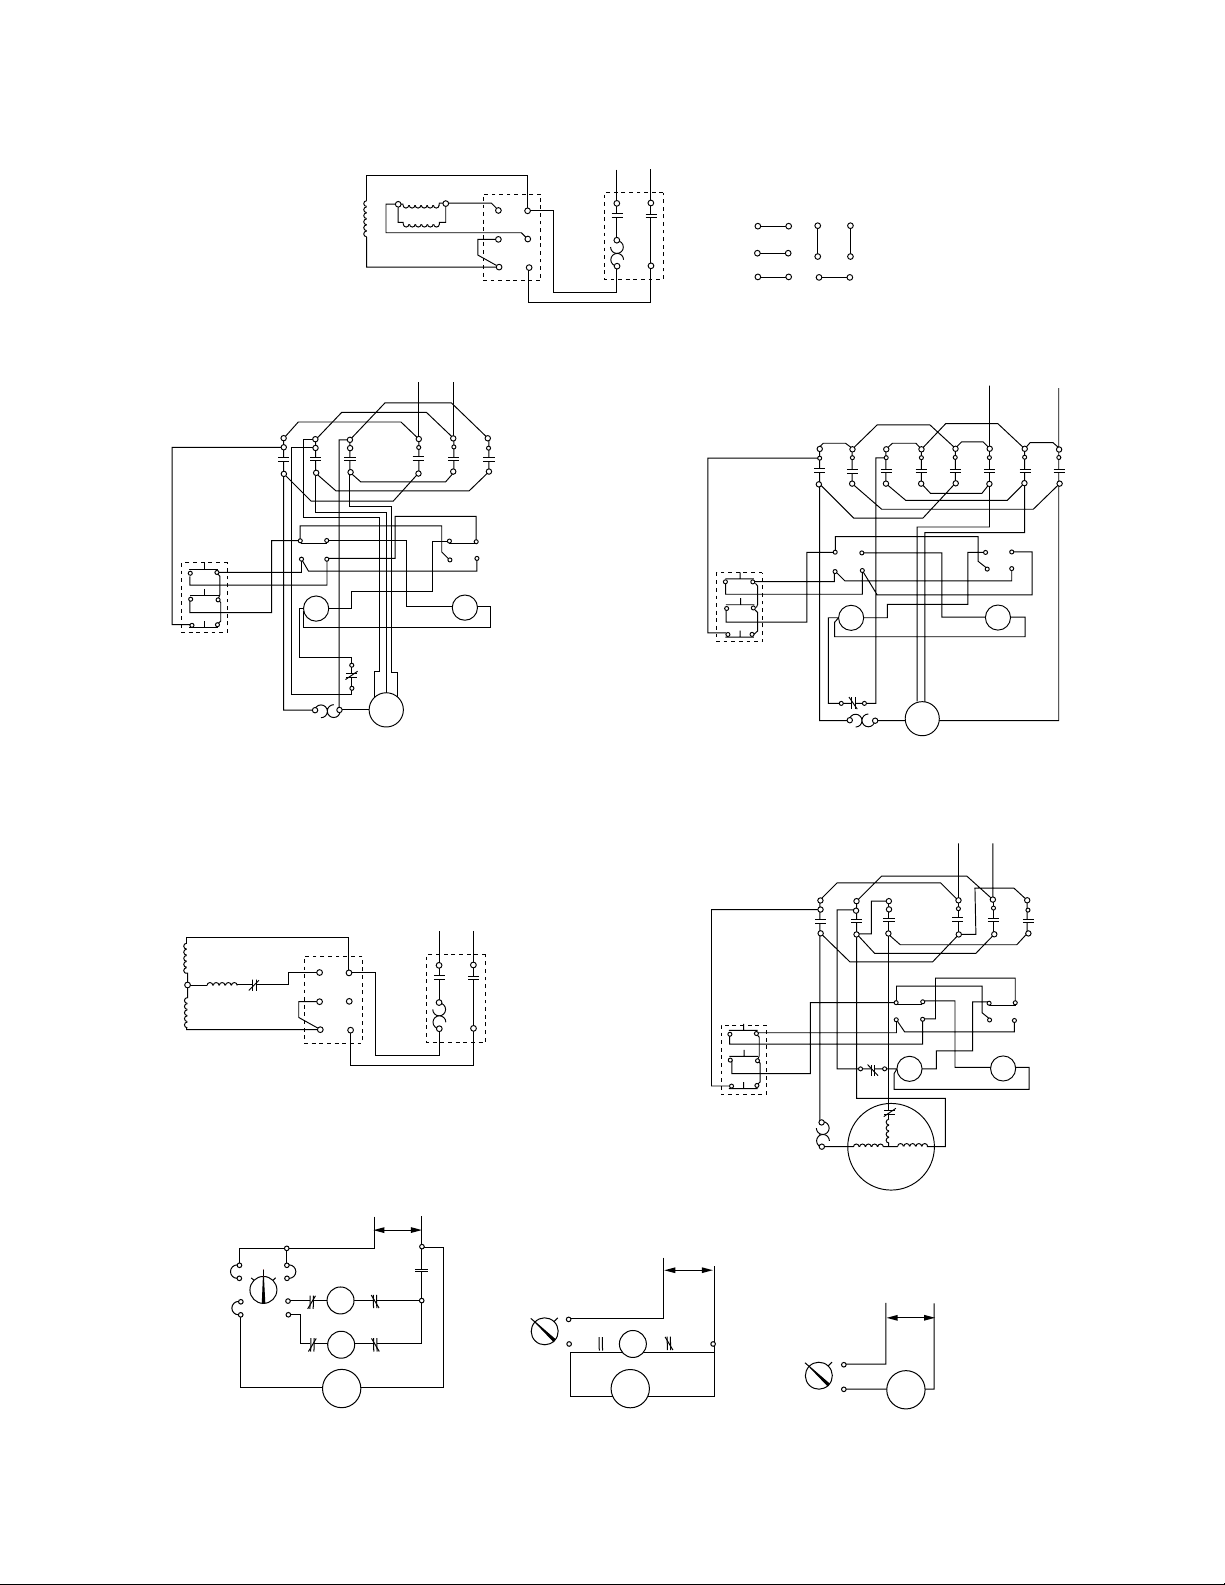
Wiring Diagrams For Tu-WAY™ Roof Ventilator Single Phase Motor
Single Voltage Motors or Low Voltage Connections on Dual Voltage Motors
L2
L1
Drum Con troller
T1
Start
Run 1
Run 2
T2
T1
T2
Manual or Magnetic Starter With Reversing Drum Controller (Furnas J3 or Equal)
L2
L1
T8
T1
7
Forward
Reverse
Stop
5
3
2
For
6
5
Rev
3
4
Contact Arrangement on
Furnas J2 Drum Switch
7
5
3
Forward
Reverse
Stop
2
For
L1
6
5
Rev
L2
3
4
T4T4T1
T8
Motor
T5
T4
T8
T5
T1
Motor
3-Pole Magnetic Reversing Starter 4-Pole Magnetic Reversing Starter
(Allen Bradley Bulletin 705 or equal) (Allen Bradley Bulletin 705 or equal)
High Voltage Connections on Dual Voltage Motors
L2
L1
Run 1
Run 2
Manual or Magnetic Starter With Reversing
Drum Con troller
T1
T2
T2
T1
Forward
Reverse
Stop
L1
L2
7
5
3
2
For
6
5
3
4
Rev
Drum Controller (Furnas J2 or equal)
Start
Run 2
Run 1
X1 X2
115V
Off
For
Rev
3
9
5
115V
Coil
115V
Coil
Damper
Motor
Damper
End Switch
For use with motorized damper
and magnetic reversing starter
or 2-speed stater with reversing
drum controller.
X1 X2
115V
On
Off
115V
9
Damper
End Switch
Coil
Damper
Motor
For use with motorized damper and magnetic starter with
reversing drum controller.
3-Pole Magnetic Reversing Shutter
(Allen Bradley Bulletin 705 or equal)
X1 X2
115V
Closed Open
Damper
Motor
9
For use with complete manual starter systems and motorized dampers. Open damper
fully before energizing fan.
 Loading...