

Page 1
M
ini
R
ose
arden
G
Planting Date:
Planting & Tending Guide
PLANT ROSES IMMEDIATELY UPON ARRIVAL!
planting and what to do if it is not
Please see pages 3 through 6 for directions on
possible to plant immediately.
Page 2

CONTENTS
Welcome
Thank you for your
purchase of our
AeroGarden. We
have spent years
developing and
refining our technology to
create a growing system that
assures you will have a pleasurable and successful yearround gardening experience.
I sincerely hope you enjoy
your AeroGarden and
sharing your beautiful roses
with family and friends.
Best Regards,
Michael Bissonnette
Founder and Chairman
AeroGrow International, Inc.
Starting Your Garden
Prepare Your AeroGarden .....3
Plant Your Mini Roses ........4
A Note About Shipping
Live Plants.................6
Tending Your Garden
Add Water.................7
Raise Lamp Hood (Light[s]) ....7
Feed Garden
AeroGarden 3/Mini.........8
Other models .............9
Prune Mini Rose Plants ......10
Keep Your Mini Rose
Garden Healthy............11
Plant Problems
and Remedies . . . . . . . . . . . . .12
Appendices
Questions and Answers
– Light(s) ................13
Set Your Light Timer........ 14
Replace Bulb(s) ...........14
Troubleshooting ..........15
Page 3

Before Getting Started…
Whether this is the first or fifth garden being planted in your
AeroGarden
Start Guide.
If you have planted a garden in your AeroGarden prior to
this one, you will need to reset the nutrient timer. Please
refer to “Replanting Your AeroGarden” in the
Guide
To download the most current version of your model’s Quick
Start Guide, go to www.aerogarden.com.
, you will need to reference your model’s Quick
Quick Start
before you proceed.
Whoever
plants a garden
plants happiness.
– CHINESE PROVERB
Page 4

tarting Your Garden
S
Plant Your Roses As Soon As They Arrive!
If you are unable to plant roses immediately, keep them sealed in
air-permeable shipping bags and store in refrigerator for up to 24 hours.
Prepare Your AeroGarden
•
Fill the Bowl with water to “Fill To Here” and place Bowl on Base.
• Lower Lamp Hood to lowest setting and plug in your AeroGarden.
• Add one nutrient tablet (AeroGarden 3/Mini) or two nutrient
tablets (all other AeroGarden models).
• Reset nutrient timer (refer to your model’s latest Quick Start Guide
located on our website at www.aerogarden.com).
• Select a plant setting on the Control Panel (select models only):
– AeroGarden Classic - “Flowers”
100,
– PRO
– SPACE•SAVER and AeroGarden 6 models - “Live Plants”
Your AeroGarden is now ready for your Mini Roses.
• Use room-temperature water. Very hot or very cold water will hurt
your young plants.
• We recommend using municipal tap, bottled or purified water. Well
!
or softened water SHOULD NOT be used because the extra minerals
in these sources may be harmful to aeroponically grown plants.
PRO
200
or Deluxe - “Strawberries & Other Live Plants”
Please use the Quick Start Guide included in your original AeroGarden box for
more detailed setup instructions. If you no longer have your Quick Start Guide,
you can nd a copy on our website at www.aerogarden.com.
Starting Your Garden
3
Page 5
NEED ADDITIONAL HELP?
Call: 1-800-476-9669
Visit Our Website: www.aerogarden.com
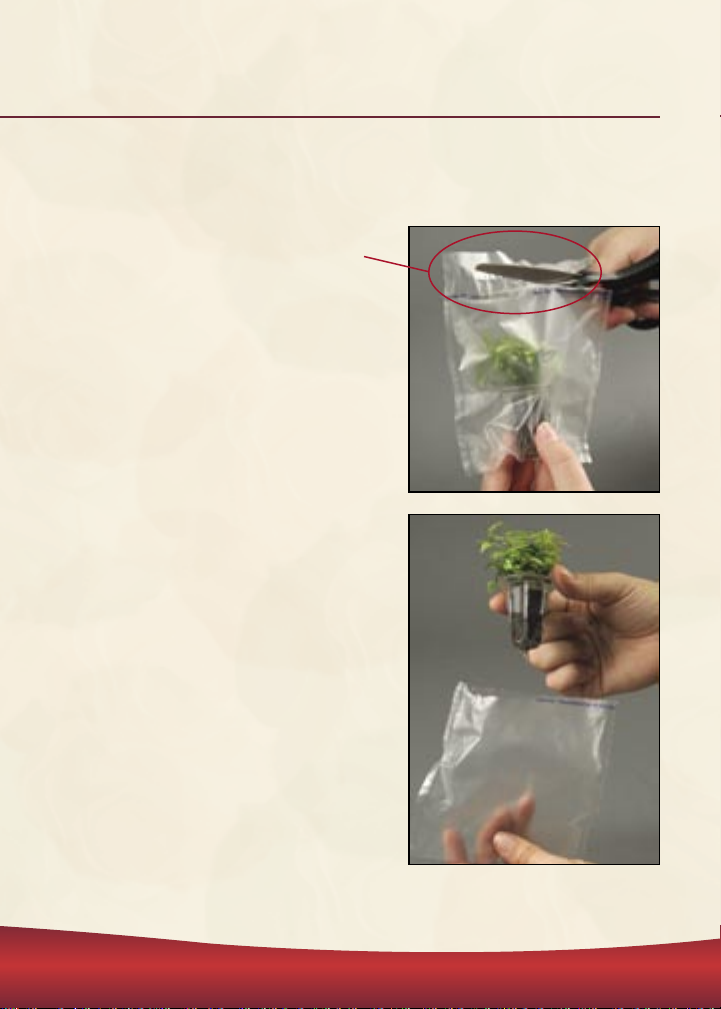
Plant Your Mini Roses
To plant your roses:
• Open the top of the air-permeable
shipping bag with scissors, taking
care not to cut the plant.
• Remove Plant Pod from bag by
holding the Grow Basket. Keep
the entire Plant Pod assembled
(i.e., the Grow Sponge, Grow
Basket and plant.)
Short Plant Pod shown. Plant
Pods may also be longer.
(Continued on next page)
Starting Your Garden
4
Page 6
Starting Your Garden (Continued)
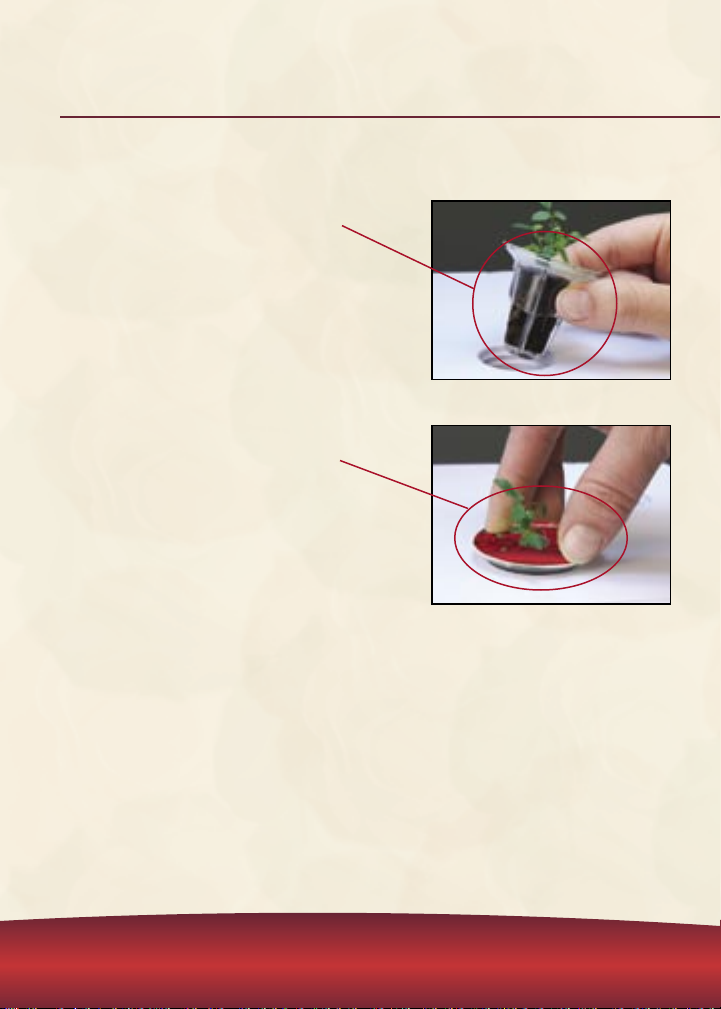
Begin planting:
• Place Plant Pod in the Grow
Surface Opening.
• Press down on edge of Grow Basket
until the rim almost touches
the Grow Surface.
• Record Planting Date on the cover of
this Guide.
That’s it! Your roses are now planted!
Short Plant Pod shown. Plant Pods
may also be longer.
Positioning Your Plant Pods
As your Mini Rose plants begin to grow, you will notice that some of
the plants grow taller than others. When this happens, we recommend
moving shorter plants to the front openings on the Grow Surface.
Starting Your Garden
5
Page 7
NEED ADDITIONAL HELP?
A Note About Shipping Live Plants
Your plants have been tossed about in planes and trucks on their
journey to your doorstep. As a result, you may see:
• Bruised leaves or broken stems on your plants –
Simply remove the damaged part and your plants will recover.
• Drooping flowers/buds –
These perk up after a few
hours under the light(s) of your
AeroGarden.
• Browning on some leaf edges or
a yellowish cast to the leaves –
As your plants grow, they will
recover from the stress of travel
and new leaves will be green
and will not have browned edges.
(If however, your plants are significantly damaged or blackened,
please contact us at 1-800-476-9669.)
• A delay of about one week until your plants start growing –
This delay occurs because your plants need time to recover
from the shock of traveling.
Call: 1-800-476-9669
Visit Our Website: www.aerogarden.com
Starting Your Garden
6
Page 8

T
ending Your Garden
A little bit of care for your roses will ensure healthy growth and
plentiful blooms. Please take a moment to review this section
shortly after planting your Mini Rose Garden.
Add Water – All AeroGarden Models
There should always be water in the Bowl of your AeroGarden.
For instructions, see the “Add Water Using a Spouted Container”
section in your model’s Quick Start Guide.
•
Use room-temperature water. Very hot or very cold water will hurt
your plants.
• We recommend using municipal tap, bottled or purified water. Well
!
or softened water SHOULD NOT be used because the extra minerals
in these sources may be harmful to aeroponically grown plants.
Raise Lamp Hood (Light[s]) - All AeroGarden Models
As your roses grow, you will need to raise the Lamp Hood.
Leave 1-2 inches of space between the top of plants and the
light(s). Before raising light(s), we recommend pruning any in-
dividual branches that are taller than the others in your Garden
(refer to “Prune Rose Plants” on page 10 of this guide).
For instructions on how to raise the Lamp Hood (Light[s]), refer to
“Raise Lamp Hood (Light[s])” in your model’s Quick Start Guide.
If Grow Bulb(s) are too close to the plants, the leaves may brown and
burn. If they are too far away, your plants will “stretch” toward the
light(s) and look floppy and unhealthy.
Tending Your Garden
7
Page 9

Feed Garden – AeroGarden 3/Mini Only
Every 2 weeks, the red “Add Nutrients” light will illuminate.
Follow the rinse directions below before adding nutrients. This will keep
your Garden healthy. You will need a sink, clean counter space and a
mixing bowl or pot that is at least 4” deep and has a top opening of 5-8”.
Unplug AeroGarden and carefully
1
remove the Bowl from the Base and
bring it to a sink.
Remove the Grow Surface from the
2
Bowl and rest it in the mixing bowl.
Empty contents of Bowl into sink.
3
Rinse and empty Bowl. Use only water.
4
Fill Bowl with room-temperature
5
water up to “Fill To Here” and set
Bowl on counter.
Place Grow Surface back on Bowl and
6
replace the Bowl on Base.
Reset Nutrient Timer:
7
• Press and HOLD the button on the
control panel until “Add Nutrient”
light begins to blink (about 3 seconds).
• Release the control panel button.
• IMMEDIATELY press and release the
control panel button again to reset
the nutrient timer.
8
Add 1 Mini Rose nutrient tablet.
Note: We recommend checking for bugs every time you add nutrients.
See Troubleshooting on page 17 of this Guide for details.
Tending Your Garden
8
Page 10

Feed Garden – All Other AeroGarden Models
Every 2 weeks, both the “Add Nutrient” and “Water Level Low”
lights will blink on and off. At that time…
Follow the rinse directions below before adding nutrient tablets.
This will keep your Garden healthy.
Unplug AeroGarden and carefully
1
remove the Bowl from the Base and
bring it
to a sink.
Remove the Grow Surface from
2
the Bowl and place on a counter
near the sink.
(Hint: Lift the View Door and slide
one hand into the Bowl. Don’t
worry if you gently tear some roots.)
Empty contents of Bowl into sink.
3
Rinse and empty Bowl. Use only water.
4
Fill Bowl with room-temperature
5
water up to “Fill To Here” and set
Bowl on counter.
Place Grow Surface back on Bowl,
6
arranging the roots over Cross Beams.
Carefully replace Bowl on Base and
7
plug in AeroGarden.
Add 2 Mini Rose nutrient tablets and
8
press the “Reset” button.
Bowl
Base
Grow Surface
Cross
Beams
Bowl
AeroGarden Classic shown.
Note: We recommend checking for bugs every time you add nutrients.
See Troubleshooting on page 17 of this Guide for details.
Tending Your Garden
9
Page 11

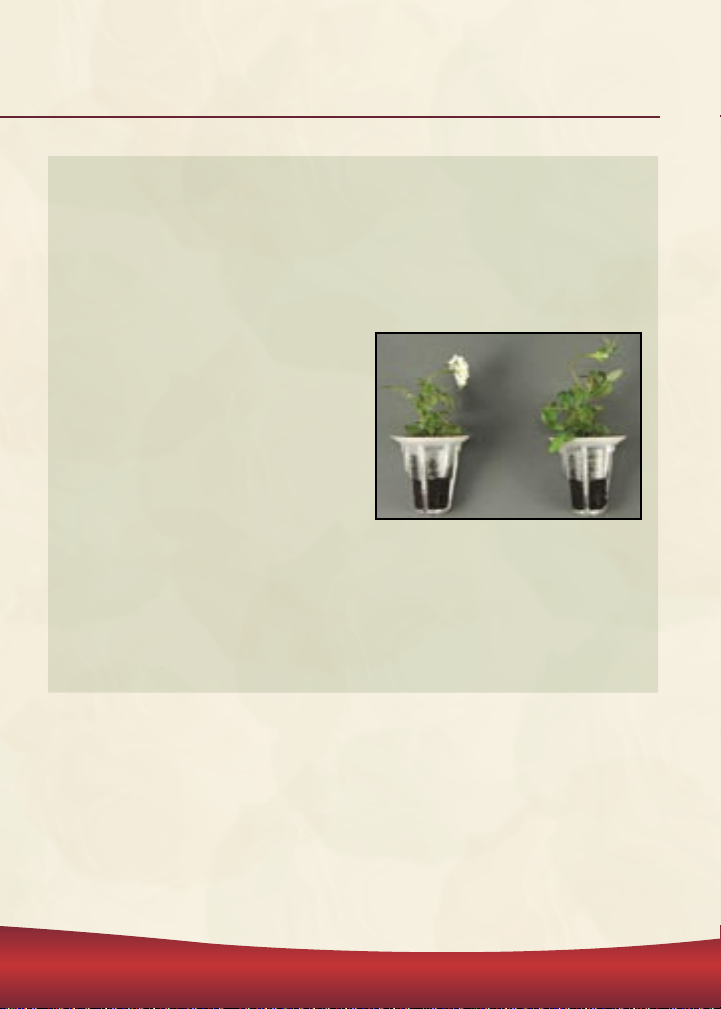
Prune Mini Rose Plants
Pruning your rose plants to remove a branch that is taller than the other
branches in your Garden allows you to keep the Lamp Hood low, providing all your roses with the intense light they need to grow.
To Prune Mini Rose Plants
• Remove tall branches that are within an
inch of the light(s) and taller than the other
plants in your Garden.
Garden with a branch that
needs pruning.
• Use scissors or pruning shears to make
cuts. Follow the branch to where it
meets another branch and cut just
above this junction.
The photo at right shows the same Garden
after pruning a tall branch. The Lamp Hood
was not raised.
Don’t be discouraged if you cut a branch
with some flowers or buds. Pruning will help
the plants in your Garden stay healthy and
produce many more flowers.
Tending Your Garden
10
Page 12

Keep Your Mini Rose Garden Healthy
Keeping a watchful eye on your Garden is not only a joy, but
also a smart way to make sure your plants stay healthy.
As your roses grow, the older leaves will start to brown and die.
This is perfectly normal.
• Remove brown and dead leaves
by cutting with scissors at the
base of the leaf stem.
• Keep the Grow Surface clear of
dead leaves.
Remove Dead Flower Blossoms
Removing dead flower blossoms (deadheading) encourages your plant
to produce more flowers. When your blossoms begin to fade, wilt or
just start to look unattractive, it’s time to deadhead. Each Mini Rose
blossom lasts for about 1 week.
• Remove dead flower blossoms by
cutting with household scissors.
• Cut the flower stem at its base
where it meets another stem.
Watch out for thorns...
These roses are small, but the
tiny thorns are sharp!
Tending Your Garden
11
Page 13

Plant Problems and Remedies
These pictures show plants that are stressed. Follow the suggestions to
restore your Garden’s health.
Burned – Plant is too close to Grow
Bulb(s). Raise Lamp Hood (see Quick
Start Guide) and/or prune plant (see
page 10).
Wilted – Plant is not getting enough
water. Add water up to “Fill To
Here” in Bowl.
Tending Your Garden
12
Page 14

A
ppendices
Questions and Answers – Light(s)
Do I need to turn the
AeroGarden light(s) on
and off manually?
No. Your AeroGarden includes
a built-in timer that turns your
light(s) on and off at specific
intervals. These intervals are
designed to maximize the growth
of your roses. The timing system
started as soon as you plugged in
your AeroGarden.
Can I change the time of
day the light(s) go Off?
On select models – yes. Some
models are equipped with this
feature and some are not. If it
is possible to change the time
your light(s) go off, instructions
will be found in the “Personalize
Your Light Timer” section of your
model’s Quick Start Guide (available at www.aerogarden.com).
Does it matter what time of
day the light(s) go off?
Yes. Rose plants require a daily dark
period in order to produce flowers.
If your plants will receive any
room light during the day (natural
or artificial) we recommend that
you set your light(s) to be on during
the day and off at night.
Can I temporarily turn off
my light(s)?
Yes. The “Light(s)” button serves as
an on/off switch. Just push and then
immediately release this button to
manually turn the light(s) off (or
back on). This will not change any
of the settings for your AeroGarden
and your light(s) will turn on (or off)
at the next regularly programmed
time. Occasional use of this feature
will not harm or slow down the
growth of your plants.
NEED ADDITIONAL HELP?
Appendices
13
Call: 1-800-476-9669
Visit Our Website: www.aerogarden.com
Page 15

NEED ADDITIONAL HELP?
Call: 1-800-476-9669
Visit Our Website: www.aerogarden.com
Set Your Light Timer – All AeroGarden Models
Your AeroGarden has light(s) and a built-in timer that automati-
cally provide your plants with the optimal amount of light needed
to grow an abundance of gorgeous roses.
If the option is available to set the light timer* on your AeroGarden,
you will find instructions in the “Personalize Your Light Timer” section
of your model’s Quick Start Guide.
*Option not available on all AeroGarden models – consult Quick Start Guide
available at www.aerogarden.com.
Keep in mind that roses require a daily dark
period in order to produce blooms.
!
Replace Bulb(s) – All AeroGarden Models
Grow Bulb(s) should be replaced after 6 months of use. Most
AeroGarden models have a “Replace Bulb(s)” indicator on the
control panel as a convenient reminder. See “Replace Grow
Bulb(s)” in your Quick Start Guide for replacement instructions.
Replacement bulbs can be ordered at www.aerogarden.com or by
calling 1-800-476-9669. If you no longer have your Quick Start Guide,
you can nd the latest version at www.aerogarden.com.
Appendices
14
Page 16

Troubleshooting
What do I do when a Grow
Bulb burns out?
Replacement bulbs can be ordered at www.aerogarden.com or
by calling 1-800-476-9669. You
should replace your Grow Bulb(s)
after 6 months of use.
What should I do if Grow
Bulb(s) are not working?
Make sure the Grow Bulb(s) are
firmly inserted in the Lamp Hood.
Also check that your Garden is
plugged into a working electrical outlet and the Lamp Cord is
plugged into the Lamp Hood.
What if I want to move my
AeroGarden to another
location?
Go right ahead! Keep in mind
that each AeroGarden model has
different features. Unplugging a
Garden in the middle of its
growth cycle could cause your
AeroGarden’s light timer to reset.
Before moving your AeroGarden,
consult your Quick Start Guide to
see how the light timer is affected
when your model is unplugged.
To move your AeroGarden, be
sure to pick it up by holding the
Lamp Arm with one hand and
sliding your other hand under the
bottom of the Base.
H
ow do I take care of my
Garden when I go out of town?
Add water to raise the level up
to “Fill To Here.” If you will be
out of town for several days, we
recommend you make arrangements for someone to care for
your plants while you are away.
My Mini Rose Garden doesn’t
look healthy. What can I do?
If you are concerned about the
health of your garden, please go
through the following before
contacting Customer Service…
•
Read “A Note About Shipping
Live Plants” on page 6.
•
Make sure you selected the
correct plant setting on the
Control Panel (see page 3).
• Keep light(s) as close to plants as
possible, without leaves/flowers
touching the Grow Bulb(s).
15
Appendices
Page 17

NEED ADDITIONAL HELP?
Call: 1-800-476-9669
Visit Our Website: www.aerogarden.com
• If your Grow Bulb(s) have been
in use for 6 months, they should
be replaced. Order replacement
bulbs at www.aerogarden.com
or by calling 1-800-476-9669.
•
Follow the pruning instructions
on pages 10-11 of this Guide.
• Don’t use softened or
unfiltered well water.
• Continually remove dead
flower blossoms and leaves
as described on page 11.
What can I do to reduce the
sound of water dripping from
the Plant Pods into the Bowl?
Keeping the water level in the
Bowl up to “Fill To Here” will
help reduce the sound of dripping
water. As your plants grow and the
roots reach the water in the Bowl,
the dripping noise will go away
completely.
(Continued on next page)
Appendices
16
Page 18

Troubleshooting (Continued)
What if I see bugs or leaf damage?
Occasionally bugs may decide to visit your roses. They find their way
into homes by hitching a ride on clothing or cut flowers. Spider mites
and aphids in particular, are fond of rose plants. We recommend you
check your plants every week for these bugs.
Check for Bugs
• This image shows leaves with
spider mite damage.
• Look under the leaves for spider
mites, which look like tiny gray dots.
• A heavily infested plant will have
noticeable webs on the underside
of the leaves.
• Aphids also like the underside of leaves, particularly near to where
the leaf meets the stem. If you notice a sticky substance on the Grow
Surface, there are probably aphids in your Garden.
• Another sign of bugs is black
discoloration on leaves – usually on
the leaf’s underside. Along with the
black discoloration, you will see
white, pinprick-size spots on the
top surface of leaves.
17
Appendices
Page 19

NEED ADDITIONAL HELP?
•
If you notice a white to gray powdery
substance on leaf tops, buds or flower
petals, your plant has powdery mildew,
which is caused by a fungus
If you see bugs or leaf damage from bugs or fungus on your plant:
Call: 1-800-476-9669
Visit Our Website: www.aerogarden.com
.
• Prune out heavily infested or severely damaged leaves and discard the
damaged leaves in a sealable plastic bag.
Remember to remove the Bowl from your AeroGarden before
spraying, as the mist may break the Grow Bulb(s).
• Spray your plants with an insecticidal soap (if you see bugs) –
following the manufacturer’s directions – to eliminate insects.
• For powdery mildew, use a fungicide designed for indoor household
use – following manufacturer’s directions.
(Continued on next page)
Appendices
18
Page 20

Troubleshooting (Continued)
• Coat the entire leaf with insecticidal
soap (or fungicide) by spraying the
top (photo #1) and underside
(photo #2).
1
• Treat every plant in your Garden,
not just the ones on which you can
see bugs or powdery mildew.
• Repeat as recommended on the
container of insecticidal soap (or
fungicide).
2
To identify bugs, we recommend you visit either:
www.whatsthatbug.com or the entomology (bug) department at
Texas A&M University at http://vegipm.tamu.edu/imageindex.html.
19
Appendices
Page 21

NEED ADDITIONAL HELP?
Call: 1-800-476-9669
Visit Our Website: www.aerogarden.com
Transplant Outdoors
Although we do not guarantee success, you can transplant your roses
into an outdoor garden or pot if it is the right time of year. Make sure
your soil is workable (not frozen) and properly amended.
Be sure to provide plants with plenty of moisture and cover for
the first few days.
Appendices
20
Page 22

M
y Garden Notes
NEED ADDITIONAL HELP?
21
Call: 1-800-476-9669
Visit Our Website: www.aerogarden.com
Page 23

lant Kit Limited Warranty
P
What Is Covered
This warranty covers any defects in materials or workmanship and health of plants,
with the exceptions stated below.
How Long Coverage Lasts
This warranty runs for 48 hours from the Time of Delivery for the live plants and for
6 months for all other components of the Plant Kit.
What Is Not Covered
The warranty shall not apply to problems arising from: normal wear; failure to
adhere to included Planting & Tending instructions; serial numbered products if the
serial number has been removed or defaced; products subject to negligence, accident, improper use, maintenance or storage; products damaged by circumstances
beyond AeroGrow International, Inc.’s control; loss or damage to removable
parts; or products modified (including, but not limited to, modifications through
the use of unauthorized parts or attachments) or repaired by anyone other than
AeroGrow International, Inc. or its designee. This warranty excludes all incidental
or consequential damages. This warranty becomes void if the Plant Kit is used in a
growing system other than an AeroGarden and/or made by any manufacturer other
than AeroGrow International, Inc., or if materials not provided or recommended by
AeroGrow are used in or on the AeroGarden or applied to the plants grown using
this Plant Kit.
What AeroGrow Will Do
AeroGrow International, Inc., at its option, will repair any defects in materials or
workmanship or will replace this product with one of similar features and
price. AeroGrow International, Inc.’s sole obligation and your exclusive remedy
under this warranty shall be limited to such repair or replacement.
How To Return This Product
If you have questions or concerns regarding your AeroGarden or the plants you are
growing, please contact Customer Service at 1-800-476-9669. Please do not return
any product without contacting AeroGrow for return authorization. Unauthorized
returns, as well as C.O.D. shipments, will be refused. For more information regarding returns, please see the Customer Care section at www.aerogrow.com.
Due to continuing improvements, actual product may differ slightly from the product described herein. Some states
do not allow the exclusion or limitation of incidental or consequential damages, so the above limitation or exclusion may not apply to you. This warranty gives you specific legal rights, and you may have other legal rights that
vary from state to state. If you have any questions please feel free to contact our customer service representatives
at customerservice@aerogrow.com.
AeroGrow International, Inc., P.O. Box 18450, Boulder, CO 80308
www.aerogrow.com
© 2007-2008 AeroGrow International, Inc.
22
Page 24

AeroGrow International, Inc.
P.O. Box 18450
Boulder, CO 80308
NEED ADDITIONAL HELP?
Call: 1-800-476-9669
Visit Our Website: www.aerogarden.com
507118-0000 AA 4/3/08 © 2007-2008 AeroGrow International, Inc. Patents Pending
 Loading...