

Page 1
ASSEMBLY
Replace
Grow Bulb
Add
Nutrients
PLANTING
STARTING
QUESTIONS?
Call: 1-800-476-9669
Email: customerservice@aerogrow.com
Visit Our Website: www.aerogrow.com/help
Simple Steps
To Get Your
Mini
Up and Growing
Quick Start Guide
Mini
Page 2
IMPORTANT SAFETY INSTRUCTIONS
(SAVE THESE INSTRUCTIONS)
When using this AeroGarden Mini electrical furnishing, basic precautions
should always be followed, including the following:
Read all directions before using this AeroGarden Mini furnishing.
1. To reduce the risk of electric shock, the AeroGarden Mini has a specific plug.
Do not change the plug in any way.
DANGER – to reduce risk of electric shock:
2. Always unplug the AeroGarden Mini from the electrical outlet before cleaning or
changing the Grow Bulb.
WARNING – to reduce risk of burns, fire, electric shock, or injury to persons:
3. Unplug AeroGarden Mini from outlet before putting on or taking off parts.
4. Close supervision is necessary when the AeroGarden Mini is used by or near children,
invalids, or disabled persons.
5. Use the AeroGarden Mini only for its intended use as described in the instructions. Do
not use attachments not recommended by the manufacturer.
6. Never operate the AeroGarden Mini if it has a damaged cord or plug, if it is not working
properly, if it has been dropped and damaged, or dropped into water, contact your
supplier for instructions.
7. Keep the cord away from heated surfaces.
8. Never operate the AeroGarden Mini with the air openings blocked or covered.
9. Never drop or insert any object into any electrical openings.
10. Do not use outdoors.
11. Do not operate where aerosol (spray) products are being used or where oxygen is
being administered.
12. Do not touch moving parts or hot parts such as pumps, bulb, reflective surfaces,
and the like.
13. To disconnect, remove plug from outlet.
14. Do not place or submerse the base, cord, plug, or lamp hood in water or other
liquid to clean it.
15. Do not allow water to contact hot lamp bulb.
16. Use only approved and supplied parts and accessories. Use only lamp model #100340
Grow Bulb (light bulb) with this AeroGarden Mini unit. Replacement parts
can be ordered from your supplier.
17. Do not use the AeroGarden Mini for other than intended purpose.
18. This product is intended for household, residential and office use only. This product
is not approved for commercial applications.
19. Read and follow all important notices on the AeroGarden Mini and in the
accompanying literature.
20. If the supply cord is damaged, it must be replaced by the manufacturer, its service agent ,
or similarly qualified technician in order to avoid a hazard.
21. The electrical wiring must be in accordance with local regulations.
LIMITED WARRANTY
What Is Covered – This warranty covers any defects
in materials or workmanship, with the exceptions
stated below.
How Long Coverage Lasts – This warranty runs for
one (1) year on the AeroGarden Mini and six (6)
months on the Grow Bulb, from the date of original
purchase, for the original purchaser/user.
What is Not Covered – The warranty shall not apply
to problems arising from: normal wear; failure to
adhere to enclosed operating instructions; serial
numbered products if the serial number has been
removed or defaced; products subject to negligence, accident, improper use, maintenance or
storage; products damaged by circumstances
beyond AeroGrow International, Inc.’s control;
loss or damage to removable parts; or products
modified (including, but not limited to, modifications through the use of unauthorized parts or
attachments) or repaired by anyone other than
AeroGrow International, Inc., or its designee. This
warranty excludes all incidental or consequential
damages.
What AeroGrow Will Do – AeroGrow, at its option,
will repair any defects in materials or workmanship
or will replace these products with ones of similar
features and price. AeroGrow’s sole obligation and
your exclusive remedy under this warranty shall be
limited to such repair or replacement.
To Return This Product – If you have questions or
concerns with your AeroGarden Mini, please do
not return to retailer. Call Customer Service at
1-800-476-9669 for return authorization and
instructions. Unauthorized returns, as well as C.O.D.
shipments will be refused.
Due to continuing improvements, actual product may
differ slightly from the product described herein.
Some states do not allow the exclusion or limitation
of incidental or consequential damages, so the above
limitation or exclusion may not apply to you.
This warranty gives you specific legal rights, and you may
have other legal rights that vary from state to state.
If you have any questions please feel free
to contact our customer service representatives
at customerservice@aerogrow.com.
AeroGrow International, Inc.
P.O. Box 18750, Boulder, CO 80308
CAUTION
You are cautioned that any changes or modifications not expressly approved in this manual could void your authority to operate this equipment.
NOTE:
This equipment has been tested and found to comply with the limits for a Class B digital device, pursuant to Part 15 of the FCC Rules. These limits
are designed to provide reasonable protection against harmful interference in a residential installation. This equipment generates, uses, and can radiate
radio frequency energy and, if not installed and used in accordance with the instructions, may cause harmful interference to radio communications.
However, there is no guarantee that interference will not occur in a particular installation. If this equipment does cause harmful interference
to radio or television reception, which can be determined by turning the equipment off and on, the user is encouraged to try to correct the interference
by one or more of the following measures: Reorient or relocate the receiving antenna; Increase the separation between the equipment and receiver;
Connect the equipment into an outlet on a circuit different from that to which the receiver is connected; or, Consult the dealer or an experienced radio/TV
technician for help.
1
Page 3
Replace
Grow Bulb
Add
Nutrients
1
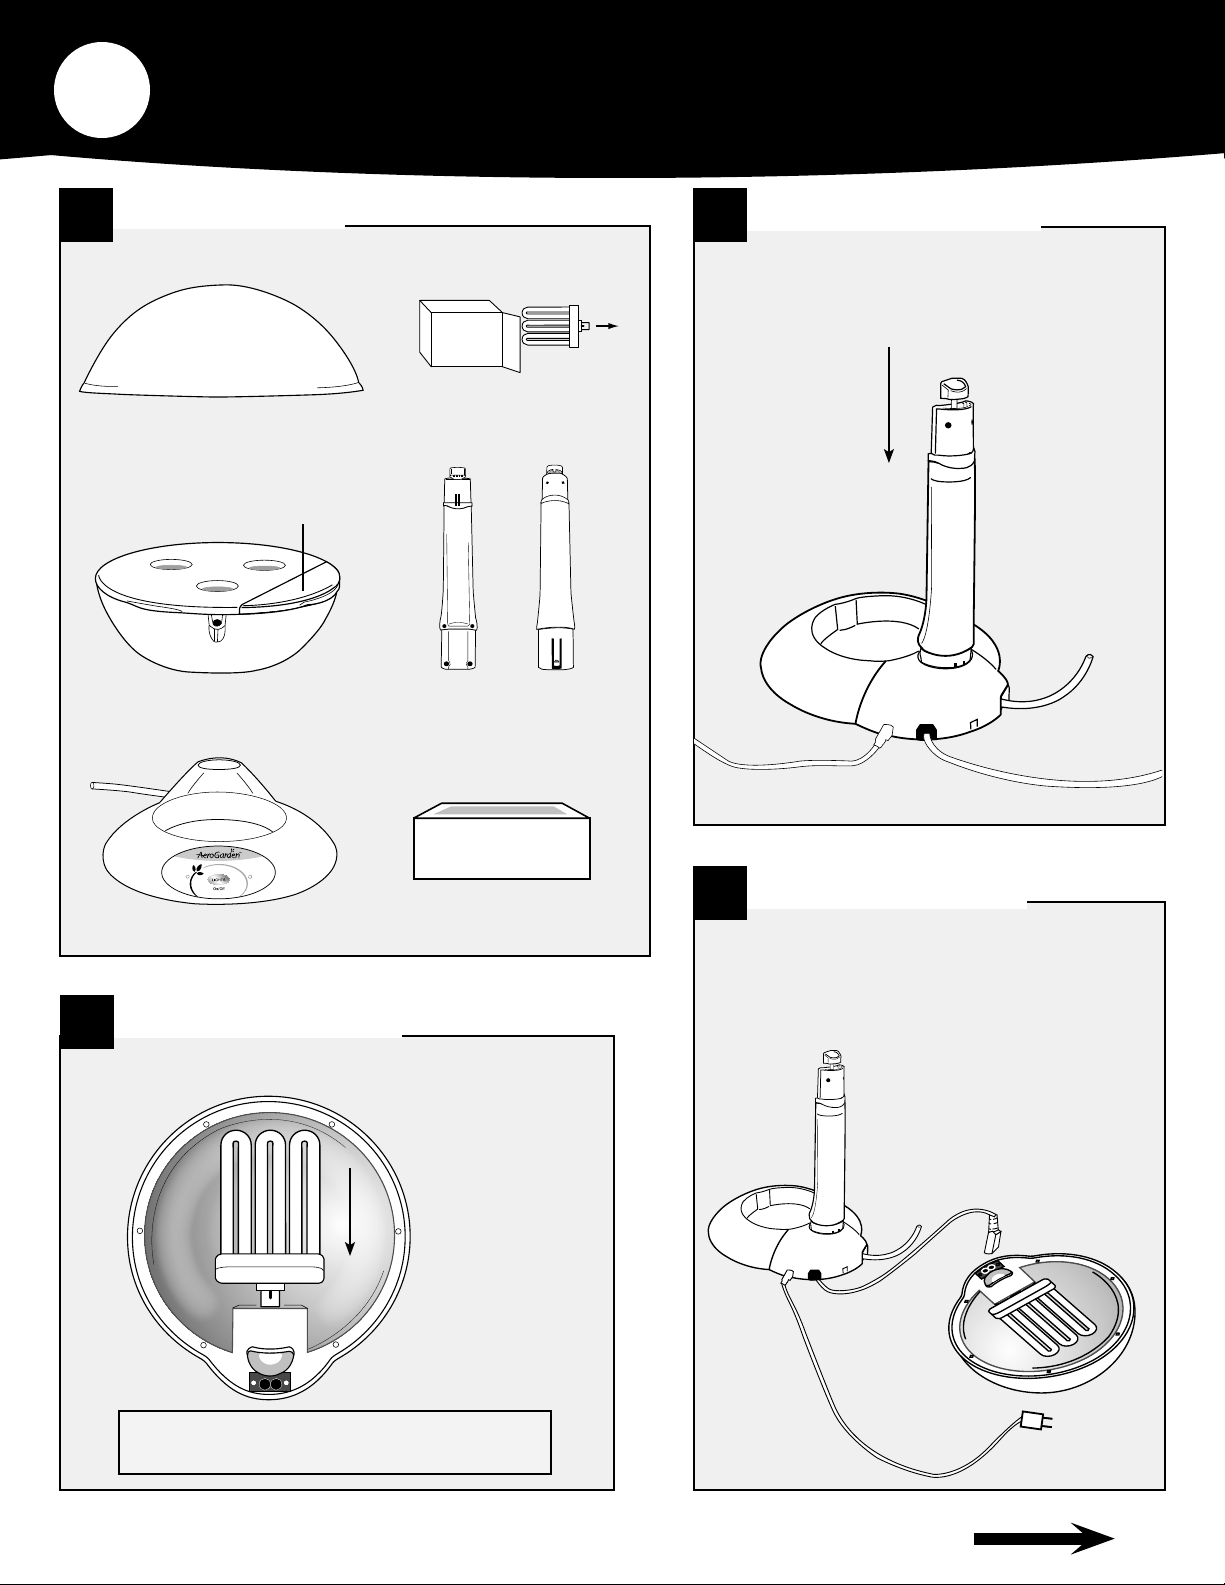
Quick Start Assembly (No tools required)
Unpack Your
A
AeroGarden Mini
Lamp Hood
(front view)
Bowl
View
Door
Grow Bulb (1)
(front view) (back view)
Lamp Arm
B
Insert Lamp Arm
into Base
Push
Lamp Arm
down until
you hear
a “click.”
Lamp Arm
(back view)
Base
(back view)
Base (front view)
C
Insert Grow Bulb
into Lamp Hood
DO NOT TWIST BULB!
Seed Kit
Push straight in.
Lamp Hood
(bottom view)
D
Plug Lamp Cord
into Lamp Hood
Push Lamp Cord
firmly into socket
in Lamp Hood.
Lamp Cord
Instructions Continued On Next Page
2
Page 4
Replace
Grow Bulb
Add
Nutrients
1
Replace
Grow Bulb
Add
Nutrients
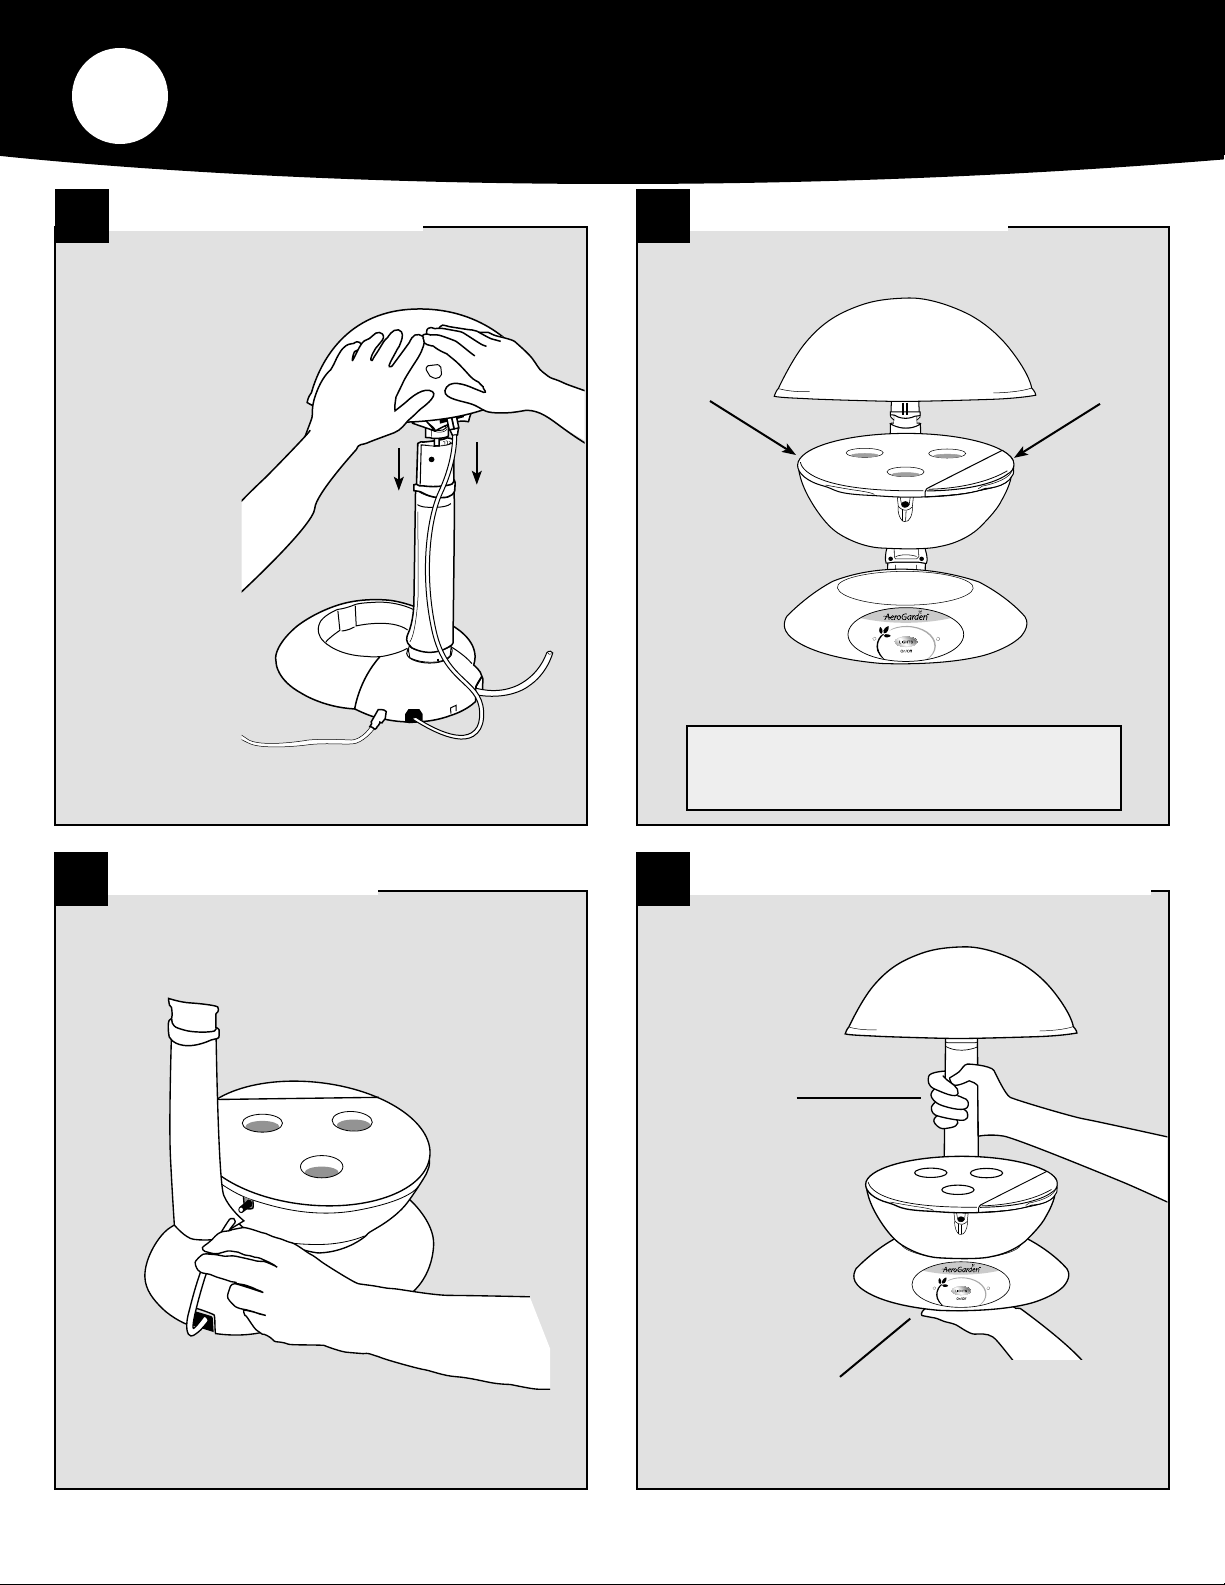
Quick Start Assembly (Continued)
Insert Lamp Hood
E
into Lamp Arm
Center hands over
Lamp Arm and push
Lamp Hood down
until you hear a
“click.”
(back view)
Set Bowl into Base
F
(front view)
Check to be sure that Bowl
is securely in place.
G
Insert Air Hose
Insert Air Hose from
back of Base into Bowl
H
Moving Your AeroGarden Mini
Use one
hand to
grasp the
Lamp Arm.
Gently slide your AeroGarden Mini toward
the surface edge and place other hand
under the Base.
3
Page 5

Place Your Garden
68
o
I
Note: Do not place beneath
under-cabinet lights.
Away from:
Reach of children and pets
Direct sources of heat (e.g., stove, furnace vents)
Direct sources of cold air (e.g., window drafts, A/C vents)
For Optimal Tending & Harvesting, Also Consider:
Easy access to un-softened water
Ease of harvesting
Bright lights (on about 17 hrs/day)
*Recommend using GFCI outlet where
required by National Electrical Code (NEC).
4
Page 6

Replace
Grow Bulb
Add
Nutrients
Replace
Grow Bulb
Add
Nutrients
2
A
Add Water Using a Spouted Container
Planting Your Garden
FILL TO
HERE
Lift
View Door
Fill to “Fill To Here”
(
located below the View Door)
Water Level Indicator will turn red
when water needs to be added.
Use room temperature municipal tap, bottled or
purified water. Do not use well or softened water.
Amount of
Water
To Be Added:
1.5 quarts or ...
6 cups or ...
1.4 liters
Plant Your Garden
B
Insert Seed Pods into Grow Surface openings.
Check to see that:
• There is a Seed Pod or Plant Spacer in every opening.
• Seed Pod Labels are facing forward.
• Seed Pods are pressed firmly in place.
Seed Pod
Bio-Domes
™
Seed Kit Tray
Grow Surface
5
Page 7

Place Bio-Domes on Seed Pods
Replace
Grow Bulb
Add
Nutrients
Replace
Grow Bulb
Add
Nutrients
C
• Place a Bio-Dome on each Seed Pod.
• Press Bio-Dome down until its rim
almost touches Grow Surface.
Bio-Dome
Note: Do not remove Bio-Domes
until seeds have sprouted.
NEVER REMOVE SEED
POD LABELS.
D
Add Starting Nutrient Tablet and Record Planting Date
Record Planting Date
Record the date you planted
your AeroGarden Mini
on the front cover of
the Tending &
Harvesting Guide.
Add 1 tablet from the
“Starting Nutrients”
bag directly into the Bowl.
6
Page 8

3
Replace
Grow Bulb
Add
Nutrients
Replace
Grow Bulb
Add
Nutrients
A
Starting Your Garden
Plug Cord in Wall Socket
What will happen...
1
Grow Bulb will come on.
Look under Lamp Hood to check
bulb is lit.
If not
, check to see if:
• Grow Bulb (light) is properly inserted
into Lamp Hood. (See step 1C)
• Lamp Cord is plugged into Lamp
Hood. (See step 1D)
• You are getting power through the
electrical outlet.
2
Pump will turn on.
Lift the View Door. You should see
bubbles in the water as the pump
cycles on and off.
Your Light Timer
B
View
Door
1
Your Light Timer is Set
To Start Growing Your Plants...
Plug In
• Your lights will stay on for 17 hours and will
shut off for 7 hours.
• Your lights will come on every day at the time
you plugged in your AeroGarden Mini.
7
Starting Now!
If You Would Like to
Change the Time of Day
2
Your Lights Go On...
See Page 8.
Page 9

Replace
Grow Bulb
Add
Nutrients
4
Enjoy it!
Personalize Your Light Timer (optional)
Your Built-In Light Timer
Your AeroGarden Mini has a built-in timer
that automatically provides your plants with
the optimal amount of “sunlight” (17 hours)
and “night” (7 hours).
As long as your plants get this amount of
light, it does not matter when the light is
turned off.* Many people find it convenient to
have the light go on in the morning and off at night
to match their own wake and sleep schedule.
*The exceptions to this are flowering and fruiting plants.
They require a daily dark period in order to produce flowers.
If your plants will receive any room light during the day
(either natural or artificial) we recommend that you set
your AeroGarden Mini lights to be on during the day.
If you would like to change the time of day your
light will go ON…
• Decide what time of day you want the light to
go ON.
• AT THAT TIME, unplug your AeroGarden Mini, and
then plug it back in.
Now, each day, your AeroGarden Mini lights will automatically
• Turn on at the time you plugged in your AeroGarden Mini
• Remain on for 17 hours
• Turn off for 7 hours
You can reset your timer as often as you want.
If the reflection from your AeroGarden Mini light is
visible from your bedroom, you may want
to set the light to go off about the time you usually
go to bed, so as not to disturb your sleep.
In case of power failure, your AeroGarden Mini
has a backup system that stores your nutrient and
grow bulb timer settings. You will need to manually
reset the Off-On cycle for your light (see above) to
return to your previously selected light setting.
8
Page 10

Replace
Grow Bulb
Add
Nutrients
5
Basic Reminders About Your AeroGarden
The AeroGarden Mini Control Panel
See Tending & Harvesting Guide for “Kit-Specific” information
LIGHTS ON/OFF
Use to occasionally override the built-in light timer. Once pushed, lights will stay off/on until the next time
built-in light timer is set to go on/off. This will not affect the timing of your light cycle and occasional use
of this feature will not harm your plants.
ADD NUTRIENTS
When the “Add Nutrients” light is red (every
2 weeks):
Add 1 nutrient tablet and fill the Bowl
1
with water up to “Fill To Here.”
PRESS AND HOLD the “Lights” button
2
until the “Add Nutrients” light begins
flashing (about 3 seconds).
Release the “Lights” button, then
3
IMMEDIATELY press and release the
“Lights” button again to restart the timer.
REMOVE
BIO-DOMES
When plants appear
through the hole in the
Seed Pod Labels, remove
Bio-Domes and discard
or recycle. Do not
remove label.
REPLACE GROW BULB
When the “Replace Grow Bulb” light is red (after
180 days of use):
It is time to replace your Grow Bulb. Replace-
1
ment bulbs can be ordered from our website
at: www.aerogrow.com.
After replacing Grow Bulb, PRESS AND HOLD
2
the “Lights” button until the “Replace Grow
Bulb” light begins flashing (about 3 seconds).
Release the “Lights” button, then IMMEDIATELY
3
press and release the “Lights” button again to
restart the timer.
WATER
LEVEL LOW
When Water Level
indicator is RED,
add water to “Fill
To Here.”
9
Page 11

Raise Lamp Hood/Lamp Arm
As plants grow, raise the Lamp Hood/Arm one notch at a time, keeping the plants about 1” from the
lights. Be sure the Arm is set to the lowest position when you start your AeroGarden Mini.
Unplug the AeroGarden Mini.
1
2
Disconnect Air Hose from back of Bowl.
Remove Bowl from Base.
3
4
Raise Lamp Arm/Lamp Hood:
• Hold Lamp Arm.
• With other hand, support the
Lamp Hood and use thumb to
push in Locking Button.
• Release Locking Button while
pulling up on Lamp Arm.
• Locking Button will automatically
click into next notch.
5
Replace Bowl on Base.
Insert Air Hose from back of Base
6
into Bowl (see step 1-G).
7
Plug in the AeroGarden Mini.
Note: When lowering Lamp Hood,
be sure to hold Lamp Arm to
avoid crushing plants.
10
Page 12

© 2007 AeroGrow International, Inc.
300291 AA 9/4/07 Patents Pending
Mini
Need AdditioNAl Help?
Call: 1-800-476-9669
Email: customerservice@aerogrow.com
Visit Our Website: www.aerogrow.com/help
 Loading...