

Page 1
Quick Start
Guide
Simple Steps
English
To Get Your “Trellis-Ready”
PRO
200
Up and Growing
KEEP THIS GUIDE!
CONGRATULATIONS
On your purchase of the AeroGarden PRO
With this upgraded AeroGarden you get all the features of the original AeroGarden,
enhanced with…
• “24-Hour Light” Setting – that lets you override the built-in light timer and decide
how much light your plants receive (see details on page 10).
• 24” Extendable Arm – which gives you the flexibility to grow tall plants, such as
full-size tomato plants and bell peppers.
• Enhanced Lamp Hood – with 3 Deluxe Grow Bulbs, providing more light than the
original Grow Bulbs, giving larger plants the light needed to grow and thrive.
• “Replace Grow Bulbs” Indicator – alerts you to replace Deluxe Grow Bulbs. With
this feature, you’ll be sure plants are always getting the right intensity and full spectrum of light needed for optimal growth.
• Optional Deluxe Trellis System (not included) – lets you easily support heavy,
fruit-filled branches on full-size plants such as tomatoes, peppers and cucumbers.
200
!
Model #s: 100733-DSS
Input Voltage: 115V, 60Hz, 1.5A
Date Code:
Page 2

IMPORTANT SAFETY INSTRUCTIONS
(SAVE THESE INSTRUCTIONS)
When using this AeroGarden PRO
200
electrical furnishing, basic precautions should always be followed, in-
cluding the following:
Read all instructions before using this AeroGarden furnishing.
1. To reduce the risk of electric shock, the AeroGarden PRO
DANGER
2. Always unplug AeroGarden PRO
WARNING
3. Unplug AeroGarden PRO
4. Close supervision is necessary when AeroGarden PRO
5. Use AeroGarden PRO
manufacturer.
6. Never operate AeroGarden PRO
damaged, or if it has been dropped in water. If any of these conditions occur/exist, contact www.aerogardensupport.com or
your country’s local distributor for instructions.
7. Keep cord away from heated surfaces.
8. Never operate furnishing with air openings blocked. Keep air openings free of lint, hair, and the like.
9. Never drop or insert any object into any electrical openings.
10. Do not use outdoors.
11. Do not operate where aerosol (spray) products are being used or where oxygen is being administered.
12. Do not touch moving parts or hot parts such as pumps, bulbs, reflective surfaces, and the like.
13. To disconnect, remove plug from outlet.
14. Do not place or submerse base, cord, plug, or lamp hood in water or other liquid to clean it.
15. Do not allow water to contact hot light bulbs.
16. Use only approved and supplied parts and accessories. Use only lamp model 100633 (N. America) or 200633 (Europe & Australia) Grow Bulbs with this AeroGarden model. Use of any other kind of accessory is not recommended. Replacement parts can
be ordered from www.aerogardensupport.com or from your retailer.
17. Do not use AeroGarden PRO
18. This product is intended for household and residential use only. This product is not approved for commercial applications.
19. Read and follow all important notices on the AeroGarden PRO
20. If supply cord is damaged, it must be replaced by manufacturer, its service agent, or similarly qualified technician in order to
avoid a hazard.
– to reduce risk of electric shock:
200
from electrical outlet before cleaning or changing Grow Bulbs (light bulbs).
– to reduce risk of burns, fire, electric shock, or injury to persons:
200
from outlet before putting on or taking off parts.
200
only for its intended use as described in the instructions. Do not use attachments not recommended by
200
if it has a damaged cord or plug, if it is not working properly, if it has been dropped and
200
for other than intended purpose.
200
has a specific plug. Do not change the plug in any way.
200
is used by or near children, invalids, or disabled persons.
200
and in the accompanying literature.
21. Electrical wiring must be in accordance with local regulations.
22. This appliance is not intended for use by persons (including children) with reduced physical, sensory or mental capabilities, or
lack of experience and knowledge, unless they have been given supervision or instruction concerning use of appliance by a
person responsible for their safety.
23. Children should be supervised to ensure they do not play with the appliance.
SAVE THESE INSTRUCTIONS
1
Page 3
Master Gardener
Wonderful Plants
Seed Kit
1
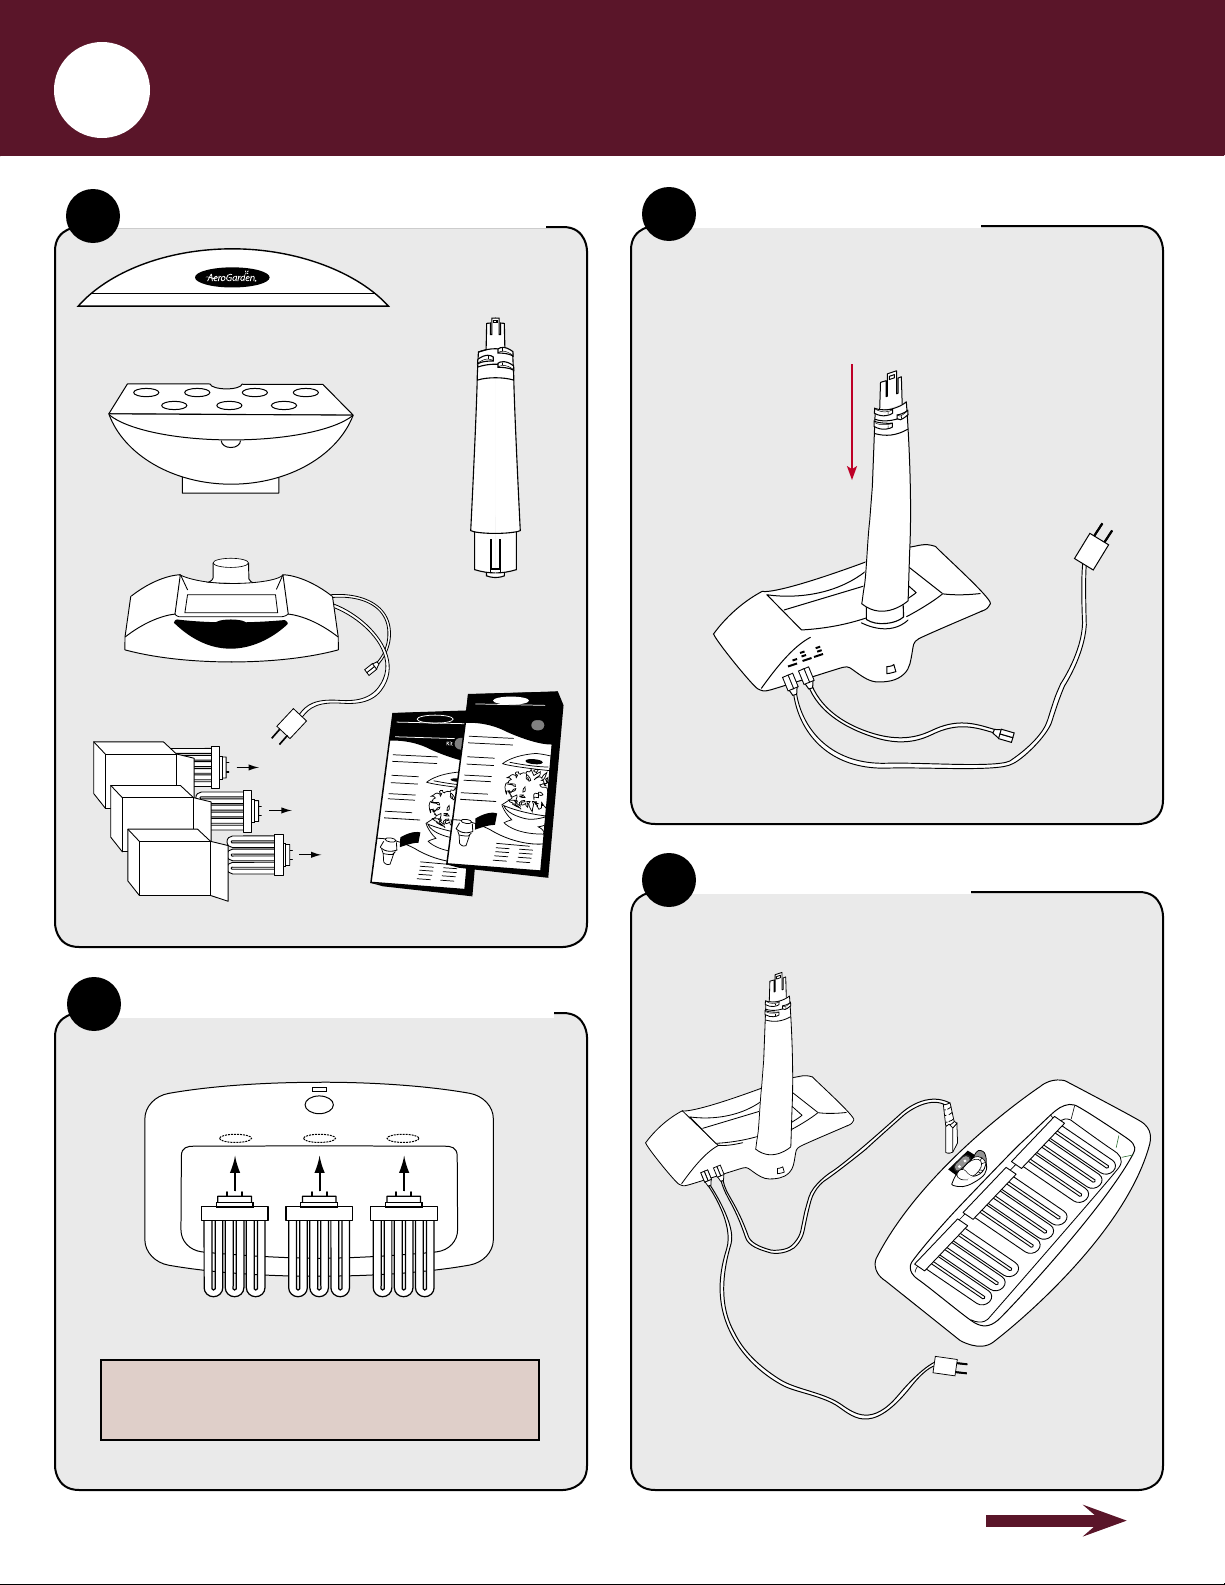
Quick Start Assembly (No tools required)
Unpack Your AeroGarden
A
PRO
Lamp Hood
(front view)
Bowl
(front view)
Base
(front view)
200
Lamp Arm
(back view)
Insert Lamp Arm
B
into Base
Push
Lamp Arm
down until
you hear
a “click.”
Lamp Arm
(back view)
Base
(back view)
Deluxe Grow Bulbs (3) 2 Seed Kits
Insert Deluxe Grow Bulbs
C
into Lamp Hood
Lamp Hood (bottom view)
Push straight in.
DO NOT TWIST BULBS!
Remember to replace Grow Bulbs every 6 months.
D
Plug Lamp Cord
into Lamp Hood
Push Lamp Cord
firmly into socket
in Lamp Hood.
Lamp
Cord
Instructions Continued On Next Page
2
Page 4
1
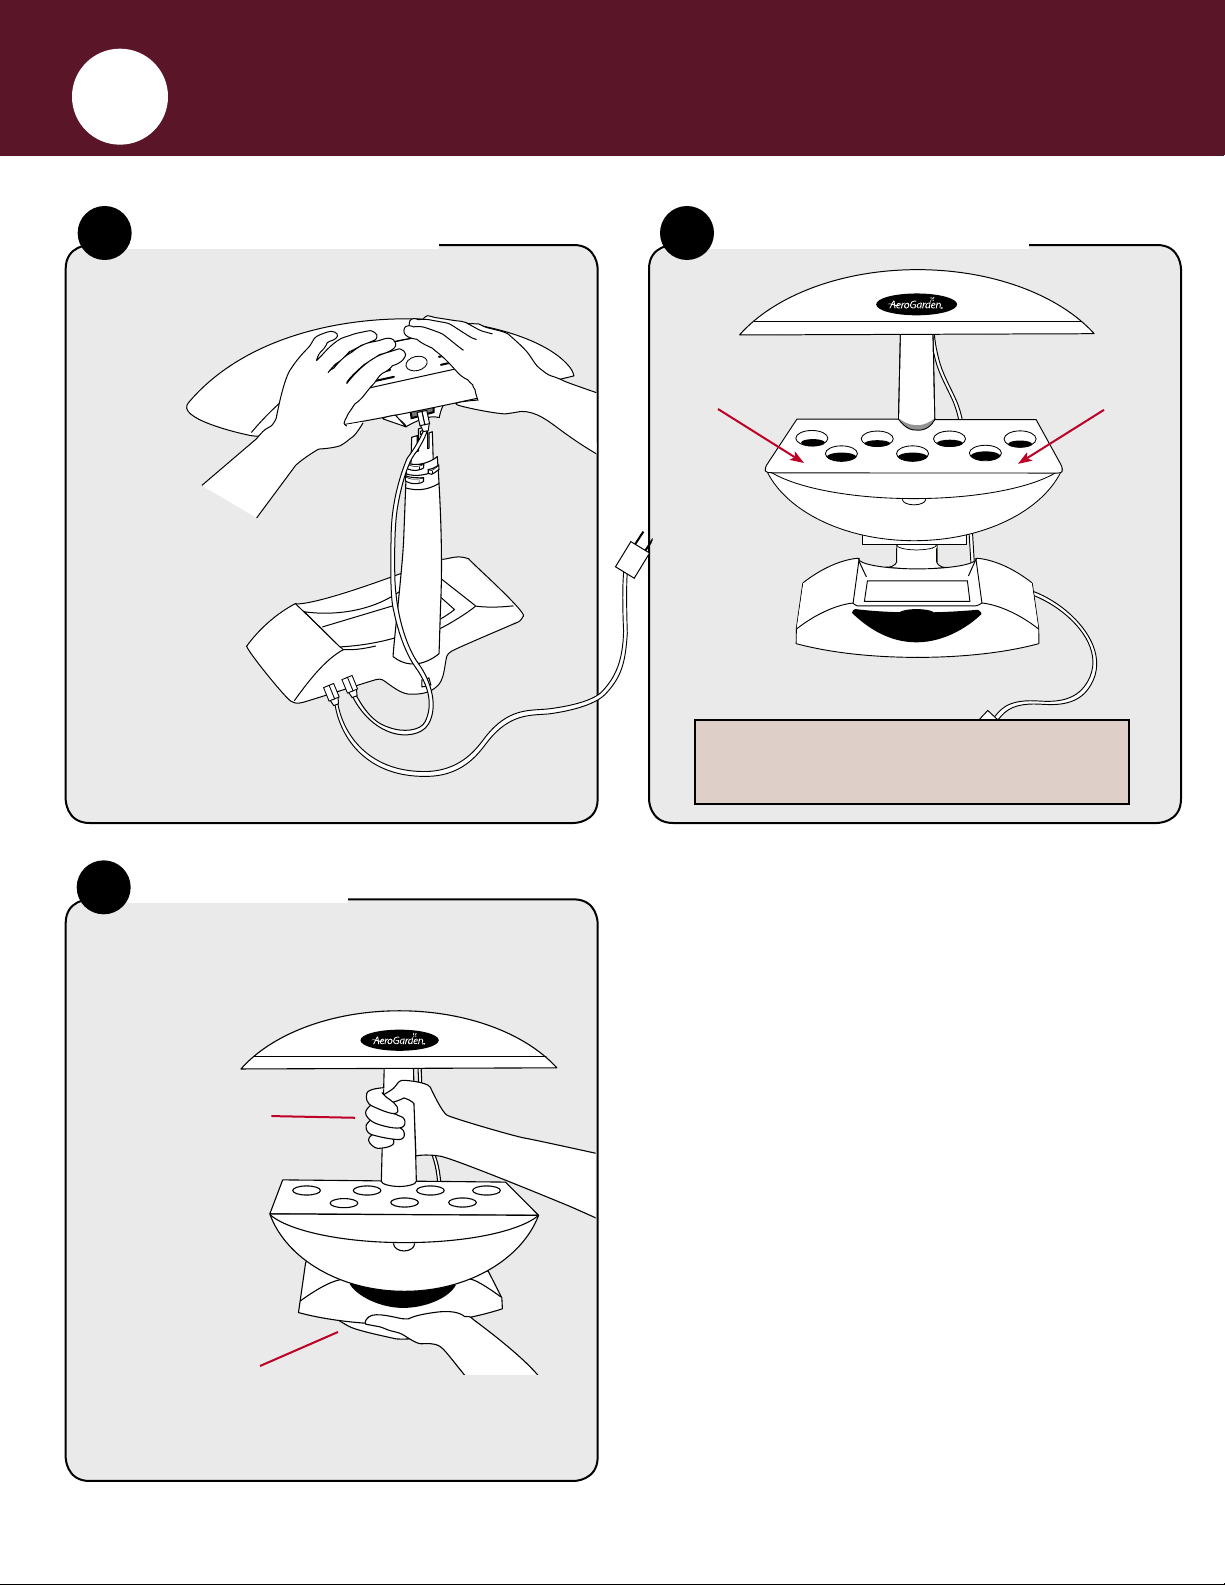
Quick Start Assembly (continued)
Place Lamp Hood
E
on Lamp Arm
Center hands
over Lamp Arm
and push Lamp
Hood down
until you hear a
“click.”
(back view)
F
Set Bowl into Base
(front view)
Check to be sure that
is securely in place.
Bowl
G
Moving Your
AeroGarden PRO
Use one hand to
grasp
Lamp Arm
Gently slide AeroGarden
toward the surface edge and
place other hand under
.
Base
200
NEED ADDITIONAL HELP?
For supplies and information, visit…
www.aerogardensupport.com
.
3
Page 5
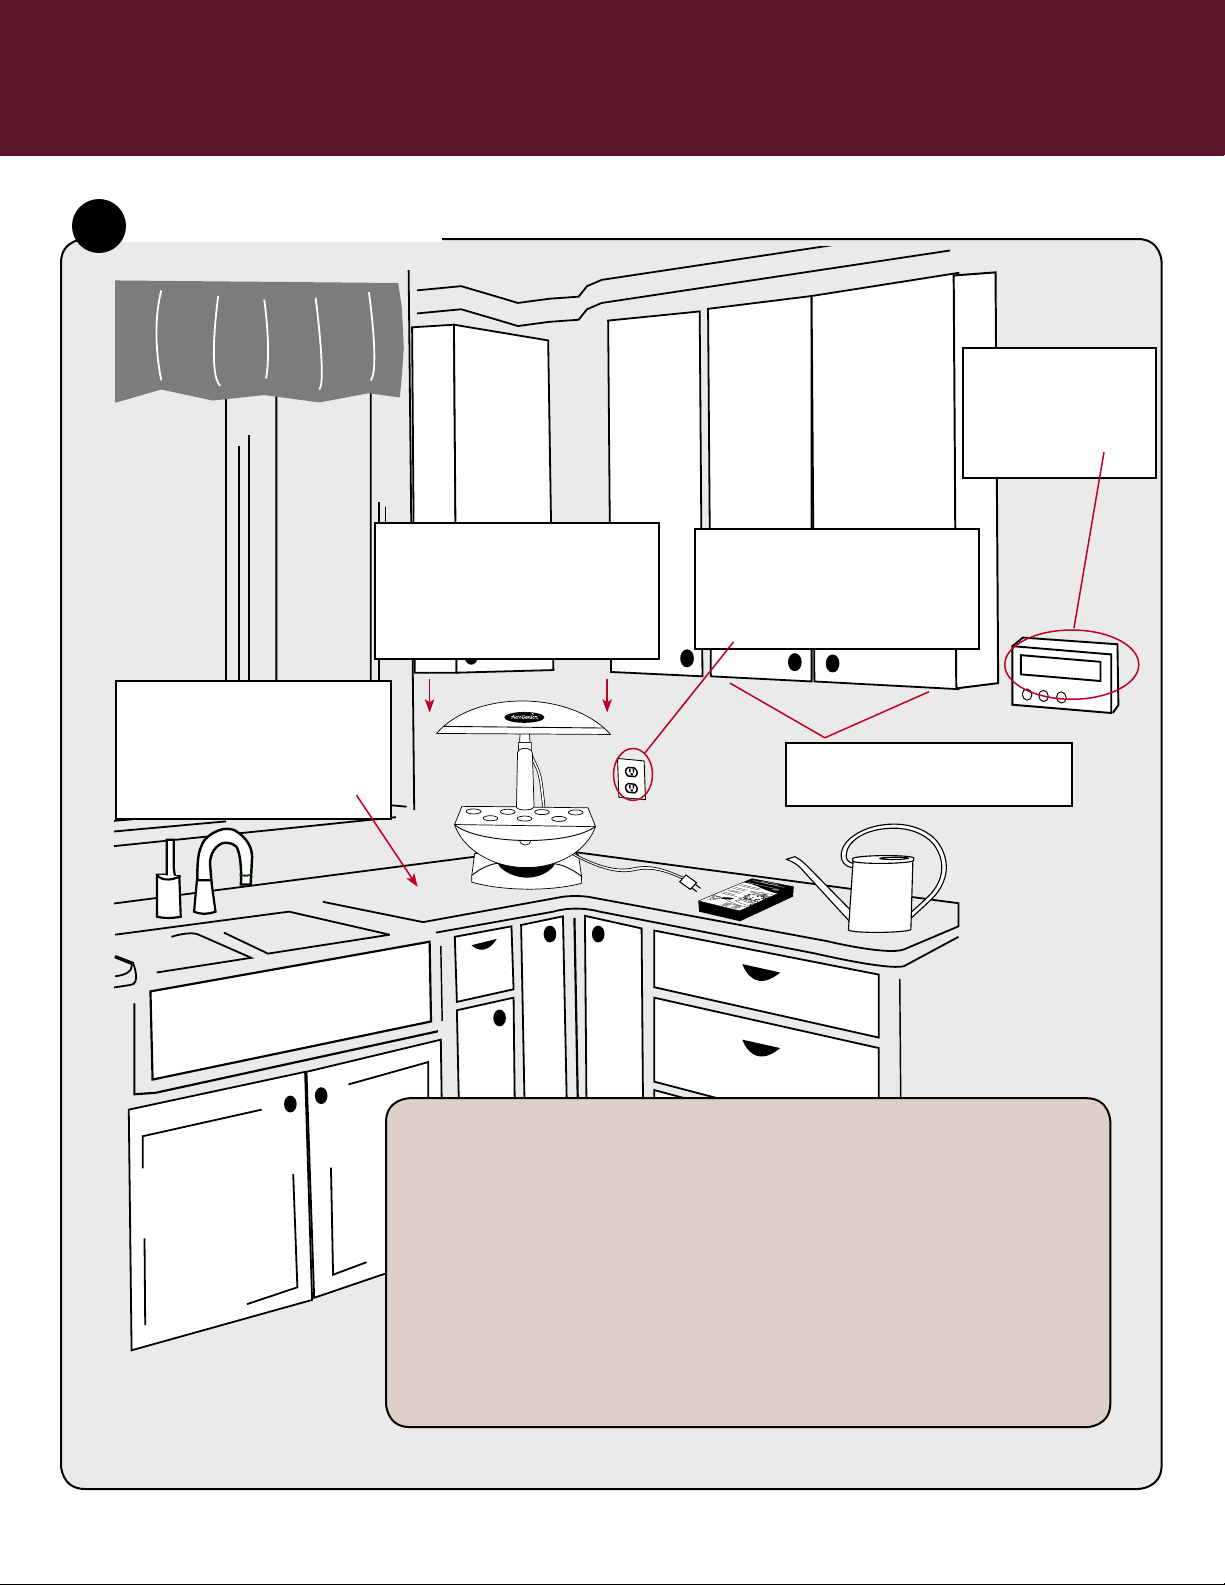
Wonderful Stuff
Place Your Garden
H
In: A 60-75°F
(16-24°C)
environment
(optimal)
On: A sturdy, watertolerant surface
(Metal surfaces may cause
noise due to vibration)
Under: A space that
allows 35” (89cm)
clearance for the full
height of raised lamp
Away From
Near: A standard
electrical outlet, per
local regulations
68°F/20°C
Note: Do not place beneath
under-cabinet lights.
Reach of children and pets
Direct sources of heat (e.g., stove, furnace vents)
Direct sources of cold air (e.g., window drafts, A/C vents)
For Optimal Tending & Harvesting, Also Consider
Easy access to un-softened water
4
Page 6

2
A
Planting Your Garden
Add Water Using a Spouted Container
Use room temperature municipal tap, bottled or
purified water. Do not use well or softened water.
Lift
View Door
Fill to “Fill To Here”
(located inside Bowl)
When additional water is needed, “Water Level Low” light on Control Panel will blink.
Add water to raise level up to “Fill To Here” inside Bowl.
It is okay to add water up to “Fill To Here” before “Water Level Low” light blinks.
Plant Your Garden
B
The AeroGarden PRO
pre-seeded pods and a Master Gardener Kit for planting your own seeds.
Gourmet Herb Kit: insert Seed Pods into
Grow Surface openings. Check to see that…
• Seed Pods are in the same position on
Grow Surface as they were in Seed Kit Tray.
• Seed Pod Labels are facing forward.
• Seed Pods are pressed firmly in place.
Master Gardener Kit –
Refer to Guide for detailed
planting instructions.
200
comes with a Gourmet Herb Seed Kit for planting
Seed Pod
Amount of
Water To Be
Added:
3.5 quarts or...
3.2 liters
Grow Surface
5
Bio-Domes
Nutrients
™
Seed Kit Tray
Page 7

Place Bio-Domes™ on Seed Pods
C
Place a Bio-Dome on
each Seed Pod.
Press Bio-Dome down
until its rim almost
touches Grow Surface.
Add Starting Nutrient Tablets and Record Planting Date
D
Bio-Dome
Note: Do not remove Bio-Domes until
seeds have sprouted. NEVER
REMOVE SEED POD LABELS.
Record Planting Date
Record the date Gourmet Herb Seed Kit was planted on
front cover of the Tending & Harvesting Guide
Record the date Master Gardener Seed Pods were planted
on a calendar or in a notebook.
.
For Gourmet Herb Kit – Add 2 tablets from
“Starting Nutrients” bag directly into Bowl.
For Master Gardener Kit – Add 2 tablets from
“Small” nutrient bag directly into Bowl.
See "Add Nutrient" (Feed Garden - Basic Feeding) on page 11 of
this guide for additional feeding instructions.
6
Page 8

3
A
Starting Your Garden
Plug Cord into Electrical Outlet
What will happen...
A green light next to “Germination” and
1
a white light on Control Panel will illuminate.
Plug in
View Door
Deluxe Grow Bulbs will come on.
2
Look under Lamp Hood to check that all 3 bulbs are lit.
If not, check to see if:
• Deluxe Grow Bulbs are properly inserted in Lamp Hood
(page 2, step 1D).
• Lamp Cord is plugged into Lamp Hood (page 3, step 1E).
• You are getting power through the electrical outlet.
When Pump starts* it may make a gurgling noise for a moment.
3
Lift View Door. You should see water dripping from the bottom of Seed
Pods into the Bowl.
If not
, check to see if:
• Lamp Arm is fully inserted into Base (page 2, step 1B).
• Bowl is firmly seated in Base (page 3, step 1G).
*Pump may take up to twelve hours to start.
7
Note: You will hear water flowing until plant roots have grown to surface level of
water (a few weeks). Keeping water level in Bowl up to “Fill To Here” will help
reduce the sound of dripping water.
Page 9

Select Plant Type
B
Press the SELECT button until you reach the type of plants you are growing
(Tomatoes/Peppers, Salad Greens, etc.).
Your Light Timer
C
Note: Depending on the plant type selected, your
AeroGarden
turn on and off at pre-programmed intervals.
Pump controls the flow of water
Pods to optimize plant growth.
PRO
200
pump will automatically
Your Light Timer is Set To Start
1
Growing Your Plants...Starting Now!
If You Would Like to Change the Time
2
of Day Your Lights Will Go Off...
See “Personalize Your Light Timer” on page 9.
through Seed
• Your lights will stay on for about 16 hours and will shut off for about 8 hours.
• Your lights will come on every day at the time you plugged in your AeroGarden PRO
*Except when using “24-Hour Light” setting, which sets lights to be on for 24 hours.
*
200
.*
8
Page 10

Personalize Your Light Timer (optional)
Your PRO
(about 16 hours) and “night” (about 8 hours), depending on the plant type you selected in the previous section.
As long as plants get this amount of light, it does not matter when lights are turned off.* Many people find it conve-
nient to have lights go on in the morning and off at night to match their own wake and sleep schedule.
*The exceptions to this are Flower & Vegetable plants.
light during the day (natural or artificial), we recommend setting your AeroGarden lights to be on during the day.
200
has lights and a built-in timer that automatically provide plants with the optimal amount of “sunlight”
They require a daily dark period in order to produce flowers. If your plants will receive any room
5 Simple Steps...
In order to make this as simple as possible, you only
need to set the time you want your AeroGarden
lights to go off (Off Time) and your built-in light
timer automatically sets the On Time...nothing
more for you to do.
Do the following to set the time you want your lights to go off:
Decide what time you want the lights to go OFF.
1
AT THAT TIME check that lights are on. If they are off, quickly press “Lights” button and im-
2
mediately release. (Lights must be on in order to reset timer.)
With lights on, press and hold “Lights” button until white light next to the plant type you
3
selected starts blinking – about 5 seconds.
Release the button.
4
When blinking stops (about 9 seconds), the lights will go off and your lights are now set to
5
go off at this time every day.
You can reset your timer as often as you want.
Lights Button
Blinking Light
In case of power failure, your PRO
timers as well as plant selection settings. When power is restored, your AeroGarden will go back to the Off-On
cycle you have set.
200
has a backup system that stores light, nutrient & replace grow bulbs
(if you selected Salad Greens)
9
Page 11

Personalize Your Light Timer (continued)
AeroGarden PRO
The “24-Hour Light” setting allows
the built-in light timer and keep lights on and pump
running 24 hours a day. You can also customize the
amount of light plants receive by manually turning
lights on and off using the “Lights” button, or setting
automatic on/off times, using a standard light timer.*
Use the “24-Hour Light” setting when growing plants
that thrive with continual light and moisture, such as
leafy greens and some herbs.
For the more experienced gardener, the “24-Hour
Light” setting provides added flexibility when plant-
ing a custom garden. You are no longer limited to the
pre-programmed light schedules associated with each
plant type (such as Tomatoes/Peppers, Salad Greens,
etc.).
NOTE: “24-Hour Light” setting is not recommended for
Flower or Vegetable plants – they require a daily dark
period to produce flowers.
200
“24-Hour Light” Setting
you to override
“24-Hour Light” Setting
• Press “Select” until you reach Strawberries setting.
• Press and hold “Select” until the white light next to
Strawberries starts blinking - about 5 seconds.
• Release the button.
• When blinking stops (about 5 seconds), the
Strawberries will remain on and the green
“Germination” will light up. Your Aero
is now on the “24-Hour Light” setting.
pump will remain on 24 hours a day.)
• To exit “24-Hour Light” setting, simply push the “Select”
button.
* Not included. If you use a light timer to turn the lights on and off,
the nutrient timer and pump will stop whenever the lights are OFF.
Both will start up again when the lights turn back on.
The nutrient timer does not record the time elapsed when
lights are off. To ensure that your plants are fed every 2 weeks, we
recommend keeping track of your feeding schedule on a calendar.
light next to
light next to
Garden PRO
(The lights and
200
Select
Once your AeroGarden PRO
will
remain on 24 hours a day. To shorten the amount of time lights are on, quickly press and
release “Lights” button, and lights will turn off. Lights will automatically
12 hours – or, you can press and release “Lights” button again, to turn lights back on.
200
is set on the “24-Hour Light” setting, the lights and pump
Germination
come back on within
10
Page 12

Basic Reminders About Your AeroGarden
AeroGarden PRO
200
• Water Low
When light blinks add
water up to “Fill To Here.”
• Add Nutrient
(Feed Garden - Basic Feeding)
When “Add Nutrient” and “Water
Low” lights start blinking (every
2 weeks), add 2 nutrient tablets*
and fill the Bowl with water up to
“Fill to Here.” Press and release
“Reset” button to restart nutrient
timer and turn off blinking lights.
*See Tending & Harvesting Guide for
plant-specific nutrient information.
Control Panel
• Lights On/Off
Use to occasionally override built-in light timer. Once pushed, lights
will stay off/on until the next time built-in light timer is set to go on/
off. This will not affect the timing of your light cycle and occasional
use of this feature will not harm your plants.
• Replace Grow Bulbs*
When light blinks (after 6 months
of use), it is time to replace Deluxe
Grow Bulbs. Bulbs can be ordered
at www.aerogardensupport.com
or from your retailer. After replacing Deluxe Grow Bulbs, press
“Reset” button to restart grow bulb
timer and turn off flashing light.
NOTE: If you store your AeroGarden
200
PRO
between uses, grow bulb
timer automatically stops when
200
PRO
is unplugged.
*See complete replacement
instructions on next page.
• Adaptive Intelligence
The green light tracks garden
growth from germination
through maturity. AeroGarden
200
PRO
the amount of light and water
plants receive to provide optimal growing conditions for
every stage of a plant’s life.
NOTE: The time of day your lights
automatically adjusts
turn off may change as your
Garden matures.
11
• Remove Bio-Domes
When plants appear through hole in
Seed Pod Labels, remove Bio-Domes
and discard or recycle.
NOTE: Never remove Seed Pod Labels.
Page 13

Basic Reminders About Your AeroGarden
AeroGarden PRO
200
Lamp Arm & Hood Features
(continued)
Raise Lamp Hood (Lights)
As plants grow to 1-2” from lights, raise Lamp Arm one notch at a time (each of the three Lamp Arm sections has
200
three notches). Be sure Lamp Arm is set at the lowest setting when you start your AeroGarden PRO
.
1
Unplug AeroGarden PRO
from Base.
2
Raise Lamp Arm/Lamp Hood:
• Hold Lamp Arm where it connects to Lamp Hood with
one hand. With other hand, push in Locking Lever.
• Release Locking Lever while pulling up on Lamp Arm.
• Locking Lever will automatically click into next
notch in the Lamp Arm section.
Push Locking
Lever in
200
and remove Bowl
Push Locking
Lever in
Push Locking
Replace Bowl on Base and plug in
3
200
AeroGarden PRO
Lever in
.
Push Locking
Lever in
Replace Grow Bulbs – Order bulbs at www.aerogardensupport.com
When “Replace Grow Bulbs” light on Control Panel begins blinking
after 6 months of use…
• Unplug AeroGarden PRO
• Remove old Grow Bulbs and carefully discard*.
IMPORTANT: To avoid burning, be sure Grow Bulbs are cool before handling.
• Insert new Grow Bulbs into Lamp Hood.
• Plug in AeroGarden PRO
restart grow bulb timer.
Early Grow Bulb Replacement
If you replace Grow Bulbs before “Replace Grow Bulbs” light illuminates, be
sure to restart grow bulb timer as follows:
• Press and hold “Lights” button until white light next to your selected plant
type starts blinking – about 5 seconds.
• Release “Lights” button. The plant type selected light will continue to blink
for about 9 seconds. While plant light is still blinking…
• Quickly press and release “Reset” button. “Replace Grow Bulbs” light will
blink once and the plant selected light will stop blinking.
200
200
.
and press and release “Reset” button to
*Check with local recycling authorities for light
bulb recycling availability in your area.
12
Page 14

Basic Reminders About Your AeroGarden
(continued)
(Optional) Trellis System
About the Trellis System (not included)
Your AeroGarden PRO
allows you to easily support heavy, fruit-filled branches on full-size plants such as tomatoes, peppers and cucumbers.
If you are interested in purchasing an AeroGarden Trellis System, you may do so at www.aerogardensupport.com or
from your retailer.
Trellis System installation
If your PRO
Bulbs from the Lamp Hood before starting. It is best to do this when the lights are off.
200
is already assembled, you will need to remove the Lamp Hood from Lamp Arm, and remove Grow
200
has the option of connecting a Trellis System to it’s Lamp Hood. The Trellis System
1
Unplug AeroGarden
2
Turn Lamp Hood over and remove Grow Bulbs.
3
PRO
200
and carefully remove Lamp Hood from Lamp Arm.
(Be sure bulbs are cool before handling.)
Attach Trellis Brackets to Lamp Hood
Hand tighten pre-mounted screws
with phillips head
screwdriver. Do not over-tighten.
4
Insert Grow Bulbs into Lamp Hood.
5
Replace Lamp Hood on Lamp Arm and plug in AeroGarden
Use Trellis System
Clip Trellis Coil on Bracket.
1
Lamp Hood
Pull down Trellis Coil.
2
PRO
200
.
Wrap Strap around branch that
3
needs support and snap closed.
Bracket
Trellis Coil
As a safety precaution, unplug AeroGarden furnishing
before performing this task. Be sure Grow Bulbs are cool
to the touch before attaching or adjusting Trellis Coil.
13
Gently push up on supported branch
4
until it is at desired height.
Page 15

Prepare For Your Next Garden
Cleaning Instructions for your AeroGarden
Use only water and mild soap when cleaning your AeroGarden (except when Sanitizing - Step 7). Do not use
abrasive cleaners or run through the dishwasher.
When your Garden has completed it’s growing cycle…
1
Unplug AeroGarden.
2
Carefully remove Bowl and
Grow Surface from Base and
bring to a sink. Set Base and
Lamp Hood aside.
NEVER SUBMERSE BASE AND
CONTROL PANEL IN WATER.
Remove Grow Surface from
3
Bowl and place on a counter
near a sink.
4
Empty contents of Bowl in sink.
Remove Seed Pods and plants
5
from Grow Surface.
• Pull Seed Pods out of Grow
Surface openings.
• Throw away Seed Pods and
plant debris (plant growth and
roots). If you compost, plant
debris can be composted.
6
Rinse and clean Grow Surface,
Pump Stand and Pump Filter.*
• Use a soft scrub brush to clean
tangled roots from underside of
Grow Surface and Pump Stand.
• Remove Pump Filter from
Pump Stand. Gently scrub
roots from Pump Filter.
• Place Pump Filter back into
Pump Stand.
After cleaning, there may still be a few
roots in your Grow Surface, Pump Stand
or Pump Filter. This will not affect the
operation of your AeroGarden.
Pump
Stand
Plant
Growth
Seed
Pod
Roots
Grow
Surface
Pump
Filter
7
Sanitize AeroGarden.
• Fill Bowl ¾ full with water.
• Add ¼ cup (59ml) of chlorine
bleach.
• Replace Grow Surface on Bowl,
place Bowl on Base and plug in
AeroGarden for 1-2 minutes.
(Select Salad Greens on Control
Panel to be sure water is flowing.)
• Unplug AeroGarden and empty
bleach water from Bowl.
8
Rinse AeroGarden.
• Rell Bowl with tap water and
replace on Base.
• Plug in and run AeroGarden
for 1-2 minutes. (Select Salad
Greens again.)
• Unplug AeroGarden, empty Bowl
and repeat this step (step 8) one
more time.
9
Towel dry the Bowl and Grow
Surface before putting them back
together and setting them back on
the Base.
If your Grow Bulbs have been in use
10
more than 6 months, they should be
replaced at this time (see page 12).
Your AeroGarden is now ready for
replanting.
* IMPORTANT NOTE: We recommend replacing the Pump Filter after growing
two gardens. Order Pump Filters from www.aerogardensupport.com or from
your retailer.
14
Page 16

Prepare For Your Next Garden (continued)
Replanting Your AeroGarden
If you have already grown a garden in your AeroGarden, please follow the instructions below to reset
the nutrient timer:
• Press and HOLD “Reset” button until red “Add Nutrient” light blinks (approximately 9 seconds).
• Release “Reset” button. “Add Nutrient” light will turn off.
• Your AeroGarden is now reset. (In some cases you may see other lights blink as well. This is nothing to worry about.)
Reset
Add Nutrient
U.S. CAUTION
authority to operate this equipment.
NOTE: This equipment has been tested and found to comply with the limits for a Class B digital device, pursuant to Part 15 of the FCC Rules. These limits are designed to provide reasonable protection against harmful interference in a residential installation. This equipment generates, uses, and can radiate radio frequency
energy and, if not installed and used in accordance with the instructions, may cause harmful interference to radio communications. However, there is no guarantee that interference will not occur in a particular installation. If this equipment does cause harmful interference to radio or television reception, which can be
determined by turning the equipment off and on, the user is encouraged to try to correct the interference by one or more of the following measures: Reorient or
relocate the receiving antenna; Increase the separation between the equipment and receiver; Connect the equipment into an outlet on a circuit different from that
to which the receiver is connected; or, Consult the dealer or an experienced radio/TV technician for help.
To reduce the risk of electric shock, this furnishing has a
polarized plug (one blade is wider than the other). This
plug will fit in a polarized outlet only one way. If the plug
does not fit fully in the outlet, reverse the plug. If it still
does not fit, contact a qualified electrician to install the
proper outlet. Do not change the plug in any way.
–
You are cautioned that any changes or modications not expressly approved in this manual could void your
CAUTION: TO PREVENT ELECTRIC SHOCK, MATCH
WIDE BLADE OF PLUG TO WIDE SLOT, FULLY INSERT.
ATTENTION: POUR ÉVITER UN CHOC ÉLECTRIQUE,
PRÉSENTER LA LAME LARGE À LA FENTE LARGE ET
POUSSER JUSQU’AU FOND
Bundle cord when furnishing is not in use.
!
.
PRO
© 2007-2008 AeroGrow International, Inc., Boulder, CO U.S.A. U.S. Patents Pending
5/8/08
200
 Loading...