

Page 1
Grad15prog
Page 2
WARNINGS
•
•
This appliance is intended for domesc household
use only and should not be used for any other
purpose or in any other applicaon, such as for
non-domesc use or in a commercial environment.
If the supply cord is damaged, it must be replaced by
the manufacturer, its service agent or similarly
qualified persons in order to avoid a hazard.
Catalogue
Language of Introduction
English
French
Dutch
Spanish
Portuguese
Page
GB1
FR11
NL23
ES35
PT47
-
-
-
-
-
GB10
FR22
NL34
ES46
PT58
For the details concerning the method of cleaning,
•
please see secon “Cleaning and Maintenance” on
page GB 10.
WARNING: In order to avoid overheang, do
•
not cover the heater.
The heater must not be located immediately below
•
a socket-outlet.
WARNING: The heater must not be used if the glass
•
panel is damaged.
Do not use this heater in the immediate
•
surroundings of a bath, a shower or a swimming
pool.
Children of less than 3 years should be kept away
•
unless connuous supervised.
Children aged from 3 years and less than 8 years
•
GB 1
Page 3

shall only switch on/off the appliance provided that
it has been placed or installed in its intended normal
operang posion and they have been given
supervision or instrucon concerning use of the
appliance in a safe way and understand the hazards
involved. Children aged from 3 years and less than 8
years shall not plug in, regulate and clean the
appliance or perform user maintenance.
•
CAUTION ― Some parts of this product can
become very hot and cause burns. Parcular
aenon has to be given where children and
vulnerable people are present.
•
The main plug must remain easily accessible.
•
This appliance can be used by children aged from 8
years and above and persons with reduced physical,
sensory or mental capabilies or lack of experience
and knowledge if they have been given supervision
or instrucon concerning use of the appliance in a
safe way and understand the hazards involved.
Children shall not play with the appliance. Cleaning
and user maintenance shall not be made by children
without supervision.
•
Do not use this heater with a programmer, mer,
separate remote-control system or any other device
that switches the heater on automacally, since a
fire risk exists if the heater is covered or posioned
incorrectly.
•
The heater must not be installed closed to curtains
and other combusble materials.
•
Regarding the instrucons of the method on how to
fix the feet to the heater, refer to the secon “Feet
Assembly”.
•
The baery must be removed from the appliance
before it is scrapped.
•
The baery is to be disposed of safely.
•
Aenon should be drawn to the environmental
aspects of baery disposal. Don’t throw used
baeries in dustbin. Please contact your retailer in
order to protect the environment.
•
The baeries (baeries installed) shall not be
exposed to excessive heat such as sunshine, fire or
the like.
•
Warning: If this appliance is used in a bathroom, it shall
be placed only in the out of volume zone, at a minimum
of 60 cm from any bathtub or shower, as stated in the
French standard NF C 15-100 for electrical installaon
inside the house. If you are not sure, it’s recommended
to ask a qualified electrician for help.
•
The switches and other controls cannot be touched
by a person in the bath or shower.
GB 2 GB 3
Page 4

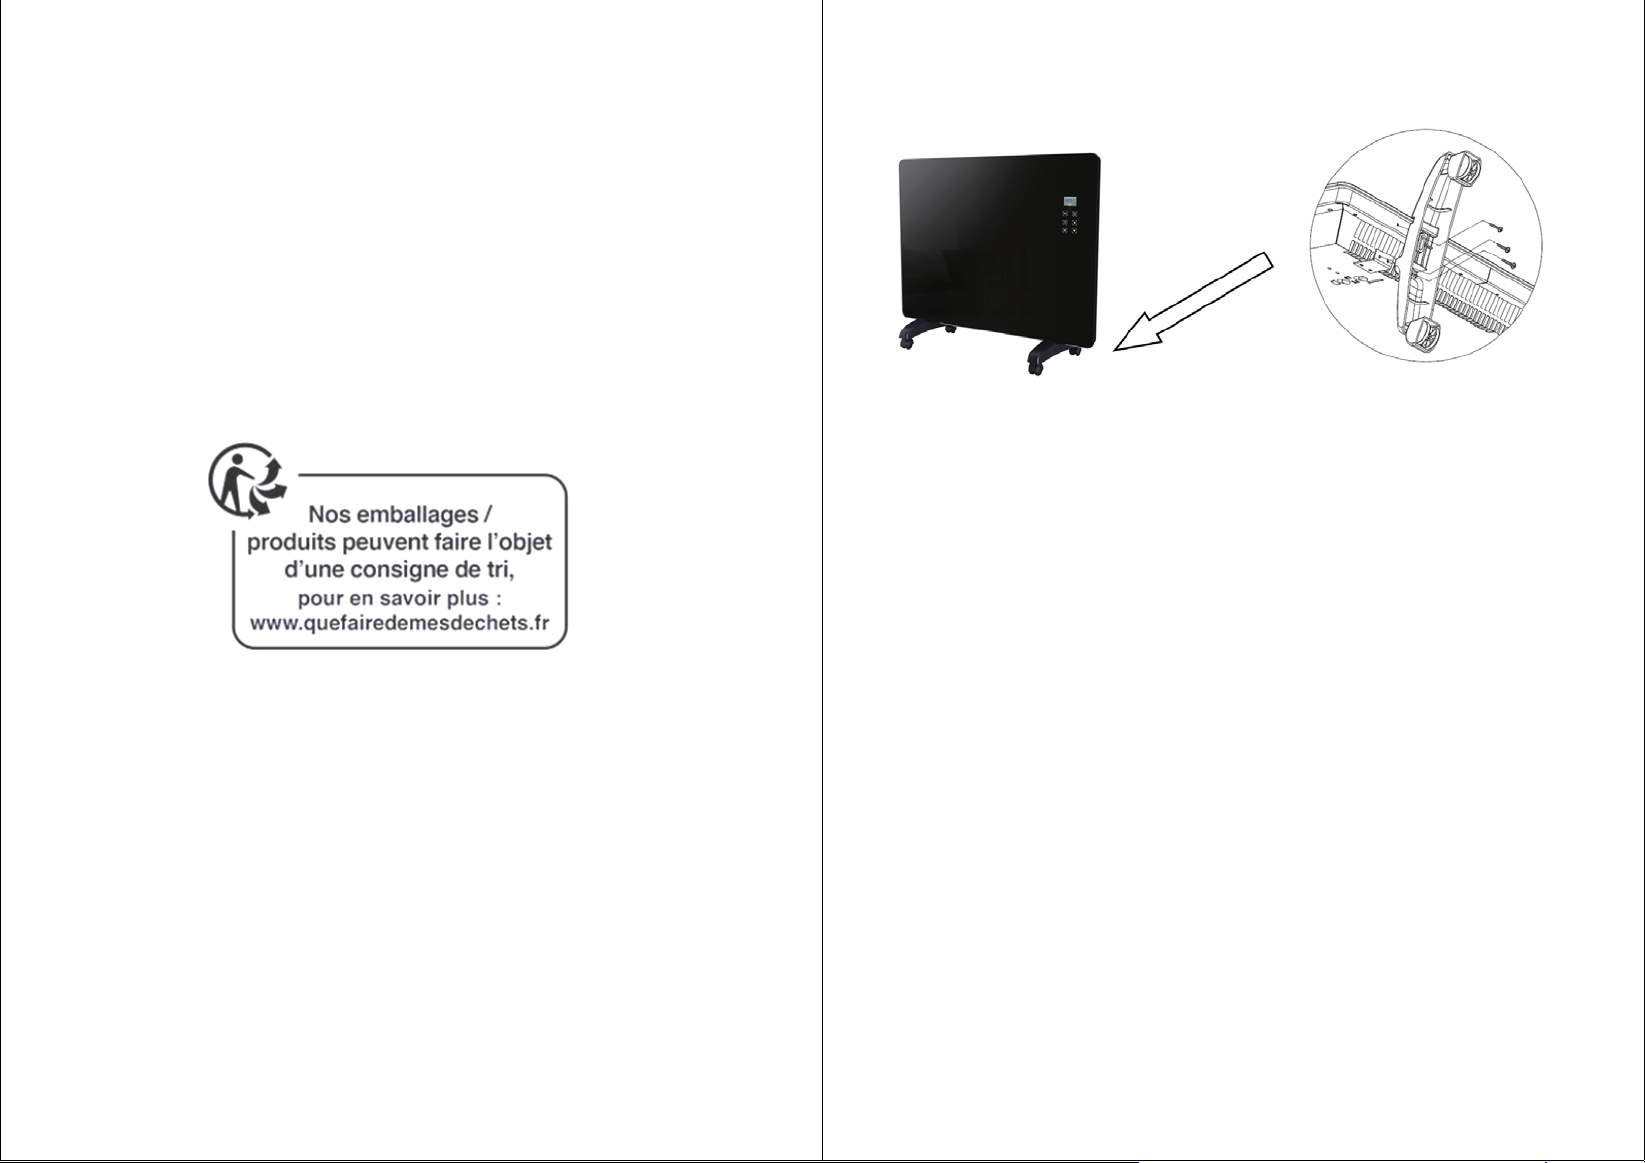
FEET ASSEMBLY
1.
Carefully turn the heater upside down and aach
the feet to the base of the heater.
• Make sure that the holes on the feet and the base
of the heater are aligned.
2.
Insert and ghten the supplied screws to secure
both feet to the base of the heater.
IMPORTANT SAFETY INSTRUCTIONS
Please read carefully these instrucons before operang the appliance and
keep the instrucon manual for future reference.
Do not use outdoors.
•
Do not use the appliance if it has been damaged.
•
Switch off and unplug the appliance from the mains socket when it is not in
•
use and before cleaning.
Do not use the appliance for any purpose other than its intended use.
•
Do not let the power cord hang over the edge of a table or counter, or touch
•
hot surfaces.
Always use and store the heater in the upright posion.
•
Do not use the heater in rooms where flammable liquids or gases are used
•
or stored.
Keep combusble materials, such as furniture, pillows, bedding, papers,
•
clothes and curtains at least 25cm away from the front, sides and rear of the
heater and keep them at least 1m away from the top of the heater.
Do not insert objects into the slots of the heater.
•
BATTERY WARNING: Only adults should handle the baery. Do not allow a
child to use the remote control unless the baery cover is securely aached to
the baery compartment.
The baery type used in this remote control is one CR2025 Lithium baery (not
included). This baery is located internally and is readily accessible.
Slide out the baery holder at the boom of the remote control to remove the
baery.
The baery must be disposed of at your local recycling point.
CONTROLS
2
5
6
Main power switch (I/O)
1.
Display
2.
Programming buon
3.
Timer buon
4.
Display
Day of the week
1
Standby
mode
Comfort
mode
3
4
5
Mode selecon buon
5.
Standby buon
6.
/ Up and down buons
7.
Economy
mode
Anfreeze
mode
Degree °C
Time and temperature
Hours
GB 4 GB 5
Page 5
Remote control
The remote control operates in the same manner as the control panel on the
heater.
To install the baery:
Slide out the baery holder at the boom of the remote control.
1.
Insert a Lithium baery (CR2025) into the baery holder with
2.
baery text facing up.
Slide the baery holder back onto the remote control.
3.
When operang the remote control,
always point it towards the remote
control signal receiver.
Signal receiver
Ensure there is no obstrucon between
the remote control and the receiver.
INSTALLATION
The heater is compliant with the IP24 coding system and suitable for bathroom
use.
Warning: This drawing is for reference only. If the
configuraon of your bathroom is different than the
one shown on this drawing, we strongly suggest you to
contact a professional electrician to perform the
correct installaon according standard NFC15-100.
IP code is a coding system to indicate the degrees of protecon provided by an
enclosure against access to hazardous parts, ingress of solid foreign objects,
ingress of water and to give addional informaon in connecon with such
protecon.
Descripon of IP24 is given in the following chart.
Code leers
First
characterisc
numeral
Second
characterisc
numeral
Numerals
IP +
2
4
Meaning for the protecon of
Equipment
Against ingress of solid foreign
objects
≥12.5 mm diameter
Against ingress of water with
harmful effects
Splashing
Meaning for the
protecon of
persons
Against access to
hazardous parts
with finger
―
GB 6 GB 7
OPERATION
WARNING: The heater carries a warning ‘DO NOT COVER’ to alert the user
to the risk of overheang that exists if the heater is accidentally covered.
Seng the Day and Time
Seng the date and me is required to operate the heater with one of the
following programmes: P1, P2, P3 or Individual 7-day programme.
Press the main power switch on the right hand side of the heater to the I side.
1.
• The display will illuminate, displaying all symbols briefly and then displaying “1”
(Monday) and 12:00 as the default day and me seng.
• The hour digits “12” will flash for a few seconds.
While “12” is flashing, repeatedly press to select seng among hour, minute
2.
and day of week.
Repeatedly press to set the hour/minute/day of the week.
3.
Page 6
4.
Press to confirm the seng and then enter the standby
state.
• You can also wait for about 10 seconds. The seng will
automacally be confirmed and enter the standby state.
• The symbol will appear on the display, indicang that the heater enters the
standby state.
Selecng a Mode and Seng the Temperature
Press to exit standby state.
1.
Repeatedly press to select the desired mode among three modes.
2.
• The corresponding mode symbol will flash on the display.
display alternately.
Comfort mode Economy mode
P1
If you select P1, the appliance will operate every day the same way: from
midnight to 1 am in Comfort mode, from 1 am to 8 am in Economy mode and
from 8 am to midnight again in Comfort mode.
Monday –Sunday
Symbol Mode
Descripon
Comfort The heater will run at the set temperature level.
Economy The heater will maintain temperature which is
equal to the comfort mode temperature
lowered by 3.5°C.
Anfreeze The heater will run at approximately 7°C.
Repeatedly press / to select the desired temperature.
3.
• The temperature can be set between 5°C and 30°C in comfort mode and
between 1.5°C and 26.5°C in economy mode.
• The temperature cannot be adjusted in anfreeze mode.
• Aer about 5 seconds the seng will be confirmed.
• The temperature sensor can automacally adjust the temperature. When the
room temperature is higher than the selected temperature, the heater will stop
heang.
Seng the Timer
You can operate the heater using a delayed off mer. This allows you to
program the heater to operate for a set period of me.
Repeatedly press to set the desired operaon period. The delayed off mer
•
can be set in 1 hour increments to a maximum of 24 hours.
To cancel the delayed off mer, press
•
P1/P2/P3 Programs
The heater has three preinstalled programs.
Repeatedly press to select P1, P2 or P3 and then repeatedly press /
to select the desired temperature between 1.5°C and 26.5°C.
The icon of the program (P1/P2/P3) and the set temperature will appear on the
Monday – Friday
P2
Weekends
Monday – Friday
P3
Weekends
Individual 7 Day Program
This programme allows you to programme three different modes
(Comfort/Economy/Standby) at the set me period for each day of the week.
Press to set the day.
1.
• The day “1” will flash.
While the day is flashing, repeatedly press / to select the desired
2.
day of the week (1-7).
Press to set the individual 7 day program.
3.
• The me period 0h will flash.
While the me period is flashing, repeatedly press to select the desired me
4.
period from 1 hour to 24 hours.
GB 8 GB 9
Page 7
Repeatedly press to select the desired mode.
5.
AVERTISSEMENTS
Comfort mode Economy mode Standby mode
Aer about 30 seconds the heater will automacally save program sengs.
6.
Repeat steps above to set the following days.
7.
CLEANING AND MAINTENANCE
Make sure that the heater is switched off and
unplugged from the mains socket and has cooled to
room temperature before cleaning.
Clean the outer surface of the heater with a slightly
damp cloth. Dry thoroughly.
Never immerse it in water.
Do not use any abrasive or chemical cleaning agents.
SPECIFICATIONS
Rangs: 220-240V~ 50/60Hz 1500W
DISPOSAL
As a responsible company we care about the environment.
As such we urge you to follow the correct disposal procedure
for the appliance, packaging materials and if applicable,
baeries. This will help conserve natural resources and ensure
that it is recycled in a manner that protects health and the
environment.
You must dispose of this appliance and its packaging according to local laws and
regulaons.
Because this appliance contains electronic components and may contain
baeries, the appliance and its accessories must be disposed of separately from
household waste when the appliance reaches its end of life.
Cet appareil est desné à un usage domesque
•
uniquement. Toute ulisaon autre que celle prévue
pour cet appareil, ou pour une autre applicaon que
celle prévue, par exemple une applicaon
commerciale, est interdite.
Si le câble d'alimentaon est endommagé, il doit
•
être remplacé par le fabricant, son service
après-vente ou des personnes de qualificaon
similaire afin d'éviter un danger.
En ce qui concerne la méthode du neoyage,
•
référez-vous à la secon “NETTOYAGE ET
ENTRETIEN” en page FR 21.
MISE EN GARDE: Pour éviter une surchauffe, ne
•
pas couvrir l'appareil de chauffage.
L’appareil de chauffage ne doit pas être placé juste
•
en dessous d’une prise de courant.
MISE EN GARDE: L’appareil de chauffage ne doit pas
•
être ulisé si les panneaux de verre sont endommagés.
Contact your local authority to learn about disposal and recycling.
The appliance and if applicable, baeries should be taken to your local
collecon point for recycling. Some collecon points accept appliance free of
charge.
We apologize for any inconvenience caused by minor inconsistencies in these
instrucons, which may occur as a result of product improvement and
development.
Darty Holdings SAS © 14 route d’Aulnay 93140 Bondy, France 18 / 05 / 2017
GB 10
Ne pas uliser ou installer cet appareil de chauffage à
•
proximité d’une baignoire, d’une douche ou d’une
piscine.
Il convient de maintenir à distance les enfants de
•
moins de 3 ans, à moins qu'ils ne soient sous une
surveillance connue.
FR 11
Page 8

•
Les enfants âgés entre 3 ans et 8 ans doivent uniquement
mere l'appareil en marche ou à l'arrêt, à condion que
ce dernier ait été placé ou installé dans une posion
normale prévue et que ces enfants disposent d'une
surveillance ou aient reçu des instrucons quant à
l'ulisaon de l'appareil en toute sécurité et en
comprennent bien les dangers potenels.
•
Les enfants âgés entre 3 ans et 8 ans ne doivent ni
brancher, ni régler ni neoyer l'appareil, et ni
réaliser l'entreen de l'ulisateur.
•
ATTENTION - Certaines pares de ce produit
peuvent devenir très chaudes et provoquer des
brûlures. Il faut prêter une aenon parculière en
présence d'enfants et de personnes vulnérables.
•
Ne pas uliser cet appareil de chauffage avec un
programmateur, une minuterie, un système de
commande à distance séparé ou tout autre disposif
qui met l’appareil de chauffage sous tension
automaquement, car il y a risque de feu si
l’appareil est recouvert ou placé de façon incorrecte.
•
L' appareil de chauffage ne doit pas être installé à
proximité de rideaux et autres matériaux
combusbles.
•
En ce qui concerne la méthode sur l’installaon des pieds,
référez-vous à la secon “Assemblage des pieds”.
•
La baerie doit être rerée de l'appareil avant que
celui-ci ne soit mis au rebut.
•
La fiche de prise de courant doit demeurer
facilement accessible.
•
Cet appareil peut être ulisé par des enfants âgés
d'au moins 8 ans et par des personnes ayant des
capacités physiques, sensorielles ou mentales
réduites ou dénuées d’expérience ou de
connaissance, s'ils (si elles) sont correctement
surveillé(e)s ou si des instrucons relaves à
l'ulisaon de l'appareil en toute sécurité leur ont
été données et si les risques encourus ont été
appréhendés. Les enfants ne doivent pas jouer avec
l’appareil. Le neoyage et l'entreen par l'usager ne
doivent pas être effectués par des enfants sans
surveillance.
FR 12 FR 13
•
La baerie doit être éliminée de façon sûre.
•
Il convient d’arer l’aenon sur les problèmes
d’environnement dus à la mise au rebut des piles
usagées de façon sûre. Déposez-les dans des bacs de
collecte prévus pour cet effet (renseignez-vous
auprès de votre revendeur afin de protéger
l'environnement).
•
Les piles ne doivent pas être exposées à une chaleur
excessive telle que celle du soleil, d'un feu ou
d'origine similaire.
•
Averssement: si cet appareil est installé dans une
salle de bain, il doit être ulisé uniquement dans la
Page 9
zone hors volume, au minimum à 60 cm d’une
baignoire ou d’une douche, conformément aux
exigences de la norme française d’installaon
électrique NF C 15-100. Nous vous suggérons de
contacter un électricien professionnel pour toute aide.
L’appareil de chauffage doit être placé de façon telle
•
que les interrupteurs et autres disposifs de
commande ne puissent pas être touchés par une
personne dans la baignoire ou la douche.
ASSEMBLAGE DES PIEDS
1.
Retournez soigneusement l’appareil et aachez les
pieds à la base.
• Assurez-vous de bien aligner les trous sur les pieds
avec les trous situés sur la base de l’appareil.
2.
Insérez et serrez les vis fournies pour fixer les deux
pieds à la base de l'appareil.
INSTRUCTIONS IMPORTANTES DE SÉCURITÉ
Veuillez lire aenvement ces instrucons avant d’uliser l’appareil et
conservez-les pour toute consultaon ultérieure.
Cet appareil n’est pas conçu pour être ulisé en plein air.
•
N’ulisez pas l’appareil s’il est endommagé.
•
Éteignez l’appareil et débranchez le câble de la prise secteur quand vous ne
•
l’ulisez pas et avant de le neoyer.
N’ulisez pas cet appareil pour un usage autre que celui pour lequel il a
•
été conçu.
Ne laissez pas le câble d’alimentaon pendre d’une table ou d’un plan de
•
travail, ni toucher des surfaces chaudes.
Ulisez et rangez toujours l’appareil en posion vercale.
•
N’ulisez pas l’appareil dans des pièces où des gaz ou liquides inflammables
•
sont ulisés ou stockés.
Aucun matériau combusble (par exemple meuble, coussin, linge de lit,
•
papier, vêtement ou rideau) ne doit être placé devant, derrière ni sur les
côtés de l’appareil. Ces derniers doivent être situés à au moins 1 mètre du
haut de l’appareil.
N’insérez pas d’objet dans les fentes de l’appareil.
•
FR 14 FR 15
Page 10

MISES EN GARDE CONCERNANT LA PILE : La pile doit être manipulée
exclusivement par un adulte. Ne laissez pas un enfant uliser la télécommande
si le couvercle du logement de la pile n’est pas correctement refermé.
Le type de pile ulisée dans cee télécommande est une pile en lithium CD2025
(non incluse). Cee pile se place à l'intérieur de la télécommande et est
directement accessible.
Pour enlever la pile, faites glisser le couvercle du logement de la pile en bas de
la télécommande.
À la fin de sa durée de vie, la pile doit être jetée dans centre local de recyclage.
BOUTONS DE CONTRÔLE
Panneau de contrôle (à l'avant de l’appareil)
2
5
6
Interrupteur d'alimentaon (I/O)
1.
Affichage
2.
Bouton de programmaon
3.
Bouton du minuteur
4.
Affichage
Mode
de veille
Jour de la
semaine
1
Mode
confort
3
4
5
5.
6.
7.
Mode
économie
Bouton de sélecon du mode
Bouton de veille
/ Boutons haut et bas
Mode
angel
Degrés °C
Heure et température
Heures
Télécommande
La télécommande a les mêmes foncons que les boutons sur le panneau de
contrôle de l’appareil.
Pour insérer la pile:
Faites glisser le couvercle du logement de la pile en bas de la
1.
télécommande.
Insérez une pile en lithium (CR2025) dans le porte-pile en
2.
posionnant le + de la pile vers le haut.
Réinsérez le porte-pile dans la télécommande.
3.
Pour uliser la télécommande, dirigez-la
toujours vers le récepteur de signal de
l’appareil.
Récepteur de
signal
Enlevez tous les obstacles présents entre
la télécommande et le récepteur.
INSTALLATION
Cet appareil est conforme au système de refroidissement IP24 et peut être
ulisé dans une salle de bain.
L’indice de protecon (IP) est une norme internaonale indiquant le degré de
protecon fourni par un boîer contre l’accès aux composants dangereux,
l’intrusion de corps solides et l’intrusion d’eau, et fournissant des informaons
complémentaires sur cee protecon.
La descripon de l’indice IP24 est fournie dans le tableau suivant :
Codage en
leres
Premier
chiffre
(dizaine)
Deuxième
chiffre
(unité)
IP +
chiffres
2
4
Significaon concernant la
protecon de l'appareil
Protégé contre l’intrusion de
corps solides de diamètre
supérieur à 12,5 mm.
Protégé contre l’intrusion d’eau
à cause d’éclaboussures. ―
Significaon pour
la protecon des
personnes
Protecon contre
l’accès des doigts
aux pièces
dangereuses.
FR 16 FR 17
Page 11

4.
Sélecon d'un mode et réglage de la température
1.
2.
Appuyez sur pour confirmer le réglage et remere
l’appareil en mode de veille.
• Vous pouvez aussi aendre 10 secondes environ. Le
réglage sera automaquement confirmé et l’appareil se
mera en mode de veille.
• Le symbole apparaîtra sur l'affichage, indiquant que l’appareil est en mode
de veille.
Appuyez sur pour quier le mode de veille.
Appuyez de manière répétée sur pour séleconner le mode désiré parmi les
trois modes.
• Le symbole du mode correspondant clignotera sur l'affichage.
Symbole Mode
Confort L’appareil fonconnera à la température réglée.
Descripon
Averssement: Ce schéma est donné uniquement à
tre d’exemple. Si la configuraon présentée sur le
schéma ne correspond pas à celle de votre salle de
bain, nous vous suggérons fortement de contacter un
électricien professionnel pour réaliser l’installaon
adéquate selon la norme NF C 15-100.
FONCTIONNEMENT
AVERTISSEMENT : L’appareil porte le symbole d'averssement ‘NE PAS
COUVRIR ’ qui alerte l’ulisateur sur le risque de surchauffe qui pourrait se
produire si l’appareil est recouvert accidentellement.
Réglage du jour et de l'heure
Le réglage de la date et de l'heure est nécessaire pour faire fonconner
l’appareil avec l'un des programmes suivants: P1, P2, P3 ou programme
personnalisable sur 7 jours.
Appuyez sur l’interrupteur d'alimentaon situé sur le côté droit de l’appareil
1.
pour le mere en posion I .
• L'écran s'allume, affichant brièvement tous les symboles puis “1” (lundi) et
12:00 s'afficheront, représentant le jour et l'heure par défaut.
• Les chiffres des heures "12" se meent à clignoter.
Alors que “12” clignote, appuyez de manière répétée sur pour séleconner le
2.
réglage entre les heures, les minutes et le jour de la semaine.
Appuyez de manière répétée sur pour régler les heures / les minutes / le jour
3.
de la semaine.
Economie L’appareil mainendra la température réglée en
mode confort avec 3,5°C de moins.
Mode
angel
Appuyez de manière répétée sur / pour séleconner la température
3.
requise.
• La température peut être réglée entre 5°C et 30°C en mode confort et entre
1,5°C et 26,5°C en mode économie.
• La température ne peut pas être réglée en mode angel.
• Après environ 5 secondes, le réglage sera confirmé.
• Le capteur de température peut ajuster automaquement la température.
Lorsque la température ambiante est supérieure à la température séleconnée,
l’appareil cesse de chauffer.
L’appareil fonconnera à une température de 7°C.
Réglage du minuteur
Vous pouvez acver le minuteur pour que l’appareil s’arrête automaquement
après une certaine durée.
•
Appuyez de manière répétée sur pour régler la durée de fonconnement
requise. Le délai du minuteur peut être réglé par intervalles de 1 heure jusqu'à
un maximum de 24 heures.
•
Pour désacver le minuteur, appuyez sur .
Programmes P1/P2/P3
L’appareil offre trois programmes intégrés.
Appuyez de manière répétée sur pour séleconner le programme P1, P2 ou
P3 puis appuyez plusieurs fois sur / pour séleconner la température
désirée entre 1,5°C et 26,5°C.
FR 18 FR 19
Page 12

L'icône du programme (P1/P2/P3) et la température réglée apparaissent
alternavement sur l'affichage.
Appuyez plusieurs fois sur pour séleconner le mode désiré.
5.
Mode confort Mode économie Mode de veille
Mode confort Mode économie
P1
Si vous séleconnez P1, l'appareil fonconnera tous les jours de la même façon:
de minuit à 1 h en mode confort, de 1 h à 8 heures en mode économie et de 8 h
à minuit à nouveau en mode confort.
P2
P3
Lundi – dimanche
Lundi – vendredi
Week-ends
Lundi – vendredi
Week-ends
Programme personnalisable sur 7 jours
Ce programme vous permet de paramétrer le mode de votre choix (Confort /
Economie / Veille) selon l’heure de la journée et le jour de la semaine.
Appuyez sur pour régler le jour.
1.
• Le jour “1” clignotera.
Lorsque le jour clignote, appuyez plusieurs fois sur / pour
2.
séleconner le jour désiré de la semaine (1-7).
Appuyez sur pour régler le programme personnalisable sur 7 jours.
3.
• L’heure 0h clignotera.
Lorsque l’heure clignote, appuyez plusieurs fois sur pour séleconner la
4.
période de temps désirée de 1 heure à 24 heures.
Après environ 30 secondes, l’appareil sauvegardera automaquement les réglages.
6.
Répétez les étapes ci-dessus pour régler les jours suivants.
7.
NETTOYAGE ET ENTRETIEN
Vérifiez que l’appareil est éteint, débranché de la prise
électrique et qu'il a refroidi jusqu'à la température
ambiante avant de le neoyer.
Neoyez les surfaces extérieures de l’appareil avec un
chiffon légèrement humide. Séchez-le complètement.
Ne l’immergez jamais dans l’eau.
N’ulisez aucun produit abrasif ou neoyant chimique.
SPÉCIFICATIONS
Caractérisques nominales: 220-240 V~ 50/60 Hz 1500W
MISE AU REBUT
En tant que distributeur responsable, nous accordons une grande
importance à la protecon de l’environnement.
Nous vous encourageons à respecter les procédures correctes de mise
au rebut de votre appareil, des piles et des éléments d’emballage. Cela
aidera à préserver les ressources naturelles et à garanr qu’il soit
recyclé d’une manière respectueuse de la santé et de l’environnement.
Vous devez jeter ce produit et son emballage selon les lois et les règles locales.
Puisque ce produit conent des composants électroniques et parfois des piles,
le produit et ses accessoires doivent être jetés séparément des déchets
domesques lorsque le produit est en fin de vie.
Pour plus de renseignements sur les procédures de mise au rebut et de
recyclage, contactez les autorités de votre commune.
Apportez l’appareil à un point de collecte local pour qu’il soit recyclé. Certains
centres acceptent les produits gratuitement.
Hotline Darty France
Quels que soient votre panne et le lieu d'achat de votre produit en France,
avant de vous déplacer en magasin Darty, appelez le 0 978 970 970 (prix d'un
appel local) 7j/7 et 24h/24.
FR 20 FR 21
Page 13

Hotline Vanden Borre
Le service après-vente est joignable au +32 2 334 00 00, du lundi au vendredi de
8h à 18h et le samedi de 9h à 18h.
En raison des mises au point et amélioraons constamment apportées à nos
produits, de petes incohérences peuvent apparaître dans ces instrucons.
Veuillez nous excuser pour la gêne occasionnée.
Darty Holdings SAS © 14 route d’Aulnay 93140 Bondy, France 18 / 05 / 2017
WAARSCHUWINGEN
Dit apparaat is alleen bestemd voor huishoudelijk
•
gebruik en mag niet voor andere doeleinden of
toepassingen worden gebruikt, zoals niet-huishoudelijk
gebruik of in een commerciële omgeving.
Als het snoer beschadigd is, moet het worden
•
vervangen door de fabrikant, een erkend
servicecentrum of een gelijkwaardig vakbekwaam
persoon om elk gevaar te vermijden.
Voor informae over de reinigingsmethode,
•
raadpleeg de sece “Reiniging en onderhoud” op
pagina NL 33.
WAARSCHUWING: Bedek het verwarmingstoestel
•
niet om oververhing te voorkomen.
Het verwarmingstoestel mag niet recht onder een
•
stopcontact te staan.
WAARSCHUWING: Gebruik de kachel niet als het
•
glazen paneel beschadigd is.
Gebruik dit verwarmingstoestel niet in de
•
onmiddellijke omgeving van een bad, douche of
zwembad.
Houd kinderen jonger dan 3 jaar aljd uit de buurt of
•
houd er connu toezicht op.
Kinderen tussen 3 en 8 jaar mogen het apparaat
•
FR 22 NL 23
Page 14

enkel in- en uitschakelen wanneer het apparaat op
een voor gebruik geschikte locae is geplaatst of
geïnstalleerd en indien ze gepaste instruces
hebben gekregen of onder toezicht staan, zodat ze
het apparaat op een veilige manier kunnen
gebruiken en op de hoogte zijn van de gevaren die
het gebruik van het apparaat met zich meebrengt.
Kinderen tussen 3 en 8 jaar mogen het apparaat niet
ontkoppelen, bedienen, reinigen of onderhouden.
•
OPGELET - Bepaalde delen van dit product kunnen
zeer heet worden en brandwonden veroorzaken.
Wees zeer aandachg als het apparaat in de
aanwezigheid van kinderen en kwetsbare personen
wordt gebruikt.
•
De stekker moet steeds makkelijk bereikbaar zijn.
•
Dit apparaat kan worden gebruikt door kinderen
vanaf 8 jaar en ouder of personen met beperkte
fysische, visuele of mentale mogelijkheden, of die
een gebrek hebben aan ervaring en kennis, als ze
onder toezicht staan of instruces hebben gekregen
over het veilig gebruik van het apparaat en de
gevaren die het gebruik van het apparaat met zich
meebrengen begrijpen. Laat kinderen nooit met het
apparaat spelen. Kinderen mogen het apparaat niet
zonder toezicht reinigen of onderhouden.
•
Gebruik geen programmeertoestel, mer, afzonderlijke
afstandsbediening of andere apparatuur die het
verwarmingstoestel automasch inschakelt, er is risico
op brand als het verwarmingstoestel wordt bedekt of
verkeerd geplaatst is.
•
Installeer het verwarmingstoestel niet in de buurt
van gordijnen of andere brandbare materialen.
•
Voor instruces over het vastmaken van de
voetstukken aan het verwarmingstoestel, raadpleeg
de sece “De voetstukken installeren”.
•
Haal de baerij uit het apparaat voordat u het
afdankt.
•
Gooi de afgedankte baerij op een juiste manier
weg.
•
Voer de baerij op een milieuvriendelijke manier af.
Gooi geen gebruikte baerijen weg met het huisvuil.
Neem contact op met uw handelaar om het milieu
te beschermen.
•
Stel de baerijen (geïnstalleerde baerijen) niet
bloot aan overmage hie zoals zonlicht, vuur, etc.
•
Waarschuwing: Als dit apparaat in een badkamer
wordt geïnstalleerd, installeer deze alleen in de
volume 3 van de badkamer, op minstens 60 cm van
een badkuip of douche, zoals vermeld in de Franse
norm NF C 15-100 voor elektrische installae in de
woning. Als u niet zeker bent, vraag advies aan een
vakbekwame elektricien.
NL 24 NL 25
Page 15

Zorg dat de schakelaars en andere
•
bedieningselementen niet door een persoon in een
bad of douche aangeraakt kunnen worden.
DE VOETSTUKKEN INSTALLEREN
1.
Draai de kachel voorzichg om en bevesg de
voetstukken aan de onderkant van de kachel.
• Zorg dat de gaten op de voetstukken en op de
onderkant van de kachel zich op één lijn bevinden.
2.
Breng de meegeleverde schroeven aan en draai vast
om beide voetstukken aan de onderkant van de
kachel stevig vast te maken.
BELANGRIJKE VEILIGHEIDSINSTRUCTIES
Lees deze instruces zorgvuldig door voordat u het apparaat gebruikt en
bewaar deze gebruikershandleiding voor latere raadpleging.
Gebruik het apparaat niet buitenshuis.
•
Gebruik het apparaat niet als het beschadigd is.
•
Schakel het apparaat uit en haal de stekker uit het stopcontact wanneer niet
•
in gebruik of voor reiniging.
Gebruik het apparaat niet voor andere doeleinden dan bestemd.
•
Laat het snoer niet over de rand van een tafel of aanrecht hangen en laat het
•
niet met hete oppervlakken in aanraking komen.
Gebruik en bewaar het verwarmingstoestel aljd in een rechtopstaande posie.
•
Gebruik het verwarmingstoestel niet in een ruimte waar brandbare
•
vloeistoffen of gassen worden gebruikt of zijn opgeslagen.
Houd brandbare materialen zoals meubilair, kussens, dekens, papier, kleding
•
en gordijnen minstens 25cm verwijderd van de voor-, achter- en zijkant van
de kachel en minstens 1m verwijderd van de bovenkant van de kachel.
Stop geen voorwerpen in de sleuven van de kachel.
•
NL 26 NL 27
Page 16

WAARSCHUWINGEN OVER BATTERIJEN: Alleen volwassenen mogen de baerij
installeren. Een kind mag de afstandsbediening alleen gebruiken als het
baerijdeksel goed op het baerijvak is bevesgd.
Deze afstandsbediening werkt op één CR2025 lithium baerij (niet
meegeleverd). Deze baerij bevindt zich binnenin en is makkelijk toegankelijk.
Schuif de baerijhouder aan de onderkant van de afstandsbediening uit om de
baerij te verwijderen.
Lever gebruikte baerijen in bij uw plaatselijk inzamelpunt.
BESCHRIJVING VAN DE ONDERDELEN
Bedieningspaneel (aan voorkant van kachel)
2
5
6
Aan/uit schakelaar (I/O)
1.
Scherm
2.
Programmaknop
3.
Timerknop
4.
Scherm
Dag van
de wee
1
Stand-by
modus
Comfort
modus
3
4
5
Moduskeuzeknop
5.
Stand-byknop
6.
/ Omhoog en omlaag knop
7.
Besparings
modus
Anvorst
modus
Graden °C
Tijd en temperatuur
Uren
Afstandsbediening
De afstandsbediening werkt op dezelfde manier als het bedieningspaneel op de
kachel.
De baerij installeren:
Schuif de baerijhouder eruit zoals op de achterkant van de
1.
afstandsbediening is afgebeeld.
Plaats een lithium baerij (CR2025) met de tekst naar boven in de
2.
baerijhouder.
Schuif de baerijhouder terug in de afstandsbediening.
3.
Houd de afstandsbediening jdens
gebruik steeds naar de signaalontvanger
Signaalontvanger
op de kachel gericht.
Controleer of er geen obstakel tussen de
afstandsbediening en de ontvanger is.
INSTALLATIE
De kachel is in overeenstemming met het IP24 coderingssysteem en is geschikt
voor gebruik in de badkamer.
De IP-code is een coderingssysteem om de beschermingsgraad aan te geven die
een behuizing tegen toegang tot gevaarlijke onderdelen, indringing van vaste
vreemde voorwerpen, indringing van water levert en om extra informae in
verband met dergelijke bescherming te geven.
De beschrijving van IP24 wordt in de volgende grafiek weergegeven.
Codeleers
Eerste cijfer
Tweede cijfer
IP + cijfers Betekenis voor de bescherming
2
4
van apparatuur
Tegen indringing van vaste
vreemde voorwerpen met een
diameter
Tegen indringing van water met
schadelijke effecten
12,5 mm
≥
Betekenis voor de
bescherming van
personen
Tegen toega n g tot
gevaarlijke
onderdelen met de
vinger
―
NL 28 NL 29
Page 17

Buiten volume
Een modus selecteren en de temperatuur instellen
1.
2.
• U kunt tevens circa 10 seconden wachten. De instelling
wordt automasch bevesgd en de kachel gaat in stand-by.
• Het symbool verschijnt op het scherm om aan te
geven dat de kachel in stand-by staat.
Druk op om stand-by af te sluiten.
Druk herhaaldelijk op om de gewenste modus uit de drie modi te selecteren.
• Het overeenkomsg modussymbool knippert op het display.
Afgewerkte vloer
Verborgen volume
Ruimte onder bad
Volume 1 of 3
Waarschuwing: Deze tekening is louter indicaef. Als
de inrichng van uw badkamer verschillend is dan in
deze tekening weergegeven, bevelen we aan om
contact op te nemen met een vakbekwame elektricien
om de juiste installae in overeenstemming met norm
NFC15-100 uit te voeren.
WERKING
WAARSCHUWING: Het verwarmingstoestel is voorzien van de waarschuwing
‘NIET BEDEKKEN’ om de gebruiker te waarschuwen voor het risico op
oververhing als het verwarmingstoestel per ongeluk wordt bedekt.
De datum en jd instellen
Het instellen van de datum en jd is nodig om de kachel met een van de
volgende programma's te gebruiken: P1, P2, P3 of het individueel 7-dagen
programma.
Duw de aan/uit-schakelaar aan de rechterkant van de kachel naar de stand I.
1.
• Het scherm wordt verlicht. Alle symbolen worden kort weergegeven waarna
"1" (maandag) en 12:00 als de standaard dag- en jdinstelling worden
weergegeven.
• De uurweergave “12” knippert gedurende enkele seconden.
Terwijl “12” knippert, druk herhaaldelijk op om de instelling dag, minuten of
2.
dag van de week te selecteren.
Druk herhaaldelijk op om de dag / minuten / dag van de week in te stellen.
3.
Druk op om de instelling te bevesgen. De kachel gaat vervolgens in stand-by.
4.
Symbool Modus
Comfort
Economie De kachel handhaa de temperatuur die gelijk is
Mode
angel
Druk herhaaldelijk op / om de gewenste temperatuur te selecteren.
3.
• De temperatuur kan in de comfortmodus tussen 5°C en 30°C, en in de
besparingsmodus tussen 1,5°C en 26,5°C worden ingesteld.
• Het is niet mogelijk om de temperatuur in de anvorstmodus te wijzigen.
• Het duurt circa 5 seconden voordat de instelling wordt bevesgd.
• De temperatuursensor kan de temperatuur automasch wijzigen. Als de
kamertemperatuur hoger dan de geselecteerde temperatuur is, dan stopt de
kachel met verwarmen
Beschrijving
De kachel wordt ingeschakeld op het ingestelde
temperatuurniveau.
aan de temperatuur in de comfortmodus verlaagd
met 3,5°C.
De kachel werkt op circa 7°C.
De mer instellen
U kunt de kachel met een uitgestelde uitschakelmer gebruiken. Dit stelt u in staat
om de kachel te programmeren om gedurende een ingestelde periode te werken.
•
Druk herhaaldelijk op om de gewenste werkingsperiode in te stellen. De
uitgestelde uitschakelmer kan worden ingesteld in stappen van 1 uur, tot
maximaal 24 uur.
•
Om de uitgestelde uitschakeljd te annuleren, druk op .
P1/P2/P3 programma’s
De kachel is voorzien van drie vooraf ingestelde programma’s.
Druk herhaaldelijk op om P1, P2 of P3 te selecteren en druk vervolgens
herhaaldelijk op / om een gewenste temperatuur tussen 1,5°C en 26,5°C
te selecteren.
NL 30 NL 31
Page 18

Het programmapictogram (P1/P2/P3) en de ingestelde temperatuur worden
afwisselend op het scherm weergegeven.
Druk herhaaldelijk op om de gewenste modus te selecteren.
5.
Comfortmodus Besparingsmodus Stand-bymodus
Comfortmodus Besparingsmodus
P1
Als u P1 selecteert zal het apparaat elke dag op dezelfde manier werken: tussen
middernacht en 1 uur in de Comfortmodus, tussen 1 en 8 uur in de
Besparingsmodus en vanaf 8 uur tot middernacht opnieuw in de Comfortmodus.
P2
P3
Maandag - Zondag
Maandag – Vrijdag
Weekends
Maandag – Vrijdag
Weekends
Individueel 7 dagen programma
Dit programma stelt u in staat om drie verschillende modi (Comfort/Besparing/
Stand-by) op de ingestelde periode te programmeren voor elke dag van de week.
Druk op om de dag in te stellen.
1.
• De dag “1” knippert.
Terwijl de dag knippert, druk herhaaldelijk op / om de gewenste
2.
dag van de week (1-7) in te stellen.
Druk op om het individueel 7 dagen programma in te stellen.
3.
• De jdsperiode 0h knippert.
Terwijl de jdsperiode knippert, druk herhaaldelijk op om de gewenste
4.
jdsperiode tussen 1 en 24 uur in te stellen.
De kachel zal na circa 30 seconden de programma-instellingen automasch opslaan.
6.
Herhaal bovenstaande stappen om de volgende dagen in te stellen.
7.
REINIGING EN ONDERHOUD
Schakel het verwarmingstoestel uit, haal de stekker uit het
stopcontact en laat het apparaat tot kamertemperatuur
aoelen voordat u het reinigt.
Maak de buitenkant van het verwarmingstoestel schoon
met een licht bevochgde doek. Veeg grondig droog.
Dompel het apparaat nooit in water.
Gebruik geen agressieve of chemische
schoonmaakmiddelen.
TECHNISCHE GEGEVENS
Vermogen: 220-240V~ 50/60Hz 1500W
VERWIJDERING
Als verantwoordelijke handelaar dragen we zorg voor het milieu.
We moedigen u aan om de juiste verwijderingsprocedure voor uw
apparaat en verpakkingsmateriaal te volgen. Dit draagt bij tot het
behoud van de natuurlijke rijkdommen door deze te recyclen zodat
zowel de menselijke gezondheid en het milieu worden beschermd.
Gooi dit apparaat en de verpakking weg in overeenstemming met de geldende
wetgeving en voorschrien.
Aangezien dit apparaat elektronische componenten bevat moet het apparaat en
toebehoren aan het einde van hun levensduur afzonderlijk van het huisafval
worden weggegooid.
Neem contact op met uw gemeente voor informae over afdanking en recycling.
Lever het apparaat in bij het inzamelpunt van uw gemeente voor recycling. Bij
sommige inzamelpunten kunt u het apparaat gras inleveren.
Hotline Vanden Borre
De dienst na verkoop is bereikbaar van maandag tot zaterdag op +32 2 334 00 00
NL 32 NL 33
Page 19

Hulplijn Nederland
Hiervoor kunt u contact opnemen met het BCC Service Center:
0900 0555 (lokaal tarief), geopend van maandag t/m vrijdag van
9.00 tot 17.00 uur.
We verontschuldigen ons voor enig ongemak veroorzaakt door kleine
inconsistenes in deze gebruikershandleiding, die kunnen ontstaan door
productverbetering of –ontwikkeling.
Darty Holdings SAS © 14 route d’Aulnay 93140 Bondy, France 18 / 05 / 2017
ADVERTENCIAS
Este aparato ha sido diseñado solamente para uso
•
domésco y no deberá ulizarse para ningún otro
propósito o aplicación, como puedan ser fines no
doméscos o comerciales.
Si el cable de alimentación se daña, deberá
•
reemplazarlo el fabricante, su agente de servicios, o
alguna persona con una cualificación similar con el fin
de evitar situaciones de peligro.
Para información sobre su limpieza, consulte el
•
apartado de «Limpieza y mantenimiento» en la página
ES 45.
ADVERTENCIA: A fin de evitar el
•
sobrecalentamiento, no cubra el aparato de calefacción.
Este aparato de calefacción no debe colocarse justo
•
debajo de una toma de corriente.
ADVERTENCIA: El aparato de calefacción no debe
•
ulizarse si el panel de cristal está dañado.
No ulice este aparato de calefacción junto a bañeras,
•
duchas o piscinas.
Los niños menores de 3 años deben mantenerse
•
alejados del aparato, a menos que estén bajo
supervisión constante.
Los niños entre 3 y 8 años solo deberán encender o
•
NL 34 ES 35
Page 20

apagar el aparato si está colocado o instalado en la
posición de funcionamiento prevista y están siendo
supervisados o han sido instruidos en el uso seguro del
aparato y comprenden los riesgos que acarrea. Los
niños entre 3 y 8 años no deberán enchufar, ajustar o
limpiar el aparato, ni realizar tareas de mantenimiento.
•
ATENCIÓN — Algunas partes de este producto pueden
calentarse mucho y ocasionar quemaduras. Deberá
prestarse especial atención cuando se ulice el aparato
en presencia de niños o personas vulnerables.
•
El enchufe debe permanecer fácilmente accesible.
•
Este aparato puede ser ulizado por niños a parr de
los 8 años o personas con mermas sicas, sensoriales o
mentales, o que no cuenten con suficiente experiencia
o conocimientos, si son supervisadas o han sido
instruidas en el uso apropiado y seguro del aparato y
enenden los peligros que acarrea. Los niños no deben
jugar con este aparato. Las tareas de limpieza y
mantenimiento no podrán ser realizadas por niños sin
la debida supervisión.
•
No ulice este aparato de calefacción con un
programador, un temporizador, un sistema de control
a distancia o cualquier otro disposivo que pueda
acvarlo automácamente, ya que puede producirse
un incendio si está cubierto por algún objeto u
orientado de manera incorrecta.
•
El aparato de calefacción no debe instalarse cerca de
cornas u otros materiales combusbles.
•
En relación a las instrucciones de cómo fijar las patas
del aparato de calefacción, consulte el apartado
tulado «Montaje de las patas».
•
La batería debe extraerse del aparato antes de
desecharlo.
•
La batería debe desecharse de una manera segura.
•
Sea considerado con los aspectos medioambientales al
desechar las baterías. No arroje las pilas usadas al cubo
de la basura. Consulte con su distribuidor acerca de
cómo proteger el medioambiente.
•
Las pilas (batería o pilas instaladas) no deben quedar
expuestas al calor excesivo producido por la luz directa
del sol, el fuego u otras fuentes similares.
•
Advertencia: si este aparato se instala en el baño,
deberá instalarse en el volumen 3 del baño, a una
distancia mínima de 60 cm del baño o la ducha, según
lo establecido por el reglamento español ITC-BT-27
para instalaciones eléctricas dentro del hogar. En caso
de dudas, se recomienda solicitar ayuda a un
electricista cualificado.
ES 36 ES 37
Page 21

Los interruptores y demás controles no pueden ser
•
tocados por una persona en el baño o la ducha.
MONTAJE DE LAS PATAS
1.
Ponga con cuidado el aparato de calefacción boca
abajo y fije las patas a su base.
• Asegúrese de que los orificios de las patas y la base
del aparato de calefacción estén alineados.
2.
Inserte y apriete los tornillos suministrados para fijar
las dos patas a la base del aparato de calefacción.
MEDIDAS DE SEGURIDAD IMPORTANTES
Por favor, lea el manual de instrucciones detenidamente antes de usar el
aparato y guárdelo para futuras consultas.
No lo ulice en exteriores.
•
No ulice el aparato si presenta algún daño.
•
Apague y desenchufe el aparato de la toma de corriente cuando no se esté
•
ulizando o antes de limpiarlo.
No ulice este aparato para fines disntos al pretendido.
•
No deje que el cable de alimentación cuelgue por el borde de una mesa o
•
una encimera, ni que entre en contacto con superficies calientes.
Siempre debe ulizar y guardar el aparato de calefacción en posición
•
vercal.
No ulice el aparato de calefacción en lugares donde se ulicen o almacenen
•
líquidos inflamables.
Mantenga los materiales combusbles, como muebles, almohadas, ropa de
•
cama, papeles, prendas de vesr o cornas a una distancia mínima de 25 cm
de la parte frontal, la parte trasera y los lados del aparato de calefacción, y a
un 1 m como mínimo de la parte superior.
No introduzca objetos por las ranuras del aparato de calefacción.
•
ES 38 ES 39
Page 22

ADVERTENCIA SOBRE LA BATERÍA: La pila solo debe ser manipulada por
personas adultas. No permita que ningún niño ulice este mando a distancia si
la tapa del comparmento de la pila no está bien cerrada.
El mando a distancia funciona con una pila de lio po CR2025 (no incluida). La pila
se encuentra ubicada en el interior del mando a distancia y es de fácil acceso.
Deslice hacia fuera el portapilas situado en la parte inferior del mando a
distancia para sacar la pila.
La batería debe desecharse en los puntos de recogida de productos reciclables
de su localidad.
CONTROLES
Panel de control (en la parte frontal del aparato de calefacción)
2
5
6
Interruptor principal (I/O)
1.
Pantalla
2.
Botón de programación
3.
Botón del temporizador
4.
Pantalla
Modo de
espera
Día de la
semana
1
Modo
confort
3
4
5
Selector de modo
5.
Botón de modo de espera
6.
/ Botones arriba y abajo
7.
Modo
económico
Modo
ancongelación
Grados °C
Tiempo y temperatura
Horas
Mando a distancia
El mando a distancia funciona de la misma manera que el panel de control del
aparato de calefacción.
Cómo instalar la pila:
Tire hacia fuera del portapilas situado en la parte inferior del mando
1.
a distancia.
Inserte la pila de lio (CR2025) en el portapilas con el texto de la pila
2.
mirando hacia arriba.
Vuelva a insertar el portapilas en el mando a distancia.
3.
Cuando ulice el mando a distancia,
oriéntelo siempre hacia el receptor de la
señal del mando a distancia.
Receptor de la señal
Asegúrese de que no haya objetos entre
el mando a distancia y el receptor.
INSTALACIÓN
El aparato de calefacción cumple con la clase de protección IP24 y, por lo tanto,
puede ulizarse en el baño.
El código IP es un sistema de codificación que indica el grado de protección de
una cubierta externa para impedir el acceso a componentes peligrosos, la
penetración de objetos o la penetración de agua, así como para suministrar
información adicional en conexión con dicha protección.
La descripción de IP24 se detalla en el cuadro siguiente:
Caracteres
del código
Primer
numeral
Segundo
numeral 4
Numerales
IP +
2
Significado para la protección
del aparato
Impide la penetración de
objetos sólidos con un diámetro
12.5 mm
≥
Impide la penetración del agua
con efectos dañinos como las
salpicaduras
Significado parar la
protección de
personas
Impide acceder a
componentes
peligrosos con los
dedos
―
ES 40 ES 41
Page 23

Buiten volume
Volume 2 Volume 1
Volume 0
Suelo acabado
Volumen oculto
Espacio debajo
de la bañera
Advertencia: esta ilustración solo se muestra a modo
de referencia. Si la configuración de su baño es
diferente a la mostrada en esta ilustración, le rogamos
que se ponga en contacto con un electricista
profesional para que lleve a cabo la instalación
siguiendo el reglamento ITC-BT-27.
MODO DE EMPLEO
ADVERTENCIA: El aparato de calefacción lleva la advertencia (NO CUBRIR)
para alertar al usuario del riesgo de sobrecalentamiento si se cubre
accidentalmente.
Ajuste de la hora y el día
La fecha y la hora son necesarios para poder hacer funcionar el aparato de
calefacción en uno de los siguientes programas: P1, P2, P3 o programas de 7
días individuales.
1.
Pulse el interruptor principal I en el lado derecho del aparato de calefacción.
• La pantalla se encenderá y mostrará todos los símbolos brevemente antes de
mostrar “1” (lunes) y 12:00 como el día y la hora predeterminadas.
• Los dígitos de la hora (“12”) parpadearán unos segundos.
2.
Mientras “12” está parpadeando, pulse reiteradamente para seleccionar
entre ajustar la hora, los minutos o el día de la semana.
3.
Pulse reiteradamente para ajustar las horas, los minutos o el día de la
semana.
4.
Pulse para confirmar los ajustes y seleccione el modo de espera.
• También puede esperar unos 10 segundos. Los ajustes se
confirmarán automácamente y el aparato pasará al modo
en espera.
• El símbolo aparecerá en la pantalla, indicando que el
aparato de calefacción está en el modo de espera.
Seleccionar un modo y ajustar la temperatura
1.
Pulse para salir del modo de espera.
2.
Pulse reiteradamente para seleccionar uno de los tres modos de
funcionamiento.
• El símbolo del modo correspondiente parpadeará en la pantalla.
Símbolo Modo
Confort
Económico El aparato de calefacción mantendrá la temperatura
Ancongelación
Pulse / reiteradamente para seleccionar la temperatura deseada.
3.
• La temperatura se puede ajustar entre 5 y 30 °C en modo confort y entre 1,5 y
26,5 °C en el modo económico.
• La temperatura no puede ser ajustada en el modo ancongelación.
• Después de unos 5 segundos, el ajuste será confirmado.
• El sensor de temperatura puede ajustar automácamente la temperatura. El
aparato de calefacción dejará de calentar cuando la temperatura de la
habitación supere la temperatura seleccionada.
Descripción
El aparato de calefacción funcionará a la
temperatura establecida.
3,5 °C por debajo de la temperatura establecida
para el modo confort.
El aparato funcionará a una temperatura
aproximada de 7 °C.
Ajuste del temporizador
El aparato de calefacción puede ulizarse con un programa de apagado. Esta opción
le permite programar el aparato de calefacción para funcionar durante un periodo
de empo establecido.
Pulse reiteradamente para establecer el empo deseado. El programa de
•
apagado puede ajustarse en incrementos de 1 hora hasta un máximo de 24
horas.
Pulse para cancelar el programa de apagado.
•
Programas P1/P2/P3
El aparato de calefacción incluye tres programas preinstalados.
Pulse reiteradamente para seleccionar P1, P2 o P3 y, a connuación, pulse
/ para seleccionar una temperatura entre 15 y 26,5 °C.
El icono del programa (P1/P2/P3) y la temperatura de ajuste aparecerán
ES 42 ES 43
Page 24

alternavamente en la pantalla.
Modo confort Modo económico
5.
6.
7.
Pulse reiteradamente para seleccionar el modo de funcionamiento.
Modo confort Modo económico Modo de espera
Después de unos 30 segundos, el aparato de calefacción guardará
automácamente los ajustes del programa.
Repita los pasos anteriores para establecer los días siguientes.
P1
Si selecciona P1, el aparato funcionará todos los días de la misma manera: desde la
medianoche hasta la 1 de la mañana en modo confort, de 1 a 8 de la mañana en modo
económico, y desde las 8 de la mañana hasta la medianoche de nuevo en modo confort.
P2
P3
De lunes a domingo
De lunes a viernes
Fines de semana
De lunes a viernes
Fines de semana
Programa de 7 días individuales
Este programa le permite programar tres modos diferentes (Confort/Economía/En
espera) en el período de empo establecido para cada día de la semana.
Pulse para establecer el día.
1.
• El día “1” parpadeará.
Mientras los dígitos del día parpadean, pulse / reiteradamente para
2.
seleccionar el día de la semana (1-7).
Pulse para establecer el programa de 7 días individuales.
3.
• Los dígitos del empo “0h” empezarán a parpadear.
Mientras los dígitos del empo parpadean, pulse reiteradamente para
4.
seleccionar un período de empo entre 1 y 24 horas.
LIMPIEZA Y MANTENIMIENTO
Antes de limpiar el aparato de calefacción, asegúrese de que
esté apagado y desenchufado del suministro de corriente, y
de que se haya enfriado hasta alcanzar la temperatura
ambiente.
Limpie la superficie externa del aparato de calefacción
ulizando un paño suave y húmedo. Séquelo bien.
Nunca sumerja el aparato en el agua.
No ulice productos de limpieza químicos o abrasivos.
ESPECIFICACIONES
Tensión y consumo eléctrico: 220-240 V~ 50/60 Hz 1500 W
ELIMINACIÓN
Somos un distribuidor responsable y nos preocupa el medio ambiente.
Por este movo le pedimos que siga correctamente las instrucciones
de eliminación a la hora de desechar el aparato y su material de
embalaje. De este modo, contribuirá a la conservación de los recursos
naturales y garanzará que se recicla de modo correcto para preservar
la salud las personas y el medio ambiente.
Este aparato y su embalaje se deben desechar conforme a la normava y
regulación local.
Debido a que el aparato conene componentes electrónicos, el aparato y sus
accesorios no se deben rar en la basura domésca al final de la vida úl del
aparato.
Consulte a las autoridades locales sobre el modo correcto de eliminación y
reciclaje de residuos.
El aparato se debe depositar en un punto local de recogida de residuos para
proceder a su reciclaje. En algunos puntos de recogida se aceptan residuos
gratuitamente.
ES 44 ES 45
Page 25

Le pedimos disculpas por cualquier problema provocado por pequeñas
inconsistencias en estas instrucciones, que podrían ser debidas al proceso de
desarrollo y mejora del producto.
Darty Holdings SAS © 14 route d’Aulnay 93140 Bondy, France 18 / 05 / 2017
AVISOS
Este aparelho desna-se apenas a uma ulização
•
domésca e não deve ser ulizado para qualquer outro
fim ou em qualquer outra aplicação, tal como a
ulização não-domésca ou num ambiente comercial.
Se o fio da alimentação ficar danificado, deverá ser
•
substuído pelo fabricante, o agente de reparação ou
uma pessoa igualmente qualificada, de modo a evitar
quaisquer perigos.
Para mais detalhes acerca do método de limpeza,
•
consulte a secção "Limpeza e manutenção" na página
PT 57.
AVISO: De modo a evitar o sobreaquecimento,
•
não cubra o aquecedor.
O aquecedor não pode ficar imediatamente à frente de
•
uma tomada.
AVISO: O aquecedor não pode ser usado se o painel de
•
vidro esver danificado.
Não use este aquecedor perto de uma banheira,
•
chuveiro ou piscina.
As crianças com menos de 3 anos de idade deverão ser
•
mandas afastadas, a não ser que sejam
constantemente supervisionadas.
As crianças dos 3 aos 8 anos de idade só deverão
•
ES 46 PT 47
Page 26

ligar/desligar o aparelho se este for colocado ou
instalado na sua posição normal de funcionamento, e
se forem supervisionadas ou ensinadas a usar o
aparelho de um modo seguro e compreendam os
perigos envolvidos. As crianças dos 3 aos 8 anos de
idade não deverão ligar à alimentação, afinar nem
limpar o aparelho, nem deverão efetuar a
manutenção.
•
CUIDADO: Algumas partes do produto podem ficar
muito quentes e causar queimaduras. Deverá ser
prestada especial atenção quando esverem
presentes crianças e pessoas vulneráveis.
•
A ficha tem de permanecer facilmente acessível.
•
Este aparelho pode ser usado por crianças com
mais de 8 anos de idade e pessoas com
capacidades sicas, sensoriais ou mentais
reduzidas, ou falta de experiência e
conhecimentos, se forem supervisionadas e
ensinadas quanto à ulização do aparelho de um
modo seguro, e compreenderem os perigos
envolvidos. As crianças não deverão brincar com o
aparelho. A limpeza e manutenção não deverão
ser feitas por crianças sem supervisão.
•
Não use este aquecedor com programador,
temporizador, sistema de telecomando em
separado ou qualquer outro disposivo que
ligue o radiador automacamente, pois existe o
perigo de incêndio se o radiador esver coberto
ou posicionado incorretamente.
•
O aquecedor não pode ser instalado perto de cornas
ou de outros materiais combusveis.
•
Relavamente às instruções sobre como fixar os pés do
aquecedor, consulte a secção "Montagem dos pés".
•
A pilha tem de ser rerada do aparelho antes de ser
eliminada.
•
A pilha deve ser eliminada de forma segura.
•
Deve ser dada alguma atenção aos aspetos ambientais
da eliminação de pilhas. Não are pilhas gastas para o
lixo. Por favor, contacte o seu revendedor para
proteger o ambiente.
•
As pilhas (pilhas instaladas) não devem ser expostas a
calor excessivo, tal como a luz solar, fogo ou
semelhante.
•
Aviso: Se este aparelho for instalado numa casa de
banho, deverá ser instalado apenas no volume 3 da
casa de banho, a uma distância mínima de 60 cm da
banheira ou chuveiro, conforme indicado na norma
francesa NF C 15-100 para instalações elétricas dentro
de casa. Se não ver a certeza, recomendamos que
peça ajuda a um eletricista qualificado.
PT 48 PT 49
Page 27

Os interruptores e outros controlos não podem ser
•
usados por uma pessoa dentro da banheira ou
chuveiro.
MONTAGEM DOS PÉS
1.
Vire cuidadosamente o aquecedor para baixo e fixe
os pés na base do aquecedor.
• Cerfique-se de que os oricios nos pés e na base
do aquecedor ficam alinhados.
2.
Insira e aperte os parafusos fornecidos para fixar
ambos os pés na base do aquecedor.
INSTRUÇÕES IMPORTANTES DE SEGURANÇA
Por favor, leia estas instruções com atenção antes de usar o aparelho, e
guarde-as para futuras referências.
Não ulize no exterior.
•
Não ulize o aparelho se esver danificado.
•
Desligue o aparelho e rere a ficha da tomada quando não o ulizar e antes
•
de proceder à limpeza.
Não ulize o aparelho com outros intuitos para além dos previstos.
•
Não deixe o fio pender de uma mesa ou bancada, nem entrar em contacto
•
com supercies quentes.
Use sempre e guarde o aquecedor na vercal.
•
Não use o aquecedor em locais onde sejam usados ou guardados líquidos ou
•
gases inflamáveis.
Mantenha os materiais combusveis, como mobiliário, almofadas, roupa da
•
cama, papéis, vestuário e cornas a, pelo menos, 25 cm das partes dianteira,
laterais e traseira do aquecedor, e mantenha-os a, pelo menos, 1 metro do
topo do aquecedor.
Não insira objetos nas ranhuras do aquecedor.
•
PT 50 PT 51
Page 28

AVISOS QUANTO ÀS PILHAS: Apenas os adultos devem manusear a pilha. Não
permita que uma criança use o telecomando, a não ser que a tampa do
comparmento das pilhas esteja bem fixada ao telecomando.
Este telecomando funciona com uma pilha de lío CR2025 (não incluída). Esta pilha
está localizada internamente e prontamente acessível.
Rere a tampa do comparmento da pilha, localizada na parte inferior do
telecomando para remover a pilha.
A pilha deve ser eliminada no seu ponto de reciclagem local.
CONTROLOS
Painel de controlo (na frente do aquecedor)
2
1
Interruptor de ligar/desligar (I/O)
1.
Visor
2.
Botão de programação
3.
Botão do temporizador
4.
Visor
Modo
inavo
Dia da
semana
Modo de
conforto
3
4
5
Botão de seleção do modo
5.
Botão de inavo
6.
/ Botões de subir e descer
7.
Modo
económico
Modo
an-congelamento
Graus °C
Hora e temperatura
Horas
5
6
Telecomando
O telecomando funciona do mesmo modo que o painel de controlo no
aquecedor.
Para instalar a pilha:
Faça deslizar o suporte da pilha na parte inferior do telecomando.
1.
Insira uma pilha de lío (CR2025) no suporte da pilha com o texto
2.
da pilha virado para cima.
Faça deslizar o suporte da pilha de volta para o telecomando.
3.
Quando ulizar o telecomando,
aponte-o sempre para o recetor do sinal
do telecomando.
Recetor do sinal
Cerfique-se de que não há qualquer
obstrução entre o telecomando e o
recetor.
INSTALAÇÃO
O aquecedor encontra-se em conformidade com o sistema de codificação IP24
e é adequado para um uso na casa de banho.
O código IP é um sistema de código para indicar os graus de proteção
fornecidos por uma proteção contra o acesso a peças perigosas, a entrada de
objetos estranhos sólidos, a entrada de água e para dar informação adicional
juntamente com essa proteção.
A descrição de IP24 é apresentada na tabela seguinte.
Letras de
código
Primeiro
caracter
numérico
Segundo
caracter
numérico
IP +
Números
2
4
Significado da proteção do
equipamento
Contra a entrada de objetos
estranhos sólidos ≥ 12,5 mm de
diâmetro
Contra a entrada de água com
salpicos com efeitos danosos ―
Significado da
proteção das
pessoas
Contra o acesso às
peças perigosas
com os dedos
PT 52 PT 53
Page 29

Fora do volume
Volume 2 Volume 1
Selecionar um Modo e Definir a Temperatura
1.
2.
• O símbolo aparece no visor, indicando que o aquecedor
entrou no modo inavo.
Prima para sair do modo inavo.
Prima repedamente para selecionar o modo desejado entre três modos.
• O símbolo do modo correspondente pisca no visor.
Volume 0
Piso com acabamento
Volume oculto
Espaço por debaixo
da banheira
Volume 1 ou 3
Aviso: Este esboço serve apenas de referência. Se a
configuração da sua casa de banho for
diferente da apresentada neste esboço, sugerimos que
contacte um eletricista profissional para efetuar a
instalação correta de acordo com a norma NFC15-100.
FUNCIONAMENTO
AVISO: O aquecedor tem um aviso "NÃO COBRIR" para alertar o ulizador
do risco de sobreaquecimento que existe se o aquecedor for coberto
acidentalmente.
Acertar o dia e a hora
Tem de acertar a data e a hora para ulizar o aquecedor com um dos seguintes
programas: P1, P2, P3 ou o programa individual de 7 dias.
1.
Prima o interruptor da alimentação do lado direito do aquecedor para o lado I.
• O visor acende, apresentando todos os símbolos brevemente e depois
apresentando “1” (segunda-feira) e 12:00 como o dia e hora predefinidos.
• Os dígitos das horas “12” começam a piscar durante alguns segundos.
2.
Enquanto “12” esver a piscar, prima repedamente para selecionar entre
as horas, minutos e dia da semana.
3.
Prima repedamente para acertar as horas / minutos / dia da semana.
4.
Prima para confirmar o acerto e entrar no modo inavo.
• Também pode esperar cerca de 10 segundos. As definições serão confirmadas
automacamente e entra no modo inavo.
Símbolo Modo
Conforto
Descrição
O aquecedor funciona ao nível da temperatura
definida.
Económico O aquecedor mantém a temperatura igual à
temperatura do modo de conforto diminuída
em 3,5 °C.
An-
congelamento
Prima repedamente / para selecionar a temperatura desejada.
3.
O aquecedor funciona a cerca de 7 °C.
• A temperatura pode ser definida entre 5 °C e 30 °C no modo de conforto, e
entre 1,5 °C e 26,5 °C no modo económico.
• A temperatura não pode ser ajustada no modo an-congelamento.
• Passados cerca de 5 segundos, a definição será confirmada.
• O sensor da temperatura consegue ajustar automacamente a temperatura.
Quando a temperatura ambiente for superior à temperatura selecionada, o
aquecedor pára de aquecer.
Acertar o temporizador
Pode ulizar o aquecedor usando um temporizador diferido. Este permite-lhe
programar o aquecedor para funcionar durante um período de tempo definido.
Prima repedamente para definir o período de funcionamento desejado. O
•
temporizador diferido pode ser definido em incrementos de 1 hora até um
máximo de 24 horas.
Para cancelar o temporizador diferido, prima .
•
Programas P1/P2/P3
O aquecedor tem três programas pré-instalados.
Prima repedamente para selecionar P1, P2 ou P3 e depois prima
repedamente / para selecionar a temperatura desejada entre 1,5 °C e
26,5 °C.
PT 54 PT 55
Page 30

O ícone do programa (P1/P2/P3) e a temperatura definida aparecem
alternadamente no visor.
Modo de conforto Modo económico
P1
Segunda-feira - Domingo
Prima repedamente para selecionar o modo desejado.
5.
Modo de conforto Modo económico Modo inavo
Passados cerca de 30 segundos, o aquecedor guarda automacamente as
6.
definições do programa.
Repita os passos apresentados acima para definir os dias seguintes.
7.
LIMPEZA E MANUTENÇÃO
Se selecionar P1, o aparelho funciona todos os dias do mesmo modo: Da meia-noite à
1h00 no modo de Conforto, da 1h00 às 8h00 no modo Económico e das 8h00 à
meia-noite de novo no modo de Conforto.
Segunda-feira - Sexta-feira
P2
Fins-de-semana
Segunda-feira - Sexta-feira
P3
Fins-de-semana
Programa individual de 7 dias
Este programa permite-lhe programar três modos diferentes (Conforto/Económico/
Inavo) no período de tempo definido para cada dia da semana.
Prima para definir o dia.
1.
• O dia “1” começa a piscar.
Enquanto o dia esver a piscar, prima repedamente / para
2.
selecionar o dia da semana desejado (1-7).
Prima para definir o programa individual de 7 dias.
3.
• O período de tempo 0h começa a piscar.
Enquanto o período de tempo esver a piscar, prima repedamente para
4.
selecionar o período de tempo desejado de 1 hora a 24 horas.
Cerfique-se de que o aquecedor é desligado da
alimentação e que arrefeceu até à temperatura ambiente
antes de proceder à limpeza.
Limpe a supercie exterior do aquecedor com um pano
ligeiramente embebido em água. Seque bem.
Nunca coloque dentro de água.
Não use agentes de limpeza corrosivos ou abrasivos.
CARACTERÍSTICAS TÉCNICAS
Classificações: 220-240V~ 50/60Hz 1500W
ELIMINAÇÃO
Como retalhista responsável, preocupamo-nos com o ambiente.
Como tal, aconselhamos que cumpra os procedimentos adequados
para eliminação do aparelho e dos respecvos materiais de
embalamento. Dessa forma, irá ajudar a conservar recursos naturais e
assegurar que são reciclados de uma forma que protege a saúde e o
ambiente.
Deve eliminar este aparelho e a sua embalagem de acordo com a legislação e
regulamentação locais.
Dado que este aparelho contém componentes eletrónicos, o produto e os seus
acessórios devem ser eliminados separadamente do lixo domésco quando
angirem o fim da sua vida úl.
Contacte as autoridades locais para obter informações acerca da eliminação e
reciclagem.
O aparelho deve ser transportado para o ponto de recolha local, para
reciclagem. Alguns pontos de recolha aceitam os aparelhos sem encargos.
Pedimos desculpa por qualquer inconveniente provocado por pequenas
PT 56 PT 57
Page 31

inconsistências nestas instruções, as quais poderão ser resultado do
melhoramento e desenvolvimento do produto.
Darty Holdings SAS © 14 route d’Aulnay 93140 Bondy, France 18 / 05 / 2017
PT 58
 Loading...