


Downloaded from
www . vandenborre . be
ADH20EC
Downloaded from
www . vandenborre . be

Downloaded |
|
from |
|
English P.2 |
www |
|
|
|
. |
French P.14 |
vandenborre |
|
. |
|
be |
Spanish P.26
Dutch P.38
EN-1

WARNINGS |
Downloaded |
|
|
|
|
||
This appliance is intended for domestic householdfromuse |
|
||
only and should not be used for any other purposewwwor in |
|
||
|
. |
|
|
|
vandenborre |
||
any other application, such as for non domestic use or in a |
|
||
commercial environment. |
|
. |
|
This appliance can be used by children aged from 8 years |
|||
be |
|||
|
|
||
and above and persons with reduced physical, sensory or mental capabilities or lack of experience and knowledge if they have been given supervision or instruction concerning use of the appliance in a safe way and understand the hazards involved. Children shall not play with the appliance. Cleaning and user maintenance shall not be made by children without supervision.
If the supply cord is damaged, it must be replaced by the manufacturer, its service agent or similarly qualified persons in order to avoid a hazard.
For the details concerning the method and frequency of cleaning, please see section “Cleaning and maintenance” on page 10.
R 134a is a fluorinated greenhouse gas under the Kyoto Protocol. Its global warming potential (GWP) is 1430. The refrigerant used in this appliance is fluorinated greenhouse gases, which can be harmful to environment and can be responsible for the global warming if it leaks into atmosphere.
EN-2
IMPORTANT SAFETY INSTRUCTIONS |
Downloaded |
|
|
|
|
||
• Disconnect the appliance from the mains socket when not in use or before cleaning. |
from |
|
|
• Do not place any objects on the appliance. |
|
|
|
• Do not drink or use the water collected in the water bucket. |
|
|
|
|
|
|
|
• Do not operate the appliance near flammable gas or combustibles, such as gasoline, benzene, thinner, |
|
||
|
|
www |
|
etc. |
|
. |
|
|
|
|
|
• Do not remove the water bucket during operation. |
|
|
|
• Do not operate the appliance in small spaces. |
|
|
|
• Do not place aerosols or other hazardous materials in the vicinity. Also do not place inflammablevandenborre |
|||
materials such as petrol or thinner nearby. These may explode and cause fire. |
|
. |
|
|
be |
||
• Do not place the appliance near a heat source. This may cause the plastic parts inside to melt and catch fire.
• Operate the appliance only on level, stable surfaces.
• Do not place any water container such as a vase on the appliance. Water spillage may cause insulation failure and electrical shock or fire.
• Do not stand or lean against the appliance. This may cause it to fall over, resulting in personal injury.
• Do not obstruct air intake or outlet with clothing or anything else. Obstruction of the airflow will cause overheating, malfunction or fire.
• Do not operate the appliance without the filter in place.
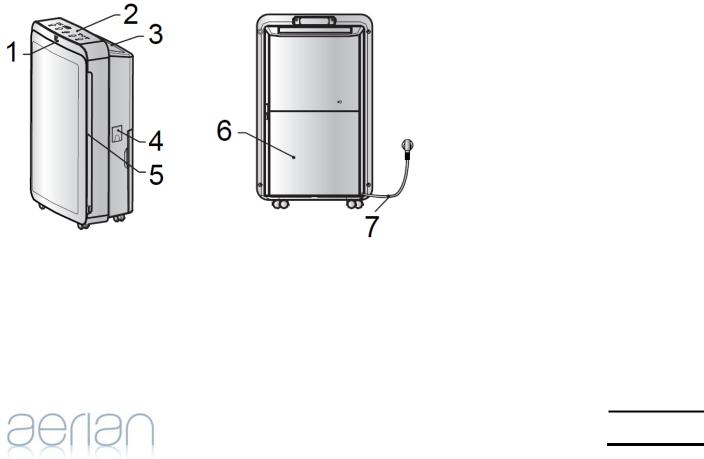
IDENTIFICATION OF PARTS
Front and Side Views |
Rear View |
1. Display
2. Control panel
3. Air outlet
4. Cover for continuous drainage point
5. Air intake grille
6. Water bucket
7. Power cord
EN-3

POSITIONING YOUR DEHUMIDIFIER
• Select a suitable location, making sure you have easy
access to the mains socket.
• Allow at least 50 cm of space on the top and 20 cm at
the sides of the appliance for proper circulation.
•Install your dehumidifier on a stable, level surface. Make sure the surface is strong enough to support the weight of the dehumidifier with a full bucket.
Do not sit or stand on the dehumidifier.
•Place the appliance away from the clothes dryer, heater or radiator.
•Use the appliance to prevent books or valuables
from
moisture damage.
Downloaded from
www . vandenborre . be
•Use the appliance in a basement to help prevent moisture damage.
•The appliance must be operated in an enclosed area to be most effective.
•Close all doors, windows and other outside openings to the room.
•Casters can let you move the appliance easily.
OPERATION
•This appliance is designed to operate with working environment between 5°C and 35°C.
•Make sure the water bucket is correctly fitted otherwise the appliance will not operate properly.
•Do not connect the appliance to a multiple socket outlet.
•Plug the appliance into the mains socket.
NOTE: Always be careful when moving the appliance, especially as water gets higher in the bucket; the higher the water gets in the bucket, the easier it is for the appliance to fall over when being moved. It is recommended to empty the bucket before moving the appliance.
Control Panel
EN-4
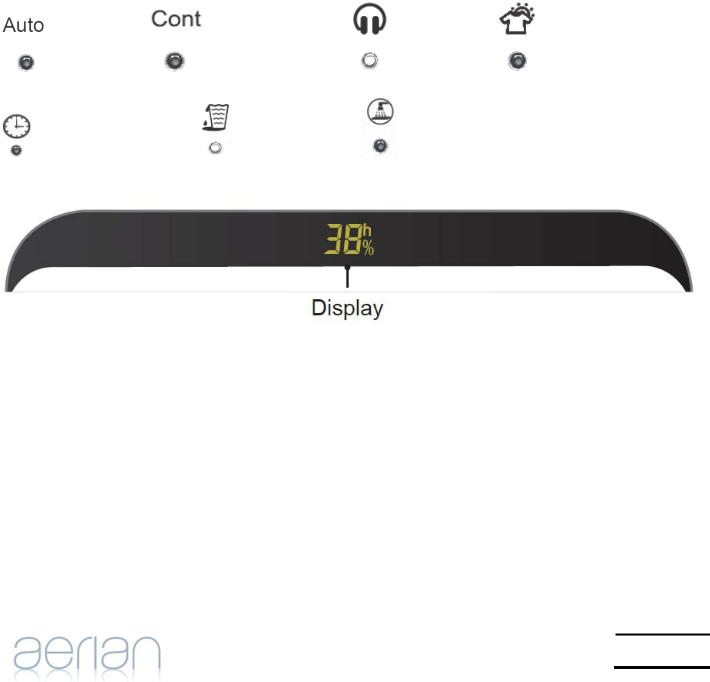
Buttons:
 :
:
 :
:
 :
:
 :
:
 :
:
|
Downloaded |
|
Press to turn the dehumidifier on or off. |
from |
|
|
|
|
Press to select the delayed start or delayed stop function. |
www |
|
|
|
|
|
|
. |
Press to adjust relative humidity percentage level. |
|
vandenborre |
|
|
|
Press to select the desired operating mode: auto, continuous, quiet and dry modes. |
|
|
|
|
. |
Press to activate or deactivate the fan speed function. |
|
be |
|
|
|
Indicator lights:
 : Fan speed (High Medium Low)
: Auto mode |
: Continuous mode |
: Quiet mode |
: Dry mode |
:Delayed start/stop |
:Bucket full |
: Clean filter |
|
Display: To show the relative humidity percentage level, error codes, the delayed start or delayed stop time.
Power On and Off
Plug the appliance into the mains socket.
• The indicator light on the power button  will illuminate red. Press
  to turn on the appliance.
•The indicator light on the power button will illuminate white.
•The display will show the ambient humidity level.
To turn off the appliance, press  again. The indicator light on the power button will illuminate red again.
EN-5

NOTE: In the event of a power failure |
Downloaded |
|
|
||
Once the power is restored after a power failure, the appliance will continue to operate at the selected |
||
settings before the power failure. |
from |
|
|
|
|
Setting the Fan Speed |
www |
|
. |
||
Repeatedly press |
to select the desired fan speed. |
vandenborre |
|
||
The corresponding indicator light will illuminate. |
. |
|
|
|
|
|
|
be |
NOTE: You cannot set the fan speed when the appliance is in the quiet and dry modes.
Setting the Humidity Level
Repeatedly press  to set the required humidity level. The humidity level can be set within a range of 30% to 80%.
yFor drier air, set the humidity level for a lower percentage value.
yFor damper air, set the humidity level for a higher percent value.
Each time you press  the humidity level will be increased by 10%. After you have set the desired humidity level, the display will briefly show the set humidity level and then return to actual ambient humidity level.
NOTE: You cannot set the humidity level when the appliance is in the continuous and dry modes.
Setting the Mode
NOTE: In auto and quiet modes if the ambient humidity level is lower than the set humidity level or lower than the default comfortable temperature, the appliance will stop dehumidifying.
Auto mode
Repeatedly press  until the indicator light
  illuminates, indicating that the appliance is in the auto mode.
In this mode, the appliance will automatically select the comfortable humidity level.
Continuous mode |
|
|
Repeatedly press |
until the indicator light |
illuminates, indicating that the appliance is in the |
continuous mode.
With this function the appliance will operate continuously.
EN-6
Quiet mode |
|
Downloaded |
|
|
|
|
|
Repeatedly press |
until the indicator light |
illuminates, indicating that the appliancefrom |
is in the |
quiet mode. |
|
|
|
In this mode, the appliance will automatically select the comfortable humidity level and operatewwwat the low |
|||
Dry mode |
|
|
. |
|
|
vandenborre |
|
fan speed. |
|
|
|
|
|
|
. |
|
|
|
be |
Repeatedly press |
until the indicator light |
illuminates, |
|
indicating that the appliance is in the dry mode. |
|
|
|
The fan speed is fixed and cannot be adjusted. The humidity level will be automatically controlled according to the ambient humidity.
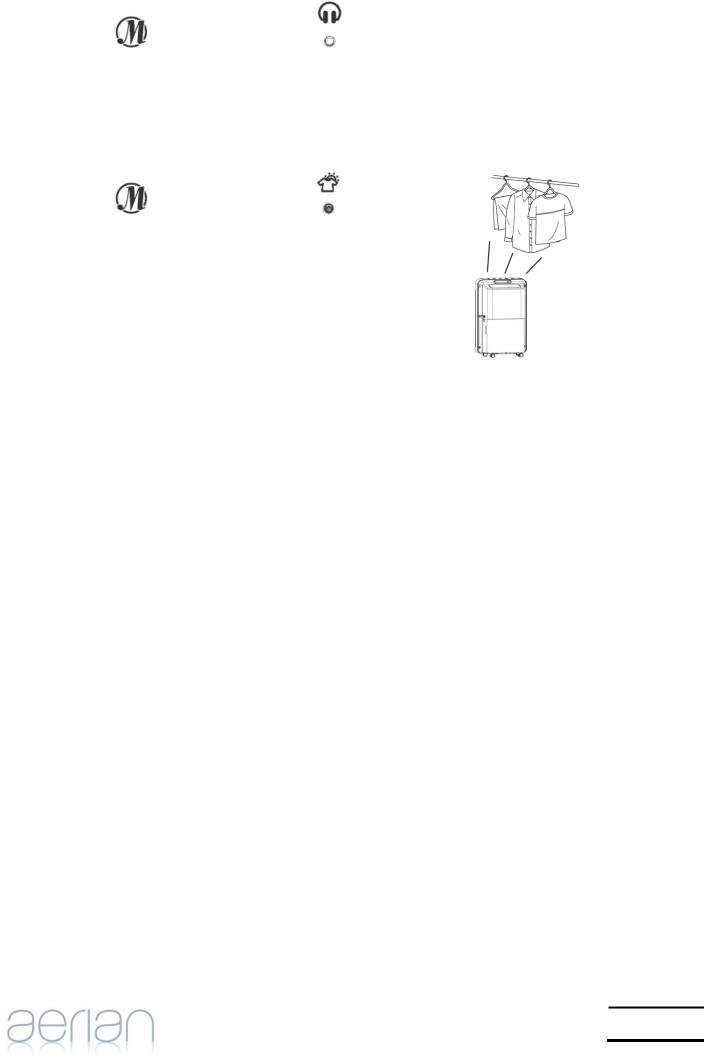
Tips for drying wet cloths:
yAllow a 30 50 cm gap between the air outlet and any clothing.
yTo allow good airflow, line the wet clothes up and leave space between each garment.
yHang wet thick clothing directly in front of the air outlet. The optimal drying performance may not be obtained for thick and heavy clothing.
Setting the Timer
To program the delayed start function:
1.When the appliance is in the power off state, press  .
.
•The indicator light  will illuminate and the display will show the hour.
2.While the hour is displaying, repeatedly press or press&hold  to set the desired hours.
•The delayed start time will be changed by 1 hour increments up to 24 hours.
3.After a few seconds the set time will be confirmed and then disappear from the display.
4.When the set time has elapsed, the appliance will start working.
To program the delayed stop function:
1.When the appliance is in the power on state, press  .
.
•The indicator light  will illuminate and the display will show the hour.
2.While the hour is displaying, repeatedly press or press&hold  to set the desired hours.
•The delayed stop time will be changed by 1 hour increments up to 24 hours.
3.After a few seconds the set time will be confirmed and then the display will return to the ambient humidity level.
EN-7
4. When the set time has elapsed, the appliance will stop working. |
|
Downloaded |
|
|||
|
|
|
|
|||
To modify or cancel the timer: |
|
|
|
from |
|
|
• If you wish to modify the set delayed start or stop time, press |
|
|
www |
|
||
once and then while the hour is |
|
|||||
|
|
|
|
|
. |
|
displaying, repeatedly press or press&hold |
until the desired time is selected. |
vandenborre |
||||
|
|
|||||
• If you wish to cancel the timer, press |
once and then while the hour is displaying repeatedly press |
. |
||||
|
|
|
|
|
|
|
or press&hold |
until the display shows “00h”. You can also press |
. |
|
be |
||
Other Functions
Bucket full
The indicator light  will flash when the water bucket is full or not in place. Please empty the bucket or replace it in the correct position and then this indicator light will go out.
Auto Shut Off
The dehumidifier will shut off when the water bucket is full, or when the water bucket is removed or not placed in the proper position. It will also be shut off when the ambient humidity level is 5% lower than the set dehumidity level.
Cleaning filter
When the indicator light  illuminates, you need to clean the filter by referring to the Cleaning and
Maintenance section. Once the filter has been cleaned and replaced, press |
and |
at the same |
time and then the indicator light  will go out.
Child lock function
To activate this function, press  and
and  at the same time and the letters “LC” will briefly flash on the display. All buttons will be disabled.
To deactivate this function, press  and
and  at the same time again and the letters “LC” will disappear from the display.
REMOVING COLLECTED WATER
Emptying the water bucket:
When the water bucket is full, the indicator light  will illumiante.
EN-8
1.Slowly pull out the water bucket.
•Hold the appliance firmly and pull out the bucket by the handles on both sides of the bucket, being careful not to spill any water.
•Carry a full bucket carefully by the bucket handle.
2.Pour out the water.
Downloaded from
www . vandenborre . be
3.Push the water bucket gently all the way in.
•Failing to push the bucket securely may cause the appliance to stop operating.
4. When the bucket is put back, the appliance will start operating. The indicator light  will go out.
NOTE: Never drink the water or use it to water plant.
Continuous drainage:
If the appliance is to be operated for long periods but you are unable to empty the bucket, it is recommended to use the continuous drain facility.
1.Open the cover on the side of the appliance.
2.Unscrew the drain cap and then remove the rubber plug.
3.Fasten a hose (not supplied) with a diameter of 16 mm to the drain outlet.
4.Make sure that the hose is not higher than the outlet, otherwise water will remain in the bucket. Also check that the hose is not kinked.
EN-9

Downloaded from
www . vandenborre . be
NOTE: When the continuous drain facility is not being used, remove the hose from the outlet and attach the rubber plug and drain cap back to the drain outlet.
CLEANING AND MAINTENANCE
Turn off and disconnect the appliance from the mains socket before performing any cleaning or maintenance operations.
Never immerse the appliance in water.
Cleaning the body
Clean the outside of the appliance with a slightly damp cloth. Dry thoroughly.
Do not use abrasive or chemical cleaning agents.
Cleaning the air filter
The air filter behind the front panel should be checked and cleaned regularly.
1. Remove the front panel and filter.
2.Clean the filter in warm soapy water. Rinse and dry it thoroughly before replacing it.
3.Fit the filter back in place.
EN-10

4.Attach the front panel to the appliance.
•Hook the top tabs of the front panel to the top part of the appliance.
Downloaded from
www . vandenborre . be
CAUTION: DO NOT operate the dehumidifier without a filter because dirt and lint will clog it and reduce performance.
Routine cleaning of the bucket (once a month)
Depending on where the dehumidifier is used, the inside of the bucket may become dirty as a result of dirt and dust contained in the air.
To clean the bucket,
1.Pull up the buckle of the bucket lid to remove the lid from the bucket.
2.Clean the bucket and lid in soapy water.
3.After cleaning, attach the lid to the bucket.
•Align the the tabs on the bucket with the holes in the lid and then press down the lid to the bucket until it clicks into place.
4.Replace the bucket into the appliance.
Storage
If the appliance is not used for long periods, after turning off and unplugging the appliance from the mains socket, empty the bucket.
Clean the outside of the appliance. Clean and reposition the bucket and air filter. Cover the appliance to protect it from dust.
Store the appliance upright in a dry, well ventilated place.
EN-11
TROUBLESHOOTING |
|
|
Downloaded |
|
|
Before calling for service, check the following items yourself. |
|
||||
|
from |
|
|||
|
|
|
|
|
|
Problem |
|
|
What to check |
|
|
|
|
|
|
||
The appliance does not operate. |
|
• Check that the appliance is plugged into the mains socket. |
|
||
|
|
|
|
www |
|
|
|
• Check that the fuse/circuit breaker box. |
. |
|
|
|
|
|
|
||
|
|
• Check that the appliance has reached the set humidity level or |
|
||
|
|
the bucker is full. |
|
vandenborre |
|
|
|
• Check that the bucket is placed in place. |
|||
Room humidity does not go |
• Check that all doors or windows are closed or not opened too |
. |
|||
be |
|||||
down. |
|
often. |
|
|
|
•Check that the room temperature is higher than 5°C.
•Check that there is no kerosense heater or other device giving off water vapour in the room.
• Check that the filter is not clogged.
• Check that the appliance is not tilted.
•Check that the floor surface where the appliance is placed is stable and level.
• Check that the rubber plug is inserted into the drain outlet when using the bucket to collect water.
•Check that the hose is connected properly to the drain outlet when using the continuous external draining facility.
Code |
Description |
Possible Solution |
L1 |
Humidity sensor error |
|
F1 |
Ambient temperature sensor error |
Unplug the appliance and plug it back in. If this error |
F2 |
Temperature sensor error |
repeats, call for service. |
E3 |
Appliance malfunction |
|
F0 |
Freon lacking protection |
Unplug the appliance and call for service. |
H3 |
Overload protection |
|
|
|
|
EN-12

SPECIFICATIONS
Rated voltage and frequency |
220 240V~ 50Hz |
Rated dehumidification |
0.501/h (EN810) |
capacity |
|
Power input |
345W (EN810) |
Dehumidification capacity |
0.831/h (at 30°C, 27.1°C) |
Rated input |
385W |
Pressure |
Discharge : 3.0 MPa |
|
Suction: 1.8 MPa |
Maximum allowable pressure |
3.0 Mpa |
Refrigerant |
R134a/ 0.185kg |
Weight |
14kg |
Downloaded from
www . vandenborre . be
We apologise for any inconvenience caused by minor inconsistencies in these instructions, which may occur as a result of product improvement and development.
Darty Plc © UK: EC1N 6TE 22 / 12 / 2014
EN-13

AVERTISSEMENTS
Downloaded
Cet appareil est destiné à un usage domestique |
|
|
from |
|
|
www |
|
|
uniquement. Toute utilisation autre que celle prévue pour |
|
|
cet appareil, ou pour une autre application que celle |
. |
|
vandenborre |
||
|
|
|
prévue, par exemple une application commerciale, est |
|
|
interdite. |
|
. |
|
|
be |
Cet appareil peut être utilisé par des enfants âgés d'au moins 8 ans et par des personnes ayant des capacités physiques, sensorielles ou mentales réduites ou dénuées d’expérience ou de connaissance, s'ils (si elles) sont correctement surveillé(e)s ou si des instructions relatives à l'utilisation de l'appareil en toute sécurité leur ont été données et si les risques encourus ont été appréhendés. Les enfants ne doivent pas jouer avec l’appareil. Le nettoyage et l'entretien par l'usager ne doivent pas être effectués par des enfants sans surveillance.
Si le câble d'alimentation est endommagé, il doit être remplacé par le fabricant, son service après vente ou des personnes de qualification similaire afin d'éviter un danger.
En ce qui concerne la méthode et la fréquence du nettoyage, référez vous à la section “NETTOYAGE ET ENTRETIEN” en page 22.
R 134a est un gaz à effet de serre fluorescent relevant du protocole de Kyoto. Son potentiel de réchauffement planétaire (GWP) est 1430.
Le fluide frigorigène utilisé dans cet appareil est un gaz à
FR-14
 Loading...