

Page 1

AGPH15
Page 2
English
French
Dutch
P2
P15
P28
WARNINGS
This appliance is intended for domestic
household use only and should not be
used for any other purpose or in any
other application, such as for nondomestic use or in a commercial
environment.
If the supply cord is damaged, it must be
replaced by the manufacturer, its
service agent or similarly qualified
persons in order to avoid a hazard.
For the details concerning the method of
cleaning, please see section “Cleaning
and Maintenance” on page 14.
Children of less than 3 years should be
EN 1
kept away unless continuous
supervised.
Children aged from 3 years and less
than 8 years shall only switch on/off the
appliance provided that it has been
placed or installed in its intended normal
operating position and they have been
given supervision or instruction
concerning use of the appliance in a
safe way and understand the hazards
involved. Children aged from 3 years
EN 2
Page 3
and less than 8 years shall not plug in,
regulate and clean the appliance or
perform user maintenance.
CAUTION ― Some parts of this product
can become very hot and cause burns.
Particular attention has to be given
where children and vulnerable people
are present.
WARNING: In order to avoid
overheating, do not cover the heater.
The heater must not be located
immediately below a socket-outlet.
WARNING: The heater must not be used
if the glass panel is damaged.
experience and knowledge if they have
been given supervision or instruction
concerning use of the appliance in a
safe way and understand the hazards
involved.
Children shall not play with the
appliance.
Cleaning and user maintenance shall
not be made by children without
supervision.
Do not use this heater with a
programmer, timer, separate remotecontrol system or any other device that
switches the heater on automatically,
since a fire risk exists if the heater is
covered or positioned incorrectly.
Do not use this heater in the immediate
surroundings of a bath, a shower or a
swimming pool.
The main plug must remain easily
accessible.
This appliance can be used by children
aged from 8 years and above and
persons with reduced physical, sensory
or mental capabilities or lack of
The heater must not be installed closed
to curtains and other combustible
materials.
Regarding the instructions of the
method on how to fix the feet to the
heater, refer to the section “Feet
Assembly”.
Regarding the instructions for the heater
intended to be fixed by screws on the
EN 4EN 3
Page 4
method of fixing and how to install the
appliance, refer to the section “Wall
Mount”.
ASSEMBLY
The heater is designed to be used either freestanding
or wall mounted.
Assembling the feet
Carefully turn the heater
1.
upside down and attach the feet
to the base of the heater.
Make sure that the holes on the
feet and the base of the heater
are aligned.
Insert and tighten the supplied
2.
screws to secure both feet to the
base of the heater.
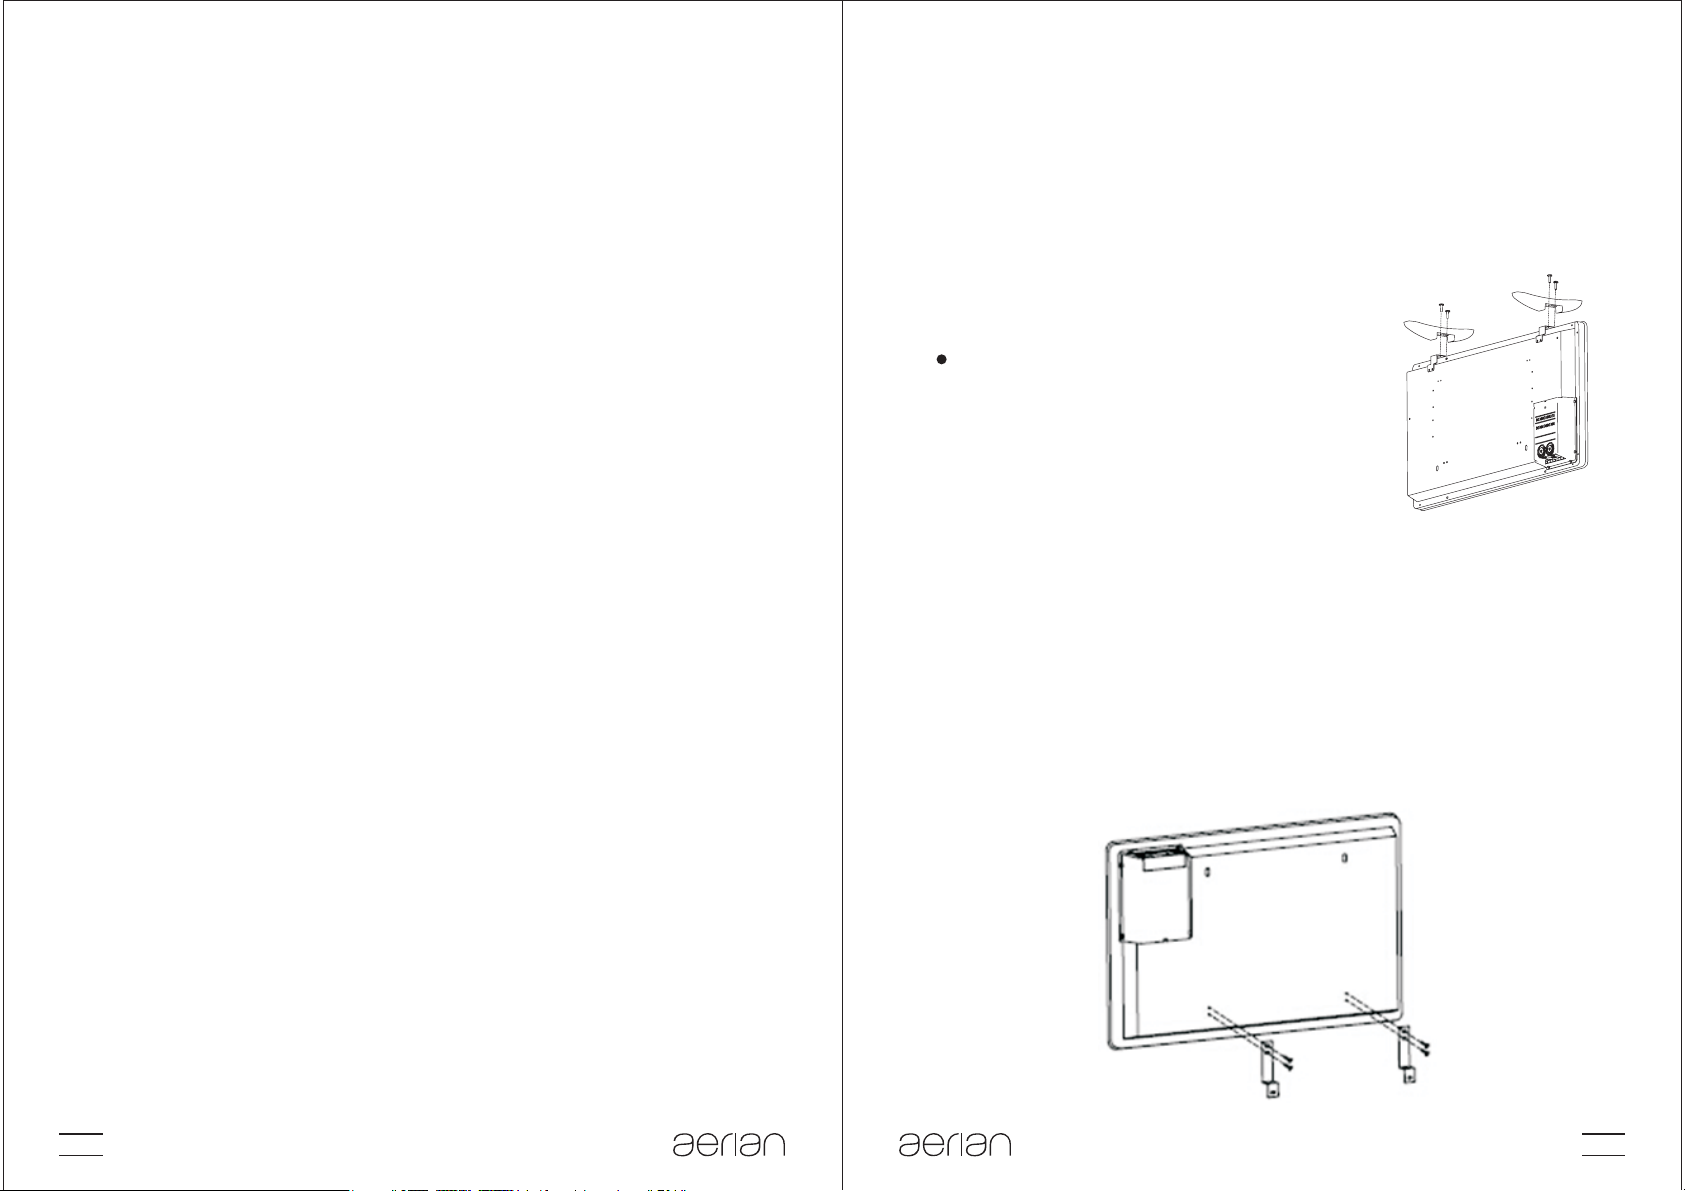
Wall mounting
IMPORTANT: Before drilling the wall, make sure the
area is free of electrical wires or pipes.
1.Remove the feet from the base of the heater by
removing screws.
2.Fix two supplied wall brackets at the bottom of the
heater.
EN 6EN 5
Page 5
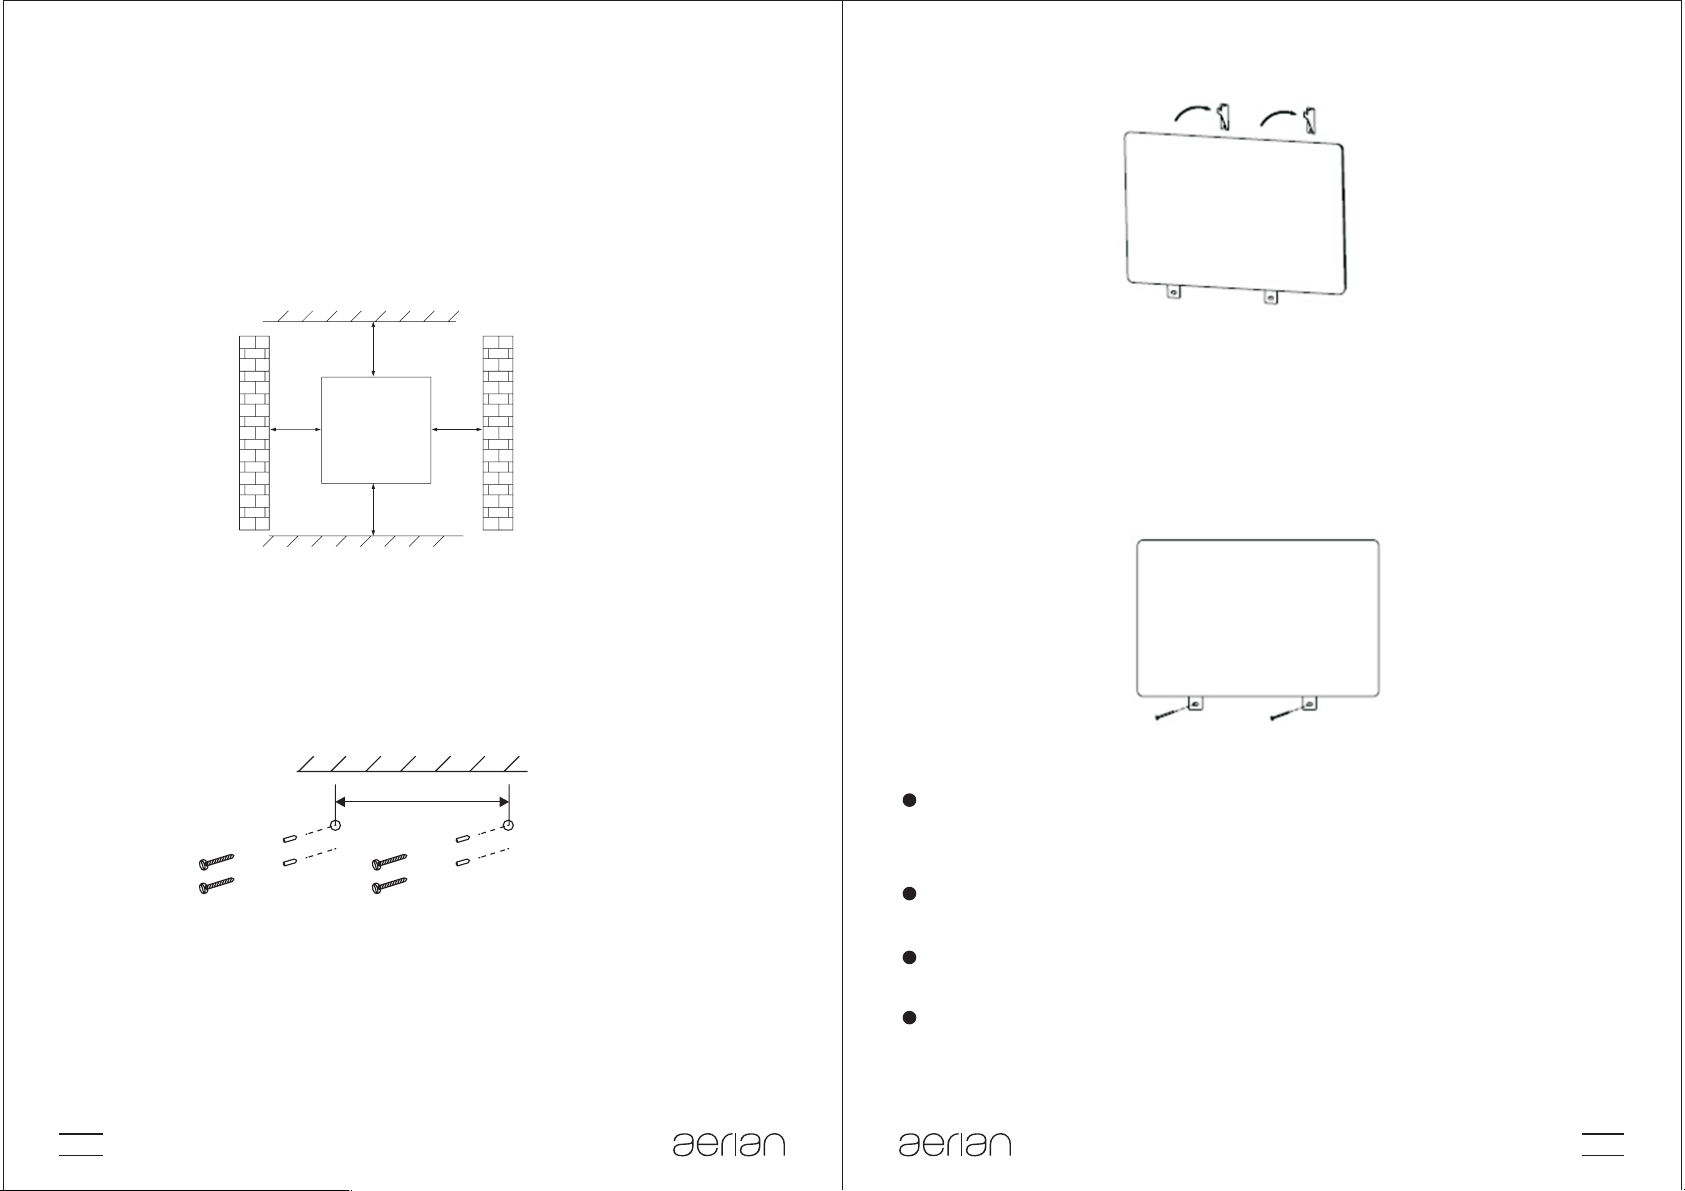
3 Mark the two top fixing points on the wall. The
.
space between those points should be 315mm.
A clearance of at least 250 mm shall be provided
on three sides of the heater and the top of the heater
shall be at least 300mm below the ceiling.
CEILING
≥300mm
≥250mm≥250mm
≥300mm
FLOOR
4.On the points you marked, drill four 8mm diameter
holes 40mm deep in the wall.
5.Insert a wall plug into each hole.
6.Fix the supplied two top wall brackets onto the wall
with the supplied four screws.
8.Remove the heater from the top wall brackets and
drill the bottom holes 40mm deep in the wall.
9.Fit the wall plugs into the bottom holes.
10.Hang the heater onto the top wall brackets and fix
the heater onto the bottom wall brackets by tightening
the screws.
315mm
7.Hang the heater onto the top wall brackets and
mark the bottom fixing points on the wall.
IMPORTANT SAFETY INSTRUCTIONS
Switch off and disconnect the appliance from the
mains socket when the appliance is not in use and
before cleaning.
Always use and store the heater in the upright
position.
Do not use the heater in rooms where flammable
liquids or gases are used or stored.
Ensure that the heater is positioned no closer than
1m to curtains or furniture during use as this could
create a fire hazard.
EN 8EN 7
Page 6
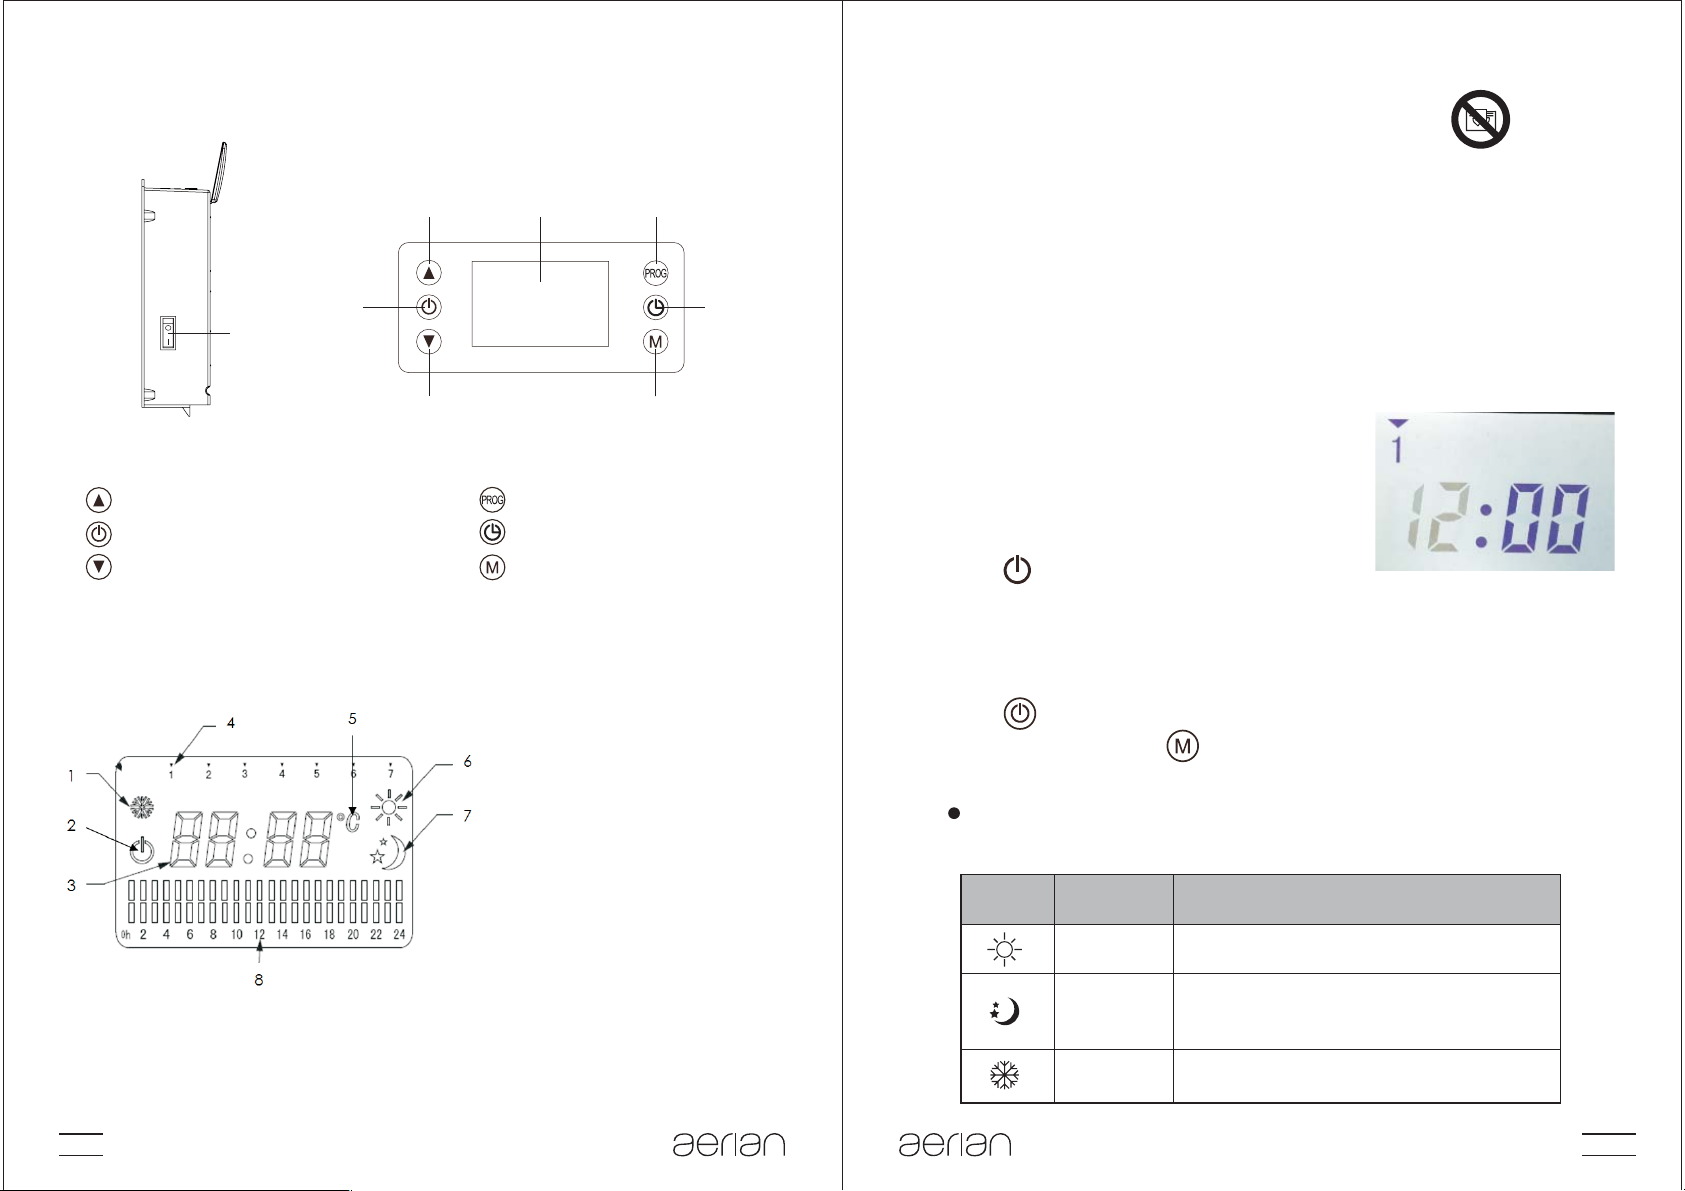
CONTROLS
3
1
1.Main power switch (I/O)
2. Up button
3. Standby button
4. Down button
Display
Control panel (at the top of the heater)
2
4
5 6
8
5.Display
6. Programming button
7. Timer button
8. Mode selection button
1.Antifreeze mode
2.Standby
3.Time and temperature
4.Day of the week
5.Degree C
°
6.Comfort mode
7.Economy mode
8. Hours
OPERATION
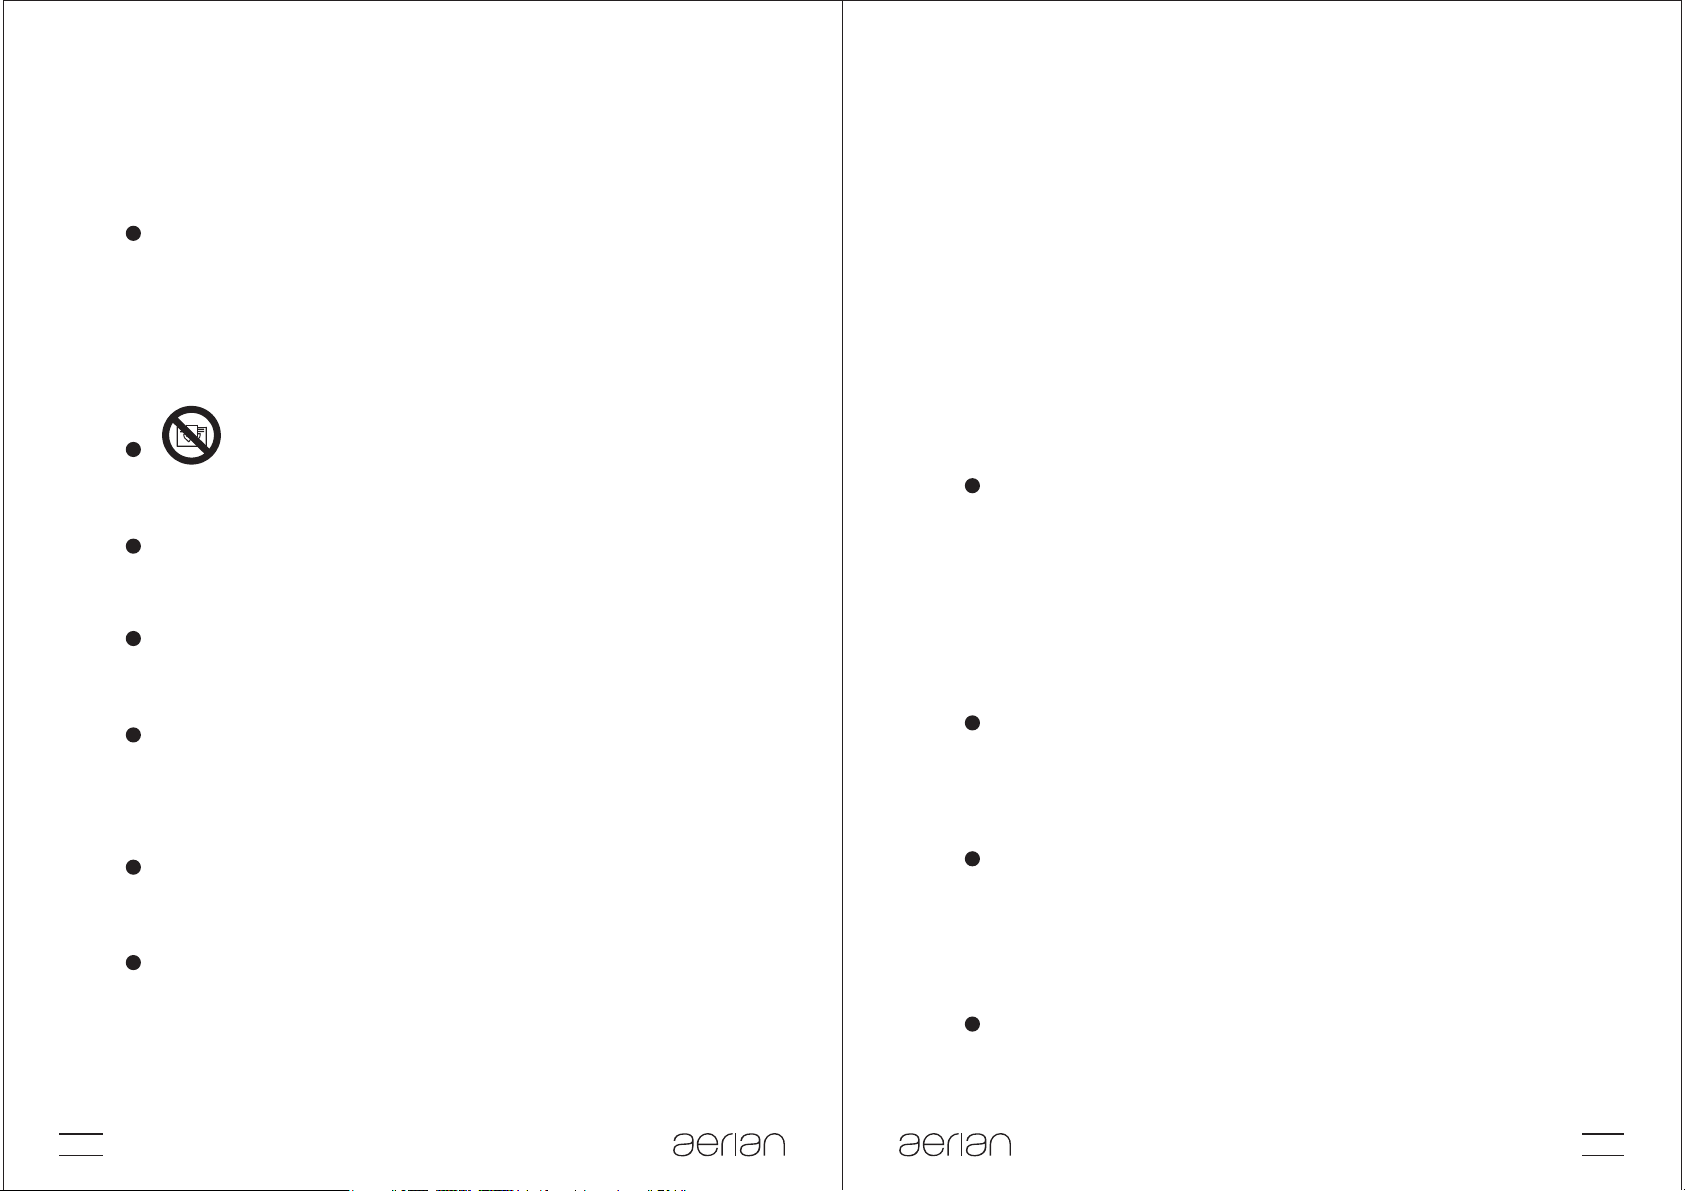
WARNING:
The heater carries a warning
‘DO NOT COVER' to alert the user to the risk of
overheating that exists if the heater is accidentally
covered.
7
Press the main power switch on the right hand side of
Switching on the Heate
r
the heater to the I side.
The display will illuminate,
displaying all symbols briefly and
then displaying “1” (Monday) and
12:00 as the default day and time
setting. The hour digits “12” will
flash for a few seconds then the
symbol will appear on the
display, indicating that the heater
enters the standby state.
Selecting a Mode and Setting the Temperature
1.Press to exit standby state.
2.Repeatedly press to select the desired mode
among three modes.
The corresponding mode symbol will flash on
the display.
Symbol Mode Description
Comfort
Economy
The heater will run at the set temperature level.
The heater will maintain temperature which is
equal to the comfort mode temperature
lowered by 3.5°C.
Antifreeze
The heater will run at approximately 7°C.
EN 10EN 9
Page 7
.
3 Repeatedly press / to select the desired
temperature between 5 C and 30 C.
°°
The temperature cannot be adjusted in
antifreeze mode.
After about 5 seconds the setting will be
confirmed.
The temperature sensor can automatically
adjust the temperature. When the room
temperature is higher than the selected
temperature, the heater will stop heating.
Setting the Timer
You can operate the heater using a delayed off timer.
This allows you to program the heater to operate for a
set period of time.
Repeatedly press to set the desired operation
period. The delayed off timer can be set in 1 hour
increments to a maximum of 24 hours.
To cancel the delayed off timer, repeatedly press
until the number “0” flashes on the display.
6.While the day digit is flashing, repeatedly press
to set the day of the week.
7.After about 5 seconds, the setting will be confirmed.
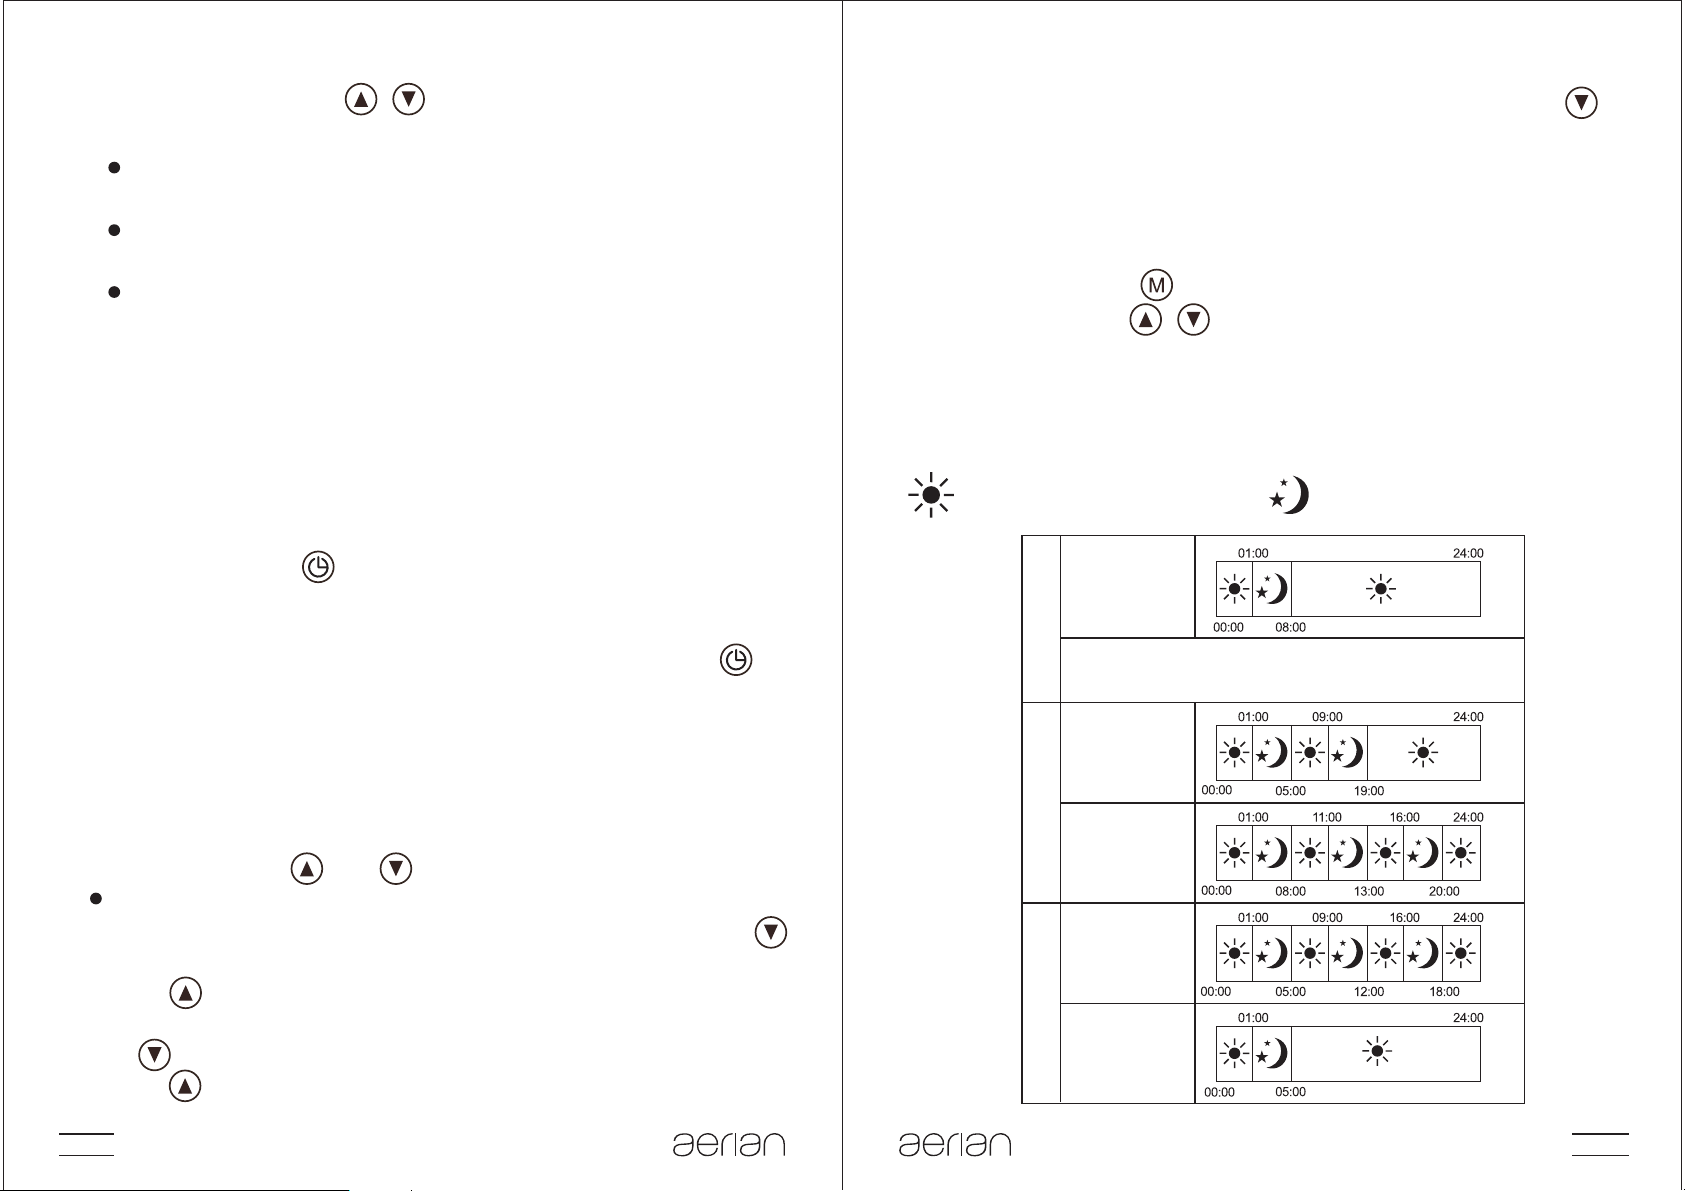
P1/P2/P3 Programs
The heater has three preinstalled programs.
Repeatedly press to select P1, P2 or P3 and then
repeatedly press / to select the desired
temperature between 5 C and 30 C.
°°
The icon of the program (P1/P2/P3) and the set
temperature will appear on the display alternately.
Comfort mode Economy mode
Monday –SundayP1
If you select P1, theappliance willoperate every day thesame way:
from midnight to 1 amin Comfortmode, from 1 amto 8am in
Economy mode and from 8am tomidnight again in Comfortmode.
Setting the Day and Time
Setting the date and time is required to operate the
heater with one of the following programmes: P1, P2,
P3 or Individual 7-day programme.
1.Press and hold and .
The hour digits will flash.
2.While the hour digits are flashing, repeatedly press
to set the hours.
3.Press and the minute digits will flash.
4.While the minute digits are flashing, repeatedly
press to set the minutes.
5.Press and the day digit will flash.
Monday – Friday
P2
Weekends
Monday – Friday
P3
Weekends
EN 12EN 11
Page 8

Individual 7 Day Program
This programme allows you to programme three
different modes (Comfort/Economic/Standby) at the
set time period for each day of the week.
1.Press to set the individual 7 day
program.
The time period 0h will flash.
2.While the time period is flashing,
repeatedly press to select the desired time
period from 1 hour to 24 hours.
3.Repeatedly press toselect the desired mode.
Comfort mode Economic mode Standby mode
4.Press .
The day “1” will flash.
1 234567
5.While the day is flashing, repeatedly press / to
select the desired day of the week (1-7).
6.Repeat steps above to set the following days.
To modify this programme, press and then use / .
For example, if you want to reset the day of the week
from Monday (1) to Thursday (4), repeatedly press
until the number1 flashes, then repeatedly
press / until the number 4 flashes.
CLEANING AND MAINTENANCE
Make sure that the heater is switched off and
unplugged from the mains socket and has cooled to
room temperature before cleaning.
Clean the outer surface of the heater with a slightly
damp cloth. Dry thoroughly.
Never immerse it in water.
Do not use any abrasive or chemical cleaning agents.
SPECIFICATIONS
Ratings: 220V-240V~ 50Hz
1500W
We apologise for any inconvenience caused by minor
inconsistencies in these instructions, which may
occur as a result of product improvement and
development.
Darty Holdings SNC © 14 route d'Aulnay 93140
Bondy, France
29 / 05 / 2015
EN 14EN 13
Page 9

AVERTISSEMENTS
Cet appareil est destiné à un usage
domestique uniquement. Toute
utilisation autre que celle prévue pour
cet appareil, ou pour une autre
application que celle prévue, par
exemple une application commerciale,
est interdite.
Si le câble d'alimentation est
endommagé, il doit être remplacé par le
fabricant, son service après vente ou
des personnes de qualification similaire
afin d'éviter un danger.
En ce qui concerne la méthode du nettoyage,
référez-vous à la section “NETTOYAGE ET
aient reçu des instructions quant à
l'utilisation de l'appareil en toute
sécurité et en comprennent bien les
dangers potentiels.
Les enfants âgés entre 3 ans et 8 ans ne
doivent ni brancher, ni régler ni nettoyer
l'appareil, et ni réaliser l'entretien de
l'utilisateur.
ATTENTION - Certaines parties de ce
produit peuvent devenir très chaudes et
provoquer des brûlures. Il faut prêter
une attention particulière en présence
d'enfants et de personnes vulnérables.
MISE EN GARDE: Pour éviter une
surchauffe, ne pas couvrir l'appareil de
ENTRETIEN” en page 27.
Il convient de maintenir à distance les
enfants de moins de 3 ans, à moins
qu'ils ne soient sous une surveillance
continue.
Les enfants âgés entre 3 ans et 8 ans
doivent uniquement mettre l'appareil en
marche ou à l'arrêt, à condition que ce
dernier ait été placé ou installé dans une
position normale prévue et que ces
enfants disposent d'une surveillance ou
chauffage.
L'appareil de chauffage ne doit pas être
placé juste en dessous d'une prise de
courant.
MISE EN GARDE: L'appareil de
chauffage ne doit pas être utilisé si les
panneaux de verre sont endommagés.
Attention: Ne pas utiliser ou installer cet
appareil de chauffage à proximité d'une
baignoire, d'une douche ou d'une piscine.
FR 16FR 15
Page 10

La fiche de prise de courant doit
demeurer facilement accessible.
Cet appareil peut être utilisé par des
enfants âgés d'au moins 8 ans et par des
personnes ayant des capacités
physiques, sensorielles ou mentales
réduites ou dénuées d'expérience ou de
connaissance, s'ils (si elles) sont
correctement surveillé(e)s ou si des
instructions relatives à l'utilisation de
l'appareil en toute sécurité leur ont été
données et si les risques encourus ont
été appréhendés.
Les enfants ne doivent pas jouer avec
l'appareil.
Le nettoyage et l'entretien par l'usager
L' appareil de chauffage ne doit pas être
installé à proximité de rideaux et autres
matériaux combustibles.
En ce qui concerne la méthode sur
l'installation des pieds, référez-vous
dans la section “Assemblage des pieds”.
En ce qui concerne les informations
détaillées sur la méthode de fixation
pour l'installation de l'appareil de
chauffage destiné à être fixé par des vis
ou d'autres moyens, référez-vous dans
la section “Fixation Murale”.
ne doivent pas être effectués par des
enfants sans surveillance.
Ne pas utiliser cet appareil de chauffage
avec un programmateur, une minuterie,
un système de commande à distance
séparé ou tout autre dispositif qui met
l'appareil de chauffage sous tension
automatiquement, car il y a risque de feu
si l'appareil est recouvert ou placé de
façon incorrecte.
FR 18FR 17
Page 11

ASSEMBLAGE
Ce radiateur convecteur est conçu pour être utilisé en
pose libre ou fixé sur un mur.
Assemblage des pieds
Retournez précautionneusement
1.
le radiateur et assemblez les
pieds à la base du radiateur.
Alignez les trous des pieds avec
ceux situés sur la base du radiateur.
Insérez et serrez les vis fournies
2.
pour fixer les deux pieds à la base
de l'appareil.
Fixation murale
IMPORTANT: Avant de percer des trous dans un mur,
vérifiez qu'il n'y a aucun fil électrique ni aucune
conduite dans ce mur.
1.Démontez les pieds de la base du radiateur en
dévissant les vis.
2.Fixez les deux supports muraux fournis sur le bas
du radiateur.
3.Marquez sur le mur l'emplacement des deux trous
de fixation supérieurs. Ces points doivent être
espacés de 315mm.
Un espace libre d'au moins 250 mm doit être prévu
sur trois côtés du radiateur et le haut de l'appareil
doit être éloigné au moins de 300 mm du plafond.
PLAFOND
≥300mm
≥250mm≥250mm
≥300mm
SOL
4.Au niveau des points marqués, percez des trous de 8
mm de diamètre et de 40mm de profondeur dans le mur.
5.Insérez une cheville murale dans chaque trou.
6.Fixez les deux supports muraux supérieurs fournis
dans le mur avec les quatre vis fournies.
315mm
7.Accrochez le radiateur aux supports muraux
supérieurs et marquez sur le mur l'emplacement des
points de fixation inférieurs.
FR 20FR 19
Page 12

BOUTONS DE CONTRÔLE
Panneau de contrôle (en haut du radiateur)
2
5 6
8.Enlevez le radiateur des supports muraux
supérieurs et percez les deux trous inférieurs dans le
mur à une profondeur de 40 mm.
9.Insérez les chevilles dans les trous inférieurs.
.
10 Placez le radiateur sur les supports muraux
supérieurs et inférieurs et fixez-le en vissant
solidement les vis.
INSTRUCTIONS IMPORTANTES DE SÉCURITÉ
Eteignez le radiateur et débranchez le câble
d'alimentation de la prise murale lorsque l'appareil
n'est pas utilisé et avant de le nettoyer.
Le radiateur doit toujours être utilisé et rangé en
position verticale.
N'utilisez pas le radiateur dans les pièces où des
gaz ou liquides inflammables sont utilisés ou
stockés.
Veillez à placer le radiateur à plus d'un mètre des
rideaux ou des meubles pendant son utilisation,
pour éviter de provoquer un incendie.
3
1
4
1.Interrupteur d'alimentation (I/O)
2. Bouton Haut
3. Bouton de veille
4. Bouton Bas
5.Écran d'affichage
6. Bouton de programmation
7. Bouton du minuteur
8. Bouton de sélection du mode
Écran d'affichage
1.Mode Antigel
2.Veille
3.Heure et température
4.Jour de la semaine
5.Degré C
6.Mode Confort
7.Mode Economique
8.Heures
7
8
°
FR 22FR 21
Page 13

FONCTIONNEMENT
AVERTISSEMENT:
Le radiateur porte le symbole
d'avertissement " NE PAS COUVRIR" qui alerte
l'utilisateur sur le risque de surchauffe qui pourrait se
produire si le radiateur est recouvert accidentellement.
Mise en marche du radiateur
Appuyez sur l'interrupteur d'alimentation situé sur le
côté droit du radiateur pour le mettre en position I.
L'écran s'allume, affichant
brièvement tous les symboles puis
“1” (lundi) et 12:00 s'afficheront
représentant le jour et l'heure par
défaut. Les chiffres des heures “12”
clignoteront quelques secondes
puis le symbole apparaîtra sur
l'affichage, indiquant que le
radiateur est en mode de veille.
Sélection d'un mode et réglage de la température
1.Appuyez sur pour quitter le mode de veille.
2.Appuyez plusieurs fois sur pour sélectionner le
mode désiré parmi les trois modes.
Le symbole du mode correspondant clignotera
sur l'écran d'affichage.
3 Appuyez de manière répétée sur / pour
.
sélectionner la température désirée entre 5 C et 30 C.
°°
Le symbole °C clignotera sur l'écran d'affichage.
La température ne peut pas être réglée en mode
antigel.
Après environ 5 secondes, le réglage sera confirmé.
Le capteur de température est conçu pour
ajuster automatiquement la température.
Lorsque la température ambiante est supérieure
à la température sélectionnée, le radiateur
cessera de chauffer.
Réglage du minuteur
Vous pouvez activer le minuteur pour que le radiateur
s'arrête automatiquement après une certaine durée.
Appuyez plusieurs fois sur pour régler la durée de
fonctionnement requise. Le délai du minuteur peut
être réglé par intervalles de 1 heure jusqu'à un
maximum de 24 heures.
Pour désactiver le minuteur, appuyez plusieurs fois
sur jusqu'à ce que “0” clignote sur l'affichage.
Réglage du jour et de l'heure
Vous devez obligatoirement régler le jour et l'heure
pour pouvoir utiliser le programme P1, P2, P3 ou le
programme personnalisé sur 7 jours.
Symbol Mode Description
confort
Economie
Mode Antigel
Le radiateur fonctionnera à la température réglée.
Le radiateur maintiendra la température qui a
été réglée en mode confort avec 3,5°C de moins.
Le radiateur fonctionnera à une température de 7°C.
1.Appuyez sur les boutons et et maintenez-les
enfoncés.
Les chiffres des heures se mettront à clignoter.
2.Lorsque les chiffres des heures clignotent, appuyez
plusieurs fois su pour régler les heures.
3.Appuyez sur et les chiffres des minutes se
mettront à clignoter.
4.Lorsque les chiffres des minutes clignotent,
FR 24FR 23
Page 14

appuyez plusieurs fois sur pour régler les minutes.
5.Appuyez sur et leschiffres desjours semettront à
clignoter.
6.Lorsque les chiffres des jours clignotent, appuyez
plusieurs fois sur pour régler le jour de la semaine.
7.Après environ 5 secondes, le réglage sera confirmé..
Programmes P1/P2/P3
Le radiateur offre trois programmes intégrés.
Appuyez plusieurs fois sur pour sélectionner le
programme P1, P2 ou P3 puis appuyez plusieurs fois
sur / pour sélectionner la température désirée
entre 5 C et 30 C.
°°
L'icône du programme (P1/P2/P3) et la température
réglée apparaissent alternativement sur l'affichage.
Mode confort Mode économie
Week-ends
P3
Programme personnalisé sur 7 jours
Ce programme vous permet de paramétrer
le mode de votre choix (confort, économie
ou veille) selon l'heure de la journée et le
jour de la semaine.
1.Appuyez sur pour personnaliser vos préférences
sur 7 jours.
Ladurée 0h clignote en bas de l'écran.
2.Lorsque la durée clignote, appuyez plusieurs fois sur
pour sélectionner la durée de fonctionnement souhaitée
(entre 1 heure et 24 heures).
3.Appuyez plusieurs fois sur poursélectionnerle
mode désiré.
Lundi –dimancheP1
Si vous sélectionnez le programme ci-dessus, l'appareil
fonctionnera tous les jours de la même manière : de minuit à
1h du matin en mode confort, de 1h à 8h en mode économie
puis de 8h à minuit de nouveau en mode confort.
Lundi – vendredi
P2
Week-ends
Lundi – vendredi
P3
Mode confort Mode économie Mode de veille
4.Appuyez sur .
Le jour “1” clignotera.
1 234567
5.Lorsque le jour clignote, appuyez plusieurs fois sur /
pour sélectionner le jour de la semaine souhaité entre 1 à 7
(1 représentant le lundi, -7 le dimanche).
6.Répétez lesétapes ci-dessuspour régler les jours suivants.
Pour modifier ce programme, appuyez sur puissur / .
Par exemple, si vous voulez redéfinir le programme du lundi
(1) au jeudi (4), appuyez plusieurs fois sur jusqu'à ce que
le chiffre1 clignote, puis appuyez plusieurs fois sur /
jusqu'à ce que le chiffre 4 clignote.
FR 26FR 25
Page 15

NETTOYAGE ET ENTRETIEN
Avant de nettoyer le radiateur, éteignez-le, débranchez
le câble de la prise secteur et attendez que l'appareil
ait refroidi jusqu'à la température ambiante.
Nettoyez les surfaces extérieures du radiateur avec
un chiffon légèrement humide.
Séchez-le soigneusement.
Ne l'immergez jamais dans l'eau.
N'utilisez aucun nettoyant chimique ou abrasif.
SPÉCIFICATIONS
Caractéristiques nominales: 220V-240V~ 50Hz
1500 W
Nous nous excusons pour tout inconvénient causé
par des incohérences mineures du manuel
d'instructions, pouvant survenir en raison des mises
au point et améliorations constamment apportées à
nos produits.
WAARSCHUWINGEN
Dit apparaat is alleen bestemd voor
huishoudelijk gebruik en mag niet voor
andere doeleinden of toepassingen
worden gebruikt, zoals niethuishoudelijk gebruik of in een
commerciële omgeving.
Als het snoer beschadigd is, laat het
vervangen door de fabrikant, een erkend
servicecentrum of een gelijkwaardig
gekwalificeerd persoon.
Voor details over de reinigingsmethode,
zie de rubriek "Reiniging en onderhoud”
op pagina 40.
Houd kinderen jonger dan 3 jaar altijd uit
Darty Holdings SNC © 14 route d'Aulnay 93140
Bondy, France
29 / 05 / 2015
de buurt of houd er continu toezicht op.
Kinderen tussen 3 en 8 jaar mogen het
apparaat enkel in- en uitschakelen
wanneer het apparaat op een voor
gebruik geschikte locatie is geplaatst of
geïnstalleerd en indien ze gepaste
instructies hebben gekregen of onder
toezicht staan, zodat ze het apparaat op
een veilige manier kunnen gebruiken en
op de hoogte zijn van de gevaren die het
gebruik van het apparaat met zich
NL 28FR 27
Page 16

meebrengt. Kinderen tussen 3 en 8 jaar
mogen het apparaat niet op de voeding
aansluiten, bedienen, reinigen of
onderhouden.
OPGELET Bepaalde delen van dit
―
product kunnen zeer heet worden en
brandwonden veroorzaken.
Let goed op
als het apparaat in de aanwezigheid van
kinderen en kwetsbare personen wordt
gebruikt.
WAARSCHUWING: Bedek de
kachel in geen geval om oververhitting
te voorkomen.
De kachel mag niet recht onder een
stopcontact staan.
met beperkte fysische, visuele of
mentale mogelijkheden, of die een
gebrek aan ervaring en kennis hebben
indien ze gepaste instructies hebben
gekregen zodat ze het apparaat op een
veilige manier kunnen gebruiken en op
de hoogte zijn van de gevaren die het
gebruik van het apparaat met zich
meebrengt.
Kinderen mogen het apparaat niet als
speelgoed gebruiken.
Kinderen mogen het apparaat niet
reinigen of onderhouden
zondertoezicht.
Gebruik geen programmeertoestel,
timer, afzonderlijke afstandsbediening
of andere apparatuur die het
WAARSCHUWING: Gebruik de kachel
niet als het glazen paneel beschadigd is.
Gebruik deze kachel niet in de
onmiddellijke nabijheid van een bad,
een douche of een zwembad.
De stekker moet steeds makkelijk
bereikbaar zijn.
Dit apparaat mag worden gebruikt door
kinderen vanaf 8 jaar oud en personen
verwarmingstoestel automatisch
inschakelt, er is risico op brand als het
verwarmingstoestel wordt bedekt of
verkeerd geplaatst is.
Installeer de kachel niet in de buurt van
gordijnen of andere brandbare
materialen.
Voor instructies over het vastmaken van
de voetstukken aan het
NL 30NL 29
Page 17

verwarmingstoestel, raadpleeg de
sectie “De voetstukken installeren”.
Voor instructies over het vastmaken van
het verwarmingstoestel met behulp van
schroeven en het installeren van het
apparaat, raadpleeg de sectie
”Muurmontage”.
MONTAGE
De kachel kan zowel vrijstaand worden gebruikt als
aan de muur worden gemonteerd.
De voetstukken installeren
Draai de kachel voorzichtig om en
1.
bevestig de voetstukken aan de
onderkant van de kachel.
Zorg datde gatenop de voetstukken
en opde onderkantvan de kachel
zich opéén lijnbevinden.
Breng de meegeleverde schroeven
2.
in de gaten en draai vast om beide
voetstukken aan de onderkant van
de kachel stevig vast te maken.
Muurmontage
BELANGRIJK: Voordat u in de muur boort, zorg dat er
zich geen elektrische leidingen of buizen in het
montage-oppervlak bevinden.
1.Haal de voetsteunen van de kachel af door de
schroeven te verwijderen.
2.Maak de twee meegeleverde muurbeugels aan de
onderkant van de kachel vast.
NL 32NL 31
Page 18

3.Markeer de twee bovenste bevestigingspunten op
de muur. De ruimte tussen deze punten moet 315mm
zijn.
Zorg voor een vrije ruimte van minstens 250 mm
aan weerskanten en de onderkant van de kachel en
een vrije ruimte van minstens 300mm tussen de
bovenkant van de kachel en het plafond.
PLAFOND
≥300mm
≥250mm≥250mm
≥300mm
VLOER
4.Op de gemarkeerde punten, boor vier 8mm
diameter gaten 40mm diep in de muur.
5.Breng een plug in elk gat.
6.Maak de twee meegeleverde bovenste
muurbeugels aan de wand vast met behulp van de
vier meegeleverde schroeven.
315mm
7.Hang de kachel aan de bovenste muurbeugels en
markeer de onderste bevestigingspunten op de muur.
8.Verwijder de kachel van de bovenste muurbeugels
en boor de onderste gaten 40mm diep in de muur.
9.Steek de pluggen in de onderste gaten.
10.Hang de kachel aan de bovenste muurbeugels en
maak de kachel op de onderste muurbeugels vast met
behulp van de schroeven.
BELANGRIJKE VEILIGHEIDSINSTRUCTIES
Schakel het apparaat uit en haal de stekker uit het
stopcontact wanneer het apparaat niet wordt
gebruikt en voor reiniging.
Gebruik en berg de kachel altijd op in een
rechtopstaande positie.
Gebruik de kachel niet in een ruimte waar
brandbare vloeistoffen of gassen worden gebruikt
of zijn opgeslagen.
Houd de kachel tijdens gebruik op een afstand van
minstens 1 meter van gordijnen of meubilair, dit
kan brandgevaar opleveren.
NL 34NL 33
Page 19

BESCHRIJVING VAN DE ONDERDELEN
Bedieningspaneel (aan de bovenkant van de kachel)
3
1
1.Aan/uit schakelaar (I/O)
2. Omhoog knop
3. Stand-by knop
2
4
6. Programma knop
7. Timer knop
8. Modusselectie knop
5 6
4. Omlaag knop
5.Display
Écran d'affichage
1.Antivorstmodus
2.Stand-by
3.Tijd en temperatuur
4.Dag van de week
5.Graden C
6.Comfortmodus
7.Besparingsmodus
8.Uren
WERKING
WAARSCHUWING: De kachel is voorzien van de
waarschuwing 'NIET BEDEKKEN' om de gebruiker
te waarschuwen voor het risico op oververhitting als
de kachel per ongeluk wordt bedekt.
De kachel inschakelen
7
Duw de aan/uit-schakelaar aan de rechterkant van de
kachel naar de positie I.
Het display wordt verlicht. Alle
8
symbolen worden kort weergegeven
waarna "1" (maandag) en 12:00 als
de standaard dag- en tijdinstelling
worden weergegeven. De uurcijfers
“12” knipperen enkele seconden
waarna het symbool op het display
wordt weergegeven om aan te geven
dat de kachel in stand-by staat.
Een modus selecteren en de temperatuur instellen
1.Druk op om stand-by af te sluiten.
2.Druk herhaaldelijk op om de gewenste modus uit
de 3 modi te selecteren.
Het overeenkomstig modussymbool knippert op
het display.
°
Symbool Modus Beschrijving
Comfort
Besparing
De kachel wordt ingeschakeld aan het ingestelde
temperatuurniveau.
De kachel handhaaft de temperatuur die gelijk is aan
de temperatuur in de comfortmodus verlaagd
met 3,5°C.
Antivorst
De kachel wordt ingeschakeld aan circa 7°C.
NL 36NL 35
Page 20

3.Druk herhaaldelijk op / om een gewenste
temperatuur tussen 5 C en 30 C te selecteren.
°°
Het is niet mogelijk om de temperatuur in de
antivorstmodus te wijzigen.
Het duurt circa 5 seconden voordat de instelling
wordt bevestigd.
De temperatuursensor kan de temperatuur
automatisch wijzigen. Als de kamertemperatuur
hoger dan de geselecteerde temperatuur is, dan
stopt de kachel met verwarmen.
De timer instellen
U kunt de kachel met een uitgestelde uitschakeltimer
gebruiken. Dit stelt u in staat om de kachel teprogrammeren
om gedurende een ingestelde periode te werken.
Druk herhaaldelijk op om de gewenste werkingsperiode
in te stellen. De uitgestelde uitschakeltimer kan worden
ingesteld in stappen van 1 uur, tot maximaal 24 uur.
Om de uitgestelde uitschakeltimer te annuleren, druk
herhaaldelijk op totdat het cijfer “0” ophet displayknippert.
5.Druk op en het cijfer voor de dag knippert.
6.Terwijl het cijfer voor de dag knippert, druk
herhaaldelijk op om de dag van de week in te
stellen.
7.Het duurt circa 5 seconden voordat de instelling
wordt bevestigd.
P1/P2/P3 programma's
De kachel is voorzien van drie vooraf ingestelde
programma's.
Druk herhaaldelijk op om P1, P2 of P3 te selecteren
en druk vervolgens herhaaldelijk op / om een
gewenste temperatuur tussen 5 C en 30 C te
°°
selecteren.
Het programmapictogram (P1/P2/P3) en de ingestelde
temperatuur verschijnen afwisselend op het display.
Comfortmodus Besparingsmodus
De datum en tijd instellen
Het instellen van de datum en tijd is nodig om de kachel
met een van de volgende programma's te gebruiken:
P1, P2, P3 of het individueel 7-dagen programma.
1.Druk en houd en ingedrukt.
De cijfers voor uurweergave knipperen.
2.Terwijl de cijfers voor uurweergave knipperen, druk
herhaaldelijk op om het uur in te stellen.
3.Druk op , de cijfers voor minutenweergave
knipperen.
4.Terwijl de cijfers voor minutenweergave knipperen,
druk herhaaldelijk op om de minuten in te stellen.
Maandag - ZondagP1
Maandag – Vrijdag
P2
Weekends
Maandag – Vrijdag
P3
NL 38NL 37
Page 21

P3
Weekends
wijzigen, druk herhaaldelijk op totdat het cijfer 1
knippert. Druk vervolgens herhaaldelijk op /
totdat het cijfer 4 knippert.
Individueel 7 dagen programma
Dit programma stelt u in staat om drie
verschillende modi
(Comfort/Besparing/Stand-by) op de
ingestelde periode te programmeren
voor elke dag van de week.
1.Druk op om het individueel 7 dagen programma
in te stellen.
De tijdsperiode 0h knippert.
2.Terwijl de tijdsperiode knippert, druk herhaaldelijk
op om de gewenste tijdsperiode tussen 1 en 24 uur
in te stellen.
3.Druk herhaaldelijk op om de gewenste modus te
selecteren.
Comfortmodus Besparingsmodus Stand-bymodus
4.Druk op .
De dag “1” knippert.
REINIGING EN ONDERHOUD
Schakel de kachel uit, haal de stekker uit het
stopcontact en laat het apparaat tot
kamertemperatuur afkoelen voordat u het reinigt.
Maak de buitenkant van de kachel schoon met een
licht bevochtigde doek. Droog grondig.
Dompel het apparaat nooit in water.
Gebruik geen agressieve of chemische
schoonmaakmiddelen.
TECHNISCHE GEGEVENS
Ratings: 220V-240V~ 50Hz
1500W
We verontschuldigen ons voor enig ongemak
veroorzaakt door kleine inconsistenties in deze
gebruikershandleiding, die kunnen ontstaan door
productverbetering of –ontwikkeling.
1 234567
5.Terwijl de dag knippert, druk herhaaldelijk op /
om de gewenste dag van de week (1-7) in te stellen.
6.Herhaal bovenstaande stappen om de volgende
dagen in te stellen.
Om dit programma te wijzigen, druk op en gebruik
vervolgens / . Bijvoorbeeld, als u de dag van de
week van maandag (1) naar donderdag (4) wilt
Darty Holdings SNC © 14 route d'Aulnay 93140
Bondy, France
29 / 05 / 2015
NL 40NL 39
 Loading...