

Page 1
MODEL: AFP40IX
Page 2

English...........................................P.1
French............................................P.7
Dutch..............................................P.14
Spanish.......................................... P.20
Page 3
WARNINGS
This appliance is intended for domestic
household use only and should not be used
for any other purpose or in any other
application, such as for non-domestic use
or in a commercial environment.
This appliance can be used by children
aged from 8 years and above and persons
with reduced physical, sensory or mental
capabilities or lack of experience and
knowledge if they have been given
supervision or instruction concerning use
of the appliance in a safe way and
understand the hazards involved. Children
shall not play with the appliance. Cleaning
and user maintenance shall not be made by
children without supervision.
If the supply cord is damaged, it must be
replaced by the manufacturer, its service
agent or similarly qualified persons in order
to avoid a hazard.
EN -1
Page 4
For the details concerning the method of
cleaning, please see section “Cleaning and
Maintenance” on page GB-5.
Warning! After assembly, it's strictly
forbidden to remove the protective guards
during maintenance or cleaning.Never use
the fan without the guards in place.
Regarding the method on how to assembly
and how to fix the fan with screws, refer to
the section “ASSEMBLY”.
Once the fan guard was assembled, it's
forbidden to remove and reassemble.
IMPORTANT SAFETY INSTRUCTIONS
Make sure the appliance is placed on a stable surface when
used.
Do not let hair, net curtains, tablecloths or loose clothing come
into contact with the moving parts of the fan as it may cause
damage or injuries.
Do not use this fan near a window that may have condensation
on it.
Do not use this fan with any external semi-conductor speed
controller.
EN -2
Page 5
Do not use this fan in areas where flammable liquids are used
or stored.
The fan should be unplugged from the mains supply when not
in use.
Turn the fan off and unplug it from the mains socket before
moving it from one place to another or cleaning.
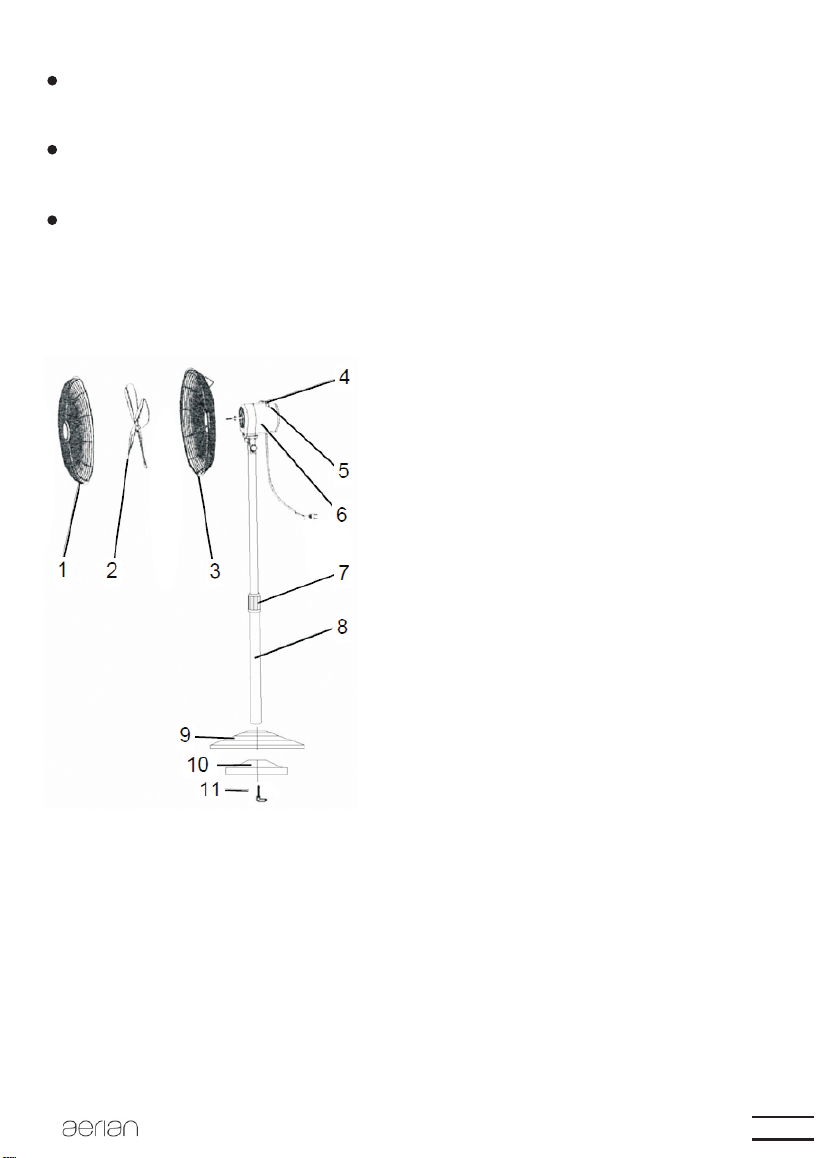
DESCRIPTION
1.Front guard
2.Fan blade
3.Rear guard
4.Control knob
5.Oscillation knob
6.Motor housing
7.Height adjustment ring
8.Outer pole
9.Base
10.Additional part of
the base
11.Locking lever
ASSEMBLY
CAUTION:
DO NOT insert the mains plug into the mains socket until the fan
has been completely assembled. Never operate the fan with a
cracked or damaged fan blade.
EN -3
Page 6

Base assembly
1.Unscrew the locking lever from the base.
2.Insert the outer pole into the base then locks it into place by
fastening the locking lever.
3.Slide the internal pole up from the outer pole to the desired
height then securely hold this position by turning the height
adjustment ring clockwise.
Rear guard assembly
1. Remove the screw and washer from the motor housing.
2. Position the rear guard on the front of the motor housing,
ensuring the handle is at the top.
3.Insert two protrusions on the rear guard into the holes of the
motor housing and then pull down the rear guard to lock it in
place.
4. Attach the rear guard to the motor housing. Insert the washer
and screw and then tighten the screw.
Fan blade assembly
1.Insert the fan blade onto the motor spindle, making sure the
motor spindle is fully seated into the blade groove.
2.Insert the securing screw into the hole of the fan blade and
tighten it.
Front guard assembly
Remove the small securing screw and nut from the front guard.
Attention!
The hook of the front guard must be at the top.
EN -4
Page 7
Make sure that the holes in both guards are aligned
and fasten them securely by using the provided
screw and nut. Once the guard is in position fasten
the clips to finally secure both guards.
OPERATION
1.Place the fan on a stable, level surface.
2.Plug the fan in the mains socket.
3.Set the control knob to select the desired speed. To turn off the
fan, set the control knob to the 0 position.
0= Off 1= Low speed 2=Medium speed 3=High speed
4.To make the fan oscillate, push down the oscillation knob
located on the top of the motor housing and the fan will oscillate
from side to side. To stop the fan from oscillating, lift up the
oscillation knob.
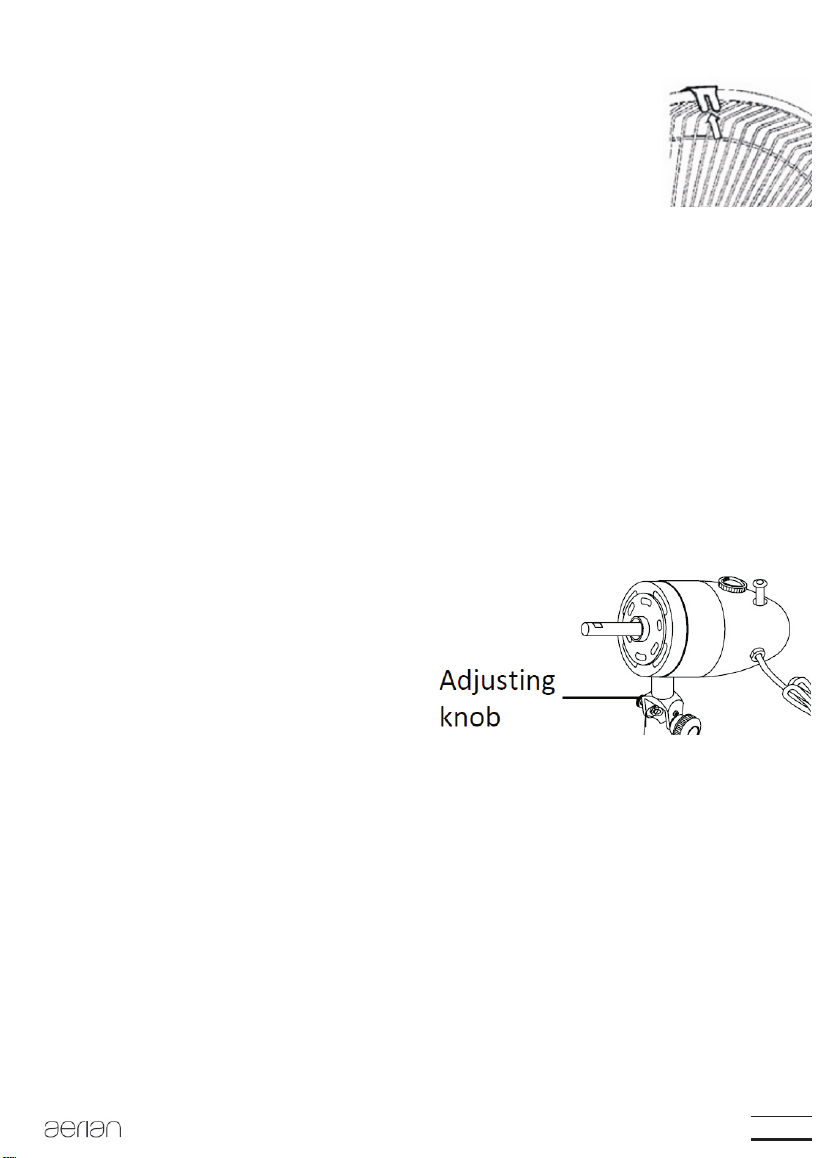
5.Tilting Adjustment
Loosen the adjusting knob to
adjust the fan head to the
desired position and then
tighten the adjusting knob.
CLEANING AND MAINTENANCE
Always unplug the fan from the mains socket before cleaning.
Once the fan is assembled, it is forbidden to disassemble the
grids (guard) when cleaning.
Clean the fan with a slightly damp cloth, and then dry it.
Do not immerse the motor housing in water or any other liquid.
Do not use chemical or abrasive cleaner.
EN -5
Page 8
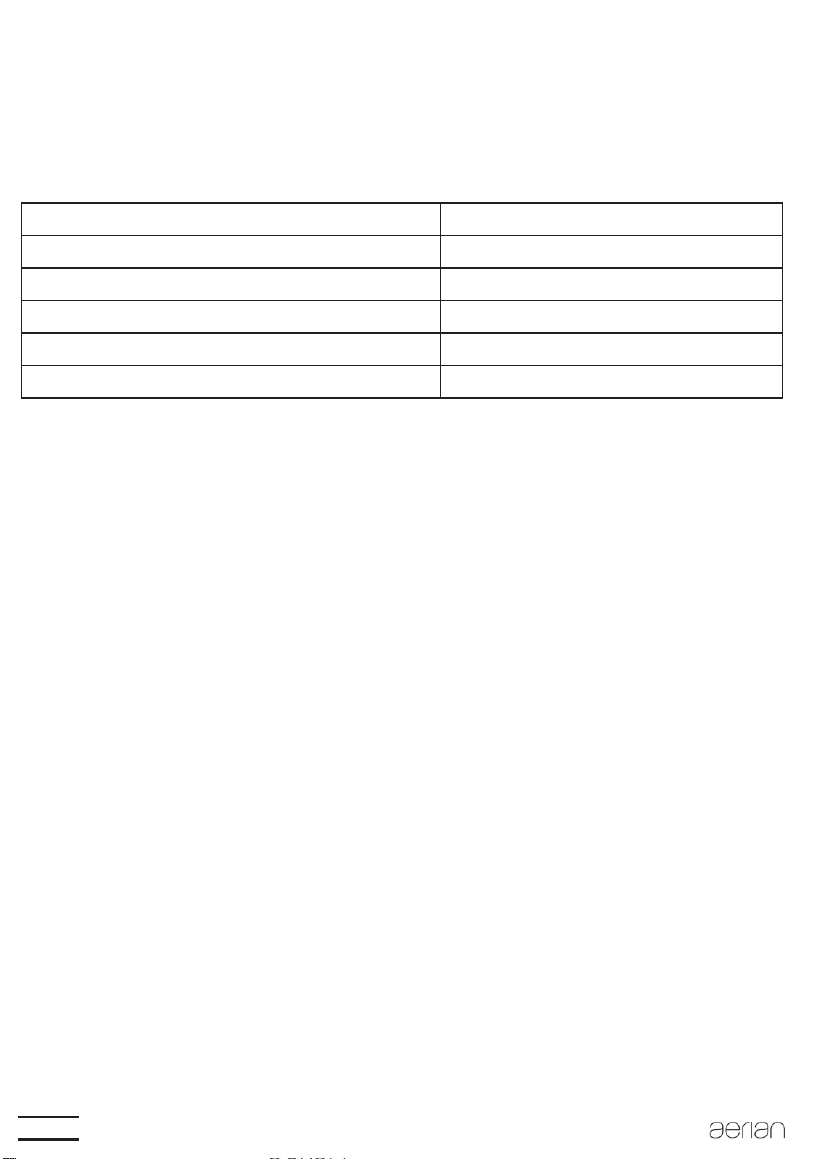
SPECIFICATIONS
Ratings: 220-240V~ 50Hz
50W
Maximum fan flow rate (F): 46.85 m³/min
Service value (SV):
Standby power consumption (PSB):
Fan sound power level (LWA):
Maximum air velocity (c):
Measurement standard for service value:
We apologise for any inconvenience caused by minor
inconsistencies in these instructions, which may occur as a result
of product improvement and development.
1.28 (m³/min)/W
0.00 W
62.8 dB(A)
2.78 meters/sec
IEC 60879: 1986 (corr. 1992)
EN -6
Darty Plc © UK: EC1N 6TE 22 / 12 / 2014
Page 9
AVERTISSEMENTS
Cet appareil est destiné à un usage
domestique uniquement. Toute utilisation
autre que celle prévue pour cet appareil, ou
pour une autre application que celle prévue,
par exemple une application commerciale,
est interdite.
Cet appareil peut être utilisé par des
enfants âgés d'au moins 8 ans et par des
personnes ayant des capacités physiques,
sensorielles ou mentales réduites ou
dénuées d’expérience ou de connaissance,
s'ils (si elles) sont correctement
surveillé(e)s ou si des instructions relatives
à l'utilisation de l'appareil en toute sécurité
leur ont été données et si les risques
encourus ont été appréhendés. Les enfants
ne doivent pas jouer avec l’appareil. Le
nettoyage et l'entretien par l'usager ne
doivent pas être effectués par des enfants
sans surveillance.
FR -7
Page 10

Si le câble d'alimentation est endommagé,
il doit être remplacé par le fabricant, son
service après vente ou des personnes de
qualification similaire afin d'éviter un
danger.
En ce qui concerne la méthode du
nettoyage, référez-vous à la section
“NETTOYAGE ET ENTRETIEN” en page
FR-12.
Avertissement ! Après l'assemblage, il est
strictement interdit d'enlever les grilles de
protection lors de l'entretien ou du
nettoyage.
N'utilisez jamais le ventilateur sans les
grilles en place.
En ce qui concerne les informations
détaillées sur l’assemblage et la façon de
fixer le ventilateur avec des vis,
référez-vous dans la section
“ASSEMBLAGE”.
FR -8
Page 11

Une fois que la grille du ventilateur a été
assemblée, il est interdit de la retirer et de
la réassembler.
INSTRUCTIONS IMPORTANTES DE SÉCURITÉ
L'appareil doit toujours reposer sur une surface stable pendant
qu'il fonctionne.
Afin d'éviter les risques de dommages matériels et corporels,
faites attention à ce que les parties en mouvement du
ventilateur n'entrent jamais en contact avec des cheveux,
rideaux, nappes ou habits amples.
Ne faites pas fonctionner le ventilateur à proximité d'une fenêtre
recouverte de buée.
Ne faites pas fonctionner le ventilateur à l'aide d'un régulateur
de vitesse à semi-conducteurs.
Ne faites pas fonctionner le ventilateur dans une pièce où des
liquides inflammables sont utilisés ou stockés.
Débranchez toujours le ventilateur après usage.
Éteignez et débranchez le ventilateur de la source
d'alimentation avant de le déplacer et avant de le nettoyer.
FR -9
Page 12

DESCRIPTION
1.Grille avant
2.Pale de ventilation
3.Grille arrière
4.Bouton de contrôle
5.Bouton d'oscillation
6.Boîtier du moteur
7.Bague de réglage de la hauteur
8.Montant externe
9.Base
10.Pièce supplémentaire de
la base
11.Levier de blocage
ASSEMBLAGE
ATTENTION :
NE BRANCHEZ PAS le câble d'alimentation du ventilateur avant
que l'appareil ne soit entièrement assemblé. N’utilisez jamais le
ventilateur si une pale est endommagée ou fissurée.
Montage de la base
1.Dévissez le levier de blocage de la base.
2.Insérez le montant externe dans la base et fixez-le en position
en serrant le levier de blocage.
3.Faites glisser le montant interne hors du montant externe
jusqu’à la hauteur désirée puis fixez cette position en tournant
la bague de réglage de la hauteur dans le sens des aiguilles
d’une montre.
FR -1 0
Page 13

Assemblage de la grille arrière
1. Retirez la vis et la rondelle du bloc moteur.
2. Placez la grille arrière sur l'avant du bloc moteur, en assurant
de placer la poignée en haut.
3. Insérez les deux saillies de la grille arrière dans les trous du
bloc moteur puis tirez la grille arrière vers le bas pour la
verrouiller en place.
4. Fixez la grille arrière au bloc moteur.Insérez la rondelle et la vis
puis serrez la vis.
Assemblage de la pale du ventilateur
1.Faites glisser la pale sur l’arbre d’entraînement du moteur en
veillant à complètement insérer l’arbre du moteur dans la
rainure de la pale.
2.Insérez la vis de fixation dans le trou de la pale du ventilateur
et serrez-la.
Assemblage de la grille avant
Dévissez la petite vis et l’écrou de fixation de la grille avant.
Attention!
Le crochet de la grille avant doit être placé en haut.
Alignez les trous des deux grilles, puis fixez-les
solidement avec la vis et l’écrou fournis. Une fois
les grilles assemblées, fixez les clips pour les
solidariser l’une à l’autre.
FR -11
Page 14

FONCTIONNEMENT
1.Placez le ventilateur sur une surface plane et stable.
2.Branchez le câble d’alimentation du ventilateur à une prise
électrique murale.
3.Tournez le bouton de contrôle pour sélectionner la vitesse
désirée. Pour éteindre le ventilateur, réglez le bouton de
contrôle en position "0".
0 = Arrêt 1 = Vitesse lente 2 = Vitesse moyenne
3 = Vitesse rapide
4.Pour que le ventilateur oscille latéralement, appuyez sur le
bouton d’oscillation situé en haut du boîtier du moteur.Pour
arrêter les oscillations du ventilateur, relevez le bouton
d’oscillation.
5.Réglage d’inclinaison
Tournez le bouton de réglage
d'inclinaison de la tête du
ventilateur pour ajuster la
direction du flux d'air puis
resserrez le bouton.
Bouton de réglage
NETTOYAGE ET ENTRETIEN
Débranchez toujours le ventilateur de la prise secteur avant de le
nettoyer.
Une fois que le ventilateur est assemblé, il est interdit de
démonter les grilles lors du nettoyage.
Nettoyez le ventilateur avec un chiffon légèrement humidifié, puis
séchez-le.
N’immergez pas le boîtier du moteur dans de l’eau ni dans aucun
autre liquide.
N’utilisez pas de nettoyant chimique ou abrasif.
FR -1 2
Page 15

SPÉCIFICATIONS
Caractéristiques nominales: 220-240V~ 50Hz
50W
Taux maximal de flux d’air (F): 46,85 m³/min
Valeur de service (SV):
Consommation en veille (PSB):
Niveau de puissance acoustique du
ventilateur (LWA):
1.28 (m³/min)/W
0,00 W
62,8 dB(A)
Vitesse maximale du souffleur (c):
Norme de mesure de la valeur du service:
2,78 mètres/sec
IEC 60879: 1986 (corr. 1992)
En raison des mises au point et améliorations constamment
apportées à nos produits, de petites incohérences peuvent
apparaître dans le mode d'emploi. Veuillez nous excuser pour la
gêne occasionnée.
Darty Plc © UK: EC1N 6TE 22 / 12 / 2014
FR -1 3
Page 16

WAARSCHUWINGEN
Dit apparaat is alleen bedoeld voor
huishoudelijk gebruik en mag niet voor
andere doeleinden of toepassingen worden
gebruikt, zoals niet-huishoudelijk gebruik of
in een commerciële omgeving.
Dit apparaat mag worden gebruikt door
kinderen vanaf 8 jaar oud en personen met
beperkte fysische, visuele of mentale
mogelijkheden, of die een gebrek aan
ervaring en kennis hebben indien ze
gepaste instructies hebben gekregen zodat
ze het apparaat op een veilige manier
kunnen gebruiken en op de hoogte zijn van
de gevaren die het gebruik van het
apparaat met zich meebrengt. Laat
kinderen niet met het apparaat spelen.
Kinderen mogen het apparaat niet zonder
toezicht reinigen of onderhouden.
NL -14
Page 17

Laat het snoer vervangen door de fabrikant,
reparateur of gelijksoortig bevoegd
persoon als het is beschadigd, om risico's
te voorkomen.
Voor details over de reinigingsmethode, zie
de rubriek "Reiniging en onderhoud” op
pagina NL-18.
Waarschuwing! Na montage is het strikt
verboden om de roosters tijdens onderhoud
of reiniging te verwijderen.Gebruik de
ventilator nooit zonder de roosters op hun
plaats.
Voor informatie over de montageprocedure
en hoe de ventilator met de schroeven vast
te maken, raadpleeg de sectie "MONTAGE".
Eenmaal het rooster is gemonteerd is het
niet toegestaan om deze af te halen of
opnieuw te monteren.
NL -15
Page 18

BELANGRIJKE VEILIGHEIDSINSTRUCTIES
Gebruik het apparaat altijd op een stabiel oppervlak.
Zorg dat haar, gordijnen, tafellakens of losse kleding niet met de
bewegende onderdelen van de ventilator in aanraking komen,
dit kan schade of letsel veroorzaken.
Gebruik deze ventilator niet in de nabijheid van een venster
waar er condensatie op zit.
Gebruik de ventilator niet met een externe semigeleidende
snelheidsregelaar.
Gebruik deze ventilator niet in een ruimte waar brandbare
vloeistoffen worden gebruikt of zijn opgeslagen.
Haal de stekker uit het stopcontact wanneer de ventilator niet
wordt gebruikt.
Haal de stekker uit het stopcontact alvorens de ventilator naar
een andere ruimte te brengen en voor reiniging.
OMSCHRIJVING
NL -16
1.Voorrooster
2.Ventilatorblad
3.Achterrooster
4.Regelknop
5.Oscillatieknop
6.Motorbehuizing
7.Hoogte-afstelring
8.Buitenpaal
9.Voetstuk
10.Bijkomend deel voor
voetstuk
11.Vergrendelingshendel
Page 19

MONTAGE
OPGELET:
Steek de stekker PAS in het stopcontact eenmaal de ventilator
volledig gemonteerd is. Gebruik de ventilator nooit met een
gebarsten of beschadigd ventilatorblad.
Het voetstuk monteren
1.Schroef de vergrendelingshendel uit het voetstuk.
2.Steek de buitenpaal in het voetstuk en maak deze aan elkaar
vast met behulp van de vergrendelingshendel.
3.Schuif de binnenpaal omhoog uit de buitenpaal totdat u de
gewenste hoogte bereikt en maak deze op de gekozen positie
vast door de hoogte-afstelring met de klok mee te draaien.
Het achterrooster monteren
1. Verwijder de schroef en sluitring van de motorbehuizing.
2. Plaats het achterrooster op de voorkant van de motorbehuizing.
Zorg dat het handvat zich bovenaan bevindt.
3. Breng de twee uitsteeksels op het achterrooster in de gaten van
de motorbehuizing en duw het achterrooster vervolgens omlaag
om te vergrendelen.
4. Bevestig het achterrooster aan de motorbehuizing.
Breng de sluitring en schroef in en draai de schroef vervolgens
vast.
Het ventilatorblad monteren
1.Schuif het rotorblad op de motoras. Zorg dat de motoras
volledig in de bladgroef is geplaatst.
2.Breng de vastzetschroef in het gat van het
rotorblad en draai vervolgens vast.
Het voorrooster monteren
Verwijder de kleine vastzetschroef en moer van het voorrooster.
NL -17
Page 20

Opgelet!
De haak van het voorrooster dient zich bovenaan te bevinden.
Zorg dat de gaten in beide roosters zich op dezelfde plaats
bevinden en maak de roosters stevig aan elkaar vast met behulp
van de meegeleverde schroef en moer. Eenmaal het rooster is
vastgezet, maak de clips vast om beide roosters stevig aan
elkaar te vergrendelen.
WERKING
1.Plaats de ventilator op een stabiel en vlak oppervlak.
2.Steek de stekker in een stopcontact.
3.Stel de regelknop op de gewenste snelheid in. Om de ventilator
uit te schakelen, draai de regelknop naar de positie 0.
0= Uit 1= Lage snelheid 2=Medium snelheid 3= Hoge snelheid
4.Om de ventilator te laten oscilleren, duw de oscillatieknop,
bovenaan de motoreenheid omlaag en de ventilator draait
zijdelings.Om het oscilleren te stoppen, trek de oscillatieknop
omhoog.
5.De schuine stand afstellen
Draai de regelknop los, stel de ventilatorkop op de gewenste
positie in en draai de regelknop vervolgens opnieuw vast.
REINIGING EN ONDERHOUD
Regelknop
Haal de stekker uit het stopcontact voor reiniging.
Eenmaal de ventilator in elkaar is gezet, is het verboden om de
roosters tijdens het reinigen af te halen.
Reinig de ventilator met een licht bevochtigde doek en droog het
vervolgens.
Dompel de motorbehuizing niet in water of een andere vloeistof.
Gebruik geen chemische of schurende middelen.
NL -18
Page 21

SPECIFICATIES
Vermogen: 220-240V~ 50Hz
50W
Maximale stroomsnelheid van ventilator (F): 46.85 m³/min
Servicewaarde (SV):
Stroomverbruik bij stand-by (PSB):
Geluidsvermogenniveau van ventilator (LWA):
Maximale luchtsnelheid (c):
Meetstandaard voor servicewaarde:
We verontschuldigen ons voor enig ongemak veroorzaakt door
kleine inconsistenties in deze gebruikershandleiding, die kunnen
ontstaan door productverbetering of -ontwikkeling.
1.28 (m³/min)/W
0.00 W
62.8 dB(A)
2.78 meters/sec
IEC 60879: 1986 (corr. 1992)
Darty Plc © UK: EC1N 6TE 22 / 12 / 2014
NL -19
Page 22

ADVERTENCIAS
Este aparato ha sido diseñado
exclusivamente para uso doméstico y no
deberá utilizarse para ningún otro propósito
o aplicación, como puedan ser fines no
domésticos o en entornos comerciales.
Este aparato puede ser utilizado por niños a
partir de los 8 años y personas con mermas
físicas, sensoriales o mentales, así como
personas que no cuenten con la
experiencia o los conocimientos necesarios,
si son supervisados o han sido instruidos
en el uso apropiado y seguro del aparato y
entienden los peligros que acarrea. Los
niños no deben jugar con este aparato. Los
niños no deberán realizar tareas de
limpieza o mantenimiento sin supervisión
adulta.
ES -2 0
Page 23

Si el cable de alimentación está dañado,
deberá reemplazarlo el fabricante, su
agente de servicios, o alguna persona
similarmente cualificada con el fin de evitar
riesgos innecesarios.
Para obtener más información acerca del
método de limpieza, consulte la sección
titulada “Limpieza y mantenimiento” de la
página ES-25.
¡Advertencia! Una vez montado, queda
terminantemente prohibido retirar las
rejillas de protección durante el
mantenimiento o la limpieza de la unidad.
No utilice nunca el ventilador sin las rejillas
instaladas.
En lo que concierne al método de montaje y
fijación del ventilador mediante tornillos,
remítase a la sección titulada “MONTAJE”.
Una vez instaladas las rejillas del ventilador,
está prohibido quitarlas o reinstalarlas.
ES -2 1
Page 24

MEDIDAS DE SEGURIDAD IMPORTANTES
Asegúrese de que el aparato se encuentre en una superficie
estable cuando se utilice.
No deje que el cabello, las cortinas, los manteles o la ropa
holgada entren en contacto con las piezas móviles del
ventilador, dado que podrían ocasionar daños o lesiones.
No utilice este ventilador cerca de una ventana que tenga
restos de condensación de agua.
No utilice el ventilador con un controlador electrónico de
velocidad externo.
No utilice el ventilador en lugares donde se utilicen o
almacenen líquidos inflamables.
El ventilador debe desenchufarse del suministro de la corriente
cuando no se utilice.
Apague el ventilador y desenchúfelo de la toma de corriente
antes de limpiarlo o moverlo de un sitio a otro.
DESCRIPCIÓN
ES -2 2
1.Rejilla frontal
2.Aspa del ventilador
3.Rejilla trasera
4.Mando de control
5.Botón de oscilación
6.Bloque de motor
7.Manguito roscado para el
ajuste de la altura
8.Tubo externo
9.Base
10.Parte adicional de la base
11.Tornillo de sujeción
Page 25

MONTAJE
ATENCIÓN:
NO conecte el enchufe a la toma de corriente hasta haber
completado el montaje del ventilador. No utilice nunca el
ventilador si el aspa está dañada o rajada.
Montaje de la base
1.Desatornille el tornillo de sujeción de la base.
2.Inserte el tubo externo en el orificio superior de la base y fíjelo
con el tornillo de sujeción.
3.Inserte el tubo interno por la parte de arriba del tubo externo
hasta la altura deseada y asegúrelo en posición girando el
manguito roscado hacia la derecha.
Montaje de la rejilla trasera
1. Quite el tornillo de la carcasa del motor.
2. Posicione el protector trasero en la parte frontal de la carcasa
del motor, procurando que el mango esté en la parte superior.
3. Inserte las dos protrusiones del protector trasero en los
agujeros de la carcasa del motor y tire de él hacia abajo para
asegurarlo en su lugar.
4. Acople el protector trasero a la carcasa del motor.
Inserte la arandela y el tornillo, y apriételo a continuación.
Montaje del aspa del ventilador
1. Inserte el aspa en el eje del motor, asegurándose de que
quede totalmente encajado en la ranura del aspa.
2. Inserte el tornillo de sujeción en el orificio del aspa del
ventilador y apriételo.
ES -2 3
Page 26

Montaje de la rejilla frontal
Quite la tuerca y el tornillo pequeño de la rejilla frontal.
¡Atención!
El gancho de la rejilla frontal debe estar
situado en la parte superior.
Compruebe que los orificios de ambas rejillas están alineados y
fíjelas entre sí utilizando el tornillo y la tuerca suministrados.
Una vez que la rejilla está instalada, asegúrela a la
otra rejilla conos ganchos.
MODO DE EMPLEO
1.Coloque el aparato sobre una superficie plana y estable.
2.Enchufe el ventilador a la toma de corriente.
3.Ajuste el mando de control para seleccionar la velocidad
deseada. Para apagar el ventilador, gire el mando de control a
la posición 0.
0= Apagado 1= Velocidad baja 2=Velocidad media
3=Velocidad alta
4.Para hacer oscilar el ventilador de un lado a otro, presione el
botón de oscilación ubicado en la parte superior del bloque de
motor.Para detener la oscilación del ventilador, tire hacia arriba
del botón de oscilación.
5.Ajuste de la inclinación
Afloje el mando de ajuste de la inclinación para posicionar la
cabeza del ventilador en el ángulo deseado y vuelva a apretar
el mando.
ES -2 4
Mando de ajuste de
la inclinación
Page 27

LIMPIEZA Y MANTENIMIENTO
Desenchufe siempre el ventilador de la toma de corriente antes
de limpiarlo.
Una vez montado el ventilador, no le quite las rejillas
(protecciones) durante la limpieza.
Limpie el ventilador con un paño ligeramente humedecido y
séquelo a continuación.
No sumerja el bloque del motor en el agua ni en ningún otro
líquido.
No utilice limpiadores químicos o abrasivos.
ESPECIFICACIONES
Tensión y potencia nominales: 220-240V~ 50Hz
50W
Índice de flujo máximo del ventilador (F): 46.85 m³/min
Valor de servicio (VS):
Consumo en espera (PSB):
Nivel de potencia acústica del ventilador (LWA):
Velocidad máxima del aire (c):
Medición estándar para valor de servicio:
1.28 (m³/min)/W
0.00 W
62.8 dB(A)
2.78 meters/sec
IEC 60879: 1986 (corr. 1992)
Pedimos disculpas por cualquier molestia debido a
inconsistencias menores en estas instrucciones como
consecuencia del continuo esfuerzo por mejorar y desarrollar
nuestros productos.
Darty Plc © UK: EC1N 6TE 22 / 12 / 2014
ES -2 5
 Loading...