

Page 1
Domino
Operating Instructions
Contents:
1. Introduction
2. Precautionary Measures
3. Operating Elements
4. Summary of Operations
5. Technical Data
Appendix 1 Effectchart
Appendix 2 Insert/Link
2
Appendix 3 Blockdiagram
6. Regulations for Disposal
1. Introduction
Welcome to AER. Thank you for purchasing the
DOMINO.
Based on our Compact/Bingo acoustic system we
have developed the DOMINO, a 100-watt system,
that combines the excellent tone of the Compact
with increased power and higher efficiency. The
DOMINO is - of course - dynamically controlled and
equipped with: two parallel power-amplifiers, two
8“ twin-cone loudspeakers, 4 channels with mute
option and a new 32bit digital AER-effect with 16
presets.
To obtain maximum enjoyment from your amplifier
please read this manual carefully before using your
DOMINO.
Page 2

Domino 2
-2-
2. Precautionary Measures
When you use your DOMINO, always take basic
safety precautions to reduce to a minimum the
risk of injury by fire or by electric shock.
Read all the directions in these operating instructions and make sure that you understand them.
Pay attention to all warnings, instructions and
supplementary text written on the DOMINO.
Always use a grounded mains connection with the
appropriate supply voltage. If you are uncertain
whether the connection is grounded, have a qualified expert check it.
Use the same type and value to replace a broken
fuse. Never try to repair it
Do not let your DOMINO come into contact with
water and never touch the amplifier if you have wet
hands. . Always operate your DOMINO in a place
where no one can trip over the cables causing injury
to themselves or damage to the cables. Do not
operate your DOMINO near devices with strong
electromagnetic fields such as large mains transformers, generators, neon lights etc. Do not lay the
signal cable parallel to power lines.
Do insure that your DOMINO is switched off before
plugging in the power cable to the mains.
Before cleaning your DOMINO, unplug it from the
mains supply. Use a damp cloth to clean it. Do not
use cleaning agents, and be careful that no liquid
finds its way into the amp.
There are no parts within your DOMINO that can be
serviced by the user. Refer all repairs and servicing
to an agent authorised by AER. Any unauthorised
repair or servicing will void the two year warranty!
Keep these operating instructions in a safe place.
Page 3
Domino 2
input
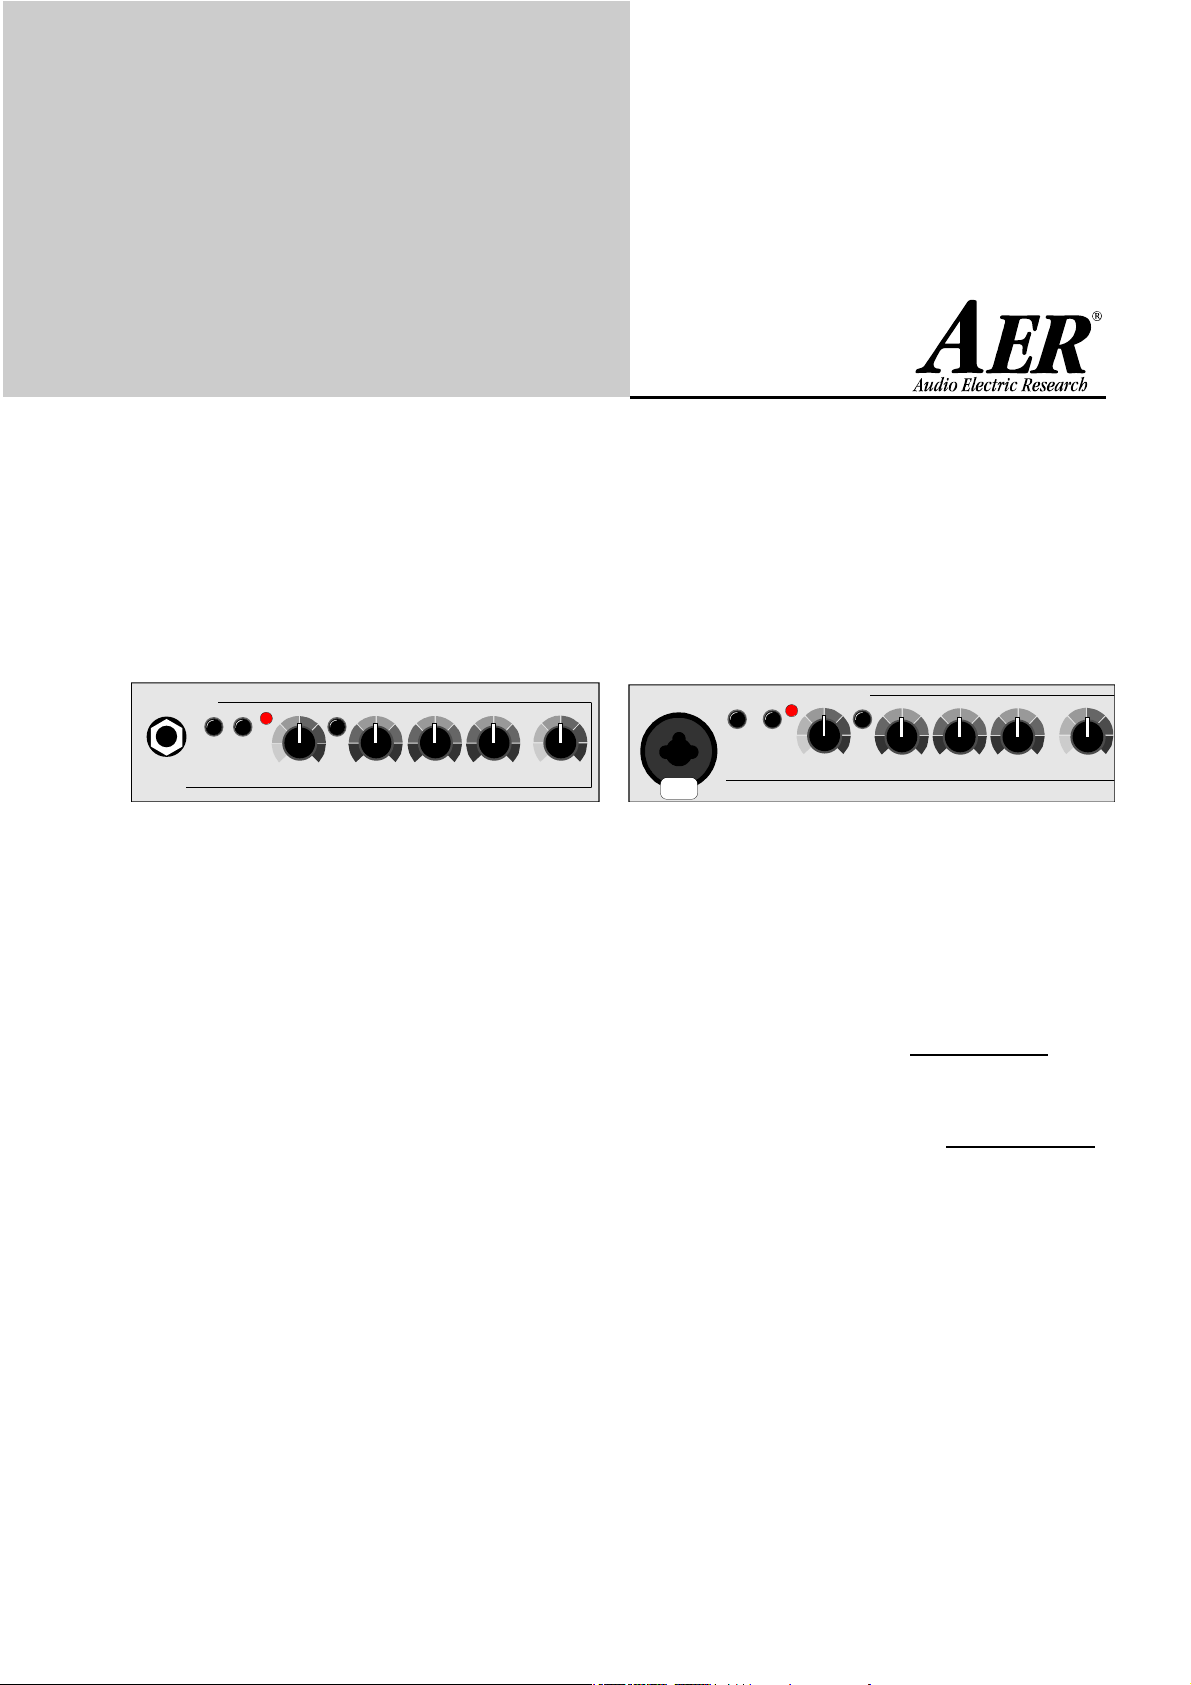
3. Operating Elements
Front above (from left to right):
-3-
channel one:
channel
one
mute
clip
high/
low
colour
gain bass middle treble send
channel
input
input (1) socket for a 6.3 mm jack plug,
high impedance piezo input
channel mute switch to mute the channel
high/low switch to adjust input sensitivity
high for high input sensitivity
low for low input sensitivity
clip overload indicator
gain input level control
colour mid-range contour filter
bass bass tone control
middle middle tone control
treble treble tone control
send effect send control, adjusts the
channels effect amount
channel two:
channel
two
mute
clip
line/
mic
colour
gain bass middle treble send
channel
input (2) Combi-Connector with a socket
for a 6.3 mm jack plug and
XLR male socket
channel Mute switch to mute the channel
line/mic switch to adjust input sensitivity
line: sources with line level,
instruments with active
preamplifiers and magnetic
sound pick-ups, connnected to jack input only
mic:
balanced microphone input
with 48V phantom power
to be used with XLR and
jack input, 48V for XLR only
clip overload indicator
gain input level control
colour mid-range contour filter
bass bass tone control
middle middle tone control
treble treble tone control
send effect send control, adjusts the
channels effect amount
Page 4
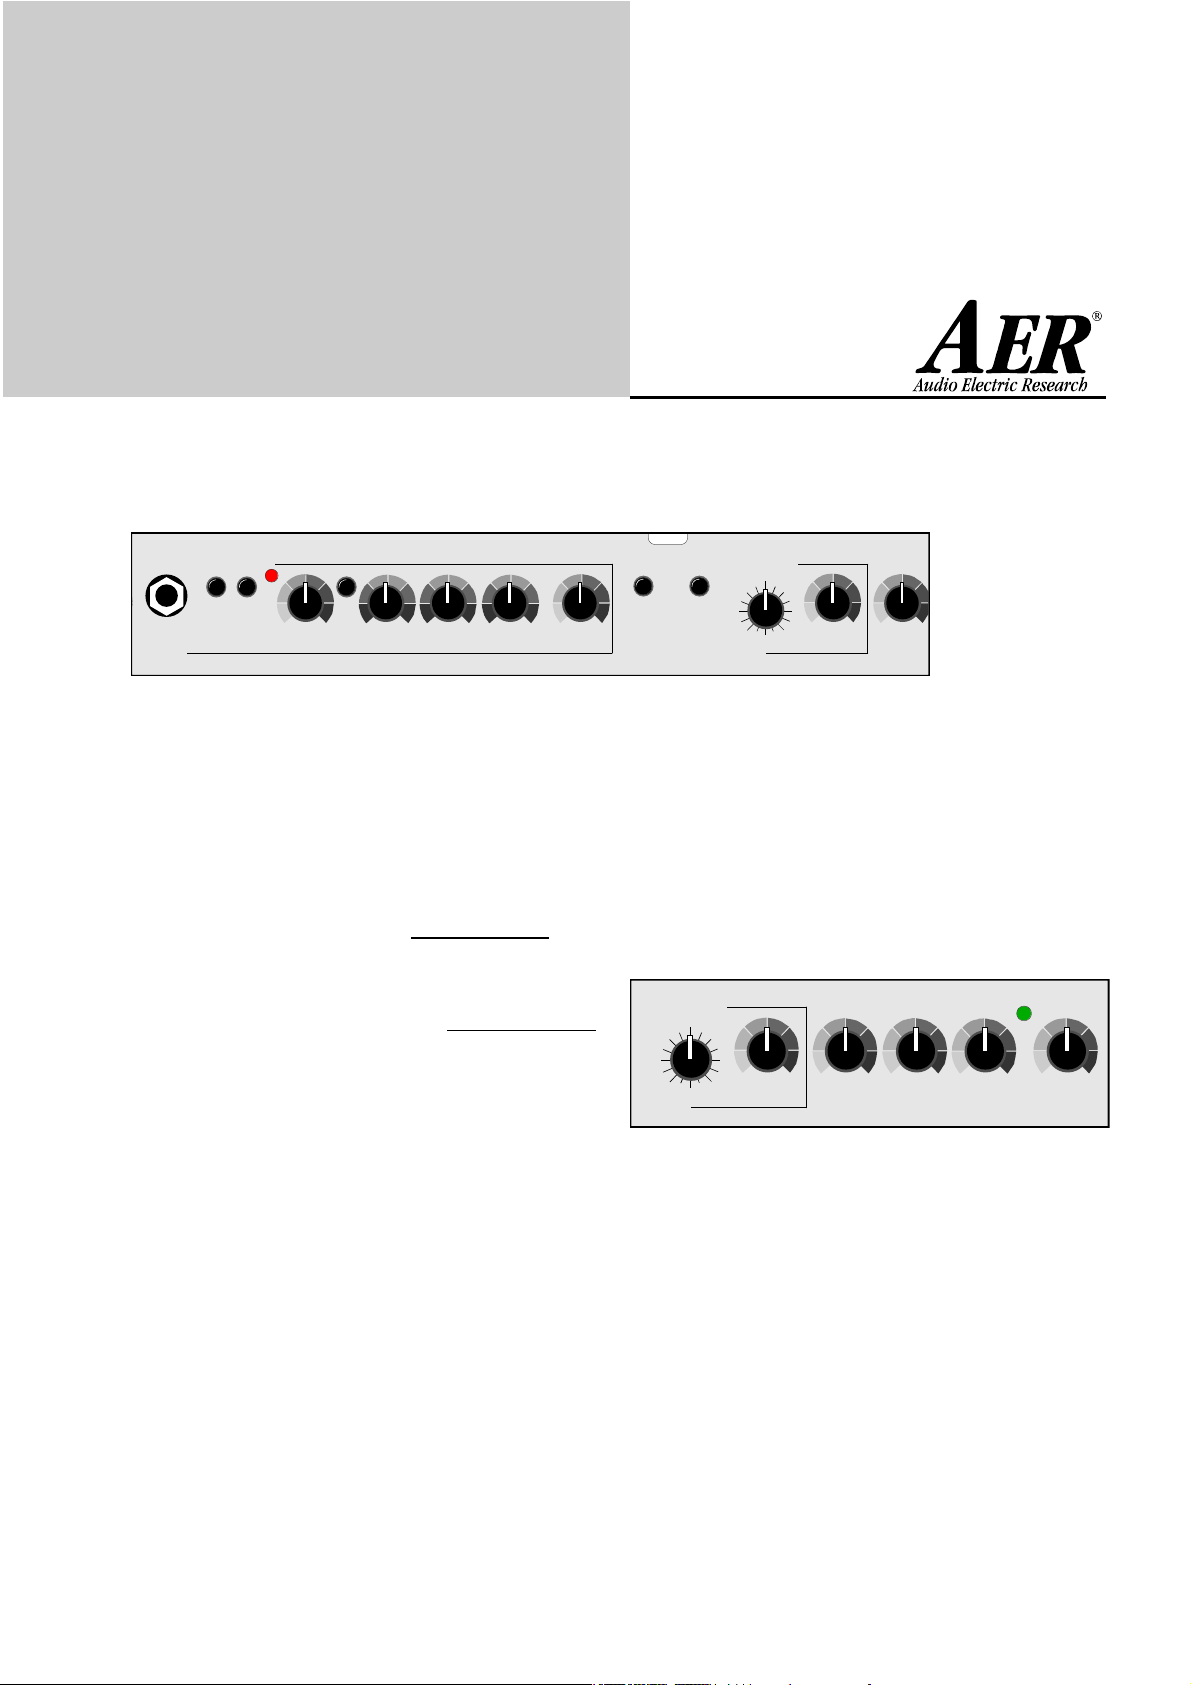
Domino 2
power
channels three & four:
channel
three + four
mute
high/
low
clip
gain
channel
input
colour
bass middle treble send
-4-
48V
stereo
sim.
effect
section
select
return
aux
return
input (3) Combi-Connector with a socket
for a 6.3 mm jack plug and
XLRmale socket
channel Mute switch to mute the channel
line/mic switch to adjust input sensitivity
line: sources with line level,
instruments with active
preamplifiers and magnetic
sound pick-ups, connnected to jack input only
mic:
balanced microphone input
with 48V phantom power
to be used with XLR and
jack input, 48V for XLR only
gain input level control
input (4) socket for a 6.3 mm jack plug,
high impedance line/piezo input
channel mute switch to mute the channel
high/low switch to adjust input sensitivity
high for high input sensitivity
low for low input sensitivity
clip overload indicator
gain input level control
colour mid-range contour filter
bass bass tone control
middle middle tone control
treble treble tone control
send effect send control, adjusts the
channels effect amount for both
channels
48V 48 volt phantom power on/off
stereo sim. stereo simulation on/off
effect/aux/master:
effect
section
select
return
aux
return
effect 2
return
pre
master
master
effect select switch to select between
16 different effect presets
10 reverbs, 4 delay, 2
chorus (see app. 1)
return effect-return-control, sets the
total level of the internal effect
aux return aux-return-control, sets the level
of signals connected to aux-in
effect 2 return effect-return-control, sets the
level of signals connected to
return
pre master level control for L-out, R-out
and rec-out
power power indicator lamp
master overall volume level control
Page 5
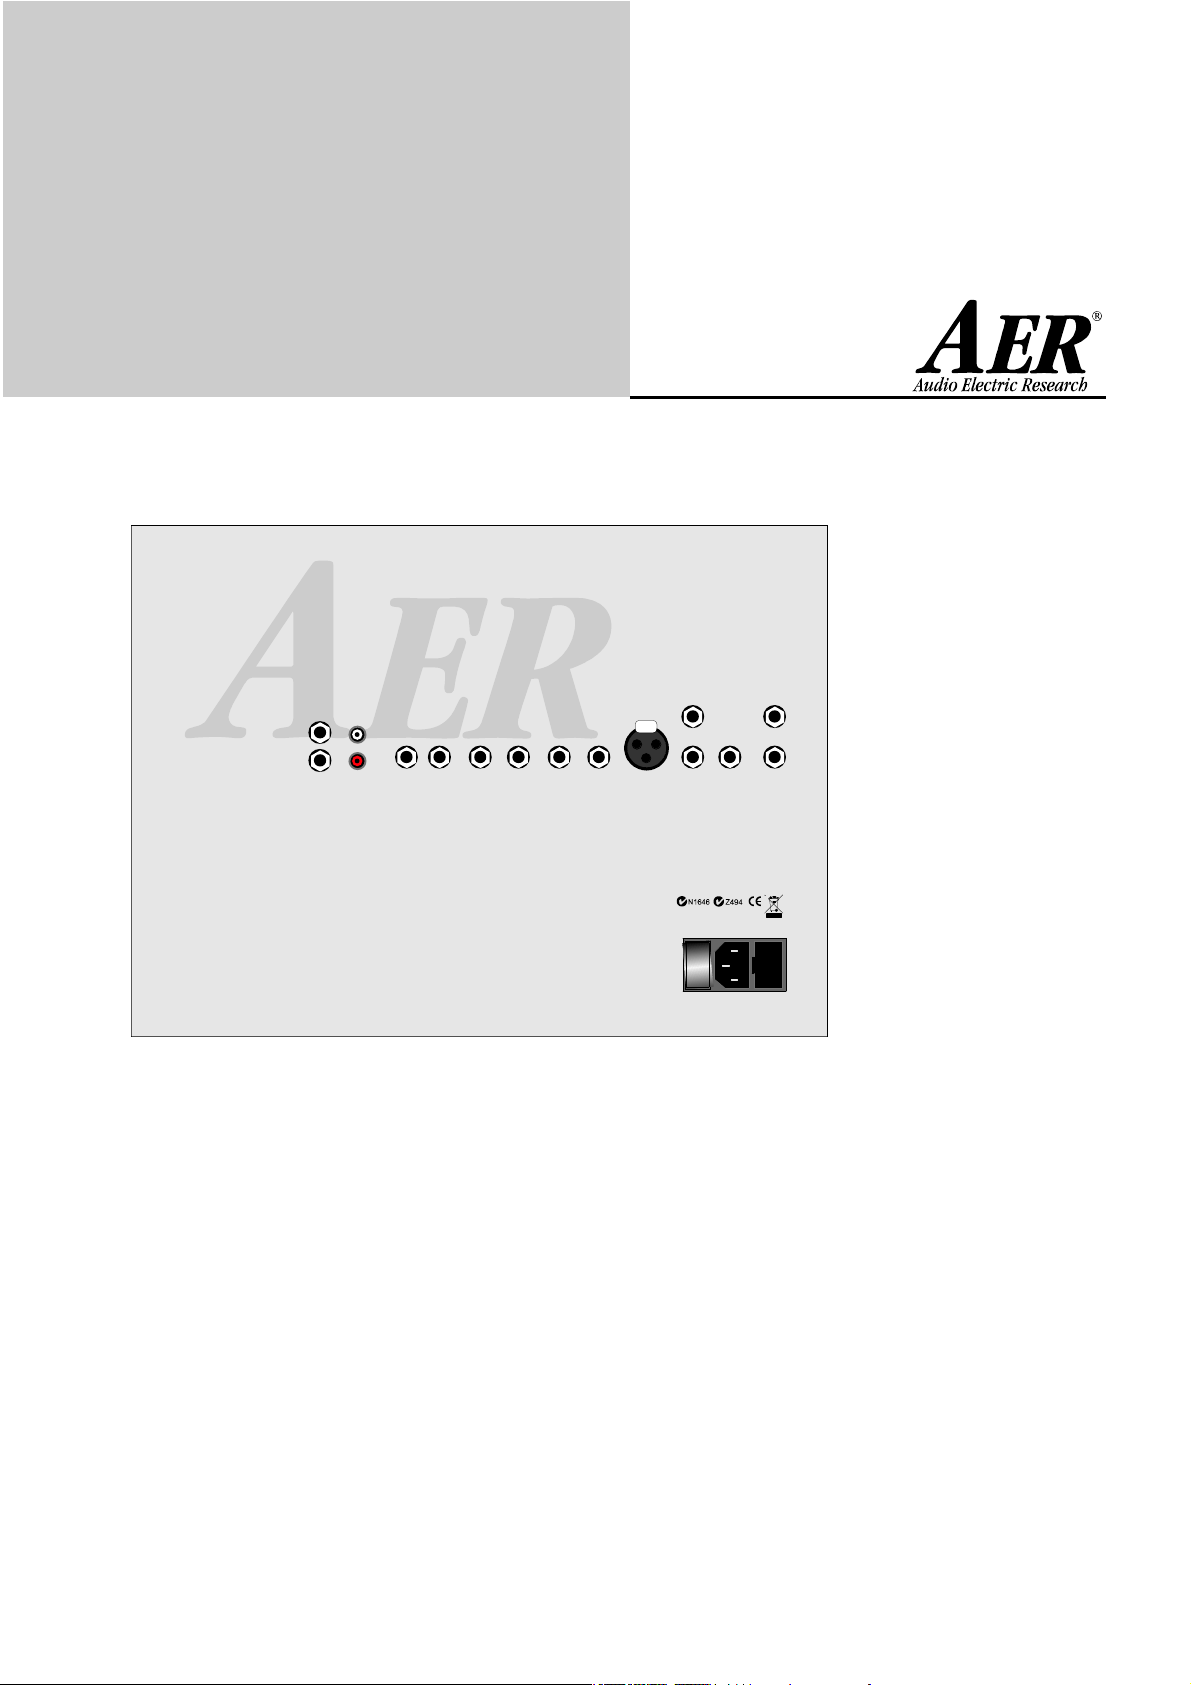
Domino 2
Back (from left to right):
-5-
rec out aux in phones tuner L-out insertR-out line out DI-out return footswitch
Domino
2
acoustic strategy
l-, r-, rec-out recording out, L-out, R-out,
adjustable via post master, pre
EQ, effect, stereo performance
of external effect, aux-in and
stereo simulator (switchable)
aux in RCA input-socket for cd, etc.,
stereo
phones stereo headphone output, post
effect and aux-in without stereo
simulation
tuner tuner output, pre eq and effect
insert insert loop, seriel for e.g. effect
with:
input –> return = ring
output –> send = tip
or to connect AER amps with the
link function. (see Append. 2)
line out output for e.g. active extension,
post eq and effect, level
depending on master
effect
footswitch
mute channel 1/2
footswitch
mute channel 3/4
2=pos
3=neg
send1=gnd
Caution
: Risk of electric shock. Do not open!
No user serviceable parts inside.
Refer servicing to qualified personal.
Made in Germany by AER.
power on
DI out balanced XLR-output pre master,
pre eq and effects
send output for external effect unit,
post eq
return stereo input for an external
effect unit or other signal source
footswitch effect internel/external effect on/off,
stereo
footswitch
mute 1/2 socket for a stereo footswitch
to mute channels 1/2
footswitch
mute 3/4 socket for a stereo footswitch
to mute channels 3/4
power combined mains switch with
mains socket and fuse holder
Page 6

Domino 2
4. Summary of Operations
• Connecting and starting-up:
Check to ensure that mains voltage at your location
corresponds to what is permitted to operate the
DOMINO. You will find the necessary information
on the sticker at the rear side of the amp under
‘voltage’. Before switching on the amp, ‘Master’ and
‘Return’ controls should be turned to zero position
(as far left as they may go) and all other controls to
middle position. Then make all necessary cable
connections (mains, instruments, microphone and
link). Now you can turn on your DOMINO with the
power switch on the rear of the amp. The green
power indicator shows that the amp is working.
• Level control
You can use the ‘High/Low’-switch, the ‘Line/Mic’switch and the ‘Gain’-control to adjust the various
pick-up systems and signal sources to the DOMINO.
The ‘Clip’-indicator shows that the input signal is
too high. To ensure distortion-free reproduction you
should then reduce ‘Gain’-control or ‘Volume’-control on your signal source.
Clipping can already accure at very low or even
maximum gain depending on the output of your
source. Pleace verify: set the master control to zero
position. Play at a high dynamic level and increase
the gain level to the point the clip indicator starts
to flicker. With that you can be sure that youre source
is able to fully address the inputstage. Reduce the
gain a little bit to generate additional dynamic headroom and then use the master control to adjust the
final overall volume.
Temporary flickering gives no cause of concern. But
you should pay attention not to get above this level
Please consider the Domino has four channels. For
individual input gains add up and may distored the
.
-6-
signal incoming the effect unit. This distortion is not
monitored by the clipping indicator. It is only audible.
In any case of audible distortion reduce the gains.
You can mute the channels either by mute switches
per channel or via footswitch.
• Tone controls
The three band tone controls of your DOMINO are
designed to fulfill the special requirements of acoustic
instruments as well as general demands of other
sources. The ‘Colour’- switches activate a ‘mid-cut
treble-boost’-filter, which is particularly appropriate
for fingerstyle techniques.
• Effects
The DOMINO has an integrated (internal) digital 32
bit AER-effect processor, providing you with
16 presets (reverb, delay, chorus – see Appd. 1) to
be selected by the ‘Effect Select’-switch. The
‘Return’- control determines the intensity of the total effect (as far left as possible = no effect).
The individual effect sends adjust the amount of
effect per channel.
Furthermore a supplementary effect device can be
connected (external effect). For this purpose, use
the sockets ‘Send’ and ‘Return’ on the rear of the
DOMINO (‘Send’ to the input, ‘Return’ to the output of the external effect). The intensity will then
be determined by the Effect 2-return.
You can connect a stereo (double) footswitch either
to footswitch effect or footswitch 1,2,3,4 to switch
the effects on/off (internal and external) or mute
the channels.
Page 7

Domino 2
-7-
• Stereo-Simulation
The DOMINO is mono! Thus you find the same
effect signal on ‘R-Out’ and ‘L-Out’. These outputs
are designed to connect AER active fullrange systems to (AG8, CX8, AS Q8, AS 281) and adjust the
overall volume by the pre master independend from
the Domino volume. If you switch on the stereo
simulation now a more or less stereo like, broader
sound is generated. On stage, Domino as monitor
the sound stays unchanged.
• Insert
The insert loop is an input and output on a stereo
socket to link different effect devices (EQs, compressors…) in serial mode with:
tip = send –> output and
ring = return –> input.
You can also use this insert as additional line output
separately or additional line input separately or to
link several AER-amps with insert function. (Domino
Compact classic, AG8) For each function you need a
special cable accordingly. For the special AER link
function refer to see appd. 2.
Link mode secures that all signals of all connected
AER-amplifiers are audible on every connected amp
even with different effect settings without feedback. The only implication is, gains are depending
on each other. However linked amps in conjunction
with an active AER fullrange system work as a
complete reinforcement/monitor system easy to be
operated from the stage.
,
OK? We hope you enjoy your DOMINO!
Page 8

Domino 2
5. Technical Data
-8-
Inputs Ch 1/4: Line: unbalanced,
2.2 Meg, 22mV, -33dBV
high/low attenuation 10dB
Ch 2/3: Line: unbalanced,
1 Meg, 20mV, -34 dBV
Mic: balanced, 1,2 K
(unbalanced use 4K)
jack and XLR
1,7 mV, -55dBV
48V phantom power
with XLR only
Eff. Return >12K, 2 x 400 mV -8dBV,
mix level 0 dB
Aux-In L/R > 6K, 2 x 120 mV, -18dBV
Outputs Tuner: -10dBV, Line: +1 dBV,
depending on master
DI: -24dBV, Send: -1 dBV
L-Out: -1dBV, R-Out: -1dBV
insert: send 47 ohm, +1dBV,
return 22K, +1dBV
Phones stereo, max. 2x100 mW, 32 ohm,
mutes speaker
Footswitch
effect on/off Tip = build-in effect,
Ring = external effect
Footswitch
mute 1,2,3,4 1/3 = Tip, 2/4 = Ring,
Sleeve: ground
EQ, Ch. 1/2/3 u.4
Analog Signal
Processor: Limiter, Subsonic Filter und
Effect 32bit AER-Effectprocessor,
Power Mains 220-240 V / 50-60Hz / 220 W
Bass: 100 Hz / ± 8 dB
Middle: 600 Hz / ± 2 dB
Treble: 10 kHz / ± 8 dB
Enhancer
16 Presets
Mains Fuse: 1.6 A slow
Power Amp
Rating 2 x 60 Watt / 4 ohm RMS
Speaker 2 x 8" twin-cone speaker system
(96 dB 1W/1m, freq. range 60 Hz
- 18 kHz)
Cabinet 0.59’ (15 mm) birch plywood
Dimension 14.37’ (365 mm) high, 16.55’
(420 mm) wide, 11.81’ (300 mm)
deep
Finish waterbased acrylic,
black spatter finish
Weight 31 lbs (14 kg)
• 0 dBV ~ 1V
Specifications and appearance
subject to change without notice
Audio Electric Research GmbH
www.aer-amps.com
Page 9

Domino 2
Appendix 1
Effectchart
Hall 1 Room, small/bright
2 Room, mid/soft
3 Hall, small/bright
4 Hall, short/vocal
5 Hall, mid/vocal
6 Hall, large/bright
7 Church, mid/wood
8 Church, large/marble
9 Ambience, glass/hall
10 Ambience, large/warm
Appendix 2
-9-
Delay 11 Slapback
12 Long Pan
13 Slapback vocal
14 Slapback mid/
vocal
Chorus 15 Slight silky
16 Frozen
effect
section
1
select
return
A. Insert Point
amp 1
insert
B. Connecting diagram, link R-out, L-Out
amp 2
ring
tip
insert
tip
amp 3
tip
tip
ring
line out
return
line out
ring
tip
external
effect
send
tip
ring
In case of occupied „return” socket, d ue to the
insert operating, you can still loop an external
effect, using the effect „send” and the „aux in”
sockets.
L
R
aux in
return
pre master
L-Out
R-Out
link
Amp 1 Amp 2 Amp 3
link
PA
Page 10

Domino 2
Appendix 3
Block Diagramm, Sheet 1
-10-
Page 11

Domino 2
Block Diagramm, Sheet 2
-11-
Page 12

Domino 2
-12-
6. Regulations for Disposal
Regulations regarding the disposal of old electrical equipment.
It is not allowed to dispose of old electrical equipment
together with domestic refuse.
Old AER GmbH electrical equipment should not be disposed of
at public electrical refuse disposal centres.
The company AER GmbH is solely responsible for the disposal
of old AER GmbH electrical equipment, which is marked with
the sign of a refuse bin.
Before disposing of old AER GmbH electrical equipment carrying a refuse bin sign, please contact us.
We will take care of a professional and self-financing disposal.
For old AER GmbH electrical equipment not carrying a waste
bin sign, the owner is responsible for a professional disposal
according to legislation.
In this case we will gladly help you and recommend a professional disposal contact.
By calling us on +49 (2361) 89 17 89, we can give you qualified
information regarding the disposal of old AER GmbH electrical
equipment.
Declaration:
The EU directive regarding the disposal of electrical equipment, (WEEE,22/96/EC) has been implemented according
to the law.
EU, Norway, Iceland and Liechtenstein
In the European Union, Norway, Iceland and Liechtenstein,
disposal of electrical refuse together with domestic refuse
is not allowed.
All AER GmbH electrical equipment relevant to the WEEE regulations, manufactured since 13.08.2005, has been supplied with
a crossed waste bin sign. This sign denotes that the equipment
may not be disposed with the domestic refuse. This is also valid
in Norway, Iceland and Liechtenstein.
Publication in this form has been required since 13.08.2005.
The European regulations of WEEE have been implemented in
the national laws of all European countries. Because of this we
are unable to offer standard disposal solutions.
The distributor or importer in a particular country is
responsible for abidance of the countries regulations, and is
must thereby be responsible for the disposal of old electrical
equipment, according to the national laws.
For other Nations
For professional disposal of old electrical equipment, please
refer to your local distributor or the relevant authority.
All AER GmbH electrical equipment relevant to the WEEE
regulations, manufactured since 13.08.2005, has been supplied
with a crossed waste bin sign. This sign denotes that the
equipment may not be disposed with the domestic refuse.
Publication in this form has been required since 13.08.2005.
The Company AER GmbH is registered at the
German Registration Office, EAR, under the WEEE
registration number DE2631529
 Loading...