

Page 1

Cable Locator
Transmitter/Receiver
Model 6681
User Manual
ENGLISH
www.aemc.com
®
CHAUVIN ARNOUX GROUP
Page 2

Statement of Compliance
Chauvin Arnoux®, Inc. d.b.a. AEMC® Instruments
certifies that this instrument has been calibrated using
standards and instruments traceable to international
standards.
We gu
arantee that at the time of shipping your
instrument has met its published specifications.
The recommended calibration interval for this
instrument is 12 months and begins on the date of
receipt by the customer. For recalibration, please
use our calibration services. Refer to our repair and
calibration section at www.aemc.com.
Serial #:
Catalog #: 2127.85
Model #: 6681
Please fill in the appropriate date as indicated:
Date Received:
Date Calibration Due:
®
hauvin Arnoux
C
d.b.a AEMC
, Inc.
®
Instruments
www.aemc.com
Page 3

ORDERING INFORMATION
(1) Cable Locator Transmitter and
(1) Soft Carrying Case
(1) Adapter - 110V
Ordering Information:
Cable Locator Transmitter and Receiver ............................................................... Cat. #2127.85
Shipping Contents:
(1) Cable Locator Receiver
Set of 2, Color-coded (Red/Black)
Leads & Alligator Clips (Rated
1000V CAT IV)
Also includes (6) AAA batteries, (1) 9V battery and user manual.
(1) Mini Ground Rod
outlet w/banana plugs
Replacement Parts
Lead - Set of 2, 5 ft Color-coded (Red/Bl ack) Leads,
& Alligator Clips (Rated 1000V CAT IV) ................................................................... Cat. #2140.62
Mini Ground Rod ....................................................................................................... Cat. #5000.79
Case – Replacement Soft Carrying Case................................................................. Cat. #5000.81
Adapter – 110V Outlet w/4mm Banana Plugs............................................................. Cat. #2118.49
For accessories and replacement parts, visit our store at www.aemc.com.
Model 6681 Cable Locator 3
Page 4

Thank you for purchasing the Model 6681 Cable Locater Transmitter and Receiver.
This instrument and its accessories comply with safety standards IEC
61010 for voltages of 300V in category III at an altitude of less than 6562
(2000m), indoors, with a degree of pollution of not more than 2. Failure to
observe
and destruction of the instrument and of the installations.
If you use this instrument other than as specified, the protection it provides
to you may be compromised.
For best results read this user manual carefully and follow all precautions for its use.
SYMBOLS
Danger. Refer to this data sheet whenever this danger symbol appears.
Indicates conformity with European directives, in particular LVD and
EMC.
Indicates that, in the European Union, the product must undergo
selective disposal in compliance with Directive WEEE 2002/96/EC. This
equipment must not be treated as hous ehold waste.
Battery.
DC and AC.
PRECAUTIONS FOR USE
’
the safety instructions may result in electric shock, fire, explosion,
• Do not use the instrument if it appears damaged, incomplete, or poorly closed.
• Do not use the instrument on networks on which the voltage or category
exceeds those specified in this manual.
• Comply with all conditions of use, including temperature, relative humidity,
altitude, degree of pollution, and place of use.
• Before each use, check the condition of the insulation on the leads, housing,
and accessories. Any item on which the insulation is deteriorated (even
partially) must be set aside for repair or scrapping.
4 Model 6681 Cable Locator
Page 5

• Only use leads and accessories supplied. Using leads or accessories of a lower
Connecting the transmitter to an installation at line voltage may
milliamps
In normal use,
neutral
ground
may
When
ensure installation
depending on the country), in particular
the ground conductor (PE) to earth.
voltage or category reduces the voltage or category of the combined instrument
+ leads (or accessories) to that of the leads/accessories.
• All troubleshooting and metrological verifications must be done by certified
personnel. Any change may compromise safety.
• Wear suitable personal protective equipment when hazardous voltages may be
accessible in the installation where the measurement is made.
• Store the instrument a clean, dry, cool place. Remove the batteries before any
prolonged period of non-use.
create a
-level current in the circuit.
the transmitter must be connected only between phase and
. If the transmitter is accidentally connected between phase and
, and there is a fault in the installation, all parts connected to ground
become live.
used on a live installation, the instrument mu st first be checked to
complies with standards (NF-C-15-100, VDE-100, etc.,
earth resistance and connection of
MEASUREMENT CATEGORIES
CAT IV: corresponds to measurements taken at the source of low-voltage
installations.
Example: power feeders, counters and protection devices.
CAT III: corresponds to measurements on building installations.
Example: distribution panel, circuit-breakers, machines or fixed industrial devices.
CAT II: corresponds to measurements taken on circuits directly connected to lowvoltage installations.
Example: power supply to electro-domestic devices and portable tools.
Model 6681 Cable Locator 5
Page 6

TABLE OF CONTENTS
1. INTRODUCTION ............................................................................................................... 7
2. DESCRIPTION .................................................................................................................. 8
1 TRANSMITTER ........................................................................................................... 8
2.
2.1.1 INTERFACE ........................................................................................................ 8
2.1.2 LCD SCREEN ..................................................................................................... 9
2.2 RECEIVER .................................................................................................................. 9
2.2.1 INTERFACE ........................................................................................................ 9
2.2.2 LCD SCREEN ................................................................................................... 10
2.2.3 CABLE DETECTION MODE EXAMPLES ......................................................... 10
3.OPERATION ................................................................................................................... 11
1 GETTING STARTED ................................................................................................. 11
3.
3.1.1 SETTING UP ..................................................................................................... 11
3.1.2 USE .................................................................................................................. 11
3.1.3 NEXT STEP: 2 TRANSMITTER CONNECTION MODES ................................. 12
3.2 SINGLE-POLE OPERATION ..................................................................................... 13
3.2.1 LOCATING AND TRACING LINES AND OUTLETS .......................................... 13
3.2.2 LINE BREAKS LOCATION ................................................................................. 14
3.2.3 LINE BREAKS LOCATION USING TWO TRANSMITTERS ............................... 16
3.2.4 FLOOR RADIENT HEATING SYSTEM FAULT DETECTION ............................. 17
3.2.6 METALLIC WATER SUPPLY AND HEATING RADIATORS DETECTION ......... 19
3.2.7 IDENTIFICATION OF A BRANCH CIRCUIT ON THE SAME FLOOR ................ 20
3.2.8 UNDERGROUND CIRCUIT TRACING ............................................................. 21
3.3 TWO-POLE OPERATION ......................................................................................... 22
3.3.1 CLOSED-CIRCUIT APPLICATIONS ................................................................. 22
3.
3.2 CIRCUIT BREAKERS/FUSES DETECTION ..................................................... 23
3.3.3 SHORT-CIRCUIT DETECTION......................................................................... 24
3.3.4 DEEP UNDERGROUND CABLES DETECTION ............................................... 25
3.3.5 SORTING OR IDENTIFICATION OF CONDUCTOR PAIRS .............................. 26
3.4 INCREASING THE EFFECTIVE RADIUS OF DETECTION
3.5 LINE VOLTAGE IDENTIFICATION/SEARCHING FOR
4. ADDITIONAL FUNCTIONS ............................................................................................. 29
1 TRANSMITTER VOLTMETER FUNCTION ................................................................ 29
4.
4.2 FLASHLIGHT FUNCTION .......................................................................................... 29
4.3 BACK-LIGHT FUNCTION .......................................................................................... 29
4.4 BUZZER ACTIVATION/DE-ACTIVATION .................................................................. 29
4.4.1 TRANSMITTER................................................................................................. 29
4.4.2 RECEIVER........................................................................................................ 29
4.5 AUTOMATIC POWER-OFF FUNCTION .................................................................... 29
4.5.1 TRANSMITTER................................................................................................. 29
4.5.2 RECEIVER........................................................................................................ 29
5. SPECIFICATIONS .......................................................................................................... 30
5.1 TRANSMITTER SPECIFICATIONS ........................................................................... 30
5.2 RECEIVER SPECIFICATIONS .................................................................................. 30
5.3 COMPLIANCE WITH INTERNATIONAL STANDARDS .............................................. 31
6.MAINTENANCE .............................................................................................................. 32
1 CLEANING ................................................................................................................ 32
6.
6.2 BATTERY REPLACEMENT ...................................................................................... 32
6.3 TRANSMITTER FUSE CHECK ................................................................................. 32
OF LIVE CIRCUITS ....... 27
BREAKS IN THE CIRCUIT .. 28
6 Model 6681 Cable Locator
Page 7

1. INTRODUCTION
The Cable Locator Model 6681 detects telecommunications cables, data cables,
electric power supply cables, and metal pipes in installations of category III (or lower),
at voltages of 300V (or less) with respect to ground.
The instrument is a portable device comprising a transmitter, receiver, and
accessories. The transmitter and receiver each have a large back-lit LCD and large
keys.
The transmitter applies an AC voltage modulated by digital signals to the circuit that is
to be located, which creates a proportional alternating electric field. The transmitter is
also an AC/DC voltmeter; the display of the measured voltage is accompanied by a
symbol warning of the presence of a voltage. The transmitter also has a self-test
function, indicating good transmission between transmitter and receiver.
The receiver has a sensitive sensor that generates a display proportional to the
electric field detected. The variations of this signal, after decoding, processing, and
shaping, enable the user to determine the location of underground cables and pipes,
and the detection of any faults in them. The receiver also has a buzzer that changes
pitch as a function of the strength of the signal detected.
Fig. 1
Model 6681 Cable Locator 7
Page 8

2.1 TRANSMITTER
Fig. 2
2.1.1 INTERFACE
2. DESCRIPTION
1. LCD screen.
2. POWER: Turns instrument ON/OFF.
3. LEVEL SEL: Adjusts/confirms
transmit power level (Level I, II or III).
4. START/STOP: Starts/stops
transmission.
5. CODE SEL: Adjusts/confirms code
information to be set. Press key for 1
second to activate code selection mode.
Press briefly to exit from this mode.
Codes F, E, H, D, L, C, Y, and A can be
selected; F is the default.
6. : Decreases transmitt e d p ower level or
changes the transmission code.
7. : Increases transmitted power level or
changes the transmission code.
8. : Silent mode activation/de-activation.
In silent mode, key presses and the
buzzer are silent.
9. : Flashlight ON/OFF.
10. "+" input/output terminal for voltage
measurement and injection signal to
system under test.
11. "COM" input/output terminal/Grounding
terminal.
Note that if one of the POWER, CODE SEL, or LEVEL SEL keys is active, the other
two are inactive.
8 Model 6681 Cable Locator
Page 9

2.1.2 LCD SCREEN
11. Silent mode symbol.
Fig. 4
1. Transmitter battery indicastor.
2. Transmitted power level (Level I, II,
or III).
3. Transmission code (F is default).
4. AC voltage.
5. DC voltage.
6. Measured voltage. The instrument can
be used as a voltmeter with a range 12
to 300V AC/DC.
7. Transmission status.
8. Code transmitted.
Fig. 3
9. Transmitted signal strength.
10. Voltage present symbol.
2.2 RECEIVER
2.2.1 INTERFACE
1. Flashlight indication.
2. Sensor head.
3. LCD screen.
4. : Turns instrument ON/OFF.
5. : Backlighting and silent mode
ON/OFF. Press briefly to activate/deactivate backlighting. Press for 1 second to
activate/de-activate sile nt mod e. In silent
mode, key presses and the buzzer are
silent.
6. : Flashlight ON/OFF.
7. UAC: Cable detection mode or Line
voltage detection mode.
8. MANUAL: Manual or automatic cable
detection mode.
9. : Decrease received sensitivity in manual
mode.
10. : Increase received sensitivity in manual
mode.
11. Buzzer.
Model 6681 Cable Locator 9
Page 10

2.2.2 LCD SCREEN
3. Mains voltage identification mode
Fig. 8
1. Receiver battery indicator.
2. Transmitter battery indicator.
3. Received signal level (Level I, II, or III).
4. Manual mode indicator.
5. Automatic mode indicator.
6. Signal str engt h indi cator in automatic
mode. In manual mode, displays either
"SEL" (to indicate that there is no signal) or
a value indicating signal strength. In AC
mode, "UAC" is displayed.
7. Concentric circles indicating the preset
sensitivity in graphic form. A large number
Fig. 5
of circles indicates high sensitivity. A
small number indicates lower sensitivity.
8. Code received.
9. Received signal strength.
10. Voltage present indicator.
11. Silent mode indicator.
2.2.3 CABLE DETECTION MODE EXAMPLES
1. Automatic mode
Fig. 6
2. Manual mode
Fig. 7
10 Model 6681 Cable Locator
Page 11

3. OPERATION
1. Obtain a length of sheathed 3-conductor
leads (provided).
3.1 GETTING STARTED
The best way to learn to use the Model 6681 cable locater is to follow the exam p l e
below:
3.1.1 SETTING UP
cable with a cross section of at least
0.0625”.
2. Temporarily staple a 15’ length of this cable
along a wall, on an attachment surface at
eye level. The wall must be accessible from
both sides.
3. Create an artificial break in one of the
conductors at approximate ly 5’ from one
end.
Fig. 9
5. Connect the COM terminal of the transmitter to ground. All other conductors of
the cable must also be connected to the transmitter and to the same ground
(see Fig. 9).
At the far end of the cable, the conductors must be "open" (not connected to each
other).
3.1.2 USE
1. Switch the transmitter ON using the ON/OFF key. The transmitter displays the
initial screen and the buzzer beeps twice.
2. Press LEVEL SEL on the transmitter to enter transmit level adjustment, then
use the up and down arrow k e y s t o select the transmit level (I, II, or III). After
setting this level, press LEVEL SEL again to exit.
3. To change the code transmitted, press the CODE SEL key on the transmitter for
approxim at e ly 1 s e c ond, then press the up arrow key or the down arrow key t o
select the code transmitted (F, E, H, D, L, C, Y, or A; F is default). Press the
CODE SEL key again to exit.
4. Press START/STOP to start transmission. The concentric circles displayed on
the LCD screen will spread gradually, the code of the transmitted signal appears
on the lower right side of the display, and the strength is graphically displayed
(see Fig 5).
Model 6681 Cable Locator 11
4. Connect the end of the broken cable to the
(+) terminal on the transmitter using the test
Page 12

5. Press the ON/OFF key on the receiver to turn it on. The LCD displays the start
screen, the buzzer beeps twice, and the receiver changes to Automatic Mode
as default.
6. Move the probe of the receiver slowly along the cable up to the break. A bar
graph on the right side on the receiver displ ays the received power level, the
code transmitted by the transmi tter appears on the bottom right, the dynamic
signal strength is graphically displayed, and the buzzer changes pitch with the
change of signal strength. When the receiver pro be passes over the break, the
strength of the displayed signal exhibits an obvious drop, and then disappears
completely.
7. To refine the detection, press the MANUAL key on the receiver to change to
manual mode, then use the down arrow key to reduce the sensitivity as far as
possible while checking that the receiver screen can display the transmit code
from the transmitter. This identifies where the break is located.
3.1.3 NEXT STEP: 2 TRANSMITTER CONNECTION MODES
Only these transmitter connection modes can be used to locate conductors with the
Model 6681 Cable Locator.
Single-pole application
Connect the transmitter to a single conductor. If the signal transmitted by the
transmitter is a high-frequency signal, only one conductor can be detected and traced.
The second conductor is then grounded.
This arrangement causes the flow of a high-frequency current in the conductor and its
transmission through the ai r to ground; this is the same principle used between the
transmitter and the receiver for radio broadcasting.
Two-pole application
This connection can be made energized or de-energized AC lines. The transmitter is
connected to both conductors using the two test leads.
Connection to an energized cable:
1. Connect the "+" terminal of the transmitter to the conductor connected to the
phase.
2. Connect the COM terminal of the transmitter to the neutral wire. In this case, if
there is no load on the line, the modulated current from the transmitter will flow
to the neutral conductor by coupling via the distributed capacitance of the wires,
and then return to the transmitter.
NOTE: When the transmitter is connected to a live line , if one of its terminals is
connected to a ground wire rather than the neutral, the current through the transmitter
is added to the leakage current already present in the installation. The resulting total
leakage current may then activate a GFCI if it is in that branch and possibly trip it.
12 Model 6681 Cable Locator
Page 13

Connection to a de-energized cable:
1. Connec t the "+" terminal of the transmitter to one wire of the cable.
2. Connect the other terminal of the transmitter to the other wire of the cable.
3. At the other end of the cable, connect the two wires together.
In this case, the modulated current returns directly to the transmitter through the
cable.
In another method, the two test leads of the transmitter can be connected to the two
ends of a single wire. In addition, since the installation is dead, the ground conductor
of the line can also be used without risk.
3.2 SINGLE-POLE OPERATION
To detect breaks in conductors in walls or under a floor:
1. Locate and trace wires, outlets, junction boxes, switches, etc., in domestic
installations.
2. Locate bottlenecks, twists, deformations, and obstructions in piping installations
using a metal wire.
3.2.1 LOCATING AND TRACING LINES AND OUTLETS
Preconditions:
• The circuit must be de-energized.
• The neutral wire and the ground wire must be connected and operational.
• Connect the transmitter to the phase and to the ground wire as shown in
Fig. 10.
Model 6681 Cable Locator 13
Page 14

Fig. 10
NOTE: If the cable supplied by the signals from the transmitter is near other
conductors that are parallel to it (examples: cable tray, channel, etc.) or is interlaced
with or crosses them, the signal may then propagate in these cables and create false
detection.
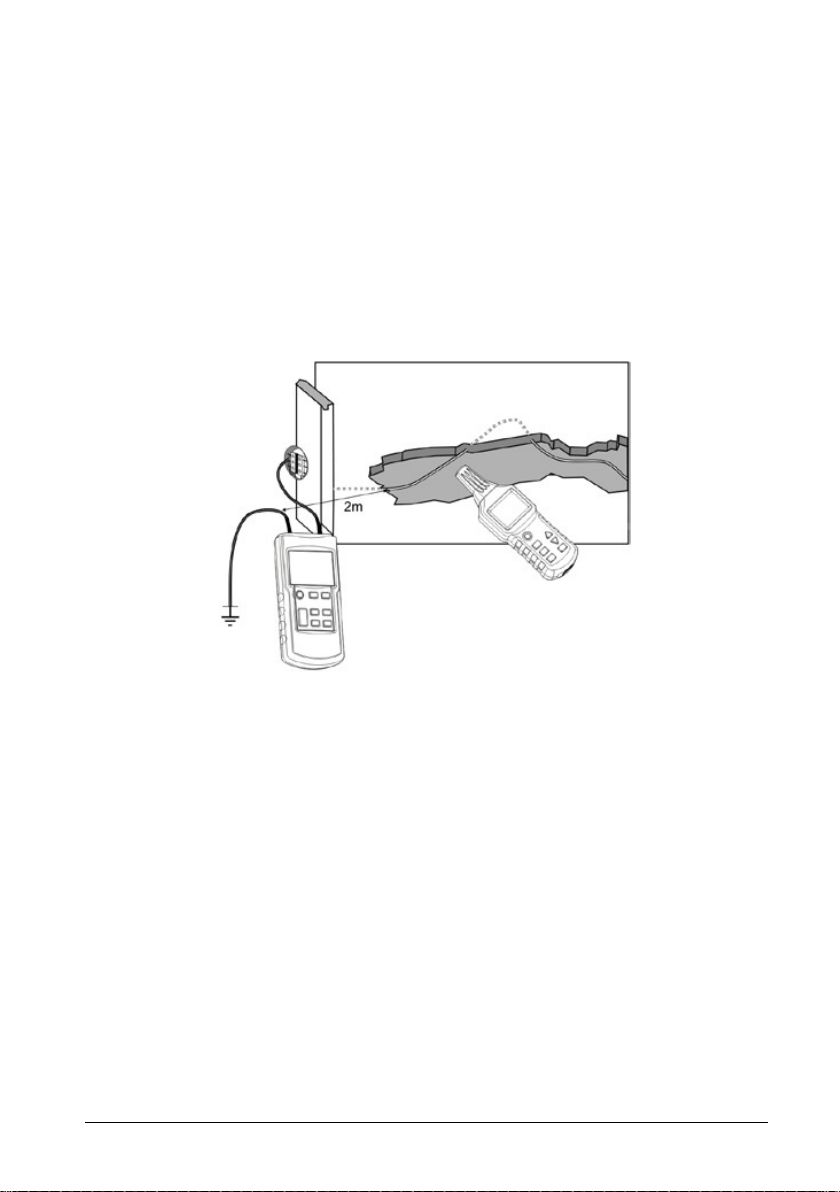
3.2.2 LINE BREAKS LOCATION
Preconditions:
• The circuit must be de-energized.
• All the other wires must be grounded as shown in Fig. 11.
• Connect the transmitter to the wire under test and to ground as shown in
Fig. 11.
14 Model 6681 Cable Locator
Page 15

Fig. 11
NOTES:
• The transition resistance of the break in the line must be greater than 10kΩ.
• When breaks in multi-conductor cables are traced, all the other wires of the
cable or of the shielded conductor must be grounded. This prevents cross
coupling of the applied signals (by a capacitive effect) on the terminals of the
source.
• The ground connected to the transmitter can be an auxiliary ground, the
grounding terminal of a pow e r ou t le t, or a properly grounded water pipe.
• Refine the detection by setting the power level transmitted by the transmitter
and the sensitivity of the receiver in manual mode.
• When the wire is traced, the place at which the signal received by the receiver
falls off suddenly is the location of the break.
Model 6681 Cable Locator 15
Page 16

3.2.3 LINE BREAKS LOCATION USING TWO TRANSMITTERS
When a line break is located using a transmitter supplying one end of the conductor,
its location may not be precise if conditions are unsatisfactory because of a
disturbance of the field. These issues can be avoided by using two transmitters (one
at each end) to detect line breaks. In this case, each transmitter is set to a different
line code, e.g. one transmitter to code F and the other to code C. (The second
transmitter, with a different line code, must therefore be purchased separately.)
Preconditions:
• The circuit measured must not be energized.
• All unused lines must be grounded as shown in Fig. 12.
• Connect the two transmitters as shown in Fig. 12.
• The measurement method is identical to that used in §3.1.
If the transmitters are connected as shown in Fig. 12, the receiver will indicate C to
the left of the line break. If the receiver goes beyond the location of the break, to the
right, it will display F. If the receiver is placed right on the break, no line code will be
displayed, because of the superposition of the signals from the two transmitters.
Fig. 12
16 Model 6681 Cable Locator
Page 17

NOTES:
Fig. 13a
• The transition resistance of the line break must be greater than 100kΩ.
• When breaks in multi-conductor cables are traced, all the other wires of the
cable or of the shielded conductor must be grounded. This is necessary to
prevent cross coupling of the applied signals (by a capacitive effect) on the
terminals of the source.
• The ground connected to the transmitter can be an auxiliary ground, using the
grounding terminal of a power outlet, a properly grounded water pipe, or the
mini ground rod supplied with the Model 6681.
• When the line is traced, the place at which the signal received by the receiver
falls off suddenly is the location of the break.
Refine the detection by setting the power level transmitted by the transmitter and the
sensitivity of the receiver in manual mode.
3.2.4 FLOOR RADIENT HEATING SYSTEM FAULT DETECTION
Preconditions:
• The circuit measured must be de-energized.
• All unused lines must be grounded as shown in Fig. 13a.
• Connect the two transmitters (if two transmitters are used) as shown in Fig. 13b.
• The measurement method is identical to that used in §3.1.
Fig. 13b
• If there is a screen above the heating wires, there may not be a ground
connection. If necessary, separate the shielding from the ground connection.
• There must be grounding, and there must be a long distance between the
grounding terminal of the transmitter and the line to be located. If this
distance is too short, the signal and the line cannot be located precisely.
Model 6681 Cable Locator 17
Page 18

• A second transmitter is not essential for this application. (For an application
with only one transmitter, refer to Fig. 13a.)
• When the line is traced, the place at which the signal received by the
receiver falls off suddenly is the location of the break.
Refine the detection by setting the power level transmitted by the transmitter and the
sensitivity of the receiver in manual mode.
3.2.5 CONSTRICTED (PLUGGED) SECTION OF A NON-METALLIC PIPE
DETECTION
Preconditions:
• The pipe must be made of a non-conducting material (such as plastic).
• The pipe must not be energized.
• The transmitter is connected to a metallic helical tube (flexible metallic tube or
pipe) and to an auxiliary ground as shown in Fig. 14.
• The measurement method is identical to that used in §3.1.
Fig. 14
18 Model 6681 Cable Locator
Page 19

NOTES:
Fig. 15
• If there is a current flowing in the pipe, turn off its supply and connect it to
ground when the pipe is de-energized.
• One end of the pipe must be grounded, and the ground of the transmitter must
be at a safe distance from the pipe to be located. If the estimated distance is too
short, the signal and the circuit cannot be located precisely.
• If you have only a helical pipe made of a non-conducting material (fiberglass,
PVC, etc.), we suggest inserting a metal wire having a cross section of
approximately 0.0625” in the non-conducting helical pipe.
• When the line is traced, the place at which the signal received by the receiver
falls off suddenly is the location of the constriction.
• Refine the detection by setting the power level transmitted by the transmitter
and the sensitivity of the receiver in manual mode.
3.2.6 METALLIC WATER SUPPLY AND HEATING R ADIATO RS
DETECTION
Preconditions:
• The pipe to be detected must be conductive and metallic (for example
galvanized steel).
• The pipe must not be grounded. There must be a relatively high resistance
between the pipe and the ground (otherwise, the detection distance will be too
short).
• Connect the transmitter to the pipe and to ground.
NOTES:
• The transmitter must be grounded at a safe distance from the pipe to be
detected. If the distance is too short, the signals and the circuit cannot be
located precisely.
Model 6681 Cable Locator 19
Page 20

• To detect a pipe made of a non-conducting material, we suggest first inserting a
helical metal tube or a metal wire having a cross section of approximately 0.625”
in the pipe, as explained in §3.2.5.
• Refine the detection by setting the power level transmitted by the transmitter
and the sensitivity of the receiver in manual mode.
3.2.7 IDENTIFICATION OF A BRANCH CIRCUIT ON THE SAME
FLOOR
Precondition: The circuit measured must de-energized.
To detect a supply circuit on the same floor, proceed as follows:
1. Trip the main circuit-breaker of the fl o or 's load center (circuit breaker panel).
2. In the circuit breaker panel, disconnect the neutral wire of the circuit to be
identified from the neutral wires of the other circuits.
3. Connect the transmitter as shown in Figure 16.
Fig. 16
NOTE: Refine the detection by setting the power level transmitted by the transmitter
and the sensitivity of the receiver in manual mode.
20 Model 6681 Cable Locator
Page 21
3.2.8 UNDERGROUND CIRCUIT TRACING
Preconditions:
• The circuit measured must be de-energized.
• The transmitter must be connected to ground.
Then proceed as follows:
1. Connec t the transmitter as shown in Figure 17.
2. Select the automatic mode of the receiver.
3. Use the power of the signal displayed to find and trace the circuit.
Fig. 17
NOTES:
• The distance between the ground wire and the circuit to be located must be as
long as possible. If this distance is too short, the signals and the circuit cannot
be located precisely.
• The depth of detection is strongly influenced by the conditions of the earth.
Select suitable receive sensitivities to locate the circuit precisely.
• If you move the receiver slowly along the circuit to be located, you will see that
the screen changes somewhat. The most powerful signals represent the precise
position of the circuit.
• The longer the distance between the signals transmitted (by the transmitter) and
the receiver, the lower the power of the signals received and the lower the depth
of detection possible.
Model 6681 Cable Locator 21
Page 22

3.3 TWO-POLE OPERATION
3.3.1 CLOSED-CIRCUIT APPLICATIONS
These can be applied to both energized and de-energized circuits:
• In de-energized circuits, the transmitter only sends coded signals to the circuits
to be detected.
•
In energized circuits, the transmitter sends coded signals to the circuits to be
detected, and also meas ures the voltage present, as shown in Figure 18:
Fig. 18
NOTES:
• This method is ideal for locating outlets, switches, circuit breakers, fuses, etc., in
electrical installations that have sub-distribution electrical cabinets.
• The depth of detection varies according to the medium in which the cable is
located and according to the manner of use. It is generally less than 1.5’.
• Adjust the power transmitted by the transmitter according to the various radii of
detection.
22 Model 6681 Cable Locator
Page 23

3.3.2 CIRCUIT BREAKERS/FUSES DETECTION
The transmitter is connected to the phase and neutral conductors of the circuit of
which the protection fuse is to be located.
1. Trip all the circuit-breakers in the distribution box.
2. Connect the transmitter as shown in Figure 19.
Fig. 19
NOTES:
• The identification and location of the circuit breakers are strongly influenced by
the condition of the wiring of the distribution frame. To locate circuit breakers or
fuses as precisely as possible, it may be necessary to open or remove the
cover of the distribution panel to isolate the branch supply wire.
• During the search process, the circuit breaker or fuse with the strongest and
most stable signals is the one associated with the branch outlet that the
transmitter is connected to. Because of the coupling of the connections, the
detector can detect signals from other circuit breakers or fuses, but their power
is relatively low.
• During the detection, it is best to place the probe of the detector on the input of
the circuit breaker or fuse connection to obtain the best result.
• Adjust the power transmitted by the transmitter according to the various radii of
detection.
• Select manual mode on the receiver and a suitable receive sensitivity to locate
the circuit precisely.
Model 6681 Cable Locator 23
Page 24

3.3.3 SHORT-CIRCUIT DETECTION
Precondition: The circuit must be de-energized.
1. Connect the transmitter as shown in figure 20.
2. The measurement method is identical to that used in §3.1.
Fig. 20
NOTES:
• During searc he s f or s ho r t -circuits in sheathed wires and cables, the depth of
detection vary because the wires are twisted together in the sheath. Only shortcircuits with an impedance less than 20Ω can be detected correctly. The
impedance of the short-circuit can be measured with a multimeter.
• During the detection process along the circuit, if the signals received are
suddenly attenuated, the position detected is where the short-circuit is located.
• If the impedance of the shor t-circuit is greater than 20Ω, try using the method of
searching for a break in a circuit (see §3.2.2) to find the court-circuit.
24 Model 6681 Cable Locator
Page 25

3.3.4 DEEP UNDERGROUND CABLES DETECTION
The magnetic field produced by the signal from the transmitter is strongly conditioned
by the shape and size (area) of the loop formed by the "forward" conductor
(connected to the "+" terminal of the transmitter) and the "return" conductor
(connected to the COM terminal of the transmitter).
For this reason, the depth of detection is severely limited in two-pole applications on a
small multi-conductor cable. Since the two conductors are very close together, the
area of the loop is often insufficient. In this case, it is best to use an "auxiliary"
conductor, not one of the conductors of the multi-conductor cable, for the return path.
The important point is that the distance between the conductor connected to the +
terminal and the "return" conductor connected to the COM terminal should be greater
than the depth underground, and in practice this distance is routinely at least 6’.
Precondition: The circuit must be de-energized.
1. Connect the transmitter as shown in Fig. 21. The distance between the supply
line and the loopback line must be at least 6 to 7.5’.
2. The measurement method is identical to that used in §3.1.
Fig. 21
NOTE: In this application, the influence of the moisture in the floor or wall on the
depth of detection is negligible.
Model 6681 Cable Locator 25
Page 26

3.3.5 SORTING OR IDENTIFICATION OF CONDUCTOR PAIRS
Preconditions:
• The circuit must be de-energized.
• The ends of the wires of each pair must be twisted together and be equally
conducting; each pair remains insulated from the others.
1. Connect the transmitter as shown in Fig. 22.
2. The measurement method is the same as in the example.
Fig. 22
NOTES:
• The ends of each pair must be twisted together to ensure correct continuity.
• When several transmitters are used, each transmitter must be set to a different
transmission code.
• If only one transmitter is used, make several measurements with different
connections between the transmitter and the various pairs.
26 Model 6681 Cable Locator
Page 27

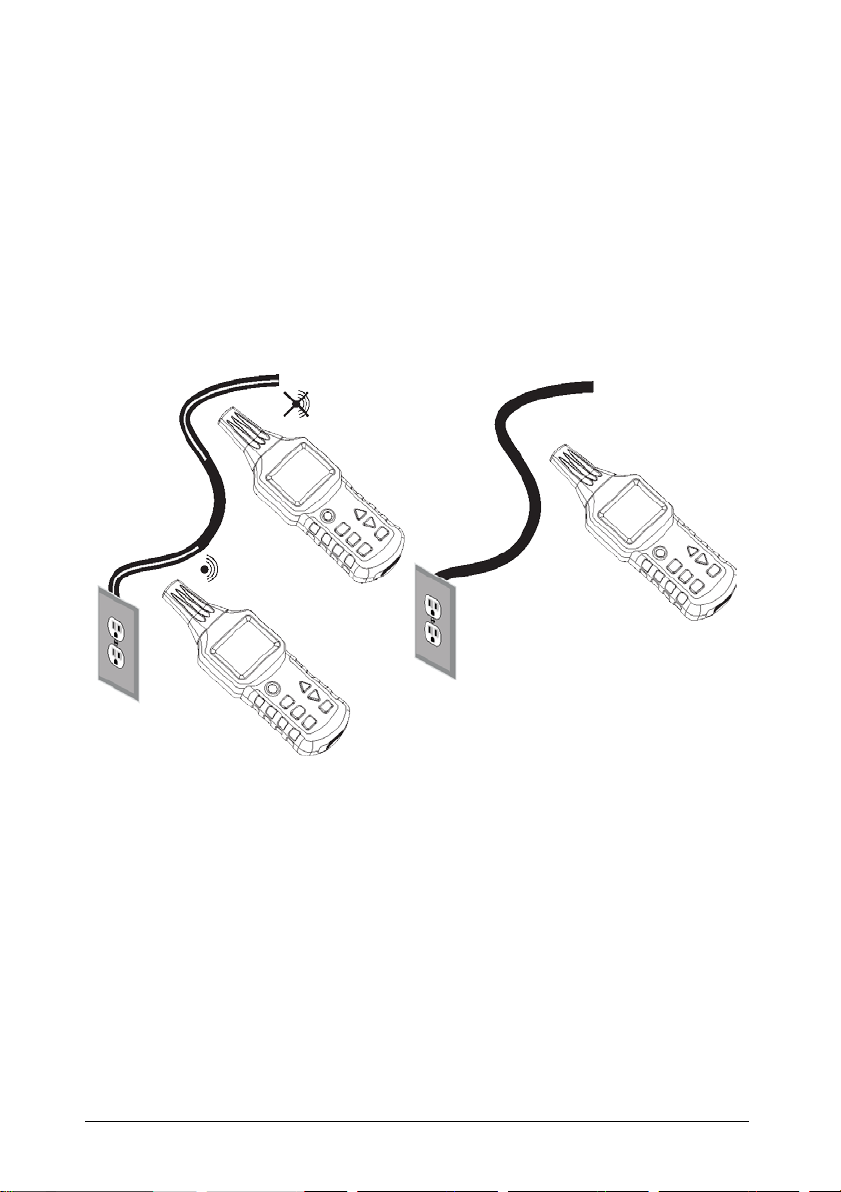
3.4 INCREASING THE EFFECTIVE RADIUS OF DETECTION OF LIVE CIRCUITS
The magnetic field produced by the signal from the transmitter is strongly conditioned
by the shape and size (area) of the loop formed by the conductor connected to the
"+" of the transmitter and the "return" conductor connected to the "COM" terminal of
the transmitter. Consequently, in a configuration where the transmitter is connected to
the phase and neutral conductors, constituted by two parallel wires (as shown in Fig.
23), the effective radius (distance) of detection is not more than 1.5’.
Fig. 23
To eliminate this effect, connect as shown in Fig. 24, where the loopback line uses a
separate cable to increase the effective radius of detection. With a cable extender
(see Fig. 24), it is possible to obtain a detection distance of up to 7.45’.
Fig. 24
Model 6681 Cable Locator 27
Page 28
3.5 LINE VOLTAGE IDENTIFICATION/SEARCHING FOR BREAKS IN THE CIRCUIT
This application does not need the transmitter (unless you want to use its voltmeter
function to measure the voltage in the circuit precisely).
Preconditions:
• The circuit must be connected to an energized line.
• The measurement must be made as shown in Fig. 25.
Set the receiver to the "Identification of line voltage" mode (designated "UAC
mode").
Fig. 25
NOTES:
• The AC signals detected by the receiver in UAC mode indicate only that the
circuit is energized. For a precise measurement of the voltage, use the
voltmeter function of the transmitter.
• During the search for the ends of several supply lines, the lines must be
connected separately, one at a time.
• The number of bars indicating the strength of the received signal and the
frequency of the audible signal emitted depend on the voltage in the circuit to
be detected and on the distance from this circuit. The higher the voltage and
the shorter the distance from the circuit, the more bars are displayed and the
higher the frequency of the audible signal.
28 Model 6681 Cable Locator
Page 29

4. ADDITIONAL FUNCTIONS
4.1 TRANSMITTER VOLTMETER FUNCTION
If the transmitter is connected to an energized circuit and the voltage measured is
greater than 12V, the actual voltage will be displayed on the bottom left side of the
screen with AC or DC indication, and the danger triangle is displayed in the upper
part of the screen (see §2.1.1). The measurement range is 12 to 300V, DC or AC
(50/60Hz).
4.2 FLASHLIGHT FUNCTION
Press the flashlight button on the transmitter or on the receiver to activate the
flashlight; press it again to de-activate the function.
4.3 BACK-LIGHT FUNCTION
Press the back-light button on the receiver to turn the back-light on; press the
button again to turn it off. The transmitter does not have a back-light function.
4.4 BUZZER ACTIVATION/DE-ACTIVATION
4.4.1 TRANSMITTER
Press the silent mode button on the transmitter to de-activate the buzzer. In this
mode, key presses are silent. Press again to reactivate the buzzer.
4.4.2 RECEIVER
Press the back-light/silent mode button on the receiver for longer than one
second to de-activate the audible signal. Press for one second to re-activate
the audible signal.
4.5 AUTOMATIC POWER-OFF FUNCTION
4.5.1 TRANSMITTER
The transmitter does not have an automatic power-off function.
4.5.2 RECEIVER
If you have not pressed a button on the receiver within 10 minutes, the receiver
automatically powers OFF. Press the ON/OFF key to turn it back ON.
Model 6681 Cable Locator 29
Page 30

Output Sig nal Frequency
125kHz
Voltage M easurement Range
12 to 300VDC ± 2.5%; 12 to 300VAC (50/60Hz) ± 2.5%
Display
LCD with dis play of functio ns and bar graph
Electrical Safety
300V CAT III; Pollution class 2
Power Supply
One 9V battery, IEC 6LR61
Power Consumption
Between approximately 31mA and 115mA depending
Fuse
F 0.5A 500V, 0.25 × 1.26” (6.3 × 32mm)
Operating Temperature Range
32° to 104°F (0° to 40°C) with a maximum relative
humidity of 80% (without condensation)
Storage Temperature
-4° to 140°F (-20° to +60°C) with a maxim um relative
humidit y of 80% (without condensation)
Altitude
6562 ft (2000m) max
Dimensions (H × W × D)
7.48 × 3.5 × 1.67” (190 × 89 × 42.5mm)
Weight
Approximately 12 oz (360g) without battery
Approximately 15 oz (420g) with battery
Depth of Detection
Single-pole application: 0 to approximately 6.6’ (2m)
Single loopback line: up to 8.2’ (2.5m)
Identification of Line Voltage
Approximately 0 to 15.7” (0.4m)
Display
LCD, with display of functions and bar graph
Power Supply
Six 1.5V batteries, IEC LR03
Consumption
Between approximately 32mA and 89mA depending on
use
Operating Temperature Range
32° to 104°F (0° to 40°C) with a maximum relative
humidity of 80% (without condensation)
Storage Temperature
-4° to 140°F (-20° to +60°C) with a maximum relative
humidity of 80% (without conden sat io n)
Altitude
6562ft (2000m) max.
Dimensions (H × W × D)
9.5 × 3.07 × 1.52” (241.5 × 78 × 38.5mm)
Weight
Approximately 9.8 oz (280g) without battery
Approximately 12 oz (360g) with battery
5. SPECIFICATIONS
5.1 TRANSMITTER SPECIFICATIONS
on use
5.2 RECEIVER SPECIFICATIONS
Two-pole application: 0 to approximately 19.7” (0.5m)
NOTE: The depth of detection also depends on the material and the specific
application.
30 Model 6681 Cable Locator
Page 31

5.3 COMPLIANCE WITH INTERNATIONAL STANDARDS
Electrical Safety
Compliant with standards EN 61010-1
Electromagnetic Compatibility
Compliant with standard EN 61326-1
Model 6681 Cable Locator 31
Page 32

Other than the fuse and batteries, the instrument contains no parts
that c
Any non
components, m
6. MAINTENANCE
an be replaced by a person who is not trained and certified.
-certified work, or parts replacement using unapproved
ay gravely impair safety.
6.1 CLEANING
Wipe the instrument with a cloth dampened with clean water or neutral detergent,
then wipe dry with a cloth. Do not use the instrument until it is completely dry.
6.2 BATTERY REPLACEMENT
If the battery symbol on the LCD blinks (on the transmitter or on the receiver)
and the buzzer emits a warning, the battery(ies) must be replaced (one batter y for
transmitter, six for recei ver). The following steps apply to both the transmitter and
the receiver:
1. Switch the instrument OFF and disconnect it from all circuits being measured.
2. Remove the screw on the back of the instrument and remove the battery
compartment cover.
3. Remove the old battery(ies).
4. Install the new battery(ies); observing polarity.
5. Replace the battery compartment cover and screw it back in.
6.3 TRANSMITTER FUSE CHECK
The transmitter fuse (F 0.5A 500V, 0.25 × 1.26” (6.3 × 32mm)) protects the
instrument from overloads and operator errors. If the fuse is blown, the transmitter
can only transmit weak signals. If the transmitter self-test is OK and the transmitted
signal is weak, the fuse has blown. If no signal is transmitted during the self-test,
and battery voltage is normal, the transmitter is damaged and must be repaired by
an authorized technician. To check the transmitter fuse:
1. Disconnect all circuits from the transmitter.
2. Turn ON the transmitter and set it to transmit mode.
3. Set LEVEL SEL to Level I.
4. Connect a test lead between the two transmitted terminals.
5. Switch the receiver ON to search for the signals from the test lead, and move
the receiver probe towards the test lead.
6. If the fuse is good, the value displayed by the receiver will double.
If the fuse is blown, replace it with a fuse of the same specifications. This fuse is a
fast-blow type. Do not replace it with a slow-blow or wire type, because this could
jeopardize the safety of the instrument.
32 Model 6681 Cable Locator
Page 33

REPAIR AND CALIBRATION
To ensure that your instrument meets factory specifications, we recommend that it
be scheduled to be sent back to our factory Service Center at one-year intervals for
recalibration, or as required by other standards or internal procedures.
For instrument repair and calibration: You must contact our Service Center for a
Customer Service Authorization Number (CSA#). This will ensure that when your
instrument arrives, it will be track ed and processed promptly. Please write the
CSA# on the outside of the shipping container.
®
Ship To: Chauvin Arnoux
, Inc. d.b.a. AEMC® Instruments
15 Faraday Drive, Dover, NH 03820 USA
Phone: (800) 945-2362 (Ext. 360) • (603) 749-6434 (Ext. 360)
Fax: (603) 742-2346 or (603) 749-6309
E-mail:
repair@aemc.com
(Or contact your authorized distributor.) Costs for repair and calibration are
available.
NOTE: You must obtain a CSA# before returning any instrument.
TECHNICAL SALES AND ASSISTANCE
If you are experiencing any technical problems, or require any assistance with the
proper operation or application of your instrument, please call, fax, or e-mail our
technical support team:
Contact: Chauvin Arnoux®,
Phone: (800) 945-2362 (Ext. 351) • (
Fax: (603) 742-2346
E-mail: techsupport@aemc.com
Inc. d.b.a. AEMC® Instruments
603) 749-6434 (Ext. 351)
LIMITE D WAR RANTY
The Model 66 8 1 i s w arranted to the owner for a period of two years from the date
of original purchase against defects in manufacture. This limited warranty is given
by AEMC
warranty is void if the unit has been tampered with or abused, or if the defect is
related to service not performed by AEMC
Full warranty coverage and product registration is available on our website at
www.aemc.com/warranty.html.
Please print the online Warranty Coverage Information for your records.
What AEMC
period, you may return the instrument to us for repair, provided we have your
warranty registration information on file or a proof of purchase. AEMC
will, at its option, repair or replace the faulty material.
Model 6681 Cable Locator 33
®
Instruments, not by the distributor from whom it was purchased. This
®
Instruments.
®
Instruments will do: If a malfunction occurs within the two-year
®
Instruments
Page 34

WARRANTY REPAIRS
What you must do to return an in strument for Warranty Rep a ir:
First, request a Customer Service Authorization Number (CSA#) by phone or by fax
from our Service Department (see address below), then return the instrument along
with the signed CSA Form. Please write the CSA# on the outside of the shipping
container. Return the instrument, postage or shipment pre-paid to:
®
Ship To: Chauvin Arnoux
15 Faraday Drive, Dover, NH 03820 USA
Phone: (800) 945-2362 (Ext. 360) • (603) 749-6434 (Ext. 360)
E-mail:
repair@aemc.com
CAUTION: To protect yourself against in-transit loss, we recommend you insure
your returned material.
NOTE: You must obtain a CSA# before returning any instrument.
, Inc. d.b.a. AEMC® Instruments
34 Model 6681 Cable Locator
Page 35

NOTES:
Page 36

02/18
99-MAN 100439 v3
15 Faraday Drive • Dover, NH 03820 USA • Phone: (603) 749-6434 • Fax: (603) 742-2346
Chauvin Arnoux®, Inc. d.b.a. AEMC® Instruments
www.aemc.com
 Loading...