

Page 1
DIGITAL GROUND RESISTANCE
AND SOIL RESISTIVITY TESTER
6470-B
ENGLISH
User Manual
Page 2

Page 3

Statement of Compliance
Chauvin Arnoux®, Inc. d.b.a. AEMC® Instruments
certifies that this instrument has been calibrated
using standards and instruments traceable to
international standards.
We guarantee that at the time of shipping your
instrument has met its published specifications.
An NIST traceable certificate may be
requested at the time of purchase, or obtained
by returning the instrument to our repair and
calibration facility, for a nominal charge.
The recommended calibration interval for this
instrument is 12 months and begins on the date of
receipt by the customer. For recalibration, please
use our calibration services. Refer to our repair
and calibration section at www.aemc.com.
Serial #: ________________________________
Catalog #: ______________________________
Model #: 6470-B
Please fill in the appropriate date as indicated:
Date Received: _________________________________
Date Calibration Due: _______________________
Chauvin Arnoux®, Inc.
d.b.a AEMC® Instruments
www.aemc.com
Page 4
READ CAREFULLY BEFORE
USING FOR THE FIRST TIME
Your instrument is equipped with a NiMH battery. This technology offers several
advantages:
• Long battery charge life for a limited volume and weight.
• Possibility of quickly recharging your battery.
• Signicantlyreducedmemoryeffect:youcanrechargeyour
battery even if it is not fully discharged.
• Respectfortheenvironment:nopollutantmaterialssuchaslead
or cadmium, in compliance with the applicable regulations.
After prolonged storage, the battery may be completely discharged. If so, it must
be completely recharged.
Your instrument may not function during part of this recharging operation.
Full recharging of a completely discharged battery may take several hours.
NOTE: In this case, at least 5 charge/discharge cycles will be necessary for
your battery to recover 95% of its capacity.
To make the best possible use of your battery and extend its effective service life:
• Only use the charger supplied with your instrument. Use of
another charger may be dangerous.
• Only charge your instrument at temperatures between 0° and 40°C.
• Complywiththeconditionsofusedenedintheoperatingmanual.
• Complywiththestorageconditionsspeciedintheoperating
manual.
NiMH technology allows a limited number of charge/discharge cycles depending
signicantly on:
• The conditions of use.
• The charging conditions.
Please refer to § 9 for correct replacement of the battery.
Do not dispose of the battery pack with other solid waste. Used batteries
must be entrusted to a qualied recycling company or to a company
specialized in processing hazardous materials.
Page 5

Table of Contents
1. INTRODUCTION ................................................................................. 6
1.1 International Electrical Symbols ...........................................................7
1.2 Denition of Measurement Categories .................................................7
1.3 Receiving Your Shipment .....................................................................7
1.4 Ordering Information ............................................................................7
1.4.1 Kits, Accessories and Replacement Parts ..............................8
2. PRODUCT FEATURES ......................................................................... 9
2.1 Description ...........................................................................................9
2.2 Key Features ......................................................................................10
2.3 Control Features ................................................................................11
2.4 Display ...............................................................................................12
2.5 Button Functions ................................................................................14
3. SPECIFICATIONS ............................................................................. 15
3.1 Reference Conditions.........................................................................15
3.2 Electrical .............................................................................................15
3.2.1 Frequency Measurements ....................................................15
3.2.2 Voltage Measurements .........................................................15
3.2.3 DC Resistance Measurements .............................................16
3.2.4 AC Earth/Ground Resistance Measurements .......................17
3.2.5 Soil Resistivity Measurement ρ ............................................18
3.3 Data Storage ......................................................................................20
3.4 Power .................................................................................................20
3.5 Mechanical .........................................................................................21
3.6 Environmental ....................................................................................21
3.7 Safety .................................................................................................21
4. OPERATION ..................................................................................... 22
4.1 General Operating Instructions ..........................................................22
4.1.1 Automatic Mode ....................................................................22
4.1.2 Manual (Expert) Mode ..........................................................22
4.2 Instrument Conguration (SET-UP mode) .........................................23
Ground Resistance Tester Model 6470-B
3
Page 6

5. AUTOMATIC MODE .......................................................................... 24
5.1 Switching the Test Voltage .................................................................24
5.2 Resistance Measurement mΩ (2-Wire) ..............................................24
5.2.1 Lead Compensation Measurement ......................................25
5.2.2 Alarm Function ......................................................................26
5.3 Resistance Measurement mΩ (4-Wire) ..............................................27
5.4 Earth/Ground Measurement (3-Pole) .................................................28
5.4.1 62% Method ..........................................................................28
5.4.2 Full Method ...........................................................................30
5.4.3 Recommendations for a Reliable Measurement ...................31
5.5 Earth/Ground Measurement (4-Pole) .................................................32
5.6 Soil Resistivity Measurements (ρ Position) ........................................34
5.6.1 Advantages/Disadvantages of Wenner & Schlumberger ......34
5.6.2 Changing the Measurement Method.....................................35
5.6.3 Programming the Distance for Electrode Placement ............35
5.6.4 Wenner Method ....................................................................36
5.6.5 Schlumberger Method...........................................................37
6. MANUAL MODE ............................................................................... 39
6.1 Switching the Test Voltage .................................................................39
6.2 Measurement Frequency Selection ...................................................40
6.3 Manual Settings for mΩ Measurements ............................................40
6.3.1 Continuity Test ......................................................................41
6.4 3-Pole Earth/Ground Measurements & Coupling ................................ 41
6.4.1 3-Pole Earth/Ground Measurements ....................................41
6.4.2 Earth/Ground Coupling Measurements ................................41
6.5 4-Pole Earth/Ground Measurements .................................................43
6.6 Soil Resistivity Measurements ...........................................................43
6.7 Smoothing ..........................................................................................43
7. MEMORY FUNCTION ........................................................................ 44
7.1 Saving Measurements into Memory...................................................44
7.2 Recalling Measurements from Memory .............................................45
7.3 Erasing Measurements from Memory ................................................45
7.3.1 Erasing All Measurements ....................................................45
7.3.2 Erasing Selective Measurements .........................................45
DATAVIEW® SOFTWARE ....................................................................... 47
8.1 Installing DataView
8.2 Connecting the Model 6470-B to your Computer ...............................51
4
® ...................................................................................................................................47
Ground Resistance Tester Model 6470-B
Page 7

8.3 Establishing Communication to the Instrument ..................................51
8.4 The Ground Tester Control Panel ......................................................52
8.5 Conguring the Instrument .................................................................53
8.5.1 DC Continuity Test
8.5.2 3-Pole Ground Resistance Test
8.5.3 4-Pole Ground Resistance
8.5.4 4-Pole Soil Resistivity
8.6 Tools Menu .........................................................................................58
8.6.1 Tools > Options .....................................................................58
8.6.2 Tools > Colors .......................................................................58
8.6.3 Tools > Recover Data ...........................................................58
8.7 Starting a Test ....................................................................................58
8.8 Downloading Data to Database .........................................................58
8.8.1 Session Properties ................................................................59
8.9 Exporting the Report to a PDF File ..................................................60
..............................................................54
..........................................55
..................................................56
.........................................................57
MAINTENANCE ................................................................................... 61
9.1 Maintenance.....................................................................................61
9.2 Cleaning ...........................................................................................61
9.3 Fuse Replacement ...........................................................................61
9.4 Recharging the Battery ....................................................................62
9.5 Replacing the Battery .......................................................................63
TROUBLESHOOTING ............................................................................ 65
10.1 Error Reporting.................................................................................65
10.1.1 Electrode Resistance Too High .............................................65
10.1.2 Out of Range.........................................................................65
10.1.3 Misconnection ......................................................................65
10.1.4 Out of Limits Indicators .........................................................66
10.1.5 Error Messages .....................................................................67
GLOSSARY OF TERMS ......................................................................... 68
Basic Terminologies ....................................................................................68
Glossary ......................................................................................................69
Repair and Calibration.................................................................................72
Technical and Sales Assistance ..................................................................72
Limited Warranty .........................................................................................73
Warranty Repairs ........................................................................................73
Ground Resistance Tester Model 6470-B
5
Page 8
CHAPTER 1
INTRODUCTION
These safety warnings are provided to ensure the safety of personnel.
Please read and comply with these precautions:
• This instrument is protected from accidental voltages of not more than
50V with respect to earth in measurement CAT IV. The guaranteed level
of protection of this equipment may be compromised if used in a manner
not specied by the manufacturer.
• Safety is the responsibility of the operator.
• All metal objects or wires connected to the electrical system should be
assumed to be lethal until tested. Grounding systems are no exception.
• Never exceed the maximum rated voltage and current, and the mea-
surement category.
• Never exceed the protection limits, and always comply with the conditions and place of use, indicated in the specications.
• Do not use the instrument or its accessories if they appear damaged.
• Use accessories that have overvoltage category and service voltages
greater than or equal to those of the instrument (CAT IV 50V). Use only
accessories that comply with safety standards (IEC 61010-2-031 & 32).
• Wear the appropriate protective gear (insulating boots and gloves).
• Check that no terminal is connected and the switch is set to OFF before
opening the device.
• Use only the charging unit supplied with the instrument to recharge the
battery.
• Troubleshooting and metrological verication procedures must only be
performed by qualied, approved personnel, or the factory.
• NOTE:The potentials on the various rods used for an earth measurement
may be different if a nearby electrical installation is defective or certain
weather conditions prevail (thunderstorms). It is up to the operator
to decide whether to continue or postpone measurements in these
situations.
WARNING
6
Ground Resistance Tester Model 6470-B
Page 9
1.1 International Electrical Symbols
Signifies that the instrument is protected by double or reinforced insulation.
This symbol on the instrument indicates a WARNING that the operator must
refer to the user manual for instructions before operating the instrument. In
this manual, the symbol preceding instructions indicates that if the instructions
are not followed, bodily injury, installation/sample and/or product damage may
result.
Risk of electric shock. The voltage at the parts marked with this symbol may be
dangerous.
Ground/Earth symbol
In conformity with WEEE 2002/96/EC
1.2 Definition of Measurement Categories
CATII: For measurements performed on circuits directly connected to the electrical
distribution system. Examples are measurements on household appliances or
portable tools.
CATIII:
CATIV:For measurements performed at the primary electrical supply (<1000V) such
For measurements performed in the building installation at the distribution level
such as on hardwired equipment in xed installation and circuit breakers.
as on primary overcurrent protection devices, ripple control units, or meters.
1.3 Receiving Your Shipment
Upon receiving your shipment, make sure that the contents are consistent with the
packing list. Notify your distributor of any missing items. If the equipment appears
to be damaged, le a claim immediately with the carrier and notify your distributor
at once, giving a detailed description of any damage. Save the damaged packing
container to substantiate your claim.
1.4 Ordering Information
Ground Resistance Tester Model 6470-B ..................................... Cat. #2135.01
Includes carrying bag, 110/240V power adapter with US power cord, optical USB cable,
rechargeable NiMH battery pack, and a USB stick with DataView® software, ground tester
workbook and user manual.
Ground Resistance Tester Model 6470-B Kit (150 ft) .................. Cat. #2135.02
Includes meter, two carrying bags, two 150 ft color-coded leads on spools (red/blue), one 30
ft lead (green), two 5 ft color-coded leads (red/blue), 110/240V power adapter with US power
cord, optical USB cable, two T-shaped auxiliary ground electrodes, set of ve spaded lugs,
one 100 ft tape measure, rechargeable NiMH battery pack, and a USB stick with DataView®
software, ground tester workbook and user manual.
Ground Resistance Tester Model 6470-B
7
Page 10

Ground Resistance Tester Model 6470-B Kit (300 ft) .................. Cat. #2135.03
Includes meter, two carrying bags, two 300 ft color-coded leads on spools (red/blue), two 100
ft color-coded leads (hand-tied, green/black), two 5 ft color-coded leads (red/blue), 110/240V
power adapter with US power cord, optical USB cable, four T-shaped auxiliary ground
electrodes, set of ve spaded lugs, one 100 ft tape measure, rechargeable NiMH battery
pack, and a USB stick with DataView® software, ground tester workbook and user manual.
Ground Resistance Tester Model 6470-B Kit (500 ft) .................. Cat. #2135.04
Includes meter, two carrying bags, two 500 ft color-coded leads on spools (red/blue), two
100 ft color-coded leads (hand-tied, green/black), one 30 ft lead (green), two 5 ft colorcoded leads (red/blue), 110/240V power adapter with US power cord, optical USB cable,
four T-shaped auxiliary ground electrodes, set of ve spaded lugs, one 100 ft tape measure,
rechargeable NiMH battery pack, and a USB stick with DataView® software, ground tester
workbook and user manual.
1.4.1 Kits, Accessories and Replacement Parts
Test Kit for 3-Pole (3-Point) Testing (150 ft) .................................Cat. #2135.35
Includes one carrying bag, two 150 ft color-coded leads on spools (red/blue), one 30 ft lead
(green), two 5 ft color-coded leads (red/blue), two T-shaped auxiliary ground electrodes, set
of ve spaded lugs and one 100 ft tape measure.
Test Kit for 4-Pole (4-Point) Testing (300 ft) .................................Cat. #2135.36
Includes one carrying bag, two 300 ft color-coded leads on spools (red/blue), two 100 ft colorcoded leads (hand-tied, green/black), two 5 ft color-coded leads (red/blue), four T-shaped
auxiliary ground electrodes, set of ve spaded lugs and one 100 ft tape measure.
Test Kit for 4-Pole (4-Point) Testing (500 ft) .................................Cat. #2135.37
Includes one carrying bag, two 500 ft color-coded leads on spools (red/blue), two 100 ft
color-coded leads (hand-tied, green/black), one 30 ft lead (green), two 5 ft color-coded leads
(red/blue), four T-shaped auxiliary ground electrodes, set of ve spaded lugs and one 100 ft
tape measure.
Test Kit for 3-Pole (3-Point) Testing
(Supplemental for 4-Pole (4-Point) Testing) ............................................. Cat. #2135.38
Includes one carrying bag, two 100 ft color-coded leads (hand-tied, green/black), one 30 ft
lead (green), two T-shaped auxiliary ground electrodes, set of ve spaded lugs and one 100
ft tape measure.
Extra Large Classic Tool Bag ...........................................................Cat. #2133.73
Tape Measure (100 ft) ......................................................................Cat. #2130.60
Ground Tester DVD/Workbook Set ...................................................Cat. #2130.64
Set of Two, 14.5" T-shaped Auxiliary Ground Electrodes ................. Cat. #2135.39
Replacement - Carrying Bag for Meter ............................................. Cat. #2135.40
Optical USB Cable............................................................................Cat. #2135.41
Inverter – 12VDC to 120VAC 200 Watt for vehicle use ......................Cat. #2135.43
Replacement - Fuse, set of 5, 0.63A 250V 5x10 1.5kA .................... Cat. #2135.81
Rechargeable NiMH 9.6V Battery Pack ...........................................Cat. #2960.21
Replacement - Power Adapter 110/240V & Power Cord 115V US ... Cat. #5000.13
Power Cord 115V US .......................................................................Cat. #5000.14
8
Ground Resistance Tester Model 6470-B
Page 11

CHAPTER 2
PRODUCT FEATURES
2.1 Description
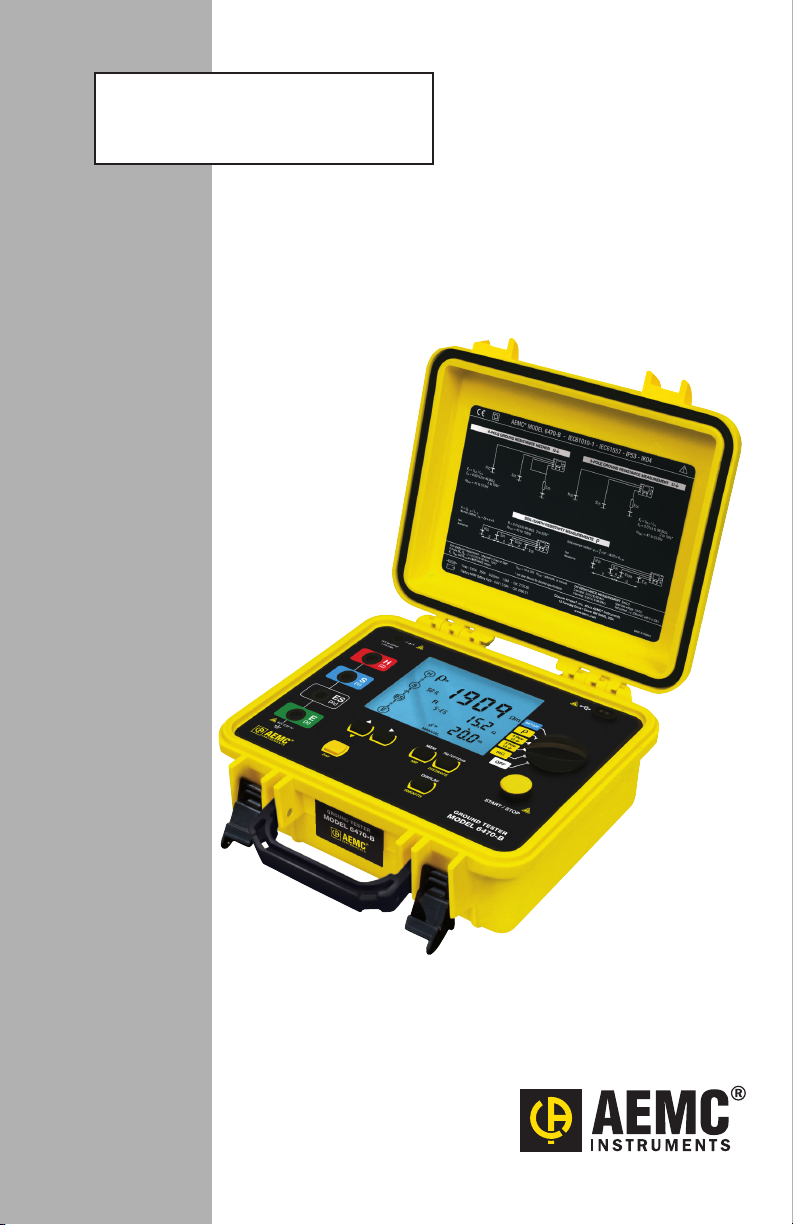
The Digital Ground Resistance Tester Model 6470-B is a portable measurement
instrument designed to measure Ground Resistance, Soil Resistivity (two methods
– Wenner and Schlumberger), Bonding Resistance (DC Resistance 2-Wire and
4-Wire Kelvin sensing) and Earth Coupling resistance. This direct reading tester
measures from 0.01 to 99.99kΩ and is auto-ranging, automatically seeking out the
optimum measurement range and test current.
Easy-to-use – simply connect the leads, select the test mode, press Start and read
the results. Up to 512 test results can be stored in internal memory for later recall
to the display or downloaded to a PC via DataView® software.
The large LCD is easy-to-read and indicates ground electrode resistance, test
voltage, current and frequency as well as individual electrode resistance, battery
status and more.
The Model 6470-B is CAT IV rated to 50V and is over voltage protected to more
than 250VAC against accidental connection to live circuits. The voltage is also displayed on screen. In the event of a system fault, the Model 6470-B can withstand
250VAC.
Additional features of the Model 6470-B include a heavy-duty eld case sealed
against dust and water when closed (the test button is also sealed against the
elements); manual and automatic test frequency selection from 40 to 513Hz; user
selectable 3-Pole (3-Point) Fall of Potential or 4-Pole (4-Point) Soil Resistivity test
methods and user selectable 2-Wire or 4-Wire Bond Resistance test method.
The Model 6470-B is powered by 9.6V, 3.5 Ah NiMH rechargeable batteries. An
external recharger powered from 120/230V 50/60Hz is included and provides for
testing while recharging. The Model 6470-B can also be vehicle powered from an
optional 12V battery adapter.
The Ground Resistance Tester Model 6470-B is rugged, easy-to-use and ideal for
maintenance crews performing numerous tests. It exceeds mechanical and safety
specications for shock, vibration and drop tests per IEC standards. The adjust-
able test frequency provides for rejection of high levels of interference, allowing it
to be used under difcult conditions such as high stray currents that normally affect
accuracy.
Ground Resistance Tester Model 6470-B
9
Page 12

2.2 Key Features
• 2- and 4-Wire Bond Resistance/Continuity measurement (DC Resistance) with
automatic polarity reversal
• 3-Pole (3-Point) Fall-of-Potential measurement with manual or automatic
frequency selection
• 4-Pole (4-Point) Fall-of-Potential measurement for very low resistance
measurements with manual and automatic frequency selection and automatic
lead compensation.
• 4-Pole (4-Point) Soil Resistivity measurement with automatic calculation of
Rho (ρ) and user selection of the Wenner or Schlumberger test method
• 3-Pole (3-Point) Earth Coupling measurement
• Manual and automatic frequency scan from 40 to 513Hz for optimum test ac-
curacy in electrically noisy environments
• Selectable test voltage of 16 or 32V up to 250mA of test current
• Auto-off power management
• Automatic recognition of all electrode connections and their resistance value
• Stores up to 512 complete test results in internal memory
• Optically isolated USB communication
• Remote set up and operation of all measurements using DataView® software
supplied
• Automatic report generation
• Rechargeable NiMH batteries from wall charger or vehicle power
• Rugged dustproof and rainproof eld case – IP54 rated in closed position
• Grounding standards IEC 61557 parts 4 and 5 compliant
• Includes DataView® software for data storage, real-time display, analysis, report generation and system conguration
10
Ground Resistance Tester Model 6470-B
Page 13

2.3 Control Features
1
7
2
3
4
5
6
Item
Description
1
Backlit LCD Display (see §2.4)
2
Battery charging connector
3
Input terminal H (Z) - auxiliary electrode
4
Input terminal S (Y) - auxiliary electrode
5
Input terminal ES (Xv) - auxiliary electrode
6
Input terminal E (X) - grounding electrode under test
7
Six program/ function buttons (see §2.5)
8
Optical interface connector for connection to a computer
9
Range selection switch
10
Start/Stop button
Figure 2-1
Ω
Ω
mΩ
GROUND TESTER
MODEL 6470-B
8
9
10
Ground Resistance Tester Model 6470-B
11
Page 14
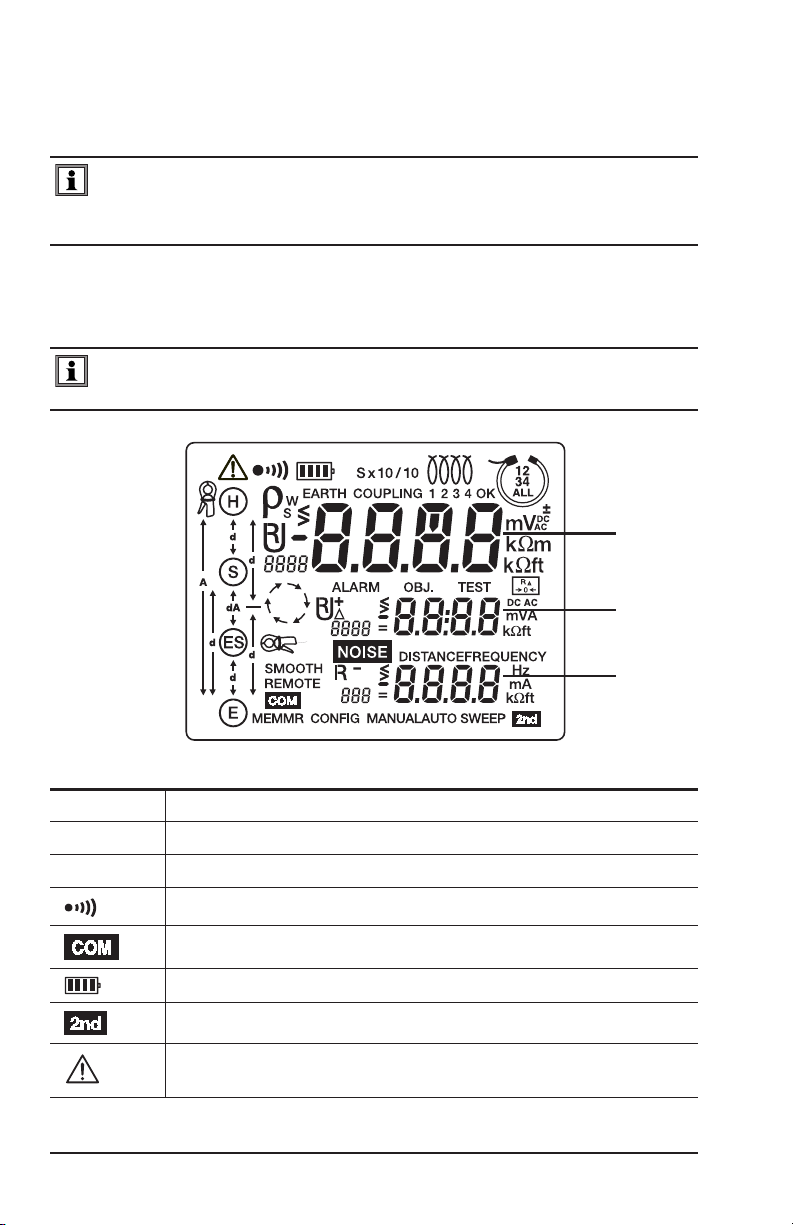
2.4 Display
The Model 6470-B’s display is a custom 256 segment multi-line backlit LCD.
External voltages will be displayed only on the small displays (A2 and A3)
without the view of the main display (A1). This helps to rapidly recognize that
these are measurements of external voltages.
Backlight: The backlight turns ON automatically when entering a function and
turns OFF after the function is complete. Press the DISPLAY button to turn it back
on.
In the Set-up mode (Instrument Configuration § 4.) pressing the DISPLAY
button also selects the next configurable parameter.
A1
A2
12
A1
A2
A3
A3
Figure 2-2
Top main display
Middle small display
Bottom small display
Warning buzzer is activated
Communication port active
Indicates the battery charge condition; the segments represent the energy
Indicates that the secondary function of a button will be used
External voltage present - this symbol is activated when the instrument
measures voltages above 60Vp
Ground Resistance Tester Model 6470-B
Page 15
Indicates that the measurement is running in State 2 or instrument is
NOISE
working
MANUAL
AUTO
ALARM
REMOTE
MEM
MR
DISTANCE
CONFIG
SMOOTH
SWEEP
FREQUENCY
OBJ:TEST
Indicates MANUAL mode - the user has to stop the measurement, otherwise the measurement keeps on running
Indicates AUTO mode - measurement stops immediately after all results
are available. In AUTO mode, the measurement frequency is automatically
adjusted to the best available disturbance voltage rejection.
Symbol not used in Model 6470-B
Indicates the 2-Wire DC resistance; calculates the offset of the cable
resistance into the result (5Ω max for offset value)
Symbol not used in Model 6470-B
Symbol not used in Model 6470-B
Symbol not used in Model 6470-B
Symbolizes the soil resistivity value (Rho): W or S indicates respectively
that Wenner or Schlumberger method is used for the measurement
(changed by the Hz/OPTIONS button)
Indicates the alarm is activated. An audible alarm will sound if the value
measured is above the limit defined in the SET-UP mode.
Indicates the instrument is controlled remotely by the RS-232/USB interface. In this mode, all of the buttons and the rotary switch are inactive,
except switching to the OFF position.
Indicates that there is recorded data in memory
Memory recall - displayed as long as this state is active
If blinking, indicates the measurement had a disturbance at the moment
the measurement was started.
If blinking, indicates the value is ready to be overwritten with a new value
or that a new value will be entered instead of “- - -”. If more than one
value has to be entered, the CHANGE button moves to the next one.
Indicates that the blinking value of AUTO/MANUAL mode, frequency, voltage or DC current direction can be changed.
Optional with a push on the 2nd button - sets a digital filter active
Symbol not used in Model 6470-B
Indicates the test frequency
Memory address
Ground Resistance Tester Model 6470-B
13
Page 16
2.5 Button Functions
Starts a measurement and compensates for lead resistance (§ 5.2.1).
A short push (<2s) enables a faster measurement because there is no
measurement of the auxiliary rod resistances.
START/STOP
A long push (>2s) - until the second beep occurs - enables the measurement of all auxiliary rod resistances.
Measurement stops automatically (AUTO) or is stopped by pressing this
button again (MANUAL).
Selects the second function highlighted in yellow under the buttons.
Increases or decreases the value of the flashing parameter displayed or
selects the next parameter. Press the button for a longer time to increase
the change of value speed at a faster rate.
MEM/MR
DISPLAY/
SMOOTH
Hz/OPTIONS/
DISTANCE
Selects the parameter to be modified or moves the cursor to the right.
MEM: Stores measurements to memory (§ 7)
MR: Retrieves measurements from memory.
DISPLAY: Displays all parameters of a measurement.
SMOOTH: Smooths the display of measurement providing a more
stable result.
Hz/OPTIONS: Enables configuration of measurement functions.
DISTANCE: Available for soil resistivity and V potential measurements. It
allows the setting of values of distances used for Rho (ρ) calculation.
14
Ground Resistance Tester Model 6470-B
Page 17
CHAPTER 3
SPECIFICATIONS
3.1 Reference Conditions
Influencing Parameters Reference Values
Temperature 68°F ± 5.5°F (20°C ± 3°C)
Relative Humidity 45 to 55% RH
Power Supply 9 to 11.2V
Frequency Range of Input Signal 0 to 440Hz
Capacitance Parallel to Input Resistance 0 uF
Electric Field <1 V/m
Magnetic Field < 40 A/m
In the following sections, the intrinsic error is dened under the reference conditions and the operating error under the operating conditions in accordance with
IEC 61557 (1.4 and 5).
3.2 Electrical
3.2.1 Frequency Measurements
MeasuringMethod: Digital with a sampling frequency of 4028Hz, low pass, FFT.
The frequency of the strongest spectral component is displayed.
MeasuringRate:Display updates approx. 3 times per s.
Measurement Range 5 to 450Hz
Resolution 1Hz
Operating error ± 2Hz
Min. input voltage 10mV
3.2.2 Voltage Measurements
Overvoltages up to 75Vrms are displayed as ">65V". Permanent overvoltages
between 70 and 75V at terminals H (Z) and E (X) can cause overheating of the
overvoltage protection varistor.
Voltages of more than 75Vrms lead to error message 31 (excessive external
voltage) or 32 (voltage measurement overrange).
If terminals H (Z) and E (X) are put into contact with the line voltage, the protection
fuse will blow.
Ground Resistance Tester Model 6470-B
15
Page 18
External Voltage Measurements
MeasuringMethod:Digital by sampling at 4028Hz, low pass lter, FFT.
The frequency of the strongest spectral component is displayed.
MeasuringRate: Display updates approx. 3 times per s.
Measured Range 0.00 to 9.99V 10 to 65V
Resolution 0.01V 0.1V
Intrinsic error ± (2% + 1ct)
Operating error ± (5% + 1ct)
Input impedance Z
Operating frequency DC and 15 to 440Hz
, Z
(Z
H-E
) 1.2MΩ
S-E
S-ES
3.2.3 DC Resistance Measurements
MeasuringMethod:Voltage/Current measurement (Standard EN 61557 part 4)
Nominal Output Voltage: 16VDC (if resistance < 22Ω the output voltage is
reduced to 10VDC)
MaxOutputCurrent:> 200mADC for resistances < 20Ω
MaxOverload(permanent):50Vrms (protection up to 250V is guaranteed)
MaxInductiveLoad:2 H
MaxInterferingVoltage:60Vpeak > 10Hz
TimeforAutoRangeSelecting:approx 5 s
MeasuringTime:8 s with automatic polarity inversion
MeasuringRate:3 per s in manual mode
LeadCompensation:Possible from 0 to 5Ω
AlarmSetting:“>” or “<” from 1 to 999Ω (max 3 digits)
2-Pole mΩ measurement
Measurement
Range
Resolution 0.01Ω 0.1Ω 1Ω 10Ω 100Ω
Intrinsic error ± (2% + 2cts)
Operating error ± (5% + 3cts)
16
0.12 to
9.99Ω
10.0 to
99.9Ω
100 to
999Ω
Ground Resistance Tester Model 6470-B
1.00 to
9.99kΩ
10.0 to
99.9kΩ
Page 19
4-Pole mΩ measurement
Measurement
Range
Resolution 0.001Ω 0.01Ω 0.1Ω 1Ω 10Ω
Intrinsic error ± (2% + 2cts)
Operating error ± (5% + 5cts)
0.020 to
9.999Ω
10.00 to
99.99Ω
100.0 to
999.9Ω
1.000 to
9.999kΩ
10.00 to
99.99kΩ
3.2.4 AC Earth/Ground Resistance Measurements
MeasuringMethod: Voltage/Current measurement (EN 61557 part 5)
OpenCircuitVoltage: 16 or 32Vrms square wave (if current > 240mA the output
voltage is reduced to 10Vrms)
TestFrequency: Selectable from 41 to 513Hz (see table in § 6.2)
ShortCircuitCurrent: > 200mAAC
NoiseSuppression:> 80 dB for frequencies 20% or more above or below the
test frequency
Max.Overload:250Vrms
Max. Value for RH & RS:100kΩ
MeasuringTime: ShortpushonSTART:approx. 7 s for rst value of RE at
128Hz, then 3 measurements per s.
LongpushonSTART: approx. 15 s for rst value of RE at
128Hz, then 3 measurements per s.
The following error indications refer to reference conditions with a test voltage of
32V, test frequency of 128Hz, RH and RS = 1kΩ, no external voltage.
The operating error of AC resistance measurements can be less than that speci-
ed for voltage or current because frequency characteristics of the voltage channel
are matched to those of the current channel.
Measurement of auxiliary electrodes RH, RS, RES, RE
Measurement
Range
Resolution 0.1Ω 0.1Ω 1Ω 10Ω 100Ω
Operating error ± (10% + 2cts)
0.14 to
9.99Ω
10.0 to
99.9Ω
100 to
999Ω
1.00 to
9.99kΩ
10.0 to
99.9kΩ
The START button must be pressed for more than 2 s. For frequencies between
41 and 256Hz, the resistance of the auxiliary earth electrodes is measured at the
test frequency set. At higher frequencies the resistance is measured at 256Hz.
Ground Resistance Tester Model 6470-B
17
Page 20

3-Pole earth resistance measurement RE
Measurement
Range
0.09 to
9.99Ω
10.0 to
99.9Ω
100 to
999Ω
1.00 to
9.99kΩ
10.0 to
99.9kΩ
Resolution 0.01Ω 0.1Ω 1Ω 10Ω 100Ω
Intrinsic error ± (2% + 1ct)
Operating conditions: RE < 3 x RH, U
Values for RH, RS and RE Frequency (Hz)
(RH + RS) / RE
< 3000
(RH + RS) / RE
< 5000
Note: For a test voltage U
RH ≥ 0Ω, Rs ≤ 3kΩ 41 to 513 ± (3% + 2cts)
RH > 3kΩ, Rs ≤ 30kΩ 41 to 513 ± (10% + 2cts)
RH > 30kΩ, Rs < 100kΩ 41 to 128 ± (10% + 3cts)
of 16V, halve the value for RH.
OUT
4-Pole earth resistance measurement R
Measurement
Range
0.011 to
9999Ω
10.00 to
99.99Ω
OUT
= 32V
E
100.0 to
999.9Ω
Operating error for R
1.000 to
9.999kΩ
10.00 to
99.99kΩ
Resolution 0.001Ω 0.01Ω 0.1Ω 1Ω 10Ω
Intrinsic error ± (2% + 1ct)
Operating conditions: RE < 3 x RH, U
Values for RH, RS and RE Frequency (Hz)
(RH + RS) / RE
< 3000
(RH + RS) / RE
< 5000
RH ≥ 0Ω, Rs ≤ 3kΩ 41 to 513 ± (3% + 2cts)
RH > 3kΩ, Rs ≤ 30kΩ 41 to 513 ± (10% + 2cts)
RH > 30kΩ, Rs < 100kΩ 41 to 128 ± (10% + 3cts)
Note:With a test voltage U
of 16V, halve the value of RH.
OUT
OUT
= 32V
Operating error for R
E
E
3.2.5 Soil Resistivity Measurement ρ
MeasuringMethod: Voltage/Current measurement (EN 61557 part 5)
OpenCircuitVoltage: 16 or 32Vrms square wave
TestFrequency: Selectable from 41 to 128Hz (see table in § 6.2)
ShortCircuitCurrent: > 200mAAC
NoiseSuppression:> 80 dB for frequencies 20% or more above or below the
test frequency
Max.Overload:250Vrms
18
Ground Resistance Tester Model 6470-B
Page 21
Max.Value for RH, RS, RES, RE:100kΩ
CalculationFormula,Wenner: ρW = 2p d R
CalculationFormula,Schlumberger: ρS = (p (d2 - (A/2)²) / A) R
S-ES
S-ES
Maximum Value of ρ: 999kΩm (display in kΩft is not possible)
MeasuringTime: ShortpushonSTART:approx. 8 s for rst value of R
128 Hz, then 3 measurements per s.
LongpushonSTART: approx. 20 s for rst value of R
128 Hz, then 3 measurements per s.
S-ES
S-ES
at
at
Measurement
Range
0.00 to
9.99Ω
10.0 to
99.9Ω
100 to
999Ω
1.00 to
9.99kΩ
10.0 to
99.9kΩ
Resolution 0.01Ω 0.1Ω 1Ω 10Ω 100Ω
Intrinsic error ± (2% + 1ct)
The intrinsic error specied refers to reference conditions with a test voltage of
32V, test frequency of 128Hz, R
Operating conditions : R
R
R
R
R
R
R
R
is the resistance of the earth rods R
rod
cal.
electrode
electrode
electrode
S-ES
electrode
/ R
electrode
/ R
electrode
/ R
Note: With a test voltage U
Measurement of Auxiliary Electrodes R
Measurement
Range
0.14 to
9.99Ω
, R
, R
ρ-H
< 3 x R
ρ-S
and: Operating error for R
ρ
-H
ρ-ES
and R
≤ 100kΩ
≤ 2000
S-ES
≤ 50kΩ
≤ 10,000
S-ES
≤ 10kΩ
≤ 20,000
S-ES
, R
ρ
of 16V, halve the value of R
OUT
10.0 to
99.9Ω
, R
ρ
-E
-ES
, R
ρ
ρ
-H
-S
100 to
999Ω
= 1kΩ, no external voltage.
ρ-E
± (7% + 2cts)
± (15% + 3cts)
± (20% + 1ct)
, R
ρ
, R
assumed to be identi-
ρ
-E
-H
.
rod
, R
-ES
ρ
-E
ρ
1.00 to
9.99kΩ
S-ES
10.0 to
99.9kΩ
Resolution 0.1Ω 0.1Ω 1Ω 10Ω 100Ω
Operating error ± (10% + 2cts)
The START button must be pressed for more than 2s. For frequencies between 41
and 128Hz, the resistance of the auxiliary earth electrodes is measured at the test
frequency set. At higher frequencies the resistance is measured at 128Hz.
Ground Resistance Tester Model 6470-B
19
Page 22
3.3 Data Storage
MemoryCapacity:512 test results (64kB)
Communication: Optically isolated USB
3.4 Power
PowerSource: Rechargeable 9.6V, 3.5Ah NiMH Battery Pack
At the middle and bottom of the display you will see one of the following messages:
bAtt CHrG Fast charging is active (normal state)
bAtt LOW Battery voltage is too low for a fast charge - charging at a lower current
bAtt Battery voltage is too high for a fast charge - charging at a lower current
bAtt HOt Battery is too warm for a fast charge (>40°C) - charging at a lower current
bAtt COLd Battery is too cold for a fast charge (< 0°C) - charging at a lower current
bAtt FULL Battery is full - switch to trickle charging
Power Supply: 110/220, 50/60Hz external charger with 18VDC, 1.9A output or
12VDC vehicle power
In this case the low-potential of the vehicle’s 12V outlet is at the potential of
terminals E (X) and ES (Xv) of the ground tester. For safety reasons, do not
connect or use the unit if there is a possibility that voltages at E (X) or ES (Xv)
could exceed 32V.
Fuse:0.63A, 250V, 5x20mm, 1.5kA
BatteryLife:
Function Power consumed Typical number of measurements
Device off < 5 mW —
Voltage Measurement 1.5 W 4500
(2)
mΩ
3-Pole, 4-Pole
(1): Measurements in automatic mode at 25-s intervals
(2): With R = 1Ω
(3): With RH + RE = 100Ω
(4): With RH + RS-ES = 100Ω
20
(3)
(4)
ρ
4.9 W 1500
4.9 W 1500
4.9 W 1500
Ground Resistance Tester Model 6470-B
(1)
Page 23

3.5 Mechanical
Dimensions: 10.7 x 9.76 x 5.12" (272 x 248 x 130mm)
Weight:7 lbs (3.2kg) approx
CaseMaterial: ULV0 Polypropylene
Terminals:4mm recessed banana jacks
CaseProtection:EN 60529 - IP53 (cover closed)
DropTest:Per EN 61010-1
VibrationTest:Per EN 61557-1
3.6 Environmental
OperatingTemperature:32° to 113°F (0° to 45°C); 0 to 90% RH
SpeciedOperatingTemperature
StorageTemperature: -40° to 158°F (-40° to 70°C); 0 to 90% RH
Altitude:< 3000m
(1): This range corresponds to the one defined by standard EN 61557, for which an operating error including the
quantities of influence is defined. When the device is used outside this range, 1.5%/10°C and 1.5% between
75 and 90% RH must be added to the operating error.
(1)
: 0° to 95°F (0° to 35°C); 0 to 75% RH
3.7 Safety
Electromagnetic Compatibility
This instrument satises the EMC and LVD directives required for the CE marking
and product standard IEC 61326-1 (Ed. 97) + A1 (Ed. 98).
• Immunity in industrial environment
• Emissions in residential environment.
Electrical safety according to EN 61010-1 (Ed. 2 of 2001)
Measurement according to EN 61557 (Ed. 2 of 2007) parts 1, 4 and 5.
CAT IV, 50V
Pollution Degree 2
*Specications are subject to change without notice
Ground Resistance Tester Model 6470-B
21
Page 24

CHAPTER 4
OPERATION
For detailed information regarding ground resistance testing, see the
Understanding Ground Resistance Testing Workbook CD that was
included with the instrument.
4.1 General Operating Instructions
The Model 6470-B has two operating modes:
• Automatic mode for routine applications.
• Manual (Expert) mode in which the user can change the parameters of the
measurement functions.
Fully charge the battery before the first use (see § 9.4)
4.1.1 Automatic Mode
• Set the switch to the desired function.
• Make the connections appropriate to the function.
• Press the START/STOP button. The instrument takes the measurement
and stops automatically.
• Read the measurement result on the display and the relevant parameters
using the DISPLAY button.
• To save the information in memory, use the MEM button (see § 7.1).
4.1.2 Manual (Expert) Mode
• Set the switch to the desired function.
• Make the connections appropriate to the function.
• Select MANUAL mode.
• Choose various measurement parameters using the Hz/OPTIONS button.
• Press the START/STOP button. The measurement frequency or the direc-
tion of the current (resistance measurement) can be changed during the
measurement. To view the impact upon the measurement and the parameters relevant to the measurement use the DISPLAY button.
22
Ground Resistance Tester Model 6470-B
Page 25

• When the measurement results are acceptable, stop the measurement by
pressing the START/STOP button.
• View the result on the display and toggle through the relevant parameters
using the DISPLAY button.
• To record the information into memory, use the MEM button (see § 7).
4.2 Instrument Configuration (SET-UP mode)
To congure the Model 6470-B parameters, turn the rotary switch to SET-UP:
• All the segments on the display are activated for 1 second and then the
“PUSH button” message appears on the display.
• Various parameters are accessible by pressing the corresponding button.
• The number or symbol which can be modied ashes. These are changed
using the SELECT button [►] and CHANGE buttons [▲▼].
• To exit SET-UP, turn the rotary switch to another position.
• All of the parameters that are modied are permanently saved until a new
instrument conguration is performed.
Parameter to be modified Button Possible values Default values
Distance unit DISPLAY (1st press) m (meter) or ft (feet) m
Alarm (for mΩ and 2-wire
measurements only)
Buzzer DISPLAY (3rd press) ON / OFF ON
Modbus address DISPLAY (4th press) 1 to 247 1
Date Hz/OPTIONS (1st press) yyyy.mm.dd* Current date*
Time Hz/OPTIONS (2nd press) hh : mm* Current time*
Baud Hz/OPTIONS (3rd press) 9.6k / 19.2k / 38.4k 9.6 k bits
Default configuration Hz/OPTIONS (4th press) yes / no yes
Memory used MEM (1st press) 000 to 512 (total
*International format date and time only
DISPLAY (2nd press) ON / OFF
direction (< or >)
value (1 to 999Ω)
number of locations)
OFF
>
2Ω
000 on 512
Ground Resistance Tester Model 6470-B
23
Page 26

CHAPTER 5
AUTOMATIC MODE
VOLTAGE CHECK: The tester first checks for possible interference. If there
is an external voltage of more than 42V, the warning triangle will be
displayed. If measurements are being performed in AUTO mode and a
disturbance frequency is detected, the tester will automatically look for a
frequency that is different from the default 128Hz.
5.1 Switching the Test Voltage
Available in all functions except mΩ.
If necessary, the test voltages can be switched to either 16 or 32V as follows:
• Press the Hz/OPTIONS button, then press it again to make the output volt-
age (Uout) blink.
• Use the ► button to switch to 16 or 32V, then press Hz/OPTIONS again.
This setting is retained when the unit is turned off.
5.2 Resistance Measurement mΩ (2-Wire)
WARNING: Before performing the resistance test, verify that the sample
under test is not energized.
1. Set the switch to
2. Connect the resistance to terminals H (Z) and E (X).
24
.
R
Ground Resistance Tester Model 6470-B
Page 27

3. The 6470-B makes a measurement with a positive current (R+), then reverses
the direction of the current and makes another measurement with negative (R-).
H
ALARM
E
AUTO
±
DC
Ω
Ω
Ω
R =
(R+) + (R-)
2
H
ALARM
E
AUTO
±
DC
Ω
Ω
Ω
4. To display the measurement parameters, press DISPLAY several times.
The device displays the following parameters:
R+, R-, +U
H-E
, +I
H-E
, -U
H-E
, -I
H-E
, U-Act (U
and its frequency) and R∆0 if there
H-E
is compensation for the measurement leads.
5.2.1 Lead Compensation Measurement
Lead compensation subtracts the resistance of the test leads from the measured
result.
• Short the two measurement leads connected to H (Z) and E (X) terminals.
• Press the 2nd button, then the START/STOP button to start the measure-
ment.
• This value will be deducted from all resistance values measured thereafter
until the rotary switch is turned to another function.
appears on the display after the compensation value has been measured.
If the compensation resistance is > 5Ω, or if the leads are not shorted when the
measurement is started, the value of compensation will be canceled.
Ground Resistance Tester Model 6470-B
25
Page 28

5.2.2 Alarm Function
2
3
This function is active only for 2-Pole resistance measurements. By default, the
visual alarm (ALARM symbol ashes) and the audible alarm (buzzer sounds for a
few seconds) are triggered when R < 2Ω.
This threshold can be changed using the SET-UP function:
ALARM
<
x
Ω
Turn the alarm
ON or OFF
Set the value of the alarm
between 1 and 999Ω
and
Access the
type of alarm
Choose a low (<) or
high (>) alarm
Complete the adjustment
of the alarm setting
x
26
Ground Resistance Tester Model 6470-B
Page 29

5.3 Resistance Measurement mΩ (4-Wire)
This measurement is used to improve the resolution (10x better than the 2-Wire
measurement) for low resistance values.
To perform a 4-Wire measurement:
Press Hz/OPTIONS
(AUTO will blink)
Press ►
(H, S, ES and E will all blink)
Press Hz/OPTIONS once again
(H and E will blink)
Conrm choice by pressing
Hz/OPTIONS again
WARNING: Before performing the resistance test, verify that the sample
under test is not energized.
1. Set the switch to
2. Connect the resistance to all 4 terminals.
Ground Resistance Tester Model 6470-B
.
R
27
Page 30

3. Start the measurement by pressing the START/STOP button.
H
S
ES
E
ALARM
AUTO
±
±
DC
DC
Ω
Ω
Ω
4. To display the measurement parameters, press DISPLAY several times.
The device displays the following parameters:
R+, R-, +U
H-E
, +I
H-E
, -U
H-E
, -I
H-E
, U-Act (U
and its frequency)
H-E
5.4 Earth/Ground Measurement (3-Pole)
This function is used to measure an earth (ground) resistance with 2 auxiliary
electrodes.
There are several measurement methods, the full and simplied (62% method) will
be discussed in this section.
5.4.1 62% Method
1. Set the switch to
2. Place electrodes H (Z) and S (Y) to form a straight line with the earth electrode
under test.
The distance between electrode S (Y) and the earth electrode is 62% of
the distance between electrode H (Z) and the earth electrode; the distance
between the electrodes H (Z) and E (X) should be 8 to 10 times the depth of
the rod you are testing.
Ω
.
H (Z)
Ω
Ω
distance A - 8 to 10 times rod depth
S (Y)
distance d - 62% d
In order to avoid electromagnetic interference, it is best to unwind the full length of
each cable from the reel, to keep the cables as far apart as possible on the ground,
28
Ground Resistance Tester Model 6470-B
Page 31

taking care not to form loops, and to avoid placing the cables near or parallel to
metallic conductors (cables, rails, fences, etc.).
Connect the cables to terminals H (Z) and S (Y) (red and blue respectively); disconnect the earth strap from the rod under test, then connect terminal E (green) to
the rod or electrode system to be tested.
3.
Press the 2nd button, then the DISTANCE button. The "hundredths" will blink.
H
S
A
AUTO
m
m
Ω
Ω
d
E
=
DISTANCE
=
4. To modify the hundredths (of meters or feet), press the ▲ button until the
desired digit is displayed (0-9).
5. To select and modify the tens, press the ► button and then the ▲ button until
the desired digit is displayed (0-9).
6. To select and modify the units and tenths of a unit, press the ► button and
then the ▲ button until the desired digits are displayed (0.0- 9.9).
7. To terminate the programming of distance, press the 2nd button and then the
DISTANCE button.
It is also necessary to program distance A. This is done in the same way as for
distance d.
8. Start the measurement by pressing the START/STOP button.
EARTH
H
S
A
d
E
=
=
AUTO
m
m
H
S
E
AUTO
Ω
mV
mA
9. To display the measurement parameters, press DISPLAY several times.
The device displays the following parameters:
RE, U
Ground Resistance Tester Model 6470-B
S-E
, I
H-E
, U-Act (U
and its frequency, U
H-E
and its frequency).
S-E
29
Page 32

To measure the resistances of auxiliary electrodes H (Z) and S (Y), or if the resistance of the electrodes is too high (see § 10.1), start the measurement with a long
press of the START/STOP button.
RH, RS will be displayed.
EARTH
H
S
> 2s
E
AUTO
Ω
kΩ
kΩ
NOTE:Repeat the process at 52% and at 72% for the S electrode.
5.4.2 Full Method
A more thorough measurement can be obtained by taking measurement by moving the S (Y) auxiliary electrode every 10% between H (Z) and E (X) and plotting
the results. A distinct plateau should result as shown below.
R10
0 10
R30 R40 R50
R20
20 30 40 50 60 70 80 90 100
R60
% H - E
Take the average of the 3 or 4 readings on the
plateau to obtain the earth electrode resistance.
30
R90
R80
R70
R40 + R50 + R60 + R70
R =
4
Ground Resistance Tester Model 6470-B
Page 33

5.4.3 Recommendations for a Reliable Measurement
Moving the Auxiliary Electrodes
Move electrode S (Y) towards electrode H (Z) by a distance equal to 10% of d and
make another measurement. Then move electrode S (Y) again by a distance equal
to 10% of d, but towards the earth electrode.
H (Z)
S (Y)
52% d
62% d
72% d
d
The three measurement results should be the same to within a few percent. If this
is the case, the measurement is valid.
If not, electrode S (Y) is in the zone of inuence of the earth electrode. It will be
necessary to increase distance d for the H (Z) auxiliary electrode and repeat the
measurements.
Positioning of the Auxiliary Electrodes
To make sure that your earth measurements are not distorted by interference, we
recommend repeating the measurement with the auxiliary electrodes placed at a
different distance and in another direction (for example, rotated 90° from the rst
alignment).
H (Z)
H (Z)
Ground Resistance Tester Model 6470-B
S (Y)
d1
S (Y)
E (X)
d2
31
Page 34

If you nd the same values, your measurement is reliable. If the measured values
H (Z)
are substantially different, it is likely that they were inuenced by earth currents or
a groundwater source. It may be useful to drive the electrodes deeper and/or wet
the ground near them to reduce their contact resistance with the soil.
Avoid routing the connecting cables of the earth electrodes near or parallel to other
cables (transmission or supply), metallic conductors, rails, or fences: high test fre-
quencies may cause cross-talk and affect the measurements.
5.5 Earth/Ground Measurement (4-Pole)
This function is suited to the measurement of very low earth resistances. It
provides better resolution (10x better than 3P measurement) and there is no need
to compensate for the resistance of the measurement leads.
1. Set the switch to
Ω
.
2. Place electrodes H (Z) and S (Y) at least 30m apart.
Ω
Ω
> 30 m
S (Y)
> 30 m
In order to avoid electromagnetic interference, it is best to unwind the full length of
each cable from the reel, to keep the cables as far apart as possible on the ground,
taking care not to form loops, and to avoid placing the cables near or parallel to
metallic conductors (cables, rails, fences, etc.). Connect the cables to terminals
H (Z) and S (Y); disconnect the earth strap from the rod under test, then connect
terminals E (X) and ES (Xv) to the earth electrode to be tested.
3. Start the measurement by pressing the START/STOP button.
H
S
ES
E
AUTO
mV
mA
Ω
32
Ground Resistance Tester Model 6470-B
Page 35

4. To display the measurement parameters, press DISPLAY several times.
The device displays the following parameters:
RE, U
S-E
, I
H-E
, U-Act (U
and its frequency, U
H-E
and its frequency).
S-E
To measure the resistances of auxiliary electrodes H (Z) and S (Y), or if the resistance of the electrodes is too large (see § 10.1), start the measurement with a long
press of the START/STOP button.
RH, RS, U
will be displayed.
H-E
H
Ω
kΩ
kΩ
> 2s
ES
S
E
AUTO
We recommend repeating the measurement with the auxiliary electrodes placed at
a different distance and in another direction (see § 5.4.3).
Ground Resistance Tester Model 6470-B
33
Page 36

5.6 Soil Resistivity Measurements (ρ Position)
To measure the resistivity of the soil, two measurement methods are possible:
Wenner and Schlumberger
The difference between the two methods lies in the positioning of the electrodes.
By default, the device selects the Wenner method. The Schlumberger method,
which allows you to move only two measurement electrodes rather than three, is
better suited for measuring soil resistivity at multiple depths.
The soil resistivity measurement with different distances d, and therefore in dif-
ferent layers (in depth) of the soil, can be used to establish resistivity proles of
the soil in question, which can be useful for geological analysis, the exploration
of deposits, hydrological studies, etc., and to determine the location of an earth
electrode.
5.6.1 Advantages and Disadvantages of Wenner and Schlumberger
SCHLUMBERGER WENNER
Advantage Disadvantage Advantage Disadvantage
Need to move the two
potential electrodes ES
(Xv) and S (Y) only for
most readings. This can
significantly decrease the
time required to acquire
a sounding
Because the potential
electrodes remain in
fixed locations, the effects of the near surface
lateral variations in
resistivity are reduced.
Because the potential
electrode spacing is
small compared to
the current electrode
soakings, higher meter
sensitivity is required.
In general, interpretations
based on DC soundings
will be limited to simple,
horizontal; layered
structures
Potential electrode
spacing increases
as current electrode
spacing increases. Less
sensitive meters may
be used.
All four electrodes, the two
current E (X) and H (Z) and
the two potential ES (Xv)
and S (Y) must be moved
equally to acquire each
reading.
Because all electrodes
are moved for each
reading, this method can
be more susceptible to
near-surface, lateral, and
variations in resistivity.
These near surface lateral
variations could potentially
be misinterpreted in terms
of depth variations in
resistivity.
In general, interpretations
based on DC soundings
will be limited to simple,
horizontal; layered
structures.
Source: DC Resistivity - T. Boyd
34
Ground Resistance Tester Model 6470-B
Page 37

5.6.2 Changing the Measurement Method
x 2
1. Set the switch to .
2. Press the Hz/OPTIONS button. "AUTO" will blink.
W
H
ρ
d
S
d
ES
d
E
CONFIG
3. Press the Hz/OPTIONS button again. "W" will blink.
4. Press the ► button to change to the Schlumberger method.
5. To confirm and exit, press the Hz/OPTIONS button twice.
W
H
ρ
d
S
d
ES
d
E
CONFIG
AUTO
V
Hz
H
ρ
S
d
S
A
ES
d
E
CONFIG
AUTO
AUTO
V
Hz
V
Hz
To switch back to the Wenner method, simply repeat this procedure.
The last measurement method selected (Wenner or Schlumberger) is stored in
memory when the device is switched off.
5.6.3 Programming the Distance for Electrode Placement
The distance can be programmed before or after the measurement. If it is not
programmed, only the value of R
indeterminate.
1. Set the switch to .
2.
Press the 2nd button, then the DISTANCE button. The "hundredths" will blink.
Ground Resistance Tester Model 6470-B
will be displayed, since the value of ρ remains
S-ES
35
Page 38

H
W
H
ρ
d
S
d
ES
d
E
DISTANCE
=
AUTO
Ωm
Ω
m
3. To modify the hundredths (of meters or feet), press the ▲ button until the
desired digit is displayed (0-9).
4. To select and modify the tens, press the ► button and then the ▲ button until
the desired digit is displayed (0-9).
5. To select and modify the units and tenths of a unit, press the ► button and
then the ▲ button until the desired digits are displayed (0.0- 9.9).
6. To terminate the programming of distance, press the 2nd button and then the
DISTANCE button.
In the case of the Schlumberger method, it is also necessary to program distance
A. This is done in the same way as for distance d.
5.6.4 Wenner Method
1. Set the switch to .
2. Place the 4 earth electrodes on a straight line, at a distance d from one another and at a depth p < 1/20 d. Distance d must be between 2 and 30m.
3. Connect the cables to the electrodes, then to terminals H (Z), S (Y), ES (Xv),
and E (X) in sequence.
4. Program the distance into the instrument as described in § 5.6.3.
S ES
d
d
E
d
In order to avoid electromagnetic interference, it is best to unwind the full length of
each cable from the reel, to keep the cables as far apart as possible on the ground,
taking care not to form loops, and to avoid placing the cables near or parallel to
metallic conductors (cables, rails, fences, etc.).
36
Ground Resistance Tester Model 6470-B
p
Page 39

5. Start the measurement by pressing the START/STOP button.
W
H
ρ
d
S
d
ES
d
E
ρ
= 2.π.d.R
W
AUTO
S-ES
k Ωm
Ω
m
To display the measurement parameters, press DISPLAY several times.
The device displays the following parameters:
ρW, R
S-ES
, d, U
S-ES
, I
H-E
, U-Act (U
and its frequency, U
S-ES
and its frequency).
H-E
To measure the resistances of the auxiliary electrodes H (Z), S (Y), ES (Xv) and E
(X), or if the resistance of the electrodes is too high (see § 10.1), start the measure-
ment by a long press of the START/STOP button.
R
and R
P-E
> 2s
, then R
P-H
and R
P-ES
W
H
ρ
d
S
d
ES
d
E
will be displayed.
P-S
k Ωm
kΩ
kΩ
AUTO
W
H
ρ
d
S
d
ES
d
E
AUTO
k Ωm
kΩ
kΩ
5.6.5 Schlumberger Method
1. Set the switch to .
2. Place electrodes S (Y) and ES (Xv) at a distance A apart, then place elec-
trodes H (Z) and E (X) in the same straight line, at a distance d measured from
the midpoint of distance A. Distance d must be between 2 and 30m.
3. Drive the electrodes to a depth p of not more than 1/20 of d.
4. Connect the cables to the electrodes, then to terminals H (Z), S (Y), ES (Xv),
and E (X).
5. Program the distance into the instrument as described in § 5.6.3.
Ground Resistance Tester Model 6470-B
37
Page 40

H (Z)
S (Y) ES (Xv)
A
d
E (X)
p
d
In order to avoid electromagnetic interference, it is best to unwind the full length of
each cable from the reel, to keep the cables as far apart as possible on the ground,
taking care not to form loops, and to avoid placing the cables near or parallel to
metallic conductors (cables, rails, fences, etc.).
6. Start the measurement by pressing the START/STOP button.
H
ρ
d
S
A
ES
d
E
S
d2-
ρ
= π. .R
s
=
2
A
4
A
AUTO
S-ES
Ωm
Ω
m
To display the measurement parameters, press DISPLAY several times.
The device displays the following parameters:
ρS, R
S-ES
, d, U
S-ES
, I
H-E
, U-Act (U
and its frequency, U
S-ES
and its frequency).
H-E
To measure the resistances of the auxiliary electrodes H (Z), S (Y), ES (Xv),
and E (X), or if the resistance of the electrodes is too high (see § 10.1), start the
measurement by a long press of the START/STOP button.
R
and R
P-E
, then R
P-H
P-ES
and R
will be displayed.
P-S
38
H
ρ
S
d
S
> 2s
A
ES
d
E
AUTO
Ωm
kΩ
kΩ
Ground Resistance Tester Model 6470-B
H
ρ
S
d
S
A
ES
d
E
AUTO
Ωm
kΩ
kΩ
Page 41

CHAPTER 6
MANUAL MODE
All of the measurement functions described in § 5 (AUTO mode) can be performed
in MANUAL mode if necessary.
To access MANUAL mode:
• Press the Hz/OPTIONS button once. The Hz/OPTIONS symbol appears
and the AUTO indicator blinks.
• Use the ► button to switch from AUTO to MANUAL.
• When the tester is in MANUAL mode you can press Hz/OPTIONS repeat-
edly to see various parameters that can be set, depending on the measurement function selected.
When a measurement is performed by a short or long press on the START/STOP
button (the circular arrows on the display will rotate), the measurement can be
stopped by a second press of this button.
Whenever a new measurement function is selected, the device automatically
changes back to AUTO mode.
6.1 Switching the Test Voltage
Available in all functions except mΩ.
If necessary, the test voltages can be switched to either 16 or 32V as follows:
• Press the Hz/OPTIONS button, then press it again to make the output voltage (Uout) blink.
• Use the ► button to switch to 16 or 32V, then press Hz/OPTIONS again.
This setting is retained when the unit is turned off.
Ground Resistance Tester Model 6470-B
39
Page 42

6.2 Measurement Frequency Selection
If there are signals with a frequency that could interfere with the chosen test frequency, the NOISE symbol will appear.
While in MANUAL mode, change the frequency by pressing the Hz/OPTIONS
button until the frequency flashes.
Press the ► button to choose the following frequencies:
• USr, 55, 92, 110, 119, 128 Hz (128 Hz is default).
• 128, 1367, 1611, 1758 Hz for the 2-clamps function (1611 Hz is default).
To change the user frequency (USr), press the ▲▼ buttons (▲▼ raises the value,
and + ▲▼ lowers it).
Table of possible USr frequencies (48 values from 41 to 513Hz):
41 43 46 49 50 55 60 61 64 67 69 73 79 82 85 92
98 101 110 119 122 128 134 137 146 159 165 171 183 195 201 220
238 244 256 269 275 293 317 330 342 366 391 403 439 476 488 513
There are two user frequencies: one for resistivity and one for earth and soil potential measurements. These two values remain in memory even after the device
is switched off.
For soil resistivity measurements, the user frequency is limited to 128Hz.
6.3 Manual Settings for mΩ Measurements
Pressing Hz/OPTIONS in MANUAL mode allows the following parameters to be
changed using the ► button:
• Terminal symbols H and E blink H S ES E blink (4-Pole measurement)
• POS on H and DC+ blinks neg on H and DC- (reversal of polarity at terminal H)
In MANUAL mode the tester does not reverse polarity automatically during the
measurement; however, the polarity can be reversed during the measurement by
pressing the Hz/OPTIONS button.
40
Ground Resistance Tester Model 6470-B
Page 43

6.3.1 Continuity Test
Measurement #3
1E
#2Measurement
The 2-wire mΩ measurement gives a quick measurement result, accompanied by
an audible beep, during a continuity check.
The display is in the sensitivity range (0.5Ω to 1.99kΩ) and the terminal check is
limited to terminal H (Z) (a cable must be connected to it), making it possible to
start the measurement with an open circuit.
For a continuity check, the following settings are mandatory:
• The 2-wire mΩ measurement function must be selected.
• The device must be in manual mode.
• The alarm function must be active (On).
• The alarm threshold must be low (<).
• The buzzer must be activated (bEEP On).
6.4 3-Pole Earth/Ground Measurements & Coupling
6.4.1 3-Pole Earth/Ground Measurements
Pressing on Hz/OPTIONS in MANUAL mode allows the following parameters to
be changed using the ► button:
• EARTH blinks Earth Coupling Measurement
• 128 Hz blinks Test Frequency Measurement
• Test voltage blinks Test Voltage Selection
6.4.2 Earth/Ground Coupling Measurements
This measurement calls for making and storing three intermediate measurements
(at the same frequency). It is available only in MANUAL mode.
Connection diagram:
Earth
Ground Resistance Tester Model 6470-B
R
#1
1
R
1-2
R
A
R
C
R
b
arth 2
Measurement
R
2
41
Page 44

Press Hz/OPTIONS and use the ► button to switch from EARTH to EARTH COU-
PLING. Proceed as follows:
• If you want to eliminate the resistance of the measurement leads, you can
use lead compensation (2nd + START) before starting the actual coupling
measurement (see § 5.2.1).
• Turn the rotary switch to 3-Pole.
• Select a test frequency and a test voltage (if desired).
• The screen displays EARTH COUPLING 1. Make a 3-pole earth measure-
ment on the rst earth system (measurement of R1 in the connection dia-
gram on previous page).
• Stop the measurement by pressing the START/STOP button. The MEM
symbol ashes to indicate that this result must be recorded in memory.
Press the MEM button twice. To save to another location, refer to §7.
• The screen now displays EARTH COUPLING 2. Make a 3-pole earth mea-
surement on the second earth system (measurement of R2). For this second
measurement, leave the H (Z) and S (Y) electrodes in the same positions as
for the rst measurement.
• Store this result in the same memory location as before by pressing the
MEM button twice.
• The screen now displays the message EARTH COUPLING 3. Disconnect
terminal S (Y) and make a 2-wire resistance measurement with terminal H
(Z) connected to earth 1 and terminal E (X) to earth 2.
• Record this result by pressing the MEM button twice.
• EARTH COUPLING 4 and the results of the measurements are displayed.
The calculation is based on the following formulas:
RC = (R1 + R2 – R
C1 = RC/R1 and C2 = RC/R
Rb = R2 - R
C
)/2
1-2
= R1 - RC
2 RA
• To display all of the measurement parameters, press the MR button.
• To scroll through all of the measurements, use the ► and ▲ buttons.
then x 4
42
Ground Resistance Tester Model 6470-B
Page 45

Press DISPLAY several times to display the following parameters:
EARTH COUPLING 1
R1 , U
OUT
and frequency, U
, I
, U-In (U
S-E
H-E
and frequency)
S-E
RH and RS if long press of START/STOP
EARTH COUPLING 2
R2 , U
OUT
and frequency, U
, I
, U-In (U
S-E
H-E
and frequency)
S-E
RH and RS if long press of START/STOP
EARTH COUPLING 3
EARTH COUPLING 4
R
, U
1-2
H-E
RC , C1, C2, RA, Rb, U
and frequency, I
, U-In (U
H-E
out
H-E
and its frequency.
and frequency).
6.5 4-Pole Earth/Ground Measurements
Pressing the Hz/OPTIONS button allows the following parameters to be changed
using the ► button:
• 128Hz blinks Change the test frequency
• Test voltage blinks Switch between 16 and 32V
6.6 Soil Resistivity Measurements
Pressing the Hz/OPTIONS button allows the following parameters to be changed
using the ► button:
• ρ
blinks (Wenner method) Switch to ρS (Schlumberger method)
W
• 128Hz blinks Change the test frequency
• Test voltage blinks Switch between 16 and 32V
6.7 Smoothing
In the manual mode, you can activate or deactivate the smoothing of the measurement results by pressing the 2nd + DISPLAY (SMOOTH) buttons. This smooth-
ing displays an exponential mean value, a signicant help with highly uctuating
values.
Ground Resistance Tester Model 6470-B
43
Page 46

CHAPTER 7
MEMORY FUNCTION
The instrument has a total of 512 memory locations. Each of these locations is
dened by an object number (OBJ) from 01 to 99 and by a TEST number from 01
to 99.
For 3- and 4-pole earth measurements, the sweep mode (SWEEP) can record
several measurement results at the same memory location, with the frequency as
third addressing criterion.
During soil potential or resistivity measurements (Wenner or Schlumberger meth-
ods), several measurement results are recorded at the same memory location,
with the distance between electrodes as the third addressing criterion.
For earth coupling measurements (EARTH COUPLING 1, 2, 3, 4), the four measurements provide the third addressing criterion for the same memory location.
None of the other measurements has an additional addressing criterion, so each
occupies only one memory address.
Since each measurement is dated, you must set the date and time of the device
before any storage in memory (see § 4.2).
7.1 Saving Measurements into Memory
Measurement results can be saved by performing the following:
• Press the MEM button. The tester will automatically suggest the next free
memory location ( message).
• Press the MEM button a second time to save to the OBJ/TEST location.
• If you decide not to save your results, press DISPLAY to exit MEM mode.
• To change the OBJ and TEST location, use the ► and ▲▼ buttons.
NOTE: If a memory location is already occupied, the message will be displayed. Pressing the MEM button will overwrite the measurement record.
For soil resistivity and potential measurements, if several measurements are made
with different distances (d), you can store them under the same OBJ:TEST num-
ber, with the distance being the third criterion.
It will be possible to overwrite values already stored with new ones having the
same distance d, or even to add new results having other values for the distance d
provided that all of the other measurement parameters are identical.
44
Ground Resistance Tester Model 6470-B
Page 47

7.2 Recalling Measurements from Memory
To recall saved measurements, perform the following:
• Select a measurement function, then press the and MR buttons.
• Use the ► and ▲▼ buttons to choose the OBJ and TEST numbers.
• Press the DISPLAY button to display the time (tiME) and date (dAtE).
• Press DISPLAY again to display the measurement and its parameters.
• Press the MR button again to exit the recall mode.
The SET-UP function lets you read all memory addresses one after the other
independently of which measurement function is chosen.
Any measurement stored in the tester can be retrieved individually using DataView® software (see § 8).
7.3 Erasing Measurements from Memory
There are two ways to erase measurements - complete and selective.
7.3.1 Erasing All Measurements
• Set the switch to SET-UP.
• Push once on the MEM button to display the number of free and available
records.
• Push a second time on the MEM button.
• The display will show “dEL ALL”. Change the blinking NO to YES with the ▲
button, then perform a long press (>2s) on the MEM button.
WARNING: This will delete ALL saved records.
• To exit without erasing, perform a short press on the MEM button.
7.3.2 Erasing Selective Measurements
• Set the switch to SET-UP.
• Press the button.
• Press the MR button. The Object and Test numbers of the last stored test ap-
pear, with the Object number blinking.
• If you need to change the Object number, press the ▲ button until the desired
number is displayed. Then press the ► button; the Test number now blinks.
Ground Resistance Tester Model 6470-B
45
Page 48

• Press the ▲ button until the desired test is displayed.
• Press the MEM button to display the dEL screen. By default, the blinking word
NO appears on the screen, indicating the test is not to be deleted. To delete
the test, press the ▲ button to change the blinking NO to YES, then press and
hold down (>2s) the MEM button. To exit without erasing, perform a short press
on the MEM button.
Note that if the test stored in this Object/Test number is a sweep test (which consists of multiple measurements taken at different frequencies) this procedure only
deletes a single measurement. The remaining sweep measurements will still be
stored in this Object/Test. You must delete all individual measurements to completely remove a sweep test.
When a test is deleted, its Object/Test number is removed from memory. When you
subsequently view stored tests, this number will be skipped. This Object/Test number combination remains unavailable for storing tests until you completely erase
memory, as instructed in Section 7.3.1.
46
Ground Resistance Tester Model 6470-B
Page 49

CHAPTER 8
DATAVIEW® SOFTWARE
8.1 Installing DataView
®
DO NOT CONNECT THE INSTRUMENT TO THE PC BEFORE INSTALLING THE
SOFTWARE AND DRIVERS.
NOTE: When installing, the user must have Administrative access rights
during the installation. The users access rights can be changed after the
installation is complete.
DataView
USB Flash Drive Install
1. Insert the USB stick into an available USB port (wait for driver to be installed).
2. If Autorun is enabled then an AutoPlay window should appear as shown.
®
must be reinstalled for each user in a multi-user system.
Ground Resistance Tester Model 6470-B
47
Page 50

NOTE: If Autorun is disabled, it will be necessary to open Windows Explorer,
then locate and open the USB stick drive labeled “DataView” to view the files
on the drive.
3. In the AutoPlay window, select Open Folder to view Files.
4. Double-click on Setup.exe from the opened folder view to launch the Data-
View setup program.
NOTE: If installing onto a Vista based computer the User Account Control
dialog box will be displayed. Select the Allow option to proceed.
5. A Set-up window, similar to the one below, will appear.
Figure 8-1
There are several different options to choose from. Some options(*) require an
internet connection.
• DataView, Version x.xx.xxxx - Installs DataView® onto the PC.
• *Adobe Reader - Links to the Adobe® website to download the most recent
version of Adobe® Reader to the computer. Adobe® Reader is required for
viewing PDF documents supplied with DataView®.
• *DataView Updates - Links to the online DataView® software updates to
check for new software version releases.
• *Firmware Upgrades - Links to the online rmware updates to check for
new rmware version releases.
48
Ground Resistance Tester Model 6470-B
Page 51

• Documents - Shows a list of instrument related documents that you can
view. Adobe® Reader is required for viewing PDF documents supplied with
DataView®.
6. DataView, Version x.xx.xxxx option should be selected by default. Select
the desired language and then click on Install.
7. The Installation Wizard window will appear. Click Next.
8.
To proceed, accept the terms of the license agreement and click Next.
9. In the Customer Information window, enter a Name and Company, then click
Next.
10.
In the Setup Type window that appears, select the “Complete” radio button
option, then click Next.
11. In the Select Features window that appears, select the instrument’s control
panel that you want to install, then click Next.
NOTE: The PDF-XChange option must be selected to be able to generate
PDF reports from within DataView®.
Figure 8-2
12. In the Ready to Install the Program window, click on Install.
13. If the instrument selected for installation requires the use of a USB port, a
warning box will appear, similar to Figure 8-3. Click OK.
Ground Resistance Tester Model 6470-B
49
Page 52

Figure 8-3
NOTE: The installation of the drivers may take a few moments. Windows may
even indicate that it is not responding, however it is running. Please wait for
it to finish.
14. When the drivers are nished installing, the Installation Successful dialog
box will appear. Click on OK.
15. Next, the Installation Wizard Complete window will appear. Click on Finish.
16. A Question dialog box appears next. Click Yes to read the procedure for con-
necting the instrument to the USB port on the computer.
NOTE: The Set-up window remains open. You may now select another option
to download (e.g. Adobe® Reader), or close the window.
17. Restart your computer, then connect the instrument to the USB port on the
computer.
18. Once connected, the Found New Hardware dialog box will appear. Windows
will complete the driver installation process automatically.
Shortcuts for DataView® and each instrument control panel selected during the
installation process have been added to your desktop.
NOTE: If you connected your instrument to the computer before installing
the software and drivers, you may need to use the Add/Remove Hardware
utility to remove the instrument driver before repeating the process.
50
Ground Resistance Tester Model 6470-B
Page 53

8.2 Connecting the Model 6470-B to your Computer
The Model 6470-B is supplied with an optically isolated USB interface cable
required for connecting the instrument to the computer. This cable (Cat. #2135.41)
is equipped with a USB type A on one end, and an optical connector on the other
end.
To connect the Model 6470-B to your computer:
1. Connect the optical connector end of the cable to the serial port on the
front panel of the Model 6470-B (see Figure 2-1, Item #4).
2. Connect the USB type A end of the cable, to an available USB port on
your computer.
8.3 Establishing Communication to the Instrument
• Double-click the Ground Tester Icon that was created during software instal-
lation, located on the desktop.
• The Connection dialog box will appear. Make sure that the communication port
matches the port that the serial cable is plugged into.
Figure 8-4
• Once the proper communication parameters have been specied, click OK.
If the instrument is turned ON at the time the Control Panel is opened, a communication link will happen automatically.
If the instrument is turned OFF at the time the Control Panel is opened, establish a
communication link by going to Instrument > Connect in the main menu.
The connection status can be seen in the lower right-hand corner of the
Control Panel and in the Instrument window under status.
Ground Resistance Tester Model 6470-B
51
Page 54

8.4 The Ground Tester Control Panel
After communication to the instrument is established (see § 8.4), the Ground
Tester Control Panel will appear.
Figure 8-5
The Control Panel consists of the following:
• A shortcut toolbar.
• A toolbar with the mode selection and start/stop buttons.
• The instrument's status window (on the left-hand side):
- Recorded data from the instrument
- Real-time data
- Connection status
- The communications port and speed of the connection
- The model number, serial number, and rmware version
- Date and time from the clock
- Battery status
• A conguration window that shows all of the parameters available for modi-
cation. This window defaults to the instrument mode that is selected.
• Real-time Measurement window that shows the measurement of each test
performed in real-time (available only after a test has been performed).
If the indicated items are not shown on the screen, select Restore Default Layout
from the Window menu.
52
Ground Resistance Tester Model 6470-B
Page 55

8.5 Configuring the Instrument
First, establish a connection to open the Control Panel (see § 8.4). Located on the
right-hand side of the Control Panel is the Conguration window.
Choose a mode to congure:
Common buttons and features in all 4 modes are:
• LoadfromFile:Retrieves stored congurations to be used in programming
the instrument.
• Saveto File: Saves the current conguration. This le will reside on the
computer’s disk drive. Saving different conguration setups can be useful
for future functions and tests.
• SetInstrumentClock: Updates the clock to the PC clock.
• Buzzer: When selected, buzzer is ON.
• Alarm: When selected, alarm is ON.
• Drop-downIndicators: Indicates the conguration available for each mea-
surement range.
To set the Terminal Label markings (e.g. E, ES, S, H or X, Sv, Y, Z), Numeric
format, Measurement units and Rho units, go to Tools > Options.
Ground Resistance Tester Model 6470-B
53
Page 56

8.5.1 DC Continuity Test
When DC Continuity is selected from the tool bar, you can:
• Select a 2- or 4-Wire test.
• Select a test current (positive, negative or Auto ±).
• Enter and activate an alarm from 1 to 999Ω (2-Wire only), if desired.
For very low resistance measurement, a lead compensation value (see § 5.2.1)
may be entered using the Change button.
Input noise status at the input of the meter is always displayed.
54
Figure 8-6
Ground Resistance Tester Model 6470-B
Page 57

8.5.2 3-Pole Ground Resistance Test
Ω
When 3-Pole Ground Resistance is selected from the tool bar, you can select:
• With or without Auxiliary Rod Resistance.
• Test voltage of 16 or 32VAC.
• Distance "d" from terminal X to terminal Y.
• Distance "a" from terminal X to terminal Z.
• Auto frequency - selects the optimum frequency (from 41 to 513Hz), usually
128Hz, or select manually from the drop-down frequency list.
Selecting a sweep frequency test from the drop-down list will enable the sweep
table selection.
The Input Noise option allows the viewing of noise for Z or Y inputs.
Ground Resistance Tester Model 6470-B
Figure 8-7
55
Page 58

8.5.3 4-Pole Ground Resistance
Ω
When 4-Pole Test Resistivity is selected from the tool bar, you can select:
• With or without Auxiliary Rod Resistance.
• Test voltage 16 or 32VAC.
• Auto frequency - selects the optimum frequency (from 41 to 513Hz), usually
128Hz, or select manually from the drop-down frequency list.
Selecting a sweep frequency test from the drop-down list will enable the sweep
table selection.
The Input Noise option allows the viewing of noise for Z or Y inputs.
56
Figure 8-8
Ground Resistance Tester Model 6470-B
Page 59

8.5.4 4-Pole Soil Resistivity
When 4-Pole Test Resistivity is selected from the tool bar, you can select:
• With or without Auxiliary Rod Resistance.
• Test voltage 16 or 32VAC.
• Auto frequency - selects the optimum frequency (from 41 to 128Hz), usually
128Hz, or select manually from the drop-down frequency list.
• Test Method - Wenner or Schlumberger.
• Distances - the distance “d” (for Wenner test method) or “d” and “a” (for Sch-
lumberger test method), between the test electrodes, needs to be entered
for resistivity calculation to read out directly in Rho.
Selecting a sweep frequency test from the drop-down list will bring you to the
sweep table selection.
The Input Noise option allows the viewing of noise for Z or Y inputs.
Ground Resistance Tester Model 6470-B
Figure 8-9
57
Page 60

8.6 Tools Menu
8.6.1 Tools > Options
• Set number display as scientic (1000 as "1E+3") or letters (1000 as "1k").
• Set Label Terminals to be "X", "Xv", "Y", "Z", or "E", "ES", "S", H".
• Set Measurement units to meter or feet.
• Set Rho units to Ohm-meter or Ohm-centimeter.
8.6.2 Tools > Colors
Sets colors for measurement channels.
8.6.3 Tools > Recover Data
Every time the directory of recorded data is displayed by the Ground Tester Control
Panel, a backup copy of all the data is saved to a le. Use this option to recover
previous data.
8.7 Starting a Test
Press the START button to begin a test. Some tests congurations are automatic
and end when the data is stable. Others, generally when there is a manual frequency, show a STOP button, which should be pressed when the data is available
on the screen and has stable values.
8.8 Downloading Data to Database
Click the plus sign next to Recorded Data from the instrument in the Instrument
window on the left-hand side.
Select the data you want to download by clicking on the le name. Choose to per-
form one of the following:
• Print:Prints the data.
• CreateDataViewReport:Opens the newly created report in DataView®.
• Create Spreadsheet. Allows you to save as either an .xls (Excel spread-
sheet le) or .csv (comma delimited le).
58
Ground Resistance Tester Model 6470-B
Page 61

8.8.1 Session Properties
After creating a DataView® report, you can open the Session Properties dialog box
by selecting Edit > Edit Session Properties.
Figure 8-10
The Session Properties dialog box allows you to specify Operator, Site and Custom
parameters that are to be saved with recorded data. These parameters are used
when generating reports.
The Operator and Site tabs allow you to maintain lists of operators and sites,
saving you time when specifying parameters for reports.
On the left of the Operator and Site tabs is the list of previously dened Operators
and Sites. On the right of the Operator and Site tabs is the individual parameters
that will be saved in an associated database. Only a single set of operator and site
elds are saved in the recording database.
The Custom tab allows you to set up user dened parameters. Click the New
button to create a user dened parameter. Double-click on the name (or click the
Edit button) to assign a name and value. A checkbox appears to the left of the
value. Items that are checked will be added to an associated database and used
in displaying a report. Only a single set of Custom parameters can be maintained
(unlike the Operator and Site lists).
You can also set defaults for session properties within the Ground Tester
Control Panel by selecting File > Edit Session Properties.
Ground Resistance Tester Model 6470-B
59
Page 62

8.9 Exporting the Report to a PDF File
• Select the data by clicking on the le name under Recorded Data from the instrument in the Instrument window on the left-hand side of the Control Panel.
• Click the Print button.
• In the Print dialog box that appears, select PDF-XChange 3.0 from the drop-
down menu, then click OK.
• When the PDF is complete, the Save As dialog box will appear.
• Choose a location to save the le and click Save.
60
Ground Resistance Tester Model 6470-B
Page 63

CHAPTER 9
MAINTENANCE
Replacement batteries and fuses are available directly online.
Check our Storefront at www.aemc.com/store for availability.
9.1 Maintenance
Please make sure that you have read and fully understand the WARNING
section on page 3.
• To avoid electrical shock, do not attempt to perform any servicing unless
you are qualied to do so.
• To avoid electrical shock and/or damage to the instrument, do not get water
or other foreign agents into the case.
• Turn the instrument OFF and disconnect the unit from all circuits before
opening the case.
• Use specied spare parts only.
9.2 Cleaning
Disconnect the instrument from any source of electricity.
Use a soft cloth lightly moistened with soapy water. Wipe with a moist cloth and
then dry with a dry cloth. Never use alcohol, solvents or hydrocarbons.
9.3 Fuse Replacement
• FuseforterminalH(Z):
If this fuse is defective, the unit will no longer produce an output voltage, making it
impossible to perform resistance measurements.
To test this fuse, turn the switch to the mΩ position (2-Wire), connect measurement
leads to terminals H (Z) and E (X) and start a measurement. If the unit refuses to
operate and the symbol for terminal H (Z) blinks, the fuse must be replaced.
Ground Resistance Tester Model 6470-B
61
Page 64

Only use the type of fuse shown on label inside the instrument’s cover:
0.63 A 250V 5x20mm 1.5kA (Cat. #2135.81)
Procedureforreplacingfuses:
1. Disconnect the unit completely, turn the rotary switch to OFF, and close
the lid.
2. Loosen the four permanent screws at the bottom of the unit, but do not
remove them.
3. Open the lid and carefully turn the housing upside-down, making sure the
front panel does not fall out. Then carefully pull the front panel and the unit
all the way out of the housing.
4. The fuse for terminal H (Z) is accessible at the back of the unit (in the
corner near the terminal for the battery charger).
5. Wipe off any dirt on the seal and housing rim.
6. Put the unit back into the housing and screw it into place.
9.4 Recharging the Battery
To make the best use of the battery and prolong its service life, observe the
following rules.
• Use only the battery charger supplied with the unit; other chargers may be
hazardous!
• Recharge the battery only at temperatures between 32° and 104°F (0° and
+40°C).
• Observe the conditions of use and storage dened in the specications.
Even an NiMH battery can be recharged only a limited number of times. This number, and thus the service life of the battery, is highly dependent on the following
factors:
• the operating conditions
• the recharging conditions
As the earth tester might go some time without use and the battery has a natural
tendency to run down, you should check the battery level at regular intervals. To do
this, turn on the unit and check the battery level indicator at the top of the
display. If there is only one bar in the symbol or if there are no bars at all, the battery should be recharged.
62
Ground Resistance Tester Model 6470-B
Page 65

If the unit is not used for a long time, the battery might run down all the way. In
this case, recharging can take several hours. In addition, the unit might not work
properly at the start of recharging.
The capacity and lifetime of the battery may also be diminished. After about ve
charging/discharging cycles the battery will recover its initial capacity.
To recharge the battery, plug the charging unit into the connector at the upper left
(connector in Fig. 2-1) and connect the charging unit to a 100 to 240VAC power
source (suitable for Europe and the U.S.). The frame of the battery symbol will
blink during charging. Charging goes faster when the tester is turned off. The battery voltage is shown on the large display next to Ubatt.
At the middle and bottom of the display you will see one of the following messages:
bAtt CHrG Fast charging is active (normal state)
bAtt LOW Battery voltage is too low for a fast charge - charging at a lower current
bAtt Battery voltage is too high for a fast charge - charging at a lower current
bAtt HOt Battery is too warm for a fast charge (>40°C) - charging at a lower current
bAtt COLd Battery is too cold for a fast charge (< 0°C) - charging at a lower current
bAtt FULL Battery is full - switch to trickle charging
The 6470-B tester can also be recharged from a 12VDC car outlet with a special
charging unit.
In this case the low-potential of the vehicle’s 12V outlet is at the potential of
terminals E (X) and ES (Xv) of the ground tester. For safety reasons, do not
connect or use the unit if there is a possibility that voltages at E (X) or ES (Xv)
could exceed 32V.
9.5 Replacing the Battery
The battery in this unit is a special product with customized safety features and
protective devices. It should be replaced only by the same model. If a different
model is used, there is a danger of re or explosion, leading to possible damage
or injury.
NOTE: Only replace the battery with an identical model:
NiMH Custom Pack 9.6V / 3.5 Ah (Cat. #2960.21)
Procedureforreplacingthebattery:
1. Disconnect the unit completely, turn the rotary switch to OFF, and close
the lid.
Ground Resistance Tester Model 6470-B
63
Page 66

2. Loosen the four permanent screws at the bottom of the unit, but do not
remove them.
3. Open the lid and carefully turn the housing upside-down, making sure the
front panel does not fall out. Then carefully pull the front panel and the unit
all the way out of the housing.
4. Loosen the two screws on the lid of the battery case and remove the lid.
5. Pull the battery a short way out of the case without overstretching the con-
nection leads, and loosen the two screws at the bottom of the case. Then
put the battery back into the case.
6. Making sure the battery leads are not overstretched and that the battery
does not fall out, carefully lift off the back of the unit, turn it over and
place it next to the front panel with the electronic components.
7. Press the clip off the plug, and pull out the plug with the four battery
leads (in the corner, near the terminal for the optical interface). Avoid
touching the circuitry or components.
8. Remove the old battery from the case and put in a new one. Run the
leads with the plug through the largest slot in the battery case.
9. Insert the battery plug (in the corner, near the terminal for the optical
interface). The two pins should point towards the clip. Avoid touching the
circuitry or components.
10. Return the back of the unit (with the new battery in the case) to the front
panel with the components, taking care not to stretch the battery leads.
Carefully lower the back of the unit and make sure that it is aligned
correctly (the four cylindrical holes on the back must slip over the four
mounting pins on the front panel). Also make sure you do not pinch the
battery leads or other wires or components.
11. Pull the battery a short way out of the case without overstretching the
connection leads, and re-tighten the two screws at the bottom of the
case. Then put the battery back into the case.
12. Put the lid back onto the battery case and screw it shut.
13. Wipe off any dirt on the seal and housing rim.
14. Put the unit back into the housing and screw it into place.
15. Fully charge the new battery in the unit before using it.
16. Reset the time and date.
If the instrument is not used for long periods of time (more than 6 months)
it is recommended to make several charge-discharge cycles (3 to 5 times).
Discharge cycle (15 H) can be made with the instrument in MANUAL mode,
DC 2-Pole (2-Pole) resistance measurement and a short-circuit between H
(Z) and E (X) plugs.
64
Ground Resistance Tester Model 6470-B
Page 67

CHAPTER 10
TROUBLESHOOTING
10.1 Error Reporting
10.1.1 Electrode Resistance Too High
This can happen in a 3- or 4-pole earth measurement, a resistivity measurement,
or an earth potential measurement.
This message is displayed when the measurement is triggered by a short press of
the START/STOP button and the resistances of the auxiliary electrodes are too high.
The measurement must then be started by a long press on the START/STOP but-
ton. The device then measures the values of the electrodes and compensates for
them to display the correct result.
10.1.2 Out of Range
>
<
or
<
and
The ashing > or < symbol indicates the measurement is
out of range.
If both symbols ash together, it means that the accuracy
of the value displayed is outside of the instrument
>
specication or is subject to large uctuations. Activating
the smoothing function (SMOOTH) may correct this.
Press the 2nd button, then the SMOOTH button to activate
smoothing.
10.1.3 Misconnection
H
Ground Resistance Tester Model 6470-B
S
ES
E
This ashing indicates that a terminal
needs to be either connected or disconnected. You must correct the connections
or the measurement will not proceed. The
ashing of terminal H may also indicate that
current I
nal S may also indicate that resistance RS
is too high.
is too low. The ashing of termi-
H-E
65
Page 68

To reduce RH, you can add one or more electrodes, 2 meters apart from each
NOISE
other, in the H (Z) leg of the circuit, or increase the test voltage.
To reduce RS, you can add one or more electrodes, 2 meters apart from each
other, in the S (Y) leg of the circuit.
To reduce the resistance of the electrodes, you can also drive them deeper, pack
the ground around them well, or dampen them with water.
10.1.4 Out of Limits Indicators
This ashing during a passive measurement means that the device
has detected the presence of an external voltage exceeding 42V on
the terminals and that the measurement is impossible.
This ashing during an active measurement means that the operating limits have been exceeded.
If this symbol remains lit during an active measurement, it means
that the values measured are subject to large uctuations or that
there is an incorrect connection.
The display of an indenite value for a passive measurement indi-
cates that measurement current IES or I
The display of the NOISE symbol indicates that a stray external voltage is likely to
interfere with the measurement. You should change to manual mode and change
the measurement voltage and/or frequency in order to make a valid measurement.
or voltage U
SEL
is too low.
S-ES
After the measurement has started there are indicators of when:
• Values RH and/or RS are too high,
• Measurement current I
, IES or I
H-E
is too low,
SEL
• The instability of the measurement is large.
66
Ground Resistance Tester Model 6470-B
Page 69

10.1.5 Error Messages
When started up, the Model 6470-B device automatically performs a self-test. If a
fault appears during this self-test or during a measurement, the device displays a
message in the form Err XX.
Thereare3categoriesoferrors:
• Harmless Errors 6, 7, 11
The message appears for approximately 1 second to inform
the user. Consider a repair if the error recurs.
• Errors 6 and 7 are always preceded by an automatic reset.
• During Error 11, the tester automatically resets to the fac-
tory default settings.
• Correctable Errors 5, 14, 15, 18, 19, 30, 31, 32 and 33
These errors concern the current measurement function and
disappear if the function is changed. The device can therefore
be used, but a repair will be necessary if the error persists.
• Error 18 indicates that the rechargeable battery in the
tester cannot be recharged. If this error occurs during
recharging, disconnect the tester from the charger and
follow the procedure described in the “fatal” errors.
• Error 19 can be corrected by clearing the entire memory of
the unit (see section 8.3).
• Errors 31, 32 and 33 indicate excessive voltage or
excessive current during a measurement. Check the
measurement setup for faults.
• Fatal Errors 0, 1, 2, 3, 8, 12, 13, 15, 16, 18 (during battery recharge)
and 21
These errors make operation of the unit impossible. Turn off
the unit and turn it on again. If the error persists, repair is
necessary.
Ground Resistance Tester Model 6470-B
67
Page 70

APPENDIX A: GLOSSARY
GLOSSARY OF TERMS
Basic Terminologies
Explanations for some of the basic terms related to earth measurements follow:
Auxiliary electrode - H (Z)
A supplementary electrode through which a measurement current ows.
Earth conductor
The conductor which connects the installation to be earthed to the earth electrode.
Earth connection
A locally restricted group of electrically connected earth contacts. It also includes metal parts of installations such as pylon footings, bracings, cable
sheathing and earth conductors.
Earth electrode - E (X)
A conductor which is buried in the earth and makes electrical contact with it.
Earth potential
The potential difference measured between the earth connection and a reference earth electrode.
Earth electrode - ES (Xv)
A connection on the earth electrode or earthing system used for measuring
the potential of the earth electrode.
Earth resistance
The resistance measured between the earth connection and a reference earth
electrode (cf. selective earth resistance).
Earth
The location of an earth connection (see also reference earth).
Earthing system
The set of all installations connected to the earth.
Electrode - S (Y)
An auxiliary electrode used for measuring the potential of the reference earth.
The voltage, which is proportional to the resistance of the earth connection, is
measured between this electrode and the earth electrode.
68
Ground Resistance Tester Model 6470-B
Page 71

Reference earth
The area of earth (especially at the surface) which is outside the range of inu-
ence of the earth electrode or earthing system.
Resistivity of the earth (ρ)
Resistivity is dened as the resistance from wall to opposite wall of a cubic
meter of soil. It is measured in ohm-meters (Ωm).
Selective earth resistance
The parallel partial resistance of an earth connection or earthing system. It
is measured by selective measurements of current in the corresponding resistance branch. A selective earth resistance is always greater than the total
earth resistance (parallel connection).
Step voltage
The potential difference bridged by a person who takes a step of 1m (approx.
3 ft), with the resulting current owing through the body from one foot to the
other (cf. touch voltage).
Supplementary electrode
An additional earth electrode (earth stake, earth rod).
Touch voltage
The potential difference which a person is able to bridge with his or her body,
the resulting current being limited by the body and the local earth resistance
(cf. step voltage).
The general term earth measurement can refer to measurements of individual
earth electrodes, earth connections or entire earthing systems, depending on the
object of interest.
Glossary
This glossary lists the terms and abbreviations used on the instrument and the
digital display.
3-Poles : measurement of earth resistance with 2 auxiliary stakes (3-
Pole method)
4-Poles : 4-Pole measurement of low earth resistance with 2 auxiliary
stakes (4-Pole method)
C1 : earth coupling coefcient RA with earth Rb (C1= RC / R1 )
C2 : earth coupling coefcient Rb with earth RA (C2= RC / R2 )
d, A : distances to be programmed to calculate resistivity according
to the measuring method used
mΩ : measurement of low resistance /continuity
Ground Resistance Tester Model 6470-B
69
Page 72

E : terminal E (X) - earth socket; current measurement return
terminal
EARTH : earth measurement (3 or 4 poles)
EARTH COUPLING
: coupling measurement between two earth sockets
ES : ES (Xv) terminal (measurement potential socket for
calculating earth resistance)
H : H (Z) terminal (measurement current injection terminal)
(1)
I-Act
: external current circulating at present between the instrument
terminals
I
: measurement current circulating between the H and E
H-E
terminals
NOISE : indicates the presence of external interference causing
misrepresentation of the earth or resistivity measurement
R : average resistance calculated from R+ and R-
R+ : resistance measured with a positive current circulation from
terminal H to E
R- : resistance measured with a negative current circulation from
terminal H to E
(1)
R-Act
: resistance currently calculated from values U-Act and I-Act
R1 : rst value measured to calculate the coupling between 2 earth
sockets (R1 = RA + RC )
R2 : second value measured to calculate the coupling between 2
earth sockets (R2 = Rb + RC )
R
: third value measured to calculate the coupling between 2
1-2
earth sockets (R
= RA + Rb )
1-2
RA : rst earth value calculated (RA = R1 - RC )
Rb : second earth value calculated (Rb = R1 - RC )
RC : coupling resistance between earths RA and Rb (Rc = (R1 + R2
– R
) / 2)
1-2
RE : earth resistance connected to terminal E
RH : resistance of the stake connected to terminal H
R
: value of the R-Act resistance (PASS for "passive"
PASS
measurement with interference current circulating in the
installation)
RS : resistance of the stake connected to terminal S
(2)
R
: resistance between stakes S and ES (used for resistivity
S-ES
measurement)
70
Ground Resistance Tester Model 6470-B
Page 73

R∆0 : measuring lead compensation resistance
S : S (Y) terminal (reference potential socket for calculating earth
resistance)
(1)
U-Act
U
U
: external voltage currently present on the instrument terminals
: voltage measured between terminals H and E
H-E
: voltage generated by the instrument between terminals H and
OUT
E (32V or 16V)
U
: voltage measured between terminals S and E
S-E
U
: voltage measured between terminals S and ES
S-ES
USR : frequency chosen by the user
U
: voltage of terminal S (compared with E) expressed as a
SrEL
relative value (rEL); value without unit
ρS : ground resistivity measured according to the Schlumberger
method (expressed as Ω.m)
ρW : ground resistivity measured according to the Wenner method
(expressed as Ω.m)
(1) The sufx Act becomes In (for "Input" in English) when this value is recorded by the instru-
ment and then read, to make a distinction between the current and recorded values. In both
cases, this value on the display is associated with its frequency.
(2) In this case, the resistances of the 4 rods used for measurement are indicated by R
R
, R
.
P-ES
P-E
, R
P-H
P-S
,
Ground Resistance Tester Model 6470-B
71
Page 74

Repair and Calibration
To ensure that your instrument meets factory specications, we recommend
that it be scheduled back to our factory Service Center at one-year intervals
for recalibration, or as required by other standards or internal procedures.
Forinstrumentrepairandcalibration:
You must contact our Service Center for a Customer Service Authorization
Number (CSA#). This will ensure that when your instrument arrives, it will be
tracked and processed promptly. Please write the CSA# on the outside of the
shipping container. If the instrument is returned for calibration, we need to
know if you want a standard calibration, or a calibration traceable to N.I.S.T.
(Includes calibration certicate plus recorded calibration data).
ShipTo: Chauvin Arnoux®, Inc. d.b.a. AEMC® Instruments
15 Faraday Drive
Dover, NH 03820 USA
Phone: (800) 945-2362 (Ext. 360)
(603) 749-6434 (Ext. 360)
Fax: (603) 742-2346 or (603) 749-6309
E-mail: repair@aemc.com
(Or contact your authorized distributor)
Costs for repair, standard calibration, and calibration traceable to N.I.S.T. are
available.
NOTE:YoumustobtainaCSA#beforereturninganyinstrument.
Technical and Sales Assistance
If you are experiencing any technical problems, or require any assistance with
the proper operation or application of your instrument, please call, mail, fax or
e-mail our technical support team:
Chauvin Arnoux®, Inc. d.b.a. AEMC® Instruments
200 Foxborough Boulevard
Foxborough, MA 02035 USA
Phone: (800) 343-1391
(508) 698-2115
Fax: (508) 698-2118
E-mail: techsupport@aemc.com
www.aemc.com
NOTE:DonotshipinstrumentstoourFoxborough,MAaddress.
72
Ground Resistance Tester Model 6470-B
Page 75

Limited Warranty
The Model 6470-B is warranted to the owner for a period of one year from the
date of original purchase against defects in manufacture. This limited warranty
is given by AEMC® Instruments, not by the distributor from whom it was purchased. This warranty is void if the unit has been tampered with, abused or if
the defect is related to service not performed by AEMC® Instruments.
Full warranty coverage and product registration is available on our
website at www.aemc.com/warranty.html.
Please print the online Warranty Coverage Information for your records.
What AEMC®Instrumentswilldo:
If a malfunction occurs within the one-year period, you may return the instrument
to us for repair, provided we have your warranty registration information on le
or a proof of purchase. AEMC® Instruments will, at its option, repair or replace
the faulty material.
REGISTER ONLINE AT:
www.aemc.com
Warranty Repairs
WhatyoumustdotoreturnanInstrumentforWarrantyRepair:
First, request a Customer Service Authorization Number (CSA#) by phone
or by fax from our Service Department (see address below), then return the
instrument along with the signed CSA Form. Please write the CSA# on the
outside of the shipping container. Return the instrument, postage or shipment
pre-paid to:
ShipTo: Chauvin Arnoux®, Inc. d.b.a. AEMC® Instruments
15 Faraday Drive • Dover, NH 03820 USA
Phone: (800) 945-2362 (Ext. 360)
(603) 749-6434 (Ext. 360)
Fax: (603) 742-2346 or (603) 749-6309
E-mail: repair@aemc.com
Caution: To protect yourself against in-transit loss, we recommend you insure
your returned material.
NOTE:YoumustobtainaCSA#beforereturninganyinstrument.
Ground Resistance Tester Model 6470-B
73
Page 76

10/15
99-MAN 100298 v23
15 Faraday Drive • Dover, NH 03820 USA • Phone: (603) 749-6434 • Fax: (603) 742-2346
Chauvin Arnoux®, Inc. d.b.a. AEMC® Instruments
www.aemc.com
 Loading...