

Page 1

WARNING:
!
This installation is not for the tuning novice nor the PC illiterate!
Use this system with EXTREME caution! The AEM EMS System
allows for total flexibility in engine tuning. Misuse of this
product can destroy your engine! If you are not well versed in
engine dynamics and the tuning of management systems or are
not PC literate, please do not attempt the installation. Refer the
installation to a AEM trained tuning shop or call 800-423-0046
for technical assistance. You should also visit the AEM EMS
Tech Forum at http://www.aempower.com
NOTE: AEM holds no responsibility for any engine damage that
results from the misuse of this product!
Installation Instructions for:
Crank Angle Sensor replacement for EMS P/N 30-6600
89-94 Nissan 240SX S13 KA24DE
91-94 Nissan Sentra B13 GA16DE
90-94 Nissan Pulsar GTi-R N14 SR20DET
91-93 Nissan NX B13 GA16DE
93-94 Nissan Altima U13 KA24DE
89-95 Nissan Bluebird U13 SR20DET
91-93 Infiniti G20 P10 SR20DE
This product is legal in California for racing vehicles only and should never
be used on public highways.
2010 ADVANCED ENGINE MANAGEMENT INC.
2205 126th Street Unit A Hawthorne, CA. 90250
Phone: (310) 484-2322 Fax: (310) 484-0152
http://www.aempower.com
Instruction Part Number: 10-6600-A supplement
Page 1 of 9
Page 2

**Cam / Crank Angle Sensor: AEM trigger disc MUST be used
Discrepancies have been observed in the OEM cam/crank angle trigger discs between
model years and/or trim levels; to avoid confusion the Series 2 EMS does not support the
OEM Nissan trigger pattern. A replacement trigger disc is now included with every Nissan
EMS and must be installed before attempting to start the engine. The following installation
was performed on a stock Nissan S13 240SX so your installation may require more or less
removal of parts, but the procedure for the CAS disc change should be identical.
Tools/parts required:
Replacement trigger disc for Nissan GA/KA/SR cam angle sensor
(AEM P/N 35-8760, supplied with 30-6600, 30-6601, 30-6602, 30-6610, 30-6611,
30-6620, and 30-6623 EMS)
8mm and 10mm socket with ratchet and extension
10mm combination wrench
Medium pry bar
¼” flat screwdriver
No. 2 Phillips screwdriver
No. 1 Phillips screwdriver
Red threadlocker
WARNING:
Failure to perform the following procedure correctly could result in permanent damage to
mechanical and electrical sensor components, which could result in engine damage.
Please read all instructions carefully before attempting this procedure, and do not attempt
the install if you feel you may not be able to perform all operations safely without
damaging components. AEM will not be held liable for any damage that occurs as a result
of these instructions.
Page 2 of 9
Page 3
Instructions with photos on the following pages:
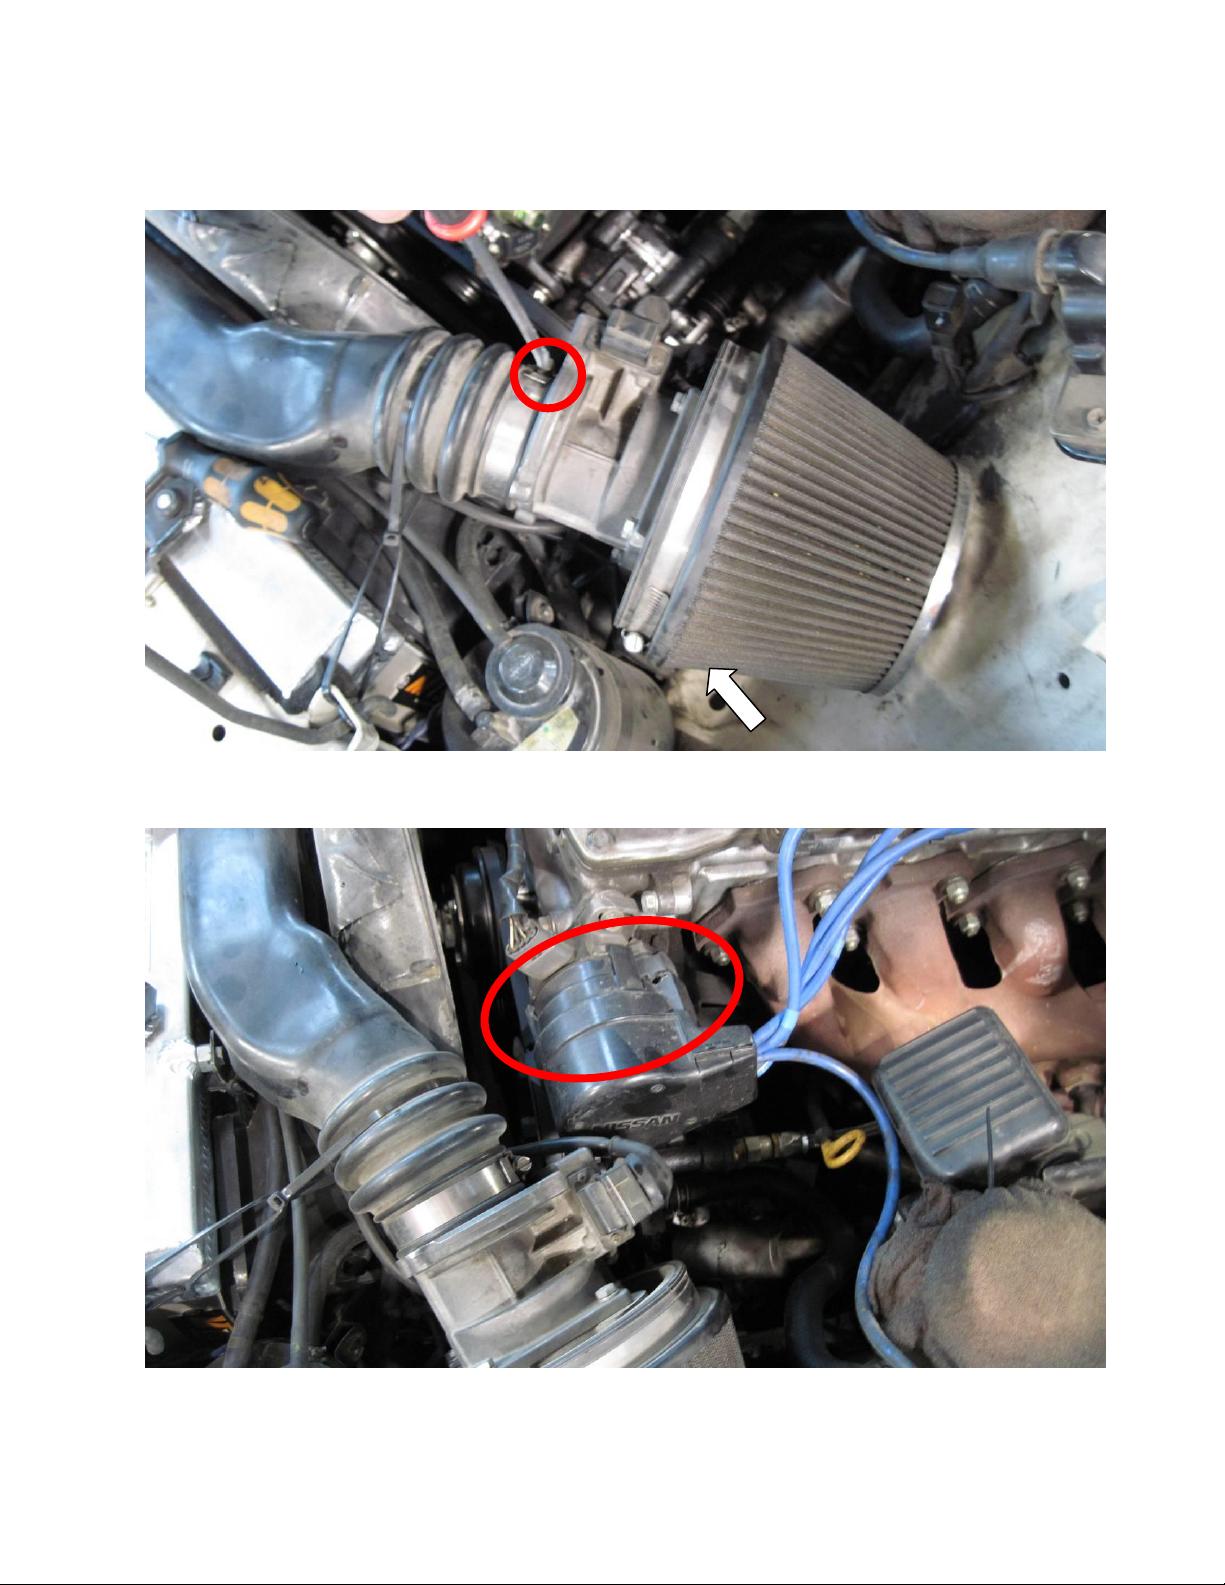
Remove the MAF sensor assembly as shown in figure 1. The arrow points to a mount that
may or may not be present on your vehicle which was removed using a 10mm
combination wrench and 10mm socket. The hose clamp is removed with the ¼” flat
screwdriver.
Figure 1: MAF assembly removal
Figure 2 shows the location of the CAS sensor (inside the distributor assembly).
Figure 2: Location of CAS sensor (underneath distributor cap)
Page 3 of 9
Page 4
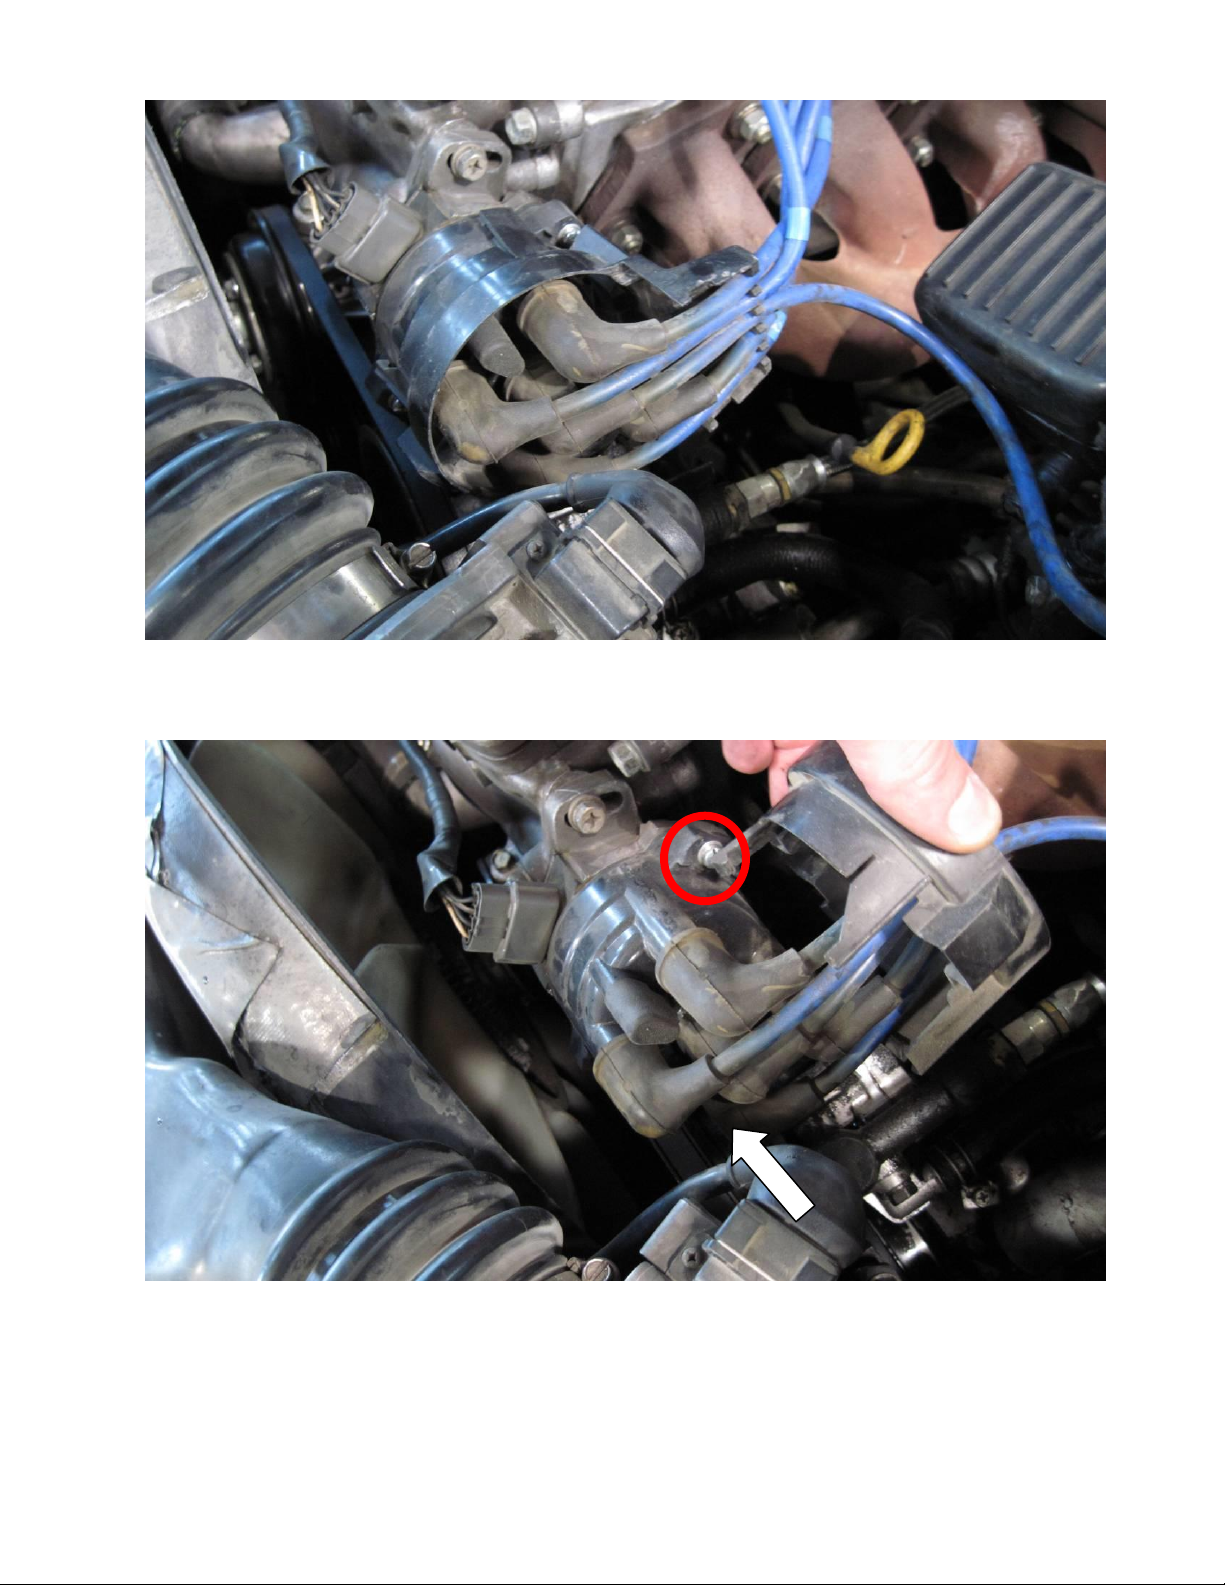
Remove the plastic cover as shown in figure 3.
Figure 3: Plastic wire cover removed
Remove the back part of the outer plastic cover on the distributor and remove the
distributor cap as shown in figure 4.
Figure 4: Plastic wire cover removed and distributor cap removed
Page 4 of 9
Page 5
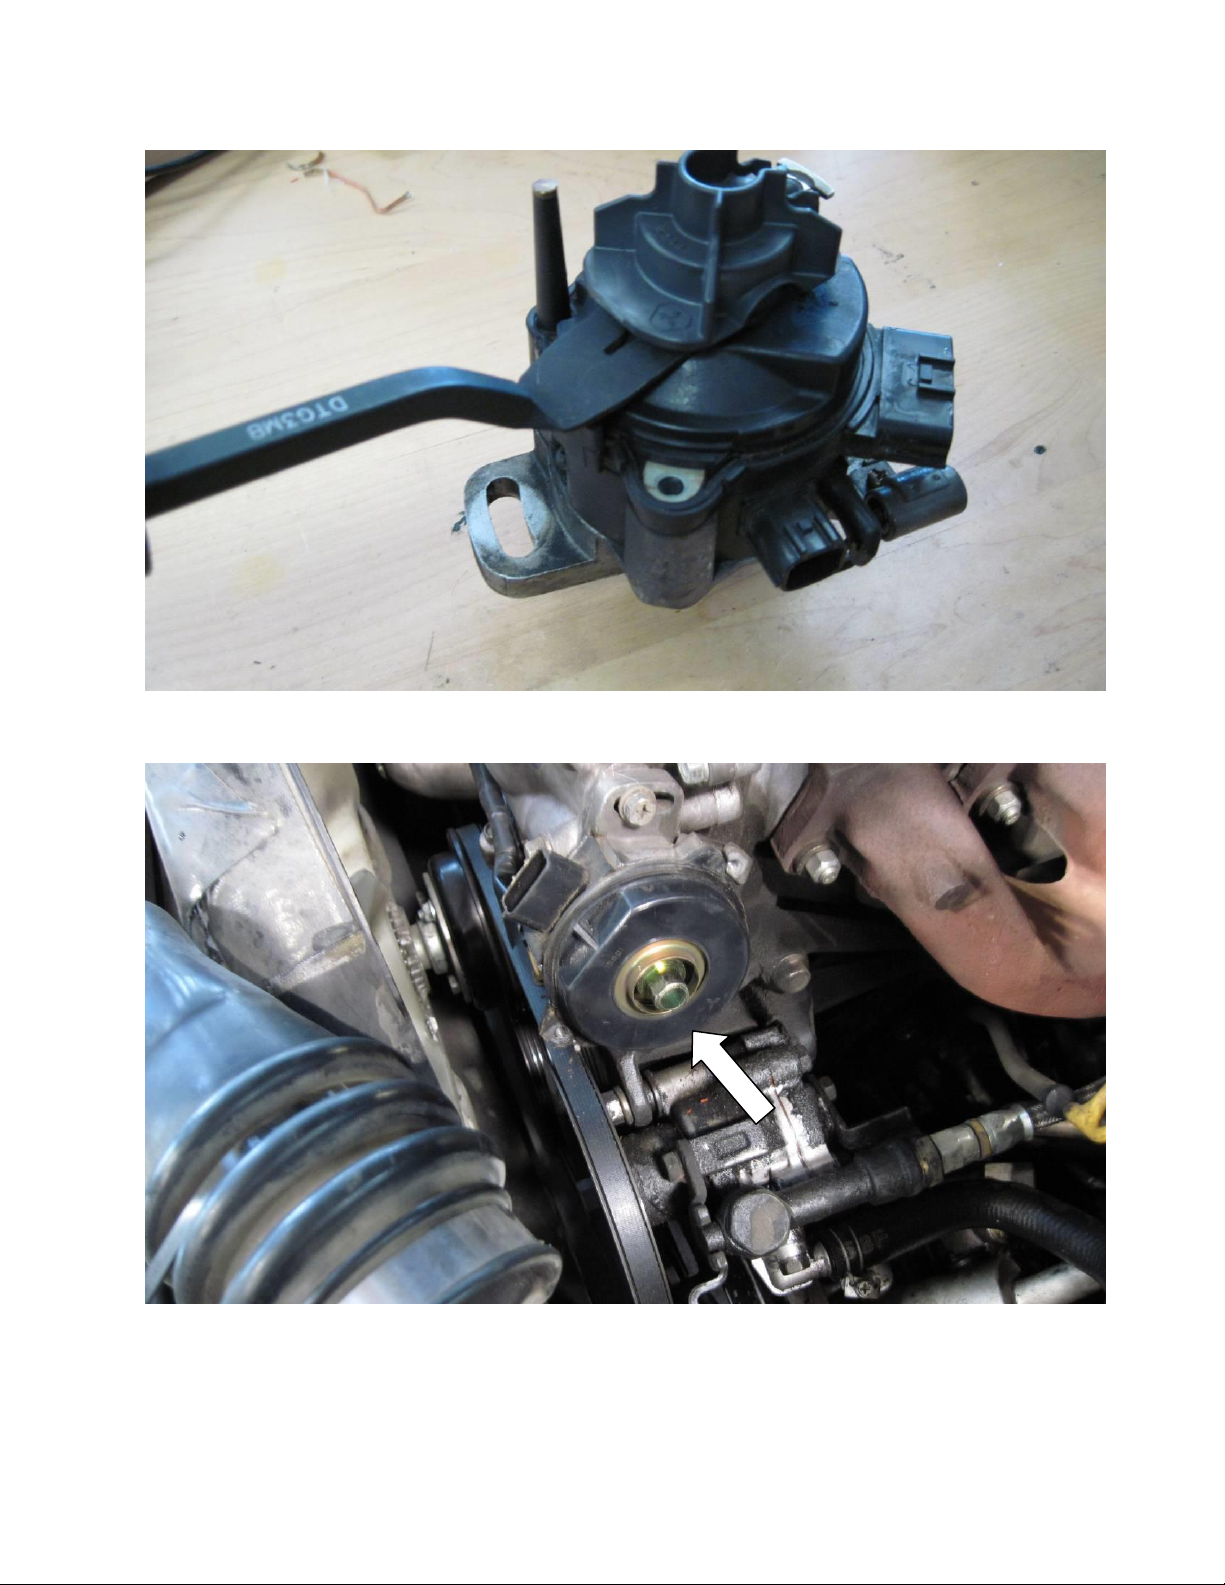
Remove the distributor rotor with carefully with the pry bar as shown in figure 5, taking
note of how the rotor was oriented on the shaft. (The photo shows a different distributor
that has the same type of rotor installation)
Figure 5: Distributor rotor removed with pry bar
Remove the internal plastic cover shown in figure 6.
Figure 6: Internal plastic cover to be removed
Page 5 of 9
Page 6
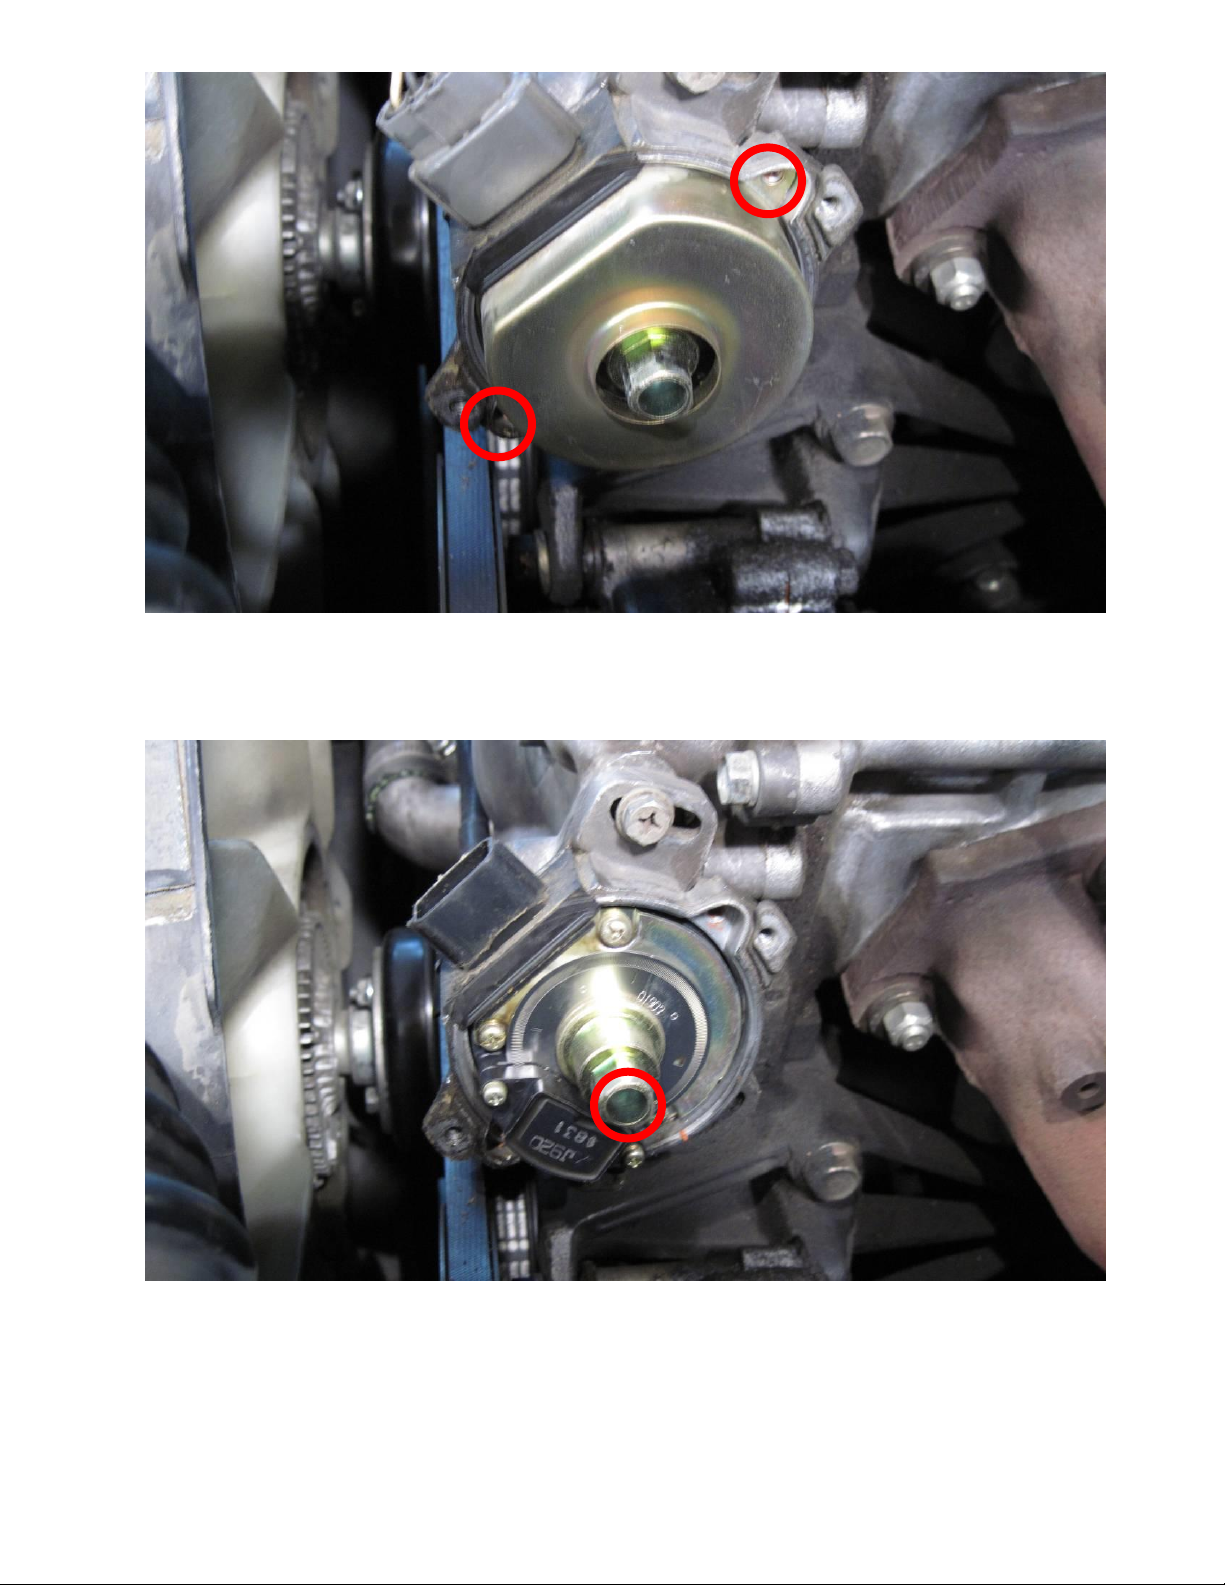
Remove the internal CAS disc cover shown in figure 7 with a #2 Phillips screwdriver.
Figure 7: Removal of internal CAS disc cover
Remove the screw holding the CAS disc and collar as shown in figure 8 with the #2
Phillips screwdriver (Make sure screwdriver is firmly planted since this screw will be very
tight).
Figure 8: Original CAS disc removal
Page 6 of 9
Page 7
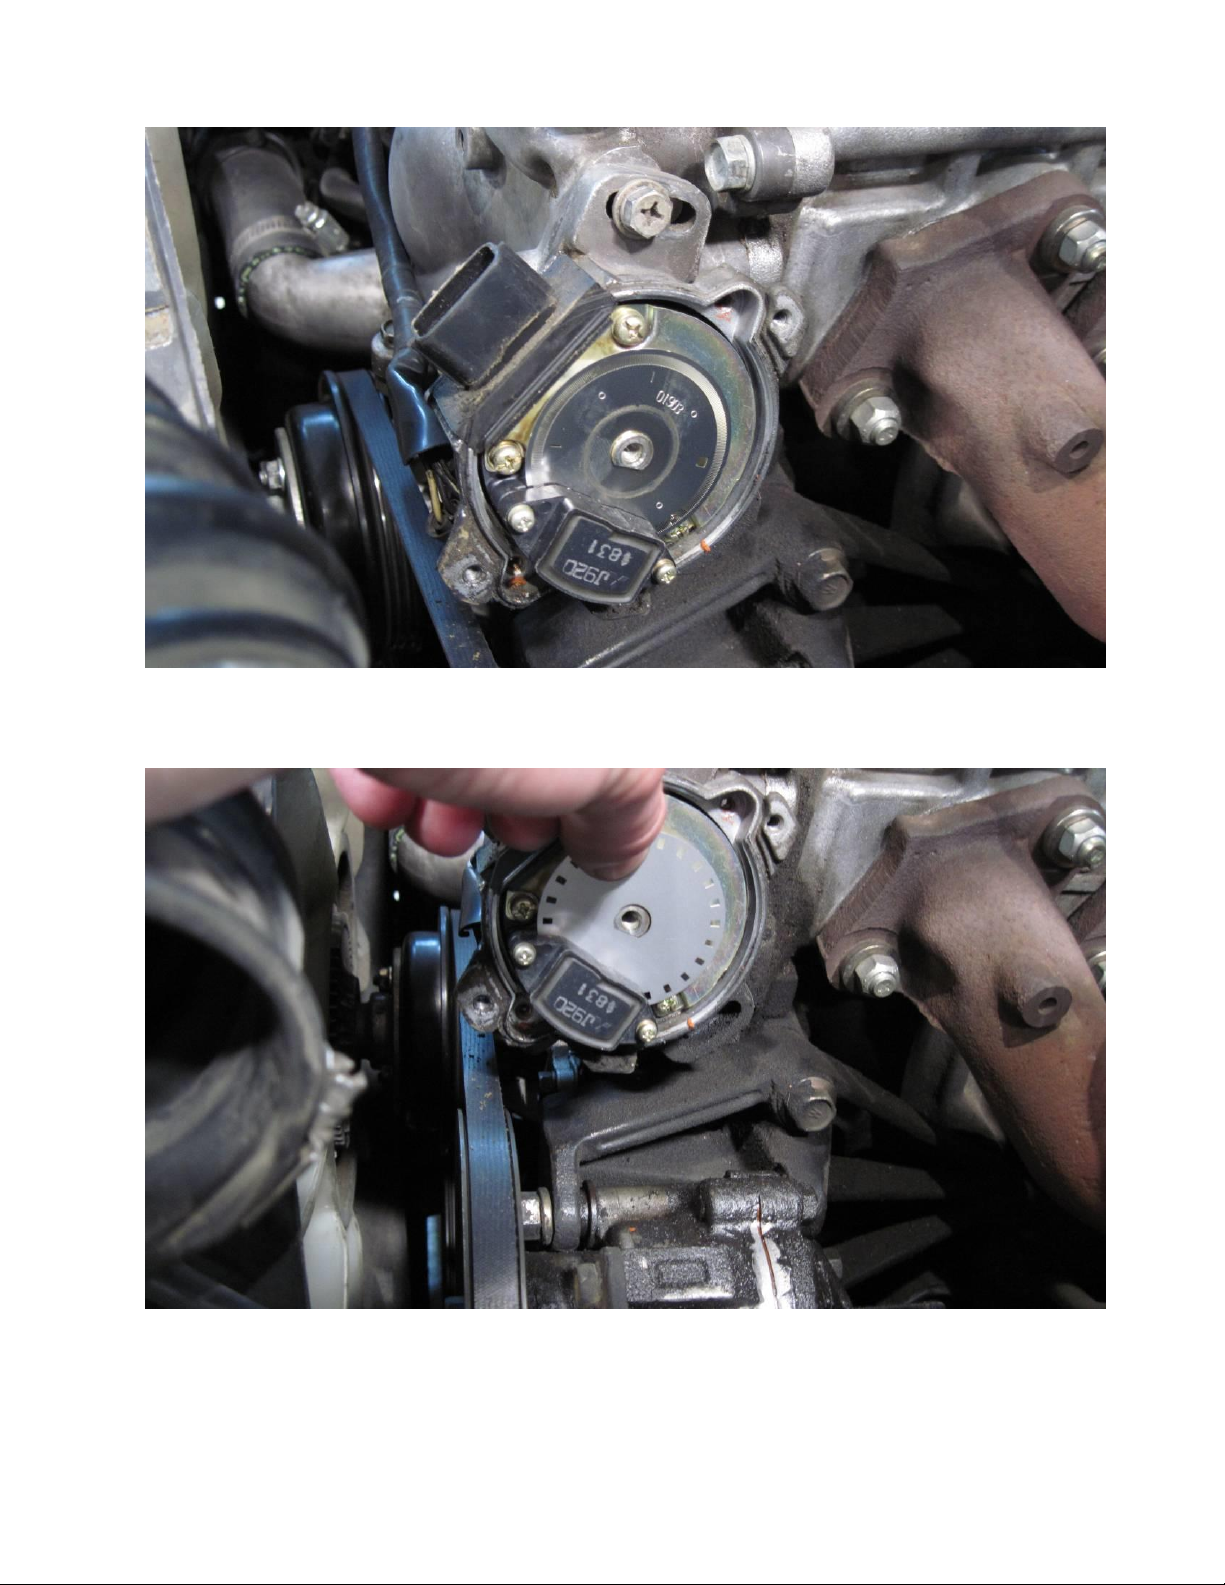
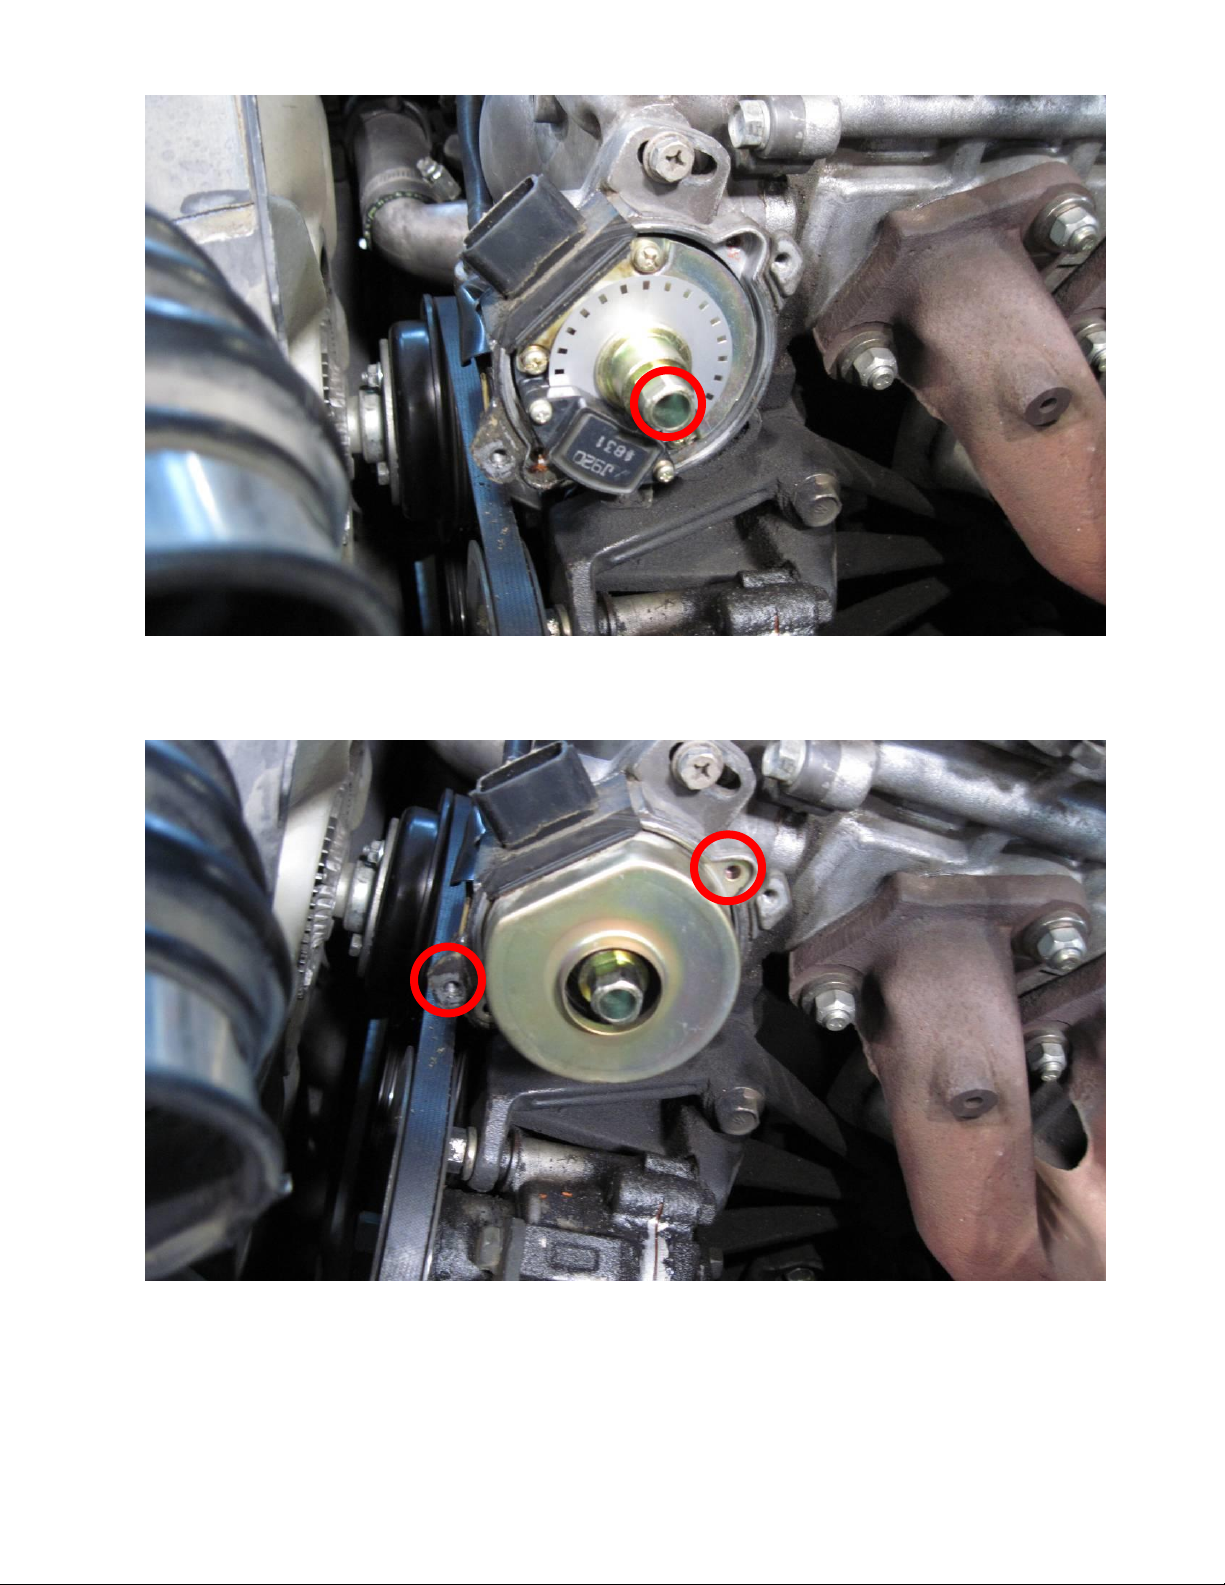
Figure 9 shows the original CAS disc with the collar that holds it in place removed. The
original disc can be removed now. For future use, the original disc should be marked UP
to remember what the original orientation of the disc is.
Figure 9: Original CAS disc with collar removed
The new AEM trigger disc is installed as shown in figure 10, orientation up or down is not
important, only the D-shaped mounting on the shaft.
Figure 10: AEM CAS trigger disc installed
Page 7 of 9
Page 8
The collar and screw can be reinstalled as shown in figure 11.
Figure 11: Trigger disc and collar reinstalled
The internal CAS disc cover can be reinstalled with two screws that held it in place as
shown in figure 12.
Figure 12: Trigger disc cover reinstalled
Page 8 of 9
Page 9

The internal plastic cover is reinstalled as shown in figure 13.
Figure 13: Internal plastic cover reinstalled
Reassemble the rest of the items in the reverse order of disassembly.
Page 9 of 9
Page 10

WARNING:
!
This installation is not for the tuning novice nor the PC illiterate!
Use this system with EXTREME caution! The AEM EMS System
allows for total flexibility in engine tuning. Misuse of this
product can destroy your engine! If you are not well versed in
engine dynamics and the tuning of management systems or are
not PC literate, please do not attempt the installation. Refer the
installation to a AEM trained tuning shop or call 800-423-0046
for technical assistance. You should also visit the AEM EMS
Tech Forum at http://www.aempower.com
NOTE: AEM holds no responsibility for any engine damage that
results from the misuse of this product!
Installation Instructions for:
Crank Angle Sensor replacement for EMS P/N 30-6601,
30-6602, 30-6620, and 30-6623
1991-1993 S13 180SX & Silvia SR20DET, 1994-1997 S14 180SX
& Silvia SR20DET, 1998 S14 Silvia SR20DET, 1993-1998 S13
200SX SR20DET, and 1999-2003 Skyline GTR RB26DETT
This product is legal in California for racing vehicles only and should never
be used on public highways.
2010 ADVANCED ENGINE MANAGEMENT INC.
2205 126th Street Unit A Hawthorne, CA. 90250
Phone: (310) 484-2322 Fax: (310) 484-0152
http://www.aempower.com
Instruction Part Number: 10-6600-B supplement
Page 1 of 9
Page 11

**Cam / Crank Angle Sensor: AEM trigger disc MUST be used
Discrepancies have been observed in the OEM cam/crank angle trigger discs between
model years and/or trim levels; to avoid confusion the Series 2 EMS does not support the
OEM Nissan trigger pattern. A replacement trigger disc is now included with every Nissan
EMS and must be installed before attempting to start the engine. The following installation
was performed on a modified Nissan S13 240SX with an SR20DET swap so your
installation may require more or less removal of parts, but the procedure for the CAS disc
change should be identical.
Tools/parts required:
Replacement trigger disc for Nissan RB/VG/VE cam angle sensor
(AEM P/N 35-8760, supplied with 30-6601, 30-6602, and 30-6620 EMS)
8mm socket with ratchet
¼ ” flat screwdriver
No. 1 Phillips screwdriver
Red threadlocker
WARNING:
Failure to perform the following procedure correctly could result in permanent damage to
mechanical and electrical sensor components, which could result in engine damage.
Please read all instructions carefully before attempting this procedure, and do not attempt
the install if you feel you may not be able to perform all operations safely without
damaging components. AEM will not be held liable for any damage that occurs as a result
of these instructions.
Instructions (figures on the following pages):
1. Figures 1 & 2 show the location of the CAS sensor disc cover
2. Figure 3 shows the removal of the vacuum line that goes to the blow-off valve for
this custom vehicle
3. Using the 8mm socket, the intake tube with blow-off valve are removed. Figures 4 &
5 show the removal of the intake tube which makes for easy access to the CAS disc
cover for this custom vehicle.
4. Figure 6 shows the uncovered CAS disc cover and figure 7 shows the CAS disc
cover being removed with the No. 1 Phillips screwdriver.
5. Figure 8 shows the uncovered CAS disc which is removed with the ¼” flat
screwdriver as shown in figure 9. Before complete removal, be sure to mark to
original disc to ensure correct installation if required. Figure 10 shows the screw
removed, figure 11 shows the washer removed, and figure 12 shows the original
CAS disc removed.
6. Carefully install the provided AEM CAS disc as shown in figure 13 and 14. When
replacing screw that holds CAS disc, apply threadlocker to it.
7. Reassemble all items in the reverse order of disassembly.
Page 12

Figure 1: Location of CAS
Figure 2: Location of CAS
Page 13

Figure 3: Removal of vacuum line from blow-off valve
Figure 4: Removal of intake tube
Page 14

Figure 5: Removal of intake tube
Figure 6: CAS cover
Page 15

Figure 7: Removal of CAS cover
Figure 8: Cover removed
Page 16

Figure 9: Removal of original CAS disc
Figure 10: Original CAS screw removed
Page 17

Figure 11: Washer removed
Figure 12: Original CAS disc removed
Page 18

Figure 13: Installation of AEM CAS disc
Figure 14: AEM CAS disc installed
Page 19

Installation Instructions 10-6610-A supplement for:
Crank Angle Sensor replacement for EMS P/N 30-6610/6611
95 Nissan 240SX S14 KA24DE
95-97 Nissan Sentra B14 SR20DE & GA16DE
95-96 Nissan Altima U13 KA24DE
94-96 Infiniti G20 P10 SR20DE
WARNING:
This installation is not for the tuning novice nor the PC illiterate!
Use this system with EXTREME caution! The AEM EMS System
allows for total flexibility in engine tuning. Misuse of this
product can destroy your engine! If you are not well versed in
,!
This product is legal in California for racing vehicles only and should never
engine dynamics and the tuning of management systems or are
not PC literate, please do not attempt the installation. Refer the
installation to a AEM trained tuning shop or call 800-423-0046
for technical assistance. You should also visit the AEM EMS
Tech Forum at http://www.aempower.com
NOTE: AEM holds no responsibility for any engine damage that
results from the misuse of this product!
be used on public highways.
© 2010 ADVANCED ENGINE MANAGEMENT INC.
2205 126
Instruction Part Number: 10-6610-A supplement
th
Street Unit A Hawthorne, CA. 90250
Phone: (310) 484-2322 Fax: (310) 484-0152
http://www.aempower.com
1
Page 20

**Cam / Crank Angle Sensor: AEM trigger disc MUST be used
Discrepancies have been observed in the OEM cam/crank angle trigger discs between
model years and/or trim levels; to avoid confusion the Series 2 EMS does not support the
OEM Nissan trigger pattern. A replacement trigger disc is now included with every Nissan
EMS and must be installed before attempting to start the engine. The following installation
was performed on a stock Nissan S14 240SX so your installation may require removal of
more parts, but the procedure for the CAS disc change should be identical.
Tools/parts required:
• Replacement trigger disc for Nissan GA/KA/SR cam angle sensor
(AEM P/N 35-8760, supplied with 30-6600, 30-6601, 30-6602, 30-6610, 30-6611,
30-6620, and 30-6623 EMS)
• 8mm and 10mm socket with ratchet and extension
• 10mm combination wrench
• Medium pry bar
• ¼” flat screwdriver
• No. 2 Phillips screwdriver
• No. 1 Phillips screwdriver
• Red threadlocker
WARNING:
Failure to perform the following procedure correctly could result in permanent damage to
mechanical and electrical sensor components which could result in engine damage.
Please read all instructions carefully before attempting this procedure, and do not attempt
the install if you feel you may not be able to perform all operations safely without
damaging components. AEM will not be held liable for any damage that occurs as a result
of these instructions.
2
Page 21

Instructions with photos on the following pages:
Remove the distributor cap with the #1 Phillips screwdriver as shown in figure 1 by
removing the two screws holding it in place (Note: these instructions were performed with
the distributor removed, but it is not necessary)
Figure 1: Distributor cap removal
Remove the distributor rotor with carefully with the pry bar as shown in figure 2, taking
note of how the rotor was oriented on the shaft.
Figure 2: Distributor rotor removed with pry bar
3
Page 22

Remove the internal cover over the CAS disc as shown in figure 3.
Figure 3: Removal of internal cover over CAS disc
Remove the screw holding the CAS disc and collar as shown in figure 4 with the #2
Phillips screwdriver (Make sure screwdriver is firmly planted since this screw will be very
tight).
Figure 4: Removal of screw holding on CAS disc
4
Page 23

When collar and screw are removed, the assembly will look like figure 5.
Figure 5: Original CAS screw and collar removed
Install the AEM CAS disc as shown below in figure 6, with the D-shaped shaft aligned as
shown.
Figure 6: AEM CAS disc installed
5
Page 24

Reinstall the screw that holds the CAS disc with some red threadlocker with the #2 Phillips
screwdriver as shown in figure 7.
Figure 7: Screw and collar to hold CAS reinstalled with red threadlocker
Reassemble the rest of the items in the reverse order of disassembly.
Also note that the base calibrations were created with the distributor mounted in the
central adjustment position (two screws shown below) on our test vehicle. See figure 8
below:
Figure 8: Adjustment screws set to central position
6
 Loading...