

Page 1

www.electrolux.com
822 86 00-01
05/04
Page 2
Page 3
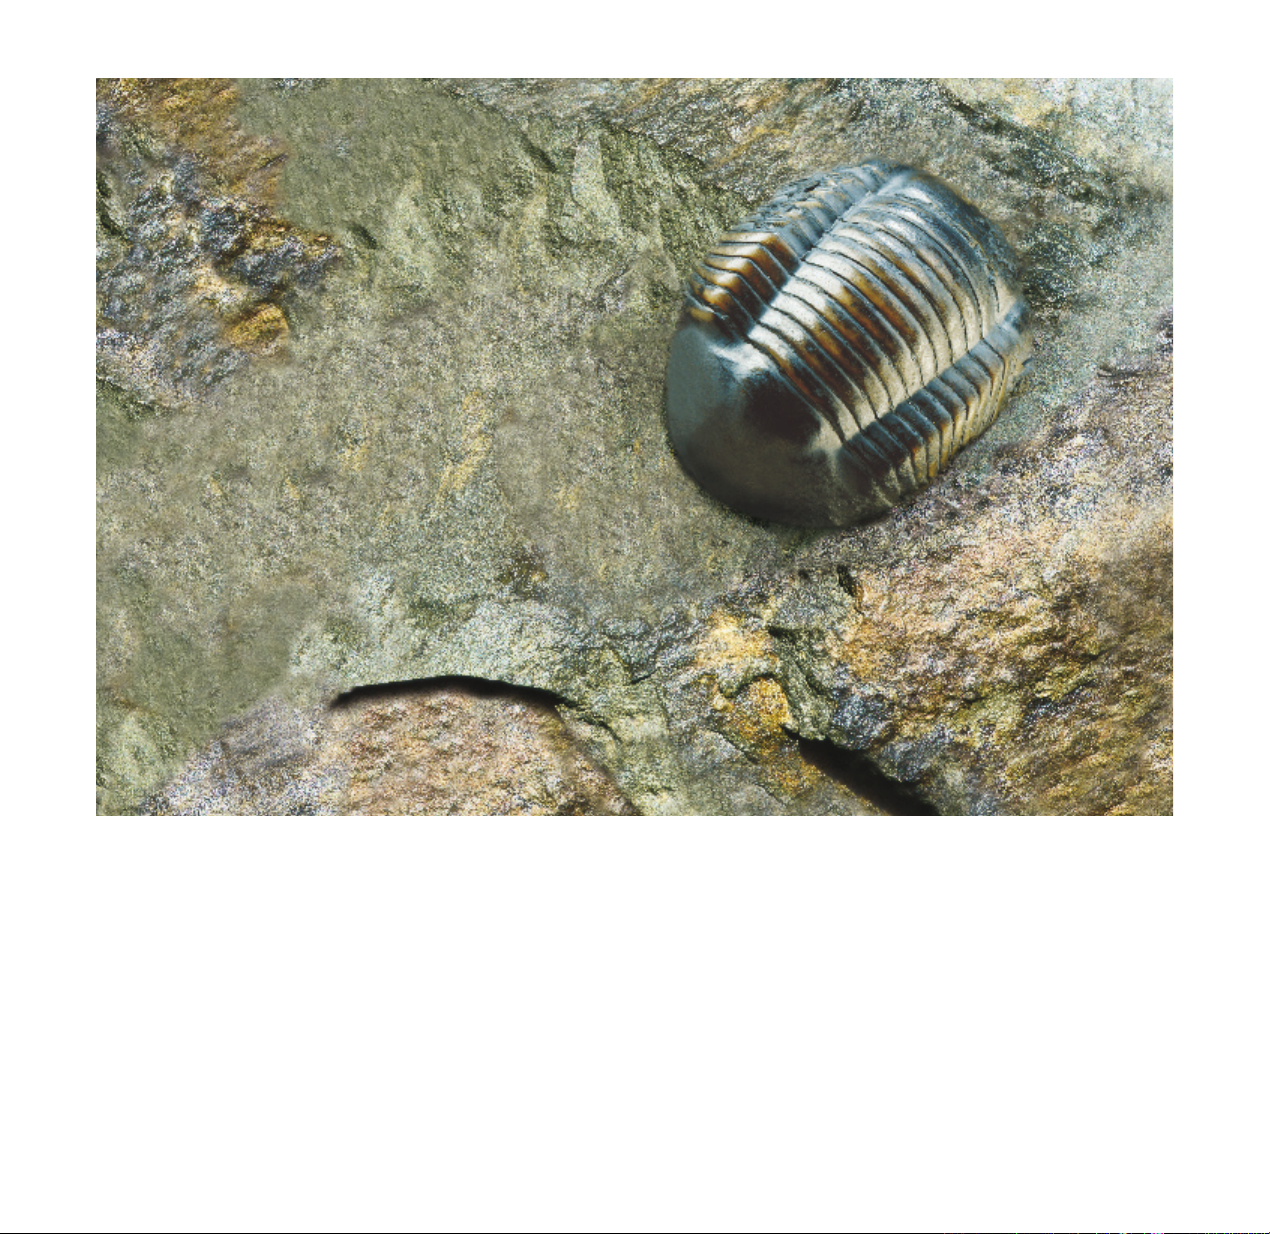
Trilobite – a class of arthropods that lived on
earth about 250-560 million years ago. Many
received nourishment by vacuuming the ocean
beds for small animals and particles. Their backs
were hard, and they are perhaps the most well
known fossils we know today, and can often be
observed embedded in stone in walls, staircases
and floors. This ancient creature has served as a
source of inspiration for the futuristic design of
Trilobite.
Trilobiitti – niveljalkaisiin kuuluva eläinlaji, joka
eli maapallolla noin 250 - 560 miljoonaa vuotta
sitten. Trilobiitit elivät “imuroimalla” pieniä eläimiä ja hiukkasia valtamerien pohjasta. Niiden
selässä oli kova panssari, ja trilobiittien fossiilit
ovat ehkä tunnetuin fossiilimuoto, joka nykyään
tunnetaan. Trilobiittien fossiileja löytyy kallioseinämistä sekä kivistä. Tämä esihistoriallinen
eläin on vaikuttanut inspiroivasti Trilobite-imurin
futuristiseen muotoiluun.
Трилобиты – класс членистоногих, живших на
Земле приблизительно 250–560 млн лет назад.
Многие из них питались, подбирая со дна
океана органические частицы и мелких
животных. Панцирь трилобитов был очень
твердым. Вероятно, это самые известные из
ископаемых существ – нередко их можно
увидеть навсегда застывшими в камне стен,
лестниц и полов. Облик давно вымерших
животных послужил источником вдохновения при создании футуристического дизайна
пылесоса «Трилобит».
Page 4

English
Table of Contents
Suomi
Sisällys
Русский
Содержание
Quick Start 3
Product Description 4
Functional Description 5
For Your Own Safety 6–7
Preparations Before Use 8–9
Buttons and Display 10
Vacuuming Programs 11
Timer and Changing the Message
Display Language 12
Programmable Timer 12
Error Messages 13
Emptying and Cleaning
the Dust Collector 14–15
Cleaning the Roller 14–15
Questions and Answers 16-17
Accessories/After-Sales Service 18
Technical Specifications 19
Declaration of Conformity 19
Pikaohje 3
Tuotekuvaus 4
Toimintojen kuvaus 5
Turvallisuus 6–7
Ennen käyttöönottoa 8–9
Painikkeet ja näyttö 10
Imurointiohjelmat 11
Ajastin 12
Ohjelmoitava ajastin 12
Viestin muuttaminen
Näyttökieli 13
Virheilmoitukset 13
Tyhjennys ja puhdistaminen
Pölynkeräin 14–15
Rullaosan puhdistaminen 14–15
Kysymyksiä ja vastauksia 16–17
Lisävarusteet ja huolto 18
Tekniset tiedot 19
С чего начать 3
Описание пылесоса 4
Возможности пылесоса 5
Меры безопасности 6–7
Подготовка к работе 8–9
Кнопки и дисплей 10
Программы уборки 11
Таймер 12
Программируемый таймер 12
Изменение
языка сообщений 13
Сообщения об ошибках 13
Опорожнение и очистка
пылесборника 14–15
Чистка ролика 14–15
Вопросы и ответы 16–17
Принадлежности и послепродажное
обслуживание 18
Технические характеристики 19
Page 5
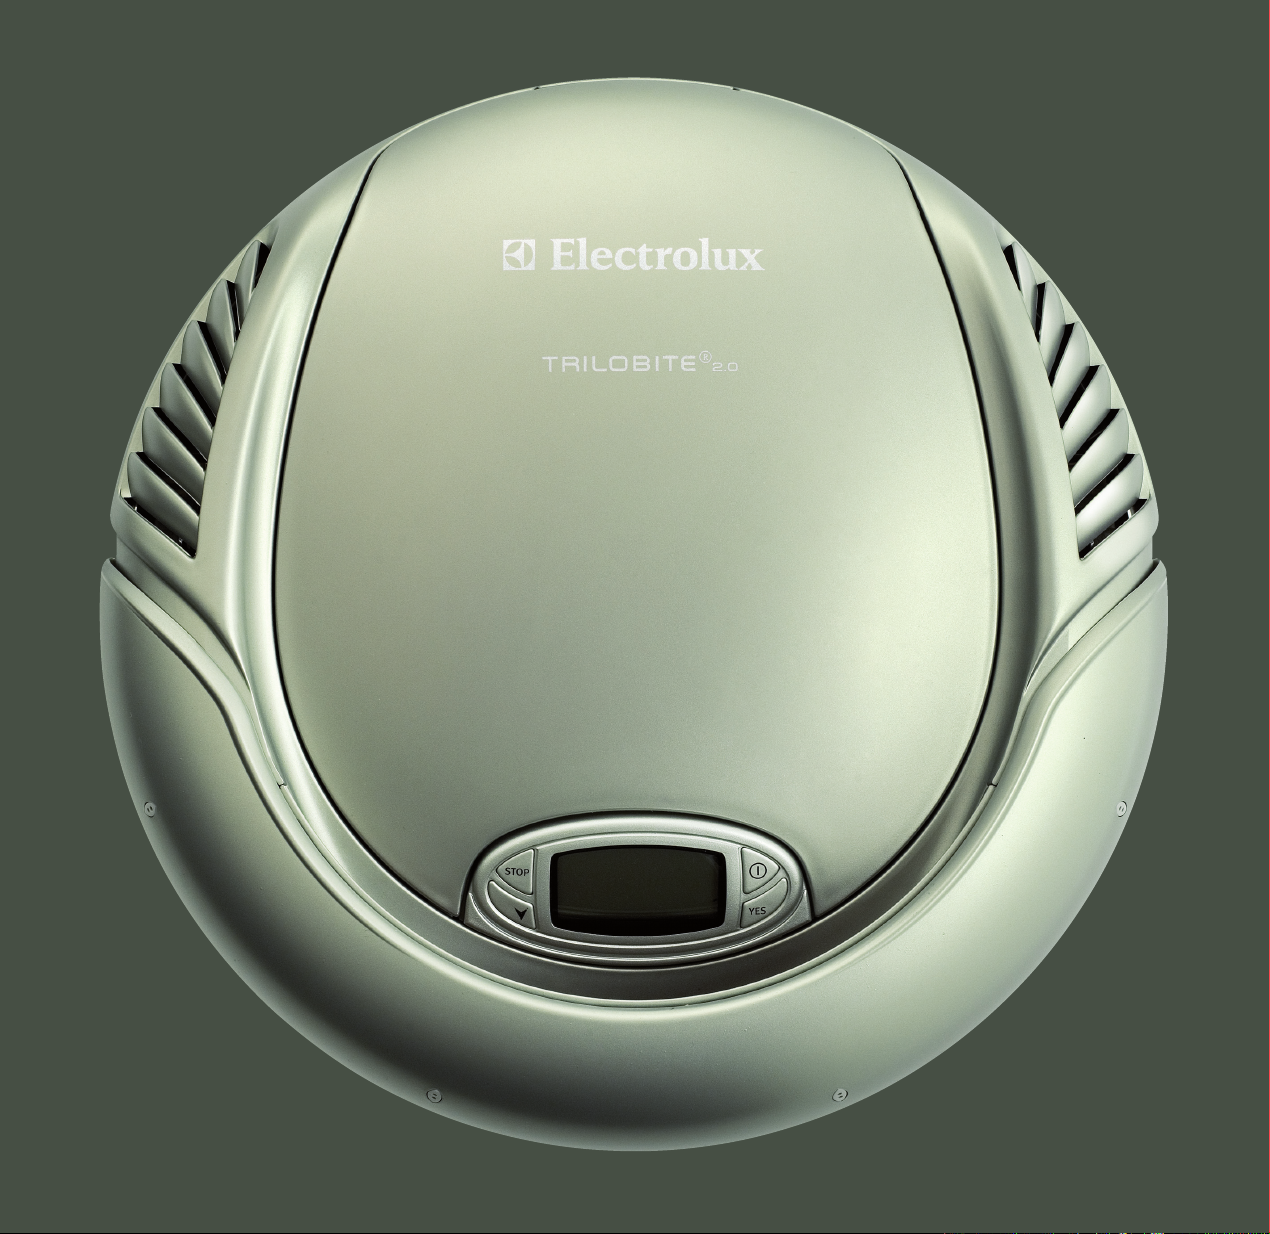
“I am Trilobite – your personal vacuum
cleaner. I do the vacuuming so you can
do other things”
Page 6
I am your automatic vacuum cleaner. The Trilobite.
Just leave me on the floor and I will do the job for you.
Scan the room, move around by myself and vacuum the floor.
You don’t even need to watch me. I keep on working
independently until the entire room is vacuumed. And I even
recharge automatically when necessary. And I turn myself off
when I’m finished.
Enable time for yourself – to ease your mind. That’s why
we developed a vacuum cleaner that you don’t have to push
about yourself – that just gets the job done.
You don’t have to think about vacuuming – you can spend
time doing other things. Trilobite – a vacuum that cleans by
itself. While you do other things instead – one example of
how Electrolux makes life a little easier.
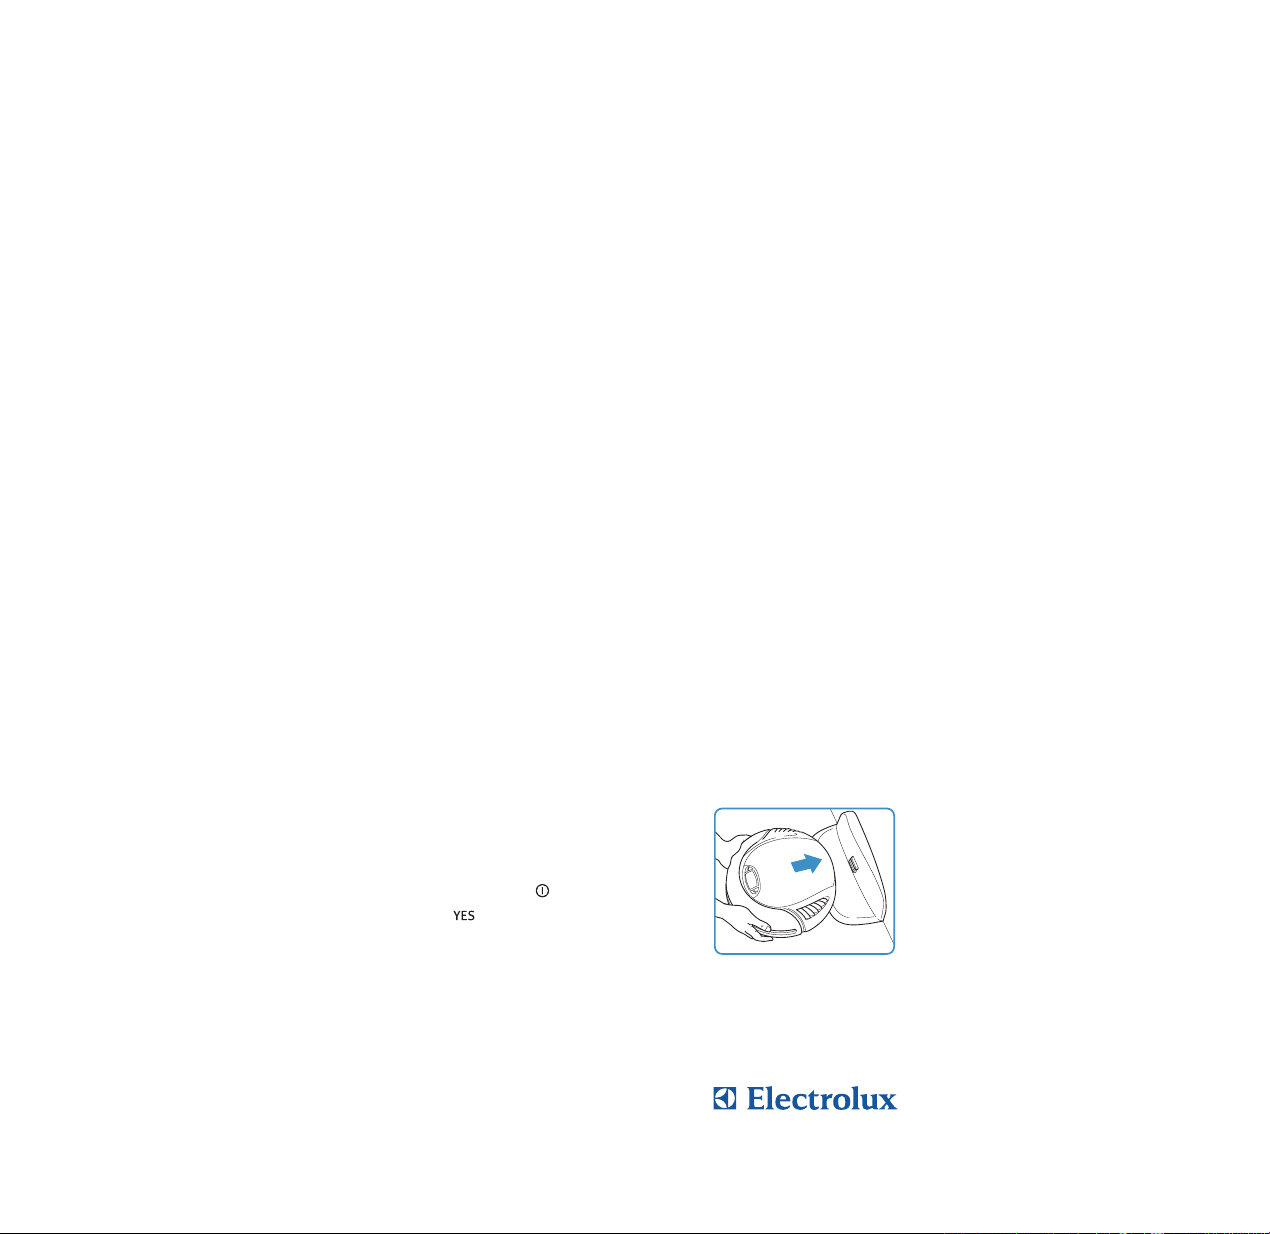
Quick start
Of course you’re impatient and want to switch me on right away. No problem.
To start normal cleaning (firstly along the walls and then all open spaces in the
room), simply:
1. Place the charger against a wall and position me for
charging as shown.
2. When “ready” is displayed, leave me in the charger
and press the start button .
3. Confirm with and I will start cleaning.
4. After cleaning I will find my way back to the charger
and park for a new charge.
But before starting, read For Your Own Safety on pages 6–7!
English 3
Page 7
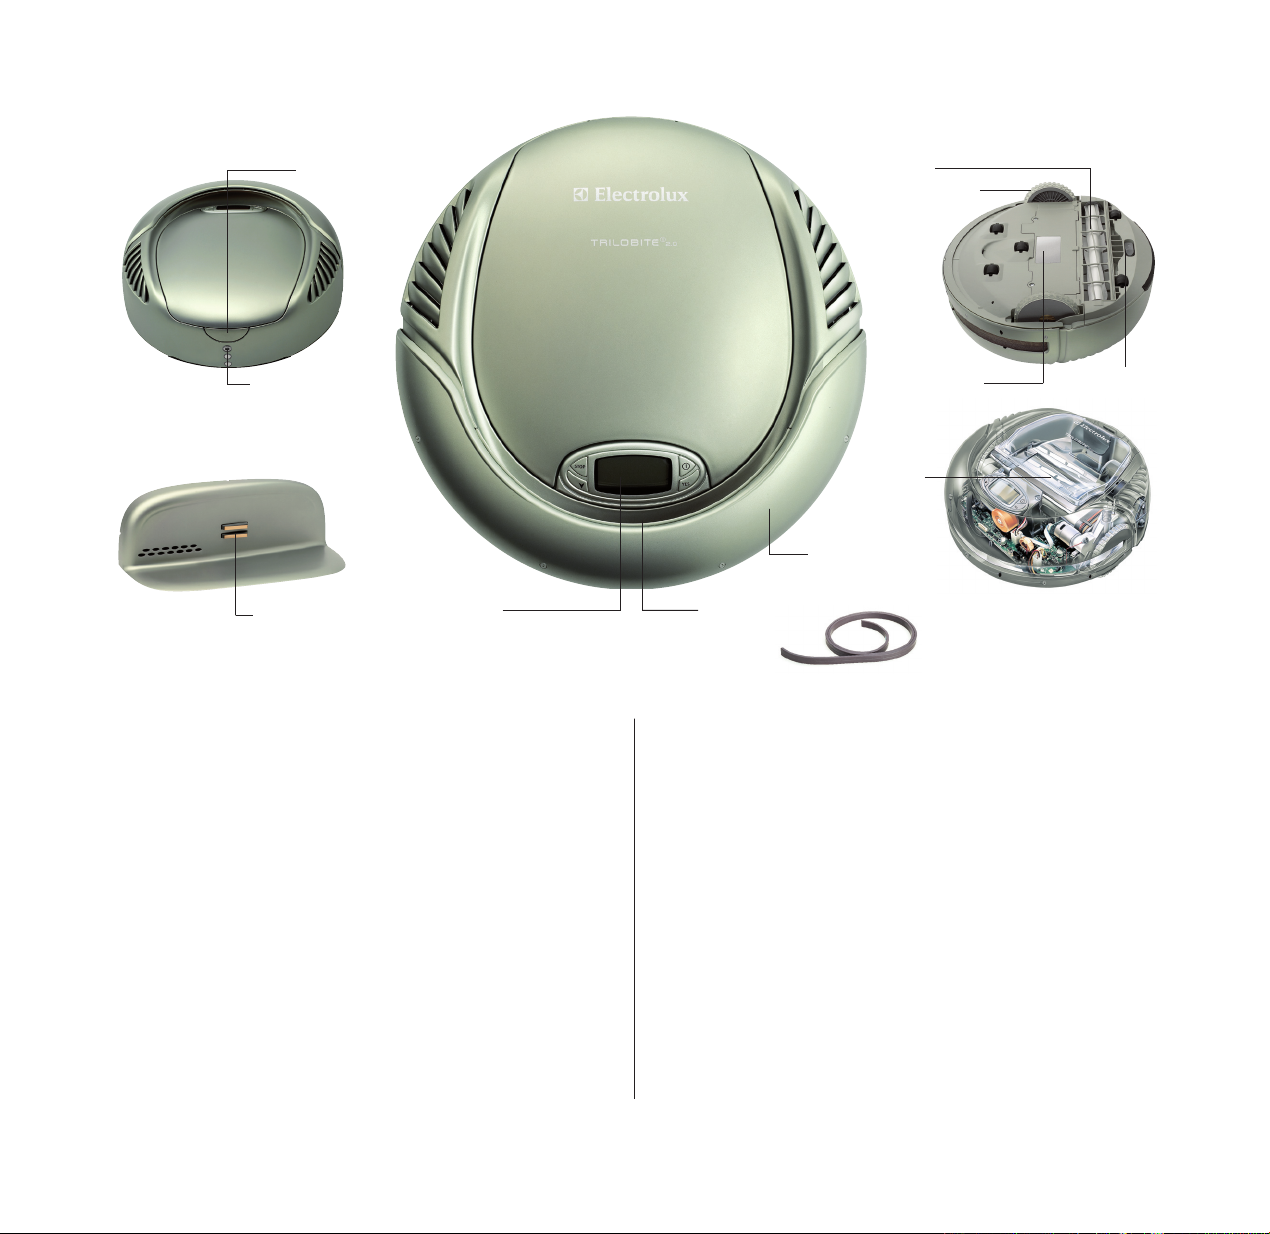
Product description
Filter lid
lock button
Terminals for
connection to
charger
Battery charger
Connection
terminals
Display
Trilobite
Trilobite navigates using ultrasound and uses infrared light to detect
level differences. During edge cleaning, it receives information about
the size of the room. Edge cleaning serves as the basis for the estimated
duration for independent vacuuming in the Normal vacuuming mode.
NOTE! Trilobite is not fully charged upon delivery. Before using it
the first time, connect it to the battery charger. (Refer to page 8.)
A full battery charge requires approximately two hours.
Battery charger
When Trilobite has completed Normal or Quick vacuuming and it
has indicated the charger (flash in display. Refer to page 10), it returns
to the charger. The batteries are then charged and it is ready for more
work.
Magnetic strip
The magnetic strip serve as “virtual walls” and are important for
correct operation. Use it to block e.g. door and wall openings and
level differences lower than 10 centimetres. (Refer to page 9.)
Roller
Drive wheel
Rating plate
Dust
collector
Flexible bumper
Handle
Self-adhesive magnet strip
for permanent installation
Roller cover
lock button
Use a pair of scissors or a knife to trim the magnetic strip to the
correct length. See page 9 in the user instructions to see how the
magnetic strip should be fitted.
Display and function keys
The function keys are used to start/stop Trilobite and for performing
any necessary setup and programming. The display clearly shows
which function is selected.
Handle
The handle, with its ergonomic grip, is used to lift and carry Trilobite
easily.
Roller
The motor-driven rotating roller contributes to excellent dust pickup.
Dust collector
The dust collector, with its efficient microfilter, has a high capacity
and is very simple to lift out for emptying. (See also page 5.)
4 English
Page 8
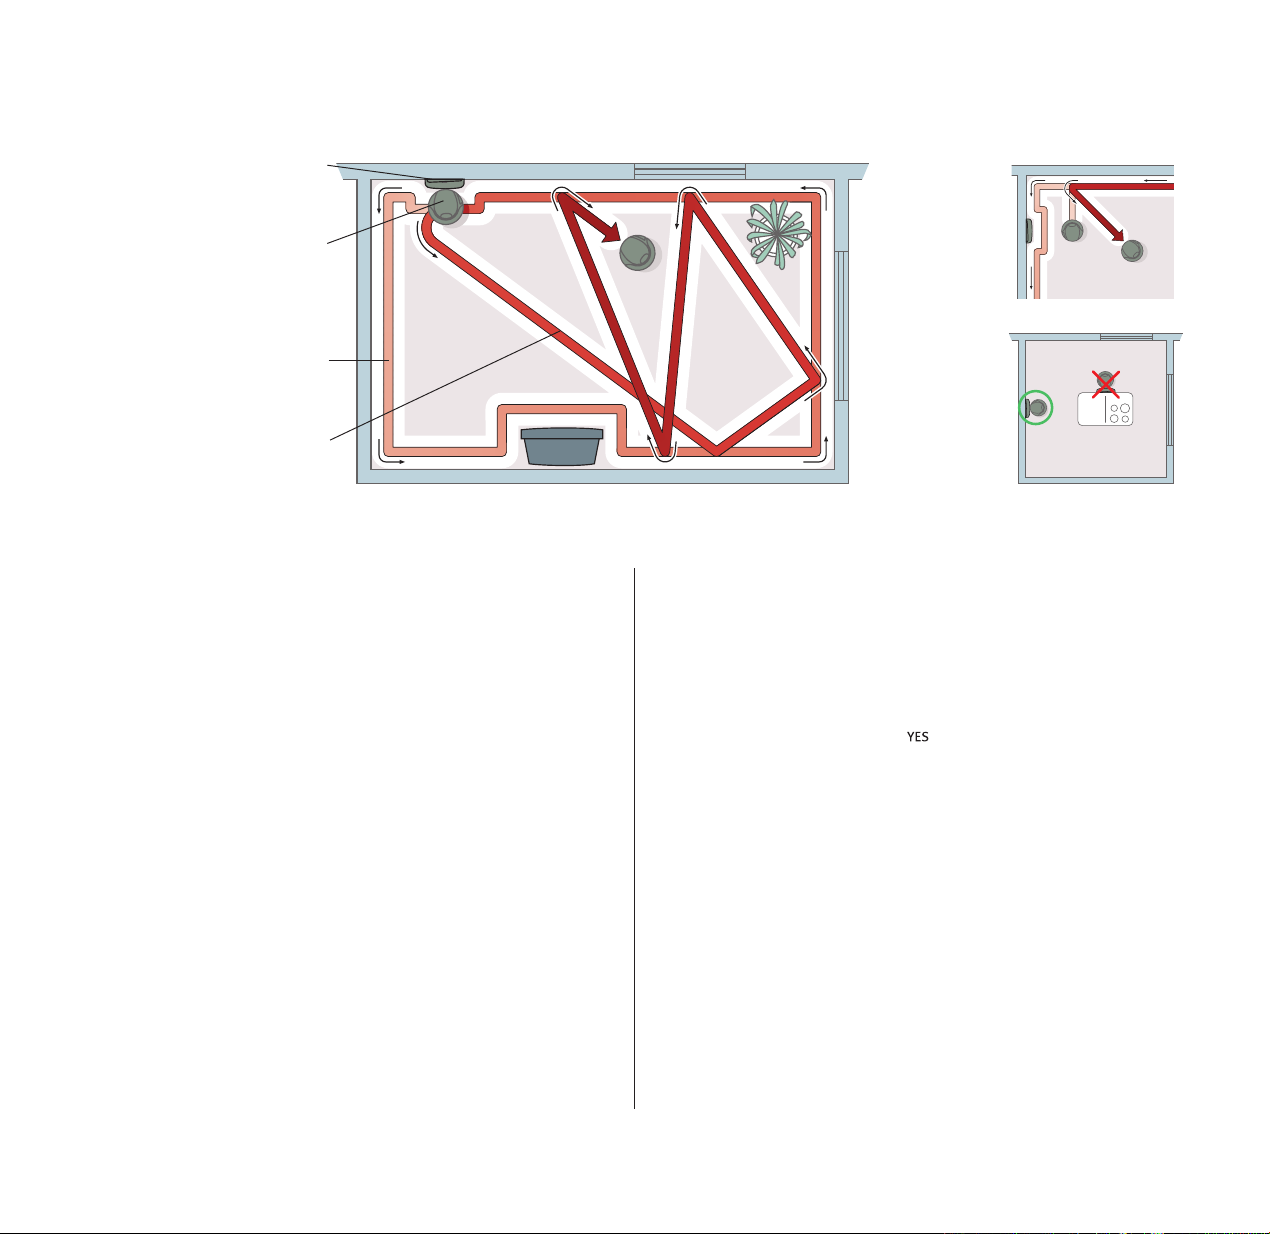
Functional Description
Place the charger close to a wall.
This way, Trilobite will find the
charger in the edge cleaning mode.
Start Trilobite directly from the
charger or face it towards a wall at
a distance of 0.5 m, to the right of
the charger. Start vacuuming
Trilobite starts by first travelling
along the walls of the room to
establish the size of the room.
In the Vacuum Cycle, Trilobite
moves through the room at its own.
Charger
Start
(see page 11).
Edge cleaning
Cleaning
Vacuum programs
Trilobite has three vacuum programs:
“Normal” Trilobite first plots the room by following the walls
(edge cleaning) and then vacuums all open surfaces.
“Quick” The same as Normal, however without egde cleaning.
“Spot” Trilobite vacuums an area of about one square metre twice.
Refer to page 11 for more information on how to proceed and when to use the
different programs.
Starting vacuuming
You will probably use the Normal program most of the time. In
Normal mode, Trilobite starts with approaching a wall and then follows
the outer edges of the room by left turns until one full circumference
of the room is covered. Depending on the size and layout of the room,
edge cleaning may last for up to 15 minutes (25 minutes if it has found
the charger). After this, edge cleaning ends, and vacuuming commences.
Programmable Timer
Trilobite can be programmed to clean at a particular time, on the day
or days you select for cleaning. (Read more on page 12.)
Main cleaning program
During the main cleaning sequence, Trilobite moves freely all over the
room. Trilobite “sees” its way around with the help of harmless ultrasound. This is the same technique that is used by bats for navigation in
the dark, for instance, and for foetal diagnosis in hospitals.
To make it easier
to find the charger,
start Trilobite towards
a wall close to and
to the right of the
charger.
To make it possible
for Trilobite to find
its way back to the
charger, place the
charger against one
of the outer walls of
the room.
When it discovers an object in its path, Trilobite stops a few centimetres in front of it and then changes direction. Trilobite can handle most
obstacles. However, if it gets stuck, it will continue with its cleaning
program if you release it within 20 minutes, put it back down on the
floor within 30 seconds and press the “Continue Cleaning” button.
If Trilobite is lifted while cleaning, the cleaning program is cancelled
and Trilobite is reset. If this happens, restart Trilobite. To pause a
cleaning program, press stop. Press to resume.
Charging
If Trilobite is started from the charger or locates it during edge cleaning,
it will return to the charger unit whenever the battery charge falls below
a specific level. Once the batteries have been charged, Trilobite goes to
work again until the room has been vacuumed. When the work is done,
Trilobite returns to the charger. If Trilobite cannot find the charger
during edge cleaning and the battery voltage becomes too low, it will
stop somewhere in the room.
If you use the “Quick” program, always start Trilobite from the
charger. It will then return to the charger when it has finished cleaning.
Emptying the dust collector
Empty the dust collector when the dust collector icon shows in the
display. Be sure to empty the dust collector even if it is not completely
full. The light indicator may be due to e.g. a blocked filter. Always
replace the filter with a new one.
English 5
Page 9

For Your Own Safety
Trilobite is a machine that moves by itself. It is tempting
to prying children’s fingers and is at work when nobody is
around... With this in mind, it is important to read the
following before you put it to work.
Danger Warning Caution
General
Use
Only use Trilobite for normal household vacuuming.
Do not use Trilobite to vacuum
• outdoors
• attics or basements garage
• bathrooms, washing rooms or other wet rooms
• ventilation rooms, inside false ceilings, etc.
• staircases
• tabletops, shelves, etc.
• warehouses, industrial buildings, etc.
Children
Do not leave children alone with Trilobite. Children are curious and
Trilobite is exciting. If a child by mistake starts the machine, he/she
could become scared, run away with the risk of injuries.
Magnetic strips
Do not install magnetic strips close to magnetic objects, since the
magnetic fields generated by them may affect the function of the
magnetic strips. Consequently, move magnetic objects to another
place in the room.
Carpet wear
In exceptional cases, Trilobite’s brush roller may cause certain
carpet types to wear quickly.
Charger
• Do not pull or carry the charger by cord, use cord as a handle,
close a door on cord, or pull cord around sharp edges or corners.
Keep cord away from heated surfaces.
• Do not unplug by pulling on cord. To unplug grasp the charger plug not
the cord.
• Locate charger indoors in a cool, dry area not exposed to the weather
to avoid electrical shock and/or cleaner damage.
6 English
Page 10
Before vacuuming
While cleaning
Risk of falling
The Trilobite cannot sense level differences lower than 10 centimetres.
Because of this, it might travel down a stairway or fall off a terrace if
the initial level difference is small. It may even start climbing up
inclines, e.g. slides in children’s rooms. Consequently, be sure to close
all doors and “box” Trilobite in with magnetic strips where necessary.
(Available as after sales item.)
Loose objects on tables, etc.
Trilobite automatically stops some centimetres in front of e.g. chairs,
tables and pedestals. Make absolutely sure that Trilobite cannot catch
suspended electric cords, tablecloths, belts, cords, etc.
In the worst case, Trilobite will pull objects off tables and cabinets
or down your walls.
Objects on the floor
Put away small objects on the floor, which might be vacuumed by
Trilobite.
Combustibles
Never use Trilobite to:
• Vacuum rooms with lit candles, lamps with open fires, etc.
• Vacuum rooms with open fire or embers in an open fireplace without
supervision
• Vacuum rooms where curtains or other textiles can become stuck to e.g.,
electric radiators
• Vacuum combustible substances such as petrol, white spirit, thinner, etc.
• Vacuum glowing cigarette butts
Because Trilobite can build up static electricity, never use it in rooms
where the air contains:
• Combustible gasses, such as petrol, white spirit, thinner, etc.
• Gasses from hairspray or deodorants
Do not spray the Trilobite with fragrances when it is operating.
Risk of personal injury
When Trilobite is working, somebody could stumble over it. This may
especially happen when Trilobite is returning to the charger – in this case
it is quiet as a whisper. With this in mind, make sure everybody in your
home knows that Trilobite is working. Do NOT sit or stand on Trilobite!
If vacuum cleaner is not working as it should, has been dropped, dam-
aged, left outdoors, or dropped into water – return it to a service center.
Attention
Liquids: Do not allow Trilobite to vacuum liquids, since this may
severely damage the machine. Very thin dust: Do not allow Trilobite to
vacuum very thin dust like sement, plaster etc. since this may severely
damage the machine.
After vacuuming
Batteries
Only allow an Electrolux service centre to replace the batteries since
the use of incorrect batteries may cause overheating. Not covered by
warranty. Do not under any circumstances heat the batteries! Use only
the charger Electrolux model ZAC2 to recharge Trilobite.
Cleaning of Trilobite
Only use a damp cloth for wiping Trilobite. Take care when cleaning
the bumper guards. Avoid touching the bumper sensors.
Cleaning the dust and filter collector
Carefully empty the dust collector. Dust collected in the unit can cause
allergic reactions in sensitive persons. (Use only original Electrolux
micro filters for a snug fit.) Always dispose the old micro filter.
Be especially careful if there is a chance Trilobite has vacuumed rat
poison, detergent, disease carriers, etc. Please also pay attention to the
fact that Trilobite may have vacuumed e.g. insects or spiders.
Tip: Empty the dust collector in a plastic bag, while ensuring the
bag fits tightly around the unit.
Storing
Make sure small children cannot start Trilobite by accident.
English 7
Page 11

8 English
Preparations Before Use
Recharging
Push the Trilobite unit with its rear against the battery
charger’s contact plate. Press it in securely. Keep it
pressed in until you hear an acknowledging signal
(this may take a few seconds). This is particularly
important if the batteries are almost entirely dead.
When the batteries are exhausted: Push Trilobite
against the charger and hold it there for about a minute. Take it out and push it in again. Trilobite will then
automatically move towards the charger.
Battery indicator
Normal. Timer: Auto
Start cleaning?
A
Charging status
The battery indicator on Trilobite’s
display shows the battery capacity
during vacuuming and charging.
You may well develop a personal affection to Trilobite and
appreciate its intelligence. To get the best from your Trilobite,
we recommend you consider the following.
Charging (see also picture “Charging status”)
Put the battery charger on the floor, connect it to the mains and place
it with its rear side facing the wall. Allow a free space of 0.2 metres to
the right of the charger.
Check the battery indicator before vacuuming starts.
Refer to the lower, middle picture.
A. Charge your Trilobite before vacuuming
B. You can commence vacuuming. But your Trilobite will need to
find the charger soon.
C. You don’t need a charger in the room to start vacuuming
Avoid interrupting the charging process. If unavoidable, pull the
machine away from the charger and press the button. Vacuuming can
also be started while Trilobite is still being charged. If the power to the
charger is interrupted for more than 30 seconds during charging, and
you have not manually placed Trilobite in the charger, it will leave it,
take a spin on the floor and then connect with the charger again. To
ensure that the batteries are fully charged after Trilobite has been left
If the battery charger
is placed on a soft
surface, e.g. a rug or
carpet, or if you have
a protruding skirting
board preventing you
from placing the battery
charger right against the
wall, use the adjustment
screw on the back of
the battery charger.
B C
The battery charger
should be placed
along a wall with a
free margin of 0.2
metres to the right of
the charger.
An audible signal
sounds and the
battery symbol in the
display show when
charging commences.
Trilobite becomes fully
charged in about two
hours at which time
“Ready” shows in the
display.
unused in the charger for a longer period of time, pull it out and push
it back in to start a new charge cycle.
Move the furniture
Trilobite picks its way around furniture, whether freestanding or placed
flush against a wall. However, cleaning is both quicker and more
effective if you move the furniture slightly before it is time to start
cleaning. Of course, you do not need to move heavy furniture such as
sofas. On the other hand, chairs can be conveniently placed on top of
tables, lamps can be moved out of the way, loose rugs can be shifted.
But don’t complicate matters more than you need to! Normally, all
you need to do is to put Trilobite on the floor and let it get on with
the job of cleaning.
Loose objects
Trilobite cannot distinguish between dust, coins, rings and expensive
jewellery. Before starting Trilobite, be sure to put away small, loose
objects you do not want to lose. Also make sure there are no cords
or other objects on the floor that may prevent Trilobite from moving
freely in the room.
For your own safety
Before vacuuming, read “For Your Own Safety“ on page 6–7!
Page 12
English 9
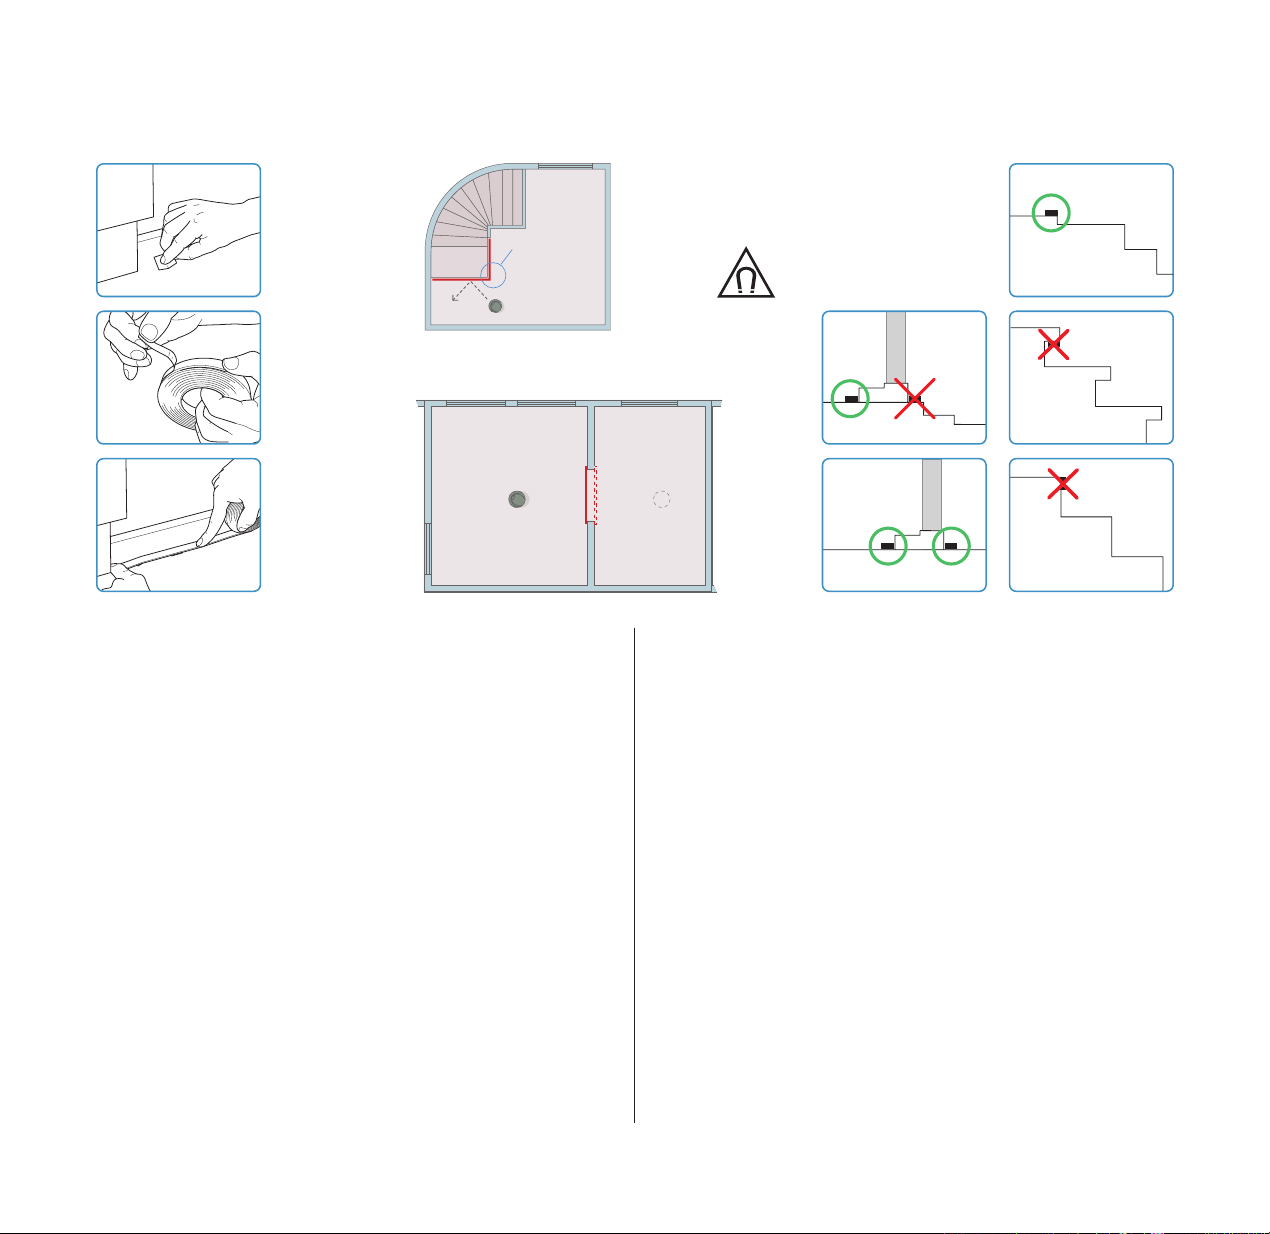
Affixing the
magnetic strip
Clean the surface
with the enclosed
cleaning pad.
Allow to dry.
NOTE! Do
not place the
magnetic strip
at a n a ngle of
less tha n 90°.
1. Room with a low landing
Always attach the magnetic strip
on top of the level difference
(Figure 5) and never along its side
(as shown in Figure 6 and 7).
Warning! Credit cards, etc.
held in the immediate vicinity
may become demagnetised.
3.
5.
6.
Pull off
2. Room with wall openings
the protective
backing.
Affix the
magnetic strip.
Magnetic strips
Be sure to block level differences lower than 10 centimetres with the
magnetic strips. If you fail to do so the Trilobite can pass over the edge
and cause injuries and damage to property.
A self-adhesive magnetic strip that has once been removed has poorer
adhesive capability. We therefore strongly recommend that you attach
the necessary strips once and for all. Never re-use the adhesive of a
magnetic strip in any important application where safety is an important
parameter. If you nonetheless choose to let the strip lie unfastened on
the floor, make sure that the side with the adhesive (with the protective
paper backing) faces downwards! Please note that the magnetic strip is
not a safety device unless it is fastened to the floor.
Rooms with a staircase
Trilobite can detect a staircase provided that the step height is 10 cm
or greater. When Trilobite detects such a staircase, it stops automatically.
Do not place any objects on the top steps.
In rooms with landings or split levels
Trilobite cannot detect level differences of less than 10 cm. If the room
contains a landing of less than 10 cm in height, and that is also followed
by a staircase, this landing must be blocked using a magnetic strip to
make Trilobite stop before the landing. See pictures 1 and 5.
Room with
doorsteps
4.
Room with
doorsteps
7.
Rooms with wall openings
Trilobite is able to vacuum rooms with wall openings or walls placed at
odd angles. However, this will take longer than usual. It is a good idea
to vacuum one room at a time and separate the rooms by using the
magnetic strip as shown in picture 2.
Rooms with doorsteps
Always fit magnetic strip on the floor in front of the doorsteps in the
room you will be vacuuming. See picture 3 and 4.
Magnetic strips and carpets
If the carpet has a pile depth of less 15 mm the magnetic strip can be
placed under it with maintained functionality. If the strip is fitted on
top of the carpet, be sure it is securely attached.
Be careful!
Before starting Trilobite, be sure to put away small, loose objects that
might otherwise be vacuumed by Trilobite.
Also make sure there are no cords or other objects on the floor that
may prevent Trilobite from moving freely in the room.
Page 13
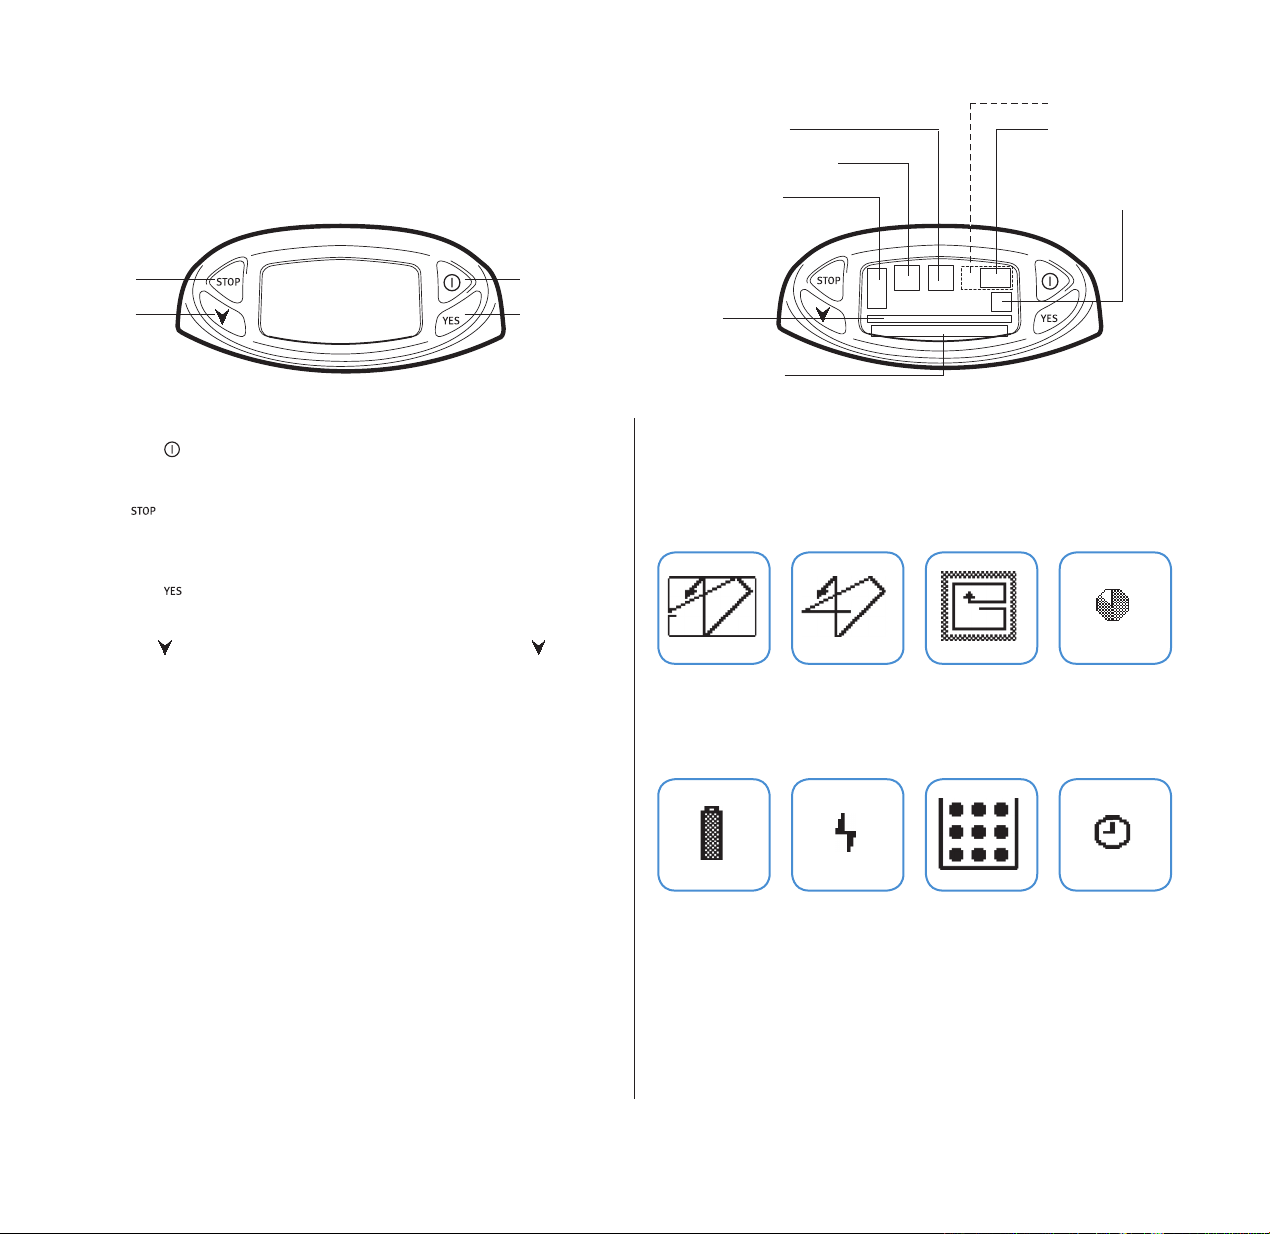
Buttons and Display
Dust collector full
Charger Found indicator
Day and time
Remaining time
Stop
Next
On/Off
Yes
On/Off
Press the button for about one second to start and stop Trilobite.
Stop
The button has two functions. Use it to cancel a command or to
stop Trilobite during vacuuming.
Yes
Press the button to confirm a setting shown on the display.
Next
Use the button to select items on the menu. Also use the button
as a “No” button when you do not want to select a setting presented
in the display.
Battery indicator
Current
vacuum
program
Message display
Clock
Symbols
Information is shown in the display using status messages and also
by symbols. (The battery capacity symbol is shown on page 8.)
Normal
Vacuuming
Quick
Vacuuming
Spot
Vacuuming
Timer
10 English
Battery Charger found Dust
collector full
Clocksymbol
Page 14

Vacuuming Programs
Normal. Timer: Auto
Select program?
Normal vacuuming
When you start Trilobite it is ready to start
vacuuming using the Normal program and
automatic time calculation.
1. When Trilobite is switched off or placed
in the charger, press to start.
2. Press to start vacuuming.
Changing the time setting
This may be necessary when vacuuming
floor surfaces of 40 m2.
1. Press twice until “Select timer?”
is shown, confirm by pressing .
2. Set the desired time setting by pressing
and then confirm with .
(When “On” is chosen, use to set
desired time, confirm by pressing .
This is the vacuuming time after wall
mapping.)
3. Press to commence vacuuming.
Quick. Timer: 10min
Select program?
Quick vacuuming
The Quick program is identical with Normal
vacuuming except that edge cleaning is not
included. Vacuuming takes shorter time with
the duration preset to 10 minutes, however,
the vacuum result may be slightly inferior.
1. After you have switched on Trilobite,
press until “Select program?” is shown.
Confirm by pressing .
2. Use until “Quick” is displayed and
confirm by pressing .
3. If you don’t want to change the time
setting, press twice and start
vacuuming by pressing . If you would
like to change the time setting, please
follow the next steps instead of step 3.
4. Confirm the option “Select timer?”
by pressing .
5. Set the desired time setting by pressing
and then confirm with .
(When “On” is chosen, use to set
desired time, confirm by pressing .)
6. Press to commence vacuuming.
Spot
Select program?
Spot vacuuming
Use Spot vacuuming to quickly vacuum
a limited area, like if you have spilled something. The area that is vacuumed is approx.
2
with Trilobite placed in the centre of
1-m
the area. The area is vacuumed twice.
1. After you have switched on Trilobite,
press until “Select program?” is shown.
Confirm by pressing .
2. Use until “Spot” is displayed and
confirm by pressing .
3. Put Trilobite in the centre of the area to
be vacuumed and start vacuuming by
pressing .
Do not under any circumstances
vacuum liquids or lit or glowing objects,
e.g. cigarette butts.
Never start vacuuming at distances
under 0.5 m from a magnetic strip, staircase
or level difference. Vacuuming can always
be interrupted by pressing . After this,
pressing recommences vacuuming, while
pressing will call up the menu.
Never start vacuuming at distances
under 0.5 m from a magnetic strip, staircase
or level difference. Vacuuming can always
be interrupted by pressing . After this,
pressing recommences vacuuming, while
pressing will call up the menu.
Never start vacuuming at distances
under 0.5 m from a magnetic strip, staircase
or level difference. Vacuuming can always
be interrupted by pressing . After this,
pressing recommences vacuuming, while
pressing will call up the menu.
English 11
Page 15

Timer and Changing
Programmable
the Message Display Language
Normal. Timer: Auto
Select timer?
Timer
It is possible to set the time duration for
Normal or Quick vacuuming.
1. Select the desired vacuum program, or
press twice til “Select timer?” is shown.
Confirm by pressing .
2. Set the desired time setting by pressing
and then confirm by pressing . When
“Auto” is chosen Trilobite will calculate its
own vacuuming time. When “On” is chosen,
use to set desired time, confirm by
pressing .
When “Off” is chosen Trilobite will clean until
charging is needed. For normal vacuuming
program, this is the vacuuming time after
edge cleaning.
3. Press
to commence vacuuming.
Language
Trilobite is able to present the information on
the display in a number of different languages.
1. To change the display language, switch on
Trilobite and press .
2. Press until the displays asks whether you
want to change the language. Press .
3. Press
to select the desired language and
confirm by pressing .
Trilobite will now show display messages in
the selected language.
Status Messages
When you select a function, a status message is
shown on the display for about seven seconds.
After this, the name of the function is shown
again. It is of course possible to change or
confirm a displayed function even while the
status message is shown.
Timer
Normal. Timer: Auto
Select start time?
Trilobite can be programmed to clean at a
particular time on every day of the week.
To use this function, you must first activate
and program Trilobite’s day and time functions. You can then set which day or days you
want Trilobite to clean on. After programming,
it is a simple matter to activate or deactivate
the setting.
NOTE: Trilobite can only start programmed
cleaning if it is placed in the charging station.
Set clock
1. Start Trilobite.
2. Press
3. Press
4. “Set time” is displayed.
5. Press
6. “Set day” is displayed. Press
7. Press
8. “Set clock” is displayed.
9. Press
10. Press
11. Press
12. Press
13. Press
14. Press
until “Select start time” is displayed.
.
.
until the
desired day is displayed.
.
until the desired hour is displayed.
.
until the desired 10-minute block
is displayed.
.
until the desired minute is
displayed.
. The day and time are now
displayed.
12 English
Page 16

Normal. Timer: Auto
Select start time?
Normal. Timer: Auto
Select start time?
Error Messages
Error: 7
Check
the bumper
See manual
To program the cleaning time:
1. Start Trilobite.
2. Press
3. Press
4. “Timetab.” is displayed. (If the clock is not
5. Press
6. “Select start day” is displayed.
7. Press
8. Press
9. “Select start time” is displayed.
10. Press
11. Press
12. Press
13. Press
14. “OK?” flashes. If the setting is correct,
If you require a different cleaning program:
15. Press . “Select program?” flashes.
16. Press
17. Press
18. Press
19. Select the desired cleaning time.
20. The set program is displayed. “OK?” flashes.
21. Repeat the programming steps for any
22. Press “On/Off” button and place it in the
until “Select start time” is displayed.
.
set, “Set time” is displayed. See above on
setting the time.)
.
until the desired day is displayed.
.
until the desired hour is displayed.
.
until the desired minute is
displayed.
. The desired start time and program are displayed. The default setting is
the normal program with automatic timer.
confirm with . “Start cleaning?”
is displayed. Proceed to step 22.
.
to select the desired program.
.
(See “Timer” on this page.)
Confirm with . “Start cleaning?” is
displayed.
other days you want cleaning to be out.
charger.
When Trilobite is placed in the charger and
a cleaning program is active, a clock symbol
is displayed. (Trilobite will now clean on the
set time.) NOTE: If batteries are not fully
charged at set start time, the cleaning start will
be skipped or delayed up to one hour.
To activate Trilobite:
1. Start Trilobite.
2. Press
3. Press
4. Press
5. Press
until “Select start time” is displayed.
.
to select “Enable”.
to activate the cleaning program.
To deactivate Trilobite:
1. Start Trilobite.
2. Press
3. Press
4. Press
5. Press
until “Select start time” is displayed.
.
to select “Disable”.
to deactivate the cleaning program.
To remove a cleaning program:
1. Start Trilobite.
2. Press
3. Press
4. Select “Timetab.”.
5. Press
6. “Select start day” is displayed.
7. Press
On days with cleaning set, the start time is displayed;
8. Press “Select start time” is displayed.
9. Press
10. Press
until “Select start time” is displayed.
.
.
until the day is displayed on which
you wish to remove the cleaning program.
otherwise “—:—” is displayed.
until “—:—” is displayed.
.
Error Messages
The only faults that you can rectify yourself
are the ones listed below. In the event of
other error messages, recharge and restart your
Trilobite. If it still does not start, contact our
Customer Service, see page 18.
The errors you can correct yourself are
presented below:
5. Check roller.
Is something stuck?
Is it incorrectly attached?
6. Check casters.
Is something stuck?
7. Check bumper.
Verify its spring action. Is something stuck
preventing it from moving?
12. Trilobite is stuck.
Move it and switch it on again.
Also see Normal Vacuuming on page 5.
15. Check dust cassette.
In most cases, the filter unit has probably
not been set or it is incorrectly set.
16. Check charger.
Is the charger connected to the mains?
Are the terminals on the charger and Trilobite
properly connected to each other?
21. Moisture on the circuit board.
Let the machine dry out for 12 hours.
Then try restarting it.
English 13
Page 17

Emptying and Cleaning the Dust Collector
1. Press the button on the
rear side of Trilobite, and ...
2. ... lift off the lid. 3. Take out the dust collector. 4. Remove the grille with the
Cleaning the Roller
1. Check the roller each time
the dust collector is
emptied. Begin by lifting
Trilobite by the handle.
2. Turn Trilobite upside down
and put it on a soft surface
with the display facing you.
3. Push the locking knob to
the right.
opening facing up.
5. Empty the collector
(preferably in a plastic bag
fit snugly around the unit).
Do not knock the
collector against hard
surfaces to empty it.
Always replace with
a new filter.
4. Raise the cover. 5. Lift the roller by the end
without a drive belt.
Remove it by holding it
at an angle and pulling
upwards/outwards.
14 English
Page 18

6. Rinse the dust collector
under running water.
Do not clean in a dishwasher or clothes washing
machine.
7. Insert a new filter and
replace the grille.
8. Replace the motor filter for
each tenth time the dust
collector filter is replaced.
Attach the filter with the
cut-off corners facing to
the right.
9. Replace the dust collector. 10. Replace the lid, and push
down on the lid. If the
lid cannot be properly
closed, the dust collector
is most likely set incorrectly.
6. Clean the roller. Use a pair
of scissors to cut away
strings, threads, etc.
Do not wash the
roller in water or other
liquids.
7. Slide in the roller, take
care to secure the belt and
rotate it so that the teeth
engage securely.
8. Press the roller downwards/
inwards.
9. Replace the lid. When the
three pegs in the picture
are placed correctly, the lid
is in the correct position.
10. Finally push down the lid
in place.
English 15
Page 19

Questions and Answers
Should I pay attention to anything special when I vacuum a room for the first
time?
It is a good idea to be present when the room is vacuumed the first
time, for example to see if it takes unnecessary time for Trilobite to
navigate around furniture.
Can I use Trilobite in a room with an activated alarm?
Yes, if it has a “pets monitoring” function.
Can I hide the magnetic strips under e.g. a carpet?
Yes, as long as it is not thicker than 15 mm.
Trilobite operates at different speeds. Is something wrong?
Not at all. The speed varies depending on the layout and furniture in
the room.
Is it all right to always leave Trilobite connected to the charger when it is not is
use?
Yes, but make sure children cannot start it by mistake.
Is it necessary to switch off Trilobite before charging it?
No.
How can I know whether I have placed Trilobite correctly during manual battery
charging?
A battery symbol lights in the display and you hear an audible signal.
Why doesn’t it charge?
1. Check that Trilobite is correctly connected to the charger
(Refer to page 8.)
2. Check that the charger has been connected to the mains.
3. Check that the rear of the charger has enough support. (Refer to
page 8.)
Is it dangerous to touch the charging terminals?
No. They have no power in the output mode and carry max. 27 V in the
input mode.
Why does Trilobite sometime pause for approximately
10 seconds during vacuuming?
Trilobite uses two battery packs. It will briefly pause when switching
from one battery pack to the other.
Why does Trilobite stop completely during vacuuming?
1. Check that it has been sufficiently charged. (Refer to page 8.)
2. Did it find the charger during edge cleaning?
3. The time duration for vacuuming may need to be increased. (Refer to
page 12.)
Why does Trilobite crackle while vacuuming?
This sound is produced by the navigation system.
Why do I need to replace the filter so often?
The filter is actually one of the most important components in the
machine. It collects all dust, even very small dust particles (this is why
you should also use original Electrolux filters). Just like a dust bag
becomes full, so does the filter. There is no dust bag in the Trilobite, but
the filter is always a necessity and should be replaced every time you
empty the dust collector.
If Trilobite starts to smell bad, what could this be due to?
Probably the dust filter was not replaced.
What should I do when an error message is displayed?
The error messages you can correct yourself are shown on page 13.
In all other cases, contact Customer Service, see page 18.
What is the Cable Protection System?
This is simply a system that prevents Trilobite from getting stuck in
electric cords on the floor.
What is the Trilobite Stairsafe system?
It is a safety system that allows the Trilobite to detect and avoid falling
down staircases using infrared light.
16 English
Page 20

Why do I have to place magnetic strips by level differences of less than 10 cm?
Depending on the floor colour and texture, Trilobite may not detect
level differences of less than 10 cm in some cases.
Do I need to vacuum myself also?
Yes, in areas that Trilobite cannot reach, such as staircases, bookshelves, underneath very low furniture, etc. However, if Trilobite is used
regularly, the total amount of dust in the room is reduced. This reduces
the need for manual vacuuming.
Why can’t Trilobite find its way back to the charging station?
1. Has Trilobite identified the charger? (Refer to page 5.)
2. Is the charger correctly positioned? (Refer to page 8.)
3. Are there obstacles along the wall preventing Trilobite from finding its
way to the charging station? If possible, move the obstacle to make it
easier for Trilobite to find the charging station.
Why didn’t Trilobite clean at the set time?
1. Trilobite must be placed in the charger.
2. The batteries were not fully charged within one hour of the cleaning
start time.
If I go on holiday, do I have to remove all settings to prevent Trilobite from
cleaning?
You can deactivate Trilobite’s cleaning program to prevent it from
cleaning automatically.
You can reactivate the cleaning program whenever you want.
English 17
Page 21

Accessories After-Sales Service
Battery charger Filter
Magnetic strips
Battery charger
To make vacuuming easier, you can purchase additional chargers.
Why not one for each room? Or one for your weekend cottage?
Order number: ZAC2
Trilobite might mistake loudspeakers placed on the floor for the charger.
Magnetic strips
You can also purchase additional magnetic strips. For more
information, contact your dealer, our Customer Service
department, or visit our web site. Order number: ZE 110.
Filter
Filters come in 10+1 packages, i.e. 10 filters for the dust collector and
one motor protection filter (the latter should be replaced for each
tenth time the dust collector is emptied). The filters are available from
your dealer. You can also use our filter subscription service (contact
Customer Service) – or order them from our web site.
Order number: EF 110
Miscellaneous
The selection of accessories is continuously updated. Please contact
your dealer, Electrolux Customer service or visit our web site for more
information about new accessories.
Customer Service
Accessories, service, problems… No matter what type of question you
may have about your Trilobite, you are always welcome to contact our
Customer Service. Please visit www.electrolux.com
Reservations
Electrolux will not accept any responsibility for damage caused by
incorrect use or unauthorized modifications of the product. Product
designs and specifications are subject to change without notice.
The products are protected by patents or registered designs.
18 English
Page 22

Technical Specifications
Declaration of conformity
Trilobite
Model name
Diameter 350 mm
Height 130 mm
Weight 5 kg
Noise level approx 75 dBA
Power approx 90 W
Speed max 0,4 m/sec.
Navigation 180° ultrasound
Stair detection infrared light
Dust collector 1,2 l
Vacuum duration is calculated automatically or can be set
manually up to 60 mins.
Batteries environmentally friendly Nickel-Metal hydrid
Charging duration approx 2 hours
Charger
Charger name
Height 130 mm
Width 160 mm
ZA2
ZAC2
Concerning Machinery Directive – 98/37/EC
Low Voltage Directive – 73/23/ECC
EMC-Directive – 89/336/ECC
Manufacturer: Electrolux Lehel Kft., Floor Care Factory
H-5101 Jászberény, HUNGARY
Declares that the automatic household vacuum cleaner Trilobite
with charger – ZA2 (machine) and ZAC2 (charger) conforms
with the productive requirements of the Machinery Directive 98/37/
EC, the Low Voltage Directive 73/23/EEC and the
EMC Directive 89/336/EEC.
It is further declared that the automatic household vacuum
cleaner Trilobite with charger – ZA2 (machine) and ZAC2
(charger) conforms with the productive requirements of the
following harmonised European standards:
Machinery Directive: EN 292-1 (1992), EN 292-1 (1992) and
A1 (1995), EN 1050 (1996).
Low Voltage Directive: EN 60335-1 (1994) and A11 (1995), A12 (1996),
A1 (1996), A13 (1998), A15 (2000), A2 (2000), A14 (1998), A16 (2001),
EN 60335-2-2 (1995) and A1 (1998), A2 (2000), EN60335-2-29 (1996)
and A11 (1997).
EMC Directive: EN 55014-1 (1993) and A1 (1997), A2 (1999),
EN 55014-2 (1997), EN 61000-3-2 (1995), EN 61000-3-3 (1994).
Low Voltage tests and EMC-tests have been conducted by
authorised organisations.
Low Voltage tests: UL International DEMKO A/S, Lyskaer 8,
DK-2730 Herlev, Denmark.
EMC-tests: SEMKO AB, Box 1103, S-164 22 Kista, SWEDEN.
Length 380 mm
Weight 0,8 kg
Input voltage AC 100-240 V, 50/60 Hz
Output voltage max DC 27 V
Power 60 W
Cord length 180 cm
Jászberény, 2005-11-23
Attila Vass, General Manager
English 19
Page 23

20 Русский
English
Suomi
Русский
e symbol on the product or on its packaging indicates that this product may not be
treated as household waste. Instead it shall be
handed over to the applicable collection point
for the recycling of electrical and electronic
equipment. By ensuring this product is disposed
of correctly, you will help prevent potential
negative consequences for the environment and
human health, which could otherwise be caused
by inappropriate waste handling of this product.
For more detailed information about recycling
of this product, please contact your local city
oce, your household waste disposal service
or the shop where you purchased the product.
Symboli , joka on merkitty tuotteeseen
tai sen pakkaukseen, osoittaa, että tätä tuotetta
ei saa käsitellä talousjätteenä. Tuote on sen
sijaan luovutettava sopivaan sähkö- ja elektroniikkalaitteiden kierrätyksestä huolehtivaan
keräyspisteeseen. Tämän tuotteen asianmukaisen hävittämisen varmistamisella autetaan
estämään sen mahdolliset ympäristöön ja terveyteen kohdistuvat haittavaikutukset, joita voi
aiheutua muussa tapauksessa tämän tuotteen
epäasianmukaisesta jätekäsittelystä. Tarkempia
tietoja tämän tuotteen kierrättämisestä saa paikallisesta kunnantoimistosta, talousjätehuoltopalvelusta tai liikkeestä, josta tuote on ostettu.
Символ на изделии или на его упаковке
указывает, что оно не подлежит утилизации в
качестве бытовых отходов. Вместо этого его следует сдать в соответствующий пункт приемки
электронного и электрооборудования для последующей утилизации. Соблюдая правила утилизации изделия, Вы поможете предотвратить
причинение окружающей среде и здоровью людей
потенциального ущерба, который возможен, в
противном случае, вследствие неподобающего обращения с подобными отходами. За более
подробной информацией об утилизации этого
изделия просьба обращаться к местным властям,
в службу по вывозу и утилизации отходов или
в магазин, в котором Вы приобрели изделие.
Page 24

Русский 21
 Loading...