

Page 1
Z420
Instruction book .........................4
g
Mode d’emploi ...........................7
f
Brugsanvisning...........................9
k
Bruksanvisning .........................12
s
PAGE
Bruksanvisning......................... 15
n
Käyttöohje ................................17
q
Инструкцию по эксплуатации
u
.. 20
Page 2
/A
1
A
B
D
K
C
L
F
2
J
H
E
G
3
4
4/B
2
Page 3

5
15
9
6
4
/C5/A
5/B
10
13
7
3
8
11
14
12
4
3
Page 4

g
Dear Customer,
g
Please read these operating instructions through carefully.
Above all please observe the safety
instructions on the initial pages of
these operating instructions! Please
keep these operating instructions for
future reference. Pass them onto any
subsequent owner of the appliance.
In the event of technical problems, our
local factory customer service centre
will provide you with assistance at any
time.
Using the warning triangle and/or the
1
use of specific words (Warning!,
Caution!, Important!) information
that is important for your safety or the
function of the appliance is highlighted. It is imperative that this information is observed.
0 This symbol guides you step by step
through the operation of the
appliance.
Next to this symbol you will find addi-
3
tional information and practical tips on
using the appliance.
Tips and instructions for the economi-
2
cal and environmentally conscious use
of the appliance are marked with a
cloverleaf.
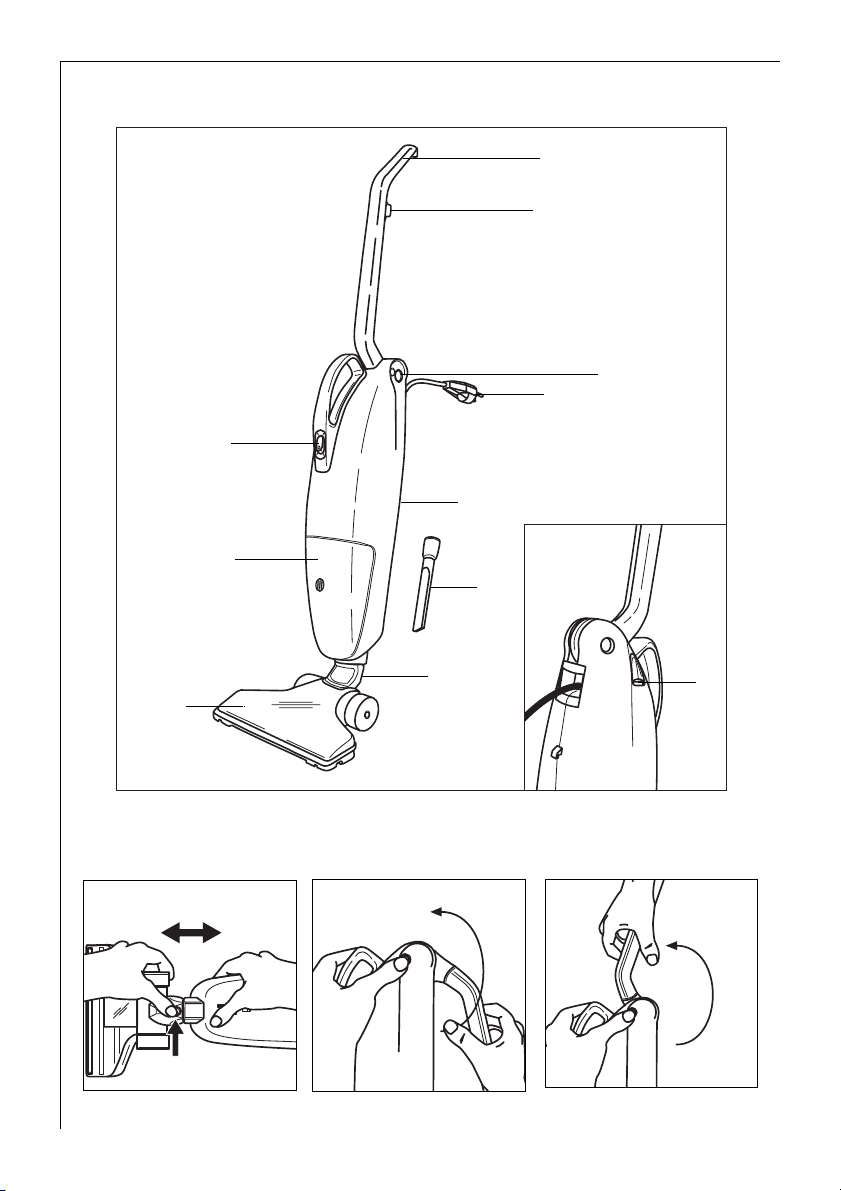
Appliance Description
(Figure 1 and 2)
A Handle with
B Cable Clip
C On/Off Switch
D Handle Button (left hand side)
E Cable Rewind Button (right hand side)
F Bag Compartment Lid
G Floor Nozzle
H Floor Nozzle Button
J Crevice Nozzle
K Mains Cable with Plug
L Rating Plate (on the underside)
1 Safety Instructions
• The operating voltage and mains
voltage must match! (See rating plate
on the underside of the vacuum cleaner.)
• The mains circuit for the socket used
must be protected with a fuse with a
rating of at least 10 A.
• Prior to performing maintenance or
cleaning, ensure that the appliance is
switched off and unplugged from the
mains.
• Never remove the mains plug from the
socket by pulling on the cable.
• Do not use the appliance if:
– the mains lead is damaged,
– the housing shows visible signs of
damage.
• Avoid running over the mains cable
with the appliance. The insulation
could be damaged.
• Repairs to electrical appliances are
only to be performed by qualified
service engineers. Improper repairs
can give rise to significant hazards
for the user.
• In the case of a malfunction, please
therefore contact your dealer or Electrolux customer service directly.
• Ensure that a paper filter and a
MICROFILTER are always fitted.
• Leave wet shampooed carpets to dry
completely. Never vacuum liquids with
the vacuum cleaner – otherwise the
vacuum cleaner will be damaged.
Furthermore, protection against electric shock may be impaired.
• People and animals must not be vacuumed with the appliance.
• Keep children away from the appliance.
• Do not vacuum up matches, hot ashes
or cigarette ends with the appliance.
Avoid drawing up hard, pointed objects
because these could damage the
appliance or the paper filter.
• If the appliance is used for purposes
other than those intended or used
incorrectly, no liability can be accepted
for any damage that may be caused.
4
Page 5

This appliance complies with the follo-
;
wing EU directives:
• 73/23/EWG dated 19.02.1973 –
Low Voltage Directive
• 89/336/EWG dated 03.05.1989
(including Directive Amendment 92/
31/EWG) – EMC Directive
Using for the First Time
0 Fit the floor nozzle (Figure 3).
0 To open out the handle, you must push
the handle button (Figure 4/C).
0 Plug into the mains socket.
0 Put the appliance into operation by
pressing the On/Off switch (Figure 5/A).
Press the button to remove the floor
3
nozzle (Figure 3).
Changing the Filters
1. Paper Filter
0 Open the bag compartment and
remove the lid (Figure 7).
0 Remove the paper filter (Figure 8).
Bags full of normal household dust
2
may be disposed of with household
rubbish. If necessary, wipe out the filter
compartment with a damp cloth.
0 Place the new paper filter on the filter
carrier (Figure 9).
2. MICROFILTER
Please note: The MICROFILTER must
1
also be replaced every fifth paper
filter change (Figure 10) to maintain
optimum suction performance.
By renewing the MICROFILTER in
good time you will ensure good
suction performance and reduce the
amount of time spent vacuuming.
0 Insert the lid into the appliance and
close by pressing it into place
(Figure 11).
Please use original Electrolux paper
1
filters, or paper filters that carry the
Electrolux quality seal. They guarantee
high suction performance and reliability.
Paper filters can be obtained from
specialist retailers under E No.
900 084 290 or from Electrolux customer service under ET No. 109 990 106.
The guarantee is void in the event of
damage if you use other paper filters.
Every packet of original size 6 Electrolux paper filters contains 10 paper
filters and 2 MICROFILTERS.
Using the Floor Nozzle
For the daily care of carpets and hard
floors.
The floor nozzle is suitable for universal use in the daily vacuuming of
carpets and hard floor coverings such
as parquet, tiles, linoleum, etc. without
the need to switch the nozzle manually. The four rollers and two large
wheels at the rear make the appliance
easy to manoeuvre. The additional
rotating joint makes your vacuum
cleaner particularly agile.
The rollers ensure that the separation
between the floor and underside of the
nozzle is always constant – this makes
it possible to vacuum hard floors
without problems.
Converting into a Handheld
Appliance / Using the Crevice
Nozzle
The vacuum cleaner is also easy to use
as a handheld appliance.
0 Fold down the handle (Figure 4/C).
0 Remove the floor nozzle (Figure 3) and
fit the crevice nozzle (Figure 6).
g
5
Page 6

g
Winding Up the Cable
(Figure 12)
The vacuum cleaner is equipped with a
cable winder.
0 Simply take hold of the plug and pull
out the mains cable.
0 To rewind the cable, press the cable
rewind button (Figure 2/E).
You can press the mains cable into the
3
clip on the upper part of the handle
(Figure 13).
Storage
The appliance can be stored in a
3
manner that saves a considerable
amount of space. Simply fold up the
handle (Figure 4/C). Leave the floor
nozzle fitted to the vacuum cleaner so
that it can stand up on its own
(Figure 14). The crevice nozzle can be
stored on the rear of the appliance
(Figure 15).
2 Protecting the Environment
Do not simply throw packaging material away.
– The cardboard packaging can be
deposited in the waste paper collection container or the relevant waste
disposal system.
– Deposit the plastic bag made from
polyethylene (PE) at a PE collection
point for recycling.
Please inquire with your local authority
about your local recycling centre.
Customer Service
The highest quality requirements are
placed on our appliances.
Should you nevertheless have questions in respect of the usage of this
appliance, please write to us. It is only
with your support that we are in the
position to develop appliances to suit
your needs.
6
 Loading...