

Page 1
Household Type
Maxi Steam Gun
Owner’s Guide
350 Series
IMPORTANT
For any advice on your cleaner,
pleaser refer to your local
telephone directory for your
nearest Electrolux Service
Agent. If you reside in the UK
please contact the
Customer Care line
08706 055055
INDEX
Important Safeguards...................2
Service Information ...................... 3
Use & Assembly........................4-8
Maintaining...................................8
Problem Solving ...........................9
Guarantee ..................................10
Page 2

IMPORTANT SAFEGUARDS
Carefully read these instruction:
The appliance is provided with a temperature regulator, a thermofuse and
a safety plug. It complies with European standards regarding electrical
household appliances.
Check that the voltage indicated on the plate corresponds with that of the
local network before connecting the appliance to the supply mains.
Always plug the appliance into a grounded outlet.
When using the flexible pipe (21), before releasing the steam, direct the
jet of the gun (13) into a container so as to remove the condensation from
the pipe.
Never leave the appliance unattended when it is connected to the electric
network.
Do not tilt the appliance more than 45° from its upright position while it is being
used in order to prevent hot water from leaking out of the boiler tank together with
steam.
Avoid directing the jet of steam towards people, animals or equipment with
electrical components (e.g. ovens).
Do not immerse the appliance in water or other liquids.
Always unplug the appliance when you fill the boiler tank with water.
Never leave the appliance within child’s reach.
Never add descaling agents, aromatics, alcoholics or detergents to the water in
the appliance - they may damage it or make it unsafe to use.
Do not touch hot surfaces while the appliance is being used. Allow the
attachments to cool down before replacing them.
Attention: before unscrewing the cap (3), carry out the following operations:
- unplug the power cord from the outlet
- slowly unscrew the cap (3) and wait for a few seconds before unscrewing it
completely in order to allow the hissing noise of the steam to stop.
Attention: before removing the flexible pipe (21) carry on the following
operations:
- slowly turn the pipe and remove it from the appliance
Do not use the appliance if it is damaged. Any repair work, including the
replacement of the power cord, must be carried out by an Electrolux Service
Agent in order to prevent any risk.
This appliance is intended for domestic use only.
This appliance is in conformity with directive 89/336 EEC relevant to
electromagnetic compatibility.
When cleaning carpets or upholstery fabric, always test a small hidden area
before. Do not use on velvet or velour upholstery.
When the steam cools down, water may form in the steam hose. When you first
use the machine or when it has not been used for a long period of time, drain the
hot water into a container by pressing the steam spray button and aiming the
spray nozzle into the measuring cup until steam begins to disperse again.
When using the carrying strap always keep the product in the horizontal position.
Do not allow the product to hang in the vertical position.
KEEP THESE INSTRUCTIONS
2
Page 3
GENERAL INFORMATION
The steamer is designed as a complete change from old methods of traditional
cleaning. This appliance is designed as a multi-purpose cleaner with a variety of
applications.
Service Information
The instructions in this booklet serve as a guide to routine maintenance. For additional
service information telephone Electrolux Customer Care on 08706 055055 (for UK
residents only) or contact your nearest Electrolux Service Agent. You should know
the model and type when you call.
Rating Plate
The model and type are indicated on the rating
plate located on the bottom of the cleaner. For
prompt and complete service information,
always refer to these numbers when inquiring
about service.
MODEL TYPE
VOLTZ WATTS HERTZ
Electrolux
Made in Italy
Model & Type______________________
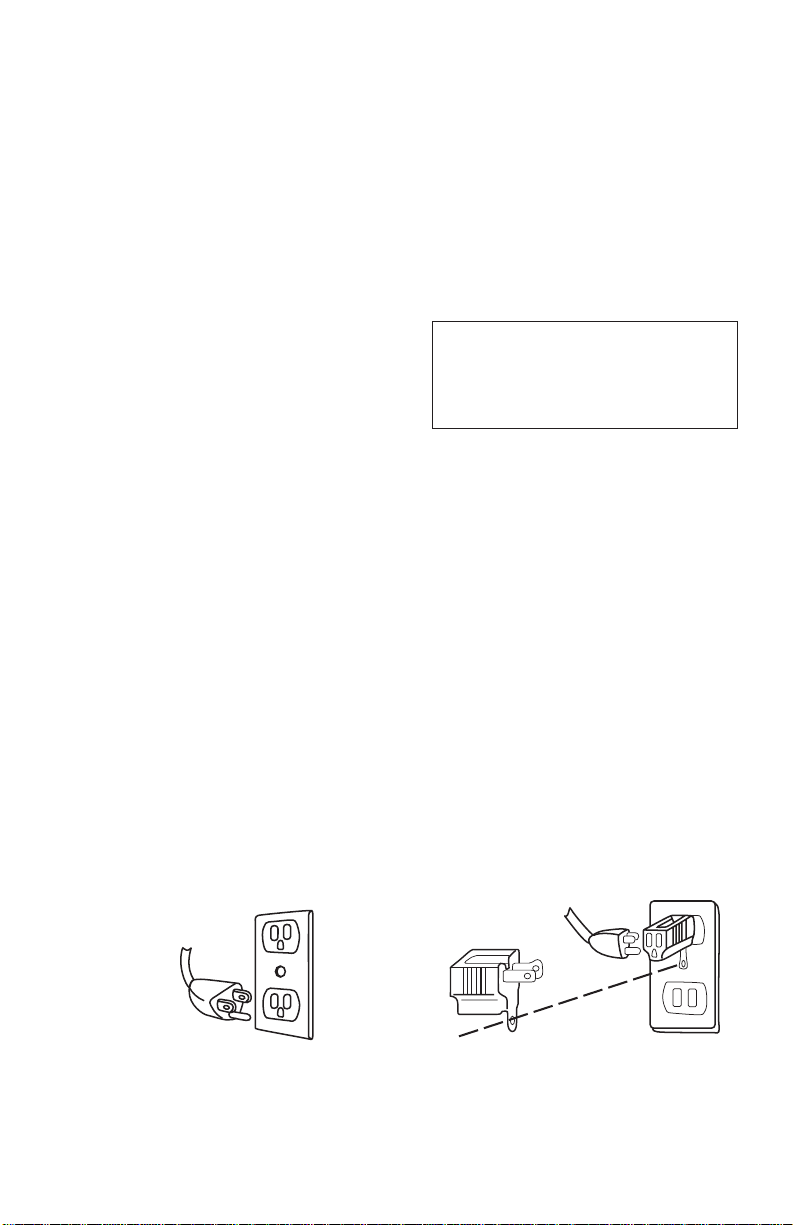
GROUNDING INSTRUCTIONS
This appliance must be grounded. If it should malfunction or breakdown, grounding
provides a path of least resistance for electric current to reduce the risk of electric shock.
This appliance is equipped with a cord having an equipment-grounding conductor and
grounding plug. The plug must be inserted into an appropriate outlet that is properly
installed and grounded in accordance with all local codes and ordinances.
DANGER
Improper connection of the equipment-grounding conductor can result in a risk of electric
shock. Check with a qualified electrician or service person if you are in doubt as to
whether the outlet is properly grounded. Do not modify the plug provided with the
appliance - if it will not fit the outlet, have a proper outlet installed by a qualified electrician.
GROUNDED
OUTLET BOX
GROUNDED
OUTLET BOX
GROUNDING BLADE
IS LONGEST OF THE
THREE BLADES
.
FIGURE A
METAL
SCREW
3
ADAPTER
GROUNDING
.
FIGURE B
TAB
Page 4
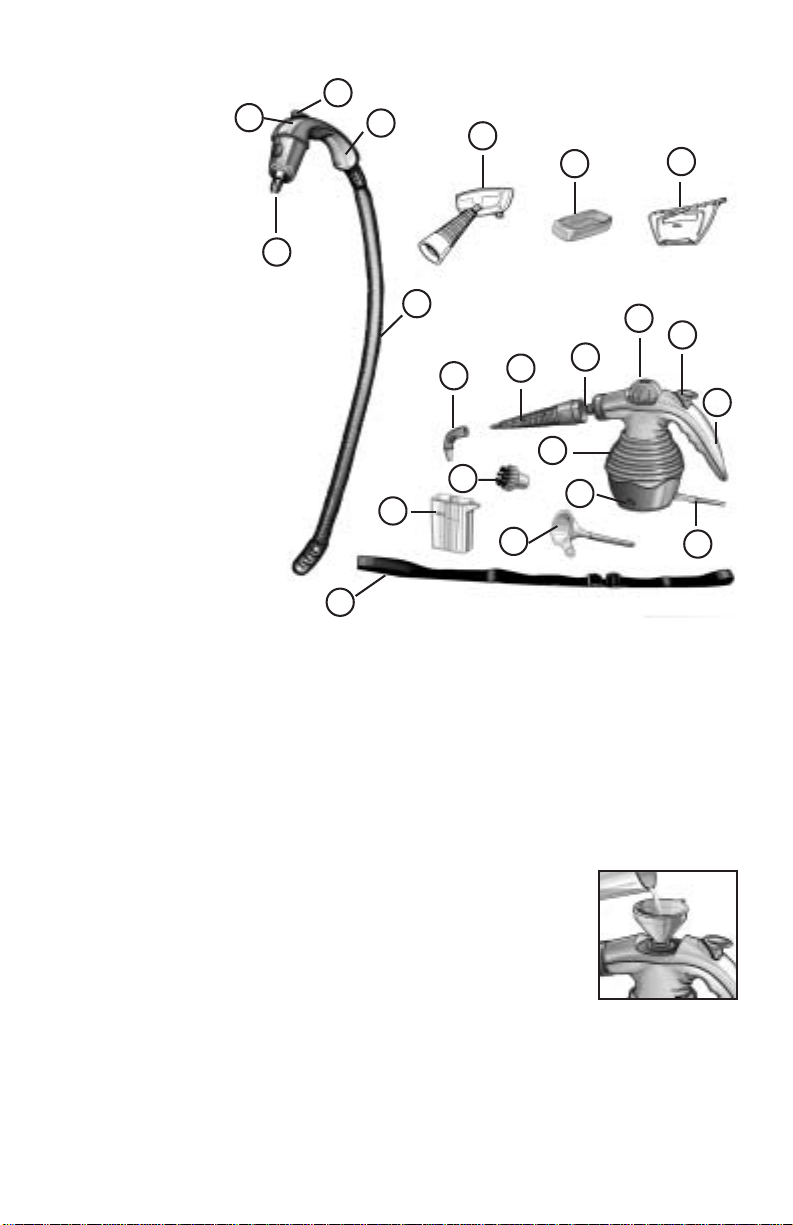
Description of the hand held steamer
1. Appliance Body
2. Articulated Steam
nozzle
3. Safety Cap
4. Steam Push Button
5. Handel
6. Power Cord
7. Warning Light
ACCESSORIES
8. Funnel
9. Measure
10. Round Brush
11. Bent Nozzle
12. Straight Nozzle
13. Gun
14. Safety Cursor
15. Steam Release Button
16. Gun Nozzle
17. Brush for Fabric
18. Glass Wiper
19. Cloth
20. Shoulder Belt
21. Flexible pipe
14
16
15
20
13
17
18
21
11
9
12
10
8
2
1
7
19
3
4
5
6
Dear Customer,
Thank you for choosing this Electrolux Envirosteam Gun which is an ideal cleaning
product because of the degreasing and cleaning power of steam which eliminates
bacteria, microbes, mites. It is an ecological method of cleaning which does not require
the use of chemicals.
INSTRUCTIONS FOR USE
How to fill the boiler tank before use
Unscrew the safety cap (3) and overturn the boiler tank to drain it
completely.
Fill the boiler tank (figure A) with a measure (9) full of water by
means of the funnel (8).
Screw the safety cap (3) on again.
How to start the appliance
Insert the plug attached to the power cord into the outlet. The warning light (7) will go
on. Steam will be ready after about 3 to 4 minutes. Press button (4) to release steam.
Never unscrew the boiler tank cap unless you are sure that the appliance has
been unplugged from the outlet.
4
Fig. A
Page 5

APPLICATION OF THE ATTACHMENTS
Straight nozzle:
a) fully insert the attachment by pushing it a against the appliance
body. Align the mark on the nozzle with the yellow mark on the
appliance as shown in figure B.
b) turn in a clockwise direction until the mark on the nozzle is
perfectly aligned with the two lines on the appliance body. Now
the attachment is locked in the central position.
Round brush and bent nozzle:
Both these attachments can be attached to the straight nozzle (Figure C and D), or to
the articulated steam nozzle on the appliance body (Figure E and F).
Fig. B
Fig. C
Fig. D Fig. E Fig. F
Flexible pipe, Brush for fabrics and glass wiper:
The flexible pipe (21) must be attached to the articulated steam nozzle (2). Then attach
whichever accesory you wish to use - the round brush (10), the bent nozzle (11) the
straight nozzle (12), then the brush for fabrics (17) .
The brush for fabrics comes with a cloth that can be used to clean delicate surfaces
such as sofas and armchairs, and with a glass wiper fitted as shown in figure G, as
well as for ironing hanging clothing articles (Fig. H).
Fig. G
Fig. H
CAUTION: do not use th glass wiper on cold glass. It may break the glass.
NOTE: never put descaling, aromating, alcoholic or detergent products into the
appliance, as this may damge it or make it unsafe for use.
5
Page 6

HOW TO ATTACH THE SHOULDER BELT TO THE STEAMER
Position the steamer and the shoulder
belt as shown above.
Tighten the shoulder belt around the
body , properly adjusting the strap buckle
nearest the steamer body.
Place the shoulder belt under the
handle and around the steamer body.
Adjust the belt farthest away from the
steamer body to a comfortable working
position.
Example of how to carry the steamer.
6
Page 7

Suggested Uses for Attachments
Scrub Brush
Stovetops, countertops, sealed grout, inside trash
receptacles.
Fabric T ool
Window Cleaner
Straight Nozzle
Angled Nozzle
Steaming clothes, upholstery, window coverings.
It is suggested that the cloth is used with the fabric
tool when used on clothing, upholstery and curtains.
Windows, mirrors, glass doors. Do not use on cold
windows or glass. It may break.
Edging, window sills, ledges, tile, mantles.
Difficult to reach areas, toilet bowls, window sills.
7
Page 8

How to fill the boiler while the appliance is being used
When the water in the boiler tank has run out and you press the button (4) no steam
will come out. To refill, carry out the following operations:
a) unplug the appliance;
b) wait for about 10 seconds;
c) carefully unscrew the safety cap (3). Before unscrewing it completely wait for the
hissing noise created by residual steam to stop;
d) unscrew the cap completely and slowly pour a measure of water into the boiler by
means of the funnel (8). Take care not to let any water flow out of the tank during
this operation;
e) retighten the safety cap;
f) insert the plug into the outlet.
CLEANING AND MAINTENANCE
Unplug the appliance from the outlet before carrying out any operation. Let the
appliance cool down completely before putting it away or cleaning it.
To ensure the best performance and long life of the appliance, rinse out the boiler
every month to remove any scale deposits. Do not use vinegar or other descaling
agents.
8
Page 9

PROBLEM SOLVING
NOTE: Unplug the electrical cord before servicing.
PROBLEM CAUSE SOLUTION
Appliance won’t
start
√
Electric plug
√
No water in tank
Push plug securely into
outlet. Verify power on light
is on.
Try another outlet.
Check circuit breaker.
Check the tank for water.
Appliance won’t
make steam
Appliance spits
water out of nozzle
Water boils out of fill
spout when adding
water.
Accessories will not
stay on.
General questions
√
No water in tank
√
Too much water in
tank. Do not overfill.
√
Unit positioned
upside down.
√
Not fully preheated.
√
Water tank too hot.
√
Not properly
installed.
√
Assembly or related
accessories
Check the tank for water.
Check the water level in the
tank.
Use in upright position.
Allow more time for water to
heat up.
Allow more time for cooling.
Add water slowly.
Use special funnel provided.
Check for proper assembly.
Review this guide for
assembly instructions.
Please refer to your local
telephone directory for your
nearest Electrolux Service
Agent. If you reside in the
UK, you may contact the
Customer Care line 08706
055055. Know the Model
and T ype numbers when you
call.
9
Page 10

Guarantee (for UK residents only)
This guarantee is in addition to your statutory and other legal rights.
This product is for household use only.
Electrolux products are carefully designed, manufactured, tested and inspected
and, in consequence, we undertake to replace or repair any part found to be defective
in material or workmanship, within one year of delivery to the original purchaser,
free of charge. You may be required to take the product to your nearest service
provider if the product requires attention during the first year.
There are certain conditions which may invalidate this guarantee:
a. It is dependent upon the appliance being correctly installed and used in
accordance with the Company’s instructions under normal domestic conditions
within the United Kingdom or the Republic of Ireland.
b. Service at all times must be carried out by an Electrolux Service Representative
or authorised agent.
c. The guarantee may be invalidated by unauthorised repair or modification of
the appliance.
d. You may be charged by Electrolux if you call for an engineer to resolve a problem
that we believe is covered in the instruction booklet.
The Company does not accept liability for defects arising from neglect, misuse or
accident.
Proof of the date of purchase will be required before service under guarantee is
provided. For further assistance call our customer care line on 08706 055055.
Important:
For future reference we suggest you record the following details here, and keep
the receipt with the handbook as proof of purchase.
Purchased from___________________________________________________
Date purchased_________________ Model no _________________________
10
Page 11

2002 Electrolux
Printed in Italy
Cod. 5065103400 rev. 0 del 28/03/02
 Loading...