

Page 1

user manual
Tumble Dryer
TAL1E100
Page 2

Page 3

Welcome to the world of Electrolux
Thank you for choosing a first class product from
Electrolux, which hopefully will provide you with lots of
pleasure in the future. The Electrolux ambition is to
offer a wide variety of quality products that make your
life more comfortable. You find some examples on
the cover in this manual. Please take a few minutes
to study this manual so that you can take advantage
of the benefits of your new machine. We promise that
it will provide a superior User Experience delivering
Ease-of-Mind. Good luck!
electrolux 3
GB
Page 4

4 contents electrolux
Contents
Safety information..............................5
Product description ...........................7
Control panel.....................................8
Use ..............................................9-13
Drying hints ................................14-15
Drying programme .....................16-17
Programme information ...................18
Care and cleaning ......................19-20
Something not working ..............21-22
Technical data .................................23
Consumption values ........................24
Installation ..................................25-27
Environment concerns.....................28
Guarantee conditions .................29-30
The following symbols are used in this manual:
Important information concerning your personal safety and information on how
to avoid damaging the appliance.
General information and tips
Environmental information
Page 5

safety information electrolux 5
IImmppoorrttaanntt ssaaffeettyy iinnffoorrmmaattiioon
IInn tthhee iinntteerreesstt ooff yyoouurr ssaaffeettyy aanndd ttoo eennssuurre
tthhee ccoorrrreecctt uussee,, bbeeffoorree iinnssttaalllliinngg aanndd ffiirrsst
uussiinngg tthhee aapppplliiaannccee,, rreeaadd tthhiiss uusseerr mmaannuuaal
ccaarreeffuullllyy,, iinncclluuddiinngg iittss hhiinnttss aanndd wwaarrnniinnggss.. TTo
aavvooiidd uunnnneecceessssaarryy mmiissttaakkeess aanndd aacccciiddeen
iitt iiss iimmppoorrttaanntt ttoo eennssuurree tthhaatt aallll ppeeooppllee uussiinng
tthhee aapppplliiaannccee aarree tthhoorroouugghhllyy ffaammiilliiaarr wwiitthh iitts
ooppeerraattiioonn aanndd ssaaffeettyy ffeeaattuurreess.. SSaavvee tthheesse
iinnssttrruuccttiioonnss aanndd mmaakkee ssuurree tthhaatt tthheeyy rreemmaaiin
wwiitthh tthhee aapppplliiaannccee iiff iitt iiss mmoovveedd oor
tthhaatt eevveerryyoonnee uussiinngg iitt tthhrroouugghh iittss lliiffee wwiillll bbe
pprrooppeerrllyy iinnffoorrmmeedd oonn aapppplliiaannccee uussee aannd
ssaaffeettyy.
.
GGeenneerraall ssaaffeetty
• It is dangerous to alter the specifications
or attempt to modify this pr
way.
• This appliance is not intended for use by
persons (including children) with reduced
physical, sensory or lack of experience
and knowledge, unless they have been
given supervision or instruction
concerning use of the appliance by a
person responsible for their safety.
• Make sure that small pets do not climb
into the drum. To avoid this, please
check into the drum before using.
• Any objects such as coins, safety pins,
nails, screws, stones or any other hard,
sharp material can cause extensive
damage and must not be placed into the
machine.
• In order to avoid danger of fires caused
by excessive drying, do not use
appliance to dry the following items:
Cushions, quilts and the like (these items
accumulate heat).
• tems such as foam rubber (latex foam),
shower caps, waterproof textiles, rubber
backed articles and clothes or pillows
fitted with foam rubber pads should not
y
ssoolldd,, sso
r
oduct in any
e
t
l
o
ttss,
,
n
g
s
e
n
o
e
d
n
be dried in the tumble dryer.
• Always unplug the appliance after use,
clean and maintenance.
• Under no circumstances should you
attempt to repair the machine yourself.
Repairs carried out by inexperienced
persons may cause injury or serious
malfunctioning. Contact your local
Service Centre. Always insist on genuine
spare parts.
• Items that have been soiled with
substances such as cooking oil acetone,
petrol, kerosene, spot removers,
turpentine, waxes and wax removers
should be washed in hot water with an
extra amount of detergent before being
dried in the tumble dryer.
DDaannggeerr ooff eexxpplloossiioonn:
•
items that have been in contact with
inflammable solvents (petr
spirits, dry cleaning fluid and the like). As
these substance are volatile, they could
cause an explosion. Only tumble dry
items washed with water.
RRiisskk ooff ffiirree:
•
or soaked with vegetable or cooking oil
constitute a fir
be placed in the tumble dryer.
• If you have washed your laundry with
stain remover you must execute an extra
rinse cycle before loading your tumble
dryer.
• Please make sure that no gas lighters or
matches have accidentally been left in
pockets of garments to be loaded into
appliance
WWAARRNNIINNGG!
Never stop a tumble dry before the end of the
drying cycle unless all items are quickly
removed and spr
dissipated.
RRiisskk ooff ffiirree!
:
Never tumble dry
ol, methylated
:
items that have been spotted
e hazard and should not
!
ead out so that the heat is
!
GB
Page 6

6 electrolux safety information
IInnssttaallllaattiioon
n
• This appliance is heavy. Care should be
taken when moving it.
When unpacking the appliance, check
•
that it is not damaged. If in doubt, do not
use it and contact the Service Centre.
• All packing and transit bolts must be
removed before use. Serious damage
can occur to the product and to property
if this is not adhered to. See relevant
section in the user manual.
• The final part of a tumble dryer cycle
occurs without heat ( cool down cycle )
to ensure that the items are left at a
temperature that ensures that items will
not be damaged.
• Any electrical work required to install this
appliance should be carried out by a
qualified electrician or competent
person.
• Care must be taken to ensure that the
appliance does not stand on the
electrical supply cable.
• If the machine is situated on a carpeted
floor, please adjust the feet in order to
allow air to circulate freely.
• After having installed the appliance,
check that it is not pressing or standing
on its electrical supply cable.
• If the tumble dryer is placed on top of a
washing machine, it is compulsory to use
the stacking kit (optional accessory).
UUsse
e
• This appliance is designed for domestic
use. It must not be used for purposes
other than those for which it was
designed.
• Only wash fabrics which are designed to
be machine dried. Follow the instructions
on each garment label.
•
Do not dry unwashed items in the tumble
dryer.
• Do not overload the appliance. See the
relevant section in the user manual.
• Clothes which are dripping wet should
not be placed in the dryer.
• Garments which have been in contact
with volatile petroleum products should
not be machine dried. If volatile cleaning
fluids are used, care should be taken to
ensure that the fluid is removed from the
garment before placing in the machine.
• Never pull the power supply cable to
remove the plug from the socket; always
take hold of the plug itself.
• Never use the tumble dryer if the power
supply cable, the control panel, the
working surface or the base are
damaged so that the inside of the tumble
dryer is accessible.
• Fabric softeners, or similar products
should be used as specified by the fabric
softener instructions.
CChhiilldd ssaaffeetty
y
• This machine is not intended for use by
young children or infirm persons without
supervision.
•
Children should be supervised to ensure
that they do not play with the appliance.
• The packaging components (e.g. plastic
film, polystyrene) can be dangerous to
children - danger of suffocation! Keep
them out of children’s reach.
• Keep all detergents in a safe place out of
children’s reach.
• Make sure that children or pets do not
climb into the drum.
Page 7
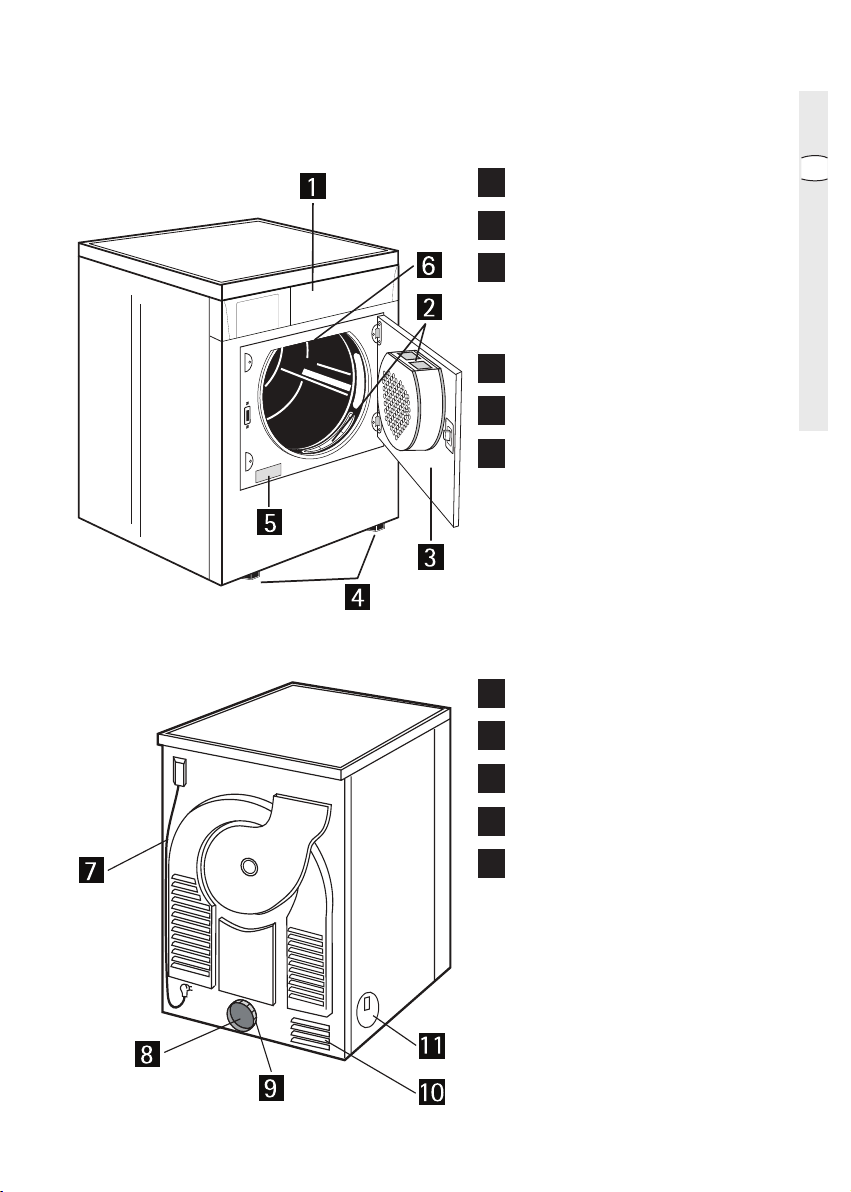
Product description
11
product description electrolux 7
FFrroonntt vviieew
RReeaarr vviieew
w
w
1
1
Control panel
2
2
Fluff filters
3
3
Door
(opening direction can
be changed)
4
4
Adjustable feet
5
5
Rating plate
6
6
Drum light
7
7
Power supply cable
GB
8
8
Rear vent outlet
9
9
Ring nut
0
110
Intake grille
1
111
Side vent outlet
Page 8
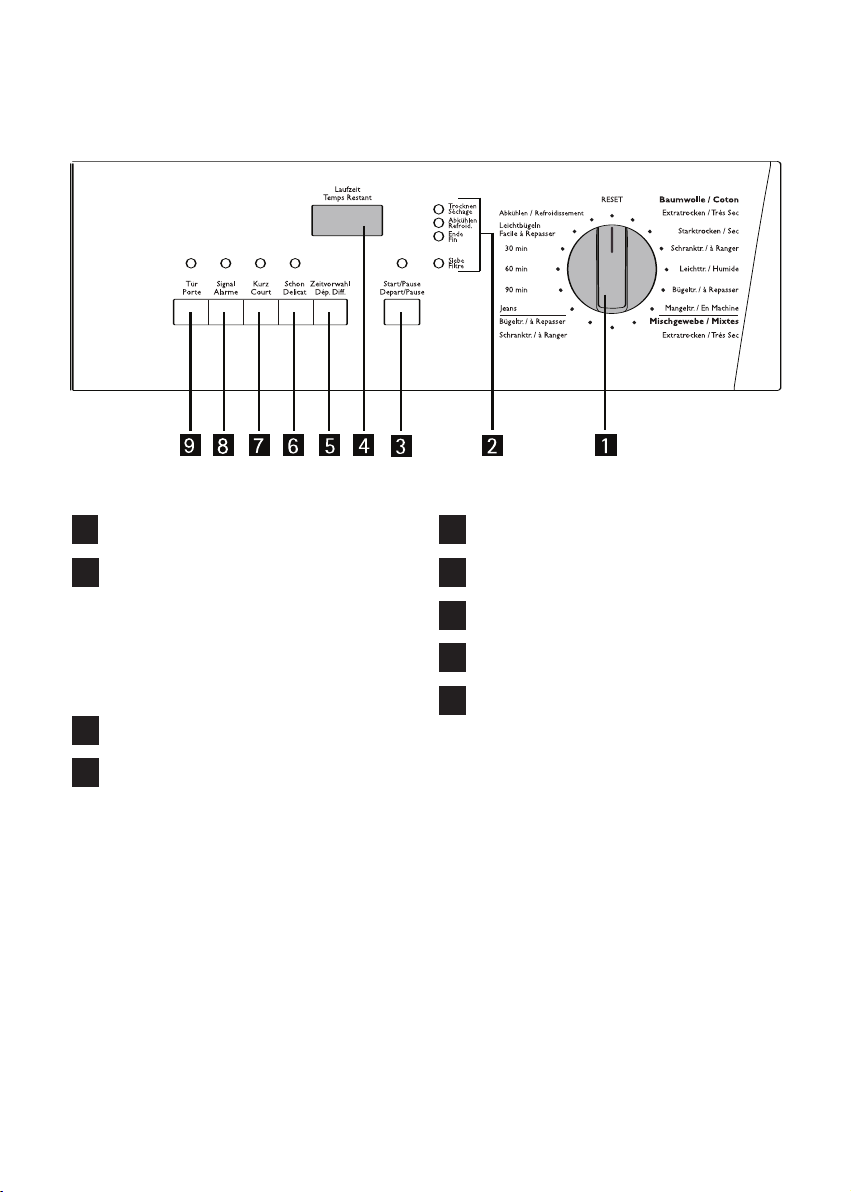
8 electrolux control panel
11
Control panel
1
1
PPrrooggrraammmmee//TTiimmee SSeelleeccttoorr DDiiaal
2
2
IInnddiiccaattoorr lliigghhtt
- TROCKNEN
- ABKÜHLEN - Cooling
- ENDE -End
- SIEB - Filtres
3
3
Start/Pause button
4
4
Display
- Drying
5
5
l
Delay start button
6
6
Delicate button
7
7
Quick button
8
8
Buzzer button
9
9
Door button
Page 9
use electrolux 9
P1108
P1104
Use
First Use
• Ensure that the electrical connections
comply with the installation instructions.
• Remove the polystryrene block and
any material from the drum.
• Before using your tumble dryer for the
first time, were commend that you to
place a few damp cloths inside the
appliance and dry for 30 minutes.
There may be dust inside a brand
new tumble dryer.
Daily Use
Connect the appliance.
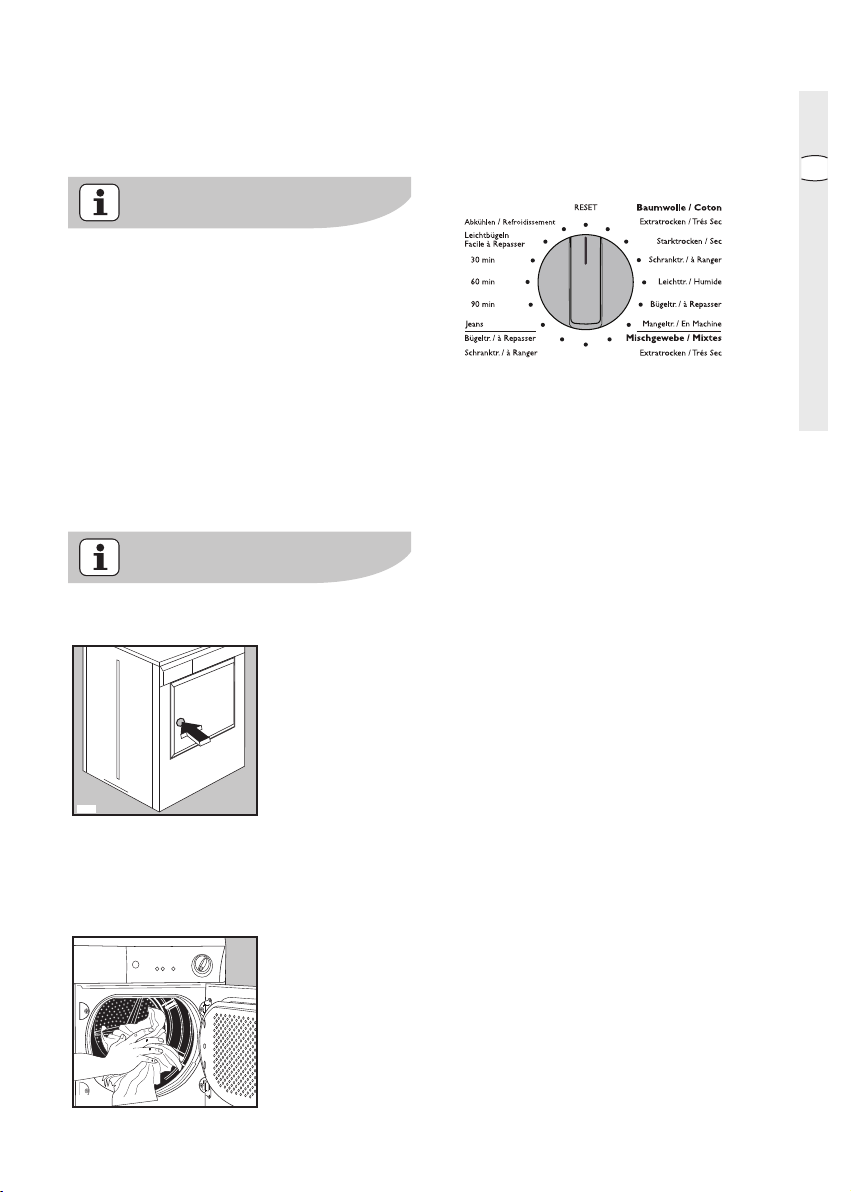
Open the door (see picture).
Place the laundry in the drum, one item
at a time, shaking them out as much
as possible. Close the door. Please check
the laundry does not get caught
between the door and filter.
SSeelleecctt tthhee rreeqquuiirreedd pprrooggrraammmme
e
Turn the programme selector dial to the
r
equired programme.
The light Start/Pause starts to flash.
The selector dial is divided into following
sections:
Baumwolle / Cottons
Mischgewebe/Synthetics
Zeit /Time
Special
Allows you to select electronically
controlled or time controlled drying. Turn
the dial to the required programme or time.
EElleeccttrroonniiccaallllyy ccoonnttrroolllleedd ddrryyiinngg ((aauuttoommaattiicc))
The appliance runs these programmes
with the help of pr
obes which detect the
degree of dampness of the laundry.
Simply select the programme according
to the type of laundry and degree of
drying required.
TTiimmee ccoonnttrroolllleedd ddrryyiinng
g
Can be used to finish off drying if necessary.
Select the 90 or 60 minute programme for
cottons or the 30 minute pr
ogramme for
synthetics. To cancel a programme which is
running, turn the programme selector dial to
“RESET”. At the end of drying, turn the
selector dial to “RESET” to switch the
machine off before removing the laundry.
GB
PPrrooggrraammmmee OOppttiioonn bbuuttttoonns
s
Depending on the programme, different
functions can be combined. These must
be selected after choosing the desir
ed
programme and before depressing the
Page 10
10 electrolux use
Start/Pause button. When these buttons
are pressed, the corresponding pilot lights
come on. When they are pressed again, the
pilot lights go out.
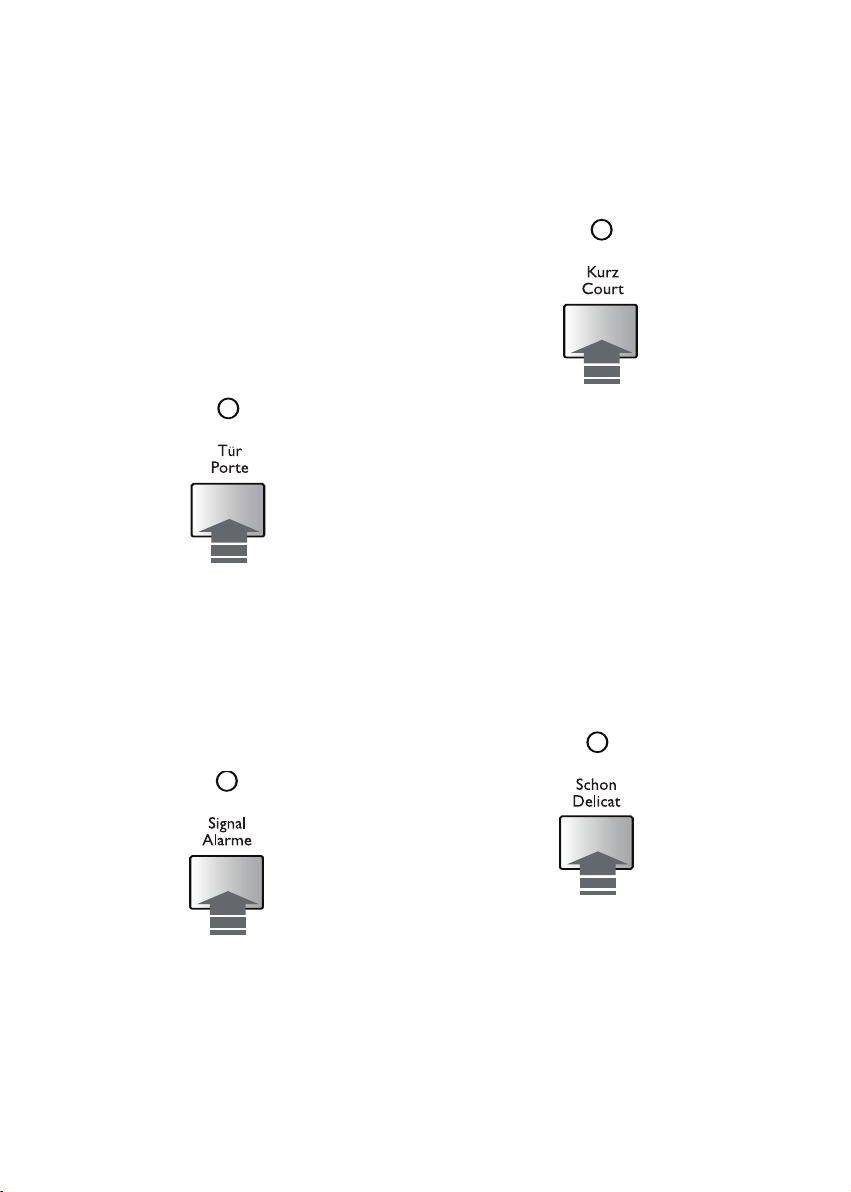
SSeelleecctt DDoooor
r
Press this button to open the door. The
light above the button will light up.
Opening the door by means of this
button is possible only if the tumble
dryer is on (pr
ogramme selector dial
set to a programme or drying
time)
If you open the door during a programme, in order to restart the programme you must re-press the
START/PAUZE button again after having closed the door.
SSeelleecctt tthhee BBuuzzzzeerr
When the drying cycle has finished, an
intermittent audible signal will sound.
option button during the cycle
• at the end of the programme.
The corresponding light comes on
SSeelleecctt tthhee QQuuiicckk bbuuttttoon
n
By depressing this button the drying
time is r
educed in the following
COTTON programmes:
• Extratrocken / extra dry
• Starktrocken /ready to wear
• Schranktrocken /store dry
The corresponding light illuminates.
This option cannot be selected togeth-
n
er with
SScchhoon
/low temperature function
.
SSeelleecctt DDeelliiccaatte
e
Pressing this button allows drying to be
performed at a lower temperature, for
delicate items.
By depr
essing buzzer button the
acoustic signal is switched off in the
following cases:
• when selecting the programme
• when depressing the buttons
• when the programme selector dial is
turned to another position during the
programme or when you depress an
The corr
esponding pilot light comes
on. This option can also be used for
time controlled drying.
This function cannot be used with
z
KKuurrz
/quick drying.
Page 11

use electrolux 11
SSeelleecctt DDeellaayy ssttaarrt
t
This button allows you to delay the
starting of the pr
ogramme by 12 hours
max. This option must be selected
after having selected the programme
and before pressing Start/Pauze to
start the programme.
Every time the button is pressed, the
time is increased by 30 minutes, until
the display shows a delay of “2 hours”.
After this, the delay is displayed hour
by hour. The minutes or hours of delay
that have been selected are displayed
for 2 seconds, then the display shows
the duration of the previously selected
programme. The countdown begins
after you have pressed the Start/Pauze
button. To cancel the delay time press
the DELAYED START button until the
display indicates 0’h. Then press the
Start/Pauze button again. When the
delay is cancelled, the display shows
the duration of the programme. During
the delayed start, it is not possible to
change the programme or the delay
time that have been selected. To do
this, you must first switch off the
machine by setting the programme
selector dial to “RESET”. Select the
new programme, the options and the
delayed start, then press the
Start/Pauze button. To cancel or
change options that have been selected, simply set the appliance to PAUZE.
Once you perform the desired operation, press once again the Start/Pauze
button.
If you wish to add more laundry while
the machine is performing the countdown, simply open the door.
When you close the door, press the
Start/Pauze button again to cause the
countdown to be resumed.
y
DDiissppllaay
The display shows the following information:
DDuurraattiioonn ooff sseelleecctteedd pprrooggrraammmme
e
After you have selected the programme,
its duration (in hours and minutes) appears
n the display. It is calculated automatically
o
on the basis of the maximum load
accepted for each type of fabric and of the
required degree of drying.
When the programme starts, the remaining
time is displayed every 5 minutes.
DDeellaayyeedd ssttaarrt
t
If you have selected a delay time by means
of the relevant button, the display shows it
for 3 seconds; then it shows the duration
of the pr
eviously selected programme. The
countdown is displayed every 30 minutes
until it displays “90 minutes” and then hour
by hour.
EEnndd ooff pprrooggrraammmme
e
A flashing zero indicates the end of the
GB
Page 12

12 electrolux use
programme and it is displayed after the
“anticreasing” phase.
IInnccoorrrreecctt ooppttiioonn sseelleeccttiioon
n
If you select an option that is not compatible
with the pr
ogramme you have selected,
the display shows Err (error).
This code will reappear during the execution of
the programme if you press one of the option
buttons or turn the programme selector.
AAllaarrmm ccoodde
e
In case of a functional anomaly, the display
shows an alarm code (e.g. E21).
button must be pressed again after
closing the door in order to restart the
programme from the point at which it
was interrupted. In both cases the light
of the Start/Pause button flashes to
remind you that the start button needs
to be pressed again.
IInnddiiccaattoorr lliigghhtts
s
These lights indicate the following
functions:
TTrroocckknneenn//DDrryyiinngg lliigghhtt
This light indicates that the appliance is
in the drying phase.
AAbbkküühhlleenn//CCoooolliinngg lliigghhtt
This light indicates that the appliance is
in the cooling phase. At the end of
drying, ther
e is a 10 minute cooling
phase to cool the laundry.
EEnnddee//EEnndd ooff pprrooggrraammmmee lliigghhtt
This light is on at the end of the cooling
phase, during the anti-cr
easing phase
and at the end of the programme.
SSiieebbee//FFiilltteerr cclleeaanniinngg lliigghhtt
This light illuminates at the end of the
ogramme to remind you that the
pr
filters must be cleaned.
SSeelleecctt tthhee SSttaarrtt//PPaauusse
e
Press this button to start the dryer after
having selected the pr
ogramme and
the options. The relevant light will stop
flashing. If the door of the appliance or
the small door at the bottom is opened
while the programme is running, this
AAtt tthhee eenndd ooff tthhee pprrooggrraammmme
e
All drying programmes end with a 10
minute cooling phase.
If the laundry is not r
emoved at the end
of the cycle, the dryer performs an
anti-creasing phase (duration: 30 minutes maximum).
If you do not remove the laundry, the
dryer will stop automatically at the end
of the anti-creasing phase.
Lights end and filter remain lit and the
buzzer sounds for 2 minutes.
Turn the programme selector dial to
“RESET”; all the lights go out. The appliance is switched off.
Remove the laundry.
Page 13

If you open and then close the door
before turning the selector dial to
“RESET” all the indicator lights come on.
AAfftteerr eeaacchh uusse
e
• Clean the filters.
IImmppoorrttaanntt!
!
If the drying programme has to be
stopped before it reaches the end, we
recommend that you turn the programme selector dial to position
AAbbkküühhlleenn//CCoooolliinngg
and wait until the
end of this cooling phase before removing the laundry. This will avoid a build-up
of heat inside the appliance.To do this
T
first turn the dial to “
AAbbkküühhlleenn//CCoooolliinngg
RREESSEET
” and then to
and depress Start
button.
MMooddiiffyyiinngg tthhee pprrooggrraammmme
e
To change a programme which is running, first cancel it by tur
gramme selector dial to “
ning the pro-
T
RREESSEET
”. Select
the new programme and press the Start
button .
columns and margins electrolux 13
GB
Page 14

14 electrolux drying hints
Drying hints
Before loading the laundry
Never tumble dry the following:
Particularly delicate items such as
net curtains, woollen, silk, fabrics
with metal trim, nylon tights, bulky
materials such as anoraks, blankets,
eiderdowns, sleeping bags, feather
quilts and any items containing rubber foam or materials similar to rubber foam.
• Always follow the instructions on gar-
ment labels:
may be tumble dried
normal drying (high tempera-
ture)
delicate drying (low tempera-
ture)
do not tumble dry
• Close pillowcases and covers with
fasteners to prevent small laundry
items getting tangled inside them.
Close press studs, zips and hooks
and tie belts and apron strings.
• Sort laundry according to type and
degree of drying required.
• Do not over-dry laundry, this avoids
creasing and saves energy.
• Avoid drying dark clothes with light
coloured fluffy items such as towels
as they could attract the fluff.
• The laundry must be thoroughly spun
before tumble drying.
EEaassyy--ccaarree iitteemms
•
should be briefly pre-spun before
s
, too, e.g. shirts,
drying (depending on crease resistance approx. 30 seconds or using
the special brief spin programme of
your washing machine).
• Knitted textiles (knitted underwear)
may shrink a little during drying.
Please do not overdry items of this
type. It is advisable to allow for
shrinkage when choosing the size of
new purchases.
• You can also put starched items into
your dryer. However, to achieve the
desired starched effect, choose the
programme “iron dry”. To remove any
starch residues, wipe out the internal
drum after drying with a moist cloth
and then rub it dry.
• To avoid a static charge when drying
is completed, use either a fabric softener when you are washing the
laundry or a fabric conditioner specifically for tumble dryers.
• Remove the laundry when the dryer
has finished drying.
• If individual items are still damp after
drying, set a brief post-drying time,
aatt lleeaasstt 3300 mmiinnuuttees
but
s
. This will be
necessary particularly for multilayered
items (e.g. collars, pockets, etc.).
Make sure that no metal objects
are left in the laundry (e.g. hair
clips, safety pins, pins).
Button up pillowcases, close zip
fasteners, hooks and poppers. Tie any
belts or long tapes.
Remove persistent stains before
washing.
Rub particularly soiled areas with a
special detergent or detergent paste.
Treat curtains with special care. Remove
hooks or tie them up in a bag or net.
Page 15

Maximum loads
Recommended loads are indicated in
the programme charts.
General rules:
Cotton, linen: drum full but not too
tightly packed;
Synthetics: drum no more than half full;
Delicate fabrics and woollens: drum
no more than one third full.
Try to load to the maximum capacity
of the machine as small loads are
uneconomical.
Laundry weights
The following weights are indicative:
1200 gbathrobe
100 gnapkin
700 gquilt cover
500 gsheet
200 gpillow case
250 gtablecloth
200 gtowelling towel
100 gtea cloth
200 gnight dress
100 gladies’ briefs
600 gman’s work shirt
200 gman’s shirt
500 gman’s pyjamas
100 gblouse
100 gmen’s underpants
drying hints electrolux 15
GB
Page 16

16 electrolux drying programmes
Drying programmes
Programme
EExxttrraattrroocckkeen
/
/
Extra
-
SSttaarrkk-
n
ttrroocckkeen
/Strong
SScchhrraannkkttrroocckkeen
/
/
Cupboard
-
LLeeiicchhtt-
n
ttrroocckkeen
/
/
Damp
-
BBüüggeellttrroocckkeenn/
/
Iron
Mangeltrocken
/Michne
iron
EExxttrraattrroocckkeen
/
/
Extra
Type of
laundry
Cotton and
n
linen
Cotton and
linen
Cotton and
n
linen
Cotton and
linen
Cotton and
linen
Cotton and
linen
Synthetics
n
Options
QQuuiicckk BBuuzzzzeer
DDeelliiccaatte
e
DDeellaay
y
QQuuiicckk BBuuzzzzeer
DDeelliiccaatte
e
DDeellaay
y
QQuuiicckk BBuuzzzzeer
DDeelliiccaatte
e
DDeellaay
y
BBuuzzzzeer
r
DDeelliiccaatte
e
DDeellaay
y
BBuuzzzzeer
r
DDeelliiccaatte
e
DDeellaay
y
BBuuzzzzeer
r
DDeelliiccaatte
e
DDeellaay
y
BBuuzzzzeer
r
DDeelliiccaatte
e
DDeellaay
y
Description of programme
r
Drying thick or multi-layered textiles,
e.g. terry towelling items
r
Drying thick textiles, e.g. terry towelling
items, towels.
Drying textiles of even thicknesses,
r
e.g. terry towelling items, knitted
items, towels.
For thin textiles which are still to be
ironed, e.g. knitted items, cotton
shirts.
For cotton or linen laundry which are
still to be put through a machine, e.g.
bedding, table linen.
For cotton or linen laundry which are
still to be put through a machine,
e.g.bedding, table linen.
Drying thick or multi-layered textiles,
e.g. pullovers, bedding, table linen.
SScchhrraannkkttrroocckkeen
/
/
Cupboard
-
BBüüggeell-
n
ttrroocckkeen
/
/
Iron
Synthetics
n
Synthetics
BBuuzzzzeer
DDeelliiccaatte
DDeellaay
y
BBuuzzzzeer
DDeelliiccaatte
DDeellaay
y
r
e
r
e
For thin textiles which are not ironed,
e.g. easy care shirts, table linen,
baby’s clothes, socks, underwear.
For thin textiles which are still to be
ironed, e.g. knitted items, cotton
shirts.
Page 17

Drying programmes
drying programmes electrolux 17
Programme
Special
Jeans
Zeit/Time
30 min
60 min
90 min
Special
Leichtbügeln
/
Easy
Special
Abkühlen
/Cooling
Type of
laundry
Cotton
Synthetics
Cotton
Cotton
Synthetics
Cotton and
linen
Synthetics
Options Description of programme
BBuuzzzzeer
DDeelliiccaatte
DDeellaay
y
r
e
For leisure clothing, such as jeans,
sweat-shirts, etc., of different material
thicknesses (e.g. at the neck, cuffs
and seams).
Drying thick or multi-layered textiles,
BBuuzzzzeer
DDeelliiccaatte
DDeellaay
y
r
e
e.g. terry towelling items.
For drying individual items of laundry
or for small volumes of less than 1kg.
Special programme with anti-crease
mechanism for easy care textiles such
shirts and blouses; for minimum
ironing effort. The result depends on
BBuuzzzzeer
DDeelliiccaatte
DDeellaay
y
r
e
the type and quality of textiles. (The
loading volume corresponds to
approx. 4 to 5 shirts.)
Recommendation: Place textiles in the
dryer straight after spinning. Once
dried, immediately remove textiles and
place on clothes hanger.
Special programme, lasting around 10
minutes, for refreshing or gently
cleaning textiles with commercially
available dry cleaning sets.
BBuuzzzzeer
r
(Only use those products which are
declared as suitable for the drier by
the manufacturer; please observe the
manufacturer’s instructions for use.)
GB
Max Cottons load: 7 kg
Max Synthetics load: 3 kg
Max Time load: 3 kg
Max Special Jeans load: 7 kg
Page 18

18 electrolux programme information
Programme information
Objective
Adjusting the level
of conductivity
Implementation
Water contains, a variable quantity of limestone and mineral salts
of which quantities vary according to geographical locations thus
varying its conductivity values.
Relevant variations of the conductivity of the water compared to
those prefixed by the factory could slightly influence the residual
humidity of the laundry at the end of the cycle. Your dryer allows
you to regulate the sensitivity of the drying sensor based on
conductivity values of the water by using the following procedure.
TToo aacccceessss aaddjjuussttmmeenntt mmooddee:
1. Turn the programme selector dial to switch on the appliance.
2. In selection mode,pr
KKuurrzz//QQuuiicck
Press the buttons down until until «C0» appears on the digits.
AAddjjuussttiinngg tthhee lleevveell ooff ccoonndduuccttiivviitty
Pr
ess the
of conductivity is indicated by the lighting of the horizontal
hyphens.
Display
CO Low < 300
CO Medium 300-600
CO High >600
Normally, the appliance is factory-set to the highest level;
however, certain models may be configured differently.
MMeemmoorriizziinngg tthhee nneeww sseettttiinngg:
Simultaneously press the buttons
SSttaarrtt//ppaauusse
drying cycle time appears again on the display and the
buzzer sounds.
k
SSttaarrtt//ppaauusse
and
ZZeeiittwwoorrwwaahhll//DDeellaay
Conductivity Approximate value µS/cm
e
. Press the buttons down until the previous
:
ess simultaneously the buttons
e
y
:
y
button sequentially: the level
:
KKuurrzz//QQuuiicck
k
and
RESET =
Cancelling/OFF
To reset a programme and to switch off the machine turn
the selector dial to RESET. Now can a new programme be
selected.
Page 19

Care and cleaning
A
U
T
OR
E
V
E
R
S
E
k
g
5
k
g
2
,5
8
0
0
/
9
0
0
7
0'
-
9
0'
3
5
'
-
5
0'
1
0
0
0
/
1
2
0
0
6
5
'
-
8
5
'
3
0'
-
4
5
'
8
0
0
/
9
0
0
8
0
'
- 1
0
0
'
5
5
'
-
7
0'
1
0
0
0
/
1
2
0
0
7
5
'
-
9
5
'
5
0'
-
6
5
'
6
5
0
5
0'
-
6
0'
3
0'
-
3
5
'
k
g
2
,5
k
g
1
P1109
A
U
TO
RE
VE
RS
E
kg
5
kg
2,
5
8
0
0
/
9
0
0
7
0
'
-
9
0
'
35'
-
50
'
1
0
0
0
/
1
2
0
0
6
5'
-
8
5'
30
'
-
4
5'
8
0
0
/
9
0
0
8
0
'
-
10
0
'
55'
-
7
0
'
1
0
0
0
/
1
2
0
0
7
5'
-
9
5'
50
'
-
6
5'
6
5
0
50
'
-
6
0
'
30
'
-
35'
kg
2,
5
kg
1
P1112
A
U
TO
RE
VE
RS
E
kg
5
kg
2
,5
8
0
0
/
9
0
0
7
0
'
-
9
0
'
35
'
-
5
0
'
1
0
0
0
/
1
2
0
0
6
5
'
-
8
5
'
30
'
-
4
5
'
8
0
0
/
9
0
0
8
0
'
-
1
0
0
'
5
5
'
-
7
0
'
1
0
0
0
/
1
2
0
0
7
5
'
-
9
5
'
5
0
'
-
6
5
'
6
5
0
5
0
'
-
6
0
'
30
'
-
35
'
kg
2
,5
kg
1
P1111
P1110
You must DISCONNECT the appliance
from the electricity supply, before you
can carry out any cleaning or
maintenance work.
care and cleaning electrolux 19
GB
EExxtteerrnnaall cclleeaanniinng
g
Use only soap and water and then dry
thoroughly.
IImmppoorrttaanntt:
diluents or similar pr
CClleeaanniinngg tthhee ddoooor
:
do not use methylated spirit,
oducts..
r
Clean periodically the interior part of
the door to remove any fluff from the
seals around the filter. Accurate cleaning ensures correct drying.
CClleeaanniinngg tthhee ffiilltteerrs
s
Your dryer will only function well if the filters are clean.
The filters collect all the fluff which
accumulates during drying and they
must therefore be cleaned
ooff eeaacchh pprrooggrraammmme
e
, before r
the laundry, with a damp cloth.
The light
you this operation.
SSiieebbee//ffiilltteerrs
s
is on to remind
aatt tthhee eennd
emoving
The filter in the inner door must be
removed for cleaning.
Do not be alarmed by the amount of fluff. It
is not due to excessive wear caused by the
dryer.
All fabric loses fluff when drying but it
goes un-noticed in the air. In a tumble
dryer it simply collects in the filter.
After a while, a withish patina due to
detergent residue on laundry forms on
the filters. When this occurs, clean the
filters with warm water using a brush.
Remove the filter in the door opening
as per picture (it can be positioned with
the tooth facing to the left or to the
right).
d
Page 20

20 electrolux care and cleaning
DDoo nnoott uussee tthhee aapppplliiaannccee wwiitthhoouutt ffiilltteerrss.
CClleeaanniinngg tthhee ddrruum
When your laundry does not reach the desired
degree of dryness, in other words, when it
turns out either too dry or too damp, we
advise you to clean the inside of the drum with
a cloth soaked with vinegar.
This will eliminate the slight patina that has
formed in the drum (due to residues of
detergent and softeners used in the washing, and to the lime contained in the water),
which prevents the probes from detecting
the correct degree of dryness.
m
.
Page 21

something not working electrolux 21
Something not working
Certain problems are due to lack of simple maintenance or oversights, which can be
solved easily without calling out an engineer. Before contacting your local Service
Centre, please carry out the checks listed below.
During machine operation it is possible that the Start/Pause pilot light flashes to
indicate that the machine is not working.
Once the problem has been eliminated, press the Start/Pause button to restart the
programme. If after all checks, the problem persists, contact your local Service
Centre.
Malfunction Possible cause Solution
GB
Dryer does not work.
Drying results
unsatisfactory.
● Mains plug is not plugged in
or fuse is not working
correctly.
● Loading door is open.
● Have you pressed the
START/PAUSE button?
● Wrong programme selected.
● Lint filter clogged.
● Incorrect volume of laundry.
● Ventilation slots in base area
covered up.
●Residue on inside surface of
drum or drum ribs.
● Plug in at mains socket.
Check fuse in fuse box
(domestic installation).
● Close loading door.
● Press the START/PAUSE
button again.
● Select a different programme the
next time you dry (see “Overview
of programmes” section).
● Clean lint filter.
● Observe recommended
loading volumes.
● Uncover ventilation slots in
base area.
● Clean inside surface of drum
and drum ribs
Loading door does not
close.
● Fine strainer not in place
and/or large mesh filter not
locked in place.
● Install fine strainer and/or
snap large mesh filter into
place.
Page 22

22 electrolux something not working
P1206
Mod. ..........
Prod. No. ...........
Ser. No. .........
Mod. ..........
Prod. No. ...........
Ser. No. .........
Malfunction Possible cause Solution
When pressing a button, the
corresponding button flashes
several times.
Drum light does not
work
Drying cycle ends
shortly after programme
starts. END light illuminated.
Drying cycle lasts an
unusually long time.
Note:
After around 5 hours
the drying cycle ends
automatically (see
„Drying cycle complete“)
When a button is pressed, Err
appears in the multi-display.
● Washing protection. After the
start of the programme, the
option can no longer be set.
● Programme selector in
“RESET” position.
● Defective light bulb
● Not enough washing loaded
or washing loaded is too
dry for selected programme.
● Lint filter clogged.
SScchhoonn//DDeelliiccaat
●
essed and load volume too
pr
t
button
big.
● Load volume too big.
● Laundry insufficiently
predrained.
● Washing protection. After the
start of the programme, the
option can no longer be set.
● Turn the programme knob to
“RESET”. Set the programme
again
● Turn programme selector to
any programme
● Replace light bulb (see next
section).
● Select time programme or
higher drying level (e.g. EXTRA
DRY instead of STRONG).
● Clean lint filter
SScchhoonn//DDeelliiccaat
●
t
only suitable
for use with loads of up to 3
kg!
● Reduce load volume.
● Laundry must be adequately
pre-drained.
● Turn the programme knob to
“RESET” Set the programme
again.
If you are unable to identify or solve the
problem, contact our service centre.
Before telephoning, make a note of the
model, serial number and purchase date
of your machine: the Service Centre will
require this information.
IMPORTANT: if you call out an engineer
to a fault listed below, or to repair a fault
caused by incorrect use or installation, a
charge will be made even if the
appliance is under guarantee.
Page 23

Technical data
technical data electrolux 23
Dimensions Width 60 cm
85 cm
58 cm
Electrical connection
Voltage - Overall power Fuse
Height
Depth
Information on the electrical connection is given
on the rating plate on the inner edge of the
appliance door
Depth with loading door open 109 cm
Maximum Load 7 kg
Use
Cotton
Synthetics
3 kg
Domestic
+ 5°C à + 35°C
This appliance conforms with the following EU Directives:
– 73/23/EEC dated 19.02.1973 Low Voltage Directive
– 89/336/EEC dated 03.05.1989 EMC Directive inclusive of
Amending
Directive 92/31/EEC
– 93/68/EEC dated 22.07.1993 CE Marking Directive
GB
Page 24

24 electrolux consumption values
Consumption values
Programme Energy
Programme
duration
(in minutes)
Cottons Cupboard
Cottons Iron
Cottons Cupboard
Cottons Iron
Synthetics Cupboard
1)
Max Cottons load: 7 kg
2)
Max Synthetics load: 3 kg
1)
1)
1)
1)
2)
123 3,9
102 3,0
114 3,70
80 2,65 1400
35 1,18
consumption
(in kWh)
Revolutions
per
minute
1000
1000
1400
1200
The consumption values have been
established under standard conditions.
They may deviate when the machine is
operated in domestic circumstances.
Page 25

P0046
installation electrolux 25
Installation
Unpacking
All transit bolts and packing must be
removed before using the appliance.
Slide out the polythene bag with the
polystyrene stuffing before using the
appliance Pull off adhesive strips from
inside machine on top of drum.
SShhoouulldd tthhee aapppplliiaannccee bbee mmoovveedd,, iitt mmuusst
bbee ttrraannssppoorrtteedd vveerrttiiccaalllly
Positioning
It is r
ecommended that, for your
convenience, the machine is positioned
close to your washing machine. Whilst
drying, the tumble dryer will expel a
certain amount of warm, very moist air,
and this should be removed from the
room as quickly as possible to prevent
condensation. In an extremely well
ventilated room or close to an open
window, this may occur naturally.
However, in general, it is better to carry
the dryer's exhaust outside via the 100
mm diameter flexible hose supplied
with the appliance; ending either
temporarily at an open window, or
permanently at a fixed ventilation grille,
fitted to an exterior wall or window.
y
.
The tumble dryer must be installed in a
clean place, where dirt does not build up.
Make sure there are no obstructing
items or material near the air-intake
louvres provided at the back (e.g. paper,
rags etc.). To keep vibration and noise to
a minimum when the dryer is in use, it
should be placed on a firm, level surface.
Once in its permanent operating
position, check that the dryer is
absolutely level with the aid of a spirit
level. If it is not, raise or lower the feet
until it is.
TThhee ffeeeett mmuusstt nneevveerr bbee rreemmoovveedd.
DDoo nnoott rreessttrriicctt tthhee fflloooorr cclleeaarraanncce
t
tthhrroouugghh ddeeeeppppiillee ccaarrppeettss,, ssttrriippss oof
wwoooodd oorr ssiimmiillaarr.. TThhiiss mmiigghhtt ccaauussee hheeaat
bbuuiilldd--uupp wwhhiicchh wwoouulldd iinntteerrffeerree wwiitthh tthhe
ooppeerraattiioonn ooff tthhee aapppplliiaannccee.
IImmppoorrttaannt
t
.
The hot air emitted by the tumble dryer
can reach temperatures of up to 60°C.
The appliance must ther
efore not be
installed on floors which are not resistant
to high temperatures.
When operating the tumble dryer, the
room temperature must not be lower
than +5°C and higher than +35°C, as it
may affect the performance of the
appliance.
GB
.
e
f
t
e
Page 26

P1056
B
P1027
A
A
P1028
P0055
26 electrolux installation
Fitting the vent hose
A special stacking kit is available
throughTo simplify the installation, there
is a choice of vent outlets: one at the
back, the others in the left and righthand side.
Connect the hose to whichever is the
more convenient by pulling the ring nut
(A) from the vent outlet at the back,
screwing it on to the hose and pushing it
firmly back into place. The unused vents
should now be sealed with the special
snap covers provided.
Advice: If the hose is long and the
room temperature low, the moisture
might condense to water inside the
hose. This is an unavoidable natural
phenomenon. To prevent this water
from Iying in the hose or flowing back
into the tumble dryer, it is advisable to
drill a small hole (dia. 3 mm) in the
lowest point of the hose and to place a
small container below it.(See picture,
point B).
Once connected to the dryer, run the
vent hose to the desired outlet point,
ensuring that the run’s overall length is
less than 2 m, and that it contains no
more than two bends. As to the outlet
itself, if you have decided on a fixed
wall/window grille, a good local
builder’s merchant should be able to
supply you with the necessary fittings
and installation advice.
It is important not to connect the
vent hose to, for example, a cooker
hood, or a chimney or flue pipe
designed to carry the exhaust from
a fuel burning appliance.
Note that to avoid condensation
problems, it is essential that the dryer
be fitted with the flexible hose to carry
its “exhaust” at least beyond the
kitchen units; preferable outside the
kitchen.
In order to prevent the appliance from
overheating, it is important that the
steam exhaust is unobstructed.
Therefore, in case of a permanent hose
fitted to an exterior wall or ceiling, it
must be ensured an exhaust capacity
of at least 150 m3/h.
If the dryer is fitted next to kitchen
units, make sure that the vent hose is
not squashed. If the hose is partially
squashed, drying efficiency will be
reduced, resulting in longer drying
times and higher energy consumption.
If the hose is completely squashed, the
Page 27

P1107
installation electrolux 27
safety cut-outs with which the machine
is fitted may operate.
When operating the tumble dryer, the
room temperature must not be lower
than +5°C and higher than +35°C, as it
may affect the performance of the
appliance.
Stacking kit
A special stacking kit is available through
your dealer, to enable the mounting of
the dyer on top of a front loading
washing machine with cover’s depth
between 48 and 60 cm.
Read carefully the instructions supplied
with the kit.
Electrical connection
This machine is designed to operate on
a 220-230 V,
single-phase, 50 Hz supply. Check that
your domestic electrical installation can
take the maximum load required, also
taking into account any other appliances
in use.
Connect the machine to an earthed
socket, in accordance with current
wiring regulations.
The manufacturer declines any
responsibility for damage or injury
through failure to comply with the
above safety precaution. Should
the appliance power supply cable
need to be replaced, this must be
carried out by our Service Centre.
GB
Door reversal
To make it easier to load or unload the
laundry the door can be reversed.
This operation must be carried out by
qualified personnel.
Please contact the nearest Service
Centre.
Important!
The power supply cable must be
accessible after installing the machine.
Page 28

28 electrolux environment concerns
Environment concerns
Packaging materials
The materials marked with the symbol
are recyclable.
>PE<=polyethylene
>PS<=polystyrene
>PP<=polypropylene
This means that they can be recycled by
disposing of them properly in
appropriate collection containers.
Old machine
Use authorised disposal sites for your
old appliance. Help to keep your country
tidy!
The symbol on the product or on its
packaging indicates that this product
may not be treated as household waste.
Instead it shall be handed over to the
applicable collection point for the
recycling of electrical and electronic
equipment. By ensuring this product is
disposed of correctly, you will help
prevent potential negative consequences
for the environment and human health,
which could otherwise be caused by
inappropriate waste handling of this
product. For more detailed information
about recycling of this product, please
contact your local city office, your
household waste disposal service or the
shop where you purchased the product.
Ecological hints
To save energy and to help protect the
environment,we recommend that you
follow these hints:
• Try to load the maximum capacity of
the machineas small loads are
uneconomical.
• Always load well spun laundry. The
higher the spinspeed, the lower the
electricity consumption andthe shorter
the drying times.
• Do not over-dry laundry, this avoids
creasing andsaves energy.
Select the drying programme
according to thetype of laundry and
the required degree ofdryness.
• To utilize the maximum load, laundry
which is tobe dried ready to put away
(store dry) can be driedtogether with
items to be ironed. To do this,
selectthe programme for iron-dry,
remove the iron-dryitems at the end of
the programme and thenfinish-dry the
rest of the load.
• Clean the filters regularly to avoid
excessive dryingtimes and high
electricity consumption.
• Ventilate the room well. The room
temperatureshould not exceed +35°C
during.
Page 29

European guarantee
guarantee conditions electrolux 29
This appliance is guaranteed by
Electrolux, in each of the countries
listed in the following page, for the
period specified in the appliance
guarantee or otherwise by law. If you
move from one of these countries to
another of these countries the
appliance guarantee will move with you
subject to the following qualifications:
● The appliance guarantee starts from
the date you first purchased the
appliance which will be evidenced by
production of a valid purchase
document issued by seller of the
appliance.
● The appliance guarantee is for the
same period and to the same extent
for labour and parts as exists in your
country of residence for this
particular model or range of
appliances.
● The appliance guarantee is personal
to the original purchaser of the
appliance and cannot be transferred
to another user.
● The appliance is installed and used in
accordance with instructions issued
by Electrolux and is only used within
the home, i.e. is not used for
commercial purposes.
● The appliance is installed in
accordance with all relevant
regulations in force within your new
country of residence.
The provisions of this European
Guarantee do not affect any of the rights
granted to you by law.
GB
Page 30

30 electrolux guarantee conditions
Belgique/België/Belgien +32 2 363 04 44 Bergensesteenweg 719, 1502 Lembeek
ýeská republika +420 2 61 12 61 12 BudČjovická 3, Praha 4, 140 21
Danmark +45 70 11 74 00 Sjællandsgade 2, 7000 Fredericia
Deutschland +49 180 32 26 622 Muggenhofer Str. 135, 90429 Nürnberg
Eesti +37 2 66 50 030 Mustamäe tee 24, 10621 Tallinn
España +34 902 11 63 88 Carretera M-300, Km. 29,900 Alcalá de Henares Madrid
France
Great Britain +44 8705 929 929 101 Oakley Road LUTON Beds LU4 9RJ
Hellas +30 23 10 56 19 70 4, Limnou Str., 54627 Thessaloniki
Hrvatska
+385 1 6323 338 Slavonska avenija 3, 10000 Zagreb
Ireland +353 1 40 90 753 Longmile Road Dublin 12
Italia +39 (0) 434 558500 C.so Lino Zanussi, 26 - 33080 Porcia (PN)
Latvija +37 17 84 59 34 Kr. Barona iela 130/2, LV-1012, Riga
Lituania +370 5 27 80 609 Verkiu 29, 09108 Vilnius, Lithuania
Luxembourg +35 2 42 43 13 01 Rue de Bitbourg, 7, L-1273 Hamm
Magyarország +36 1 252 1773 H-1142 Budapest XIV, Erzsébet királyné útja 87
Nederland +31 17 24 68 300 Vennootsweg 1, 2404 CG - Alphen aan den Rijn
Norge +47 81 5 30 222 Risløkkvn. 2 , 0508 Oslo
Österreich +43 18 66 400 Herziggasse 9, 1230 Wien
Polska +48 22 43 47 300 ul. Kolejowa 5/7, Warsaw
Portugal +35 12 14 40 39 39 Quinta da Fonte - Edificio Gonçalves Zarco - Q35 -2774-518 Paço de Arcos
Romania +40 21 44 42 581 B-dul Timisoara 90, S6, Bucharest
Schweiz - Suisse - Svizzera +41 62 88 99 111 Industriestrasse 10, CH-5506 Mägenwil
Slovenija +38 61 24 25 731 Traška 132, 1000 Ljubljana
Slovensko +421 2 43 33 43 22 Electrolux Slovakia s.r.o., Electrolux Domáce spotrebiþe SK, Seberíniho 1, 821 03 Bratislava
Suomi +35 8 26 22 33 00 Konepajanranta 4, 28100 Pori
Sverige +46 (0)771 76 76 76 Electrolux Service, S:t Göransgatan 143, S-105 45 Stockholm
Türkiye +90 21 22 93 10 25 Tarlabaúı caddesi no : 35 Taksim østanbul
Ɋɨɫɫɢɹ +7 095 937 7837 129090 Ɇɨɫɤɜɚ, Ɉɥɢɦɩɢɣɫɤɢɣ ɩɪɨɫɩɟɤɬ, 16, Ȼɐ "Ɉɥɢɦɩɢɤ"
www.electrolux.fr
Page 31

guarantee conditions electrolux 31
GB
Page 32

136904480-01-05022008
 Loading...