

Page 1
LAVATHERM 7021 TK ELECTRONIC
Condensation dryer
User Information
Page 2

Dear customer,
Please read this User Information carefully and keep it to refer to at a
later date.
Pass this User Information on to any subsequent owner of the appliance.
The following symbols are used in the text:
1 Safety instructions
Warning: Notes that concern your personal safety.
Attention: Notes that show how to avoid damage to the appliance.
3 Useful tips and hints
2 Environmental information
2
Page 3

Contents
Instructions for use . . . . . . . . . . . . . . . . . . . . . . . . . . . . . . . . . . . . . . . . 5
Safety . . . . . . . . . . . . . . . . . . . . . . . . . . . . . . . . . . . . . . . . . . . . . . . . . . . . . . . . . 5
Disposal . . . . . . . . . . . . . . . . . . . . . . . . . . . . . . . . . . . . . . . . . . . . . . . . . . . . . . . 6
Environmental tips. . . . . . . . . . . . . . . . . . . . . . . . . . . . . . . . . . . . . . . . . . . . . . 7
Description of machine. . . . . . . . . . . . . . . . . . . . . . . . . . . . . . . . . . . . . . . . . . 8
Operating screen . . . . . . . . . . . . . . . . . . . . . . . . . . . . . . . . . . . . . . . . . . . . . . . 8
Before the first drying cycle . . . . . . . . . . . . . . . . . . . . . . . . . . . . . . . . . . . . . 9
Sorting and preparing laundry . . . . . . . . . . . . . . . . . . . . . . . . . . . . . . . . . . . 9
Programme overview . . . . . . . . . . . . . . . . . . . . . . . . . . . . . . . . . . . . . . . . . . . . 10
Drying . . . . . . . . . . . . . . . . . . . . . . . . . . . . . . . . . . . . . . . . . . . . . . . . . . . . . . . . . 12
Switching machine on / switching light on . . . . . . . . . . . . . . . . . . . . . . . . . . 12
Opening loading door / loading laundry . . . . . . . . . . . . . . . . . . . . . . . . . . . . . 12
Selecting the programme . . . . . . . . . . . . . . . . . . . . . . . . . . . . . . . . . . . . . . . . . 12
Selecting additional functions . . . . . . . . . . . . . . . . . . . . . . . . . . . . . . . . . . . . . 12
AUDIBLE SIGNAL (SIGNAL) . . . . . . . . . . . . . . . . . . . . . . . . . . . . . . . . . . . . . 13
SPECIAL CARE (SCHON) . . . . . . . . . . . . . . . . . . . . . . . . . . . . . . . . . . . . . . . . 13
SENSITIVE (SENSITIV) . . . . . . . . . . . . . . . . . . . . . . . . . . . . . . . . . . . . . . . . . . 13
Setting time delay . . . . . . . . . . . . . . . . . . . . . . . . . . . . . . . . . . . . . . . . . . . . . . . 13
Starting the programme . . . . . . . . . . . . . . . . . . . . . . . . . . . . . . . . . . . . . . . . . . 14
Changing programme . . . . . . . . . . . . . . . . . . . . . . . . . . . . . . . . . . . . . . . . . . . . 14
Putting in extra items or taking items out before end of programme . . . . 14
Drying cycle complete / removing laundry . . . . . . . . . . . . . . . . . . . . . . . . . . . 15
Cleaning and maintenance . . . . . . . . . . . . . . . . . . . . . . . . . . . . . . . . . . . . . . 16
Cleaning fluff filter . . . . . . . . . . . . . . . . . . . . . . . . . . . . . . . . . . . . . . . . . . . . . . 16
Cleaning the door seal. . . . . . . . . . . . . . . . . . . . . . . . . . . . . . . . . . . . . . . . . . . . 17
Emptying the condensate tank. . . . . . . . . . . . . . . . . . . . . . . . . . . . . . . . . . . . . 18
Cleaning heat exchanger . . . . . . . . . . . . . . . . . . . . . . . . . . . . . . . . . . . . . . . . . 18
Cleaning the drum. . . . . . . . . . . . . . . . . . . . . . . . . . . . . . . . . . . . . . . . . . . . . . . 20
Clean operating screen and housing . . . . . . . . . . . . . . . . . . . . . . . . . . . . . . . . 20
What to do if…?. . . . . . . . . . . . . . . . . . . . . . . . . . . . . . . . . . . . . . . . . . . . . . . . 20
Troubleshooting by yourself . . . . . . . . . . . . . . . . . . . . . . . . . . . . . . . . . . . . . . . 20
Changing bulb for inside light . . . . . . . . . . . . . . . . . . . . . . . . . . . . . . . . . . . . . 22
Programming options . . . . . . . . . . . . . . . . . . . . . . . . . . . . . . . . . . . . . . . . . . . 23
Technical Data . . . . . . . . . . . . . . . . . . . . . . . . . . . . . . . . . . . . . . . . . . . . . . . . . 24
Consumption values. . . . . . . . . . . . . . . . . . . . . . . . . . . . . . . . . . . . . . . . . . . . . 24
3
Page 4

Installation and connection instructions. . . . . . . . . . . . . . . . . 25
Installation safety instructions . . . . . . . . . . . . . . . . . . . . . . . . . . . . . . . . . . . 25
Removing transport safety equipment . . . . . . . . . . . . . . . . . . . . . . . . . . . . 26
Electrical connection. . . . . . . . . . . . . . . . . . . . . . . . . . . . . . . . . . . . . . . . . . . . 26
Changing door stop . . . . . . . . . . . . . . . . . . . . . . . . . . . . . . . . . . . . . . . . . . . . . 26
Special accessories. . . . . . . . . . . . . . . . . . . . . . . . . . . . . . . . . . . . . . . . . . . . . . 28
Customer Services. . . . . . . . . . . . . . . . . . . . . . . . . . . . . . . . . . . . . . . . . . 29
Service . . . . . . . . . . . . . . . . . . . . . . . . . . . . . . . . . . . . . . . . . . . . . . . . . . . . . . 31
4
Page 5

Instructions for use
1 Safety
Before first starting up
• Note the ”Installation and connection instructions”
• Before first starting up, check the machine for any damage incurred
during transport. Never connect up a damaged machine. If parts are
damaged, contact your supplier.
Intended use
• The dryer is intended for drying standard laundry in domestic applications.
• Conversions or modifications to the dryer are not permitted.
• The laundry must not contain flammable solvents (benzene,
alcohol, stain remover, etc.). Risk of fire and/or explosion! Laundry
which has come into contact with such substances must be rinsed
thoroughly by hand before drying.
• When using dry-cleaning sets: Only use those products which are declared as suitable for the dryer by the manufacturer.
• Do not place items of laundry in the dryer which contain foam rubber
or materials similar to rubber. Risk of fire!
• Do not place heavily worn laundry items in the dryer. Risk of fire!
• Do not place laundry items with loose fillings (e.g. cushions) in the
dryer. Risk of fire!
• Parts with rigid components (e.g. door mats) may cover the air slots.
Risk of fire! Do not place such items in the dryer.
• Do not overfill the dryer. Risk of fire! Observe max. loading volume of
6 kg.
• Ensure that explosive objects (e.g. cigarette lighters, spray cans, etc.)
do not enter the dryer with the laundry. Risk of fire and/or explosion!
• Clean the micro-fine filter and fine strainer after each drying cycle.
• Do not use the machine if there are no lint filters or if these are dam-
aged. Risk of fire!
• Risk of fire: items that have been spotted or soaked with vegetable or
cooking oil constitute a fire hazard and should not be placed in the
tumble dryer.
• If you have washed your laundry with stain remover you must execute an extra rinse cycle before loading your tumble dryer.
5
Page 6

• Clean the heat exchanger regularly.
• With stacked washer and dryer: Do not place objects on the dryer.
These may fall off during operation.
• The covering bonnet of the bulb for the drum light must be screwed
down tightly.
Child safety
• Keep packaging away from children. Risk of suffocation!
• Children can often not see the dangers associated with electric ma-
chines. Never leave unsupervised children near the dryer.
• Ensure that children and small animals cannot climb into the dryer’s
drum. Risk of death! Keep the dryer door shut whenever it is not being used.
General safety
• Only specialists may undertake repairs on the dryer.
• Never start up the dryer if the mains cable is damaged or if the oper-
ating screen, operating plate or base area are damaged so that the inside of the machine is open and accessible.
• Switch off the dryer before all cleaning, care or maintenance work.
Also disconnect the mains plug from the socket or – with permanent
connections – switch off the LS switch in the fuse box and/or fully
unscrew the screwed-in fuse.
• Disconnect the machine from the power supply during long pauses in
operations.
• When removing from the socket, never pull the mains plug by the cable, instead take a hold of the plug.
• Manifold plugs, couplings and extension cables must not be used.
Risk of fire from overheating!
• Do not spray down the dryer with jets of water. Risk of electric shock!
• Do not lean on the open door. The machine may tip over.
• Once the drying cycle has been interrupted, the laundry and drum
may be hot. Risk of burns! Take care when removing the laundry.
Disposal
Packaging material
2
The packaging materials are environmentally friendly and can be recycled. The plastic components are identified by markings, e.g. >PE<,
>PS<, etc. Please dispose of the packaging materials in the appropriate
container at the community waste disposal facilities.
6
Page 7

2 Old appliance
The symbol
W on the product or on its packaging indicates that this
product may not be treated as household waste. Instead it shall be
handed over to the applicable collection point for the recycling of electrical and electronic equipment. By ensuring this product is disposed of
correctly, you will help prevent potential negative consequences for the
environment and human health, which could otherwise be caused by
inappropriate waste handling of this product. For more detailed information about recycling of this product, please contact your local city
office, your household waste disposal service or the shop where you
purchased the product.
1
Warning!
Remove mains plug from socket when you have no further use
for the machine. Cut off mains cable and dispose of together with plug.
Destroy loading door lock. Children cannot then lock themselves in the
machine and put their lives at risk.
2 Environmental tips
• In the dryer, laundry becomes fluffy and soft. Fabric softeners are not
therefore needed when washing.
• Your dryer will function most economically if you:
– always keep the ventilation slots on the base of the dryer unob-
structed;
– use the loading volumes specified in the programme overview;
– ensure you have good ventilation in the installation room;
– clean the micro-fine filter and fine strainer after each drying cycle;
– spin the laundry well before drying. Example: Consumption data –
depending on spinning speed – for 6kg of laundry, dried using the
COTTONS STORAGE DRY (BAUMWOLLE SCHRANKTROCKEN) programme.
Pre-draining Drying cycle
Revolutions per
minute
800 4.2 70 130 4,3
1000 3,6 60 11 5 3.7
1200 3.2 53 11 0 3.3
1400 3.0 50 105 3.1
1800 2.5 42 90 2.6
Residual dampness Required
in litres as a %
in minutes
time
Energy con-
sumption
in kWh
7
Page 8
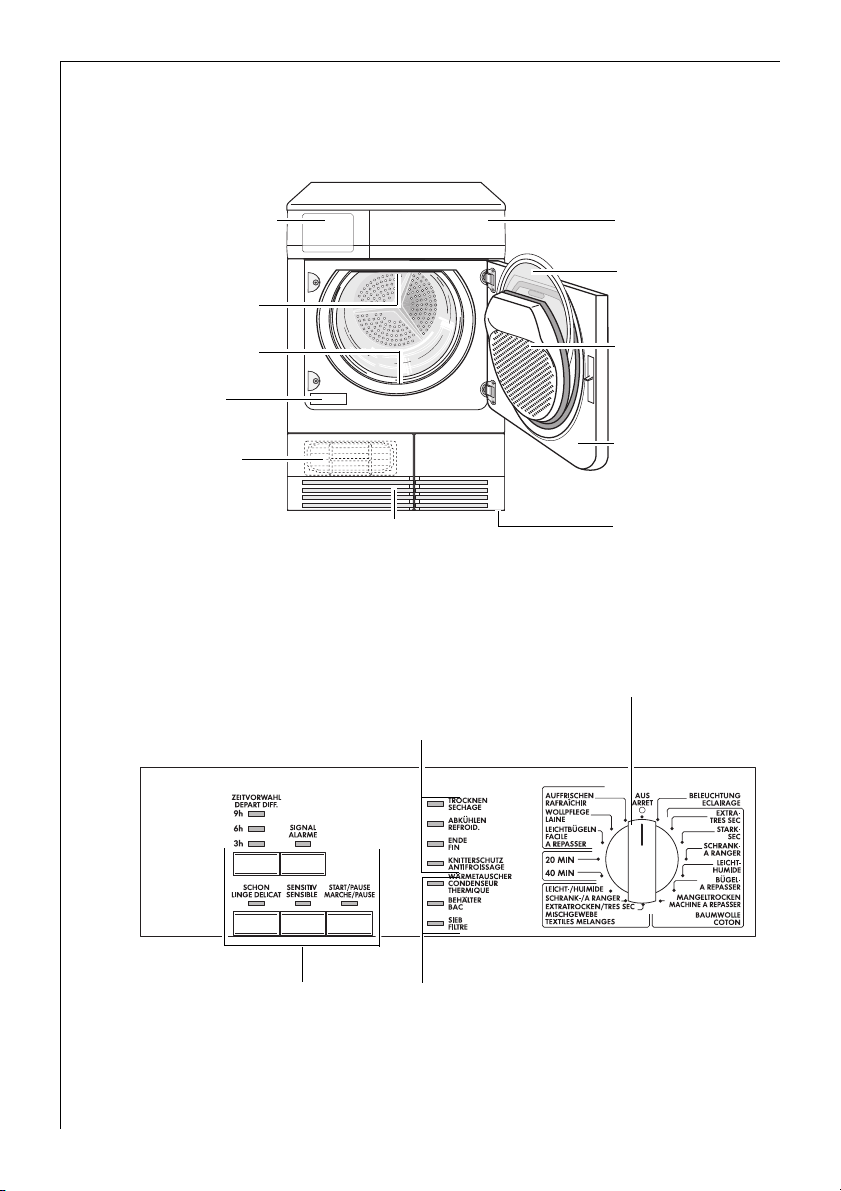
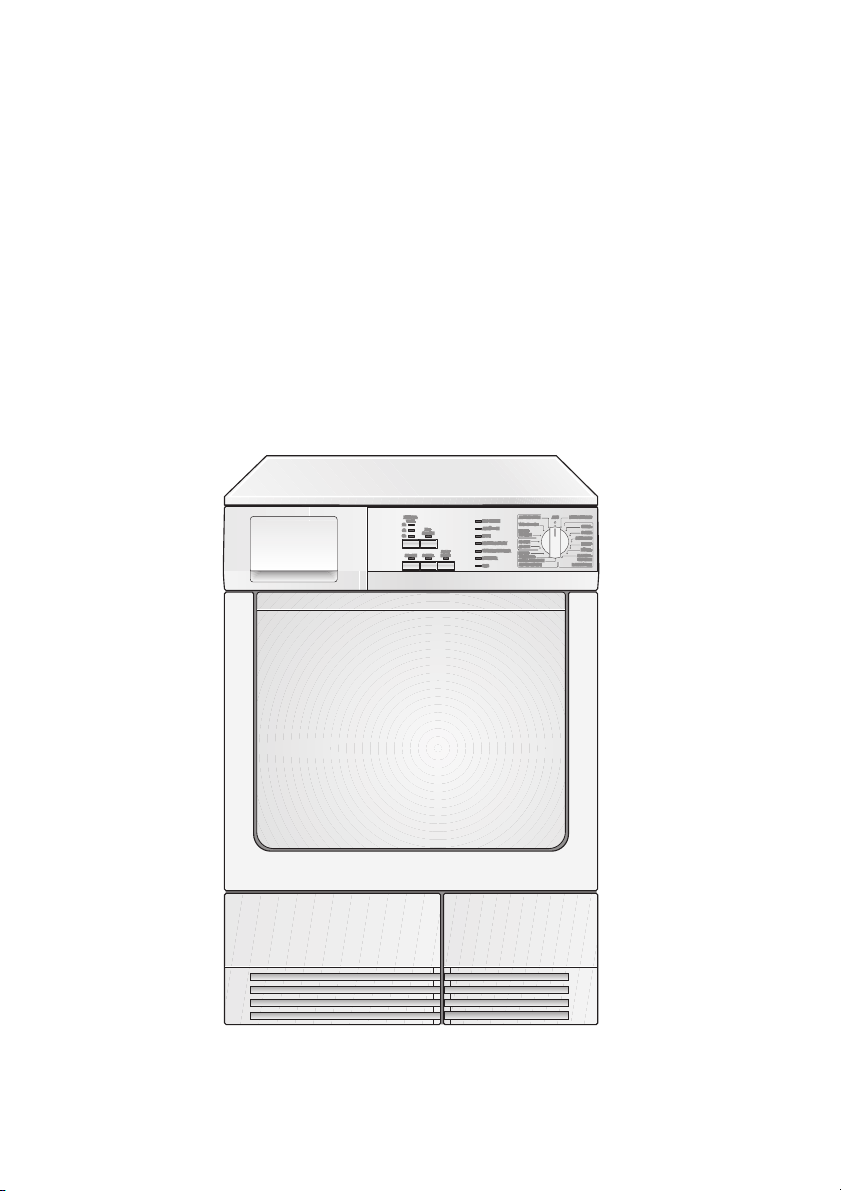
Description of machine
Drawer containing
condensate tank
Lamp for inside
light
Micro-fine filter
lint filter)
Type plate
Base door
upstream of
heat exchanger
Operating screen
Air slots
Programme progress display
Operating screen
Fine strainer
(lint filter)
Large mesh filter
(lint filter)
Loading door
(interchangeable
stop)
Screwed feet
(with height
adjustment)
Programme selector
Block of buttons
and displays
Maintenance displays
– HEAT EXCHANGER (WÄRMETAUSCHER - clean!)
– EMPTY WATER (BEHÄLTER - empty!)
– CLEAN FILTER (SIEB - clean fluff filter!)
8
Page 9

Before the first drying cycle
In order to remove any residues which may have been produced during
production, wipe the dryer drum with a damp cloth or carry out a brief
drying cycle (20 MIN) with damp cloths in the machine.
Sorting and preparing laundry
Sorting laundry
• Sort by fabric type:
– Cotton/linen for programmes in COTTONS (BAUMWOLLE) pro-
gramme group.
– Mixtures and synthetics for programmes in EASY CARES (MISCH-
GEWEBE) programme group.
• Sorting by care label. The care labels mean:
n m l k
Basic drying in tumble
dryer possible
Drying at
normal
temperature
• Do not dry new, coloured textiles together with light-coloured laun-
dry items. Textile colours may bleed.
• Do not dry tricot or knitted items with the EXTRA DRY (EXTRA
TROCKEN) programme. Items may become stuck!
• Do not dry wool in the dryer. May become entangled! After air-dry-
ing, wool may be dried with the WOOL CARE (WOLLPFLEGE) programme.
Drying at
reduced temperature
(press SPECIAL CARE
(SCHON) button!)
Drying in tumble
dryer not
possible
Preparing laundry
• To avoid laundry becoming tangled: Close zips, button up coverings
and tie loose bands or ribbons (e.g. of aprons).
• Empty pockets. Remove metallic items (paperclips, safety pins etc).
• Turn items with double-layered fabrics inside out (e.g. with cotton-
lined anoraks, the cotton layer should be outermost). These fabrics
will then dry better.
9
Page 10

Programme overview
Additional
functions
1)
1)
Programmes
max. load
(weight when dry)
AUDIBLE SIGNAL (SIGNAL)
SPECIAL CARE (SCHON)
SENSITIVE (SENSITIV)
EXTRA DRY
[EXTRATROCKEN]
INTENSIVE DRY
[STARKTROCKEN]
STORAGE DRY
[SCHRANKTROCKEN]
DAMP
[LEICHTTROCKEN]
COTTONS [BAUMWOLLE]
HAND IRON
-
[BÜGEL
TROCKEN]
MACHINE IRON
[MANGELTROCKEN]
EXTRA DRY
[EXTRATROCKEN]
STORAGE DRY
[SCHRANKTROCKEN]
DAMP
[LEICHT-
EASY CARES [MISCHGEWEBE]
TROCKEN]
1) SPECIAL CARE (SCHON) and SENSITIVE (SENSITIV) cannot be selected together.
2) Press SPECIAL CARE (SCHON) button.
6kg • • •
6kg • • •
6kg • • •
6kg • • •
6kg • • •
6kg • • •
3kg • • •
3kg • • •
3kg • • •
Application/properties
Thorough drying of thick or multilayered fabrics, e.g. terry towelling
items, bathrobes.
Thorough drying of thick fabrics,
e.g. terry towelling items, towels.
Thorough drying of fabrics of even
thicknesses, e.g. terry towelling
items, knitted items, towels.
For thin fabrics which are also to be
ironed, e.g. knitted items, cotton
shirts.
For normal thickness cotton or linen laundry, e.g. bedding, table linen.
For cotton or linen laundry which is
also to be machine pressed, e.g.
bedding, table linen.
Thorough drying of thick or multilayered fabrics, e.g. pullovers, bedding, table linen.
For thin fabrics which are not
ironed, e.g. easy care shirts, table
linen, baby clothes, socks, lingerie
with bones or wires.
For thin fabrics which are also to be
ironed, e.g. knitted items, cotton
shirts.
Care
symbols
m n
m n
m n
m n
m n
m n
m l2)
n
2)
m l
n
2)
m l
n
10
Page 11

Additional
functions
1)
1)
Programmes
max. load
(weight when dry)
AUDIBLE SIGNAL (SIGNAL)
SPECIAL CARE (SCHON)
SENSITIVE (SENSITIV)
20 MIN
40 MIN
EASY IRON
[LEICHTBÜGELN]
WOOL CARE
[WOLLPFLEGE]
REFRESH
[AUFFRISCHEN]
1) SPECIAL CARE (SCHON) and SENSITIVE (SENSITIV) cannot be selected together.
2) Press SPECIAL CARE (SCHON) button.
1kg • • -
1kg • • -
1kg • • -
1kg • • -
For drying individual items of laundry or
for small volumes of less than 1kg.
Special programme with anti-crease mechanism for easy care fabrics such shirts and
blouses; for minimum ironing effort. The
result depends on the type of fabric and its
finish. (The load corresponds to approx. 5
to 7 shirts.)
Recommendation: Place fabrics in the dryer straight after spinning. Once dried, immediately remove fabrics and place on a
clothes hanger.
Special programme for briefly treating
woollens with warm air, after they have
been dried naturally, worn or stored for
long periods. Wool fibres stand up and the
wool becomes soft and cosy.
Recommendation: Remove fabrics immediately after drying.
Special programme, lasting around 35
minutes, for refreshing or gently cleaning
textiles with commercially available dry
cleaning products.
(Only use those products which are declared as suitable for the dryer by the
manufacturer; please observe the manufacturer’s instructions for use.)
Application/properties
Care
symbols
2)
m l
n
m l2)
n
11
Page 12
Drying
Switching machine on / switching light on
Turn the programme selector to any programme or turn it to LIGHT (BELEUCHTUNG). The machine has been switched on. When the loading
door is opened, the drum is illuminated.
Opening loading door / loading laundry
1. Open loading door:
Use force to push against the loading door (push point )
2. Load your laundry (do not force it in).
1 Caution! Do not jam laundry in between the loading door and rubber
seal.
3. Close loading door securely. Lock must audibly lock.
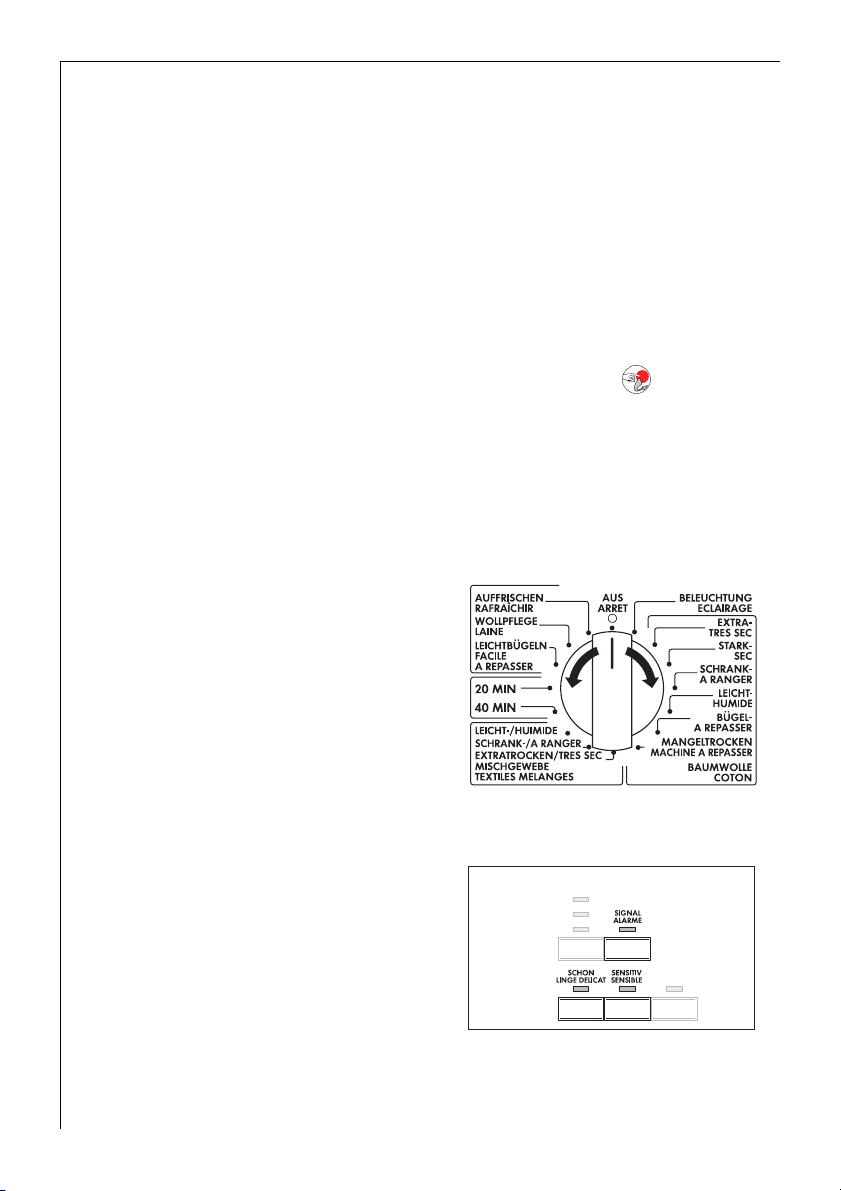
Selecting the programme
Use the programme selector to set
the programme you require.
Selecting additional functions
If required, press the AUDIBLE SIGNAL (SIGNAL), SPECIAL CARE
(SCHON) or SENSITIVE (SENSITIV)
buttons.
12
Page 13

AUDIBLE SIGNAL (SIGNAL)
When the drying cycle has finished, an intermittent audible signal will
sound.
SPECIAL CARE (SCHON)
For especially gentle drying of sensitive fabrics with the l care label
and for temperature-sensitive textiles (e.g. acrylic, viscose). Programme
is executed with reduced heat.
SPECIAL CARE (SCHON) is only suitable for use with loads of up to 3kg!
SENSITIVE (SENSITIV)
For gentle drying of frequently-worn textiles. Programme starts on full
heat setting, which is then reduced towards the end of the programme
to ensure gentle care of laundry.
3 SPECIAL CARE (SCHON) and SENSITIVE (SENSITIV) cannot be selected
together.
Setting time delay
3 The DELAY TIMER (ZEITVORWAHL) button allows you to delay the start
of a programme by 3, 6 or 9 hours.
1. Select the programme
2. Press the DELAY TIMER (ZEITVORWAHL) button as many times as neces-
sary until the required display is illuminated:
– 9h display for programme to start in 9 hours.
– 6h display for programme to start in 6 hours.
– 3h display for programme to start in 3 hours.
3 By pressing the DELAY TIMER (ZEITVORWAHL) button again, the time
delay is cancelled. The display goes out.
3. To activate the delay timer, press the START/PAUSE button.
Note: If a time delay of 9 hours is selected, the display 9h is illuminat-
ed. After 3 hours, the display will jump round and 6h will be illuminated; after another 3 hours, 3h is illuminated. After a total of 9 hours, the
programme will start.
13
Page 14

Starting the programme
Press the START/PAUSE button. The programme is started.
The programme progress display show drying progress.
Changing programme
To change a programme which has been selected by mistake once the
programme has started, first turn the programme selector to OFF (AUS)
and then reset the programme.
3 The programme can no longer be changed directly once the programme
has started. If nevertheless there is an attempt to change the programme on the programme knob, the programme progress display and
the maintenance indicators flash. If an option button (excluding the
AUDIBLE SIGNAL (SIGNAL) button) is pressed, the corresponding indicator flashes several times. The drying programme is not however affected by this (laundry protection).
Putting in extra items or taking items out before end of
programme
1. Open door.
1 Warning! Laundry and drumcan become hot.Risk of burns!
2. Load or remove laundry items.
3. Close door securely.
4. Press the START/PAUSE button to continue the drying cycle.
14
Page 15

Drying cycle complete / removing laundry
Once the drying cycle is complete, the END (ENDE) and CREASE GUARD
(KNITTERSCHUTZ) displays light up. If the AUDIBLE SIGNAL (SIGNAL)
button has been pressed, an audible signal sounds intermittently.
3 The drying cycle is automatically followed by a crease guard phase
which lasts around 30 minutes. The drum rotates in intervals during
this phase. The laundry thereby remains relaxed and free of creases. The
laundry can be removed at any time during the crease guard phase.
(The laundry should be taken out towards the end of the crease guard
phase at the latest to prevent creases from forming.)
1. Open loading door
2. Before removing the laundry, remove lint from the micro-fine filter. It is
best to use a damp hand for this purpose (refer to “Cleaning and maintenance” section).
3. Remove laundry.
4. Turn the programme selector to OFF (AUS).
Important! After each drying cycle
– clean the micro-fine filter and fine strainer,
– drain the condensate tank
(refer to the “Cleaning and maintenance” section).
5. Close loading door.
15
Page 16

Cleaning and maintenance
Cleaning fluff filter
To ensure that the dryer works perfectly, the fluff filters (micro-fine filter and fine strainer) must be cleaned after every drying cycle.
1 Caution! Never operate the dryer without fluff filters or with damaged
or blocked fluff filters.
1. Open loading door
2. Use a damp hand to clean the mi-
cro-fine filter, which is built into
the lower part of the loading aperture.
3. Push down unlock button on large
mesh filter.
Large mesh filter jumps up.
4. Take out fine strainer.
5. Remove fluff from fine strainer. It
is best to use a damp hand for this
purpose.
16
Page 17

Clean the entire filter area
3 The strainer area does not have to be cleaned after every drying cycle,
but should be checked regularly and cleaned of fluff if necessary.
6. To do this, grip the top of the large
mesh filter and pull it forwards until it comes loose from the two
brackets.
7. Remove fluff from the entire filter
area. It is best to use a vacuum
cleaner for this purpose.
8. Press both journals of the large
mesh filter into the brackets on the
loading door until they snap into
place.
9. Re-insert fine strainer.
10. Press against the large mesh filter
until it locks into the interlock.
3 If the fine strainer is not fitted, the
large mesh filter will not snap into
place and the loading door cannot
be closed.
Cleaning the door seal
Wipe the door seal with a damp cloth immediately after the drying cycle has finished.
17
Page 18

Emptying the condensate tank
Empty condensate tank after every drying cycle.
If the condensate tank is full, an active programme will break off auto-
matically and the EMPTY WATER (BEHÄLTER) display will light up. In order to continue the programme, the condensate tank must first be
emptied.
1 Warning! The condensate is not suitable for drinking or for preparing
foodstuffs.
1. Pull drawer containing condensate
tank out all the way (1). Pull out
condensate tank’s outlet connections (2).
2. Pour condensate out into basin or
other suitable container.
3. Slide outlet connections in and refit condensate tank.
If the programme has been interrupted as a result of the condensate tank being full:
Press the START/PAUSE button to
continue the drying cycle.
3 The condensate tank has a volume of approx. 4 litres. This is sufficient
for around 6kg of laundry which has previously been spun at 800 revolutions/minute.
3 The condensate can be used as distilled water, e.g. for steam ironing.
However first filter the condensate (e.g. with a coffee filter) to remove
any residue and small pieces of fluff.
Cleaning heat exchanger
If the HEAT EXCHANGER (WÄRMETAUSCHER) display is illuminated, the
heat exchanger needs to be cleaned.
1 Caution! Operating when the heat exchanger is clogged with lint can
damage the dryer. This also increases energy consumption.
18
Page 19

1. Open loading door
2. Open base door. To do this, press
the release button located beneath
the loading aperture and open the
base door to the left.
3. Remove lint from the inside of the
door and the heat exchange chamber. Wipe the door seal with a
damp cloth.
4. Turn both lock washers inwards.
5. Use the handle to pull the heat ex-
changer out of the base and carry
it horizontally to prevent any remaining water from spilling.
6. To empty the heat exchanger, hold
vertically over a washing-up bowl.
1 Caution! Do not use sharp objects
to clean. The heat exchanger could
develop leaks.
7. Clean heat exchanger.
It is best to use a brush or to rinse thoroughly with a shower head.
8. Replace heat exchanger and lock into place (turn both lock washers
outwards until they snap into place).
9. Close base door.
3 The dryer will not operate if the HEAT EXCHANGER (WÄRMETAUSCHER)
indicator is still lit.
1 Caution! Never operate the dryer without the heat exchanger.
19
Page 20

Cleaning the drum
1 Caution! Do not use abrasives or steel wool to clean the drum.
3 Lime in the water or cleaning agents may form a barely visible lining on
the inside of the drum. The degree to which the laundry has been dried
is then no longer detected reliably. The laundry is damper than expected when removed from the dryer.
Use a standard domestic cleaner (e.g. vinegar-based cleaner) to wipe
down the inside of the drum and drum ribs.
Clean operating screen and housing
1 Caution! Do not use furniture cleaners or aggressive cleaning agents to
clean the machine.
Use a damp cloth to wipe down the operating screen and housing.
What to do if…?
Troubleshooting by yourself
If, during operation, the dryer shows an error display (one or more displays flashing on the programme progress display), check first of all
whether you can remedy the problem yourself by means of the table
below. If you cannot solve the problem: Switch the machine off and on
again. Reset programme. Press the START/PAUSE button.
If the error display is still shown, please contact our after-sales service
and inform them which displays are flashing.
20
Problem Possible cause Remedy
Dryer does not work.
Mains plug is not plugged in
or fuse is not working correctly.
Loading door is open. Close loading door.
Have you pressed the START/
PAUSE button?
Plug in at mains socket. Check
fuse in fuse box (domestic installation).
Press the START/PAUSE button
again.
Page 21

Problem Possible cause Remedy
Select a different programme
the next time you dry
(see “Overview of programmes” section).
Clean heat exchanger.
Observe recommended loading volumes.
Uncover ventilation slots in
base area.
Clean inside surface of drum
and drum ribs.
Re-programme standard setting for degree of drying (see
‘Programming options’ section).
Install fine strainer and/or
snap large mesh filter into
place.
Turn the programme knob to
OFF (AUS). Set the programme
again.
Turn programme selector to
LIGHT (BELEUCHTUNG) or to
any programme.
Replace lamp (see next section).
Empty condensate tank, then
start programme with START/
PAUSE button.
Select time programme or
higher drying level (e.g. INTENSIVE DRY [STARK TROCKEN] instead of STORAGE DRY
[SCHRANK TROCKEN]).
Drying results unsatisfactory.
Loading door does not
close.
When pressing a button, the corresponding
button flashes several
times.
Drum light does not
work.
Programme inactive,
EMPTY WATER (BEHÄLTER) display illuminated.
Drying cycle ends
shortly after programme starts. END
(ENDE) display illuminated.
Wrong programme selected.
Lint filter clogged. Clean lint filter.
Heat exchanger clogged
with lint.
Incorrect volume of laundry.
Ventilation slots in base area
covered up.
Residue on inside surface of
drum or drum ribs.
Conductance of water at installation site differs from
standard setting of machine.
Fine strainer not in place
and/or large mesh filter not
locked in place.
Washing protection. After
the start of the programme,
the option can no longer be
set.
Programme selector in OFF
(AUS) position.
Defective lamp.
Condensate tank is full.
Not enough washing loaded or washing loaded is too
dry for selected programme.
21
Page 22

Problem Possible cause Remedy
Lint filter clogged. Clean lint filter.
Drying cycle lasts an
unusually long time.
Note:
After up to 5 hours the
drying cycle finishes
automatically
(see ”Drying cycle
complete”).
Heat exchanger clogged
with lint.
SPECIAL CARE (SCHON) button pressed and load volume too big.
Load volume too big. Reduce load volume.
Laundry insufficiently predrained.
Clean heat exchanger.
SPECIAL CARE (SCHON) is only
suitable for use with loads of
up to 3kg!
Laundry must be adequately
pre-drained.
Changing bulb for inside light
Only use a special bulb which is designed specially for dryers. The special bulb is available from the after-sales service,
ET-Nr. 112 552 000-5.
1 Warning! Do not use standard bulbs! These develop too much heat and
may damage the machine!
1 Warning! Before replacing the bulb, disconnect the mains plug; with a
permanent connection: fully unscrew or deactivate the fuse.
1. Unscrew covering bonnet from above bulb (this can be found directly
behind the loading aperture, at the top; refer to “Description of machine” section.)
2. Replace defective bulb.
3. Screw covering bonnet back down.
1 Warning! For reasons associated with safety, the covering bonnet must
be screwed down tightly. If this is not done, the dryer must not be operated.
22
Page 23

Programming options
Objective Implementation
Permanently program
in the audible signal
which reminds you that
the programme is complete.
Adjust detection of degree of drying:
If the laundry is slightly
drier or slightly damper at the end of the
programme than with
the standard setting.
If the EMPTY WATER
(BEHÄLTER) display is to
remain permanently
deactivated when using an external condensate drain.
1. Turn the programme selector to any programme.
2. Press the AUDIBLE SIGNAL (SIGNAL) button and hold
down for approx. 5 seconds.
A brief signal sounds several times. The AUDIBLE SIGNAL
(SIGNAL) display flashes several times.
The setting is permanently programmed.
The setting is cancelled as described under 1 and 2.
1. Turn the programme selector to any programme.
2. Press the AUDIBLE SIGNAL (SIGNAL) and SENSITIVE (SEN-
SITIV) buttons at the same time and hold down for approx. 5 seconds.
The current setting is displayed on the programme
progress display:
– END (ENDE) display: Setting for drier laundry
– COOLING (ABKÜHLEN) display: Standard setting
– DRYING (TROCKNEN) display: Setting for damper laun-
dry
3. Press the START/PAUSE button until the setting required
appears on the programme progress display.
4. Turn the programme selector to OFF (AUS).
The setting is permanently programmed.
1. Turn the programme selector to any programme.
2. Press the DELAY TIMER (ZEITVORWAHL) and SPECIAL
CARE (SCHON) buttons at the same time and hold down
for approx. 5 seconds. The EMPTY WATER (BEHÄLTER) display flashes briefly.
The EMPTY WATER (BEHÄLTER) display is permanently deactivated.
Settings may be cancelled as under 1 and 2, but the EMPTY
WATER (BEHÄLTER) display is briefly illuminated (instead of
flashing).
23
Page 24

Technical Data
This appliance complies with the following EU directives:
5
– 73/23/EEC dated 19.02.1973 Low Voltage Directive
– 89/336/EEC dated 03.05.1989 EMC Directive inclusive of Amending
Directive 92/31/EEC
– 93/68/EEC dated 22.07.1993 CE Marking Directive
Height x width x depth 85 x 60 x 60 cm
Depth with loading door open 109 cm
Height can be adjusted by 1.5 cm
Weight when empty approx. 40kg
Loading volume (depends on programme)
Energy consumption in accordance with IEC 1121 s. e.
(6kg of cotton, pre-drained at 1000 rpm,
COTTONS STORAGE DRY (BAUMWOLLE SCHRANKTROCKEN) programme)
Scope Domestic
permissible ambient temperature + 5°C to + 35°C
1) Different loading volume data may be needed in some countries as a result of different measuring methods.
1)
max. 6kg
3,7kWh
Consumption values
The consumption values have been established under standard conditions. They may deviate when the machine is operated in domestic circumstances.
Programme
COTTONS STORAGE DRY
(BAUMWOLLE SCHRANKTROCKEN)
COTTONS HAND IRON
(BAUMWOLLE BÜGELTROCKEN)
EASY CARES STORAGE DRY
(MISCHGEWEBE SCHRANKTROCKEN)
1) pre-drained at 1000 rpm
2) pre-drained at 1200 rpm
24
Loading volume
in kg
1)
1)
2)
6 3,70
6 3,00
3 1,35
Energy
consumption
in kWh
Page 25

Installation and connection instructions
1 Installation safety instructions
• Before first starting up, all parts of the transport safety equipment
must be removed. The machine may otherwise be damaged.
• Before starting up for the first time, ensure that the nominal voltage
and type of current specified on the machine type plate match the
nominal voltage and type of current at the installation site. The electrical fuses required can also be found on the type plate.
• Always connect the plug into a protection contact socket which has
been installed as specified.
• With permanent connections: A permanent connection may only be
established by an authorised specialist electrician.
• Do not install machine in rooms at risk of frost.
• Ensure that the door of the machine cannot be blocked by interior
doors of the house or the doors of other appliances.
• Do not install on carpets with high piles. Air circulation will be hindered at the ventilation slots.
• Ensure that the machine is not placed on its mains cable.
• Install the machine horizontally.
25
Page 26

Removing transport safety equipment
Caution! Before first starting up,
1
all parts of the transport safety
equipment must be removed.
1. Open loading door
2. Pull off adhesive strips from inside
machine on top of drum.
3. Remove foil hose and polystyrene
padding from the machine.
Electrical connection
Details on mains voltage, type of current and the fuses required should
be taken from the type plate. The type plate is fitted near the loading
aperture (see “Machine description” section).
Important:
The plug must be accessible after the appliance has been installed.
Changing door stop
Warning! The door stop may only be changed by a specialist. If neces-
1
sary, please contact our after-sales service or your specialist dealer.
Warning! Before changing the door stop, disconnect the mains plug;
with a permanent connection: fully unscrew or deactivate the fuse.
26
Page 27
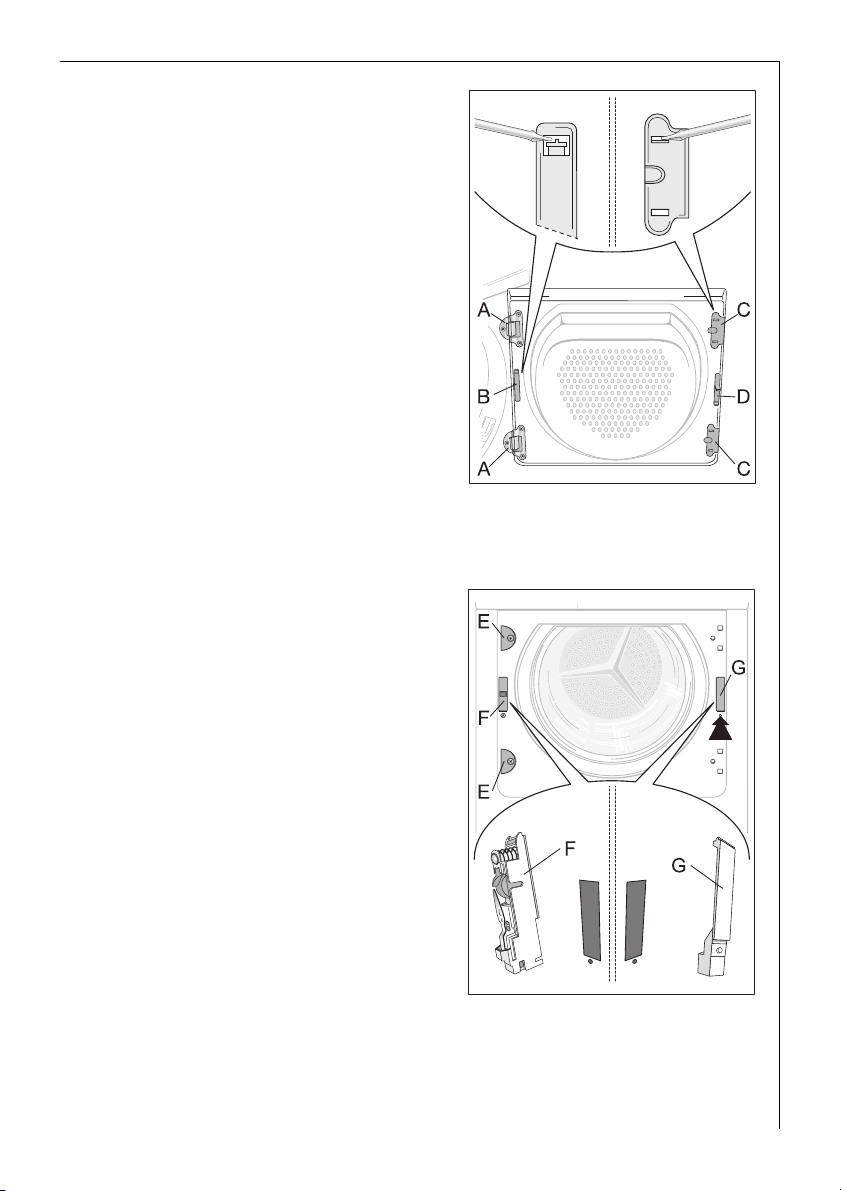
1. Open loading door
2. Unscrew hinge A from the front of
the machine and take off the loading door.
3. Remove cover plates B and C. To do
this, insert a thin screwdriver into
the slots as shown in the illustration, press downwards slightly and
pry out the cover plates.
4. Use an appropriate tool and exert
pressure to unfasten locking block D
from the snap-on fixture, take out
and reinsert on the other side, having rotated the block through 180°.
5. Unscrew hinge A from the loading
door, rotate through 180°, reinsert
on the opposite side and screw
down.
6. Reinsert cover plates B and C on the opposite site having first rotated
them through 180°.
7. Unscrew cover plates E from the
front of the machine, rotate
through 180, screw on the opposite
side.
8. Unscrew door lock F, push down
slightly and remove from the front
of the machine.
9. Press snap-in button G in and down,
press cover down slightly and remove from front of the machine.
10. Transfer door lock F to the oppositeside and screw down.
11. Fix cover G on to the other side and
allow the snap-in button to lock in
place.
12.Insert loading door and hinges into
recesses on the front of the machine and screw down.
Note regarding contact protection: The machine is only secure for
operations again once all plastic parts have been inserted.
27
Page 28

Special accessories
The following special accessories are available from your Service Force
Centre or your specialist dealer:
Intermediate installation kits for stacked washer and
dryer:
These intermediate installation kits can be used to arrange the dryer
and an automatic AEG-Electrolux washing machine (60cm wide, front
loading) as a space-saving washer/dryer stack. The automatic washing
machine is at the bottom and the dryer is at the top.
Two versions can be supplied:
– without stacker plate 916 019 102
– with extractable stacker plate 916 019 103
Installation kit for external condensate drain
Installation kit (125 122 510) for direct draining of condensate into a
basin, siphon, gully, etc. The condensate tank then no longer has to be
drained, it must however remain in its intended position in the machine. Refer to the “Programme options” section for how to deactivate
the EMPTY WATER (BEHÄLTER) display.
Max. displacement height: 1m from the base of the dryer; max. displacement length: 3m
28
Page 29

Customer Services
Servicestellen
5506 Mägenwil/Zürich
Industriestrasse 10
9000 St. Gallen
Vonwilstrasse 15
4127 Birsfelden
Hauptstrasse 52
8604 Volketswil
Hölzliwisenstrasse 12
6032 Emmen
Buholzstrasse
7000 Chur
Comercialstrasse 19
3063 Ittigen/Bern
Ey 5
Ersatzteilverkauf
5506 Mägenwil
Industriestrasse 10
0848 848 028
Fachberatung/Verkauf
8048 Zürich
Badenerstrasse 587
044 405 85 00
Garantie
Für jedes Produkt gewähren
wir ab Verkauf bzw. Lieferdatum an den Endverbraucher eine Garantie von
2 Jahren. (Ausweis durch
Garantieschein, Faktura
oder Verkaufsbeleg).
Die Garantieleistung umfasst die Kosten für Material, Arbeits- und Reisezeit.
Die Garantieleistung entfällt
bei Nichtbeachtung der Gebrauchsanweisung und Betriebsvorschriften,
unsachgerechter Installation, sowie bei Beschädigung durch äussere
Einflüsse, höhere Gewalt,
Eingriffe Dritter und Verwendung von Nicht-Original-Teilen.
1
Points de Service
1028 Préverenges
Le Trési 6
Points de vente de rechange
5506 Mägenwil
Industriestrasse 10
0848 848 028
Demonstration/Vente
8048 Zürich
Badenerstrasse 587
044 405 85 00
Garantie
Nous octroyons sur chaque produit 2 ans de garantie à partir de
la date de livraison ou de la mise
en service au consommateur
(documenté au moyen d’une facture, d’un bon de garantie ou
d’un justificatif d’achat).
Notre garantie couvre les frais de
mains d’œuvres et de déplacement, ainsi que les pièces de rechange.
Les conditions de garantie ne
sont pas valables en cas d’intervention d’un tiers non autorisé,
de l’emploi de pièces de rechange
non originales, d’erreurs de
maniement ou d’installation dues
à l’inobservation du mode d’emploi, et pour des dommages
causés par des influences extérieures ou de force majeure.
Servizio dopo vendita
6916 Grancia
Zona Industriale E
Vendita pezzi di ricambio
5506 Mägenwil
Industriestrasse 10
0848 848 028
Consulente (cucina)/Vendita
8048 Zürich
Badenerstrasse 587
044 405 85 00
Garanzia
Per ogni prodotto concediamo
una garanzia di 2 anni a
partire dalla data di consegna
o dalla sua messa in funzione
(fa stato la data della fattura,
del certificato di garanzia o
dello scontrino d’acquisto).
Nella garanzia sono comprese
le spese di manodopera, di
viaggio e del materiale.
Dalla copertura sono esclusi il
logoramento ed i danni
causati da agenti esterni, intervento di terzi, utilizzo di
ricambi non originali o dalla
inosservanza delle prescrizioni
d’istallazione ed istruzioni per
l’uso.
29
Page 30

30
Page 31

Service
In the event of technical faults, please first check whether you can
remedy the problem yourself with the help of the operating instructions (section “What to do if…”).
If you were not able to remedy the problem yourself, please contact the
Customer Care Department or one of our service partners.
In order to be able to assist you
quickly, we require the following
information:
– Model description
– Product number (PNC)
– Serial number (S No.)
(for numbers see rating plate)
– Type of fault
– Any error messages displayed by
the appliance
So that you have the necessary reference numbers from your appliance
at hand, we recommend that you write them in here:
Model description: .....................................
PNC: .....................................
S No: .....................................
31
Page 32

From the Electrolux Group. The world´s No.1 choice.
The Electrolux Group is the world´s largest producer of powered appliances for kitchen, cleaning and outdoor
use. More than 55 million Electrolux Group products (such as refrigerators, cookers, washing machines,
vacuum cleaners, chain saws and lawn mowers) are sold each year to a value of approx. USD 14 billion in more
than 150 countries around the world.
AEG Hausgeräte GmbH
Postfach 1036
D-90327 Nürnberg
http://www.aeg-electrolux.de
© Copyright by AEG
822 944 765-01-210206-02
Subject to change without notice
 Loading...