

Page 1

hm170.book Seite 1 Mittwoch, 28. Juli 1999 12:25 12
SHM 170
Instruction book ............5
g
Mode demploi ............12
f
Brugsanvisning............25
k
Bruksanvisning............44
s
PAGE
Bruksanvisning ........... 55
n
Käyttöohje
q
Инструкцию по ............
u
эксплуатации
Page 2

hm170.book Seite 4 Mittwoch, 28. Juli 1999 12:25 12
*
+
/
0
.
)
,
-
!
Page 3

hm170.book Seite 1 Mittwoch, 28. Juli 1999 12:25 12
g
Dear customer,
Please read these operating instructions
through carefully. Please make sure you
read the safety instructions on the first
pages of these operating instructions! Keep
the operating instructions for future reference. Pass them on to any future owners.
Appliance description
Please first make yourself familiar with your
appliance (Fig. 1):
A
On/Off switch
B
Ejector switch
C
Attachment holder
D
Hand grip
E
Lead
F
Rating plate with output data
G
Whisk
H
Dough hooks
Purpose of use
Work such as stirring, kneading, mixing, and
beating can be carried out with the Electrolux hand mixers. While the mixer is
doing this work, you move it around in gentle circles through the material being
mixed.
The whisk
(Fig. 1/G) is mainly suitable for
preparing light dough mixes, beating eggs,
whipping cream, and making mayonnaise,
purées, etc. It can also be used for stirring
sauces and dessert powders.
The dough hooks
heavier dough, such as bread dough and
cake mix. Potato starch dough can also be
mixed very easily with this attachment.
(Fig. 1/H) are used for
Safety instructions
The appliance should only ever be con-
nected to an electricity supply whose
voltage is the same as that indicated on
the rating plate (see Fig. 1/F).
Never switch on the appliance until the
working attachments are in the
mixing bowl.
attachment has come to a halt before
talking it out of the bowl.
Do not hold any hard objects (e.g. a
spoon, knife or whiks) against the moving attachments, and do not touch them
with your hand. This could result in
injury!
No paints (including gloss paints, polyes-
ter, etc.) should be stirred with the appliance.
The appliance should be switched off
and unplugged before any cleaning or
maintenance work is done on it. Never
clean the appliance under running
water, and certainly never put in into
washing-up water.
The working attachments are only to be
inserted into or removed from the appliance when it is switched off.
Never leave the appliance unattended,
and supervise particularly carefully if
young children are around.
Check the lead from time to time to
make sure it is not damaged. If any damage is visible, have it replaced at once.
Plastic parts must not be dried on or
near radiators.
Never use the hand mixer if your hands
are wet.
When you have finished worked with
the appliance, switch it off and unplug it
from the electricity supply.
Should any repair be necessary, includ-
ing replacement of the lead, send the
appliance back to the dealer from whom
Always wait until the
This could result in an explosion!
Page 4
hm170.book Seite 2 Mittwoch, 28. Juli 1999 12:25 12
it was purchased or to an Electrolux
service centre.
Repairs to electrical appliances should
only be performed by trained personnel!
Improper repairs may seriously endanger
the user.
If the appliance is used for an improper
purpose or wrongly operated, no liability
can be assumed for any damage howsoever
caused.
This appliance complies with the fol-
;
lowing EC directives:
73/23/EEC of 19.02.1973 Low-Voltage
Directive
89/336/EEC of 03.05.1989 (including
Amendment Directive 92/31/EEC) EMC
(Electromagnetic Compatibility) Directive.
Operating instruction
Inserting and ejecting the attachments:
whisk
The
are inserted into the opening on the under-
and
dough hook
attachments
side of the appliance as far as they will go
until you hear them click into place. One
attachment of each pair is fitted with a
toothed wheel, and this has to be fitted
into the opening with the corresponding
marking (Fig. 3).
Please note:
wrong way round, the dough will be transported upwards! The ejection button (Fig. 1/
B) is for ejecting the working attachments
after the work has been finished. For this
purpose, press the button downwards and
remove the attachment.
if you fit the attachment the
Selecting the operating speed
The 2-stage switch (Fig. 3) permits the
appliance to be adjusted to any of 3 different speeds. The benefits of this appliance
can be enjoyed to the full by setting the
switch at the lowest speed for stirring flour
or cocoa powder, homogenising sauce,
blending liquids, etc.
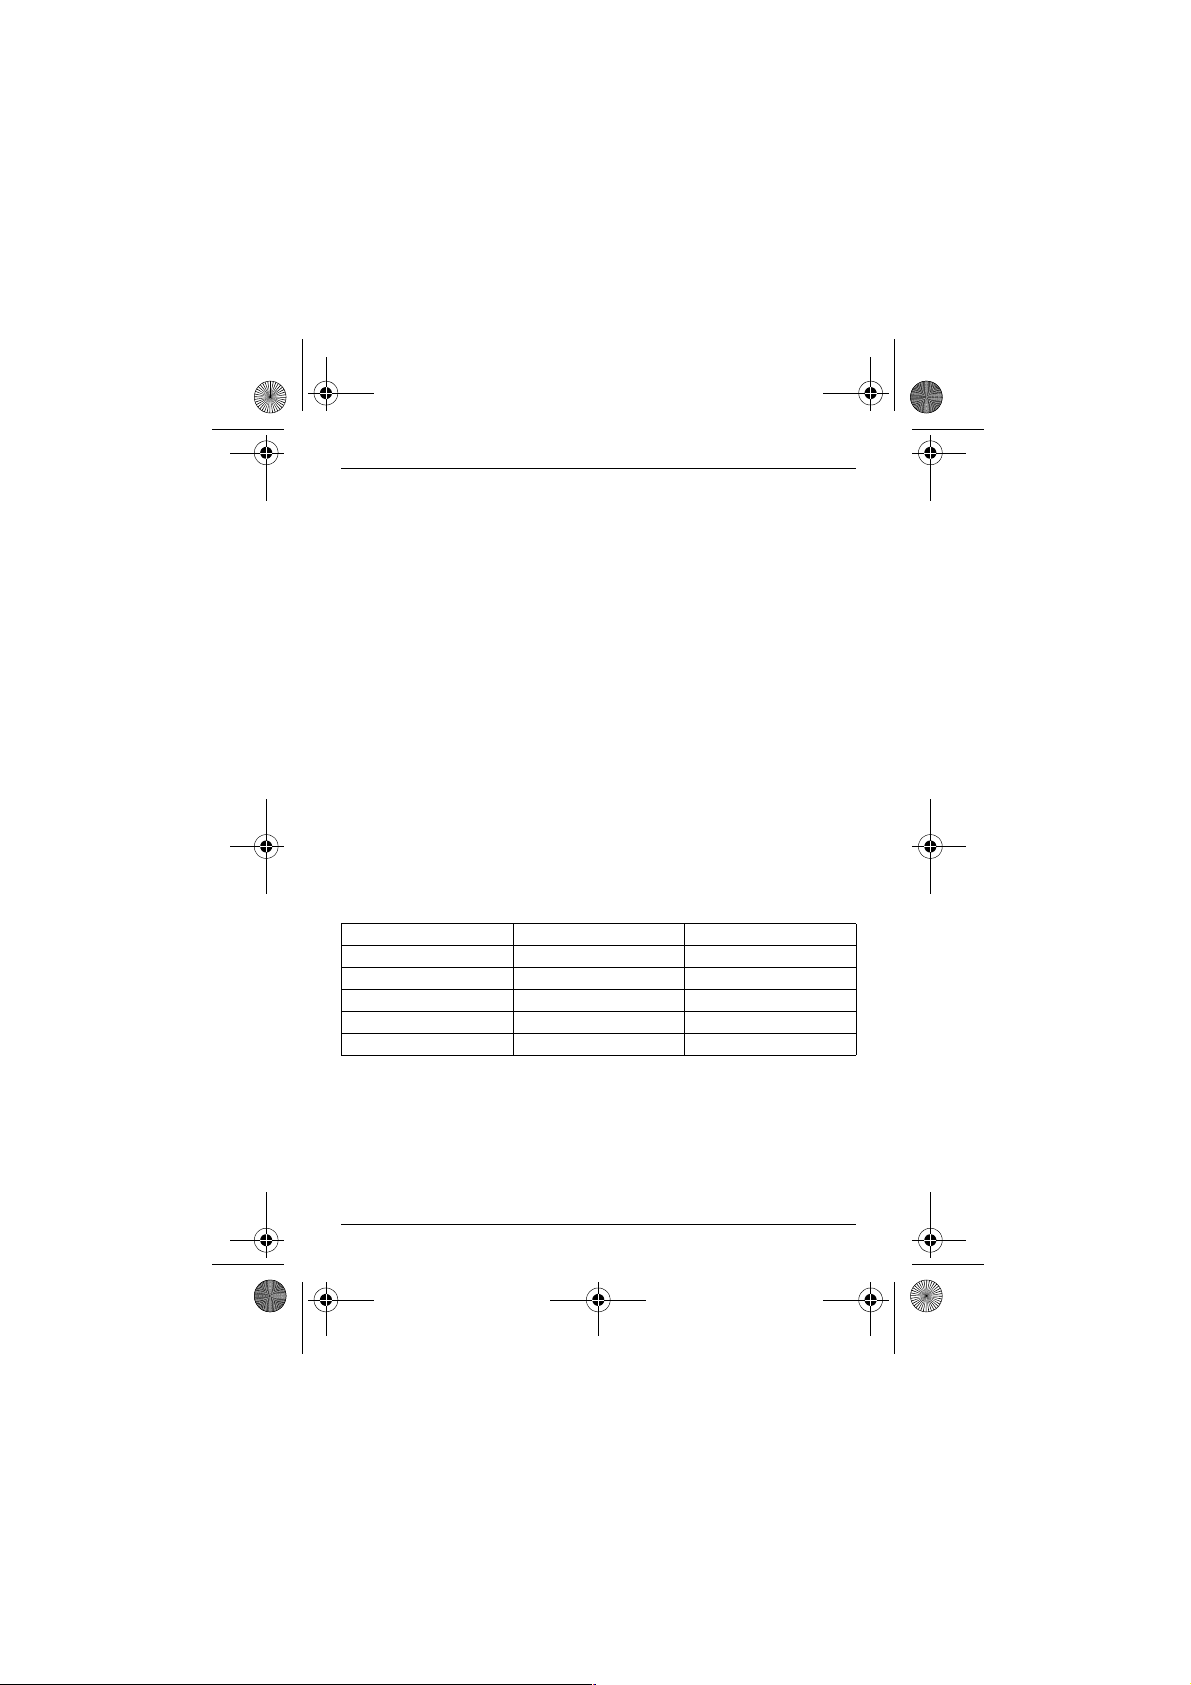
The following table gives you more detailed
information on use of the hand mixer:
Operating conditions
Attachment Use Quantity
Whisk Mixing dough 375 g flour + ingredients
Whisk Beating eggwhite any
Whisk Whipping cream any
Whisk Mayonnaise any
Dough hooks Kneading dough 250 g flour + ingredients
Page 5
hm170.book Seite 3 Mittwoch, 28. Juli 1999 12:25 12
Cleaning the appliance
The drive unit can be cleaned with a damp
cloth. The attachments can be rinsed under
running water or immersed in water containing a proprietary washing-up liquid. The
dough hooks and whisk can be washed in a
dishwasher. Please make sure that no water
ever finds its way inside the appliance!
Storage
If you put the appliance down for a
moment while working with it, you will find
it easy to park it upright on the flat rear
side of its housing.
For the sake of the environment
Do not simply throw the packaging away.
The cardboard packaging material can
be handed in as salvage at your local
wastepaper collection point.
The plastic bag made of polyethylene
(PE) can be handed in to your local PE
collection point.
Please ask your local authority for the
address of your nearest recycling depot.
Customer service
Our products are subject to the highest
demands of quality.
It is only with your help that we can
develop and market appliances meeting
your requirement.
Should you nevertheless have any problem
in using this appliance, please write to us.
Page 6

hm170.book Seite 1 Mittwoch, 28. Juli 1999 12:25 12
822 949 068 - 0799
 Loading...