

Page 1

SG231N
.................................................. ...............................................
EN FREEZER USER MANUAL 2
IT CONGELATORE ISTRUZIONI PER L’USO 19
Page 2

www.electrolux.com
2
CONTENTS
SAFETY INFORMATION . . . . . . . . . . . . . . . . . . . . . . . . . . . . . . . . . . . . . . . . . . . . . . . . . . . . . . . . . 3
PRODUCT DESCRIPTION . . . . . . . . . . . . . . . . . . . . . . . . . . . . . . . . . . . . . . . . . . . . . . . . . . . . . . . 5
CONTROL PANEL . . . . . . . . . . . . . . . . . . . . . . . . . . . . . . . . . . . . . . . . . . . . . . . . . . . . . . . . . . . . . 6
DAILY USE . . . . . . . . . . . . . . . . . . . . . . . . . . . . . . . . . . . . . . . . . . . . . . . . . . . . . . . . . . . . . . . . . . . 8
HELPFUL HINTS AND TIPS . . . . . . . . . . . . . . . . . . . . . . . . . . . . . . . . . . . . . . . . . . . . . . . . . . . . . 10
CARE AND CLEANING . . . . . . . . . . . . . . . . . . . . . . . . . . . . . . . . . . . . . . . . . . . . . . . . . . . . . . . . 11
TROUBLESHOOTING . . . . . . . . . . . . . . . . . . . . . . . . . . . . . . . . . . . . . . . . . . . . . . . . . . . . . . . . . 12
INSTALLATION . . . . . . . . . . . . . . . . . . . . . . . . . . . . . . . . . . . . . . . . . . . . . . . . . . . . . . . . . . . . . . 14
NOISES . . . . . . . . . . . . . . . . . . . . . . . . . . . . . . . . . . . . . . . . . . . . . . . . . . . . . . . . . . . . . . . . . . . . 17
ENVIRONMENT CONCERNS . . . . . . . . . . . . . . . . . . . . . . . . . . . . . . . . . . . . . . . . . . . . . . . . . . . . 18
WE’RE THINKING OF YOU
Thank you for purchasing an Electrolux appliance. You’ve chosen a product that brings with it
decades of professional experience and innovation. Ingenious and stylish, it has been designed with
you in mind. So whenever you use it, you can be safe in the knowledge that you’ll get great results
every time.
Welcome to Electrolux.
Visit our website for:
Get usage advice, brochures, trouble shooter, service information:
www.electrolux.com
Register your product for better service:
www.electrolux.com/productregistration
Buy Accessories, Consumables and Original spare parts for your appliance:
www.electrolux.com/shop
CUSTOMER CARE AND SERVICE
We recommend the use of original spare parts.
When contacting Service, ensure that you have the following data available.
The information can be found on the rating plate. Model, PNC, Serial Number.
Warning / Caution-Safety information
General information and tips
Environmental information
Subject to change without notice.
Page 3

SAFETY INFORMATION
ENGLISH 3
In the interest of your safety and to ensure
the correct use, before installing and first
using the appliance, read this user manual
carefully, including its hints and warnings.
To avoid unnecessary mistakes and accidents, it is important to ensure that all people using the appliance are thoroughly familiar with its operation and safety features.
Save these instructions and make sure that
they remain with the appliance if it is moved
or sold, so that everyone using it through
its life will be properly informed on appliance use and safety.
For the safety of life and property keep the
precautions of these user's instructions as
the manufacturer is not responsible for
damages caused by omission.
CHILDREN AND VULNERABLE
PEOPLE SAFETY
• This appliance is not intended for use by
persons (including children) with reduced
physical, sensory or mental capabilities,
or lack of experience and knowledge,
unless they have been given supervision
or instruction concerning use of the appliance by a person responsible for their
safety.
Children should be supervised to ensure
that they do not play with the appliance.
• Keep all packaging well away from children. There is risk of suffocation.
• If you are discarding the appliance pull
the plug out of the socket, cut the connection cable (as close to the appliance
as you can) and remove the door to prevent playing children to suffer electric
shock or to close themselves into it.
• If this appliance featuring magnetic door
seals is to replace an older appliance
having a spring lock (latch) on the door
or lid, be sure to make that spring lock
unusable before you discard the old appliance. This will prevent it from becoming a death trap for a child.
GENERAL SAFETY
WARNING!
Keep ventilation openings, in the appliance
enclosure or in the built-in structure, clear
of obstruction.
• The appliance is intended for keeping
foodstuff and/or beverages in a normal
household as explained in this instruction
booklet.
• Do not use a mechanical device or any
artificial means to speed up the thawing
process.
• Do not use other electrical appliances
(such as ice cream makers) inside of refrigerating appliances, unless they are
approved for this purpose by the manufacturer.
• Do not damage the refrigerant circuit.
• The refrigerant isobutane (R600a) is contained within the refrigerant circuit of the
appliance, a natural gas with a high level
of environmental compatibility, which is
nevertheless flammable.
During transportation and installation of
the appliance, be certain that none of the
components of the refrigerant circuit become damaged.
If the refrigerant circuit should become
damaged:
– avoid open flames and sources of igni-
tion
– thoroughly ventilate the room in which
the appliance is situated
• It is dangerous to alter the specifications
or modify this product in any way. Any
damage to the cord may cause a shortcircuit, fire and/or electric shock.
WARNING!
Any electrical component (power
cord, plug, compressor) must be
replaced by a certified service
agent or qualified service personnel
to avoid hazard.
1.
Power cord must not be lengthened.
2.
Make sure that the power plug is not
squashed or damaged by the back
of the appliance. A squashed or
damaged power plug may overheat
and cause a fire.
3.
Make sure that you can come to the
mains plug of the appliance.
4.
Do not pull the mains cable.
Page 4

www.electrolux.com
4
• This appliance is heavy. Care should be
• Do not remove nor touch items from the
• Avoid prolonged exposure of the appli-
• Bulb lamps (if foreseen) used in this ap-
DAILY USE
• Do not put hot pot on the plastic parts in
• Do not store flammable gas and liquid in
• Appliance's manufacturers storage rec-
CARE AND CLEANING
• Before maintenance, switch off the appli-
• Do not clean the appliance with metal
• Regularly examine the drain in the refrig-
INSTALLATION
• Unpack the appliance and check if there
5.
If the power plug socket is loose, do
not insert the power plug. There is a
risk of electric shock or fire.
6.
You must not operate the appliance
without the lamp cover (if foreseen)
of interior lighting.
taken when moving it.
freezer compartment if your hands are
damp/wet, as this could cause skin
abrasions or frost/freezer burns.
ance to direct sunlight.
pliance are special purpose lamps selected for household appliances use only.
They are not suitable for household room
illumination.
the appliance.
the appliance, because they may explode.
ommendations should be strictly adhered to. Refer to relevant instructions.
ance and disconnect the mains plug
from the mains socket.
objects.
erator for defrosted water. If necessary,
clean the drain. If the drain is blocked,
water will collect in the bottom of the appliance.
For electrical connection carefully
follow the instructions given in specific paragraphs.
are damages on it. Do not connect the
appliance if it is damaged. Report possible damages immediately to the place
you bought it. In that case retain packing.
• It is advisable to wait at least four hours
before connecting the appliance to allow
the oil to flow back in the compressor.
• Adequate air circulation should be
around the appliance, lacking this leads
to overheating. To achieve sufficient ventilation follow the instructions relevant to
installation.
• Wherever possible the back of the product should be against a wall to avoid
touching or catching warm parts (compressor, condenser) to prevent possible
burn.
• The appliance must not be located close
to radiators or cookers.
• Make sure that the mains plug is accessible after the installation of the appliance.
• Connect to potable water supply only (If
a water connection is foreseen).
SERVICE
• Any electrical work required to do the
servicing of the appliance should be carried out by a qualified electrician or competent person.
• This product must be serviced by an authorized Service Centre, and only genuine spare parts must be used.
ENVIRONMENT PROTECTION
This appliance does not contain
gasses which could damage the
ozone layer, in either its refrigerant
circuit or insulation materials. The
appliance shall not be discarded
together with the urban refuse and
rubbish. The insulation foam contains flammable gases: the appliance shall be disposed according
to the applicable regulations to obtain from your local authorities.
Avoid damaging the cooling unit,
especially at the rear near the heat
exchanger. The materials used on
this appliance marked by the sym-
are recyclable.
bol
Page 5

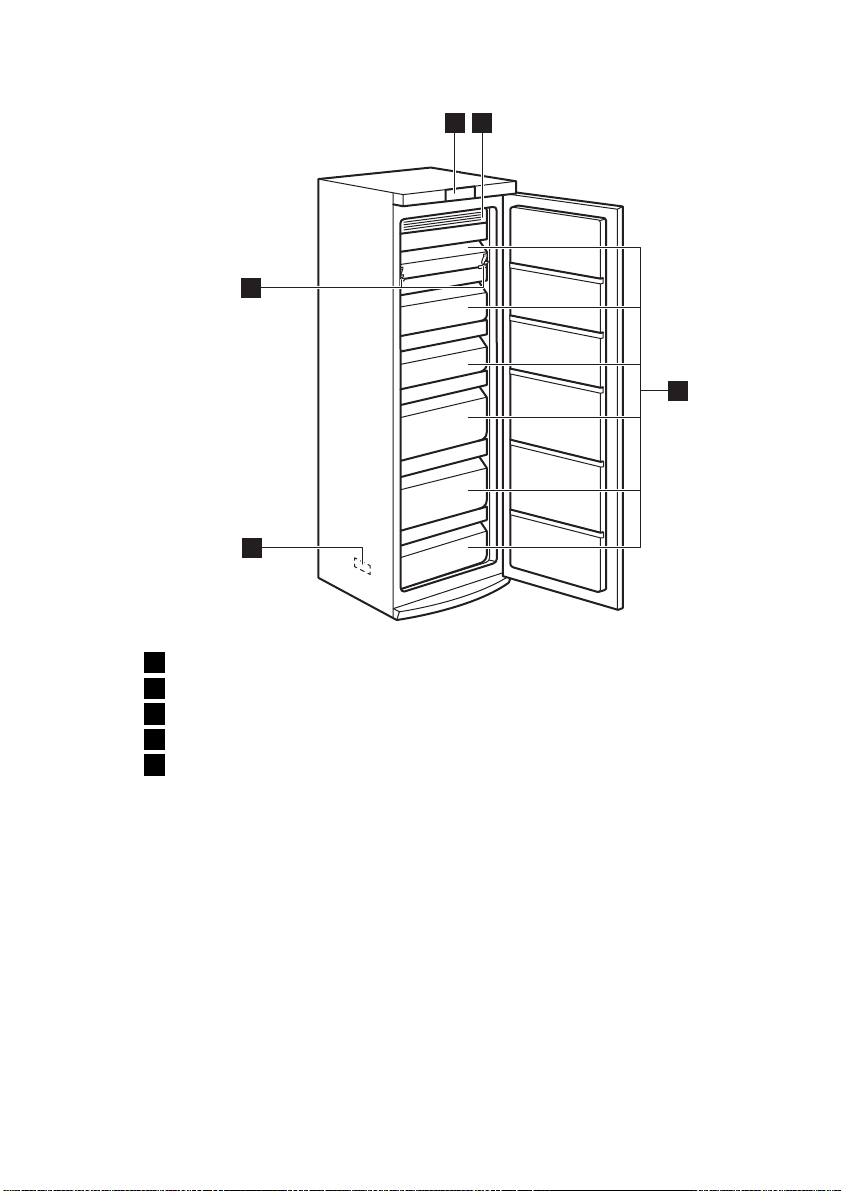
PRODUCT DESCRIPTION
5
4
ENGLISH 5
1 2
3
Control panel
1
Cold module
2
Freezer drawers
3
Rating plate
4
Flap compartment
5
Page 6

www.electrolux.com
6
CONTROL PANEL
Display
1
Temperature warmer button
2
Temperature colder button
3
OK button
4
Mode button
5
ON/OFF button
6
It is possible to change predefined sound
of buttons to a loudly one by pressing together Mode button and Temperature
colder button for some seconds. Change is
reversible.
DISPLAY/INDICATOR
Timer indicator
1
FROSTMATIC function
2
Minute Minder function
3
Child Lock function
4
Alarm indicator
5
Temperature indicator
6
SWITCHING ON
To switch on the appliance do these steps:
1.
Connect the mains plug to the power
socket.
2.
Press the ON/OFF button if the display
is off.
3.
If "dEMo" appears on the display, the
appliance is in demonstration mode.
Refer to "What to do if..." paragraph.
4.
The temperature indicators show the
set default temperature.
To select a different set temperature refer
to "Temperature regulation".
1
23456
SWITCHING OFF
To switch off the appliance do these steps:
1.
Press the ON/OFF button for 5 seconds.
2.
The display switches off.
3.
To disconnect the appliance from the
power disconnect the mains plug from
the power socket.
TEMPERATURE REGULATION
The set temperature of the fridge may be
adjusted by pressing the temperature button.
Set default temperature: +5°C for the
fridge.
The temperature indicator shows the set
temperature.
3 4 5 621
The set temperature will be reached within
24 hours.
After a power failure the set temperature remains stored.
MINUTE MINDER FUNCTION
The Minute Minder function is to be used to
set an acoustic alarm at the preferred time,
useful for example when a recipe requires
to cool down a mixture for a certain length
of time.
To switch on the function:
1.
Press the Mode button until the corresponding icon appears.
The Minute Minder indicator flashes.
The Timer shows the set value (30 mi-
nutes) for a few seconds.
2.
Press the Timer regulator button to
change the Timer set value from 1 to
90 minutes.
3.
Press the OK button to confirm.
The Minute Minder indicator is shown.
Page 7

The Timer start to flash (min).
At the end of the countdown the Minute
Minder indicator flashes and an audible
alarm sounds:
1.
press OK button to switch off the
sound and terminate the function.
It is possible to deactivate the function at
any time during the countdown:
1.
Press the Mode button until the Minute
Minder indicator flashes.
2.
Press the OK button to confirm.
3.
The Minute Minder indicator goes off.
It is possible to change the time at any time
during the countdown and at the end by
pressing the Temperature colder button
and the Temperature warmer button.
CHILD LOCK FUNCTION
To lock the buttons from unintentional operation select the Child Lock function.
To switch on the function:
1.
Press the Mode button until the corre-
sponding icon appears.
2.
The Child Lock indicator flashes.
3.
Press the OK button to confirm.
The Child Lock indicator is shown.
To switch off the function:
1.
Press the Mode button until the Child
Lock indicator flashes.
2.
Press the OK button to confirm.
3.
The Child Lock indicator goes off.
ENGLISH 7
DOOR OPEN ALARM
An acoustic alarm will sound if the door is
left open for a few minutes. The door open
alarm conditions are indicated by:
• flashing Alarm indicator
• acoustic buzzer
When normal conditions are restored (door
closed), the alarm will stop.
During the alarm, the buzzer can be
switched off by pressing any button.
Page 8

www.electrolux.com
8
DAILY USE
STORAGE OF FROZEN FOOD
When first starting-up or after a period out
of use, before putting the products in the
compartment let the appliance run at least
2 hours.
The freezer baskets ensure that it is quick
and easy to find the food package you
want. If large quantities of food are to be
stored, remove all drawers except for the
bottom basket which needs to be in place
to provide good air circulation. On all
shelves except for the top shelf it is possible to place food that protrude 15 mm from
the door.
In the event of accidental defrosting, for example due to a power
failure, if the power has been off for
longer that the value shown in the
technical characteristics chart under "rising time", the defrosted food
must be consumed quickly or
cooked immediately and then refrozen (after cooling).
THAWING
Deep-frozen or frozen food, prior to being
used, can be thawed in the refrigerator
compartment or at room temperature, depending on the time available for this operation.
Small pieces may even be cooked still frozen, directly from the freezer: in this case,
cooking will take longer.
FREEZING FRESH FOOD
The freezer compartment is suitable for
freezing fresh food and storing frozen and
deep-frozen food for a long time.
To freeze fresh food activate the FROSTMATIC function at least 24 hours before
placing the food to be frozen in the freezer
compartment.
Place the fresh food to be frozen in the
FROSTMATIC compartment.
The maximum amount of food that can be
frozen in 24 hours is specified on the rat-
ing plate, a label located on the inside of
the appliance.
The freezing process lasts 24 hours: during
this period do not add other food to be frozen.
Page 9

ENGLISH 9
REMOVAL OF FREEZING BASKETS AND GLASS SHELVES FROM
THE FREEZER
Some of the freezing baskets have a limit
stop to prevent their accidental removal or
falling out. At the time of its removal from
the freezer, pull the basket towards yourself
2
1
1
and, upon reaching the end point, remove
the basket by tilting its front upwards
At the time of putting it back, slightly lift the
front of the basket to insert it into the freezer.
Once you are over the end points, push the
basket back in their position.
The appliance is equipped with shelf stops
to secure the shelves.
The shelves must be lifted up (1) on each
side and than pulled outwards (2).
The glass shelves equipped with expander
rollers are secured with locking pins.
2
1
1
To remove them proceed as follow:
1.
Use a screwdriver to loosen the locking pin on each side on the expander
roller.
2.
Then pull out both locking pin (1).
3.
Then pull the glass shelf outwards (2).
1
2
1
Page 10

www.electrolux.com
10
HELPFUL HINTS AND TIPS
NORMAL OPERATING SOUNDS
• You may hear a faint gurgling and a bub-
bling sound when the refrigerant is pumped through the coils or tubing. This is
correct.
• When the compressor is on, the refriger-
ant is being pumped around and you will
hear a whirring sound and a pulsating
noise from the compressor. This is correct.
• The thermic dilatation might cause a
sudden cracking noise. It is natural, not
dangerous physical phenomenon. This is
correct.
• When the compressor switches on or
switches off, you will hear a faint "click"
of the temperature regulator. This is correct.
HINTS FOR ENERGY SAVING
• Do not open the door frequently or leave
it open longer than absolutely necessary.
• If the ambient temperature is high and
the Temperature Regulator is set to low
temperature and the appliance is fully
loaded, the compressor may run continuously, causing frost or ice on the evaporator. If this happens, set the Temperature Regulator toward warmer settings to
allow automatic defrosting and so a saving in electricity consumption.
To obtain the best performance:
• do not open the door frequently or leave
it open longer than absolutely necessary
• do not remove the cold accumulators
from the freezer basket.
and to make it possible subsequently to
thaw only the quantity required;
• wrap up the food in aluminium foil or polythene and make sure that the packages
are airtight;
• do not allow fresh, unfrozen food to
touch food which is already frozen, thus
avoiding a rise in temperature of the latter;
• lean foods store better and longer than
fatty ones; salt reduces the storage life of
food;
• water ices, if consumed immediately after removal from the freezer compartment, can possibly cause the skin to be
freeze burnt;
• it is advisable to show the freezing in
date on each individual pack to enable
you to keep tab of the storage time.
HINTS FOR STORAGE OF
FROZEN FOOD
To obtain the best performance from this
appliance, you should:
• make sure that the commercially frozen
foodstuffs were adequately stored by the
retailer;
• be sure that frozen foodstuffs are transferred from the foodstore to the freezer
in the shortest possible time;
• not open the door frequently or leave it
open longer than absolutely necessary;
• once defrosted, food deteriorates rapidly
and cannot be refrozen;
• do not exceed the storage period indicated by the food manufacturer.
HINTS FOR FREEZING
To help you make the most of the freezing
process, here are some important hints:
• the maximum quantity of food which can
be frozen in 24 hrs. is shown on the rating plate;
• the freezing process takes 24 hours. No
further food to be frozen should be added during this period;
• only freeze top quality, fresh and thoroughly cleaned, foodstuffs;
• prepare food in small portions to enable
it to be rapidly and completely frozen
Page 11

CARE AND CLEANING
ENGLISH 11
CLEANING THE INTERIOR
Before using the appliance for the first time,
wash the interior and all internal accessories with lukewarm water and some neutral
soap so as to remove the typical smell of a
brand-new product, then dry thoroughly.
Do not use detergents or abrasive
powders, as these will damage the
finish.
If “dEMo” appears on the Display,
the appliance is in demonstration
mode: refer to “WHAT TO DO IF...”
paragraph.
CAUTION!
Unplug the appliance before carrying out any maintenance operation.
This appliance contains hydrocarbons in its cooling unit; maintenance and recharging must therefore only be carried out by authorized technicians.
PERIODIC CLEANING
The equipment has to be cleaned regularly:
• clean the inside and accessories with
lukewarm water and some neutral soap.
• regularly check the door seals and wipe
clean to ensure they are clean and free
from debris.
• rinse and dry thoroughly.
Do not pull, move or damage any
pipes and/or cables inside the cabinet.
Never use detergents, abrasive
powders, highly perfumed cleaning
products or wax polishes to clean
the interior as this will damage the
surface and leave a strong odour.
Many proprietary kitchen surface cleaners
contain chemicals that can attack/damage
the plastics used in this appliance. For this
reason it is recommended that the outer
casing of this appliance is only cleaned with
warm water with a little washing-up liquid
added.
PERIODS OF NON-OPERATION
When the appliance is not in use for long
periods, take the following precautions:
• disconnect the appliance from elec-
tricity supply
• remove all food
• defrost (if foreseen) and clean the appliance and all accessories
• leave the door/doors ajar to prevent unpleasant smells.
If the cabinet will be kept on, ask somebody to check it once in a while to prevent
the food inside from spoiling in case of a
power failure.
DEFROSTING
Your appliance is frost free. This means
that there is no buildup of frost when it is in
operation, neither on the internal walls nor
on the foods.
The absence of frost is due to the continuous circulation of cold air inside the compartment, driven by an automatically controlled fan.
After cleaning, reconnect the equipment to
the mains supply.
Clean the condenser (black grill) and the
compressor at the back of the appliance
with a brush. This operation will improve
the performance of the appliance and save
electricity consumption.
Take care of not to damage the
cooling system.
Page 12

www.electrolux.com
12
TROUBLESHOOTING
WARNING!
Before troubleshooting, disconnect
the mains plug from the mains
socket.
Only a qualified electrician or competent person must do the troubleshooting that is not in this manual.
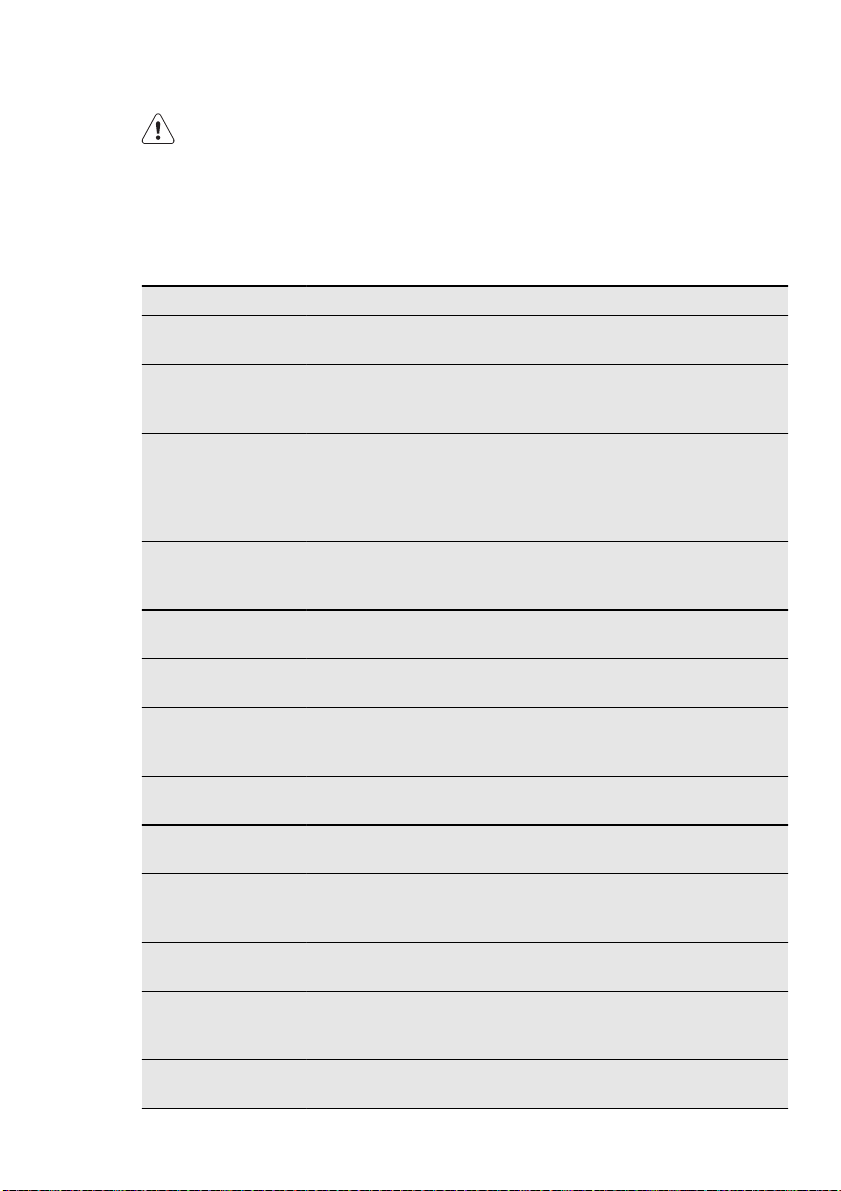
Problem Possible cause Solution
The appliance
does not operate.
The mains plug is not con-
The appliance has no power.
The compressor
operates continually.
The door is not closed cor-
The door has been opened
The product temperature is
The room temperature is too
The FROSTMATIC function is
The temperature
in the freezer is
too low.
The FROSTMATIC function is
The temperature
in the freezer is
too high.
The door is not closed cor-
The product temperature is
The appliance is switched off. Switch on the appliance.
Connect the mains plug to the
nected to the mains socket
mains socket correctly.
correctly.
Connect a different electrical
There is no voltage in the
mains socket.
The temperature is not set
appliance to the mains socket.
Contact a qualified electrician.
Set a higher temperature.
correctly.
Refer to "Closing the door".
rectly.
Do not keep the door open
too frequently.
longer than necessary.
Let the product temperature
too high.
decrease to room temperature
before storage.
Decrease the room temperahigh.
ture.
Refer to "FROSTMATIC funcswitched on.
The temperature regulator is
tion".
Set a higher temperature.
not set correctly.
Refer to "FROSTMATIC funcswitched on.
The temperature regulator is
tion".
Set a lower temperature.
not set correctly.
Refer to "Closing the door".
rectly.
Let the product temperature
too high.
decrease to room temperature
before storage.
Page 13

Problem Possible cause Solution
Many products are stored at
the same time.
Products are too near to
each other.
There is too much
frost.
Food is not wrapped correctly.
The door is not closed cor-
Store less products at the
same time.
Store products so that there is
cold air circulation.
Wrap the food correctly.
Refer to "Closing the door".
rectly.
The temperature regulator is
Set a higher temperature.
not set correctly.
The buzzer
sounds. The
The door is not closed correctly.
Refer to "Door open alarm".
Alarm icon flashing.
dEMo appears on
the display.
The appliance is in demonstration mode.
Keep pressed approximately
10 sec the OK button since a
long sound of buzzer is heard
and the display shut off for a
short while: appliance start
works regularly.
upper or lower
square is shown
in the temperature display.
An error has occurred in
measuring the temperature.
Call your service representative (the cooling system will
continue to keep food products cold, but temperature adjustment will not be possible).
CLOSING THE DOOR
1.
Clean the door gaskets.
2.
If necessary, adjust the door. Refer to
"Installation".
3.
If necessary, replace the defective door
gaskets. Contact the Service Center.
ENGLISH 13
Page 14
www.electrolux.com
14
INSTALLATION
WARNING!
Read the "Safety Information" carefully for your safety and correct operation of the appliance before installing the appliance.
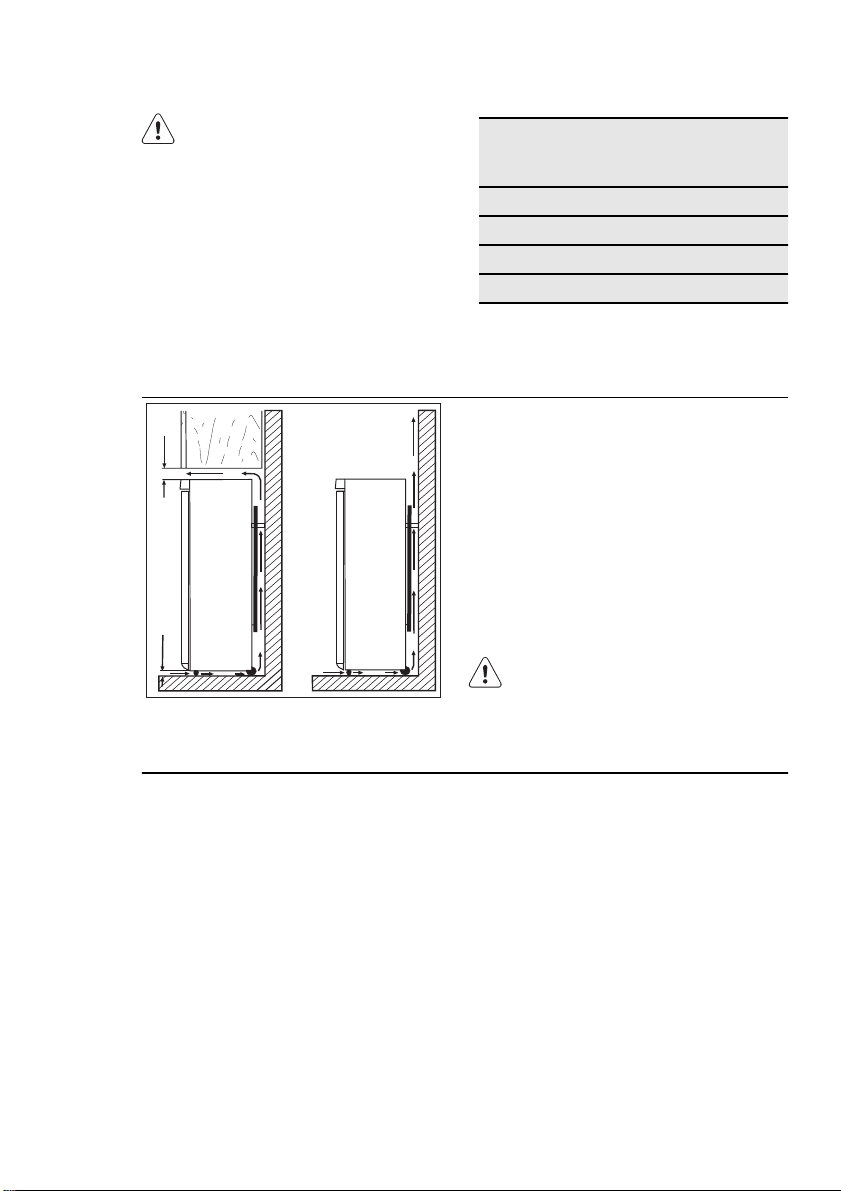
POSITIONING
Install this appliance at a location where the
ambient temperature corresponds to the
climate class indicated on the rating plate
of the appliance:
LOCATION
100 mm
min
A
20 mm
B
ELECTRICAL CONNECTION
Before plugging in, ensure that the voltage
and frequency shown on the rating plate
correspond to your domestic power supply.
The appliance must be earthed. The power
supply cable plug is provided with a contact for this purpose. If the domestic power
Cli-
Ambient temperature
mate
class
SN +10°C to + 32°C
N +16°C to + 32°C
ST +16°C to + 38°C
T +16°C to + 43°C
The appliance should be installed well away
from sources of heat such as radiators,
boilers, direct sunlight etc. Ensure that air
can circulate freely around the back of the
cabinet. To ensure best performance, if the
appliance is positioned below an overhanging wall unit, the minimum distance between the top of the cabinet and the wall
unit must be at least 100 mm . Ideally,
however, the appliance should not be positioned below overhanging wall units. Accurate levelling is ensured by one or more adjustable feet at the base of the cabinet.
WARNING!
It must be possible to disconnect
the appliance from the mains power supply; the plug must therefore
be easily accessible after installation.
supply socket is not earthed, connect the
appliance to a separate earth in compliance with current regulations, consulting a
qualified electrician.
The manufacturer declines all responsibility
if the above safety precautions are not observed.
This appliance complies with the E.E.C. Directives.
Page 15

REAR SPACERS
ENGLISH 15
4
3
LEVELLING
DOOR REVERSIBILITY
2
1
You can find the two spacers in the bag
with documentation.
Do these steps to install the spacers:
1.
Release the screw.
2.
Engage the spacer below the screw.
3.
Turn the spacer to the right position.
4.
Tighten again the screws.
When placing the appliance ensure that it
stands level. This can be achieved by two
adjustable feet at the bottom in front.
To carry out the following operations, we suggest that this be
made with another person that will
keep a firm hold on the doors of
the appliance during the operations.
To change the opening direction of the
door, do these steps:
• Remove the plug from the power socket.
• Tilt back the appliance carefully so that
the compressor cannot touch the floor.
• Remove the plinth.
• Unscrew and remove the lower hinges.
• Remove the door.
Page 16

www.electrolux.com
16
• Unscrew the upper pin and screw it on
the opposite side.
• Refit the door.
• Make sure the edge of the door is paral-
2
lel with the edge of the top.
1
• Unscrew the pin (A) and screw it on the
A
B
opposite side.
• Remove the cap (B) and position it on
the opposite side.
• Screw the lower hinges.
• Refit the plinth.
• Stand the appliance upright.
• Fit the handle on the opposite side and
put the plastic caps (contained in the instructions bag) in the free holes.
• Do a final check to make sure that:
– All screws are tightened.
– The door opens and closes correctly.
If the ambient temperature is cold (i.e. in
Winter), the gasket may not fit perfectly to
the cabinet. In that case, wait for the natural fitting of the gasket.
In case you do not want to carry out the
above mentioned operations, contact the
nearest After Sales Service Force. The After
Sales Service specialist will carry out the reversibility of the doors at your cost.
Dimension
Height 1850 mm
Width 600 mm
Depth 660 mm
Rising Time 20 h
Voltage 230-240 V
Frequency 50 Hz
The technical information are situated in the
rating plate on the internal left side of the
appliance and in the energy label.
Page 17

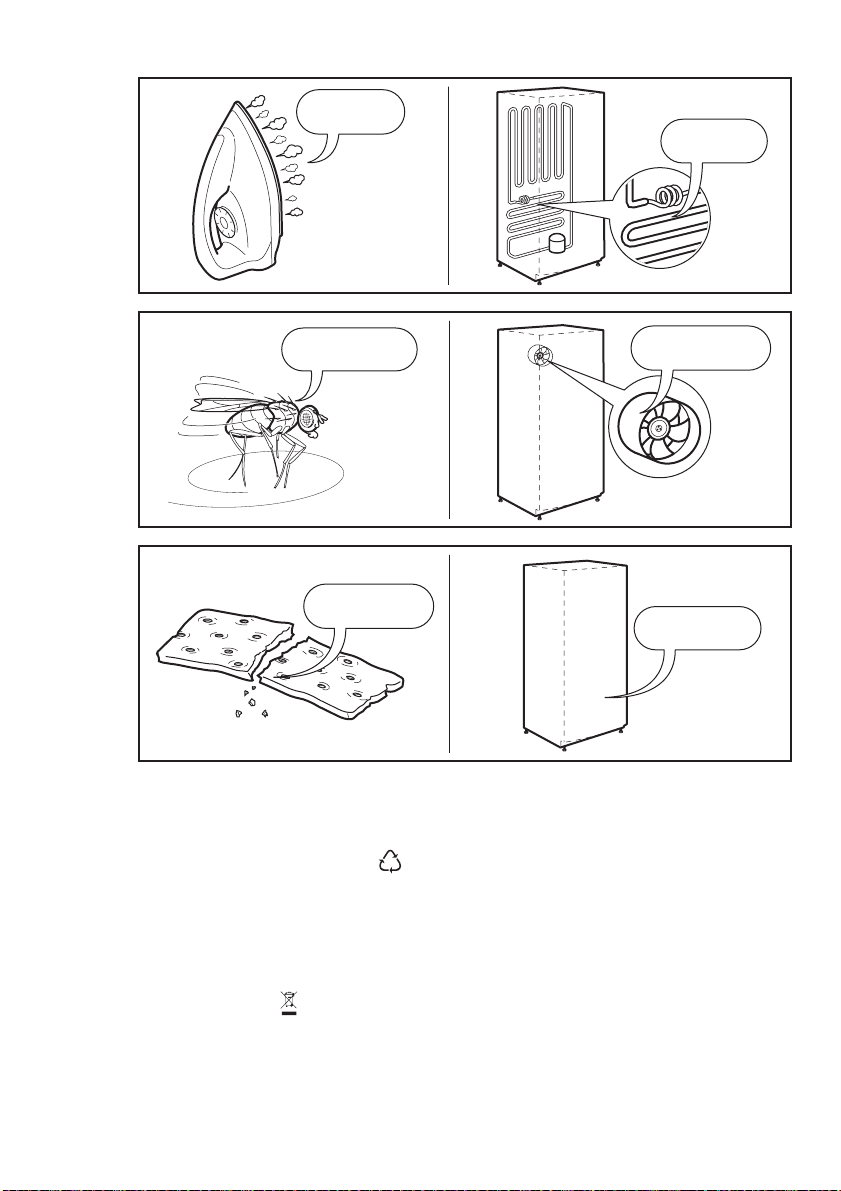
NOISES
There are some sounds during normal running (compressor, refrigerant circulation).
SSSRRR!
HISSS!
ENGLISH 17
CLICK!
BRRR!
OK
CLICK!
BRRR!
CRACK!
BLUBB!
CLICK!
BRRR!
BLUBB!
BLUBB!
Page 18

www.electrolux.com
18
HISSS!
HISSS!
SSSRRR!
CRACK!
ENVIRONMENT CONCERNS
Recycle the materials with the symbol
Put the packaging in applicable containers
to recycle it.
Help protect the environment and human
health and to recycle waste of electrical
SSSRRR!
CRACK!
and electronic appliances. Do not dispose
.
appliances marked with the symbol
the household waste. Return the product
to your local recycling facility or contact
your municipal office.
with
Page 19

ITALIANO 19
INDICE
INFORMAZIONI PER LA SICUREZZA . . . . . . . . . . . . . . . . . . . . . . . . . . . . . . . . . . . . . . . . . . . . . . 20
DESCRIZIONE DEL PRODOTTO . . . . . . . . . . . . . . . . . . . . . . . . . . . . . . . . . . . . . . . . . . . . . . . . . 23
PANNELLO DEI COMANDI . . . . . . . . . . . . . . . . . . . . . . . . . . . . . . . . . . . . . . . . . . . . . . . . . . . . . 24
UTILIZZO QUOTIDIANO . . . . . . . . . . . . . . . . . . . . . . . . . . . . . . . . . . . . . . . . . . . . . . . . . . . . . . . . 26
CONSIGLI E SUGGERIMENTI UTILI . . . . . . . . . . . . . . . . . . . . . . . . . . . . . . . . . . . . . . . . . . . . . . . 28
PULIZIA E CURA . . . . . . . . . . . . . . . . . . . . . . . . . . . . . . . . . . . . . . . . . . . . . . . . . . . . . . . . . . . . . 29
RISOLUZIONE DEI PROBLEMI . . . . . . . . . . . . . . . . . . . . . . . . . . . . . . . . . . . . . . . . . . . . . . . . . . . 30
INSTALLAZIONE . . . . . . . . . . . . . . . . . . . . . . . . . . . . . . . . . . . . . . . . . . . . . . . . . . . . . . . . . . . . . 32
RUMORI . . . . . . . . . . . . . . . . . . . . . . . . . . . . . . . . . . . . . . . . . . . . . . . . . . . . . . . . . . . . . . . . . . . . 36
CONSIDERAZIONI AMBIENTALI . . . . . . . . . . . . . . . . . . . . . . . . . . . . . . . . . . . . . . . . . . . . . . . . . 37
PENSATI PER VOI
Grazie per aver acquistato un'apparecchiatura Electrolux. Avete scelto un prodotto che ha alle spalle
decenni di esperienza professionale e innovazione. Ingegnoso ed elegante, è stato progettato
pensando a voi. Quindi, in qualsiasi momento desiderate utilizzarlo, potete esser certi di ottenere
sempre i migliori risultati.
Benvenuti in Electrolux.
Visitate il nostro sito web per:
ricevere consigli, scaricare i nostri opuscoli, eliminare eventuali anomalie, ottenere
informazioni sull'assistenza.
www.electrolux.com
registrare il vostro prodotto e ricevere un servizio migliore:
www.electrolux.com/productregistration
acquistare accessori, materiali di consumo e ricambi originali per la vostra apparecchiatura:
www.electrolux.com/shop
SERVIZIO CLIENTI E MANUTENZIONE
Consigliamo sempre l’impiego di ricambi originali.
Quando si contatta l'Assistenza, accertarsi di disporre dei seguenti dati.
Le informazioni si trovano sulla targhetta di identificazione. Modello, numero dell'apparecchio (PNC),
numero di serie.
Avvertenza / Attenzione - Importanti Informazioni di Sicurezza
Informazioni e consigli generali
Informazioni in materia di sicurezza ambientale
Con riserva di modifiche.
Page 20

www.electrolux.com
20
INFORMAZIONI PER LA SICUREZZA
Per garantire un impiego corretto e sicuro
dell'apparecchio, prima dell'installazione e
del primo utilizzo leggere con attenzione il
libretto istruzioni, inclusi i suggerimenti e le
avvertenze. Per evitare errori e incidenti, è
importante garantire che tutte le persone
che utilizzano l'apparecchio ne conoscano
il funzionamento e le caratteristiche di sicurezza. Conservare queste istruzioni e accertarsi che rimangano unite all'apparecchio in caso di vendita o trasloco, in modo
che chiunque lo utilizzi sia correttamente
informato sull'uso e sulle norme di sicurezza.
Per la sicurezza delle persone e delle cose
osservare le precauzioni indicate nelle presenti istruzioni per l'utente, il produttore
non è responsabile dei danni provocati da
eventuali omissioni.
SICUREZZA DEI BAMBINI E
DELLE PERSONE FRAGILI
• Questo apparecchio non deve essere
usato da persone, bambini inclusi, con
ridotte capacità fisiche, sensoriali o psichiche, oppure prive di conoscenza e
esperienza, a meno che non siano state
istruite all'uso dell'apparecchio da parte
dei responsabili della loro sicurezza, oppure sotto vigilanza di questi.
I bambini devono essere sorvegliati per
assicurarsi che non giochino con l'apparecchio.
• Tenere i materiali di imballaggio al di fuori
della portata dei bambini. Alcuni materiali
possono creare rischi di soffocamento.
• Qualora l'apparecchio venga demolito,
estrarre la spina dalla presa, tagliare il
cavo di collegamento (il più vicino possibile all'apparecchio) e smontare lo sportello per evitare che i bambini giocando
possano subire scosse elettriche o chiudersi dentro l'apparecchio.
• Se questo nuovo apparecchio, che è dotato di guarnizioni magnetiche nello sportello, va a sostituirne uno più vecchio
avente sportello o coperchio con chiusure a molla, si deve rendere inutilizzabili
tali chiusure prima di eliminare l'apparecchio sostituito, per evitare che diventi
una trappola mortale per i bambini.
NORME DI SICUREZZA
GENERALI
AVVERTENZA!
Verificare che le aperture di ventilazione, sia
sull'apparecchiatura che nella struttura da
incasso, siano libere da ostruzioni.
• L'apparecchiatura è progettata per la
conservazione domestica di alimenti e/o
bevande nelle modalità descritte nelle
presenti istruzioni.
• Non usare dispositivi elettrici o altri mezzi
artificiali non raccomandati dal produttore allo scopo di accelerare il processo di
sbrinamento.
• Non utilizzare altre apparecchiature elettriche (per esempio gelatiere) all'interno
del frigorifero, salvo quelle approvate per
tale scopo dal produttore.
• Non danneggiare il circuito refrigerante.
• Il circuito refrigerante dell'apparecchiatura contiene isobutano (R600a), un gas
naturale con un elevato livello di compatibilità ambientale che, tuttavia, è infiammabile.
Durante il trasporto e l'installazione dell'apparecchiatura, assicurarsi che nessuno dei componenti del circuito refrigerante venga danneggiato.
In caso di danneggiamento del circuito
refrigerante:
– evitare fiamme libere e scintille
– aerare bene il locale in cui si trova l'ap-
parecchiatura
• È pericoloso cambiare le specifiche o
modificare il prodotto in qualunque modo. Un danneggiamento del cavo potrebbe provocare cortocircuiti, incendi e/
o scosse elettriche.
AVVERTENZA!
Tutti i componenti elettrici (cavo di
alimentazione, spina, compressore)
devono essere sostituiti da un tecnico certificato o da personale
d'assistenza qualificato al fine di
evitare di correre rischi.
1.
Non collegare prolunghe al cavo di
alimentazione.
Page 21

2.
Evitare che il lato posteriore dell'apparecchiatura possa schiacciare o
danneggiare la spina, causandone il
surriscaldamento con un conseguente rischio di incendio.
3.
La spina dell'apparecchiatura deve
trovarsi in una posizione accessibile.
4.
Evitare di tirare il cavo di alimentazione.
5.
Se la presa elettrica non è perfettamente stabile, non inserire la spina. Il
collegamento potrebbe provocare
scosse elettriche o creare un rischio
di incendio.
6.
L'apparecchiatura non deve essere
messa in funzione senza il coprilampada interno (se previsto).
• Questa apparecchiatura è pesante. Procedere con cautela durante gli spostamenti.
• Evitare di estrarre o di toccare gli alimenti
riposti nel vano congelatore con le mani
bagnate o umide; il contatto potrebbe
provocare abrasioni o ustioni da freddo.
• Evitare un'esposizione prolungata dell'apparecchiatura alla luce solare diretta.
• Le lampadine utilizzate in questa apparecchiatura (se previste) sono lampade
speciali selezionate esclusivamente per
elettrodomestici. Non sono adatte per
l'illuminazione degli ambienti.
USO NORMALE
• Non appoggiare pentole calde sulle parti
in plastica dell'apparecchiatura.
• Non riporre gas o liquidi infiammabili nell'apparecchio: i contenitori potrebbero
esplodere.
• Osservare rigorosamente le raccomandazioni del produttore riguardo alla conservazione degli alimenti. Leggere attentamente le relative istruzioni.
PULIZIA E CURA
• Prima di eseguire qualunque intervento
di manutenzione, spegnere l'apparecchiatura ed estrarre la spina dalla presa.
• Non pulire l'apparecchiatura con oggetti
metallici.
• Ispezionare regolarmente lo scarico dell'acqua di sbrinamento. Lo scarico deve
essere sempre perfettamente libero. L'ostruzione dello scarico può causare un
ITALIANO 21
deposito di acqua sul fondo dell'apparecchiatura.
INSTALLAZIONE
Per il collegamento elettrico, seguire attentamente le istruzioni dei paragrafi corrispondenti.
• Disimballare l'apparecchio e assicurarsi
che non presenti danni. Non collegare
l'apparecchio se è danneggiato. Segnalare immediatamente gli eventuali danni
al negozio in cui è stato acquistato. In
questo caso conservare l'imballaggio.
• Si consiglia di attendere almeno due ore
prima di collegare l'apparecchio per consentire all'olio di arrivare nel compressore.
• Attorno all'apparecchio vi deve essere
un'adeguata circolazione dell'aria, altrimenti si può surriscaldare. Per ottenere
una ventilazione sufficiente seguire le
istruzioni di installazione.
• Se possibile il retro dell'apparecchio dovrebbe essere posizionato contro una
parete per evitare di toccare le parti calde o di rimanervi impigliati (compressore,
condensatore), evitando così possibili
scottature.
• L'apparecchio non deve essere posto vicino a radiatori o piani di cottura a gas.
• Installare l'apparecchio in modo che la
presa rimanga accessibile.
• Collegare solo a sorgenti d'acqua potabile (se è previsto un collegamento alla
rete idrica).
ASSISTENZA TECNICA
• Gli interventi elettrici sull'apparecchiatura
devono essere eseguiti esclusivamente
da elettricisti qualificati o da personale
competente.
• Gli interventi di assistenza devono essere
eseguiti esclusivamente da tecnici autorizzati e utilizzando solo ricambi originali.
TUTELA AMBIENTALE
Questo apparecchio non contiene
gas che potrebbero danneggiare lo
strato di ozono nel circuito refrigerante o nei materiali isolanti. L'apparecchio non deve essere smaltito
assieme ai rifiuti urbani e alla spaz-
Page 22

www.electrolux.com
22
zatura. La schiuma dell'isolamento
contiene gas infiammabili: lo smaltimento dell'apparecchio va eseguito
secondo le prescrizioni vigenti da
richiedere alle autorità locali. Evitare
di danneggiare il gruppo refrigerante, specialmente nella parte posteriore vicino allo scambiatore di calore. I materiali usati su questo apparecchio contrassegnati dal sim-
sono riciclabili.
bolo
Page 23
DESCRIZIONE DEL PRODOTTO
5
4
ITALIANO 23
1 2
3
Pannello comandi
1
Modulo freddo
2
Cassetti congelatore
3
Targhetta dei dati
4
Scomparto flap
5
Page 24

www.electrolux.com
24
PANNELLO DEI COMANDI
1
23456
Display
1
Tasto Temperatura più calda
2
Tasto Temperatura più fresca
3
TastoOK
4
TastoMode
5
TastoON/OFF
6
È possibile modificare le impostazioni audio
predefinite dei tasti e impostarle con un volume più alto, premendo contemporaneamente il tasto Mode e il tasto temperatura
più fresca per alcuni secondi. La modifica è
reversibile.
DISPLAY/INDICATORE
3 4 5 621
Spia timer
1
FunzioneFROSTMATIC
2
FunzioneMinute Minder
3
Funzione Sicurezza bambini
4
Indicatore allarme
5
Indicatore della temperatura
6
ACCENSIONE
Per accendere l'apparecchiatura procedere
come segue:
1.
Inserire la spina nella presa di alimentazione.
2.
Premere il tasto ON/OFF se il display è
spento.
3.
Se "dEMo" appare sul display, l'apparecchiatura si trova in modalità dimostrazione. Fare riferimento al paragrafo
"Cosa fare se...".
4.
Gli indicatori di temperatura visualizzano la temperatura impostata predefini-
ta.
Per selezionare una temperatura diversa,
consultare la sezione "Regolazione della
temperatura".
SPEGNIMENTO
Per spegnere l'apparecchiatura, procedere
come segue:
1.
Premere il tasto ON/OFF per 5 secon-
di.
2.
Il display si spegne.
3.
Per scollegare l’apparecchiatura dalla
corrente elettrica, staccare la spina
dalla presa di alimentazione.
REGOLAZIONE DELLA
TEMPERATURA
È possibile regolare la temperatura impostata del frigorifero, premendo il tasto temperatura.
Impostare la temperatura predefinita: +5°C
per il frigorifero.
Gli indicatori della temperatura visualizzano
la temperatura impostata.
La temperatura impostata verrà raggiunta
entro 24 ore.
Dopo un'interruzione di corrente la
temperatura impostata rimane in
memoria.
FUNZIONE MINUTE MINDER
La funzione Minute Minder serve per impostare un segnale acustico in un preciso
momento, utile per esempio quando una
pietanza richiede il raffreddamento di alimenti misti per un certo periodo di tempo.
Per attivare la funzione:
Page 25

1.
Premere il tasto Mode finché non appare l'icona corrispondente.
L'indicatore Minute Minder lampeggia.
Il timer visualizza il valore impostato (30
minuti) per alcuni secondi.
2.
Premere il tasto Regolatore timer per
modificare il valore impostato da 1 a
90 minuti.
3.
Premere il tasto OK per confermare.
La spia Minute Minder viene visualizza-
ta.
Il Timer inizia a lampeggiare (min).
Al termine del conto alla rovescia la spia
Minute Minder lampeggia e viene emesso
un segnale acustico:
1.
premere il tasto OK per spegnere il se-
gnale acustico e porre fine alla funzio-
ne.
È possibile disattivare la funzione in qualsiasi momento durante il conto alla rovescia:
1.
Premere il tasto Mode fino a quando la
spia Minute Minder lampeggia.
2.
Premere il tasto OK per confermare.
3.
La spia Minute Minder si spegne.
È possibile modificare l'ora in qualsiasi momento durante il conto alla rovescia e alla
fine premendo il tasto Temperatura più
fredda ed il Tasto temperatura più calda.
ITALIANO 25
ALLARME PORTA APERTA
Se la porta è lasciata aperta per alcuni minuti, viene emesso un segnale acustico. Le
condizioni di allarme della porta aperta sono indicate da:
• indicatore allarme lampeggiante
• segnale acustico
Al ripristino delle condizioni normali (porta
chiusa), l'allarme si interrompe.
Durante l'allarme, il segnale acustico può
essere disattivato premendo qualsiasi tasto.
FUNZIONE SICUREZZA
BAMBINI
Per evitare che i tasti vengano premuti accidentalmente, selezionare la funzione Sicurezza Bambini.
Per attivare la funzione:
1.
Premere il tasto Mode fino a quando
non appare l'icona corrispondente.
2.
L'indicatore Sicurezza Bambini lam-
peggia.
3.
Premere il tasto OK per confermare.
Viene visualizzato l'indicatore Sicurezza
Bambini.
Per disattivare la funzione:
1.
Premere il tasto Mode fino a quando
l'indicatore Sicurezza Bambini non
lampeggia.
2.
Premere il tasto OK per confermare.
3.
L'indicatore Sicurezza Bambini si spe-
gne.
Page 26

www.electrolux.com
26
UTILIZZO QUOTIDIANO
CONSERVAZIONE DEI
SURGELATI
Al primo avvio o dopo un periodo di inutilizzo si consiglia di lasciare in funzione l'apparecchiatura per almeno 2 ore, prima di introdurre gli alimenti nel vano.
I cestelli del congelatore consentono di individuare rapidamente e facilmente la confezione di alimenti desiderata. Se occorre
conservare grandi quantità di cibo, si consiglia di rimuovere tutti i cassetti ad eccezione del cestello inferiore, la cui presenza
è necessaria per assicurare la buona circolazione dell'aria. Su tutti i ripiani, eccezion
fatta per quello superiore, è possibile posizionare alimenti fino a una sporgenza massima di 15 mm dalla porta.
In caso di sbrinamento accidentale,
per esempio a causa di un'interruzione dell'alimentazione elettrica,
se l'alimentazione manca per un
periodo superiore al valore indicato
nella tabella dei dati tecnici sotto
"Tempo di risalita", il cibo scongelato deve essere consumato rapidamente o cucinato immediatamente e quindi ricongelato (dopo il
raffreddamento).
fero o a temperatura ambiente, in funzione
del tempo disponibile per questa operazione.
I pezzi piccoli possono addirittura essere
cucinati ancora congelati, direttamente dal
congelatore: in questo caso la cottura durerà più a lungo.
CONGELAZIONE DI ALIMENTI
FRESCHI
Il vano congelatore è adatto alla congelazione di alimenti freschi e alla conservazione a lungo termine di alimenti congelati e
surgelati.
Per congelare alimenti freschi, attivare la
funzione FROSTMATIC almeno 24 ore prima di introdurli nel vano congelatore.
Riporre i cibi freschi da congelare nello
scomparto FROSTMATIC .
La quantità massima di alimenti congelabili
in 24 ore è riportata sulla targhetta, un'eti-
chetta presente sulle pareti interne dell'apparecchiatura.
Il processo di congelamento dura 24 ore:
non aggiungere altri alimenti da congelare
per tutta la durata del processo.
SCONGELAMENTO
Prima dell'utilizzo, i cibi surgelati o congelati
possono essere scongelati nel vano frigori-
Page 27

RIMOZIONE DEI CESTELLI E DEI RIPIANI IN VETRO DAL
CONGELATORE
Alcuni dei cestelli del congelatore sono
provvisti di un fermo che ne impedisce la
caduta o la rimozione accidentale. Per
estrarre un cestello dal vano congelatore,
2
1
1
tirarlo in avanti e, al raggiungimento del fermo, inclinare verso l'alto la parte anteriore
Per reinserire il cestello, sollevarlo leggermente sul lato anteriore e introdurlo nel
congelatore.
Una volta superato il fermo, spingere il cestello nella posizione originaria.
L'apparecchiatura è dotata di appositi fermi
per bloccare i ripiani.
I ripiani vanno sollevati (1) su ciascun lato e
tirati verso l'esterno (2).
I ripiani in vetro corredati di rulli di espansione sono bloccati dai perni di arresto.
ITALIANO 27
2
1
1
Per rimuoverli, procedere nel seguente modo:
1.
Con un cacciavite allentare il perno di
arresto su ciascun lato del rullo di
espansione.
2.
Quindi estrarre entrambi i perni di arresto (1).
3.
Quindi tirare il ripiano in vetro verso l'esterno (2).
1
2
1
Page 28

www.electrolux.com
28
CONSIGLI E SUGGERIMENTI UTILI
RUMORI NORMALI DURANTE IL
FUNZIONAMENTO
• Quando il refrigerante viene pompato at-
traverso le bobine o le tubazioni si può
sentire un fievole gorgoglio e un borbottio. Non si tratta di un'anomalia.
• Quando il compressore è in funzione,
viene pompato il refrigerante e si può
sentire un ronzio e un rumore pulsante
dal compressore. Non si tratta di un'anomalia.
• La dilatazione termica potrebbe provoca-
re uno schiocco improvviso. È un fenomeno naturale, non pericoloso. Non si
tratta di un'anomalia.
• Quando il compressore si accende o si
spegne, si sente un lieve scatto del regolatore della temperatura. Non si tratta di
un'anomalia.
CONSIGLI PER IL RISPARMIO
ENERGETICO
• Non aprire frequentemente la porta e li-
mitare il più possibile i tempi di apertura.
• Se la temperatura ambiente è elevata, la
manopola della regolazione della temperatura è impostata su un valore basso e
l'apparecchiatura è a pieno carico, il
compressore può funzionare in maniera
ininterrotta, causando la formazione di
brina o di ghiaccio sull'evaporatore. In tal
caso, ruotare la manopola della regolazione della temperatura verso temperature più calde per consentire lo sbrinamento automatico e ridurre il consumo
energetico.
Per ottenere risultati ottimali:
• Non aprire frequentemente la porta e li-
mitare il più possibile i tempi di apertura
• Non rimuovere gli accumulatori di freddo
dal cestello di congelamento.
CONSIGLI PER IL
CONGELAMENTO
Per un processo di congelamento ottimale,
ecco alcuni consigli importanti:
• la quantità massima di cibo che può es-
sere congelata in 24 h è riportata sulla
targhetta;
• il processo di congelamento dura 24 ore.
In questo periodo non aggiungere altro
cibo da congelare;
• congelare solo alimenti freschi, di ottima
qualità e accuratamente puliti;
• preparare il cibo in piccole porzioni per
consentire un congelamento rapido e
completo e per scongelare in seguito solo la quantità necessaria;
• avvolgere il cibo in pellicole di alluminio o
in politene e verificare che i pacchetti siano ermetici;
• non lasciare che cibo fresco non congelato entri in contatto con quello già congelato, per evitare un aumento della temperatura in quest'ultimo;
• i cibi magri si conservano meglio e più a
lungo di quelli grassi; il sale riduce il periodo di conservazione del cibo;
• i ghiaccioli, se consumati immediatamente dopo la rimozione dal vano congelatore, possono causare ustioni da congelamento della pelle;
• si consiglia di riportare la data di congelamento su ogni singolo pacchetto per
riuscire a tenere traccia del tempo di
conservazione;
CONSIGLI PER LA
CONSERVAZIONE DEI
SURGELATI
Per ottenere risultati ottimali
• Controllare che i surgelati esposti nei
punti vendita non presentino segni di interruzione della catena del freddo
• Il tempo di trasferimento dei surgelati dal
punto vendita al congelatore domestico
deve essere il più breve possibile;
• Non aprire frequentemente la porta e limitare il più possibile i tempi di apertura;
• Una volta scongelati, gli alimenti si deteriorano rapidamente e non possono essere ricongelati;
• Non superare la durata di conservazione
indicata sulla confezione.
Page 29
PULIZIA E CURA
ITALIANO 29
PULIZIA DELL'INTERNO
Prima di utilizzare l'apparecchiatura per la
prima volta, lavare l'interno e gli accessori
con acqua tiepida e sapone neutro per eliminare il tipico odore dei prodotti nuovi,
quindi asciugare accuratamente.
Non usare detergenti corrosivi o
polveri abrasive che possano danneggiare la finitura.
Se “dEMo” appare sul display, l'apparecchiatura si trova in modalità
dimostrazione: fare riferimento al
paragrafo “COSA FARE SE…”.
ATTENZIONE
Staccare la spina dell'apparecchio
prima di eseguire lavori di manutenzione.
Questo apparecchio contiene idrocarburi nell'unità di raffreddamento;
la manutenzione e la ricarica devono pertanto essere effettuate esclusivamente da tecnici autorizzati.
PULIZIA PERIODICA
L'apparecchio deve essere pulito regolarmente:
• Pulire l'interno e gli accessori con acqua
tiepida e un po' di sapone neutro.
• Controllare regolarmente le guarnizioni
della porta e verificare che siano pulite e
prive di residui.
• Risciacquare e asciugare accuratamente.
Non tirare, spostare o danneggiare
tubi e/o cavi all'interno dell'apparecchio.
Non usare mai detergenti, polveri
abrasive, prodotti per la pulizia con
una forte profumazione o cere lucidanti per pulire l'interno, in quanto
danneggiano la superficie e lasciano un odore forte.
Non danneggiare il sistema di raffreddamento.
Molti detergenti per cucine di marca contengono sostanze chimiche in grado di attaccare/danneggiare la plastica impiegata
in questo apparecchio. Per questo motivo
si raccomanda di pulire l'involucro esterno
dell'apparecchio solo con acqua calda con
un po' di liquido detergente.
PERIODI DI INUTILIZZO
Quando l'apparecchio non è utilizzato per
lunghi periodi, adottare le seguenti precauzioni:
scollegare l'apparecchio dalla rete
•
elettrica
• rimuovere tutto il cibo
• sbrinare (se necessario) e pulire l'apparecchiatura e tutti gli accessori
• lasciare la/e porta/e socchiusa/e per evitare odori sgradevoli.
Se l'apparecchio rimane acceso, chiedere
a qualcuno di controllare ogni tanto per evitare che il cibo contenuto marcisca in caso
di interruzione dell'alimentazione elettrica.
SBRINAMENTO
L'apparecchiatura è "frost free" Ciò significa che non si forma ghiaccio durante il normale funzionamento sulle pareti interne dell'apparecchiatura o sugli alimenti.
L'assenza di ghiaccio è dovuta alla circolazione continua di aria fredda all'interno del
comparto mossa da una ventola ad azionamento automatico.
Dopo la pulizia, ricollegare l'apparecchio alla rete di alimentazione.
Pulire il condensatore (griglia nera) e il compressore sul retro dell'apparecchio con una
spazzola. Questa operazione migliorerà le
prestazioni dell'apparecchiatura riducendone i consumi di energia.
Page 30
www.electrolux.com
30
RISOLUZIONE DEI PROBLEMI
AVVERTENZA!
Prima di eseguire la ricerca guasti,
estrarre la spina dalla presa di alimentazione.
Le operazioni di ricerca guasti, non
descritte nel presente manuale, devono essere eseguite esclusivamente da elettricisti qualificati o da
personale competente.
Problema Causa possibile Soluzione
L'apparecchio
non funziona.
La spina non è inserita cor-
L'apparecchio non riceve
Il compressore rimane sempre in
funzione.
La porta non è chiusa corret-
La porta viene aperta troppo
La temperatura degli alimenti
La temperatura ambiente è
La funzione FROSTMATIC è
La temperatura
nel congelatore è
troppo bassa.
La funzione FROSTMATIC è
La temperatura
nel vano congelatore è troppo alta.
La porta non è chiusa corret-
L'apparecchio è spento. Accendere l’apparecchiatura.
rettamente nella presa di alimentazione.
corrente. Assenza di tensione
nella presa di alimentazione.
La temperatura non è impostata correttamente.
tamente.
frequentemente.
è troppo alta.
troppo alta.
attiva.
Il regolatore della temperatura
non è impostato correttamente.
attiva.
Il regolatore della temperatura
non è impostato correttamente.
tamente.
Inserire correttamente la spina
nella presa di alimentazione.
Collegare alla presa di alimentazione un altro apparecchio
elettrico.
Rivolgersi ad un elettricista
qualificato.
Impostare una temperatura
superiore.
Consultare la sezione "Chiusura della porta".
Limitare il più possibile il tempo di apertura della porta.
Prima di mettere a conservare
gli alimenti, lasciarli raffreddare
a temperatura ambiente.
Abbassare la temperatura ambiente.
Fare riferimento a "FunzioneFROSTMATIC ".
Impostare una temperatura
superiore.
Fare riferimento a "FunzioneFROSTMATIC ".
Impostare una temperatura inferiore.
Consultare la sezione "Chiusura della porta".
Page 31
Problema Causa possibile Soluzione
La temperatura degli alimenti
è troppo alta.
Prima di mettere a conservare
gli alimenti, lasciarli raffreddare
a temperatura ambiente.
Sono stati introdotti molti ali-
menti contemporaneamente.
I prodotti sono troppo vicini
tra loro.
Introdurre gli alimenti un poco
alla volta.
Disporre i prodotti in modo da
consentire una corretta circolazione dell'aria fredda.
Si forma troppa
brina.
La porta non è chiusa corret-
Il regolatore della temperatura
Gli alimenti non sono avvolti
correttamente.
tamente.
non è impostato corretta-
Avvolgere correttamente gli
alimenti.
Consultare la sezione "Chiusura della porta".
Impostare una temperatura
superiore.
mente.
Viene emesso un
segnale acustico.
La porta non è chiusa correttamente.
Fare riferimento alla sezione
"Allarme porta aperta".
Il simbolo di Allarme lampeggia.
dEMo appare sul
display.
L'apparecchiatura è in modalità dimostrazione.
Tenere il tasto OK premuto
per circa 10 sec., finché non
si sente un suono prolungato
provenire dal cicalino ed il display si spegne per un tempo
brevissimo: l'apparecchiatura
inizia a funzionare regolarmente.
Sul display
della temperatura
è visualizzato un
quadrato superiore o inferiore.
Si è verificato un errore durante la misurazione della
temperatura.
Contattare il servizio assistenza (il sistema refrigerante continuerà a tenere gli alimenti
freddi, ma non sarà possibile
regolare la temperatura).
CHIUSURA DELLA PORTA
1.
Pulire le guarnizioni della porta.
2.
Se necessario, regolare la porta. Vedere "Installazione".
3.
Se necessario, sostituire le guarnizioni
della porta difettose. Contattare il Centro di assistenza locale.
ITALIANO 31
Page 32

www.electrolux.com
32
INSTALLAZIONE
AVVERTENZA!
Leggere con attenzione le "Informazioni per la sicurezza" per la vostra sicurezza e per il corretto funzionamento dell'apparecchio prima
di procedere all'installazione.
POSIZIONAMENTO
Installare questo apparecchio in un punto
in cui la temperatura ambiente corrisponda
alla classe climatica indicata sulla sua targhetta:
UBICAZIONE
100 mm
min
A
20 mm
B
COLLEGAMENTO ELETTRICO
Prima di inserire la spina, verificare che la
tensione e la frequenza riportate sulla targhetta corrispondano ai valori della rete
elettrica domestica.
L'apparecchio deve essere collegato a
massa. La spina del cavo di alimentazione
è dotata di un contatto a tale scopo. Se la
Classe
Temperatura ambiente
climatica
SN da + 10°C a + 32°C
N da + 16°C a + 32°C
ST da + 16°C a + 38°C
T da + 16°C a + 43°C
L'apparecchiatura deve essere installata
lontano da fonti di calore come per esempio termosifoni, boiler, luce solare diretta,
ecc. Verificare che sul lato posteriore sia
garantita un'adeguata circolazione dell'aria.
Per ottenere prestazioni ottimali, se l'apparecchiatura è installata sotto un pensile, si
raccomanda di mantenere una distanza minima di 100 mm tra quest'ultimo e lo spigolo superiore dell'apparecchiatura. Se
possibile, tuttavia, evitare di installare l'apparecchiatura sotto un pensile. Per consentire un perfetto livellamento dell'apparecchiatura sono disponibili uno o più piedini regolabili.
AVVERTENZA!
L'apparecchiatura deve poter essere scollegabile dalla presa di corrente; pertanto, al termine dell'installazione, la spina deve essere facilmente accessibile.
presa della rete elettrica domestica non è
collegata a massa, collegare l'apparecchio
ad una massa separata in conformità alle
norme relative alla corrente, consultando
un elettricista qualificato.
Il fabbricante declina qualsiasi responsabilità se le precauzioni suddette non sono rispettate.
Il presente apparecchio è conforme alle direttive CEE.
Page 33

DISTANZIATORI POSTERIORI
ITALIANO 33
2
1
4
3
LIVELLAMENTO
REVERSIBILITÀ DELLA PORTA
Nel sacchetto contenente la documentazione sono presenti due distanziatori.
Per installare i distanziatori, procedere nel
modo seguente:
1.
Svitare la vite.
2.
Sistemare il distanziatore al di sotto
della vite.
3.
Ruotare il distanziatore verso destra.
4.
Serrare nuovamente le viti.
L'apparecchiatura deve trovarsi perfettamente in piano. Per correggere gli eventuali
dislivelli è possibile regolare in altezza i due
piedini anteriori.
Per effettuare le seguenti operazioni, si raccomanda di farsi aiutare da
un'altra persona che tenga ben ferme le porte dell'apparecchiatura.
Per modificare il senso di apertura della
porta, procedere come segue:
• Estrarre la spina dalla presa di alimentazione.
• Inclinare l'apparecchiatura verso la parte
posteriore facendo in modo che il compressore non tocchi il pavimento.
• Rimuovere lo zoccolo.
• Svitare e rimuovere le cerniere inferiori.
• Rimuovere la porta.
Page 34

www.electrolux.com
34
• Svitare il perno superiore e avvitarlo sul
lato opposto.
• Rimontare la porta.
• Prestare attenzione affinché il bordo della
2
porta sia parallelo al bordo del top.
1
• Svitare il perno (A) e avvitarlo sul lato op-
A
B
posto.
• Togliere il coperchietto (B) e posizionarlo
sul lato opposto.
• Avvitare le cerniere inferiori.
• Rimontare lo zoccolo.
• Sollevare l’apparecchiatura in posizione
verticale.
• Montare la maniglia sul lato opposto,
mettere nei fori rimasti liberi le coperture
in plastica che si trovano nel sacchetto
delle istruzioni d'uso.
• Eseguire un controllo finale per accertarsi
che:
– Tutte le viti sono serrate.
– La porta si apra e si chiuda corretta-
mente.
Se la temperatura ambiente è bassa (ad
esempio in inverno), è possibile che la
guarnizione non aderisca perfettamente all'apparecchiatura. In tal caso, attendere
che aderisca naturalmente.
Per chi preferisce non eseguire direttamente le operazioni sopra descritte, consigliamo di rivolgersi al Centro di Assistenza più
vicino. L'intervento di inversione delle porte,
eseguito dai tecnici del servizio post-vendita, sarà a carico dell'utente.
Dimensioni
Altezza 1850 mm
Larghezza 600 mm
Profondità 660 mm
Tempo di risalita 20 h
Tensione 230-240 V
Frequenza 50 Hz
Page 35

I dati tecnici sono riportati sulla targhetta
del modello, applicata sul lato sinistro interno dell'apparecchiatura, e sull'etichetta dei
valori energetici.
ITALIANO 35
Page 36

www.electrolux.com
36
RUMORI
Durante l'uso, alcuni rumori di funzionamento (come quelli del compressore o del
OK
CLICK!
BRRR!
circuito refrigerante) sono da considerarsi
normali.
SSSRRR!
CLICK!
HISSS!
BLUBB!
BRRR!
CRACK!
CLICK!
BRRR!
BLUBB!
BLUBB!
Page 37
HISSS!
ITALIANO 37
HISSS!
SSSRRR!
CRACK!
CONSIDERAZIONI AMBIENTALI
Riciclare i materiali con il simbolo
Buttare l'imballaggio negli appositi
contenitori per il riciclaggio.
Aiutare a proteggere l’ambiente e la salute
umana e a riciclare rifiuti derivanti da
apparecchiature elettriche ed elettroniche.
Non smaltire le apparecchiature che
riportano il simbolo
rifiuti domestici. Portare il prodotto al punto
di riciclaggio più vicino o contattare il
comune di residenza.
insieme ai normali
.
SSSRRR!
CRACK!
Informazioni: Dove portare gli
apparecchi fuori uso? In qualsiasi
negozio che vende apparecchi nuovi
oppure si restituiscono ai centri di
raccolta ufficiali della SENS oppure ai
riciclatori ufficiali della SENS. La lista
dei centri di raccolta ufficiali della SENS
è visibile nel sito www.sens.ch.
Page 38

www.electrolux.com
38
Page 39

ITALIANO 39
Page 40

www.electrolux.com/shop 280150053-A-072012
 Loading...