

Page 1
SEM.book Seite 1 Montag, 28. Juni 1999 3:58 15
SEM 885
Instruction book .........................5
g
Mode demploi .........................11
f
Brugsanvisning.........................17
k
Bruksanvisning .........................23
s
PAG E
Bruksanvisning ........................... 29
n
Käyttöohje .................................. 34
q
Инструкцию по
u
эксплуатации ............................ 40
Page 2

SEM.book Seite 2 Montag, 28. Juni 1999 3:58 15
1
A
B
C
D
E
F
G
H
I
K
M
N
O
PL
2
Page 3
5
/
/A
/
/A
3
4
SEM.book Seite 3 Montag, 28. Juni 1999 3:58 15
2
5
8
3
12
11
12
B
6
1
2
3
4
10
9
4
10
7
B
13
3
Page 4
B
SEM.book Seite 4 Montag, 28. Juni 1999 3:58 15
8
14
9
15
10 A
10
16
17
18
19
4
Page 5

SEM.book Seite 5 Montag, 28. Juni 1999 3:58 15
g
Dear Customer,
g
Please read these operating instructions through carefully.
Above all please observe the safety
instructions on the first few pages of
these operating instructions! Please
keep these operating instructions for
later reference. Pass them on to any
subsequent owner of the appliance.
Features (Fig. 1)
Control panel
A
Steam lever
B
Cup tray (removable)
C
Fresh water tank (removable)
D
Fill-level indicator
E
Foam nozzle (swivelling)
F
G Cable storage (underside)
H Drip grill (removable)
I Drip tray (removable)
K Rating plate (on the underside)
L Sieve carrier
M 1-cup Crema Plus sieve
N 2-cup Crema Plus sieve
O Problem-solving sieve
P Measuring spoon
1
Safety instructions
The appliance must only ever be con-
nected to a mains supply with the
same voltage, type of current and frequency as those shown on the rating
plate (see underside of appliance).
Never allow the lead to come into con-
tact with the hot parts of the appliance.
Never pull the plug out of the socket
by tugging on the lead.
Never operate the appliance if:
the lead is damaged, or
there is visible damage to the hous-
ing.
The foam nozzle, steam pipe, boiling
head, sieve, and sieve carrier inevitably
become very hot during operation.
Keep children well away!
Follow the instructions for de-scaling.
Make sure the appliance is switched off
and the plug has been taken out of the
socket before doing any cleaning work.
Do not immerse the appliance in water.
Only ever fill the appliance with water,
and never with milk or any other liq-
uid.
Do not operate the appliance unless
the fresh water tank is full.
Do not take the sieve carrier off during
the boiling process because the appli-
ance is pressurised. Someone could
suffer burns.
Do not operate the appliance without
the drip tray and drip grill.
If any repair is necessary, including the
replacement of the lead, the appliance
must be handed in to the electrical
dealer from which it was purchased or
to an Electrolux Service Centre.
Repairs to electrical appliances must
only ever be carried out by a qualified
electrician.
No legal liability can be accepted for
damage resulting from the appliance
being used wrongly or for the wrong
purpose.
This appliance complies with the fol-
;
lowing EC directives:
73/23/EWG dated 19.2.1973
Low Voltage Directive
89/336/EWG dated 3.5.1989
(including Directive Amendment
92/31/EWG) EMC Directive.
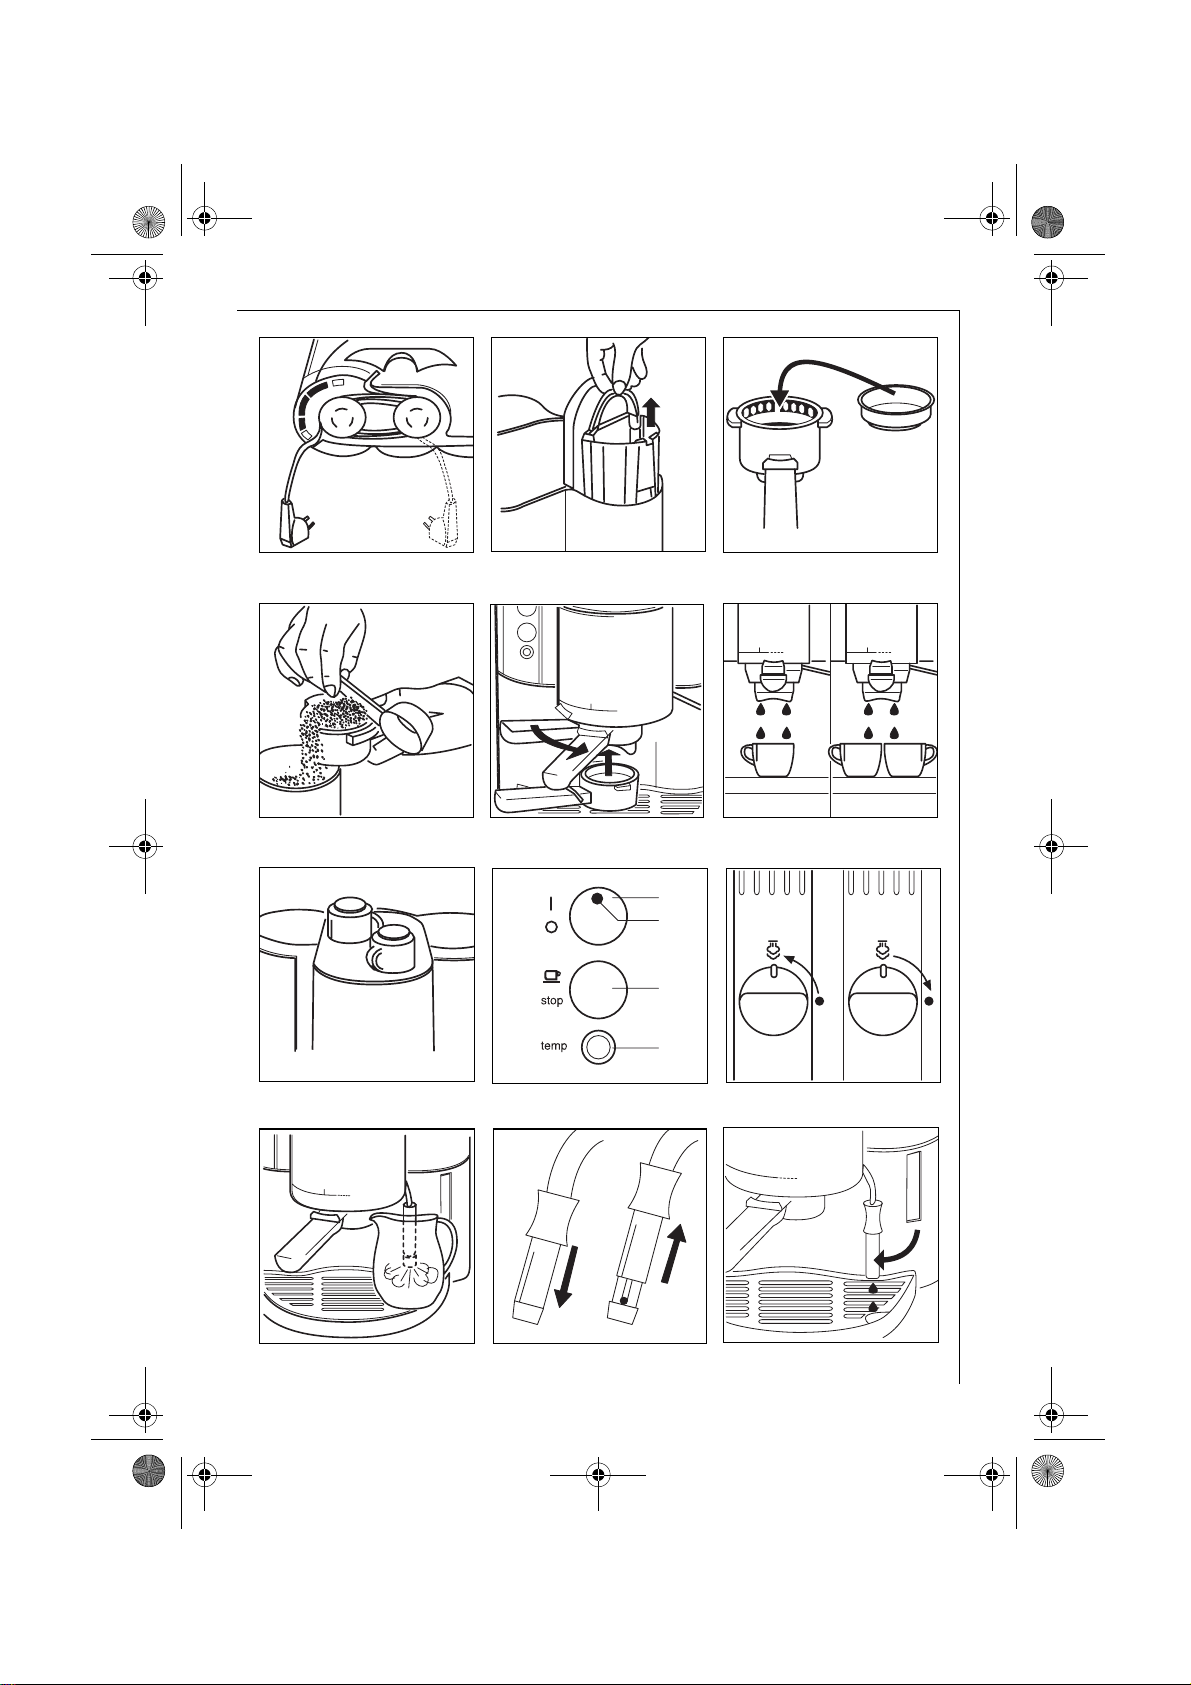
Cable storage (Fig. 2)
Your espresso machine has a cable
store. If the lead is longer than it needs
to be to reach the socket, you can store
the surplus length in the cable store.
All according to the position of the
socket, you can let the cable out on the
right-hand or the left-hand side of the
base of the appliance.
5
Page 6

SEM.book Seite 6 Montag, 28. Juni 1999 3:58 15
g
Before using for the first time
Before you make your first cup of
espresso, rinse the heating system
through with a tankful of fresh water
but without espresso coffee, and boil
it. Proceed exactly as described below
under Making espresso coffee or
Making steam but without any
espresso ground coffee in the sieve.
Place as large a container as possible in
the middle of the drip grill (Fig. 1/H)
and underneath the foam nozzle (Fig.
1/F), after swivelling this outwards.
Making espresso coffee
We recommend that you rinse the system through every day, before the first
and after the last cup of espresso coffee, for about 10 seconds without any
espresso ground coffee in it, to prevent
any particles of coffee from accumulating anywhere. Proceed as described
under points 1 to 6 below, but without
any espresso ground coffee in the
machine.
1. Fill water (Fig. 3)
First open the lid of the fresh water
0
tank and pull the tank upwards by its
handle out of the appliance.
Fill the tank
0
Then place the tank back in the appli-
0
ance and press it downwards so that it
sits firmly.
Now close the lid again.
0
Make sure the water is above the
MIN level on the filling indicator
(Fig. 1/E).
In order to make an aromatic espresso,
3
please note the following points:
Change the water every day!
Do not use mineral water or distilled
water.
Clean the fresh water tank at least
once a week with ordinary washingup water,
machine.
only
with cold tap water.
not
in the dish-washing
2. Filling espresso ground coffee
(Figs. 4 and 5)
All according to whether you wish to
make one cup of espresso or two, place
either the 1-cup Crema Plus sieve (Fig.
1/M) or the 2-cup Crema Plus sieve
(Fig. 1/N) into the sieve carrier
(Fig. 1/L).
Fill the espresso ground coffee with the
aid of the measuring spoon (Fig. 1/P).
Fill the sieve up to the rim and then
level the espresso coffee grounds with
one stroke of the measuring spoon (Fig.
5). Clean the edge of the sieve of
ground coffee.
Caution:
3
espresso coffee sold in the trade contain a particularly high proportion of
coffee dust. This dust can block the
sieve, so that the espresso coffee only
runs out very slowly or perhaps not at
all. If this happens, we recommend that
you use the enclosed problem-solving
sieve (identifiable by its brown inner
ring and the fine, elongated hole structure, Fig. 1/O).
Just a few of the brands of
3. Insert sieve (Fig. 6)
Rotate the sieve carrier from left to
right in its holder until the handle
passes the
handle pointing forwards, Fig. 6). The
sieve carrier is fitted with a plastic
insert to keep he temperature loss to a
minimum even when a minimum
quantity of espresso is being made, as
the most descriminating espresso-lover
requires.
min
position (i. e. with the
4. Place cup(s) in position (Fig. 7)
If you only wish to make one cup, place
in the middle of the drip grill
it
that the espresso coffee can flow into
it from both openings in the sieve
holder. However, if you wish to make
two cups,
opening of the sieve holder.
The cup shelf (Fig. 8) is a convenient
place for some more cups.
one cup under each
place
so
6
Page 7

SEM.book Seite 7 Montag, 28. Juni 1999 3:58 15
g
5. Switch on the main switch
Your espresso machine will reach its
operating temperature in a very short
time. This is a major advantage in comparison with conventional espresso
machines.
You switch the appliance on by flicking
the main switch (Fig. 9/1) upwards. The
pilot light (Fig. 9/2) comes on, as does
the temperature indicator at the same
time (Fig. 9/4), to show that the system
ist warming up. It goes out as soon as
the operating temperature is reached.
Note:
The temperature indicator can
come on during operation, to show
that the appliance is warming up
again.
6. Start boiling
switch on pump switch
When you start the boiling cycle, the
heated water is forced through the
espresso ground coffee at a high internal pressure. This pressure, together
with the special construction of the
Crema Plus sieve and fresh espresso
ground coffee, produces the crown of
foam which makes espresso coffee
from an Electrolux machine so incomparable.
You can make your Espresso crema as
follows:
When the temperature indicator (Fig.
0
9/4) has gone out you can start the
boiling process by flipping the pump
switch (Fig. 9/3) upwards.
Once the required quantity of espresso
0
has been boiled up, you flip the pump
switch (Fig. 9/3) downwards again and
this stops the brewing process.
Making steam with the
foam nozzle (Fig. 9-13)
The hot steam can be used to foam up
milk for cappuccino, to pre-heat the
espresso cups, and to heat up liquids
generally.
To generate steam, first switch the
0
appliance on with the main switch (Fig.
9/1) and wait until operating temperature has been reached. The temperature indicator (Fig. 9/4) must have
gone out.
Then immerse the foam nozzle into the
0
milk or other liquid you wish to foam
up or heat up, or the espresso or cappuccino cups you wish to warm, and
start
generating steam by rotating the
steam lever (Fig. 1/B)
as far as it will go (Fig. 10/A). For technical reasons, a little water will first
escape from the nozzle; it can be
removed before the actual steam generation starts but it does not harm the
good result, e.g. from foaming up milk,
in any way at all.
Important:
3
only about half way into the liquid, so
that the flow of air is not hindered. The
foam nozzle should not be allowed to
touch the base of the container as this
might restrict the outflow of steam
(Fig. 11).
Caution:
1
yourself.
Frothing up milk, symbol (Fig.
10/A):
You should then slide down the moving tube (Fig. 12/A) to its fullest extent.
Heating liquids (e.g. milk), symbol (Fig. 10/A):
You should then slide up the moving
tube (Fig. 12/B).
stop
To
steam lever
position (Fig. 10/B). It is advisible, especially after foaming up milk, to activate the steam flow once again briefly
in order to blow the foam nozzle free.
Immerse the foam nozzle
Take care you do not scald
the flow of steam, turn the
clockwise
anti-clockwise
back to the Off
7
Page 8

SEM.book Seite 8 Montag, 28. Juni 1999 3:58 15
g
Afterwards, turn the foam nozzle as far
as it will go to the left so that the inevitable last few drops can fall into the
drip grill provided for the purpose (Fig.
13).
After steam has been generated the
system has to be topped up, to do this,
switch the pump switch (Fig. 9/3) on,
and as soon as water starts to come
out of the brewing head switch the
pump switch off again.
Preparing cappuccino:
Proceed as for espresso, but for cappuccino you will need a larger coffee
cup, half or threequarters full of
espresso, which you then fill up with
foaming milk.
After making espresso/Cleaning
If you wish to make another cup of
espresso, leave the appliance switched
on, remove the sieve holder (see below,
Point 2), clean the sieve and the holder
(see below, Point 3), and then proceed
as described under Making espresso.
1. Switch appliance off
If the appliance will not be used for
some time it should be steamed out, so
that fresh water is always available
next time it is used. Place a container
under the foam nozzle and proceed as
follows:
Open the steam lever (Fig. 10/A) and let
0
the system steam out. If no more steam
comes out, close the steam lever again
(Fig. 10/B).
To switch the appliance off, flip the
0
main switch (Fig. 9/1) downwards. The
pilot light (Fig. 9/2) goes out.
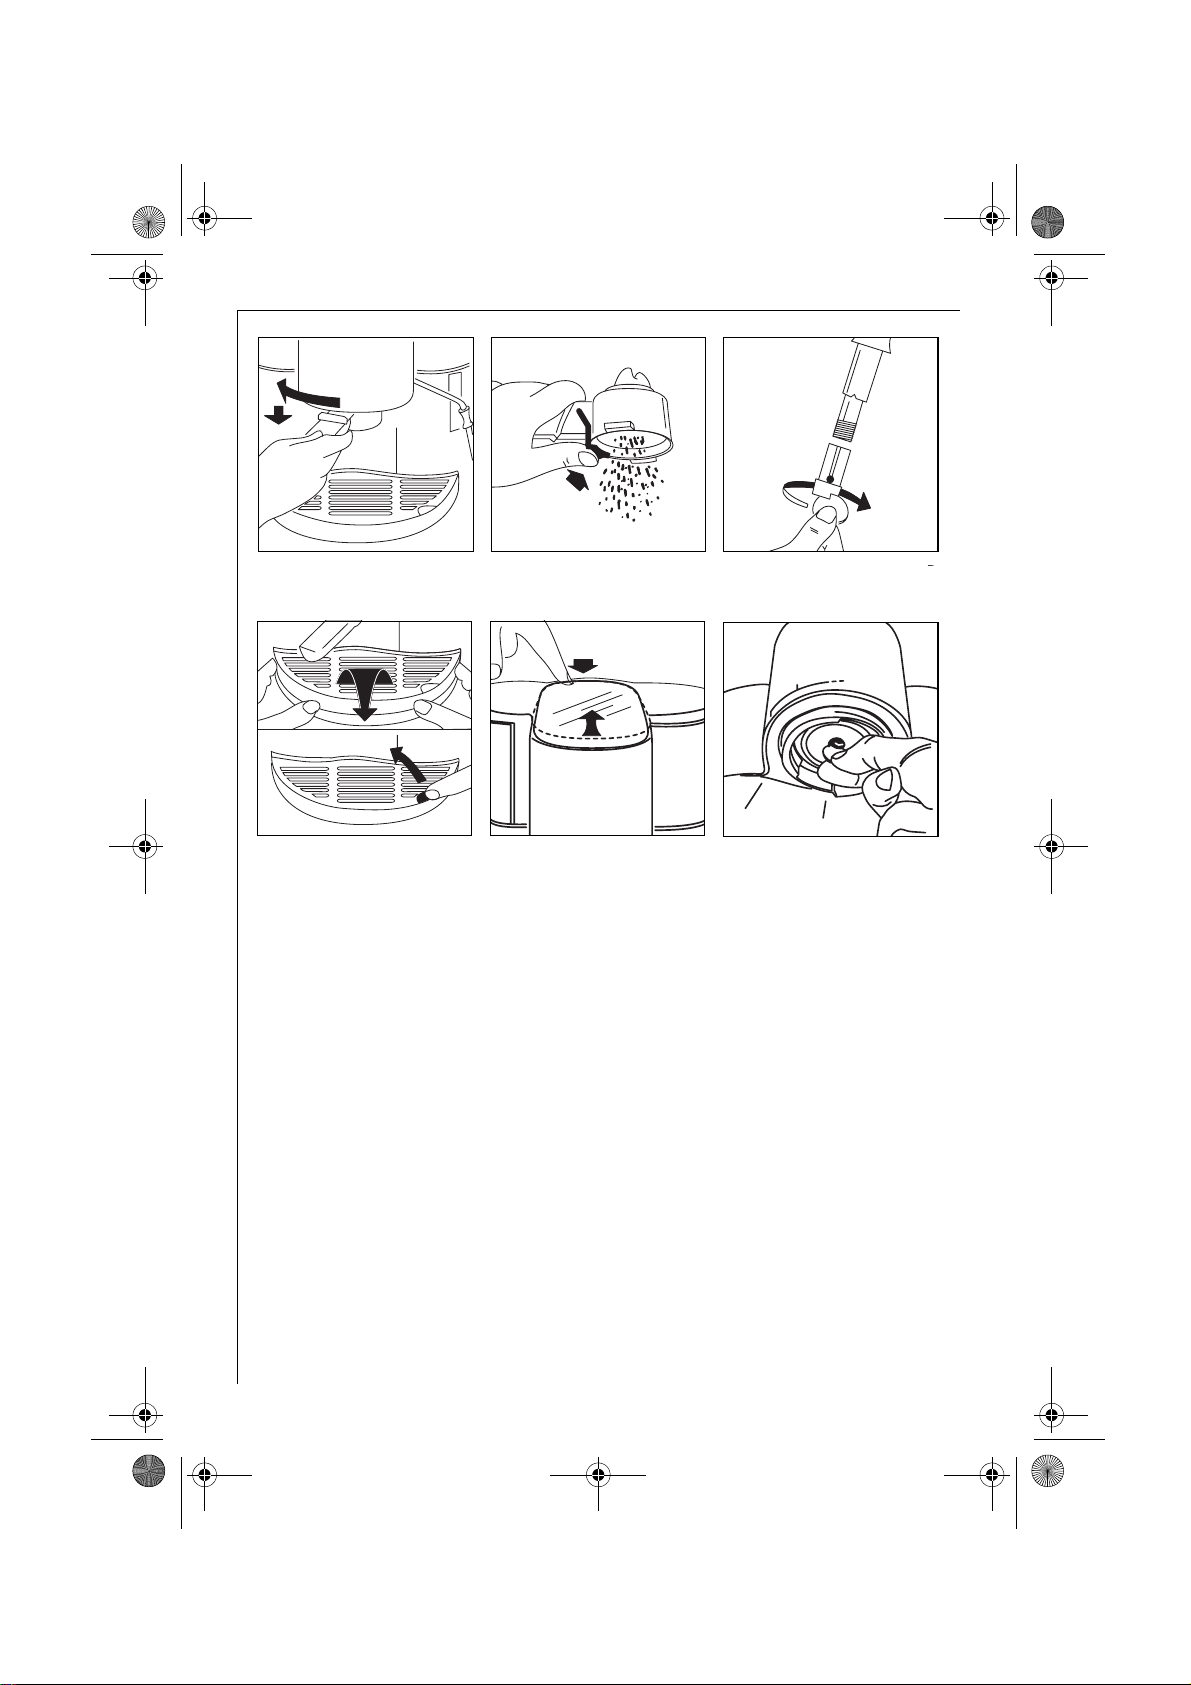
2. Remove sieve carrier (Fig. 14)
You remove the sieve carrier by rotating it to the left and taking it out of its
holding ring. If you are not going to
use the appliance again for some time,
do not re-insert the sieve carrier; this
will lengthen the service life of the
sieve seal.
3. Cleaning sieve and sieve
carrier (Fig. 15)
Knock the used espresso ground coffee
out of the sieve, holding the sieve
firmly to the sieve carrier by the finger
protector. Then clean the sieve and the
carrier under running water or with
ordinary washing-up water.
Note:
Do not wash the sieve carrier in
a dishwashing machine.
4. Remove the remaining water
from the fresh water tank
5. Cleaning the foam nozzle
(Fig. 16)
Clean the foam nozzle especially
after frothing up milk with a damp
cloth. If the foam nozzle is clogged, it
can be unscrewed with a coin. Pull off
the lower part of the nozzle downwards and clean the foam nozzle, make
sure it is seated properly.
6. Cleaning the drip grill and
drip tray (Fig. 17)
The drip grill can be taken out for
cleaning very easily with the aid of the
finger-shaped depression at the front
right-hand edge of the drip tray. The
drip tray can be taken out for cleaning
by simply lifting it forwards out of the
appliance base. The drip grill and the
drip tray can be cleaned in ordinary
washing-up water.
7. Cleaning the cup shelf
(Fig. 18)
The best way to clean the cup shelf is
with a damp cloth. To remove it, press
it down at the rear end and pull it
upwards and forwards out of its retaining rim.
8. Cleaning the boiling head
(Fig. 19)
After it has been in use for some time,
the boiling head should be cleaned
with a damp cloth. If the boiling sieve
is particularly dirty it can be unscrewed
from the boiling head with the aid of a
coin and cleaned under running water.
8
Page 9

SEM.book Seite 9 Montag, 28. Juni 1999 3:58 15
g
De-scaling
The service life of your automatic
espresso machine will be lengthened if
you de-scale it regularly. To do this,
please use an environmentally friendly
de-scaling agent, and use it as stated
in the manufacturers instructions.
When de-scaling, it is essential first
to unscrew the boiling sieve from
the boiling head with the aid of a
coin (Fig. 19).
First fill about half a litre of water
0
into the fresh water tank and
the de-scaling agent never the
other way round!
Place a sufficiently large container in
0
the middle of the drip grill.
Allow about one-third of the de-scal-
0
ing agent and water to run through
the system by operating the appliance
as if you were making espresso (see
Section Making espresso coffee).
Switch the appliance off again, and
leave the de-scaling agent to work in
for 10 or 15 minutes.
Then run the rest of it through the sys-
0
tem. It may be necessary to repeat the
de-scaling if the lime deposits are
heavy.
After the last cycle, run one or two
0
tankfuls of clear, fresh water through
the system to prevent the de-scaling
agent from having any affect on the
flavour of the espresso.
Then fit the boiling sieve back into the
0
boiling head.
Remark:
dered de-scaling product!
Please do not use any pow-
then add
What do I do if...
the espresso temperature is too low?
Run a boiling cycle but without any
espresso ground coffee before actually making espresso, and with the
sieve and carrier in position, in order
to pre-heat them.
Tamp the espresso ground coffee
down a little more firmly.
Pre-warm the cups.
De-scale the appliance.
the through-flow speed falls off
noticeably?
Do not tamp the espresso ground
coffee down so firmly.
De-scale the appliance.
If the espresso ground coffee is too
finely ground it can block the
Crema-Plus sieve. If so, we recom-
mend the use of the problem-solving
sieve (Fig. 1/O).
the espresso runs out at the side of the
sieve carrier?
Make sure the sieve carrier is fitted
into the holding ring properly.
Tighten the sieve carrier a little more
firmly into the holding ring.
Clean the espresso ground coffee of
the edge of the sieve carrier.
Clean the seal.
no espresso comes out?
Ensure that the fresh water tank is
full.
Ensure that the fresh water tank is
properly fitted into position.
Ensure that the sieve carrier is prop-
erly fitted into the holding ring.
Do not tamp the espresso ground
coffee down so firmly.
Move the steam lever to the OFF
setting.
Clean the boiling sieve.
De-scale the appliance.
9
Page 10

SEM.book Seite 10 Montag, 28. Juni 1999 3:58 15
g
the appliance runs relative noisily?
Ensure that the fresh water tank is
full.
Ensure that the fresh water tank is
properly fitted into position.
Always use fresh espresso ground
coffee.
the crema does not form so well as it
used to?
Always use fresh espresso ground
coffee.
Ensure there is sufficient espresso
ground coffee in the sieve.
Tamp the espresso ground coffee
down lightly.
not enough foam is generated when
foaming up milk?
Always use cool, fresh (low-fat) milk.
Use a suitable container (such as a
small jug).
Clean the foam nozzle.
no steam comes out?
Top the system up (see last para-
graph of Section Making steam
with the foam nozzle).
2
For the sake of the
environment
Do not simply throw the packaging
away.
Cardboard packaging material can
be handed in as salvage at your local
waste-paper collection point.
If the following packaging materials
have been used...
Plastic bags made of polythene (PE)
can be handed in to your local PE
collection point.
Padding made of expanded polysty-
rol (PS) are free of CFCs.
Please ask your local authority for the
adress of your nearest recycling depot.
Used espresso coffee grouts are marvellous for composting.
After-sales service
We demand the highest quality of ourselves and our products.
Should you nevertheless have any
problem in using this appliance, please
write to us. It is only with your help
that we will be able to develop appliances which exactly match your
requirements.
10
Page 11

SEM.book Seite 1 Montag, 28. Juni 1999 3:58 15
822 949 067 - 0699
 Loading...