

Page 1

S86348KG1
S86340KG1
User manual Fridge-Freezer
Инструкция по
эксплуатации
Қолдану туралы
нұсқаулары
Холодильник с
морозильной
камерой
Тоңазытқыш-
мұздатқыш
Page 2

Contents
2
Thank you for choosing one of our high-quality products.
To ensure optimal and regular performance of your appliance please read this
instruction manual carefully. It will enable you to navigate all processes perfectly
and most efficiently. To refer to this manual any time you need to, we recommend
you to keep it in a safe plac e. An d p le as e pass it to any future owner of the appliance.
We wish you much joy with your new appliance.
Contents
Safety information 3
Children and vulnerable people safety
General safety 3
Daily Use 4
Care and cleaning 4
Installation 4
Service 5
Control panel 5
Display 6
Switching on 6
Switching off 6
Switching off the fridge or freezer 6
Switching on the fridge or freezer 7
Temperature regulation 7
Child Lock function 7
Holiday function 7
COOLMATIC function 8
Quick Chill function 8
FROSTMATIC function 9
High temperature alarm 9
First use 10
Cleaning the interior 10
Daily use 10
Use of the fridge compartment 10
Use of the freezer compartment 11
Storage of frozen food 11
Thawing 11
Clean Air Control Filter 11
Movable shelves 12
Vegetable Drawer 12
The Natura fresh zone 13
Regulation of air humidity 13
Positioning the door shelves 13
Removal of freezing baskets from the
freezer 14
Helpful hints and tips 14
3
Hints for energy saving 14
Hints for fresh food refrigeration 14
Hints for refrigeration 14
Hints for temperature inside the fridge
Hints for freezing 16
Hints for storage of frozen food 16
Care and cleaning 16
Periodic cleaning 16
Replacing the Clean Air Control filter 17
Cleaning the ventilation grille 17
Defrosting the refrigerator 18
Defrosting of the freezer 18
Periods of non-operation 18
What to do if… 18
Replacing the lamp 20
Closing the door 21
Technical data 21
Installation 21
Positioning 21
Location 22
Electrical connection 22
Removing the transport support 22
Removing the shelf holders 23
Rear spacers 23
Fitting the door handles 23
Levelling 24
Installation of the Clean Air Control filter
Door reversibility 25
Environmental concerns 25
Subject to change without notice
15
24
Page 3
Safety information
Safety information
In the interest of your safety and to ensure the correct use, before installing and first using
the appliance, read this user manual carefully, including its hints and warnings. To avoid
unnecessary mistakes and accidents, it is important to ensure that all people using the
appliance are thoroughly familiar with its operation and safety features. Save these instructions and make sure that they remain with the appliance if it is moved or sold, so that
everyone using it through its life will be properly informed on appliance use and safety.
For the safety of life and property keep the precautions of these user's instructions as the
manufacturer is not responsible for damages caused by omission.
Children and vulnerable people safety
• This appliance is not intended for use by persons (including children) with reduced
physical, sensory or mental capabilities, or lack of experience and knowledge, unless they
have been given supervision or instruction concerning use of the appliance by a person
responsible for their safety.
Children should be supervised to ensure that they do not play with the appliance.
• Keep all packaging well away from children. There is risk of suffocation.
• If you are discarding the appliance pull the plug out of the socket, cut the connection
cable (as close to the appliance as you can) and remove the door to prevent playing
children to suffer electric shock or to close themselves into it.
• If this appliance featuring magnetic door seals is to replace an older appliance having a
spring lock (latch) on the door or lid, be sure to make that spring lock unusable before
you discard the old appliance. This will prevent it from becoming a death trap for a child.
3
General safety
CAUTION!
Keep ventilation openings clear of obstruction.
• The appliance is intended for keeping foodstuff and/or beverages in a normal household
as explained in this instruction booklet.
• Do not use a mechanical device or any artificial means to speed up the thawing process.
• Do not use other electrical appliances (such as ice cream makers) inside of refrigerating
appliances, unless they are approved for this purpose by the manufacturer.
• Do not damage the refrigerant circuit.
• The refrigerant isobutane (R600a) is contained within the refrigerant circuit of the appliance, a natural gas with a high level of environmental compatibility, which is nevertheless flammable.
During transportation and installation of the appliance, be certain that none of the
components of the refrigerant circuit become damaged.
If the refrigerant circuit should become damaged:
– avoid open flames and sources of ignition
– thoroughly ventilate the room in which the appliance is situated
• It is dangerous to alter the specifications or modify this product in any way. Any damage
to the cord may cause a short-circuit, fire and/or electric shock.
Page 4
Safety information
4
WARNING!
Any electrical component (power cord, plug, compressor) must be replaced by a certified
service agent or qualified service personnel.
1. Power cord must not be lengthened.
2. Make sure that the power plug is not squashed or damaged by the back of the
appliance. A squashed or damaged power plug may overheat and cause a fire.
3. Make sure that you can come to the mains plug of the appliance.
4. Do not pull the mains cable.
5. If the power plug socket is loose, do not insert the power plug. There is a risk of
electric shock or fire.
6.
You must not operate the appliance without the lamp cover
1)
of interior lighting.
• This appliance is heavy. Care should be taken when moving it.
• Do not remove nor touch items from the freezer compartment if your hands are damp/
wet, as this could cause skin abrasions or frost/freezer burns.
• Avoid prolonged exposure of the appliance to direct sunlight.
Daily Use
• Do not put hot pot on the plastic parts in the appliance.
• Do not store flammable gas and liquid in the appliance, because they may explode.
•
Do not place food products directly against the air outlet on the rear wall.
• Frozen food must not be re-frozen once it has been thawed out.
• Store pre-packed frozen food in accordance with the frozen food manufacturer's instructions.
• Appliance's manufacturers storage recommendations should be strictly adhered to. Refer
to relevant instructions.
• Do not place carbonated or fizzy drinks in the freezer compartment as it creates pressure
on the container, which may cause it to explode, resulting in damage to the appliance.
• Ice lollies can cause frost burns if consumed straight from the appliance.
2)
Care and cleaning
• Before maintenance, switch off the appliance and disconnect the mains plug from the
mains socket.
• Do not clean the appliance with metal objects.
• Do not use sharp objects to remove frost from the appliance. Use a plastic scraper.
• Regularly examine the drain in the refrigerator for defrosted water. If necessary, clean
the drain. If the drain is blocked, water will collect in the bottom of the appliance.
• Never use a hair drier or other heating appliances to speed up defrosting. Excessive heat
may damage the plastic interior, and humidity could enter the electric system making it
live.
Installation
For electrical connection carefully follow the instructions given in specific paragraphs.
1) If the lamp cover is foreseen
2) If the appliance is Frost Free
Page 5
Control panel
• Unpack the appliance and check if there are damages on it. Do not connect the appliance
if it is damaged. Report possible damages immediately to the place you bought it. In that
case retain packing.
• It is advisable to wait at least four hours before connecting the appliance to allow the
oil to flow back in the compressor.
• Adequate air circulation should be around the appliance, lacking this leads to overheating. To achieve sufficient ventilation follow the instructions relevant to installation.
• Wherever possible the back of the product should be against a wall to avoid touching
or catching warm parts (compressor, condenser) to prevent possible burn.
• The appliance must not be located close to radiators or cookers.
• Make sure that the mains plug is accessible after the installation of the appliance.
•
Connect to potable water supply only.
3)
Service
• Any electrical work required to do the servicing of the appliance should be carried out
by a qualified electrician or competent person.
• This product must be serviced by an authorized Service Centre, and only genuine spare
parts must be used.
Environment Protection
This appliance does not contain gasses which could damage the ozone layer, in either its
refrigerant circuit or insulation materials. The appliance shall not be discarded together
with the urban refuse and rubbish. The insulation foam contains flammable gases: the
appliance shall be disposed according to the applicable regulations to obtain from your
local authorities. Avoid damaging the cooling unit, especially at the rear near the heat
exchanger. The materials used on this appliance marked by the symbol
5
are recyclable.
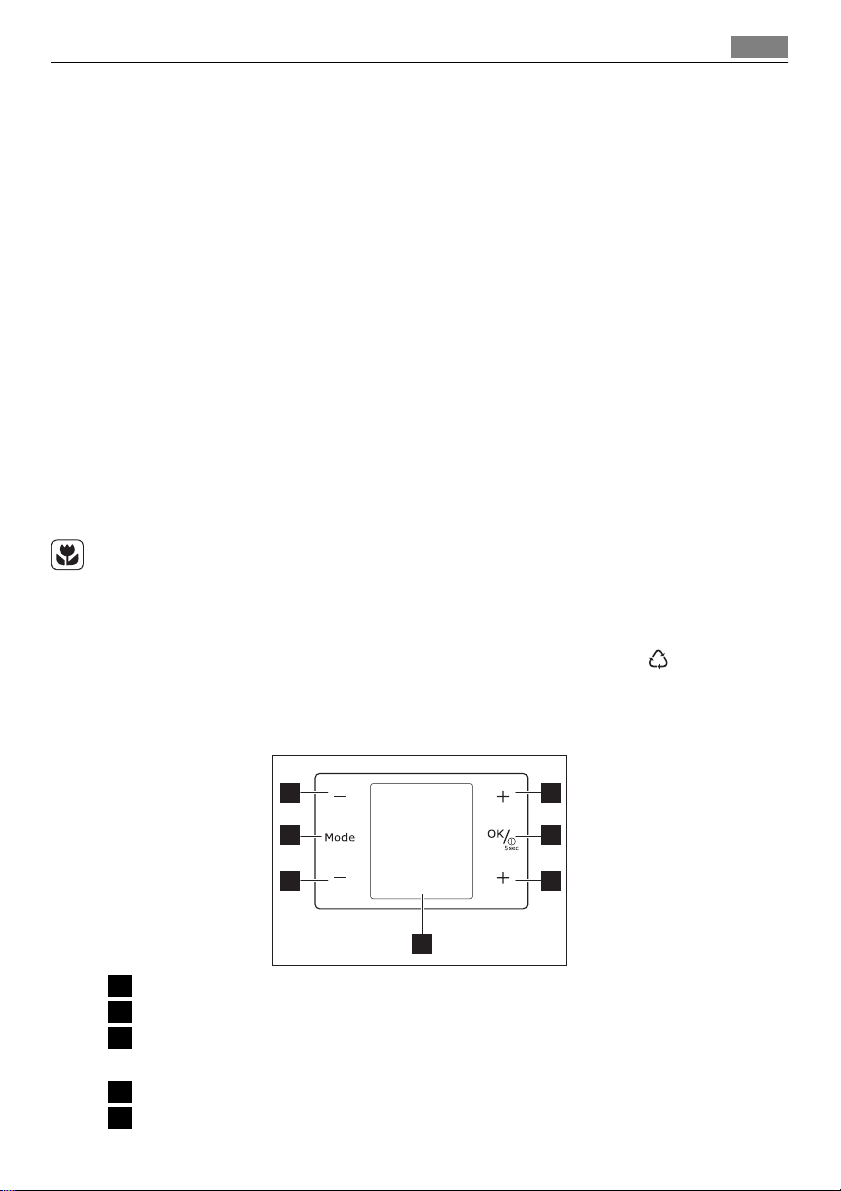
Control panel
1 Fridge temperature colder button
2 Fridge temperature warmer button
3 ON/OFF button
OK button
4 Freezer temperature warmer button
5 Display
3) If a water connection is foreseen
1
7
6
5
2
3
4
Page 6
6
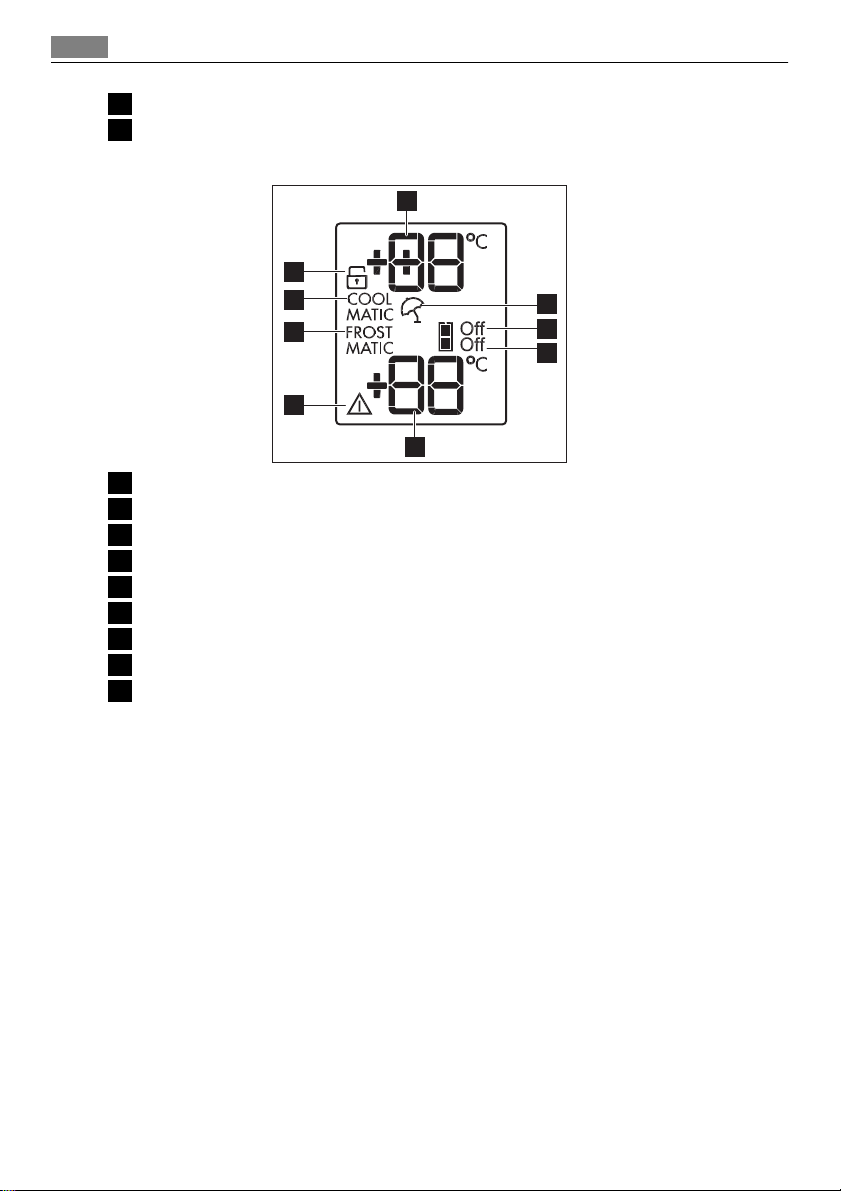
Display
Control panel
6 Freezer temperature colder button
7 Mode button
9
8
7
6
1 Fridge temperature indicator
2 Holiday function
3 Fridge Off
4 Freezer Off
5 Freezer temperature indicator
6 Alarm indicator
7 FROSTMATIC function
8 COOLMATIC function
9 Child Lock function
1
2
3
4
5
Switching on
To switch on the appliance do these steps:
1. Connect the mains plug to the power socket.
2. Press the ON/OFF button if the display is off.
3. The alarm buzzer could operate after few seconds.
To reset the alarm refer to "High temperature alarm".
4. The temperature indicators show the setted default temperature.
To select a different set temperature refer to "Temperature regulation".
Switching off
To switch off the appliance do these steps:
1. Press the ON/OFF button for 5 seconds.
2. The display switches off.
3. To disconnect the appliance from the power disconnect the mains plug from the power
socket.
Switching off the fridge or freezer
To switch off the fridge or freezer:
1. Press the Mode button until the corresponding icon appears.
Page 7

Control panel
The fridge or freezer Off indicator flashes.
The fridge or freezer temperature indicator shows dashes.
2. Press the OK button to confirm.
3. The fridge or freezer Off indicator is shown.
Switching on the fridge or freezer
To switch on the fridge or freezer:
1. Press the fridge or freezer temperature regulator.
Or:
1. Press the Mode button until the corresponding icon appears.
The fridge or freezer Off indicator flashes.
2. Press the OK button to confirm.
3. The fridge or freezer Off indicator goes off.
Temperature regulation
The set temperature of the fridge and of the freezer may be adjusted by pressing the
temperature regulators.
Set default temperature:
• +5°C for the fridge
• -18°C for the freezer
The temperature indicators show the set temperature.
The set temperature will be reached within 24 hours.
After a power failure the set temperature remains stored.
7
Child Lock function
To lock the buttons from unintentional operation select the Child Lock function.
To switch on the function:
1. Press the Mode button until the corresponding icon appears.
2. The Child Lock indicator flashes.
3. Press the OK button to confirm.
The Child Lock indicator is shown.
To switch off the function:
1. Press the Mode button until the Child Lock indicator flashes.
2. Press the OK button to confirm.
3. The Child Lock indicator goes off.
Holiday function
This function allows you to keep the refrigerator closed and empty during a long holiday
period without the formation of a bad smell.
The fridge compartment must be empty with holiday function on.
To switch on the function:
1. Press the Mode button until the corresponding icon appears.
The Holiday indicator flashes.
Page 8
Control panel
8
The fridge temperature indicator shows the set temperature.
2. Press the OK button to confirm.
The Holiday indicator is shown.
To switch off the function:
1. Press the Mode button until the Holiday indicator flashes.
2. Press the OK button to confirm.
3. The Holiday indicator goes off.
The function switches off by selecting a different fridge set temperature.
COOLMATIC function
If you need to insert a large amount of warm food, for example after doing the grocery
shopping, we suggest activating the COOLMATIC function to chill the products more rapidly
and to avoid warming the other food which is already in the refrigerator.
To switch on the function:
1. Press the Mode button until the corresponding icon appears.
The COOLMATIC indicator flashes.
The fridge temperature indicator shows the set temperature.
2. Press the OK button to confirm.
The COOLMATIC indicator is shown.
The COOLMATIC function shuts off automatically after approximately 6 hours.
To switch off the function before its automatic end:
1. Press the Mode button until the COOLMATIC indicator flashes.
2. Press the OK button to confirm.
3. The COOLMATIC indicator goes off.
The function switches off by selecting a different fridge set temperature.
Quick Chill function
The Quick Chill function provide rapid cooling of
cans and bottles through cold airstream.
Put the cans/bottles on the Quick Chill bottle
holder and open the air lever (1) towards maximum.
To switch on the function:
1. Press the Mode button until the corresponding icon appears
The COOLMATIC indicator flashes.
1
Page 9
Control panel
The fridge temperature indicator shows the set temperature.
2. Press the OK button to confirm.
The COOLMATIC indicator is shown.
When the cooling is finished return the air lever (1) towards minimum.
To switch off the function:
1. Press the Mode button until the COOLMATIC indicator flashes.
2. Press the OK button to confirm.
3. The COOLMATIC indicator goes off.
The Quick Chill function stops automatically after approximately 6 hours.
The Quick Chill bottle holder can be removed if not used.
FROSTMATIC function
It is possible to place the fresh food to be frozen in all compartments except the lowest.
To switch on the function:
1. Press the Mode button until the corresponding icon appears.
The FROSTMATIC indicator flashes.
The freezer temperature indicator shows
2. Press the OK button to confirm.
The FROSTMATIC indicator is shown.
An animation starts.
This function stops automatically after 52 hours.
To switch off the function before its automatic end:
1. Press the Mode button until the FROSTMATIC indicator flashes.
2. Press the OK button to confirm.
3. The FROSTMATIC indicator goes off.
The function switches off by selecting a different freezer set temperature.
symbol.
9
High temperature alarm
An increase in the temperature in the freezer compartment (for example due to an earlier
power failure) is indicated by:
• flashing the alarm and freezer temperature indicators
• sounding of buzzer.
To reset the alarm:
1. Press any button.
2. The buzzer switches off.
3. The freezer temperature indicator shows the highest temperature reached for a few
seconds. Then show again the set temperature.
4. The alarm indicator continue to flash until the normal conditions are restored.
When the alarm has returned the alarm indicator goes off.
Page 10

First use
10
First use
Cleaning the interior
Before using the appliance for the first time, wash the interior and all internal accessories
with lukewarm water and some neutral soap so as to remove the typical smell of a brandnew product, then dry thoroughly.
Do not use detergents or abrasive powders, as these will damage the finish.
Check that the drain hose at the rear of the cabinet
discharges into the drip tray.
Daily use
Use of the fridge compartment
The temperature of this compartment may be regulated between +3°C and +8°C.
During normal functioning the indicator shows the set temperature inside the fridge.
A medium setting is generally the most suitable.
The exact setting should be chosen keeping in mind that the temperature inside the appliance depends on:
• room temperature
• how often the door is opened
• the quantity of food stored
• the location of the appliance.
If the ambient temperature is high or the appliance is fully loaded, and the appliance is set
to the lowest temperatures, it may run continuously causing frost to form on the rear wall.
In this case the Temperature regulator must be set to a warmer temperature to allow
automatic defrosting and therefore reduced energy consumption.
Page 11

Daily use
Use of the freezer compartment
The symbol means that the freezer is suitable for freezing fresh food and for
long term storage. The temperature may be regulated between -15°C and -24°C. We suggest
setting the temperature to -18°C, which is optimal for energy consumption and frozen
food storage.
Difference between setting temperature and actual temperature is normal.
Especially when:
• a new setting has recently been selected
• the door has been open for a long time
• warm food has been placed in the compartment.
Difference until 5°C inside the compartment are quite normal.
During operation the temperature indicator shows setting value.
Storage of frozen food
When first starting-up or after a period out of use, before putting the products in the
compartment let the appliance run at least 2 hours.
The freezer baskets ensure that it is quick and easy to find the food package you want. If
large quantities of food are to be stored, remove all drawers except for the bottom basket
which needs to be in place to provide good air circulation. On all shelves except for the top
shelf it is possible to place food that protrude until load limit stated on the side of the
middle section
11
In the event of accidental defrosting, for example due to a power failure, if the power has
been off for longer that the value shown in the technical characteristics chart under "rising
time", the defrosted food must be consumed quickly or cooked immediately and then refrozen (after cooling).
Thawing
Deep-frozen or frozen food, prior to being used, can be thawed in the refrigerator compartment or at room temperature, depending on the time available for this operation.
Small pieces may even be cooked still frozen, directly from the freezer: in this case, cooking
will take longer.
Clean Air Control Filter
Your appliance is equipped with a carbon filter behind the air lever flap.
The filter purifies the air from unwanted odours in the fridge compartment preserving food
quality.
On delivery the filter is in a plastic bag. Refer to "Installation of the Clean Air Control filter"
for instructions.
Make sure that the air lever flap is closed to obtain proper function.
Page 12

Daily use
12
Movable shelves
The walls of the refrigerator are equipped with a
series of runners so that the shelves can be positioned as desired.
Some shelves must be lifted up by the rear edge
to enable them to be removed.
Do not move the glass shelf above the vegetable
drawer to ensure correct air circulation.
Vegetable Drawer
The drawer is suitable for storing fruit and vegetables.
Some models have a separator inside the drawer that can be placed in different positions
to allow for the subdivision best suited to personal needs.
All parts inside the drawer can be removed for cleaning purposes.
Page 13
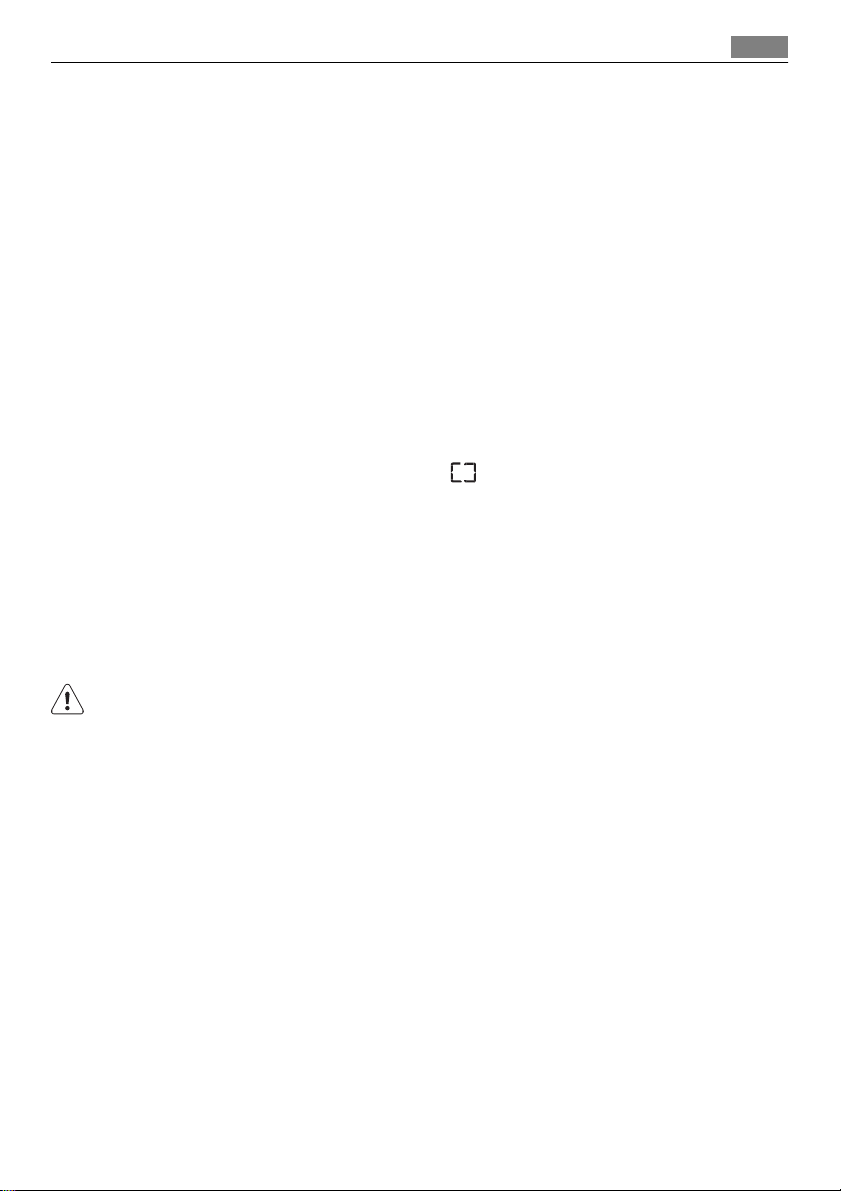
The Natura fresh zone
The temperature in the Natura fresh zone is constantly just above 0°C. Adjustment by the user is
not necessary.
The Natura fresh zone contains two drawers.
The lower drawer with a higher humidity of the
air, is suited for keeping berries, fruits and vegetables.
The upper drawer is suited for meat, fish and
poultry.
Foodstuffs not suitable to keep in the Natura fresh
zone:
• Cold sensitive fruits like bananas, papaya, pas-
sion fruits, avocado and citrus fruits.
• Cold sensitive vegetables like pimiento, cucum-
ber courgette, aubergine potatoes and tomatoes. Fruit and vegetables not yet mellow like
pears.
Pack all foodstuffs before keeping in the Natura
fresh zone. In this way aroma, moisture and colour
is kept for a longer time.
Suitable packing materials:
• Polyethylene airtight bags and wraps
• Plastic containers with lids
• Aluminium foil
Daily use
13
Regulation of air humidity
The two drawers are fitted with adjustable air slots. The opening of the air slots can be
adjusted with sliders, to regulate the humidity inside the drawers.
• With the air slots open, the stronger air circulation results in a lower air moisture in the
drawer.
• A closed air slots keeps the natural air moisture for longer.
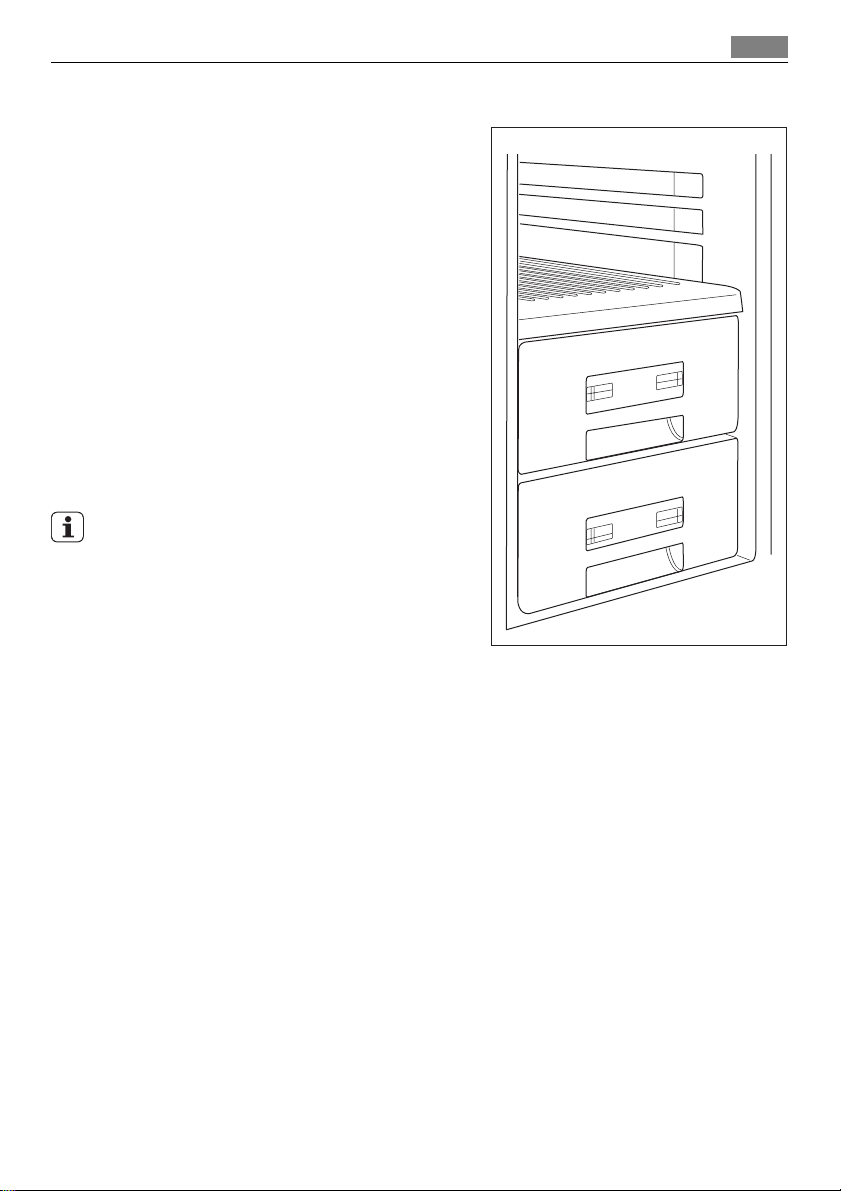
Positioning the door shelves
To permit storage of food packages of various sizes, the door shelves can be placed at
different heights.
Page 14
Helpful hints and tips
14
Gradually pull the shelf in the direction of the arrows until it comes free, then reposition as required.
Do not move the lower door shelf to ensure correct air circulation.
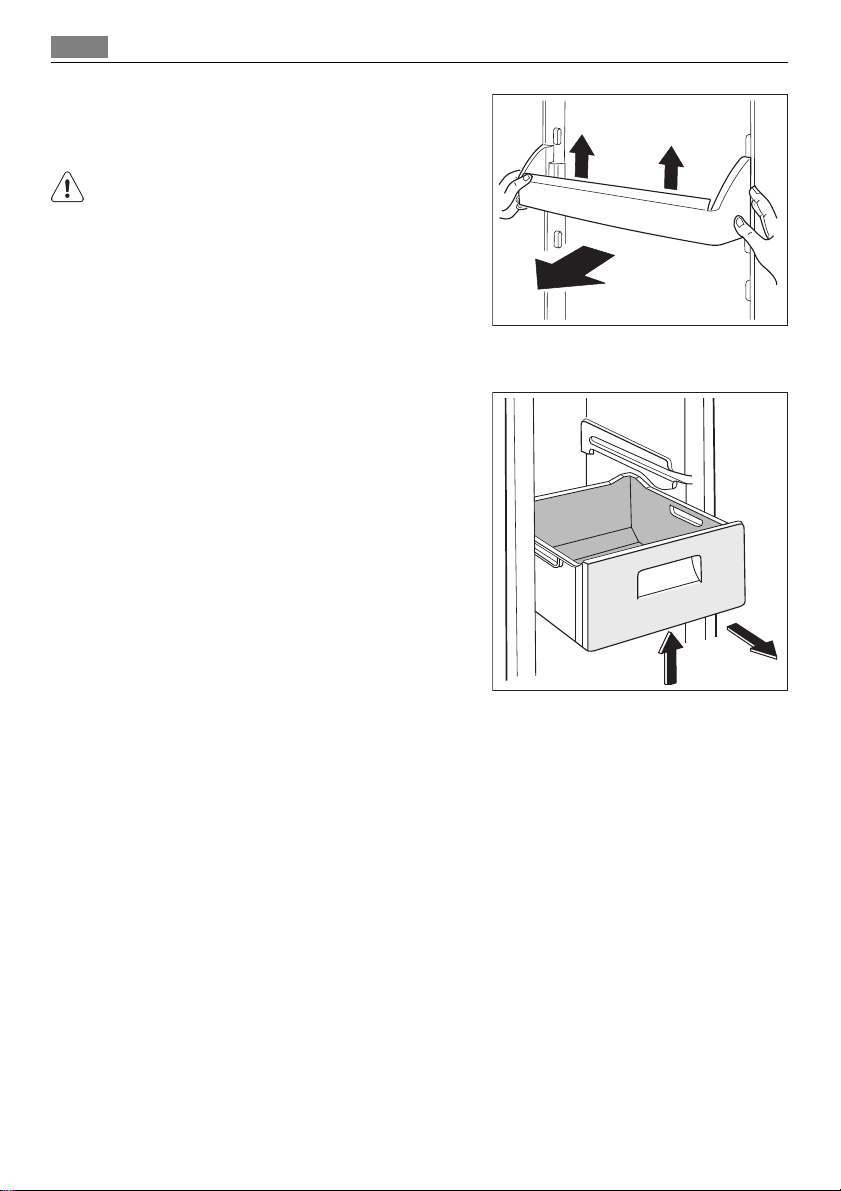
Removal of freezing baskets from the freezer
The freezing baskets have a limit stop to prevent
their accidental removal or falling out. At the time
of its removal from the freezer, pull the basket
towards yourself and, upon reaching the end
point, remove the basket by tilting its front upwards.
At the time of putting it back, slightly lift the front
of the basket to insert it into the freezer. Once you
are over the end points, push the baskets back in
their position.
2
Helpful hints and tips
Hints for energy saving
• Do not open the door frequently or leave it open longer than absolutely necessary.
• If the ambient temperature is high and the Temperature Regulator is set to low tem-
perature and the appliance is fully loaded, the compressor may run continuously, causing
frost or ice on the evaporator. If this happens, set the Temperature Regulator toward
warmer settings to allow automatic defrosting and so a saving in electricity consumption.
Hints for fresh food refrigeration
To obtain the best performance:
• do not store warm food or evaporating liquids in the refrigerator
• do cover or wrap the food, particularly if it has a strong flavour
• position food so that air can circulate freely around it
Hints for refrigeration
Useful hints:
1
Page 15
Helpful hints and tips
Meat (all types) : wrap in polythene bags and place on the glass shelf above the vegetable
drawer.
For safety, store in this way only one or two days at the most.
Cooked foods, cold dishes, etc..: these should be covered and may be placed on any shelf.
Fruit and vegetables: these should be thoroughly cleaned and placed in the special drawer(s)
provided.
Butter and cheese: these should be placed in special airtight containers or wrapped in
aluminium foil or polythene bags to exclude as much air as possible.
Milk bottles: these should have a cap and should be stored in the bottle rack on the door.
Bananas, potatoes, onions and garlic, if not packed, must not be kept in the refrigerator.
Hints for temperature inside the fridge
A suitable temperature inside the fridge is approx. +5° C. When the temperature regulator
is set to +5°C this represents the mean temperature in the fridge. It is normal with higher
temperature in the top of the fridge. It is also normal with lower temperature in the lower
part.
If the temperature regulator is set to a cold temperature, the ambient temperature is high
or if the fridge is fully loaded the compressor will run for a longer time. It too cold, change
to a higher temperature setting.
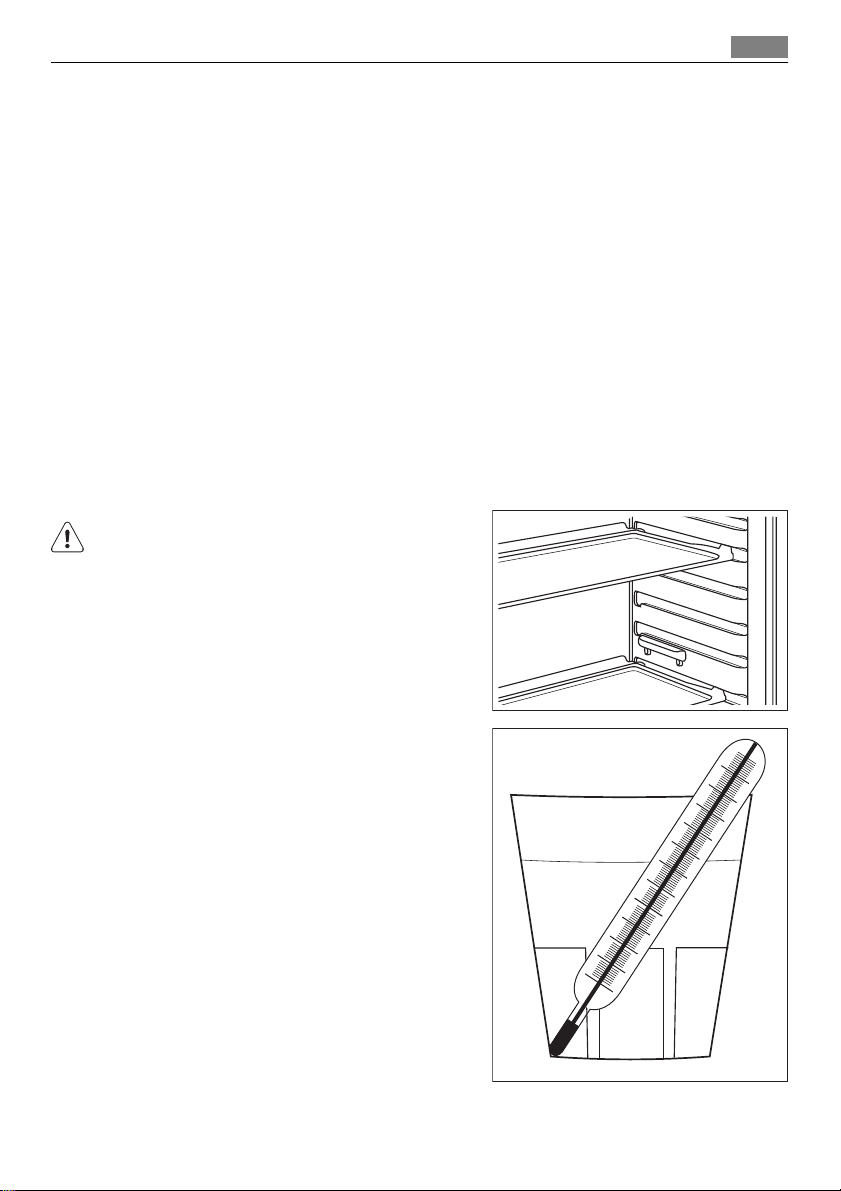
Do not place food against or close to the temperature sensor. This can result in too cold temperatures.
15
If you want to check the temperature of food
stored in the refrigerator, place a glass of water
centrally in the cabinet, and put a proper thermometer with an accuracy of +/– 1 °C into it. After
6 hours the temperature can be monitored. The
measuring shall be performed under steady-stated conditions (without changing the load).
Page 16
Care and cleaning
16
Hints for freezing
To help you make the most of the freezing process, here are some important hints:
• the maximum quantity of food which can be frozen in 24 hrs. is shown on the rating
plate;
• the freezing process takes 24 hours. No further food to be frozen should be added during
this period;
• only freeze top quality, fresh and thoroughly cleaned, foodstuffs;
• prepare food in small portions to enable it to be rapidly and completely frozen and to
make it possible subsequently to thaw only the quantity required;
• wrap up the food in aluminium foil or polythene and make sure that the packages are
airtight;
• do not allow fresh, unfrozen food to touch food which is already frozen, thus avoiding
a rise in temperature of the latter;
• lean foods store better and longer than fatty ones; salt reduces the storage life of food;
• water ices, if consumed immediately after removal from the freezer compartment, can
possibly cause the skin to be freeze burnt;
• it is advisable to show the freezing in date on each individual pack to enable you to keep
tab of the storage time.
Hints for storage of frozen food
To obtain the best performance from this appliance, you should:
• make sure that the commercially frozen foodstuffs were adequately stored by the re-
tailer;
• be sure that frozen foodstuffs are transferred from the foodstore to the freezer in the
shortest possible time;
• not open the door frequently or leave it open longer than absolutely necessary.
• Once defrosted, food deteriorates rapidly and cannot be refrozen.
• Do not exceed the storage period indicated by the food manufacturer.
Care and cleaning
CAUTION!
Unplug the appliance before carrying out any maintenance operation.
This appliance contains hydrocarbons in its cooling unit; maintenance and recharging must
therefore only be carried out by authorized technicians.
Periodic cleaning
The equipment has to be cleaned regularly:
• clean the inside and accessories with lukewarm water and some neutral soap.
• regularly check the door seals and wipe clean to ensure they are clean and free from
debris.
• rinse and dry thoroughly.
Do not pull, move or damage any pipes and/or cables inside the cabinet.
Never use detergents, abrasive powders, highly perfumed cleaning products or wax polishes
to clean the interior as this will damage the surface and leave a strong odour.
Page 17
Care and cleaning
Clean the condenser (black grill) and the compressor at the back of the appliance with a
brush or a vacuum cleaner. This operation will improve the performance of the appliance
and save energy consumption.
Take care of not to damage the cooling system.
When moving the cabinet, lift it by the front edge to avoid scratching the floor.
Many proprietary kitchen surface cleaners contain chemicals that can attack/damage the
plastics used in this appliance. For this reason use a soft cloth rinsed in warm water and
neutral soap emulsion for cleaning external surfaces.
Do not use detergents or abrasive paste as these will damage the paint, or stainless steel
anti finger print coating.
After cleaning, reconnect the equipment to the mains supply.
Replacing the Clean Air Control filter
To get the best performance replace the Clean Air Control filter once every year.
New active filters can be purchased from your local dealer.
Refer to "Installation of the Clean Air Control filter" for instructions.
Cleaning the ventilation grille
The ventilation grille can be removed for washing.
Make sure the door is open and then:
1. Loosen the upper edge of the grille by
pulling outward/downward.
2. Pull the grille straight out to completely
remove it.
3. Vacuum clean under the cabinet.
17
Page 18
What to do if…
18
Defrosting the refrigerator
Frost is automatically eliminated from the evaporator of the refrigerator compartment every time
the motor compressor stops, during normal use.
The defrost water drains out through a drain hole
into a special container at the back of the appliance, over the motor compressor, where it evaporates.
It is important to periodically clean the defrost
water drain hole to prevent the water overflowing
and dripping onto the food inside. It is located
behind the Natura fresh drawers in the refrigerator compartment.
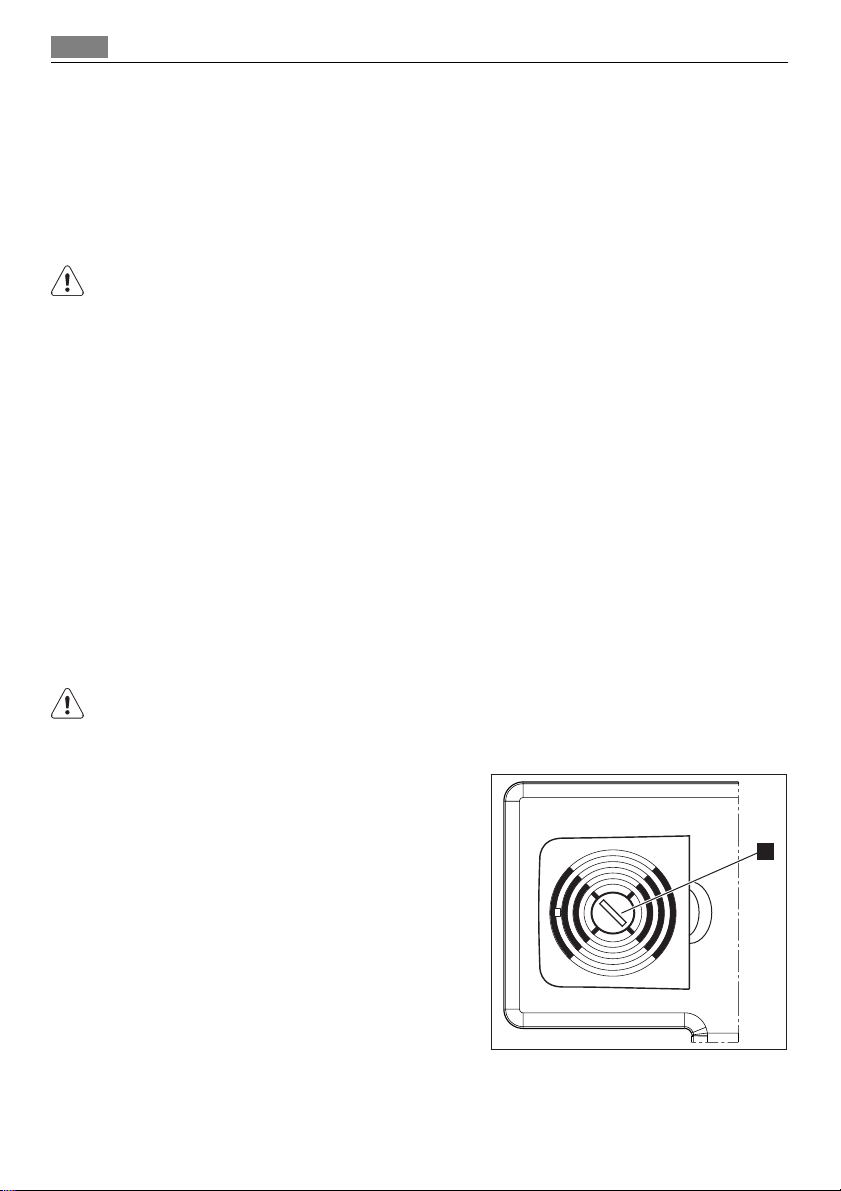
Defrosting of the freezer
The freezer compartment of this model, on the other hand, is a "no frost" type. This means
that there is no buildup of frost when it is in operation, neither on the internal walls nor
on the foods.
The absence of frost is due to the continuous circulation of cold air inside the compartment,
driven by an automatically controlled fan.
Periods of non-operation
When the appliance is not in use for long periods, take the following precautions:
1. disconnect the appliance from electricity supply
2. remove all food
3. clean the appliance and all accessories
4. leave the door/doors open to prevent unpleasant smells.
If the cabinet will be kept on, ask somebody to check it once in a while to prevent the food
inside from spoiling in case of a power failure.
What to do if…
During operation of the appliance some smaller but annoying trouble can often occur,
which does not require calling a technician out. In the following chart information is given
about them to avoid unnecessary charges on service.
The operation of the appliance goes with certain sounds (compressor and circulating
sound). This not means a trouble, but a normal operation.
The appliance operates discontinuously, so the stopping of compressor does not mean being
no current. That is why you must not touch the electrical parts of the appliance before
breaking the circuit.
Page 19
What to do if…
Problem Possible cause Solution
The appliance is noisy.
The cushion spacers located be-
The buzzer sounds. The
Alarm icon flashing.
upper or lower square
is shown in the temperature display.
The compressor runs
continuously.
The door is not closed correctly. Refer to "Closing the door".
The door has been opened too
The food temperature is too
The room temperature is too
Water flows inside the
refrigerator.
Food prevent that water flows
Water flows on the
ground.
There is too much frost
and ice.
The door gasket is deformed or
The temperature in the
appliance is too cold.
The temperature in the
appliance is too warm.
The door is not closed correctly. Refer to "Closing the door".
The appliance is not supported
properly.
tween the back of the cabinet
and the pipes come loose.
The temperature in the freezer is
too high.
An error has occurred in measuring the temperature.
The Temperature regulator may
be set incorrectly.
frequently.
high.
high.
The water outlet is clogged. Clean the water outlet.
into the water collector.
The melting water outlet does
not flow in the evaporative tray
above the compressor.
The door is not closed correctly. Refer to "Closing the door".
dirty.
The Temperature regulator may
be set incorrectly.
The Temperature regulator may
be set incorrectly.
Check if the appliance stands stable (all feet and wheels should be
on the floor). Refer to "Levelling".
Put them back in place again.
Refer to "High Temperature
Alarm"
Call your service representative
(the cooling system will continue
to keep food products cold, but
temperature adjustment will not
be possible).
Set a warmer temperature.
Do not keep the door open longer
than necessary.
Let the food temperature decrease to room temperature before storage.
Decrease the room temperature.
Make sure that food do not touch
the rear plate.
Attach the melting water outlet
to the evaporative tray.
Refer to "Closing the door".
Set a warmer temperature.
Refer to "Hints for temperature
inside the fridge.
Set a colder temperature.
19
Page 20
What to do if…
20
Problem Possible cause Solution
The food temperature is too
The temperature in the
refrigeration is too warm.
Large quantities of food to be
The temperature in the
freezer is too warm.
Large quantities of food to be
The appliance does not
operate.
The mains plug is not connected
The appliance has no power.
The lamp does not work.
The lamp is defective. Refer to "Replacing the lamp".
Door interferes with ventilation grill.
Misaligned door
high.
There is no cold air circulation in
the appliance.
cooled were put in at the same
time.
Food is too near to each other. Store food so that there is cold air
frozen were put in at the same
time.
The appliance is switched off. Switch on the appliance.
to the mains socket correctly.
There is no voltage in the mains
socket.
The door has been open to long. Close the door.
The appliance is not levelled. Refer to "Levelling"
The appliance is not levelled. Refer to "Levelling"
Let the food temperature decrease to room temperature before storage.
Make sure that there is space between food to allow air circulation.
Insert smaller quantities of food
to be cooled at the same time.
circulation.
Insert smaller quantities of food
to be frozen at the same time.
Connect the mains plug to the
mains socket correctly.
Connect another electrical appliance to the mains socket. Check
fuse. Contact a qualified electrician.
As much as the advice does not lead to result, call the nearest brand-mark service.
Replacing the lamp
1. Disconnect the mains plug from the power socket.
Page 21
Technical data
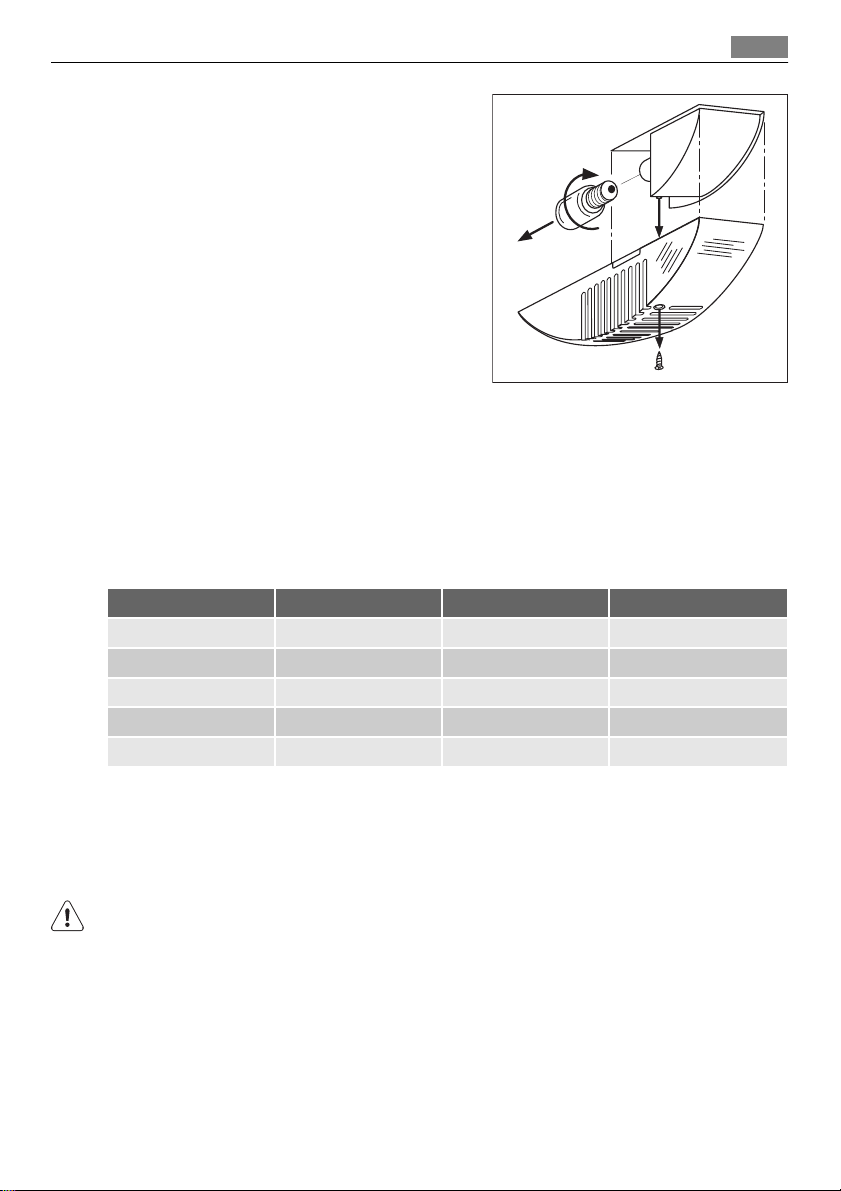
2. Remove the screw from the lamp cover.
3. Remove the lamp cover.
4. Replace the bulb (E14 socket) with one of
the same power (the maximum power is
shown on the lamp cover).
5. Install the lamp cover.
6. Tighten the screw to the lamp cover.
7. Connect the mains plug to the power
socket.
Closing the door
1. Clean the door gaskets.
2. If necessary, adjust the door. Refer to "Installation".
3. If necessary, replace the defective door gaskets. Contact the Service Center.
Technical data
S86340KG1 S86348KG1
Dimension
Height 2000 mm 2000 mm
Width 595 mm 595 mm
Depth 623 mm 623 mm
Rising Time 10 h 10 h
The technical information are situated in the rating plate on the internal left side of the
appliance and in the energy label.
21
Installation
WARNING!
Read the "Safety Information" carefully for your safety and correct operation of the appliance before installing the appliance.
Positioning
Install this appliance at a location where the ambient temperature corresponds to the
climate class indicated on the rating plate of the appliance:
Page 22
Installation
22
Climate class Ambient temperature
SN +10°C to + 32°C
N +16°C to + 32°C
ST +16°C to + 38°C
T +16°C to + 43°C
Location
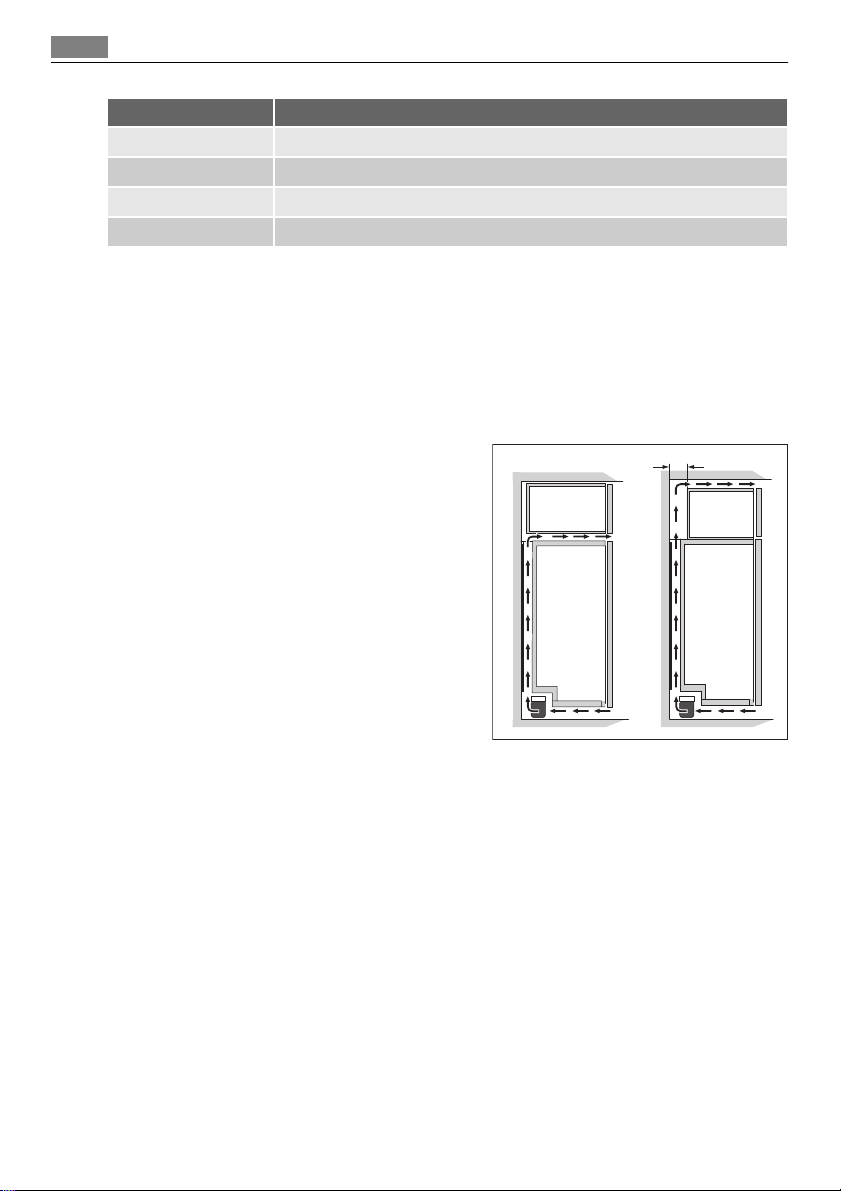
To ensure best performance, if the appliance is positioned below an overhanging wall unit,
the minimum distance between the top of the cabinet and the wall unit must be at least
40 mm . Ideally, however, the appliance should not be positioned below overhanging wall
units.
If the cabinet is placed in a corner and the side with the hinges facing the wall, the distance
between the wall and the cabinet must be at least 360 mm to allow the door to open
enough so that the equipment can be removed.
The ventilation space can be:
• directly above the appliance
• behind and above the top cupboard.
In this case, the space behind the top cupboard
must be at least 50 mm deep.
50mm
Electrical connection
Before plugging in, ensure that the voltage and frequency shown on the rating plate correspond to your domestic power supply.
The appliance must be earthed. The power supply cable plug is provided with a contact for
this purpose. If the domestic power supply socket is not earthed, connect the appliance to
a separate earth in compliance with current regulations, consulting a qualified electrician.
The manufacturer declines all responsibility if the above safety precautions are not observed.
This appliance complies with the E.E.C. Directives.
Removing the transport support
Your appliance is equipped with transport support to secure the door during transportation.
To remove them do these steps:
Page 23
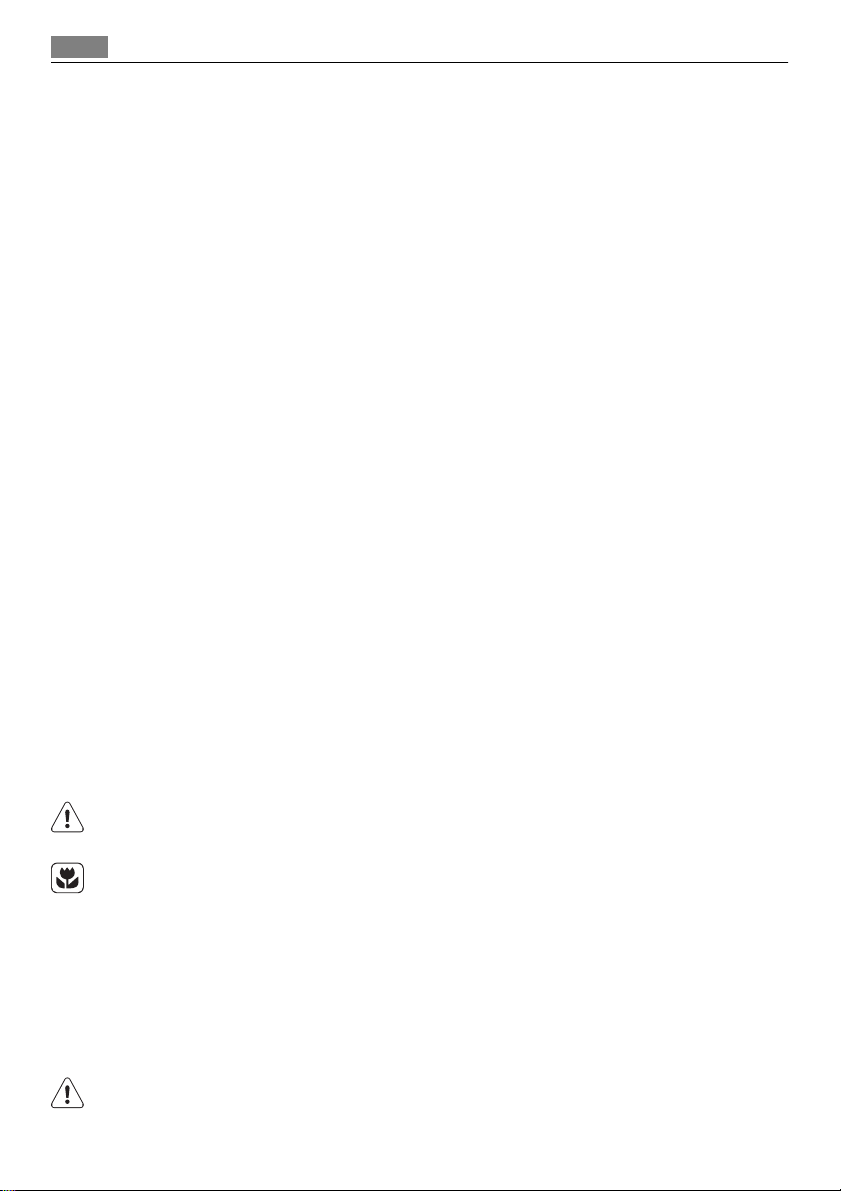
1. Open the door.
2. Remove the transport support from the
door sides.
3. Remove the transport support from the
lower hinge (some models).
Some models are fitted with a silencing pad
under the cabinet. Do not remove this pad.
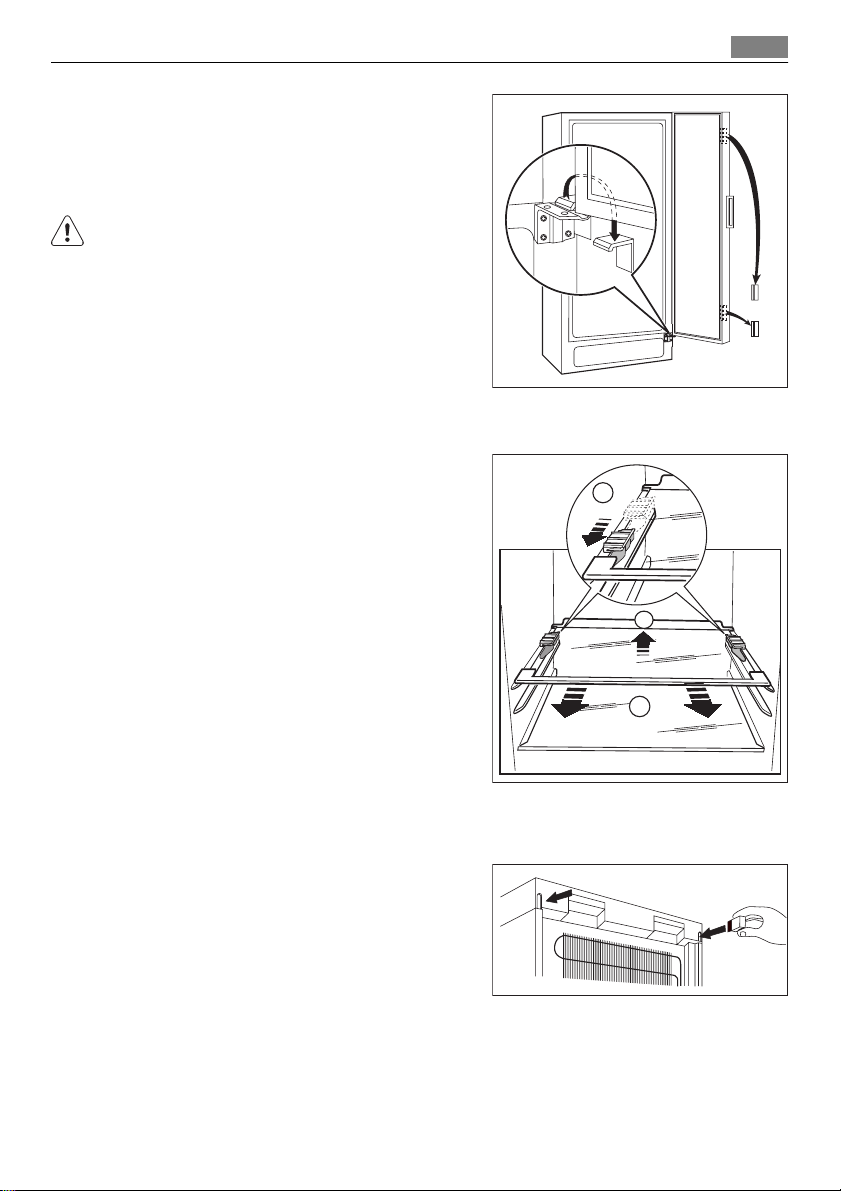
Removing the shelf holders
Your appliance is equipped with shelf retainers
that make it possible to secure the shelves during
transportation.
To remove them proceed as follows:
1. Move the shelf holders in the direction of the
arrow (A).
2. Raise the shelf from the rear and push it forward until it is freed (B).
3. Remove the retainers (C).
Installation
3
A
B
23
2
Rear spacers
Install the spacers provided within the accessory bag as shown in the figure.
Install the spacers on the back side of the panel.
Fitting the door handles
The handles are supplied as a kit at delivery.
C
Page 24

24
Installation
1. Screw the top handle bracket to the handle rod.
2. Fit the bottom handle bracket on the lower right-hand side of the door.
3. Fit the top handle bracket on the top
right-hand side of the door.
4. Screw the handle rod to the bottom handle bracket.
Do not use excessive force and overtighten the
screws (max. 2 Nm) as you may damage the
door handles.
12
34
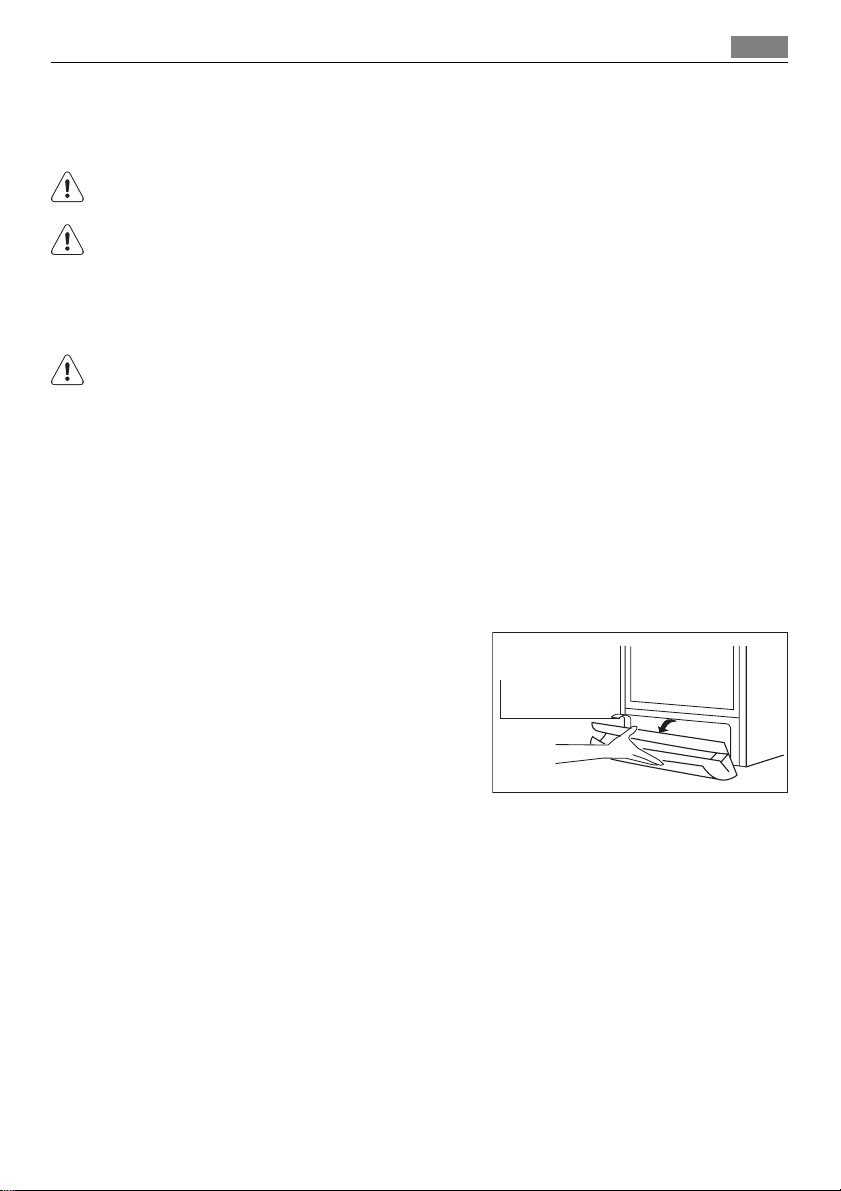
Levelling
When placing the appliance ensure that it stands
level. If necessary adjust the feet using the adjustment spanner supplied.
Door alignment is dependent on proper levelling.
Installation of the Clean Air Control filter
The Clean Air Control filter is an active carbon filter which absorbs bad odours maintain
the best flavour and aroma for all foodstuffs without risk of odour cross contamination.
On delivery the carbon filter is in a plastic bag to preserve performance.
1. Open the air lever flap.
2. Take the filter out of the plastic bag.
Page 25

Environmental concerns
3. Insert the filter in the slot found in the
back of the air lever flap.
4. Close the air lever flap.
The filter should be handled carefully so fragments do not loosen from the surface.
Make sure that the air lever flap is closed to
obtain proper function.
Door reversibility
The door reversibility is not possible.
Environmental concerns
The symbol on the product or on its packaging indicates that this product may not be
treated as household waste. Instead it should be taken to the appropriate collection point
for the recycling of electrical and electronic equipment. By ensuring this product is disposed
of correctly, you will help prevent potential negative consequences for the environment
and human health, which could otherwise be caused by inappropriate waste handling of
this product. For more detailed information about recycling of this product, please contact
your local council, your household waste disposal service or the shop where you purchased
the product.
25
Page 26

26
Содержание
Благодарим вас за то, что выбрали одно из наших
высококачественных изделий.
Чтобы обеспечить оптимальную и бесперебойную работу прибора,
внимательно прочитайте настоящее Руководство. Это позволит
выполнять все операции наиболее правильным и эффективным
образом. Для того чтобы в нужный момент всегда можно было
свериться с настоящим Руководством, рекомендуем хранить его в
надежном месте. Просим также передать его новому владельцу
прибора в случае продажи или уступки.
Надеемся, что новый прибор доставит вам много радости.
Содержание
Сведения по технике безопасности
27
Безопасность детей и лиц с
ограниченными возможностями
27
Общие правила техники
безопасности 28
Ежедневная эксплуатация 29
Чистка и уход 29
Установка 30
Обслуживание 30
Панель управления 31
Дисплей 31
Включение 32
Выключение 32
Выключение морозильной или
холодильной камеры 32
Включение морозильной или
холодильной камеры 32
Регулирование температуры 32
Функция «Защита от детей» 33
Функция «Отпуск» 33
Функция COOLMATIC 34
Функция Quick Chill 34
Функция FROSTMATIC 35
Оповещение о высокой
температуре 35
Первое использование 36
Чистка холодильника изнутри
36
Ежедневное использование 36
Использование холодильной
камеры 36
Использование морозильной
камеры 37
Хранение замороженных
продуктов 37
Размораживание продуктов 37
Фильтр Clean Air Control 38
Съемные полки 38
Ящик для овощей 38
Зона «Натуральная свежесть»
39
Регулировка влажности воздуха
39
Размещение полок дверцы 39
Вынимание корзин из морозильной
камеры 40
Полезные советы 40
Рекомендации по экономии
электроэнергии 40
Рекомендации по охлаждению
продуктов 40
Рекомендации по охлаждению
41
Рекомендации по температуре
внутри холодильника 41
Рекомендации по замораживанию
42
Рекомендации по хранению
замороженных продуктов 42
Уход и чистка 43
Периодическая чистка 43
Замена фильтра Clean Air Control
44
Чистка вентиляционной решетки
44
Page 27

Сведения по технике безопасности
27
Размораживание холодильника
44
Размораживание морозильной
камеры 44
Перерывы в эксплуатации 45
Что делать, если ... 45
Замена лампы 47
Закрытие дверцы 48
Технические данные 48
Установка 48
Размещение 48
Расположение 49
Подключение к электросети 49
Удаление транспортировочных
креплений 49
Снятие держателей полок 50
Задние прокладки 50
Монтаж дверных ручек 50
Выравнивание 51
Установка фильтра Clean Air
Control 51
Перевешивание дверцы 52
Забота об окружающей среде 52
Право на изменения сохраняется
Сведения по технике безопасности
Для обеспечения собственной безопасности и правильной эксплуатации
прибора, перед его установкой и первым использованием внимательно
прочитайте данное руководство, не пропуская рекомендации и предупре‐
ждения. Чтобы избежать нежелательных ошибок и несчастных случаев,
важно, чтобы все, кто пользуется данным прибором, подробно ознако‐
мились с его работой и правилами техники безопасности. Сохраните на‐
стоящее руководство и в случае продажи прибора или его передачи в
пользование другому лицу передайте вместе с ним и данное руководство,
чтобы новый пользователь получил соответствующую информацию о
правильной эксплуатации и правилах техники безопасности.
В интересах безопасности людей и имущества соблюдайте меры пред‐
осторожности, указанные в настоящем руководстве, так как производи‐
тель не несет ответственности за убытки, вызванные несоблюдением
указанных мер.
Безопасность детей и лиц с ограниченными возможностями
• Данное изделие не предназначено для эксплуатации лицами (в том
числе детьми) с ограниченными физическими, сенсорными или ум‐
ственными способностями или с недостаточным опытом или знаниями
без присмотра лица, отвечающего за их безопасность, или получения
от него соответствующих инструкций, позволяющих им безопасно эк‐
сплуатировать его.
Необходимо следить за тем, чтобы дети не играли с прибором.
Page 28

28
Сведения по технике безопасности
• Держите все упаковочные материалы в недоступном для детей месте.
Существует опасность удушения.
• Если прибор больше не нужен, выньте вилку из розетки, обрежьте шнур
питания (как можно ближе к прибору) и снимите дверцу, чтобы дети,
играя, не получили удар током или не заперлись внутри прибора.
• Если данный прибор (имеющий магнитное уплотнение дверцы) пред‐
назначен для замены старого холодильника с пружинным замком (за‐
щелкой) дверцы или крышки, перед утилизацией старого холодильника
обязательно выведите замок из строя. Это позволит исключить пре‐
вращение его в смертельную ловушку для детей.
Общие правила техники безопасности
ПРЕДУПРЕЖДЕНИЕ!
Не допускайте перекрытия вентиляционных отверстий.
• Настоящий прибор предназначен для хранения продуктов питания и
напитков в обычном домашнем хозяйстве, как описано в настоящем
руководстве.
• Не используйте механические приспособления или любые другие
средства для ускорения процесса размораживания.
• Не используйте другие электроприборы (например, мороженицы) внут‐
ри холодильников, если производителем не допускается возможность
такого использования.
• Не допускайте повреждения контура хладагента.
• Холодильный контур прибора содержит безвредный для окружающей
среды, но, тем не менее, огнеопасный хладагент изобутан (R600a).
При транспортировке и установке прибора следите за тем, чтобы не
допустить повреждений каких-либо компонентов холодильного конту‐
ра.
В случае повреждения холодильного контура:
– не допускайте использования открытого пламени и источников вос‐
пламенения
– тщательно проветрите помещение, в котором установлен прибор
• Изменение характеристик прибора или внесение каких-либо изменений
в его конструкцию сопряжено с опасностью. Поврежденный шнур мо‐
жет вызвать короткое замыкание, пожар или удар электротоком.
ВНИМАНИЕ!
Замену электрических частей изделия (шнура питания, вилки, компрес‐
сора) должен производить сертифицированный представитель сервис‐
ного центра или квалифицированный обслуживающий персонал.
1. Запрещено удлинять шнур питания.
2. Убедитесь, что штепсельная вилка не сплющена и не повреждена с
тыльной стороны прибора. Сплющенная или поврежденная штеп‐
сельная вилка может перегреться и стать причиной пожара.
3. Убедитесь, что Вы сможете достать вилку сетевого шнура прибора.
4. Не тяните сетевой шнур.
Page 29

Сведения по технике безопасности
5. Если розетка электропитания не закреплена, не вставляйте в нее
вилку. Существует опасность поражения электрическим током или
пожара.
6.
Нельзя пользоваться прибором с лампой без плафона
го освещения.
• Данный прибор тяжелый. Будьте осторожны при его перемещении.
• Не вынимайте и не трогайте предметы в морозильном отделении мок‐
рыми или влажными руками, это может привести к появлению на руках
ссадин или ожогов от обморожения.
• Не допускайте долговременного воздействия на прибор прямых сол‐
нечных лучей.
Ежедневная эксплуатация
• Не ставьте на пластмассовые части прибора горячую посуду.
• Не храните в холодильнике воспламеняющиеся газы и жидкости, так
как они могут взорваться.
• Не помещайте продукты питания прямо напротив воздуховыпускного
отверстия в задней стенке.
• Замороженные продукты после размораживания не должны подвер‐
гаться повторной заморозке.
• При хранении расфасованных замороженных продуктов следуйте ре‐
комендациям производителя.
• Следует тщательно придерживаться рекомендаций по хранению, дан‐
ных изготовителем прибора. См. соответствующие указания.
• Не помещайте в холодильник газированные напитки, т.к. они создают
внутри емкости давление, которое может привести к тому, что она лоп‐
нет и повредит холодильник.
• Ледяные сосульки могут вызвать ожог обморожения, если брать их в
рот прямо из морозильной камеры.
5)
4)
внутренне‐
29
Чистка и уход
• Перед выполнением операций по чистке и уходу за прибором выклю‐
чите его и выньте вилку сетевого шнура из розетки.
• Не следует чистить прибор металлическими предметами.
• Не пользуйтесь острыми предметами для удаления льда с прибора.
Используйте пластиковый скребок.
• Регулярно проверяйте отверстие в корпусе холодильника, предназна‐
ченное для слива талой воды. При необходимости прочищайте его.
Если отверстие закупорится, вода будет скапливаться в нижней части
прибора.
• Никогда не используйте фен для волос или другие нагревательные
приборы для ускорения размораживания. Чрезмерное тепло может по‐
вредить пластиковую внутреннюю отделку, а влага может проникнуть
в электрическую систему и вызвать утечку тока.
4) Если предусмотрен плафон
5) Если холодильник с защитой от образования льда и инея
Page 30

30
Сведения по технике безопасности
Установка
Для подключения к электросети тщательно следуйте инструкциям, при‐
веденным в соответствующих параграфах.
• Распакуйте изделие и проверьте, нет ли повреждений. Не подключайте
к электросети поврежденный прибор. Немедленно сообщите о повре‐
ждениях продавцу прибора. В таком случае сохраните упаковку.
• Рекомендуется подождать не менее четыре часа перед тем, как вклю‐
чать холодильник, чтобы масло вернулось в компрессор.
• Необходимо обеспечить вокруг холодильника достаточную циркуля‐
цию воздуха, в противном случае прибор может перегреваться. Чтобы
обеспечить достаточную вентиляцию, следуйте инструкциям по уста‐
новке.
• Если возможно, изделие должно располагаться обратной стороной к
стене так, чтобы во избежание ожога нельзя было коснуться горячих
частей (компрессор, испаритель).
• Данный прибор нельзя устанавливать вблизи радиаторов отопления
или кухонных плит.
• Убедитесь, что к розетке будет доступ после установки прибора.
•
Подключайте прибор только к питьевому водоснабжению.
Обслуживание
• Любые операции по техобслуживанию прибора должны выполняться
квалифицированным электриком или уполномоченным специалистом.
• Техобслуживание данного прибора должно выполняться только спе‐
циалистами авторизованного сервисного центра с использованием ис‐
ключительно оригинальных запчастей.
6)
Защита окружающей среды
Ни холодильный контур, ни изоляционные материалы настоящего при‐
бора не содержат газов, которые могли бы повредить озоновый слой.
Данный прибор нельзя утилизировать вместе с бытовыми отходами и
мусором. Изоляционный пенопласт содержит горючие газы: прибор под‐
лежит утилизации в соответствии с действующими нормативными поло‐
жениями, с которыми следует ознакомиться в местных органах власти.
Не допускайте повреждения холодильного контура, особенно, вблизи
теплообменника. Материалы, использованные для изготовления данного
прибора, помеченные символом
ки.
6) Если предусмотрено подключение к водопроводу
, пригодны для вторичной переработ‐
Page 31

Панель управления
Панель управления
31
1 Кнопка понижения температуры холодильной камеры
2 Кнопка повышения температуры холодильной камеры
3 Кнопка ON/OFF
4 повышения температуры морозильной камеры
5 Дисплей
6 Кнопка понижения температуры морозильной камеры
7 Кнопка Mode
Дисплей
Кнопка OK
1
7
6
5
2
3
4
1
9
8
7
2
3
4
6
5
1 Дисплей температуры холодильной камеры
2 Функция «Отпуск»
3 Кнопка отключения холодильной камеры
4 Кнопка отключения морозильной камеры
5 Дисплей температуры морозильной камеры
6 Сигнальный индикатор
7 Функция FROSTMATIC
8 Функция COOLMATIC
9 Функция «Защита от детей»
Page 32

32
Панель управления
Включение
Для включения прибора выполните приведенные ниже действия.
1. Вставьте вилку сетевого шнура в розетку.
2. Нажмите кнопку ON/OFF , если дисплей отключен.
3. Через несколько секунд может прозвучать звуковой сигнал сигнали‐
зации.
Сведения о сбросе сигнализации см. в разделе "Оповещение о высо‐
кой температуре".
4. На индикаторах температуры отображаются значения температуры,
заданные по умолчанию.
Информацию о выборе другого значения температуры см. в разделе "Ре‐
гулирование температуры".
Выключение
Для выключения прибора выполните приведенные ниже действия.
1. Нажмите кнопку ON/OFF и удерживайте ее нажатой в течение 5 се‐
кунд.
2. Дисплей отключится.
3. Для отключения прибора от сети электропитания извлеките вилку се‐
тевого шнура из розетки.
Выключение морозильной или холодильной камеры
Чтобы отключить морозильную или холодильную камеру,
1. нажимайте кнопку Mode, пока на дисплее не отобразится соответ‐
ствующий значок.
Замигает значок отключения холодильной или морозильной камеры.
На дисплее температуры холодильной или морозильной камеры от‐
образятся символы тире.
2. Чтобы подтвердить отключение, нажмите кнопку OK.
3. На дисплее отобразится индикатор отключения холодильной или мо‐
розильной камеры.
Включение морозильной или холодильной камеры
Чтобы включить морозильную или холодильную камеру,
1. нажмите кнопку регулятора температуры холодильной камеры.
Или
1. нажимайте кнопку Mode, пока на дисплее не отобразится соответ‐
ствующий значок.
Замигает значок отключения холодильной или морозильной камеры.
2. Чтобы подтвердить выбор, нажмите кнопку OK.
3. Индикатор выключения морозильной или холодильной камеры погас‐
нет.
Регулирование температуры
Установленное значение температуры холодильной или морозильной ка‐
меры можно изменить нажатием кнопок регулирования температуры.
Page 33

Панель управления
Установленная температура по умолчанию:
• +5 °C для холодильной камеры;
• -18 °C для морозильной камеры.
На дисплее температуры отображается заданное значение температуры.
Заданная температура достигается в течение 24 часов.
При сбое в подаче электроэнергии заданное значение температуры со‐
храняется.
Функция «Защита от детей»
Функция «Защита от детей» служит для блокировки кнопок управления
холодильником.
Включение функции:
1. нажимайте кнопку Mode, пока на дисплее не отобразится соответ‐
ствующий значок.
2. Замигает индикатор «Защита от детей».
3. Чтобы подтвердить выбор, нажмите кнопку OK.
Отобразится индикатор «Защита от детей».
Выключение функции.
1. Нажимайте кнопку Mode, пока не замигает индикатор «Защита от де‐
тей».
2. Чтобы подтвердить выбор, нажмите кнопку OK.
3. Индикатор «Защита от детей» погаснет.
Функция «Отпуск»
Функция позволяет оставлять холодильную камеру пустой и закрытой в
течение продолжительного отсутствия владельца, без образование в ней
неприятных запахов.
При включенной функции «Отпуск» в холодильнике не должно быть про‐
дуктов.
33
Включение функции.
1. Нажимайте кнопку Mode, пока на дисплее не отобразится соответ‐
ствующий значок.
Замигает индикатор «Отпуск».
На дисплее температуры отображается заданное значение темпера‐
туры.
2. Чтобы подтвердить выбор, нажмите кнопку OK.
Отобразится индикатор «Отпуск».
Выключение функции.
1. Нажимайте кнопку Mode, пока не замигает индикатор «Отпуск».
2. Чтобы подтвердить выбор, нажмите кнопку OK.
3. Индикатор «Отпуск» погаснет.
Функция выключается при задании другой температуры холодильной ка‐
меры.
Page 34

34
Панель управления
Функция COOLMATIC
Если необходимо поместить в холодильник большое количество теплых
продуктов, например, после посещения магазина, рекомендуется акти‐
вировать функцию COOLMATIC для ускоренного охлаждения продуктов
и предотвращения повышения температуры уже находящихся в холо‐
дильнике продуктов.
Включение функции.
1. Нажимайте кнопку Mode, пока на дисплее не отобразится соответ‐
ствующий значок.
Индикатор COOLMATIC замигает.
На дисплее температуры отображается заданное значение темпера‐
туры.
2. Чтобы подтвердить выбор, нажмите кнопку OK.
Загорится индикатор COOLMATIC.
Функция COOLMATIC выключается автоматически примерно через 6 ча‐
сов.
Выключение функции до ее автоматического завершения.
1. Нажимайте кнопку Mode, пока не замигает индикатор COOLMATIC.
2. Чтобы подтвердить выбор, нажмите кнопку OK.
3. Индикатор COOLMATIC погаснет.
Функция выключается при задании другой температуры холодильной ка‐
меры.
Функция Quick Chill
Функция Quick Chill обеспечивает бы‐
строе охлаждение банок и бутылок по‐
током холодного воздуха.
Поместите банки или бутылки на полку
быстрого охлаждения для бутылок
Quick Chill и установите регулятор по‐
дачи воздуха (1) на максимум.
Включение функции.
1. Нажимайте кнопку Mode, пока на дисплее не отобразится соответ‐
ствующий значок.
Замигает индикатор COOLMATIC.
На дисплее температуры отображается заданное значение темпера‐
туры.
2. Чтобы подтвердить выбор, нажмите кнопку OK.
1
Page 35

Панель управления
Загорится индикатор COOLMATIC.
Когда охлаждение будет завершено, установите регулятор (1) на мини‐
мум.
Выключение функции.
1. Нажимайте кнопку Mode, пока индикатор COOLMATIC не замигает.
2. Чтобы подтвердить выбор, нажмите кнопку OK.
3. Индикатор COOLMATIC погаснет.
Функция Quick Chill выключается автоматически примерно через 6 часов.
Когда полка для быстрого охлаждения бутылок Quick Chill не использует‐
ся, ее можно вынуть.
Функция FROSTMATIC
Замораживание свежих продуктов возможно во всех отделениях кроме
нижнего.
Включение функции.
1. Нажимайте кнопку Mode, пока на дисплее не отобразится соответ‐
ствующий значок.
Замигает индикатор FROSTMATIC.
На дисплее температуры морозильной камеры отобразится символ
.
2. Чтобы подтвердить выбор, нажмите кнопку OK.
Загорится индикатор FROSTMATIC.
Начнется показ анимированного изображения.
Функция автоматически выключается через 52 часа.
Выключение функции до ее автоматического завершения.
1. Нажимайте кнопку Mode, пока индикатор FROSTMATIC не замигает.
2. Чтобы подтвердить выбор, нажмите кнопку OK.
3. Индикатор FROSTMATIC погаснет.
Функция выключается при задании другой температуры морозильной ка‐
меры.
35
Оповещение о высокой температуре
Повышение температуры в морозильной камере (например, из-за имев‐
шего ранее место перебоя в подаче электропитания) отображается:
• миганием сигнального индикатора и дисплея температуры;
• звуковым сигналом.
Отключение оповещения.
1. Нажмите любую кнопку.
2. Звуковой сигнал выключится.
3. На дисплее температуры морозильной камеры в течение нескольких
секунд отобразится самое высокое достигнутое значение температу‐
ры. Затем снова отобразится заданная температура.
4. Сигнальный индикатор продолжит мигать до достижения заданной
температуры.
При достижении заданной температуры сигнальный индикатор погаснет.
Page 36

36
Первое использование
Первое использование
Чистка холодильника изнутри
Перед первым включением прибора вымойте его внутренние поверхно‐
сти и все внутренние принадлежности теплой водой с нейтральным мы‐
лом, чтобы удалить запах, характерный для только что изготовленного
изделия, затем тщательно протрите их.
Не используйте моющие или абразивные средства, т.к. они могут повре‐
дить покрытие поверхностей холодильника.
Позаботьтесь, чтобы вода из сливного
шланга над емкостью сбора конденсата
сзади холодильника стекала точно в ем‐
кость.
Ежедневное использование
Использование холодильной камеры
Температуру в камере можно регулировать в диапазоне от +3 °C до +8 °C .
При нормальной работе дисплей отображает заданную температуру
внутри холодильника.
Обычно оптимальным является среднее значение температуры.
Однако, точную задаваемую температуру следует выбирать с учетом то‐
го, что температура внутри прибора зависит от:
• температуры в помещении;
• частоты открывания дверцы;
• количества помещенных в холодильник продуктов;
• места расположения прибора.
Page 37

Ежедневное использование
В случае высокой температуры в помещении или полного заполнения
прибора продуктами, если задано самое низкое значение температуры,
компрессор прибора может работать непрерывно; при этом задняя стен‐
ка прибора будет покрываться льдом. В этом случае следует задать бо‐
лее высокую температуру, чтобы сделать возможным автоматическое
размораживание и, таким образом, уменьшить расход энергии.
Использование морозильной камеры
Символ означает, что морозильная камера пригодна для за‐
мораживания свежих продуктов и для длительного хранения. Темпера‐
туру можно регулировать в диапазоне от -15 °C до -24 °C. Рекомендуется
установить температуру на -18 °C, поскольку она является оптимальной
с точки зрения энергопотребления и хранения замороженных продуктов.
Отклонение заданной температуры от фактической является нормаль‐
ным явлением.
В особенности в следующих случаях:
• недавно было задано новое значение;
• дверца длительное время была открыта;
• в камеру были помещены теплые продукты.
Разница в пределах 5 °C внутри камеры вполне нормальна.
Во время работы на дисплее температуры отображается заданное зна‐
чение.
37
Хранение замороженных продуктов
При первом запуске или после длительного простоя перед закладкой
продуктов в отделение дайте прибору поработать не менее 2 часов.
Корзины морозильника позволяют быстро и легко найти тот пакет с про‐
дуктами, который вам нужен. Если вам необходимо поместить большое
количество продуктов для хранения, выньте все ящики, кроме нижней
корзины, которая должна оставаться на месте для обеспечения хорошей
циркуляции воздуха. На всех полках, кроме верхней, можно помещать
выступающие за ее края продукты, придерживаясь ограничения по весу,
указанного на боковой стенке средней секции.
При случайном размораживании продуктов, например, при сбое электро‐
питания, если напряжение в сети отсутствовало в течение времени, пре‐
вышающего указанное в таблице технических данных "время повышения
температуры", размороженные продукты следует быстро употребить в
пищу или немедленно подвергнуть тепловой обработке, затем повторно
заморозить (после того, как они остынут).
Размораживание продуктов
Замороженные продукты, включая продукты глубокой заморозки, перед
использованием можно размораживать в холодильном отделении или
Page 38

38
Ежедневное использование
при комнатной температуре, в зависимости от времени, которым Вы рас‐
полагаете для выполнения этой операции.
Маленькие куски можно готовить, даже не размораживая, в том виде, в
каком они взяты из морозильной камеры: в этом случае процесс приготов‐
ления пищи займет больше времени.
Фильтр Clean Air Control
Прибор оснащен угольным фильтром, установленным за заслонкой ре‐
гулятора подачи воздуха.
Он очищает воздух от нежелательных запахов в холодильной камере,
сохраняя качество хранящихся продуктов.
При поставке фильтр находится в пластиковом пакете. Подробнее см.
раздел «Установка фильтра Clean Air Control».
Чтобы обеспечить правильную работу, убедитесь, что заслонка регуля‐
тора подачи воздуха закрыта.
Съемные полки
На стенках холодильника установлен
ряд направляющих, позволяющих раз‐
мещать полки по желанию.
Чтобы вынуть некоторые полки, нужно
поднять их заднюю часть.
Чтобы была обеспечена правильная
циркуляция воздуха, не снимайте сте‐
клянную полку, расположенную над
ящиком для овощей.
Ящик для овощей
Ящик предназначен для хранения овощей и фруктов.
Внутри ящика имеется разделитель, который можно располагать в раз‐
личных положениях в соответствии с потребностями.
Все внутренние детали ящика можно вынимать для проведения чистки.
Page 39

Зона «Натуральная свежесть»
В зоне «Натуральная свежесть» по‐
стоянно поддерживается температура
чуть выше 0 °C. Регулировка темпера‐
туры пользователем не требуется.
В зоне «Натуральная свежесть» нахо‐
дятся два ящика.
В нижнем ящике влажность воздуха вы‐
ше; он больше подходит для хранения
ягод, фруктов и овощей.
Верхний ящик подходит для хранения
мяса, рыбы и птицы.
Продукты, для которых зона «Натураль‐
ная свежесть» не подходит:
• фрукты, портящиеся на холоде, такие
как бананы, папайя, маракуйя, авока‐
до и цитрусовые;
• портящиеся на холоде овощи, такие
как огурцы, цукини, баклажаны, кар‐
тофель и помидоры. Не совсем спе‐
лые фрукты и овощи, например, не‐
дозрелые груши.
Перед укладкой продуктов в зону «На‐
туральная свежесть» их следует упако‐
вать. Так их аромат, сочность и цвет со‐
хранятся дольше.
Ежедневное использование
39
Подходящие упаковочные материалы:
• герметичные полиэтиленовые пакеты и пленка:
• пластиковые контейнеры с крышками;
• алюминиевая фольга.
Регулировка влажности воздуха
Оба ящика оснащены регулируемыми вентиляционными отверстиями.
Размер отверстий можно менять при помощи задвижек, тем самым регу‐
лируя влажность воздуха внутри ящиков.
• Когда вентиляционные отверстия открыты, увеличенная циркуляция
воздуха снижает уровень влажности в ящике.
• При закрытых отверстиях естественный ур овень в лажност и сохра няет‐
ся дольше.
Размещение полок дверцы
Чтобы обеспечить возможность хранения упаковок продуктов различных
размеров, полки дверцы можно размещать на разной высоте.
Page 40

40
Полезные советы
Медленно потяните полку в направле‐
нии, указанном стрелками, пока она не
высвободится; затем установите ее на
нужное место.
Чтобы обеспечить правильную циркуля‐
цию воздуха, не меняйте положение
нижней полки в дверце.
Вынимание корзин из морозильной камеры
Корзины морозильной камеры оснаще‐
ны стопором, препятствующим их слу‐
чайному выниманию или их падению.
Чтобы вынуть корзину из морозильной
камеры, потяните ее на себя. Когда она
достигнет конечного положения, при‐
поднимите передний край корзины и
снимите ее.
Вставляя корзину в морозильную каме‐
ру, слегка приподнимите ее переднюю
часть. Преодолев стопоры, задвиньте
корзину до упора.
2
1
Полезные советы
Рекомендации по экономии электроэнергии
• Не открывайте дверцу слишком часто и не держите ее открытой дол‐
ьше, чем необходимо.
• Если температура окружающей среды высокая, регулятор температу‐
ры находится в самом высоком положении и холодильник полностью
загружен, компрессор может работать без остановок, что приводит к
образованию инея или льда на испарителе. Если такое случается, по‐
верните регулятор температуры до более низких значений, чтобы сде‐
лать возможным автоматическое оттаивание, и, следовательно, сни‐
зить потребление электроэнергии.
Рекомендации по охлаждению продуктов
Для получения оптимальных результатов:
• не помещайте в холодильник теплые продукты или испаряющиеся жид‐
кости
Page 41

Полезные советы
• накрывайте или заворачивайте продукты, особенно те, которые имеют
сильный запах
• располагайте продукты так, чтобы вокруг них мог свободно циркулиро‐
вать воздух
Рекомендации по охлаждению
Полезные советы:
Мясо (всех типов): помещайте в полиэтиленовые пакеты и кладите на
стеклянную полку, расположенную над ящиком для овощей.
Храните мясо таким образом один, максимум два дня, иначе оно может
испортиться.
Продукты, подвергшиеся тепловой обработке, холодные блюда и т.д.:
должны быть накрыты и могут быть размещены на любой полке.
Фрукты и овощи: должны быть тщательно очищенными; их следует по‐
мещать в специально предусмотренные для их хранения ящики.
Сливочное масло и сыр: должны помещаться в специальные воздухоне‐
проницаемые контейнеры или быть обернуты алюминиевой фольгой или
полиэтиленовой пленкой, чтобы максимально ограничить контакт с воз‐
духом.
Бутылки с молоком: должны быт ь закрыты кр ышкой и размеще ны в полке
для бутылок на дверце.
Бананы, картофель, лук и чеснок не следует хранить в холодильнике в
неупакованном виде.
Рекомендации по температуре внутри холодильника
Оптимальная температура внутри холодильника составляет приблизи‐
тельно +5 °C. Когда регулятор температуры установлен на +5 °C, это со‐
ответствует средней температуре в холодильнике. Обычно в верхней ча‐
сти холодильной камеры температура выше. В то же время, в нижней
части холодильной камеры температура ниже.
Если регулятор установлен на меньшее значение температуры, а
температура окружающего воздуха высока, или если холодильник пол‐
ностью загружен, компрессор будет включен более продолжительное
время. Если температура слишком низкая, измените установку темпера‐
туры на более высокую.
Не следует размещать продукты напро‐
тив датчика температуры или рядом с
ним. Результатом может быть слишком
низкая температура.
41
Page 42

42
Полезные советы
Если необходимо проверить температу‐
ру продуктов, хранящихся в холодиль‐
нике, установите стакан с водой в цен‐
тре камеры и поместите в него подходя‐
щий термометр с точностью измерения
+/-1 °C. Через 6 часов можно считывать
показания. Измерение следует прово‐
дить в установившемся состоянии (без
изменения загрузки).
Рекомендации по замораживанию
Ниже приведен ряд рекомендаций, направленных на то, чтобы помочь
сделать процесс замораживания максимально эффективным:
• максимальное количество продуктов, которое может быть заморожено
в течение 24 часов. указано на табличке технических данных;
• процесс замораживания занимает 24 часа. В этот период не следует
класть в морозильную камеру новые продукты, подлежащие замора‐
живанию;
• замораживайте только высококачественные, свежие и тщательно вы‐
мытые продукты;
• перед замораживанием разделите продукты на маленькие порции для
того, чтобы быстро и полностью их заморазить, а также чтобы иметь
возможность размораживать только нужное количество продуктов;
• заверните продукты в алюминиевую фольгу или в полиэтиленовую
пленку и проверьте, чтобы к ним не было доступа воздуха;
• не допускайте, чтобы свежие незамороженные продукты касались уже
замороженных продуктов во избежание повышения температуры по‐
следних;
• постные продукты сохраняются лучше и дольше, чем жирные; соль со‐
кращает срок хранения продуктов;
• пищевой лед может вызвать ожог кожи, если брать его в рот прямо из
морозильной камеры;
• рекомендуется указывать дату замораживания на каждой упаковке; это
позволит контролировать срок хранения.
Рекомендации по хранению замороженных продуктов
Для получения оптимальных результатов следует:
• убедиться, что продукты индустриальной заморозки хранились у про‐
давца в должных условиях;
Page 43

Уход и чистка
• обеспечить минимальное время доставки замороженных продуктов из
магазина в свою морозильную камеру;
• не открывать дверцу слишком часто и не держать ее открытой дольше,
чем необходимо.
• После размораживания продукты быстро портятся и не подлежат по‐
вторному замораживанию.
• Не превышайте время хранения, указанное изготовителем продуктов.
Уход и чистка
ПРЕДУПРЕЖДЕНИЕ!
Перед выполнением каких-либо операций по чистке или уходу за прибо‐
ром выньте вилку сетевого шнура из розетки.
В холодильном контуре данного прибора содержатся углеводороды; по‐
этому его обслуживание и заправка должны осуществляться только упо‐
лномоченными специалистами.
Периодическая чистка
Холодильник нуждается в регулярной чистке:
• внутренние поверхности холодильника и принадлежности мойте теп‐
лой водой с нейтральным мылом.
• тщательно проверьте уплотнение дверцы и протрите его, чтобы обес‐
печить его чистоту и отсутствие загрязнений.
• затем сполосните и тщательно вытрите.
Не тяните, не двигайте и следите за тем, чтобы не повредить трубки и/
или кабели, находящиеся внутри корпуса.
Ни в коем случае не пользуйтесь для чистки внутренних поверхностей
моющими средствами, абразивными порошками, чистящими средствами
с сильным запахом или полировальными пастами, так как они могут по‐
вредить поверхность и оставить стойкий запах.
43
Прочистите конденсор (черная решетка) и компрессор, расположенные с
задней стороны холодильника, щеткой или пылесосом. Выполнение этой
операции приведет к более эффективной работе Вашего холодильника
и экономии электроэнергии.
Будьте осторожны, чтобы не повредить холодильный контур.
При передвижении холодильника поднимите его передний край, чтобы не
поцарапать пол.
Некоторые бытовые чистящие средства содержат химикаты, могущие
повредить пластмассовые детали холодильника. По этой причине для
ухода за внешними поверхностями холодильника пользуйтесь смоченной
теплой водой с добавлением небольшого количества мягкого моющего
средства.
Page 44

44
Уход и чистка
Не используйте чистящие средства или абразивную пасту, т.к. они могут
повредить окраску или особое покрытие нержавеющей стали, на котором
не остается отпечатков пальцев.
После чистки подключите прибор к сети электропитания.
Замена фильтра Clean Air Control
Чтобы получить наилучшую производительность, меняйте фильтр Clean
Air Control раз в год.
Новые фильтры можно приобрести в магазине.
Подробнее см. раздел «Установка фильтра Clean Air Control».
Чистка вентиляционной решетки
Чтобы помыть вентиляционную решетку, ее можно снять.
Обязательно сначала откройте дверцу, а затем проделайте следующее:
1. Освободите верхний край решет‐
ки, потянув ее наружу и вниз.
2. Полностью извлеките решетку,
потянув ее на себя.
3. Пропылесосьте под холодильни‐
ком.
Размораживание холодильника
При нормальных условиях наледь с ис‐
парителя холодильной камеры автома‐
тически удаляется при каждом выклю‐
чении компрессора. Талая вода стекает
через сливное отверстие в специальный
поддон, установленный с задней сторо‐
ны прибора над компрессором, а затем
испаряется.
Чтобы вода не попадала на продукты,
необходимо периодически прочищать
сливное отверстие. Оно находится
Natura fresh за ящиками в холодильной
камере.
Размораживание морозильной камеры
Морозильная камера данной модели относится к типу "no frost" (без инея).
Это означает, что в ней не образуются иней и лед ни на продуктах, ни на
стенках самой камеры.
Отсутствие инея обеспечивается благодаря постоянной циркуляции хо‐
лодного воздуха внутри камеры от автоматически включающегося вен‐
тилятора.
Page 45

Что делать, если ...
Перерывы в эксплуатации
Если прибор не будет использоваться в течение длительного времени,
примите следующие меры предосторожности:
1. отключите прибор от сети электропитания;
2. выньте все продукты;
3. вымойте прибор и все принадлежности;
4. чтобы предотвратить появление неприятного запаха, оставьте двер‐
цу/дверцы приоткрытыми.
Если прибор будет продолжать работать, попросите кого-нибудь провер‐
ять его время от времени, чтобы не допустить порчи находящихся в нем
продуктов в случае отключения электроэнергии.
Что делать, если ...
В ходе эксплуатации прибора могут случаться небольшие, но неприятные
неполадки, для устранения которых не требуется вызывать специалиста.
В следующей таблице приведена информация о таких неполадках. Она
поможет избежать излишних расходов на обслуживание.
Работа прибора сопровождается некоторыми звуками (от компрессора и
циркуляции хладагента). Это не неисправность, а нормальная работа.
Прибор работает прерывисто, так что остановка компрессора не озна‐
чает отсутствия тока. Поэтому запрещено касаться электрических частей
прибора до отключения его от сети.
45
Неполадка Возможная причина Способ устранения
Прибор издает силь‐
ный шум.
Ослабли амортизирую‐
Раздается предупре‐
ждающий звуковой
сигнал. Мигает значок
аварийного сигнала.
Прибор не установлен
должным образом.
щие прокладки, располо‐
женные между задней па‐
нелью корпуса и трубка‐
ми.
Температура в морозиль‐
ной камере слишком вы‐
сока.
Проверьте, устойчиво ли
стоит прибор (все ножки и
колесики должны стоять на
полу). См. раздел «Вырав‐
нивание».
Верните их на место.
См. раздел «Сигнализация
превышения температу‐
ры».
Page 46

46
Что делать, если ...
Неполадка Возможная причина Способ устранения
сверху или снизу на
дисплее температуры
отображается ква‐
драт.
Постоянно работает
компрессор.
Неплотно закрыта двер‐
Дверцу открывали слиш‐
Температура продуктов
Температура воздуха в
Вода стекает внутрь
холодильника.
Продукты мешают воде
Вода стекает на пол. Сброс талой воды направ‐
Слишком много льда
и инея.
Прокладка дверцы де‐
Температура внутри
прибора слишком низ‐
кая.
Температура внутри
прибора слишком вы‐
сокая.
Неплотно закрыта двер‐
Произошла ошибка в из‐
мерении температуры.
Возможно, неверно зада‐
на температура.
ца.
ком часто.
слишком высока.
помещении слишком вы‐
сокая.
Засорилось сливное от‐
верстие.
стекать в водосборник.
лен не в поддон испарите‐
ля над компрессором.
Неплотно закрыта двер‐
ца.
формирована или загряз‐
нена.
Возможно, неверно зада‐
на температура.
Возможно, неверно зада‐
на температура.
ца.
Позвоните в сервисный
центр (система охлажде‐
ния будет и далее поддер‐
живать низкую температу‐
ру продуктов, однако регу‐
лировка температуры бу‐
дет невозможна).
Задайте более высокую
температуру.
См. раздел «Закрытие
дверцы».
Не оставляйте дверцу от‐
крыто й д ол ьше, чем это не ‐
обходимо.
Прежде чем положить про‐
дукты на хранение, дайте
им охладиться до комнат‐
ной температуры.
Обеспечьте снижение тем‐
пературы воздуха в поме‐
щении.
Прочистите сливное отвер‐
стие.
Убедитесь, что продукты
не касаются задней стенки.
Направьте сброс талой во‐
ды в поддон испарителя.
См. раздел «Закрытие
дверцы».
См. раздел «Закрытие
дверцы».
Задайте более высокую
температуру.
См. раздел «Рекоменда‐
ции по выбору температу‐
ры в холодильнике».
Задайте меньшее значе‐
ние температуры.
См. раздел «Закрытие
дверцы».
Page 47

Что делать, если ...
Неполадка Возможная причина Способ устранения
Температура продуктов
Температура внутри
холодильника слиш‐
ком высокая.
Одновременно положено
Температура в моро‐
зильной камере слиш‐
ком высока.
Одновременно положено
Прибор не работает. Прибор выключен. Включите прибор.
Вилка сетевого кабеля не‐
На прибор не подается
Лампа не горит. Дверца была открыта
Лампа перегорела. См. раздел «Замена лам‐
Дверце мешает вен‐
тиляционная решет‐
ка.
Дверца установлена
неровно.
слишком высокая.
Внутри прибора нет цир‐
куляции холодного возду‐
ха.
слишком большое количе‐
ство продуктов для охла‐
ждения.
Продукты расположены
слишком близко друг к
другу.
слишком большое количе‐
ство продуктов для замо‐
раживания.
правильно вставлена в
розетку.
электропитание. Отсут‐
ствует напряжение в сете‐
вой розетке.
слишком долго.
Прибор не выровнен. См. раздел «Выравнива‐
Прибор не выровнен. См. раздел «Выравнива‐
Прежде чем положить про‐
дукты на хранение, дайте
им охладиться до комнат‐
ной температуры.
Позаботьтесь о том, чтобы
между продуктами было
пространство для циркуля‐
ции холодного воздуха.
Одновременно заклады‐
вайте меньшее количество
продуктов для охлажде‐
ния.
Укладывайте продукты та‐
ким образом, чтобы обес‐
печить циркуляцию холод‐
ного воздуха.
Одновременно заклады‐
вайте меньшее количество
продуктов для заморажи‐
вания.
Правильно вставьте вилку
сетевого кабеля в розетку.
Подключите к этой сетевой
розетке другой электро‐
прибор. Проверьте предох‐
ранитель. Обратитесь к
квалифицированному
электрику.
Закройте дверцу.
пы».
ние»
ние»
47
Если приведенные рекомендации не позволяют устранить неисправ‐
ность, обратитесь в местный авторизованный сервисный центр.
Замена лампы
1. Выньте вилку сетевого шнура из розетки.
Page 48

48
Технические данные
2. Вывинтите винт из плафона.
3. Снимите плафон.
4. Установите новую лампу той же
мощности (максимальная мощ‐
ность указана на плафоне) с цо‐
колем E14.
5. Установите плафон.
6. Затяните винт на плафоне.
7. Вставьте вилку сетевого кабеля в
розетку.
Закрытие дверцы
1. Прочистите уплотнители дверцы.
2. При необходимости отрегулируйте дверцу. См. раздел "Установка".
3. При необходимости замените непригодные уплотнители дверцы. Об‐
ратитесь в сервисный центр.
Технические данные
S86340KG1 S86348KG1
Габариты
Высота 2000 мм 2000 мм
Ширина 595 мм 595 мм
Глубина 623 мм 623 мм
Время повыше‐
ния температуры
Технические данные указаны на паспортной табличке на левой стенке
внутри прибора и на табличке энергопотребления.
10 час 10 час
Установка
ВНИМАНИЕ!
Перед установкой прибора внимательно прочитайте "Информацию по
технике безопасности" для обеспечения собственной безопасности и
правильной эксплуатации прибора.
Размещение
Устанавливайте холодильник в месте, где температура окружающей сре‐
ды соответствует климатическому классу, указанному на табличке с тех‐
ническими данными:
Page 49

Установка
49
Климатический
класс
SN от +10°C до +32°C
N от +16°C до +32°C
ST от +16°C до +38°C
T от +16°C до +43°C
Температура окружающей среды
Расположение
Если прибор расположен под подвесной мебелью, для обеспечения оп‐
тимальной работы минимальное расстояние между верхом прибора и
мебелью должно быть не менее 40 мм. В идеальном случае лучше не
устанавливать прибор под подвесной мебелью.
При установке прибора в углу петлями к стене расстояние между боковой
стеной и прибором должно быть не менее 360 мм, чтобы дверца откры‐
валась достаточно широко для извлечения оборудования.
Вентиляционный зазор может находить‐
ся:
• непосредственно над прибором;
• за верхним шкафчиком и над ним.
В этом случае расстояние до верхнего
шкафчика должно быть не менее 50
мм.
50mm
Подключение к электросети
Перед включением прибора в сеть удостоверьтесь, что напряжение и ча‐
стота, указанные в табличке технических данных, соответствуют пара‐
метрам вашей домашней электрической сети.
Прибор должен быть заземлен. С этой целью вилка сетевого шнура
имеет специальный контакт заземления. Если розетка электрической се‐
ти не заземлена, выполните отдельное заземление прибора в соответ‐
ствии с действующими нормами, поручив эту операцию квалифициро‐
ванному электрику.
Изготовитель снимает с себя всякую ответственность в случае несоблю‐
дения вышеуказанных правил техники безопасности.
Данное изделие соответствует директивам Европейского Союза.
Удаление транспортировочных креплений
Прибор снабжен транспортировочными креплениями для фиксирования
дверцы при транспортировке.
Page 50

50
Установка
Чтобы снять их, проделайте следующее:
1. Откройте дверцу.
2. Удалите транспортировочные
упоры с боковых сторон дверцы.
3. Удалите транспортировочное
крепление с нижней петли (не во
всех моделях).
У некоторых моделей под холодиль‐
ником имеется шумопоглощающая
прокладка. Не удаляйте эту проклад‐
ку.
Снятие держателей полок
Ваш холодильник оснащен держателя‐
ми полок, позволяющими фиксировать
полки при транспортировке.
Чтобы снять их, действуйте следующим
образом:
1. Передвиньте держатели полок по на‐
правлению стрелки (A).
2. Поднимите полку сзади и потяните
ее вперед, пока она не снимется (B).
3. Снимите держатели (C).
3
2
A
B
C
Задние прокладки
Установите прокладки из пакета с принадлежностями как показано на ри‐
сунке.
Установите прокладки на задней пане‐
ли.
Монтаж дверных ручек
Ручки включены в комплект поставки.
Page 51

Установка
51
1. Привинтите верхний кронштейн
ручки к ее стержню.
2. Прикрепите нижний кронштейн
ручки к нижней правой части две‐
ри.
3. Прикрепите верхний кронштейн
ручки к верхней правой части две‐
ри.
4. Привинтите стержень ручки к ее
нижнему кронштейну.
Не прилагайте чрезмерное усилие
(момент затяжки не более 2 Нм), по‐
скольку вы можете повредить ручки
двери.
12
34
Выравнивание
При установке прибора убедитесь, что
он стоит ровно. При необходимости от‐
регулируйте ножки при помощи прила‐
гаемого ключа.
Прилегание дверцы зависит от правиль‐
ности выравнивания.
Установка фильтра Clean Air Control
Фильтр Clean Air Control — это фильтр с активированным углем, погло‐
щающий неприятные запахи и обеспечивающий сохранение наилучшего
вкуса и аромата всех пищевых продуктов без смешения запахов.
При поставке угольный фильтр находится в пластиковом пакете для со‐
хранения его работоспособности.
1. Откройте заслонку регулятора
подачи воздуха.
2. Достаньте фильтр из пластиково‐
го пакета.
Page 52

52
Забота об окружающей среде
3. Вставьте фильтр в паз, располо‐
женный с задней стороны заслон‐
ки регулятора подачи воздуха.
4. Закройте заслонку регулятора
подачи воздуха.
Чтобы не повредить поверхность
фильтра, обращаться с ним следует
аккуратно.
Чтобы обеспечить правильную ра‐
боту, убедитесь, что заслонка регу‐
лятора подачи воздуха закрыта.
Перевешивание дверцы
Перевесить дверцу на другую сторону нельзя.
Забота об окружающей среде
Символ на изделии или на его упаковке указывает, что оно не
подлежит утилизации в качестве бытовых отходов. Вместо этого его
следует сдать в соответствующий пункт приемки электронного и
электрооборудования для последующей утилизации. Соблюдая правила
утилизации изделия, Вы поможете предотвратить причинение
окружающей среде и здоровью людей потенциального ущерба, который
возможен в противном случае, вследствие неподобающего обращения с
подобными отходами. За более подробной информацией об утилизации
этого изделия просьба обращаться к местным властям, в службу по
вывозу и утилизации отходов или в магазин, в котором Вы приобрели
изделие.
Page 53

Мазмұны
Біздің жоғарғы сапалы өнімдеріміздің бірін таңдағаныңызға
алғысымызды білдіреміз.
Бұл құрылғы тиімді әрі тұрақты жұмыс жасау үшін осы нұсқаулықты
мұқият оқып шығыңыз. Бұл құрылғының барлық үрдістерін жете
меңгеріп, оны неғұрлым тиімді пайдалануға мүмкіндік береді. Қажет
жағдайда керек нұсқауларды оқып отыру үшін бұл нұсқаулықты
сенімді жерге сақтап қойыңыз. Құрылғыны келесі пайдаланушыға
берер кезде нұсқаулықты да қоса беруді ұмытпаңыз.
Жаңа құрылғыны пайдаланып жайлы көңіл-күйге жете беріңіз.
Мазмұны
53
Қауіпсіздік туралы мағлұматтар 54
Балалар мен әлсіз адамдардың
қауіпсіздігі 54
Жалпы қауіпсіздік туралы
мағлұматтар 55
Күнделікті пайдалану 56
Күту менен тазалау 56
Орнату 56
Қызмет 57
Басқару панелі 57
Бейнебет 58
Қосу 58
Өшіру 58
Тоңазытқышты немесе
мұздатқышты сөндіру 59
Тоңазытқышты немесе
мұздатқышты қосу 59
Температураны реттеу 59
Бала қауіпсіздігі функциясы 59
“Демалыс” функциясы 60
COOLMATIC функциясы 60
Quick Chill функциясы 61
FROSTMATIC функциясы 61
Жоғары температураны ескерту
сигналы 62
Бірінші қолдану 62
Ішін тазалау 62
Әркүндік қолдану 63
Тоңазытқыш камерасын қолдану
63
Мұздатқыш камерасын қолдану
63
Мұздатылған тағамды сақтау
63
Жібіту 64
Clean Air Control Сүзгі 64
Жылжымалы сөрелер 64
Көкөніс сөресі 65
Табиғи қалыпта сақтайтын бөлік
65
Ауаның ылғалдылығын реттеу
65
Есіктің сөрелерін орналастыру
66
Мұздатқыш себеттерді
мұздатқыштан алу 66
Пайдалы нұсқаулар менен кеңестер
66
Қуатты үнемдеуге қатысты ақыл-
кеңес 66
Жаңа тағамды тоңазытуға қатысты
ақыл-кеңес 66
Тоңазытуға қатысты ақыл-кеңес
67
Тоңазытқыштың ішкі
температурасына қатысты ақылкеңес 67
Тоңазыту туралы кеңес 68
Тоңазытылған тағамдарды сақтауға
қатысты ақыл-кеңес 68
Күту менен тазалау 69
Мерзімді тазалау 69
Сүзгіні Clean Air Control ауыстыру
70
Желдеткіш торкөзді тазалау 70
Тоңазытқыш мұзын жібіту 70
Тоңазытқыш қырауын еріту 70
Құрылғыны қолданбаған кезде
71
Page 54

54
Қауіпсіздік туралы мағлұматтар
Не істерсіңіз, егер... 71
Шамды ауыстыру 74
Есікті жабыңыз 74
Техникалық сиппатама 74
Орнату 75
Орналастыру 75
Орналастыру 75
Электр желісіне жалғау 76
Тасымал құралдарын алу 76
Сөре тіреуіштерді алу 77
Бекіткіш тетіктер 77
Есік тұтқаларын орнату 77
Деңгейін реттеу 78
Сүзгіні Clean Air Control орнату
Есіктің ашылатын жағын өзгерту
Қоршаған орта мәселелері 79
Өндіруші ескертусіз өзгеріс енгізу құқығына ие.
Қауіпсіздік туралы мағлұматтар
Құрылғыны орнатып, ең алғаш пайдаланбас бұрын, өз қауіпсіздігіңіз бен
құрылғыны дұрыс қолдану мақсатында, пайдаланушыға арналған бұл
нұсқаулықты, оның ішінде кеңестері мен ескертулеріне назар салып оқып
шығыңыз. Осы құрылғыны пайдаланатын адамдардың барлығы, қажетсіз
ақаулықтар мен тұрмыстық апаттардың алдын алу үшін,оны пайдалану
тәсілдерімен және қауіпсіздікті қамтамасыз ететін функцияларымен жете
таныс болуы керек. Осы қолдану туралы нұсқаулықты сақтап қойыңыз
және тоңазытқышты басқа адамдарға бергеніңізде немесе
сатқаныңызда, оны пайдаланатын әрбір адамның бұйымның қолданыс
мерзімі аяқталғанға дейін оған қатысты пайдалану және қауіпсіздік
шараларынан хабардар болуы үшін нұсқаулықты да қоса беруді
ұмытпаңыз.
Адам өмірі мен құрылғының қауіпсіздігін қамтамасыз ету үшін осы
пайдаланушы нұсқаулығындағы ескертулерді орындаңыз, себебі
қадағалаудың жеткіліксіздігінен туған ақаулық үшін өндіруші
жауапкершілік көтермейді.
78
79
Балалар мен әлсіз адамдардың қауіпсіздігі
• Бұл құрылғыны физиологиялық, сезімдік не болмаса ақыл-ой деңгейіне
байланысты не пеш жұмысына қатысты тәжрибиесі мен білімінің
аздығына байланысты пайдалана алмайтын адамдар (балаларды қоса
алғанда), пешті пайдалану туралы ерекше нұсқауларды алмайынша не
олардың қауіпсіздігіне ие адамның қадағалауынсыз пайдаланбауға
тиіс.
Балалар құрылғымен ойнамас үшін оларды қадағалап отыру қажет.
• Машинаның орауыштары мен қорабын балалардың қолы жетпейтін
жерде сақтаңыз. Тұншығып кету қаупі бар.
• Егер құрылғыны тастасаңыз, оның ашасын розеткадан суырыңыз да,
қорек сымын қиып(құрылғыға барынша тақата)балалар ішіне кіріп
қамалып не электр тогының қатерлі әсеріне ұшырамас үшін есігін
ағытып алып тастаңыз.
• Егер есігі магнитті тығыздағышпен жабдықталған бұл құрылғыны,
есігінде не қақпағында серіппелі құлыбы бар ескі құрылғының орнына
Page 55

Қауіпсіздік туралы мағлұматтар
қоймақ болсаңыз, ескі құрылғыны ең алдымен оның серіппелі құлыбын
жарамсыз етіп барып тастаңыз. Бұл құрылғыны бала ішіне қамалып
қалатын қауіп көзіне айналудан сақтайды.
Жалпы қауіпсіздік туралы мағлұматтар
Сақтандыру туралы ескерту!
Желдеткіш саңылауларды еш бөгетсіз ашық ұстаңыз.
• Құрылғы тағам мен/не сусындарды осы нұсқаулық кітапшасында
көрсетілгендегідей қалыпты жағдайда сақтауға арналған.
• Жібіту үрдісін жылдамдату үшін еш механикалық құралды не жасанды
затты пайдаланбаңыз.
• Тоңазытқыш құрылғы ішінде (крем мейкер тәрізді) электр
құрылғыларын, өндірушісі олардың осы мақсатта пайдалануға
жарамдылығын арнайы көрсетпеген жағдайда пайдаланбаңыз.
• Салқындатқыш сұйық жүйесіне еш нұқсан келтірмеңіз.
• Құрылғының салқындатқыш жүйесіне салқындатқыш изобутан (R600a)
құйылған, бұл қоршаған ортаға аса сай келетін табиғи, бірақ тұтанғыш
газ.
Құрылғыны тасымалдау мен орнату кезінде оның салқындатқыш
жүйесінің еш элементіне нұқсан келмегеніне көз жеткізіп алыңыз.
Салқындатқыш жүйеге нұқсан келген жағдайда:
– ашық от пен тұтанғыш заттарды аулақ ұстаңыз
– құрылғы орнатылған бөлмені мұқият желдетіңіз
• Құрылғыға өз геріс ен г і зу не оны қанда й да бір жолме н өзгерт уге тырысу
қауіпті болып табылады. Электр сымының зақымдалуы қысқа
тұйықталу мен өрт және/не электрдің қатерлі әсеріне ұшырауға әкеліп
соқтырады.
Назарыңызда болсын!
Электрлік компоненттердің кез келгенін (қорек сымы, аша, компрессор)
тек уәкілетті қызмет көрсету маманы не білікті қызмет көрсету маманы
ауыстыруға тиіс.
55
1. Қорек сымын ұзартуға болмайды.
2. Электр ашасының құрылғы артында жаншылып не бүлініп
қалмағанын тексеріңіз. Жаншылып не бүлініп қалған аша қатты
қызып кетіп, өрт қатерін тудыруы мүмкін.
3. Құрылғы ашасына жете алатындығыңызға көз жеткізіңіз.
4. Қорек сымын тартпаңыз.
5. Егер аша сұғылатын розетка босап тұрса, оған ашаны қоспаңыз.
Электр қатеріне ұшырау не өрт шығу қаупі бар.
6. Құрылғы шамының қалпағы кигізіліп тұрмаса, құрылғыны қолдануға
7)
тиіс емессіз
бар ма.
• Құрылғы салмағы ауыр. Оны жылжытқан кезде абай болыңыз.
7) Ішкі жарықтама шамының қалпағы
Page 56

56
Қауіпсіздік туралы мағлұматтар
• Тоңазытқыш камера ішіндегі заттарды ылғал/су қолмен алмаңыз да,
қолыңызды да тигізбеңіз, себебі бұл терінің сыдырылып не аяз/суықтан
қолдың үсіп кетуіне әкеліп соқтырады.
• Құрылғыны тура түсіп тұрған күн сәулесінің астында ұзақ уақыт
қалдырмаңыз.
Күнделікті пайдалану
• Ыстық ыдысты құрылғы ішіндегі пластик жерлерге қоймаңыз.
• Құрылғы ішіне тұтанғыш газ бен сұйықты қоймаңыз, себебі олар
жарылып кетуі мүмкін.
• Тағамды пештің артқы қабырғасындағы ауа шығатын саңылауға тура
қарама-қарсы жерге қоймаңыз.
• Мұздатылған т а ғ амды жібітіп а л ған соң оны қ айта мұ з д а туға болмайды.
• Алдын ала оралған тағамды мұздатылған тағам өндірушінің
нұқсауларына сай сақтаңыз.
• Құрылғы өндірушінің тағам сақтауға қатысты ұсыныстарын қатаң
орындау керек. Тиісті нұсқауларға қараңыз.
• Көмірқышқылдандырылған не көпіршитін сусындарды тоңазытқыш
камераға қоймаңыз, себебі ыдысқа түскен қысым оның жарып,
нәтижесінде құрылғыға нұқсан келуі мүмкін.
• Мұздақтарды тоңазытқыштан алған бетте пайдаланғанда аяз қарып
жіберуі мүмкін.
8)
Күту менен тазалау
• Құрылғыны тазалар алдында электр желісінен ағытып, ашасын
розеткадан суырыңыз.
• Құрылғыны металл заттармен тазаламаңыз.
• Құрылғы қырауын тазалау үшін өткір заттарды пайдаланбаңыз.
Пластик қырғышты пайдаланыңыз.
• Тоңазытқыштағы еріген су ағатын саңылауды жиі тексеріп отырыңыз.
Қажет болса, саңылауды тазалаңыз. Су ағатын саңылау бітелсе, еріген
су құрылғының астына жиналады.
• Құрылғы мұзын жылдам еріту үшін, ешқашан шаш кептіргішті немесе
басқа қыздырғыш құрылғыларды қолданбаңыз. Артық қызу құрылғының
ішкі пластик бөлшектерін бүлдіруі мүмкін және электр жүйесіне ылғал
кіріп, оның бойына ток жүгіруіне себеп болуы мүмкін.
Орнату
Электр желісіне қосарда, арнайы бөлімдерде берілген нұсқауларды
мұқият орындаңыз.
• Құрылғы орамын ашып, оның еш жерінің бүлінбегенін тексеріп алыңыз.
Құрылғының бір жері бүлініп қалса қоспаңыз. Қандай да бір бүлінушілік
орын алғанда, құрылғыны сатып алған жерге дереу хабарлаңыз.
Бұндай жағдайда қорабын сақтап қойыңыз.
• Құрылғыны қоспас бұрын оның майы компрессорға ағып құйылу үшін
кем дегенде екі сағат күтіңіз.
8) Құрылғы ішіне қырау жиналмайды
Page 57

Басқару панелі
• Құрылғы айналасында ауа жеткілікті түрде айналуға тиіс, ауа айналымы
жеткіліксіз болса құрылғы қызып кетеді. Желдету жеткілікті болу үшін
орнатуға қатысты нұсқауларды орындаңыз.
• Мүмкін болса, құрылғының жылы тұратын бөлшектерін (компрессор,
конденсатор) ұстап қалып не оларға қол тигізіп алып күйіп қалмас үшін
тоңазытқыштың арт жағын әрқашан қабырғаға қаратып қойыңыз.
• Құрылғыны радиатор не пештердің қасына жақын орналастыруға
болмайды.
• Құрылғыны орнатқан соң оның ашасының қол оңай жететін жерде
болуын қамтамасыз етіңіз.
•
Тек ауыз суы жүйесіне ғана қосыңыз.
9)
Қызмет
• Құрылғыны жөндеу үшін қажет электр жұмыстарын электр маманы не
білікті адам жүзеге асыруға тиіс.
• Бұл өнімге қызмет көрсетуді тек уәкілетті қызмет көрсету орындары
жүзеге асыру керек және құрылғының нағыз өз бөлшектері ғана
пайдаланылуға тиіс.
Қоршаған ортаны қорғау
Бұл құрылғының салқындатқыш сұйығының құрамында да, изоляция
материалдарында да озон қабатына зиян келтіретін газдар жоқ. Бұл
құрылғыны тұрмыстық қалдық пен қоқыстар тасталатын жерге тастауға
болмайды. Оның изоляция қабаттамасында тұтанғыш газдар бар:
құрылғыны жергілікті құзырлы мекемелерден алынатын жарамды
ережелерге сай тастау қажет. Салқындатқыш құралға, әсіресе оның қызу
алмастырғышқа жақын артқы бөлігіне зиян келтірмеңіз. Құрылғыда
пайдаланылған
өңдеуден өткізуге жарайды.
белгішесімен белгіленген материалдар қайта
57
Басқару панелі
1 Тоңазытқыш температурасының "суығырақ" түймешігі
2 Тоңазытқыш температурасының "жылырақ" түймешігі
3 ON/OFF түймешігі
9) Су жүйесіне қосу қарастырылған ба
1
7
6
5
2
3
4
Page 58

58
Басқару панелі
OK түймешігі
4 Мұздатқыш температурасының "жылырақ" түймешігі
5 Бейнебет
6 Мұздатқыш температурасының "суығырақ" түймешігі
7 Mode түймешігі
Бейнебет
1 Тоңазытқыш температурасының индикаторы
2 “Демалыс” функциясы
3 Тоңазытқыш сөндірулі
4 Мұздатқыш сөндірулі
5 Мұздатқыш температурасының индикаторы
6 Ескерту индикаторы
7 FROSTMATIC функциясы
8 COOLMATIC функциясы
9 Бала қауіпсіздігі функциясы
1
9
8
7
6
5
2
3
4
Қосу
Құрылғыны қосу үшін, мына әрекеттерді орындаңыз:
1. Ашаны розеткаға сұғыңыз.
2. Бейнебет сөніп тұрса, ON/OFF түймешігін басыңыз.
3. Бірнеше секундтан кейін ескерту құралы сигнал береді.
Ескерту құралын бастапқы қалпына қайтару үшін, "Жоғары
температураны ескерту" тарауын қараңыз.
4. Температура индикаторы бастапқы орнатылған температураны
көрсетеді.
Орнатылған температураның басқа түрін таңдау үшін, "Температураны
реттеу" тарауын қараңыз.
Өшіру
Құрылғыны сөндіру үшін, мына әрекеттерді орындаңыз:
1. Мына ON/OFF түймешікті 5 секунд басыңыз.
Page 59

Басқару панелі
2. Бейнебет сөнеді.
3. Құрылғыны электр желісінен ағыту үшін, ашаны розеткадан суырыңыз.
Тоңазытқышты немесе мұздатқышты сөндіру
Тоңазытқышты немесе мұздатқышты сөндіру үшін:
1. Тиісті белгіше көрсетілгенше, Mode түймешігін басыңыз.
Тоңазытқыштың немесе мұздатқыштың Off индикаторы
жыпылықтайды.
Тоңазытқыштың немесе мұздатқыштың температура индикаторынан
сызықша көрсетіледі.
2. Құптау үшін, OK түймешігін басыңыз.
3. Тоңазытқыштың немесе мұздатқыштың Off индикаторы көрсетіледі.
Тоңазытқышты немесе мұздатқышты қосу
Тоңазытқышты немесе мұздатқышты қосу үшін:
1. Тоңазытқыштың немесе мұздатқыштың температура тетігін басыңыз.
Немесе:
1. Тиісті белгіше пайда болғанша, Mode түймешігін басыңыз.
Тоңазытқыштың немесе мұздатқыштың Off индикаторы
жыпылықтайды.
2. Құптау үшін, OK түймешігін басыңыз.
3. Тоңазытқыштың немесе мұздатқыштың Off индикаторы сөнеді.
Температураны реттеу
Тоңазытқыштың және мұздатқыштың орнатылған температурасын
температура тетіктерін басып реттеуге болады.
Әдепкі температураны орнатыңыз:
• тоңазытқыш температурасы +5°C
• мұздатқыш температурасы -18°C
Температура индикаторлары орнатылған температураны көрсетеді.
Орнатылған температураға 24 сағат ішінде қол жеткізіледі.
Электр қуаты үзіліп қалса, орнатылған температура сақтаулы қалады.
59
Бала қауіпсіздігі функциясы
Түймешіктер байқаусызда іске қосылып кетпес үшін, бала қауіпсіздігі
функциясын таңдаңыз.
Функцияны іске қосу үшін:
1. Тиісті белгіше пайда болғанша, Mode түймешігін басыңыз.
2. Бала қауіпсіздігі функциясының индикаторы жыпылықтайды.
3. Құптау үшін, OK түймешігін басыңыз.
Бала қауіпсіздігі функциясының индикаторы көрсетіледі.
Функцияны ажырату үшін:
1. Бала қауіпсіздігі функциясының индикаторы жыпылықтағанша, Mode
түймешігін басыңыз.
2. Құптау үшін, OK түймешігін басыңыз.
Page 60

60
Басқару панелі
3. Бала қауіпсіздігі функциясының индикаторы сөнеді.
“Демалыс” функциясы
Бұл функция ұзаққа созылатын демалыс кездері, тоңазытқышта
жағымсыз иіс туғызбай, босатып, жауып қоюға мүмкіндік береді.
“Демалыс” функциясы қосылып тұрған кезде, тоңазытқыш камерасының
іші бос болуға тиіс.
Функцияны іске қосу үшін:
1. Тиісті белгіше пайда болғанша, Mode түймешігін басыңыз.
“Демалыс” функциясының индикаторы жыпылықтайды.
Тоңазытқыш температурасының индикаторы орнатылған
температураны көрсетеді.
2. Құптау үшін, OK түймешігін басыңыз.
“Демалыс” функциясының индикаторы көрсетіледі.
Функцияны ажырату үшін:
1. “Демалыс” функциясының индикаторы жыпылықтағанша, Mode
түймешігін басыңыз.
2. Құптау үшін, OK түймешігін басыңыз.
3. "Демалыс” функциясының индикаторы сөнеді.
Тоңазытқыштың басқа орнатылған температурасын таңдаған кезде,
функция өшеді.
COOLMATIC функциясы
Жылы тағамды көп мөлшерде мысалы, азық-түлік дүкенінен келген соң
бірден салғыңыз келсе, тағамдарды неғұрлым тез тоңазытып алу үшін,
әрі тоңазытқыштағы тағамдар жылып кетпес үшін, COOLMATIC
функциясын қосуды ұсынамыз.
Функцияны іске қосу үшін:
1. Тиісті белгіше пайда болғанша, Mode түймешігін басыңыз.
Индикатор COOLMATIC жыпылықтайды.
Тоңазытқыш температурасының индикаторы орнатылған
температураны көрсетеді.
2. Құптау үшін, OK түймешігін басыңыз.
Индикатор COOLMATIC көрсетіледі.
Шамамен 6 сағат өткеннен кейін COOLMATIC функциясы автоматты
түрде өшеді.
Функцияны автоматты түрде сөніп қалмай тұрып өшіру үшін:
1. Мына түймешікті Mode, COOLMATIC индикаторы жыпылықтағанша
басыңыз.
2. Құптау үшін, OK түймешігін басыңыз.
3. Индикатор COOLMATIC сөнеді.
Тоңазытқыштың басқа орнатылған температурасын таңдаған кезде
функция өшеді.
Page 61

Басқару панелі
Quick Chill функциясы
Бұл Quick Chill функция, қалбыр және
бөтелкедегі тағамды суық ауа ағысымен
дереу қыздыруға көмектеседі.
Қалбырды/шөлмекті Quick Chill бөтелке
қойғышқа қойыңыз да, ауа тетігін (1)
макс. қалпына қойыңыз.
Функцияны іске қосу үшін:
1. Тиісті белгіше пайда болғанша, Mode түймешігін басыңыз.
Индикатор COOLMATIC жыпылықтайды.
Тоңазытқыш температурасының индикаторы орнатылған
температураны көрсетеді.
2. Құптау үшін, OK түймешігін басыңыз.
Индикатор COOLMATIC көрсетіледі.
Салқындатып болғаннан кейін ауа тетігін (1) мин. қалпына қойыңыз.
Функцияны ажырату үшін:
1. Мына түймешікті Mode, COOLMATIC индикатор жыпылықтағанша
басыңыз.
2. Құптау үшін, OK түймешігін басыңыз.
3. Индикатор COOLMATIC сөнеді.
Шамамен 6 сағат өткеннен кейін Quick Chill функциясы автоматты түрде
өшеді.
Бөтелке қойғышты Quick Chill қолданбасаңыз, оны алып қоюға болады.
61
1
FROSTMATIC функциясы
Мұздатқыңыз келген жаңа тағамды астыңғы камерадан басқа
камералардың барлығына қоюға болады.
Функцияны іске қосу үшін:
1. Тиісті белгіше көрсетілгенше, Mode түймешігін басыңыз.
Индикатор FROSTMATIC жыпылықтайды.
Мұздатқыш температурасының индикаторы
2. Құптау үшін, OK түймешігін басыңыз.
Индикатор FROSTMATIC көрсетіледі.
Жандану басталады.
Бұл функция 52 сағаттан соң автоматты түрде тоқтайды.
Функцияны автоматты түрде сөніп қалмай тұрып өшіру үшін:
1. Мына түймешікті Mode, FROSTMATIC индикатор жыпылықтағанша
басыңыз.
белгішесін көрсетеді.
Page 62

62
Бірінші қолдану
2. Құптау үшін, OK түймешігін басыңыз.
3. Индикатор FROSTMATIC сөнеді.
Мұздатқыштың басқа орнатылған температурасын таңдаған кезде
функция өшеді.
Жоғары температураны ескерту сигналы
Мұздатқыш камераның ішіндегі температураның жоғарылағаны (мысалы,
электр қуаты өшкен кезде) төмендегідей көрсетіледі:
• ескерту сигналының және мұздатқыш температурасының
индикаторлары жыпылықтайды
• дыбысты сигнал естіледі.
Ескерту сигналын тоқтату үшін:
1. Кез келген түймешікті басыңыз.
2. Дыбысты сигнал өшеді.
3. Мұздатқыш температурасының индикаторы, ең жоғары
температураны бірнеше секунд көрсетіп тұрады. Содан кейін қайта
орнатылған температураны көрсетеді.
4. Ескерту индикаторы қалыпты жағдай орнағанша жыпылықтап тұрады.
Ескерту сигналы тоқтаған кезде ескерту индикаторы сөнеді.
Бірінші қолдану
Ішін тазалау
Құрылғыны ең алғаш пайдаланбас бұрын, жаңа бұйымға тән иісті арылту
үшін оның іші мен ішкі керек-жарақтарын сәл нейтрал сабын салынған
жылы сумен жуып, содан соң мұқият құрғатыңыз.
Жуғыш зат не жеміргіш ұнтақтарды пайдаланбаңыз, бұл құрылғының
сыртқы қабатына зиян келтіреді.
Корпустың артқы жағындағы су төгетін
түтік, суды су жинайтын науаға төгіп
жатқанын тексеріңіз.
Page 63

Әркүндік қолдану
Әркүндік қолдану
Тоңазытқыш камерасын қолдану
Бұл камераның температурасын +3°C және +8°C аралығында орнатуға
болады.
Қалыпты жұмыс жасап тұрған кезде, индикатор камераның ішкі
орнатылған температурасын көрсетіп тұрады.
Әдетте орташа суықтықты таңдаған дұрыс.
Дегенмен, параметрді дәл тауып орнату үшін құрылғының ішіндегі
температураның төмендегі жағдайларға тәуелді болатынын ескеру керек:
• бөлме температурасы
• есіктің қаншалықты жиі ашылғандығы
• сақталатын тағамның мөлшері
• құрылғы орнатылған жер.
Егер бөлме температурасы жоғары болса не тағам тоңазытқыш ішіне
толтыра салынса және құрылғы төменгі температурада тұрса, құрылғы
үздіксіз жұмыс жасап оның қабырғасына қырау тұруы мүмкін. Мұндай
жағдайда температура тетігін жылырақ температураға қойып, мұздың көп
қуат шығындамай, өздігінен еріп кетуіне мүмкіндік беру қажет.
Мұздатқыш камерасын қолдану
Белгіше мұздатқыштың жаңа тағамды мұздат уға және тағамды
ұзақ сақтауға жарайтындығын көрсетеді. Температураны -15°C және
-24°C аралығына қоюға болады. Температураны -18°C градусқа қоюды
ұсынамыз, бұл қуатты үнемдеу мен мұздатылған тағамды сақтау үшін
тиімді температура болып табылады.
Орнатылған температура мен ағымдық температура арасындағы
айырмашылық қалыпты болып есептеледі.
63
Әсіресе:
• жаңа параметр жақында таңдалса
• есік ұзақ уақыт ашық тұрса
• камераға жылы тағам қойылса.
Камераның ішкі температурасының айырмашылығы 5°C градусқа дейін
болса, қалыпты деп есептелінеді.
Жұмыс жасап тұрған кезде, температура индикаторы орнатылған мәнді
көрсетеді.
Мұздатылған тағамды сақтау
Құрылғыны жаңа іске қосарда не біраз уақыт пайдаланбай барып іске
қосқан кезде, тағамды камераға салмай тұрып, құрылғыны кем дегенде 2
сағатқа қосыңыз.
Мұздатқыштағы себеттер оралған тағамдарды дереу, әрі оңай тауып
алуға көмектеседі. Егер көп мөлшерде тағам сақтағыңыз келсе, ауа
Page 64

64
Әркүндік қолдану
айналымын жақсарту үшін, орнында тұруға тиіс астыңғы себеттен басқа
суырмалардың барлығын алыңыз. Тағамды ең үстіңгі сөреден басқа
сөрелердің барлығына, ортаңғы сөренің қабырғасында көрсетілген
салмаққа дейін жеткізіп қоюға болады
Мысалы, электр қуаты өшіп қалып құрылғы мұзы кездейсоқ жібіп кетсе
және электр қуаты, техникалық параметрлер кестесінің "температураның
жоғарлау уақыты" бөлімінде көрсетілген шамадан да ұзақ уақыт жоқ
болса, тағамды дереу тауысу не пісіріп барып қайта тоңазыту керек
(салқындатқан соң).
Жібіту
Мұздатылған не тоңазытылған тағамды қажетке жаратпас бұрын, осы
жұмысқа арналған уақыттың шамасына қарай отырып, оны тоңазытқыш
ішінде не бөлме температурасында жылытуға болады.
Тағамның кіші кесектерін тоңазытқыштан алған бетте мұздаған қалпы
пісіре беруге болады. бұндай жағдайда пісіру уақыты ұзағырақ болады.
Clean Air Control Сүзгі
Құрылғыңыз ауа тетігі қалқанының артқы жағында орналасқан көміртегі
сүзгісімен жабдықталған.
Сүзгі тоңазытқыш камерадағы ауаны жағымсыз иістен тазартып,
тағамның сапасын өз қалпында ұстайды.
Сүзгі пластик қалтаға салынып жеткізіледі. "Сүзгіні орнату Clean Air
Control нұсқаулығы" тарауындағы нұсқауларды қараңыз.
Сүзгі дұрыс жұмыс істеу үшін, ауа тетігінің қалқанын жауып қоюды
ұмытпаңыз.
Жылжымалы сөрелер
Тоңазытқыштың қабырғасында
сөрелерді қажетті қатарға
орналастыруға арналған бірнеше
бағыттағыш жолдар бар.
Кейбір сөрелерді алу үшін, шет жағынан
ұстап көтеру керек.
Ауаның дұрыс айналуын қамтамасыз
ету үшін, көкөніс салынатын суырманың
бетіндегі шыны сөрені алмаңыз.
Page 65

Әркүндік қолдану
Көкөніс сөресі
Бұл көкөніс пен жеміс сақтауға арналған суырма.
Құрылғының кейбір үлгілерінде, суырманың ішін бөлуге арналған,
қажеттілікке қарай әр түрлі орынға қоюға болатын бөлгіштер бар.
Суырманың ішіндегі бөлшектердің барлығын тазалау үшін алуға болады.
Табиғи қалыпта сақтайтын бөлік
Табиғи қалыпта сақтайтын бөліктің
ішіндегі температура 0°C градустан
тұрақты түрде сәл жоғары тұрады.
Пайдаланушы үшін бұл температураны
реттеудің қажеті жоқ.
Табиғи қалыпта сақтайтын бөліктің екі
суырмасы бар.
Астыңғы суырмадағы ауаның
ылғалдылығы жеміс-жидек, көкөніс
сақтауға лайықталған.
Үстіңгі суырма етті, балықты және құс
етін сақтауға арналған.
Табиғи қалыпта сақтайтын бөлікте
сақтауға жарамайтын тағам түрлеріне
мыналар жатады:
• Банан, папайя, маракуйя, авокадо
және цитрус жемістері тәрізді суыққа
төзімсіз жемістер.
• Пимиенто, сопақ кәдіш, баклажан,
картоп және қызанақ тәрізді суыққа
төзімді емес көкөністер. Мысалы
алмұрт тәрізді піспеген жемістер
немесе көкөністер.
Тағамдардың барлығын табиғи қалыпта
сақтайтын бөлікке қояр алдында ораңыз. Осылайша тағамның
ылғалдылығы мен түсін ұзақ уақыт сақтауға болады.
65
Жарамды орам материалдары:
• Ауа өткізбейтін полиэтилен қалта немесе орамдар
• Қақпағы бар пластикалық сауыттар
• Алюминий фольга
Ауаның ылғалдылығын реттеу
Екі суырмаға реттелмелі ауа саңылаулары салынған. Суырманың ішіндегі
ылғалдылықты реттеу үшін, сырғытпаларды жылжыту арқылы ауа
саңылауларын реттеуге болады.
• Ауа саңылаулары ашық тұрғанда, ауа айналымы күшейіп, суырма
ішіндегі ылғалдылық азаяды.
• Ауа саңылаулары жабық тұрғанда, ауаның табиғи ылғалдылығы ұзақ
уақытқа сақталады.
Page 66

66
Пайдалы нұсқаулар менен кеңестер
Есіктің сөрелерін орналастыру
Әртүрлі үлкендікте оралған тағамдарды орналастыру үшін, есіктегі
сөрелерді әртүрлі биіктікке қоюға болады.
Сөрелерді көрсеткі бағыты бойынша
орнынан шыққанша ақырын тартыңыз
да, содан соң қажетті орынға қойыңыз.
Ауа дұрыс айналып тұру үшін, есіктің
астыңғы сөресін жылжытпаңыз.
Мұздатқыш себеттерді мұздатқыштан алу
Мұздатқыш себеттер, кездейсоқ алынып
қалуға немесе құлап кетуге жол
бермейтін тіреуішпен жабдықталған.
Оны мұздатқыштан алу үшін, себетті
өзіңізге қарай тартыңыз да, шегіне
жеткен кезде себеттің алдыңғы жағын
жоғары көтеріп қалыңыз.
Қайта орнына қою үшін, себеттің
алдыңғы жағын ақырын ғана көтеріп
мұздатқышқа салыңыз. Шеткі жақтарын
келтіріп салғаннан кейін, себеттерді өз
орындарына қарай итеріңіз.
2
1
Пайдалы нұсқаулар менен кеңестер
Қуатты үнемдеуге қатысты ақыл-кеңес
• Есікті жиі-жиі ашпаңыз не қажетті уақыттан артық уақыт ашып
тұрмаңыз.
• Орта температурасы жоғары болса, температура регуляторы ең
жоғарғы параметрге қойылса және тоңазытқыш ішіне тамақ
толтырылса салынса, компрессор буландырғыш құралдың үстіне мұз
қатырып, үздіксіз жұмыс жасауы мүмкін. Бұндай жағдай орын алса,
температура регуляторын құрылғы электр қуатын үнемдей отырып
өздігінен жібу үшін төменгі көрсеткішке қойыңыз.
Жаңа тағамды тоңазытуға қатысты ақыл-кеңес
Ең жақсы нәтижеге жету үшін:
Page 67

Пайдалы нұсқаулар менен кеңестер
• жылы не буы бұрқырап тұрған сұйық заттарды тоңазытқышқа қоймаңыз
• тағамның бетін жабыңыз не оны орап салыңыз, әсіресе ол өткір иісті
болса
• тағамды ауа оның айналасында еркін айнала алатындай етіп
орналастырыңыз
Тоңазытуға қатысты ақыл-кеңес
Пайдалы кеңестер:
Ет (барлық түрлері) : полиэтилен қалтаға орап көкөніс суырмасының
үстіңгі жағындағы шыны сөреге қойыңыз.
Сақтық мақсатында тағамды осылайша тек бір, көп дегенде екі күн ғана
сақтау керек.
Пісірілген тағамдар, суық тағамдар т.б.: бұлардың бетін жауып кез келген
сөреге қоюға болады.
Жемістер мен көкөністер: бұларды мұқият тазалап арнайы сөреге (лер)
салу қажет.
Сарымай мен ірімшік: бұларды арнайы ауа өткізбейтін сауыттарға салып
не алюминий қағазға не полиэтилен қалтаға орап, мүмкіндігінше ауа
өткізбеуге тырысу қажет.
Сүт бөтелкелері: бұлардың тығындарын жауып, есіктегі бөтелке
қойылатын қатарға қою қажет.
Оралмаған банан, картоп, пияз бен сарымсақты тоңазытқышта ұстауға
болмайды.
Тоңазытқыштың ішкі температурасына қатысты ақыл-кеңес
Тоңазытқыштың тиімді ішкі температурасы шамамен +5° C градусқа тең.
Температура тетігі +5°C градусқа қойылса, тоңазытқыш ішінде орташа
температура орнағаны көрсетіледі. Тоңазытқыштың үстіңгі жағындағы
температураның жоғары болуы қалыпты жағдай. Астыңғы жағындағы
температураның төмен болуы да қалыпты жағдай.
Егер температура тетігі суық температураға қойылса, бөлме
температурасы жоғары болады немесе тоңазытқышқа тағам толтырып
салынса, компрессор ұзағырақ жұмыс жасайды. Тым суық болса,
температураны жоғары мәнге қойыңыз.
Тағамды температура сенсорына қарсы
немесе оған жақын қоймаңыз. Себебі
тым суық температура орнауы мүмкін.
67
Page 68

68
Пайдалы нұсқаулар менен кеңестер
Тоңазытқышта сақталған тағамның
температурасын тексергіңіз келсе, бір
стакан суды оның дәл ортасына
қойыңыз да, оған температураны +/– 1
°C дәлдікте көрсететін термометрді
салыңыз. 6 сағаттан кейін
температураны тексеруге болады.
Температураны тоңазытқыш ішіндегі
тағам мөлшерін азайтпай өлшеу керек.
Тоңазыту туралы кеңес
Төменде тоңазыту үрдісін барынша тиімді жүзеге асыру үшін бірнеше
маңызды кеңестер берілген:
• 24 сағат ішінде тоңазытуға болатын ең көп тағам мөлшері техникалық
ақпарат тақтайшасында берілген;
• мұздату үрдісі 24 сағатқа созылады. Осы уақыт аралығында
тоңазытылуға тиіс ешбір қосымша тағамды қосып салуға болмайды;
• тек аса жоғары сапалы, жаңа және мұқият тазаланған тағамдарды ғана
тоңазытыңыз;
• тағамды жылдам әрі толықтай мұздатып, қажетті кезде оның тек қажетті
мөлшерін ғана жібіту үшін кішкене бөлшектерге бөліп дайындаңыз;
• тағамды алюминий қағазға не полиэтилен қалтаға орап, орамының ауа
өткізбейтіндігіне көз жеткізіп алыңыз;
• жаңа, мұздамаған тағамды әлдеқашан мұздаған тағамға, оның
температурасы көтеріле бастамас үшін тигізбеңіз;
• майы аз тағамдар майлы тағамдарға қарағанда жақсы әрі ұзақ
сақталады; тұз тағамның сақталу уақытын азайтады;
• мұз текшелерін мұздатқыш камерадан алған бетте тура пайдаланса,
аяз теріні қарып кетуі мүмкін;
• Тағамдарды сақтау уақытының кестесін жасау үшін, тағамның әрбір
жеке орамасына оның тоңазытылған ай-күнін жазып қою ұсынылады;
Тоңазытылған тағамдарды сақтауға қатысты ақыл-кеңес
Құрылғыны аса тиімді пайдалану үшін:
• сатылып алынатын тағамдардың бөлшек сауда орнында тиісті түрде
сақталғанын тексеріп алыңыз;
• мұздатылған тағамдардың тағам дүкенінен тоңазытқышқа
мүмкіндігінше қысқа уақыт ішінде жеткізілуін қадағалаңыз;
• есікті жиі-жиі ашып не қажетті уақыттан артық ашып қалдырмаңыз.
Page 69

Күту менен тазалау
• Тағамды бірден жібітіп алған соң оның сапасы төмендей бастайды жән е
қайта тоңазытуға келмейді.
• Тағам өндірушісі көрсеткен уақыттан артық уақыт сақтамаңыз.
Күту менен тазалау
Сақтандыру туралы ескерту!
Жөндеу жұмысын жүргізбес бұрын құрылғыны электр желісінен
ағытыңыз.
Бұл құрылғының салқындатқыш құралында сутегілі көміртек бар;
сондықтан да, жөндеу жұмыстары мен оны қайта толтыруды тек уәкілетті
маман ғана жүзеге асыруға тиіс.
Мерзімді тазалау
Құрылғыны жиі тазалап отыру керек:
• құрылғының іші мен керек-жарақтарын, аздап нейтрал сабын қосылған
жылы сумен жуыңыз.
• есіктің тығыздағыштарын жиі тексеріп, қоқыстан арылту үшін, тазалап
отырыңыз.
• шайыңыз да, жақсылап құрғатыңыз.
Камераның ішіндегі түтікше немесе сымдардың ешқайсысын тартуға,
қозғауға немесе бүлдіруге болмайды.
Жуғыш заттар, жеміргіш ұнтақ, әтір иісі қатты шығатын тазалағыш зат
немесе жылтыратқыш балауызбен тазаламаңыз, себебі мұндай заттар
құрылғының ішкі бетін бүлдіріп, қатты иіс қалдырады.
69
Құрылғының артында орналасқан конденсат құрылғысы (қара гриль) мен
компрессорды шөтке немесе шаңсорғышпен тазалаңыз. Бұлай тазалау
құрылғының жұмысын жақсартып, электр қуатын аз жұмсауға
көмектеседі.
Салқындатқыш жүйені бүлдіріп алудан сақтаныңыз.
Корпусты жылжытқан кезде, еденді сызып кетпес үшін алдыңғы жағынан
көтеріңіз.
Ас үйге арналған тазалағыш заттардың көпшілігінің құрамында,
құрылғының пластикалық бөліктеріне зиян келтіретін/бүлдіретін
химиялық заттар бар. Сондықтан да, құрылғының сыртқы бетін тазалау
үшін нейтрал сабын қосылған, жылы суға шайылған жұмсақ шүберекті
қолданыңыз.
Жуғыш зат немесе түрпілі түйірлері бар пастаны қолданбаңыз, себебі
мұндай заттар құрылғының сыртқы бояуын немесе дақ түсуден сақтайтын
қаптамасын бүлдіреді.
Тазалап болған соң құрылғыны электр желісіне қайта қосыңыз.
Page 70

70
Күту менен тазалау
Сүзгіні Clean Air Control ауыстыру
Құрылғы жұмысы барынша жақсы болуы үшін, Clean Air Control сүзгіні
жылына бір рет ауыстырыңыз.
Жаңа сүзгіні жергілікті сатушыдан сатып алуға болады.
"Сүзгіні орнату Clean Air Control нұсқаулығы" тарауындағы нұсқауларды
қараңыз.
Желдеткіш торкөзді тазалау
Желдеткіш торкөзді алып жууға болады.
Есіктің ашық екенін тексергеннен кейін мына әрекеттерді орындаңыз:
1. Торкөздің үстіңгі шетін сыртқа/
төмен қарай жылжытып
босатыңыз.
2. Торкөзді біржола алу үшін сыртқа
қарай тура тартыңыз.
3. Корпустың астыңғы жағын
шаңсорғышпен тазалаңыз.
Тоңазытқыш мұзын жібіту
Құрылғы қалыпты жұмыс істеп тұрса,
қырау тоңазытқыш камерадағы
буландырғыштан, мотор компрессоры
тоқтаған сайын автоматты түрде
шығарылады. Еріген су құрылғының
артындағы, мотор компрессорының
үстіндегі арнайы контейнерге су
шығатын саңылау арқылы жиналады да,
осы жерде буға айналады.
Еріген суды ағызатын саңылауды су
ішке қарай ағып, тағамға тамшыламас
үшін жиі тазалап отыру қажет. Ол
тоңазытқыш камерадағы
суырмалардың Natura fresh артқы
жағында орналасқан.
Тоңазытқыш қырауын еріту
Осы үлгідегі мұздатқыш камера, екінші жағынан алғанда "еш қырау
тұрмайтын" түрге жатады. Бұл құрылғы пайдаланылып тұрғанда
құрылғының ішкі қабырғаларына да, тағамдырдың үстіне де еш қырау
тұрмайды дегенді білдіреді.
Қыраудың болмауы автоматты түрде басқарылатын желдеткіштің
көмегімен құрылғы ішінде үздіксіз айналыстағы суық ауаның болуына
байланысты.
Page 71

Не істерсіңіз, егер...
Құрылғыны қолданбаған кезде
Құрылғыны ұзақ уақыт бойы қолданбаған кезде мына сақтық шараларын
орындаңыз:
1. құрылғыны электр желісінен ажыратыңыз
2. барлық тағамдарды шығарыңыз
3. құрылғыны және оның керек-жарақтарының барлығын тазалаңыз
4. Жағымсыз иіс пайда болмас үшін есікті/есіктерді ашық қалдырыңыз.
Егер құрылғыны қосып қалдыратын болсаңыз, электр қуаты өшіп қалған
жағдайда ішіндегі тағам бұзылып кетпес үшін, басқа бір адамның
арасында бір рет бақылап қойып отыруын сұраңыз.
Не істерсіңіз, егер...
Құрылғы жұмыс жасап тұрған кезде, шамалы, бірақ мазаны алатын шуыл
естілуі мүмкін, бұл үшін техник маманды шақырудың қажеті жоқ. Келесі
кестеде көрсетілген ақпарат босқа қызмет ақысын төлеудің алдын алу
үшін беріледі.
Жұмыс жасап тұрған құрылғы өзіне тән шуыл (компрессор және айналу
дыбысы) шығарады. Бұл ақаулық емес, құрылғының қалыпты жұмысы.
Құрылғы үздіксіз жұмыс жасамайды, сондықтан да, компрессордың
тоқтап қалуы электр қуаты өшті дегенді білдірмейді. Сондықтан да,
құрылғының электр бөлшектеріне құрылғыны электр желісінен ағытпай
тұрып қол тигізуге болмайды.
71
Ақаулық Ықтимал себебі Шешімі
Құрылғыдан шуыл
шығады.
Корпустың артқы жағы
Дыбысты сигнал
естіледі. Ескерту
белгішесі
жыпылықтайды.
Құрылғы дұрыс
орнықпаған.
мен түтікшелердің
арасына қойылған
жастықшалар босап
қалған.
Мұздатқыш камерадағы
температура тым жоғары.
Құрылғының орнықты
тұрған тексеріңіз (барлық
аяқтары мен дөңгелектері
еденге тиіп тұруға тиіс).
"Деңгейін реттеу" тарауын
қараңыз.
Ол арды қайт а оры ндар ына
қойыңыз.
"Жоғары температураны
ескерту сигналы" тарауын
қараңыз.
Page 72

72
Не істерсіңіз, егер...
Ақаулық Ықтимал себебі Шешімі
температура
бейнебетінің үстіңгі
және астыңғы
жағында текшелер
көрсетіледі.
Компрессор үздіксіз
жұмыс жасайды.
Есік дұрыс жабылмаған. "Есікті жабу" тарауын
Есік тым жиі ашылған. Есікті қажет кезде ғана
Тағам температурасы
Бөлме температурасы
Су тоңазытқыштың
ішіне ағады.
Тағам судың коллекторға
Су жерге ағады. Еріген су ағатын түтікше
Қырау, мұз тым көп
қатқан.
Есіктің тығыздағышы
Құрылғының ішіндегі
температура тым
төмен.
Температураны өлшеген
кезде қате орын алды.
Температура тетігі дұрыс
орынға қойылмай тұруы
мүмкін.
тым жоғары.
тым жоғары.
Су ағатын түтікше бітеліп
қалған.
қарай ағуына бөгет
жасайды.
арқылы аққан су,
компрессордың үстіндегі
буландырғыш науаға
ақпайды.
Есік дұрыс жабылмаған. "Есікті жабу" тарауын
майысқан немесе
ластанған.
Температура тетігі дұрыс
орынға қойылмай тұруы
мүмкін.
Қызмет көрсету орталығы
өкіліне хабарласыңыз
(салқындатқыш жүйе
тағамды салқындатуын
жалғастырады, бірақ
температураны реттеу
мүмкін емес).
Жылырақ температураға
қойыңыз.
қараңыз.
ашыңыз, ұзақ ашып
қоймаңыз.
Тағамның температурасын
бөлме температурасына
дейін азайтып барып
сақтаңыз.
Бөлменің температурасын
азайтыңыз.
Су ағатын түтікшені
тазалаңыз.
Тағамның артқы тақтаға
тимейтінін тексеріңіз.
Еріген су ағатын түтікшені
буландырғыш науаға
жалғаңыз.
қараңыз.
"Есікті жабу" тарауын
қараңыз.
Жылырақ температураға
қойыңыз.
"Тоңазытқыштың ішкі
температурасына қатысты
ақыл-кеңес" тарауын
қараңыз.
Page 73

Не істерсіңіз, егер...
Ақаулық Ықтимал себебі Шешімі
Құрылғының ішіндегі
температура тым
жылы.
Есік дұрыс жабылмаған. "Есікті жабу" тарауын
Тағам температурасы
Тоңазытқыш ішіндегі
температура тым
жылы.
Тоңазытылуға тиіс
Мұздатқыш
температурасы тым
жылы.
Тоңазытылуға тиіс
Құрылғы жұмыс
істемей тұр.
Қуат ашасы розеткаға
Құрылғыға электр қуаты
Шам жанбайды. Есік ұзақ уақытқа ашық
Шамның ақауы бар. "Шамды ауыстыру"
Есік желдеткіш
торкөзге бөгет жасап
тұр.
Есік дұрысталмаған. Құрылғы деңгейі дұрыс
Температура тетігі дұрыс
орнатылмаған болуы
мүмкін.
тым жоғары.
Құрылғының ішінде суық
ауа айналымы жоқ.
тағамның барлығы көп
мөлшерде бірге
салынған.
Тағамдар бір-біріне өте
жақын қойылған.
тағамдар бірдей уақытта
көп мөлшерде бірге
салынған.
Құрылғы сөндірулі. Құрылғыны қосыңыз.
дұрыс сұғылмаған.
келмей тұр. Розеткада ток
жоқ.
тұрған.
Құрылғы деңгейі дұрыс
орнатылмаған.
орнатылмаған.
Суығырақ температураны
орнатыңыз.
қараңыз.
Тағамның температурасын
бөлме температурасына
дейін азайтып барып
сақтаңыз.
Ауаның айналуына
мүмкіндік туғызу үшін,
тағамдарды бір-біріне
тақамай қойыңыз.
Бір уақытта салқындату
үшін, тағамды аз
мөлшерде салыңыз.
Тағамдарды суық ауа
айнала алатындай етіп
сақтаңыз.
Тоңазытылатын
тағамдарды бірдей
уақытта аздан салыңыз.
Ашаны розеткаға дұрыстап
сұғыңыз.
Розеткаға басқа электр
құрылғысын қосып көріңіз.
Сақтандырғышты
тексеріңіз. Кәсіби электрик
маманға хабарласыңыз.
Есікті жабыңыз.
тарауын қараңыз.
"Деңгейін реттеу" тарауын
қараңыз.
"Деңгейін реттеу" тарауын
қараңыз.
73
Page 74

74
Техникалық сиппатама
Берілген ақыл-кеңес ақаулықты түзетуге көмектеспесе, жақын жердегі
қызмет көрсету орталығына хабарласыңыз.
Шамды ауыстыру
1. Ашаны розеткадан ағытыңыз.
2. Шамның қалпағындағы
бұранданы алыңыз.
3. Шамның қалпағын алыңыз.
4. Шамды (патроны E14) қуаты дәл
осындай жаңа шаммен
ауыстырыңыз (шамның
қалпағында максимум қуат
деңгейі көрсетілген).
5. Шамның қалпағын орнына
қойыңыз.
6. Шамның қалпағын бұрандамен
қатайтыңыз.
7. Ашаны розеткаға сұғыңыз.
Есікті жабыңыз
1. Есік тығыздағыштарын тазалаңыз.
2. Қажет болса, есікті лайықтаңыз. "Орнату" тарауын қараңыз.
3. Қажет болса, есіктің нұқсан келген тығыздағыштарын айырбастаңыз.
Қызмет көрсету орталығына хабарласыңыз.
Техникалық сиппатама
S86340KG1 S86348KG1
Өлшемі
Биіктігі 2000 мм 2000 мм
Ені 595 мм 595 мм
Тереңдігі 623 мм 623 мм
Температураны
көтеру уақыты
Техникалық ақпарат құрылғының ішкі сол жағында орналасқан
техникалық ақпарат тақтайшасында және қуат мәндері берілген
жапсырмада көрсетілген.
10 сағ 10 сағ
Page 75

Орнату
Орнату
Назарыңызда болсын!
Құрылғыны орнатпай тұрып "Қауіпсіздік туралы ақпаратты" жеке
басыңыздың қауіпсіздігін қамтамасыз ету үшін және құрылғыны дұрыс
пайдалану үшін мұқият оқып шығыңыз.
Орналастыру
Бұл құрылғыны температурасы құрылғының техникалық ақпараттар
тақтайшасында көрсетілген климат санатына сай келетін жерге
орналастыру қажет:
Климат санаты Қоршаған орта температурасы
SN +10°C бастап + 32°C дейін
N +16°C бастап + 32°C дейін
ST +16°C бастап + 38°C дейін
T +16°C бастап + 43°C дейін
Орналастыру
Құрылғы тамаша жұмыс жасап тұруы үшін, егер құрылғы қабырғаға ілініп
тұрған құрылғының астына қойылса, құрылғының үсті мен қабырғалық
аспалы құрылғының арасында кем дегенде 40 мм орын сақталуға тиіс.
Дегенмен, ең жақсысы, құрылғыны қабырғаға ілінетін заттың астына
қоймаған дұрыс.
Егер құрылғы бұрышқа қойылып, оның топсалары бар жағы қабырғаға
қарап тұрса, оның есігін еркін ашып, ішіндегі керек-жарақты алу үшін,
қабырға мен құрылғы арасындағы қашықтық кем дегенде 360 мм болуға
тиіс.
Желдетуге арналған орын:
• құрылғының тура үстінде
• құрылғы қойылатын жиһаздың арты
немесе үстінде.
Мұндай жағдайда, құрылғы
қойылатын жиһаздың артқы жағынан
қалатын орын 50 мм болуы тиіс.
75
50mm
Page 76

76
Орнату
Электр желісіне жалғау
Электр желісіне қоспас бұрын техникалық ақпарат тақтайшасында
көрсетілген кернеу мен жиіліктің үйдегі электр желісінің қуатына сай
келетіндігін тексеріп алыңыз.
Құрылғы жерге қосылуға тиіс. Осы мақсатта қорек сымы контактпен қатар
жеткізілген. Егер үйдегі розетка жерге қосылмаған болса, білікті электр
маманынан ақыл-кеңес ала отырып, құрылғыны қолданыстағы
ережелерге сай жерге жекелей қосыңыз.
Жоғарыда айтылып өткен ережелер сақталмаса, өндіруші қандай да бір
жауапкершілікті өз мойнына алудан бас тартады.
Бұл құрылғы E.E.C. ережелеріне сай келеді.
Тасымал құралдарын алу
Құрылғыңыз тасымалдау барысында есікті өз орнында ұстау үшін,
қолданылатын тасымал құралдарымен жабдықталған.
Оларды алу үшін, мына әрекеттерді орындаңыз:
1. Есікті ашыңыз.
2. Есіктің жақтауларынан тасымал
құралдарын алыңыз.
3. Тасымал құралдарын астыңғы
топсадан (кейбір үлгілерде)
алыңыз.
Кейбір үлгілерде корпус астына
қойылатын шуыл азайтқыш
қолданылады. Бұл жабдықты
алмаңыз.
3
2
Page 77

Сөре тіреуіштерді алу
Құрылғы тасымал кезінде сөрелерді
орнынан жылжыптай ұстауға арналған
тіреуіштермен жабдықталған.
Тіреуіштерді алу үшін мына әрекеттерді
орындаңыз:
1. Сөре тіреуіштерін көрсеткі(A)
бағытымен жылжытыңыз.
2. Сөрені артқы жағынан көтеріңіз де,
алға қарай әбден босағанша итеріңіз
(B).
3. Тіреуіштерді алыңыз(C).
Бекіткіш тетіктер
Керек-жарақтар қалтасына салынған бекіткіш тетіктерді суретте
көрсетілгендей орнатыңыз.
Бекіткіш тетіктерді панельдің артқы
жағына орнатыңыз.
Орнату
A
B
C
77
Есік тұтқаларын орнату
Тұтқалар жеке жинақ ретінде жеткізіледі.
1. Үстіңгі тұтқаның ұстағышын тұтқа
орнықтырғышқа бұраңыз.
2. Астыңғы тұтқаның ұстағышын
есіктің астыңғы оң жағына
орнатыңыз.
3. Үстіңгі тұтқаның ұстағышын
есіктің үстіңгі оң жағына
орнатыңыз.
4. Тұтқа орнықтырғышты астыңғы
тұтқаның ұстағышына бұрап
орнатыңыз.
Шамадан тыс көп күш жұмсап
бұрамаңыз және бұрандаларды тым
қатты қатайтпаңыз (макс. 2 Нм),
себебі есікті бүлдіріп алуыңыз мүмкін.
12
34
Page 78

78
Орнату
Деңгейін реттеу
Құрылғының орнықты болып
орнатылуын қадағалаңыз. Қажет болса,
аяғын берілген кілтпен лайықтаңыз.
Есіктің реттелуі құрылғы деңгейінің
дұрыс болуына байланысты болады.
Сүзгіні Clean Air Control орнату
Бұл Clean Air Control жағымыз иістерді сіңіріп, тағамның хош иісін, дәмін,
тағамды уландырмай өз қалпында сақтайтын, белсенді көміртектен
жасалған сүзгі болып табылады.
Сүзгі жұмысына зиян келмес үшін, пластикалық қалтаға салынып
жеткізіледі.
1. Ауа тетігі қалқанын ашу.
2. Сүзгіні пластикалық қалтадан
алыңыз.
3. Сүзгіні ауа тетігі қалқанының
артқы жағында орналасқан
саңылауға орнатыңыз.
4. Ауа тетігі қалқанын жабыңыз.
Сүзгіні беткі фрагменттері босап
кетпес үшін абайлап ұстау керек.
Сүзгі дұрыс жұмыс істеу үшін, ауа
тетігінің қалқанын жауып қоюды
ұмытпаңыз.
Page 79

Қоршаған орта мәселелері
Есіктің ашылатын жағын өзгерту
Есікті басқаша ашылатын етіп өзгерту мүмкін емес.
Қоршаған орта мәселелері
Бұйымдағы немесе бұйым қорапшасындағы белгісі осы бұйым кәдімгі
үй қалдығы емес екенін көрсетіп білдіреді. Сондықтан оны ескі электр
және электроникалық бұйымдарды жинап утилизация үшін арнайы
контейнерлерге салуыңыз керек. Осы бұйымды дұрыс түрде утилизация
арқылы Сіз қоршаған орта менен адам денсаулығына түсіп пайда бола
алатын зиянын болдыртпауын үшін үлес қоса аласыз; осы зиян бұл
бұйымды дұрыс емес қолданғанда пайда болуы мүмкін. Осы бұйымның
утилизациясы туралы көбірек білуіңіз үшін жергілікті әкімшілігіңізбен,
қалдықтарды жинап әкететін мекемеңізбен немесе осы бұйымды Өзіңізге
сатқан дүкенімен хабарласыңыз.
79
Page 80

www.electrolux.com
To buy accessories, consumables and spare parts at our online shop please visit:
www.aeg-electrolux.co.uk
www.aeg-electrolux.ru
www.aeg.kz
855809600-01-022010
 Loading...