

Page 1
user manual
frost free refrigeration
Page 2
2 contents frost free refrigeration
ContentsCongratulations
Congratulations and thank you for choosing our products.
We are sure you will fi nd your new appliance a pleasure to
use. Before you use the appliance, we recommend that you
read through the entire user manual, which provides the
description of the appliance and its functions.
To avoid the risks that are always present when you use
an electric appliance, it is important that the appliance is
installed correctly and that you read the safety instructions
carefully to avoid misuse and hazards.
We recommend that you keep this user manual for future
reference and pass it on to any future owners.
After unpacking the appliance please check it is not
damaged. If in doubt, do not use the appliance but contact
your local Electrolux Customer Care Centre.
Top and Bottom mount features ................................... 3
Important safety instructions ........................................ 4
Installing your new appliance ........................................ 5
Initial start up .................................................................. 6
Electronic display controls – electronic models only ...... 7
– Controlling the temperature ......................................... 7
– Freezer temperature alarm ........................................... 7
– Door alarm ................................................................... 7
– Child lock .................................................................... 7
– Drinks chill timer .......................................................... 7
– Energy effi ciency .......................................................... 7
Using your appliance ..................................................... 9
– Crisper bin ................................................................... 9
– Door storage bins ........................................................ 9
– Dairy compartment ...................................................... 9
– Deodoriser ................................................................... 9
– Modula bottle caddy .................................................... 9
– Bottle Twist holder ....................................................... 9
– Twist ice & serve .......................................................... 9
– Slideaway Spillsafe™ glass shelf ................................... 9
Care and maintenance ................................................. 10
– Changing the lightbulb ............................................... 10
– Cleaning the appliance .............................................. 10
General information ..................................................... 12
– Safety ........................................................................ 12
Troubleshooting ............................................................ 13
Subject to change without notice
Information on disposal for users
• Most of the packing materials are recyclable. Please
dispose of those materials through your local recycling
depot or by placing them in appropriate collection
containers.
• If you wish to discard this product, please contact your local
authorities and ask for the correct method of disposal.
Page 3
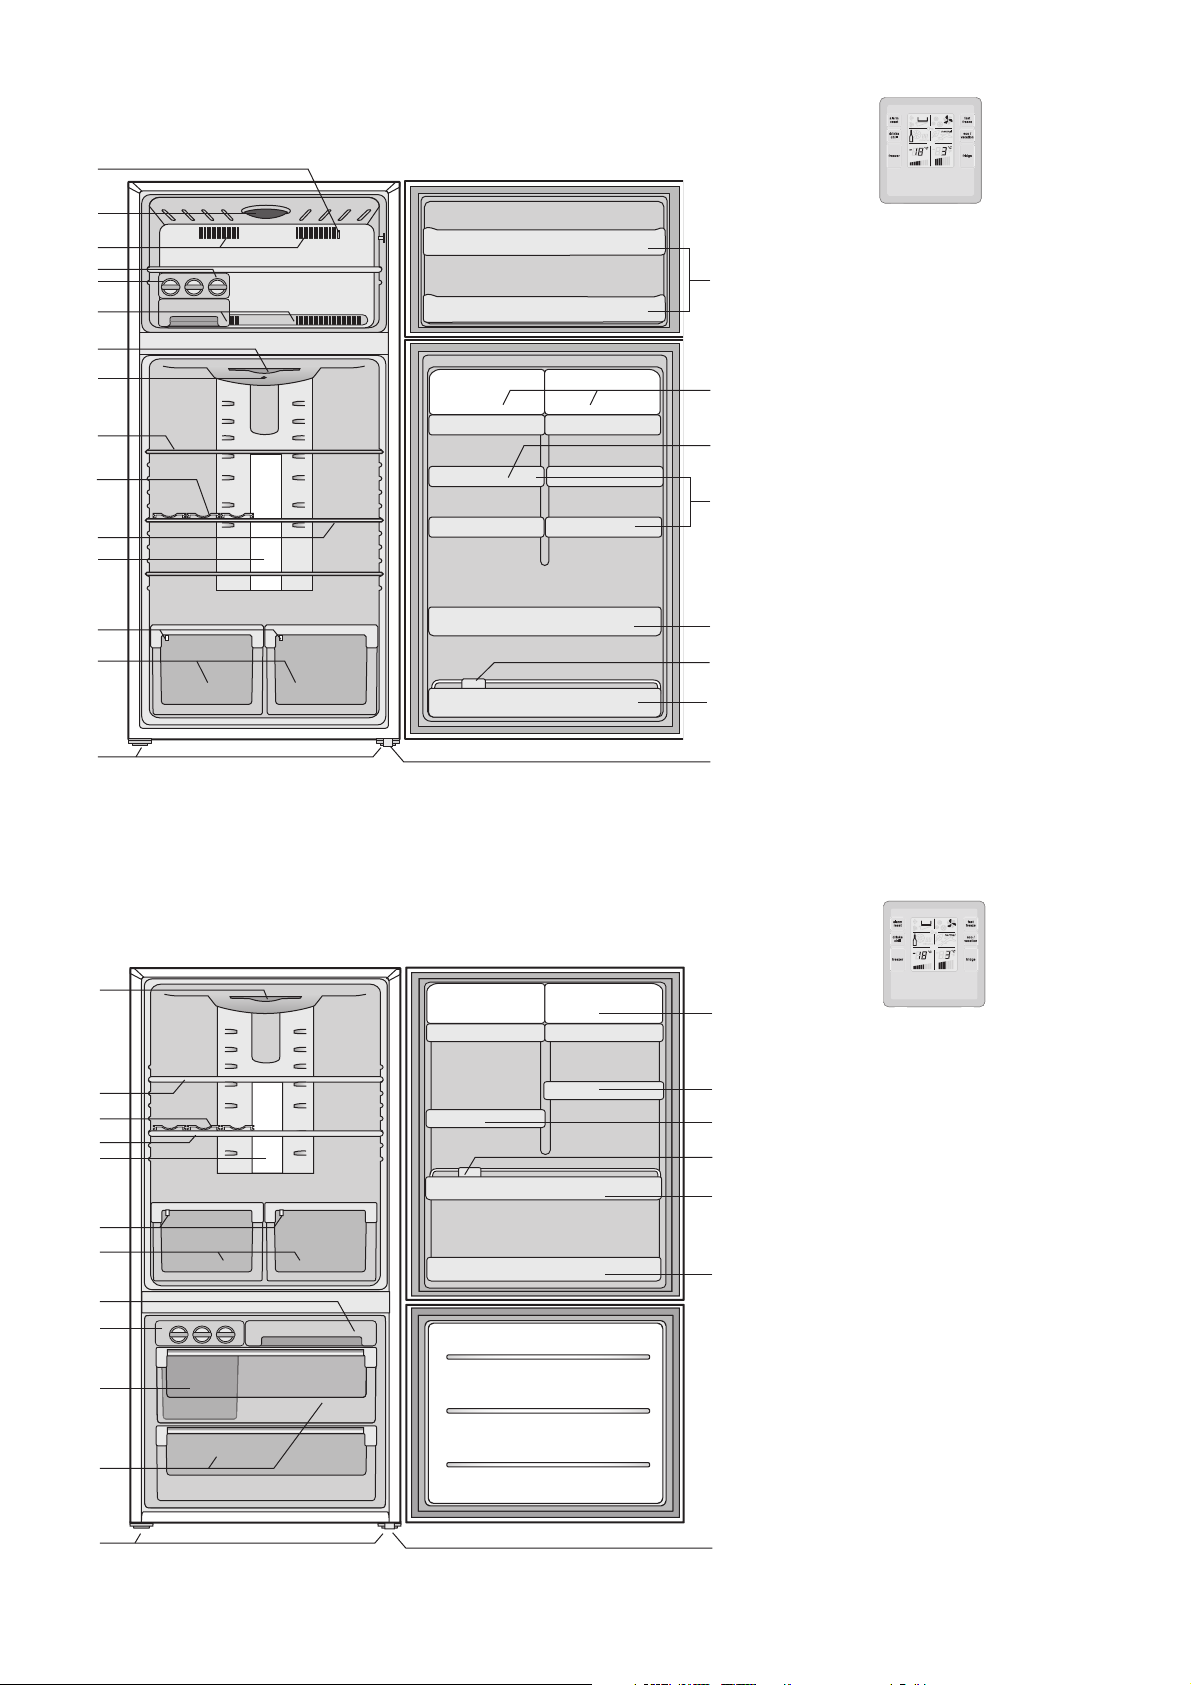
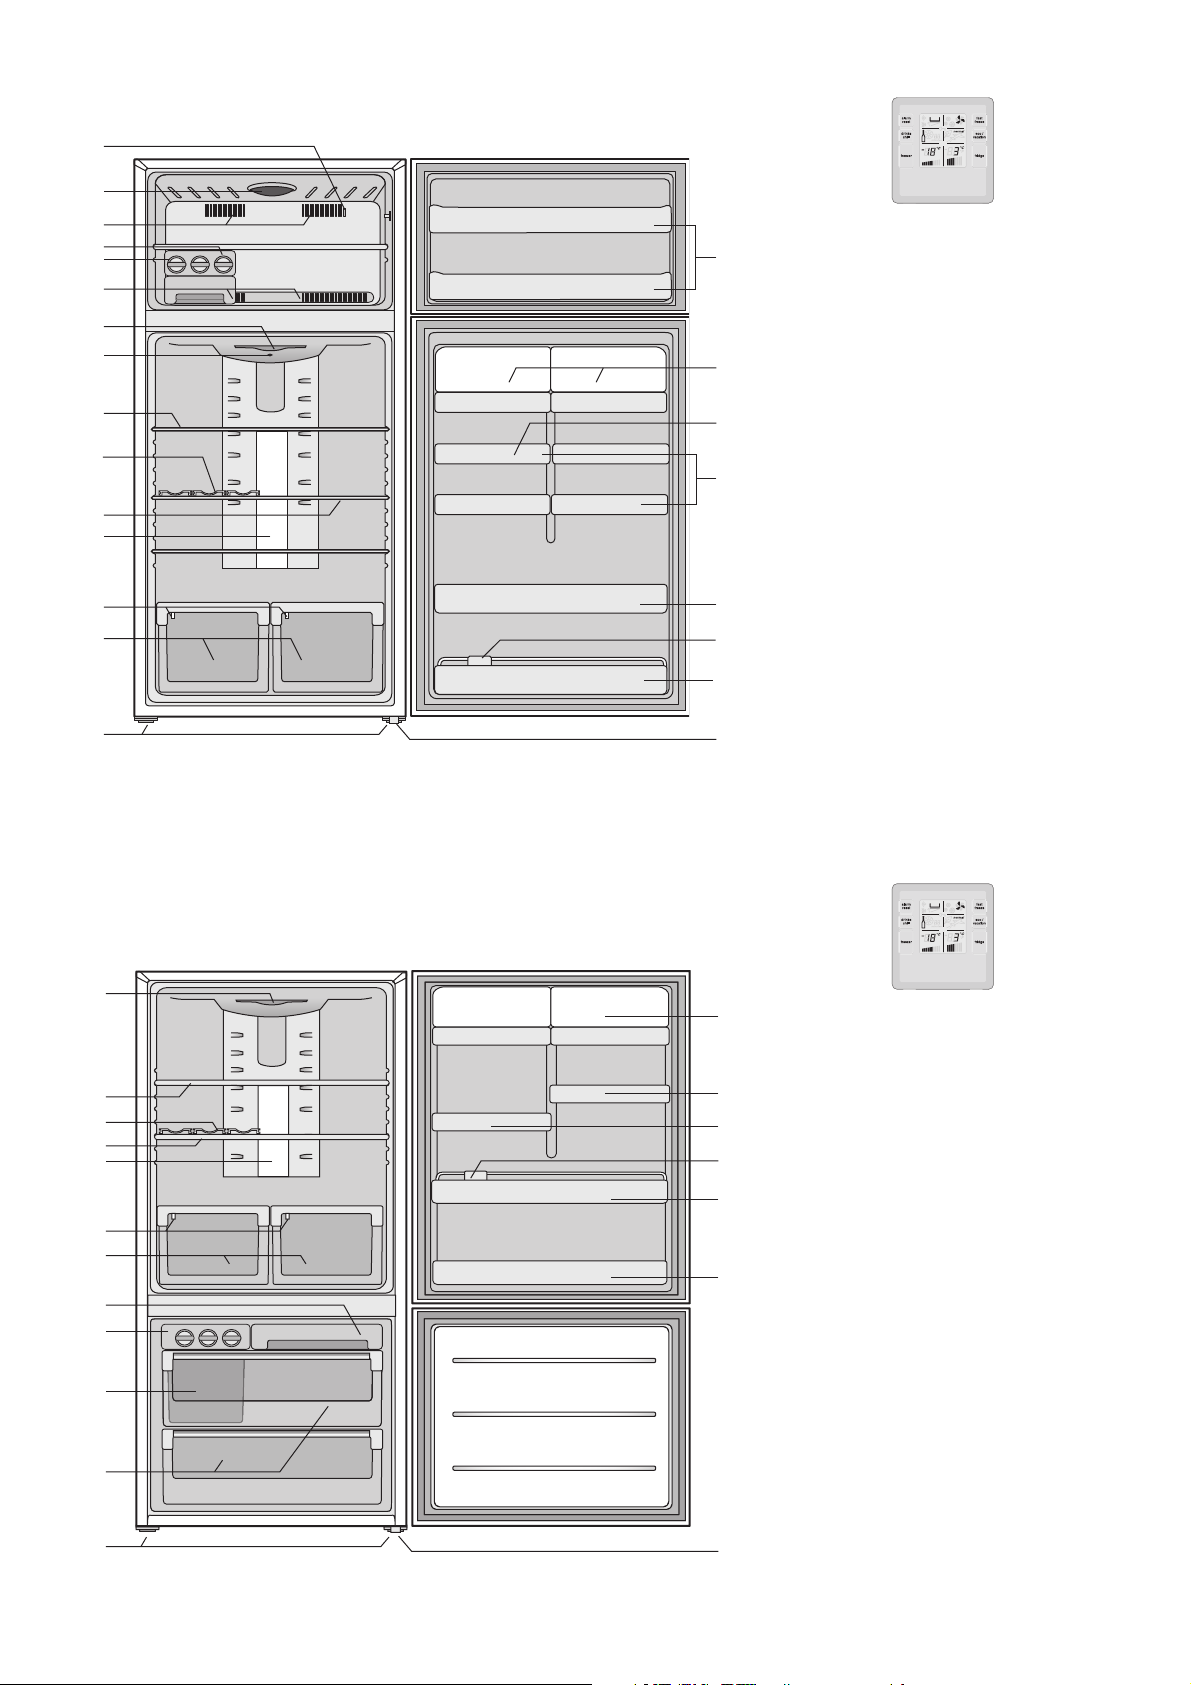
Top mount freezer model
1
frost free refrigeration features 3
2
3
4
5
6
7
8
9
10
11
12
13
14
15
Note: Product illustrations demonstrate various features but may not be completely in line
with current products.
21
22
Touch Panel on Freezer Door.
1 Sensor
16
2 Freezer light
3 Freezer air delivery vents
4 Spillsafe™ glass shelf
5 Twist ice & serve with ice cube trays
17
6 Freezer air return vents
7 Sensor
18
8 Deodoriser
9 Spillsafe™ slide away glass shelf
19
10 Modula Bottle Caddy
11 Spillsafe™ glass shelves
12 Fridge light
13 Crisper humidity controls
14 Crisper bins
20
15 Adjustable height rollers
16 Freezer door bins
17 Dairy compartments
18 Egg tray
19 Adjustable door bins
23
20 Full width door bin
21 Bottle twist holder (where fi tted)
22 Full width door bin with wire retainer
23 Stabilising foot
Bottom mount freezer model
1
2
3
4
5
6
7
8
9
10
11
12
13
14
15
16
17
18
19
Touch Panel on Refrigerator Door.
1 Deodoriser
2 Spillsafe™ slide away shelf (where fi tted)
3 Modula bottle caddy
4 Adjustable Spillsafe™ glass shelf
5 Fridge light
6 Crisper humidity controls
7 Crisper bins (full width on some models)
8 Freezer storage tray
9 Twist & serve ice
10 Ice bin with scoop (inside freezer drawer)
11 Freezer drawers on telescopic extension slides
12 Adjustable rollers
13 Dairy compartments
14 Adjustable door bins
15 Egg tray
16 Bottle twist holder (where fi tted)
17 Full width bottle bin
18 Full width bottle bin (can bin on smaller models)
19 Stabilising foot
Note: Product illustrations demonstrate various features but may not be completely
in line with current products.
Page 4
4 important safety instructions frost free refrigeration
Important safety instructions
Please read the user manual carefully and store in a handy
place for later reference.
warning
This appliance is not intended for use by persons
(including children) with reduced physical, sensory
or mental capabilities, or lack of experience and
knowledge, unless they have been given supervision
or instruction concerning use of the appliance by a
person responsible for their safety.
Children should be supervised to ensure that they do
not play with the appliance.
warning
R600a refrigerant
This appliance contains a small quantity of
environmentally friendly, but fl ammable, non-synthetic
R600a refrigerant:
• Ensure that the tubing of the refrigerant circuit is not
damaged during transportation and installation.
• Leaking refrigerant may cause eye injuries or ignite.
• The room for installing appliance must be at least 1m3
per 8g of refrigerant. The amount of refrigerant in
the appliance can be found on the rating plate inside
the appliance.
warning
• If pressurised aerosol containers bear the word
‘fl ammable’ and/or a small fl ame symbol,
do not store them inside any refrigerator or
freezer. If you do so you may cause an explosion.
• When you dispose of your old refrigerators and
freezers, remove any doors. Children can suffocate
if they get trapped inside.
• This appliance contains insulation formed with
fl ammable blowing gases. Avoid safety hazards by
carefully disposing of this appliance.
• Don’t use a steam cleaner. If live components come
into contact with condensing steam, they may
short-circuit or cause an electric shock.
warning
The refrigerator must be plugged into its own dedicated
electrical outlet.
The plug must be accessible when the refrigerator is in
position.
It is essential the power point is properly earthed to
ground. Consult a qualifi ed electrician if you are unsure.
Don’t use extension cords or adapter plugs with this
refrigerator.
If the power cord is damaged, have it replaced by a
qualifi ed service technician.
Unplug the refrigerator before cleaning it, or changing
the light bulb to avoid electric shock.
Never unplug the refrigerator by pulling the electrical
cord as this may damage it. Grip the plug fi rmly and pull
straight out.
Choose a location for your refrigerator that isn’t too cold.
The ambient room temperature should be above 10°C.
Stand your refrigerator in a dry place – avoid areas of
high moisture or humidity.
Don’t put the refrigerator in frosty or unprotected areas
like a garage or on the verandah.
Keep the refrigerator out of direct sunlight.
Don’t locate the refrigerator near stoves, fi res or heaters.
When installed correctly, your refrigerator should:
– Have adequate space at the back and sides for air
circulation (refer to “Installing your new appliance”).
– Be aligned to the surrounding cupboards.
– Have doors that will self-close from a partially open position.
Keep ventilation openings in the appliance enclosure or
in the built-in structure clear of obstruction.
When transporting and installing the refrigerator,
care should be taken to ensure that no parts of the
refrigerating circuit are damaged.
When disposing of your old refrigerator or freezer,
remove all doors. Children can suffocate if they get
trapped inside.
Switching off your appliance
If the appliance needs to be switched off for an extended
period, the following steps should be taken to reduce the
symptoms of mould:
1. Remove all food.
2. Remove the power plug from the power point.
3. Clean and dry the interior thoroughly.
4. Ensure that all the doors are wedged open slightly for
air circulation.
Page 5

(x)
50mm
30mm
30mm
Recommended
airspace
CABINET
DOOR
350mm
(y)
A
Installing your new appliance
frost free refrigeration installing your new appliance 5
Adequate ventilation around your refrigerator.
The diagram below shows the recommended airspace to
allow for ventilation of your refrigerator. If you don’t have
a cupboard with a rear gap, the recommended clearance
area on top increases from 50mm to 90mm (y) and from
35mm to 75mm (x). When positioned in a corner area,
spacing of at least 350mm on the hinge side will allow the
doors to open enough to enable the removal of bins
and shelves.
NOTE:
Doors are designed to sit proud of
cabinetry (not fl ush). The clearances shown
above are the recommended minimum clearances.
The clearance at the rear must not exceed 75mm.
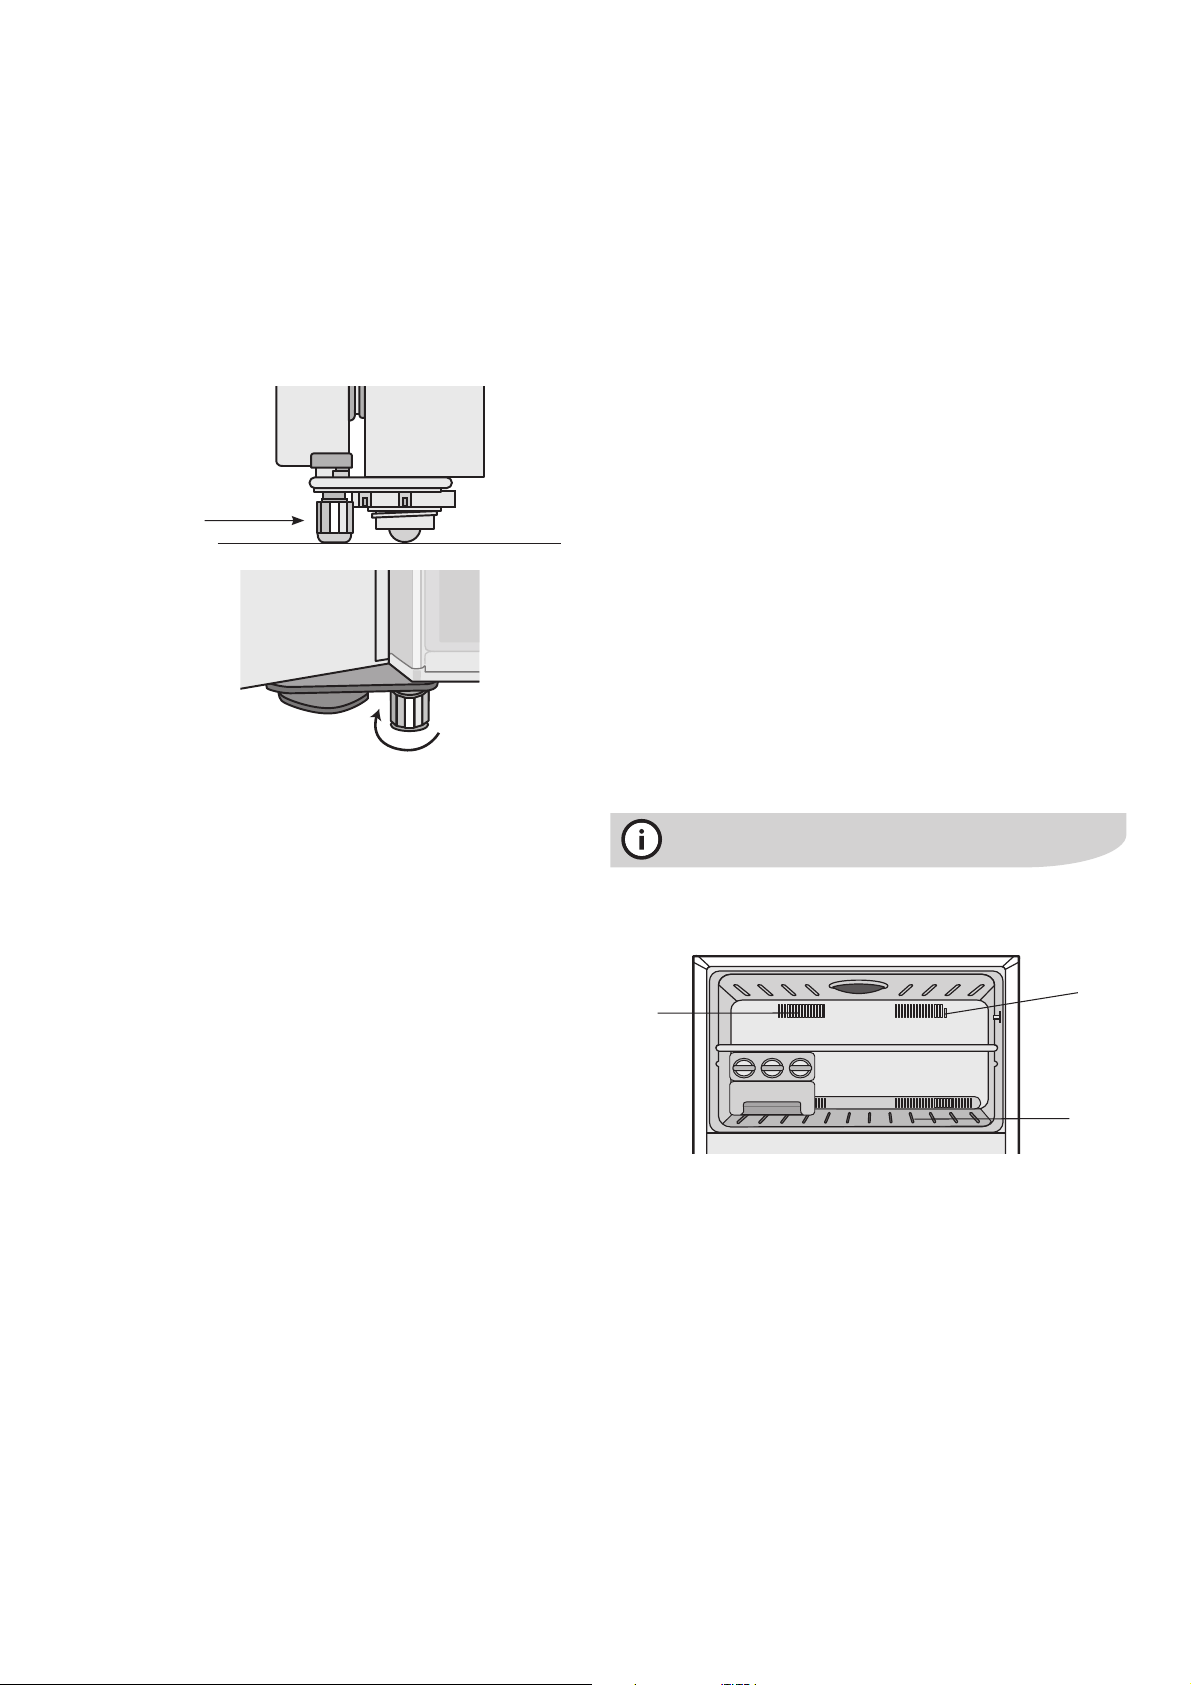
Installing your refrigerator
Your new refrigerator should arrive with the front adjustable
rollers wound down, to tilt the top backwards by about
10mm from upright. This will allow your refrigerator door to
self-close, providing a consistent closed seal.
10-15mm
caution
The rollers are designed for forward or backward movement
only. They are not castors. Moving the refrigerator sideways
may damage your fl oor and the rollers.
1. Roll the refrigerator into place.
2. The top of the refrigerator should be tilted back by
10mm. This will allow the doors to self-close providing a
consistent door seal.
3. If the refrigerator isn’t tilted back, you can adjust the two
front rollers by turning the large, plastic roller nut. One
turn of the nut increases the height of the refrigerator by
10mm. If you have diffi culty turning the roller nut, have
someone tilt the refrigerator back, so you have better
access. Alternatively, you can access the rollers from the
side, using a fl at screwdriver. (See diagram below).
Large plastic
roller nut
Stability foot
wound up
4. Check the alignment of the refrigerator to the
surrounding cupboards to see if it is level. You can
adjust the level with the rollers as detailed in step 3.
ligned to
cupboards
ie. even gap
Top of refrigerator
is level ie. horizontal
Height adjustable
front rollers
Fixed rear
rollers
The stability foot should also be wound fully up so it will not
interfere with the operation of the rollers (see diagram in
Step 3).
Adjust front rollers
for uneveness of floor
eg. wind this roller
down or up
5. If you fi nd your refrigerator rocks from corner to corner,
it means your fl oor is uneven. Find a piece of plastic or
hardboard etc. and pack it fi rmly under the roller.
6. On certain fl oor surfaces the refrigerator may roll
forward during operation. If this occurs a “roller stop” or
wedge can be placed under the front rollers.
7. You may now need to fi ne-tune the installation by
repeating Steps 3, 4 and 5.
Page 6
6 initial start up frost free refrigeration
Initial start-up
8. When you have the appliance in its fi nal position, it
needs to be stabilised. Wind the stability foot down to
the fl oor until it just makes contact with the fl oor. Lift
the front of the appliance to take the weight off the
stability foot, then turn it ¼ turn further to ensure fi rm
contact with the fl oor. Whenever you need to move the
appliance, be sure to wind the foot back up so that the
appliance can roll freely and be sure to reset it when
reinstalling.
side view
Stabilising foot
wound down
front view
¼ turn
Refrigerators work by transferring heat from the food inside
to the outside air. This operation makes the back and sides
of the refrigerator (particularly at start-up) feel warm
– which is normal.
A cooling coil is located behind the rear wall of the freezer
section. This coil cools and removes moisture from
the air inside.
Avoid placing food against the air vents in the refrigerator,
as it affects the effi cient circulation. If the door is opened
frequently, a light frosting will occasionally occur on the
freezer’s interior. This is normal and will clear after a few
days. If the freezer door is accidentally kept open, a heavy
frost will coat the inside walls and should be removed.
Your new refrigerator uses a high-speed compressor,
along with other energy-effi cient components, which may
make unusual sounds. These sounds simply indicate your
refrigerator is working how it should. They include:
• Compressor running noises;
• Air movement noise from the small fan motor;
• A gurgling sound, similar to water boiling;
• A popping noise, heard during automatic defrosting
Further details can be found in “Troubleshooting”.
9. Clean your refrigerator thoroughly following the
instructions in the “Care and maintenance” section of
this manual and wipe off any dust that has accumulated
during shipping.
10. Plug your refrigerator straight into its own power point
and never use a double adapter. If you need to roll the
refrigerator to get to the plug, remember to raise the
stability foot fi rst.
11. Before you put any food in your refrigerator, it’s
recommended you leave it on for 2 or 3 hours to check
it is running properly.
Congratulations! You have successfully installed your new
refrigerator.
tips and information
• Don’t place food forward of the ribs on the freezer fl oor,
as it will keep the door open.
Sensor
Air vents
Ribs
Page 7
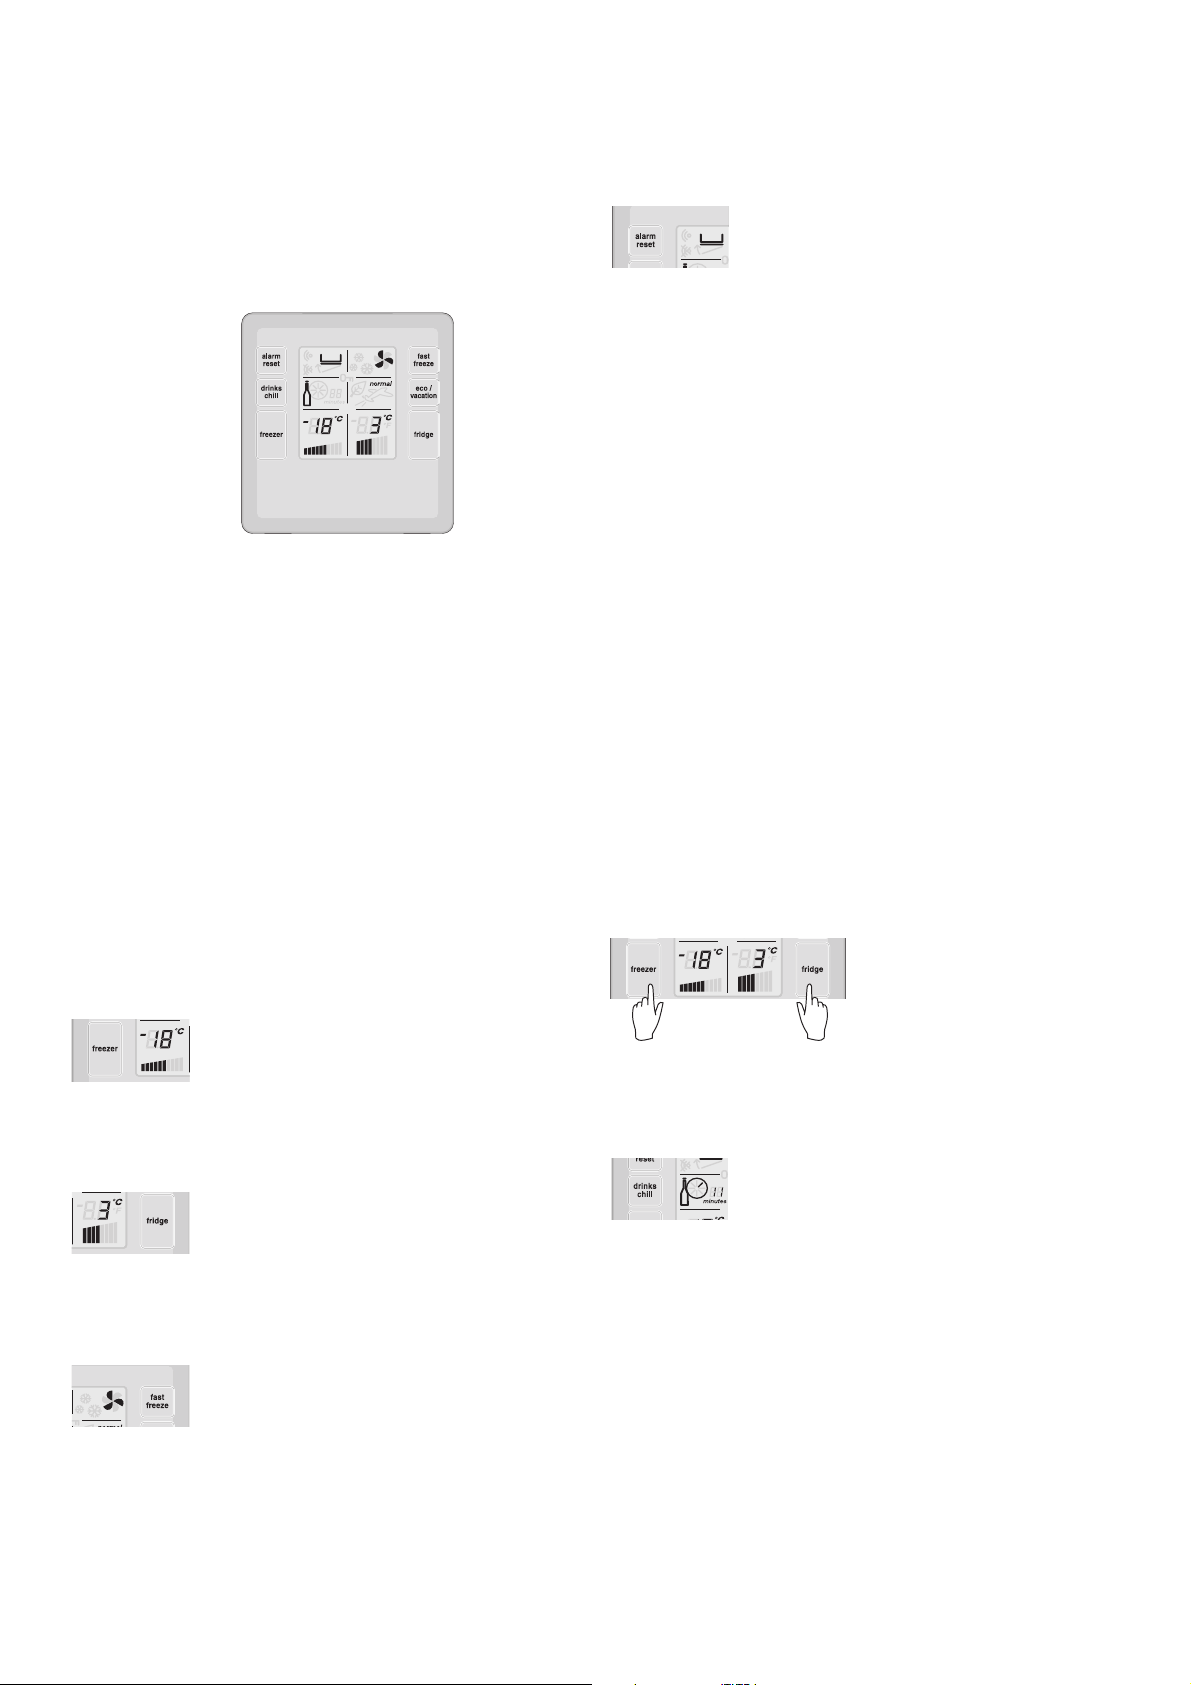
Electronic display controls
frost free refrigeration electronic display controls 7
The electronic display panel consists of an LCD (liquid
crystal display) with white backlighting and 6 touch
buttons. When the power is fi rst turned on, the display with
backlighting will come on. If no buttons have been pressed
and the fridge door is closed the backlighting will turn off
after 30 seconds.
Controlling the temperature
We recommend that when you start your refrigerator for
the fi rst time, the temperature for the refrigerator is set
to 3°C and the freezer to -18°C. If you want to change
the temperature, follow the instructions below. Make only
small adjustments and wait 24 hours to see if it’s correct.
Checking the softness of ice cream is a good indication
if your freezer is the right temperature, while feeling the
coldness of water kept in the refrigerator is a good way of
checking the temperature of the food compartment.
NOTE: When you set a temperature, you set an
average temperature for the whole refrigerator cabinet.
Temperatures inside each compartment may vary,
depending on how much food you store and where you
place it. High or low room temperature may also affect the
actual temperature inside the refrigerator.
Changing the freezer temperature
Press the freezer button to make the freezer
colder in 1°C steps. Once the maximum of -23°C is
reached, the display will return to -14°C with the next press
of the button. The bar graph gets smaller with colder freezer
settings.
Changing the refrigerator temperature
Press the fridge button to make the
refrigerator colder in 1°C steps. Once 0°C is reached, the
display will return to 7°C with the next button press. The bar
graph gets smaller with colder refrigerator settings.
Fast freeze function
Use the fast freeze function when you
add a large amount of food to the freezer
compartment. This freezes the food quickly but does not
affect the temperature in the refrigerator compartment.
To use this function, press the fast freeze button once. An
animated icon will light up. The fast freeze function will now
operate for 90 minutes and then switch off. If you want
to turn the fast freeze function off before 90 minutes have
passed, simply press the fast freeze button again. The icon
will disappear and the freezer will return to
normal operation.
Freezer temperature alarm
If the alarm sounds for no apparent reason,
check whether anything is keeping the door
open. If the freezer becomes too warm due to the freezer
door being left open or warm food being placed too close to
the temperature sensor, a buzzer will sound.
The icon adjacent to the alarm reset button, the freezer set
temperature and bar graph will all fl ash, until the alarm reset
button is pressed. Once pressed, the alarm disable icon
adjacent to the alarm button will illuminate for 50 minutes,
or until the temperature drops to an acceptable level.
Make sure nothing is holding the freezer door open and
move any warm food away from the temperature sensor. If
the freezer is still too warm after 50 minutes, the alarm will
sound again, indicating that something may be wrong with
the refrigerator.
NOTE:
The freezer temperature alarm can be reset for 12 hours
by pressing the alarm reset button continuously for 10
seconds.
Fridge door alarm
If the fridge door is left open for more than two minutes, the
alarm will buzz and an arrow pointing to an open door will
fl ash, along with the temperature setting and bar graph.
If you want to leave the door open while you load the
refrigerator, you can turn the alarm off for 8 minutes by
pressing the alarm reset button.
Child Lock
Press and hold the freezer
and fridge buttons together to
activate the child lock. This will
disable the display to prevent
accidental changes to settings. To turn the child lock off,
press and hold the freezer and fridge buttons together.
Drinks chill timer
The drinks chill timer is used to quickly chill
a bottle. Place the bottle in the freezer and
the timer can be set for a minimum of 5
minutes to a maximum of 30 minutes. To set, simply press
the drinks chill button repeatedly for the number of minutes
(in 5-minute intervals). Once set, an animated icon appears
beside the drinks chill button, with a timer that counts down
one minute at a time.
You can change the time or turn the timer off even after the
countdown has started. A buzzer will tell you when the time
is fi nished and the icon will fl ash until the alarm reset button
is pressed.
If your drink is not cold enough, reset the drinks chill
function (remembering the drink is already partially chilled).
Suggested chilling times:
• 10 minutes for cans of drink
• 20 minutes for bottles of beer or wine
• 30 minutes for bottles of soft drink.
Page 8
8 electronic display controls frost free refrigeration
Using your appliance
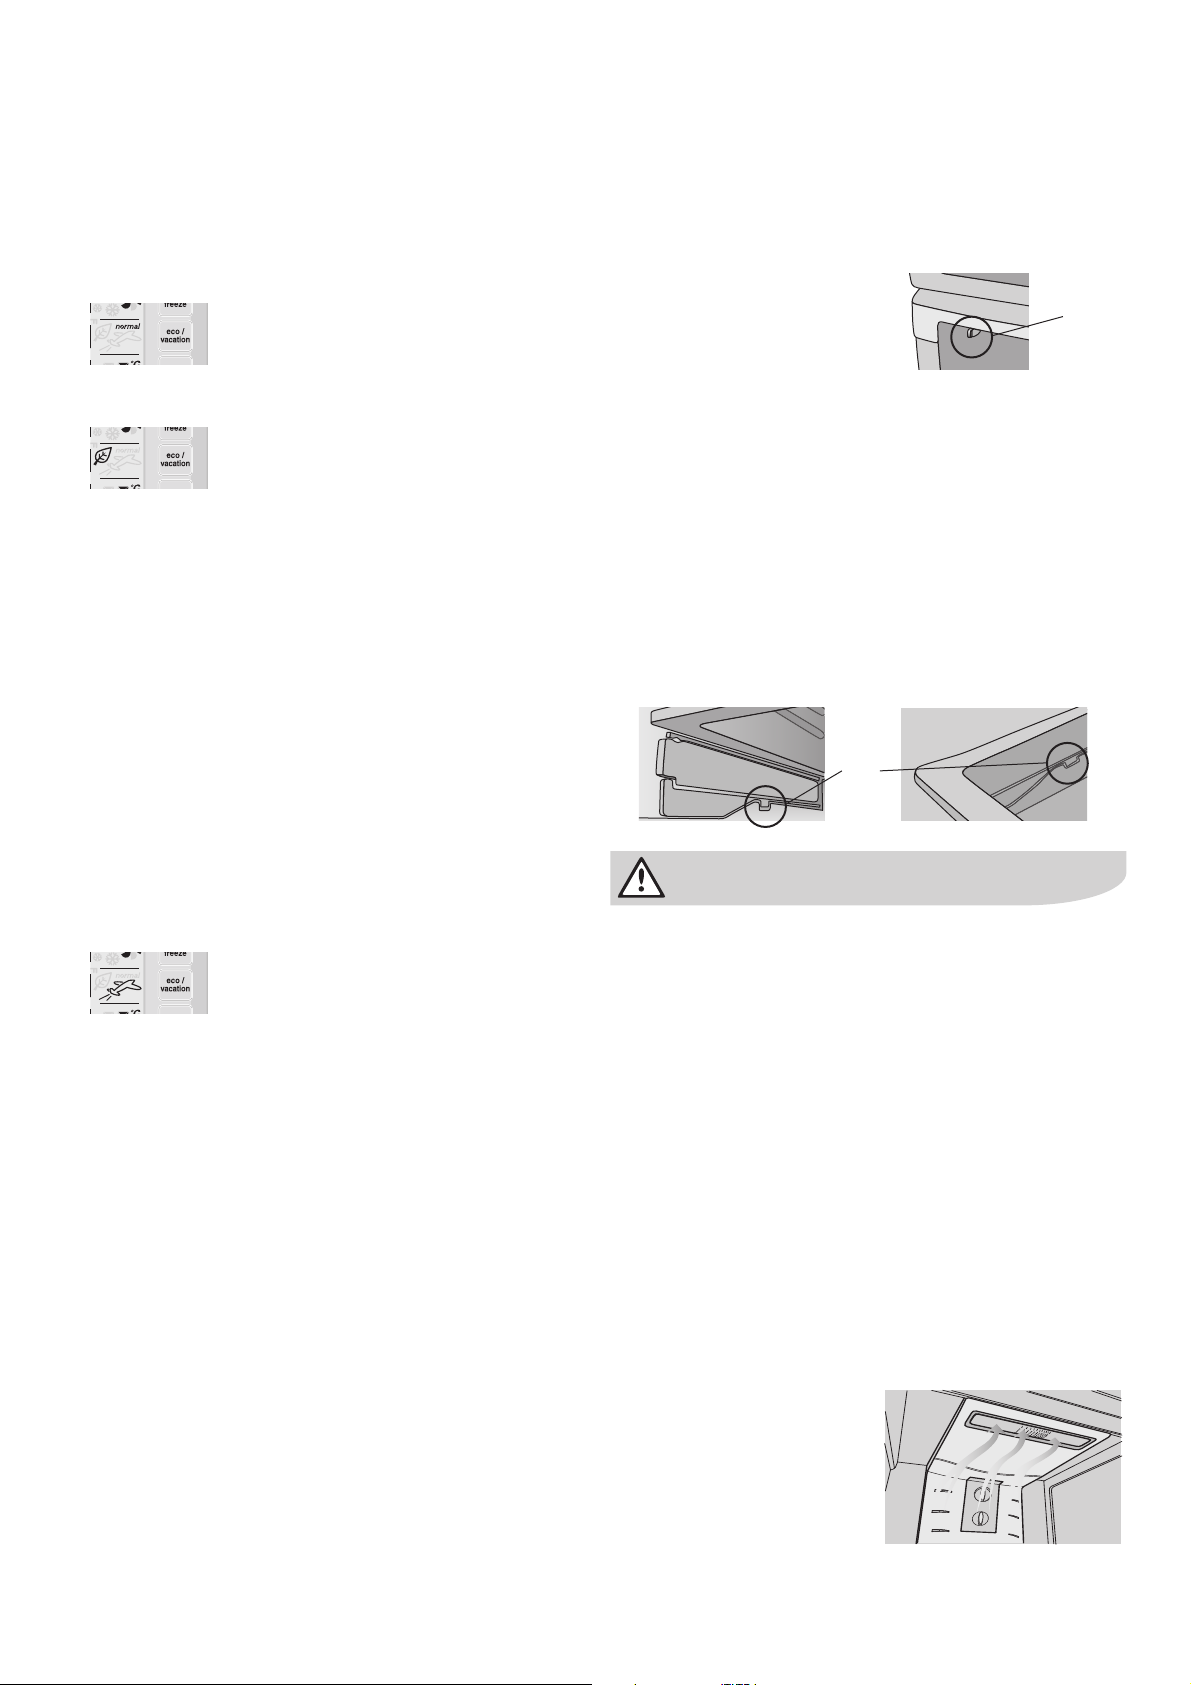
Energy effi ciency
Your refrigerator has been designed to be energy-effi cient
and can operate in three modes: Normal, Eco and Holiday.
• Normal mode
Normal mode is used when the refrigerator
door is often opened. This is the normal
operating mode of your refrigerator.
• Eco mode
Eco mode can be used if you don’t open
your refrigerator door a lot. It is activated in
one of two ways:
– by manually pressing the eco/holiday button once when
in normal mode, or,
– is automatically activated after 30 hours if the refrigerator
door has not been opened.
The leaf icon will appear on the electronic display when
eco mode is on. If eco mode is activated automatically, the
refrigerator will revert to normal mode once the refrigerator
door is opened. If eco mode is entered manually, opening
the door will not revert it back to normal mode. To exit eco
mode, simply press the eco/holiday button until the word
“normal” is displayed. Use Eco mode when you’re not
using the refrigerator all the time (eg. as a long-term storage
refrigerator). If the door is going to be opened a lot, switch
back to normal mode.
Remember, if eco mode is turned on manually, it won’t
switch off automatically.
• Holiday mode
Use this button when you go on holiday
or leave the house for long periods. The
refrigerator minimises defrosting to save
energy but maintains your temperature settings. To put
the refrigerator into holiday mode, press the eco/holiday
mode button until the aeroplane icon appears. The holiday
mode will operate until the button is pressed again or the
refrigerator door is opened.
NOTE: Opening the freezer door won’t effect the operation
of either Eco or Holiday modes.
Eco and Holiday Modes minimise defrosting to save energy,
while maintaining your temperature settings.
Other special refrigerator features
• Independent control of the compressor and fan to
provide the best performance.
• Extra cooling depending on the number of times the
door is opened.
• Automatic defrost when the door is not frequently opened.
NOTE: Display malfunctions may be due to brief power
supply interruptions. If this occurs, turn the refrigerator off
at the power point and wait 5 minutes. The refrigerator
pressure will need time to equalise before you turn the
refrigerator on again at the powerpoint.
This section tells you how to make the most of the many useful
features of your new refrigerator.
Crisper bin
Use the crisper bin to store
vegetables, fruit or smallgoods.
Humidity control
Change the humidity by sliding the
humidity control.
• Storing vegetables
Store vegetables in the crisper bin and remember to set
the humidity control to more humid (closed).
• Storing fruit & smallgoods
Store fruit and smallgoods in the crisper bin and
remember to set the humidity control to less
humid (open).
• Removal (standard Crisper Bins)
1. Empty food from the drawer.
2. Remove the crisper bin(s) by pulling forward, then up
and forward again.
3. Remove the crisper shelf by lifting the catches on the
underside of the shelf and pulling the shelf forward.
Catch
caution
Never store solvents or fl ammable materials like nail polish
remover or lighter fl uid inside your refrigerator. They will affect
the life of the plastic components and may taint stored food.
Door storage bins
Your refrigerator is fi tted with door storage bins. These bins
adjust to meet different storage needs. All the door bins are
completely removable for cleaning. If you want to remove
or adjust a bin, lift it over the support lugs on the inner door
panel. To replace, push the bin down over the support lugs
to lock it in place.
Dairy compartment
Use the dairy compartment to store foods like butter,
margarine and cheeses. The compartment is slightly
warmer than the rest of the refrigerator compartment, while
the lid provides protection against odours.
Deodoriser
Your appliance is fi tted with a
catalysing deodoriser to assist
with the removal of food odours
inside your appliance.
Odours are removed by
adsorption through the fi lter
by the normal operation of the
appliance. Keeping food covered and wrapping food with
plastic wrap will also help to reduce the
odours inside your appliance.
Page 9

frost free refrigeration using your appliance 9
Modula bottle caddy
The Modula bottle caddy is made of anodised aluminium.
They are used to store various types of bottles like wine or
beer. Bottles should be stored with the bottom end towards
the back of the refrigerator. The fridge arrives with three
combined caddies, but they can be separated if desired.
Bottle twist holder operation (where fi tted)
The bottle twist holder is used to prevent bottles from falling
over. The bottle twist holder consists of two parts, a sliding
front, and a rotating retainer ring.
The bottle twist holder can be used in two positions:
• Horizontal
When the bottle twist holder ring is horizontal, any item
that fi ts within the ring can simply be placed inside it.
Your Twist & serve ice can be relocated to the other
side of the freezer as follows:
1. Remove the ice bin and ice cube tray. If the ice tray
assembly is frozen to the carriage, simply squeeze the
tray and shelf together to break the ice.
2. Before you remove the ice carriage, remember to
disengage it from the glass shelf (as shown), as it may
result in damage to the assembly.
3. Remove the centre runner by disengaging it at the front
of the shelf, and removing it from the rear.
4. Refi t the runner in to the rear of the shelf on the right
hand side and then engage the front (as shown)
5. Fit the carriage by sliding it into the runners until the
front of the carriage engages
with the shelf.
6. Refi t the ice tray and ice bin.
Slide away glass shelf
This shelf can be used either as a full
depth shelf or when tall items need to be stored at the front
of the appliance it can be collapsed to half its original depth.
• To collapse the shelf:
1. Pull the front half of the shelf forward.
• Vertical
When the bottle twist holder ring is vertical, it is possible
to simply slide the bottle twist holder along the bottle
retainer bar until it is pushed up against a bottle.
Note:
The bottle should be constrained on the other side by either
the end of the bin or other adjacent bottles.
Twist Ice & Serve
To use, remove the tray, fi ll with
water and place back in the
freezer. Once ice has formed
(approximately 3 hours) simply
twist the knob at the front
clockwise until the ice drops
into the bin below.
Insert into the slot at
the rear of the shelf
Then engage
into the front
of the shelf
2. Then, from the underside, lift the front half of the shelf
by raising the rear edge over the recessed hook detail.
3. Pull the shelf forward and allow the rear to drop into the
side channels.
4. Push the front shelf backwards (3,4) until it reaches the
rear stops.
• Repositioning:
The shelf can be repositioned
within the appliance unit by
pulling the whole assembly
out until the side panels are
free to pivot down, then
Hook detail
pivoting the rear of the shelf
until the shelf is free from the
liner runners. The shelf can
then be positioned in any of
the runners – this is a very
useful feature if your appliance
door happens to have limited
access.
Page 10

10 care and maintenance frost free refrigeration
Care and maintenance
warning
Before changing any light bulb, switch the power off
at the power point and remove the power cord from
the power point.
Changing the light bulb
• Refrigerator light
1. Switch off the power at the power
point and remove the refrigerator’s
power cord from the power point.
2. Remove shelves.
3. Carefully unclip the light cover. You
do this by pulling the upper part of
the cover towards the front of the cabinet.
4. Unscrew the light bulb and replace it with a bulb that is
the same as the original. If, when you remove the light
bulb the small rubber “O” ring comes out with the bulb,
fi t the “O” ring over the new bulb and screw bulb into
the socket (see diagram).
Never insert your fi nger into the light bulb
socket to check for the presence of the “O” ring.
5. Replace the light cover by hooking the light cover lugs
into the bottom of the housing and pressing the upper
part of the cover until it clips in.
6. Replace shelves.
7. Wait 5 minutes to ensure pressures in the refrigeration
system are equalized. Then reconnect and turn the
refrigerator on at the power point.
• Freezer light
1. Switch off the power at the power point and remove the
refrigerator’s power cord from the power point.
2. Carefully unclip the light cover. You do this
by pulling the light cover tab at the rear
towards the front of the cabinet.
3. Unscrew the light bulb and replace it with
a bulb that is the same as the original. If,
when you remove the light bulb the small
rubber “O” ring comes out with the bulb, fi t the “O” ring
over the new bulb and screw bulb into the socket (see
diagram).
Never insert your fi nger into the light bulb
socket to check for the presence of the “O” ring.
4. Replace the light cover by hooking the light cover lugs
into the front of the housing and pressing the rear of the
cover up until it clips in.
5. Wait 5 minutes to ensure pressures in the refrigeration
system are equalized. Then reconnect and turn the
refrigerator on at the power point.
tips and information
Ensure the ‘O’ ring is in place before replacing the bulb.
Light bulb “O” ring Light socket
Cleaning the appliance
warning
BEFORE CLEANING: Turn appliance off at the power
point, then remove power cord from socket. This will
make sure there is no chance of getting an
electric shock.
• Doors and exterior
– stainless steel
Your stainless steel appliance is manufactured from a
mark resistant stainless steel. This stainless steel has
a special advanced protective coating that eases the
removal of marks such as fi nger prints and water spots.
To keep your stainless steel appliance looking at its best,
you should clean it regularly. You should only clean the
stainless steel doors with luke-warm soapy water and
a soft cloth, rinsing with clean water and then wipe the
surface with clean water and a soft clean cloth to remove
soap residue.
– pacifi c silver
You should only clean the pacifi c silver doors with lukewarm soapy water and a soft cloth, rinsing with clean
water and then wipe the surface with clean water and a
soft clean cloth to remove soap residue.
caution
Do not use stainless steel cleaners, abrasive pads
or other cleaners as they are likely to scratch the
surface. Damage to this product after delivery is not
covered by your warranty.
• Interior
You should clean the appliance interior regularly. It will
be easiest to clean when the food supply is low. Wash
the interior with a soft cloth and use an unscented mild
soap with lukewarm water. Thoroughly dry all surfaces
and removable parts. Avoid getting water on appliance
controls. If you have taken out any removable parts,
replace them and switch the power on before restocking the appliance with food. Naturally, you should
keep the interior of your appliance hygienic by promptly
and thoroughly wiping up any food spills.
Don’t use a steam cleaner. If live components come into
contact with condensing steam, they may short-circuit or
cause an electric shock.
• Door seals
Take care to keep door seals clean. Sticky food and
drink can cause seals to stick to the cabinet and
tear when you open the door. Wash seal with a mild
detergent and warm water. Rinse thoroughly and dry.
caution
Never use hot water, solvents, commercial kitchen
cleaners, aerosol cleaners, metal polishes, caustic or
abrasive cleaners, or scourers to clean this appliance,
as they will damage it. Many commercially available
cleaning products and detergents contain solvents
that will damage your refrigerator. When cleaning,
use only a soft cloth with an unscented mild soap and
lukewarm water.
Page 11

frost free refrigeration general information 11
This appliance complies to the following E.E.C Directives:
2006/95/EC: Low Voltage Directive
2004/108/EC: Electromagnetic Compatibility (EMC) Directive
92/75EEC: Energy Labelling
94/2/EC: Energy Labelling: Implementation for Refrigerators and Freezers
96/57/EC: Effi ciency Requirements for Refrigerators and Freezers
93/68/EEC: Global Amendment Directive
2002/95/CE: Restriction on Hazardous Substances (RoHS).
Harmonised Standards to which Conformity is Declared:
92/7/5/EC:
EN153:1996 Energy Consumption: Refrigerators
89/336/EEC:
EN55014-1:1993 Emissions: Household and Similar Devices
EN55014-2:1997 Immunity: Household and Similar Devices
EN61000-3-2 Limits of harmonic current emissions
EN61000-3-3 Limits of voltage fl uctuations and fl icker
The symbol on the product or on its packaging indicates that this product may not be treated as household
waste. Instead it should be taken to the appropriate collection point for the recycling of electrical and
electronic equipment. By ensuring this product is disposed of correctly, you will help prevent potential
negative consequences for the environment and human health, which could otherwise be caused by
inappropriate waste handling of this product. For more detailed information about recycling of this product,
please contact your local council, your household waste disposal service or the shop where you purchased
the product.
Technical data
Dimensions 500L top mount 510L bottom mount 420L top mount 430L bottom mount
Height 1720mm 1720mm 1640mm 1720mm
Width 803mm 803mm 703mm 703mm
Depth 745mm 745mm 709mm 745mm
The technical information is situated on the rating plate on
the internal left side of the appliance and on the energy label.
Positioning
Install this appliance at a location where the ambient
temperature corresponds to the climate class indicated
on the rating plate of the appliance:
Installation
warning
Climate class Ambient temperature
SN +10˚C to + 32˚C
Read the “Safety Information” carefully for your safety
and correct operation of the appliance before installing
the appliance.
N +16˚C to + 32˚C
ST +16˚C to + 38˚C
T +18˚C to + 43˚C
Page 12

12 troubleshooting frost free refrigeration
Troubleshooting
If you think something may be wrong with your refrigerator,
you can carry out some easy checks before calling for
service. You may locate the problem, sparing yourself from
inconvenience, saving time and money.
problem solution
Refrigerator is not
operating
When there is
refrigerator/freezer
noise
If there are odours
inside the refrigerator
• Check that the power cord is plugged into
the power outlet properly and that the outlet
is switched ‘ON’.
• Try running another appliance from the
power outlet. If no power is coming from
the outlet you may have blown a fuse or
tripped a circuit of your household power
supply.
• Try adjusting the temperature control to a
slightly “colder” position.
• It is normal for the freezer fan NOT to
operate during the automatic defrost cycle,
or for a short time after the appliance is
switched on.
Modern refrigerators/freezers with
increased storage capacity use high speed
compressors. These can provide a seemingly
high level of sound which is quite normal.
Normal operational sounds include:
• Occasional gurgling, similar to water boiling.
• Air fl ow noise (air circulates because of a
small fan).
• A popping noise heard during automatic
defrost.
Other strange sounds may mean that you
need to check and take action. For example,
noises may mean that:
• The cabinet is not level.
• The fl oor is uneven or weak.
• Bottles are badly placed and rattling.
• There are vibrations from an object on top
of or behind or beside the refrigerator.
• The back of the refrigerator cabinet is
touching the wall.
Remember it is quite normal for noise to
seem louder just after the refrigerator
starts operating.
• The interior may need cleaning.
• Some foods produce odours.
• Some containers and wrapping can
cause odours.
• Ask yourself if the odour started about the
same time you started storing something
unusual.
problem solution
When the motor
seems to run more
than expected
If the temperature in
the refrigerator is too
warm
If the temperature in
the refrigerator is too
cold
If heavy frosting
occurs in the freezer
If water drips on the
fl oor
Fridge does not exit
vacation mode
If the doors will not
close
Your new refrigerator has a large fridge and
freezer section to keep cool. So it is normal
to frequently hear the sound of the motor.
However, to keep operation to a minimum
check the following:
• Are doors kept open too long or too often?
• Are controls set too cold? Refer to
Controlling the temperature
“
• Have large amounts of warm food just
recently been stored? Summer, festive
seasons and holidays usually mean a lot more
work for your refrigerator.
• If the day is hot or the room is very warm, the
refrigerator will need to run more than normal.
• The refrigerator will run more that normal just
after you install it or when it has been turned
off for a long time.
• Check that the appliance has enough
clearance at the sides, back and top. Refer to
“Installing your new appliance”
• Refer to “Controlling the temperature”
• You may have kept the door open too long or
too frequently.
• Food containers or packaging may be holding
a door open.
• Refer to “Controlling the temperature”
• Increase the temperature to avoid high energy
consumption.
Make sure you fully close the freezer and fridge
doors. If the doors are left open, a heavy frost
will coat the inside of the freezer. If a frost
develops, remove it and take care to properly
close the doors.
The defrost water tray, (located at the back or
underneath of the cabinet) may not be properly
positioned, or the drain tube may not be
properly positioned to direct water into this tray.
You may need to pull the refrigerator away from
the wall to check the tray and tube.
Turn appliance off at the power point. Leave off
for three (3) minutes for the memory to clear,
then turn back on.
• Check whether the top of the refrigerator is
tilted back 10-15mm to allowthe doors to self
close.
• Check whether something is holding the door
open.
It is normal for the freezer door to momentarily
open and re-close, when the food storage
compartment door is closed. If the freezer door
stays open, it indicates that the refrigerator
needs to be tilted backwards a little further. If
you call a service person to solve this problem
you will be charged for the cost of the service
call, this is not a warranty fault.
’”
If you still require service
If you have a problem, and the problem persists after you
have made the checks mentioned above, contact your
nearest Electrolux approved Service Centre or the dealer
you bought the refrigerator from. Be ready to quote the
model number, 9-digit PNC and 8-digit serial number, which
is stated on the label inside the refrigerator compartment.
Page 13

Manuel d'utilisation
Réfrigération sans givre
Page 14
14 table des matières réfrigération sans givre
Félicitations Table des matières
Félicitations ! Nous vous remercions d'avoir opté pour nos
produits. Nous sommes persuadés que votre nouvel appareil
électroménager vous procurera le plus grand plaisir. Avant
toute utilisation, il est recommandé de lire attentivement
le présent Manuel. Vous y trouverez une description de
l'appareil et de ses fonctionnalités.
Pour réduire les risques liés à l'installation des appareils
électriques et éviter un usage impropre de l'appareil, il
importe que le réfrigérateur-congélateur soit correctement
installé et que vous lisiez soigneusement les consignes de
sécurité.
Nous vous conseillons de conserver ce Manuel d'utilisation
pour toute consultation ultérieure. Remettez-le à l'acheteur
éventuel de votre appareil en cas de cession.
Après avoir retiré l'appareil de son emballage, vérifi ez qu'il
n'est pas endommagé. En cas de doute, n'utilisez pas
l'appareil et contactez le service d'assistance à la clientèle
Electrolux local.
Fonctions de modèles à congélateur superposé ou
réfrigérateur superposé ............................................... 15
Consignes de sécurité importantes............................ 16
Autonomie de fonctionnement .................................... 17
Stockage des denrées dans les réfrigérateurs et
règles d’hygiène ........................................................... 17
Emplacement des denrées .......................................... 18
Installation de votre nouvel appareil........................... 19
Mise en marche initiale ................................................ 20
Commandes à affi chage électronique – modèles
électroniques uniquement ................................................ 21
– Réglage de la température ......................................... 21
– Alarme de température du congélateur ...................... 21
– Alarme porte ouverte ................................................. 21
– Sécurité enfant .......................................................... 21
– Minuterie de réfrigération des boissons ......................21
– Economie d'énergie ................................................... 21
Utilisation de votre appareil ........................................23
– Bac à légumes .......................................................... 23
– Balconnets de porte .................................................. 23
– Compartiment à laitages ............................................ 23
– Désodoriseur ............................................................. 23
– Caddie à bouteilles modulaire .................................... 23
– Support pour bouteilles .............................................23
– Distributeur à glaçons ................................................ 23
– Plateau en verre rabattable Spillsafe™ ....................... 23
Entretien et Nettoyage ................................................. 24
– Remplacement de l'ampoule ..................................... 24
– Nettoyage de l'appareil ..............................................24
Informations générales ................................................ 26
– Sécurité ..................................................................... 26
Conseil pour le respect de l’environnemen
Informations sur la mise au rebut de
l'appareil destinées à l'acheteur
• La majorité de nos emballages sont recyclables. Pour la
mise au rebut des matériaux d'emballage, contactez votre
centre de recyclage local ou utilisez les conteneurs de tri
sélectif.
• Pour la mise au rebut de votre appareil, informez-vous de la
démarche à suivre auprès des autorités locales.
Page 15
Modèle à congélateur superposé
1
2
3
4
5
6
7
8
9
10
11
12
13
14
15
Remarque : Les illustrations du produit présentent différentes fonctions, qui ne
correspondent pas nécessairement parfaitement aux produits actuels.
réfrigération sans givre fonctions 15
Bandeau de commandes tactile sur la porte du
16
1 Capteur
2 Eclairage du congélateur
3 Fentes d'amenée d'air du congélateur
4 Plateau en verre Spillsafe™
17
5 Distributeur à glaçons avec bacs à glaçons
6 Fentes de retour d'air du congélateur
7 Capteur
18
8 Désodoriseur
9 Plateau en verre rabattable Spillsafe™
19
10 Caddie à bouteilles modulaire
11 Plateaux en verre Spillsafe™
12 Eclairage intérieur du réfrigérateur
13 Boutons de réglage de l'humidité des bacs à
légumes
20
14 Bacs à légumes
15 Roulettes à hauteur réglable
21
16 Balconnets de porte de congélateur
17 Compartiments à laitages
22
18 Bac à oeufs
19 Balconnets de porte réglables
23
20 Balconnet de porte pleine largeur
21 Support pour bouteilles (selon le modèle)
22 Balconnet de porte pleine largeur avec arrêtoir
en fi l métallique
23 Pied de stabilisation
congélateur.
Modèle à réfrigérateur superposé
1
2
3
4
5
6
7
8
9
10
11
12
Remarque : Les illustrations du produit présentent différentes fonctions, qui ne
correspondent pas nécessairement parfaitement aux produits actuels.
13
14
15
16
17
18
19
Bandeau de commandes tactile sur la porte du
réfrigérateur
1 Désodoriseur
2 Plateau rabattable Spillsafe™ (selon le modèle)
3 Caddie à bouteilles modulaire
4 Plateau en verre réglable Spillsafe™
5 Eclairage intérieur du réfrigérateur
6 Touches de réglage de l'humidité des bacs à
légumes
7 Bacs à légumes (pleine largeur sur certains
modèles)
8 Plateau de stockage du congélateur
9 Distributeur de glaçons
10 Réserve à glaçons avec cuiller (à l'intérieur du
tiroir du congélateur)
11 Tiroir du congélateur sur glissières
télescopiques
12 Roulettes réglables
13 Compartiments à laitages
14 Balconnets de porte réglages
15 Bac à oeufs
16 Support pour bouteilles (selon le modèle)
17 Balconnet à bouteilles pleine largeur
18 Balconnet à bouteilles pleine largeur (balconnet
à cannettes sur les plus petits modèles)
19 Pied de stabilisation
Page 16
16 consignes de sécurité importantes réfrigération sans givre
Consignes de sécurité importantes
Lisez soigneusement ce manuel et conservez-le en lieu sûr
pour consultation ultérieure.
avertissement
Cet appareil n'est pas destiné à être utilisé par des
enfants ou des personnes dont les capacités physiques,
sensorielles ou mentales, ou le manque d'expérience et
de connaissance les empêchent d'utiliser l'appareil sans
risque lorsqu'ils sont sans surveillance ou en l'absence
d'instruction d'une personne responsable qui puisse
leur assurer une utilisation de l'appareil sans danger.
Empêchez les enfants de jouer avec l'appareil.
avertissement
Frigorigène R600a
Cet appareil contient une petite quantité de frigorigène R600a
non synthétique écologique, mais infl ammable :
• Vérifi ez que la tuyauterie du circuit de frigorigène
n'a pas été endommagée pendant le transport et
l'installation de l'appareil.
• Les fuites de frigorigène peuvent provoquer des
blessures aux yeux ou s'enfl ammer.
• La pièce où l'appareil doit être installé doit faire au
moins 1m3 par 8 g de frigorigène. La quantité de
frigorigène que contient l'appareil fi gure sur la plaque
signalétique à l'intérieur de l'appareil.
avertissement
• Ne conservez pas d’aérosols sous pression
portant la mention ‘infl ammable’ et/ou ou le
symbole d’une petite fl amme à l’intérieur de
votre réfrigérateur ou congélateur. Le non-respect de
cette consigne peut provoquer une explosion.
• Pour mettre le réfrigérateur et le congélateur au
rebut, retirez les portes pour éviter que des enfants
ne s’y enferment et ne suffoquent.
• Cet appareil comprend des matériaux isolants
constitués de gaz infl ammables explosifs. Une mise
au rebut correcte de l’appareil permettra d’éviter tout
risque.
• N’utilisez pas de nettoyeur à vapeur. Si des
composants sous tension entrent en contact avec
la vapeur de condensation, cela peut provoquer un
court-circuit ou un choc électrique.
Pour mettre le réfrigérateur et le congélateur au rebut,
retirez les portes pour éviter que des enfants ne s’y
enferment et ne suffoquent.
Mise à l’arrêt de votre appareil
Si vous devez mettre votre appareil à l’arrêt pendant une
période prolongée, sans qu’il ne se forme de moisissures ni
d’odeurs, procédez comme suit :
1. Retirez tous les aliments.
2. Débranchez votre appareil.
3. Nettoyez et séchez bien l’intérieur.
4. Maintenez les portes entrouvertes. Si toutefois vous n’avez
pas la possibilité de débrancher et vider l’appareil, faites
vérifi er régulièrement le bon fonctionnement de celui-ci et
ceci en tenant compte de sa charge et de son autonomie
de fonctionnement.
avertissement
L'appareil doit être branché dans sa propre prise
électrique.
Le cordon d'alimentation doit être accessible une fois
l'appareil en place.
Il est essentiel que la prise soit mise correctement à
la terre. En cas de doute, faites appel à un électricien
qualifi é.
N'utilisez ni rallonges ni adaptateurs avec cet appareil.
Si le cordon d'alimentation est endommagé, il doit être
remplacé par un technicien de service après-vente
qualifi é.
Débranchez l'appareil avant de le nettoyer ou de
remplacer l'ampoule, afi n d'éviter tout choc électrique.
Ne débranchez jamais l'appareil en tirant sur le cordon
d'alimentation, car vous risqueriez de l'endommager.
Saisissez fermement la fi che et tirez-la d'un coup sec.
Choisissez un emplacement qui ne soit pas trop frais.
La température doit être supérieure à 10°C.
Installez l'appareil dans un lieu sec, à l'abri d'une
moisissure ou humidité excessive.
N'installez pas l'appareil dans des endroits exposés au
gel ou non protégés comme un garage ou une véranda.
Maintenez l'appareil à l'abri des rayons directs du
soleil.
Ne placez pas l'appareil à proximité d'un poêle, d'un
radiateur électrique ou d'un chauffage.
Si l'appareil est installé correctement, il doit :
– Avoir un espacement suffi sant pour la circulation
de l'air à l'arrière et sur les côtés (reportez-vous au
chapitre "Installation de votre nouvel appareil")
– Etre aligné avec les meubles adjacents.
– Avoir les portes qui se ferment automatiquement
lorsqu'elles sont entrouvertes.
Veillez à ce que les orifi ces de ventilation, situés dans
l'enceinte de l'appareil ou la structure intégrée, ne
soient pas obstrués.
Lorsque vous transportez et installez le réfrigérateur,
veillez à n'endommager aucune partie du circuit de
réfrigération.
Page 17

réfrigération sans givre autonomie de fonctionnement, stockage et règles d’hygiène 17
Autonomie de fonctionnement
Lors de sa fabrication, cet appareil a été construit selon des
normes, directives et/ou décrets pour une utilisation sur le
territoire français.
Pour la sécurité des biens et des personnes ainsi
que pour le respect de l’environnement, vous devez
d’abord lire impérativement les préconisations
suivantes avant toute utilisation de votre appareil.
attention
• Pour éviter tout risque de détérioration de l’appareil,
transportez-le dans sa position d’utilisation muni de
ses cales de transport (selon modèle).
Au déballage de celui-ci, et pour empêcher des risques
d’asphyxie et corporel, tenez les matériaux d’emballage
hors de la portée des enfants.
• Pour éviter tout risque (mobilier, immobilier, corporel,.),
l’installation, les raccordements (eau, gaz, électricité,
évacuation selon modèle), la mise en service et la
maintenance de votre appareil doivent être effectués par un
professionnel qualifi é.
• Votre appareil a été conçu pour être utilisé par des adultes.
Il est destiné à un usage domestique normal. Ne l’utilisez
pas à des fi ns commerciales ou industrielles ou pour
d’autres buts que ceux pour lesquels il a été conçu. Vous
éviterez ainsi des risques matériel et corporel.
• Débranchez votre appareil avant toute opération de
nettoyage manuel. N’utilisez que des produits du
commerce non corrosifs ou non infl ammables. Toute
projection d’eau ou de vapeur est proscrite pour écarter le
risque d’électrocution.
• Si votre appareil est équipé d’un éclairage, débranchez
l’appareil avant de procéder au changement de l’ampoule (ou
du néon, etc.) pour éviter de s’électrocuter.
• Afi n d’empêcher des risques d’explosion et d’incendie,
ne placez pas de produits infl ammables ou d’éléments
imbibés de produits infl ammables à l’intérieur, à proximité
ou sur l’appareil.
• Lors de la mise au rebut de votre appareil, et pour écarter
tout risque corporel, mettez hors d’usage ce qui pourrait
présenter un danger : coupez le câble d’alimentation au ras
de l’appareil. Informez-vous auprès des services de votre
commune des endroits autorisés pour la mise au rebut de
l’appareil.
• Respectez la chaîne de froid dès l’acquisition d’un
aliment jusqu’à sa consommation pour exclure le risque
d’intoxication alimentaire.
Veuillez maintenant lire attentivement cette notice pour
une utilisation optimale de votre appareil.
Conformément au règlement UTE-C-73-997 de juillet 2006,
seules les personnes ayant reçues une formation spécifi que
aux fl uides infl ammables peuvent intervenir sur cet appareil qui
contient des hydrocarbures.
Ce gaz est néanmoins infl ammable :
Pendant le transport et l’installation de votre appareil, assurez-vous
qu’aucune partie du circuit n’est endommagée. Si tel est le cas :
– évitez les fl ammes vives (briquet) et tout autre allumage
(étincelles),
– aérez la pièce où se trouve l’appareil.
Si la panne est de courte durée, il n’y a aucun risque
d’altération pour les aliments.
Abstenez-vous cependant d’ouvrir la(les) porte(s).
Si la panne doit se prolonger, transférez les produits surgelés et
congelés dans un autre congélateur.
L’autonomie de fonctionnement est de 13 heures (modèles
S85528-1 KG et ENB 5298 X) et 15 heures (modèles S85582-1
DT et END 5298 X) (selon la norme NF EN 28187).
Cette durée est sensiblement raccourcie suivant la charge de
l’appareil. Dès que vous constatez un début de décongélation,
consommez les aliments le plus rapidement possible ou
recongelez-les après les avoir cuits (aliments crus).
Stockage des denrées dans les
réfrigérateurs et règles d’hygiène
La consommation croissante de plats préparés et d’autres
aliments fragiles, sensibles en particulier au non-respect de la
chaîne de froid (1), rend nécessaire une meilleure maîtrise de la
température de transport et de stockage de ces produits.
A la maison, le bon usage du réfrigérateur et le respect de
règles d’hygiène rigoureuses contribuent de façon signifi cative
et effi cace à l’amélioration de la conservation des aliments.
Conservation des aliments / Maîtrise des températures
Le principe du « FROID VENTILE » a pour effet d’uniformiser la
température à l’intérieur du réfrigérateur. La température idéale
ainsi assurée à tous les niveaux du réfrigérateur permet plus
de liberté pour le rangement de tous les aliments et leur offre
une meilleure et plus longue conservation.
L’observation des conseils suivants est de nature à éviter la
contamination croisée et à prévenir une mauvaise conservation
des aliments.
• Emballer systématiquement les produits pour éviter que les
denrées ne se contaminent mutuellement.
• Se laver les mains avant de toucher les aliments et
plusieurs fois pendant la préparation du repas si celleci implique des manipulations successives de produits
différents, et après, bien sûr, au moment de passer à table
comme les règles d’hygiène l’imposent.
• Ne pas réutiliser des ustensiles ayant déjà servis (cuillère en
bois, planche à découper sans les avoir bien nettoyées au
préalable).
• Attendre le refroidissement complet des préparations avant
de les stocker (exemple : soupe).
• Limiter le nombre d’ouvertures de la porte et, en tout état
de cause, ne pas la laisser ouverte trop longtemps pour
éviter une remontée en température du réfrigérateur.
• Disposer les aliments de telle sorte que l’air puisse circuler
librement tout autour.
Il convient de vérifi er régulièrement que la température
est correcte et le cas échéant, d’ajuster le thermostat en
conséquence comme indiqué (page « Utilisation »).
Page 18

18 emplacement des denrées réfrigération sans givre
Emplacement des denrées
La mesure de la température dans une zone (sur
une clayette par exemple) peut se faire au moyen d’un
thermomètre placé, dès le départ, dans un récipient
rempli d’eau (verre). Pour avoir une représentation fi dèle
de la réalité, lisez la température sans manipulation des
commandes ni ouverture de porte.
Respect des règles d’hygiène
• Nettoyez fréquemment l’intérieur du réfrigérateur en
utilisant un produit d’entretien doux sans effet oxydant
sur les parties métalliques, puis rincer avec de l’eau
additionnée de jus de citron, de vinaigre blanc ou avec
tout produit désinfectant adapté au réfrigérateur.
• Retirez les suremballages du commerce avant de
placer les aliments dans le réfrigérateur (par exemple
suremballages des packs de yaourts).
• Couvrez les aliments.
• Consultez la notice d’utilisation de l’appareil en toutes
circonstances et en particulier pour les conseils
d’entretien.
1) Chaîne de froid : maintien sans rupture de la température requise d’un produit, depuis sa
préparation et son conditionnement jusqu’à son utilisation par le consommateur.
Le principe du « FROID VENTILE » a pour effet
d’uniformiser la température à l’intérieur du réfrigérateur.
La température idéale ainsi assurée à tous les niveaux du
réfrigérateur permet plus de liberté pour le rangement de
tous les aliments et leur offre une meilleure et plus longue
conservation.
Compartiment réfrigérateur
Indicateur de température : Pour vous aider au bon
réglage de votre appareil nous avons équipé votre
réfrigérateur d’un indicateur de température, celui-ci étant
placé dans la zone la plus froide.
Pour la bonne conservation des denrées dans votre
réfrigérateur et notamment dans la zone la plus froide,
veillez à ce que dans l’indicateur de température « OK »
apparaisse.
Si « OK » n’apparaît pas, la température moyenne de la
zone est trop élevée. Réglez le dispositif de réglage de
température sur une position supérieure.
L’indicateur « OK » apparaissant en noir, celui-ci est
diffi cilement visible si l’indicateur de température est mal
éclairé. La bonne lecture de celui-ci est facilitée s’il est
correctement éclairé.
A chaque modifi cation du dispositif de réglage de
température, attendez la stabilisation de la température à
l’intérieur de l’appareil avant de procéder si nécessaire, à
un nouveau réglage. Ne modifi ez la position du dispositif de
réglage de température que progressivement et attendez
au moins 12 heures avant de procéder à une nouvelle
vérifi cation et à une éventuelle modifi cation.
NOTA : Après chargement de l’appareil de denrées fraîches
ou après ouvertures répétées (ou ouverture prolongée) de
la porte il est normal que l’inscription « OK » n’apparaisse
pas dans l’indicateur de température ; attendez au moins
12 heures avant de réajuster le dispositif de réglage de
température.
Nos conseils
• N’entreposez que des aliments frais, nettoyés et
enfermés dans des emballages ou récipients appropriés
de qualité alimentaire (il en existe de nombreux modèles
dans le commerce).
• Respectez les conseils pour le stockage des denrées, et
les règles d’hygiène alimentaire donnés au paragraphe «
Avertissements importants ».
• Afi n de permettre une circulation d’air correcte, ne
couvrez jamais les clayettes de papier ou de feuilles en
plastique.
REMARQUES : les bananes, les pommes de terre, l’ail
et les oignons ne se conservent pas au réfrigérateur. Les
fromages fermentés ne seront mis au réfrigérateur que si
l’on désire arrêter leur maturation. Ils devront alors être
soigneusement enveloppés.
Page 19

(x)
50mm
30mm
30mm
Recommended
airspace
CABINET
DOOR
350mm
(y)
A
Installation de votre nouvel appareil
réfrigération sans givre installation de votre appareil 19
Ventilation adéquate autour de votre appareil.
Le schéma ci-dessous illustre l'espacement recommandé
pour assurer une ventilation adéquate de l'appareil.
Si vous ne disposez pas d'un meuble ouvert à l'arrière,
il est recommandé de prévoir un dégagement de 50 mm à
90 mm (y) et de 35 mm à 75 mm (x). Lorsque l'appareil est
placé dans un coin, laissez un dégagement d'au moins 350
mm côté charnière pour permettre une ouverture suffi sante
des portes et le retrait des balconnets et des plateaux/
clayettes.
REMARQUE :
Les portes ne sont pas conçues pour arriver
au ras mais pour dépasser de la caisse. Les
dégagements illustrés ci-dessus sont les dégagements
minimum recommandés. Le dégagement à l'arrière ne doit
pas dépasser 75 mm.
Installation de votre appareil
10-15mm
Votre nouvel appareil est livré
avec les roulettes réglables
avant abaissées, pour renverser
le haut de 10 mm environ vers
l'arrière par rapport à la position
verticale. Ce qui permettra à
la porte de l'appareil de se fermer
automatiquement, à condition que
le joint soit bien étanche.
Pieds avant
réglables roulants
Pieds arrières
fixes
Le pied de stabilisation doit également être totalement
relevé de manière à ne pas interférer avec les roulettes (voir
le schéma de l'étape 3).
attention
Les roulettes sont conçues uniquement pour le mouvement
avant et arrière. Ce ne sont pas des roues. Si vous déplacez
l'appareil latéralement, vous risquez d'endommager le sol et
les roulettes.
facilement. Vous pouvez également accéder aux
roulettes depuis le côté, en vous servant d'un
tournevis plat. (Voir schéma ci-après.)
Grand écrou
en plastique
Pied stabilisateur
remonté
4. Vérifi ez l'alignement de l'appareil par rapport aux
meubles adjacents pour vérifi er qu'il est de niveau.
Vous pouvez régler le niveau à l'aide des roulettes,
comme décrit à l'étape 3.
ligné sur les
placards,
c’est à dire
que l’espace
doit ètre régulier
Le haut du
réfrigérateur
est de niveau
c’est à dire
horizontal
Ajustez les pieds
routants avant en
cas d’irrégularité
du sol, par ex.
remontez ou
abaisses ce pied
5. Si votre appareil bascule d'un coin à l'autre, cela signifi e
que votre sol n'est pas de niveau. Prenez un morceau
de plastique ou de bois, etc. et placez-le fermement
sous la roulette.
6. Sur certains sols, l'appareil peut rouler vers l'avant lorsqu'il
fonctionne. Si c'est le cas, une “butée de roulette” ou une
cale peut être placée sous les roulettes avant.
7. Vous devrez peut-être parachever l'installation en
répétant les étapes 3, 4 et 5.
8. Lorsque vous avez placé l’appareil dans sa position
défi nitive, il faut le stabiliser. Abaissez le pied de
stabilisation jusqu’au sol jusqu’à ce qu’il fasse contact
avec le sol. Levez l’avant de l’appareil pour dégager
le poids du pied de stabilisation, puis tournez-le de
¼ de tour supplémentaire pour assurer un contact
ferme avec le sol. Chaque fois que vous devez bouger
l’appareil, veillez à relever le pied, de façon à ce que
l’appareil puisse rouler facilement et à le remettre en
place lorsque vous le réinstallez.
vue latérale
1. Faites roulez l'appareil jusqu'à son emplacement.
2. Renversez le haut de l'appareil de 10 mm vers l'arrière.
Ce qui permettra à la porte de l'appareil de sefermer
automatiquement, à condition que le joint soit bien
étanche.
3. Si vous ne renversez pas l'appareil en arrière, vous
pouvez régler les deux roulettes avant en
tournant le gros écrou de roulette en plastique. Un
tour d'écrou augmente la hauteur de l'appareil de
10 mm. Si vous avez des diffi cultés à tourner l'écrou
de roulette, demandez à quelqu'un de renverser
l'appareil en arrière pour pouvoir y accéder plus
Pied de stabilisation
abaissé
vue frontale
¼ de tour
Page 20

20 mise en marche initiale réfrigération sans givre
Mise en route initiale
9. Nettoyez soigneusement votre appareil conformément
aux instructions fournies dans le chapitre “Nettoyage et
Entretien” et enlevez la poussière qui a pu s’accumuler
au cours de l’expédition.
10. Branchez l’appareil directement dans sa propre prise
et n’utilisez jamais de double adaptateur. Si vous devez
faire rouler l’appareil pour le rapprocher de la
prise, n’oubliez pas de relever d’abord le pied de
stabilisation.
11. Avant de remplir l’appareil, il est recommandé de le faire
fonctionner 2 à 3 heures pour vérifi er que tout
fonctionne correctement.
Félicitations ! L’installation de votre nouvel appareil est
parfaitement réussie.
Branchement électrique
Votre appareil ne peut être branché qu’en 230 V
monophasé.
Vérifi ez que le compteur électrique peut supporter l’intensité
absorbée par votre appareil compte tenu des autres
appareils déjà branchés.
Calibre des fusibles en ligne (un par phase) 10 A en 230 V.
important
Les réfrigérateurs fonctionnent en transférant la chaleur des
aliments de l'intérieur vers l'air extérieur. De ce fait, l'arrière
et les côtés du réfrigérateur (en particulier au démarrage)
sont chauds - ce qui est tout à fait normal.
Une bobine de refroidissement est installée derrière la paroi
arrière du compartiment congélateur. Cette bobine refroidit
et élimine l'humidité de l'air intérieur.
Evitez de placer des aliments contre les fentes d'aération
du réfrigérateur, car cela entraverait la bonne circulation.
Si vous ouvrez souvent la porte, la paroi intérieure du
congélateur se couvrira d'une légère couche de givre.
Ce phénomène est parfaitement normal et disparaît
après quelques jours. Si la porte du congélateur reste
accidentellement ouverte, les parois intérieures se
tapisseront d'une épaisse couche de givre qu'il faudra
éliminer.
Votre nouvel appareil utilise un compresseur grande vitesse
et d'autres composants à haute économie d'énergie
pouvant générer des bruits inhabituels. Ces bruits indiquent
simplement que l'appareil fonctionne correctement. Ils
comprennent :
• Bruits de fonctionnement du compresseur ;
• Bruit de mouvement d'air provoqué par le moteur
du petit ventilateur ;
• Un frémissement similaire à de l'eau en train de
bouillir ;
• Un bruit sec qui se produit pendant le dégivrage
automatique.
L’installation doit être réalisée conformément aux
règles de l’art et normes en vigueur.
Utilisez un socle de prise de courant comportant une
borne de mise à la terre, qui doit être obligatoirement
raccordée conformément aux normes en vigueur
; cette prise de courant doit impérativement être
accessible.
Si le câble d’alimentation est endommagé, il doit être
remplacé par un câble d’alimentation certifi é.
Cette opération ne peut être effectuée que par une
personne habilitée, par votre vendeur ou par le
fabricant.
L’appareil ne doit pas être raccordé à l’aide d’un
prolongateur, d’une prise multiple ou d’un raccordement
multiple (risque d’incendie).
Vérifi ez que la prise de terre est conforme aux règlements
en vigueur.
L’appareil doit pouvoir être débranché à tout moment : il est
donc nécessaire que la prise murale reste accessible une
fois que l’installation est terminée.
Notre responsabilité ne saurait être engagée en cas
d’accidents ou d’incidents provoqués par une mise à
la terre inexistante ou défectueuse.
Pour plus de détails, reportez-vous au chapitre
“Dépannage”.
conseils et informations
• Ne placez pas des aliments à l'avant des nervures de la
paroi inférieure du congélateur, car la porte resterait ouverte.
Capteur
Fentesd'aération
Nervures
Page 21

réfrigération sans givre commandes à affi chage électronique 21
Commandes à affi chage électronique
Le panneau d'affi chage électronique se compose d'un LCD
(affi chage à cristaux liquides) avec rétroéclairage blanc et
6 touches. Lorsque vous mettez l'appareil sous tension
pour la première fois, l'affi chage rétroéclairé s'allume. Si
vous n'avez appuyé sur aucune touche et que la porte de
l'appareil est fermée, le rétroéclairage se coupe après 30
secondes.
Réglage de la température
Lorsque vous mettez votre appareil en marche pour la
première fois, nous vous recommandons de régler la
température du réfrigérateur sur 3°C et celle du congélateur
sur -18°C. Si vous souhaitez modifi er la température,
procédez comme suit. Procédez à de petits ajustements et
patientez 24 heures pour vérifi er que l'appareil fonctionne
correctement. La consistance de la glace est une bonne
indication de la température du congélateur, tandis que la
froideur de l'eau conservée dans le réfrigérateur est une
bonne façon de vérifi er la température du compartiment
alimentaire.
REMARQUE : Lorsque vous réglez une température, vous
réglez une température moyenne pour tout l'appareil.
Les températures peuvent varier à l'intérieur de chaque
compartiment, en fonction de la quantité d'aliments
conservés et de l'endroit où ils sont conservés. Une
température ambiante élevée ou basse peut également
affecter la température à l'intérieur de l'appareil.
Modifi cation de la température du congélateur
Appuyez sur la touche du congélateur pour
diminuer la température du congélateur
par pas de 1°C. Une fois le maximum de
-23°C atteint, l'affi chage revient à -14°C si
vous appuyez encore une fois sur la touche. Le graphique
à barres se rétrécit à chaque fois que vous diminuez la
température du congélateur.
Modifi cation de la température du réfrigérateur
Appuyez sur la touche du réfrigérateur
pour réduire la température du réfrigérateur
par pas de 1°C. Une fois 0°C atteint,
l'affi chage revient à 7°C si vous appuyez
encore une fois sur la touche. Le graphique à barres se
rétrécit à chaque fois que vous diminuez la température du
réfrigérateur.
Fonction de congélation rapide
Utilisez la fonction de congélation
rapide lorsque vous ajoutez de grosses
quantités d'aliments dans le compartiment
congélateur. Les aliments se congèlent
ainsi rapidement, sans affecter la température à l'intérieur
du compartiment réfrigérateur. Pour utiliser cette fonction,
appuyez une fois sur la touche de congélation rapide.
Un symbole animé s'allume. La fonction de congélation
rapide fonctionne pendant 90 minutes, puis se coupe.
Si vous souhaitez désactiver la fonction de congélation
rapide avant l'expiration des 90 minutes, il vous suffi t
d'appuyer de nouveau sur la touche de congélation rapide.
Le symbole disparaît et le congélateur revient en mode de
fonctionnement normal.
Alarme de température du congélateur
Si l'alarme retentit sans aucune raison
apparente, vérifi ez si rien n'empêche la
fermeture de la porte. Si le congélateur
chauffe trop parce que la porte est restée
ouverte ou parce que des aliments chauds ont été placés
trop près du capteur de température, une alarme retentit.
Le symbole adjacent à la touche de réinitialisation de
l'alarme, la température réglée du congélateur et le
graphique à barres se mettent tous à clignoter jusqu'à
ce que vous appuyiez sur la touche de réinitialisation
de l'alarme. Une fois la touche enfoncée, le symbole de
désactivation de l'alarme adjacent à la touche d'alarme
s'allume pendant 50 minutes, ou jusqu'à ce que la
température redescende à un niveau acceptable.
Vérifi ez que rien n'empêche la fermeture de la porte du
congélateur et éloignez les aliments chauds du capteur
de température. Si le congélateur est toujours trop chaud
après 50 minutes, l'alarme retentit de nouveau pour
indiquer qu'il y a un problème au niveau de l'appareil.
REMARQUE :
L'alarme de température du congélateur peut être
réinitialisée pendant 12 heures en appuyant sur la touche
de réinitialisation de l'alarme et en la maintenant enfoncée
10 secondes.
Alarme de porte du réfrigérateur
Si la porte du réfrigérateur est restée ouverte plus de deux
minutes, l'alarme retentit et une fl èche pointant vers une
porte ouverte se met à clignoter, en même temps que le
réglage de la température et le graphique à barres.
Si vous souhaitez laisser la porte ouverte pendant que
vous chargez le réfrigérateur, vous pouvez désactiver
l'alarme pendant 8 minutes en appuyant sur la touche de
réinitialisation de l'alarme.
Sécurité enfants
Pour activer la sécurité enfants,
appuyez simultanément sur
les touches congélateur et
réfrigérateur et maintenezles enfoncées. L'affi chage
se coupe, afi n d'empêcher
toute modifi cation accidentelle des réglages. Pour couper
la sécurité enfants, appuyez simultanément sur les touches
congélateur et réfrigérateur et maintenez-les enfoncées.
Minuterie de réfrigération des boissons
La minuterie de réfrigération des boissons
sert à refroidir rapidement une bouteille.
Placez la bouteille dans le congélateur et
réglez la minuterie entre minimum 5 minutes
et maximum 30 minutes. Pour régler la minuterie, appuyez
sur la touche de réfrigération des boissons autant de fois
que le nombre de minutes souhaités (par intervalles de 5
minutes). Une fois ce réglage terminé, un symbole animé
apparaît à côté de la touche de réfrigération des boissons,
avec une minuterie qui compte à rebours, minute par
minute.
Vous pouvez modifi er la durée ou couper la minuterie,
même si le compte à rebours à commencé. Une alarme
sonore vous signale que la durée a expiré et un symbole se
met à clignoter jusqu'à ce que vous appuyiez sur la touche
de réinitialisation de l'alarme.
Si votre boisson n'est pas assez froide, réglez de nouveau
la fonction de refroidissement des boissons (en n'oubliant
pas que la boisson a déjà été partiellement réfrigérée).
Temps de réfrigération suggérés:
• 10 minutes pour les cannettes
• 20 minutes pour les bouteilles de bière ou de vin
• 30 minutes pour les bouteilles de boissons non
alcoolisées
Page 22

22 commandes à affi chage électronique réfrigération sans givre
Economie d'énergie
Votre appareil est conçu pour économiser l'énergie et peut
fonctionner dans trois modes : Normal, Eco et Vacances.
• Mode Normal
Utilisez le mode Normal si vous ouvrez est
utilisé souvent la porte du réfrigérateur. C'est
le mode de fonctionnement normal de votre
réfrigérateur.
• Mode Eco
Utilisez le mode Eco si vous n'ouvrez pas
souvent la porte de votre réfrigérateur. Vous
pouvez l'activer de deux manières :
– en appuyant manuellement une fois sur la touche Eco/
Vacances lorsque le réfrigérateur est en mode Normal, ou
– il s'active automatiquement après 30 heures si la porte du
réfrigérateur n'a pas été ouverte.
Le symbole de feuille apparaît à l'affi cheur électronique
lorsque le mode Eco est activé. Si le mode Eco s'active
automatiquement, le réfrigérateur revient en mode Normal
dès que vous ouvrez la porte du réfrigérateur. Si vous activez
manuellement le mode Eco, vous ne pourrez pas rétablir le
mode Normal en ouvrant la porte. Pour quitter le mode Eco,
il vous suffi t d'appuyer sur la touche Eco/Vacances jusqu'à
ce que le mot “normal” s'affi che. Utilisez le mode Eco
lorsque vous n'utilisez pas le réfrigérateur tout le temps (par
ex. comme réfrigérateur de conservation longue durée). Si
vous devez ouvrir souvent la porte, rétablissez le mode Normal.
N'oubliez pas que si vous activez le mode Eco
manuellement, il ne se coupera pas automatiquement.
Utilisation de votre appareil
Ce chapitre décrit comment exploiter au maximum les
nombreuses fonctions utiles de votre nouvel appareil.
Bac à légumes
Utilisez le bac à légumes pour les
fruits et légumes ainsi que d'autres
produits de petite taille.Modifi ez le
taux d'humidité en faisant glisser le
régulateur d'humidité.
• Conservation des légumes
Conservez les légumes dans le bac à légumes et
n'oubliez pas d'augmenter le taux d'humidité (fermé).
• Conservation des fruits & produits de petite taille
Conservez les fruits et produits de petit taille dans le
bac à légumes et n'oubliez pas de diminuer le taux
d'humidité (ouvert).
• Retrait (bacs à légume standard)
1. Retirez les aliments du bac.
2. Retirez le(s) bac(s) à légumes en le tirant vers l'avant, puis
soulevez-le et tirez-le encore plus vers l'avant.
3. Retirez le plateau en soulevant les cliquets sous la partie
inférieure du plateau, puis tirez le plateau vers l'avant.
Cliquet
Réglage de
l'humidité
• Mode Vacances
Utilisez cette touche lorsque vous partez
en vacances ou quittez la maison pour une
période prolongée. Le réfrigérateur minimise
le dégivrage pour économiser l'énergie, mais maintient
les réglages de température. Pour mettre le réfrigérateur
en mode Vacances, appuyez sur la touche Eco/Vacances
jusqu'à ce que le symbole de l'avion apparaisse. Le mode
Vacances reste actif jusqu'à ce que vous appuyiez de
nouveau sur la touche ou que vous ouvriez la porte du
réfrigérateur.
REMARQUE : L'ouverture de la porte du congélateur
n'affecte pas les modes Eco ou Vacances.
Les modes Eco et Vacances minimisent le dégivrage pour
économiser l'énergie, mais maintiennent les réglages de
température.
Autres fonctions spéciales de l'appareil
• Commande indépendante du compresseur et du
ventilateur pour assurer les meilleures performances.
• Refroidissement supplémentaire en fonction du nombre
de fois que l'on ouvre la porte.
• Dégivrage automatique lorsque l'on n'ouvre pas souvent
la porte.
REMARQUE : Les pannes d'affi chage peuvent être dues
à de brèves coupures de courant. Si c'est le cas, mettez
l'appareil hors tension et patientez 5 minutes. Il faudra
attendre que la pression du réfrigérateur s'équilibre avant
de remettre l'appareil sous tension.
attention
N'utilisez jamais de solvants ou de produits infl ammables,
comme du dissolvant ou de l'essence à briquet, à l'intérieur
de votre réfrigérateur. Ils risquent d'affecter la durée de
vie des composants en plastique et décolorer les aliments
conservés.
Balconnets de porte
Votre réfrigérateur est doté de balconnets de porte.
Ces balconnets peuvent être réglés en fonction de vos
besoins. Chaque balconnet est entièrement amovible
pour le nettoyage. Si vous souhaitez retirer et ou régler
un balconnet, soulevez-le pour le dégager des pattes
d'attache du panneau de porte intérieur. Pour le remettre en
place, enfoncez le balconnet sur les pattes d'attache pour
le bloquer.
Compartiment à laitages
Utilisez le compartiment à
laitages pour conserver des
aliments comme du beurre, de
la margarine et du fromage. Le
compartiment est légèrement
plus chaud que dans le reste du
réfrigérateur et le couvercle
protège des odeurs.
Désodoriseur
Votre appareil est équipé d'un désodoriseur qui aide à
éliminer les relents de nourriture. Les odeurs sont éliminées
par absorption à travers le fi ltre lors du fonctionnement
normal de l'appareil. Vous pouvez également réduire les
odeurs à l'intérieur de votre appareil en recouvrant les
aliments et en les enveloppant de fi lm plastique.
Page 23

réfrigération sans givre utilisation de votre appareil 23
Caddie à bouteilles modulaire
Le caddie à bouteilles modulaire est fabriqué en aluminium
anodisé. Il sert à stocker divers types de bouteilles, comme
le vin ou la bière. Rangez les bouteilles avec le fond vers
l'arrière du réfrigérateur. Le réfrigérateur est livré avec trois
caddies combinés, mais vous pouvez les séparer.
Utilisation du support pour bouteilles (selon le
modèle)
Le support pour bouteilles sert à empêcher les bouteilles
de tomber. Le support pour bouteilles se compose de deux
parties, une partie frontale coulissante et un anneau de
retenue rotatif.
Le support pour bouteilles peut être utilisé dans deux
positions :
• Horizontale
Lorsque l'anneau du support pour bouteilles est à
l'horizontale, tout élément passant dans l'anneau peut
simplement être placé à l'intérieur.
Vous pouvez installer le distributeur de glaçons de
l'autre côté du congélateur, en procédant comme suit :
1. Retirez la réserve et le bac
à glaçons. Si l'ensemble
du bac à glaçons est fi gé
au plateau-support par la
glace, il suffi t d'appuyer sur
le bac et le plateau en verre
ensemble pour briser la glace.
2. Avant d'enlever le plateau-support à glaçons, n'oubliez
pas de le libérer du plateau en verre (comme illustré),
à défaut de quoi vous risqueriez d'endommager
l'ensemble.
3. Retirez la glissière centrale en la dégageant à l'avant du
plateau et en la retirant par l'arrière.
4. Remettez en place la glissière à l'arrière du plateau, à
droite, puis engagez l'avant (comme illustré).
5. Introduisez le plateau-support dans les glissières
jusqu'à ce que l'avant du plateau-support s'engage
dans le plateau en verre.
6. Remettez en place le bac à glaçons et la réserve.
Retirez le plateau en verre en le faisant glisser.
Ce plateau peut être utilisé entièrement déployé ou rabattu
de moitié pour vous permettre de ranger des produits hauts
sur le devant de l'appareil.
Insérez dans la fente
à l'arrière du plateau
• Verticale
Lorsque l'anneau du support pour bouteilles est à
la verticale, vous pouvez simplement faire glisser le
support pour bouteilles le long de la barre de retenue
des bouteilles jusque tout contre une bouteille.
Remarque :
La bouteille doit être calée de l'autre côté soit par le bout du
compartiment soit par d'autres bouteilles adjacentes.
Distributeur de glaçons
Pour l’utiliser, retirez le bac
à glaçons, remplissez-le
d’eau et remettez-le dans le
congélateur. Une fois la glace
formée (environ 3 heures),
il suffi t de tourner le bouton
à l’avant dans le sens des
aiguilles d’une montre jusqu’à ce que la glace tombe dans la
réserve en dessous.
Puis engagez
dans l'avant
du plateau
• Pour rabattre le plateau :
1. Tirez la moitié avant du
plateau vers l'avant.
2. Puis soulevez-la par en
dessous en relevant le
bord arrière par dessus
le crochet renfoncé.
Hook detail
3. Tirez le plateau vers
vous en laissant la
partie arrière retomber
dans les profi ls
latéraux.
4. Repoussez le plateau
avant (3, 4) jusqu'aux
butées arrière.
• Repositionnement:
Le plateau peut être
repositionné dans
l'appareil en extrayant
l'ensemble jusqu'à ce
que les panneaux latéraux
basculent vers l'avant, puis en faisant pivoter l'arrière du
plateau jusqu'à ce qu'il se dégage des glissières. Le plateau
peut alors être placé dans n'importe quelle glissière – cette
fonction est très utile si la porte de votre appareil offre un
accès limité.
Page 24

24 nettoyage et entretien réfrigération sans givre
Entretien et Nettoyage
avertissement
Avant de remplacer une ampoule, mettez l'appareil
hors tension et retirez le cordon d'alimentation de la
prise.
Remplacement de l'ampoule
• Eclairage du réfrigérateur
1. Mettez l'appareil hors tension et retirez
le cordon d'alimentation de la prise.
2. Retirez les plateaux/clayettes.
3. Déclipsez délicatement le cache. A cet
effet, tirez la partie supérieure du cache
vers l'avant de l'appareil.
4. Dévissez l'ampoule et remplacez-la par
une ampoule identique à celle d'origine.
Si, au moment où vous enlevez
l'ampoule, le petit joint torique en caoutchouc sort avec
l'ampoule, placez celui-ci au-dessus de la nouvelle
ampoule et vissez celle-ci dans la douille (voir le schéma).
Ne mettez jamais votre doigt dans la douille
de l'ampoule pour y vérifi er la présence du
joint torique.
5. Remettez le cache en place en accrochant les pattes du
cache dans le bas du logement et en enfonçant la partie
supérieure du cache, jusqu'à ce qu'elle s'encliquette.
6. Remettez les plateaux/clayettes en place.
7. Patientez 5 minutes pour vous assurer que les
pressions du circuit de réfrigération se sont équilibrées.
Rebranchez ensuite le réfrigérateur et remettez-le sous
tension.
• Eclairage du congélateur
1. Mettez l'appareil hors tension et retirez le cordon
d'alimentation de la prise.
2. Déclipsez délicatement le cache. A cet
effet, tirez la languette du cache à l'arrière
vers l'avant de l'appareil.
3. Dévissez l'ampoule et remplacez-la
par une ampoule identique à celle
d'origine. Si, au moment où vous
enlevez l'ampoule, le petit joint torique
en caoutchouc sort avec l'ampoule,
placez celui-ci au-dessus de la nouvelle
ampoule et vissez celle-ci dans la douille (voir le
schéma).
Ne mettez jamais votre doigt dans la douille de
l'ampoule pour y vérifi er la présence du joint
torique.
4. Remettez le cache en place en accrochant les pattes
du cache dans le bas du logement et en
enfonçant la partie supérieure du cache, jusqu'à ce
qu'elle s'encliquette.
5. Patientez 5 minutes pour vous assurer que les
pressions du circuit de réfrigération se sont équilibrées.
Rebranchez ensuite le réfrigérateur et remettez-le sous
tension.
conseils et informations
Vérifi ez que le joint torique est en place avant de
remplacer l'ampoule.
Ampoule Joint torique Douille
Nettoyage de l'appareil
avertissement
AVANT DE NETTOYER l'appareil : Mettez l'appareil hors
tension et retirez le cordon d'alimentation de la prise.
Vous ne courrez ainsi aucun risque de subir un choc
électrique.
• Portes et extérieur
- acier inoxydable
Votre appareil en acier inoxydable est fabriqué en un
acier inoxydable résistant aux marques. Cet acier
inoxydable est revêtu d'un fi l protecteur spécial qui permet
d'éliminer plus facilement les marques comme les
empreintes de doigts et les taches d'eau. Pour conserver
votre appareil en acier inoxydable aussi brillant qu'au
premier jour, vous devez le nettoyer régulièrement.
Nettoyez les portes en acier inoxydable uniquement à
l'eau tiède savonneuse et un chiffon doux, en rinçant à
l'eau claire et en essuyant ensuite la surface avec de l'eau
claire et un chiffon doux propre pour éliminer les résidus de savon.
- pacifi que argenté
Nettoyez les portes en pacifi que argenté uniquement à
l'eau tiède savonneuse et un chiffon doux, en rinçant à
l'eau claire et en essuyant ensuite la surface avec de l'eau
claire et un chiffon doux propre pour éliminer les résidus de
savon.
attention
N'utilisez pas de détergents pour acier inoxydable, de
tampons à récurer ou autres produits, car vous risquez
de rayer la surface. Les dommages subis par ce produit
après la livraison ne sont pas couverts par la garantie.
• Intérieur
L'intérieur de votre appareil doit être nettoyé
régulièrement. Il est plus facile de le nettoyer lorsqu'il
n'est pas trop rempli. Nettoyez l'intérieur à l'aide d'un
chiffon doux imbibé d'eau tiède additionnée d'un
détergent doux neutre. Essuyez soigneusement toutes
les surfaces et les accessoires amovibles
jusqu'à ce qu'ils soient secs. Evitez de mouiller les
commandes de réglage de l'appareil. Si vous avez
retiré certains accessoires amovibles de l'appareil,
remettez-les en place et remettez l'appareil sous
tension avant de le remplir de nouveau. Vous devez
bien entendu maintenir une bonne hygiène dans votre
appareil en essuyant rapidement et soigneusement tous
débordements d'aliments. N'utilisez pas de nettoyeur à
vapeur. Si des composants sous tension entrent en
contact avec la vapeur de condensation, cela peut
provoquer un court-circuit ou un choc électrique.
• Joints d'étanchéité des portes
Gardez les joints de portes propres. Le déversement de
denrées ou de boissons collantes peut causer
l 'adhésion des joints à l'appareil et leur déchirure lors
de l'ouverture de la porte. Nettoyez le joint à l'eau chaude
additionnée d'un détergent doux. Rincez soigneusement
et faites sécher.
attention
N'utilisez jamais d'eau chaude, de solvants, de
détergents domestiques en vente dans le commerce,
de produits d'entretien aérosols, de produits
d'entretien pour les métaux, de produits caustiques
ou abrasifs ou de poudre à récurer pour nettoyer
l'appareil, car vous risqueriez de l'endommager. De
nombreux produits de nettoyage et de détergents en
vente dans le commerce comprennent des solvants
susceptibles d'endommager votre réfrigérateur.
Nettoyez votre appareil uniquement à l'aide d'un
chiffon doux imbibé d'eau tiède additionnée d'un
détergent doux neutre.
Page 25

réfrigération sans givre informations générales 25
Cet appareil est conforme aux directives communautaires suivantes :
2006/95/CE : D e Tension
2004/108/CE : Directive sur la Compatibilité électromagnétique (CEM)
92/75/CEE : Etiquetage énergétique
94/2/CE : Etiquetage énergétique Implémentation pour les réfrigérateurs et les congélateurs
96/57/CE : Exigences en matière de rendement des réfrigérateurs et congélateurs
93/68/CEE : Directive générale d'amendement
2002/95/CE : Limitation de l'utilisation de certaines substances dangereuses (RoHS)
Normes harmonisées selon lesquelles la conformité est déclarée :
73/23/CEE :
EN60335.1:1994 Sécurité électrique : Impératifs généraux
EN60335.2.24:1994 Sécurité électrique : Réfrigérateurs, Congélateurs
92/7/5/CE :
EN153:1996 Consommation d'énergie : Réfrigérateurs
89/336/CEE :
EN55014-1:1993 Emissions : Appareils électroménagers et similaires
EN55014-2:1997 Immunité : Appareils électroménagers et similaires
EN61000-3-2 Limites pour les émissions de courant harmonique
EN61000-3-3 Limitations des variations de tension et du papillotement
Le symbole WEEE qui fi gure sur le produit ou son emballage indique que ce produit ne peut pas être traité
comme déchet ménager. Au lieu de cela, l'équipement doit être remis à un centre de collecte spécialisé
dans le recyclage des appareils électriques et électroniques. En éliminant l'appareil comme il se doit,
l'utilisateur contribue à atténuer les conséquences négatives qu'une mauvaise gestion des déchets de
ce produit peut avoir sur l'environnement et la santé. Pour obtenir plus de détails sur le recyclage de
ce produit, veuillez prendre contact avec le service compétent de votre commune, la société locale de
collecte des ordures ménagères ou le magasin où vous avez acheté l'appareil.
Caractéristiques techniques
Dimensions 500L top mount 510L bottom mount 420L top mount 430L bottom mount
Hauteur 1720mm 1720mm 1640mm 1720mm
Largeur 803mm 803mm 703mm 703mm
Profondeur 745mm 745mm 709mm 745mm
Les caractéristiques fi gurent sur la plaque signalétique
située sur le côté gau-che à l’intérieur de l’appareil et sur
l’étiquette d’énergie.
Installation
avertissement
Pour votre sécurité et le bon fonctionnement de l’appareil,
veuillez lire attentivement les “Consignes de sécurité” avant
d’installer l’appareil.
Emplacement
La température ambiante infl uence sur la consommation et le
fonctionnement de l’appareil.
Pour le bon fonctionnement de votre appareil, il est impératif de
respecter les températures ambiantes du local où doit être placé
l’appareil, suivant la classe climatique (indiquée sur la plaque
signalétique) pour lequel il est prévu.
Au delà de ces températures, ses performances peuvent s’en
trouver diminuées. Le tableau ci-dessous vous permet de repérer
les différentes classes climatiques existantes et les températures
ambiantes correspondantes en fonction du modèle de l’appareil.
Classe climatique Temperature ambiante
SN +10 à + 32˚C
N +16 à + 32˚C
ST +16 à + 38˚C
T +18 à + 43˚C
Page 26

26 dépannage réfrigération sans givre
Dépannage
Si vous constatez un problème au niveau de votre appareil,
procédez à quelques vérifi cations simples avant de
contacter le service après-vente. Vous pourrez peut-être
solutionner le problème, ce qui évitera des dérangements et
vous fera réaliser une économie de temps et d'argent.
Anomalie Remède
Le réfrigérateur ne
fonctionne
pas
Si le réfrigérateur/
congélateur fait du
bruit
Relents de nourriture • Il se peut que l'intérieur de votre
• Vérifi ez que le cordon d'alimentation est
correctement branché à la prise électrique
est que cette dernière est sous tension.
• Branchez un autre appareil électrique à
la prise. En cas d'absence de courant, il
se peut qu'un fusible de votre installation
domestique ait disjoncté ou que
l'installation électrique de votre habitation
soit défectueuse.
• Essayez de diminuer légèrement la
température.
• Il est tout à fait normal que le congélateur
NE fonctionne PAS pendant le cycle de
dégivrage automatique de l'appareil ou
pendant un court moment après la mise
en marche de l'appareil.
Les réfrigérateurs/congélateurs modernes
de grande capacité utilisent des
compresseurs extrêmement rapides. Leur
niveau sonore est un peu plus élevé, ce qui
est tout à fait normal. Nous attirons votre
attention sur le fait qu'il n'est pas anormal
d'entendre certains bruits comme :
• Un frémissement similaire à de l'eau en
train de bouillir.
• Le bruit du débit d'air (l'air circule grâce à
un petit ventilateur).
• Un bruit sec qui se produit pendant le
dégivrage automatique.
Les autres bruits peuvent signifi er que vous
devez faire des vérifi cations et prendre des
mesures. Par exemple, les bruits peuvent
signifi er que :
• L'appareil n'est pas correctement de
niveau.
• Le sol est irrégulier ou peu résistant.
• Les bouteilles sont mal placées et
s'entrechoquent.
• Un objet, à l'origine de vibrations, est
placé au-dessus, derrière ou à côté de
l'appareil.
• L'arrière de l'appareil est appuyé contre
un mur.
N'oubliez pas qu'il est tout à fait normal que
l'appareil semble plus bruyant juste
après sa mise en marche.
réfrigérateur ait besoin d'être nettoyé.
• Certains aliments forment des odeurs.
• Certains récipients et emballages peuvent
dégager des odeurs.
• Vous devez vous demander si l'odeur
provient de quelque chose d'insolite.
Anomalie Remède
Lorsque le moteur
semble fonctionner
plus que prévu
La température de
l'appareil est trop
élevée
La température de
l'appareil est trop
basse
En cas de formation
excessive de givre
à l'intérieur du
congélateur
Si de l'eau goutte sur
le sol
Le réfrigérateur ne
sort pas du mode
Vacances
Si les portes ne se
ferment pas
Votre nouvel appareil comporte un
compartiment réfrigérateur de grande
capacité et un compartiment congélateur
vous permettant de conserver les aliments.
Il est normal que vous entendiez souvent le
moteur fonctionner. Toutefois, pour réduire le
fonctionnement au minimum, vérifi ez ce qui suit :
• Ne laissez-vous pas les portes ouvertes trop
longtemps ou plus de temps que nécessaire ?
• Les réglages de température sont-ils trop
faibles ? Voir “
• Avez-vous récemment stocké de grandes
quantités d'aliments chauds ? Votre appareil
fonctionne généralement plus pendant l'été,
les vacances et les périodes de fêtes.
• S'il fait très chaud à l'extérieur ou que la
température ambiante est particulièrement
élevée, l'appareil fonctionne beaucoup plus
qu'en temps normal.
• L'appareil fonctionne aussi beaucoup plus
qu'en temps normal après son installation
ou lors de sa remise en service après une
inutilisation prolongée.
• Vérifi ez que le dégagement de part et
d'autre, à l'arrière et au dessus de l'appareil
est suffi sant. Voir “Installation de votre nouvel
appareil”
• Voir “Réglage de la température”
• Il se peut que vous ayez laissé la porte
ouverte trop longtemps ou que vous l'ouvriez
trop fréquemment.
• Il se peut que des récipients ou des emballages
bloquent la fermeture de la porte.
• Voir “Réglage de la température”
• Augmentez la température pour éviter une
consommation d'énergie trop importante.
Vérifi ez que les portes du congélateur et du
réfrigérateur sont bien fermées. Si les portes
restent ouvertes, l'intérieur du congélateur
se tapissera d'une épaisse couche de givre.
Eliminez toute formation de givre et veillez à
fermer correctement les portes.
Le bac de récupération de l'eau de dégivrage
(situé à l'arrière ou sous l'appareil) n'est peutêtre pas placé correctement, ou le tuyau
d'écoulement n'est peut-être pas posé
correctement pour diriger l'eau dans ce bac.
Vous devrez peut-être retirer le réfrigérateur du
mur pour vérifi er le bac et le tuyau.
Mettez l'appareil hors tension. Laissez hors
tension pendant trois (3) minutes, le temps que
la mémoire s'efface, puis rebranchez l'appareil.
• Vérifi ez que le haut du réfrigérateur est renversé
de 10-15 mm vers l'arrière pour permettre
aux portes de se fermer automatiquement.
• Vérifi ez si rien n'empêche la porte de se
fermer.
Il est tout à fait normal que la porte du congélateur
s'ouvre et se referme momentanément lorsque
la porte du compartiment de stockage des
aliments se ferme. Si la porte du congélateur
reste ouverte, cela signifi e qu'il faut renverser le
réfrigérateur un peu plus vers l'arrière. Si vous
faites appel à votre service après-vente pour
résoudre ce problème cité, son intervention
vous sera facturée, car il ne s'agit pas d'un
défaut couvert par la garantie.
Réglage de la température”
Réf. 1455086
© Copyright 2009 Electrolux Home Products Pty Ltd
ABN 51 004 762 341
Date de publication : Janvier 09
Si malgré cela vous ne parvenez pas à régler le
problème
En cas d'anomalie et si le problème persiste après avoir
effectué les vérifi cations précitées, contactez le service aprèsvente agréé Electrolux de votre magasin vendeur. Munissezvous du numéro de référence du modèle PCN à 9 chiffres et
du numéro de série à 8 chiffres fi gurant sur l'étiquette collée
à l'intérieur du compartiment réfrigérateur.
Page 27

Libretto istruzioni
frigoriferi no-frost
Page 28

28 indice frigoriferi no-frost
Complimenti
Complimenti e grazie per aver scelto un prodotto Electrolux.
È un elettrodomestico di qualità studiato per un uso pratico
e semplice. Prima dell’uso, leggere attentamente il libretto di
istruzioni, contenente la descrizione dell’apparecchio e delle
sue funzioni.
Come per tutti gli elettrodomestici, è importante eseguire
l’installazione correttamente e leggere attentamente le
avvertenze per la sicurezza, per evitare usi impropri e
condizioni di pericolo.
Conservare questo libretto di istruzioni per riferimenti futuri
e consegnarlo al nuovo proprietario in caso di cessione
dell’apparecchio.
Dopo avere estratto l’apparecchio dall’imballaggio,
controllare che non sia danneggiato. In caso di dubbi, non
utilizzare l’apparecchio e contattare il servizio di assistenza
clienti Electrolux.
Indice
Installazione superiore e inferiore .............................. 29
Istruzioni importanti per la sicurezza ......................... 30
Installazione dell’apparecchio ..................................... 31
Prima accensione ......................................................... 32
Comandi del display elettronico - solo modelli
elettronici...................................................................... 33
- Controllo della temperatura ......................................... 33
- Allarme di alta temperatura congelatore ...................... 33
- Allarme porta ..............................................................33
- Protezione bambini...................................................... 33
- Timer di raffreddamento bevande ................................ 33
- Effi cienza energetica.................................................... 33
Uso dell’apparecchio ................................................... 35
- Cassetto verdura ......................................................... 35
- Balconcini sulla controporta ........................................ 35
- Scomparto per prodotti caseari ................................... 35
- Filtro antiodori ............................................................. 35
- Portabottiglie modulare ............................................... 35
- Fermabottiglie orientabile............................................. 35
- Portaghiaccio Twist & Serve ........................................ 35
- Ripiano in vetro regolabile Spillsafe™ .......................... 35
Cura e manutenzione ................................................... 36
- Sostituzione della lampadina ....................................... 36
- Pulizia dell’apparecchio ............................................... 36
Informazioni generali ................................................... 37
- Sicurezza .................................................................... 37
Risoluzione dei problemi ............................................. 38
protezione dell’ambiente
Informazioni sullo smaltimento
• La maggior parte dei materiali di imballaggio è riciclabile.
Conferire questi materiali al centro di smaltimento e
riciclaggio più vicino o usare i contenitori di raccolta
appropriati.
• Al termine della durata utile del prodotto, rivolgersi all’uffi cio
di competenza locale per informazioni sul metodo di
smaltimento corretto.
Page 29

Modello con congelatore in alto
1
frigoriferi no-frost caratteristiche 29
2
3
4
5
6
7
8
9
10
11
12
13
14
15
Nota: Le fi gure mostrano varie caratteristiche del prodotto ma possono differire
leggermente dalla confi gurazione effettiva.
Pannello a sfi oramento sulla porta del congelatore.
1 Sensore
2 Luce del congelatore
16
3 Aperture di ingresso aria del vano congelatore
4 Ripiano in vetro Spillsafe™
5 Portaghiaccio Twist & serve con vaschette
6 Aperture di uscita aria del vano congelatore
17
7 Sensore
8 Filtro antiodori
18
9 Ripiano in vetro sdoppiabile Spillsafe™
10 Portabottiglie modulare
19
11 Ripiani in vetro Spillsafe™
12 Luce del frigorifero
13 Regolatori umidità
14 Cassetti verdura
15 Rotelle regolabili in altezza
20
16 Balconcini controporta vano congelatore
17 Scomparti per prodotti caseari
21
18 Portauova
22
19 Balconcini controporta regolabili
20 Balconcino a larghezza intera
23
21 Fermabottiglie orientabile (se presente)
22 Balconcino a larghezza intera con griglia di
tenuta
23 Piedino stabilizzatore
Modello con congelatore in basso
1
2
3
4
5
6
7
8
9
10
11
12
Nota: Le fi gure mostrano varie caratteristiche del prodotto ma possono differire
leggermente dalla confi gurazione effettiva.
13
Pannello a sfi oramento sulla porta del frigorifero.
1 Filtro antiodori
2 Ripiano sdoppiabile Spillsafe™ (se presente)
14
3 Portabottiglie modulare
15
4 Ripiano in vetro regolabile Spillsafe™
5 Luce del frigorifero
16
6 Regolatori umidità
17
7 Cassetti verdura (a larghezza intera in alcuni
modelli)
8 Scomparto congelatore
18
9 Portaghiaccio Twist & serve
10 Cassetto del ghiaccio con dosatore (all’interno
del cassetto)
11 Cassetti congelatore su guide di estensione
telescopiche
12 Rotelle regolabili
13 Scomparti per prodotti caseari
14 Balconcini controporta regolabili
15 Portauova
16 Fermabottiglie orientabile (se presente)
17 Balconcino portabottiglie a larghezza intera
19
18 Balconcino portabottiglie a larghezza intera (
portalattine nei modelli più piccoli)
19 Piedino stabilizzatore
Page 30

30 istruzioni importanti per la sicurezza frigoriferi no-frost
Istruzioni importanti per la sicurezza
Leggere attentamente il libretto di istruzioni e conservarlo
per la consultazione.
avvertenze
Questo apparecchio non deve essere usato da
persone, bambini inclusi, che presentino ridotte
capacità fi siche, sensoriali o psichiche o siano prive
di conoscenze ed esperienza, a meno che non siano
state debitamente istruite all'uso dell'apparecchio o
lo utilizzino sotto vigilanza.
Evitare che i bambini giochino con l'apparecchio.
avvertenze
Refrigerante R600a
Questo apparecchio contiene una piccola quantità di
R600a, un refrigerante naturale compatibile con l’ambiente
ma infi ammabile:
• Durante il trasporto e l'installazione
dell'apparecchio, assicurarsi che nessuno dei
componenti del circuito refrigerante
venga danneggiato.
• Le perdite di refrigerante possono causare lesioni agli
occhi o rischi di incendio.
• La volumetria del locale di installazione
dell’apparecchio deve essere di almeno 1 m3 per 8
g di refrigerante. La quantità di refrigerante
contenuta nell’apparecchio è riportata sulla
targhetta delle specifi che applicata all’interno.
avvertenze
• Non introdurre nella cella refrigerante o nel
vano congelatore bombolette spray che rechino
l’indicazione “infi ammabile” e/o un simbolo a
fi amma. Il recipiente potrebbe esplodere.
• Prima di smaltire un frigorifero o un congelatore,
rimuovere le porte. I bambini potrebbero restare
chiusi all’interno, con conseguenti rischi
di soffocamento.
• L’apparecchio contiene materiali di isolamento
realizzati con gas infi ammabili. Per evitare
condizioni di pericolo, smaltire correttamente
l’apparecchio. Non utilizzare apparecchi di pulizia
a vapore. Se i componenti sotto tensione dovessero
entrare a contatto con la condensa, potrebbero
causare un cortocircuito o rischi di scossa elettrica.
avvertenze
Il frigorifero deve essere collegato a una presa
elettrica dedicata.
La presa deve restare facilmente accessibile anche
dopo l’installazione dell’apparecchio.
È essenziale che la presa elettrica sia correttamente
collegata a terra. In caso di dubbi, rivolgersi a un
elettricista qualifi cato.
Non collegare il frigorifero a una prolunga o a una
presa multipla.
Se il cavo di alimentazione è danneggiato, farlo
sostituire da un tecnico qualifi cato.
Staccare sempre l’apparecchio dalla presa elettrica
prima di procedere alla pulizia o prima di sostituire una
lampadina, per evitare rischi di scossa elettrica.
Non scollegare l’apparecchio dalla rete elettrica
tirando il cavo di alimentazione. Afferrare saldamente
la spina e tirarla verso l’esterno.
Scegliere un luogo di installazione appropriato,
evitando i locali troppo freddi. La temperatura ambiente
dovrebbe essere superiore a 10°C.
Posizionare il frigorifero in un luogo asciutto, evitando
i locali molto umidi.
Non collocare il frigorifero in un luogo non protetto
o esposto al gelo, ad esempio in un garage o su una
veranda.
Evitare di esporre l'apparecchio alla luce solare diretta.
Non posizionare il frigorifero vicino a fornelli, camini o
termosifoni.
Per un’installazione corretta del frigorifero:
- Lasciare uno spazio libero suffi ciente sul retro e ai
lati dell’apparecchio per consentire un’adeguata
circolazione d’aria (vedere la sezione “Installazione
dell’apparecchio”).
- Allineare il frigorifero ai mobili adiacenti.
– Verifi care che le porte si chiudano da sè da una posizione
parzialmente aperta.
Verifi care che le aperture di ventilazione, sia
sull'apparecchio che nella struttura da incasso, non
siano ostruite.
Durante il trasporto e l’installazione dell’apparecchio,
adottare misure adeguate per la protezione del
circuito refrigerante.
Prima di smaltire un frigorifero o un congelatore,
rimuovere le porte. I bambini potrebbero restare chiusi
all’interno, con conseguenti rischi di soffocamento.
Spegnimento dell’apparecchio
Se l’apparecchio non deve essere utilizzato per un periodo
di tempo prolungato, procedere come segue per evitare la
formazione di muffe:
1. Estrarre tutti gli alimenti.
2. Estrarre la spina dalla presa elettrica.
3. Lavare e asciugare accuratamente l’interno.
4. Lasciare le porte leggermente aperte per consentire
all’aria di circolare.
Page 31

frigoriferi no-frost installazione dell’apparecchio 31
(x)
50mm
30mm
30mm
Recommended
airspace
CABINET
DOOR
350mm
(y)
A
Installazione dell’apparecchio
Circolazione d’aria intorno al frigorifero
La fi gura seguente mostra le distanze libere da lasciare
per consentire una corretta circolazione d’aria intorno al
frigorifero.
Se la nicchia di installazione non è aperta sul lato posteriore,
le distanze minime raccomandate sul lato superiore
aumentano da 50 mm a 90 mm (y) e da 35 mm a 75
mm (x). Se l’apparecchio deve essere installato in un
angolo, lasciare una distanza minima di 350 mm sul
lato incernierato per consentire un’apertura delle porte
suffi ciente per la rimozione dei cassetti e dei ripiani.
NOTA:
avvertenze
Le rotelle consentono solo lo scorrimento in avanti o
all’indietro. Non sono rotelle piroettanti. Lo spostamento
laterale del frigorifero può danneggiare il pavimento e le rotelle.
1. Posizionare il frigorifero nel punto di installazione.
2. La parte superiore del frigorifero dovrebbe essere
nclinata all’indietro di circa 10 mm. Questa
inclinazione consentirà la chiusura automatica delle
porte.
3. Se il frigorifero non è inclinato all’indietro, è possibile
regolare le due rotelle anteriori usando l’apposita
ghiera in plastica. Ad ogni rotazione della ghiera,
l’altezza del frigorifero cambia di circa 10 mm. Per
facilitare la regolazione della ghiera, farsi aiutare da
una persona che tenga il frigorifero inclinato
all’indietro. In alternativa, è possibile accedere alle
rotelle lateralmente usando un cacciavite a testa
piatta. (Vedere la fi gura seguente).
Grosso dado di
plastica del cuscinetto
Le porte dovrebbero sporgere (non essere allineate) rispetto
ai mobili.
Le distanze libere sopra indicate rappresentano le misure
minime consigliate.
La distanza minima sul retro non deve essere superiore a
75 mm.
Installazione del frigorifero
Alla consegna, le rotelline del frigorifero dovrebbero trovarsi
4. Controllare che il frigorifero sia allineato ai mobili
adiacenti. Se necessario, regolare l’allineamento
mediante le rotelle come descritto al punto 3.
Piedino
stabilizzatore
alzato
llineato ai
mobili, cioè
spazio
equidistante
La parte superiore
del frigorifero è a
livello, cioè orizzontale
in posizione abbassata, per produrre un’inclinazione
dell’apparecchio verso il retro di circa 10 mm rispetto
alla verticale. Questa inclinazione consente la chiusura
automatica delle porte.
10-15mm
Regolare i cuscinetti
anteriori rispetto ad
eventuali irregolarità
del pavimento, cioè
caricarli o scariocarli
5. Se il frigorifero dondola, signifi ca che il pavimento
non è in piano. Stabilizzare le rotelle usando
spessori di plastica o di cartone.
6. Su alcune superfi ci è possibile che il frigorifero tenda a
Cuscinetti anteriori
regolabili in altezza
Cuscinetti
posteriori fissi
spostarsi in avanti. In tal caso, bloccare le rotelle frontali
con un fermo o uno spessore idoneo.
7. Successivamente, potrà essere necessario ripetere
Il piedino stabilizzante dovrebbe essere completamente
i punti 3, 4 e 5 della procedura di installazione.
sollevato, per non interferire con lo scorrimento delle rotelle
(vedere la fi gura al punto 3).
Page 32

32 prima accensione frigoriferi no-frost
8. Una volta posizionato l’apparecchio, è necessario
stabilizzarlo. Ruotare il piedino stabilizzatore per
abbassarlo fi no al livello del pavimento. Sollevare il lato
anteriore dell’apparecchio per scaricare il peso dal
piedino stabilizzatore, quindi ruotarlo di un altro ¼ di
giro per garantire un contatto stabile con il pavimento.
Prima di spostare l’apparecchio, sollevare il piedino
per consentire il libero scorrimento delle rotelle e
riabbassarlo per stabilizzare l’apparecchio nella nuova
posizione.
vista laterale
Piedino stabilizzatore
abbassato
vista anteriore
Prima accensione
I frigoriferi operano trasferendo il calore dagli alimenti situati
all’interno
nell’aria esterna. Questo processo riscalda le pareti laterali e
posteriore del frigorifero
(in particolare all’accensione) - tale effetto è da considerarsi
normale.
Dietro la parete posteriore del vano congelatore è situata
una serpentina refrigerante. La serpentina raffredda l'aria ed
elimina l’umidità all’interno.
Evitare di disporre gli alimenti a ridosso delle bocchette
di ventilazione, per evitare di ostruire il fl usso d’aria. Se la
porta del vano congelatore viene aperta frequentemente,
è possibile che all’interno vi sia una leggera formazione
di brina. Si tratta di un effetto normale, che solitamente
scompare dopo alcuni giorni. Se la porta del vano
congelatore rimane accidentalmente aperta, sulle pareti
interne si formerà uno spesso strato di brina.
Questo frigorifero utilizza un compressore ad alta velocità
e altri componenti energeticamente effi cienti che possono
produrre rumori inconsueti. Questi rumori indicano
semplicemente che l’apparecchio sta funzionando
correttamente. Alcuni esempi:
9. Pulire accuratamente l’apparecchio come descritto nella
¼ di giro
sezione “Cura e manutenzione” e rimuovere la polvere
accumulata durante il trasporto.
10. Inserire la spina direttamente nella presa, senza l’uso
di multiple. Se è necessario spostare il frigorifero per
accedere alla spina, ricordarsi di sollevare il piedino
stabilizzatore.
11. Prima di introdurre gli alimenti nel frigorifero, si consiglia
di lasciarlo acceso per 2 o 3 ore per controllare che
funzioni correttamente.
Complimenti! L’installazione del frigorifero è terminata.
• Rumori di accensione del compressore
• Rumore dello spostamento d’aria generato dal
motorino della ventola
• Gorgoglii simili al rumore dell’acqua in ebollizione
• Uno schiocco durante lo sbrinamento automatico
Per maggiori informazioni, vedere la sezione “Risoluzione
dei problemi”.
suggerimenti e informazioni
• Non disporre gli alimenti sulle scanalature anteriori
alla base del vano congelatore, poiché tale disposizione
potrebbe impedire una corretta chiusura della porta.
Aperture di
ventilazione
Sensore
Scanalature
Page 33

frigoriferi no-frost comandi del display elettronico 33
Comandi del display elettronico
Il pannello elettronico comprende un display LCD con
retroilluminazione bianca e 6 tasti a sfi oramento. Alla prima
accensione, il display retroilluminato si accende. Se non
viene premuto nessun tasto o la porta non viene aperta per
30 secondi, la retroilluminazione si spegne.
Controllo della temperatura
Al primo avvio dell’apparecchio, si consiglia di impostare
la temperatura della cella refrigerante a 3°C e quella del
vano congelatore a -18°C. Per cambiare la temperatura,
seguire le istruzioni qui sotto. Apportare solo piccole
variazioni e attendere 24 ore per controllarne l’effetto. La
morbidezza del gelato è un buon indicatore per controllare
la temperatura del congelatore, mentre nel caso della
cella refrigerante un indicatore signifi cativo può essere la
freddezza dell’acqua.
NOTA: La temperatura impostata è da considerarsi la
temperatura media per l’intero apparecchio. Le temperature
dei singoli scomparti possono variare a seconda della
quantità di alimenti e della loro posizione. La temperatura
all’interno dell’apparecchio può dipendere anche dalla
temperatura ambiente esterna.
Modifi ca della temperatura del vano congelatore
Premere il tasto del vano congelatore per
abbassare la temperatura di 1°C alla volta. Al
raggiungimento della temperatura massima
di -23°C, premendo nuovamente il tasto
il display torna a -14°C. Al diminuire della temperatura, il
grafi co a barre si riduce in altezza.
Allarme di alta temperatura congelatore
Se l’allarme si attiva senza una ragione
apparente, controllare che la porta sia chiusa
correttamente. Se la temperatura del vano
congelatore aumenta eccessivamente perché la porta rimane
aperta, o perché vengono introdotti alimenti caldi vicino al
sensore di temperatura, viene emesso un segnale acustico.
L’icona situata vicino al tasto di reset dell’allarme,
la temperatura del congelatore e il grafi co a barre
lampeggiano fi nché non viene premuto il tasto di reset.
Premendo il tasto, l’icona di disabilitazione dell’allarme
vicino al tasto di reset si accende per 50 minuti, o fi nché la
temperatura non raggiunge un livello accettabile.
Controllare che la porta del congelatore sia chiusa
correttamente e allontanare gli alimenti caldi dal sensore
di temperatura. Se dopo 50 minuti la temperatura del
vano congelatore è ancora troppo alta, l’allarme si attiva
nuovamente, indicando un possibile malfunzionamento
dell’apparecchio.
NOTA:
l’allarme di alta temperatura del congelatore può essere
disattivato per 12 ore tenendo premuto il tasto di reset per
10 secondi.
Allarme porta
Se la porta del frigorifero rimane aperta per più di 2
minuti, viene emesso un segnale acustico e il simbolo di
porta aperta, la temperatura e il grafi co a barre iniziano a
lampeggiare.
Se si desidera lasciare la porta aperta durante l’introduzione
degli alimenti, è possibile disattivare l’allarme per 8 minuti
premendo il tasto di reset dell’allarme.
Protezione bambini
Per attivare la protezione
bambini, premere
simultaneamente il tasto del
vano congelatore e quello della
cella refrigerante. Il display
verrà bloccato per impedire la modifi ca accidentale delle
impostazioni. To turn the child lock off, press and hold the
freezer and fridge buttons together.
Modifi ca della temperatura della cella refrigerante
Premere il tasto della cella refrigerante
per abbassare la temperatura di 1°C alla
volta. Alla temperatura di 0°C, premendo
nuovamente il tasto il display torna a 7°C.
Al diminuire della temperatura, il grafi co a barre si riduce in
altezza.
Funzione di congelamento rapido
Questa funzione è utile quando si introduce
una grande quantità di alimenti nel vano
congelatore. Gli alimenti introdotti vengono
congelati rapidamente senza che ciò
infl uisca sulla temperatura della cella refrigerante. Per
usare questa funzione, premere il tasto di congelamento
rapido. Si accenderà un’icona animata. La funzione di
congelamento rapido resterà attiva per 90 minuti, al termine
dei quali si disattiverà automaticamente. Per disattivarla
prima che siano trascorsi 90 minuti, premere nuovamente
il tasto. L’icona scomparirà e il vano congelatore tornerà al
funzionamento normale.
Timer di raffreddamento bevande
Il timer di raffreddamento bevande è utile
quando occorre raffreddare rapidamente
una bottiglia. Introdurre la bottiglia nel vano
congelatore e impostare il timer tra un minimo di 5 minuti e
un massimo di 30 minuti. Per impostare il tempo, premere
il tasto ripetutamente (l’indicazione varia a intervalli di 5
minuti). Una volta impostato il timer, vicino al tasto compare
un’icona animata e inizia il conto alla rovescia del tempo
impostato.
È possibile modifi care il tempo impostato o spegnere il timer
anche dopo l’inizio del conto alla rovescia. Allo scadere
del tempo, viene emesso un segnale acustico e l’icona
lampeggia fi nché non viene premuto il tasto di reset.
Se la bevanda non è suffi cientemente fredda, riattivare la
funzione di raffreddamento (tenendo conto che la bevanda
è già parzialmente raffreddata). Tempi di raffreddamento
consigliati:
• 10 minuti per le bibite in lattina
• 20 minuti per le bottiglie di birra o vino
• 30 minuti per le bibite in bottiglia.
Page 34

34 comandi del display elettronico frigoriferi no-frost
Effi cienza energetica
Il frigorifero è stato progettato per un’elevata effi cienza
energetica e può operare in tre modalità: normale, eco e
vacanza.
• Modalità normale
La modalità normale è quella più adatta
se la porta del frigorifero viene aperta
frequentemente. È la modalità operativa
normale del frigorifero.
• Modalità eco
La modalità eco può essere utilizzata se la
porta del frigorifero viene aperta raramente.
Può essere attivata in due modi:
- manualmente, premendo il tasto “eco/vacanza” quando il
frigorifero è in modalità normale, oppure
- automaticamente, dopo 30 ore di chiusura ininterrotta
della porta.
Quando è attiva la modalità eco, sul display elettronico
compare un’icona a forma di foglia. Se la modalità eco
viene attivata automaticamente, all’apertura della porta
l’apparecchio torna alla modalità normale. Se la modalità
eco viene attivata manualmente, l’apertura della porta non
produce il ritorno alla modalità normale. Per uscire dalla
modalità eco, premere il tasto “eco/vacanza” fi nché sul
display non compare l’indicazione “normale”. La modalità
eco è particolarmente consigliata quando la porta viene
aperta raramente (ad esempio, se il frigorifero viene usato per
le scorte alimentari). Se la porta del frigorifero deve essere
aperta frequentemente, tornare alla modalità normale.
Si ricordi che, se la modalità eco viene attivata
manualmente, non verrà disattivata automaticamente.
• Modalità vacanza
La modalità vacanza può essere usata per
i periodi di assenza prolungati. In modalità
vacanza, il frigorifero riduce al minimo lo
sbrinamento per risparmiare energia, mantenendo tuttavia
le temperature impostate. Per attivare la modalità vacanza,
premere il tasto “eco/vacanza” fi nché compare l’icona a
forma di aeroplano. La modalità vacanza resterà attiva
fi no alla pressione successiva del tasto o fi nché non verrà
aperta la porta del frigorifero.
NOTA: L’apertura della porta del vano congelatore non ha
effetto sulle modalità eco e vacanza.
Le modalità eco e vacanza riducono al minimo lo
sbrinamento per risparmiare energia, mantenendo tuttavia
le temperature impostate.
Altre funzioni speciali del frigorifero
• Controllo indipendente del compressore e della ventola
per fornire prestazioni ottimali.
• Raffreddamento extra in funzione del numero di aperture
della porta.
• Sbrinamento automatico in caso di apertura poco
frequente della porta.
NOTA: Un eventuale malfunzionamento del display può
essere dovuto a brevi interruzioni dell’alimentazione
elettrica. Per risolvere il problema, è suffi ciente spegnere
il frigorifero e attendere 5 minuti. Prima di riaccendere il
frigorifero, è necessario attendere un tempo suffi ciente per
consentire il riequilibrio della pressione.
Uso dell’apparecchio
Questa sezione descrive l’uso ottimale delle numerose
funzioni del frigorifero.
Cassetto verdura
Questo cassetto è particolarmente
adatto per la conservazione
di frutta, verdura o salumi. Il
cursore permette di regolare il
livello di umidità.
• Conservazione di verdure
Per la conservazione della verdura, è consigliabile i
mpostare un grado di umidità relativamente alto (sfi ato
di regolazione chiuso).
• Conservazione di frutta e salumi
Per la conservazione di frutta e salumi, è consigliabile
impostare un grado di umidità relativamente basso (sfi ato
di regolazione aperto).
• Rimozione (cassetti verdura standard)
1. Vuotare il cassetto.
2. Per rimuovere il cassetto verdura, tirare in avanti e sollevare.
3. Per rimuovere il ripiano, sollevare i fermi posti sul lato
inferiore e tirare il ripiano in avanti.
Fermo
avvertenze
Non introdurre nel frigorifero solventi o materiali infi ammabili,
ad esempio solventi per smalto o combustibili liquidi per
accendisigari. Tali materiali potrebbero compromettere la
durata dei componenti in plastica e contaminare gli alimenti.
Balconcini sulla controporta
Il frigorifero è dotato di balconcini sulla controporta.
Tali balconcini possono essere regolati in base ai tipi di
alimenti da riporre. Tutti i balconcini sono completamente
estraibili per facilitare la pulizia. Per rimuovere o estrarre un
balconcino, sollevarlo dalle sporgenze di sostegno della
controporta. Per riapplicarlo, appoggiarlo sulle sporgenze di
sostegno.
Scomparto per prodotti caseari
Questo scomparto è ideale per la conservazione di burro,
margarina e formaggi. Lo scomparto ha una temperatura
leggermente superiore a quella delle altre parti della cella
refrigerante, mentre il coperchio impedisce la diffusione
degli odori.
Filtro antiodori
L’apparecchio è dotato di un
fi ltro antiodori catalizzante che
impedisce la diffusione degli
odori degli alimenti all’interno
della cella refrigerante.
Gli odori vengono
assorbiti dal fi ltro durante
il normale funzionamento
dell’apparecchio. Per ridurre ulteriormente la diffusione degli
odori, è consigliabile tenere gli alimenti coperti e avvolgerli
con una pellicola.
Controllo
dell'umidità
Page 35

frigoriferi no-frost uso dell’apparecchio 35
Portabottiglie modulare
I moduli portabottiglie sono realizzati in alluminio anodizzato.
Permettono di riporre vari tipi di bottiglie, ad esempio di
vino o birra. Le bottiglie devono essere riposte con il fondo
verso il retro del frigorifero. Il frigorifero viene fornito con
tre portabottiglie combinati, separabili in funzione delle
esigenze.
Uso del fermabottiglie orientabile (se presente)
Questo accessorio impedisce la caduta delle bottiglie dai
balconcini. Il fermabottiglie si compone di due parti: una
parte anteriore scorrevole e un anello di tenuta orientabile.
Il fermabottiglie può essere usato in due posizioni:
• Orizzontale
Con l’anello in posizione orizzontale, è possibile inserire
al suo interno qualunque oggetto di dimensione adatta.
Twist & Serve
Rimuovere la vaschetta del
ghiaccio, riempirla d’acqua e
reintrodurla nel freezer. Dopo
che il ghiaccio si è formato
(circa 3 ore), è suffi ciente
ruotare la manopola in senso
orario per far cadere i cubetti nel cassetto sottostante.
Il portaghiaccio Twist & Serve può essere spostato
sull’altro lato del freezer con la procedura seguente:
1. Rimuovere il cassetto del ghiaccio
e la vaschetta. Se la vaschetta
del ghiaccio aderisce al ripiano
adiacente, premerla contro il
ripiano per rompere il ghiaccio.
2. Prima di rimuovere il gruppo
portaghiaccio, ricordarsi di
sganciarlo dal ripiano in vetro (come mostrato nella
fi gura), per evitare possibili danni.
3. Rimuovere la guida centrale sganciandola dal lato
anteriore del ripiano ed estraendola dal retro.
Inserire nella fessura
situata nella parte
posteriore del ripiano
Quindi bloccare
nella parte
anteriore del
ripiano
• Verticale
Se l’anello è in posizione verticale, è possibile
far scorrere il fermabottiglie lungo la barra di tenuta e
appoggiarlo contro una bottiglia.
Nota:
la bottiglia dovrebbe essere in appoggio anche sul lato
opposto, ad esempio contro l’estremità del balconcino o
contro una bottiglia adiacente.
4. Reinserire la guida sul lato posteriore destro del ripiano e
fi ssarla sul lato anteriore (come mostrato nella fi gura).
5. Inserire il gruppo portaghiaccio facendolo scorrere nelle
guide fi nché il lato anteriore del gruppo non si innesta nel
ripiano.
6. Riapplicare il cassetto del ghiaccio e la vaschetta.
Ripiano in vetro sdoppiabile
Questo ripiano può essere ridotto a metà della profondità
originale per consentire l’appoggio di oggetti alti nella parte
anteriore del frigorifero.
• Per ridurre la
profondità del ripiano:
1. Tirare verso l’esterno la
sezione anteriore.
2. Sollevare quindi dal
basso la sezione
Hook detail
anteriore del ripiano
sollevando il bordo
posteriore sopra il
gancio rientrato.
3. Tirare il ripiano in avanti
e far scendere la parte
posteriore nei canali
laterali.
4. Spingere la sezione
anteriore del ripiano (3,4)
fi no ai fermi posteriori.
• Per riposizionare il
ripiano:
Per riposizionare il ripiano nell’apparecchio, tirare verso
l’esterno l’intero gruppo fi nché i pannelli laterali sono liberi di
ruotare verso il basso, quindi far ruotare il lato posteriore del
ripiano in modo da sganciarlo dalle guide. A questo punto,
il ripiano può essere posizionato all’altezza desiderata questa possibilità è particolarmente utile quando l’accesso
alla porta è limitato.
Page 36

36 cura e manutenzione frigoriferi no-frost
Cura e manutenzione
avvertenze
Prima di sostituire la lampadina, spegnere
l’apparecchio ed estrarre la spina dalla presa.
Sostituzione della lampadina
• Luce del frigorifero
1. Spegnere l’apparecchio ed estrarre la
spina dalla presa.
2. Estrarre i ripiani.
3. Sganciare il coprilampada. Tirare la
parte superiore del coprilampada verso il
lato anteriore dell’apparecchio.
4. Svitare la lampadina e sostituirla con
una equivalente. Se durante la
rimozione della lampadina il piccolo O-ring di gomma
dovesse uscire, applicarlo sulla nuova lampadina e
avvitare quest’ultima nel portalampada (vedere la fi gura).
Non introdurre le dita nel portalampada per
controllare la presenza dell’O-ring.
5.Riapplicare il coprilampada agganciandolo alla base della
sede e premendo la parte superiore fi no allo scatto.
6.Riapplicare i ripiani.
7. Attendere 5 minuti per lasciar stabilizzare la pressione
nel sistema refrigerante. Quindi, reinserire la spina e
riaccendere il frigorifero.
• Luce del congelatore
1. Spegnere l’apparecchio ed estrarre la spina dalla presa.
2. Sganciare il coprilampada. Tirare l’aletta situata sul retro
del coprilampada verso il lato anteriore
dell’apparecchio.
3. Svitare la lampadina e sostituirla con una
equivalente. Se durante la rimozione
della lampadina il piccolo O-ring di
gomma dovesse uscire, applicarlo sulla
nuova lampadina e avvitare quest’ultima nel
portalampada (vedere la fi gura).
Non introdurre le dita nel portalampada per
controllare la presenza dell’O-ring.
4. Riapplicare il coprilampada agganciando le alette sul lato
anteriore della sede e premendo la parte posteriore fi no
allo scatto.
5. Attendere 5 minuti per lasciar stabilizzare la pressione nel
sistema refrigerante. Quindi, reinserire la spina e
riaccendere il frigorifero.
Pulizia dell’apparecchio
avvertenze
PRIMA DELLA PULIZIA: Spegnere l’apparecchio ed
estrarre la spina dalla presa. Questo eliminerà ogni rischi
di scossa elettrica.
• Porte ed esterno
- acciaio inox
L’apparecchio è realizzato in acciaio inossidabile resistente
alle macchie. Lo speciale rivestimento protettivo facilita l
a rimozione delle macchie, ad esempio le impronte e i
segni lasciati dalle gocce d’acqua. Per mantenere un
aspetto ottimale dell’apparecchio in acciaio, pulirlo
regolarmente. Per la pulizia delle porte in acciaio, usare
un panno morbido imbevuto di acqua tiepida saponata,
sciacquare con acqua pulita e ripassare la superfi cie con
un panno pulito per rimuovere i residui di sapone.
- silver
Per la pulizia delle porte silver, usare un panno morbido i
mbevuto di acqua tiepida saponata, sciacquare con
acqua pulita e ripassare la superfi cie con un panno pulito
per rimuovere i residui di sapone.
avvertenze
Non usare detergenti specifi ci per acciaio, spugnette
abrasive o altri materiali che possano graffi are
la superfi cie. I danni subiti dal prodotto dopo la
consegna non sono coperti dalla garanzia.
• Interno
L’interno del frigorifero deve essere pulito regolarmente.
Si consiglia di eseguire la pulizia quando il frigorifero è
relativamente vuoto. Lavare l’interno con un panno
morbido imbevuto d’acqua tiepida e sapone neutro.
Asciugare accuratamente tutte le superfi ci e le
parti removibili. Evitare di bagnare i controlli
dell’apparecchio. Dopo aver estratto le parti removibili,
reinserirle e riaccendere l’apparecchio prima di
reintrodurre gli alimenti. Per mantenere condizioni
igieniche ottimali, pulire subito eventuali fuoriuscite o
residui di cibo.
Non utilizzare apparecchi di pulizia a vapore. Se i
componenti sotto tensione dovessero entrare a
contatto con la condensa, potrebbero causare un
cortocircuito o rischi di scossa elettrica.
•Guarnizione delle porte
Le guarnizioni delle porte devono essere pulite
regolarmente. I residui di alimenti o bevande
possono far aderire le guarnizioni al mobile e causare
strappi all’apertura. Lavare le guarnizioni con acqua
tiepida miscelata a un detergente delicato.
Risciacquare acc uratamente e asciugare.
suggerimenti e informazioni
Prima di sostituire la lampadina, controllare che l’Oring sia posizionato correttamente.
Lampadina O-ring Portalampada
avvertenze
Per pulire l’apparecchio, non usare mai acqua
bollente, solventi, detersivi per cucina, detergenti
spray, lucidi per metallo, detergenti caustici o abrasivi
o pagliette, poiché questi materiali potrebbero
danneggiare la superfi cie. Molti prodotti di pulizia e
detersivi reperibili in commercio contengono solventi
che possono danneggiare il frigorifero. Per la pulizia,
usare solo un panno morbido imbevuto di acqua
tiepida e detergente neutro.
Page 37

frigoriferi no-frost informazioni generali 37
Questo apparecchio è conforme alle seguenti direttive CEE:
2006/95/CE: Direttiva bassa tensione
2004/108/CE: Direttiva sulla compatibilità elettromagnetica (EMC)
92/75/CEE: Etichettatura indicante il consumo di energia
94/2/CE: Etichettatura indicante il consumo di energia: Frigoriferi e congelatori
96/57/CE: Requisiti di effi cienza per frigoriferi e congelatori
93/68/CEE: Direttiva di modifi ca generale
2002/95/CE: Restrizione dell’uso di sostanze pericolose (RoHS).
Standard armonizzati per i quali si dichiara la conformità:
73/23/CEE:
EN60335.1:1994 Sicurezza elettrica: Requisiti generali
EN60335.2.24:1994 Sicurezza elettrica: Frigoriferi, congelatori
92/7/5/CE:
EN153:1996 Consumo di energia: Frigoriferi
89/336/CEE:
EN55014-1:1993 Emissioni: Elettrodomestici e apparecchi analoghi
EN55014-2:1997 Immunità: Elettrodomestici e apparecchi analoghi
EN61000-3-2 Limiti per le emissioni di corrente armonica
EN61000-3-3 Limitazione delle fl uttuazioni di tensione e di fl icker
Il simbolo WEEE riportato sul prodotto o sulla confezione indica che l’apparecchio non può essere smaltito
insieme ai normali rifi uti domestici. Conferirlo al punto di raccolta appropriato per consentire il riciclaggio dei
componenti elettrici ed elettronici. Lo smaltimento corretto del prodotto permetterà di prevenire i potenziali
danni all’ambiente e alla salute delle persone risultanti da un trattamento inappropriato del prodotto usato.
Per informazioni dettagliate sul riciclaggio, contattare l’uffi cio municipale competente, il servizio di raccolta
dei rifi uti domestici o il negozio in cui è stato acquistato il prodotto.
Dati tecnici
Dimensioni 500L top mount 510L bottom mount 420L top mount 430L bottom mount
Altezza 1720mm 1720mm 1640mm 1720mm
Larghezza 803mm 803mm 703mm 703mm
Profondìtà 745mm 745mm 709mm 745mm
I dati tecnici sono riportati sulla targhetta del modello,
applicata sul lato sinistro interno dell’apparecchio, e
sull’etichetta dei valori energetici.
Posizionamento
Installare questo apparecchio in un punto in cui la
temperatura ambiente corrisponda alla classe climatica
indicata sulla sua targhetta:
Installazione
avvertenze
Classe climatica Temperatura ambiente
SN da +10˚C a + 32˚C
Leggere con attenzione le “Informazioni di sicurezza”
per la vostra sicurezza e per il corretto funzionamento
dell’apparecchio prima di procedere all’installazione.
N da +16˚C a + 32˚C
ST da +16˚C a + 38˚C
T da +18˚C a + 43˚C
Page 38

38 risoluzione dei problemi frigoriferi no-frost
Risoluzione dei problemi
Se il frigorifero presenta un funzionamento anomalo, è
possibile eseguire alcuni semplici controlli prima di rivolgersi
al servizio di assistenza. In alcuni casi, questo permette di
individuare la causa del problema e di risparmiare tempo e
denaro.
Problema Soluzione
Il frigorifero non
funziona
La cella refrigerante
o il vano congelatore
sono rumorosi
Presenza di odori
all’interno del
frigorifero
• Controllare che il cavo di alimentazione sia
inserito correttamente nella presa e che
l’interruttore sia acceso (posizione ‘I’).
• Provare a collegare un altro apparecchio
alla stessa presa. Se la presa non
fornisce corrente, la causa può essere
un fusibile danneggiato o un cortocircuito
nell’impianto elettrico domestico.
• Provare a impostare una temperatura
leggermente inferiore.
• È normale che la ventola del vano
congelatore NON si accenda durante il
ciclo di sbrinamento automatico, o per
un breve periodo dopo l’accensione
dell’apparecchio.
I frigocongelatori moderni di grande
capacità utilizzano compressori ad alta
velocità. Questi componenti possono avere
un funzionamento relativamente rumoroso,
che tuttavia è da considerarsi normale. I
seguenti rumori sono normali durante il
funzionamento:
• Gorgoglii occasionali, simili al rumore
dell’acqua in ebollizione.
• Rumori dovuti al fl usso d'aria (l’aria viene
fatta circolare da una ventola).
• Uno schiocco durante lo sbrinamento
automatico.
Altri rumori anomali possono richiedere
un controllo e altri tipi di intervento. Ad
esempio, un funzionamento rumoroso può
segnalare:
• Un allineamento non corretto del mobile.
• Un pavimento irregolare o cedevole.
• Bottiglie posizionate in modo non corretto.
• Vibrazioni dovute a un oggetto appoggiato
sopra o a lato del frigorifero.
• Un contatto tra il mobile del frigorifero e la
parete.
Si ricordi che, subito dopo l’accensione, è
normale avvertire maggiormente
il rumore prodotto dall’apparecchio.
• Può essere necessario pulire l’interno.
• Sono presenti alimenti che producono
odori.
• Alcuni contenitori e imballaggi
producono odori.
• Provare a stabilire se gli odori sono iniziati
quando si è introdotto qualcosa di insolito.
Problema Soluzione
Il motore entra in
funzione più spesso
del previsto
La temperatura della
cella refrigerante è
troppo alta
La temperatura della
cella refrigerante è
troppo bassa
Nel vano congelatore
si forma molta brina
Cola acqua sul
pavimento
La modalità vacanza
non si disattiva
Le porte non si
chiudono
L’apparecchio comprende una della
refrigerante e un vano congelatore piuttosto
grandi. È normale, perciò, che il motore si attivi
frequentemente. Tuttavia, per limitare il più
possibile la sua attivazione, eseguire i seguenti
controlli:
• Le porte vengono aperte troppo spesso o
troppo a lungo?
• Le temperature impostate sono troppo
basse? Vedere la sezione “
temperatura
• Sono state introdotte grandi quantità di
alimenti caldi? In estate, nei periodi festivi
e durante le vacanze, l’apparecchio viene
facilmente sottoposto a un utilizzo più
intenso.
• Nelle giornate molto calde o quando
la temperatura ambiente è molto alta,
l’apparecchio deve sostenere un carico di
lavoro superiore.
• Subito dopo l’installazione, o dopo un
periodo prolungato di non utilizzo, è normale
che l’apparecchio entri in funzione con
particolare frequenza.
• Controllare che siano rispettate le distanze
di installazione laterali, posteriore e
superiore. Vedere la sezione “Installazione
dell’apparecchio”
• Vedere la sezione “Controllo della
temperatura”
• La porta è stata aperta troppo spesso o
troppo a lungo.
• È possibile che un recipiente o una
confezione impediscano la perfetta chiusura
della porta.
• Vedere la sezione “Controllo della
temperatura”
• Aumentare la temperatura per contenere i
consumi di energia.
Controllare che le porte del vano congelatore
e della cella refrigerante si chiudano
perfettamente. Se le porte rimangono aperte,
all’interno del vano congelatore si formerà uno
spesso strato di brina. In tal caso, rimuovere la
brina e chiudere correttamente le porte.
È possibile che il recipiente per l’acqua di
sbrinatura (situato dietro o sotto il mobile)
non si trovi nella posizione corretta, o che
il tubo di scarico non sia disposto in modo
da incanalare l’acqua nel recipiente. Se
necessario, allontanare il frigorifero dalla parete
per controllare il recipiente e il tubo.
Spegnere l’apparecchio e staccare la spina
dalla presa. Lasciare l’interruttore spento per
tre (3) minuti per azzerare la memoria, quindi
riaccenderlo.
• Controllare che la parte alta del frigorifero
sia inclinata all’indietro di 10-15 mm per
consentire la chiusura automatica delle
porte.
• Controllare che non vi siano oggetti
sporgenti che impediscono la chiusura della
porta.
È normale aprire e chiudere temporaneamente
la porta del vano congelatore anche con la
porta della cella refrigerante chiusa. Se la
porta del vano congelatore rimane aperta,
signifi ca che l’apparecchio deve essere
inclinato maggiormente verso il retro. Questo
difetto non è coperto dalla garanzia, perciò
l’eventuale intervento di un tecnico di
assistenza sarà a carico dell’utente.
”
Controllo della
N. di parte. 1455086
© Copyright 2009 Electrolux Home Products Pty Ltd
ABN 51 004 762 341
Data di pubblicazione: Gen 09
Se il problema persiste
Se il problema persiste dopo aver eseguito i controlli sopra
elencati, rivolgersi al centro di assistenza Electrolux più
vicino o al proprio rivenditore. Sarà necessario specifi care il
numero del modello, il codice PNC a 9 cifre e il numero di
serie a 8 cifre, riportato sull’etichetta all’interno della cella
refrigerante.
Page 39

kullanma kılavuzu
frost free
Page 40

40 içindekiler frost free
Tebrikler
Ürünlerimizi seçtiğiniz için tebrik ve teşekkür ederiz. Yeni cihazınızı
kullanmanın bir zevk olduğunu hissedeceğinizden eminiz. Cihazı
kullanmadan önce, cihazı ve fonksiyonlarının açıklandığı kullanma
kılavuzunun tümünü okumanızı öneririz.
Bir elektrikli cihazı kullanırken daima mevcut bulunan risklerden
kaçınmak için, cihaz doğru şekilde kurulmuş olmalıdır ve yanlış
kullanımı ve tehlikeleri önlemek için güvenlik talimatlarını
dikkatlice okumanız gerekmektedir.
Bu kullanma kılavuzunu ileride kullanmak üzere veya birine
sattığınızda yeni sahibine vermek üzere saklayınız.
Cihazı ambalajından çıkardıktan sonra lütfen hasarlı olup
olmadığını kontrol ediniz. Eğer şüpheniz varsa, cihazı kullanmayınız
ve yerel Electrolux Müşteri Destek Merkezinizle temas kurunuz.
İçindekiler
Alttan ve Üstten montaj özellikleri ................................... 41
Güvenlikle ilgili önemli uyarılar ........................................ 42
Yeni cihazınızın kurulumu ..................................................43
İlk kez çalıştırma .................................................................44
Elektronik ekran kontrolleri – sadece elektronik ................. 45
– Sıcaklık kontrolü ...............................................................................................45
– Dondurucu sıcaklık alarmı .......................................................................... 45
– Kapı alarmı .........................................................................................................45
– Çocuk kilidi ..........................................................................................................45
– İçecekleri soğutma zamanlayıcısı ..........................................................45
– Enerji verimliliği ................................................................................................45
Cihazınızın kullanımı .......................................................... 47
– Sebzelik kutusu .................................................................................................47
– Kapı muhafaza ra arı .....................................................................................47
– Süt ürünleri bölmesi ......................................................................................47
– Koku giderici .......................................................................................................47
– Şişe rafı ...................................................................................................................47
– Burgulu şişe tutacağı ....................................................................................47
– Buzmatik................................................................................................................47
– Sürgülü Spillsafe™ cam raf .........................................................................47
Koruma ve bakım ................................................................ 48
– Lamba ampulünün değiştirilmesi .........................................................48
– Cihazın temizliği ...............................................................................................48
Genel bilgi ........................................................................... 49
– Güvenlik .................................................................................................................49
Arıza teşhis .......................................................................... 50
çevresel bilgi
Kullanıcılar için elden çıkarma ile ilgili bilgiler
• Ambalaj malzemelerinin büyük bir kısmı geri dönüşümlüdür.
Lütfen bu malzemeleri yerel geri dönüşüm depolarına koyarak
veya uygun toplama kutularına atarak elden çıkarınız.
• Bu ürünü atmak istemeniz halinde, lütfen yerel idarenizle temas
kurunuz ve uygun elden çıkarma yöntemini sorunuz.
Page 41

Üstten montajlı dondurucu modeli
1
2
3
4
5
6
7
8
9
10
11
12
13
14
15
Not: Ürün ile ilgili şekiller çeşitli özellikleri göstermekle birlikte güncel ürünlerle tamamen uyumlu
olmayabilirler.
Dondurucu Kapısındaki Dokunmatik ( Touch) Panel.
16
1 Sensör
2 Dondurucu ışığı
3 Dondurucu havası dağıtım menfezleri
4 Spillsafe™ cam raf
17
5 Buzmatik, buz küpü kapları ile birlikte
6 Dondurucu havası giriş menfezleri
7 Sensör
18
8 Koku giderici
9 Spillsafe™ sürgülü cam raf
19
10 Şişe Rafı
11 Spillsafe™ cam ra ar
12 Buzdolabı ışığı
13 Sebzelik nem kontrolleri
20
14 Sebzelik kutuları
15 Yüksekliği ayarlanabilir tekerlekler
21
16 Dondurucu kapı ra arı
22
17 Süt ürünleri bölmesi
18 Yumurta kabı
19 Ayarlanabilir kapı ra arı
23
20 Tam geniş kapı rafı
21 Burgulu şişe tutacağı (varsa)
22 Tel tutuculu tam geniş kapı rafı
23 Dengeleme ayağı
frost free özellikli 41
Alttan montajlı dondurucu modeli
1
2
3
4
5
6
7
8
9
10
11
12
Not: Ürün ile ilgili şekiller çeşitli özellikleri göstermekle birlikte güncel ürünlerle tamamen uyumlu
olmayabilirler.
13
14
15
16
17
18
19
Buzdolabı Kapısındaki Dokunmatik (Touch) Panel.
1 Koku giderici
2 Spillsafe™ sürgülü raf (varsa)
3 Şişe rafı
4 Ayarlanabilir Spillsafe™ cam raf
5 Buzdolabı ışığı
6 Sebzelik nem kontrolleri
7 Sebzelik kutuları (tam geniş, bazı modellerde)
8 Dondurucu muhafaza tablası
9 Buzmatik
10 Kepçeli buz kutusu (dondurucu çekmecesinin
içerisinde)
11 Teleskobik uzatma kızaklarında dondurucu
çekmeceleri
12 Ayarlanabilir tekerlekler
13 Süt ürünleri bölmesi
14 Ayarlanabilir kapı ra arı
15 Yumurta kabı
16 Burgulu şişe tutacağı (varsa)
17 Tam geniş şişe rafı
18 Tam geniş şişe rafı (daha küçük modellerde
konserve rafı)
19 Dengeleme ayağı
Page 42

42 güvenlikle ilgili önemli talimatlar frost free
Güvenlikle ilgili önemli uyarılar
Lütfen kullanma kılavuzunu dikkatlice okuyunuz ve ileride
yararlanmak için kolay bir yerde saklayınız.
uyarı
Bu cihaz, ziksel, duyumsal veya zihinsel kapasitesi
düşük kişiler (çocuklar da dahil) veya yeterli bilgi ve
deneyime sahip olmayan kişiler tarafından, yanlarında
güvenliklerinden sorumlu ve cihazın kullanımıyla
ilgili bilgi veren ve gözetleyen bir kişi olmadıkça
kullanılmamalıdır.
Çocukların, cihazla oynamadıklarından emin olacak
şekilde gözetim altında tutulması gerekir.
R600a soğutma gazı
uyarı
Bu cihaz, az bir miktarda, çevreyle dost fakat bununla birlikte
yanıcı özellikte, sentetik olmayan R600a soğutma gazı içerir:
• Cihazın nakliyesi ve montajı süresince, soğutma gazı
devresi borusunun hasar görmediğinden emin olunuz.
• Soğutma gazı sızıntısı yaralanmalara veya yangına yol
açabilir.
• Cihazın kurulumu için gerekli alan 8g. soğutma gazı
için en az 1m
miktarı cihazın içerisindeki bilgi etiketinde bulunabilir.
uyarı
• Basınçlı aerosol kaplarının ‘yanıcı’ yazısı veya küçük bir
alev sembolü taşıması halinde, bunları buzdolabının
veya dondurucunun içerisinde muhafaza etmeyiniz.
Bunu yapmanız halinde patlamaya neden olabilirsiniz.
• Eski buzdolaplarınızı veya dondurucularınızı elden
çıkarırken tüm kapıları çıkarınız. Çocuklar cihazın
içerisinde kapalı kalmaları halinde boğulabilirler.
• Bu cihaz, yanıcı ü eme gazları ile elde edilen bir
yalıtım içerir. Cihazı dikkatli bir şekilde elden çıkararak
güvenlikle ilgili tehlikeleri önleyiniz.
• Buharlı bir temizleyici kullanmayınız . Elektrikli
bileşenlerin yoğunlaşan buharla temas etmesi halinde,
bunlar kısa devre yapabilir veya elektrik çarpmasına
neden olabilirler.
3
olmalıdır. Cihazdaki soğutma gazının
b
uyarı
Buzdolabının şi kendisine ait elektrik prizine takılmalıdır.
Elektrik prizi, cihaz yerinde iken erişilebilir durumda
olmalıdır.
Prizin düzgün şekilde topraklanmış olması gerekmektedir.
Emin olmadığınız takdirde kali ye bir elektrik
teknisyenine danışınız.
Bu buzdolabı için uzatma kabloları veya adaptör şleri
kullanmayınız.
Güç kablosunun hasarlı olması halinde, kali ye bir
teknisyen tarafından değiştirilmesini sağlayınız.
Elektrik çarpmasını önlemek için, temizlemeden veya
lamba ampulünü değiştirmeden önce buzdolabının şini
çekiniz.
Buzdolabının şini asla elektrik kablosundan çekerek
prizden çekmeyiniz, zarar görebilir. Fişi sıkıca tutunuz ve
dışarıya doğru çekiniz.
Buzdolabınız için çok soğuk olmayan bir yer seçiniz.
Odadaki ortam sıcaklığı 10 °C'nin üzerinde olmalıdır.
Buzdolabınızı kuru bir yere kurunuz, ıslak veya nemli
yerlerden kaçınınız.
Buzdolabını garaj veya veranda gibi soğuk veya
korumasız yerlere koymayınız.
Buzdolabınızı direk güneş ışığı almayacak şekilde
yerleştiriniz.
Buzdolabını soba, ateş veya ısıtıcıların yakınına
yerleştirmeyiniz.
Düzgün şekilde kurulduğunda, buzdolabınız şunlara sahip
olmalıdır:
– Hava dolaşımı için arkada ve yanlarda yeterli alana sahip
olmalıdır (“Yeni cihazınızın kurulumu” bölümüne bakınız).
– Yanındaki dolaplarla hizalı olmalıdır.
– Kapıları kısmen açık konumda iken kendiliğinden
kapanmalıdır.
Cihazın çevresindeki veya ankastre yapıdaki havalandırma
menfezlerinin tıkanmasını önleyiniz.
Buzdolabının taşınması veya kurulumu esnasında,
soğutma devresinin hiçbir parçasının zarar görmemesi için
dikkat gösterilmelidir.
Eski buzdolabınızı veya dondurucunuzu elden çıkarırken
tüm kapıları çıkarınız. Çocuklar cihazın içerisinde kapalı
kalmaları halinde boğulabilirler.
Cihazınızın kapatılması
Eğer cihazın uzunca bir süre için kapatılması gerekiyorsa, küf
oluşumlarını önlemek için aşağıdaki önlemler alınmalıdır:
1. İçindeki tüm yiyecekleri çıkarınız.
2. Elektrik şini prizden çekiniz.
3. Cihazın içini iyice temizleyip kurulayınız.
4. Havanın içeri sirküle etmesi için kapılara bir takoz koyarak
kapanmalarını önleyiniz.
Page 43

frost free yeni cihazınızın kurulumu 43
(x)
50mm
30mm
30mm
Tavsiye edilen
hava boşluğu
Kabin
350mm
(y)
Kapısı
Yeni cihazınızın kurulumu
Buzdolabınızın çevresinde yeterli havalandırma:
Aşağıdaki diyagramda buzdolabınızın havalandırılmasını
sağlamak için önerilen hava boşlukları gösterilmektedir.
Dolabınızın arkasında aralık olmaması halinde, önerilen
mesafe alanı üst kısımda 50mm.'den 90mm.'ye
(y) ve 35mm.'den 75mm.'ye (x) çıkar. Köşe bir yere
konumlandırıldığında, menteşe tarafında bırakılan en az
350mm.'lik boşluk, kutuları ve ra arı çıkarmak için kapıların
yeterli şekilde açılabilmesini sağlar.
NOT:
Kapılar, gövdeye tam oturacak (taşmayacak) şekilde
tasarlanmıştır.
Yukarıda belirtilen mesafeler önerilen minimum mesafelerdir.
Arka kısımda bulunması gereken mesafe 75mm.'yi
geçmemelidir.
uyarı
Tekerlekler sadece ileri ve geri hareketler için tasarlanmıştır.
Nakil tekerleği değildirler. Buzdolabınızı yanlara doğru hareket
ettirmeniz zemine ve tekerleklere zarar verebilir.
1. Buzdolabının yerine taşınması.
2. Buzdolabının üst kısmı 10mm. kadar geriye doğru
eğilmelidir. Bu şekilde kapıların kendiliğinden kapanarak,
düzgün şekilde kapalı kalması sağlanır.
3. Buzdolabının geriye doğru eğilmemesi halinde, büyük
plastik tekerlek cıvatasını çevirmek suretiyle iki ön
tekerleği ayarlayabilirsiniz. Cıvatanın bir devir çevrilmesi
buzdolabının yüksekliğini 10mm. arttırır. Tekerlek cıvatasını
çevirmekte zorluk çekmeniz halinde, erişimi kolaylaştırmak
için, bir kişinin buzdolabını geriye eğmesini sağlayınız.
Alternatif olarak, tekerleklere yan taraftan, düz bir tornavida
kullanarak ulaşabilirsiniz. (Aşağıdaki diyagrama bakınız).
Büyük
plastik vida
Yardımcı
denge ayağı
Buzdolabınızın kurulumu
Buzdolabınız, üst kısmı dikeyden yaklaşık 10mm.
arkaya eğmek için, ayarlanabilir ön tekerlekler aşağıya bükülü
şekilde teslim edilmiş olmalıdır. Bu şekilde, buzdolabınızın
kapılarının kendiliğinden kapanarak, düzgün şekilde kapalı
kalması sağlanır.
10-15mm
Yüksekliği
ayarlanabilen
ön tekerlekler
Sabit arka
tekerlekler
Ayrıca, dengeleme ayağı da tekerleklerin çalışmasını
engellemeyecek şekilde, tamamen yukarıya doğru bükülü
olmalıdır (Aşama 3'teki diyagrama bakınız).
4. Düzlemsel olup olmadığını anlamak için buzdolabının
etrafındaki dolaplarla hizalı olup olmadığını kontrol ediniz.
Düzlemselliği aşama 3'te açıklandığı şekilde, tekerlekler
vasıtasıyla ayarlayabilirsiniz.
Dolapla olan hizası
(hatta aradaki aralık)
Buzdolabının en üstü
(yatay düzlüğü)
Engebeli yüzey için ön
ayakların ayarlanması
(aşağı ve yukarıya döndürerek)
5. Buzdolabının bir köşeden diğer köşeye doğru sallanması
halinde, zemin düzlemsel değildir. Bir plastik veya mukavva
parçası bularak tekerleğin altına sıkıca yerleştiriniz.
6. Bazı zemin yüzeylerinde, buzdolabı çalışma esnasında
öne doğru hareket eder. Bunun meydana gelmesi halinde,
ön tekerleklerin altına bir “tekerlek stopu” veya takoz
yerleştirilebilir.
7. Bu durumda, Aşama 3, 4 ve 5'i tekrarlayarak kurulum için
ince-ayar yapmanız gerekebilir.
Page 44

44 ilk kez çalıştırma frost free
8. Cihazı son konuma getirdiğinizde, dengelenmesi
gerekmektedir. Dengeleme ayağını zeminle temas edinceye
kadar zemine doğru indiriniz. Ağırlığı dengeleme ayağından
uzaklaştırmak için cihazın ön kısmını kaldırınız, daha sonra
zeminle sıkıca temas etmesini sağlamak için ¼ çevrim daha
çeviriniz. Cihazı taşımanız gerektiğinde, cihazı serbestçe
hareket ettirebilmek için ayağı tekrar yukarıya kaldırmayı ve
yeni kurduğunuzda da tekrar ayarlamayı unutmayınız.
yandan görünüm
Dengeleme ayağı
aşağıya bükülü
önden görünüm
¼ çevrim
9. Buzdolabınızı bu kılavuzun “Koruma ve Bakım” bölümünde
belirtilen talimatlara uygun şekilde iyice temizleyiniz ve
nakliye esnasında biriken tozları siliniz.
10. Buzdolabınızın şini sadece kendi güç noktasına takınız
ve asla ikili bir adaptör kullanmayınız. Prize ulaşmak için
buzdolabını hareket ettirmeniz gerekiyorsa, öncelikle
dengeleme ayağını kaldırmayı unutmayınız.
11. Buzdolabının içerisine yiyecek koymadan önce, düzgün
çalışıp çalışmadığını kontrol etmek için buzdolabını 2 veya 3
saat çalışır durumda bırakmanız önerilmektedir.
İlk kez çalıştırma
Buzdolapları ısıyı yiyeceğin içinden dış havaya transfer ederek
çalışır. Bu işlem buzdolabının arkasının ve yanlarının (özellikle ilk
çalıştırmada) ısınmasına neden olur, bu normaldir.
Dondurucu bölmesinin arka duvarında bir soğutma sarmalı
mevcuttur. Bu sarmal soğutma işlemi yapar ve içerideki havanın
nemini giderir.
Sirkülasyonun verimliliğini etkileyeceğinden, yiyecekleri
buzdolabının hava menfezlerinin önüne yerleştirmekten
kaçınınız. Kapının sık sık açılması halinde, dondurucunun iç
kısmında ha f bir buzlanma oluşacaktır. Bu normal bir durumdur
ve bir kaç gün sonra temizlenir. Dondurucunun kapısının kazara
açık kalması halinde, iç duvarlar ağır şekilde buzla kaplanır ve
temizlenmesi gerekir.
Buzdolabınızda diğer enerji tasarru u bileşenlerin yanı
sıra, alışılmadık sesler çıkaran yüksek hızlı bir kompresör
kullanılmaktadır. Bu sesler buzdolabınızın gerektiği şekilde
çalışmakta olduğunu belirtir. Bunlar şunlardır:
• Kompresör çalışıyor sesi;
• Küçük fan motorundan gelen hava hareketi sesi;
• Suyun kaynamasına benzer bir fokurdama sesi;
• Otomatik buz çözme esnasında duyulan patırtılar;
Daha fazla bilgi için “Arıza teşhis” bölümüne bakınız.
tavsiye ve bilgiler
• Kapıyı açık tutacağından, dondurucu zeminin üzerindeki
çubukların önüne yiyecek koymayınız.
Tebrikler! Yeni buzdolabınız başarı şekilde kurulmuştur.
Hava
menfezleri
Sensör
Çubuklar
Page 45

frost free elektronik ekran kontrolleri 45
Elektronik ekran kontrolleri
Elektronik ekran paneli beyaz fon ışıklı ve 6 dokunmatik tuşlu bir
LCD'den (sıvı kristal ekran) oluşmaktadır. Güç ilk kez açıldığında,
ekran fon ışığıyla birlikte açılır. Hiçbir tuşa basılmaması ve kapının
kapalı olması halinde, fon ışığı 30 saniye sonra söner.
Sıcaklık kontrolü
Buzdolabınızı ilk kez çalıştırdığınızda, buzdolabı sıcaklığını 3°C'ye
ve dondurucu sıcaklığını -18°C'ye ayarlamanızı öneririz. Sıcaklığı
değiştirmek istediğinizde, aşağıdaki talimatları uygulayınız.
Sadece küçük bir ayarlama yapınız ve doğru olup olmadığını
anlamak için 24 saat bekleyiniz. Dondurucunun doğru sıcaklıkta
olduğunu anlamak için dondurmanın yumuşaklığını kontrol
etmek iyi bir yöntemdir, bununla birlikte, yiyecek bölmesinin
sıcaklığını kontrol etmek için ise buzdolabında muhafaza edilen
suyun soğukluğunu hissetmek iyi bir yoldur.
NOT: Bir sıcaklık ayarladığınızda, tüm buzdolabı kabini için
ortalama bir sıcaklık ayarlamış olursunuz. Her bölmenin
içerisindeki sıcaklık, ne kadar yiyecek saklandığına ve nereye
konduğuna bağlı olarak değişiklik gösterir. Ayrıca, yüksek veya
düşük oda sıcaklıkları da buzdolabının içerisindeki gerçek
sıcaklığı etkileyebilir.
Dondurucu sıcaklığının değiştirilmesi
Dondurucuyu 1°C kademe ile daha fazla
soğutmak için dondurucu tuşuna basınız.
Maksimum -23°C'ye ulaşıldığında, tuşa tekrar
basıldığında ekranda -14°C görüntülenir. Daha soğuk dondurucu
ayarlarında, çubuk gra k küçülür.
Buzdolabı sıcaklığının değiştirilmesi
Buzdolabını 1°C kademe ile daha fazla
soğutmak için buzdolabı tuşuna basınız. 0°C'ye
ulaşıldığında, tuşa tekrar basıldığında ekranda
7°C görüntülenir. Daha soğuk buzdolabı ayarlarında, çubuk gra k
küçülür.
Hızlı dondurma fonksiyonu
Dondurucu bölmesine büyük miktarda yiyecek
eklediğinizde hızlı dondurma fonksiyonunu
kullanınız. Bu, yiyeceği hızlı bir şekilde dondurur
fakat buzdolabı bölmesindeki sıcaklığı değiştirmez.
Bu fonksiyonu kullanmak için, hızlı dondurma düğmesine bir kez
basınız. Hareketli bir simge aydınlanır. Hızlı dondurma fonksiyonu
90 dakika süre ile çalışır ve daha sonra kapanır. Hızlı dondurma
fonksiyonunu 90 dakika geçmeden önce kapatmak istemeniz
halinde, hızlı dondurma tuşuna tekrar basınız. Simge kaybolacak
ve dondurucu normal çalışmasına geri dönecektir.
Dondurucu sıcaklık alarmı
Alarmın belirli bir neden olmaksızın çalması
halinde, kapının bir nesne tarafından açık tutulup
tutulmadığını kontrol ediniz. Dondurucu kapısının
açık bırakılması veya sıcaklık sensörünün yakınına sıcak yiyeceklerin
konması nedeniyle dondurucunun fazla ısınması halinde bir ikaz
sesi işitilir.
Alarm reset tuşuna basılana kadar, alarm reset tuşunun
bitişiğindeki simge, ayarlı dondurucu sıcaklığı ve çubuk gra k
hep birlikte yanıp söner. Tuşa basıldığında, alarm tuşunun
bitişiğindeki alarm devre dışı bırakma simgesi 50 dakika süreyle
veya sıcaklık kabul edilebilir bir seviyeye düşene kadar yanar.
Dondurucu kapısının hiçbir şey tarafından açık tutulmadığından
emin olunuz ve sıcak yiyecekleri sıcaklık sensörünün yanından
uzaklaştırınız. Dondurucunun 50 dakika sonra halen fazla sıcak
olması halinde, buzdolabında bir arıza olabileceğini belirtmek
üzere alarm tekrar çalar.
NOT:
Alarm reset tuşuna 10 saniyeliğine sürekli olarak basmak
suretiyle, alarm 12 saatliğine resetlenebilir.
Soğutucu kapısı alarmı
Soğutucu kapısının iki dakikadan uzun bir süreyle açık bırakılması
halinde, alarm çalar ve sıcaklık ayarı ve çubuk gra k ile birlikte
açık bir kapıyı gösteren bir ok yanıp söner.
Buzdolabını doldururken kapısı açık bırakmak istediğinizde, alarm
reset tuşuna basmak suretiyle alarmı 8 dakikalığına kapatmanız
mümkündür.
Çocuk kilidi
Çocuk kilidini aktive etmek
için dondurucu ve soğutucu
tuşlarına birlikte basınız ve basılı
tutunuz. Bu işlem, ayarların kazara
değiştirilmesini önlemek için
ekranı devre dışı bırakır. Çocuk kilidini kapatmak için, dondurucu
ve soğutucu tuşlarına birlikte basınız ve basılı tutunuz.
İçecekleri soğutma zamanlayıcısı
İçecekleri soğutma zamanlayıcısı şişeleri hızlı
bir şekilde soğutmak için kullanılır. Şişeyi
dondurucuya yerleştiriniz, zamanlayıcı minimum
5 dakikadan maksimum 30 dakikaya kadar ayarlanabilir.
Ayarlamak için, içecekleri soğutma tuşuna dakika sayısı için
art arda basınız (5-dakikalık aralıklarla). Ayarlama yapıldığında,
içecekleri soğutma tuşunun yanında her defasında bir dakika
geri sayan bir zamanlayıcı ile birlikte bir simge görünür.
Geri sayım başlamış olsa dahi, süreyi değiştirebilirsiniz veya
zamanlayıcıyı kapatabilirsiniz. Sesli bir ikaz sürenin dolduğunu
bildirir ve simge alarm reset tuşuna basılana kadar yanıp söner.
İçeceğinizin yeterince soğuk olmaması halinde, içecekleri
soğutma fonksiyonunu yeniden ayarlayınız (içeceğin halihazırda
kısmen soğuk olduğunu unutmayınız). Önerilen soğutma
süreleri:
• Teneke kutuda içecekler için 10 dakika
• Şarap veya bira şişeleri için 20 dakika
• Ha f içecek şişeleri için 30 dakika.
Page 46

46 elektronik ekran kontrolleri frost free
Enerji verimliliği
Buzdolabınız enerji-tasarru u olacak şekilde tasarlanmıştır ve üç
modda çalıştırılabilir: Normal, Eco ve Tatil.
• Normal modu
Normal modu buzdolabının kapısı sık sık
açıldığında kullanılır. Bu, buzdolabınız için
normal çalışma modudur.
• Eco Modu
Eco modu buzdolabınızın kapısını fazla
açmadığınızda kullanılabilir. İki şekilde aktive
edilir:
– normal modunda iken eco/tatil tuşuna bir kez basılarak veya
– 30 saat sonra buzdolabı kapısının açılmaması halinde
otomatik olarak aktive edilir.
Eco modu aktif olduğunda, elektronik ekranda yaprak simgesi
görünür. Eco modunun otomatik olarak aktive edilmesi
halinde, kapı açıldığında buzdolabı normal moduna geçer. Eco
modunun manuel olarak girilmesi halinde, kapının açılması cihazı
tekrar normal moduna geçirmez. Eco modundan çıkmak için,
"normal" yazısı görüntüleninceye kadar eco/tatil tuşuna basınız.
buzdolabını her zaman kullanmadığınızda eco modunu kullanınız
(örn. bir uzun dönem muhafaza buzdolabı olarak kullandığınızda).
Kapının sık sık açılacak olması halinde cihazı geri normal moda
çeviriniz.
Ekol modu manuel olarak aktive edildiğinde cihazın otomatik
olarak mod değiştirmeyeceğini unutmayınız.
• Tatil modu
Bu tuşu tatile çıktığınızda veya evinizden
uzun süreli olarak uzaklaştığınızda kullanınız.
Buzdolabı enerjiden tasarruf etmek için buz
çözme işlemini minimuma indirir fakat sıcaklık ayarlarını
muhafaza eder. Buzdolabını tatil moduna almak için, uçak
simgesi görünene kadar eco/tatil modu tuşuna basınız. Tuşa
tekrar basılıncaya veya buzdolabının kapısı açılıncaya kadar tatil
modu çalışır durumda kalacaktır.
NOT: Dondurucu kapısının açılması Eco veya Tatil modlarının
çalışmasını etkilemez.
Eco ve Tatil Modları enerjiden tasarruf etmek için buz çözme
işlemini minimuma indirmekle birlikte sıcaklık ayarlarınızı
muhafaza ederler.
Diğer özel buzdolabı özellikleri
• En iyi performansı sağlamak için bağımsız kompresör ve fan
kontrolü.
• Kapının açılma sayısına bağlı olarak ekstra soğutma.
• Kapı sık açılmadığında otomatik buz çözme.
NOT: Ekrandaki arızalanmalar kısa süreli elektrik kesintilerinden
kaynaklanıyor olabilir. Bunun meydana gelmesi halinde,
buzdolabını güç noktasından kapatınız ve 5 dakika bekleyiniz.
Buzdolabını tekrar güç noktasından açmadan önce buzdolabı
basıncının dengelenmesi için zaman gerekmektedir.
Cihazın kullanımı
Bu bölümde yeni buzdolabınızın kullanışlı birçok özelliğinden en
iyi şekilde nasıl faydalanabileceğiniz açıklanmaktadır.
Sebzelik kutusu
Sebzelik kutusunu sebzeleri, meyveleri
veya küçük eşyaları muhafaza etmek
için kullanınız. Nem kontrolü düğmesini
kaydırarak nemlilik derecesini
değiştiriniz.
• Sebzelerin muhafaza edilmesi
Sebzeleri sebzelik kutusunda muhafaza ediniz ve nem
kontrolü düğmesini fazla nemli (kapalı) konumuna ayarlamayı
unutmayınız.
• Meyvelerin ve küçük eşyaların muhafaza edilmesi
Meyveleri ve küçük eşyaları sebzelik kutusunda muhafaza ediniz
ve nem kontrolü düğmesini az nemli (açık) konumuna
ayarlamayı unutmayınız.
• Çıkarma (standart Sebzelik Kutuları)
1. Çekmecedeki yiyecekleri boşaltınız.
2. Sebzelik kutusunu/kutularını ileriye ve daha sonra yukarıya
ve tekrar ileriye doğru çekerek çıkarınız.
3. Rafın alt tarafındaki mandalları kaldırarak ve rafı öne doğru
çekerek sebzelik rafını çıkarınız.
Mandal
uyarı
Buzdolabınızın içerisinde asla çözücüler veya tırnak boyası
çıkarıcısı veya çakmak sıvısı gibi yanıcı materyaller muhafaza
etmeyiniz. Plastik bileşenlerin ömrünü etkilerler ve muhafaza
edilen yiyecekleri bozarlar.
Kapı muhafaza ra arı
Buzdolabınızda kapı muhafaza ra arı bulunmaktadır. Bu ra ar
farklı muhafaza gereksinimlerini karşılamak için ayarlanabilir.
Kapı ra arının tümü temizlik için tamamen çıkarılabilir
özelliktedir. Bir rafı çıkarmak veya ayarlamak istediğiniz takdirde,
iç kapı panelindeki destek tırnaklarının üzerine doğru kaldırınız.
Geri takmak için, rafı destek tırnaklarının üzerine bastırarak
yerine kilitleyiniz.
Süt ürünleri bölmesi
Süt ürünleri bölmesini tereyağı, margarin ve peynir gibi
yiyecekleri muhafaza etmek için kullanınız. Bu bölme
buzdolabının diğer bölmelerinden biraz daha sıcaktır, kapak ise
kokulara karşı koruma sağlar.
Koku giderici
Cihazınız, içerisindeki yiyecek
kokularının giderilmesine
yardımcı olmak için katalize
edici bir koku gidericiye sahiptir.
Kokular, cihazın normal çalışması
vasıtasıyla ltre tarafından
absorbe edilerek giderilir.
Yiyeceklerin kapalı tutulması ve
plastik lm ile sarılması da cihazın içerisinde koku oluşmasını
azaltacaktır.
Nem kontrolü
Page 47

frost free cihazınızın kullanımı 47
Şişe rafı
Şişe rafı anodize alüminyumdan yapılmıştır. Şarap veya bira gibi
çeşitli tiplerdeki şişeleri muhafaza etmek için kullanılırlar. Şişeler
taban kısımları buzdolabının arkasına doğru gelecek şekilde
muhafaza edilmelidirler. Soğutucu üç raf kombinasyonu ile
teslim edilir fakat bunlar istenildiği takdirde değiştirilebilirler.
Burgulu şişe tutacağının çalışma şekli (varsa)
Burgulu şişe tutacağı şişelerin düşmesini engeller. Burgulu şişe
tutacağı iki kısımdan oluşur, kaydırılabilir bir ön kısım ve bir
tutma halkası.
Burgulu şişe tutacağı iki konumda kullanılabilir:
• Yatay
Burgulu şişe tutacağı yatay konumda iken, halkalara uyan
eşyalar kolaylıkla içerisine konabilir.
Buzmatik
Kullanmak için, kabı çıkarınız,
su ile doldurunuz ve tekrar
dondurucuya koyunuz. Buz
oluştuktan sonra (yaklaşık 3 saat
sonra) ön kısımdaki düğmeyi
buzlar aşağıdaki kutuya düşene kadar saat yönünde çeviriniz.
Buzmatik dondurucunun diğer tarafına aşağıda
belirtildiği gibi yerleştirilebilir:
1. Buz kutusunu ve buz küpü kabını
çıkarınız. Buz kabı takımının taşıyıcıya
yapışmış olması halinde, buzu kırmak
için kabı ve rafı birlikte sıkıştırınız.
2. Buz taşıyıcısını çıkarmadan önce,
cam raftan kurtarmayı unutmayınız
(gösterildiği gibi), aksi takdirde takım
zarar görebilir.
3. Rafın ön kısmından kurtararak ve arka taraftan çıkararak orta
rayı çıkarınız.
4. Rayı rafın arka kısmına, sağ tarafa takınız ve daha sonra ön kısmı
geçiriniz (gösterildiği gibi).
5. Ön kısmı rafa takılıncaya kadar taşıyıcıyı raylarda kaydırarak
• Dikey
Burgulu şişe tutacağı dikey konumda iken, burgulu şişe
tutacağını bir şişenin üzerine doğru yukarıya kalkıncaya kadar
şişe tutma çubuğu boyunca kaydırmak mümkündür.
Not:
Şişe diğer tarafından rafın sonu veya bitişiğindeki başka bir şişe
tarafından durdurulmuş olmalıdır.
Rafın arka tarafındaki
yuvaya yerleştiriniz
Daha sonra
rafın ön
kısmına takınız
takınız.
6. Buz kabını ve buz kutusunu geri takınız.
Sürgülü cam raf
Bu raf tam derinlikte bir raf olarak kullanılabilir veya cihazın ön
kısmında uzun eşyaların saklanması gerektiğinde yarı derinliğe
katlanabilir.
•Rafı katlamak için:
1. Rafın ön yarısını öne doğru
çekiniz.
2. Daha sonra, alt tarafından,
arka kenarı gömme
Hook detail
kancanın üzerine doğru
kaldırarak rafın ön yarısını
yukarıya kaldırınız.
3. Rafı öne doğru çekiniz ve
arka kısmın yan kanallara
düşmesini sağlayınız.
4. Arka stoplara ulaşıncaya
kadar, ön rafı arkaya doğru
itiniz (3,4).
• Yeniden Konumlama:
Yan paneller aşağıya doğru
serbestçe aşağıya doğru
dönebilecek hale gelinceye kadar tüm takımı çekmek ve daha
sonra raf kaplama raylarından kurtuluncaya kadar rafın arka
kısmını döndürmek suretiyle, raf cihaz ünitesinin içerisinde
yeniden konumlandırılabilir. Raf herhangi bir raya yerleştirilebilir,
cihazınızın kapısının sınırlı bir erişime sahip olması halinde bu
oldukça kullanışlı bir özelliktir.
Page 48

48 koruma ve bakım frost free
Koruma ve bakım
uyarı
Lamba ampulünü değiştirmeden önce, elektriği güç
noktasından kapatınız ve güç kablosunu güç kaynağından
çıkarınız.
Lamba ampulünün değiştirilmesi
• Buzdolabı ışığı
1. Elektriği güç noktasından kapatınız
ve buzdolabının güç kablosunu güç
kaynağından çıkarınız.
2. Ra arı çıkarınız.
3. Lamba kapağının klipsini dikkatlice açınız.
Bu işlemi kapağın üst kısmını kabinin ön
kısmına doğru çekerek gerçekleştiriniz.
4. Lamba ampulünü sökünüz ve orijinali
ile aynı olan bir ampulle değiştiriniz. Lamba ampulünü
çıkardığınızda “O” halkasının ampulle birlikte gelmesi halinde,
“O” halkasını yeni ampule takınız ve ampulü soketine takınız
(diyagrama bakınız).
"O" halkasının mevcut olup olmadığını anlamak
için parmağınızı asla lamba ampulünün soketine
sokmayınız.
5. Lamba kapağını, lamba kapağı tırnaklarını yuvanın tabanına
geçirerek ve takılıncaya kadar kapağın üst kısmına bastırarak
yerleştiriniz.
6. Ra arı yerleştiriniz.
7. Soğutma sistemindeki basıncın dengelendiğinden emin
olmak için 5 dakika bekleyiniz. Daha sonra bağlantısını
yapınız ve buzdolabını güç noktasından çalıştırınız.
• Dondurucu ışığı
1. Elektriği güç noktasından kapatınız ve buzdolabının güç
kablosunu güç kaynağından çıkarınız.
2. Lamba kapağını dikkatlice klipsinden çık arınız. Bu işlemi, arka
kısımdaki lamba kapağı dilini kabinin ön
tarafına doğru çekerek gerçekleştiriniz.
3. Lamba ampulünü sökünüz ve orijinali ile
aynı olan bir ampulle değiştiriniz. Lamba
ampulünü çıkardığınızda “O” halkasının
ampulle birlikte gelmesi halinde, “O”
halkasını yeni ampule takınız ve ampulü
soketine takınız (diyagrama bakınız).
"O" halkasının mevcut olup olmadığını anlamak
için parmağınızı asla lamba ampulünün soketine
sokmayınız.
4. Lamba kapağını, lamba kapağı tırnaklarını yuvanın ön
kısmına geçirerek ve takılıncaya kadar kapağın arka kısmına
bastırarak yerleştiriniz.
5. Soğutma sistemindeki basıncın dengelendiğinden emin
olmak için 5 dakika bekleyiniz. Daha sonra bağlantısını
yapınız ve buzdolabını güç noktasından çalıştırınız.
tavsiye ve bilgiler
Lamba ampulünü değiştirmeden önce ‘O’ halkasının
yerinde olduğundan emin olunuz.
Cihazın temizlenmesi
uyarı
TEMİZLİKTEN ÖNCE BİLİNMESİ GEREKENLER: Cihazı güç
noktasından kapatınız, daha sonra güç kablosunu prizden
çekiniz. Bu işlem elektrik çarpması ihtimalinin olmadığından
emin olmanızı sağlayacaktır.
• Kapılar ve dış kısım
- paslanmaz çelik
Paslanmaz çelikten yapılma cihazınız lekeye dayanıklı paslanmaz
çelikten imal edilmiştir. Bu paslanmaz çelik, parmak izleri ve su
lekeleri gibi lekelerin çıkarılmasını kolaylaştıran, ileri derecede
koruyucu özel bir kaplamaya sahiptir. En iyi şekilde görünmesini
sağlamak için, paslanmaz çelik cihazınızı düzenli olarak
temizlemeniz gerekmektedir. Paslanmaz çelik kapıları sadece
ılık sabunlu su ve yumuşak bir bezle temizlemeniz, temiz su ile
durulamanız ve kalan sabun artıklarını temizlemek için temiz su
ile ıslatılmış temiz, yumuşak bir bez ile silmeniz gerekmektedir.
- pasi k gümüş
Pasi k gümüş kapıları sadece ılık sabunlu su ve yumuşak bir
bezle temizlemeniz, temiz su ile durulamanız ve kalan sabun
artıklarını temizlemek için temiz su ile ıslatılmış temiz, yumuşak
bir bez ile silmeniz gerekmektedir.
uyarı
Paslanmaz çelik temizleyicileri, aşındırıcı pedler veya
diğer temizleyicileri kullanmayınız, yüzeyi çizebilirler.
Teslimattan sonra üründe meydana gelen hasarlar garanti
kapsamında değildir.
• İç kısım
Cihazın iç kısmını düzenli olarak temizlemeniz gerekmektedir.
Yiyecek miktarı az olduğunda temizlemek daha kolaydır.
İç kısmı parfümsüz yumuşak sabunlu ılık suda ıslatılmış
yumuşak bir bez kullanarak siliniz. Tüm yüzeyleri ve çıkarılabilir
aksamları iyice kurulayınız. Cihazın kontrol düğmelerinin su
ile ıslanmasını önleyiniz. Çıkarılabilir parçaları yerlerinden
çıkarmış olmanız halinde, bunları yerlerine takınız ve cihazı
yiyecekle doldurmadan önce elektriği açınız. Doğal olarak,
dökülen yiyecekleri derhal ve iyice temizlemek suretiyle
cihazın iç kısmını hijyenik tutmanız gerekmektedir.
Buharlı bir temizleyici kullanmayınız. Elektrikli bileşenlerin
yoğunlaşan buharla temas etmesi halinde, bunlar kısa devre
yapabilir veya elektrik çarpmasına neden olabilirler.
• Kapı contaları
Kapı contalarını temiz tutmaya dikkat ediniz. Yapışkan
yiyecek ve içecekler contaların kabine yapışmasına ve kapıyı
açtığınızda yırtılmasına neden olabilir. Contayı yumuşak bir
deterjanlı ılık su ile siliniz. İyice durulayıp, kurulayınız.
uyarı
Temizlemek için asla sıcak su, çözücüler, ticari mutfak
temizleyicileri, aerosol temizleyiciler, metal boyalar, yakıcı
veya aşındırıcı temizleyiciler veya teller kullanmayınız,
cihaza zarar verebilir. Piyasada bulunan temizlik
ürünlerinin ve deterjanların çoğu buzdolabınıza zarar
veren çözücüler içerir. Temizlerken, sadece parfümsüz
yumuşak sabunlu ılık suda ıslatılmış yumuşak bir bez
kullanınız.
Lamba ampulü “O-Halka contasıIşık soketi
Page 49

Bu cihaz, aşağıdaki E.E.C. direkti eri ile uyumludur:
2006/95/EC: Düşük Voltaj Direkti
2004/108/EC: Elektromanyetik Uyumluluk (EMC) Direkti
92/75/EEC: Enerji Etiketlemesi
94/2/EC: Enerji Etiketlemesi: Buzdolapları ve Dondurucular Uygulaması
96/57/EC: Buzdolapları ve Dondurucular İçin Verimlilik Gereksinimleri
93/68/EEC: Küresel Değişiklik Direkti
2002/95/CE: Tehlikeli Maddelerle İlgili Kısıtlamalar (RoHS).
Uygunluğun Beyan Edildiği Uyumlaştırılmış Standartlar:
73/23/EEC:
EN60335.1:1994 Elektriksel Güvenlik: Genel Koşullar
EN60335.2.24:1994 Elektriksel Güvenlik: Buzdolapları, Dondurucular
92/7/5/EC:
EN153:1996 Enerji Tüketimi: Buzdolapları
89/336/EEC:
EN55014-1:1993 Emisyonlar: Ev-tipi ve Benzeri Cihazlar
EN55014-2:1997 Bağışıklık: Ev-tipi ve Benzeri Cihazlar
EN61000-3-2 Harmonik akım emisyonları sınırları
EN61000-3-3 Voltaj dalgalanmaları ve titreme ve sınırları
frost free genel bilgiler 49
Cihazın veya cihaz ambalajının üzerindeki WEEE sembolü, bu cihazın bir ev çöpü/atığı gibi muamele görmemesi
gerektiğini belirtir. Bunun yerine, elektrikli ve elektronik ekipmanların geri-dönüşümü için uygun bir toplama
noktasına götürülmesi gerekir. Ürünün hatalı bir şekilde atılması veya imha edilmesi çevre ve insan sağlığı açısından
olumsuz sonuçlara yol açabilir. Bu nedenle, bu ürünün doğru bir şekilde elden çıkarılmasını sağlayarak olumsuz
sonuçları önlemeye yardımcı olmuş olursunuz. Bu ürünün geri dönüşümü hakkında daha detaylı bilgi için lütfen
mahalli idareyle, ev çöpü toplama servisiyle ya da ürünü satın aldığınız mağaza ile temasa geçiniz.
Teknik veriler
Boyutlar 500L üstten donduruculu 510L alttan donduruculu 420L üstten donduruculu 430L alttan donduruculu
Yükseklik 1720mm 1720mm 1640mm 1720mm
Genişlik 803mm 803mm 703mm 703mm
Derinlik 745mm 745mm 709mm 745mm
Teknik bilgiler, cihazın iç kısmının sol bölümü ve enerji etiketi
üstünde bulunan ürün etiketinde bulunmaktadır.
Konumlandırma
Bu cihazı, ürün üzerinde belirtilen iklim sınıfı göstergesine
karşılık gelen ortam sıcalığına sahip bir yere monte ediniz.
Kurulum
uyarı
Cihazı kurmadan önce, cihazın güvenli ve doğru çalışması için
“güvenlik bilgilerini” dikkatlice okuyunuz.
Hava sınıfı Ortam sıcaklığı
SN +10˚C + 32˚C
N +16˚C + 32˚C
ST +16˚C + 38˚C
T +18˚C + 43˚C
Page 50

50 Arıza teşhis frost free
Arıza teşhis
Eğer buzdolabınızda bir sorun olduğunu düşünüyorsanız,
servisi aramadan önce bazı basit kontroller yapabilirsiniz.
Sorunun kaynağını tespit edebilir ve böylece problemi gidererek
zamandan ve paradan tasarruf edebilirsiniz.
sorun çözüm
Buzdolabı
çalışmıyor
Buzdolabı/dondurucu
gürültü yapıyorsa
Eğer buzdolabının
içinde kokular varsa
• Elektrik şinin prize doğru bir şekilde takılmış
olduğundan ve prizde elektrik olduğundan
emin olunuz.
• Prize başka bir cihaz takarak çalıştırmayı
deneyiniz. Eğer prizde elektrik yoksa, sigortanız
atmıştır veya evinizin güç kaynağının şalteri
atmıştır.
• Sıcaklık kontrol düğmesini ha fçe "daha
soğuk" bir ayara getiriniz.
• Dondurucu fanın otomatik buz çözme işlemi
esnasında veya cihaz çalışmaya başladıktan
sonra kısa bir süre için ÇALIŞMAMASI
normaldir.
Daha fazla muhafaza kapasitesine sahip
modern buzdolapları/dondurucularda daha
yüksek hızlı kompresörler vardır. Bunlar, doğal
olarak daha fazla ses çıkarmaktadır ve bu da
oldukça normaldir. Normal çalışma sesleri:
• Ara sıra, suyun kaynamasına benzer bir
fokurdama sesi.
• Hava ü eme gürültüsü (küçük bir fanla yapılan
hava devir-daiminden ötürü).
• Otomatik buz çözme esnasında duyulan
patırtılar.
Diğer tuhaf sesler, kontrol etmeniz ve önlem
almanız gerektiği anlamına gelebilir. Örneğin,
bazı sesler aşağıdaki anlamlara gelebilir:
• Buzdolabı gövdesi düz durmuyordur.
• Zemin düz veya sağlam değildir.
• Şişeler kötü yerleştirilmiş ve şıngırdıyordur.
• Buzdolabının üstünde, arkasında veya
yanındaki bir nesneden kaynaklanan
titreşimler vardır.
• Buzdolabı gövdesinin arkası duvara temas
ediyordur.
Buzdolabı çalışmaya başladıktan
hemen sonra seslerin daha yüksek olması gayet
normaldir.
• İç kısmın temizlenmesi gerekli olabilir.
• Bazı yiyecekler koku yayıyordur.
• Bazı kaplar ve paketler kokuya
neden olabilir.
• Kokunun gelmeye başlamasının, sizin olağan
dışı bir şeyi koyduğunuz ana denk gelip
gelmediğini düşününüz.
sorun çözüm
Eğer motor
beklediğinizden daha
fazla çalışıyorsa
Yeni buzdolabınız, soğuk tutmak için geniş bir
soğutucu ve dondurucu bölmesine sahiptir. Bu
nedenle motor sesini sıkça duymanız normaldir.
Bununla birlikte, çalışmasını minimuma indirmek
için aşağıdaki hususları kontrol ediniz:
• Kapılar uzun süre açık kalıyor veya çok sık açılıyor
mu?
• Kontroller çok soğuğa mı ayarlanmış? “
kontrol edilmesi
• Kısa bir süre önce büyük miktarlarda sıcak
yiyecekler mi konulmuş? Yaz, sıcak mevsimler
ve tatiller, genellikle buzdolabınızın daha fazla
çalışacağı zamanlardır.
• Eğer o gün hava sıcaksa veya oda çok sıcaksa,
buzdolabının normalden daha fazla çalışması
gerekecektir.
• Buzdolabı, kurulup monte edilmesinden hemen
sonra veya uzunca bir süre kapalı kaldıktan sonra
çalıştırıldığında normalden daha fazla çalışacaktır.
Eğer buzdolabındaki
sıcaklık çok ılıksa
Eğer buzdolabındaki ısı
çok soğuksa
Eğer dondurucuda aşırı
buzlanma oluyorsa
Eğer zemine su
damlıyorsa
Soğutucu tatil
modundan çıkmıyor
Eğer kapılar
kapanmıyorsa
• Cihazın yan, arka ve üst tara arında yeterince
boşluk olduğundan emin olunuz. “Yeni
cihazınızın kurulumu” bölümüne bakınız
• “Sıcaklığın kontrol edilmesi” bölümüne bakınız
• Kapıyı çok uzun süre açık tutmuş veya çok sık
açmışsınızdır.
• Yiyecek kapları veya ambalajları kapının
kapanmasına engel oluyor olabilir.
• “Sıcaklığın kontrol edilmesi” bölümüne bakınız
• Yüksek enerji tüketimini önlemek için sıcaklığı
artırınız.
Dondurucu ve soğutucu bölmelerinin kapısını
tam olarak Kapadığınızdan emin olunuz. Eğer
kapılar açık kalırsa, dondurucunun içini aşırı buz
kaplayacaktır. Eğer buz oluşumu varsa, temizleyiniz
ve kapıları düzgün bir şekilde kapatmaya dikkat
ediniz.
Buz çözme suyu kabı, (kabinin arkasında veya alt
kısmındadır) düzgün yerleştirilmemiş olabilir, veya
tahliye borusu suyun bu kaba gönderilmesi için
düzgün şekilde yerleştirilmemiş olabilir. Kabı ve
boruyu kontrol etmek için buzdolabını duvardan
çekmeniz gerekebilir .
Cihazı güç noktasından kapayınız. Hafızanın
silinmesi için üç (3) dakika kapalı bırakınız, daha
sonra tekrar çalıştırınız.
• Buzdolabının üst kısmının, kapıların kendiliğinden
kapanmasını sağlamak için 10-15 mm. arkaya
eğilmiş olup olmadığını kontrol ediniz.
• Kapının bir şey tarafından açık tutulup
tutulmadığını kontrol ediniz.
Yiyecek muhafaza bölmesinin kapağı
kapatıldığında, dondurucu kapısının geçici olarak
açılıp kapanması normaldir. Eğer dondurucu
kapısı açık kalıyorsa, bu durum buzdolabının
arkaya doğru biraz daha fazla itilmesi gerektiğini
belirtir. Bu sorunu çözmek için bir servis
personelini çağırmanız halinde, servis çağrısı için
ücretlendirilirsiniz, bu arıza garanti kapsamında
değildir.
Sıcaklığın
” bölümüne bakınız.
Eğer halen servisi aramanız gerekiyorsa
Eğer sorununuz varsa ve yukarıda anlatılan kontrolleri yaptıktan
sonra sorununuz halen devam ediyorsa, size en yakın yetkili
Electrolux Servisiyle veya buzdolabını satın aldığınız satıcıyla
temasa geçiniz. Buzdolabı bölmesinin iç kısmındaki etikette
yazılı olan model numarasını, 9 rakamlı PNC ve 8 rakamlı seri
numarasını belirtiniz.
Page 51

Page 52

The Thoughtful Design Innovator.
Do you remember the last time you opened a gift that made you say
“Oh! How did you know? That’s exactly what I wanted!” That’s the kind of
feeling that the designers at Electrolux seek to evoke in everyone who chooses
or uses one of our products. We devote time, knowledge, and a great deal of
thought to anticipating and creating the kind of appliances that our customers
really need and want.
This kind of thoughtful care means innovating with insight. Not design for
design’s sake, but design for the user’s sake. For us, thoughtful design means
making appliances easier to use and tasks more enjoyable to perform, freeing
our customers to experience the ultimate 21st century luxury: ease of mind.
Our aim is to make this ease of mind more available to more people in more
parts of their everyday lives, all over the world.
The “Thinking of you” promise from Electrolux goes beyond meeting the needs
of today’s consumers. It also means we’re committed to making appliances
safe for the environment—now and for future generations.
Electrolux. Thinking of you.
Share more of our thinking at:
www.electrolux.com
www.electrolux.fr
www.electrolux.it
www.electrolux.com.tr
P/No. 1455086
© Copyright 2009 Electrolux Home Products Pty Ltd
ABN 51 004 762 341
Issue date: Apr 09
 Loading...