

Page 1
REFRIGERATION
CARE AND USE
INSTRUCTIONS
English
S85582DT
S85528KG
Page 2

1 - Introduction
Important Safety Instructions .....................................3
Location .....................................................................3
Clearances around your refrigerator ..........................3
2 - Features at a glance
Top Mount (TM) Freezer models ...............................
4
Bottom Mount (BM) Freezer models ......................... 5
3 - Installation
Installing your new refrigerator .................................
6
Ice Station Assembly installation ..............................7
Top freezer models ............................................7
Bottom freezer models ......................................7
4 - Operating your refrigerator
Initial start up ............................................................8
Controlling the Temperature
Electronic (Digital Display) Models ...........................
9
Adjusting temperatures ..........................................9
Changing the freezer temperature .........................9
Changing the refrigerator temperature ..................9
Fast freeze function ...............................................9
Door alarm ...........................................................10
Freezer temperature alarm ...................................10
Vacation mode .....................................................10
Child Lock ............................................................10
Drinks (wine) chill timer ........................................10
Normal Mode .......................................................10
Eco Mode .............................................................10
Vacation Mode .....................................................10
Manual (rotary controlled models) ..........................11
Top freezer models ..............................................11
Bottom freezer models ........................................11
Dairy compartment .................................................13
Door storage bins ...................................................12
Crisper Bin ..............................................................12
Storing vegetables ..........................................12
Storing fruit and small goods ..........................12
Crisper bin and shelf removal .........................12
Sliding shelf deli-bin ...............................................13
Split glass shelf .......................................................13
Deodoriser ..............................................................13
Bottle Snugger .......................................................13
Freezer baskets (bottom freezer model only) .........14
Changing the Light Bulb
Food Compartment .........................................14
Freezer Compartment .....................................14
5 - Care & Maintenanc
e
Cleaning the refrigerator .........................................
15
Exterior ............................................................ 15
Cabinet ....................................................... 15
Doors - painted .......................................... 15
Doors - stainless steel ................................ 15
Interior ............................................................. 15
Keep the door seals clean ............................... 15
Safety ...................................................................... 15
What to do before calling for service ...................... 16
Warranty Information .............................................. 18
All rights in this publication are reserved and no part may be reproduced without the prior written permission
of Electrolux Home Products Pty Ltd (“Electrolux”). The contents of this publication are believed to be correct
at the time of publication but any information, products or services mentioned may be modified, supplemented
or withdrawn at any time. Due to its’ policy of continuous product development and improvement Electrolux
reserves the right in its’ sole discretion to change products specification and materials without notice.
Use & Care - contents
Page 2
Anti+bac
Several items in your new Electrolux refrigerator have been manufactured with an anti-bacterial additive.
The advantages of the anti+bac additive are:
• Provides Antimicrobial protection.
• Kills harmful bacteria.
• Reduce odours by killing odour causing bacteria.
• Is safe and harmless for humans and animals.
• Works continuously to protect from harmful bacteria and germs.
• Helps protect against cross contamination (the most common cause of food borne illness).
• Protection that’s built in during the manufacturing process, it won’t wash or wear off. It lasts the life of the product.
• Anti+bac is not a substitute for good hygiene practices.
Page 3
1 - Introduction
Dear Customer
Congratulations on the purchase of your new
refrigerator.
We at Electrolux Home Products are very proud of our
product and we are completely committed to providing
you with the best service possible.
Please read this Use & Care Manual very carefully. It
contains valuable information on how to properly maintain
your new refrigerator. We know you’ll enjoy your new
refrigerator and thank you for choosing our product. We
hope you will consider us for future purchases.
Follow the instructions below to ensure that you install it
safely and that it runs efficiently.
PLEASE READ AND SAVE THESE INSTRUCTIONS
This Use & Care Manual provides specific operating
instructions for your model. Use your refrigerator only as
instructed in this manual. These instructions are not meant
to cover every possible condition and situation that may
occur. Common sense and caution must be practiced
when installing, operating and maintaining any appliance.
Important:- Before you install your refrigerator, PLEASE
CHECK FOR ANY DAMAGE OR MARKS. If you find that
the refrigerator is damaged or marked, you must report
this within 7 days if you wish to claim for damage / marks
under the manufacturers warranty. This does not affect
your statutory rights.
Important Safety Instructions
IF PRESSURISED AEROSOL CONTAINERS
BEAR THE WORD ‘FLAMMABLE’ AND/OR
A SMALL FLAME SYMBOL, DO NOT STORE
THEM INSIDE ANY REFRIGERATOR. IF YOU
DO SO YOU MAY CAUSE AN EXPLOSION
When you dispose of refrigerators and freezers,
remove any doors. Children can suffocate if they
get trapped inside.
This refrigerator contains insulation formed with
flammable blowing gases. Avoid safety hazards
by carefully disposing of this appliance.
• The refrigerator must be plugged into its own
dedicated 220-240 Volt, 50 Hz., AC electric outlet.
• Ensure that the electric outlet is properly earthed to
ground. Consult a qualified electrician if
you are unsure.
• Do not use an extension cord or
adapter plug.
• If the power cord is damaged, it should
be replaced by a service technician or a
qualified person .
• Unplug the refrigerator before cleaning and before
changing any of the light bulbs to avoid electric shock.
• Never unplug the refrigerator by pulling on the power
cord. Always grip the plug firmly, and pull straight out of
the receptacle to prevent damaging the power cord.
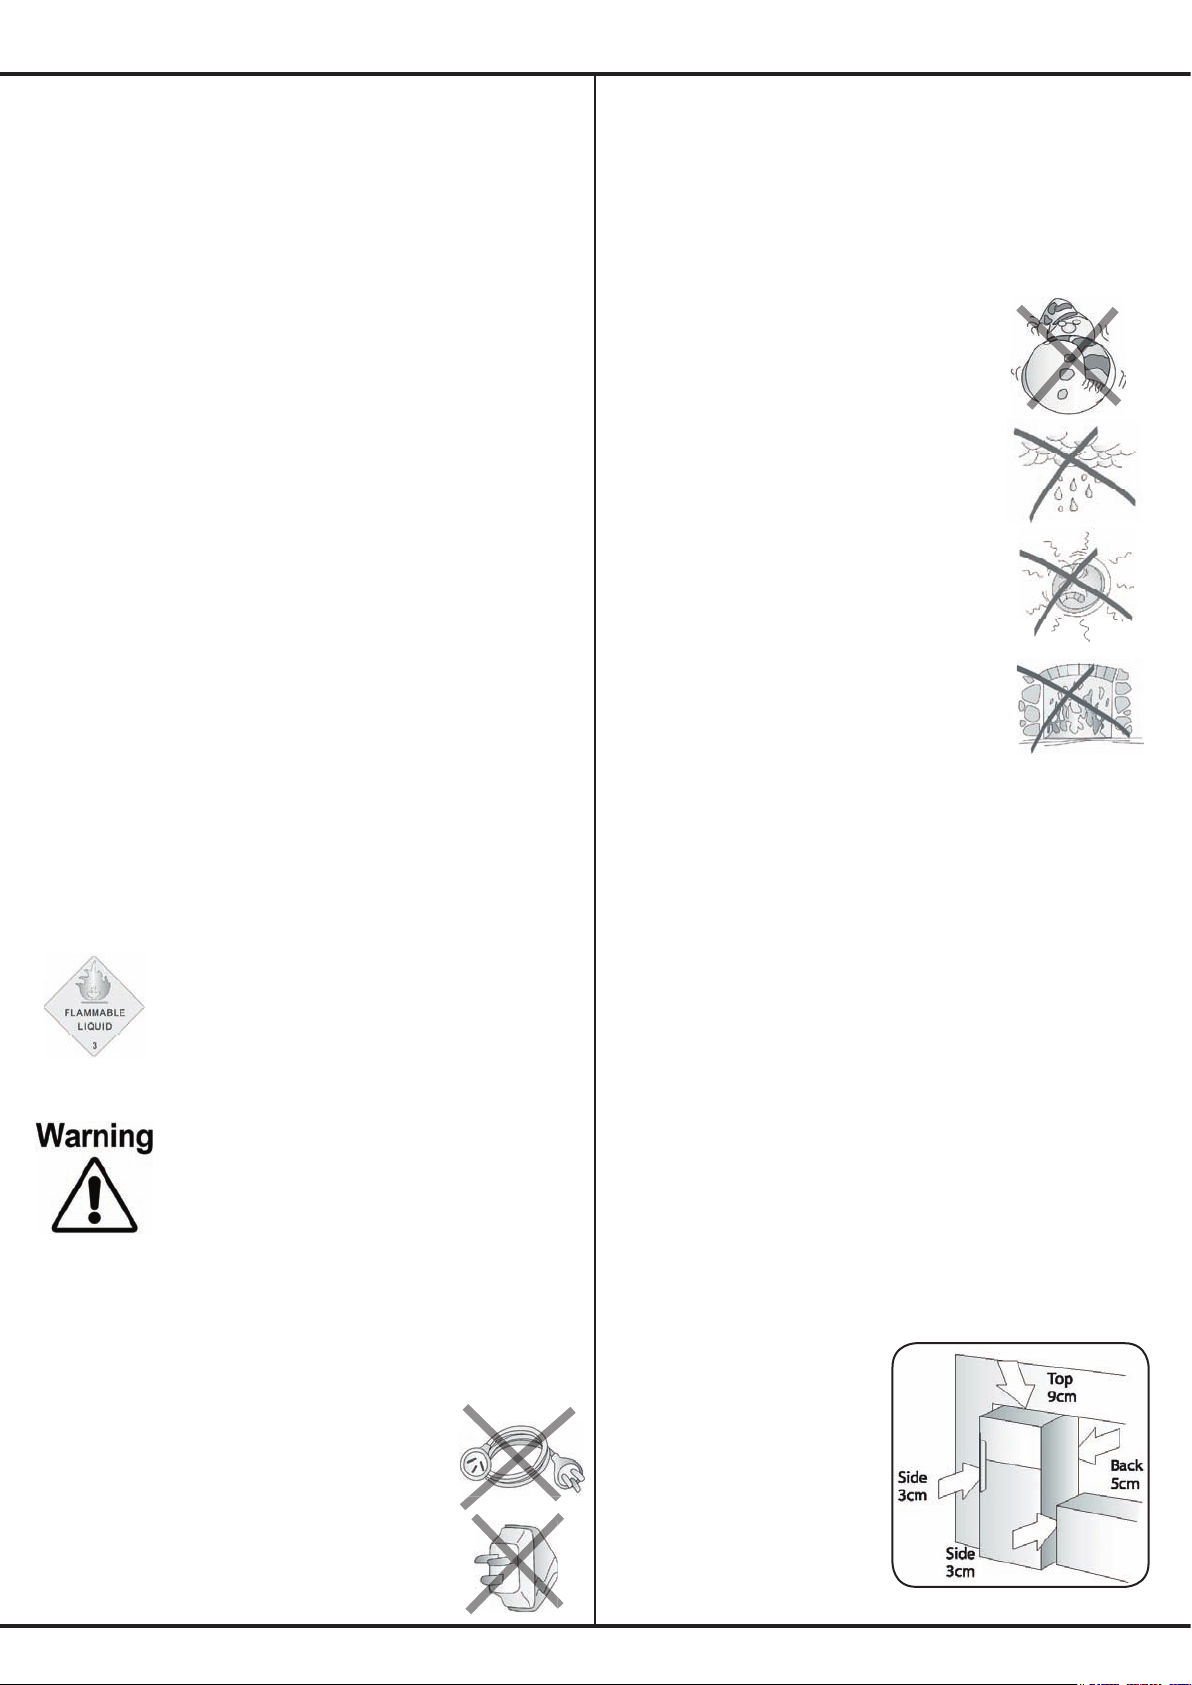
Location
• Choose a place that is not too cold the temperature should be above 10°C.
• Put the refrigerator in a dry place,
avoiding areas of high moisture or
humidity.
• Don’t put the refrigerator in frosty or
unprotected areas, for example in a
garage or on a veranda.
• Don’t put the refrigerator in direct
sunlight.
• Don’t put the refrigerator near stoves,
fires or heaters.
When correctly installed, your refrigerator should:
• have adequate clearance to the back and sides for air
circulation.
• be aligned to the surrounding cupboards.
• have doors that will self-close from a partially open
position.
• have the stability foot in place (see Diagram 4 on page 6)
to prevent the refrigerator falling forward when a door with
heavy food load is opened.
Clearances around your refrigerator.
Before you move your refrigerator into the place where it
will operate check that it will have adequate clearance.
Clearance is required for air circulation and too little
clearance may affect your refrigerators performance.
We recommend minimum clearances of:
• 3cm on each side.
• 9cm above the refrigerator.
• 5cm behind the refrigerator.
Page 3
Page 4
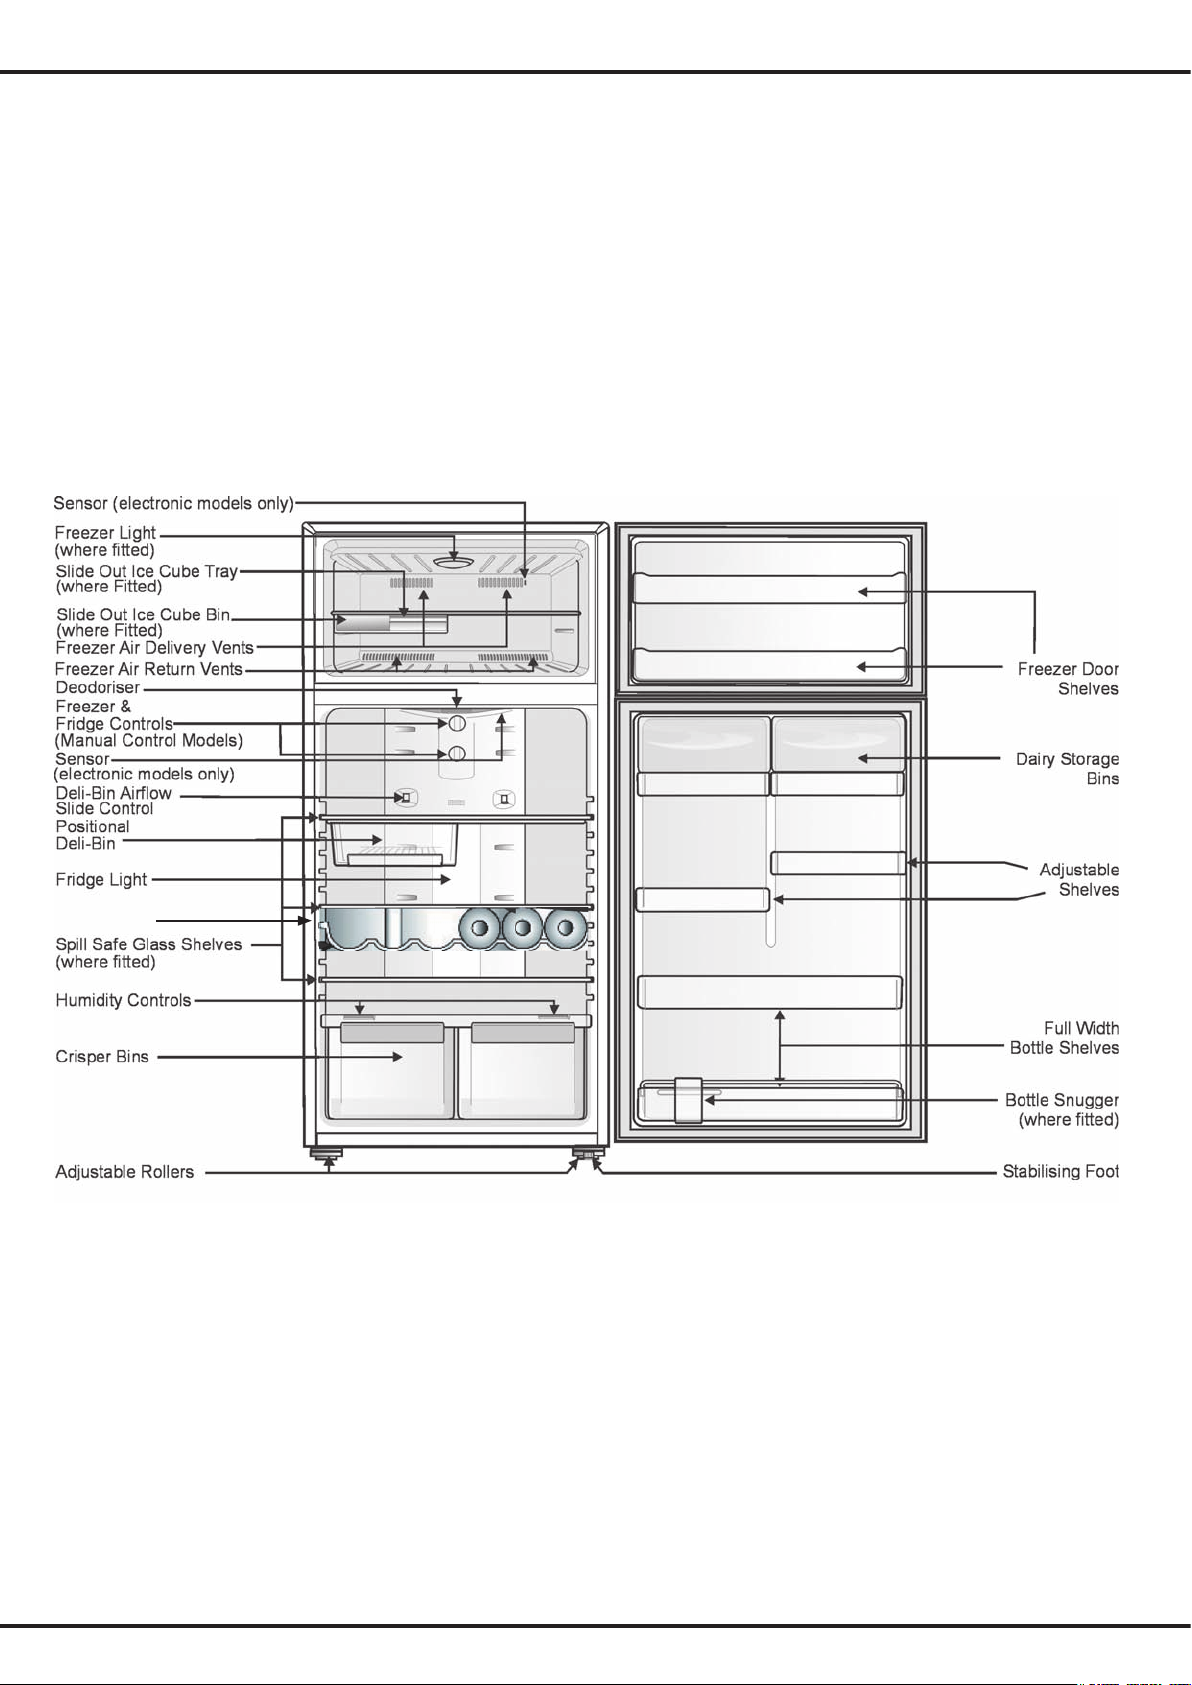
2 - Features at a glance
Please look at the diagram below before reading about how to care for your refrigerator
TOP FREEZER MODELS (TM)
Model shown: N520J
Features may vary according to model
Page 4
Wine Rack
(where fitted)
Page 5
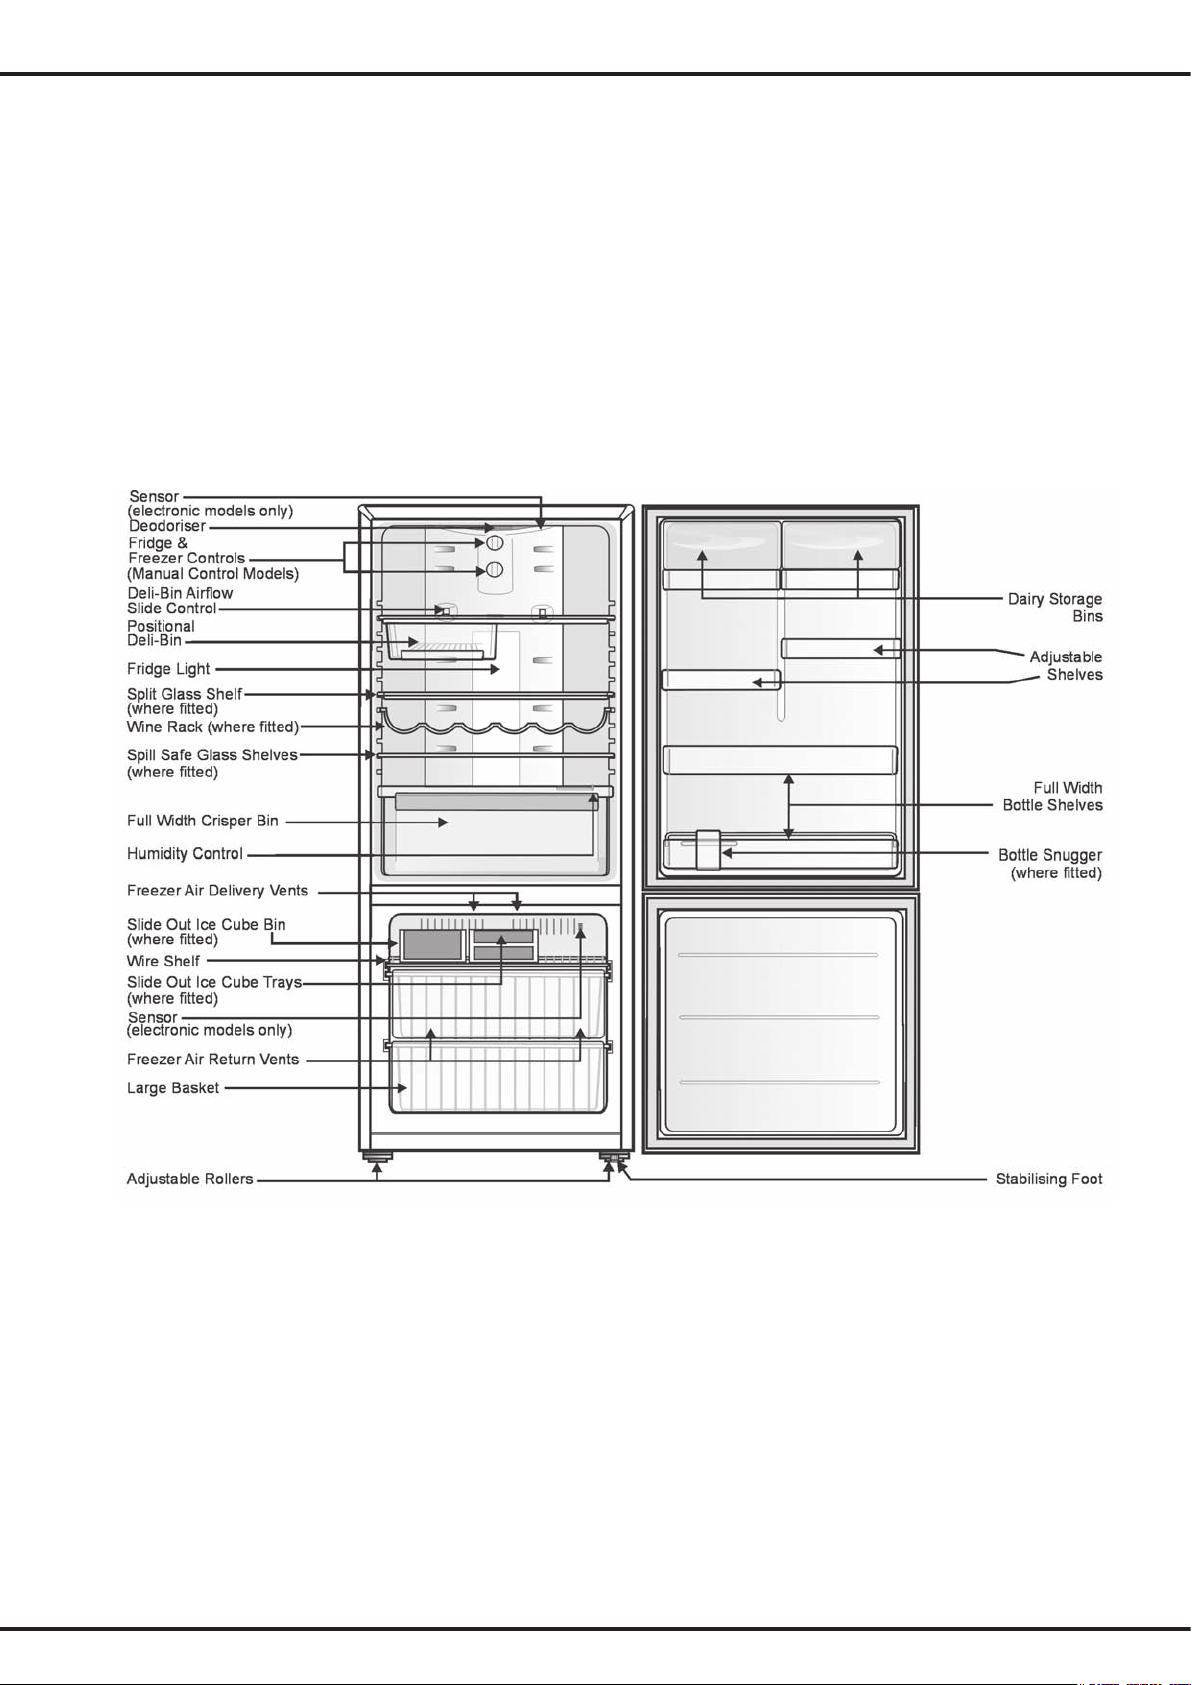
2 - Features at a glance
Please look at the diagram below before reading about how to care for your refrigerator
BOTTOM FREEZER MODELS (BM)
Model shown: NB430J
Features may vary according to model
Page 5
Page 6
3 - Installation
Installing your new refrigerator.
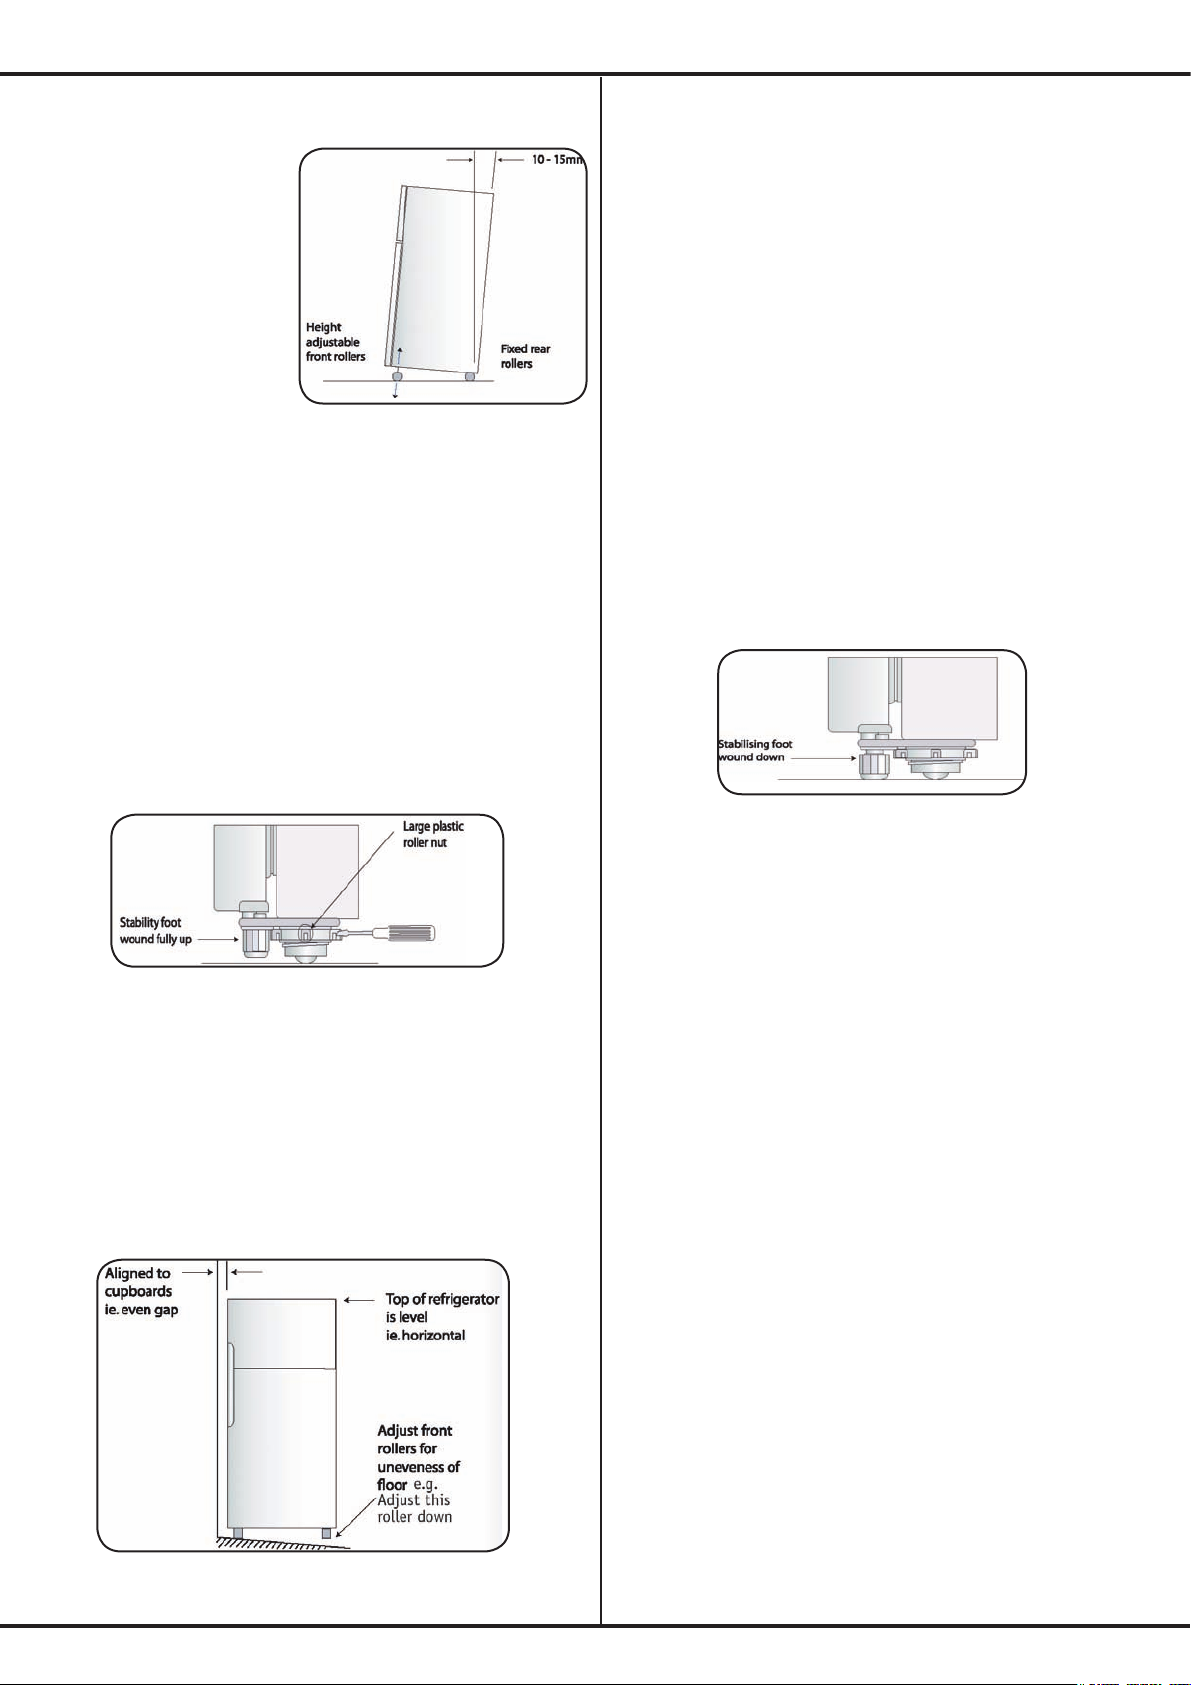
The refrigerator should
arrive with the front
adjustable rollers wound
down to tilt the top of the
refrigerator backwards
by about 10-15mm from
upright (See Diagram 1).
The stability foot should
also be wound fully up so
it will not interfere with the
operation of the rollers
(See Diagram 2).
1. Roll the refrigerator into its final position.
WARNING: The rollers are designed for forward or
backward movement only. They are not castors. Moving
the refrigerator sideways may damage
your floor and
the rollers.
2. The top of the refrigerator should be tilted back by
approximately 10-15mm. This will allow the doors to selfclose providing a consistent door seal. (See Diagram 1)
It is normal for the freezer door to momentarily open and
re-close when the food compartment door is closed firmly.
If the freezer stays open you will need to tilt the refrigerator
backwards a little further.
3. If the refrigerator is not tilted back, you can adjust the
two front rollers by turning the large, plastic roller nut (See
Diagram 2). This will increase the height of the rollers. One
turn of the nut will tilt the refrigerator back approximately
10mm. If you have difficulty turning the roller nut you can
have someone tilt the refrigerator back, so that you have
better access. Alternatively, you can access the rollers from
the side, using a flat screwdriver to help you turn the nut
(see Diagram 2).
4. Check the alignment of the refrigerator to the
surrounding cupboards. The top of the refrigerator should
be level from side to side (see Diagram 3). If you need to
adjust the level, use the adjustable rollers as discussed in
Step 3.
5. If the refrigerator now rocks from one corner to the
opposite rear corner, this means that the floor is uneven;
you will need to put some packing under one of the rear
rollers.You could use thin pieces of solid material, such as
thin board, vinyl floor tiles or laminate. Place the packing
so that it will sit under one of the rear rollers when the
refrigerator is rolled into position.
6.You may now need to fine-tune the installation by
repeating Steps 3, 4 and 5.
7. When you have the refrigerator in final position wind the
stabilising foot down until it just makes contact with the
floor (see Diagram 4). Whenever you need to move the
refrigerator, be sure to wind the foot back up so that the
refrigerator can roll freely.
8. Clean your refrigerator thoroughly following the
instructions on page 15 and wipe off any dust that has
accumulated during shipping.
9. Plug the refrigerator into the power point. Don’t use a
double adaptor. If you need to roll the refrigerator out to get
at the power point, remember to raise the stabilizing foot
before you do so.
10.We recommend that you let your refrigerator run for two
to three hours before you put any food in it. This will allow
you to check that it is operating properly and that enough
cool air is going to the freezer.
Congratulations! You have successfully installed your
refrigerator.
Diagram 1
Diagram 2
Diagram 3
Diagram 4
Page 6
Page 7
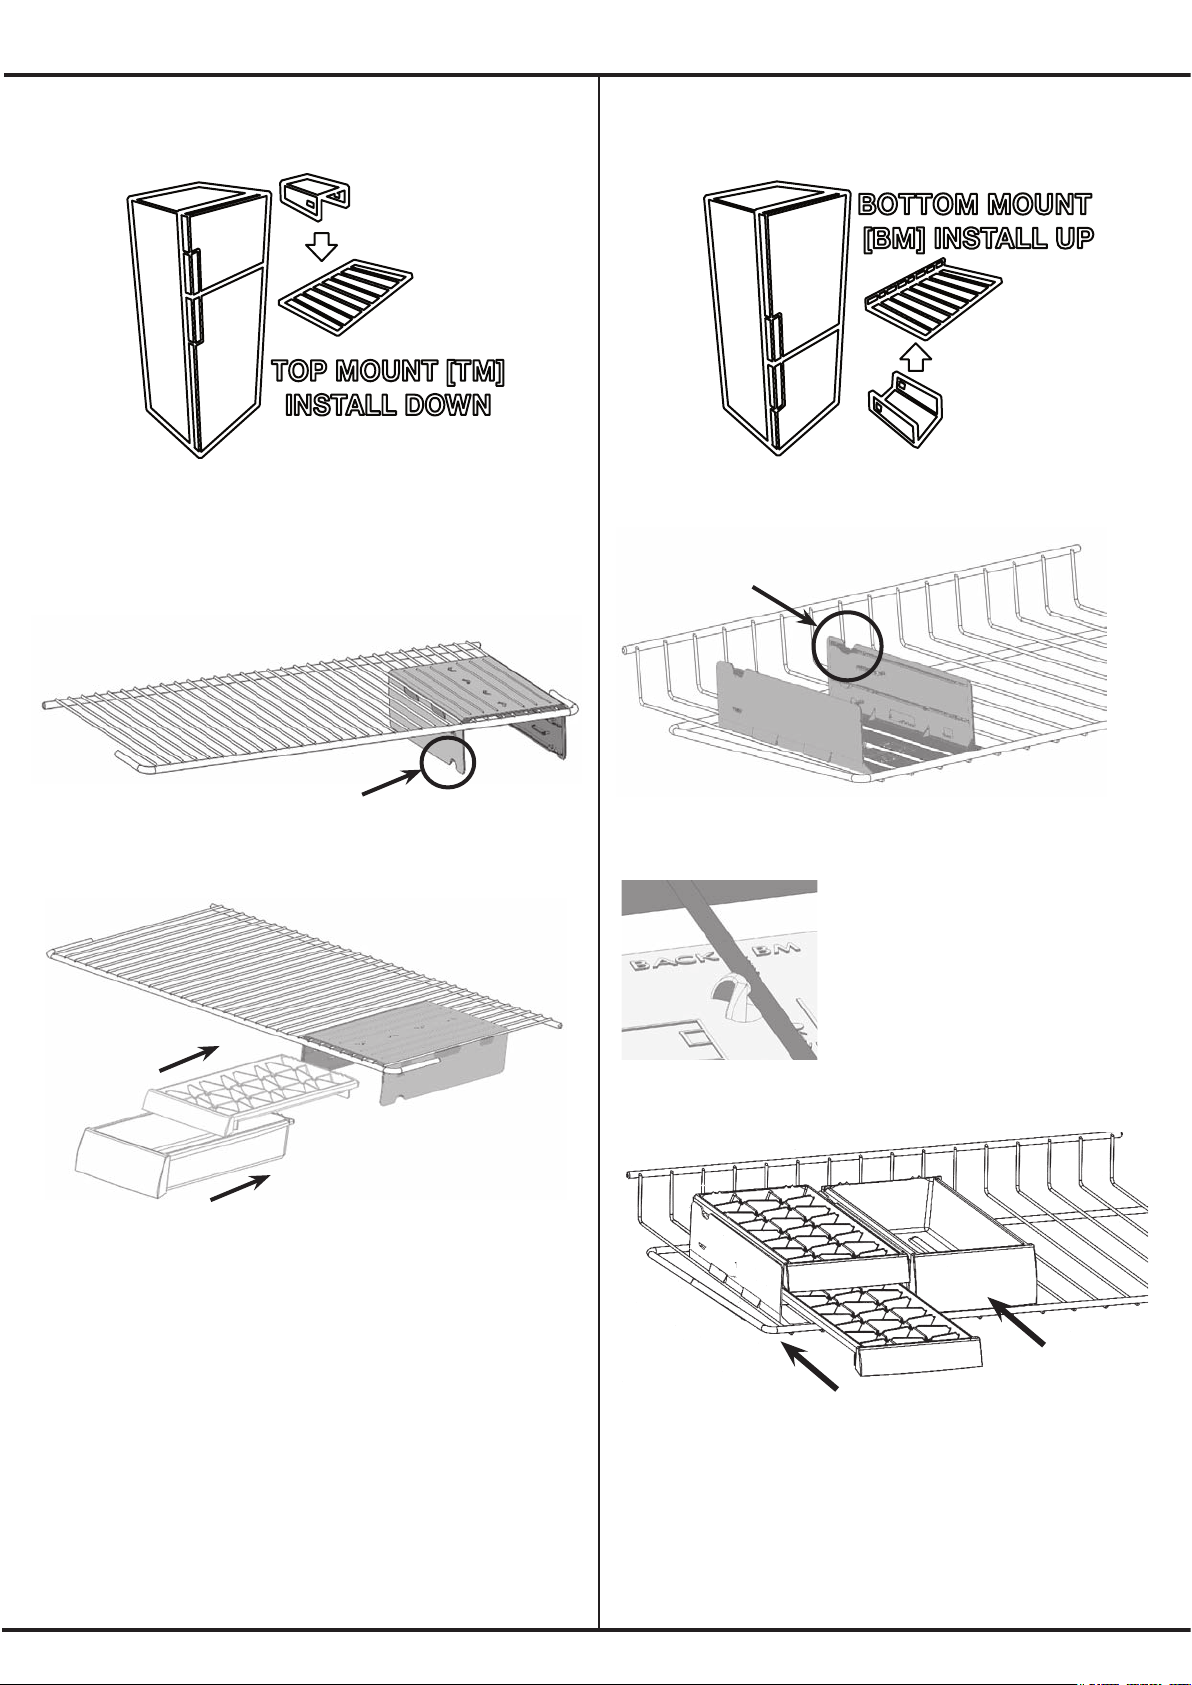
Ice Station Assembly Installation
To fit the Ice station assembly to a top freezer model;
Fit the Ice Station carrier to the wire shelf by alligning the
outside of the carrier to the wires as shown in diagram 1.
Then push down in the middle of the carrier until it clips into
place as shown in diagram 2
Finally, slide the ice cube trays or storage bin into position
as shown in diagram 2
To remove, take out the ice cube trays and storage bin and
simply lift the carrier off the wire shelf.
To fit the Ice station assembly to a bottom freezer model;
Fit the Ice Station carrier to the wire shelf by alligning the
outside of the carrier to the wires as shown in diagram 1.
Make sure the four clips are
engaged onto the central wire (as
shown in diagram 2)
Then push up in the middle of the carrier until it clips into
place
Finally, slide the ice cube trays or storage bin into position
as shown in diagram 3
To remove, take out the ice cube trays and storage bin and
simply pull the carrier off the wire shelf.
3 - Installation
Page 7
Diagram 1
Diagram 1
Diagram 2
Diagram 3
To rear of
shelf
To front of
shelf
Diagram 2
(Some models only)
Page 8
4 - Operating your refrigerator
Initial start up
The refrigerator transfers heat from food placed inside
the refrigerator to the outside air.
This process makes the rear, the sides and the area
adjacent to the doors, particularly at initial start up,
feel warm. This is normal.
There is a cooling coil located behind the rear wall of the
freezer section. This coil cools and removes moisture
from the air. A fan at the rear of the freezer section then
circulates cold, dry air throughout the refrigerator.
This air circulation means that foods are refrigerated far
more quickly than in refrigerators where the air remains
relatively static.
Avoid placing food against air outlets as this will
affect air circulation. (see diagram
on page 5)
A light frosting will occasionally occur on the cold interior
of the freezer when the door is opened frequently. This
is normal and will disappear after a few days in most
climates.
Make sure you fully close the freezer and fresh food
doors after you load or remove food from these
compartments. If the doors are left partly open, a heavy
frost will coat the inside of the freezer. If a frost develops,
remove it. Take care to properly close the doors and the
frost will not reoccur.
Your new energy efficient refrigerator uses a high-speed
compressor and other energy efficient components that
may produce different noises to your old refrigerator.
These sounds are normal and include:
• compressor running noise.
• air movement noise from the small fan motor.
• occasional gurgling, similar to water boiling.
• a popping noise, heard during defrosting.
• a clicking noise, just prior to the compressor
starting up.
These noises are normal and not cause for alarm.
Further details can be found on page 17.
Refrigerator / Freezer operation
On a top freezer refrigerator
If food is forward of the ribs on the bottom
of the freezer, it will keep the door open. So
make sure food is stored behind the ribs.
On a bottom freezer refrigerator
Ensure freezer baskets and shelves are
pushed completely back to prevent them
holding the door open.
Page 8
Page 9
Electronic models
The electronic display
panel consists of an
LCD display with white
backlighting and 6 push
buttons. When the power
is first turned on, you will
see the default settings,
with the white backlighting
on.
If no buttons have been pressed and the fridge door is
closed the backlighting will turn off after 30 seconds.
Adjusting temperatures
The default temperature for the refrigerator is 3°C, with
a default of -18°C for the freezer. If you want to change
the temperatures, use the instructions below. You should
make only small adjustments and wait 24 hours to see
whether you need to make further changes.
Note: When you set a temperature, you set an average
temperature for the whole refrigerator cabinet.
Temperatures inside each compartment may vary,
depending on how much food you store and where you
place it. High or low room temperature may also affect the
actual temperature inside the refrigerator.
Changing the freezer temperature
Press the freezer button
to make the freezer colder
in 1°C steps. Once -23°C
is reached the display will
return to -14°C with the next
button press. You’ll notice
that the bar graph gets
smaller with colder freezer
settings.
Changing the refrigerator temperature
Press the fridge button to
make the fridge colder in
1°C steps. Once 0.0°C is
reached the display will
return to 7.0°C with the
next button press. The
bar graph gets smaller
with colder settings.
Note: Testing ice cream is a good way to test the freezer
temperature. Testing drinking water is a good way to
check the refrigerator compartment temperature.
Fast freeze function.
Use the fast freeze function
when you add a large
amount of food to the freezer
compartment. This freezes
the food quickly but does not
affect the temperature in the
refrigerator compartment.
To use this function, press the
fast freeze button once. An
animated icon will light up. The fast freeze function will
now operate for 90 minutes. If you want to turn the fast
freeze function off before 90 minutes have passed, simply
press the fast freeze button again. The icon will disappear
and the refrigerator will return to normal operation.
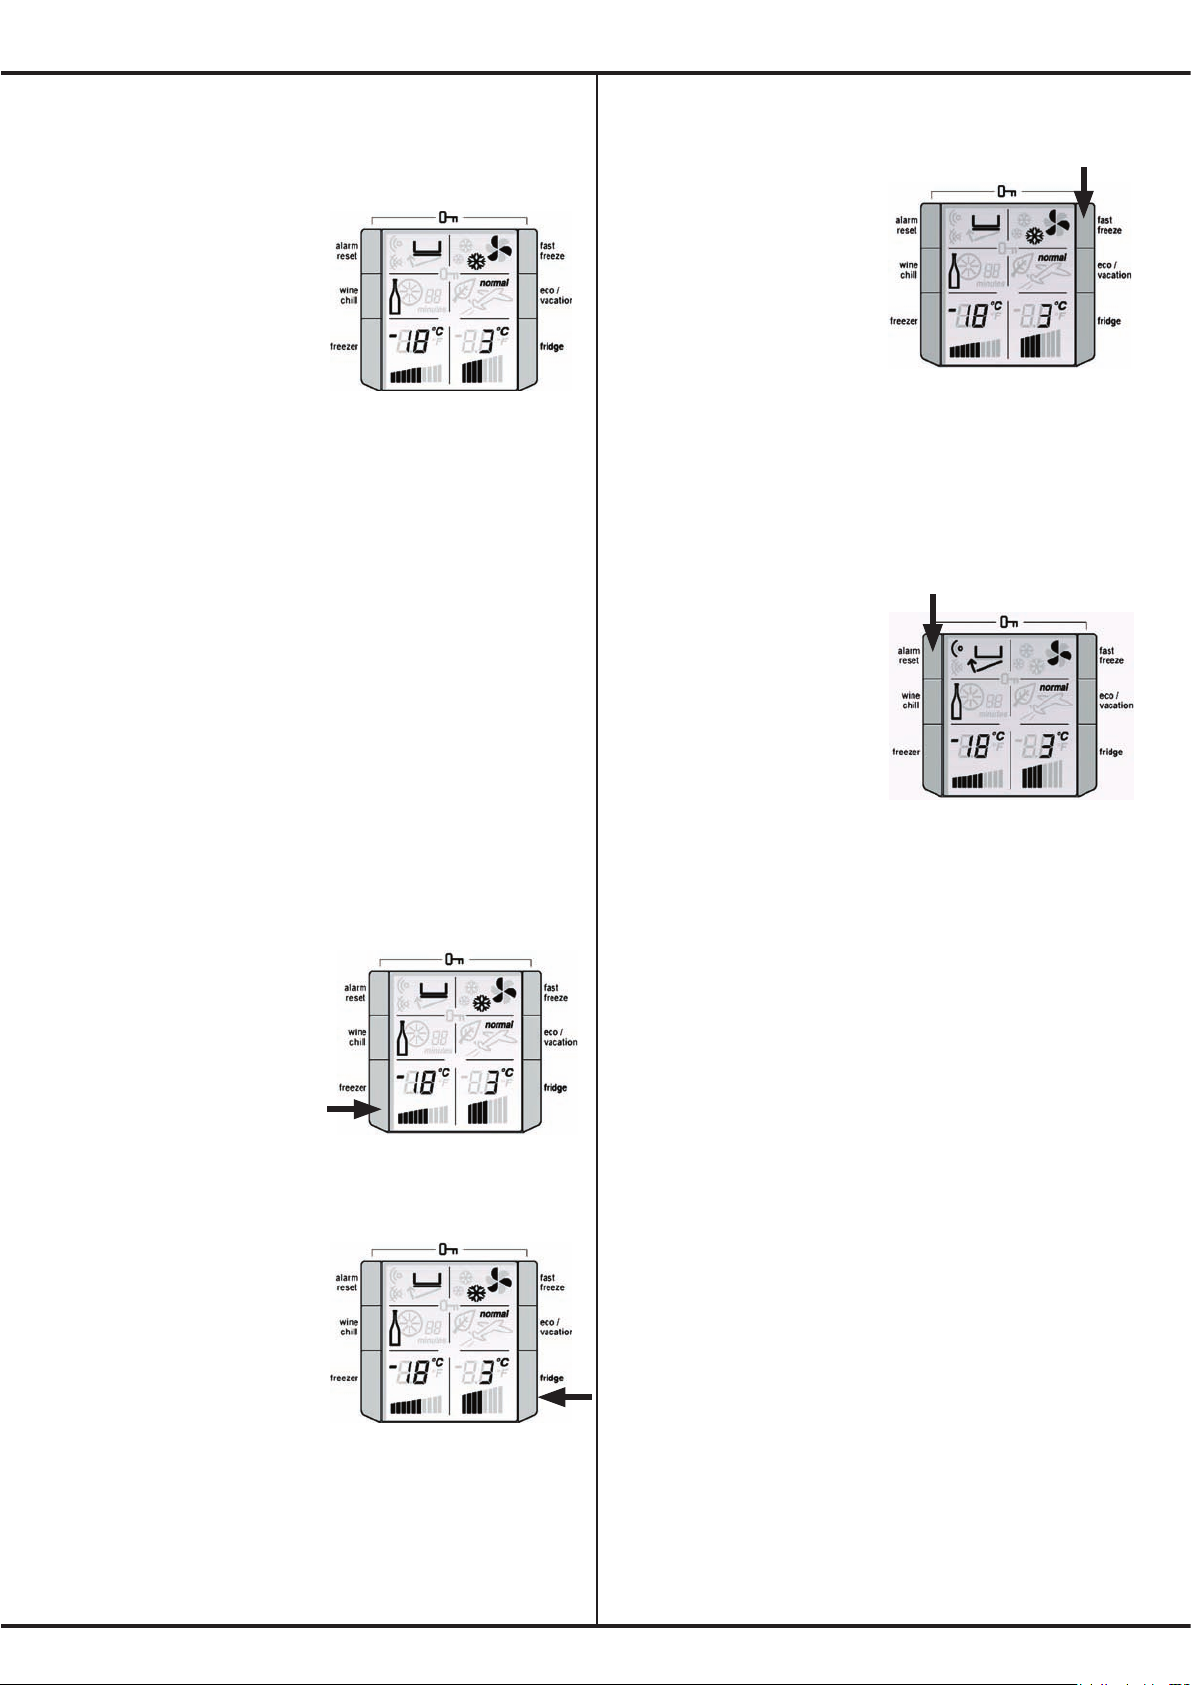
Freezer temperature alarm.
If the alarm is sounding for
no apparent reason, check
whether anything is holding the
door open. Closing the door
resets the alarm for a further 2
minutes.
If the freezer becomes too
warm due to the freezer door
being left open or warm food being placed too close to
the temperature sensor in the freezer (see page 4 & 5,
Parts of your refrigerator for the sensor location). A buzzer
will sound, the icon adjacent to the alarm reset button,
the freezer set temperature and bar graph will all flash
until the alarm reset button is pressed. Once pressed the
alarm disable icon adjacent to the alarm reset button will
illuminate for 50 minutes, or until the temperature reaches
an acceptable level.
Make sure nothing is holding the freezer door open and
move any warm food away from the temperature sensor.
See page 5 & 6 (Parts of your Refrigerator) for more
information.
If the freezer is still too warm after 50 minutes the alarm
will sound again, indicating that something may be wrong
with your refrigerator.
Note: The freezer temperature alarm can be reset for 12
hours by pressing the alarm reset button continuously for
10 seconds.
4 - Operating your refrigerator
Controlling the temperature
Page 9
Page 10
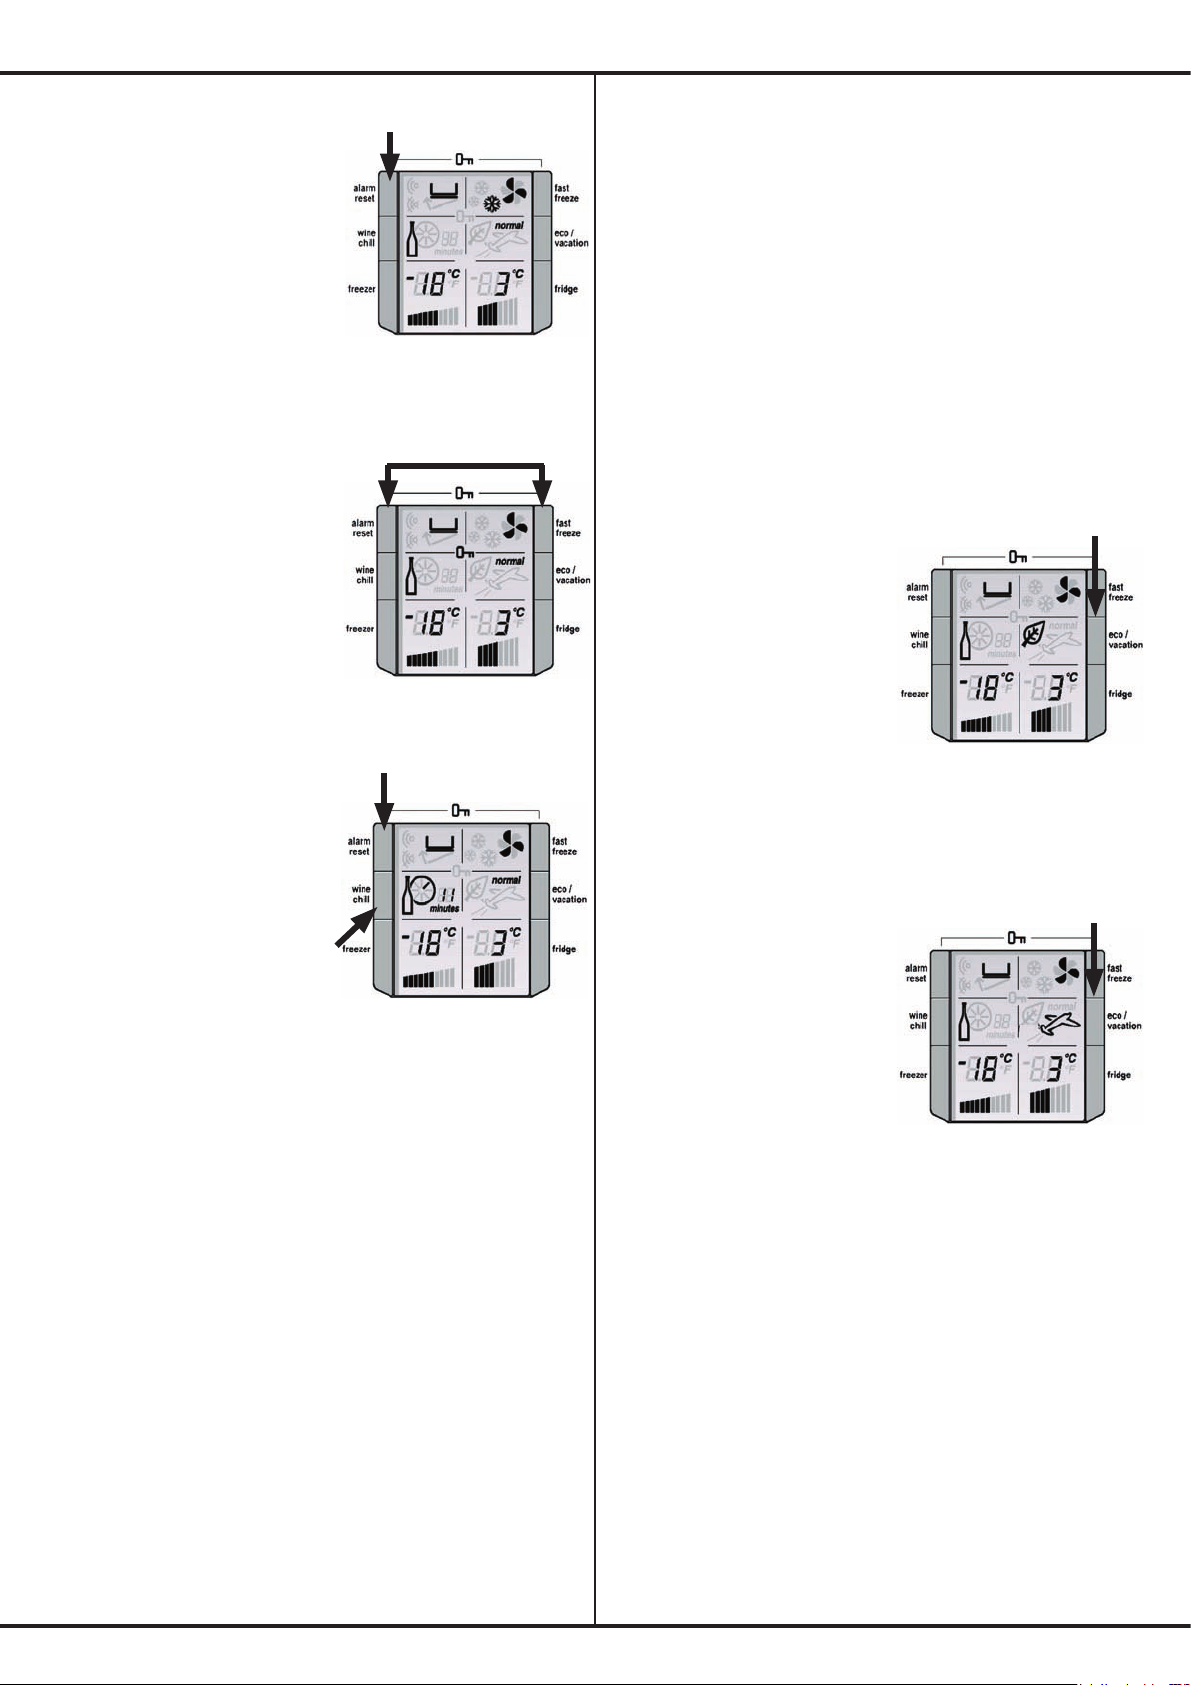
Door alarm.
If the refrigerator door is left
open for longer than 2 minutes
a buzzer will sound and an
arrow pointing to an open
door will flash. The refrigerator
temperature settings and bar
graph will also flash.
If you want to leave the door
open while you load the fridge, you can turn the alarm off
for 8 minutes by pressing the alarm reset button.
Child Lock
To activate the child lock,
press the alarm reset and fast
freeze buttons together. This
will disable the display to
prevent accidental changes
to settings.
To turn off the child lock press
and hold the alarm reset and
fast freeze buttons together.
Wine chill timer.
To use the timer, press the
wine chill button once to set
a 10 minute time limit, twice
for 20 minutes and three
times for 30 minutes. Press
four times to turn the timer
off.
If you set the wine chill timer it will sound an alarm to
remind you that you have left drinks in your freezer for
quick chilling.
An animated icon appears beside the wine chill button
with a countdown timer.
Suggested chilling times:
10 minutes for cans of drink
20 minutes for bottles of wine
30 minutes for bottles of soft drink.
When you press the wine chill button, an animated icon
will appear beside the wine chill button with a countdown
timer. The timer will count down in 1 minute increments;
you can change the time or turn the timer off even after the
countdown has started. When the countdown is finished a
buzzer will sound and the icon beside the alarm will flash
until the alarm reset button is pressed.
To stop the alarm and turn off the wine chill timer, press
the Alarm reset button. If your drink is chilled, take it out
of the freezer. If it is not cold enough, reset the wine chill
function (remembering that the drink is already partially
chilled).
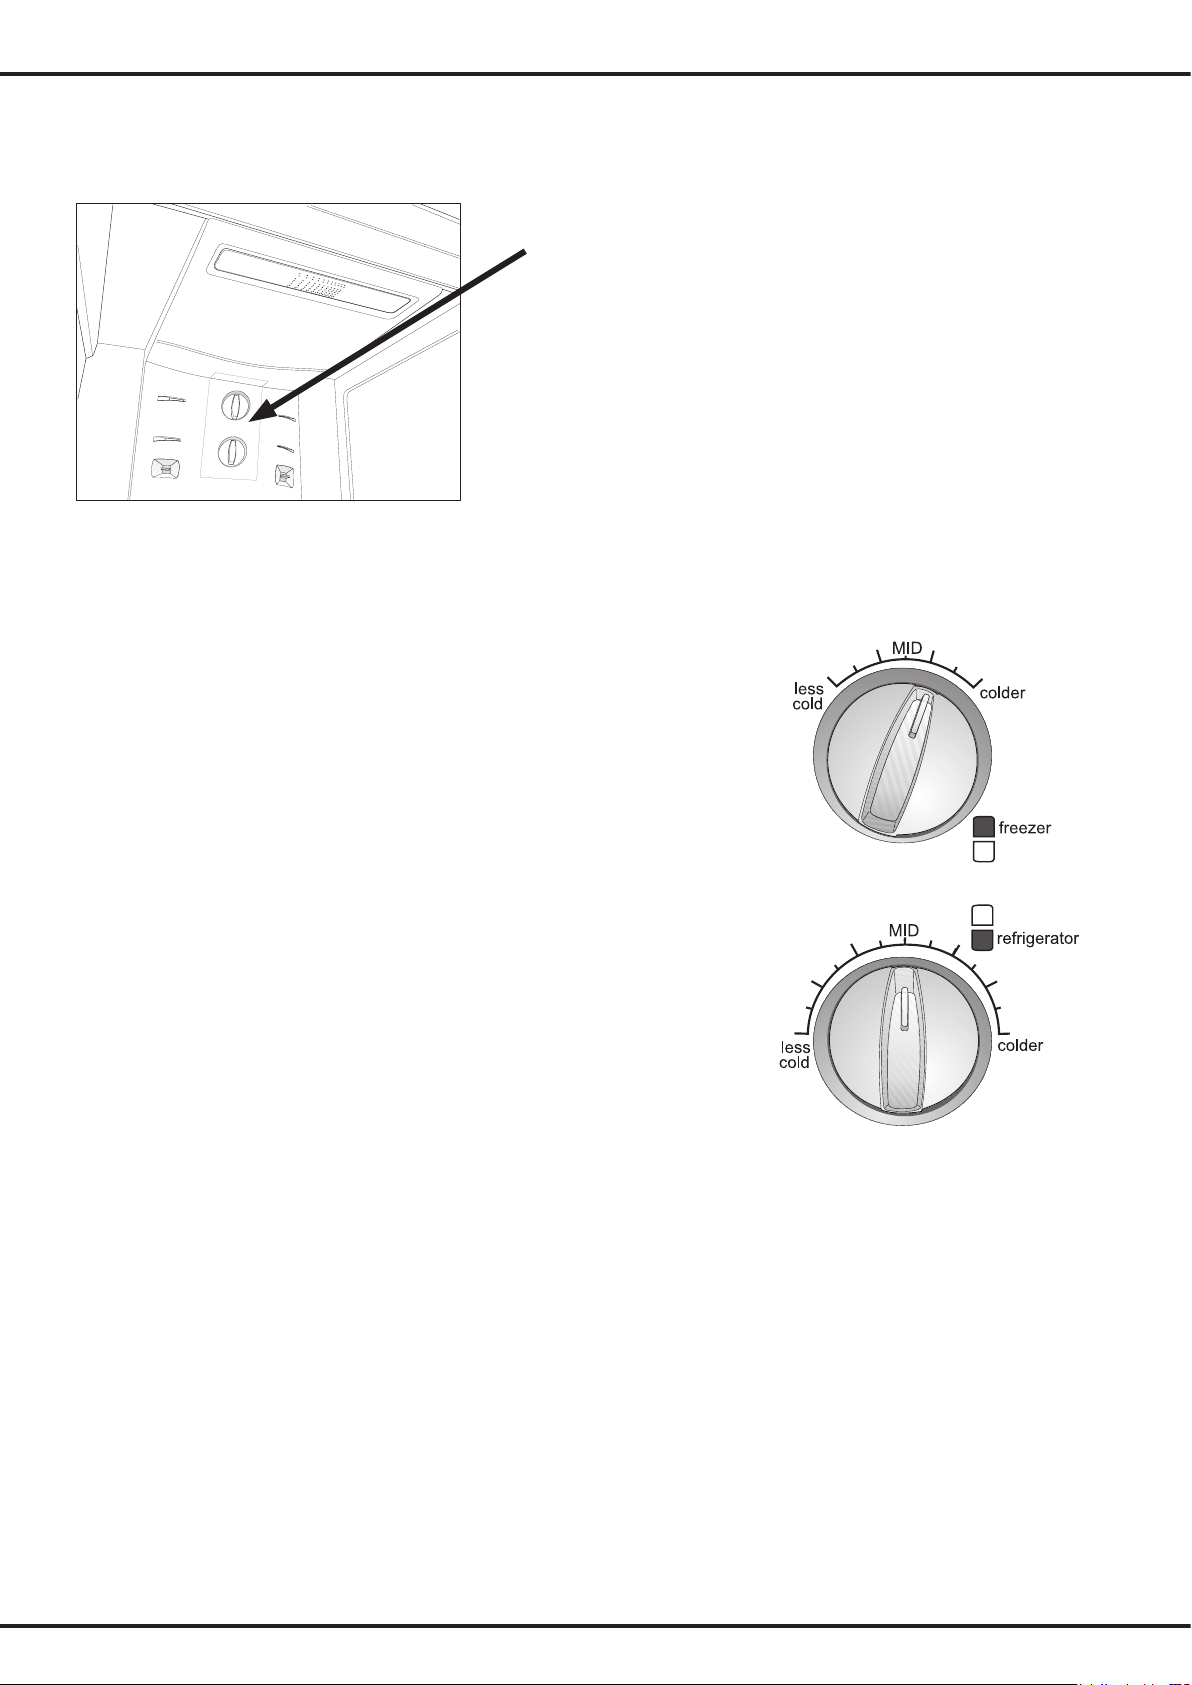
Energy Efficiency
Your refrigerator has been designed with energy efficiency
in mind and can operate in any of three modes (Normal,
Eco, Vacation), depending on the level of efficiency
sought.
Normal Mode
This is the mode which is entered automatically when the
refrigerator is first turned on. Normal Mode is the mode
most suitable when the refrigerator door is opened often.
Eco Mode
Eco Mode is a more efficient
mode than Normal Mode and
can be entered in two ways.
Either by manually pressing
the Eco / Vacation button
once when in Normal Mode,
or automatically after 30 hours
if the refrigerator door has not
been opened. If Eco Mode is
entered manually, door openings will not cause the display
to revert to Normal Mode, however if Eco Mode is entered
automatically, the refrigerator will revert to Normal Mode
once the refrigerator door is opened.
Vacation Mode
If you think that you will be
away from your refrigerator
for an extended period and
would like to take advantage
of maximum energy efficiency.
Then, from Normal Mode,
press the Eco / Vacation button
twice in succession just before
you leave and the refrigerator
will enter Vacation Mode, as indicated by the aeroplane
symbol. (If in Eco Mode a single button press is all that is
required to enter Vacation Mode).
Vacation Mode is exited automatically once the refrigerator
door is opened and Normal Mode resumes.
Eco and Vacation Modes minimise defrosting to save
energy, while maintaining your temperature settings.
Note: Opening the freezer door has no effect on the
operation of Eco and Vacation Modes, except if the freezer
temperature alarm sounds.
4 - Operating your refrigerator
Page 10
Page 11
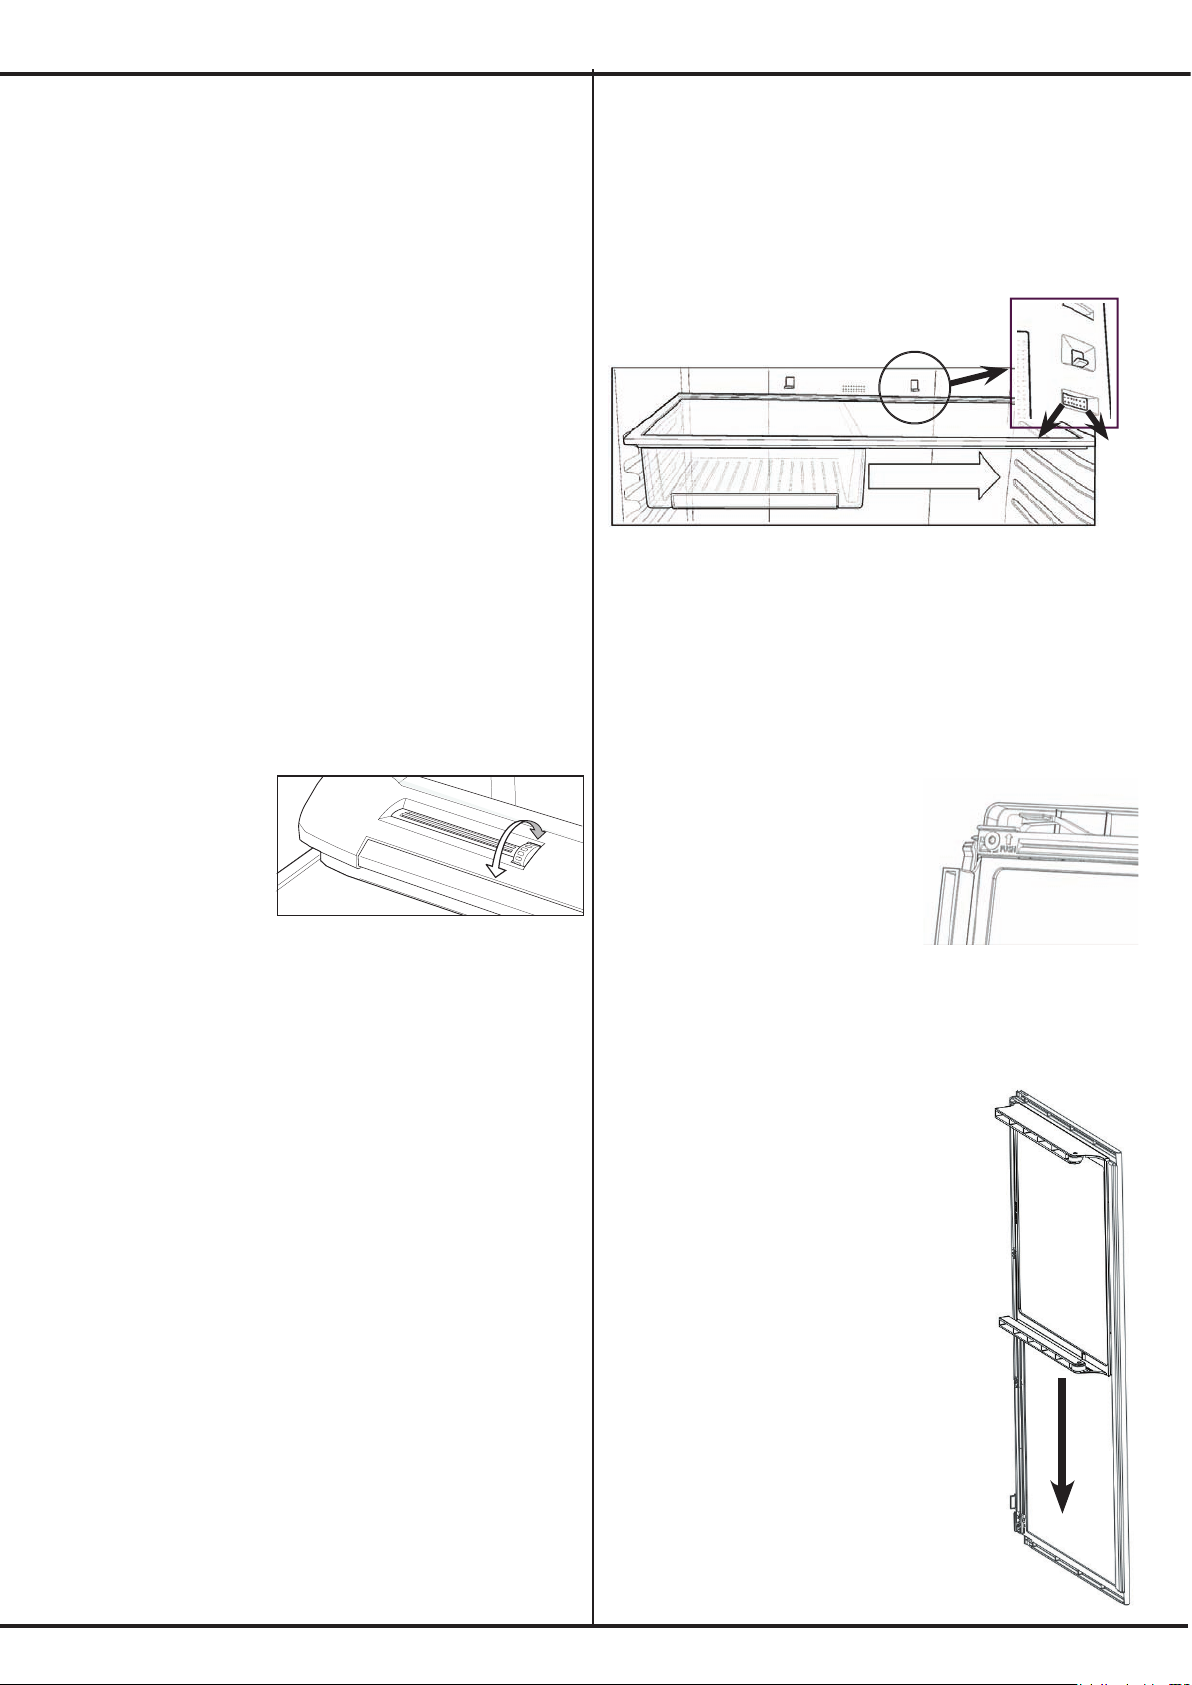
Controlling the temperature in your top freezer refrigerator
Manual (rotary control) model
Set the temperature by using the main temperature controls at
the rear of the refrigerator compartment. When you first start
your refrigerator, set both refrigerator and freezer controls to
MID. The refrigerator temperature control is affected by altitude
and it is recommended that it be set warmer to compensate. E.g.
At 1000 metres above sea level set the refrigerator temperature
control to one setting warmer than MID.
WAIT 24 HOURS AFTER CHANGING SETTINGS: When you
change temperature settings, make small adjustments and
wait 24 hours before assessing whether you need to make any
further changes.
NB: Testing ice cream is a good way to check the freezer temperature. Testing drinking water is a good way to
check the refrigerator compartment temperature.
ADJUSTING THE FREEZER TEMPERATURE
1. Select the freezer control. (Top knob).
2. Rotate the knob clockwise to set Colder.
3. Rotate the knob anti-clockwise to set Less Cold.
COLDEST FREEZER SETTING IS NOT RECOMMENDED IN NORMAL
AND VERY HOT CLIMATES AS THIS WILL LIMIT THE COOLING TO THE
REFRIGERATOR SECTION.
In very cold climates (where temperatures are below 10°C) the freezer may
need to be set colder.
ADJUSTING THE REFRIGERATOR TEMPERATURE
1. Select the refrigerator control. (Bottom knob).
2. Rotate the knob clockwise to set Colder.
3. Rotate the knob anti-clockwise to set Less Cold.
4 - Operating your refrigerator
Page 11
Page 12
How to use the features of your
refrigerator
This section tells you how to make the most of the
refrigerators many useful features and how to clean
them.
Door storage bins (shelves)
Both the refrigerator and freezer have door storage bins.
You can adjust the refrigerator bins to meet different
storage needs. All the door bins are completely removable
for cleaning. If you want to remove or adjust a bin, lift it
over the support lugs on the inner door panel. Push the
bin down over the support lugs to lock it in place.
Dairy compartment
You can use the Dairy compartment to store foods such as
butter, margarine and cheeses. The compartment is slightly
warmer than the rest of the refrigerator compartment.
Crisper Bin
Storing vegetables
You can use the
crisper bin to store
vegetables, fruit or
small goods.You can
change the humidity
inside the bin by
rotating the humidity
control.
You should store vegetables in the crisper bin remembering
to set the humidity control to more humid.
Storing fruit & smallgoods
You can also store fruit in the crisper bin remembering to
set the humidity control to less humid.
Crisper Bin and shelf removal
• Remove the crisper bin(s) by pulling forward, then
up and forward.
• Remove the glass (if fitted) by flexing the rear of the
shelf backward to disengage the clip and allowing the
glass to drop out of the plastic frame.
• Remove the crisper shelf by lifting the catches on the
underside of the shelf and pulling the shelf forward.
Sliding Deli Shelf/ Bin (where fitted)
The sliding deli bin allows you to position the deli-bin in
any position within the refrigerator. This allows you to
conveniently locate it around stored food or to align it with
the multi flow vents for direct cooling.
Usage Instructions:
In order to correctly use the deli bin it should be located
fully on the left or right or in a central position. This will
align the multiflow vents with the ducting surfaces at
the rear of the deli bin. One or both of the vents can be
opened to allow cooler air to pass over foodstuffs stored
in the deli.
The air from these vents can be very cold, which is useful
for the fast chilling of food and drinks. However, items
may freeze if left near the vents. To prevent freezing, move
items away from the vents after chilling.
Cleaning: The sliding deli shelf can be removed for ease
of cleaning. In order to do so a flexible locking mechanism
has been incorporated into the rear shelf rail.
• Remove Deli Bin
• Remove the shelf assembly
by pulling it past the stops.
• Place the full assembly up
side down on a flat surface.
• Slide the sub frame to the
left until it engages with the locking mechanism.
• Pull the thumb tag away from the rail to disengage
it.
• Slide the sub frame past this and
allow it to flex back into position.
Clean the parts as required and allow to
dry. To replace the sub frame repeat this
procedure making sure to align the front
lip on the front shelf recess.
ALL GLASS IS SAFETY GLASS.
HOWEVER CAUTION SHOULD BE
TAKEN WHEN REMOVING THE
SHELF FOR REPOSITIONING OR FOR
CLEANING. AS THE ASSEMBLY IS
RELATIVELY HEAVY AND IF HELD IN
THE VERTICAL POSITION (AS SHOWN)
THE RUNNER ASSEMBLY MAY DROP
DOWN.
DO NOT REMOVE ANY SCREWS!
4 - Operating your refrigerator
Page 12
Page 13
Spill safe glass shelves (where fitted)
Spill safe glass shelves keep spills on the shelf. A shelf
retaining system minimizes accidental movement of shelves.
The shelves can be adjusted to many different heights. Spill
safe glass shelves are not to be used as slide out shelves.
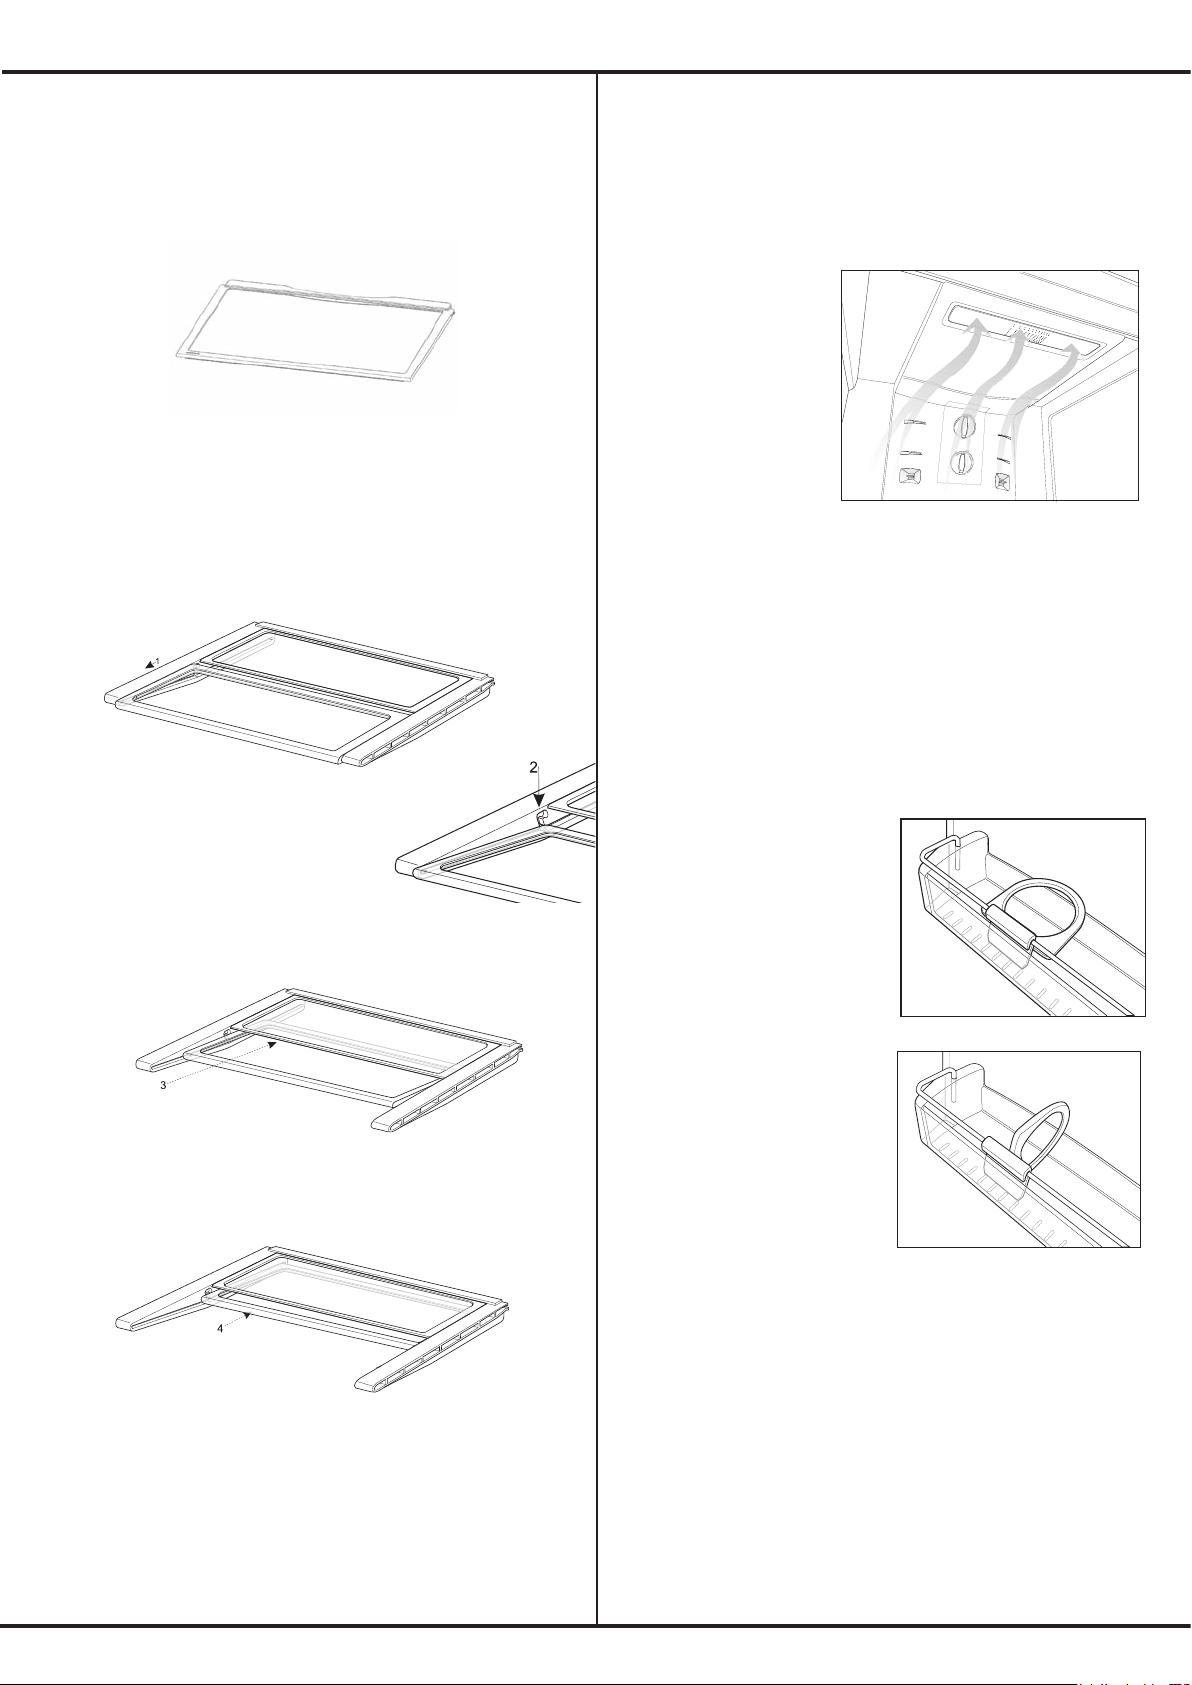
Split Glass Shelf (where fitted)
This shelf can be used either as a full depth shelf or when tall
items need to be stored at the front of the refrigerator it can
be collapsed to half its original depth.
To collapse the shelf:
• Pull the front half of the shelf
forward (1), then, from the
underside, lift the front half of
the shelf by raising the rear edge
over the recessed hook detail (2).
• Pull the shelf forward and allow the rear to drop into
the side channels.
• Push the front shelf backwards (3,4) until it reaches the
rear stops.
Repositioning:
The shelf can be repositioned within the refrigerator unit by
pulling the whole assembly out until the side panels are free
to pivot down, then pivoting the rear of the shelf until the
shelf is free from the liner runners. The shelf can then be
positioned in any of the runners – this is a very useful feature
if your appliance door happens to have limited access.
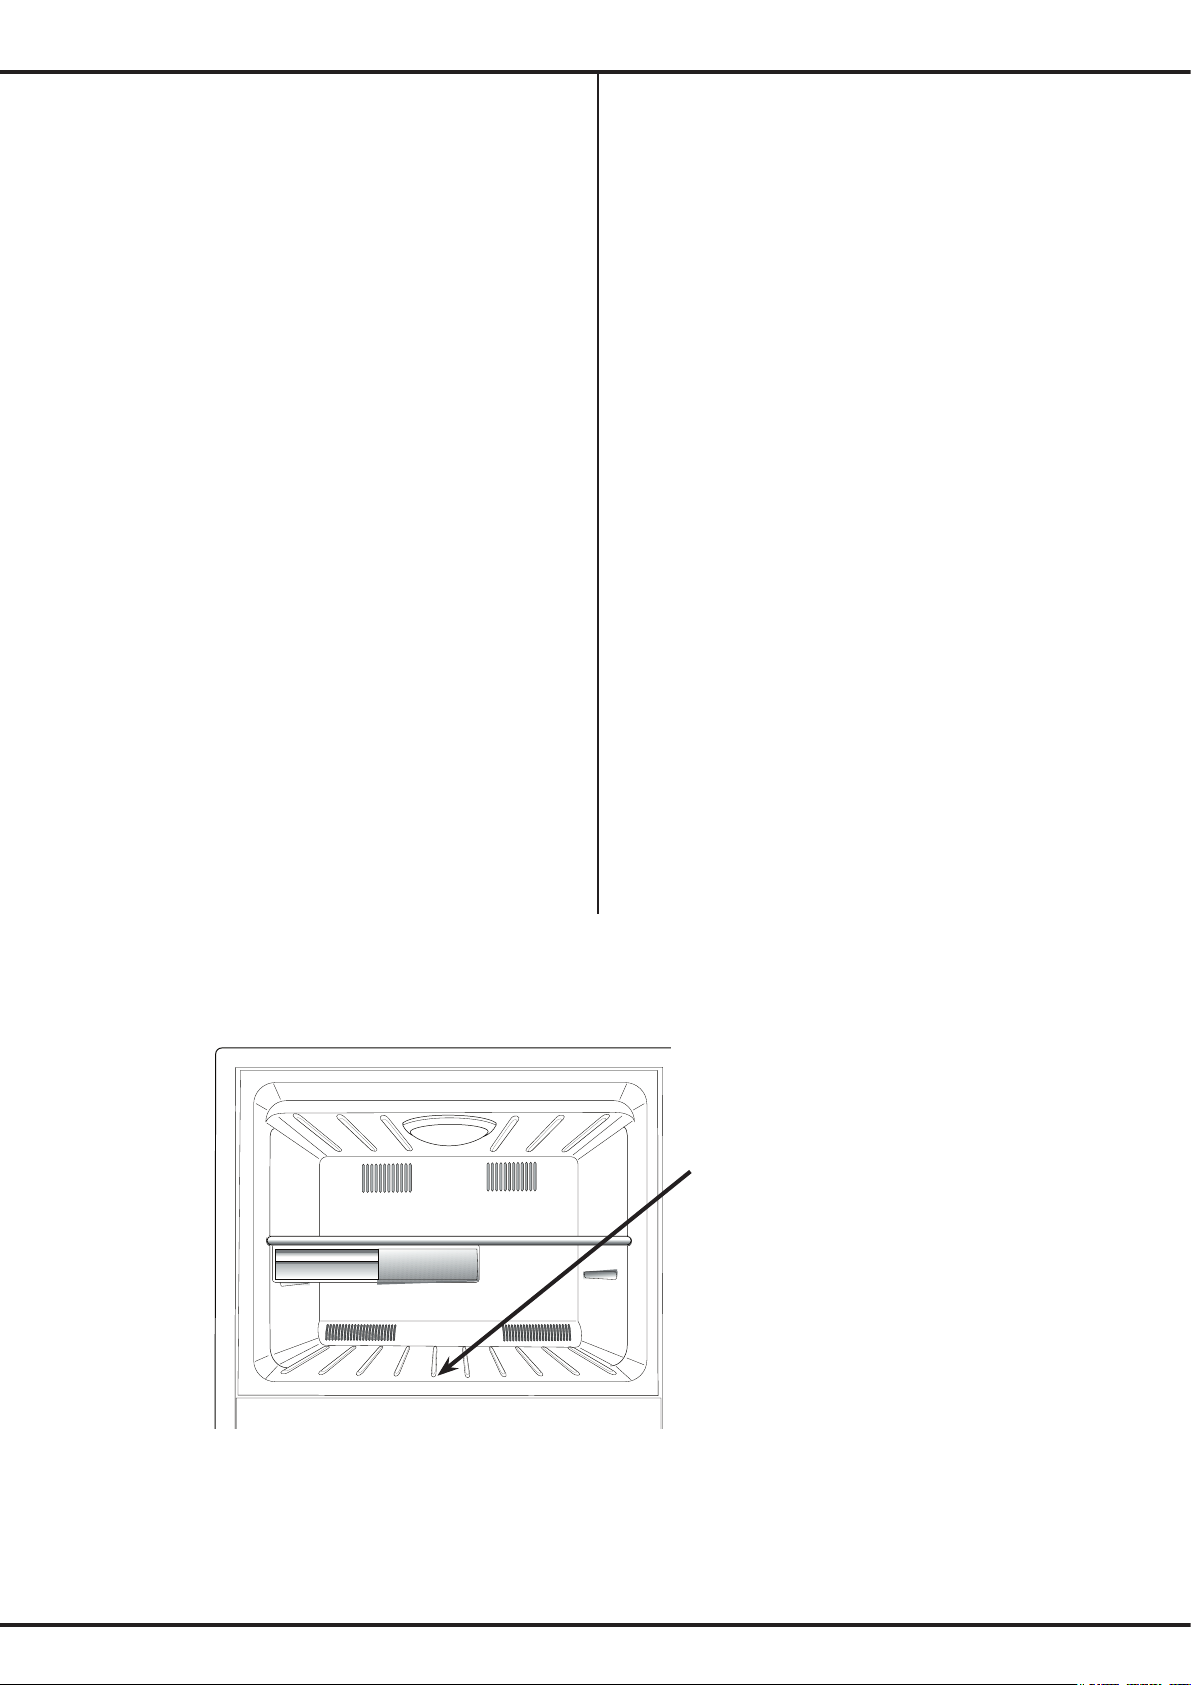
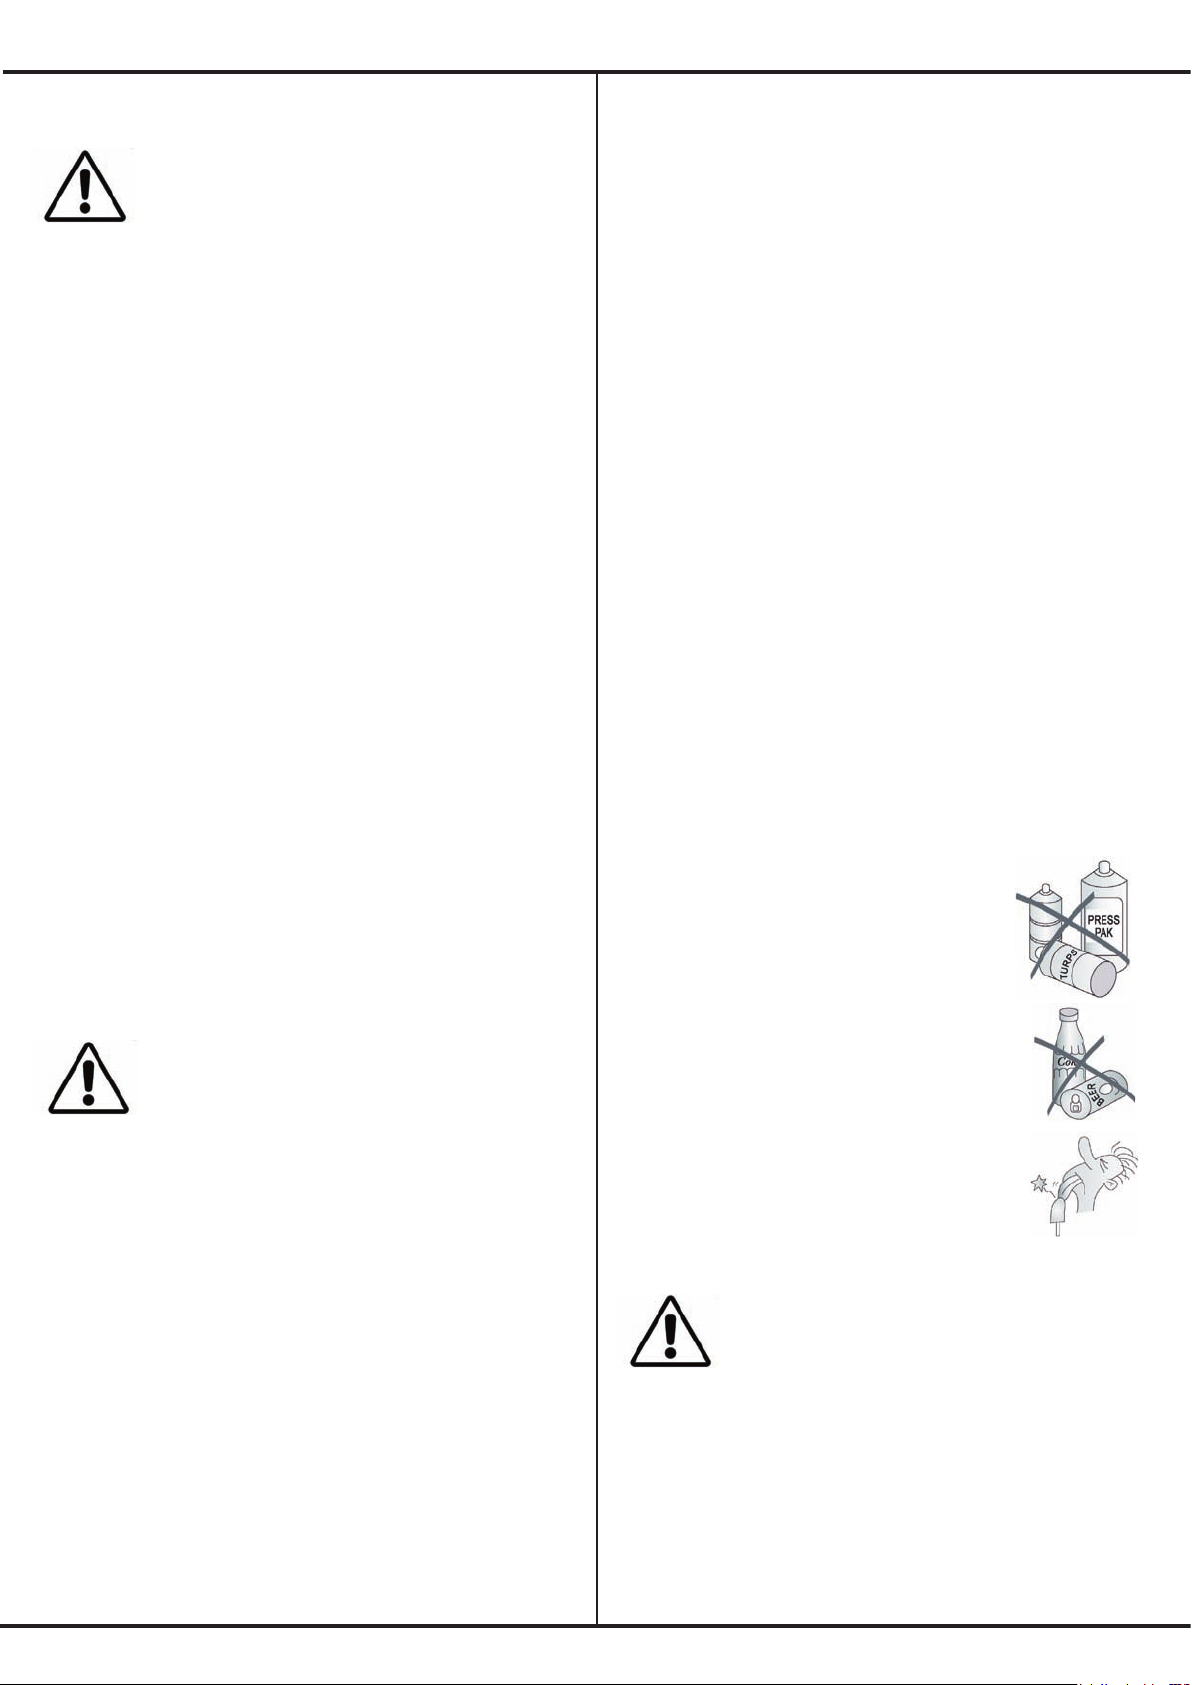
Deodoriser
Your refrigerator is fitted with a catalysing deodoriser to assist
with the removal of food odours inside your refrigerator.
It is located at the air
return so odours are
removed by adsorbtion
through the filter by the
normal operation of the
refrigerator (see diagram
1). Keeping food covered
and wrapping food with
plastic wrap will also help
to reduce the odours
inside your refrigerator.
Bottle Snugger operation (where fitted)
The bottle snugger is used to prevent bottles from falling
over. The snugger consists of two parts, a sliding front,
and a rotating retainer ring. The retainer ring can be rotated
through 360° but has positive locations for horizontal and
vertical positions.
The snugger can be used in two positions:
Horizontal
When the snugger ring is
horizontal (A), any item that fits
within the ring can simply be
placed inside it.
Vertical
When the snugger ring is
vertical (B), it is possible to
simply slide the snugger along
the bottle retainer bar until it
is pushed up against a bottle.
Note: the bottle should be
constrained on the other side
by either the end of the bin or
other adjacent bottles.
4 - Operating your refrigerator
Page 13
Diagram 1
A
B
Front of shelf
Page 14
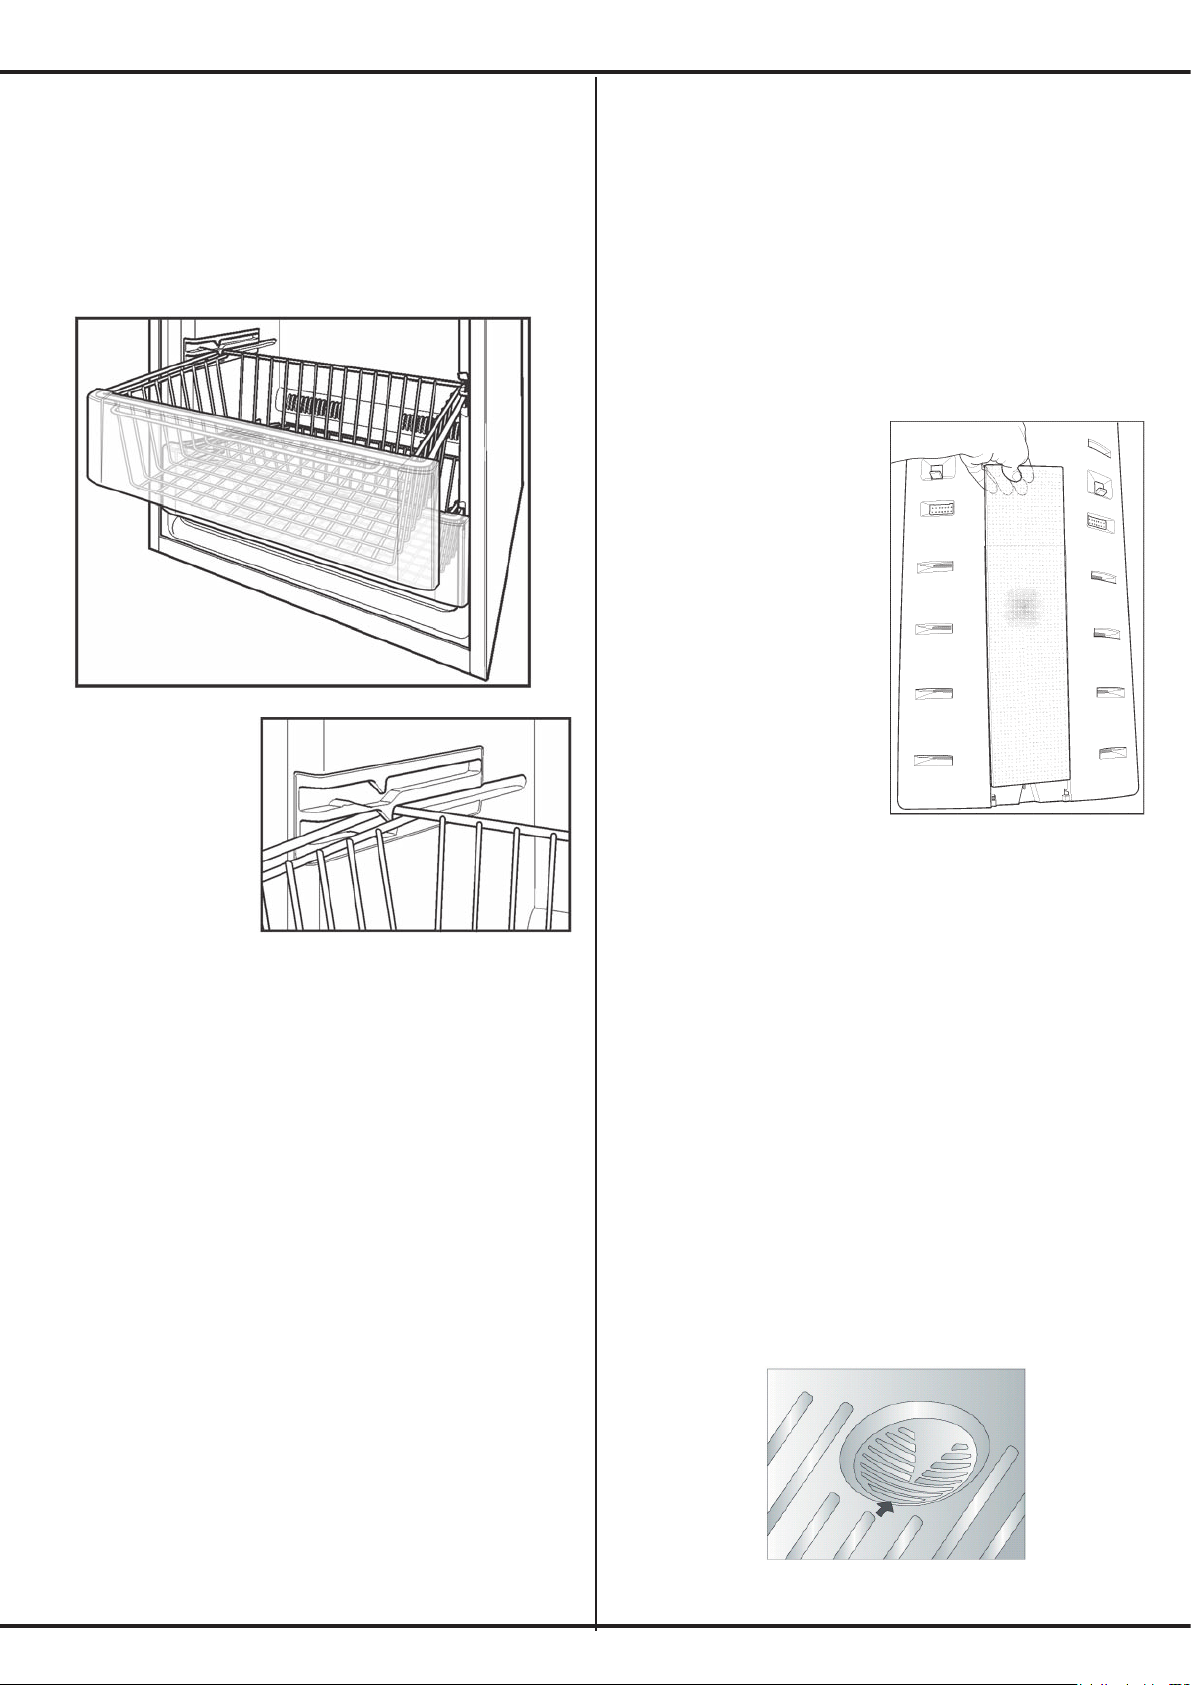
Freezer Baskets (where fitted)
Freezer baskets and a freezer shelf are fitted to bottom freezer
refrigerators. Wire baskets are used to provide easy visibility
of the contents. Both the baskets and the shelf pull out for
easy access and have a stop to prevent the basket and shelf
being pulled out to far.
To remove the basket
or shelf, pull it out until
it hits the stop then lift
the front to unhook the
stop whilke continuing
to pull forward,
Changing the Light Bulb
Food Compartment
Step 1. Switch off the power at the power point and remove
the refrigerator’s power cord from the power point.
Step 2. Remove shelves.
Step 3. Carefully unclip the light cover. You do this by pulling
the upper part of the cover towards the front of the cabinet.
(See Diagram below).
Step 4. Unscrew the light bulb
and replace it with a bulb that
is the same as the original.
Step 5. Replace the light cover
by hooking the light cover lugs
into the bottom of the housing
and pressing the upper part of
the cover until it clips in.
Step 6. Replace shelves.
Step 7. Wait 5 minutes to ensure
pressures in the refrigeration
system are equalized. Then
turn the refrigerator on at the
power point.
Freezer Compartment (where fitted)
Step 1. Switch off the power at the power point and remove
the refrigerator’s power cord from the power point.
Step 2. Carefully unclip the light cover. You do this by pulling
the light cover tab at the rear towards the front of the cabinet.
(See Diagram below)
Step 3. Unscrew the light bulb and replace it with a bulb that
is the same as the original.
Step 4. Replace the light cover by hooking the light cover lugs
into the front of the housing and pressing the rear of the cover
up until it clips in.
Step 5. Wait 5 minutes to ensure pressures in the refrigeration
system are equalized. Then turn the refrigerator on at the
power point.
5 - Care & Maintenance
Page 14
Page 15
5 - Care & Maintenance
Cleaning the refrigerator
BEFORE CLEANING:- REMOVE THE POWER
CORD FROM THE POWER SOCKET. THIS
WILL MAKE SURE THERE IS NO CHANCE OF
GETTING AN ELECTRIC SHOCK.
Exterior
Cabinet
It is a good idea to polish the cabinet at least once a year,
using a high grade wax like the one you use on your car.
After that, an occasional wipe over with a clean, damp cloth
will help remove finger marks.
NOTE: Do not wax plastic parts or decorative trim.Wash these
in warm (not hot) water using an unscented detergent.
Doors - painted
Clean as described above for the cabinet.
Doors - stainless steel
Your stainless steel appliance is manufactured from a mark
resistant stainless steel. This stainless steel has a special
advanced protective coating that eases the removal of
marks such as finger prints and water spots. To keep your
stainless steel refrigerator looking at its best, you should
clean it regularly. You should only clean the stainless steel
doors with luke-warm soapy water and a soft cloth, rinsing
with clean water and then wipe the surface with clean water
and a soft clean cloth to remove soap residue.
It is important to wipe in the direction of the grain of the
stainless steel to avoid undue marking of the surface.
DO NOT USE STAINLESS STEEL CLEANERS,
ABRASIVE PADS OR OTHER CLEANERS
AS THEY ARE LIKELY TO SCRATCH THE
SURFACE.
DAMAGE TO THIS PRODUCT
AFTER DELIVERY IS NOT COVERED BY
YOUR WARRANTY
Interior
You should clean the refrigerator interior regularly. It will be
easiest to clean when the food supply is low.Wash the interior
with a soft cloth and use an unscented mild soap with lukewarm water. Thoroughly dry all surfaces and removable parts.
Avoid getting water on refrigerator controls. If you have taken
out any removable parts, replace them and switch the power
on before re-stocking the refrigerator with food. Naturally,
you should keep the interior of your refrigerator hygienic by
promptly and thoroughly wiping up any food spills.
Keep the door seals clean
Take care to keep door seals clean. Sticky food and drink
can cause seals to stick to the cabinet and tear when you
open the door.Wash seal with a mild detergent and warm
water. Rinse thoroughly and dry.
WARNING:- Never use hot water, solvents, commercial
kitchen cleaners, aerosol cleaners, metal polishes,
caustic or abrasive cleaners, or scourers to clean this
appliance, as they will damage it. Many commercially
available cleaning products and detergents contain
solvents that will damage your refrigerator. When
cleaning, use only a soft cloth with an unscented mild
soap and luke warm water.
General Information
Safety
It is important to use your refrigerator safely. This means you
need to supervise young children and infirm persons when
they use it. You need to make sure that young children do
not play with the refrigerator. Follow the tips below.
DOs
• Check the power point is properly grounded - if you are
not sure get an electrician to check it.
• Switch off the refrigerator at the power point before you
clean or move it.
• If the supply cord is damaged you should have it replaced
by the manufacturer, it’s service agent or similarly qualified
person. This will prevent a safety hazard.
DON’Ts
•Never let children play with the refrigerator.
•Never store spray cans, explosive liquids
or flammable liquids in the refrigerator.
•Never store fizzy drinks in the freezer
compartment.
•Never lick icy foods when they first come
out of the freezer. This can freeze burn your
lips and mouth.
•Never try to repair the refrigerator yourself.
•Never use electric heaters or dryers to
defrost the freezer because you can receive
an electric shock.
• Never use electrical appliances inside the
food storage areas.
• This refrigerator contains insulation formed
with flammable blowing gases. For safety
reasons, take care when you dispose of it.
• Do not damage the refrigeration circuit.
WARNING:- When you dispose of your old
refrigerator, remove any doors. Children
can suffocate if they get trapped inside.
Page 15
Page 16
Care & Maintenance
Page 16
What to do before calling for service
If you think something may be wrong with your refrigerator, you can carry out some easy checks before calling for service.
You may locate the problem, sparing yourself from inconvenience and saving time and money.
Problem Solution
When your appliance
is not operating
• Check that the power cord is plugged into the power outlet properly and that the
outlet is switched ‘ON’.
• Try running another appliance from the power outlet. If no power is coming from
the outlet you may have blown a fuse or tripped a circuit of your household power
supply.
• Try adjusting the temperature control to a slightly “colder” position.
• It is normal for the freezer fan NOT to operate during the automatic defrost cycle, or
for a short time after the refrigerator is switched on.
When there is
refrigerator noise
Modern refrigerator/ freezers with increased storage capacity use high speed compressors.
These can provide a seemingly high level of sound which is quite normal.
Normal operational sounds include:
• occasional gurgling, similar to water boiling.
• air flow noise (air circulates because of a small fan).
• a popping noise heard during automatic defrost.
• a clicking noise heard just before the compressor starts (this is merely the automatic
switching action of the temperature control, turning the compressor on or off).
Other strange sounds may mean that you need to check and take action.
For example, noises may mean that:
• the cabinet is not level.
• the floor is uneven or weak.
• bottles are badly placed and rattling.
• there are vibrations from an object on top of or behind or beside the refrigerator.
• the back of the refrigerator cabinet is touching the wall.
Remember it is quite normal for noise to seem louder just after the refrigerator starts
operating.
If there are
odours inside the
refrigerator
• the interior may need cleaning.
• some foods produce odours.
• some containers and wrapping can cause odours.
• ask yourself if the odour started about the same time you started storing something
unusual.
When the motor
seems to run
more than
expected
Your new refrigerator provides you with large capacities in both the refrigerator section
and the separate freezer. It is normal for the motor to operate frequently. However, to keep
operation to a minimum, check the following:
• Are doors kept open too long or too often?
• Are controls set too cold? See “CONTROLLING THE TEMPERATURE”.
• Have large amounts of warm food just recently been stored? Summer, festive seasons
and holidays usually mean a lot more work for your refrigerator.
• If the day is hot or the room is very warm, the refrigerator will need to run more than
normal.
• The refrigerator will run more that normal just after you install it or when it has been
turned off for a long time.
Page 17
Care & Maintenance
Problem Solution
If the temperature
in the refrigerator
is too warm
• Check that the refrigerator has enough clearance at the sides, back and top.
Refer to the installation Instructions at the front of this booklet.
• refer to “CONTROLLING THE TEMPERATURE”.
• you may have kept the door open too long or too frequently.
• food containers or packaging may be holding a door open.
If the temperature
in the refrigerator
is too cold
• refer to “CONTROLLING THE TEMPERATURE”.
• increase the temperature to avoid high energy consumption.
If the doors will
not close
• check whether the top of the refrigerator is tilted back 10-15mm to allow the
doors to self close.
• check whether something is holding the door open.
It is normal for the freezer door to momentarily open and re-close, when the food
compartment door is being closed. If the freezer stays open it indicates that the
refrigerator cabinet needs to be tilted backwards a little further. If you call a service
person to solve this problem you will be charged for the cost of the service call, as
this is not a warranty fault.
If heavy frosting
occurs in the
freezer
Make sure you fully close the freezer and fresh food doors after you load or remove
food from these compartments. If the doors are left partly open a heavy frost will coat
the inside of the freezer. If a frost develops, remove it. Take care to properly close the
doors and the frost will not reoccur.
If water drips on
the floor.
The defrost water tray, (located on the compressor at the back of the cabinet), may
not be properly positioned. Otherwise, the drain tube may not be properly positioned
to direct water into this tray. You may need to pull the refrigerator away from the wall
to check the tray and tube.
If you still require service
If you have a problem, and the problem persists after you have made the checks mentioned above, contact your nearest
Service Centre or the dealer you bought the refrigerator from. Be ready to quote the model number, which is stated on
the label on the refrigerator section inner plastic compartment liner wall.
Important Notice
Before Calling a Service Technician please check carefully the operating instructions, service booklet and the warranty
Page 17
Page 18
Page 18
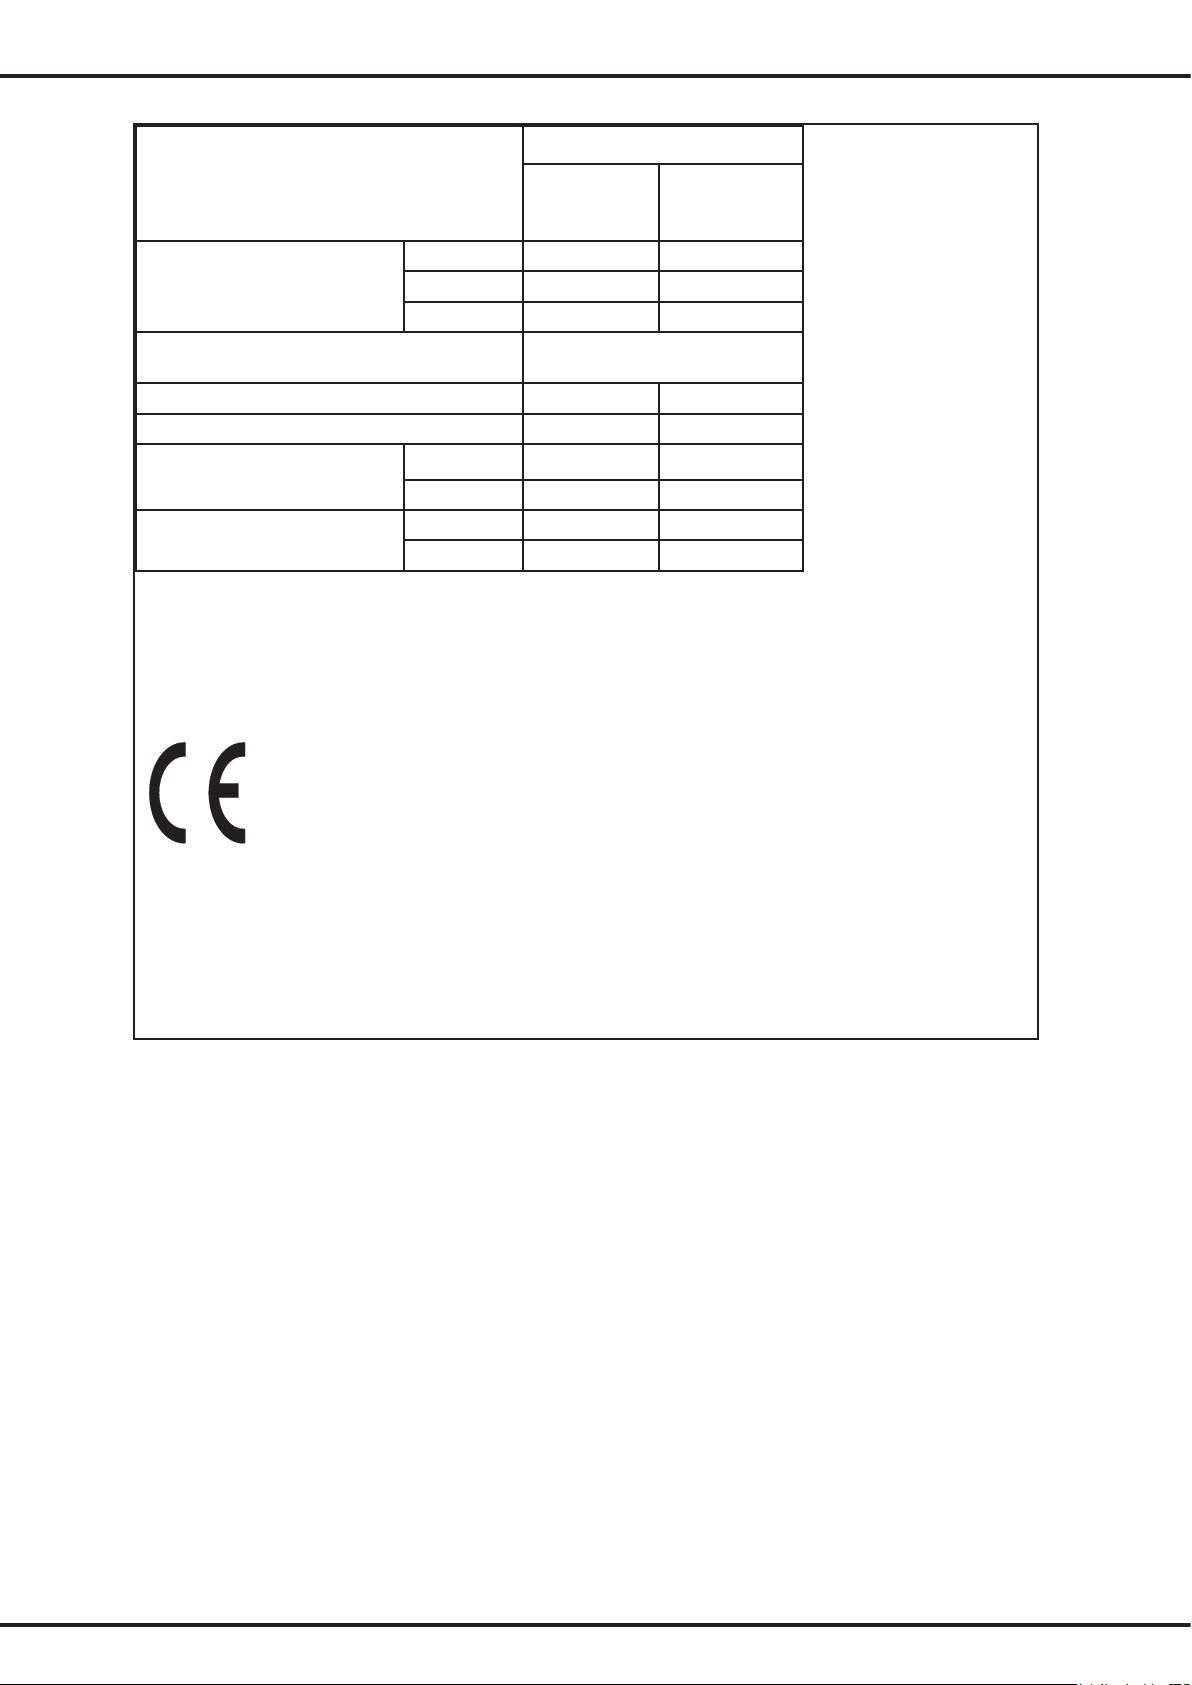
Technical Specifications
ITEM
MODEL GROUP
S85582DT S85528KG
DIMENSIONS (cm)
HEIGHT 172.0 172.0
WIDTH 80.2 80.2
DEPTH 74.3 74.3
POWER SUPPLY VOLTAGE AND
FREQUENCY
220-240v 50Hz
TOTAL POWER ABSORBED (W)
*AVERAGE DAILY UNITS ELECTRICITY (kWh)
1.07 1.19
GROSS CAPACITY (litres)
FRIDGE 395.7 348.7
FREEZER 121.4 156.3
STORAGE CAPACITY (litres)
FRIDGE 377.3 330.6
FREEZER 98.4 132.7
*This figure is based on standard test results in accordance with European Standard EN 153. Actual consump
-
tion will depend on how the appliance is used and where it is located.
This appliance complies with E.E.C Directive No. 87/308 of 2-6-87 relative to radio interference suppres
-
sion
This appliance complies the following E.E.C Directives:
- 73/23 EEC of 19.2.73 (Low Voltage Directive) and subsequent modifications;
- 89/336 EEC of 3-5-89 (Electromagnetic Compatibility Directive) and subsequent modifications
Page 19
EAN barcode:
Piece Number:
Date of issue:
©2004 ELECTROLUX HOME PRODUCTS PTY LTD A.B.N 51 004 762 341
The Electrolux Group. The world’s No.1 choice
KITCHEN, CLEANING AND OUTDOOR APPLIANCES
www.electrolux.com.au
Page 20
S85582DT
S85528KG
ISTRUZIONI PER LA
MANUTENZIONE
E L’USO
Istr S85582DT S85528KG 2-02-2005 17:21 Pagina 1
Page 21
Istr S85582DT S85528KG 2-02-2005 17:21 Pagina 2
Page 22
Manutenzione & uso - indice
3
1 - Introduzione
Importanti istruzioni sulla sicurezza ..............................4
Luogo di installazione ...................................................4
Distanze intorno al frigorifero........................................5
2 - Componenti del frigorifero
MODELLI CON CONGELATORE IN ALTO (TM)............6
MODELLI CON CONGELATORE IN BASSO (BM) ........7
3 - Installazione
Installazionde del frigorifero..........................................9
Montare il cassetto per il ghiaccio ..............................12
Congelatore in alto (TM)..............................................12
Congelatore in basso (BM)..........................................12
4 - Come usare il frigorifero
Prima messa in funzione .............................................13
Regolazione della temperatura ...................................15
Modelli elettronici........................................................15
Regolare le temperature..............................................15
Modificare la temperatura del congelatore .................15
Modificare la temperatura del frigorifero.....................15
Funzione di congelamento rapido “Fast freeze”.........15
Allarme temperatura congelatore................................15
Allarme porta...............................................................17
Opzione “blocco bambini” ..........................................17
Funzione di raffreddamento rapido bevande e vino
“Wine chill”..................................................................17
Efficienza energetica...................................................17
Modalità “Normal”.......................................................17
Modalità “Eco” ............................................................17
Modalità “Vacation” ....................................................17
Modello manuale (con manopola termostato) ............18
Cassetti sulla porta (ripiani).........................................19
Contenitore formaggi (se in dotazione).......................19
Cassetto verdura.........................................................19
Conservare le verdure.................................................19
Conservare frutta e prodotti di piccole dimensioni.....19
Rimuovere il cassetto verdura ed il ripiano.................19
Cassetti “Store safe” (se in dotazione)............................
Cassetto “Deli” (se in dotazione).....................................
Ripiani di vetro anti spandimento (se in dotazione) ....20
Ripiano in vetro pieghevole (se in dotazione)..................
Cestelli del congelatore (se in dotazione) ...................21
5 - Cura & Manutenzione
Cambiare la lampadina ...............................................22
Scomparto alimenti.....................................................22
Vano congelatore (se in dotazione) .............................22
Pulire il frigorifero ........................................................23
Esterno........................................................................23
Mobile .........................................................................23
Porte - verniciate.........................................................23
Porte - acciaio inossidabile.........................................23
Interno.........................................................................23
Tenere pulite le guarnizioni della porta........................23
Sicurezza.....................................................................23
Che cosa fare prima di contattare l’assistenza tecnica 25
Dati tecnici ..................................................................28
Tutti i diritti relativi a questa pubblicazione sono riservati. Nessuna parte di essa potrà essere riprodotta senza il previo
consenso scritto di Electrolux Home Products Pty Ltd (“Electrolux”). Il contenuto di questo libretto si ritiene corretto al
momento della pubblicazione ma informazioni, prodotti o servizi qui menzionati potranno essere modificati, integrati o
ritirati in qualsiasi momento. Lavorando per il continuo sviluppo e miglioramento dei suoi prodotti Electrolux si riserva
il diritto, a propria totale discrezione, di modificare le specifiche del prodotto ed i materiali senza darne alcun preavviso alla clientela.
Istr S85582DT S85528KG 2-02-2005 17:21 Pagina 3
Page 23

1 - Introduzione
4
Gentile Cliente,
Ci congratuliamo con Lei per l’acquisto del Suo nuovo
frigorifero.
Noi della Electrolux Home Products siamo orgogliosi dei
nostri prodotti e ci impegniamo a fornirLe il miglior servizio
possibile. La invitiamo a leggere molto attentamente questo
manuale di manutenzione ed uso. Contiene preziose informazioni su come utilizzare correttamente il Suo nuovo frigorifero. Sappiamo che apprezzerà il prodotto e la ringraziamo
per averlo scelto. Speriamo di poterla annoverare tra i nostri
clienti anche in futuro! La invitiamo a seguire le istruzioni
riportate in seguito che Le permetteranno di installare il frigorifero in modo sicuro, garantendone un efficiente funzionamento.
ISTRUZIONI DA LEGGERE E CONSERVARE
Questo manuale di manutenzione ed uso fornisce istruzioni
specifiche per il funzionamento del modello di frigorifero da
Voi scelto. Utilizzate l’elettrodomestico attenendoVi alle indicazioni di questo manuale. Vi invitiamo a considerare che
queste istruzioni non intendono coprire ogni possibile condizione o situazione che si può verificare. Quando si installa, si
utilizza e si mantiene in funzione qualsiasi elettrodomestico,
si deve agire con buon senso e cautela.
Importante:
Prima di installare il frigorifero CONTROLLATE che NON
ABBIA GUASTI O DIFETTI. Se rilevate danni o graffi sul frigorifero dovrete comunicarcelo entro 7 giorni per poter essere
risarciti ai sensi della garanzia del produttore. Rimangono
validi i Vostri diritti di consumatori sanciti per legge.
Importanti istruzioni sulla sicurezza
NON CONSERVARE IN FRIGORIFERO BOMBOLETTE SPRAY SOTTO PRESSIONE CHE
RECHINO LA DICITURA “INFIAMMABILE”
E/O IL SIMBOLO DI UNA PICCOLA FIAMMA:
POTRESTE CAUSARE UN’ESPLOSIONE.
Al momento di smaltire frigoriferi o congelatori
togliete le porte per evitare che i bambini
rimangano accidentalmente chiusi all’interno
dell’apparecchiatura.
Questo frigorifero contiene materiale di isolamento costituito da gas infiammabili esplosivi.
Smaltire questo elettrodomestico con cautela
per evitare pericoli.
• Il frigorifero deve essere collegato ad una apposita presa a
corrente alternata (AC).
• Verificate che le prese di corrente dell’impianto domestico siano collegate a
terra. Se non ne siete certi chiedete ad
un elettricista qualificato di controllare.
• Deve essere possibile scollegare l’elettrodomestico dalla rete elettrica che lo
alimenta; la spina dovrà quindi rimanere
facilmente accessibile anche ad installazione avvenuta.
• Non collegare il frigorifero ad una prolunga o ad un adattatore multiplo.
• Se il cavo di alimentazione è danneggiato dovrà essere
sostituito da un tecnico del servizio di assistenza o da una
persona qualificata.
• Per evitare una scossa elettrica prima di pulire il frigorifero
o prima di cambiare una qualsiasi lampadina al suo interno, scollegate l’elettrodomestico dalla presa di corrente.
• Non staccate mai la spina del frigorifero tirando il cavo di
alimentazione. Impugnate invece la spina ed estraetela
direttamente dalla presa a muro per evitare di danneggiare
il cavo di alimentazione.
Luogo di installazione
• Scegliere un luogo non troppo freddo la temperatura deve essere superiore ai
10°C.
• Collocare il frigorifero in un luogo
asciutto, evitando zone con molta condensa o umidità.
• Non collocare il frigorifero in zone esposte al gelo o non protette, esempio:
garage o verande.
• Non esporre il frigorifero ai raggi diretti
del sole.
• Non mettere il frigorifero vicino a stufe,
fuochi o radiatori.
Quando è installato correttamente il frigorifero dovrà:
• avere abbastanza spazio libero sul retro ed ai lati per consentire all’aria di circolare.
• essere in linea con i mobili circostanti.
• avere le porte che si richiudono da sole se lasciate semiaperte.
• avere il piedino regolabile messo nella giusta posizione (si
veda la figura 4 a pagina 6) per evitare che il frigorifero
cada in avanti quando si apre la porta molto carica di prodotti.
Distanze intorno al frigorifero
Prima di spostare il frigorifero nel luogo in cui sarà installato,
verificate di avere abbastanza spazio a disposizione. È
necessario che il frigorifero sia a debita distanza da ciò che
lo circonda per permettere una buona circolazione dell’aria;
distanze inadeguate possono comprometterne le prestazioni.
Consigliamo distanze minime di:
• 3cm su ciascun lato.
• 9cm al di sopra
del frigorifero.
• 5cm al di sotto
del frigorifero
Sopra
9cm
Lato
9cm
Sotto
9cm
Lato
9cm
B
Re
Attenzione
Istr S85582DT S85528KG 2-02-2005 17:21 Pagina 4
Page 24

2 - Componenti del frigorifero
5
Vi invitiamo a studiare il disegno riportato qui di seguito prima di leggere le indicazioni sulla manutenzione del frigorifero
MODELLI CON CONGELATORE IN ALTO (TM)
I componenti possono cambiare da modello a modello
Sensore (solo nei
modellI elettronici)
Luce scomparto congelatore
(se in dotazione)
Vaschetta estraibile per i cubetti
di ghiaccio (se in dotazione)
Cassetto estraibile per i cubetti
di ghiaccio (se in dotazione)
Bocchette di immissione aria congelatore
Bocchette di ritorno aria congelatore
Filtro antiodori
Regolazione temperatura frigo/congelatore
(per modelli a comandi manuali)
Sensore (solo nei modellI elettronici)
Controllo del flusso d’aria
verso il cassetto “Deli”
Cassetto “Deli” spostabile
Luce scomparto frigo
Ripiani antitrabocco
Regolazione umidità dei cassetti verdura
Cassetti verdura
Rotelle regolabili
Balconcini controporta vano congelatore
Balconcini controporta vano congelatore
Scomparti porta burro/formaggi
Balconcini regolabili controporta vano frigo
Balconcini regolabili controporta vano frigo
Balconcini porta bottiglie
Fermabottiglie (se in dotazione)
Piedino regolazione stabilizzazione
Istr S85582DT S85528KG 2-02-2005 17:21 Pagina 5
Page 25

2 - Componenti del frigorifero
6
Vi invitiamo a studiare il disegno riportato qui di seguito prima di leggere le indicazioni sulla manutenzione del frigorifero
MODELLI CON CONGELATORE IN BASSO (BM)
I componenti possono cambiare da modello a modello
Sensore (solo nei modellI elettronici)
Filtro antiodori
Regolazione temperatura frigo/congelatore
(per modelli a comandi manuali)
Controllo del flusso d’aria verso
il cassetto “Deli”
Cassetto “Deli” spostabile
Luce scomparto frigo
Ripiano in vetro antitrabocco
rientrabile (se in dotazione)
Griglia portabottiglie (se in dotazione)
Ripiano in vetro antitrabocco
Cassetto verdura a tutta larghezza
Regolazione umidità del cassetto verdura
Bocchette di immissione aria congelatore
Cassetto estraibile per i cubetti
di ghiaccio (se in dotazione)
Ripiano in filo
Vaschette estraibili per i cubetti
di ghiaccio (se in dotazione)
Sensore (solo modelli elettronici)
Bocchette di ritorno aria congelatore
Cassetti grandi
Rotelle regolabili
Scomparti porta burro/formaggi
Balconcini regolabili controporta vano frigo
Balconcini regolabili controporta vano frigo
Balconcini porta bottiglie
Fermabottiglie (se in dotazione)
Piedino regolazione stabilizzazione
Istr S85582DT S85528KG 2-02-2005 17:21 Pagina 6
Page 26

3 - Installazione
7
Installazione del frigorifero
Il frigorifero, al momento del posizionamento, dovrà avere le
ruote regolabili anteriori abbassate in modo da poter inclinare
la parte superiore dell’elettrodomestico all’indietro di circa
10-15 mm rispetto alla verticale (si veda la figura 1). Anche il
piedino regolabile deve essere completamente ritirato verso
l’alto per non interferire con le ruote (si veda la figura 2).
3. Se il frigorifero non è inclinato all’indietro è possibile regolare le due ruote anteriori girando il grande dado in plastica
collegato ad esse (figura 2). Questo serve ad aumentare
l’altezza delle ruote. Un giro del dado permette di inclinare
il frigorifero all’indietro di circa 10mm. Se girare il dado
risulta difficile, chiedete a qualcuno di inclinare il frigorifero
all’indietro per avere un accesso migliore. In alternativa è
possibile raggiungere le ruote dal fianco, utilizzando un
cacciavite piatto per girare il dado (vedi figura 2).
4. Controllate che il frigorifero sia in linea con i mobili circostanti. La parte superiore del frigorifero dovrà essere livellata a bolla (vedi figura 3). Se si rende necessario intervenire sul livello, agite sulle ruote regolabili come descritto al
punto 3.
1. Far scorrere il frigorifero verso la sua posizione definitiva.
ATTENZIONE: Le ruote servono solo per il movimento
avanti/indietro. Non sono ruote orientabili. Spostare il frigorifero di lato può danneggiare il pavimento e le ruote.
2. La parte superiore del frigorifero dovrà essere inclinata
all’indietro di circa 10-15mm. Questo consentirà alle porte
di chiudersi da sole, garantendo una buona tenuta (si
veda la figura 1). Quando si chiude la porta del vano cibo
in modo energico è normale che quella del congelatore si
apra momentaneamente, per poi richiudersi.
Se il congelatore rimane aperto si dovrà aumentare lievemente l’inclinazione del frigorifero verso dietro.
8. Pulite accuratamente il frigorifero seguendo le istruzioni di
pagina 15 rimuovendo eventuale polvere accumulatasi
durante il trasporto.
9. Collegate il frigorifero alla presa di corrente. Non utilizzate
adattatori multipli. Se vi serve spostare il frigorifero per
avvicinarlo alla presa di corrente, ricordate di alzare il piedino d’appoggio regolabile prima di procedere allo spostamento.
10. Consigliamo di lasciare il frigorifero in funzione per due o
tre ore prima di riporvi alimenti. Questo vi permetterà di
controllare che il frigorifero funzioni correttamente e che al
congelatore arrivi abbastanza aria fredda.
Congratulazioni!
L’installazione del vostro frigorifero è andata a buon fine!
5. A questo punto, se il frigorifero dondola appoggiandosi
prima su un angolo e poi su quello posteriore opposto,
significa che il pavimento è irregolare e bisognerà mettere
uno spessore sotto una delle ruote posteriori. Si potranno
utilizzare spessori sottili di materiale solido, come cartone,
piastrelle viniliche o laminato. Collocate lo spessore in
modo che rimanga sotto una delle ruote posteriori quando
il frigorifero è in posizione.
6. Ora, se necessario, regolate ulteriormente la posizione
ripetendo i punti 3, 4 e 5.
7. Quando il frigorifero è nella posizione definitiva allentate il
piedino regolabile portandolo verso il basso, fino a toccare
il pavimento (figura 4). Quando vi serve spostare il frigorifero ricordate di riavvitare il piedino regolabile arretrandolo
verso l’alto affinché il frigorifero possa scorrere senza
impedimenti.
Figura 1
Figura 2
Figura 4
Figura 3
10 - 15 cm
Ruote posteriori fisse
Dado grande in
plastica collegato
alle ruote
Sommità del
frigorifero
a livello, ovvero
orizzontale
Allineato ai
mobili, ovvero
distanze regolari
Regolare le ruote
anteriori in caso di
pavimentazione
sconnessa.
Ad esempio:
abbassare questa
ruota.
Piedino regolabile
abbassato
Piedino regolabile
completamente
ritirato verso l’alto
Ruote anteriori
regolabili in altezza
Istr S85582DT S85528KG 2-02-2005 17:21 Pagina 7
Page 27

3 - Installazione
8
Montare il cassetto per il ghiaccio
Per montare il cassetto per il ghiaccio sui frigoriferi con il
congelatore in alto:
Poi premere verso il basso la parte centrale del supporto
finché si aggancia a scatto nella posizione illustrata nella
figura 2.
Infine fare scorrere le vaschette o i cassettini per il ghiaccio
posizionandoli come raffigurato nella figura 2.
Per togliere quest’unità, dopo aver rimosso le vaschette ed il
cassettino porta ghiaccio, basterà sollevare il supporto allontanandolo dalla griglia.
Poi premere verso l’alto la parte centrale del supporto finché
si aggancia nella giusta posizione.
Infine fare scorrere le vaschette o i cassettini per il ghiaccio
posizionandoli come raffigurato nella figura 3.
Per togliere quest’unità, dopo aver rimosso le vaschette ed il
cassettino porta ghiaccio, basterà togliere il supporto dalla
griglia
Per installare il cassetto per il ghiaccio sui frigoriferi con il
congelatore in basso:
Fissare il supporto per il cassetto del ghiaccio alla griglia,
allineando la parte esterna del sostegno alle astine della
griglia come illustrato nella figura 1.
AssicurateVi che i quattro gancetti si innestino a scatto sull’asta
centrale della griglia (come indicato nella figura 2).
Congelatore in alto (TM)
Installazione verso il basso
Congelatore in basso (BM)
Installazione verso l’alto
Fissare il supporto per il cassetto del ghiaccio alla griglia,
allineando la parte esterna alle astine della griglia come illustrato nella figura 1.
Rivolto verso la parte
anteriore della griglia
Rivolto verso la parte
posteriore della griglia
(Solo in alcuni modelli)
Figura 1
Figura 1
Figura 3
Figura 2
Figura 2
Istr S85582DT S85528KG 2-02-2005 17:21 Pagina 8
Page 28

Funzionamento del frigorifero/congelatore
Prima messa in funzione
Il frigorifero trasferisce il calore dagli alimenti collocati al suo
interno all’aria esterna.
Tale processo riscalda il retro, i fianchi e la zona vicina alle
porte del frigorifero, in particolare al momento della prima
messa in funzione. Si tratta di un fenomeno normale.
Una serpentina di raffreddamento è posizionata dietro la
parete posteriore della sezione congelatore. Tale serpentina
raffredda l’aria e la deumidifica. Una ventola sul retro della
sezione congelatore fa poi circolare l’aria fredda e secca nel
frigorifero.
Tale sistema di circolazione dell’aria consente un raffreddamento degli alimenti molto più veloce rispetto ai frigoriferi in
cui l’aria rimane relativamente ferma.
Evitate di collocare alimenti vicino alle bocchette di ventilazione per non ostruire la circolazione dell’aria. (si veda
lo schema a pagina 5).
Occasionalmente, in caso di apertura frequente della porta,
nella parte interna, fredda, del congelatore si può formare
una leggera brina. Si tratta di un evento normale che, nella
maggior parte dei climi, scomparirà dopo pochi giorni.
Dopo aver riposto alimenti nel vano congelatore e nello
scomparto cibi freschi ricordateVi di richiudere completamente le rispettive porte. Se le porte rimangono parzialmente
aperte all’interno del congelatore si formerà uno spesso strato di brina. Se si crea brina, questa va rimossa. Per evitare
che si riformi fate attenzione a chiudere bene le porte.
Il vostro nuovo frigorifero a basso consumo energetico utilizza un compressore ad alta velocità ed altri componenti ad
alta efficienza che possono produrre rumori diversi rispetto al
vostro vecchio frigorifero. Si tratta di rumori normali, che
includono:
• rumore di funzionamento del compressore
• rumore di circolazione dell’aria proveniente dal piccolo
motore della ventola
• occasionali gorgoglii, simili all’acqua in ebollizione
• suoni simili a scoppiettii, durante lo sbrinamento
• un “clic” poco prima dell’avvio del compressore.
Si tratta di suoni normali, non allarmanti.
Ulteriori dettagli si possono trovare a pagina 17.
Frigorifero con congelatore in alto
Se sporge cibo dalla battuta della porta o dal fondo del congelatore la porta rimarrà aperta. AssicurateVi quindi che i
prodotti congelati rimangano all’interno della battuta.
Frigorifero con congelatore in basso
AssicurateVi che i cestelli ed i ripiani del congelatore siano
completamente arretrati per evitare che tengano aperta la
porta.
4 - Come usare il frigorifero
9
Istr S85582DT S85528KG 2-02-2005 17:21 Pagina 9
Page 29

Regolazione della temperatura
Modelli elettronici
Il pannello elettronico con
visore si compone di un
display LCD con retroilluminazione bianca e 6 pulsanti. Quando si mette in
funzione il frigorifero per la
prima volta vengono visualizzate le impostazioni
predefinite e la retroilluminazione bianca è accesa.
Se non sono stati premuti
pulsanti e la porta del frigorifero è chiusa, la retroilluminazione si spegne dopo 30 secondi.
Regolare le temperature
La temperatura preimpostata per il frigorifero è 3°C, quella
per il congelatore è -18°C. Se desiderate modificare queste
temperature, atteneteVi alle istruzioni riportate in seguito. Si
raccomanda di procedere per gradi e di aspettare 24 ore per
verificare se è necessario intervenire con ulteriori modifiche.
Nota: Quando si imposta una temperatura, la si imposta come
temperatura media per l’intero vano frigorifero. Le temperature
all’interno dei singoli scomparti possono variare in funzione
della quantità di alimenti contenuti e del luogo di conservazione. Anche la temperatura dell’ambiente (calda o fredda)
può influire sulla reale temperatura all’interno del frigorifero.
Modificare la temperatura del congelatore
Per abbassare la temperatura del congelatore premere il pulsante “freezer”:
si procede di 1°C alla volta. Raggiunti i -23°C, premendo il tasto nuovamente il display tornerà a 14°C. Noterete che il grafico a barre diventa più piccolo mano a mano che si
riduce la temperatura del
congelatore.
Modificare la temperatura del frigorifero
Per abbassare la temperatura del frigorifero premere il pulsante “fridge”:
si procede di 1°C alla volta. Raggiunti gli 0.0°C,
premendo il tasto nuovamente il display tornerà a
7.0°C. Il grafico a barre
diventa più piccolo mano
a mano che si riduce la
temperatura del frigorifero.
Nota:
Il test del gelato è un buon modo per controllare la temperatura del congelatore. Per controllare la temperatura del vano
frigorifero può risultare utile prendere come riferimento la
temperatura dell’acqua in bottiglia.
Funzione di congelamento rapido “Fast
freeze”.
La funzione “fast freeze”
per il congelamento rapido
va utilizzata quando si
introduce una grande
quantità di alimenti nello
scomparto congelatore.
Tale funzione permette di
congelare rapidamente gli
alimenti lasciando invariata la temperatura del vano
frigorifero.
Per utilizzare questa funzione, premere una volta il pulsante
di congelamento rapido “Fast freeze”. Si illuminerà un’icona
animata. La funzione di congelamento rapido rimarrà attiva
per 90 minuti. Se si desidera interromperla prima dello
scadere dei 90 minuti basterà premere nuovamente il pulsante “Fast freeze”. L’icona sparirà e il frigorifero tornerà alla
normale modalità di funzionamento.
Allarme temperatura congelatore
Se l’allarme suona senza
una ragione apparente,
verificate se qualcosa sta
tenendo la porta aperta.
Chiudendo la porta l’allarme si azzera per altri 2
minuti.
L’aumento eccessivo della
temperatura del congelatore - perché è stata lasciata aperta la porta o sono stati messi cibi caldi troppo vicino
al sensore di temperatura del freezer (per la posizione del
sensore si veda pagina 4 & 5, Parti del frigorifero) - sarà segnalato dal suono di un cicalino e da un’icona lampeggiante
accanto al tasto “alarm reset”. Lampeggeranno anche le
impostazioni di temperatura del congelatore ed il relativo
grafico a barre. Premere il pulsante “alarm reset” per fermare
l’allarme. A questo punto l’icona accanto al pulsante “alarm
reset” che segnala la disabilitazione dell’allarme si illuminerà
per 50 minuti, o fino a quando la temperatura raggiunge un
livello accettabile.
AccertateVi che nulla tenga la porta aperta e allontanate cibi
caldi dal sensore di temperatura. Consultate pagina 4 & 5
(Parti del frigorifero) per ulteriori informazioni.
Se il congelatore è ancora troppo caldo l’allarme suonerà
nuovamente dopo 50 minuti, ad indicare che qualcosa nel
frigorifero probabilmente non funziona.
Nota:
L’allarme temperatura del congelatore può essere azzerato
per 12 ore tenendo premuto il tasto “alarm reset” per 10 secondi.
4 - Come usare il frigorifero
10
Istr S85582DT S85528KG 2-02-2005 17:21 Pagina 10
Page 30

4 - Come usare il frigorifero
11
Allarme porta
Se la porta del frigorifero
rimane aperta per più di 2
minuti si sentirà il suono di
un cicalino e inizierà a lampeggiare una freccia che
indica una porta aperta.
Lampeggeranno anche le
impostazioni di temperatura del frigorifero ed il sottostante grafico a barre.
Se desiderate lasciare la
porta aperta mentre riempite il frigorifero, potete disinserire
l’allarme per 8 minuti premendo il pulsante “alarm reset”
(azzera allarme).
Opzione “blocco bambini”
Per attivare il blocco di
sicurezza che impedisce
ai bambini di cambiare
accidentalmente le
impostazioni del frigorifero
premere contemporaneamente i pulsanti “alarm
reset” e “fast freeze”.
Questo disabiliterà il display per evitare modifiche
delle impostazioni.
Per rimuovere il “blocco
bambini” premere insieme
per qualche secondo i tasti “alarm reset” e “fast freeze”.
Funzione di raffreddamento rapido bevande
e vino “Wine chill”
Per attivare la funzione di
raffreddamento rapido
delle bevande premere
una volta il pulsante “wine
chill”. Premere il pulsante
una volta per impostare il
timer a 10 minuti, due
volte per impostarlo a 20
minuti, tre volte per
impostarlo a 30 minuti.
Premere il pulsante quattro
volte per spegnere il timer.
Il timer della funzione “wine
chill” attiva un allarme che suona per ricordarVi che avete
messo bevande in congelatore a raffreddarsi rapidamente.
Accanto al pulsante “wine chill” apparirà un’icona con un
timer per il conto alla rovescia.
Tempi di raffreddamento suggeriti:
• 10 minuti per bevande in lattina
• 20 minuti per bottiglie di vino
• 30 minuti per bevande in bottiglia
Premendo il pulsante “wine chill” accanto al pulsante comparirà un’icona animata con un timer per il conto alla rovescia. Il conto alla rovescia sarà espresso in minuti; è possibile
modificare il tempo impostato o spegnere il timer anche
dopo l’avvio del conto alla rovescia. Allo scadere del tempo
si sentirà un suono e l’icona accanto al pulsante “Alarm
reset” inizierà a lampeggiare.
Per disinserire l’allarme e disattivare la funzione di raffreddamento bevande, premete il pulsante “Alarm reset”. Se le
bevande si sono rinfrescate toglietele dal congelatore. Se
non sono abbastanza fresche impostate nuovamente la funzione “Wine chill” (ricordate che le bevande in questione
sono già state parzialmente raffreddate).
Efficienza energetica
Questo frigorifero è stato progettato nel rispetto dei principi
di efficienza energetica ed ha tre diverse modalità di funzionamento (Normal, Eco, Vacation), rispondenti a diversi livelli di
efficienza.
Modalità “Normal”
Questa è la modalità in cui il frigorifero si pone automaticamente alla prima messa in funzione. La modalità “Normal” è
quella più adatta se la porta del frigorifero viene aperta di frequente.
Modalità “Eco”
La modalità “Eco” è più
efficiente della “Normal”.
Può essere avviata in due
modi: manualmente, premendo il pulsante “Eco/
Vacation” una volta quando il frigorifero è in modalità normale, o automaticamente se la porta del frigorifero non viene aperta
per 30 ore di seguito. Nel
caso di un avvio manuale della modalità “Eco” l’apertura della porta non farà tornare il display in modalità normale.
Invece, se la modalità “Eco” parte in automatico il frigorifero
tornerà alla modalità normale appena viene aperta la porta
del frigorifero.
Modalità “Vacation”
Questa modalità risulta
utile se pensate di assentarVi per qualche tempo e
desiderate che il vostro
frigorifero funzioni in
regime di massima efficienza energetica. In
questo caso dalla modalità “Normal” premete il
tasto “Eco/Vacation” due
volte di seguito poco prima di partire: il frigorifero si metterà in modalità vacanza,
come indicato dal simbolo dell’aeroplano. (Quando il frigo è
in modalità “Eco” basterà premere il tasto una volta per passare alla modalità vacanza).
La modalità vacanza si disabilita automaticamente all’apertura della porta del frigorifero e riparte la modalità normale.
Le modalità “Eco” e “Vacation” riducono lo sbrinamento per
risparmiare energia, pur mantenendo le impostazioni di temperatura da voi fissate.
Nota: L’apertura della porta del congelatore non influisce sul
funzionamento delle modalità “Eco” e “Vacation”, eccetto nel
caso in cui suoni l’allarme temperatura del congelatore.
Istr S85582DT S85528KG 2-02-2005 17:21 Pagina 11
Page 31

4 - Come usare il frigorifero
12
Regolazione della temperatura dei frigoriferi
con congelatore in alto
Modello manuale (con manopola termostato)
Impostare la temperatura utilizzando i termostati posti sul
retro del vano frigorifero. Quando si mette in funzione l’elettrodomestico per la prima volta, impostare sia il termostato
del frigorifero sia quello del congelatore su MID. L’altitudine
del luogo di installazione influisce sul sistema di regolazione
della temperatura del frigorifero. Si suggerisce di impostare
la temperatura su valori più elevati per compensare tale altitudine. Ad esempio: a 1000 metri sul livello del mare mettere
il termostato del frigorifero sulla tacca successiva a quella
MID.
ATTENDERE 24 ORE DOPO AVER MODIFICATO LE
IMPOSTAZIONI:
Quando si modificano le impostazioni di temperatura, procedere con piccole variazioni ed attendere 24 ore prima di
decidere se cambiare nuovamente.
NB: Il test del gelato è un buon modo per controllare la temperatura del congelatore. Per controllare la temperatura del
vano frigorifero può risultare utile prendere come riferimento
la temperatura dell’acqua in bottiglia.
Regolare la temperatura del congelatore
1. Selezionare il termostato del congelatore (manopola
superiore).
2. Ruotare la manopola in senso orario per impostare su più
freddo (Colder).
3. Ruotare la manopola in senso anti-orario per impostare su
meno freddo (Less cold).
IN CLIMI NORMALI E MOLTO CALDI SI SCONSIGLIA DI
IMPOSTARE IL CONGELATORE SUL LIVELLO DI
FREDDO MASSIMO, POICH_ QUESTO LIMITA LA
CAPACITÀ DI RAFFREDDAMENTO DEL VANO
FRIGORIFERO.
In climi molto freddi (temperature inferiori ai 10°C) potrebbe
essere necessario impostare il congelatore a temperature
inferiori.
Regolare la temperatura del frigorifero
1. Selezionare il termostato del frigorifero (manopola
inferiore).
2. Ruotare la manopola in senso orario per impostare su più
freddo (Colder).
3. Ruotare la manopola in senso anti-orario per impostare su
meno freddo (Less cold).
Istr S85582DT S85528KG 2-02-2005 17:21 Pagina 12
Page 32

4 - Come usare il frigorifero
13
Come utilizzare gli accessori del frigo
Questa sezione Vi illustra come sfruttare al meglio i molti
accessori del frigorifero, e come pulirli.
Cassetti sulla porta (ripiani)
Sia il frigorifero, sia il congelatore sono dotati di contenitori
collocati sulle rispettive porte. I contenitori del frigorifero sono
regolabili per adattarsi alle diverse esigenze. Tutti i contenitori
possono essere asportati per consentirne la pulizia. Se si
desidera togliere o regolare la posizione di un contenitore,
sollevarlo rispetto alle guide di supporto del pannello interno
della porta. Spingere il contenitore verso il basso sulle guide
di supporto per bloccarlo nella posizione desiderata.
Scomparto porta burro/formaggi
Questo contenitore si può utilizzare per conservare prodotti
come il burro, la margarina ed i formaggi. Lo scomparto è
leggermente più caldo del resto del vano frigorifero.
Cassetto verdura
Conservare le verdure
Potete utilizzare questo cassetto per conservare verdura,
frutta o prodotti di piccole dimensioni. L’umidità all’interno
del cassetto porta verdura può essere regolata ruotando
l’apposito selettore.
Quando conservate
verdura in questo
cassetto ricordate di
impostare il selettore di umidità su
“più umido”
Conservare frutta e prodotti di piccole
dimensioni
Nel cassetto verdura è possibile conservare anche frutta:
ricordate di impostare il selettore di umidità su “meno umido”.
Rimuovere il cassetto verdura ed il ripiano
• Togliere il/i cassetto/i porta verdura tirandolo/i in avanti,
poi verso l’alto e di nuovo in avanti.
• Rimuovere il vetro (se in dotazione) spingendolo verso l’alto dal lato inferiore. Maneggiare il vetro con cautela.
• Per rimuovere il ripiano del cassetto verdura sollevare i
ganci posti sul lato inferiore del ripiano e tirarlo in avanti.
Cassetto “Deli” spostabile (se in dotazione)
Il cassetto “Deli” spostabile permette di posizionare il cassetto “Deli” in qualsiasi posizione all’interno del vano frigo.
Questo ti permette di posizionare il cassetto nel modo più
conveniente , considerando il cibo immagazzinato, o di
allineare questo alle bocchette dell’aria per un raffreddamento diretto.
Per poterlo usare correttamente, il cassetto “Deli” dovrebbe
essere posizionato o a sinistra o a destra o nella posizione
centrale. In questo modo le bocchette dell’aria saranno coincidenti con le superfici di convoglio dell’aria poste nella parte
posteriore del cassetto.
L’aria che fuoriesce dalle bocchette può essere molto fredda,
perciò questo potrà essere utile
per il raffreddamento veloce di cibo o bevande.
Tuttavia questi alimenti possono congelare se vicini alle bocchette d’aria. Per prevenire, perciò, la congelazione bisogna
spostare gli alimenti lontano dalle bocchette, dopo la fase di
raffreddamento rapido.
Pulizia: il cassetto “Deli” spostabile può essere rimosso per
facilitarne la pulizia. Per fare questo è stato incorporato un
meccanismo di blocco flessibile nella parte posteriore del
ripiano.
• Estrarre il cassetto “Deli”.
• Spostare il sistema di supporto a destra fino al punto di
blocco.
• Capovolgere il ripiano su una
superficie piana.
• Far scorrere il sistema di supporto scorrevole a sinistra fino al meccanismo di blocco.
• Spingere (push) la leva di sblocco come indicato.
• Estrarre il supporto dalla guida
Pulire le parti come necessita e poi asciugare. Per riinserire il supporto scorrevole ripetere la procedura sopra indicata
facendo attenzione ad allineare il bordo
frontale del supporto al bordo frontale
del ripiano.
TUTTI I VETRI SONO VETRI DI
SICUREZZA.TUTTAVIA BIGNOA PORRE
ATTENZIONE ALLA LORO MOVIMENATIONE PER LA PULIZIA. POICHÉ IL SISTEMA DI SUPPORTO È RELATIVAMENTE PESANTE SE IL RIPIANO VIENE
POSTO IN VERTICALE (COME EVIDENZIATO) , TALE SUPPOTO PUÒ CADERE
GIÚ.
NON RIMUOVERE NESSUNA VITE!
Istr S85582DT S85528KG 2-02-2005 17:21 Pagina 13
Page 33

4 - Come usare il frigorifero
14
Ripiani di vetro antitrabocco
(se in dotazione)
I ripiani di vetro antitrabocco permettono di trattenere eventuali perdite di liquidi sul ripiano stesso. Un sistema di fermo
consente di minimizzare spostamenti accidentali dei ripiani. I
ripiani possono essere posizionati a varie altezze. I ripiani in
vetro antitrabocco non devono essere utilizzati come ripiani
estraibili.
Ripiani di vetro rientrabile (se in dotazione)
Questo ripiano può essere usato come ripiano normale,
oppure se serve inserire nella parte frontale del vano frigo
cibo di grande ingombro è possibile far rientrare metà ripiano.
Per far rientrare metà ripiano:
• Tirare in avanti la metà frontale del ripiano (1), facendo
scivolare verso il basso la
sua parte posteriore, fino a
fuoriuscire dall’apposito supporto (2).
• Fare in modo che la parte posteriore del mezzo ripiano
frontale si inserisca nelle guide poste sotto il ripiano
posteriore.
• Spingere il mezzo ripiano frontale (3,4) sotto il mezzo ripiano posteriore fino all’apposito fermo.
Riposizionamento:
Questo ripiano può essere riposizionato all’interno della cella
frigo estraendolo completamente dalle guide laterali; dopo di
che può essere riinserita in una delle altre guide poste su un
differente livello.
Filtro antiodori
Il tuo frigorifero è dotato di un filtro antiodori che permette di
eliminare gli odori del cibo all’interno del vano frigo.
Questo filtro è posizionato nel canale di ritorno dell’aria cosi
gli odori vengono assorbiti dal filtro durante il funzionamento
normale del frigorifero (vedi schema 1)
Ferma bottiglie
Il ferma bottiglie è usato per prevenire possibili cadute delle
bottiglie. Il ferma bottiglie è costituito da due parti, una parte
frontale scorrevole, ed un anello ferma bottiglie ruotabile. L’anello fermabottiglie può essere ruotato di 360° ma deve
essere utilizzato nelle posizioni orizzontale e verticale.
Il ferma bottiglie può essere usato in due posizioni:
Orizzontale
Quando l’anello fermabottiglie è posizionato orizzontalmente (A), è possibile inserire una bottiglia al
suo interno.
Verticale
Quando il ferma bottiglie è
ruotato verticalmente (B), è
possibile farlo scorrere fino
a fermarsi contro una bottiglia.
Nota: la bottiglia dovrebbe
essere collocata o sulla
parte laterale del balconcino o posta vicino ad un’altra bottiglia.
Frontale della mensola
Istr S85582DT S85528KG 2-02-2005 17:21 Pagina 14
Page 34

Cestelli del congelatore (se in dotazione)
I cestelli ed il ripiano del congelatore sono una caratteristica
dei frigoriferi con il congelatore in basso. I cestelli in griglia
permettono di vedere facilmente il contenuto. Sia i cestelli
che il ripiano possono essere estratti se necessario ed hanno
un fermo per evitare che escano dalle guide.
Per togliere il cestello o il ripiano
estrarli fino a farli
andare in battuta
sul fermo, poi sollevare la parte anteriore per sganciarli
dal fermo, continuando a tirare in
avanti.
Cambiare la lampadina
Scomparto alimenti
1. Staccare la corrente agendo sull’interruttore della presa e
scollegare il cavo di alimentazione del frigorifero dalla presa stessa.
2. Rimuovere i ripiani.
3. Sganciare con cura il coperchio proteggi-lampadina. Lo si
fa tirando la linguetta sul retro del coperchio verso la parte
anteriore del vano frigo (vedi la figura sottostante).
4. Svitare la lampadina e sostituirla con una uguale all’originale.
5. Rimettere in posizione il coperchio della lampadina:
inserire le parti che sporgono dal coperchio nella parte
anteriore della sede e premere in su la parte posteriore del
coperchio fino ad agganciarlo a scatto.
6. Riinserire i ripiani.
7. Aspettare 5 minuti per essere certi che le pressioni all’intero del sistema di refrigerazione si siano equalizzate.
Successivamente riaccendere il frigorifero.
Vano congelatore (se in dotazione)
1. Staccare la corrente agendo sull’interruttore della presa e
scollegare il cavo di alimentazione del frigorifero dalla presa stessa.
2. Sganciare con cura il coperchio proteggi-lampadina. Lo si
fa tirando la linguetta sul retro del coperchio verso la parte
anteriore del vano congelatore. (Vedi figura sotto).
3. Svitare la lampadina e sostituirla con una uguale all’originale.
4. Rimettere in posizione il coperchio della luce: inserire le
parti che sporgono dal coperchio nella parte anteriore della sede e premere in su la parte posteriore del coperchio
fino ad agganciarlo.
5. Aspettare 5 minuti per essere certi che le pressioni all’intero del sistema di refrigerazione si siano equalizzate.
Successivamente accendere il frigorifero dalla presa di
corrente.
4 - Come usare il frigorifero
15
Istr S85582DT S85528KG 2-02-2005 17:21 Pagina 15
Page 35

PRIMA DELLA PULIZIA: RIMUOVERE IL CAVO
DI ALIMENTAZIONE DALLA PRESA DI CORRENTE. QUESTO EVITERÁ OGNI PERICOLO
DI SCOSSA ELETTRICA.
Esterno
Mobile
É consigliabile lucidare la struttura esterna del frigorifero
almeno una volta all’anno utilizzando una cera ad alta resa
come quella per le automobili. Dopo tale operazione basterà
passare di tanto in tanto un panno pulito ed umido per
togliere le ditate.
NOTA:
Non applicare cera sulle parti in plastica o sulle decorazioni.
Lavarle invece con acqua calda (non bollente) utilizzando un
detergente non profumato.
Porte - verniciate
Procedere come descritto per il corpo esterno.
Porte - acciaio inossidabile
L’elettrodomestico che avete scelto è costruito con acciaio
inossidabile anti impronta: la superficie ha uno speciale ed
innovativo rivestimento che facilita la rimozione di macchie
dovute, ad esempio, a ditate o gocce d’acqua. Il frigorifero in
acciaio inossidabile deve essere pulito con regolarità perché
possa mantenere il suo aspetto migliore. Le porte in acciaio
inossidabile si possono pulire con acqua tiepida saponata ed
un panno morbido, sciacquare poi con acqua pulita ed asciugare con un panno per togliere i residui di sapone.
É importante strofinare seguendo la grana dell’acciaio per
evitare di lasciare segni non graditi sulla superficie.
EVITARE SPUGNETTE ABRASIVE O ALTRI
DETERGENTI PERCHÉ POSSONO GRAFFIARE LA SUPERFICIE.
LA GARANZIA NON COPRE QUESTO TIPO
DI DANNI DOPO LA CONSEGNA.
Interno
L’interno del frigorifero deve essere pulito con regolarità. La
pulizia risulterà più facile se il frigorifero non è molto pieno.
Lavare l’interno del frigo utilizzando un panno morbido,
acqua tiepida e sapone neutro non profumato. Asciugare
accuratamente tutte le superfici e le parti rimovibili. Evitare
che l’acqua entri in contatto con i comandi del frigorifero. Se
avete rimosso parti che si possono togliere, rimettetele in
posizione; riaccendete il frigorifero prima di riporvi nuovamente alimenti. Naturalmente l’interno del frigorifero deve
essere tenuto pulito asportando con cura eventuali spandimenti accidentali di cibo.
Tenere pulite le guarnizioni della porta
Fate attenzione a tenere pulite le guarnizioni di chiusura della
porta. Alimenti o bevande appiccicose sulle guarnizioni possono farle aderire all’armadio del frigorifero e danneggiarle
per strappo al momento dell’apertura della porta. Lavare la
guarnizione con un detergente delicato ed acqua calda. Sciacquare abbondantemente ed asciugare
Pulire il frigorifero
ATTENZIONE:
Non usare mai acqua bollente, solventi, detergenti da
cucina, detergenti spray, lucidanti da metallo, detergenti
caustici o abrasivi o sgrassanti per pulire questo elettrodomestico perché lo danneggerebbero. Molti prodotti
per la pulizia e detergenti reperibili in commercio contengono solventi che possono rovinare il frigorifero. Per
la pulizia utilizzare unicamente un panno morbido con un
sapone delicato non profumato ed acqua tiepida.
Informazioni generali
Sicurezza
É importante utilizzare il frigorifero in sicurezza. Ciò significa
che dovrete controllare i bambini piccoli e le persone inferme
quando lo utilizzano. Verificate che i bambini piccoli non
giochino con il frigorifero. Seguite i suggerimenti riportati qui
di seguito.
DA FARE
• Verificare che la presa di corrente abbia il cavo di messa a
terra. Se non ne siete certi chiedete ad un elettricista di
controllare.
• Staccare la spina del frigorifero prima di pulirlo o di
spostarlo.
• Se il cavo di alimentazione è danneggiato, fatelo sostituire
dal fabbricante, dal responsabile del servizio tecnico o da
un agente autorizzato. In questo modo si elimina una
causa di rischio.
DA NON FARE
• Non lasciare mai che i bambini giochino
con il frigorifero.
• Non conservate mai in frigorifero bombolette spray, liquidi esplosivi o infiammabili.
• Non riponete mai bevande gassate nel
congelatore.
• Non leccare mai cibi gelati appena tolti dal
congelatore. Farlo può causare un’ustione
da freddo alle labbra ed alla bocca.
• Non provate mai a riparare il frigorifero da
soli.
• Non utilizzate mai stufette elettriche o
asciugacapelli per scongelare il freezer
perché potreste ricevere scosse elettriche.
• Non utilizzate mai dispositivi elettrici all’interno degli scomparti per la conservazione
degli alimenti.
• Questo frigorifero è dotato di materiale di
isolamento ottenuto da gas infiammabili
esplosivi. Per ragioni di sicurezza, tenetene
conto al momento dello smaltimento.
• Non danneggiate il circuito di refrigerazione.
ATTENZIONE:
Al momento di smaltire frigoriferi o congelatori togliete le porte per evitare che i bambini
rimangano accidentalmente chiusi all’interno dell’apparecchiatura.
5 - Cura & Manutenzione
16
Istr S85582DT S85528KG 2-02-2005 17:21 Pagina 16
Page 36

5 - Cura & Manutenzione
17
Che cosa fare prima di contattare l’assistenza tecnica
Se pensate che il vostro frigorifero non funzioni al meglio, prima di contattare il servizio di assistenza tecnica fate alcune verifiche:
potreste riuscire a individuare il problema evitando il disagio dell’intervento e risparmiando tempo e denaro.
Se vi serve effettivamente l’assistenza del servizio tecnico
Se avete un problema che persiste anche dopo aver fatto le verifiche riportate sopra, contattate il Centro di Assistenza Tecnica più
vicino o il negoziante dal quale avete acquistato il frigorifero. Citate il numero di modello indicato sull’etichetta apposta sulla parete
di rivestimento interno in plastica
Nota importante
Prima di chiamare l’assistenza tecnica leggete con attenzione il manuale delle istruzioni, quello di manutenzione, i termini e le condizioni della garanzia.
Problema Soluzione
Se l’elettrodomestico non funziona
• Controllare che il cavo di alimentazione sia inserito correttamente nella presa di corrente e che l’interruttore posto sulla stessa sia su “ON”.
• Provate a collegare un elettrodomestico diverso alla presa di corrente. Se non arriva corrente alla presa potreste avere un fusibile bruciato o un
cortocircuito nella rete elettrica di casa.
• Provate a regolare la temperatura spostando la manopola del termostato su una posizione leggermente “più fredda”.
• É normale che la ventola del congelatore NON funzioni durante il normale ciclo di sbrinamento o per un breve periodo dopo l’accensione del
frigorifero.
Se il frigorifero
fa rumore
I frigoriferi/congelatori moderni con capienze maggiori utilizzano compressori ad alta velocità. Questo può determinare un livello di rumorosità che
può sembrare elevato, ma che è piuttosto normale.
I normali rumori di funzionamento comprendono:
• occasionali gorgoglii, simili all’acqua che bolle
• rumore da flusso d’aria (l’aria circola grazie ad una piccolo ventola)
• rumore simile a scoppiettii durante lo sbrinamento automatico
• un “clic” poco prima dell’avvio del compressore (si tratta dello scatto automatico del termostato che comanda l’avvio o lo spegnimento del
compressore).
Altri suoni strani possono indicare la necessità di verificare la situazione e di agire di conseguenza.
Ad esempio i rumori possono indicare che:
• l’armadio non è perfettamente orizzontale (a bolla)
• il pavimento è sconnesso o poco solido
• le bottiglie sono posizionate male e tintinnano
• sta vibrando un oggetto collocato sopra, dietro o accanto al frigorifero.
• il retro dell’armadio del frigorifero tocca la parete.
Ricordate che è normale che i rumori sembrino più forti subito dopo l’accensione del frigorifero.
Presenza di odori
all’interno
del frigorifero
• Serve pulire l’interno del frigo.
• Gli odori sono causati da alcuni alimenti.
• Gli odori sono causati da alcuni contenitori o imballi.
• Fate mente locale e provate a ricordare se l’odore è iniziato quando avete riposto in frigorifero qualcosa di inconsueto.
Il motore sembra
funzionare più
del dovuto
Il vostro nuovo frigorifero è molto capiente, sia nel vano frigorifero, sia in quello separato del congelatore. È normale che il motore entri in funzione
di frequente. Comunque per ridurre al minimo l’attivazione, verificate quanto segue:
• Tenete le porte aperte troppo a lungo o le aprite troppo spesso?
• Le temperature sono troppo basse? Vedi sezione “REGOLAZIONE DELLA TEMPERATURA”.
• Di recente sono state introdotte grandi quantità di cibi caldi? L’estate, i periodi di festa e le vacanze solitamente implicano molto più lavoro per
il vostro frigorifero.
• Se è una giornata afosa e la stanza è molto calda il frigorifero entrerà in funzione più del solito.
• Il motore tenderà a funzionare più del solito subito dopo l’installazione del frigorifero o alla riaccensione dopo lungo periodo di inattività.
La temperatura
del frigorifero è
troppo alta
• Controllare che il frigorifero abbia abbastanza spazio sui lati, sul retro e sopra. Consultate le istruzioni contenute nelle prime pagine del manuale.
• Fare riferimento alla sezione “REGOLAZIONE DELLA TEMPERATURA”.
• La porta potrebbe essere stata aperta troppo a lungo o troppo di frequente.
• Una porta è tenuta aperta da un contenitore o da un imballo.
La temperatura
del frigorifero è
troppo bassa
• Consultare la sezione “REGOLAZIONE DELLA TEMPERATURA”
• Aumentare la temperatura per evitare un alto consumo energetico.
Le porte
non si chiudono
• Verificare che la sommità del frigorifero sia piegata all’indietro di 10-15mm rispetto alla verticale per permettere alle porte di chiudersi da sole.
• Verificare se qualcosa sta tenendo aperta la porta.
• È normale che la porta del congelatore si apra momentaneamente per poi richiudersi quando si chiude la porta dello scomparto alimenti. Se il
congelatore rimane aperto significa che l’armadio del frigo deve essere inclinato ancora un pò all’indietro. Se vi rivolgerete al servizio tecnico
per risolvere questo problema vi sarà addebitato il costo per il diritto di chiamata poiché non si tratta di un guasto coperto da garanzia.
Nel congelatore si
forma molta brina
Dopo aver riposto alimenti nel vano congelatore e nello scomparto cibi freschi ricordatevi di richiudere completamente le rispettive porte. Se le
porte rimangono parzialmente aperte all’interno del congelatore si formerà uno spesso strato di brina. Se si crea brina, questa va rimossa. Per
evitare che si riformi fate attenzione a chiudere bene le porte.
Se gocciola acqua
sul pavimento
La vaschetta dell’acqua di scongelamento (collocata sul compressore sul retro dell’armadio) può essere messa in posizione errata. Oppure può
essere messo male il tubo di drenaggio che convoglia l’acqua in detta vaschetta.
Può essere necessario scostare il frigorifero dalla parete per controllare la vaschetta ed il tubo.
Istr S85582DT S85528KG 2-02-2005 17:21 Pagina 17
Page 37

Dati tecnici
5 - Cura & Manutenzione
18
*Questo valore risulta da risultati di test standard realizzati in
conformità con lo standard europeo EN 153. Il consumo
reale dipende dal tipo di uso che si fa dell’elettrodomestico e
dal luogo di installazione.
Questo dispositivo è conforme alla Direttiva CEE 87/308
del 2 giugno 1987 relativa alla soppressione delle interferenze radio
Questo dispositivo è conforme alle seguenti direttive CEE:
• 73/23/CEE del 19 febbraio 1973
(Direttiva basso voltaggio) e successive modifiche
• 89/336/CEE del 3 maggio 1989
(Direttiva sulla compatibilità elettromagnetica) e successive
modifiche
CARATTERISTICHE MODELLO
S85582DT S85528KG
DIMENSIONI
(cm)
ALTEZZA 172.0 172.0
LARGHEZZA 80.2 80.2
PROFONDIT
Á
74.3 74.3
TENSIONE E FREQUENZA
DI ALIMENTAZIONE
220-240v 50Hz
POTENZA TOTALE ASSORBITA (W)
*MEDIA DI CONSUMO
ENERGETICO GIORNALIERO (kWh)
1.07 1.19
CAPACITÀ
LORDA (litri)
FRIGORIFERO 395.7 348.7
CONGELATORE 121.4 156.3
CAPACITÀ
NETTA (litri)
FRIGORIFERO 377.3 330.6
CONGELATORE 98.4 132.7
Istr S85582DT S85528KG 2-02-2005 17:21 Pagina 18
Page 38

Istr S85582DT S85528KG 2-02-2005 17:21 Pagina 19
Page 39

©2004 ELECTROLUX HOME PRODUCTS PTY LTD A.B.N 51 004 762 341
KITCHEN, CLEANING AND OUTDOOR APPLIANCES
www.electrolux.com.au
Numero unità: TBA
Data di pubblicazione:
codice a barre EAN:
TBA
Istr S85582DT S85528KG 2-02-2005 17:21 Pagina 20
Page 40

AEG
ELECTROLUX
Ο∆ΗΓΙΕΣ ΧΡΗΣΗΣ ΚΑΙ ΣΥΝΤΗΡΗΣΗΣ
S85582DT
S85528KG
Ελληνικά
Page 41

Χρήση και Φροντίδα – Περιεχόµενα
1 – Εισαγωγή
Σηµαντικές οδηγίες ασφαλείας 3
Θέση 3
Αποστάσεις γύρω από το ψυγείο σας 3
2 – Χαρακτηριστικά µε µια µατιά
Μοντέλα µε Καταψύκτη Επάνω 4
Μοντέλα µε Καταψύκτη Κάτω 5
3 – Εγκατάσταση
Εγκαθιστώντας το νέο σας ψυγείο 6
Εγκατάσταση Συστήµατος Παραγωγής πάγου 7
Μοντέλα µε Καταψύκτη Επάνω 7
Μοντέλα µε Καταψύκτη Κάτω 7
4 – Λειτουργία του ψυγείου σας
Αρχική λειτουργία 8
Έλεγχος Θερµοκρασίας
Ηλεκτρονικά Μοντέλα (Ψηφιακής Ένδειξης) 9
Προσαρµογή θερµοκρασίας 9
Αλλαγή της θερµοκρασίας του καταψύκτη 9
Αλλαγή της θερµοκρασίας του χώρου συντήρησης 9
Λειτουργία ταχείας ψύξης 9
Ηχητική ειδοποίηση ανοιχτής πόρτας 10
Ηχητική ειδοποίηση θερµοκρασίας κατάψυξης 10
Λειτουργία ∆ιακοπών 10
Κλείδωµα Ασφαλείας για Παιδιά 10
Χρονοµετρητής ψύξης ποτών (κρασιών) 10
Κανονική λειτουργία [Normal Mode] 10
Οικονοµική λειτουργία [Eco Mode] 10
Λειτουργία ∆ιακοπών [Vacation Mode] 10
Χειροκίνητη λειτουργία (µοντέλα µε περιστρεφόµενους ρυθµιστές) 11
Μοντέλα µε καταψύκτη επάνω 11
Μοντέλα µε καταψύκτη κάτω 11
Χώρος γαλακτοκοµικών 13
Αποθηκευτικές Θήκες πόρτας 12
Θήκη φρέσκων τροφίµων 12
Αποθήκευση λαχανικών 12
Αποθήκευση φρούτων και µικρών τροφίµων 12
Αφαίρεση θήκης φρέσκων τροφίµων και ραφιού 12
Θήκη συσκευασµένων τροφίµων µε συρόµενο ράφι 13
Ράφι µε κινούµενο διαχωριστικό 13
Σύστηµα αποµάκρυνσης οσµών 13
∆ακτύλιος συγκράτησης φιαλών 13
Page 42

Συρτάρια κατάψυξης (µόνο για µοντέλα µε καταψύκτη κάτω) 14
Αλλαγή Λαµπτήρα
Θάλαµος Συντήρησης Τροφίµων 14
Θάλαµος Καταψύκτη 14
5 – Φροντίδα & Συντήρηση
Καθαρισµός του ψυγείου 15
Εξωτερικό ψυγείου 15
Σώµα ψυγείου 15
Βαµµένες Πόρτες 15
Πόρτες από ανοξείδωτο ατσάλι 15
Εσωτερικό ψυγείου 15
∆ιατηρείτε τους στεγανωτικούς συνδέσµους της πόρτας καθαρούς 15
Ασφάλεια 15
Τι να κάνετε προτού καλέσετε τον τεχνικό 16
Πληροφορίες εγγύησης 18
Anti + bac
Πολλά από τα εξαρτήµατα του νέου σας ψυγείου Electrolux είναι κατασκευασµένα
µε αντιβακτηριδιακά πρόσθετα.
Τα πλεονεκτήµατα των αντιβακτηριδιακών προσθέτων είναι τα εξής:
• Παρέχουν Αντι-µικροβιακή προστασία
• Σκοτώνουν τα βλαβερά βακτήρια
• Μειώνουν τις οσµές σκοτώνοντας τα βακτήρια που προκαλούν κακοσµία
• Είναι ασφαλή για τον άνθρωπο και τα ζώα
• Ενεργούν συνεχώς προστατεύοντας από επιζήµια βακτήρια και µικρόβια
• Συµβάλουν στην προστασία από τη διασταυρούµενη µόλυνση (τη
συνηθέστερη αιτία ασθενειών που προκαλούνται από τρόφιµα)
• Πρόκειται για προστασία που προστίθεται κατά την διαδικασία κατασκευής,
συνεπώς δεν φεύγει µε το πλύσιµο ούτε φθείρεται. ∆ιαρκεί καθ’ όλη τη
διάρκεια ζωής του προϊόντος
• Τα αντιβακτηριδιακά πρόσθετα δεν αντικαθιστούν τις σωστές πρακτικές
υγιεινής.
Με την επιφύλαξη όλων των δικαιωµάτων της παρούσας έκδοσης. Απαγορεύεται
η µερική αναπαραγωγή της χωρίς την προηγούµενη γραπτή άδεια της Electrolux
Home Products Ltd («Electrolux»). Το περιεχόµενο της παρούσας έκδοσης
θεωρείται σωστό κατά τη δηµοσίευση, εντούτοις κάθε πληροφορία, προϊόν ή
υπηρεσία που αναφέρεται ενδέχεται να τροποποιηθεί, να συµπληρωθεί ή να
αποσυρθεί ανά πάσα στιγµή. Λόγω της πολιτικής συνεχούς ανάπτυξης και
βελτίωσης προϊόντων που εφαρµόζει, η Electrolux διατηρεί το δικαίωµα να
αλλάζει κατά τη διακριτική της ευχέρεια τις τεχνικές προδιαγραφές και τα υλικά
των προϊόντων χωρίς ειδοποίηση.
Page 43

1 – Εισαγωγή
Αγαπητέ Πελάτη
Σας συγχαίρουµε για την αγορά του νέου σας ψυγείου.
Εµείς στην Electrolux Home Products είµαστε ιδιαίτερα περήφανοι για το
συγκεκριµένο προϊόν και δεσµευόµαστε να σας παρέχουµε τις καλύτερες δυνατές
υπηρεσίες.
∆ιαβάστε το παρόν Εγχειρίδιο Χρήσης & Φροντίδας πολύ προσεκτικά. Περιέχει
πολύτιµες πληροφορίες σχετικά µε τη σωστή συντήρηση του νέου σας ψυγείου.
Είµαστε σίγουροι ότι θα ευχαριστηθείτε το νέο σας ψυγείο και σας ευχαριστούµε που
επιλέξατε το προϊόν µας. Ελπίζουµε ότι θα µας προτιµήσετε και στις µελλοντικές
αγορές σας.
Ακολουθήστε τις παρακάτω οδηγίες για να βεβαιωθείτε ότι θα το εγκαταστήσετε µε
ασφάλεια και ότι θα λειτουργήσει αποτελεσµατικά.
ΠΑΡΑΚΑΛΟΥΜΕ ∆ΙΑΒΑΣΤΕ ΚΑΙ ΦΥΛΑΞΤΕ ΑΥΤΈΣ ΤΙΣ Ο∆ΗΓΙΕΣ
Το παρόν Εγχειρίδιο Χρήσης & Φροντίδας παρέχει συγκεκριµένες οδηγίες
λειτουργίας για το µοντέλο που επιλέξατε. Χρησιµοποιήστε το ψυγείο σας µόνο µε
τον τρόπο που αναφέρεται στον παρόν εγχειρίδιο. Οι παρούσες οδηγίες δεν
αποσκοπούν να καλύψουν κάθε πιθανή περίπτωση και κατάσταση που ενδέχεται να
προκύψει. Κοινή λογική και προσοχή θα πρέπει να επιστρατεύονται κατά την
εγκατάσταση, λειτουργία και συντήρηση οποιασδήποτε συσκευής.
Προσοχή – Προτού εγκαταστήσετε το ψυγείο σας, ΕΛΕΓΞΤΕ ΓΙΑ ΤΥΧΟΝ
ΖΗΜΙΕΣ Η ΣΗΜΑ∆ΙΑ. Εάν διαπιστώσετε ότι το ψυγείο φέρει ζηµιές ή σηµάδια, θα
πρέπει να το αναφέρετε εντός 7 ηµερών εάν επιθυµείτε αποζηµίωση για ζηµίες/
σηµάδια βάσει της εγγύησης του κατασκευαστή. Αυτό δεν επηρεάζει τα νόµιµα
δικαιώµατά σας.
Σηµαντικές Οδηγίες Ασφαλείας
ΕΑΝ ΤΑ ∆ΟΧΕΙΑ ΠΕΠΙΕΣΜΕΝΟΥ ΑΕΡΙΟΥ ΑΝΑΓΡΑΦΟΥΝ ΤΗΝ
ΕΝ∆ΕΙΞΗ «ΕΥΦΛΕΚΤΟ» ΚΑΙ/ Η ΦΕΡΟΥΝ ΕΝΑ ΜΙΚΡΟ ΣΥΜΒΟΛΟ
ΦΛΟΓΑΣ, ΜΗΝ ΤΑ ΑΠΟΘΗΚΕΥΕΤΕ ΜΕΣΑ ΣΕ ΟΠΟΙΟ∆ΗΠΟΤΕ
ΨΥΓΕΙΟ. ΚΑΤΙ ΤΕΤΟΙΟ ΕΝ∆ΕΧΕΤΑΙ ΝΑ ΠΡΟΚΑΛΕΣΕΙ ΕΚΡΗΞΗ.
Προειδοποίηση - Κατά την απόρριψη ψυγείων και καταψυκτών,
αφαιρέστε όλες τις πόρτες. Εάν παγιδευτούν µέσα παιδιά υπάρχει κίνδυνος
ασφυξίας.
Το συγκεκριµένο ψυγείο διαθέτει µόνωση αποτελούµενη από εύφλεκτα
αέρια. Αποφύγετε κινδύνους σχετικούς µε ασφάλεια επιδεικνύοντας
προσοχή κατά την απόρριψη της συσκευής αυτής.
• Το ψυγείο θα πρέπει να µπει στο δικό του βύσµα ρευµατολήπτη
εναλλασσόµενου ηλεκτρικού ρεύµατος των 220-240 Volt, 50 Hz.
• Βεβαιωθείτε ότι η πρίζα ηλεκτρικού ρεύµατος είναι σωστά γειωµένη στο
έδαφος. Σε περίπτωση αµφιβολίας, συµβουλευτείτε ηλεκτρολόγο.
Page 44

• Μη χρησιµοποιείτε καλώδια προέκτασης ή προσαρµογέα
ρευµατολήπτη.
• Σε περίπτωση φθοράς του καλωδίου παροχής ρεύµατος, η
αντικατάστασή του πρέπει να γίνει από τεχνικό σέρβις ή από
κατάλληλο άτοµο.
• Βγάλτε το ψυγείο από την πρίζα πριν αρχίσετε τον καθαρισµό και πριν
αλλάξετε οποιοδήποτε λαµπτήρα για να αποφύγετε την ηλεκτροπληξία.
• Μη βγάζετε ποτέ το ψυγείο από την πρίζα τραβώντας το καλώδιο παροχής
ρεύµατος. Πάντα κρατάτε σταθερά την πρίζα και τραβήξτε ευθεία έξω από το
σταθερό βύσµα για να µην προκληθεί ζηµιά στο καλώδιο παροχής ρεύµατος.
Θέση
• Επιλέξτε µια θέση που να µην είναι υπερβολικά κρύα – η
θερµοκρασία θα πρέπει να είναι άνω των 10º C.
• Τοποθετήστε το ψυγείο σε µέρος στεγνό, αποφεύγοντας µέρη µε
υψηλά ποσοστά υγρασίας.
• Μην τοποθετείτε το ψυγείο σε µέρη παγωµένα ή εκτεθειµένα, όπως
για παράδειγµα σε γκαράζ ή σε βεράντες.
• Μη εκθέτετε το ψυγείο στην ηλιακή ακτινοβολία.
• Μην τοποθετείτε το ψυγείο κοντά σε σόµπες, φλόγες ή θερµαντικά
σώµατα.
Εφόσον τοποθετηθεί σωστά, το ψυγείο σας θα πρέπει:
• Να έχει αρκετή απόσταση στο πίσω µέρος και στα πλάγια για να κυκλοφορεί
αέρας.
• Να είναι ευθυγραµµισµένο µε τα γύρω ντουλάπια.
• Να έχει πόρτες που θα κλείνουν αυτόµατα από µερικά ανοιχτή θέση.
• Να έχει ρυθµιστεί η βάση σταθεροποίησης (βλέπε ∆ιάγραµµα 4 στη σελίδα 5)
κατά τρόπον ώστε να µη πέσει το ψυγείο προς τα µπρος όταν ανοίξει µια
πόρτα µε βαρύ φορτίο τροφίµων.
Αποστάσεις γύρω από το ψυγείο
Προτού µετακινήσετε το ψυγείο σας στη θέση στην οποία θα λειτουργεί, βεβαιωθείτε
ότι οι γύρω αποστάσεις είναι επαρκείς. Οι αποστάσεις απαιτούνται για την
κυκλοφορία του αέρα - µια υπερβολικά µικρή απόσταση ενδέχεται να επηρεάσει την
απόδοση του ψυγείου σας.
Προτείνουµε ελάχιστες αποστάσεις:
• 3 εκατ. σε κάθε πλευρά
• 9 εκατ. πάνω από το ψυγείο
• 5 εκατ. πίσω από το ψυγείο.
Page 45

Μελετήστε το παρακάτω διάγραµµα προτού διαβάσετε για τον τρόπο φροντίδας
(
(
ψ
µ
ψ
η
Αισθητήρας (µόνο στα ηλεκτρονικά
µοντέλα)
Λαµπάκι Καταψύκτη
(όπου υπάρχει)
Συρόµενες Παγοθήκες
όπου υπάρχουν)υπάρχει)
Συρόµενη Θήκη για Παγάκια
όπου υπάρχει)
Οπές Παροχής Αέρα Καταψύκτη
Οπές Ανακύκλωσης Αέρα
ύκτη
Κατα
Σύστηµα Αποµάκρυνσης
Οσ
ών
∆ιακόπτες Ελέγχου
ύκτη & Ψυγείου
Κατα
Αισθητήρας (µόνο στα
λεκτρονικά µοντέλα)
Πλευρικός ∆ιακόπτης
Ελέγχου Ροής αέρα της
Θήκης συσκευασµένων
τροφίµων
Ρυθµιζόµενη Θήκη
συσκευασµένων τροφίµων
Λαµπάκι Ψυγείου
Γυάλινα Ράφια µε
Προστασία από Υπερχείλιση
(όπου υπάρχουν)
2 – Τα Χαρακτηριστικά του µε µια µατιά
του ψυγείου σας
ΜΟΝΤΕΛΑ ΜΕ ΚΑΤΑΨΥΚΤΗ ΕΠΑΝΩ [ΚΕ]
Πόρτα Ψυγείου
Ράφια
Θήκες Αποθήκευσης
Γαλακτοκοµικών
Ρυθµιζόµενα Ράφια
∆ιακόπτες ελέγχου Υγρασίας
Θήκη Φρέσκων Τροφίµων
Ρυθµιζόµενα Ροδάκια
Μοντέλο που παρουσιάζεται: Ν520 J
Τα χαρακτηριστικά ενδέχεται να διαφέρουν ανάλογα µε το µοντέλο
Ράφια Φιαλών σε όλο το
πλάτος
∆ακτύλιος Συγκράτησης
Φιαλών (όπου υπάρχει)
Βάση σταθεροποίησης
Page 46

Μελετήστε το παρακάτω διάγραµµα προτού διαβάσετε για τον τρόπο φροντίδας
µ
ψ
(
ψ
(
ψ
Αισθητήρας
(µόνο στα ηλεκτρονικά µοντέλα)
Σύστηµα Αποµάκρυνσης
Οσ
ών
∆ιακόπτες Ελέγχου
ύκτη & Ψυγείου
Κατα
Πλευρικός ∆ιακόπτης
Ελέγχου Ροής αέρα της
Θήκης συσκευασµένων
2 – Τα Χαρακτηριστικά του µε µια µατιά
του ψυγείου σας
ΜΟΝΤΕΛΑ ΜΕ ΚΑΤΑΨΥΚΤΗ ΚΑΤΩ [ΚΚ]
Θήκες Αποθήκευσης
Γαλακτοκοµικών
Ρυθµιζόµενη Θήκη
συσκευασµένων τροφίµων
Λαµπάκι Ψυγείου
Γυάλινο Ράφι διαιρούµενο
(όπου υπάρχει)
Ράφι για µπουκάλια
Γυάλινα Ράφια µε
Προστασία από Υπερχείλιση
(όπου υπάρχουν)
Μεγάλο συρτάρι φρέσκων
τροφίµων
∆ιακόπτες ελέγχου Υγρασίας
Οπές Παροχής Αέρα
ύκτη
Κατα
Συρόµενη Θήκη για Παγάκια
όπου υπάρχει)
Συρµάτινο ράφι
Συρόµενες Παγοθήκες
όπου υπάρχουν)υπάρχει)
Αισθητήρας (µόνο στα ηλεκτρονικά
µοντέλα)
Οπές Ανακύκλωσης Αέρα
Κατα
ύκτη
Μεγάλο συρτάρι
Ρυθµιζόµενα Ράφια
Ράφια Φιαλών σε όλο το
πλάτος
∆ακτύλιος Συγκράτησης
Φιαλών (όπου υπάρχει)
Ρυθµιζόµενα Ροδάκια
Βάση σταθεροποίησης
Μοντέλο που παρουσιάζεται: ΝΒ430 J
Τα χαρακτηριστικά ενδέχεται να διαφέρουν ανάλογα µε το µοντέλο
Page 47

Σ
Μ
Μ
ξιµ
ς
Β
Εγκαθιστώντας το νέο σας ψυγείο
Το ψυγείο θα πρέπει να παραδοθεί µε τα µπροστινά
ρυθµιζόµενα ροδάκια βιδωµένα κατά τρόπον ώστε
το πάνω µέρος του ψυγείου να κλίνει προς τα πίσω
κατά 10 - 15 χιλ από την όρθια θέση (βλέπε
∆ιάγραµµα 1). Η βάση σταθεροποίησης θα πρέπει
επίσης να είναι εντελώς βιδωµένη επάνω ούτως
ώστε να µην παρεµβαίνει στη λειτουργία των
τροχών (βλέπε ∆ιάγραµµα 2).
1. Κυλήστε το ψυγείο µέχρι την τελική του θέση.
ΠΡΟΣΟΧΗ: Τα ροδάκια είναι σχεδιασµένα µόνο για κίνηση προς τα µπρος ή
προς τα πίσω. ∆εν είναι περιστρεφόµενοι τροχοί. Εάν κινήσετε το ψυγείο προς τα
πλάγια ενδέχεται να προκαλέσετε ζηµιά στο πάτωµα και στα ροδάκια.
2. Το επάνω µέρος του ψυγείο θα πρέπει να είναι κεκλιµένο προς τα πίσω κατά 10-
15χιλ. περίπου. Αυτό θα επιτρέψει στις πόρτες να κλείνουν αυτόµατα παρέχοντας
συνεχώς αεροστεγές κλείσιµο της πόρτας (βλέπε ∆ιάγραµµα 1). Είναι φυσιολογικό
για την πόρτα του καταψύκτη να ανοίγει στιγµιαία και να ξανακλείνει όταν η πόρτα
του θαλάµου συντήρησης είναι ερµητικά κλειστή. Εάν η κατάψυξη παραµείνει
ανοικτή, θα χρειαστεί να γείρετε το ψυγείο λίγο ακόµα προς τα πίσω.
ρυθµιζόµενου
προστινά
ροδάκια
ύψους
∆ιάγραµµα 1
ταθερά
πίσω
ροδάκια
άση σταθεροποίησης
πλήρως βιδωµένη επάνω
εγάλο πλαστικό
άδι ρόδα
πα
∆ιάγραµµα 2
3. Εάν το ψυγείο δεν έχει κλίση προς τα πίσω, µπορείτε να προσαρµόσετε τα δύο
µπροστινά ροδάκια στρέφοντας το µεγάλο πλαστικό παξιµάδι της ρόδας (βλέπε
∆ιάγραµµα 2). Αυτό θα αυξήσει το ύψος των τροχών. Μια στροφή του παξιµαδιού θα
γείρει το ψυγείο προς τα πίσω κατά 10 χιλ. περίπου. Εάν έχετε πρόβληµα να στρέψετε
το παξιµάδι, µπορείτε να βάλετε κάποιον να γείρει το ψυγείο προς τα πίσω, έτσι ώστε
να έχετε καλύτερη πρόσβαση. Εναλλακτικά, µπορείτε να φτάσετε τα ροδάκια από το
πλάι, χρησιµοποιώντας ένα πλατύ κατσαβίδι για να σας βοηθήσει να στρέψετε το
παξιµάδι (βλέπε ∆ιάγραµµα 2).
Page 48

Ε
υθυγραµµισµένο
µ
∆
ς
Β
β
ε τα ντουλάπια
ηλ. ίση απόσταση
µπροστινά ροδάκια σε
περίπτωση ανωµαλίας
Αυτή τη ρόδα κάτω.
Το πάνω µέρο
Του ψυγείου είναι ίσιο
∆ηλ. οριζόντιο
Προσαρµόστε τα
του δαπέδου
Π.χ. προσαρµόστε
∆ιάγραµµα 3
4. Ελέγξτε την ευθυγράµµιση του ψυγείου µε τα γύρω ντουλάπια. Το πάνω µέρος του
ψυγείου θα πρέπει να είναι ίσιο από τη µία πλευρά µέχρι την άλλη (βλέπε ∆ιάγραµµα
3). Εάν χρειαστεί να το προσαρµόσετε, χρησιµοποιήστε τα ρυθµιζόµενα ροδάκια
όπως αναφέρεται στο Βήµα 3.
5. Εάν τώρα το ψυγείο ταλαντεύεται από τη µία γωνία στην πίσω αντίθετη γωνία,
αυτό σηµαίνει ότι το πάτωµα είναι ανώµαλο. Θα χρειαστεί να βάλετε ένα στήριγµα
για να πατήσει ένα από τα πίσω ροδάκια. Μπορείτε να χρησιµοποιήσετε λεπτά
κοµµάτια συµπαγούς υλικού, όπως µια λεπτή σανίδα, πλακάκια δαπέδου από βινύλιο
ή λαµαρίνα. Τοποθετήστε το στήριγµα κατά τρόπο ώστε να βρεθεί κάτω από µία από
τις πίσω ρόδες όταν το ψυγείο θα κυλήσει στη θέση του.
6. Τώρα ενδέχεται να χρειαστεί να ολοκληρώσετε την εγκατάσταση
επαναλαµβάνοντας τα Βήµατα 3, 4 και 5.
7. Όταν θα έχετε τοποθετήσει το ψυγείο στην τελική του θέση, ξεβιδώστε τη βάση
σταθεροποίησης προς τα κάτω µέχρις ότου πατήσει στο δάπεδο (βλέπε ∆ιάγραµµα 4).
Όποτε χρειαστεί να µετακινήσετε το ψυγείο, βεβαιωθείτε ότι θα βιδώσετε τη βάση
στην αρχική της θέση ούτως ώστε το ψυγείο να µπορεί να κυλάει ελεύθερα.
άση σταθεροποίησης
ιδωµένη κάτω
∆ιάγραµµα 4
Page 49

8. Καθαρίστε το ψυγείο σας πολύ καλά ακολουθώντας τις οδηγίες στη σελίδα 15 και
σκουπίστε όλη τη σκόνη που έχει συσσωρευτεί κατά τη µεταφορά.
9. Συνδέστε το ψυγείο µε το ηλεκτρικό ρεύµα. Μη χρησιµοποιείτε πολύπριζο. Εάν
χρειαστεί να κυλήσετε το ψυγείο προς τα έξω για να φτάσετε το σηµείο παροχής
ρεύµατος, θυµηθείτε να ανεβάσετε τη βάση σταθεροποίησης πριν προχωρήσετε.
10. Σας συνιστούµε να αφήσετε το ψυγείο να λειτουργήσει για δύο ή τρεις ώρες
προτού το γεµίσετε µε τρόφιµα. Αυτό θα σας επιτρέψει να ελέγξετε ότι λειτουργεί
σωστά και ότι στον καταψύκτη φτάνει επαρκής ποσότητα ψυχρού αέρα.
Συγχαρητήρια! Εγκαταστήσατε το ψυγείο σας µε επιτυχία.
Page 50

3 – Εγκατάσταση
υ ραφ
Εγκατάσταση Συστήµατος Παραγωγής Πάγου
Για να προσαρµόσετε το σύστηµα παραγωγής
πάγου σε ένα µοντέλο µε καταψύκτη επάνω:
Προσαρµόστε τη θήκη του Συστήµατος Παραγωγής
Πάγου στο ράφι - πλέγµα ευθυγραµµίζοντας το
εξωτερικό µέρος της θήκης µε το πλέγµα όπως
φαίνεται στο διάγραµµα 1.
ΚΑΤΑΨΥΚΤΗΣ ΕΠΑΝΩ [ΚΕ]
ΤΟΠΟΘΕΤΗΣΤΕ
ΚΑΤΩ
Για να προσαρµόσετε το σύστηµα παραγωγής πάγου
σε ένα µοντέλο µε καταψύκτη κάτω:
ΚΑΤΑΨΥΚΤΗΣ ΚΑΤΩ [ΚΚ]
ΤΟΠΟΘΕΤΗΣΤΕ ΠΑΝΩ
Προσαρµόστε τη θήκη του Συστήµατος Παραγωγής
Πάγου στο ράφι – πλέγµα ευθυγραµµίζοντας το
εξωτερικό µέρος της θήκης µε το πλέγµα όπως
φαίνεται στο διάγραµµα 1.
Στο πίσω µέρος
ιού
το
Στο µπροστινό
µέρος
του ραφιού
∆ιάγραµµα 1
∆ιάγραµµα 2
Στη συνέχεια σπρώξτε µέχρι το µέσον της θήκης
µέχρι να κλειδώσει στη θέση της, όπως φαίνεται
στο διάγραµµα 2.
Τέλος, σπρώξτε τις παγοθήκες ή τη θήκη
αποθήκευσης στη θέση τους όπως φαίνεται στο
διάγραµµα 2.
Για να το αφαιρέσετε, βγάλτε τις παγοθήκες και τη
θήκη αποθήκευσης και απλά σηκώστε τη θήκη από
το ράφι- πλέγµα.
Βεβαιωθείτε ότι οι τέσσερις
σύνδεσµοι έχουν κλειδώσει
στην κεντρική ακτίνα της
σχάρας (όπως φαίνεται στο
διάγραµµα 2)
∆ιάγραµµα 1
∆ιάγραµµα 2
∆ιάγραµµα 3 (µόνο σε µερικά µοντέλα)
Στη συνέχεια σπρώξτε µέχρι το µέσον της θήκης
µέχρι να κλειδώσει στη θέση της.
Τέλος, σπρώξτε τις παγοθήκες ή τη θήκη
αποθήκευσης στη θέση τους όπως φαίνεται στο
διάγραµµα 3.
Για να το αφαιρέσετε, βγάλτε τις παγοθήκες και τη
θήκη αποθήκευσης και απλά σηκώστε τη σχάρα από
το ράφι- πλέγµα.
Page 51

4 – Λειτουργία του ψυγείου
Λειτουργία Ψυγείου / Καταψύκτη
Αρχική λειτουργία
Το ψυγείο µεταφέρει τη θερµότητα των τροφίµων που είναι τοποθετηµένα στο
εσωτερικό του ψυγείου στο εξωτερικό του.
Η διαδικασία αυτή δηµιουργεί την αίσθηση της θερµότητας στο πίσω µέρος, στα
πλάγια και στο χώρο κοντά στις πόρτες, ειδικά κατά την αρχική λειτουργία,
πράγµα που είναι φυσιολογικό.
Υπάρχει ένα σωληνοειδές ψυκτικό στοιχείο πίσω από τον πίσω τοίχο της κατάψυξης.
Αυτό το πλέγµα ψύχει και αποµακρύνει την υγρασία από τον αέρα. Στη συνέχεια,
ένας ανεµιστήρας στο πίσω µέρος της κατάψυξης προωθεί κρύο, ξηρό αέρα σε όλο το
ψυγείο.
Αυτή η κυκλοφορία αέρα εξασφαλίζει την πολύ γρηγορότερη ψύξη των τροφίµων απ’
ότι σε ψυγεία όπου ο αέρας παραµένει σχετικά στατικός.
Αποφεύγετε την τοποθέτηση τροφίµων µπροστά στις οπές αέρα, καθώς κάτι
τέτοιο θα επηρεάσει την κυκλοφορία του αέρα (βλέπε διάγραµµα στη σελίδα 5).
Εάν η πόρτα ανοίγει συχνά, θα δηµιουργείται ένα ελαφρύ στρώµα πάγου στο
εσωτερικό του καταψύκτη. Αυτό είναι φυσιολογικό και στα περισσότερα κλίµατα
εξαφανίζεται µετά από µερικές µέρες.
Βεβαιωθείτε ότι κλείνετε καλά τις πόρτες της κατάψυξης και της συντήρησης αφού
τοποθετήσετε ή αφαιρέσετε τρόφιµα από τους χώρους αυτούς. Εάν αφήσετε τις
πόρτες ελαφρώς ανοιχτές, το εσωτερικό της κατάψυξης θα καλυφθεί µε ένα βαρύ
στρώµα πάγου. Εάν δηµιουργηθεί πάγος, αφαιρέστε τον. Φροντίστε να κλείνετε καλά
τις πόρτες και η δηµιουργία πάγου θα αποφευχθεί.
Το νέο σας ψυγείο µε σύστηµα ενεργειακής απόδοσης χρησιµοποιεί συµπιεστή
υψηλής ταχύτητας και άλλα στοιχεία ενεργειακής απόδοσης που ενδέχεται να
παράγουν διαφορετικούς ήχους απ’ ότι το παλιό σας ψυγείο. Οι ήχοι αυτοί είναι
φυσιολογικοί και περιλαµβάνουν:
• ήχο λειτουργίας συµπιεστή
• ήχο κίνησης αέρα από τον κινητήρα του µικρού ανεµιστήρα
• σποραδικό γουργούρισµα που θυµίζει νερό που βράζει
• ένα ξερό ήχο που ακούγεται κατά την απόψυξη
• ένα κλικ που ακούγεται µόλις πριν αρχίσει η λειτουργία του συµπιεστή.
Οι ήχοι αυτοί είναι φυσιολογικοί και δεν αποτελούν λόγο ανησυχίας.
Μπορείτε να βρείτε περισσότερες πληροφορίες στη σελίδα 17.
Page 52

Σε ψυγείο µε καταψύκτη πάνω
Εάν υπάρχουν τρόφιµα που εξέχουν από τις
ραβδώσεις της βάσης της κατάψυξης, η πόρτα θα
µείνει ανοιχτή. Γι’ αυτό βεβαιωθείτε ότι τα
τρόφιµα βρίσκονται πίσω από τις ραβδώσεις.
Σε ψυγείο µε καταψύκτη κάτω
Βεβαιωθείτε ότι έχετε σπρώξει τις θήκες και τα
ράφια της κατάψυξης µέχρι µέσα για να µην µείνει
η πόρτα ανοιχτή.
Page 53

4 – Λειτουργία του ψυγείου
Ρ
Κ
Σ
Λ
Ρ
Κ
Σ
Λ
Ρ
Κ
Σ
Λ
Έλεγχος της θερµοκρασίας
Ηλεκτρονικά µοντέλα
Ο ηλεκτρονικός πίνακας ενδείξεων αποτελείται
από µια οθόνη µε διόδους υγρού κρυστάλλου
(LCD) µε λευκό φωτισµό φόντου και από 6
πλήκτρα. Όταν ενεργοποιείται για πρώτη φορά
η συσκευή, θα δείτε τις προεπιλεγµένες
ρυθµίσεις και το λευκό φωτισµό του φόντου
ενεργοποιηµένο.
Εάν δεν έχει πατηθεί κανένα πλήκτρο και η πόρτα του ψυγείου είναι κλειστή, ο
φωτισµός φόντου θα σβήσει µετά από 30 δευτερόλεπτα.
Προσαρµογή θερµοκρασίας
Η προεπιλεγµένη θερµοκρασία του χώρου συντήρησης είναι 3°C και -18°C για την
κατάψυξη. Εάν θελήσετε να αλλάξετε τις θερµοκρασίες, ακολουθήστε τις παρακάτω
οδηγίες. Θα πρέπει να κάνετε µόνο µικρές προσαρµογές και να περιµένετε 24 ώρες
για να δείτε εάν χρειάζεται να γίνουν επιπλέον αλλαγές.
Σηµείωση: Όταν καθορίζετε µία θερµοκρασία, καθορίζετε µια µέση θερµοκρασία για
ολόκληρο το θάλαµο συντήρησης. Οι θερµοκρασίες στο εσωτερικό κάθε θαλάµου
ενδέχεται να διαφέρουν, ανάλογα µε το πόσα τρόφιµα αποθηκεύετε και που τα
τοποθετείτε. Η υψηλή ή χαµηλή θερµοκρασία δωµατίου µπορεί επίσης να επηρεάσει
τη θερµοκρασία στο εσωτερικό του ψυγείου.
Αλλαγή της θερµοκρασίας της κατάψυξης
Πιέστε το πλήκτρο Καταψύκτης για να
κατεβάσετε σταδιακά τη θερµοκρασία ανά
1°C. Μόλις φτάσει στους - 23°C, η οθόνη
θα επιστρέψει στους -14°C µε το επόµενο
πάτηµα ενός πλήκτρου. Θα παρατηρήσετε
ότι η κινούµενη µπάρα µικραίνει όσο
χαµηλότερα ρυθµίζεται η θερµοκρασία.
Αλλαγή της θερµοκρασίας του χώρου συντήρησης
Πιέστε το πλήκτρο Συντήρηση για να
κατεβάσετε σταδιακά τη θερµοκρασία ανά
1°C. Μόλις φτάσει στους 0.0°C, η οθόνη
θα επιστρέψει στους 7.0°C µε το επόµενο
πάτηµα ενός πλήκτρου. Η κινούµενη
µπάρα µικραίνει χαµηλότερα ρυθµίζεται η
θερµοκρασία.
Σηµείωση: Η δοκιµή παγωτού είναι ένας
καλός τρόπος να δοκιµάσετε τη
θερµοκρασία της κατάψυξης. Η δοκιµή
πόσιµου νερού είναι ένας καλός τρόπος να
ύθµιση ηχητικής
ειδοποίησης
[alarm reset]
Ψύξη κρασιών
[wine chill]
ατάψυξη
[freezer]
ύθµιση ηχητικής
ειδοποίησης
[alarm reset]
Ψύξη κρασιών
[wine chill]
ατάψυξη
[freezer]
ύθµιση ηχητικής
ειδοποίησης
[alarm reset]
Ψύξη κρασιών
[wine chill]
ατάψυξη
[freezer]
Ταχεία ψύξη
[fast freeze]
Οικονοµική Λειτουργία -
[eco/ vacation]
[fridge]
Ταχεία ψύξη
[fast freeze]
Οικονοµική Λειτουργία -
ειτουργία. ∆ιακοπών
[eco/ vacation]
υντήρηση
[fridge]
ειτουργία. ∆ιακοπών
υντήρηση
Ταχεία ψύξη
[fast freeze]
Οικονοµική Λειτουργία -
ειτουργία. ∆ιακοπών
[eco/ vacation]
υντήρηση
[fridge]
Page 54

ελέγξετε τη θερµοκρασία του θαλάµου
Ρ
Κ
Σ
Λ
Ρ
Κ
Σ
Λ
συντήρησης.
Λειτουργία ταχείας ψύξης
Χρησιµοποιείστε τη λειτουργία ταχείας
ψύξης όταν προσθέτετε µια µεγάλη
ποσότητα τροφίµων στο θάλαµο της
κατάψυξης. Έτσι τα τρόφιµα θα ψυχθούν
γρήγορα χωρίς να επηρεαστεί η
ύθµιση ηχητικής
ειδοποίησης
[alarm reset]
Ψύξη κρασιών
[wine chill]
[freezer]
ατάψυξη
Ταχεία ψύξη
[fast freeze]
Οικονοµική Λειτουργία -
ειτουργία. ∆ιακοπών
[eco/ vacation]
υντήρηση
[fridge]
θερµοκρασία του θαλάµου συντήρησης.
Για να χρησιµοποιήσετε αυτή τη λειτουργία, πιέστε το πλήκτρο Ταχεία Ψύξη µία
φορά. Ένα κινούµενο εικονίδιο θα φωτιστεί. Η λειτουργία ταχείας ψύξης θα αρχίσει
να λειτουργεί για 90 λεπτά. Εάν επιθυµείτε να απενεργοποιήσετε τη λειτουργία
ταχείας ψύξης πριν από την πάροδο των 90 λεπτών, απλά πιέστε το πλήκτρο Ταχεία
Ψύξη ξανά. Το εικονίδιο θα εξαφανιστεί και το ψυγείο θα επιστρέψει στην κανονική
λειτουργία του.
Ηχητική Ειδοποίηση Θερµοκρασίας Καταψύκτη
Εάν η ηχητική ειδοποίηση ακούγεται χωρίς
ύθµιση ηχητικής
ειδοποίησης
[alarm reset]
προφανή λόγο, ελέγξτε µήπως υπάρχει κάτι
που κρατά την πόρτα ανοιχτή. Το κλείσιµο
της πόρτας ρυθµίζει την ηχητική ειδοποίηση
για 2 επιπλέον λεπτά.
Ψύξη κρασιών
[wine chill]
[freezer]
ατάψυξη
Ενδέχεται η κατάψυξη να αποκτήσει υπερβολικά υψηλή θερµοκρασία επειδή η πόρτα
της έµεινε ανοιχτή ή επειδή ζεστό φαγητό τοποθετήθηκε πολύ κοντά στον αισθητήρα
θερµοκρασίας του ψυγείου (βλέπε σελ. 4 & 5, Μέρη του ψυγείου για τη θέση του
αισθητήρα). Στην περίπτωση αυτή θα ακουστεί ένας βόµβος, ενώ το εικονίδιο δίπλα
στο πλήκτρο ρύθµισης ηχητικής ειδοποίησης, η καθορισµένη θερµοκρασία του
καταψύκτη και η κινούµενη µπάρα θα αρχίσουν να αναβοσβήνουν ταυτόχρονα µέχρι
να πιέσετε το πλήκτρο ρύθµισης ηχητικής ειδοποίησης. Μόλις αυτό πιεστεί, τότε το
εικονίδιο απενεργοποίησης ηχητικής ειδοποίησης που βρίσκεται δίπλα στο πλήκτρο
ρύθµισης ηχητικής ειδοποίησης θα φωτιστεί για 50 λεπτά ή µέχρι η θερµοκρασία να
φτάσει σε επιθυµητά επίπεδα.
Βεβαιωθείτε ότι τίποτα δεν κρατά ανοιχτή την πόρτα της κατάψυξης και µετακινήστε
τυχόν ζεστά φαγητά µακριά από τον αισθητήρα θερµοκρασίας. Βλέπε σελίδες 5 & 6
(Μέρη του Ψυγείου) για περισσότερες πληροφορίες.
Εάν µετά από 50 λεπτά η κατάψυξη εξακολουθεί να είναι υπερβολικά ζεστή, η
ηχητική ειδοποίηση θα ακουστεί ξανά, υποδεικνύοντας ότι ενδεχοµένως το ψυγείο
σας να έχει πρόβληµα.
Σηµείωση: Η ηχητική ειδοποίηση θερµοκρασίας καταψύκτη µπορεί να ρυθµιστεί για
12 ώρες πιέζοντας το πλήκτρο ρύθµισης ηχητικής ειδοποίησης συνεχόµενα για 10
δευτερόλεπτα.
Ταχεία ψύξη
[fast freeze]
Οικονοµική Λειτουργία -
ειτουργία. ∆ιακοπών
[eco/ vacation]
υντήρηση
[fridge]
Page 55

Ηχητική Ειδοποίηση Πόρτας
Ρ
Κ
Σ
Λ
Ρ
Κ
Σ
Λ
Εάν η πόρτα του ψυγείου αφεθεί ανοιχτή για
περισσότερο από 2 λεπτά θα ακουστεί ένα
βόµβος και ένα βέλος που θα δείχνει µια
ανοιχτή πόρτα θα αρχίσει να αναβοσβήνει.
Οι ρυθµίσεις θερµοκρασίας του ψυγείου και
η κινούµενη µπάρα θα αρχίσουν επίσης να
ύθµιση ηχητικής
ειδοποίησης
[alarm reset]
Ψύξη κρασιών
[wine chill]
[freezer]
ατάψυξη
Ταχεία ψύξη
[fast freeze]
Οικονοµική Λειτουργία -
ειτουργία. ∆ιακοπών
[eco/ vacation]
υντήρηση
[fridge]
αναβοσβήνουν.
Εάν επιθυµείτε να αφήσετε την πόρτα ανοιχτή ενώ γεµίζετε το ψυγείο, µπορείτε να
απενεργοποιήσετε την ηχητική ειδοποίηση για 8 λεπτά πιέζοντας το πλήκτρο
Ρύθµιση Ηχητικής Ειδοποίησης.
Κλείδωµα ασφαλείας για Παιδιά
Για να ενεργοποιήσετε το κλείδωµα
ασφαλείας για παιδιά, πιέστε τα πλήκτρα
Ρύθµιση Ηχητικής Ειδοποίησης και Ταχεία
Ψύξη ταυτόχρονα. Έτσι θα απενεργοποιηθεί
η οπτική ένδειξη προς αποφυγή τυχαίων
αλλαγών στις ρυθµίσεις.
ύθµιση ηχητικής
ειδοποίησης
[alarm reset]
Ψύξη κρασιών
[wine chill]
[freezer]
ατάψυξη
Ταχεία ψύξη
[fast freeze]
Οικονοµική Λειτουργία -
ειτουργία. ∆ιακοπών
[eco/ vacation]
υντήρηση
[fridge]
Για να απενεργοποιήσετε το κλείδωµα
προστασίας για παιδιά πιέστε και κρατήστε
πατηµένα µαζί τα πλήκτρα Ρύθµιση
Ηχητικής Ειδοποίησης και Ταχεία Ψύξη.
Χρονοµετρητής ψύξης κρασιών
Για να χρησιµοποιήσετε το µετρητή, πιέστε
το πλήκτρο ψύξης κρασιών µία φορά για να
ορίσετε χρονικό όριο 10 λεπτών, δύο φορές
για 20 λεπτά και τρεις φορές για 30 λεπτά.
Πιέστε τέσσερις φορές για να
απενεργοποιήσετε το χρονοµετρητή.
Εάν ορίσετε το χρονοµετρητή ψύξης κρασιών, θα ακουστεί µια ηχητική ειδοποίηση
για να σας υπενθυµίσει ότι αφήσατε ποτά στην κατάψυξη για γρήγορη ψύξη.
Ένα κινούµενο εικονίδιο εµφανίζεται δίπλα στο πλήκτρο Ψύξη Κρασιών µαζί µε ένα
χρονοµετρητή αντίστροφης µέτρησης.
Συνιστώµενος χρόνος γρήγορης ψύξης:
10 λεπτά για µεταλλικά κουτιά ποτών
20 λεπτά για φιάλες κρασιού
30 λεπτά για µπουκάλια αναψυκτικών.
Όταν πιέζετε το πλήκτρο ψύξης κρασιών, ένα κινούµενο εικονίδιο θα εµφανιστεί
δίπλα στο πλήκτρο ψύξης κρασιών µαζί µε ένα χρονοµετρητή αντίστροφης µέτρησης.
Ο χρονοµετρητής θα αρχίσει να µετρά αντίστροφα ανά διαστήµατα 1 λεπτού.
Μπορείτε να αλλάξετε το χρόνο ψύξης ή να απενεργοποιήσετε το χρονοµετρητή
Page 56

αφού αρχίσει η αντίστροφη µέτρηση. Όταν η αντίστροφη µέτρηση τελειώσει, θα
ακουστεί ένας βόµβος και το εικονίδιο δίπλα στην ηχητική ειδοποίηση θα αρχίσει να
αναβοσβήνει µέχρι ότου πατήσετε το πλήκτρο ρύθµισης ηχητικής ειδοποίησης.
Για να σταµατήσετε την ηχητική ειδοποίηση και να απενεργοποιήσετε το
χρονοµετρητή ψύξης κρασιών, πιέστε το πλήκτρο Ρύθµιση Ηχητικής Ειδοποίησης.
Εάν το ποτό σας είναι δροσερό, βγάλτε το από την κατάψυξη. Εάν δεν είναι αρκετά
δροσερό, ρυθµίστε πάλι τη λειτουργία ψύξης κρασιών (λαµβάνοντας υπ’ όψιν ότι το
ποτό είναι ήδη αρκετά δροσερό).
Ενεργειακή Απόδοση
Το ψυγείο σας έχει σχεδιαστεί βάσει των αρχών της ενεργειακής απόδοσης και
µπορεί να λειτουργήσει µε τρεις διαφορετικούς τρόπους (Κανονική, Οικονοµική
Λειτουργία, Λειτουργία ∆ιακοπών), ανάλογα µε το επιθυµητό επίπεδο απόδοσης.
Κανονική Λειτουργία [Normal Mode]
Ο συγκεκριµένος τρόπος λειτουργίας ενεργοποιείται αυτόµατα όταν το ψυγείο τίθεται
για πρώτη φορά σε λειτουργία. Η Κανονική Λειτουργία είναι ο καταλληλότερος
τρόπος λειτουργίας όταν η πόρτα του ψυγείου ανοίγει συχνά.
Οικονοµική Λειτουργία [Eco Mode]
Η Οικονοµική Λειτουργία είναι
αποτελεσµατικότερος τρόπος λειτουργίας
από την Κανονική Λειτουργία και µπορεί να
ενεργοποιηθεί µε δύο τρόπους. Είτε
πιέζοντας χειροκίνητα το πλήκτρο
Οικονοµική Λειτουργία/ Λειτουργία
∆ιακοπών µία φορά ενώ το ψυγείο
βρίσκεται στην Κανονική Λειτουργία, είτε
αυτόµατα µετά από 30 ώρες εάν δεν έχει
ανοιχτεί η πόρτα του ψυγείου.
Εάν η Οικονοµική Λειτουργία ενεργοποιηθεί χειροκίνητα, το συνεχές άνοιγµα
πόρτας δεν θα αλλάξει την οπτική ένδειξη στην Κανονική Λειτουργία, εντούτοις εάν
η Οικονοµική Λειτουργία ενεργοποιηθεί αυτόµατα, το ψυγείο θα επιστρέψει στην
Κανονική Λειτουργία µόλις ανοίξει η πόρτα του ψυγείου.
της
Λειτουργία ∆ιακοπών [Vacation Mode]
Εάν πιστεύετε ότι δεν θα χρησιµοποιήσετε
το ψυγείο σας για παρατεταµένο χρονικό
διάστηµα και θέλετε να εκµεταλλευτείτε την
µέγιστη δυνατή ενεργειακή απόδοση, τότε
ενώ βρίσκεστε στην Κανονική Λειτουργία
πιέστε το πλήκτρο Οικον. Λειτουργία
/Λειτουργία ∆ιακοπών δύο φορές
συνεχόµενα λίγο πριν φύγετε και το ψυγείο
θα γυρίσει στη Λειτουργία
∆ιακοπών, όπως φαίνεται από το σύµβολο του αεροπλάνου. (Εάν βρίσκεστε στην
Οικονοµική Λειτουργία, το µόνο που χρειάζεται για να γυρίσετε στη Λειτουργία
∆ιακοπών είναι να πατήσετε µία φορά το πλήκτρο.)
Page 57

Η Λειτουργία ∆ιακοπών απενεργοποιείται αυτόµατα µόλις ανοίξει η πόρτα του
ψυγείου και επανέρχεται η Κανονική Λειτουργία.
Η Οικονοµική Λειτουργία και η Λειτουργία ∆ιακοπών ελαχιστοποιούν την απόψυξη
για να εξοικονοµήσουν ενέργεια, ενώ διατηρούν τις ρυθµίσεις θερµοκρασίας που
επιλέξατε.
Σηµείωση: Το άνοιγµα της πόρτας του καταψύκτη δεν επηρεάζει την Οικονοµική
Λειτουργία και τη Λειτουργία ∆ιακοπών, εκτός εάν ακουστεί η ηχητική ειδοποίηση
θερµοκρασίας καταψύκτη.
Page 58

Έλεγχος θερµοκρασίας σε ψυγεία µε καταψύκτη επάνω
Χειροκίνητη λειτουργία (µοντέλα µε περιστρεφόµενους ρυθµιστές)
Ρυθµίστε τη θερµοκρασία χρησιµοποιώντας τους κύριους
ρυθµιστές θερµοκρασίας στο πίσω µέρος του θαλάµου
συντήρησης. Όταν θέσετε για πρώτη φορά το ψυγείο σε
λειτουργία, γυρίστε τους ρυθµιστές τόσο του ψυγείου όσο και
της κατάψυξης στο MID. Ο ρυθµιστής θερµοκρασίας του
ψυγείου επηρεάζεται από το υψόµετρο και συνιστάται να
τεθεί σε λίγο υψηλότερη θερµοκρασία για αντιστάθµισµα. Σε
υψόµετρο 1000 µέτρων πάνω από τη θάλασσα, για
παράδειγµα, γυρίστε το ρυθµιστή θερµοκρασίας του ψυγείου
σε θερµοκρασία υψηλότερη από το MID κατά µία βαθµίδα.
ΠΕΡΙΜΕΝΕΤΕ 24 ΩΡΕΣ ΠΡΟΤΟΥ ΑΛΛΑΞΕΤΕ ΤΙΣ
ΡΥΘΜΙΣΕΙΣ: Όταν αλλάζετε τις ρυθµίσεις θερµοκρασίας
κάνετε µικρές τροποποιήσεις και περιµένετε 24 ώρες προτού
αποφασίσετε εάν χρειάζεται να κάνετε επιπλέον αλλαγές.
Σηµείωση : Η δοκιµή παγωτού είναι ένας καλός τρόπος να ελέγξετε τη θερµοκρασία της κατάψυξης. Η
δοκιµή πόσιµου νερού είναι ένας καλός τρόπος να ελέγξετε τη θερµοκρασία του θαλάµου συντήρησης.
ΠΡΟΣΑΡΜΟΖΟΝΤΑΣ ΤΗ ΘΕΡΜΟΚΡΑΣΙΑ ΤΟΥ ΚΑΤΑΨΥΚΤΗ
1. Επιλέξτε το ρυθµιστή του καταψύκτη (πάνω κουµπί)
2. Περιστρέψτε το κουµπί δεξιόστροφα για να το ρυθµίσετε
στο Πιο Κρύο.
Λιγότερο
κρύο
Περισσότερο
κρύο
3. Περιστρέψτε το κουµπί αριστερόστροφα για να το
ρυθµίσετε στο Λιγότερο Κρύο.
Η ΡΥΘΜΙΣΗ ΤΟΥ ΚΑΤΑΨΥΚΤΗ ΣΤΟ ΠΙΟ ΚΡΥΟ ∆ΕΝ
ΣΥΝΙΣΤΑΤΑΙ ΣΕ ΚΑΝΟΝΙΚΑ ΚΑΙ Ι∆ΙΑΙΤΕΡΑ ΘΕΡΜΑ
ΚΛΙΜΑΤΑ ΚΑΘΩΣ ΚΑΤΙ ΤΕΤΟΙΟ ΘΑ ΠΕΡΙΟΡΙΣΕΙ ΤΗΝ
ΨΥΞΗ ΣΤΟ ΘΑΛΑΜΟ ΣΥΝΤΗΡΗΣΗΣ.
Σε πολύ κρύα κλίµατα (όπου οι θερµοκρασίες είναι κάτω των 10ºC)
ενδέχεται να χρειαστεί να ρυθµίσετε την κατάψυξη σε πιο κρύα
βαθµίδα.
ΠΡΟΣΑΡΜΟΖΟΝΤΑΣ ΤΗ ΘΕΡΜΟΚΡΑΣΙΑ ΤΗΣ ΣΥΝΤΗΡΗΣΗΣ
1. Επιλέξτε το ρυθµιστή της συντήρησης (κάτω κουµπί)
2. Περιστρέψτε το κουµπί δεξιόστροφα για να το ρυθµίσετε
στο Πιο Κρύο.
3. Περιστρέψτε το κουµπί αριστερόστροφα για να το
ρυθµίσετε στο Λιγότερο Κρύο.
Λιγότερο
κρύο
Κατάψυξη
Συντήρηση
Περισσότερο
κρύο
Page 59

Πώς να χρησιµοποιείτε τα χαρακτηριστικά του ψυγείου σας
Το συγκεκριµένο µέρος σας δείχνει πώς να εκµεταλλευτείτε στο έπακρο τα πολλά
χρήσιµα εξαρτήµατα του ψυγείου και πώς να τα καθαρίζετε.
Αποθηκευτικές Θήκες πόρτας (ράφια)
Τόσο η συντήρηση όσο και η κατάψυξη έχουν αποθηκευτικές θήκες στην πόρτα.
Μπορείτε να προσαρµόσετε τις θήκες της συντήρησης ούτως ώστε να εξυπηρετούν
διαφορετικές αποθηκευτικές ανάγκες. Όλες οι θήκες πόρτας αφαιρούνται εντελώς για
καθαρισµό. Εάν θέλετε να αφαιρέσετε ή να προσαρµόσετε µία θήκη, σηκώστε τη
πάνω από τις προεξοχές στήριξης στο εσωτερικό τοίχωµα της πόρτας. Σπρώξτε τη
θήκη προς τα κάτω πάνω στις προεξοχές στήριξης για να την κλειδώσετε στη θέση
της.
Θήκη γαλακτοκοµικών
Μπορείτε να χρησιµοποιείτε τη θήκη Γαλακτοκοµικών για την αποθήκευση
τροφίµων όπως βούτυρο, µαργαρίνη και τυριά. Η θήκη αυτή είναι ελαφρώς πιο ζεστή
από τον υπόλοιπο θάλαµο συντήρησης.
Θήκη φρέσκων τροφίµων
Αποθήκευση λαχανικών
Μπορείτε να χρησιµοποιήσετε τη θήκη
φρέσκων τροφίµων για την αποθήκευση
λαχανικών, φρούτων ή µικρών προϊόντων.
Μπορείτε να αλλάξετε την υγρασία στο
εσωτερικό της θήκης περιστρέφοντας το
ρυθµιστή υγρασίας.
Θα πρέπει να αποθηκεύετε λαχανικά στη θήκη φρέσκων τροφίµων αφού θυµηθείτε
να γυρίσετε το ρυθµιστή υγρασίας στη µεγαλύτερη βαθµίδα υγρασίας.
Αποθήκευση φρούτων & µικρών προϊόντων
Στη θήκη φρέσκων τροφίµων µπορείτε επίσης να αποθηκεύσετε φρούτα αφού
θυµηθείτε να γυρίσετε το ρυθµιστή υγρασίας στη µικρότερη βαθµίδα υγρασίας.
Αφαίρεση Θήκης φρέσκων τροφίµων και ραφιού
• Αφαιρέστε τη θήκη(ες) φρέσκων τροφίµων τραβώντας τη µπροστά, µετά
επάνω και ξανά µπροστά.
• Αφαιρέστε το γυαλί (εάν υπάρχει) λυγίζοντας το πίσω µέρος του ραφιού προς
τα πίσω για να αποσυνδέσετε το σύνδεσµο και να µπορέσει το γυαλί να βγει
από το πλαστικό πλαίσιο.
• Αφαιρέστε το ράφι φρέσκων τροφίµων σηκώνοντας τις µπετούγιες στο κάτω
µέρος του ραφιού και τραβώντας το ράφι προς τα εµπρός.
Page 60

Συρόµενο Ράφι/ Θήκη Συσκευασµένων Τροφίµων (όπου υπάρχει)
Η συρόµενη θήκη συσκευασµένων τροφίµων σας επιτρέπει να τοποθετήσετε τη θήκη
συσκευασµένων τροφίµων σε οποιαδήποτε θέση µέσα στο χώρο συντήρησης. Αυτό
σας επιτρέπει να την τοποθετήσετε σε βολικό σηµείο δίπλα σε τρόφιµα ή να την
ευθυγραµµίσετε µε τις οπές πολλαπλής ροής αέρα για άµεση ψύξη.
Οδηγίες χρήσης:
Προκειµένου να χρησιµοποιήσετε σωστά τη θήκη συσκευασµένων τροφίµων, αυτή
θα πρέπει να τοποθετηθεί είτε εντελώς αριστερά είτε εντελώς δεξιά ή σε κεντρική
θέση. Έτσι, οι οπές πολλαπλής ροής αέρα θα ευθυγραµµιστούν µε τις επιφάνειες
εξαερισµού στο πίσω µέρος της θήκης συσκευασµένων τροφίµων. Μπορείτε να
ανοίξετε είτε τη µία είτε και τις δύο οπές για να περάσει πιο κρύος αέρας πάνω από
τα φαγώσιµα της θήκης συσκευασµένων τροφίµων.
Ο αέρα από αυτές τις οπές µπορεί να είναι πολύ κρύος, πράγµα που είναι χρήσιµο για
τη γρήγορη ψύξη τροφίµων και ποτών. Εντούτοις, τα τρόφιµα ενδέχεται να παγώσουν
εάν αφεθούν κοντά τις οπές. Για να αποφύγετε το πάγωµα, αποµακρύνετε τα τρόφιµα
από τις οπές µετά την ψύξη.
Καθαρισµός: Το συρόµενη ράφι συσκευασµένων τροφίµων µπορεί να αφαιρεθεί για
εύκολο καθάρισµα. Για το λόγο αυτό ένας εύκαµπτος µηχανισµός ασφάλισης έχει
ενσωµατωθεί µέσα στη ράγα του πίσω ραφιού.
• Αφαιρέστε τη Θήκη Συσκευασµένων τροφίµων
• Αφαιρέστε ολόκληρο το ράφι τραβώντας το πέρα από τις γλωττίδες
συγκράτησης.
• Τοποθετήστε ολόκληρο το ράφι ανάποδα σε µια επίπεδη επιφάνεια.
• Κυλήστε το βοηθητικό πλαίσιο προς τα αριστερά µέχρι να ‘κλειδώσει’ µε το
µηχανισµό ασφάλισης.
• Τραβήξτε το στρογγυλό σύνδεσµο από τη ράγα για να τον αποσυνδέσετε.
• Κυλήστε το βοηθητικό πλαίσιο πέρα απ’ αυτή και αφήστε το να λυγίσει και
να επιστρέψει στη θέση του.
Page 61

Καθαρίστε τα τµήµατα όπως υποδεικνύεται
και αφήστε τα να στεγνώσουν. Για να
επανατοποθετήσετε το βοηθητικό πλαίσιο
επαναλάβετε την παραπάνω διαδικασία,
φροντίζοντας να ευθυγραµµίσετε την
µπροστινή προεξοχή µε την µπροστινή
εσοχή του ραφιού.
ΟΛΑ ΤΑ ΓΥΑΛΙΝΑ ΤΜΗΜΑΤΑ ΕΙΝΑΙ
ΚΑΤΑΣΚΕΥΑΣΜΕΝΑ ΑΠΟ ΓΥΑΛΙ
ΑΣΦΑΛΕΙΑΣ. ΕΝΤΟΥΤΟΙΣ ΘΑ ΠΡΕΠΕΙ
ΝΑ ΕΙΣΤΕ ΠΡΟΣΕΚΤΙΚΟΙ ΚΑΤΑ ΤΗΝ
ΑΦΑΙΡΕΣΗ ΤΟΥ ΡΑΦΙΟΥ ΓΙΑ ΑΛΛΑΓΗ
ΘΕΣΗΣ Η ΓΙΑ ΚΑΘΑΡΙΣΜΟ. ΕΠΕΙ∆Η
ΟΛΟΚΛΗΡΟ ΤΟ ΣΥΣΤΗΜΑ ΕΙΝΑΙ
ΣΧΕΤΙΚΑ ΒΑΡΥ, ΕΑΝ ΤΟ ΚΡΑΤΗΣΕΤΕ
ΣΕ ΚΑΘΕΤΗ ΘΕΣΗ (ΟΠΩΣ ΦΑΙΝΕΤΑΙ
ΣΤΟ ΣΧΗΜΑ) Ο ΟΛΙΣΘΗΤΗΡΑΣ
ΕΝ∆ΕΧΕΤΑΙ ΝΑ ΠΕΣΕΙ.
ΜΗΝ ΑΦΑΙΡΕΙΤΕ ΚΑΜΙΑ ΒΙ∆Α!
Page 62

Γυάλινα Ράφια µε Προστασία από Υπερχείλιση (όπου υπάρχουν)
Τα γυάλινα ράφια µε προστασία από υπερχείλιση σταµατούν τα πιτσιλίσµατα στο
ράφι. Ένα σύστηµα συγκράτησης ραφιών ελαχιστοποιεί την τυχαία µετακίνηση των
ραφιών. Τα ράφια µπορούν να προσαρµοστούν σε πολλά διαφορετικά ύψη. Τα
γυάλινα ράφια µε προστασία από υπερχείλιση δεν θα πρέπει να χρησιµοποιούνται ως
συρόµενα ράφια.
Μπροστινό
µέρος
ραφιού
Γυάλινο Ράφι µε ∆ιαχωριστικό (όπου υπάρχει )
Το συγκεκριµένο ράφι µπορεί να χρησιµοποιηθεί είτε ως ράφι σε όλο του το βάθος ή,
όταν χρειαστεί να αποθηκευτούν ψηλά αντικείµενα στο µπροστινό µέρος του
ψυγείου, µπορεί να συµπτυχθεί στο µισό του αρχικού του βάθους.
Για να συµπτύξετε το ράφι:
• Τραβήξτε προς τα εµπρός το
µπροστινό µισό του ραφιού (1), και
στη συνέχεια ανασηκώστε, από την
κάτω πλευρά, το µπροστινό µισό
του ραφιού ανεβάζοντας το πίσω
άκρο του πάνω από το άγκιστρο
στην εσοχή (2).
• Τραβήξτε το ράφι προς τα εµπρός και αφήστε το πίσω µέρος του να πέσει
στα πλευρικά κανάλια.
• Σπρώξετε το µπροστινό ράφι προς τα πίσω (3, 4) µέχρις ότου φτάσει στις
πίσω γλωττίδες συγκράτησης.
Page 63

Επανατοποθέτηση:
Το ράφι µπορεί να επανατοποθετηθεί στο εσωτερικό της µονάδας συντήρησης
τραβώντας ολόκληρο το συναρµολογηµένο σύστηµα προς τα έξω µέχρι ότου τα
πλευρικά τοιχώµατα να µπορούν να στραφούν ελεύθερα προς τα κάτω, και στη
συνέχεια στρέφοντας το πίσω µέρος του ραφιού µέχρις ότου το ράφι ελευθερωθεί από
τους ολισθητήρες στο εσωτερικό του ψυγείου. Στη συνέχεια, το ράφι µπορεί να
τοποθετηθεί σε οποιονδήποτε από τους ολισθητήρες – αυτό το χαρακτηριστικό είναι
ιδιαίτερα χρήσιµο, εάν η πόρτα της συσκευής σας τυχαίνει να έχει περιορισµένη
πρόσβαση.
Σύστηµα αποµάκρυνσης οσµών
Το ψυγείο σας διαθέτει καταλυτικό σύστηµα αποµάκρυνσης οσµών για να
διευκολύνει την αποµάκρυνση των οσµών των τροφών µέσα στο ψυγείο σας.
Είναι τοποθετηµένο στην ανακύκλωση
αέρα, ούτως ώστε οι οσµές να
αποµακρύνονται µε απορρόφηση µέσω του
φίλτρου κατά την κανονική λειτουργία του
ψυγείου (βλέπε διάγραµµα 1). Η κάλυψη
των φαγητών και το τύλιγµά τους µε
πλαστική µεµβράνη βοηθάει επίσης στη
µείωση των οσµών στο εσωτερικό του
ψυγείου.
∆ιάγραµµα 1
∆ακτύλιος συγκράτησης φιαλών
Ο δακτύλιος συγκράτησης φιαλών χρησιµοποιείται για να αποτρέπει την πτώση των
φιαλών. Ο δακτύλιος συγκράτησης αποτελείται από δύο τµήµατα, ένα συρόµενο
µπροστινό µέρος και ένα περιστρεφόµενο δακτύλιο συγκράτησης. Ο δακτύλιος
συγκράτησης µπορεί να περιστραφεί κατά 360º, ωστόσο υπάρχουν πρακτικές θέσεις
οριζόντιας και κάθετης τοποθέτησης.
Ο δακτύλιος µπορεί να χρησιµοποιηθεί σε δύο θέσεις:
Οριζόντια
Όταν ο δακτύλιος συγκράτησης είναι
τοποθετηµένος οριζόντια (Α), κάθε
αντικείµενο που χωράει µέσα στο δακτύλιο
µπορεί απλά να τοποθετηθεί µέσα σ’ αυτόν.
Κάθετα
Όταν ο δακτύλιος συγκράτησης είναι
τοποθετηµένος κάθετα (Β), µπορείτε απλά
να κυλήσετε το δακτύλιο κατά µήκος της
ράβδου συγκράτησης µπουκαλιών µέχρις
ότου ακουµπήσει πάνω σε ένα µπουκάλι.
Σηµείωση: από την άλλη πλευρά, το
µπουκάλι θα πρέπει να στηρίζεται είτε στην
άκρη της θήκης είτε σε άλλα µπουκάλια.
Page 64

5 – Φροντίδα & Συντήρηση
Συρτάρια καταψύκτη (όπου υπάρχουν)
Τα συρτάρια και ένα ράφι του καταψύκτη είναι προσαρµοσµένα σε ψυγεία µε τον
καταψύκτη κάτω. Τα συρτάρια από πλέγµα χρησιµοποιούνται για καλύτερο οπτικό
έλεγχο του περιεχοµένου τους. Τόσο τα συρτάρια όσο και το ράφι τραβιούνται προς
τα έξω για εύκολη πρόσβαση και διαθέτουν γλωττίδα συγκράτησης για να µην
τραβηχτεί το καλάθι και το ράφι πολύ έξω.
Για να αφαιρέσετε το συρτάρι ή το ράφι,
τραβήξτε το προς τα έξω µέχρι να
σταµατήσει στη γλωττίδα συγκράτησης, και
στη συνέχεια υψώστε το µπροστινό του
µέρος για να απεµπλακεί η γλωττίδα ενόσω
εξακολουθείτε να το τραβάτε προς τα
εµπρός.
Αλλαγή του Λαµπτήρα
Θάλαµος Συντήρησης
Βήµα 1
αφαιρέστε το καλώδιο παροχής ρεύµατος του ψυγείου από το βύσµα του
ρευµατολήπτη.
Βήµα 2
Βήµα 3ο. Αποσυνδέστε µε προσοχή το
κάλυµµα του λαµπτήρα. Για να γίνει αυτό,
τραβήξτε το επάνω µέρος του καλύµµατος
προς το µπροστινό µέρος του θαλάµου
(βλέπε ∆ιάγραµµα κάτω).
Βήµα 4ο. Ξεβιδώστε το λαµπτήρα και
αντικαταστήστε τον µε ένα λαµπτήρα
πανοµοιότυπο µε τον αρχικό.
Βήµα 5ο. Επανατοποθετήστε το κάλυµµα
του λαµπτήρα στερεώνοντας τις προεξοχές
του καλύµµατος του λαµπτήρα στο κάτω
ο
. ∆ιακόψτε την τροφοδοσία του ρεύµατος στο βύσµα του ρευµατολήπτη και
ο
. Αφαιρέστε τα ράφια
Page 65

µέρος του περιβλήµατος και πιέζοντας το
άνω µέρος του καλύµµατος µέχρι να
«κουµπώσει».
Βήµα 6ο. Επανατοποθετήστε τα ράφια.
Βήµα 7ο. Περιµένετε 5 λεπτά για να βεβαιωθείτε ότι οι πιέσεις στο σύστηµα ψύξης
έχουν εξισορροπηθεί. Στη συνέχεια συνδέστε και πάλι το ψυγείο στο βύσµα του
ρευµατολήπτη.
Θάλαµος Καταψύκτη (όπου υπάρχει)
Βήµα 1ο. ∆ιακόψτε την τροφοδοσία του ρεύµατος στο βύσµα του ρευµατολήπτη και
αφαιρέστε το καλώδιο παροχής ρεύµατος του ψυγείου από το βύσµα του
ρευµατολήπτη.
Βήµα 2ο. Αποσυνδέστε µε προσοχή το κάλυµµα του λαµπτήρα. Για να γίνει αυτό,
τραβήξτε την προεξοχή του καλύµµατος του λαµπτήρα στο πίσω µέρος προς το
µπροστινό µέρος του θαλάµου (βλέπε ∆ιάγραµµα κάτω).
Βήµα 3ο. Ξεβιδώστε το λαµπτήρα και αντικαταστήστε τον µε ένα λαµπτήρα
πανοµοιότυπο µε τον αρχικό.
Βήµα 4ο. Επανατοποθετήστε το κάλυµµα του λαµπτήρα στερεώνοντας τις προεξοχές
του καλύµµατος του λαµπτήρα στο µπροστινό µέρος του περιβλήµατος και πιέζοντας
το πίσω µέρος του καλύµµατος µέχρι να «κουµπώσει».
Βήµα 5ο. Περιµένετε 5 λεπτά για να βεβαιωθείτε ότι οι πιέσεις στο σύστηµα ψύξης
έχουν εξισορροπηθεί. Στη συνέχεια συνδέστε και πάλι το ψυγείο στο βύσµα του
ρευµατολήπτη.
Page 66

Καθαρισµός του ψυγείου
ΠΡΙΝ ΑΠΟ ΤΟΝ ΚΑΘΑΡΙΣΜΟ: ΒΓΑΛΤΕ ΤΟ ΚΑΛΩ∆ΙΟ
ΤΡΟΦΟ∆ΟΣΙΑΣ ΑΠΟ ΤΗΝ ΠΡΙΖΑ ΗΛΕΚΤΡΙΚΗΣ ΠΑΡΟΧΗΣ.
ΜΕ ΑΥΤΟΝ ΤΟΝ ΤΡΟΠΟ ∆ΙΑΣΦΑΛΙΖΕΤΕ ΟΤΙ ∆ΕΝ ΥΠΑΡΧΕΙ
ΚΑΜΙΑ ΠΙΘΑΝΟΤΗΤΑ ΗΛΕΚΤΡΟΠΛΗΞΙΑΣ.
Εξωτερικό ψυγείου
Σώµα ψυγείου
Είναι καλό να καθαρίζετε το σώµα του ψυγείου τουλάχιστον µία φορά το χρόνο
χρησιµοποιώντας καλής ποιότητας κερί, όπως αυτό που χρησιµοποιείτε για το
αυτοκίνητό σας. Μετά από αυτό, ένα περιοδικό πέρασµα µε καθαρό βρεγµένο πανί
θα αφαιρεί τις δαχτυλιές.
ΣΗΜΕΙΩΣΗ: Μην περνάτε µε κερί τα πλαστικά µέρη ή τη διακοσµητική
µπορντούρα. Καθαρίστε τα µε ζεστό (όχι καυτό) νερό χρησιµοποιώντας
απορρυπαντικό χωρίς άρωµα.
Βαµµένες πόρτες
Καθαρίστε όπως περιγράφεται παραπάνω για το σώµα του ψυγείου.
Πόρτες από ανοξείδωτο χάλυβα
Η ανοξείδωτη συσκευή σας είναι κατασκευασµένη από ανοξείδωτο χάλυβα
ανθεκτικό στα σηµάδια. Ο συγκεκριµένος ανοξείδωτος χάλυβας διαθέτει µια ειδική
προηγµένη προστατευτική επίστρωση που διευκολύνει την αφαίρεση σηµαδιών όπως
τα δακτυλικά αποτυπώµατα και οι κηλίδες νερού. Για να διατηρήσει το ανοξείδωτο
ψυγείο σας την καλύτερη δυνατή όψη, θα πρέπει να το καθαρίζετε τακτικά. Οι πόρτες
από ανοξείδωτο χάλυβα θα πρέπει να καθαρίζονται µόνο µε χλιαρό νερό µε
σαπουνάδα και ένα µαλακό ύφασµα, να ξεπλένονται µε καθαρό νερό και στη
συνέχεια η επιφάνεια να σκουπίζεται µε καθαρό νερό και ένα καθαρό µαλακό
ύφασµα για την αποµάκρυνση των υπολειµµάτων σαπουνιού.
Είναι σηµαντικό να σκουπίζετε κατά τη φορά του ανοξείδωτου χάλυβα για να
αποφύγετε την άνευ λόγου δηµιουργία σηµαδιών στην επιφάνεια.
ΜΗ ΧΡΗΣΙΜΟΠΟΙΕΙΤΕ ΚΑΘΑΡΙΣΤΙΚΑ ΓΙΑ ΑΝΟΞΕΙ∆ΩΤΟ
ΑΤΣΑΛΙ, ΤΡΑΧΕΙΑ ΣΦΟΥΓΓΑΡΙΑ Η ΆΛΛΑ ΚΑΘΑΡΙΣΤΙΚΑ
ΜΕΣΑ ΓΙΑΤΙ ΥΠΑΡΧΕΙ ΚΙΝ∆ΥΝΟΣ ΝΑ ΧΑΡΑΞΟΥΝ ΤΗΝ
ΕΠΙΦΑΝΕΙΑ. ΖΗΜΙΕΣ ΠΟΥ ΠΡΟΚΑΛΟΥΝΤΑΙ ΣΤΟ
ΣΥΓΚΕΚΡΙΜΕΝΟ ΠΡΟΪΟΝ ΜΕΤΑ ΤΗΝ ΠΑΡΑ∆ΟΣΗ ΤΟΥ ∆ΕΝ
ΚΑΛΥΠΤΟΝΤΑΙ ΑΠΟ ΤΗΝ ΕΓΓΥΗΣΗ ΣΑΣ.
Εσωτερικό ψυγείου
Θα πρέπει να καθαρίζετε το εσωτερικό του ψυγείου τακτικά. Θα είναι ευκολότερο να
καθαριστεί όταν τα τρόφιµα που περιέχει είναι λίγα. Καθαρίστε το εσωτερικό µε ένα
µαλακό ύφασµα και χρησιµοποιήστε ένα µαλακό/ ήπιο σαπούνι χωρίς άρωµα και
χλιαρό νερό. Στεγνώστε πολύ καλά όλες τις επιφάνειες και τα αφαιρούµενα µέρη.
Αποφύγετε την επαφή του νερού µε τους ρυθµιστές του ψυγείου. Εάν βγάλατε
οποιαδήποτε αφαιρούµενα µέρη, τοποθετήστε τα πάλι στη θέση τους και συνδέστε το
ψυγείο µε την παροχή ρεύµατος προτού γεµίσετε και πάλι το ψυγείο. Φυσικά θα
Page 67

πρέπει να διατηρείτε υγιεινό το εσωτερικό του ψυγείου σας σκουπίζοντας αµέσως και
διεξοδικά τυχόν πιτσιλιές από φαγητά.
∆ιατηρήστε καθαρούς τους στεγανωτικούς συνδέσµους πόρτας
Φροντίστε να διατηρείτε τους στεγανωτικούς συνδέσµους της πόρτας καθαρούς. Τα
κολλώδη φαγητά και ποτά ενδέχεται να κολλήσουν τους στεγανωτικούς συνδέσµους
στο θάλαµο µε αποτέλεσµα να σχιστούν όταν ανοίγετε την πόρτα. Καθαρίστε τους
στεγανωτικούς συνδέσµους µε ένα µαλακό απορρυπαντικό και ζεστό νερό.
Ξεπλύνετε καλά και στεγνώστε τους.
ΠΡΟΕΙ∆ΟΠΟΙΗΣΗ: Μη χρησιµοποιείτε ποτέ ζεστό νερό, διαλυτικά,
καθαριστικά κουζίνας του εµπορίου, καθαριστικά τύπου αεροζόλ, γυαλιστικά
µετάλλων, καυστικά ή λειαντικά καθαριστικά ή σφουγγάρια για τον καθαρισµό
της συσκευής σας, καθώς θα της προκαλέσουν ζηµία. Πολλά καθαριστικά
προϊόντα και απορρυπαντικά που κυκλοφορούν στο εµπόριο περιέχουν διαλυτικά
που θα προκαλέσουν ζηµία στο ψυγείο σας. Κατά τον καθαρισµό,
χρησιµοποιείστε µόνο ένα µαλακό ύφασµα µε µαλακό σαπούνι χωρίς άρωµα και
χλιαρό νερό.
Γενικές Πληροφορίες
Ασφάλεια
Είναι σηµαντικό να χρησιµοποιείτε το ψυγείο σας µε ασφάλεια. Αυτό σηµαίνει ότι θα
χρειαστεί να επιβλέπετε µικρά παιδιά και ανάπηρα άτοµα όταν το χρησιµοποιούν. Θα
πρέπει να βεβαιωθείτε ότι µικρά παιδιά δεν θα παίζουν µε το ψυγείο σας.
Ακολουθήστε τις παρακάτω συµβουλές:
ΤΙ ΠΡΕΠΕΙ ΝΑ ΚΑΝΕΤΕ
• Βεβαιωθείτε ότι το βύσµα του ρευµατολήπτη είναι σωστά γειωµένο – σε
περίπτωση αµφιβολίας φωνάξτε ηλεκτρολόγο να το ελέγξει.
• ∆ιακόψτε την παροχή ρεύµατος στο ψυγείο προτού το καθαρίσετε ή το
µετακινήσετε.
• Εάν το καλώδιο παροχής ρεύµατος είναι κατεστραµµένο, θα πρέπει να
αντικατασταθεί από τον κατασκευαστή, τον εξουσιοδοτηµένο αντιπρόσωπό
του ή άλλο άτοµο µε παρόµοια εξουσιοδότηση. Με τον τρόπο αυτό θα
αποφύγετε κινδύνους σχετικούς µε την ασφάλεια.
ΤΙ ∆ΕΝ ΠΡΕΠΕΙ ΝΑ ΚΑΝΕΤΕ
• Ποτέ µην αφήνετε παιδιά να παίζουν µε το ψυγείο
• Ποτέ µην αποθηκεύετε φιάλες σπρέι, εκρηκτικά υγρά ή
εύφλεκτα υγρά στο ψυγείο.
• Ποτέ µην αποθηκεύετε ανθρακούχα ποτά στο θάλαµο της
κατάψυξης.
• Ποτέ µην γλύφετε παγωµένα φαγητά αµέσως µόλις
βγουν από τον καταψύκτη, καθώς ο πάγος ενδέχεται να
«κάψει» τα χείλη και το στόµα σας.
• Ποτέ µην επιχειρείτε να επισκευάσετε το ψυγείο µόνοι
σας.
Page 68

• Ποτέ µην χρησιµοποιείτε ηλεκτρικά θερµαντικά σώµατα
ή στεγνωτήρες µαλλιών για την απόψυξη της κατάψυξης
διότι υπάρχει κίνδυνος ηλεκτροπληξίας.
• Ποτέ µη χρησιµοποιείτε ηλεκτρικές συσκευές µέσα
στους χώρους αποθήκευσης τροφίµων.
• Το συγκεκριµένο ψυγείο διαθέτει µόνωση αποτελούµενη
από εύφλεκτα αέρια. Για λόγους ασφαλείας θα πρέπει να
δίνεται ιδιαίτερη προσοχή κατά την απόρριψή του.
• Μην προκαλείτε ζηµίες στο ψυκτικό κύκλωµα.
ΠΡΟΕΙ∆ΟΠΟΙΗΣΗ: Όταν απορρίπτετε το παλιό σας ψυγείο,
αφαιρέστε όλες τις πόρτες. Σε περίπτωση που παγιδευτούν παιδιά στο
εσωτερικό του υπάρχει κίνδυνος ασφυξίας.
Page 69

Φροντίδα & Συντήρηση
Τι να κάνετε πριν καλέσετε τον τεχνικό
Εάν πιστεύετε ότι κάτι δεν πάει καλά µε το ψυγείο σας, µπορείτε να κάνετε µερικούς
εύκολους ελέγχους πριν καλέσετε τον τεχνικό. Μπορεί να εντοπίσετε το πρόβληµα
γλιτώνοντας κόπο, χρόνο και χρήµα.
Πρόβληµα
Όταν η συσκευή σας
δεν λειτουργεί
Όταν ακούγεται
θόρυβος από το
ψυγείο
• Βεβαιωθείτε ότι το καλώδιο παροχής ρεύµατος είναι
κανονικά συνδεδεµένο µε το ρευµατολήπτη και ότι αυτός
τροφοδοτείται µε ρεύµα.
• Προσπαθήστε να λειτουργήσετε µια άλλη συσκευή από το
συγκεκριµένο ρευµατολήπτη. Εάν δεν έρχεται ρεύµα από
το ρευµατολήπτη ενδέχεται να κάηκε µια ασφάλεια ή ένα
κύκλωµα της οικιακής σας παροχής ρεύµατος.
• Προσπαθήστε να προσαρµόσετε το ρυθµιστή θερµοκρασίας
σε µια ελαφρώς πιο «κρύα» θέση.
• Είναι φυσιολογικό να ΜΗ λειτουργεί ο ανεµιστήρας της
κατάψυξης κατά τη διάρκεια του αυτόµατου κύκλου
απόψυξης ή για σύντοµο χρονικό διάστηµα αµέσως µόλις
τεθεί το ψυγείο σε λειτουργία.
Οι σύγχρονοι ψυγειοκαταψύκτες αυξηµένης χωρητικότητας
χρησιµοποιούν συµπιεστές υψηλών ταχυτήτων. Οι τελευταίοι
παράγουν ένα φαινοµενικά υψηλό ποσοστό ήχων που είναι µάλλον
φυσιολογικοί.
Οι φυσιολογικοί ήχοι λειτουργίας περιλαµβάνουν:
• σποραδικό γουργούρισµα που θυµίζει νερό που βράζει
• ήχο ροής αέρα (ο αέρας κυκλοφορεί χάρη στον µικρό
ανεµιστήρα)
• ένα ξερό ήχο που ακούγεται κατά την αυτόµατη απόψυξη
• ένα κλικ που ακούγεται µόλις πριν αρχίσει η λειτουργία του
συµπιεστή (πρόκειται απλώς για την αυτόµατη
ενεργοποίηση του ρυθµιστή θερµοκρασίας, που ενεργοποιεί
ή απενεργοποιεί τον συµπιεστή).
Άλλοι περίεργοι ήχοι µπορεί να υποδηλώνουν ότι πρέπει να κάνετε
έλεγχο και να αναλάβετε δράση.
Για παράδειγµα, κάποιοι ήχοι µπορεί να δηλώνουν ότι:
• ο θάλαµος του ψυγείου δεν είναι ίσιος
• το δάπεδο είναι ανώµαλο ή αδύναµο
• τα µπουκάλια δεν έχουν τοποθετηθεί σωστά και χτυπούν
µεταξύ τους.
• Υπάρχουν δονήσεις από κάποιο αντικείµενο πάνω από ή
πίσω από ή δίπλα στο ψυγείο.
• Το πίσω µέρος του θαλάµου του ψυγείου εφάπτεται µε τον
τοίχο.
Θυµηθείτε ότι είναι φυσιολογικό να ακούγονται οι ήχοι πιο δυνατά
αµέσως µόλις αρχίσει η λειτουργία του ψυγείου.
Λύση
Page 70

Όταν υπάρχουν
οσµές στο εσωτερικό
του ψυγείου
Όταν ο κινητήρας
φαίνεται να δουλεύει
περισσότερο από το
αναµενόµενο
Εάν η θερµοκρασία
στο εσωτερικό του
ψυγείου είναι
υπερβολικά υψηλή
Εάν η θερµοκρασία
στο ψυγείο είναι
υπερβολικά χαµηλή
Εάν οι πόρτες δεν
κλείνουν
Εάν η κατάψυξη
καλύπτεται από παχύ
• Το εσωτερικό του µπορεί να χρειάζεται καθάρισµα
• Ορισµένα τρόφιµα παράγουν οσµές
• Ορισµένα δοχεία και υλικά περιτυλίγµατος ενδέχεται να
παράγουν οσµές
• Σκεφθείτε µήπως η οσµή πρωτοεµφανίστηκε όταν αρχίσατε
να βάζετε κάτι ασυνήθιστο στο ψυγείο.
Το νέο σας ψυγείο σας παρέχει µεγάλη χωρητικότητα τόσο στο
τµήµα της συντήρησης όσο και στο χωριστό καταψύκτη. Είναι
φυσιολογικό να δουλεύει συχνά ο κινητήρας. Εντούτοις, για να
κρατήσετε τη λειτουργία του στο ελάχιστο, ελέγξτε τα παρακάτω:
• Μήπως οι πόρτες ανοίγουν για µεγάλο χρονικό διάστηµα ή
πολύ συχνά;
• Μήπως η θερµοκρασία έχει ρυθµιστεί πολύ χαµηλά; Βλέπε
‘ΕΛΕΓΧΟΣ ΘΕΡΜΟΚΡΑΣΙΑΣ’.
• Μήπως αποθηκεύσατε πρόσφατα στο ψυγείο µεγάλες
ποσότητες ζεστού φαγητού; Το καλοκαίρι, οι εορταστικές
περίοδοι και οι διακοπές συνήθως σηµαίνουν πολύ
περισσότερη δουλειά για το ψυγείο σας.
• Εάν η µέρα ή το δωµάτιο είναι πολύ ζεστά, το ψυγείο θα
χρειαστεί να δουλέψει περισσότερο από το κανονικό.
• Το ψυγείο θα δουλέψει περισσότερο από το κανονικό
αµέσως µόλις το εγκαταστήσετε ή όταν θα έχει
απενεργοποιηθεί για µεγάλο χρονικό διάστηµα.
• Βεβαιωθείτε ότι το ψυγείο έχει επαρκή απόσταση στα
πλάγια, στο πίσω και στο επάνω τµήµα. Ανατρέξτε στις
οδηγίες εγκατάστασης στο µπροστινό µέρος του παρόντος
εγχειριδίου.
• Ανατρέξτε στο τµήµα ‘ΕΛΕΓΧΟΣ ΘΕΡΜΟΚΡΑΣΙΑΣ’.
• Ενδέχεται να έχετε αφήσει την πόρτα ανοιχτή για πολύ
µεγάλο χρονικό διάστηµα ή να την ανοίγετε πάρα πολύ
συχνά.
• Ενδέχεται ορισµένα δοχεία φαγητών ή συσκευασίες να
κρατούν µία πόρτα ανοιχτή.
• Ανατρέξτε στο τµήµα ‘ΕΛΕΓΧΟΣ ΘΕΡΜΟΚΡΑΣΙΑΣ’.
• Αυξήστε τη θερµοκρασία για να αποφύγετε την υψηλή
κατανάλωση ενέργειας.
• Ελέγξτε εάν το επάνω µέρος του ψυγείου είναι γερµένο
προς τα πίσω κατά 10-15 χιλ. για να µπορούν οι πόρτες να
κλείνουν αυτόµατα.
• Ελέγξτε εάν κάτι κρατά την πόρτα ανοιχτή.
Είναι φυσιολογικό να ανοίγει και να ξανακλείνει στιγµιαία η πόρτα
της κατάψυξης όταν κλείνει η πόρτα του θαλάµου συντήρησης. Εάν
η κατάψυξη παραµείνει ανοιχτή, αυτό σηµαίνει ότι θα πρέπει να
γείρετε το θάλαµο του ψυγείου προς τα πίσω λίγο ακόµα. Εάν
καλέσετε τεχνικό για να λύσει αυτό το πρόβληµα θα χρεωθείτε µε
το κόστος της επίσκεψης του τεχνικού, καθώς αυτό δεν αποτελεί
πρόβληµα που καλύπτεται από την εγγύηση.
Βεβαιωθείτε ότι κλείσατε καλά την πόρτα την κατάψυξης και της
συντήρησης τροφίµων αφού τοποθετήσετε ή αδειάσετε τρόφιµα
Page 71

στρώµα πάγου
Εάν στάζει νερό στο
πάτωµα
από αυτούς τους θαλάµους. Εάν οι πόρτες αφεθούν µερικά
ανοιχτές, ένα παχύ στρώµα πάγου θα καλύψει το εσωτερικό της
κατάψυξης. Εάν αναπτυχθεί πάγος, αφαιρέστε τον. Φροντίστε να
κλείσετε καλά τις πόρτες και ο πάγος δεν θα επανεµφανιστεί.
Ο δίσκος νερών απόψυξης (τοποθετηµένος στον συµπιεστή στο
πίσω µέρος του θαλάµου) µπορεί να µην έχει τοποθετηθεί σωστά.
∆ιαφορετικά, ενδέχεται να µην έχει τοποθετηθεί σωστά ο σωλήνας
αποστράγγισης που κατευθύνει το νερό µέσα στο δίσκο αυτό.
Μπορεί να χρειαστεί να τραβήξετε το ψυγείο µακριά από τον τοίχο
για να ελέγξετε τον δίσκο και το σωλήνα.
Εάν εξακολουθείτε να χρειάζεστε σέρβις
Εάν έχετε κάποιο πρόβληµα το οποίο επιµένει αφού κάνετε τους ελέγχους που
αναφέρονται παραπάνω, επικοινωνήστε µε το πλησιέστερο Κέντρο Σέρβις ή τον
αντιπρόσωπο από τον οποίο αγοράσατε το ψυγείο. Να είστε έτοιµοι να αναφέρετε τον
αριθµό του µοντέλου, ο οποίος αναγράφεται στην ετικέτα της εσωτερικής πλαστικής
επικάλυψης του τοίχου στο θάλαµο συντήρησης.
Σηµαντική προειδοποίηση
Προτού καλέσετε Τεχνικό Επισκευών παρακαλούµε διαβάστε προσεκτικά τις οδηγίες
λειτουργίας, το βιβλίο επισκευών και την εγγύηση.
Page 72

ΤΕΜΑΧΙΟ
Τεχνικές Προδιαγραφές
ΟΜΑ∆Α ΜΟΝΤΕΛΩΝ
S85582DT S85528KG
∆ΙΑΣΤΑΣΕΙΣ (εκατ.)
ΤΑΣΗ & ΣΥΧΝΟΤΗΤΑ ∆ΙΚΤΥΟΥ
ΗΛΕΚΤΡΟΠΑΡΟΧΗΣ
ΣΥΝΟΛΙΚΗ ΑΠΟΡΡΟΦΗΘΕΙΣΑ ΙΣΧΥΣ (W)
* ΜΕΣΗ ΗΜΕΡΗΣΙΑ ΚΑΤΑΝΑΛΩΣΗ
ΜΟΝΑ∆ΩΝ ΗΛΕΚΤΡΙΣΜΟΥ (kWh)
ΟΛΙΚΗ ΧΩΡΗΤΙΚΟΤΗΤΑ
(λίτρα)
ΧΩΡΗΤΙΚΟΤΗΤΑ
ΑΠΟΘΗΚΕΥΣΗΣ (λίτρα)
ΥΨΟΣ
ΠΛΑΤΟΣ
ΒΑΘΟΣ
ΣΥΝΤΗΡΗΣΗ
ΚΑΤΑΨΥΞΗ
ΣΥΝΤΗΡΗΣΗ
ΚΑΤΑΨΥΞΗ
172.0 172.0
80.2 80.2
74.3 74.3
220 - 240v 50 Hz
1.07 1.19
395.7 348.7
121.4 156.3
377.3 330.6
98.4 132.7
* Ο αριθµός αυτός βασίζεται σε τυποποιηµένα αποτελέσµατα ελέγχων βάσει του
Ευρωπαϊκού Προτύπου ΕΝ 153. Η πραγµατική κατανάλωση θα εξαρτηθεί από τον
τρόπο χρήσης της συσκευής και τη θέση στην οποία έχει τοποθετηθεί.
Η συγκεκριµένη συσκευή είναι σύµφωνη προς την Οδηγία ΕΟΚ αρ. 87/308 της
02.06.87 περί καταστολής ραδιοπαρασίτων.
Η συγκεκριµένη συσκευή είναι σύµφωνη προς τις ακόλουθες Οδηγίες της ΕΟΚ:
- 73/23 της ΕΟΚ της 19.02.73 (Οδηγία περί Χαµηλής Τάσης) και τις
επακόλουθες τροποποιήσεις της
- 88/336 της ΕΟΚ της 03.05.89 (Οδηγία περί Ηλεκτροµαγνητικής
Συµβατότητας) και τις επακόλουθες τροποποιήσεις της
Page 73

Γραµµικός κώδικας EAN:
` `
Αριθµός συσκευής:
Ηµεροµηνία έκδοσης:
 Loading...