

Page 1

S83400CTM0
S83409CTM0
FRIDGE FREEZER USER MANUAL
EN
RÉFRIGÉRATEUR/CONGÉLATEUR NOTICE D'UTILISATION
FR
FRIGO-CONGELATORE ISTRUZIONI PER L’USO
IT
25
49
2
Page 2
2
FOR PERFECT RESULTS
Thank you for choosing this AEG product. We have
created it to give you impeccable performance for many
years, with innovative technologies that help make life
simpler – features you might not find on ordinary
appliances. Please spend a few minutes reading to get the
very best from it.
ACCESSORIES AND CONSUMABLES
In the AEG webshop, you’ll find everything you need to
keep all your AEG appliances looking spotless and
working perfectly. Along with a wide range of accessories
designed and built to the high quality standards you
would expect, from specialist cookware to cutlery baskets,
from bottle holders to delicate laundry bags…
Visit the webshop at:
www.aeg.com/shop
Page 3

CONTENTS
4 Safety information
6 Control panel
11 First use
12 Daily use
15 Helpful hints and tips
16 Care and cleaning
18 What to do if…
20 Technical data
20 Installation
24 Environmental concerns
Contents
3
The following symbols are used in this user
manual:
Important information concerning your
personal safety and information on how to
avoid damaging the appliance.
General information and tips
Environmental information
Subject to change without notice
Page 4

4 Safety information
SAFETY INFORMATION
In the interest of your safety and to ensure the correct use, before installing and first using
the appliance, read this user manual carefully, including its hints and warnings. To avoid
unnecessary mistakes and accidents, it is important to ensure that all people using the appliance are thoroughly familiar with its operation and safety features. Save these instructions and make sure that they remain with the appliance if it is moved or sold, so that everyone using it through its life will be properly informed on appliance use and safety.
For the safety of life and property keep the precautions of these user's instructions as the
manufacturer is not responsible for damages caused by omission.
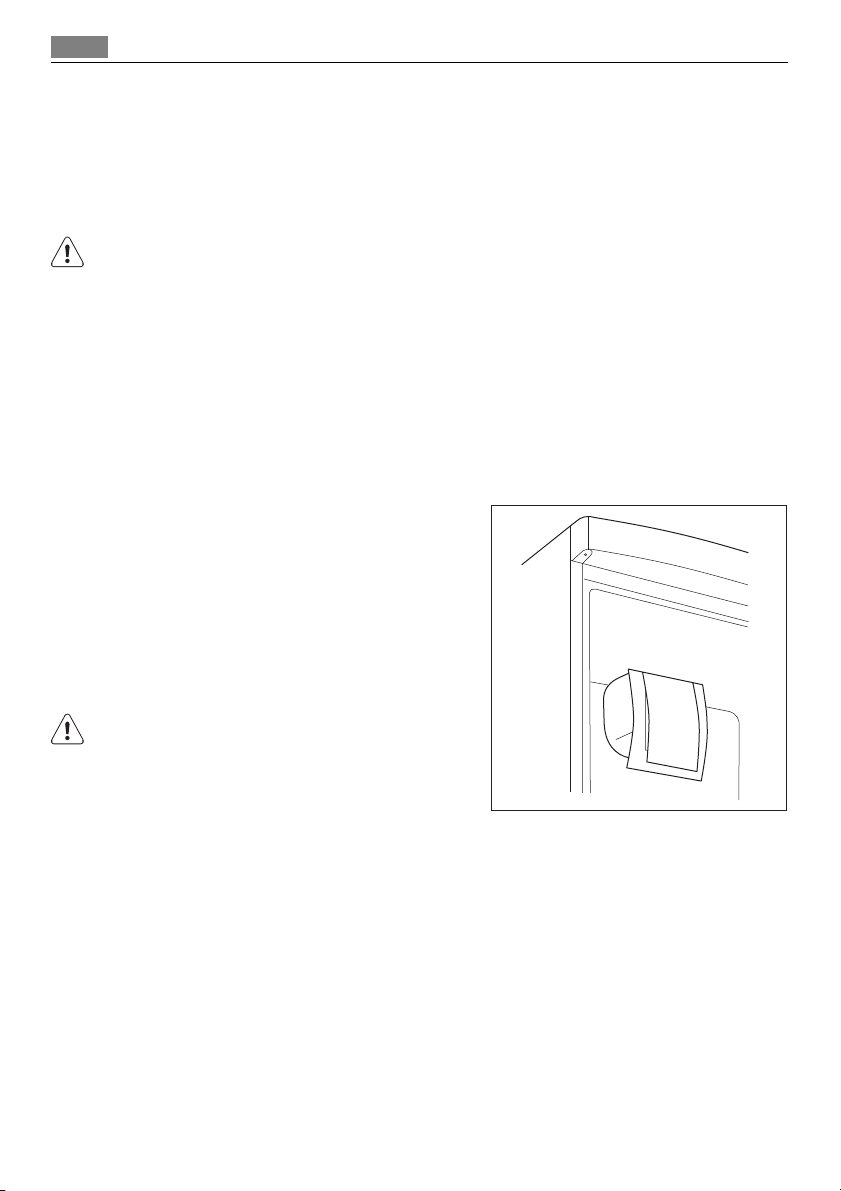
Children and vulnerable people safety
• This appliance is not intended for use by persons (including children) with reduced physical, sensory or mental capabilities, or lack of experience and knowledge, unless they have
been given supervision or instruction concerning use of the appliance by a person responsible for their safety.
Children should be supervised to ensure that they do not play with the appliance.
• Keep all packaging well away from children. There is risk of suffocation.
• If you are discarding the appliance pull the plug out of the socket, cut the connection
cable (as close to the appliance as you can) and remove the door to prevent playing children to suffer electric shock or to close themselves into it.
• If this appliance featuring magnetic door seals is to replace an older appliance having a
spring lock (latch) on the door or lid, be sure to make that spring lock unusable before
you discard the old appliance. This will prevent it from becoming a death trap for a child.
General safety
WARNING!
Keep ventilation openings, in the appliance enclosure or in the built-in structure, clear of
obstruction.
• The appliance is intended for keeping foodstuff and/or beverages in a normal household
as explained in this instruction booklet.
• Do not use a mechanical device or any artificial means to speed up the thawing process.
• Do not use other electrical appliances (such as ice cream makers) inside of refrigerating
appliances, unless they are approved for this purpose by the manufacturer.
• Do not damage the refrigerant circuit.
• The refrigerant isobutane (R600a) is contained within the refrigerant circuit of the appliance, a natural gas with a high level of environmental compatibility, which is nevertheless flammable.
During transportation and installation of the appliance, be certain that none of the components of the refrigerant circuit become damaged.
If the refrigerant circuit should become damaged:
– avoid open flames and sources of ignition
Page 5

Safety information 5
– thoroughly ventilate the room in which the appliance is situated
• It is dangerous to alter the specifications or modify this product in any way. Any damage
to the cord may cause a short-circuit, fire and/or electric shock.
WARNING!
Any electrical component (power cord, plug, compressor) must be replaced by a certified
service agent or qualified service personnel to avoid hazard.
1. Power cord must not be lengthened.
2. Make sure that the power plug is not squashed or damaged by the back of the appli-
ance. A squashed or damaged power plug may overheat and cause a fire.
3. Make sure that you can come to the mains plug of the appliance.
4. Do not pull the mains cable.
5. If the power plug socket is loose, do not insert the power plug. There is a risk of elec-
tric shock or fire.
6.
You must not operate the appliance without the lamp cover
1)
of interior lighting.
• This appliance is heavy. Care should be taken when moving it.
• Do not remove nor touch items from the freezer compartment if your hands are damp/
wet, as this could cause skin abrasions or frost/freezer burns.
• Avoid prolonged exposure of the appliance to direct sunlight.
•
Bulb lamps
2)
used in this appliance are special purpose lamps selected for household ap-
pliances use only. They are not suitable for household room illumination.
Daily Use
• Do not put hot pot on the plastic parts in the appliance.
• Do not store flammable gas and liquid in the appliance, because they may explode.
•
Do not place food products directly against the air outlet on the rear wall.
• Frozen food must not be re-frozen once it has been thawed out.
• Store pre-packed frozen food in accordance with the frozen food manufacturer's instructions.
• Appliance's manufacturers storage recommendations should be strictly adhered to. Refer
to relevant instructions.
• Do not place carbonated or fizzy drinks in the freezer compartment as it creates pressure
on the container, which may cause it to explode, resulting in damage to the appliance.
• Ice lollies can cause frost burns if consumed straight from the appliance.
Care and cleaning
• Before maintenance, switch off the appliance and disconnect the mains plug from the
mains socket.
• Do not clean the appliance with metal objects.
• Do not use sharp objects to remove frost from the appliance. Use a plastic scraper.
1) If the lamp cover is foreseen.
2) If the lamp is foreseen.
3) If the appliance is Frost Free.
3)
Page 6
6 Control panel
• Regularly examine the drain in the refrigerator for defrosted water. If necessary, clean
the drain. If the drain is blocked, water will collect in the bottom of the appliance.
Installation
For electrical connection carefully follow the instructions given in specific paragraphs.
• Unpack the appliance and check if there are damages on it. Do not connect the appliance if it is damaged. Report possible damages immediately to the place you bought it.
In that case retain packing.
• It is advisable to wait at least four hours before connecting the appliance to allow the oil
to flow back in the compressor.
• Adequate air circulation should be around the appliance, lacking this leads to overheating. To achieve sufficient ventilation follow the instructions relevant to installation.
• Wherever possible the back of the product should be against a wall to avoid touching or
catching warm parts (compressor, condenser) to prevent possible burn.
• The appliance must not be located close to radiators or cookers.
• Make sure that the mains plug is accessible after the installation of the appliance.
•
Connect to potable water supply only.
4)
Service
• Any electrical work required to do the servicing of the appliance should be carried out by
a qualified electrician or competent person.
• Do not remove the LED light cover. Contact the nearest After Sales Service Force to replace the LED light board, if it is necessary.
• This product must be serviced by an authorized Service Centre, and only genuine spare
parts must be used.
Environment Protection
This appliance does not contain gasses which could damage the ozone layer, in either its
refrigerant circuit or insulation materials. The appliance shall not be discarded together
with the urban refuse and rubbish. The insulation foam contains flammable gases: the appliance shall be disposed according to the applicable regulations to obtain from your local
authorities. Avoid damaging the cooling unit, especially at the rear near the heat exchanger. The materials used on this appliance marked by the symbol
are recyclable.
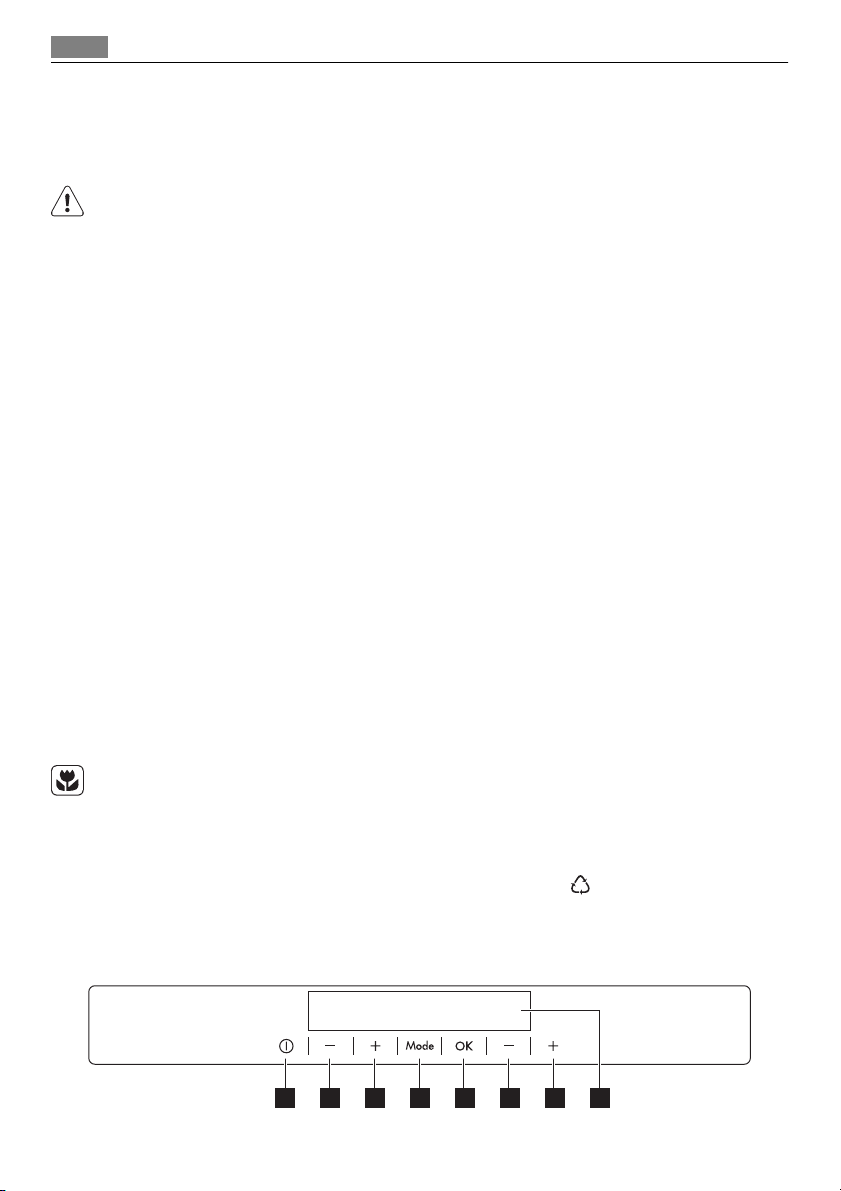
CONTROL PANEL
1 2 3 4 5 6 7 8
4) If a water connection is foreseen.
Page 7

Control panel
1 Appliance ON/OFF button
2 Fridge Temperature colder button
3 Fridge Temperature warmer button
4 Mode button
5 OK button
6 Freezer Temperature colder button
7 Freezer Temperature warmer button
8 Display
It is possible to change predefined sound of buttons to a loudly one by pressing together
Mode button and Temperature colder button for some seconds. Change is reversible.
Display
6 74 5321
COOL FROST
Off
min
1 Fridge compartment indicator
2 Fridge temperature indicator and timer indicator
3 Fridge off indicator
4 COOLMATIC function
5 Holiday function
6 FROSTMATIC function
7 Freezer temperature indicator
8 Freezer compartment indicator
9 Alarm indicator
10 Child Lock function
11 Minute Minder function
12 Dynamic Air function
MATICMATIC
1112 89
10
7
Switching on
To switch on the appliance do these steps:
1. Connect the mains plug to the power socket.
2. Press the appliance ON/OFF button if the display is off.
3. The alarm buzzer could operate after few seconds.
To reset the alarm refer to "High temperature alarm".
4. If "dEMo" appears on the display, the appliance is in demonstration mode. Refer to
"What to do if...".
5. The temperature indicators show the set default temperature.
To select a different set temperature refer to "Temperature regulation".
Page 8

8 Control panel
Switching off
To switch off the appliance do these steps:
1. Press the appliance ON/OFF button for 5 seconds.
2. The display switches off.
3. To disconnect the appliance from the power disconnect the mains plug from the power
socket.
Switching off the fridge
To switch off the fridge:
1. Press the Mode button until the corresponding icon appears.
The fridge Off indicator and the fridge compartment indicator flash.
The fridge temperature indicator shows dashes.
2. Press the OK button to confirm.
3. The fridge Off indicator is shown.
Switching on the fridge
To switch on the fridge:
1. Press the fridge temperature regulator.
Or:
1. Press the Mode button until the corresponding icon appears.
The Fridge Off indicator flashes.
2. Press the OK button to confirm.
3. The fridge Off indicator goes off.
To select a different set temperature refer to "Temperature regulation".
Temperature regulation
The set temperature of the fridge and of the freezer may be adjusted by pressing the temperature regulators.
Set default temperature:
• +5°C for the fridge
• -18°C for the freezer
The temperature indicators show the set temperature.
The set temperature will be reached within 24 hours.
Fluctuations of some degrees around set temperature are normal and does not mean any
fault in the appliance.
After a power failure the set temperature remains stored.
Minute Minder function
The Minute Minder function is to be used to set an acoustic alarm at the preferred time,
useful for example when a recipe requires to cool down a mixture for a certain lenght of
time, or when a reminder is needed in order not to forget the bottles placed in the freezer
for fast cooling.
To switch on the function:
Page 9

Control panel
1. Press the Mode button until the corresponding icon appears.
The Minute Minder indicator flashes.
The Timer shows the set value (30 minutes) for a few seconds.
2. Press the Fridge Temperature button to change the Timer set value from 1 to 90 minutes.
3. Press the OK button to confirm.
The Minute Minder indicator is shown.
The Timer start to flash (min).
At the end of the countdown the Minute Minder indicator flashes and an audible alarm
sounds:
1. Remove any drinks contained in the freezer compartment.
2. Press OK button to switch off the sound and terminate the function.
It is possible to deactivate the function at any time during the countdown:
1. Press the Mode button until the Minute Minder indicator flashes.
2. Press the OK button to confirm.
3. The Minute Minder indicator goes off.
It is possible to change the time during the countdown and at the end by pressing the
Fridge Temperature colder button or the Fridge Temperature warmer button.
Child Lock function
To lock the buttons from unintentional operation select the Child Lock function.
To switch on the function:
1. Press the Mode button until the corresponding icon appears.
2. The Child Lock indicator flashes.
3. Press the OK button to confirm.
The Child Lock indicator is shown.
To switch off the function:
1. Press the Mode button until the Child Lock indicator flashes.
2. Press the OK button to confirm.
3. The Child Lock indicator goes off.
9
High temperature alarm
An increase in the temperature in the freezer compartment (for example due to an earlier
power failure) is indicated by:
• flashing the alarm and freezer temperature indicators
• sounding of buzzer.
To reset the alarm:
1. Press any button.
2. The buzzer switches off.
3. The freezer temperature indicator shows the highest temperature reached for a few
seconds. Then show again the set temperature.
4. The alarm indicator continue to flash until the normal conditions are restored.
When the alarm has returned the alarm indicator goes off.
Page 10
10 Control panel
Door open alarm
An acoustic alarm will sound if the fridge door is left open for a few minutes. The door
open alarm conditions are indicated by:
• flashing Alarm indicator
• acoustic buzzer
When normal conditions are restored (door closed), the alarm will stop.
COOLMATIC function
If you need to insert a large amount of warm food, for example after doing the grocery
shopping, we suggest activating the COOLMATIC function to chill the products more rapidly
and to avoid warming the other food which is already in the refrigerator.
To switch on the function:
1. Press the Mode button until the corresponding icon appears.
The COOLMATIC indicator flashes.
2. Press the OK button to confirm.
The COOLMATIC indicator is shown.
The COOLMATIC function shuts off automatically after approximately 6 hours.
To switch off the function before its automatic end:
1. Press the Mode button until the COOLMATIC indicator flashes.
2. Press the OK button to confirm.
3. The COOLMATIC indicator goes off.
The function switches off by selecting a different fridge set temperature.
Holiday function
This function allows you to keep the refrigerator closed and empty during a long holiday
period without the formation of a bad smell.
The fridge compartment must be empty with holiday function on.
To switch on the function:
1. Press the Mode button until the corresponding icon appears.
The Holiday indicator flashes.
The fridge temperature indicator shows the set temperature.
2. Press the OK button to confirm.
The Holiday indicator is shown.
To switch off the function:
1. Press the Mode button until the Holiday indicator flashes.
2. Press the OK button to confirm.
3. The Holiday indicator goes off.
The function switches off by selecting a different fridge set temperature.
Page 11
DYNAMICAIR function
To switch on the function:
1. Press the Mode button until the corresponding icon appears.
The DYNAMICAIR indicator flashes.
2. Press the OK button to confirm.
The DYNAMICAIR indicator is shown.
To switch off the function:
1. Press the Mode button until the DYNAMICAIR indicator flashes.
2. Press the OK button to confirm.
3. The DYNAMICAIR indicator goes off.
If the function is activated automatically the DYNAMICAIR indicator is not shown (refer to
"Daily use").
The activation of the DYNAMICAIR function increase the energy consumption.
FROSTMATIC function
To switch on the function:
1. Press the Mode button until the corresponding icon appears.
The FROSTMATIC indicator flashes.
2. Press the OK button to confirm.
The FROSTMATIC indicator is shown.
This function stops automatically after 52 hours.
To switch off the function before its automatic end:
1. Press the Mode button until the FROSTMATIC indicator flashes.
2. Press the OK button to confirm.
3. The FROSTMATIC indicator goes off.
Place the fresh food to be frozen in the FROSTMATIC basket.
The function switches off by selecting a different freezer set temperature.
First use
11
FIRST USE
Cleaning the interior
Before using the appliance for the first time, wash the interior and all internal accessories
with lukewarm water and some neutral soap so as to remove the typical smell of a brandnew product, then dry thoroughly.
Do not use detergents or abrasive powders, as these will damage the finish.
Page 12
12 Daily use
DAILY USE
Storage of frozen food
When first starting-up or after a period out of use, before putting the products in the compartment let the appliance run at least 2 hours on the higher settings.
In the event of accidental defrosting, for example due to a power failure, if the power has
been off for longer than the value shown in the technical characteristics chart under "rising
time", the defrosted food must be consumed quickly or cooked immediately and then refrozen (after cooling).
Thawing
Deep-frozen or frozen food, prior to being used, can be thawed in the refrigerator compartment or at room temperature, depending on the time available for this operation.
Small pieces may even be cooked still frozen, directly from the freezer: in this case, cooking
will take longer.
DYNAMICAIR
The refrigerator compartment is equipped with a
device that allows for rapid cooling of foods and
more uniform temperature in the compartment.
This device activates by itself when needed, for
example for a quick temperature recovering after
door opening or when the ambient temperature
is high.
Allows you to switch on the device manually
when needed (refer to "DYNAMICAIR Function").
The DYNAMICAIR device stops when the door is
open and restarts immediately after the door
closing.
Page 13
Movable shelves
The walls of the refrigerator are equipped with a
series of runners so that the shelves can be positioned as desired.
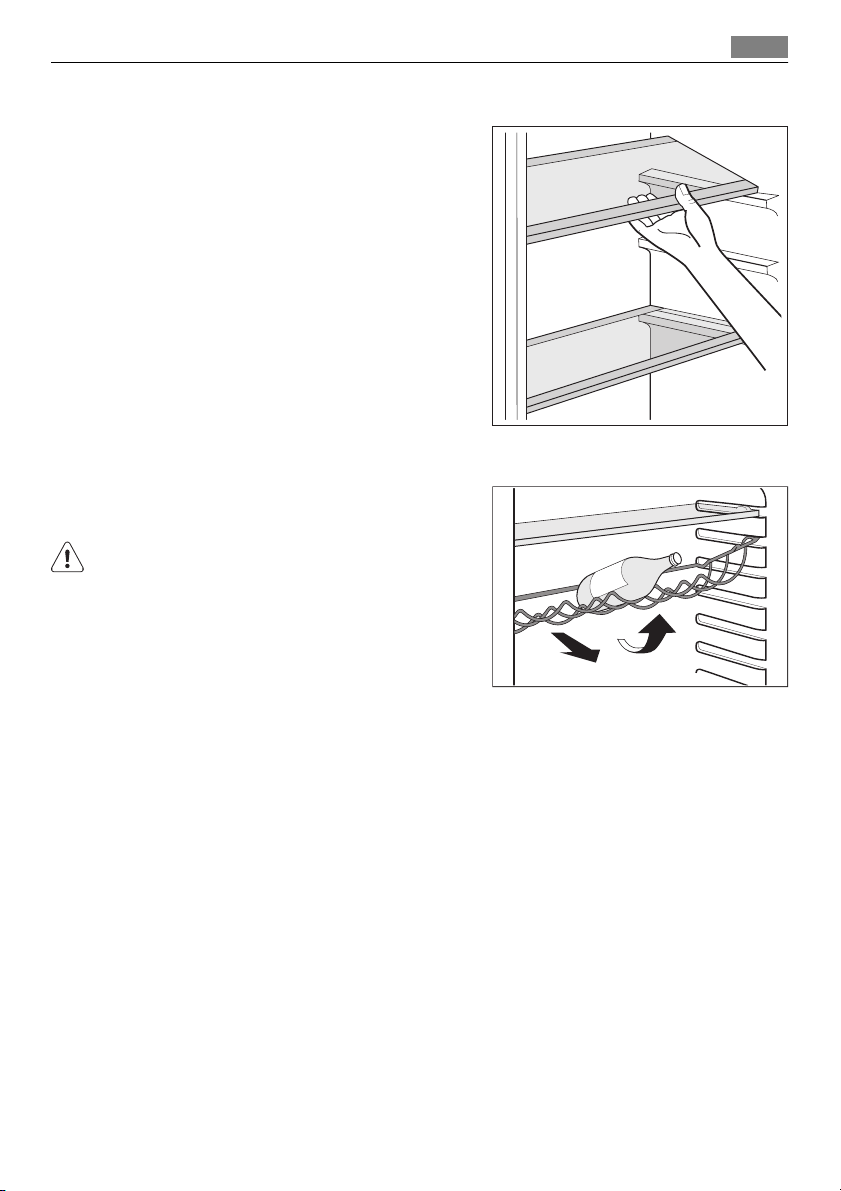
Bottle rack
Place the bottles (with the opening facing front)
in the pre-positioned shelf.
If the shelf is positioned horizontally, place only
closed bottles.
This bottle holder shelf can be tilted in order to
store previously opened bottles. To obtain this result, pull the shelf up so it can rotate upwards and
be placed on the next higher level.
Daily use 13
Page 14
14 Daily use
Positioning the door shelves
To permit storage of food packages of various sizes, the door shelves can be placed at
different heights.
To make these adjustments proceed as follows:
gradually pull the shelf in the direction of
the arrows until it comes free, then reposition as required.
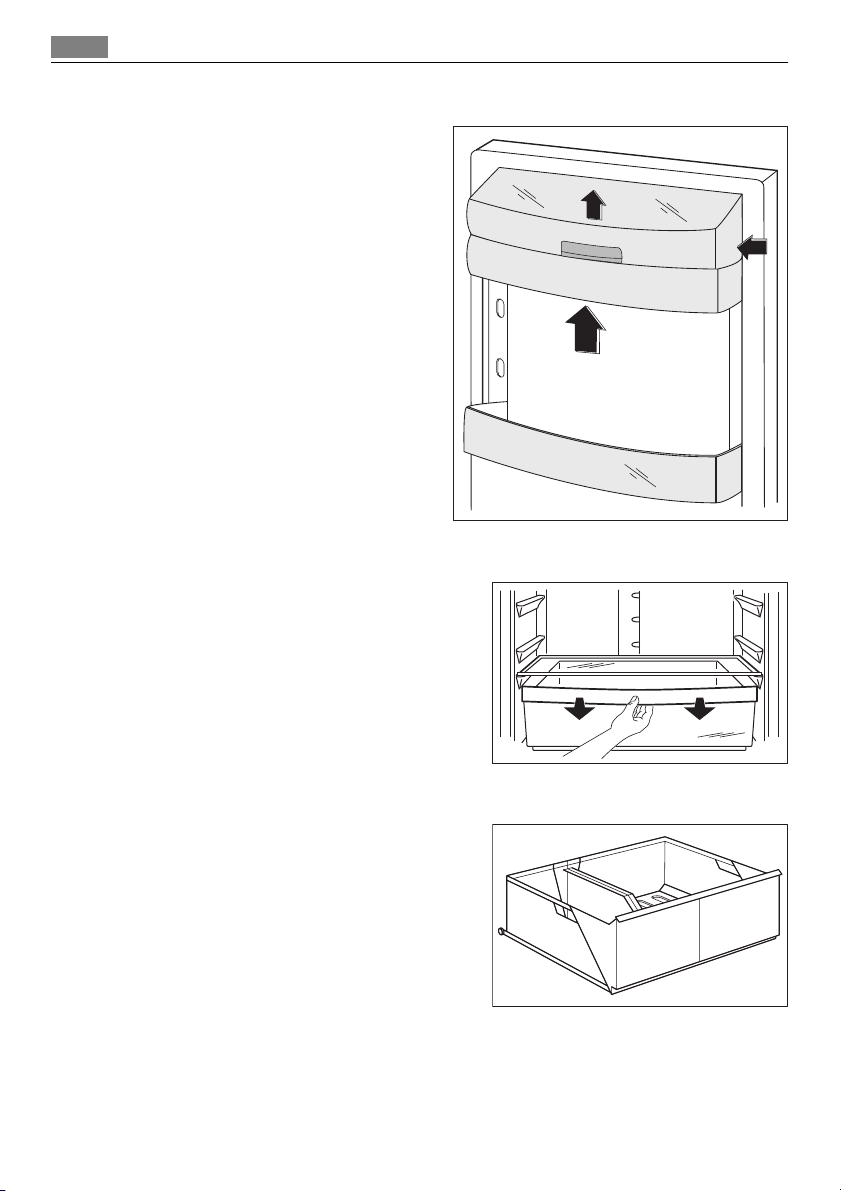
FRESHBOX drawer
The drawer is suitable for storing fresh food like
fish, meat, seafood, because the temperature is
lower here than in the rest of the fridge.
MAXIBOX drawer
The drawer is suitable for storing fruit and vegetables.
There is a separator inside the drawer that can be
placed in different positions to allow for the subdivision best suited to personal needs.
There is a grille (if foreseen) on the bottom of the
drawer to separate the fruit and vegetables from
any humidity that may form on the bottom surface.
All parts inside the drawer can be removed for
cleaning purposes
Page 15
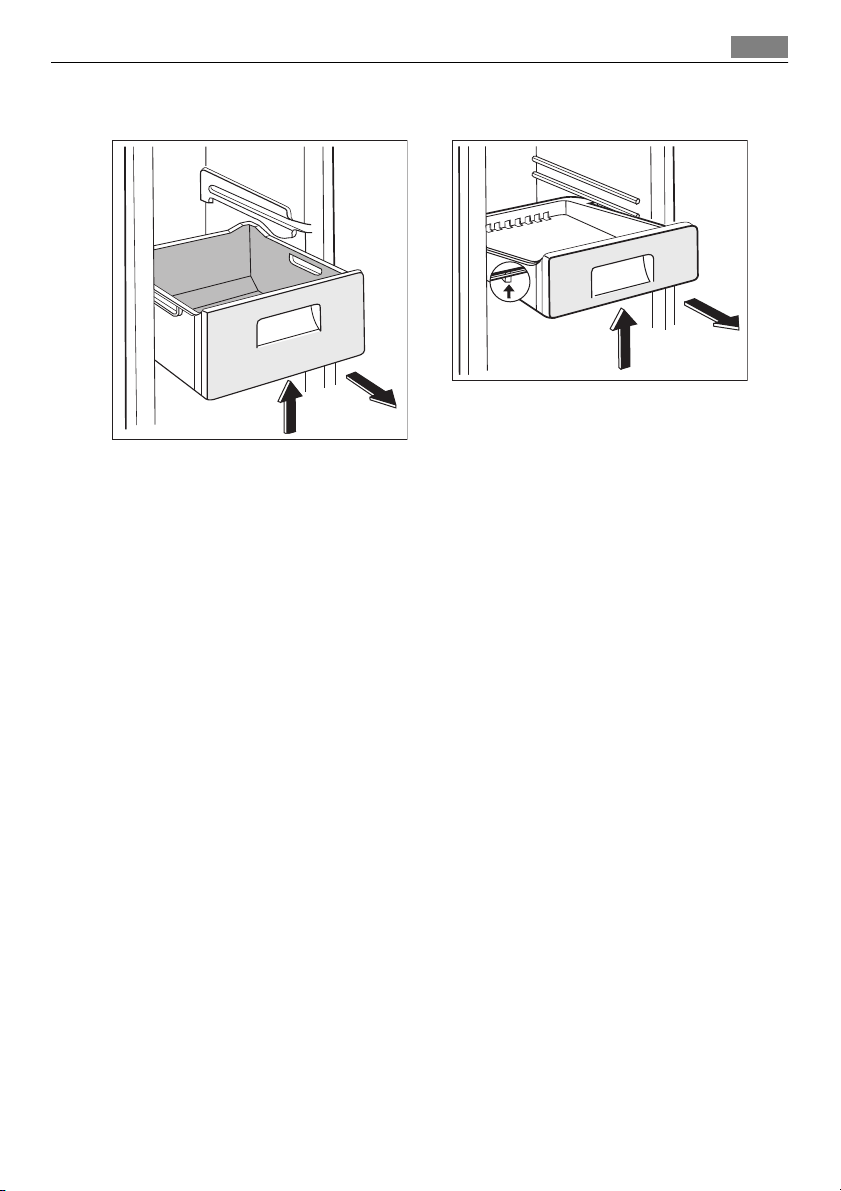
Removal of freezing baskets from the freezer
Helpful hints and tips
15
2
2
1
1
The freezing baskets have a limit stop to prevent their accidental removal or falling out.
At the time of its removal from the freezer, pull the basket towards yourself and, upon
reaching the end point, remove the basket by tilting its front upwards.
At the time of putting it back, slightly lift the front of the basket to insert it into the
freezer. Once you are over the end points, push the baskets back in their position.
HELPFUL HINTS AND TIPS
Normal Operating Sounds
• You may hear a faint gurgling and a bubbling sound when the refrigerant is pumped
through the coils or tubing. This is correct.
• When the compressor is on, the refrigerant is being pumped around and you will hear a
whirring sound and a pulsating noise from the compressor. This is correct.
• The thermic dilatation might cause a sudden cracking noise. It is natural, not dangerous
physical phenomenon. This is correct.
Hints for energy saving
To obtain the best performance:
• do not open the door frequently or leave it open longer than absolutely necessary
• do not remove the cold accumulators from the freezer basket.
Hints for fresh food refrigeration
To obtain the best performance:
• do not store warm food or evaporating liquids in the refrigerator
• do cover or wrap the food, particularly if it has a strong flavour
• position food so that air can circulate freely around it
Hints for refrigeration
Useful hints:
Page 16

16 Care and cleaning
Meat (all types) : wrap in polythene bags and place on the glass shelf above the vegetable
drawer.
For safety, store in this way only one or two days at the most.
Cooked foods, cold dishes, etc..: these should be covered and may be placed on any shelf.
Fruit and vegetables: these should be thoroughly cleaned and placed in the special drawer(s) provided.
Butter and cheese: these should be placed in special airtight containers or wrapped in aluminium foil or polythene bags to exclude as much air as possible.
Milk bottles: these should have a cap and should be stored in the bottle rack on the door.
Bananas, potatoes, onions and garlic, if not packed, must not be kept in the refrigerator.
Hints for freezing
To help you make the most of the freezing process, here are some important hints:
• the maximum quantity of food which can be frozen in 24 hrs. is shown on the rating
plate;
• the freezing process takes 24 hours. No further food to be frozen should be added during
this period;
• only freeze top quality, fresh and thoroughly cleaned, foodstuffs;
• prepare food in small portions to enable it to be rapidly and completely frozen and to
make it possible subsequently to thaw only the quantity required;
• wrap up the food in aluminium foil or polythene and make sure that the packages are
airtight;
• do not allow fresh, unfrozen food to touch food which is already frozen, thus avoiding a
rise in temperature of the latter;
• lean foods store better and longer than fatty ones; salt reduces the storage life of food;
• water ices, if consumed immediately after removal from the freezer compartment, can
possibly cause the skin to be freeze burnt;
• it is advisable to show the freezing in date on each individual pack to enable you to keep
tab of the storage time.
Hints for storage of frozen food
To obtain the best performance from this appliance, you should:
• make sure that the commercially frozen foodstuffs were adequately stored by the retail-
er;
• be sure that frozen foodstuffs are transferred from the foodstore to the freezer in the
shortest possible time;
• not open the door frequently or leave it open longer than absolutely necessary.
• Once defrosted, food deteriorates rapidly and cannot be refrozen.
• Do not exceed the storage period indicated by the food manufacturer.
CARE AND CLEANING
CAUTION!
Unplug the appliance before carrying out any maintenance operation.
Page 17
Care and cleaning 17
This appliance contains hydrocarbons in its cooling unit; maintenance and recharging must
therefore only be carried out by authorized technicians.
Periodic cleaning
The equipment has to be cleaned regularly:
• clean the inside and accessories with lukewarm water and some neutral soap.
• regularly check the door seals and wipe clean to ensure they are clean and free from
debris.
• rinse and dry thoroughly.
Do not pull, move or damage any pipes and/or cables inside the cabinet.
Never use detergents, abrasive powders, highly perfumed cleaning products or wax polishes
to clean the interior as this will damage the surface and leave a strong odour.
Clean the condenser (black grill) and the compressor at the back of the appliance with a
brush. This operation will improve the performance of the appliance and save electricity
consumption.
Take care of not to damage the cooling system.
Many proprietary kitchen surface cleaners contain chemicals that can attack/damage the
plastics used in this appliance. For this reason it is recommended that the outer casing of
this appliance is only cleaned with warm water with a little washing-up liquid added.
After cleaning, reconnect the equipment to the mains supply.
Defrosting of the refrigerator
Frost is automatically eliminated from the evaporator of the refrigerator compartment every time the motor compressor stops, during normal use. The defrost water drains out
through a trough into a special container at the back of the appliance, over the motor compressor, where it evaporates.
It is important to periodically clean the defrost
water drain hole in the middle of the refrigerator
compartment channel to prevent the water overflowing and dripping onto the food inside. Use
the special cleaner provided, which you will find
already inserted into the drain hole.
Page 18
18 What to do if…
Defrosting of the freezer
The freezer compartment of this model, on the other hand, is a "no frost" type. This means
that there is no buildup of frost when it is in operation, neither on the internal walls nor on
the foods.
The absence of frost is due to the continuous circulation of cold air inside the compartment, driven by an automatically controlled fan.
WHAT TO DO IF…
CAUTION!
Before troubleshooting, disconnect the power supply.
Only a qualified electrician or competent person must do the troubleshooting that is not in
this manual.
There are some sounds during normal use (compressor, refrigerant circulation).
Problem Possible cause Solution
The appliance is noisy. The appliance is not supported
The compressor operates
continually.
The door is not closed correctly. Refer to "Closing the door".
The door has been opened too
The product temperature is too
The room temperature is too
The FROSTMATIC function is
The COOLMATIC function is
Water flows on the rear
plate of the refrigerator.
Water flows into the refrigerator.
Products prevent that water
properly.
The Temperature regulator may
be set incorrectly.
frequently.
high.
high.
switched on.
switched on.
During the automatic defrosting
process, frost defrosts on the
rear plate.
The water outlet is clogged. Clean the water outlet.
flows into the water collector.
Check if the appliance stands stable (all the four feet should be on
the floor).
Set a warmer temperature.
Do not keep the door open longer
than necessary.
Let the product temperature decrease to room temperature before storage.
Decrease the room temperature.
Refer to "FROSTMATIC function".
Refer to "COOLMATIC function".
This is correct.
Make sure that products do not
touch the rear plate.
Page 19
What to do if…
Problem Possible cause Solution
Water flows on the
ground.
There is too much frost
and ice.
The door is not closed correctly. Refer to "Closing the door".
The temperature in the refriger-
The temperature in the
appliance is too high.
The product temperature is too
Many products are stored at the
The temperature in the refrigeration is too high.
The temperature in the
freezer is too high.
The appliance does not
operate.
The mains plug is not connected
The appliance has no power.
The lamp does not work. The lamp is in stand-by. Close and open the door.
"dEMo" appears on the
display.
The melting water outlet does
not flow in the evaporative tray
above the compressor.
Products are not wrapped properly.
ator is too low.
The door is not closed correctly. Refer to "Closing the door".
high.
same time.
There is no cold air circulation in
the appliance.
Products are too near to each
other.
The appliance is switched off. Switch on the appliance.
to the mains socket correctly.
There is no voltage in the mains
socket.
The appliance is in demonstration mode.
Attach the melting water outlet
to the evaporative tray.
Wrap the products better.
Set a higher temperature.
Let the product temperature decrease to room temperature before storage.
Store less products at the same
time.
Make sure that there is cold air
circulation in the appliance.
Store products so that there is
cold air circulation.
Connect the mains plug to the
mains socket correctly.
Connect a different electrical appliance to the mains socket. Contact a qualified electrician.
Keep pressed approximately 10
sec the OK button since a long
sound of buzzer is heard and the
display shut off for a short while:
appliance start works regularly.
19
As much as the advice does not lead to result, call the nearest brand-mark service.
Closing the door
1. Clean the door gaskets.
2. If necessary, adjust the door. Refer to "Installation".
3. If necessary, replace the defective door gaskets. Contact the Service Center.
Page 20
20 Technical data
TECHNICAL DATA
Dimension
Height 1850 mm
Width 595 mm
Depth 658 mm
Rising Time 18 h
Voltage 230 - 240 V
Frequency 50 Hz
The technical information are situated in the rating plate on the internal left side of the
appliance and in the energy label.
INSTALLATION
WARNING!
Read the "Safety Information" carefully for your safety and correct operation of the appliance before installing the appliance.
Positioning
Install this appliance at a location where the ambient temperature corresponds to the climate class indicated on the rating plate of the appliance:
Climate class Ambient temperature
SN +10°C to + 32°C
N +16°C to + 32°C
ST +16°C to + 38°C
T +16°C to + 43°C
Page 21
Installation 21
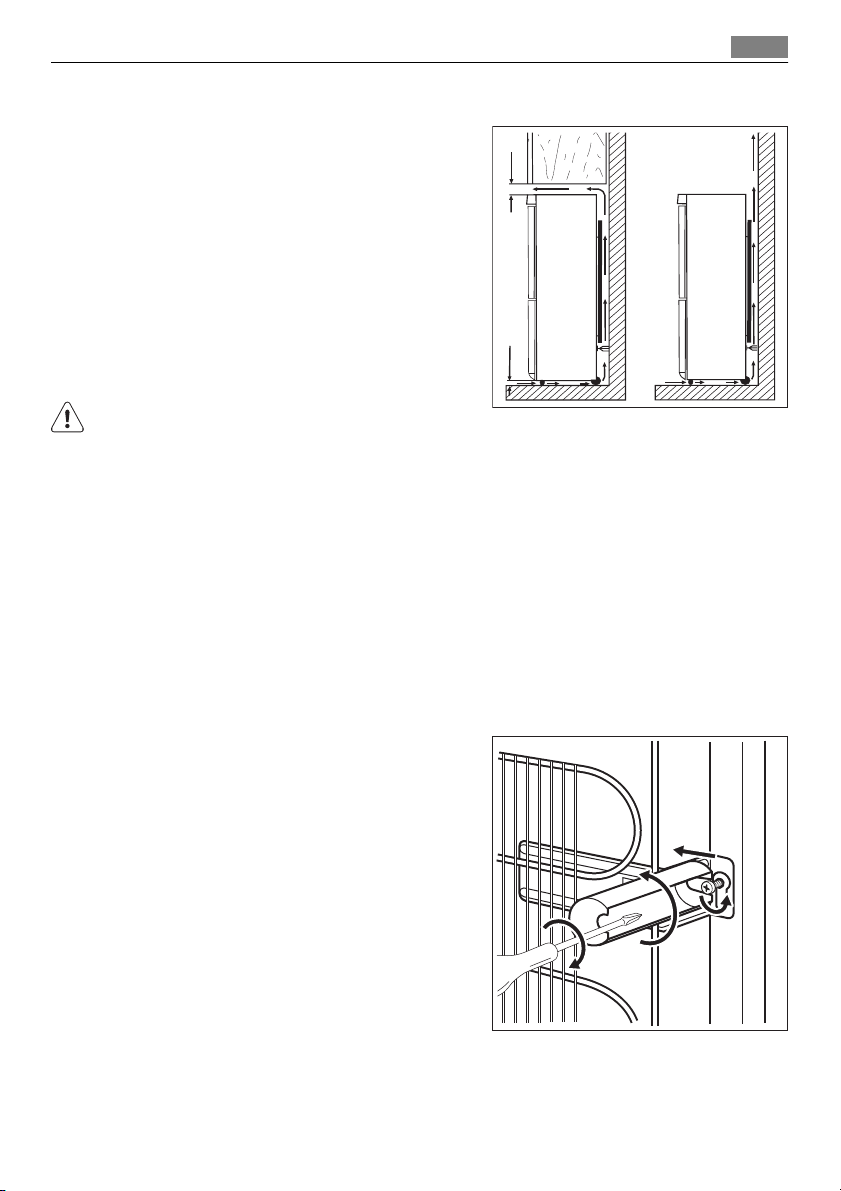
Location
The appliance should be installed well away from
sources of heat such as radiators, boilers, direct
sunlight etc. Ensure that air can circulate freely
around the back of the cabinet. To ensure best
performance, if the appliance is positioned below
an overhanging wall unit, the minimum distance
between the top of the cabinet and the wall unit
must be at least 100 mm . Ideally, however, the
appliance should not be positioned below overhanging wall units. Accurate levelling is ensured
by one or more adjustable feet at the base of the
cabinet.
WARNING!
It must be possible to disconnect the appliance
from the mains power supply; the plug must therefore be easily accessible after installation.
mm
min
100
A
mm
20
B
Electrical connection
Before plugging in, ensure that the voltage and frequency shown on the rating plate correspond to your domestic power supply.
The appliance must be earthed. The power supply cable plug is provided with a contact for
this purpose. If the domestic power supply socket is not earthed, connect the appliance to a
separate earth in compliance with current regulations, consulting a qualified electrician.
The manufacturer declines all responsibility if the above safety precautions are not observed.
This appliance complies with the E.E.C. Directives.
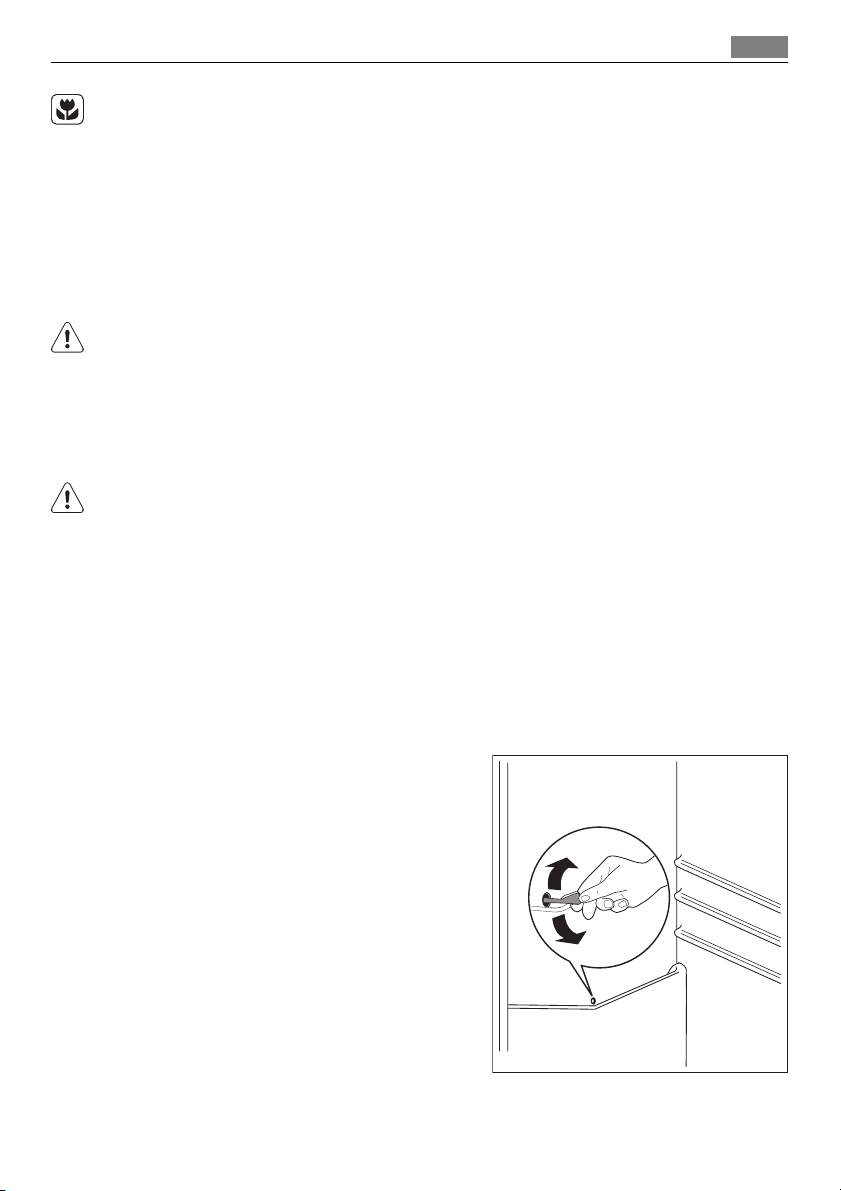
Rear spacers
You can find the two spacers in the bag with documentation.
Do these steps to install the spacers:
1. Release the screw.
2. Engage the spacer below the screw.
3. Turn the spacer to the right position.
4. Tighten again the screws.
2
1
4
3
Page 22
22 Installation
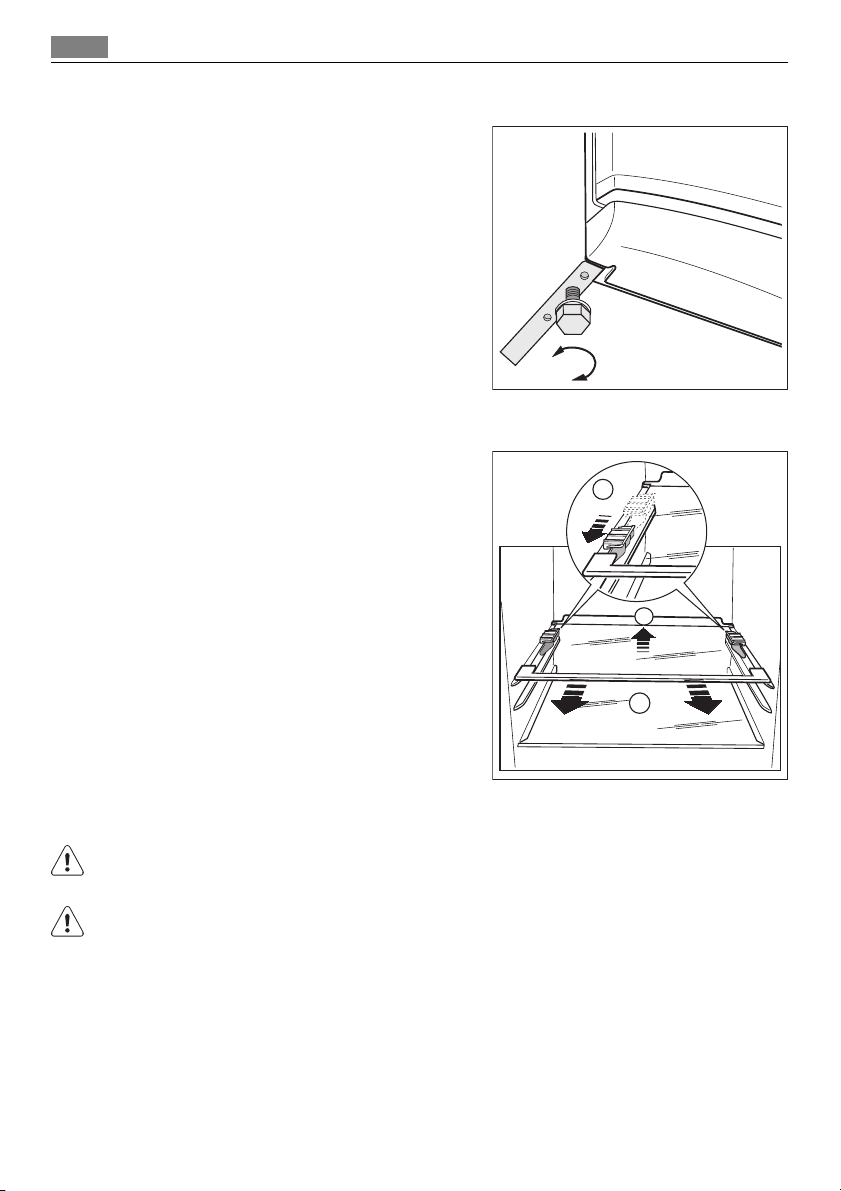
Levelling
When placing the appliance ensure that it stands
level. This can be achieved by two adjustable feet
at the bottom in front.
Removing the shelf holders
Your appliance is equipped with shelf retainers
that make it possible to secure the shelves during
transportation.
To remove them proceed as follows:
1. Move the shelf holders in the direction of the
arrow (A).
2. Raise the shelf from the rear and push it forward until it is freed (B).
3. Remove the retainers (C).
A
B
Door reversibility
WARNING!
Before carrying out any operations, remove the plug from the power socket.
To carry out the following operations, we suggest that this be made with another person
that will keep a firm hold on the doors of the appliance during the operations.
C
Page 23
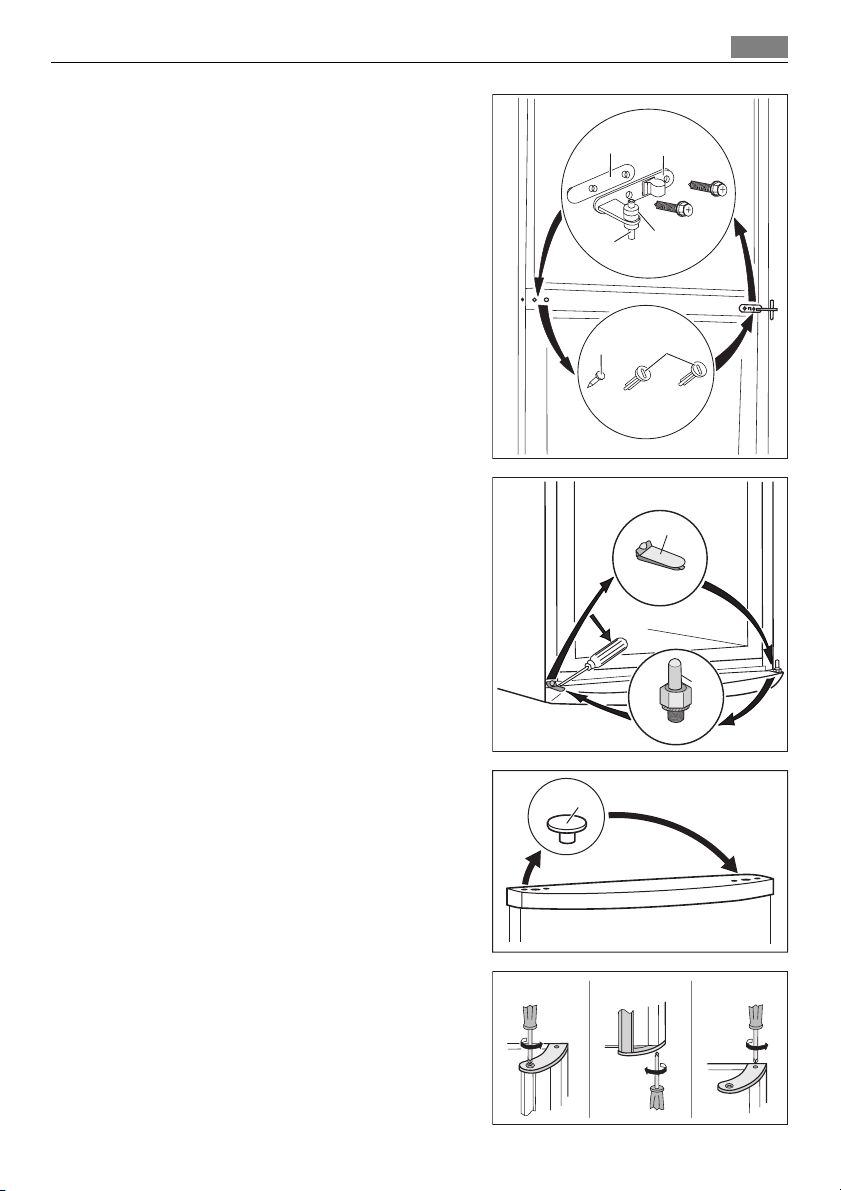
1. Open the doors. Unscrew the middle
hinge (m2). Remove the plastic spacer
(m1).
2. Remove the spacer (m6) and move to
the other side of the hinge pivot (m5).
3. Remove the doors.
4. Remove the left-hand cover pin of the
middle hinge (m3,m4) and move to the
other side.
5. Fit the pin of the middle hinge (m5) into
the left-hand hole of the lower door.
6. Remove using a tool the cover (b1). Un-
screw the lower hinge pivot (b2) and the
spacer (b3) and place them on the opposite side.
7. Re-insert the cover (b1) on the opposite
side.
Installation 23
m1
m2
m6
m5
m3
m4
b1
8. Remove the plugs (1) on the upper side
of both doors and move them to the
other side.
9. Remove the handle. Unscrew the top
handle bracket from the handle rod (h1).
Unscrew the bottom handle bracket
from the door (h2)
Unscrew the top handle bracket from
the door (h3).
b2
b3
1
h1 h2 h3
Page 24

24 Environmental concerns
10. Install the handle in the opposite side.
Re-screw the handle bracket on the
door (h4). Turn the handle bracket with
the handle and screw them to the door
(h5) and the fitted handle bracket (h6).
11. Re-insert the lower door on the lower
hinge pivot (b2).
12. Insert the middle hinge (m2) into the
left drill of the lower door.
13. Unscrew the upper hinge pivot (t1) and
place it on the opposite side.
14. Fit the upper door on the upper door
pivot.
15. Re-insert the upper door on the middle
hinge pivot (m5) slightly tilting both
doors.
16. Re-screw the middle hinge (m2). Do not
forget the plastic spacer (m1).
Do a final check to make sure that:
• All screws are tightened.
• The magnetic seal adheres to the cabinet.
• The door opens and closes correctly.
If the ambient temperature is cold (i.e. in Winter), the gasket may not fit perfectly to the
cabinet. In that case, wait for the natural fitting of the gasket.
In case you do not want to carry out the above mentioned operations, contact the nearest
After Sales Service Force. The After Sales Service specialist will carry out the reversibility of
the doors at your cost.
h4 h5 h6
t1
ENVIRONMENTAL CONCERNS
The symbol on the product or on its packaging indicates that this product may not be
treated as household waste. Instead it should be taken to the appropriate collection point
for the recycling of electrical and electronic equipment. By ensuring this product is
disposed of correctly, you will help prevent potential negative consequences for the
environment and human health, which could otherwise be caused by inappropriate waste
handling of this product. For more detailed information about recycling of this product,
please contact your local council, your household waste disposal service or the shop where
you purchased the product.
Page 25

POUR DES RÉSULTATS PARFAITS
Merci d'avoir choisi ce produit AEG. Nous l'avons créé
pour vous offrir la meilleure performance pour une
longue durée, avec des technologies innovantes qui vous
simplifient la vie - autant de caractéristiques que vous ne
trouverez pas sûrement pas sur d'autres appareils.
Veuillez prendre quelques instants pour lire cette notice
afin d'utiliser au mieux votre appareil.
ACCESSOIRES ET CONSOMMABLES
Dans la boutique en ligne d'AEG, vous trouverez tout ce
qu'il vous faut pour que vos appareils AEG fonctionnent
parfaitement. Sans oublier une vaste gamme d'accessoires
conçus et fabriqués selon les critères de qualité les plus
élevés qui soient, des articles de cuisine spécialisés aux
range-couverts, des porte-bouteilles aux sacs à linge
délicats...
25
Visitez la boutique en ligne sur
www.aeg.com/shop
Page 26

26 Sommaire
SOMMAIRE
27 Consignes de sécurité
30 Bandeau de commande
35 Première utilisation
35 Utilisation quotidienne
38 Conseils utiles
40 Entretien et nettoyage
41 En cas d'anomalie de
fonctionnement
43 Caractéristiques techniques
44 Installation
48 En matière de sauvegarde de
l'environnement
Les symboles suivants sont utilisés dans ce
manuel:
Informations importantes pour votre sécurité
et pour éviter d’abîmer l’appareil.
Informations générales et conseils
Informations écologiques
Sous réserve de modifications
Page 27

Consignes de sécurité
CONSIGNES DE SÉCURITÉ
Pour votre sécurité et garantir une utilisation correcte de l'appareil, lisez attentivement cette notice, y compris les conseils et avertissements, avant d'installer et d'utiliser l'appareil
pour la première fois. Pour éviter toute erreur ou accident, veillez à ce que toute personne
qui utilise l'appareil connaisse bien son fonctionnement et ses fonctions de sécurité. Conservez cette notice avec l'appareil. Si l'appareil doit être vendu ou cédé à une autre personne, veillez à remettre cette notice au nouveau propriétaire, afin qu'il puisse se familiariser
avec son fonctionnement et sa sécurité.
Pour la sécurité des personnes et des biens, conservez et respectez les consignes de sécurité
figurant dans cette notice. Le fabricant décline toute responsabilité en cas de dommages
dus au non-respect de ces instructions.
Sécurité des enfants et des personnes vulnérables
• Cet appareil n'est pas destiné à être utilisé par des enfants ou des personnes dont les
capacités physiques, sensorielles ou mentales, ou le manque d'expérience et de connaissance les empêchent d'utiliser l'appareil sans risque lorsqu'ils sont sans surveillance ou en
l'absence d'instruction d'une personne responsable qui puisse leur assurer une utilisation
de l'appareil sans danger.
Empêchez les enfants de jouer avec l'appareil.
• Ne laissez pas les différents emballages à portée des enfants. Ils pourraient s'asphyxier.
• Si l'appareil doit être mis au rebut, veillez à couper le câble d'alimentation électrique au
ras de l'appareil pour éviter les risques d'électrocution. Démontez la porte pour éviter que
des enfants ne restent enfermés à l'intérieur.
• Cet appareil est muni de fermetures magnétiques. S'il remplace un appareil équipé d'une
fermeture à ressort, nous vous conseillons de rendre celle-ci inutilisable avant de vous en
débarrasser. Ceci afin d'éviter aux enfants de s'enfermer dans l'appareil et de mettre ainsi
leur vie en danger.
27
Consignes générales de sécurité
AVERTISSEMENT
Veillez à ce que les orifices de ventilation, situés dans l'enceinte de l'appareil ou la structure
intégrée, ne soient pas obstrués.
• Les appareils sont destinés uniquement à la conservation des aliments et/ou des boissons
dans le cadre d’un usage domestique normal, tel que celui décrit dans la présente notice.
• N'utilisez pas d'appareils électriques, d'agents chimiques ou tout autre système artificiel
pour accélérer le processus de dégivrage.
• Ne faites pas fonctionner d'appareils électriques (comme des sorbetières électriques, ...) à
l'intérieur des appareils de réfrigération à moins que cette utilisation n'ait reçu l'agrément du fabricant.
• N'endommagez pas le circuit frigorifique.
Page 28

28 Consignes de sécurité
• Le circuit frigorifique de l’appareil contient de l’isobutane (R600a), un gaz naturel offrant
un haut niveau de compatibilité avec l’environnement mais qui est néanmoins inflammable.
Pendant le transport et l'installation de votre appareil, assurez-vous qu'aucune partie du
circuit frigorifique n'est endommagée.
Si le circuit frigorifique est endommagé :
– évitez les flammes vives et toute autre source d'allumage
– aérez soigneusement la pièce où se trouve l'appareil
• Ne modifiez pas les spécifications de l'appareil. Si le câble d'alimentation est endommagé, il peut causer un court circuit, un incendie et/ou une électrocution.
AVERTISSEMENT
Les éventuelles réparations ou interventions sur votre appareil, ainsi que le remplacement
du câble d'alimentation, ne doivent être effectuées que par un professionnel qualifié.
1. L'appareil ne doit pas être raccordé à l'aide d'un prolongateur, d'une prise multiple
ou d'un raccordement multiple (risque d'incendie).
2. Assurez-vous que la prise n'est pas écrasée ou endommagée par l'arrière de l'appa-
reil. Une prise de courant écrasée ou endommagée peut s'échauffer et causer un incendie.
3. Vérifiez que la prise murale de l'appareil est accessible.
4. Ne débranchez pas l'appareil en tirant sur le câble.
5. Si la prise murale n'est pas bien fixée, n'introduisez pas de prise dedans. Risque
d'électrocution ou d'incendie.
6.
Votre appareil ne doit pas être utilisé sans le diffuseur de l'ampoule d'éclairage.
pour l'éclairage intérieur.
• Cet appareil est lourd. Faite attention lors de son déplacement.
• Ne touchez pas avec les mains humides les surfaces givrées et les produits congelés (risque de brûlure et d'arrachement de la peau).
• Évitez une exposition prolongée de l'appareil aux rayons solaires.
•
Les ampoules
6)
utilisées dans cet appareil sont des ampoules spécifiques destinées uniquement à un usage sur des appareils ménagers. Elles ne sont pas adaptées à l'éclairage
d'une habitation.
5)
Utilisation quotidienne
• Ne posez pas d'éléments chauds sur les parties en plastique de l'appareil.
• Ne stockez pas de gaz ou de liquides inflammables dans l'appareil (risque d'explosion).
• Ne placez pas d'aliments directement contre la sortie d'air sur la paroi arrière de l'appa-
7)
reil.
• Un produit décongelé ne doit jamais être recongelé.
• Conservez les aliments emballés conformément aux instructions de leur fabricant.
5) Si l'appareil est équipé d'un diffuseur d'éclairage.
6) Si l'ampoule d'éclairage est prévue.
7) Si l'appareil est sans givre.
Page 29

Consignes de sécurité 29
• Respectez scrupuleusement les conseils de conservation donnés par le fabricant de l'appareil. Consultez les instructions respectives.
• Ne mettez pas de bouteilles ni de boîtes de boissons gazeuses dans le compartiment congélateur, car la pression se formant à l'intérieur du contenant pourrait le faire éclater et
endommager ainsi l'appareil.
• Ne consommez pas certains produits tels que les bâtonnets glacés dès leur sortie de l'appareil, car ils peuvent provoquer des brûlures.
Entretien et nettoyage
• Avant toute opération d'entretien, mettez l'appareil hors tension et débranchez-le de la
prise de courant.
• N'utilisez pas d'objets métalliques pour nettoyer l'appareil.
• N'utilisez pas d'objet tranchant pour gratter la couche de givre. Utilisez une spatule en
plastique.
• Contrôlez régulièrement l'orifice d'évacuation de l'eau de dégivrage dans le compartiment réfrigérateur. Nettoyez-le, si besoin. Si l'orifice est bouché, l'eau s'écoulera en bas
de l'appareil.
Installation
Avant de procéder au branchement électrique, respectez scrupuleusement les instructions
fournies dans cette notice.
• Déballez l'appareil et vérifiez qu'il n'est pas endommagé. Ne branchez pas l'appareil s'il
est endommagé. Signalez immédiatement au revendeur de l'appareil les dommages
constatés. Dans ce cas, gardez l'emballage.
• Il est conseillé d'attendre au moins quatre heures avant de brancher l'appareil pour que
le circuit frigorifique soit stabilisé.
• Veillez à ce que l'air circule librement autour de l'appareil pour éviter qu'il ne surchauffe.
Pour assurer une ventilation suffisante, respectez les instructions de la notice (chapitre
Installation).
• Placez l'appareil dos au mur pour éviter tout contact avec le compresseur et le condenseur (risque de brûlure).
• Placez de préférence votre appareil loin d'une source de chaleur (chauffage, cuisson ou
rayons solaires trop intenses).
• Assurez-vous que la prise murale reste accessible après l'installation de l'appareil.
•
Branchez à l'alimentation en eau potable uniquement.
8)
Service
• Les branchements électriques nécessaires à la mise en service de l'appareil doivent être
réalisés par un électricien spécialisé ou un professionnel qualifié.
• Ne retirez pas le cache voyants. Contactez le service après-vente le plus proche pour
remplacer le bandeau de commande si besoin.
• Cet appareil ne doit être entretenu et réparé que par un Service Après Vente agréé, exclusivement avec des pièces d'origine.
8) Si un branchement sur le réseau d'eau est prévu.
Page 30

30 Bandeau de commande
Protection de l'environnement
Le système frigorifique et l'isolation de votre appareil ne contiennent pas de C.F.C. contribuant ainsi à préserver l'environnement. L'appareil ne doit pas être mis au rebut avec les
ordures ménagères et les déchets urbains. La mousse d'isolation contient des gaz inflammables : l'appareil sera mis au rebut conformément aux règlements applicables disponibles auprès des autorités locales. Veillez à ne pas détériorer les circuits frigorifiques, notamment au
niveau du condenseur. Les matériaux utilisés dans cet appareil identifiés par le symbole
sont recyclables.
BANDEAU DE COMMANDE
1 2 3 4 5 6 7 8
1 Bouton ON/OFF de l'appareil
2 Dispositif de réglage de température du réfrigérateur (plus de froid)
3 Dispositif de réglage de température du réfrigérateur (moins de froid)
4 Bouton Mode
5 Bouton OK
6 Dispositif de réglage de température du compartiment congélateur (plus de froid)
7 Dispositif de réglage de température du compartiment congélateur (moins de froid)
8 Indicateur
Pour augmenter le volume défini lors de l'activation ou désactivation de boutons, appuyez
simultanément sur le bouton Mode et le bouton de réglage de température (plus de froid)
pendant plusieurs secondes. Ce changement est réversible.
Affichage
1 Voyant du compartiment réfrigérateur
2 Indicateur de température du réfrigérateur et indicateur de minuterie
3 Indicateur de mise à l'arrêt du réfrigérateur
4 Fonction COOLMATIC
5 Fonction Vacances
6 Fonction FROSTMATIC
7 Affichage de la température du compartiment congélateur
COOL FROST
Off
min
6 74 5321
MATICMATIC
1112 89
10
Page 31

Bandeau de commande
8 Voyant du compartiment congélateur
9 Voyant d'alarme
10 Fonction Sécurité enfants
11 Fonction Minute Minder
12 Fonction Dynamic Air
Mise en fonctionnement
Pour mettre en fonctionnement l'appareil, procédez comme suit :
1. Branchez électriquement l'appareil.
2. Appuyez sur la touche ON/OFF si l'affichage est éteint.
3. L'alarme sonore peut se déclencher au bout de quelques secondes.
Pour réinitialiser l'alarme, reportez-vous au paragraphe « Alarme de température ».
4. Si "dEMo" s'affiche, l'appareil est en mode démonstration. Reportez-vous au chapitre
« En cas d'anomalie de fonctionnement ».
5. Les voyants du thermostat indiquent la température programmée par défaut.
Pour sélectionner une température de consigne différente, reportez-vous au paragraphe
« Réglage de la température ».
Mise à l'arrêt
Pour mettre à l'arrêt l'appareil, procédez comme suit :
1. Appuyez sur le bouton ON/OFF pendant 5 secondes.
2. L'affichage est désactivé.
3. Pour mettre l'appareil hors tension, débranchez-le électriquement.
31
Mise à l'arrêt du compartiment réfrigérateur
Pour mettre à l'arrêt le réfrigérateur :
1. Appuyez sur le bouton Mode jusqu'à ce que le voyant correspondant apparaisse.
L'indicateur de mise à l'arrêt du réfrigérateur clignote.
L'indicateur de température du réfrigérateur affiche des tirets.
2. Appuyez sur le bouton OK pour confirmer.
3. Le voyant de mise à l'arrêt du réfrigérateur est allumé.
Mise en fonctionnement du réfrigérateur
Pour mettre en fonctionnement le réfrigérateur :
1. Appuyez sur le dispositif de réglage de température du réfrigérateur.
Ou :
1. Appuyez sur la touche Mode, jusqu'à ce que le voyant correspondant apparaisse.
Le voyant de mise à l'arrêt du réfrigérateur clignote.
2. Appuyez sur la touche OK pour confirmer.
3. Le voyant de mise à l'arrêt du réfrigérateur s'éteint.
Pour sélectionner une température de consigne différente, reportez-vous au paragraphe
« Réglage de la température ».
Page 32

32 Bandeau de commande
Réglage de la température
La température de consigne du réfrigérateur et du congélateur peuvent être réglées en appuyant sur les dispositifs de réglage de température.
Réglage de la température par défaut :
• + 5 °C dans le compartiment réfrigérateur
• -18 °C dans le compartiment congélateur
Les affichages de température indiquent la température programmée.
La température programmée sera atteinte en 24 heures.
Des variations de quelques degrés par rapport à la température programmée sont normales
et ne signifient aucun dysfonctionnement de l'appareil.
Après une coupure de courant, la température programmée reste activée.
Fonction Minute Minder
La fonction Minute Minder est à utiliser pour le réglage d'une alarme sonore à une heure
désirée, ce qui est utile, par exemple, lorsque l'on souhaite refroidir une préparation pendant un certain temps dans le cadre d'une recette de cuisine, ou lorsque l'on refroidit des
bouteilles rapidement dans le congélateur.
Pour activer la fonction :
1. Appuyez sur la touche Mode jusqu'à ce que le voyant correspondant apparaisse.
L'indicateur Minute Minder clignote.
La minuterie affiche pendant quelques secondes la valeur de consigne (30 minutes).
2. Appuyez sur la touche de réglage de la température du compartiment réfrigérateur
pour modifier la valeur de consigne (1 à 90 minutes).
3. Appuyez sur la touche OK pour confirmer.
L'indicateur Minute Minder s'affiche.
La minuterie se met à clignoter (min).
À la fin du décompte, l'indicateur Minute Minder clignote et un signal sonore retentit :
1. Retirez les boissons placées dans le compartiment congélateur.
2. Appuyez sur la touche OK pour arrêter le signal sonore et désactiver la fonction.
Il est possible de désactiver cette fonction à tout moment pendant le décompte :
1. Appuyez sur la touche Mode jusqu'à ce que l'indicateur Minute Minder clignote.
2. Appuyez sur la touche OK pour confirmer.
3. L'indicateur Minute Minder s'éteint.
Il est possible de modifier l'heure à tout moment, pendant et à la fin du décompte en appuyant simultanément sur la touche de réglage pour obtenir plus de froid et sur la touche
de réglage pour obtenir moins de froid.
Fonction Sécurité enfants
Pour verrouiller les touches afin de prévenir les erreurs de manipulation, sélectionnez la
fonction Sécurité enfants.
Pour activer la fonction :
1. Appuyez sur la touche Mode jusqu'à ce que le symbole correspondant apparaisse.
Page 33

Bandeau de commande
2. Le voyant Sécurité enfants clignote.
3. Appuyez sur la touche OK pour confirmation.
Le voyant Sécurité enfants apparaît.
Pour désactiver la fonction :
1. Appuyez sur la touche Mode jusqu'à ce que le voyant Sécurité enfants clignote.
2. Appuyez sur la touche OK pour confirmation.
3. Le voyant Sécurité enfants s'éteint.
Alarme haute température
Une augmentation de la température dans le compartiment congélateur (par exemple à
cause d'une coupure de courant) est indiquée par :
• Le clignotement de l'alarme et des voyants de température du congélateur
• Le déclenchement d'une alarme sonore.
Pour réinitier l'alarme :
1. Appuyez sur une touche quelconque.
2. L’alarme sonore s’éteint.
3. Le voyant de température du congélateur affiche la température maximum régnant
dans le compartiment durant quelques secondes. Puis il affiche à nouveau la température programmée.
4. Le voyant alarme continue de clignoter jusqu'à ce que les conditions normales de fonctionnement soient rétablies.
Une fois l'alarme rétablie, le voyant alarme s'éteint.
33
Alarme porte ouverte
Une alarme sonore se déclenche si la porte reste ouverte pendant quelques minutes. Les
conditions d'alarme porte ouverte sont signalées par :
• Un voyant d'alarme clignotant
• un signal sonore
Au rétablissement des conditions normales (porte fermée), l'alarme s'arrête.
Fonction COOLMATIC
Si vous devez ranger une grande quantité d'aliments dans votre réfrigérateur, par exemple
après avoir fait vos courses, nous vous suggérons d'activer la fonction COOLMATIC : elle
permet de refroidir rapidement les aliments tout en évitant le réchauffement des denrées
déjà stockées dans le réfrigérateur.
Pour activer la fonction :
1. Appuyez sur la touche Mode jusqu'à ce que le voyant correspondant apparaisse.
L'indicateur COOLMATIC clignote.
2. Appuyez sur la touche OK pour confirmer.
L'indicateur COOLMATIC s'affiche.
La fonction COOLMATIC se désactive automatiquement au bout d'environ 6 heures.
Pour désactiver la fonction avant sa désactivation automatique :
1. Appuyez sur la touche Mode jusqu'à ce que l'indicateur COOLMATIC clignote.
2. Appuyez sur la touche OK pour confirmer.
Page 34

34 Bandeau de commande
3. L'indicateur COOLMATIC s'éteint.
La fonction se désactive en sélectionnant une température de consigne différente.
Fonction Vacances
Cette fonction vous permet de garder le compartiment réfrigérateur vide et fermé pendant
une longue période (p.ex. les vacances d'été), sans formation de mauvaises odeurs.
Avant d'activer la fonction Vacances, le compartiment réfrigérateur doit être vide.
Pour activer la fonction :
1. Appuyez sur la touche Mode jusqu'à ce que le symbole correspondant apparaisse.
Le voyant Vacances clignote.
Le voyant du thermostat du réfrigérateur indique la température programmée.
2. Appuyez sur la touche OK pour confirmation.
Le voyant Vacances apparaît.
Pour désactiver la fonction :
1. Appuyez sur la touche Mode jusqu'à ce que le voyant Vacances clignote.
2. Appuyez sur la touche OK pour confirmation.
3. Le voyant Vacances s'éteint.
La fonction s'éteint en choisissant une température différente pour le réfrigérateur.
Fonction DYNAMICAIR
Pour activer la fonction :
1. Appuyez sur la touche Mode jusqu'à ce que le voyant correspondant apparaisse.
Le voyant DYNAMICAIR clignote.
2. Appuyez sur la touche OK pour confirmer.
Le voyant DYNAMICAIR s'affiche.
Pour désactiver la fonction :
1. Appuyez sur la touche Mode jusqu’à ce que le voyant DYNAMICAIR clignote.
2. Appuyez sur la touche OK pour confirmer.
3. Le voyant DYNAMICAIR s'éteint.
Si la fonction est activée de manière automatique, le voyant DYNAMICAIR n'est pas visible
(reportez-vous au chapitre « Utilisation quotidienne »).
L'activation de la fonction DYNAMICAIR augmente la consommation d'énergie.
Fonction FROSTMATIC
Pour activer la fonction :
1. Appuyez sur la touche Mode jusqu'à ce que le voyant correspondant apparaisse.
L'indicateur FROSTMATIC clignote.
2. Appuyez sur la touche OK pour confirmer.
Page 35

Première utilisation
L'indicateur FROSTMATIC s'affiche.
Cette fonction s'arrête automatiquement au bout de 52 heures.
Pour désactiver la fonction avant sa désactivation automatique :
1. Appuyez sur la touche Mode jusqu'à ce que l'indicateur FROSTMATIC clignote.
2. Appuyez sur la touche OK pour confirmer.
3. L'indicateur FROSTMATIC s'éteint.
Placez les denrées fraîches à congeler dans le panier FROSTMATIC.
La fonction se désactive en sélectionnant une température de consigne différente.
PREMIÈRE UTILISATION
Nettoyage intérieur
Avant d'utiliser l'appareil pour la première fois, nettoyez l'intérieur et tous les accessoires
internes avec de l'eau tiède savonneuse pour supprimer l'odeur caractéristique du "neuf"
puis séchez soigneusement.
N'utilisez pas de produits abrasifs, poudre à récurer, éponge métallique pour ne pas abîmer
la finition.
UTILISATION QUOTIDIENNE
Conservation des aliments congelés
À la mise en service ou après un arrêt prolongé, placez le thermostat sur la position Max
pendant 2 heures environ, avant d'introduire les produits dans le compartiment.
En cas de dégivrage accidentel, dû par exemple à une panne de courant, si la panne doit se
prolonger plus longtemps qu'il n'est indiqué à la rubrique "temps d'augmentation" dans la
section Caractéristiques techniques, consommez les aliments décongelés le plus rapidement
possible ou recongelez-les après les avoir cuits (une fois refroidis).
35
La décongélation
Les aliments surgelés ou congelés peuvent être décongelés dans le compartiment réfrigérateur ou à température ambiante, avant d'être utilisés, en fonction du temps disponible pour
cette opération.
Les petites pièces peuvent même être cuites sans décongélation préalable : dans ce cas, la
cuisson est plus longue.
Page 36

36 Utilisation quotidienne
DYNAMICAIR
Le compartiment réfrigérateur est équipé d'un
dispositif qui permet le refroidissement rapide des
aliments et qui maintient une température plus
homogène dans le compartiment.
Ce dispositif s'active automatiquement en cas de
besoin, par exemple pour rafraîchir rapidement le
réfrigérateur lorsque la porte est restée ouverte
ou si la température ambiante est élevée.
Vous permet de mettre manuellement le dispositif
en fonctionnement si nécessaire (reportez-vous
au chapitre « FonctionDYNAMICAIR »).
DYNAMICAIR se met à l'arrêt si la porte est ouverte et redémarre sitôt la porte refermée.
Clayettes amovibles
Les parois du réfrigérateur sont équipées d'une
série de glissières pour que les clayettes puissent
être placées en fonction des besoins.
Porte-bouteilles
Placez les bouteilles (ouverture vers l'avant) dans
le compartiment prévu à cet effet.
Si le compartiment est positionné dans le sens horizontal, n'y placer que des bouteilles fermées.
Ce porte-bouteilles peut être incliné afin de pouvoir y ranger des bouteilles déjà ouvertes. Pour ce
faire, tirez le compartiment vers le haut afin qu'il
puisse tourner vers le haut et être placé sur le niveau supérieur.
Page 37

Emplacement des balconnets de la porte
En fonction de la taille des paquets d'aliments conservés, les balconnets de la porte
peuvent être positionnés à différentes hauteurs.
Pour les ajuster, procédez comme suit :
tirez progressivement dans le sens des flèches pour les dégager, puis repositionnez-les
selon les besoins.
Tiroir FRESHBOX
Le tiroir est adapté à la conservation des denrées
fraîches et hautement périssables (poissons, viandes, fruits de mer), car la température y est inférieure à celle des autres zones du réfrigérateur.
Utilisation quotidienne 37
Tiroir MAXIBOX
Ce bac est adapté pour la conservation de fruits et
légumes.
Il possède une cloison qui, selon vos besoins, permet de séparer les aliments.
Selon le modèle, une grille permet de préserver les
fruits et légumes de toute humidité pouvant s'accumuler au fond du bac.
Tous les éléments du bac sont amovibles pour faciliter le nettoyage.
Page 38

38 Conseils utiles
Retrait des paniers de congélation du congélateur
2
2
1
1
Les paniers de congélation sont équipés d'un arrêt afin d'empêcher leur retrait accidentel
ou leur chute. Pour retirer le panier du compartiment congélateur, tirez-le vers vous et,
lorsque vous atteignez le point d'arrêt, retirez-le en inclinant la partie avant vers le haut.
Pour le remettre, relevez légèrement l'avant du panier et insérez-le dans le congélateur.
Dès que vous avez dépassé les points d'arrêt, poussez les paniers dans la bonne position.
CONSEILS UTILES
Bruits de fonctionnement normaux
• Il n'est pas anormal d'entendre le bruit de circulation du fluide frigorigène selon son état
liquide, gazeux ou vaporeux. Ce phénomène est normal.
• Le compresseur peut produire un ronronnement aigu ou un bruit de pulsation. Ce phé-
nomène est normal.
• La dilatation thermique peut provoquer un soudain, léger bruit de craquement. C'est un
phénomène normal et sans gravité. Ce phénomène est normal.
Conseils pour l'économie d'énergie
Pour obtenir les meilleures performances possibles :
• N'ouvrez pas la porte trop souvent ou plus longtemps que nécessaire.
• N'enlevez pas les accumulateurs de froid du panier de congélation.
Conseils pour la réfrigération de denrées fraîches
Pour obtenir les meilleures performances possibles :
• N'introduisez pas d'aliments encore chauds ou de liquides en évaporation dans le réfrigé-
rateur.
• Couvrez ou enveloppez soigneusement les aliments, surtout s'ils sont aromatiques.
• Placez les aliments pour que l'air puisse circuler librement autour.
Page 39

Conseils utiles
Conseils pour la réfrigération
Conseils utiles :
Viande (tous les types) : enveloppez-la dans des sachets en plastique et placez-la sur la tablette en verre au-dessus du bac à légumes.
La période de conservation est de 1 à 2 jours au maximum.
Aliments cuits, plats froids, etc. : placez-les bien couverts sur une clayette.
Fruits et légumes : placez-les une fois nettoyés dans le(s) bac(s) à légumes fourni(s).
Beurre et fromage : placez-les dans des récipients étanches spéciaux ou enveloppez-les soigneusement dans des feuilles d'aluminium ou de polyéthylène, pour emmagasiner le moins
d'air possible.
Lait en bouteille : bouchez-le et placez-le dans le balconnet de la contreporte réservé aux
bouteilles.
Bananes, pommes de terre, oignons et ail ne se conservent pas au réfrigérateur, s'ils ne sont
pas correctement emballés.
Conseils pour la congélation
Pour obtenir les meilleurs résultats, voici quelques conseils importants :
• la quantité maximale de denrées que vous pouvez congeler par 24 heures est indiquée
sur la plaque signalétique.
• le temps de congélation est de 24 heures. Aucune autre denrée à congeler ne doit être
ajoutée pendant cette période.
• congelez seulement les denrées alimentaires fraîches, de qualité supérieure (une fois net-
toyées).
• préparez la nourriture en petits paquets pour une congélation rapide et uniforme, adap-
tés à l'importance de la consommation.
• enveloppez les aliments dans des feuilles d'aluminium ou de polyéthylène et assurez-
vous que les emballages sont étanches ;
• ne laissez pas des aliments frais, non congelés, toucher des aliments déjà congelés pour
éviter une remontée en température de ces derniers.
• les aliments maigres se conservent mieux et plus longtemps que les aliments gras ; le sel
réduit la durée de conservation des aliments
• la température très basse à laquelle se trouvent les bâtonnets glacés, s'ils sont consom-
més dès leur sortie du compartiment congélateur, peut provoquer des brûlures.
• L'identification des emballages est importante : indiquez la date de congélation du pro-
duit, et respectez la durée de conservation indiquée par le fabricant.
39
Conseils pour la conservation des produits surgelés et congelés du commerce
Pour une bonne conservation des produits surgelés et congelés, vous devez :
• vous assurer qu'ils ont bien été conservés au magasin ;
• prévoir un temps réduit au minimum pour leur transport du magasin d'alimentation à
votre domicile ;
• éviter d'ouvrir trop souvent la porte du congélateur et ne la laisser ouverte que le temps
nécessaire.
• une fois décongelés, les aliments se détériorent rapidement et ne peuvent pas être re-
congelés.
Page 40

40 Entretien et nettoyage
• respecter la durée de conservation indiquée par le fabricant.
ENTRETIEN ET NETTOYAGE
ATTENTION
débrancher l'appareil avant toute opération d'entretien.
Cet appareil contient des hydrocarbures dans son circuit réfrigérant : l'entretien et la recharge ne doivent donc être effectués que par du personnel autorisé.
Nettoyage périodique
Cet appareil doit être nettoyé régulièrement :
• Nettoyez l'intérieur et tous les accessoires avec de l'eau tiède savonneuse.
• Vérifiez régulièrement les joints de porte et nettoyez-les en les essuyant pour éviter tou-
te accumulation de déchets.
• Rincez et séchez soigneusement.
Ne pas tirer, déplacer ou endommager les tuyaux et/ou câbles qui se trouvent à l'intérieur
de l'appareil.
Ne JAMAIS utiliser de produits abrasifs ou caustiques ni d'éponges avec grattoir pour nettoyer l'intérieur de façon à ne pas l'abîmer et laisser de fortes odeurs.
Nettoyer le condenseur (grille noire) et le compresseur situés à l'arrière de l'appareil avec
une brosse ou un aspirateur. Cette opération améliore les performances de l'appareil et permet des économies d'énergie.
Attention à ne pas endommager le système de réfrigération.
De nombreux détergents pour la cuisine recommandés par les fabricants contiennent des
produits chimiques qui peuvent attaquer/endommager les pièces en plastique utilisées dans
cet appareil. Il est par conséquent recommandé d'utiliser seulement de l'eau chaude additionnée d'un peu de savon liquide pour nettoyer la carrosserie de l'appareil.
Après le nettoyage, rebranchez l'appareil.
Dégivrage du réfrigérateur
Le givre est automatiquement éliminé de l'évaporateur du compartiment réfrigérateur à
chaque arrêt du compresseur, en cours d'utilisation normale. L'eau de dégivrage est collectée dans un récipient spécial situé à l'arrière de l'appareil, au-dessus du compresseur, d'où
elle s'évapore.
Page 41

En cas d'anomalie de fonctionnement 41
Il est important de nettoyer régulièrement l'orifice
d'écoulement de la gouttière d'évacuation de l'eau
de dégivrage située au milieu du compartiment
réfrigérateur pour empêcher l'eau de déborder et
de couler sur les aliments qui se trouvent à l'intérieur. Nettoyez l'orifice d'écoulement de l'eau de
dégivrage avec le bâtonnet spécial se trouvant déjà dans l'orifice.
Dégivrage du congélateur
Le compartiment congélateur de ce modèle est "sans givre". Cela signifie qu'il n'y a aucune
formation de givre pendant son fonctionnement, ni sur les parois internes si sur les aliments.
L'absence de givre est due à la circulation continuelle de l'air froid à l'intérieur du compartiment, sous l'impulsion d'un ventilateur à commande automatique.
EN CAS D'ANOMALIE DE FONCTIONNEMENT
ATTENTION
Avant d'intervenir sur l'appareil, débranchez-le.
La résolution des problèmes non mentionnés dans la présente notice doit être exclusivement confiée à un électricien qualifié ou à un professionnel qualifié.
L'appareil émet certains bruits pendant son fonctionnement (compresseur, circuit de réfrigérant).
Problème Cause possible Solution
L'appareil est bruyant. L'appareil n'est pas stable. Vérifiez la stabilité (les quatre
Le compresseur fonctionne
en permanence.
La porte n'est pas correctement
La porte a été ouverte trop sou-
Cela peut être dû à un mauvais
réglage de la température.
fermée.
vent.
pieds doivent être en contact
avec le sol).
Modifiez le dispositif de réglage
de température pour obtenir
moins de froid.
Reportez-vous au chapitre « Fermeture de la porte ».
Ne laissez pas la porte ouverte
plus longtemps que nécessaire.
Page 42

42 En cas d'anomalie de fonctionnement
Problème Cause possible Solution
La température du produit est
La température ambiante est
La fonction FROSTMATIC est ac-
La fonction COOLMATIC est acti-
De l'eau s'écoule sur la
plaque arrière du réfrigérateur.
De l'eau s'écoule dans le
réfrigérateur.
Des denrées empêchent l'eau de
De l'eau coule sur le sol. L'eau de dégivrage ne s'écoule
Il y a trop de givre et de
glace.
La porte n'est pas correctement
La température du réfrigérateur
La température à l'intérieur de l'appareil est trop
élevée.
La température du produit est
Trop de produits sont conservés
La température du compartiment réfrigérateur est
trop élevée.
La température du congélateur est trop élevée.
trop élevée.
trop élevée.
tivée.
vée.
Pendant le dégivrage automati-
que, le givre fond sur l'évaporateur.
L'orifice d'évacuation de l'eau
est obstrué.
s'écouler dans le réservoir d'eau.
pas dans le plateau d'évaporation situé au-dessus du compresseur.
Les produits ne sont pas correctement emballés.
fermée.
est trop basse.
La porte n'est pas correctement
fermée.
trop élevée.
en même temps.
L'air froid ne circule pas dans
l'appareil.
Les produits sont trop près les
uns des autres.
Laissez le produit revenir à température ambiante avant de le
placer dans l'appareil.
Réduisez la température ambiante.
Consultez le paragraphe « Fonction FROSTMATIC ».
Consultez le paragraphe « Fonction COOLMATIC ».
Ce phénomène est normal.
Nettoyez l'orifice d'évacuation de
l'eau.
Assurez-vous que les produits ne
touchent pas la plaque arrière.
Fixez le tuyau de sortie de l'eau
au plateau d'évaporation.
Emballez les produits de façon
plus adaptée.
Reportez-vous au chapitre « Fermeture de la porte ».
Modifiez le dispositif de réglage
de température pour obtenir
moins de froid.
Reportez-vous au chapitre « Fermeture de la porte ».
Laissez le produit revenir à température ambiante avant de le
placer dans l'appareil.
Conservez moins de produits en
même temps.
Assurez-vous que de l'air froid
circule dans l'appareil.
Rangez les produits de façon à
permettre la circulation de l'air
froid.
Page 43

Caractéristiques techniques
Problème Cause possible Solution
L'appareil ne fonctionne
pas.
La fiche du cordon d’alimenta-
Le courant n'arrive pas à l'appa-
L'ampoule ne fonctionne
pas.
"dEMo" s’affiche sur le
bandeau.
L'appareil est à l'arrêt. Remettez en fonctionnement
tion n'est pas correctement
branchée à la prise de courant.
reil. La prise de courant n'est pas
alimentée.
L'ampoule est en mode veille. Fermez puis ouvrez la porte.
L'appareil est en mode démonstration.
l'appareil.
Branchez correctement la fiche
du cordon d’alimentation dans la
prise de courant.
Branchez un autre appareil électrique à la prise de courant. Faites
appel à un électricien qualifié.
Maintenez la touche OK appuyée
pendant environ 10 sec jusqu'à ce
que le déclenchement d'une alarme sonore se fasse longuement
entendre et que l'écran s'éteigne
momentanément : l'appareil
commence à fonctionner régulièrement.
Si ces conseils n'apportent pas de solution à votre problème, veuillez consulter le Service
Après-vente de votre magasin vendeur.
Fermeture de la porte
1. Nettoyez les joints de la porte.
2. Si nécessaire, ajustez la porte. Consultez le paragraphe "Installation".
3. Si nécessaire, remplacez les joints défectueux. Contactez le Service Après-vente.
43
CARACTÉRISTIQUES TECHNIQUES
Dimension
Hauteur 1850 mm
Largeur 595 mm
Profondeur 658 mm
Autonomie de fonctionnement 18 h
Tension 230 - 240 V
Fréquence 50 Hz
Les caractéristiques techniques figurent sur la plaque signalétique située sur le côté gauche
à l'intérieur de l'appareil et sur l'étiquette énergétique.
Page 44

44 Installation
INSTALLATION
AVERTISSEMENT
Pour votre sécurité et le bon fonctionnement de l'appareil, veuillez lire attentivement les
"Consignes de sécurité" avant d'installer l'appareil.
Emplacement
Installez cet appareil à un endroit où la température ambiante correspond à la classe climatique indiquée sur la plaque signalétique de l'appareil :
Classe climatique Température ambiante
SN +10 à + 32 °C
N +16 à + 32 °C
ST +16 à + 38 °C
T +16 à + 43 °C
Emplacement
L'appareil doit être installé à bonne distance de
toute source de chaleur telle que les radiateurs,
chauffe-eau, lumière directe du soleil etc. Assurez-vous que l'air circule librement à l'arrière de
l'appareil. Pour garantir un rendement optimum si
l'appareil est installé sous un élément suspendu, la
distance entre le haut de l'armoire et l'élément
suspendu doit être de 100 mm minimum. Si possible, évitez de placer l'appareil sous des éléments
suspendus. La mise à niveau se fait à l'aide d'un
ou de plusieurs pieds réglables à la base de l'armoire.
AVERTISSEMENT
L'appareil doit pouvoir être débranché à tout moment ; il est donc nécessaire que la prise murale reste accessible après l'installation.
mm
min
100
A
mm
20
B
Branchement électrique
Contrôlez, avant de brancher l'appareil, si la tension et la fréquence indiquées sur la plaque
signalétique correspondent à celles de votre réseau.
L'appareil doit être relié à la terre. La fiche du câble d'alimentation comporte un logement
pour mise à la terre. Si la prise de courant murale n'est pas mise à la terre, branchez l'appareil sur une prise de terre conformément aux normes en vigueur, en demandant conseil à
un électricien qualifié.
Le fabricant décline toute responsabilité en cas d'incident suite au non-respect des consignes de sécurité sus-mentionnées.
Cet appareil est conforme aux directives communautaires.
Page 45

Entretoises arrière
Vous trouverez les deux filtres dans le sac avec la
documentation.
Pour installer les filtres, procédez comme suit :
1. Desserrez la vis.
2. Insérez le filtre sous la vis.
3. Tournez le filtre dans la bonne position.
4. Resserrez les vis.
Mise à niveau
Lors de la mise en place de l'appareil, assurez-vous
qu'il soit positionné de façon plane. Servez-vous
des deux pieds réglables se trouvant à l'avant de
l'appareil.
Installation 45
4
2
1
3
Page 46

46 Installation
Retrait des supports de clayette
Votre appareil est équipé de dispositifs de retenue
qui permettent d'immobiliser les clayettes au
cours du transport.
A
Pour les enlever, procédez comme suit :
1. Déplacez les supports de clayette dans le sens
de la flèche (A).
2. Soulevez la clayette de l'arrière et poussez-la
vers l'avant pour la dégager (B).
B
3. Enlevez les dispositifs de retenue (C).
C
Réversibilité de la porte
AVERTISSEMENT
Avant toute opération, débranchez la fiche de la prise de courant.
Pour effectuer les opérations suivantes, il est conseillé de se faire aider par une autre personne pour maintenir fermement les portes de l'appareil lors de toute manipulation de l'appareil.
1. Ouvrez les portes. Dévissez la charnière
du milieu (m2). Déposez l'entretoise en
plastique (m1).
2. Retirez les entretoises (m6) et placez-les
de l’autre côté des gonds de charnière
(m5).
3. Enlevez les portes.
4. Retirez la goupille du cache gauche de
la charnière centrale (m3, m4) et placezla de l’autre côté.
5. Insérez la goupille de la charnière cen-
trale (m5) dans le trou gauche de la porte inférieure.
m3
m1
m5
m2
m6
m4
Page 47

6. Retirez le cache (b1) à l’aide d'un outil.
Dévissez le gond de la charnière inférieure (b2) et l'entretoise (b3) et placezles du côté opposé.
7. Réinsérez le cache (b1) du côté opposé.
Installation 47
b1
b2
b3
8. Enlevez les caches (1) situés sur l'arête
supérieure des deux portes et placez-les
1
sur le côté opposé.
9. Retirez la poignée. Dévissez le support
supérieur de la tige de la poignée (h1).
h1 h2 h3
Dévissez le support inférieur de la poignée de la porte (h2).
Dévissez le support supérieur de la poignée de la porte (h3).
10. Installez la poignée sur le côté opposé.
h4 h5 h6
Revissez le support de la poignée sur la
porte (h4). Tournez le support de la poignée avec la poignée et vissez l'ensemble sur la porte (h5) et sur le support installé (h6).
11. Replacez la porte inférieure sur le gond
de la charnière inférieure (b2).
12. Insérez la charnière centrale (m2) dans le trou gauche de la porte inférieure.
Page 48

48 En matière de sauvegarde de l'environnement
13. Dévissez le gond de la charnière supéri-
eure (t1) et placez-le sur le côté opposé.
14. Installez la porte supérieure sur le gond
supérieur.
15. Replacez la porte supérieure sur le gond
de la charnière centrale (m5) en inclinant légèrement les deux portes.
16. Revissez la charnière centrale (m2).
N’oubliez pas l’entretoise en plastique
(m1).
Contrôlez une dernière fois pour vous assurer
que :
• Toutes les vis sont serrées.
• Le joint magnétique adhère bien à l'appareil.
• La porte ouvre et ferme correctement.
Si la température ambiante est basse (en hiver, par exemple), il se peut que le joint n'adhère
pas parfaitement. Dans ce cas, attendez que le joint reprenne sa taille naturelle.
Si vous ne voulez pas effectuer personnellement les opérations décrites ci-dessus, contactez
votre service après-vente. Un technicien du service après-vente procédera à la réversibilité
de la porte à vos frais.
EN MATIÈRE DE SAUVEGARDE DE L'ENVIRONNEMENT
t1
Le symbole sur le produit ou son emballage indique que ce produit ne peut être traité
comme déchet ménager. Il doit être remis au point de collecte dédié à cet effet (collecte et
recyclage du matériel électrique et électronique).
En procédant à la mise au rebut de l'appareil dans les règles de l’art, nous préservons
l'environnement et notre sécurité, s’assurant ainsi que les déchets seront traités dans des
conditions optimum.
Pour obtenir plus de détails sur le recyclage de ce produit, veuillez prendre contact avec les
services de votre commune ou le magasin où vous avez effectué l'achat.
Page 49

PER RISULTATI PERFETTI
Grazie per aver scelto di acquistare questo prodotto AEG.
Lo abbiamo creato per fornirvi prestazioni impeccabili per
molti anni, grazie a tecnologie innovative che vi
semplificheranno la vita - funzioni che non troverete sui
normali elettrodomestici. Vi invitiamo di dedicare qualche
minuto alla lettura per sapere come trarre il massimo dal
vostro elettrodomestico.
ACCESSORI E PRODOTTI DI CONSUMO
All'interno del webshop AEG troverete tutto ciò che vi
serve per fare in modo che i vostri elettrodomestici AEG
siano sempre perfettamente puliti e funzionanti. Non
mancano inoltre una vasta gamma di accessori studiati e
realizzati conformemente agli elevati standard qualitativi
che vi aspettate: pentole, scolaposate, portabottiglie e
sacchi biancheria delicati...
49
Visitate il webshop su
www.aeg.com/shop
Page 50

50 Indice
INDICE
51 Informazioni per la sicurezza
54 Pannello dei comandi
59 Primo utilizzo
59 Utilizzo quotidiano
62 Consigli e suggerimenti utili
64 Pulizia e cura
65 Cosa fare se…
67 Dati tecnici
68 Installazione
72 Considerazioni ambientali
In questo manuale sono riportati i seguenti
simboli:
Informazioni importanti relative alla
prevenzione dei rischi per la salute personale
e dei danni alle apparecchiature.
Informazioni e consigli generali
Informazioni in materia di sicurezza
ambientale
Con riserva di modifiche
Page 51

Informazioni per la sicurezza
INFORMAZIONI PER LA SICUREZZA
Per garantire un impiego corretto e sicuro dell'apparecchio, prima dell'installazione e del
primo utilizzo leggere con attenzione il libretto istruzioni, inclusi i suggerimenti e le avvertenze. Per evitare errori e incidenti, è importante garantire che tutte le persone che utilizzano l'apparecchio ne conoscano il funzionamento e le caratteristiche di sicurezza. Conservare
queste istruzioni e accertarsi che rimangano unite all'apparecchio in caso di vendita o trasloco, in modo che chiunque lo utilizzi sia correttamente informato sull'uso e sulle norme di
sicurezza.
Per la sicurezza delle persone e delle cose osservare le precauzioni indicate nelle presenti
istruzioni per l'utente, il produttore non è responsabile dei danni provocati da eventuali
omissioni.
Sicurezza dei bambini e delle persone fragili
• Questo apparecchio non deve essere usato da persone, bambini inclusi, con ridotte capa-
cità fisiche, sensoriali o psichiche, oppure prive di conoscenza e esperienza, a meno che
non siano state istruite all'uso dell'apparecchio da parte dei responsabili della loro sicurezza, oppure sotto vigilanza di questi.
I bambini devono essere sorvegliati per assicurarsi che non giochino con l'apparecchio.
• Tenere i materiali di imballaggio al di fuori della portata dei bambini. Alcuni materiali
possono creare rischi di soffocamento.
• Qualora l'apparecchio venga demolito, estrarre la spina dalla presa, tagliare il cavo di col-
legamento (il più vicino possibile all'apparecchio) e smontare lo sportello per evitare che i
bambini giocando possano subire scosse elettriche o chiudersi dentro l'apparecchio.
• Se questo nuovo apparecchio, che è dotato di guarnizioni magnetiche nello sportello, va
a sostituirne uno più vecchio avente sportello o coperchio con chiusure a molla, si deve
rendere inutilizzabili tali chiusure prima di eliminare l'apparecchio sostituito, per evitare
che diventi una trappola mortale per i bambini.
51
Norme di sicurezza generali
AVVERTENZA
Verificare che le aperture di ventilazione, sia sull'apparecchiatura che nella struttura da incasso, siano libere da ostruzioni.
• L'apparecchiatura è progettata per la conservazione domestica di alimenti e/o bevande
nelle modalità descritte nelle presenti istruzioni.
• Non utilizzare dispositivi meccanici o altri mezzi artificiali per accelerare lo sbrinamento.
• Non utilizzare altre apparecchiature elettriche (per esempio gelatiere) all'interno del fri-
gorifero, salvo quelle approvate per tale scopo dal produttore.
• Non danneggiare il circuito refrigerante.
• Il circuito refrigerante dell'apparecchiatura contiene isobutano (R600a), un gas naturale
con un elevato livello di compatibilità ambientale che, tuttavia, è infiammabile.
Durante il trasporto e l'installazione dell'apparecchiatura, assicurarsi che nessuno dei
componenti del circuito refrigerante venga danneggiato.
Page 52

52 Informazioni per la sicurezza
In caso di danneggiamento del circuito refrigerante:
– Evitare fiamme libere e scintille
– Aerare bene il locale in cui si trova l'apparecchiatura
• È pericoloso cambiare le specifiche o modificare il prodotto in qualunque modo. Un dan-
neggiamento del cavo potrebbe provocare cortocircuiti, incendi e/o scosse elettriche.
AVVERTENZA
Tutti i componenti elettrici (cavo di alimentazione, spina, compressore) devono essere sostituiti da un tecnico certificato o da personale d'assistenza qualificato al fine di evitare di
correre rischi.
1. Non collegare prolunghe al cavo di alimentazione.
2. Evitare che il lato posteriore dell'apparecchiatura possa schiacciare o danneggiare la
spina, causandone il surriscaldamento con un conseguente rischio di incendio.
3. La spina dell'apparecchiatura deve trovarsi in una posizione accessibile.
4. Non tirare il cavo di alimentazione.
5. Se la presa elettrica non è perfettamente stabile, non inserire la spina. Il collegamento potrebbe provocare scosse elettriche o creare un rischio di incendio.
6.
Non accendere l’apparecchiatura se non è installato il coprilampada
9)
della luce in-
terna.
• Quest'apparecchiatura è pesante. Prestare attenzione quando occorre spostarla.
• Evitare di estrarre o di toccare gli alimenti riposti nel vano congelatore con le mani bagnate o umide; il contatto potrebbe provocare abrasioni o ustioni da freddo.
• Evitare un'esposizione prolungata dell'apparecchiatura alla luce solare diretta.
•
Lampadine
10)
utilizzate in questa apparecchiatura solo lampadine speciali, selezionate
per essere usate unicamente negli elettrodomestici. Non sono adatte per l'illuminazione
degli ambienti.
Uso quotidiano
• Non collocare pentole calde sulle parti in plastica dell'apparecchio.
• Non collocare gas e liquidi infiammabili nell'apparecchio, perché potrebbero esplodere.
• Non collocare gli alimenti direttamente contro l'uscita dell'aria nella parete posteriore.
11)
• Gli alimenti congelati non devono essere ricongelati una volta scongelati.
• Riporre gli alimenti surgelati preconfezionati secondo le istruzioni del produttore dell'alimento surgelato.
• Osservare rigorosamente i consigli per la conservazione degli alimenti del produttore dell'apparecchio. Vedere le relative istruzioni.
• Non collocare bevande gassate o frizzanti nello scomparto congelatore perché creano
pressione sul recipiente che può esplodere danneggiando l'apparecchio.
• I ghiaccioli possono provocare bruciature da gelo se consumati immediatamente dopo
averli tolti dall'apparecchio.
9) Se previsto nel modello.
10) Se è prevista la luce.
11) Se l'apparecchio è di tipo No-Frost.
Page 53

Informazioni per la sicurezza 53
Pulizia e cura
• Prima della manutenzione, spegnere l'apparecchio e staccare la spina dalla presa.
• Non pulire l'apparecchio con oggetti metallici.
• Non usare oggetti appuntiti per rimuovere la brina dall'apparecchio. Usare un raschietto
di plastica.
• Esaminare regolarmente il foro di scarico dell'acqua di sbrinamento nel frigorifero. Se necessario, pulirlo. Se il foro è otturato, l'acqua si raccoglie sul fondo dell'apparecchio.
Installazione
Per il collegamento elettrico, seguire attentamente le istruzioni dei paragrafi corrispondenti.
• Disimballare l'apparecchio e assicurarsi che non presenti danni. Non collegare l'apparecchio se è danneggiato. Segnalare immediatamente gli eventuali danni al negozio in cui è
stato acquistato. In questo caso conservare l'imballaggio.
• Si consiglia di attendere almeno due ore prima di collegare l'apparecchio per consentire
all'olio di arrivare nel compressore.
• Attorno all'apparecchio vi deve essere un'adeguata circolazione dell'aria, altrimenti si può
surriscaldare. Per ottenere una ventilazione sufficiente seguire le istruzioni di installazione.
• Se possibile il retro dell'apparecchio dovrebbe essere posizionato contro una parete per
evitare di toccare le parti calde o di rimanervi impigliati (compressore, condensatore),
evitando così possibili scottature.
• L'apparecchio non deve essere posto vicino a radiatori o piani di cottura a gas.
• Installare l'apparecchio in modo che la presa rimanga accessibile.
•
Per il collegamento idrico, usare solo sorgenti d'acqua potabile.
12)
Assistenza Tecnica
• Gli interventi elettrici sull'apparecchiatura devono essere eseguiti esclusivamente da elettricisti qualificati o da personale competente.
• Non togliere il coperchio della spia LED. Se necessario, contattare il Centro Assistenza più
vicino per sostituire la scheda spie LED.
• Gli interventi di assistenza devono essere eseguiti esclusivamente da tecnici autorizzati e
utilizzando solo ricambi originali.
Tutela ambientale
Questo apparecchio non contiene gas che potrebbero danneggiare lo strato di ozono nel
circuito refrigerante o nei materiali isolanti. L'apparecchio non deve essere smaltito assieme
ai rifiuti urbani e alla spazzatura. La schiuma dell'isolamento contiene gas infiammabili: lo
smaltimento dell'apparecchio va eseguito secondo le prescrizioni vigenti da richiedere alle
autorità locali. Evitare di danneggiare il gruppo refrigerante, specialmente nella parte posteriore vicino allo scambiatore di calore. I materiali usati su questo apparecchio contrassegnati dal simbolo
12) Per gli apparecchi che prevedono un collegamento alla rete idrica.
sono riciclabili.
Page 54

54 Pannello dei comandi
PANNELLO DEI COMANDI
1 2 3 4 5 6 7 8
1 Tasto ON/OFF dell'apparecchiatura
2 Tasto temperatura più fredda frigorifero
3 Tasto temperatura più calda frigorifero
4 Tasto Mode
5 Tasto OK
6 Tasto temperatura più fredda congelatore
7 Tasto temperatura più calda congelatore
8 Display
È possibile modificare le impostazioni audio predefinite dei tasti e impostarle con un volume più alto premendo contemporaneamente il tasto Mode ed il tasto temperatura più fresca per alcuni secondi. La modifica è reversibile.
Display
6 74 5321
COOL FROST
Off
min
1 Indicatore del vano frigorifero
2 Indicatore della temperatura e timer del frigorifero
3 Spia off del frigorifero
4 Funzione COOLMATIC
5 Funzione Holiday
6 Funzione FROSTMATIC
7 Indicatore della temperatura del congelatore
8 Indicatore del vano congelatore
9 Indicatore allarme
10 Funzione Sicurezza bambini
11 Funzione Minute Minder
12 Funzione Dynamic Air
Accensione
Per accendere l'apparecchiatura procedere come segue:
1. Inserire la spina nella presa di alimentazione.
MATICMATIC
1112 89
10
Page 55

Pannello dei comandi
2. Premere il tasto ON/OFF se il display è spento.
3. Il segnale acustico d'allarme potrebbe attivarsi dopo alcuni secondi.
Per resettare l'allarme, consultare la sezione "Allarme di alta temperatura".
4. Se "dEMo" appare sul display, l'apparecchiatura si trova in modalità dimostrazione. Fare
riferimento al capitolo "Cosa fare se...".
5. Gli indicatori di temperatura visualizzano la temperatura impostata predefinita.
Per selezionare una temperatura diversa, consultare la sezione "Regolazione della temperatura".
Spegnimento
Per spegnere l'apparecchiatura, procedere come segue:
1. Premere il tasto ON/OFF per 5 secondi.
2. Il display si spegne.
3. Per scollegare l’apparecchiatura dalla corrente elettrica, staccare la spina dalla presa di
alimentazione.
Spegnimento del frigorifero
Per spegnere il frigorifero:
1. Premere il tasto Mode finché non appare l'icona corrispondente.
L'indicatore di frigorifero spento e l'indicatore dello scomparto frigo lampeggiano.
L'indicatore temperatura frigorifero visualizza dei trattini.
2. Premere il tasto OK per confermare.
3. Viene visualizzato l'indicatore Frigorifero Off.
55
Accensione del frigorifero
Per accendere il frigorifero:
1. Premere il regolatore della temperatura del frigorifero.
Oppure:
1. Premere il tasto Mode fino a quando non appare l'icona corrispondente.
L'indicatore Frigorifero Off lampeggia.
2. Premere il tasto OK per confermare.
3. L'indicatore Frigorifero Off si spegne.
Per selezionare una temperatura diversa, vedere "Regolazione della temperatura".
Regolazione della temperatura
È possibile regolare la temperatura impostata del frigorifero e del congelatore, premendo i
regolatori temperatura.
Impostare la temperatura predefinita:
• +5°C per il frigorifero
• -18°C per il congelatore
Gli indicatori della temperatura visualizzano la temperatura impostata.
La temperatura impostata verrà raggiunta entro 24 ore.
Le variazioni di alcuni gradi in più o in meno rispetto alla temperatura impostata sono normali e non indicano un malfunzionamento dell'apparecchiatura.
Page 56

56 Pannello dei comandi
Dopo un'interruzione di corrente la temperatura impostata rimane in memoria.
Funzione Minute Minder
La Minute Minder funzione deve essere usata per impostare un segnale acustico in un preciso momento, utile per esempio quando una pietanza richiede il raffreddamento di alimenti misti per un certo periodo di tempo o quando è necessario un pro-memoria per non dimenticare le bottiglie messe in frigorifero per un raffreddamento rapido.
Per attivare la funzione:
1. Premere il tasto Mode finché non appare l'icona corrispondente.
L'indicatore Minute Minder lampeggia.
Il timer visualizza il valore impostato (30 minuti) per alcuni secondi.
2. Premere il tasto Temperatura frigorifero per modificare il valore impostato del Timer da
1 a 90 minuti.
3. Premere il tasto OK per confermare.
La spia Minute Minder viene visualizzata.
Il Timer inizia a lampeggiare (min).
Al termine del conto alla rovescia la spia Minute Minder lampeggia e viene emesso un segnale acustico:
1. Estrarre le eventuali bevande dal vano congelatore.
2. Premere il tasto OK per spegnere il segnale acustico e porre fine alla funzione.
È possibile disattivare la funzione in qualsiasi momento durante il conto alla rovescia:
1. Premere il tasto Mode fino a quando la spia Minute Minder lampeggia.
2. Premere il tasto OK per confermare.
3. La spia Minute Minder si spegne.
È possibile modificare l'ora in qualsiasi momento e prima della fine, premendo il tasto Raffreddamento Temperatura ed il tasto Riscaldamento Temperatura del frigorifero.
Funzione Sicurezza Bambini
Per evitare che i tasti vengano premuti accidentalmente, selezionare la funzione Sicurezza
Bambini.
Per attivare la funzione:
1. Premere il tasto Mode fino a quando non appare l'icona corrispondente.
2. L'indicatore Sicurezza Bambini lampeggia.
3. Premere il tasto OK per confermare.
Viene visualizzato l'indicatore Sicurezza Bambini.
Per disattivare la funzione:
1. Premere il tasto Mode fino a quando l'indicatore Sicurezza Bambini non lampeggia.
2. Premere il tasto OK per confermare.
3. L'indicatore Sicurezza Bambini si spegne.
Allarme di alta temperatura
Un aumento di temperatura nel vano congelatore (per esempio a causa di una precedente
interruzione dell'alimentazione elettrica) è indicato da:
Page 57

Pannello dei comandi
• lampeggiamento degli indicatori di allarme e della temperatura del congelatore
• emissione di un segnale acustico.
Per resettare l'allarme:
1. Premere un tasto qualsiasi.
2. Il segnale acustico si spegne.
3. L'indicatore della temperatura del congelatore visualizza per alcuni secondi la temperatura più alta raggiunta, quindi viene nuovamente visualizzata la temperatura impostata.
4. L'indicatore di allarme continua a lampeggiare fino al ripristino delle condizioni normali.
Quando l'allarme si interrompe, l'indicatore di allarme si spegne.
Allarme porta aperta
Se la porta del frigorifero viene lasciata aperta per alcuni minuti, viene emesso un segnale
acustico. Le condizioni di allarme della porta aperta sono indicate da:
• indicatore allarme lampeggiante
• segnale acustico
Al ripristino delle condizioni normali (porta chiusa), l'allarme si interrompe.
Funzione COOLMATIC
Se occorre inserire una grande quantità di alimenti nel frigorifero, per esempio al ritorno
dalla spesa, è consigliabile attivare la funzione COOLMATIC per raffreddare più rapidamente
gli alimenti introdotti nel frigorifero e non intiepidire i cibi già presenti al suo interno.
Per attivare la funzione:
1. Premere il tasto Mode finché non appare l'icona corrispondente.
L'indicatore COOLMATIC lampeggia.
2. Premere il tasto OK per confermare.
La spia COOLMATIC viene visualizzata.
La funzione COOLMATIC si disattiva automaticamente dopo circa 6 ore.
Per disattivare la funzione prima dello spegnimento automatico:
1. Premere il tasto Mode fino a quando la spia COOLMATIC lampeggia.
2. Premere il tasto OK per confermare.
3. La spia COOLMATIC si spegne.
La funzione si disattiva selezionando un'impostazione di temperatura per il frigorifero diversa.
57
Funzione Holiday
Questa funzione consente di mantenere il frigorifero chiuso e vuoto durante un lungo periodo di vacanza senza che si formino odori sgradevoli.
Quando si attiva la funzione Holiday, il vano frigorifero deve essere vuoto.
Per attivare la funzione:
1. Premere il tasto Mode fino a quando non appare l'icona corrispondente.
Page 58

58 Pannello dei comandi
L'indicatore Holiday lampeggia.
L'indicatore della temperatura del frigorifero visualizza la temperatura impostata.
2. Premere il tasto OK per confermare.
Viene visualizzato l'indicatore Holiday.
Per disattivare la funzione:
1. Premere il tasto Mode fino a quando l'indicatore Holiday non lampeggia.
2. Premere il tasto OK per confermare.
3. L'indicatore Holiday si spegne.
La funzione si disattiva selezionando un'impostazione di temperatura per il frigorifero diversa.
Funzione DYNAMICAIR
Per attivare la funzione:
1. Premere il tasto Mode finché non appare l'icona corrispondente.
L'indicatore DYNAMICAIR lampeggia.
2. Premere il tasto OK per confermare.
La spia DYNAMICAIR viene visualizzata.
Per disattivare la funzione:
1. Premere il tasto Mode fino a quando l'indicatore DYNAMICAIR lampeggia.
2. Premere il tasto OK per confermare.
3. La spia DYNAMICAIR si spegne.
Se la funzione è attivata automaticamente l'indicatore DYNAMICAIR non viene visualizzato
(fare riferimento a "Utilizzo quotidiano").
L'attivazione della funzione DYNAMICAIR aumenta il consumo di energia.
Funzione FROSTMATIC
Per attivare la funzione:
1. Premere il tasto Mode finché non appare l'icona corrispondente.
L'indicatore FROSTMATIC lampeggia.
2. Premere il tasto OK per confermare.
La spia FROSTMATIC viene visualizzata.
Questa funzione si arresta automaticamente dopo 52 ore.
Per disattivare la funzione prima dello spegnimento automatico:
1. Premere il tasto Mode fino a quando la spia FROSTMATIC lampeggia.
2. Premere il tasto OK per confermare.
3. La spia FROSTMATIC si spegne.
Riporre i cibi freschi da congelare nel FROSTMATIC cestello.
La funzione si disattiva selezionando un'impostazione di temperatura per il congelatore diversa.
Page 59

Primo utilizzo 59
PRIMO UTILIZZO
Pulizia dell'interno
Prima di utilizzare l'apparecchio per la prima volta, lavare l'interno e gli accessori interni
con acqua tiepida e un po' di sapone neutro in modo a togliere il tipico odore dei prodotti
nuovi, quindi asciugare accuratamente.
Non usare detergenti corrosivi o polveri abrasive che danneggiano le finiture.
UTILIZZO QUOTIDIANO
Conservazione dei surgelati
Al primo avvio o dopo un periodo di non utilizzo, lasciare in funzione l'apparecchiatura per
almeno 2 ore con una regolazione alta prima di introdurre gli alimenti.
Se si verifica un'interruzione della corrente elettrica di durata superiore al "tempo di salita"
indicato nella tabella dei dati tecnici, il cibo scongelato deve essere consumato rapidamente
o cucinato immediatamente e quindi ricongelato (dopo il raffreddamento).
Scongelamento
Prima dell'utilizzo, i cibi surgelati o congelati possono essere scongelati nel vano frigorifero
o a temperatura ambiente, in funzione del tempo disponibile per questa operazione.
I pezzi piccoli possono addirittura essere cucinati ancora congelati, direttamente dal congelatore: in questo caso la cottura durerà più a lungo.
DYNAMICAIR
Il vano frigo è dotato di un dispositivo che consente un rapido raffreddamento degli alimenti e
una temperatura più uniforme nello scomparto.
Il suddetto si avvia automaticamente quando necessario, ad esempio per un rapido recupero della
temperatura dopo l'apertura dello sportello, o
quando la temperatura ambiente è elevata.
Consente di accendere manualmente il dispositivo
quando necessario (fare riferimento a "Funzione
DYNAMICAIR ").
Il dispositivo DYNAMICAIR si interrompe quando
si apre la porta e si riavvia immediatamente dopo
la chiusura della suddetta.
Page 60

60 Utilizzo quotidiano
Ripiani mobili
Le guide presenti sulle pareti del frigorifero permettono di posizionare i ripiani a diverse altezze.
Griglia portabottiglie
Disporre le bottiglie (con l'apertura in avanti) sull'apposito ripiano.
Se il ripiano è in posizione orizzontale, utilizzarlo
solo per le bottiglie chiuse.
Questo ripiano può essere inclinato per consentire
l'appoggio di bottiglie già aperte. Tirare il ripiano e
ruotarlo verso l'alto in modo da appoggiarlo al livello superiore.
Page 61

Posizionamento delle mensole
Per facilitare l'introduzione di alimenti di diverse dimensioni, le mensole della porta possono essere posizionate ad altezze differenti.
Per regolare l'altezza delle mensole, procedere come segue:
Tirare delicatamente il ripiano nella direzione
indicata dalle frecce fino a sganciarlo, poi riposizionarlo dove necessario.
CassettoFRESHBOX
Il cassetto è particolarmente adatto per la conservazione di alimenti freschi quali pesce, carne e
frutti di mare, poiché la temperatura è inferiore
rispetto al resto del frigorifero.
Utilizzo quotidiano 61
Cassetto MAXIBOX
Questo cassetto è particolarmente adatto per la
conservazione di frutta e verdura.
Il separatore interno può essere collocato in varie
posizioni per favorire una suddivisione ottimale
degli alimenti.
La griglia posta sul fondo del cassetto (se presente) separa la frutta e la verdura dagli eventuali depositi di umidità che si potrebbero formare nella
parte inferiore dell'apparecchio.
Tutti i componenti interni del cassetto possono
essere rimossi per facilitare la pulizia
Page 62

62 Consigli e suggerimenti utili
Rimozione dei cestelli dal vano congelatore
2
2
1
1
I cestelli del vano congelatore sono provvisti di un fermo che ne impedisce la caduta o la
rimozione accidentale. Per estrarre un cestello dal vano congelatore, tirarlo in avanti e, al
raggiungimento del fermo, inclinare verso l'alto la parte anteriore.
Per reinserire il cestello, sollevarlo leggermente sul lato anteriore e introdurlo nel vano
congelatore. Una volta superato il fermo, spingere il cestello nella posizione originaria.
CONSIGLI E SUGGERIMENTI UTILI
Rumori normali durante il funzionamento
• Quando il refrigerante viene pompato attraverso le bobine o le tubazioni si può sentire
un fievole gorgoglio e un borbottio. Non si tratta di un'anomalia.
• Quando il compressore è in funzione, viene pompato il refrigerante e si può sentire un
ronzio e un rumore pulsante dal compressore. Non si tratta di un'anomalia.
• La dilatazione termica potrebbe provocare uno schiocco improvviso. È un fenomeno na-
turale, non pericoloso. Non si tratta di un'anomalia.
Consigli per il risparmio energetico
Per ottenere risultati ottimali:
• Non aprire frequentemente la porta e limitare il più possibile i tempi di apertura
• Non rimuovere gli accumulatori di freddo dal cestello di congelamento.
Consigli per la refrigerazione di cibi freschi
Per ottenere i migliori risultati:
• non riporre nel frigorifero cibi caldi o liquidi in fase di evaporazione
• coprire o avvolgere il cibo, in particolare se emana un odore forte
• posizionare il cibo in modo che l'aria possa circolare liberamente attorno ad esso
Consigli per la refrigerazione
Consigli utili:
Page 63

Consigli e suggerimenti utili
Carne (tutti i tipi): avvolgerla in sacchetti di politene e collocarla sul ripiano di vetro sopra il
cassetto delle verdure.
Per motivi di sicurezza, conservarla in queste condizioni solo per uno o due giorni al massimo.
Cibi cucinati, piatti freddi ecc..: dovrebbero essere coperti e possono essere collocati su
qualsiasi ripiano.
Frutta e verdura: dovrebbero essere pulite accuratamente e collocate nell'apposito/i cassetto/i speciale/i.
Burro e formaggio: dovrebbero essere posti in contenitori ermetici speciali o avvolti in pellicole di alluminio o sacchetti di politene per escludere per quanto possibile l'aria.
Bottiglie di latte: dovrebbero essere tappate e conservate nell'apposito ripiano sulla porta.
Non conservare nel frigorifero banane, patate, cipolle o aglio se non sono confezionati.
Consigli per il congelamento
Per un processo di congelamento ottimale, ecco alcuni consigli importanti:
• la quantità massima di cibo che può essere congelata in 24 h è riportata sulla targhetta;
• il processo di congelamento dura 24 ore. In questo periodo non aggiungere altro cibo da
congelare;
• congelare solo alimenti freschi, di ottima qualità e accuratamente puliti;
• preparare il cibo in piccole porzioni per consentire un congelamento rapido e completo e
per scongelare in seguito solo la quantità necessaria;
• avvolgere il cibo in pellicole di alluminio o in politene e verificare che i pacchetti siano
ermetici;
• non lasciare che cibo fresco non congelato entri in contatto con quello già congelato,
per evitare un aumento della temperatura in quest'ultimo;
• i cibi magri si conservano meglio e più a lungo di quelli grassi; il sale riduce il periodo di
conservazione del cibo;
• i ghiaccioli, se consumati immediatamente dopo la rimozione dal vano congelatore, pos-
sono causare ustioni da congelamento della pelle;
• si consiglia di riportare la data di congelamento su ogni singolo pacchetto per riuscire a
tenere traccia del tempo di conservazione;
63
Consigli per la conservazione dei surgelati
Per ottenere i migliori risultati con questo apparecchio:
• accertare che i cibi congelati commercialmente siano adeguatamente conservati dal ri-
venditore;
• fare in modo che i cibi congelati siano trasferiti dal negozio al congelatore nel più breve
tempo possibile;
• non aprire la porta frequentemente o lasciarla aperta più del tempo strettamente neces-
sario.
• Una volta scongelato, il cibo si deteriora rapidamente e non può essere ricongelato.
• Non superare il periodo di conservazione indicato dal produttore.
Page 64

64 Pulizia e cura
PULIZIA E CURA
ATTENZIONE
Staccare la spina dell'apparecchio prima di eseguire lavori di manutenzione.
Questo apparecchio contiene idrocarburi nell'unità di raffreddamento; la manutenzione e la
ricarica devono pertanto essere effettuate esclusivamente da tecnici autorizzati.
Pulizia periodica
L'apparecchio deve essere pulito regolarmente:
• Pulire l'interno e gli accessori con acqua tiepida e un po' di sapone neutro.
• Controllare regolarmente le guarnizioni della porta e verificare che siano pulite e prive di
residui.
• Risciacquare e asciugare accuratamente.
Non tirare, spostare o danneggiare tubi e/o cavi all'interno dell'apparecchio.
Non usare mai detergenti, polveri abrasive, prodotti per la pulizia con una forte profumazione o cere lucidanti per pulire l'interno, in quanto danneggiano la superficie e lasciano un
odore forte.
Pulire il condensatore (griglia nera) e il compressore sul retro dell'apparecchio con una
spazzola. Questa operazione migliorerà le prestazioni dell'apparecchiatura riducendone i
consumi di energia.
Non danneggiare il sistema di raffreddamento.
Molti detergenti per cucine di marca contengono sostanze chimiche in grado di attaccare/
danneggiare la plastica impiegata in questo apparecchio. Per questo motivo si raccomanda
di pulire l'involucro esterno dell'apparecchio solo con acqua calda con un po' di liquido detergente.
Dopo la pulizia, ricollegare l'apparecchio alla rete di alimentazione.
Sbrinamento del vano frigorifero
Durante l'uso normale, la brina viene eliminata automaticamente dall'evaporatore del vano
frigorifero ogni volta che il motocompressore si arresta. L'acqua di sbrinamento giunge attraverso un condotto in un apposito recipiente posto sul retro dell'apparecchio, sopra il motocompressore, dove evapora.
Page 65

Cosa fare se… 65
È importante pulire periodicamente il foro di scarico dell'acqua di sbrinamento, situato al centro
del canale sulla parete posteriore, per evitare che
l'acqua fuoriesca sugli alimenti. Usare l'apposito
utensile già inserito nel foro di scarico.
Sbrinamento del vano congelatore
Il vano congelatore in questo modello è di tipo "no frost", cioè non forma ghiaccio sulle
pareti interne e sugli alimenti durante il funzionamento.
L'assenza di ghiaccio è dovuta alla circolazione continua di aria fredda prodotta all'interno
del vano da una ventola azionata automaticamente.
COSA FARE SE…
ATTENZIONE
Prima della ricerca guasti, estrarre la spina dalla presa.
Le operazioni di ricerca guasti, non descritte nel presente manuale, devono essere eseguite
esclusivamente da elettricisti qualificati o da personale competente.
Durante l'uso alcuni rumori di funzionamento (come quelli del compressore o del circuito
refrigerante) sono da considerarsi normali.
Problema Possibile causa Soluzione
L'apparecchiatura è rumorosa.
Il compressore rimane
sempre in funzione.
La porta non è chiusa corretta-
La porta viene aperta troppo
L'apparecchiatura non è appoggiata in modo corretto.
Il regolatore di temperatura potrebbe non essere impostato
correttamente.
mente.
frequentemente.
Controllare che l'apparecchiatura
sia appoggiata in modo stabile
(tutti i piedini devono essere a
contatto con il pavimento).
Impostare una temperatura superiore.
Consultare la sezione "Chiusura
della porta".
Limitare il più possibile il tempo
di apertura della porta.
Page 66

66 Cosa fare se…
Problema Possibile causa Soluzione
La temperatura degli alimenti è
La temperatura ambiente è
La funzione FROSTMATIC è atti-
La funzione COOLMATIC è attiva. Fare riferimento a "Funzione-
Sulla parete posteriore del
frigorifero scorre acqua.
All'interno del frigorifero
scorre acqua.
Gli alimenti impediscono all'ac-
Scorre acqua sul pavimento.
Presenza di brina eccessiva.
La porta non è chiusa corretta-
La temperatura nel frigorifero è
La temperatura all'interno
dell'apparecchiatura è
troppo alta.
La temperatura degli alimenti è
Sono stati introdotti molti ali-
La temperatura nel vano
frigorifero è troppo alta.
La temperatura nel vano
congelatore è troppo alta.
troppo alta.
troppo alta.
va.
Durante lo sbrinamento automatico, la brina che si forma sul
pannello posteriore si scioglie.
Lo scarico dell'acqua è ostruito. Pulire lo scarico dell'acqua.
qua di fluire nell'apposito collettore.
L'acqua di sbrinamento non viene scaricata nella bacinella di
evaporazione posta sopra il
compressore.
Gli alimenti non sono avvolti
correttamente.
mente.
troppo bassa.
La porta non è chiusa corretta-
mente.
troppo alta.
menti contemporaneamente.
L'aria fredda non circola corret-
tamente all'interno dell'apparecchiatura.
I prodotti sono troppo vicini tra
loro.
Prima di mettere a conservare gli
alimenti, lasciarli raffreddare a
temperatura ambiente.
Abbassare la temperatura ambiente.
Fare riferimento a "FunzioneFROSTMATIC ".
COOLMATIC ".
Non si tratta di un'anomalia.
Evitare di disporre gli alimenti a
diretto contatto con il pannello
posteriore.
Collegare lo scarico dell'acqua di
sbrinamento alla bacinella di evaporazione.
Avvolgere correttamente gli alimenti.
Consultare la sezione "Chiusura
della porta".
Impostare una temperatura superiore.
Consultare la sezione "Chiusura
della porta".
Prima di mettere a conservare gli
alimenti, lasciarli raffreddare a
temperatura ambiente.
Introdurre gli alimenti poco alla
volta.
Adottare le misure necessarie per
garantire una corretta circolazione dell'aria fredda.
Disporre i prodotti in modo da
consentire una corretta circolazione dell'aria fredda.
Page 67

Dati tecnici
Problema Possibile causa Soluzione
L'apparecchio non funziona.
La spina non è inserita corretta-
L'apparecchiatura non riceve
La lampadina non si accende.
"dEMo" appare sul display. L'apparecchiatura è in modalità
L'apparecchio è spento. Accendere l’apparecchiatura.
mente nella presa di alimentazione.
corrente. Non arriva tensione alla presa elettrica.
La lampadina è in modalità
stand-by.
dimostrazione.
Inserire correttamente la spina
nella presa.
Collegare alla presa di alimentazione un altro apparecchio elettrico. Rivolgersi ad un elettricista
qualificato.
Chiudere e riaprire la porta.
Tenere il tasto OK premuto per
circa 10 sec., finché non si sente
un suono prolungato provenire
dal cicalino ed il display si spegne
per un tempo brevissimo: l'apparecchiatura inizia a funzionare regolarmente.
Se il problema persiste, rivolgersi al centro di assistenza autorizzato più vicino.
Chiusura della porta
1. Pulire le guarnizioni della porta.
2. Se necessario, regolare la porta. Vedere "Installazione".
3. Se necessario, sostituire le guarnizioni della porta difettose. Contattare il Centro di assistenza locale.
67
DATI TECNICI
Dimensioni
Altezza 1850 mm
Larghezza 595 mm
Profondità 658 mm
Tempo di salita 18 h
Tensione 230 - 240V
Frequenza 50 Hz
I dati tecnici sono riportati sulla targhetta del modello, applicata sul lato sinistro interno
dell'apparecchio, e sull'etichetta dei valori energetici.
Page 68

68 Installazione
INSTALLAZIONE
AVVERTENZA
Leggere con attenzione le "Informazioni per la sicurezza" per la vostra sicurezza e per il corretto funzionamento dell'apparecchio prima di procedere all'installazione.
Posizionamento
Installare questo apparecchio in un punto in cui la temperatura ambiente corrisponda alla
classe climatica indicata sulla sua targhetta:
Classe climatica Temperatura ambiente
SN da + 10°C a + 32°C
N da + 16°C a + 32°C
ST da + 16°C a + 38°C
T da + 16°C a + 43°C
Posizione
L'apparecchio deve essere installato lontano da
fonti di calore (termosifoni, boiler, luce solare diretta, ecc.). Verificare che sul lato posteriore sia
garantita un'adeguata circolazione dell'aria. Per
ottenere prestazioni ottimali, se l'apparecchio è
installato al di sotto di un pensile, si raccomanda
di mantenere una distanza minima tra quest'ultimo e lo spigolo superiore dell'apparecchio di almeno 100 mm . Se possibile, tuttavia, evitare di
installare l'apparecchio sotto un pensile. Per consentire un perfetto livellamento dell'apparecchio
sono provvisti uno o più piedini regolabili.
AVVERTENZA
Deve essere possibile scollegare l'apparecchio dalla rete elettrica; eseguire perciò l'installazione facendo sì che la spina rimanga facilmente
accessibile.
mm
min
100
A
mm
20
B
Collegamento elettrico
Prima di inserire la spina, verificare che la tensione e la frequenza riportate sulla targhetta
corrispondano ai valori della rete elettrica domestica.
L'apparecchio deve essere collegato a massa. La spina del cavo di alimentazione è dotata di
un contatto a tale scopo. Se la presa della rete elettrica domestica non è collegata a massa,
collegare l'apparecchio ad una massa separata in conformità alle norme relative alla corrente, consultando un elettricista qualificato.
Il fabbricante declina qualsiasi responsabilità se le precauzioni suddette non sono rispettate.
Il presente apparecchio è conforme alle direttive CEE.
Page 69

Distanziatori posteriori
Nel sacchetto contenente la documentazione sono presenti due distanziatori.
Per installare i distanziatori, procedere nel modo
seguente:
1. Svitare la vite.
2. Sistemare il distanziatore al di sotto della vite.
3. Ruotare il distanziatore verso destra.
4. Serrare nuovamente le viti.
Livellamento
L'apparecchio deve trovarsi perfettamente in piano. Per correggere gli eventuali dislivelli è possibile regolare in altezza i due piedini anteriori.
Installazione 69
4
3
2
1
Page 70

70 Installazione
Rimozione dei fermi dei ripiani
L'apparecchiatura è equipaggiata con fermi dei ripiani che permettono di assicurarli durante il trasporto.
A
Per rimuoverli, procedere come segue:
1. Spostare i fermi dei ripiani in direzione della
freccia (A).
2. Sollevare il ripiano dalla parte posteriore e
spingerlo in avanti fino a liberarlo (B).
B
3. Rimuovere i fermi (C).
C
Reversibilità della porta
AVVERTENZA
Prima di eseguire le operazioni descritte, estrarre la spina dalla presa.
Per eseguire le seguenti operazioni, si raccomanda di farsi aiutare da un'altra persona che
tenga ben ferme le porte dell'apparecchiatura.
1. Aprire le porte. Svitare la cerniera cen-
trale (m2). Rimuovere il distanziatore in
plastica (m1).
2. Rimuovere il distanziatore (m6) e trasfe-
rirlo sull'altro lato del perno della cerniera (m5).
3. Rimuovere le porte.
4. Rimuovere il perno di sinistra della co-
pertura della cerniera centrale (m3, m4)
e trasferirlo sull'altro lato.
5. Inserire il perno della cerniera centrale
(m5) nel foro di sinistra della porta inferiore.
m3
m1
m5
m2
m6
m4
Page 71

6. Rimuovere la copertura (b1) usando un
utensile adatto. Svitare il perno della
cerniera inferiore (b2) e il distanziatore
(b3) e applicarli sul lato opposto.
7. Reinserire la copertura (b1) sul lato op-
posto.
Installazione 71
b1
b2
b3
8. Rimuovere i tappi (1) sul lato superiore
delle due porte e spostarli sul lato opposto.
9. Rimuovere la maniglia. Svitare la staffa
superiore dalla barra della maniglia (h1).
Svitare la staffa inferiore della maniglia
dalla porta (h2)
Svitare la staffa superiore della maniglia
dalla porta (h3).
10. Installare la maniglia sul lato opposto.
Riavvitare la staffa della maniglia sulla
porta (h4). Ruotare la staffa insieme alla
maniglia e avvitarle alla porta (h5) e alla
staffa già inserita (h6).
11. Reinserire la porta inferiore sul perno
(b2) della cerniera inferiore.
12. Inserire la cerniera centrale (m2) nel fo-
ro sinistro della porta inferiore.
1
h1 h2 h3
h4 h5 h6
Page 72

72 Considerazioni ambientali
13. Svitare il perno della cerniera superiore
(t1) e fissarlo sul lato opposto.
14. Inserire la porta superiore nel perno del-
la cerniera superiore.
15. Reinserire la porta superiore sul perno
della cerniera centrale (m5) inclinando
leggermente le due porte.
16. Riavvitare la cerniera centrale (m2). Non
dimenticare il distanziatore di plastica
(m1).
Effettuare un controllo finale per verificare
che:
• Tutte le viti siano serrate.
• La guarnizione magnetica aderisca all’apparecchiatura.
• La porta si apra e si chiuda correttamente.
Se la temperatura ambiente è bassa (ad esempio in inverno), è possibile che la guarnizione
non aderisca perfettamente. In tal caso, attendere che aderisca naturalmente.
Per chi preferisca non eseguire direttamente le operazioni sopra descritte, rivolgersi al servizio post-vendita più vicino. L'intervento di inversione delle porte eseguito dai tecnici del
servizio post-vendita sarà a carico dell'utente.
CONSIDERAZIONI AMBIENTALI
t1
Il simbolo sul prodotto o sulla confezione indica che il prodotto non deve essere
considerato come un normale rifiuto domestico, ma deve essere portato nel punto di
raccolta appropriato per il riciclaggio di apparecchiature elettriche ed elettroniche.
Provvedendo a smaltire questo prodotto in modo appropriato, si contribuisce a evitare
potenziali conseguenze negative per l’ambiente e per la salute, che potrebbero derivare da
uno smaltimento inadeguato del prodotto. Per informazioni più dettagliate sul riciclaggio di
questo prodotto, contattare l’ufficio comunale, il servizio locale di smaltimento rifiuti o il
negozio in cui è stato acquistato il prodotto.
Page 73

737475
Page 74

Page 75

Page 76

www.aeg.com/shop 210621908-A-052011
 Loading...