

Page 1

S75340KG2
S75380KG2
Gebruiksaanwijzing Koel-vriescombinatie
User manual Fridge Freezer
Istruzioni per l’uso Frigo-Congelatore
Page 2
Inhoud
2
Wij danken u voor uw keuze voor een van onze producten van hoogwaardige
kwaliteit.
Lees deze gebruiksaanwijzing alstublieft zorgvuldig door, zo kunt u zeker zijn van
optimale en professionele prestaties van uw apparaat. De handleiding zal u in staat
stellen om alle processen perfect en op de meest efficiënte wijze te laten verlopen.
Wij adviseren u deze handleiding op een veilige plaats te bewaren, dan kunt u hem
te allen tijde raadplegen. Geef deze handleiding ook aan een eventuele toekomstige
eigenaar van het apparaat.
Wij wensen u veel plezier met uw nieuwe apparaat.
INHOUD
VEILIGHEIDSINFORMATIE 3
Veiligheid van kinderen en kwetsbare
mensen 3
Algemene veiligheid 3
Dagelijks gebruik 4
Onderhoud en reiniging 4
Installatie 5
Onderhoud 5
BEDIENINGSPANEEL 6
Inschakelen 6
Uitschakelen 6
Temperatuurregeling 6
COOLMATICfunctie 7
Vakantiefunctie 7
FROSTMATICfunctie 7
Alarm hoge temperatuur 7
HET EERSTE GEBRUIK 8
De binnenkant schoonmaken 8
DAGELIJKS GEBRUIK 8
Vers voedsel invriezen 8
Het bewaren van ingevroren voedsel 8
Ontdooien 8
Verplaatsbare schappen 9
Flessenrek 9
Groentelade 9
Het plaatsen van de deurschappen 10
Luchtkoeling 10
Extra koele zone 10
Vriesmandjes uit de vriezer verwijderen
NUTTIGE AANWIJZINGEN EN TIPS 12
Normale bedrijfsgeluiden 12
Tips voor energiebesparing 12
Tips voor het koelen van vers voedsel 12
Nuttige tips voor het koelen 12
Tips voor het invriezen 12
Tips voor het bewaren van ingevroren
voedsel 13
ONDERHOUD EN REINIGING 13
Periodieke reiniging 13
Het ontdooien van de koelkast 14
Het ontdooien van de vriezer 14
PROBLEMEN OPLOSSEN 14
Het lampje vervangen 16
De deur sluiten 16
TECHNISCHE GEGEVENS 17
MONTAGE 17
Opstelling 17
Plaats 17
Elektrische aansluiting 18
Afstandsstukken achterkant 18
Waterpas zetten 18
Het verwijderen van de geleiders van de
schappen 19
Omkeerbaarheid van de deur 19
HET MILIEU 21
11
Wijzigingen voorbehouden
Page 3
Veiligheidsinformatie
VEILIGHEIDSINFORMATIE
In het belang van uw veiligheid en om een correct gebruik te kunnen waarborgen is het
van belang dat u, alvorens het apparaat te installeren en in gebruik te nemen, deze gebruiksaanwijzing, inclusief de tips en waarschuwingen, grondig doorleest. Om onnodige
vergissingen en ongevallen te voorkomen is het belangrijk ervoor te zorgen dat alle mensen
die het apparaat gebruiken, volledig bekend zijn met de werking ervan en de veiligheidsvoorzieningen. Bewaar deze instructies en zorg ervoor dat zij bij het apparaat blijven als
het wordt verplaatst of verkocht, zodat iedereen die het apparaat gedurende zijn hele
levensduur gebruikt, naar behoren is geïnformeerd over het gebruik en de veiligheid van
het apparaat.
Voor de veiligheid van mensen en eigendommen dient u zich aan de voorzorgsmaatregelen
uit dit instructieboekje te houden, de fabrikant is niet verantwoordelijk voor schade die
door het niet opvolgen van de aanwijzingen veroorzaakt is.
Veiligheid van kinderen en kwetsbare mensen
• Dit apparaat is niet bedoeld voor gebruik door personen (waaronder begrepen kinderen)
met verminderde fysieke, zintuiglijke vermogens of een gebrek aan ervaring en kennis,
tenzij dit onder toezicht gebeurt van een voor hun veiligheid verantwoordelijke persoon
of tenzij zij van een dergelijke persoon instructie hebben ontvangen over het gebruik
van het apparaat.
Houd kinderen uit de buurt om te voorkomen dat ze met het apparaat gaan spelen.
• Houd alle verpakkingsmateriaal buiten het bereik van kinderen. Gevaar voor verstikking.
• Als u het apparaat afdankt trek dan de stekker uit het stopcontact, snij de voedingskabel
door (zo dicht mogelijk bij het apparaat) en verwijder de deur om te voorkomen dat
kinderen een elektrische schok krijgen of zichzelf in het apparaat opsluiten.
• Als dit apparaat, dat voorzien is van een magnetische deursluiting, een ouder apparaat
vervangt, dat voorzien is van een veerslot (slot) op de deur of het deksel, zorg er dan
voor dat u het slot onbruikbaar maakt voordat u het oude apparaat weggooit. Dit voorkomt dat kinderen er in opgesloten kunnen raken.
3
Algemene veiligheid
LET OP!
Houd de ventilatie-openingen altijd vrij van obstructies.
• Dit apparaat is bedoeld voor het bewaren van levensmiddelen en/of dranken in een
gewoon huishouden, zoals uitgelegd in dit instructieboekje.
• Gebruik geen mechanische hulpmiddelen of kunstgrepen om het ontdooiproces te versnellen.
• Gebruik geen andere elektrische apparaten (bijvoorbeeld ijsmachines) in koelkasten, tenzij ze voor dit doel goedgekeurd zijn door de fabrikant.
• Let op dat u het koelcircuit niet beschadigt.
• Het koelmiddel isobutaan (R600a) bevindt zich in het koelcircuit van het apparaat, dit is
een natuurlijk gas dat weliswaar milieuvriendelijk is, maar ook uiterst ontvlambaar.
Controleer of de onderdelen van het koelcircuit tijdens transport en installatie van het
apparaat niet beschadigd zijn geraakt.
Page 4

Veiligheidsinformatie
4
Indien het koelcircuit beschadigd is:
– open vuur en ontstekingsbronnen vermijden
– de ruimte waar het apparaat zich bevindt grondig ventileren
• Het is gevaarlijk om wijzigingen aan te brengen in de specificaties of dit product op
enigerlei wijze te modificeren. Een beschadigd netsnoer kan kortsluiting, brand en/of een
elektrische schok veroorzaken.
WAARSCHUWING!
Alle elektrische onderdelen (netsnoer, stekker, compressor) mogen uitsluitend vervangen
worden door een erkende onderhoudsdienst of gekwalificeerd onderhoudspersoneel.
1. Het netsnoer mag niet verlengd worden.
2. Verzeker u ervan dat de stekker niet platgedrukt of beschadigd wordt door de ach-
terkant van het apparaat. Een platgedrukte of beschadigde stekker kan oververhit
raken en brand veroorzaken.
3. Verzeker u ervan dat u de stekker van het apparaat kunt bereiken.
4. Trek niet aan het snoer.
5. Als de stekker los zit, steek hem dan niet in het stopcontact. Dan bestaat er een risico
op een elektrische schok of brand.
6.
U mag het apparaat niet gebruiken zonder de afdekking van het lampje.
binnenverlichting.
• Dit apparaat is zwaar. Wees voorzichtig als u het apparaat verplaatst.
• Haal geen artikelen uit het vriesvak en raak ze niet aan als uw handen vochtig/nat zijn,
dit kan uw huid beschadigen of vrieswonden veroorzaken.
• Stel het apparaat niet langdurig bloot aan direct zonlicht.
•
Gloeilampjes
2)
gebruikt voor dit apparaat is een speciaal lampje voor huishoudelijke
apparaten. De lampjes zijn niet geschikt voor de verlichting van ruimtes.
1)
voor de
Dagelijks gebruik
• Zet geen hete potten op de kunststof onderdelen in het apparaat.
• Bewaar geen brandbare gassen of vloeistoffen in het apparaat, deze kunnen ontploffen.
•
Zet geen levensmiddelen direct tegen de luchtopening in de achterwand.
• Diepgevroren voedsel mag niet opnieuw worden ingevroren als het eenmaal ontdooid
is.
• Bewaar voorverpakte diepvriesproducten volgens de aanwijzingen van de fabrikant.
• U dient zich strikt te houden aan de aanbevelingen van de fabrikant van het apparaat
met betrekking tot het bewaren van voedsel. Raadpleeg de betreffende aanwijzingen.
• Leg geen koolzuurhoudende of mousserende dranken in de vriezer, deze veroorzaken
druk op de fles die daardoor kan ontploffen, dit kan schade toebrengen aan het apparaat.
• IJslollies kunnen vrieswonden veroorzaken als ze rechtstreeks vanuit het apparaat geconsumeerd worden.
Onderhoud en reiniging
• Schakel het apparaat uit en trek de stekker uit het stopcontact voordat u onderhoudshandelingen verricht.
• Maak het apparaat niet schoon met metalen voorwerpen.
1) Als er een afdekking voor het lampje is voorzien
2) Het lampje
3) Als het apparaat vorstvrij is
3)
Page 5
Veiligheidsinformatie
• Gebruik geen scherpe voorwerpen om ijs van het apparaat te krabben. Gebruik een
kunststof schraper.
• Controleer de afvoer in de koelkast regelmatig op dooiwater. Maak de afvoer, indien
nodig, schoon. Als de afvoer verstopt is, zal er water op de bodem van het apparaat
liggen.
Installatie
Voor de aansluiting van elektriciteit dienen de instructies in de desbetreffende paragrafen
nauwgezet te worden opgevolgd.
• Pak het apparaat uit en controleer of er beschadigingen zijn. Sluit het apparaat niet aan
als het beschadigd is. Meld mogelijke beschadigingen onmiddellijk bij de winkel waar u
het apparaat gekocht heeft. Gooi in dat geval de verpakking niet weg.
• Wij adviseren u om 4 uur te wachten voordat u het apparaat aansluit, dan kan de olie
terugvloeien in de compressor.
• Rond het apparaat dient adequate luchtcirculatie te zijn, anders kan dit tot oververhitting
leiden. Om voldoende ventilatie te verkrijgen de instructies met betrekking tot de installatie opvolgen.
• De achterkant dient zo mogelijk tegen een muur geplaatst te worden, teneinde te voorkomen dat hete onderdelen (compressor, condensator) aangeraakt kunnen worden en
brandwonden veroorzaken.
• Het apparaat mag niet vlakbij radiatoren of kooktoestellen geplaatst worden.
• Verzeker u ervan dat de stekker bereikbaar is nadat het apparaat geïnstalleerd is.
•
Sluit het apparaat alleen aan op een drinkwaterleiding.
4)
5
Onderhoud
• Alle elektrotechnische werkzaamheden die noodzakelijk zijn voor het uitvoeren van onderhoud aan het apparaat, dienen uitgevoerd te worden door een gekwalificeerd elektricien of competent persoon.
• Dit product mag alleen worden onderhouden door een erkend onderhoudscentrum en
er dient alleen gebruik te worden gemaakt van originele reserveonderdelen.
Bescherming van het milieu
Dit apparaat bevat geen gassen die de ozonlaag kunnen beschadigen, niet in het koelcircuit
en evenmin in de isolatiematerialen. Het apparaat mag niet worden weggegooid bij het
normale huishoudelijke afval. Het isolatieschuim bevat ontvlambare gassen: het apparaat
moet weggegooid worden conform de van toepassing zijnde regels die u bij de lokale overheidsinstanties kunt verkrijgen. Voorkom beschadiging aan de koeleenheid, vooral aan de
achterkant bij de warmtewisselaar. De materialen die gebruikt zijn voor dit apparaat en die
voorzien zijn van het symbool
4) Indien er een wateraansluiting voorzien is
zijn recyclebaar.
Page 6
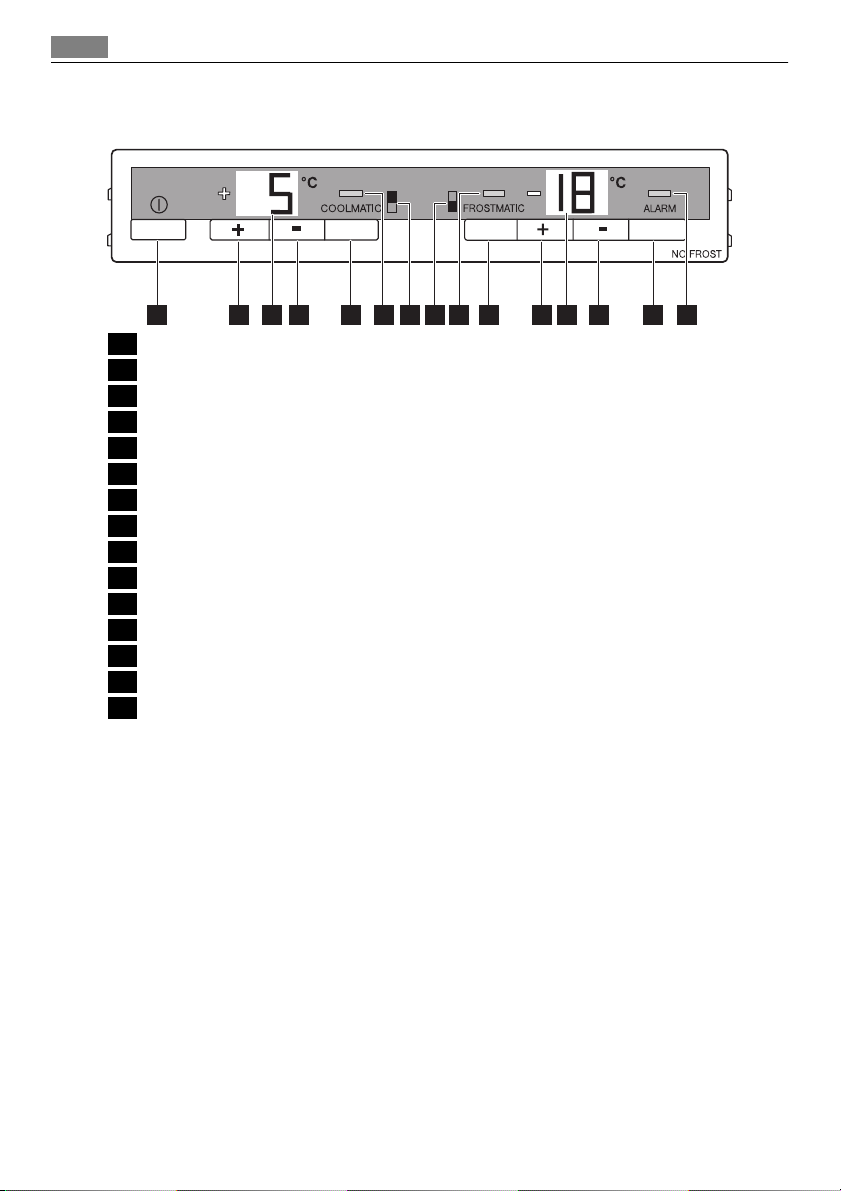
Bedieningspaneel
6
BEDIENINGSPANEEL
1 ON/OFFschakelaar
2 Temperatuurregeling koelkast, + toets
3 Weergave temperatuur koelkast
4 Temperatuurregeling koelkast, - toets
5 COOLMATICtoets
6 COOLMATICcontrolelampje
7 Weergave koelvak
8 Weergave vriesvak
9 FROSTMATICcontrolelampje
10 FROSTMATIC toets
11 Temperatuurregeling vriezer, + toets
12 Weergave temperatuur vriesvak
13 Temperatuurregeling vriezer, - toets
14 Alarm reset toets
15 Controlelampje alarm
65 7 84321 15141312119 10
Inschakelen
1. Steek de stekker in het stopcontact.
2. Zet de ON/OFF schakelaar op ON.
3. Het alarmlampje knippert tot de temperatuur bereikt is.
Het alarmsignaal klinkt.
4. Druk op de alarmresettoets om het alarm uit te schakelen.
Uitschakelen
Om het apparaat uit te schakelen:
1. zet ON/OFF de schakelaar op OFF.
2. Trek de stekker uit het stopcontact.
Temperatuurregeling
De ingestelde temperatuur van de koelkast en de vriezer kan worden ingesteld met de
temperatuurknoppen. De temperatuurweergave toont de ingestelde temperatuur.
Voor een juiste conservering van het voedsel moeten de volgende temperaturen worden
ingesteld:
• +5 °C in de koelkast
Page 7
Bedieningspaneel
• -18 °C in de vriezer.
De ingestelde temperatuur zal binnen 24 uur worden bereikt.
Schommelingen van een paar graden rond de ingestelde temperatuur zijn normaal en zijn
geen storing van het apparaat.
COOLMATICfunctie
De COOLMATIC functie is geschikt voor het snel koelen van grote hoeveelheden voedsel in
de koelkast.
Voer de volgende stappen uit om de functie in te schakelen:
1. Druk op de COOLMATIC toets.
2. Het COOLMATIC display wordt ingeschakeld.
De COOLMATIC functie zorgt nu voor intensieve koeling. Een temperatuur van +2°C wordt
automatisch gekozen.
De COOLMATIC functie stopt automatisch na 6 uur.
U kunt de functie te allen tijde uitschakelen:
1. Druk op de COOLMATIC toets.
2. Het COOLMATIC display wordt uitgeschakeld.
Vakantiefunctie
Met deze functie kunt u de koelkast gesloten en leeg houden tijdens een lange vakantieperiode (bijv. de zomervakantie) zonder dat er vieze luchtjes ontstaan.
Het koelvak moet leeg zijn als de vakantiefunctie is ingeschakeld.
Om de functie in te schakelen:
1. houd de temperatuurregelaar ( + toets) ingedrukt tot de letter "H" (Holiday/Vakantie)
op het temperatuurdisplay verschijnt. De Holiday functie stelt de temperatuur in op
ongeveer +15°C. De koelkast staat in de energiebesparende stand.
Om de functie uit te schakelen:
1. stel de gewenste temperatuur in door op de temperatuurregelaar te drukken.
7
FROSTMATICfunctie
De FROSTMATIC functie versnelt het invriezen van vers voedsel en beschermt voedsel dat
reeds is geconserveerd tegen ongewenste opwarming.
Voer de volgende stappen uit om de functie in te schakelen:
1. Druk op de FROSTMATIC toets.
2. Het FROSTMATIC display wordt ingeschakeld.
De FROSTMATIC functie wordt na 52 uur automatisch uitgeschakeld.
U kunt de functie te allen tijde uitschakelen:
1. Druk op de FROSTMATIC toets.
2. Het FROSTMATIC display wordt uitgeschakeld.
Alarm hoge temperatuur
In het geval van een abnormale stijging van de temperatuur in de vriezer (bijv. stroomuitval)
gaat het alarmlampje knipperen en klinkt er een zoemer.
Druk op de alarmresettoets om de zoemer uit te schakelen, het alarmlampje blijft knipperen.
De zoemer stopt automatisch als de temperatuur weer normaal is, het alarmlampje blijft
knipperen.
Page 8

Het eerste gebruik
8
Druk op de alarmresettoets. Het alarmlampje gaat uit en tegelijkertijd wordt op het temperatuurdisplay van de vriezer gedurende ongeveer 5 seconden de hoogste temperatuur
weergegeven die in het vriesvak bereikt is.
HET EERSTE GEBRUIK
De binnenkant schoonmaken
Voordat u het apparaat voor de eerste keer gebruikt, wast u de binnenkant en de interne
accessoires met lauwwarm water en een beetje neutrale zeep om de typische geur van een
nieuw product weg te nemen. Droog daarna grondig af.
Gebruik geen oplosmiddelen of schuurpoeders. Deze beschadigen de lak.
DAGELIJKS GEBRUIK
Vers voedsel invriezen
Het vriesvak is geschikt voor het invriezen van vers voedsel en voor het voor een lange
periode bewaren van ingevroren en diepgevroren voedsel.
Om vers voedsel in te vriezen moet de gemiddelde instelling veranderd worden.
Om het invriezen sneller te laten verlopen moet u de thermostaatknop echter op een hogere
stand instellen om de maximale koude te kunnen verkrijgen.
In deze omstandigheden kan de temperatuur in de koelkast tot onder de 0°C dalen. Als dat
gebeurt de thermostaatknop op een warmere stand instellen.
Zet het verse voedsel dat u in wilt vriezen op het bovenste vak.
Het bewaren van ingevroren voedsel
Als u het apparaat voor het eerst of na een periode dat het niet gebruikt is inschakelt, het
apparaat minstens 2 uur op een hoge instelling laten werken voordat u er producten in
plaatst.
In het geval van onbedoelde ontdooiing, bijvoorbeeld als de stroom langer is uitgevallen
dan de duur die op de kaart met technische kenmerken onder "tijdsduur" is vermeld, moet
het ontdooide voedsel snel geconsumeerd worden of onmiddellijk bereid worden en dan
weer worden ingevroren (nadat het afgekoeld is).
Ontdooien
Diepgevroren of ingevroren voedsel kunt, voordat het gebruikt wordt, in het koelvak of op
kamertemperatuur laten ontdooien, afhankelijk van de hoeveelheid tijd die hiervoor nodig
is.
Kleine stukken kunnen zelfs rechtstreeks vanuit de vriezer gekookt worden als ze nog bevroren zijn: in dat geval zal de bereiding iets langer duren.
Page 9

Verplaatsbare schappen
De wanden van de koelkast zijn voorzien van een
aantal geleiders zodat de schappen op de gewenste plaats gezet kunnen worden.
Flessenrek
Plaats de flessen (met de openingen naar voren
gericht) in het voorgeplaatste schap.
Als het schap horizontaal geplaatst is, mogen alleen afgesloten flessen worden neergezet.
Dit schap voor een flessenhouder kan worden gekanteld om vooraf geopende flessen te bewaren.
Trek hiervoor de houder omhoog zodat deze omhoog draait en op het niveau erboven kan worden
geplaatst.
Dagelijks gebruik
9
Groentelade
De lade is geschikt voor het opbergen van fruit en
groente.
Er zit een schotje in de lade dat in verschillende
standen gezet kan worden om aan persoonlijke
behoeftes te voldoen.
Er zit een rooster (indien aanwezig) op de bodem
van de lade om fruit en groente op afstand te
houden van eventuele vochtigheid op het oppervlak van de bodem.
Alle onderdelen in de lade kunnen verwijderd worden om ze schoon te maken
1
2
Page 10
Dagelijks gebruik
10
Het plaatsen van de deurschappen
Om het bewaren van voedselpakketten van
verschillende afmetingen mogelijk te maken,
kunnen de schappen op verschillende hoogtes geplaatst worden.
Om deze aanpassingen uit te voeren, gaat u
als volgt te werk:
trek het schap geleidelijk in de richting van
de pijlen totdat het los komt en plaats op een
andere gewenste hoogte terug.
Luchtkoeling
Met de Dynamic Air Cooling (DAC)-ventilator
wordt voedsel snel gekoeld en wordt de temperatuur in het koelvak gelijkmatiger.
1. U kunt de ventilator inschakelen door op de
schakelaar (1) te drukken. Het groene lampje
(2) gaat aan.
2. Pas de temperatuurregelaar aan aan de stand
van de VENTILATOR.
Deze voorziening maakt snelle koeling van levensmiddelen mogelijk en zorgt voor een gelijkmatiger
temperatuur in het vak.
Schakel de ventilator in als de kamertemperatuur
hoger dan 25° C is.
2
1
Extra koele zone
Het Extra koele vak is geschikt voor het bewaren van vers voedsel zoals vis en vlees, omdat
de temperatuur hier lager is dan in de rest van de koelkast. Het bevindt zich in het onderste
gedeelte van de koelkast, direct boven de groentenlade.
Page 11

Als u het extra koele vak wilt verwijderen, gaat u
als volgt te werk:
1. Doe de deur van de koelkast zo ver mogelijk
open. Als de deur niet in een hoek van 180°
geopend kan worden vanwege een eindstop
of andere voorwerpen, moet u het flessenrek
uit de deur verwijderen.
2. Trek de lade helemaal naar buiten.
3. Til het voorste deel van de lade een klein stukje
op.
4. Verwijder de lade uit zijn drager.
5. Til de achterkant van de drager uit zijn zitting.
6. Trek het frame naar u toe.
7. Verwijder het draagframe.
Om het Extra koele vak weer op zijn oorspronkelijke plaats te zetten bovengenoemde handelingen
in omgekeerde volgorde verrichten
Vriesmandjes uit de vriezer verwijderen
Dagelijks gebruik
5
3
11
6
2
2
1
2
1
De vriesmandjes hebben een limietstop om te voorkomen dat ze per ongeluk verschuiven
of vallen. Trek het mandje naar u toe om het uit de vriezer te halen, tot het niet verder
kan, verwijder het mandje door de voorkant naar boven te kantelen.
Bij het terugzetten tilt u de voorkant van het mandje een beetje op en schuift u het
gekanteld in de vriezer. Zodra het mandje over de eindpunten heen is, kunt u het terug
op zijn plaats schuiven.
Page 12

Nuttige aanwijzingen en tips
12
NUTTIGE AANWIJZINGEN EN TIPS
Normale bedrijfsgeluiden
• U kunt een zwak gorgelend en borrelend geluid horen wanneer het koelmiddel door
leidingen wordt gepompt. Dit is normaal.
• Als de compressor aan staat, wordt het koelmiddel rondgepompt en dan zult u een
zoemend en kloppend geluid van de compressor horen. Dit is normaal.
• De thermische uitzetting kan een plotseling krakend geluid veroorzaken. Dit is een na-
tuurlijk, niet gevaarlijk fysisch verschijnsel. Dit is normaal.
Tips voor energiebesparing
• De deur niet vaker openen of open laten staan dan strikt noodzakelijk.
• Als de omgevingstemperatuur hoog is, de thermostaatknop op een lage temperatuur
staat en het apparaat volledig gevuld is, kan de compressor continu aan staan waardoor
er ijs op de verdamper ontstaat. Als dit gebeurt, zet u de thermostaatknop naar een
warmere instelling om de koelkast automatisch te laten ontdooien en zo elektriciteitsverbruik te besparen.
Tips voor het koelen van vers voedsel
Om de beste prestatie te verkrijgen:
• Zet geen warm voedsel of verdampende vloeistoffen in de koelkast
• dek het voedsel af of verpak het, in het bijzonder als het een sterke geur heeft
• plaats het voedsel zodanig dat de lucht er vrijelijk omheen kan circuleren
Nuttige tips voor het koelen
Nuttige tips:
Vlees (alle soorten) in plastic zakken verpakken en op het glazen schap leggen, boven de
groentelade.
Bewaar het, voor de veiligheid, slechts een of maximaal twee dagen op deze manier.
Gekookt voedsel, koude schotels, enz.: deze moeten afgedekt worden en mogen op willekeurig welk schap gezet worden.
Fruit en groente: deze moeten zorgvuldig schoongemaakt worden en in de speciaal daarvoor bedoelde lade(n) geplaatst worden.
Boter en kaas: dit moet in speciale luchtdichte bakjes gelegd of in aluminiumfolie of plastic
zakjes gewikkeld worden om zoveel mogelijk lucht buiten te sluiten.
Melkflessen: deze moeten een afdekdop hebben en opgeslagen worden in het flessenrek in
de deur.
Bananen, aardappelen, uien en knoflook, indien niet verpakt, mogen niet in de koelkast
bewaard worden.
Tips voor het invriezen
Om u te helpen om het beste van het invriesproces te maken, volgen hier een paar belangrijke tips:
• de maximale hoeveelheid voedsel die in 24 uur ingevroren kan worden. is vermeld op
het typeplaatje;
• het invriesproces duurt 24 uur. Voeg gedurende deze periode niet meer in te vriezen
voedsel toe;
Page 13

Onderhoud en reiniging
• vries alleen vers en grondig schoongemaakte levensmiddelen van uitstekende kwaliteit
in;
• bereid het voedsel in kleine porties voor, zo kan het snel en volledig worden ingevroren
en zo kunt u later alleen die hoeveelheid laten ontdooien die u nodig heeft;
• wikkel het voedsel in aluminiumfolie of plastic en zorg ervoor dat de pakjes luchtdicht
zijn;
• leg vers, nog niet ingevroren voedsel niet tegen het al ingevroren voedsel, om te voor-
komen dat dit laatste warm wordt;
• smalle pakjes zijn makkelijker op te bergen dan dikke; zout maakt voedsel minder lang
houdbaar;
• water bevriest, als dit rechtstreeks uit het vriesvak geconsumeerd wordt, kan het aan de
huid vastvriezen;
• het is aan te bevelen de invriesdatum op elk pakje te vermelden, dan kunt u zien hoe
lang het al bewaard is;
Tips voor het bewaren van ingevroren voedsel
Om de beste resultaten van dit apparaat te verkrijgen, dient u:
• er zich van te verzekeren dat de commercieel ingevroren levensmiddelen op geschikte
wijze door de detailhandelaar werden opgeslagen;
• ervoor te zorgen dat de ingevroren levensmiddelen zo snel mogelijk van de winkel naar
uw vriezer gebracht worden;
• de deur niet vaker te openen of open te laten staan dan strikt noodzakelijk.
• Als voedsel eenmaal ontdooid is, bederft het snel en kan het niet opnieuw worden in-
gevroren.
• Bewaar het voedsel niet langer dan de door de fabrikant aangegeven bewaarperiode.
13
ONDERHOUD EN REINIGING
LET OP!
Voordat u welke onderhoudshandeling dan ook verricht, de stekker uit het stopcontact
trekken.
Het koelcircuit van dit apparaat bevat koolwaterstoffen; onderhoud en herladen mag alleen
uitgevoerd worden door bevoegde technici.
Periodieke reiniging
Het apparaat moet regelmatig worden schoongemaakt:
• maak de binnenkant en de accessoires schoon met lauw water en wat neutrale zeep.
• controleer de afdichtingen regelmatig en wrijf ze schoon om u ervan te verzekeren dat
ze schoon zijn en vrij van restjes zijn.
• spoel ze af en maak ze grondig droog.
Trek niet aan leidingen en/of kabels aan de binnenkant van de kast en verplaats of beschadig
ze niet.
Gebruik nooit schoonmaakmiddelen, schuurpoeders, erg geparfumeerde reinigingsproducten en waspolijstmiddelen om de binnenkant schoon te maken, aangezien deze het oppervlak beschadigen en een sterke geur achterlaten.
Page 14

Problemen oplossen
14
Maak de condensor (zwart rooster) en de compressor op de achterkant van het apparaat
schoon met een borstel of stofzuiger. Deze handeling zal de prestatie van het apparaat
verbeteren en het elektriciteitsverbruik besparen.
Zorg ervoor dat u het koelsysteem niet beschadigt.
Veel normaal verkrijgbare keukenreinigers bevatten chemicaliën die de kunststoffen die in
dit apparaat gebruikt zijn kunnen aantasten/beschadigen. Daarom wordt het aanbevolen
de buitenkant van dit apparaat alleen schoon te maken met warm water met een beetje
afwasmiddel.
Steek, na het schoonmaken van het apparaat, de stekker weer in het stopcontact.
Het ontdooien van de koelkast
Rijp wordt elke keer als de compressormotor tijdens normale werking stopt, automatisch
van de verdamper van het koelvak verwijderd. Het dooiwater loopt via een gootje in een
speciale opvangbak aan de achterkant van het apparaat, boven de compressormotor, waar
het verdampt.
Het is belangrijk om het afvoergaatje van het
dooiwater in het midden van het koelvak regelmatig schoon te maken, om te voorkomen dat het
water overloopt en op het voedsel in de koelkast
gaat druppelen. Gebruik daarvoor de speciale reiniger, die al in het afvoergaatje zit.
Het ontdooien van de vriezer
Het vriesvak van dit model is een "no-frost"-type. Dit betekent dat zich in het vriesvak geen
ijs vormt als deze in bedrijf is, noch tegen de wanden noch op de levensmiddelen.
Het voorkomen van ijsvorming wordt gerealiseerd door een continue circulatie van koude
lucht in het vak, die aangedreven wordt door een automatisch geregelde ventilator.
PROBLEMEN OPLOSSEN
LET OP!
Voordat u storingen opspoort, de stekker uit het stopcontact trekken.
Het opsporen van storingen die niet in deze handleiding vermeld zijn, dient te worden
verricht door een gekwalificeerd technicus of deskundig persoon.
Page 15
Problemen oplossen
15
Er zijn tijdens de normale werking geluiden te horen (compressor, koelcircuit).
Probleem Mogelijke oorzaak Oplossing
Het apparaat maakt lawaai.
De compressor werkt
continu.
De deur is niet goed gesloten. Zie 'De deur sluiten'.
De deur is te vaak geopend. Laat de deur niet langer dan nodig
De temperatuur van het product
De kamertemperatuur is te
De FROSTMATIC-functie is inge-
De COOLMATIC-functie is inge-
Er loopt water over de
achterkant van de koelkast.
Er loopt water in de koelkast.
Producten verhinderen dat er
Er loopt water over de
vloer.
Er is te veel rijp en ijs.
De deur is niet goed gesloten. Zie 'De deur sluiten'.
De thermostaatknop staat mis-
De temperatuur in het
apparaat is te hoog.
De temperatuur van het product
Het apparaat wordt niet goed
ondersteund.
De thermostaatknop staat misschien niet goed.
is te hoog.
hoog.
schakeld.
schakeld.
Tijdens het automatische ont-
dooiproces ontdooit de rijp tegen de achterwand.
De waterafvoer is verstopt. Reinig de waterafvoer.
water in de wateropvangbak kan
stromen.
De dooiwaterafvoer loopt niet in
de verdamperbak boven de compressor.
De producten zijn niet op de
juiste wijze verpakt.
schien niet goed.
De deur is niet goed gesloten. Zie 'De deur sluiten'.
is te hoog.
Controleer of het apparaat stabiel
staat (alle vier de voetjes moeten
op de vloer staan).
Stel een hogere temperatuur in.
openstaan.
Laat het product afkoelen tot ka-
mertemperatuur voordat u het
opbergt.
Verlaag de temperatuur in de kamer.
Raadpleeg de ' FROSTMATICfunctie'.
Raadpleeg de ' COOLMATIC-functie'.
Dit is normaal.
Zorg ervoor dat de producten de
achterwand niet raken.
Maak de dooiwaterafvoer vast op
de verdamperbak.
Pak de producten beter in.
Stel een hogere temperatuur in.
Laat het product afkoelen tot kamertemperatuur voordat u het
opbergt.
Page 16
Problemen oplossen
16
Probleem Mogelijke oorzaak Oplossing
Er zijn veel producten tegelijk
De temperatuur in de
koelkast is te hoog.
De temperatuur in het
vriesvak is te hoog.
Het apparaat werkt niet.
De stekker zit niet goed in het
Het apparaat krijgt geen stroom.
Het lampje werkt niet.
Het lampje is stuk. Zie 'Het lampje vervangen'.
Bel, wanneer het advies niet tot resultaten leidt, de dichtstbijzijnde klantenservice voor
dit merk.
Het lampje vervangen
LET OP!
Trek de stekker uit het stopcontact.
opgeborgen.
Er is geen koude luchtcirculatie
in het apparaat.
Producten zijn te dicht op elkaar
geplaatst.
Het apparaat is uitgeschakeld. Schakel het apparaat in.
stopcontact.
Er staat geen spanning op het
stopcontact.
Het lampje staat in stand-by. Sluit en open de deur.
Berg minder producten tegelijk
op.
Zorg ervoor dat er koude luchtcirculatie in het apparaat is.
Berg de producten zo op dat er
een koude luchtcirculatie is.
Steek de stekker goed in het stopcontact.
Sluit een ander elektrisch apparaat op het stopcontact aan.
Neem contact op met een gekwalificeerd elektricien.
1. Verwijder de schroef van de afdekking
van het lampje.
2. Verwijder de haak van de afdekking van
2
1
de lamp naar buiten toe.
3. Haal de afdekking van het lampje.
4. Vervang het kapotte lampje door een
nieuw lampje met hetzelfde vermogen
(het maximumvermogen is vermeld op
3
de afdekking van het lampje).
5. Installeer de afdekking van het lampje.
6. Draai de schroef van de afdekking van
het lampje vast.
7. Steek de stekker in het stopcontact.
8. Open de deur. Controleer of het lampje gaat branden.
De deur sluiten
1. Maak de afdichtingen van de deur schoon.
2. Stel de deur, indien nodig, af. Raadpleeg "Montage".
3. Vervang, indien nodig, de defecte deurafdichtingen. Neem contact met de serviceafdeling.
Page 17
Technische gegevens
TECHNISCHE GEGEVENS
S75340KG2 S75380KG2
Afmeting
Hoogte 1850 mm 2010 mm
Breedte 595 mm 595 mm
Diepte 632 mm 632 mm
Tijdsduur 18 h 18 h
De technische gegevens staan op het typeplaatje aan de linker binnenkant in het apparaat
en op het energielabel.
MONTAGE
WAARSCHUWING!
Lees voor uw eigen veiligheid en correcte werking van het apparaat eerst de "veiligheidsinformatie" aandachtig door, alvorens het apparaat te installeren.
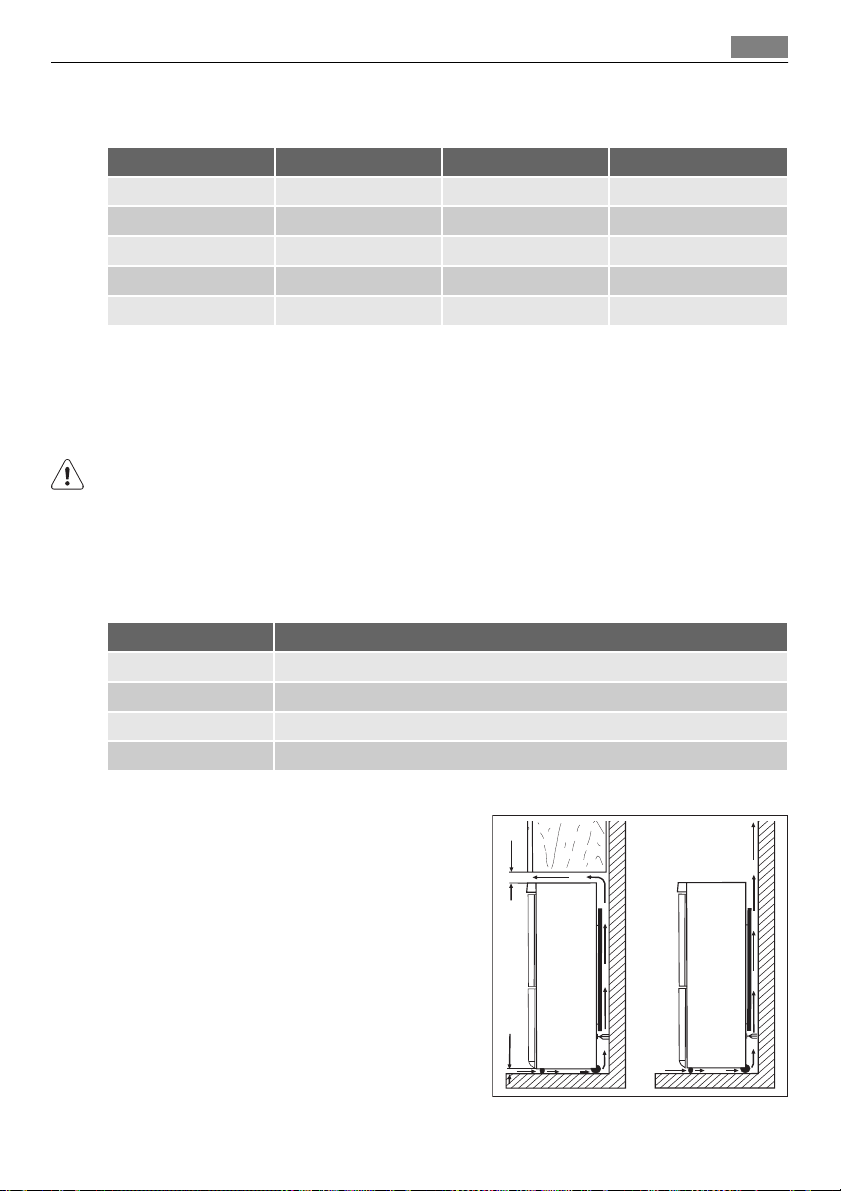
Opstelling
Installeer dit apparaat op een plaats waar de omgevingstemperatuur overeenkomt met de
klimaatklasse die vermeld is op het typeplaatje van het apparaat:
Klimaatklasse Omgevingstemperatuur
SN +10°C tot + 32°C
N +16°C tot + 32°C
ST +16°C tot + 38°C
T +16°C tot + 43°C
17
Plaats
Het apparaat moet ver van hittebronnen, zoals
radiatoren, boilers, direct zonlicht enz., vandaan
worden geïnstalleerd. Zorg er voor dat lucht vrij
kan circuleren aan de achterkant van het keukenkastje. Als het apparaat onder een muur met een
afdakje wordt geplaatst, moet de minimale afstand tussen de bovenkant van het keukenkastje
en de muur ten minste 100 mm bedragen om de
beste prestatie te garanderen Voor de beste prestatie dient u het apparaat echter niet onder een
afdakje te zetten. De afstelbare voetjes aan de onderkant van het apparaat garanderen een nauwkeurig horizontale uitlijning.
mm
min
100
A
mm
20
B
Page 18
Montage
18
WAARSCHUWING!
Het moet mogelijk zijn het apparaat van de hoofdstroomtoevoer af te halen; de stekker
moet daarom na installatie gemakkelijk toegankelijk zijn.
Elektrische aansluiting
Zorg er vóór het aansluiten voor dat het voltage en de frequentie op het typeplaatje overeenkomen met de stroomtoevoer in uw huis.
Het apparaat moet geaard zijn. De netsnoerstekker is voorzien van een contact voor dit
doel. Als het stopcontact niet geaard is, sluit het apparaat dan aan op een afzonderlijk
aardepunt, in overeenstemming met de geldende regels, raadpleeg hiervoor een gekwalificeerd elektricien.
De fabrikant neemt geen verantwoordelijkheid op zich als de bovenstaande veiligheidsmaatregelen niet worden nageleefd.
Dit apparaat voldoet aan de EU. richtlijnen.
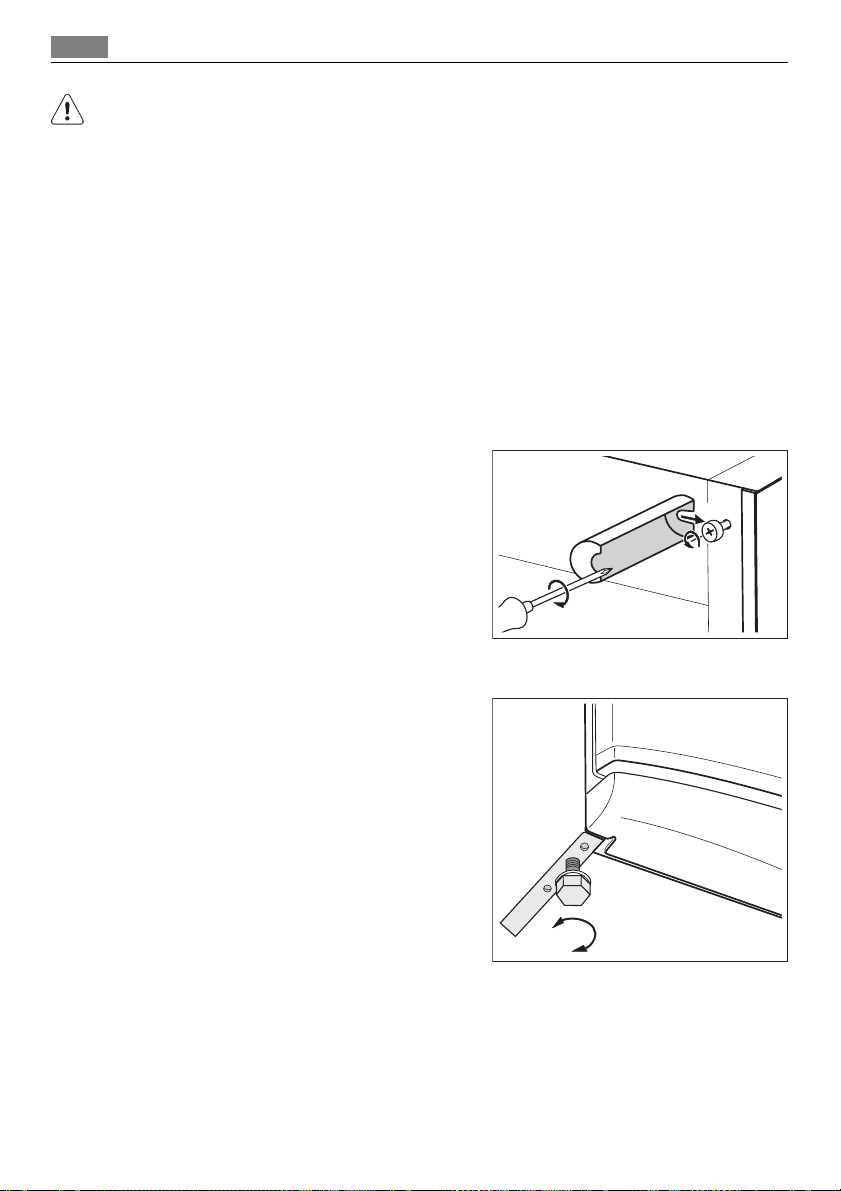
Afstandsstukken achterkant
In het zakje met de handleiding zitten twee
afstandhouders die gemonteerd moeten worden zoals te zien is in de afbeelding.
Draai de schroeven los, plaats het afstandsstuk
onder de kop van de schroef en draai de schroeven
weer vast.
3
2
1
Waterpas zetten
Zorg er voor dat, wanneer u het apparaat plaatst,
het waterpas staat. Deze stand kan bereikt worden
met de twee afstelbare voetjes die aan de voorkant
en onderkant van het apparaat bevestigd zijn.
Page 19

Montage
Het verwijderen van de geleiders van de schappen
Uw apparaat is voorzien van borgklemmen voor
de schappen die het mogelijk maken de schappen
A
vast te zetten tijdens transport.
Om deze te verwijderen gaat u als volgt te werk:
1. Trek de schaphouders in de richting van de pijl
(A).
2. Til het schap aan de achterkant op en duw het
naar voren tot het vrij komt (B).
B
3. Verwijder de borgklemmen (C).
C
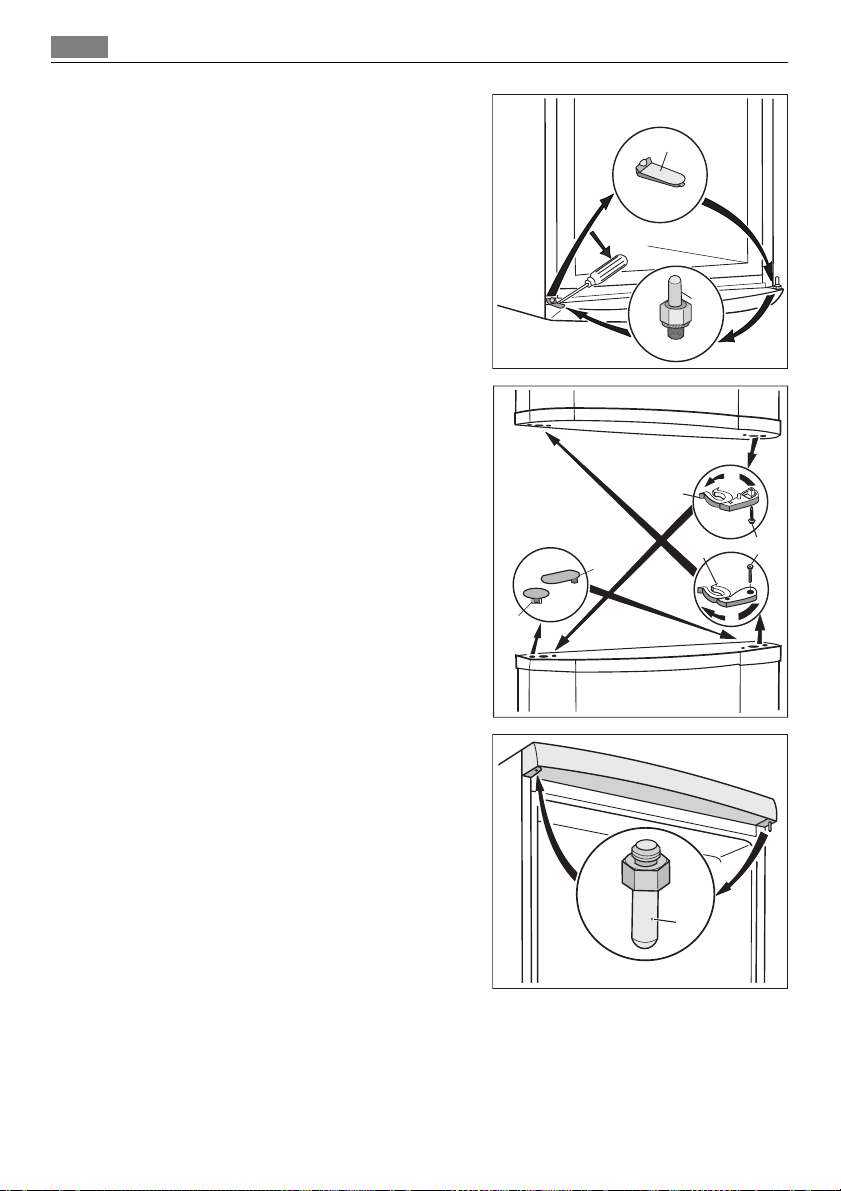
Omkeerbaarheid van de deur
WAARSCHUWING!
Voordat werkzaamheden worden uitgevoerd, moet u zich ervan verzekeren dat de stekker
uit het stopcontact is getrokken.
Om de volgende handelingen uit te voeren, raden we aan dat dit wordt gedaan met de hulp
van een tweede persoon die de deuren van het apparaat stevig vasthoudt tijdens de werkzaamheden.
19
1. Open de deur. Schroef het middelste
scharnier (m2) los. Verwijder het kunststof afstandsstuk (m1).
2. Verwijder de afstandshouders (m6) en
verplaats ze naar de andere kant van het
scharnier (m5).
3. Verwijder de deuren.
4. Verwijder de linker pen van het deksel
van het middelste scharnier (m3, m4) en
monteer ze op de andere kant.
5. Monteer de pen van het middelste
scharnier (m5) in het linker gat van de
onderste deur.
m3
m1
m5
m2
m6
m4
Page 20
Montage
20
6. Verwijder, met behulp van een gereed-
schap, het deksel (b1). Schroef het onderste scharnier (b2) en het afstandsstuk
(b3) los en monteer ze aan de andere
kant.
7. Zet het deksel (b1) terug op de andere
kant.
8. Keer de vergrendelingselementen
(d2,d3) om, verplaats deze naar de andere kant van de andere de ur en bev es ti g
deze door de schroef (d4) vast te draaien.
9. Zet de stoppers (d5,d6) terug op de an-
dere kant van de deuren.
10. Zet de onderste deur terug op het on-
derste scharnier (b2).
11. Breng het middelste scharnier (m2) aan
in de linker opening van de onderste
deur.
d5
d6
b3
b1
d2
d3
b2
d4
12. Schroef het onderste scharnier (t1) los
en monteer het aan de andere kant.
13. Bevestig de bovenste deur op het bo-
venste scharnier.
14. Plaats de bovenste deur weer op het
middelste scharnier (m5) en kantel de
beide deuren enigszins.
15. Schroef het middelste scharnier (m2)
weer vast. Vergeet het kunststof afstandsstuk (m1) niet.
t1
Page 21

Het milieu
16. Verwijder de pennen (h1). Verwijder de
afdekking (h2).
17. Schroef de handgrepen (h3) los en be-
vestig deze aan de tegenovergestelde
zijde.
18. Zet de afdekking (h2) terug en de pen-
nen (h1).
Controleer goed en verzeker u ervan dat:
• alle schroeven zijn aangehaald,
• de magnetische afdichtstrip vast zit aan de
h1
h2
kast,
• de deur goed open en dicht gaat.
Als de omgevingstemperatuur laag is (bijv. in de winter), kan het zijn dat de pakking niet
precies op de kast past. Wacht in dat geval tot de pakking op natuurlijke wijze passend
wordt.
Als u bovenstaande handelingen liever niet zelf uitvoert, neem dan contact op met de
dichtstbijzijnde Klantenservice. De deskundige van de Klantenservice zal de draairichting
van de deuren op uw kosten veranderen.
HET MILIEU
Het symbool op het product of op de verpakking wijst erop dat dit product niet als
huishoudafval mag worden behandeld, maar moet worden afgegeven bij een verzamelpunt
waar elektrische en elektronische apparatuur wordt gerecycled. Als u ervoor zorgt dat dit
product op de juiste manier wordt verwijderd, voorkomt u mogelijke negatieve gevolgen
voor mens en milieu die zich zouden kunnen voordoen in geval van verkeerde
afvalverwerking. Voor gedetailleerdere informatie over het recyclen van dit product, kunt
u contact opnemen met de gemeente, de gemeentereiniging of de winkel waar u het
product hebt gekocht.
21
h3
Page 22

Contents
22
Thank you for choosing one of our high-quality products.
To ensure optimal and regular performance of your appliance please read this
instruction manual carefully. It will enable you to navigate all processes perfectly
and most efficiently. To refer to this manual any time you need to, we recommend
you t o k eep it in a sa fe p la ce. An d p lea se pass it to any future owner of the appliance.
We wish you much joy with your new appliance.
CONTENTS
SAFETY INFORMATION 22
Children and vulnerable people safety
23
General safety 23
Daily Use 24
Care and cleaning 24
Installation 24
Service 25
CONTROL PANEL 25
Switching on 26
Switching off 26
Temperature regulation 26
COOLMATIC function 26
Holiday function 26
FROSTMATIC function 27
High temperature alarm 27
FIRST USE 27
Cleaning the interior 27
DAILY USE 27
Freezing fresh food 27
Storage of frozen food 28
Thawing 28
Movable shelves 28
Bottle rack 28
Vegetable Drawer 29
Positioning the door shelves 29
Air cooling 30
Chiller Zone 30
Removal of freezing baskets from the
freezer 31
HELPFUL HINTS AND TIPS 31
Normal Operating Sounds 31
Hints for energy saving 31
Hints for fresh food refrigeration 31
Hints for refrigeration 32
Hints for freezing 32
Hints for storage of frozen food 32
CARE AND CLEANING 32
Periodic cleaning 33
Defrosting of the refrigerator 33
Defrosting of the freezer 34
WHAT TO DO IF… 34
Replacing the lamp 36
Closing the door 36
TECHNICAL DATA 36
INSTALLATION 36
Positioning 36
Location 37
Electrical connection 37
Rear spacers 37
Levelling 38
Removing the shelf holders 38
Door reversibility 38
ENVIRONMENTAL CONCERNS 40
Subject to change without notice
SAFETY INFORMATION
In the interest of your safety and to ensure the correct use, before installing and first using
the appliance, read this user manual carefully, including its hints and warnings. To avoid
unnecessary mistakes and accidents, it is important to ensure that all people using the
Page 23

Safety information
appliance are thoroughly familiar with its operation and safety features. Save these instructions and make sure that they remain with the appliance if it is moved or sold, so that
everyone using it through its life will be properly informed on appliance use and safety.
For the safety of life and property keep the precautions of these user's instructions as the
manufacturer is not responsible for damages caused by omission.
Children and vulnerable people safety
• This appliance is not intended for use by persons (including children) with reduced
physical, sensory or mental capabilities, or lack of experience and knowledge, unless they
have been given supervision or instruction concerning use of the appliance by a person
responsible for their safety.
Children should be supervised to ensure that they do not play with the appliance.
• Keep all packaging well away from children. There is risk of suffocation.
• If you are discarding the appliance pull the plug out of the socket, cut the connection
cable (as close to the appliance as you can) and remove the door to prevent playing
children to suffer electric shock or to close themselves into it.
• If this appliance featuring magnetic door seals is to replace an older appliance having a
spring lock (latch) on the door or lid, be sure to make that spring lock unusable before
you discard the old appliance. This will prevent it from becoming a death trap for a child.
General safety
CAUTION!
Keep ventilation openings clear of obstruction.
23
• The appliance is intended for keeping foodstuff and/or beverages in a normal household
as explained in this instruction booklet.
• Do not use a mechanical device or any artificial means to speed up the thawing process.
• Do not use other electrical appliances (such as ice cream makers) inside of refrigerating
appliances, unless they are approved for this purpose by the manufacturer.
• Do not damage the refrigerant circuit.
• The refrigerant isobutane (R600a) is contained within the refrigerant circuit of the ap-
pliance, a natural gas with a high level of environmental compatibility, which is nevertheless flammable.
During transportation and installation of the appliance, be certain that none of the
components of the refrigerant circuit become damaged.
If the refrigerant circuit should become damaged:
– avoid open flames and sources of ignition
– thoroughly ventilate the room in which the appliance is situated
• It is dangerous to alter the specifications or modify this product in any way. Any damage
to the cord may cause a short-circuit, fire and/or electric shock.
WARNING!
Any electrical component (power cord, plug, compressor) must be replaced by a certified
service agent or qualified service personnel.
1. Power cord must not be lengthened.
2. Make sure that the power plug is not squashed or damaged by the back of the
appliance. A squashed or damaged power plug may overheat and cause a fire.
Page 24

Safety information
24
3. Make sure that you can come to the mains plug of the appliance.
4. Do not pull the mains cable.
5. If the power plug socket is loose, do not insert the power plug. There is a risk of
electric shock or fire.
6.
You must not operate the appliance without the lamp cover
5)
of interior lighting.
• This appliance is heavy. Care should be taken when moving it.
• Do not remove nor touch items from the freezer compartment if your hands are damp/
wet, as this could cause skin abrasions or frost/freezer burns.
• Avoid prolonged exposure of the appliance to direct sunlight.
•
Bulb lamps
6)
used in this appliance are special purpose lamps selected for household
appliances use only. They are not suitable for household room illumination.
Daily Use
• Do not put hot pot on the plastic parts in the appliance.
• Do not store flammable gas and liquid in the appliance, because they may explode.
•
Do not place food products directly against the air outlet on the rear wall.
• Frozen food must not be re-frozen once it has been thawed out.
• Store pre-packed frozen food in accordance with the frozen food manufacturer's instructions.
• Appliance's manufacturers storage recommendations should be strictly adhered to. Refer
to relevant instructions.
• Do not place carbonated or fizzy drinks in the freezer compartment as it creates pressure
on the container, which may cause it to explode, resulting in damage to the appliance.
• Ice lollies can cause frost burns if consumed straight from the appliance.
7)
Care and cleaning
• Before maintenance, switch off the appliance and disconnect the mains plug from the
mains socket.
• Do not clean the appliance with metal objects.
• Do not use sharp objects to remove frost from the appliance. Use a plastic scraper.
• Regularly examine the drain in the refrigerator for defrosted water. If necessary, clean
the drain. If the drain is blocked, water will collect in the bottom of the appliance.
Installation
For electrical connection carefully follow the instructions given in specific paragraphs.
• Unpack the appliance and check if there are damages on it. Do not connect the appliance
if it is damaged. Report possible damages immediately to the place you bought it. In that
case retain packing.
• It is advisable to wait at least four hours before connecting the appliance to allow the
oil to flow back in the compressor.
• Adequate air circulation should be around the appliance, lacking this leads to overheating. To achieve sufficient ventilation follow the instructions relevant to installation.
5) If the lamp cover is foreseen
6) If the lamp is foreseen
7) If the appliance is Frost Free
Page 25

Control panel
• Wherever possible the back of the product should be against a wall to avoid touching
or catching warm parts (compressor, condenser) to prevent possible burn.
• The appliance must not be located close to radiators or cookers.
• Make sure that the mains plug is accessible after the installation of the appliance.
•
Connect to potable water supply only.
8)
Service
• Any electrical work required to do the servicing of the appliance should be carried out
by a qualified electrician or competent person.
• This product must be serviced by an authorized Service Centre, and only genuine spare
parts must be used.
Environment Protection
This appliance does not contain gasses which could damage the ozone layer, in either its
refrigerant circuit or insulation materials. The appliance shall not be discarded together
with the urban refuse and rubbish. The insulation foam contains flammable gases: the
appliance shall be disposed according to the applicable regulations to obtain from your
local authorities. Avoid damaging the cooling unit, especially at the rear near the heat
exchanger. The materials used on this appliance marked by the symbol
CONTROL PANEL
25
are recyclable.
65 7 84321 15141312119 10
1 ON/OFF switch
2 Fridge temperature regulator, + button
3 Fridge temperature indicator
4 Fridge temperature regulator, - button
5 COOLMATIC button
6 COOLMATIC indicator
7 Fridge compartment indicator
8 Freezer compartment indicator
9 FROSTMATIC indicator
10 FROSTMATIC button
11 Freezer temperature regulator, + button
12 Freezer temperature indicator
13 Freezer temperature regulator, - button
8) If a water connection is foreseen
Page 26

Control panel
26
14 Alarm reset button
15 Alarm indicator
Switching on
1. Insert the plug into the mains socket.
2. Set ON/OFF switch to ON.
3. The alarm indicator light flashes since the temperature is reached.
The acoustic alarm sounds.
4. Press the alarm reset button to reset the alarm.
Switching off
To switch the entire appliance off:
1. Set ON/OFF switch to OFF.
2. Disconnect the mains plug from the mains socket.
Temperature regulation
The set temperature of the fridge and of the freezer may be adjusted by pressing the
temperature regulator button. The temperature indicators show the set temperature.
For a correct storage of the food the following temperatures should be set:
• +5 °C in the fridge
• -18 °C in the freezer.
The set temperature will be reached within 24 hours.
Fluctuations of some degrees around set temperature are normal and does not mean any
fault in the appliance.
COOLMATIC function
The COOLMATIC function is suited for quick cooling of large quantities of goods in the
refrigerator.
To activate the function, do these steps:
1. Press the COOLMATIC button.
2. The COOLMATIC indicator switches on.
The COOLMATIC function now provides for intensive cooling. A temperature of +2°C is
automatically selected.
The COOLMATIC function is ended automatically after a period of 6 hours.
You can deactivate the function at any time:
1. Press the COOLMATIC button.
2. The COOLMATIC indicator switches off.
Holiday function
This function allows you to keep the refrigerator shut and empty during a long holiday
period (e.g. the summer holidays) without the formation of a bad smell.
The fridge compartment must be empty when the holiday function is on.
To activate the function:
1. press continuously the temperature regulator (+ button) until the letter "H" (Holiday)
appears on the temperature indicator. The Holiday function sets the temperature approx +15°C. The refrigerator is in the energy-saving mode.
Page 27

First use
To deactivate the function:
1. set the required temperature by pressing the fridge temperature regulator.
FROSTMATIC function
The FROSTMATIC function accelerates the freezing of fresh food and, at the same time,
protects foodstuffs already stored from undesirable warming.
To activate the function, do these steps:
1. Press the FROSTMATIC button.
2. The FROSTMATIC indicator switches on.
The FROSTMATIC function is ended automatically after a period of 52 hours.
You can deactivate the function at any time:
1. Press the FROSTMATIC button.
2. The FROSTMATIC indicator switches off.
High temperature alarm
In the event of an abnormal temperature rise inside the freezer (e.g. power cut) alarm
indicator light will start to flash and a buzzer will sound.
Push the alarm reset button to stop the buzzer sound, while the alarm indicator light will
continue to flash.
The buzzer will stop automatically when the temperature has returned to normal while the
alarm indicator light will continue to flash.
Press the alarm reset button. The alarm indicator light goes out and at the same time the
freezer temperature indicator show for about 5 seconds the warmest temperature reached
in the freezer compartment.
27
FIRST USE
Cleaning the interior
Before using the appliance for the first time, wash the interior and all internal accessories
with lukewarm water and some neutral soap so as to remove the typical smell of a brandnew product, then dry thoroughly.
Do not use detergents or abrasive powders, as these will damage the finish.
DAILY USE
Freezing fresh food
The freezer compartment is suitable for freezing fresh food and storing frozen and deepfrozen food for a long time.
To freeze fresh foods it is not necessary to change the medium setting.
However, for a faster freezing operation, turn the temperature regulator toward higher
settings to obtain the maximum coldness.
In this condition, the refrigerator compartment temperature might drop below 0°C. If this
occurs reset the temperature regulator to a warmer setting.
Page 28

Daily use
28
Place the fresh food to be frozen on the top compartment.
Storage of frozen food
When first starting-up or after a period out of use, before putting the products in the
compartment let the appliance run at least 2 hours on the higher settings.
In the event of accidental defrosting, for example due to a power failure, if the power has
been off for longer than the value shown in the technical characteristics chart under "rising
time", the defrosted food must be consumed quickly or cooked immediately and then refrozen (after cooling).
Thawing
Deep-frozen or frozen food, prior to being used, can be thawed in the refrigerator compartment or at room temperature, depending on the time available for this operation.
Small pieces may even be cooked still frozen, directly from the freezer: in this case, cooking
will take longer.
Movable shelves
The walls of the refrigerator are equipped with a
series of runners so that the shelves can be positioned as desired.
Bottle rack
Place the bottles (with the opening facing front)
in the pre-positioned shelf.
If the shelf is positioned horizontally, place only
closed bottles.
This bottle holder shelf can be tilted in order to
store previously opened bottles. To obtain this result, pull the shelf up so it can rotate upwards and
be placed on the next higher level.
Page 29

Vegetable Drawer
The drawer is suitable for storing fruit and vegetables.
There is a separator inside the drawer that can be
placed in different positions to allow for the subdivision best suited to personal needs.
There is a grille (if foreseen) on the bottom of the
drawer to separate the fruit and vegetables from
any humidity that may form on the bottom surface.
All parts inside the drawer can be removed for
cleaning purposes
Positioning the door shelves
To permit storage of food packages of various sizes, the door shelves can be placed at
different heights.
To make these adjustments proceed as follows:
gradually pull the shelf in the direction of the
arrows until it comes free, then reposition as
required.
Daily use
1
2
29
Page 30

Daily use
30
Air cooling
The Dynamic Air Cooling (DAC) fan let food cool
quickly and a more uniform temperature in the
compartment.
1. You can switch on the fan by pressing the
switch (1). The green light (2) comes on.
2. Adjust the Temperature regulator to the FAN
position.
This device allows for rapid cooling of foods and
a more uniform temperature in the compartment.
Switch on the fan when the ambient temperature
exceeds 25°C.
2
Chiller Zone
The Chiller Zone compartment is suitable for storing fresh food like fish, meat, seafood,
because the temperature is lower here than in the rest of the fridge. It is placed in the lower
part of the refrigerator, directly above of the vegetable drawer.
If you wish to remove the Chiller Zone compartment, do these steps:
1. Open the door of the refrigerator as wide as
possible. If you cannot open the door at an
angle of 180° because of a limit stop or any
other objects , remove the bottle shelf from
the door.
2. Pull the drawer towards yourself to the end
point.
3. Slightly lift the front part of the drawer.
4. Remove the drawer from its support.
5. Lift the back of the support from its nest.
6. Pull the frame towards yourself.
7. Remove the support frame.
To put the Chiller Zone compartment to its initial
position, do above steps in opposite sequence.
5
1
6
2
3
Page 31

Removal of freezing baskets from the freezer
Helpful hints and tips
31
2
2
1
1
The freezing baskets have a limit stop to prevent their accidental removal or falling out.
At the time of its removal from the freezer, pull the basket towards yourself and, upon
reaching the end point, remove the basket by tilting its front upwards.
At the time of putting it back, slightly lift the front of the basket to insert it into the
freezer. Once you are over the end points, push the baskets back in their position.
HELPFUL HINTS AND TIPS
Normal Operating Sounds
• You may hear a faint gurgling and a bubbling sound when the refrigerant is pumped
through the coils or tubing. This is correct.
• When the compressor is on, the refrigerant is being pumped around and you will hear
a whirring sound and a pulsating noise from the compressor. This is correct.
• The thermic dilatation might cause a sudden cracking noise. It is natural, not dangerous
physical phenomenon. This is correct.
Hints for energy saving
• Do not open the door frequently or leave it open longer than absolutely necessary.
• If the ambient temperature is high and the Temperature Regulator is set to low tem-
perature and the appliance is fully loaded, the compressor may run continuously, causing
frost or ice on the evaporator. If this happens, set the Temperature Regulator toward
warmer settings to allow automatic defrosting and so a saving in electricity consumption.
Hints for fresh food refrigeration
To obtain the best performance:
• do not store warm food or evaporating liquids in the refrigerator
• do cover or wrap the food, particularly if it has a strong flavour
• position food so that air can circulate freely around it
Page 32

Care and cleaning
32
Hints for refrigeration
Useful hints:
Meat (all types) : wrap in polythene bags and place on the glass shelf above the vegetable
drawer.
For safety, store in this way only one or two days at the most.
Cooked foods, cold dishes, etc..: these should be covered and may be placed on any shelf.
Fruit and vegetables: these should be thoroughly cleaned and placed in the special drawer(s)
provided.
Butter and cheese: these should be placed in special airtight containers or wrapped in
aluminium foil or polythene bags to exclude as much air as possible.
Milk bottles: these should have a cap and should be stored in the bottle rack on the door.
Bananas, potatoes, onions and garlic, if not packed, must not be kept in the refrigerator.
Hints for freezing
To help you make the most of the freezing process, here are some important hints:
• the maximum quantity of food which can be frozen in 24 hrs. is shown on the rating
plate;
• the freezing process takes 24 hours. No further food to be frozen should be added during
this period;
• only freeze top quality, fresh and thoroughly cleaned, foodstuffs;
• prepare food in small portions to enable it to be rapidly and completely frozen and to
make it possible subsequently to thaw only the quantity required;
• wrap up the food in aluminium foil or polythene and make sure that the packages are
airtight;
• do not allow fresh, unfrozen food to touch food which is already frozen, thus avoiding
a rise in temperature of the latter;
• lean foods store better and longer than fatty ones; salt reduces the storage life of food;
• water ices, if consumed immediately after removal from the freezer compartment, can
possibly cause the skin to be freeze burnt;
• it is advisable to show the freezing in date on each individual pack to enable you to keep
tab of the storage time.
Hints for storage of frozen food
To obtain the best performance from this appliance, you should:
• make sure that the commercially frozen foodstuffs were adequately stored by the re-
tailer;
• be sure that frozen foodstuffs are transferred from the foodstore to the freezer in the
shortest possible time;
• not open the door frequently or leave it open longer than absolutely necessary.
• Once defrosted, food deteriorates rapidly and cannot be refrozen.
• Do not exceed the storage period indicated by the food manufacturer.
CARE AND CLEANING
CAUTION!
Unplug the appliance before carrying out any maintenance operation.
Page 33

Care and cleaning
This appliance contains hydrocarbons in its cooling unit; maintenance and recharging must
therefore only be carried out by authorized technicians.
Periodic cleaning
The equipment has to be cleaned regularly:
• clean the inside and accessories with lukewarm water and some neutral soap.
• regularly check the door seals and wipe clean to ensure they are clean and free from
debris.
• rinse and dry thoroughly.
Do not pull, move or damage any pipes and/or cables inside the cabinet.
Never use detergents, abrasive powders, highly perfumed cleaning products or wax polishes
to clean the interior as this will damage the surface and leave a strong odour.
Clean the condenser (black grill) and the compressor at the back of the appliance with a
brush or a vacuum cleaner. This operation will improve the performance of the appliance
and save electricity consumption.
Take care of not to damage the cooling system.
Many proprietary kitchen surface cleaners contain chemicals that can attack/damage the
plastics used in this appliance. For this reason it is recommended that the outer casing of
this appliance is only cleaned with warm water with a little washing-up liquid added.
After cleaning, reconnect the equipment to the mains supply.
33
Defrosting of the refrigerator
Frost is automatically eliminated from the evaporator of the refrigerator compartment
every time the motor compressor stops, during normal use. The defrost water drains out
through a trough into a special container at the back of the appliance, over the motor
compressor, where it evaporates.
It is important to periodically clean the defrost
water drain hole in the middle of the refrigerator
compartment channel to prevent the water overflowing and dripping onto the food inside. Use the
special cleaner provided, which you will find already inserted into the drain hole.
Page 34

What to do if…
34
Defrosting of the freezer
The freezer compartment of this model, on the other hand, is a "no frost" type. This means
that there is no buildup of frost when it is in operation, neither on the internal walls nor
on the foods.
The absence of frost is due to the continuous circulation of cold air inside the compartment,
driven by an automatically controlled fan.
WHAT TO DO IF…
CAUTION!
Before troubleshooting, disconnect the power supply.
Only a qualified electrician or competent person must do the troubleshooting that is not
in this manual.
There are some sounds during normal use (compressor, refrigerant circulation).
Problem Possible cause Solution
The appliance is noisy.
The compressor operates
continually.
The door is not closed correctly. Refer to "Closing the door".
The door has been opened too
The product temperature is too
The room temperature is too
The FROSTMATIC function is
The COOLMATIC function is
Water flows on the rear
plate of the refrigerator.
Water flows into the refrigerator.
Products prevent that water
The appliance is not supported
properly.
The Temperature regulator may
be set incorrectly.
frequently.
high.
high.
switched on.
switched on.
During the automatic defrosting
process, frost defrosts on the
rear plate.
The water outlet is clogged. Clean the water outlet.
flows into the water collector.
Check if the appliance stands stable (all the four feet should be on
the floor).
Set a warmer temperature.
Do not keep the door open longer
than necessary.
Let the product temperature decrease to room temperature before storage.
Decrease the room temperature.
Refer to "FROSTMATIC function".
Refer to "COOLMATIC function".
This is correct.
Make sure that products do not
touch the rear plate.
Page 35

What to do if…
Problem Possible cause Solution
Water flows on the
ground.
There is too much frost
and ice.
The door is not closed correctly. Refer to "Closing the door".
The Temperature regulator may
The temperature in the
appliance is too high.
The product temperature is too
Many products are stored at the
The temperature in the
refrigeration is too high.
The temperature in the
freezer is too high.
The appliance does not
operate.
The mains plug is not connected
The appliance has no power.
The lamp does not work.
The lamp is defective. Refer to "Replacing the lamp".
The melting water outlet does
not flow in the evaporative tray
above the compressor.
Products are not wrapped properly.
be set incorrectly.
The door is not closed correctly. Refer to "Closing the door".
high.
same time.
There is no cold air circulation in
the appliance.
Products are too near to each
other.
The appliance is switched off. Switch on the appliance.
to the mains socket correctly.
There is no voltage in the mains
socket.
The lamp is in stand-by. Close and open the door.
Attach the melting water outlet
to the evaporative tray.
Wrap the products better.
Set a higher temperature.
Let the product temperature decrease to room temperature before storage.
Store less products at the same
time.
Make sure that there is cold air
circulation in the appliance.
Store products so that there is
cold air circulation.
Connect the mains plug to the
mains socket correctly.
Connect a different electrical appliance to the mains socket. Contact a qualified electrician.
35
As much as the advice does not lead to result, call the nearest brand-mark service.
Page 36

Technical data
36
Replacing the lamp
CAUTION!
Disconnect the plug from the mains socket.
1. Remove the screw from the lamp cover.
2. Pull outwards the hook of the lamp cover.
3. Remove the lamp cover.
4. Replace the lamp with one of the same
power (the maximum power is shown on
the light bulb cover).
5. Install the lamp cover.
6. Tighten the screw to the lamp cover.
7. Connect the plug to the mains socket.
8. Open the door. Make sure that the light
comes on.
2
Closing the door
1. Clean the door gaskets.
2. If necessary, adjust the door. Refer to "Installation".
3. If necessary, replace the defective door gaskets. Contact the Service Center.
TECHNICAL DATA
1
3
S75340KG2 S75380KG2
Dimension
Height 1850 mm 2010 mm
Width 595 mm 595 mm
Depth 632 mm 632 mm
Rising Time 18 h 18 h
The technical information are situated in the rating plate on the internal left side of the
appliance and in the energy label.
INSTALLATION
WARNING!
Read the "Safety Information" carefully for your safety and correct operation of the appliance before installing the appliance.
Positioning
Install this appliance at a location where the ambient temperature corresponds to the
climate class indicated on the rating plate of the appliance:
Page 37

Installation
Climate class Ambient temperature
SN +10°C to + 32°C
N +16°C to + 32°C
ST +16°C to + 38°C
T +16°C to + 43°C
Location
The appliance should be installed well away from
sources of heat such as radiators, boilers, direct
sunlight etc. Ensure that air can circulate freely
around the back of the cabinet. To ensure best
performance, if the appliance is positioned below
an overhanging wall unit, the minimum distance
between the top of the cabinet and the wall unit
must be at least 100 mm . Ideally, however, the
appliance should not be positioned below overhanging wall units. Accurate levelling is ensured
by one or more adjustable feet at the base of the
cabinet.
WARNING!
It must be possible to disconnect the appliance
from the mains power supply; the plug must therefore be easily accessible after installation.
mm
min
100
A
mm
20
B
37
Electrical connection
Before plugging in, ensure that the voltage and frequency shown on the rating plate correspond to your domestic power supply.
The appliance must be earthed. The power supply cable plug is provided with a contact for
this purpose. If the domestic power supply socket is not earthed, connect the appliance to
a separate earth in compliance with current regulations, consulting a qualified electrician.
The manufacturer declines all responsibility if the above safety precautions are not observed.
This appliance complies with the E.E.C. Directives.
Rear spacers
In the bag with the documentation, there are
two spacers which must be fitted as shown in
the figure.
Slacken the screws and insert the spacer under the
screw head, then tighten again the screws.
3
2
1
Page 38

Installation
38
Levelling
When placing the appliance ensure that it stands
level. This can be achieved by two adjustable feet
at the bottom in front.
Removing the shelf holders
Your appliance is equipped with shelf retainers
that make it possible to secure the shelves during
transportation.
To remove them proceed as follows:
1. Move the shelf holders in the direction of the
arrow (A).
2. Raise the shelf from the rear and push it forward until it is freed (B).
3. Remove the retainers (C).
A
B
C
Door reversibility
WARNING!
Before carrying out any operations, remove the plug from the power socket.
To carry out the following operations, we suggest that this be made with another person
that will keep a firm hold on the doors of the appliance during the operations.
Page 39

1. Open the doors. Unscrew the middle
hinge (m2). Remove the plastic spacer
(m1).
2. Remove the spacer (m6) and move to the
other side of the hinge pivot (m5).
3. Remove the doors.
4. Remove the left-hand cover pin of the
middle hinge (m3,m4) and move to the
other side.
5. Fit the pin of the middle hinge (m5) into
the left-hand hole of the lower door.
6. Remove using a tool the cover (b1). Un-
screw the lower hinge pivot (b2) and the
spacer (b3) and place them on the opposite side.
7. Re-insert the cover (b1) on the opposite
side.
m1
m5
m3
Installation
m2
m6
m4
b1
39
8. Reverse the door locking elements
(d2,d3), move to the other side of the
other door and fix by screwing in the
screw (d4).
9. Re-insert the stoppers (d5,d6) on the
other side of the doors.
10. Re-insert the lower door on the lower
hinge pivot (b2).
11. Insert the middle hinge (m2) into the left
drill of the lower door.
d5
d6
b3
d2
d3
b2
d4
Page 40

Environmental concerns
40
12. Unscrew the upper hinge pivot (t1) and
place it on the opposite side.
13. Fit the upper door on the upper door
pivot.
14. Re-insert the upper door on the middle
hinge pivot (m5) slightly tilting both
doors.
15. Re-screw the middle hinge (m2). Do not
forget the plastic spacer (m1).
t1
16. Remove the cover pins (h1). Remove the
cover (h2).
17. Unscrew the handles (h3) and fix them
on the opposite side.
18. Re-insert the cover (h2) and the cover
h3
pins (h1).
Do a final check to make sure that:
• All screws are tightened.
• The magnetic seal adheres to the cabinet.
• The door opens and closes correctly.
h1
h2
If the ambient temperature is cold (i.e. in
Winter), the gasket may not fit perfectly to
the cabinet. In that case, wait for the natural fitting of the gasket.
In case you do not want to carry out the above mentioned operations, contact the nearest
After Sales Service Force. The After Sales Service specialist will carry out the reversibility of
the doors at your cost.
ENVIRONMENTAL CONCERNS
The symbol on the product or on its packaging indicates that this product may not be
treated as household waste. Instead it should be taken to the appropriate collection point
for the recycling of electrical and electronic equipment. By ensuring this product is disposed
of correctly, you will help prevent potential negative consequences for the environment
and human health, which could otherwise be caused by inappropriate waste handling of
this product. For more detailed information about recycling of this product, please contact
your local council, your household waste disposal service or the shop where you purchased
the product.
Page 41

Grazie per aver scelto uno dei nostri prodotti di qualità.
Per garantire il funzionamento ottimale e regolare dell'apparecchio, la preghiamo
di leggere attentamente questo manuale d'istruzioni. In tal modo potrà eseguire
ogni operazione alla perfezione e con la massima efficienza. Le consigliamo inoltre
di conservare il manuale in un luogo sicuro, affinché possa consultarlo ogni volta
che ne avrà bisogno. Infine, qualora l'apparecchio cambiasse proprietario, non
dimentichi di consegnargli il presente manuale.
Le auguriamo di trarre la massima soddisfazione dal suo nuovo acquisto.
INDICE
Indice
41
INFORMAZIONI PER LA SICUREZZA 42
Sicurezza dei bambini e delle persone fragili
42
Norme di sicurezza generali 42
Uso quotidiano 43
Pulizia e cura 43
Installazione 44
Assistenza tecnica 44
PANNELLO DI CONTROLLO 44
Accensione 45
Spegnimento 45
Regolazione della temperatura 45
Funzione COOLMATIC 45
Funzione Holiday 46
Funzione FROSTMATIC 46
Allarme di alta temperatura 46
PANNELLO DEI COMANDI 47
Pulizia dell'interno 47
UTILIZZO QUOTIDIANO 47
Congelazione dei cibi freschi 47
Conservazione dei surgelati 47
Scongelamento 47
Ripiani mobili 48
Griglia portabottiglie 48
Cassetto per verdura 48
Posizionamento delle mensole 49
Raffreddamento dell'aria 49
Cassetto Chiller 49
Rimozione dei cestelli dal vano congelatore
50
UTILIZZO QUOTIDIANO 51
Rumori normali durante il funzionamento
51
Consigli per il risparmio energetico 51
Consigli per la refrigerazione di cibi freschi
51
Consigli per la refrigerazione 51
Consigli per il congelamento 51
Conservazione per la conservazione di cibi
congelati 52
PULIZIA E CURA 52
Pulizia periodica 52
Sbrinamento del vano frigorifero 53
Sbrinamento del vano congelatore 53
COSA FARE SE… 53
Sostituzione della lampadina 55
Chiusura della porta 55
DATI TECNICI 56
INSTALLAZIONE 56
Posizionamento 56
Posizione 57
Collegamento elettrico 57
Distanziatori posteriori 57
Livellamento 58
Rimozione dei fermi dei ripiani 58
Reversibilità delle porte 58
CONSIDERAZIONI AMBIENTALI 60
Con riserva di modifiche
Page 42

Informazioni per la sicurezza
42
INFORMAZIONI PER LA SICUREZZA
Per garantire un impiego corretto e sicuro dell'apparecchio, prima dell'installazione e del
primo utilizzo leggere con attenzione il libretto istruzioni, inclusi i suggerimenti e le avvertenze. Per evitare errori e incidenti, è importante garantire che tutte le persone che
utilizzano l'apparecchio ne conoscano il funzionamento e le caratteristiche di sicurezza.
Conservare queste istruzioni e accertarsi che rimangano unite all'apparecchio in caso di
vendita o trasloco, in modo che chiunque lo utilizzi sia correttamente informato sull'uso e
sulle norme di sicurezza.
Per la sicurezza delle persone e delle cose osservare le precauzioni indicate nelle presenti
istruzioni per l'utente, il produttore non è responsabile dei danni provocati da eventuali
omissioni.
Sicurezza dei bambini e delle persone fragili
• Questo apparecchio non deve essere usato da persone, bambini inclusi, con ridotte capacità fisiche, sensoriali o psichiche, oppure prive di conoscenza e esperienza, a meno
che non siano state istruite all'uso dell'apparecchio da parte dei responsabili della loro
sicurezza, oppure sotto vigilanza di questi.
I bambini devono essere sorvegliati per assicurarsi che non giochino con l'apparecchio.
• Tenere i materiali di imballaggio al di fuori della portata dei bambini. Alcuni materiali
possono creare rischi di soffocamento.
• Qualora l'apparecchio venga demolito, estrarre la spina dalla presa, tagliare il cavo di
collegamento (il più vicino possibile all'apparecchio) e smontare lo sportello per evitare
che i bambini giocando possano subire scosse elettriche o chiudersi dentro l'apparecchio.
• Se questo nuovo apparecchio, che è dotato di guarnizioni magnetiche nello sportello, va
a sostituirne uno più vecchio avente sportello o coperchio con chiusure a molla, si deve
rendere inutilizzabili tali chiusure prima di eliminare l'apparecchio sostituito, per evitare
che diventi una trappola mortale per i bambini.
Norme di sicurezza generali
ATTENZIONE
Accertarsi che le aperture di ventilazione non siano ostruite.
• L'apparecchiatura è progettata per la conservazione domestica di alimenti e/o bevande
nelle modalità descritte nelle presenti istruzioni.
• Non utilizzare dispositivi meccanici o altri mezzi artificiali per accelerare lo sbrinamento.
• Non utilizzare altre apparecchiature elettriche (per esempio gelatiere) all'interno del
frigorifero, salvo quelle approvate per tale scopo dal produttore.
• Non danneggiare il circuito refrigerante.
• Il circuito refrigerante dell'apparecchiatura contiene isobutano (R600a), un gas naturale
con un elevato livello di compatibilità ambientale che, tuttavia, è infiammabile.
Durante il trasporto e l'installazione dell'apparecchiatura, assicurarsi che nessuno dei
componenti del circuito refrigerante venga danneggiato.
In caso di danneggiamento del circuito refrigerante:
– Evitare fiamme libere e scintille
– Aerare bene il locale in cui si trova l'apparecchiatura
Page 43

Informazioni per la sicurezza
• È pericoloso cambiare le specifiche o modificare il prodotto in qualunque modo. Un
danneggiamento del cavo potrebbe provocare cortocircuiti, incendi e/o scosse elettriche.
AVVERTENZA
Tutti i componenti elettrici (cavo di alimentazione, spina, compressore) devono essere sostituiti da un tecnico certificato o da personale d'assistenza qualificato.
1. Non collegare prolunghe al cavo di alimentazione.
2. Evitare che il lato posteriore dell'apparecchiatura possa schiacciare o danneggiare
la spina, causandone il surriscaldamento con un conseguente rischio di incendio.
3. La spina dell'apparecchiatura deve trovarsi in una posizione accessibile.
4. Evitare di tirare il cavo di alimentazione.
5. Se la presa elettrica non è perfettamente stabile, non inserire la spina. Il collegamento
potrebbe provocare scosse elettriche o creare un rischio di incendio.
6. L'apparecchiatura non deve essere messo in funzione senza il coprilampada interno.
9)
della luce interna.
• Questa apparecchiatura è pesante. Prestare attenzione quando occorre spostarla.
• Evitare di estrarre o di toccare gli alimenti riposti nel vano congelatore con le mani
bagnate o umide; il contatto potrebbe provocare abrasioni o ustioni da freddo.
• Evitare un'esposizione prolungata dell'apparecchiatura alla luce solare diretta.
•
Lampadine
10)
utilizzate in questa apparecchiatura sono lampadine speciali selezionate
per essere usate unicamente negli elettrodomestici. Non sono adatte per l'illuminazione
degli ambienti.
Uso quotidiano
• Non collocare pentole calde sulle parti in plastica dell'apparecchio.
• Non collocare gas e liquidi infiammabili nell'apparecchio, perché potrebbero esplodere.
• Non collocare gli alimenti direttamente contro l'uscita dell'aria nella parete posteriore.
11)
• Gli alimenti congelati non devono essere ricongelati una volta scongelati.
• Riporre gli alimenti surgelati preconfezionati secondo le istruzioni del produttore dell'alimento surgelato.
• Osservare rigorosamente i consigli per la conservazione degli alimenti del produttore
dell'apparecchio. Vedere le relative istruzioni.
• Non collocare bevande gassate o frizzanti nello scomparto congelatore perché creano
pressione sul recipiente che può esplodere danneggiando l'apparecchio.
• I ghiaccioli possono provocare bruciature da gelo se consumati immediatamente dopo
averli tolti dall'apparecchio.
43
Pulizia e cura
• Prima della manutenzione, spegnere l'apparecchio e staccare la spina dalla presa.
• Non pulire l'apparecchio con oggetti metallici.
• Non usare oggetti appuntiti per rimuovere la brina dall'apparecchio. Usare un raschietto
di plastica.
• Esaminare regolarmente il foro di scarico dell'acqua di sbrinamento nel frigorifero. Se
necessario, pulirlo. Se il foro è otturato, l'acqua si raccoglie sul fondo dell'apparecchio.
9) Per le apparecchiature che prevedono il coprilampada
10) Le lampadine
11) Se l'apparecchio è di tipo No-Frost
Page 44

Pannello di controllo
44
Installazione
Per il collegamento elettrico, seguire attentamente le istruzioni dei paragrafi corrispondenti.
• Disimballare l'apparecchio e assicurarsi che non presenti danni. Non collegare l'apparecchio se è danneggiato. Segnalare immediatamente gli eventuali danni al negozio in
cui è stato acquistato. In questo caso conservare l'imballaggio.
• Si consiglia di attendere almeno due ore prima di collegare l'apparecchio per consentire
all'olio di arrivare nel compressore.
• Attorno all'apparecchio vi deve essere un'adeguata circolazione dell'aria, altrimenti si
può surriscaldare. Per ottenere una ventilazione sufficiente seguire le istruzioni di installazione.
• Se possibile il retro dell'apparecchio dovrebbe essere posizionato contro una parete per
evitare di toccare le parti calde o di rimanervi impigliati (compressore, condensatore),
evitando così possibili scottature.
• L'apparecchio non deve essere posto vicino a radiatori o piani di cottura a gas.
• Installare l'apparecchio in modo che la presa rimanga accessibile.
•
Per il collegamento idrico, usare solo sorgenti d'acqua potabile.
12)
Assistenza tecnica
• Gli interventi elettrici sull'apparecchiatura devono essere eseguiti esclusivamente da
elettricisti qualificati o da personale competente.
• Gli interventi di assistenza devono essere eseguiti esclusivamente da tecnici autorizzati
e utilizzando solo ricambi originali.
Tutela ambientale
Questo apparecchio non contiene gas che potrebbero danneggiare lo strato di ozono nel
circuito refrigerante o nei materiali isolanti. L'apparecchio non deve essere smaltito assieme
ai rifiuti urbani e alla spazzatura. La schiuma dell'isolamento contiene gas infiammabili: lo
smaltimento dell'apparecchio va eseguito secondo le prescrizioni vigenti da richiedere alle
autorità locali. Evitare di danneggiare il gruppo refrigerante, specialmente nella parte posteriore vicino allo scambiatore di calore. I materiali usati su questo apparecchio contrassegnati dal simbolo
sono riciclabili.
PANNELLO DI CONTROLLO
65 7 84321 15141312119 10
1 Interruttore ON/OFF
12) Per gli apparecchi che prevedono un collegamento alla rete idrica
Page 45

Pannello di controllo
2 Tasto di regolazione della temperatura del frigorifero, tasto +
3 Indicatore di temperatura del frigorifero
4 Tasto di regolazione della temperatura del frigorifero, tasto -
5 Tasto COOLMATIC
6 Indicatore COOLMATIC
7 Indicatore del vano frigorifero
8 Indicatore del vano congelatore
9 Indicatore FROSTMATIC
10 Tasto FROSTMATIC
11 Tasto di regolazione della temperatura del congelatore, tasto +
12 Indicatore di temperatura del congelatore
13 Tasto di regolazione della temperatura del congelatore, tasto -
14 Tasto di azzeramento allarme
15 Indicatore di allarme
Accensione
1. Inserire la spina nella presa di corrente.
2. Portare l'interruttore ON/OFF in posizione ON.
3. L'indicatore di allarme lampeggia finché non viene raggiunta la temperatura richiesta.
Il cicalino emette un segnale acustico.
4. Per interrompere le indicazioni di allarme, premere l'apposito tasto di azzeramento.
45
Spegnimento
Per spegnere l'intero apparecchio:
1. Portare l'interruttore ON/OFF in posizione OFF.
2. Estrarre la spina dalla presa di corrente.
Regolazione della temperatura
È possibile regolare la temperatura impostata del frigorifero e del congelatore, premendo
i tasti di regolazione della temperatura. Gli indicatori della temperatura visualizzano la
temperatura impostata.
Per una corretta conservazione degli alimenti si dovrebbero impostare le temperature seguenti:
• +5 °C nel frigorifero
• -18 °C nel congelatore.
La temperatura impostata verrà raggiunta entro 24 ore.
Le variazioni di alcuni gradi in più o in meno rispetto alla temperatura impostata sono
normali e non indicano un malfunzionamento del dispositivo.
Funzione COOLMATIC
La funzione COOLMATIC è indicata per il raffreddamento rapido di grandi quantità di alimenti nel frigorifero.
Per attivare la funzione, procedere nel modo seguente:
1. Premere il tasto COOLMATIC.
2. L'indicatore COOLMATIC si accende.
Page 46

Pannello di controllo
46
La funzione COOLMATIC ora fornisce un raffreddamento intensivo. Viene automaticamente
selezionata una temperatura di +2°C.
La funzione COOLMATIC si disattiva automaticamente dopo un periodo di 6 ore.
Per disattivare la funzione in qualsiasi momento:
1. Premere il tasto COOLMATIC.
2. L'indicatore COOLMATIC si spegne.
Funzione Holiday
Questa funzione consente di mantenere il frigorifero chiuso e vuoto durante un periodo di
vacanza (per es. durante le vacanze estive) senza che si formino odori sgradevoli.
Il vano frigorifero deve essere vuoto quando si attiva la funzione Holiday.
Per attivare la funzione:
1. premere più volte il tasto di regolazione della temperatura (tasto +) finché compare la
lettera "H" (Holiday). La funzione Holiday imposta la temperatura a circa +15°C. Il frigorifero è in modalità di risparmio energetico.
Per disattivare la funzione:
1. impostare la temperatura richiesta premendo il regolatore di temperatura del frigorifero.
Funzione FROSTMATIC
La funzione FROSTMATIC accelera il congelamento degli alimenti freschi e, allo stesso tempo, impedisce l'aumento della temperatura degli alimenti già surgelati.
Per attivare la funzione, procedere nel modo seguente:
1. Premere il tasto FROSTMATIC.
2. L'indicatore FROSTMATIC si accende.
La funzione FROSTMATIC si disattiva automaticamente dopo 52 ore.
Per disattivare la funzione in qualsiasi momento:
1. Premere il tasto FROSTMATIC.
2. L'indicatore FROSTMATIC si spegne.
Allarme di alta temperatura
In caso di aumento anomalo della temperatura all'interno del congelatore (ad es. a causa
di un'interruzione di corrente), l'indicatore di allarme inizia a lampeggiare e viene emesso
un segnale acustico.
Premendo il tasto di azzeramento dell'allarme è possibile interrompere il segnale acustico,
mentre l'indicatore luminoso continuerà a lampeggiare.
L'allarme acustico si interrompe automaticamente quando la temperatura torna al valore
normale, mentre l'indicatore luminoso continua a lampeggiare.
Premere il tasto di azzeramento dell'allarme. L'indicatore di allarme luminoso si spegne e,
allo stesso tempo, l'indicatore di temperatura del congelatore mostra per 5 secondi la temperatura più alta raggiunta dal vano congelatore.
Page 47

Pannello dei comandi
PANNELLO DEI COMANDI
Pulizia dell'interno
Prima di utilizzare l'apparecchio per la prima volta, lavare l'interno e gli accessori interni
con acqua tiepida e un po' di sapone neutro in modo a togliere il tipico odore dei prodotti
nuovi, quindi asciugare accuratamente.
Non usare detergenti corrosivi o polveri abrasive che danneggiano le finiture.
UTILIZZO QUOTIDIANO
Congelazione dei cibi freschi
Il vano congelatore è adatto alla congelazione di cibi freschi e alla conservazione a lungo
termine di cibi congelati e surgelati.
Per congelare cibi freschi non è necessario cambiare la regolazione media.
Tuttavia, per un'operazione di congelamento più rapida, ruotare il termostato verso una
regolazione più alta per ottenere il massimo raffreddamento.
In questa condizione la temperatura del vano frigorifero può scendere sotto 0°C. In questo
caso riportare il termostato verso una regolazione più calda.
Riporre i cibi freschi da congelare nel comparto superiore.
47
Conservazione dei surgelati
Al primo avvio o dopo un periodo di non utilizzo, lasciare in funzione l'apparecchiatura per
almeno 2 ore con una regolazione alta prima di introdurre gli alimenti.
Se si verifica un'interruzione della corrente elettrica di durata superiore al "tempo di salita"
indicato nella tabella dei dati tecnici, il cibo scongelato deve essere consumato rapidamente
o cucinato immediatamente e quindi ricongelato (dopo il raffreddamento).
Scongelamento
Prima dell'utilizzo, i cibi surgelati o congelati possono essere scongelati nel vano frigorifero
o a temperatura ambiente, in funzione del tempo disponibile per questa operazione.
I pezzi piccoli possono addirittura essere cucinati ancora congelati, direttamente dal congelatore: in questo caso la cottura durerà più a lungo.
Page 48

Utilizzo quotidiano
48
Ripiani mobili
Le guide presenti sulle pareti del frigorifero permettono di posizionare i ripiani a diverse altezze.
Griglia portabottiglie
Disporre le bottiglie (con l'apertura in avanti) sull'apposito ripiano.
Se il ripiano è in posizione orizzontale, utilizzarlo
solo per le bottiglie chiuse.
Questo ripiano può essere inclinato per consentire
l'appoggio di bottiglie già aperte. Tirare il ripiano
e ruotarlo verso l'alto in modo da appoggiarlo al
livello superiore.
Cassetto per verdura
Questo cassetto è particolarmente adatto per la
conservazione di frutta e verdura.
Il separatore interno può essere collocato in varie
posizioni per favorire una suddivisione ottimale
degli alimenti.
La griglia posta sul fondo del cassetto (se presente)
separa la frutta e la verdura dagli eventuali depositi di umidità.
Tutti i componenti interni del cassetto possono
essere rimossi per facilitare le operazioni di pulizia
1
2
Page 49

Posizionamento delle mensole
Per facilitare l'introduzione di alimenti di diverse dimensioni, le mensole della porta possono essere posizionate ad altezze differenti.
Per regolare l'altezza delle mensole, procedere come segue:
Tirare delicatamente il ripiano nella direzione
indicata dalle frecce fino a sganciarlo, poi riposizionarlo dove necessario.
Raffreddamento dell'aria
La ventola del sistema Dynamic Air Cooling (DAC)
produce un raffreddamento degli alimenti più veloce e una temperatura più uniforme nello scomparto.
1. Per accendere la ventola, premere l'interruttore (1). La spia verde (2) si accende.
2. Ruotare il regolatore di temperatura in posizione FAN.
Questo dispositivo consente un rapido raffreddamento degli alimenti e mantiene più uniforme la
temperatura nello scomparto.
Accendere la ventola quando la temperatura ambiente è superiore a 25°C.
Utilizzo quotidiano
2
49
1
Cassetto Chiller
Il cassetto Chiller è indicato per la conservazione di alimenti freschi come pesce, frutti di
mare e carne, perché presenta una temperatura più bassa rispetto al resto del frigorifero.
Si trova nella parte inferiore del frigorifero, direttamente sopra il cassetto per le verdure.
Page 50

Utilizzo quotidiano
50
Per rimuovere il cassetto Chiller, procedere come
segue:
1. Aprire il più possibile la porta del frigorifero.
Se non è possibile aprire la porta a 180°, rimuovere il ripiano delle bottiglie dalla porta
del frigorifero.
2. Tirare il cassetto fino alla massima apertura.
3. Sollevare leggermente la parte anteriore del
cassetto.
4. Rimuovere il cassetto dal supporto.
5. Sollevare la parte posteriore del supporto dalla
sua sede.
6. Tirare il telaio verso di sé.
7. Rimuovere il telaio di supporto.
Per reinserire il cassetto Chiller nella posizione
originaria, eseguire la procedura sopra descritta in
ordine inverso.
Rimozione dei cestelli dal vano congelatore
5
6
2
3
2
1
2
1
I cestelli del vano congelatore sono provvisti di un fermo che ne impedisce la caduta o la
rimozione accidentale. Per estrarre un cestello dal vano congelatore, tirarlo in avanti e,
al raggiungimento del fermo, inclinare verso l'alto la parte anteriore.
Per reinserire il cestello, sollevarlo leggermente sul lato anteriore e introdurlo nel vano
congelatore. Una volta superato il fermo, spingere il cestello nella posizione originaria.
Page 51

Utilizzo quotidiano
UTILIZZO QUOTIDIANO
Rumori normali durante il funzionamento
• Quando il refrigerante viene pompato attraverso le bobine o le tubazioni si può sentire
un fievole gorgoglio e un borbottio. Non si tratta di un'anomalia.
• Quando il compressore è in funzione, viene pompato il refrigerante e si può sentire un
ronzio e un rumore pulsante dal compressore. Non si tratta di un'anomalia.
• La dilatazione termica potrebbe provocare uno schiocco improvviso. È un fenomeno
naturale, non pericoloso. Non si tratta di un'anomalia.
Consigli per il risparmio energetico
• Non aprire frequentemente la porta e non lasciarla aperta più di quanto assolutamente
necessario.
• Se la temperatura ambiente è elevata, il termostato è impostato su una regolazione alta
e l'apparecchio è a pieno carico, il compressore può funzionare in continuo causando la
formazione di brina o ghiaccio sull'evaporatore. In questo caso, ruotare il termostato su
una regolazione più bassa per consentire lo scongelamento automatico risparmiando
così energia.
Consigli per la refrigerazione di cibi freschi
Per ottenere i migliori risultati:
• non riporre nel frigorifero cibi caldi o liquidi in fase di evaporazione
• coprire o avvolgere il cibo, in particolare se emana un odore forte
• posizionare il cibo in modo che l'aria possa circolare liberamente attorno ad esso
51
Consigli per la refrigerazione
Consigli utili:
Carne (tutti i tipi): avvolgerla in sacchetti di politene e collocarla sul ripiano di vetro sopra
il cassetto delle verdure.
Per motivi di sicurezza, conservarla in queste condizioni solo per uno o due giorni al massimo.
Cibi cucinati, piatti freddi ecc..: dovrebbero essere coperti e possono essere collocati su
qualsiasi ripiano.
Frutta e verdura: dovrebbero essere pulite accuratamente e collocate nell'apposito/i cassetto/i speciale/i.
Burro e formaggio: dovrebbero essere posti in contenitori ermetici speciali o avvolti in
pellicole di alluminio o sacchetti di politene per escludere per quanto possibile l'aria.
Bottiglie di latte: dovrebbero essere tappate e conservate nell'apposito ripiano sulla porta.
Non conservare nel frigorifero banane, patate, cipolle o aglio se non sono confezionati.
Consigli per il congelamento
Per un processo di congelamento ottimale, ecco alcuni consigli importanti:
• la quantità massima di cibo che può essere congelata in 24 h è riportata sulla targhetta;
• il processo di congelamento dura 24 ore. In questo periodo non aggiungere altro cibo
da congelare;
• congelare solo alimenti freschi, di ottima qualità e accuratamente puliti;
Page 52

Pulizia e cura
52
• preparare il cibo in piccole porzioni per consentire un congelamento rapido e completo
e per scongelare in seguito solo la quantità necessaria;
• avvolgere il cibo in pellicole di alluminio o in politene e verificare che i pacchetti siano
ermetici;
• non lasciare che cibo fresco non congelato entri in contatto con quello già congelato,
per evitare un aumento della temperatura in quest'ultimo;
• i cibi magri si conservano meglio e più a lungo di quelli grassi; il sale riduce il periodo di
conservazione del cibo;
• i ghiaccioli, se consumati immediatamente dopo la rimozione dal vano congelatore,
possono causare ustioni da congelamento della pelle;
• si consiglia di riportare la data di congelamento su ogni singolo pacchetto per riuscire a
tenere traccia del tempo di conservazione;
Conservazione per la conservazione di cibi congelati
Per ottenere i migliori risultati con questo apparecchio:
• accertare che i cibi congelati commercialmente siano adeguatamente conservati dal
rivenditore;
• fare in modo che i cibi congelati siano trasferiti dal negozio al congelatore nel più breve
tempo possibile;
• non aprire la porta frequentemente o lasciarla aperta più del tempo strettamente ne-
cessario.
• Una volta scongelato, il cibo si deteriora rapidamente e non può essere ricongelato.
• Non superare il periodo di conservazione indicato dal produttore.
PULIZIA E CURA
ATTENZIONE
Staccare la spina dell'apparecchio prima di eseguire lavori di manutenzione.
Questo apparecchio contiene idrocarburi nell'unità di raffreddamento; la manutenzione e
la ricarica devono pertanto essere effettuate esclusivamente da tecnici autorizzati.
Pulizia periodica
L'apparecchio deve essere pulito regolarmente:
• pulire l'interno e gli accessori con acqua tiepida e un po' di sapone neutro.
• controllare regolarmente le guarnizioni della porta e verificare che siano pulite e prive
di residui.
• risciacquare e asciugare accuratamente.
Non tirare, spostare o danneggiare tubi e/o cavi all'interno dell'apparecchio.
Non usare mai detergenti, polveri abrasive, prodotti per la pulizia con una forte profumazione o cere lucidanti per pulire l'interno, in quanto danneggiano la superficie e lasciano
un odore forte.
Pulire il condensatore (griglia nera) e il compressore sul retro con una spazzola o un aspirapolvere. Questa operazione migliorerà le prestazioni dell'apparecchio riducendo i consumi
elettrici.
Page 53

Cosa fare se…
Non danneggiare il sistema di raffreddamento.
Molti detergenti per cucine di marca contengono sostanze chimiche in grado di attaccare/
danneggiare la plastica impiegata in questo apparecchio. Per questo motivo si raccomanda
di pulire l'involucro esterno dell'apparecchio solo con acqua calda con un po' di liquido
detergente.
Dopo la pulizia, ricollegare l'apparecchio alla rete di alimentazione.
Sbrinamento del vano frigorifero
Durante l'uso normale, la brina viene eliminata automaticamente dall'evaporatore del vano
frigorifero ogni volta che il motocompressore si arresta. L'acqua di sbrinamento giunge
attraverso un condotto in un apposito recipiente posto sul retro dell'apparecchio, sopra il
motocompressore, dove evapora.
È importante pulire periodicamente il foro di scarico dell'acqua di sbrinamento, situato al centro
del canale sulla parete posteriore, per evitare che
l'acqua fuoriesca sugli alimenti. Usare l'apposito
utensile già inserito nel foro di scarico.
53
Sbrinamento del vano congelatore
Il vano congelatore in questo modello è di tipo "no frost", cioè non forma ghiaccio sulle
pareti interne e sugli alimenti durante il funzionamento.
L'assenza di ghiaccio è dovuta alla circolazione continua di aria fredda prodotta all'interno
del vano da una ventola azionata automaticamente.
COSA FARE SE…
ATTENZIONE
Prima della ricerca guasti, estrarre la spina dalla presa.
Le operazioni di ricerca guasti non descritte nel presente manuale devono essere eseguite
esclusivamente da elettricisti qualificati o da personale competente.
Durante l'uso, alcuni rumori di funzionamento (come quelli del compressore o del circuito
refrigerante) sono da considerarsi normali.
Page 54

Cosa fare se…
54
Problema Possibile causa Soluzione
L'apparecchio è rumoroso.
Il compressore rimane
sempre in funzione.
La porta non è chiusa corretta-
La porta viene aperta troppo fre-
La temperatura degli alimenti è
La temperatura ambiente è
La funzione FROSTMATIC è ac-
La funzione COOLMATIC è acce-
Scorre acqua sul pannello
posteriore del frigorifero.
Scorre acqua all'interno
del frigorifero.
Gli alimenti impediscono all'ac-
Scorre acqua sul pavimento.
Lo strato di brina è troppo
spesso.
La porta non è chiusa corretta-
Il regolatore di temperatura non
La temperatura all'interno dell'apparecchio è
troppo alta.
L'apparecchio non è appoggiato
in modo corretto.
Il regolatore di temperatura non
è impostato correttamente.
mente.
quentemente.
troppo alta.
troppo alta.
cesa.
sa.
Durante lo sbrinamento auto-
matico, la brina che si forma sul
pannello posteriore si scioglie.
Lo scarico dell'acqua è ostruito. Pulire lo scarico dell'acqua.
qua di scorrere nell'apposito collettore.
L'acqua di sbrinamento non viene scaricata nella bacinella di
evaporazione posta sopra il
compressore.
Gli alimenti non sono avvolti
correttamente.
mente.
è impostato correttamente.
La porta non è chiusa corretta-
mente.
Controllare che l'apparecchio sia
appoggiato in modo stabile (tutti
i piedini devono essere a contatto
con il pavimento).
Impostare una temperatura superiore.
Vedere "Chiusura della porta".
Limitare il più possibile il tempo di
apertura della porta.
Prima di introdurre gli alimenti,
lasciarli raffreddare a temperatura ambiente.
Abbassare la temperatura ambiente.
Fare riferimento a "Funzione
FROSTMATIC".
Fare riferimento a "Funzione
COOLMATIC".
Non si tratta di un'anomalia.
Evitare di disporre gli alimenti direttamente contro la parete posteriore.
Collegare lo scarico dell'acqua di
sbrinamento alla bacinella di evaporazione.
Avvolgere correttamente gli alimenti.
Vedere "Chiusura della porta".
Impostare una temperatura superiore.
Vedere "Chiusura della porta".
Page 55

Cosa fare se…
Problema Possibile causa Soluzione
La temperatura degli alimenti è
Sono stati introdotti molti ali-
La temperatura nel vano
frigorifero è troppo alta.
La temperatura nel vano
congelatore è troppo alta.
L'apparecchio non funziona.
La spina non è inserita corretta-
L'apparecchio non riceve cor-
La lampadina non si accende.
La lampada è difettosa. Fare riferimento alla sezione "So-
troppo alta.
menti insieme.
L'aria fredda non circola corret-
tamente all'interno dell'apparecchio.
I surgelati sono troppo vicini tra
loro.
L'apparecchio è spento. Accendere l'apparecchio.
mente nella presa.
rente. Non arriva tensione alla
presa elettrica.
La lampadina è in modalità
stand-by.
Prima di introdurre gli alimenti,
lasciarli raffreddare a temperatura ambiente.
Introdurre gli alimenti poco alla
volta.
Adottare le misure necessarie per
garantire una corretta circolazione dell'aria fredda.
Disporre i surgelati in modo da
consentire una corretta circolazione dell'aria fredda.
Inserire correttamente la spina
nella presa.
Collegare alla presa un altro apparecchio elettrico. Rivolgersi a
un elettricista qualificato.
Chiudere e riaprire la porta.
stituzione della lampadina".
55
Se il problema persiste, rivolgersi al centro di assistenza autorizzato più vicino.
Sostituzione della lampadina
ATTENZIONE
Estrarre la spina dalla presa di corrente.
1. Rimuovere la vite dal coprilampada.
2. Tirare il gancio del coprilampada verso
l'esterno.
3. Rimuovere il coprilampada.
4. Sostituire la lampadina con una di uguale potenza (la potenza massima è indicata sul coprilampada).
5. Installare il coprilampada.
6. Serrare la vite del coprilampada.
7. Inserire la spina nella presa.
8. Aprire la porta. Controllare che la lampadina si accenda.
Chiusura della porta
1. Pulire le guarnizioni della porta.
2. Se necessario, regolare la porta. Vedere "Installazione".
2
1
3
Page 56

Dati tecnici
56
3. Se necessario, sostituire le guarnizioni della porta difettose. Contattare il Centro di
assistenza locale.
DATI TECNICI
S75340KG2 S75380KG2
Dimensioni
Altezza 1850 mm 2010 mm
Larghezza 595 mm 595 mm
Profondità 632 mm 632 mm
Tempo di salita 18 h 18 h
I dati tecnici sono riportati sulla targhetta del modello applicata sul lato sinistro interno
dell'apparecchiatura e sull'etichetta dei valori energetici.
INSTALLAZIONE
AVVERTENZA
Leggere con attenzione le "Informazioni per la sicurezza" per la vostra sicurezza e per il
corretto funzionamento dell'apparecchio prima di procedere all'installazione.
Posizionamento
Installare questo apparecchio in un punto in cui la temperatura ambiente corrisponda alla
classe climatica indicata sulla sua targhetta:
Classe climatica Temperatura ambiente
SN da + 10°C a + 32°C
N da + 16°C a + 32°C
ST da + 16°C a + 38°C
T da + 16°C a + 43°C
Page 57

Installazione
Posizione
L'apparecchio deve essere installato lontano da
fonti di calore (termosifoni, boiler, luce solare diretta, ecc.). Verificare che sul lato posteriore sia
garantita un'adeguata circolazione dell'aria. Per
ottenere prestazioni ottimali, se l'apparecchio è
installato al di sotto di un pensile, si raccomanda
di mantenere una distanza minima tra quest'ultimo e lo spigolo superiore dell'apparecchio di almeno 100 mm . Se possibile, tuttavia, evitare di
installare l'apparecchio sotto un pensile. Per consentire un perfetto livellamento dell'apparecchio
sono provvisti uno o più piedini regolabili.
AVVERTENZA
Deve essere possibile scollegare l'apparecchio dalla rete elettrica; eseguire perciò l'installazione facendo sì che la spina rimanga facilmente
accessibile.
mm
min
100
A
mm
20
B
Collegamento elettrico
Prima di inserire la spina, verificare che la tensione e la frequenza riportate sulla targhetta
corrispondano ai valori della rete elettrica domestica.
L'apparecchio deve essere collegato a massa. La spina del cavo di alimentazione è dotata
di un contatto a tale scopo. Se la presa della rete elettrica domestica non è collegata a
massa, collegare l'apparecchio ad una massa separata in conformità alle norme relative alla
corrente, consultando un elettricista qualificato.
Il fabbricante declina qualsiasi responsabilità se le precauzioni suddette non sono rispettate.
Il presente apparecchio è conforme alle direttive CEE.
57
Distanziatori posteriori
Nel sacchetto della documentazione sono inclusi due distanziatori, da installare come mostrato nella figura.
Allentare le viti, inserire il distanziatore sotto la
testa delle viti e stringerle nuovamente.
2
1
3
Page 58

Installazione
58
Livellamento
L'apparecchio deve trovarsi perfettamente in piano. Per correggere gli eventuali dislivelli è possibile
regolare in altezza i due piedini anteriori.
Rimozione dei fermi dei ripiani
L'apparecchiatura è equipaggiata con fermi dei
ripiani che permettono di assicurarli durante il
trasporto.
Per rimuoverli, procedere come segue:
1. Spostare i fermi dei ripiani in direzione della
freccia (A).
2. Sollevare il ripiano dalla parte posteriore e
spingerlo in avanti fino a liberarlo (B).
3. Rimuovere i fermi (C).
A
B
C
Reversibilità delle porte
AVVERTENZA
Prima di eseguire le operazioni descritte, spegnere l'apparecchio ed estrarre la spina dalla
presa.
Per eseguire le seguenti operazioni, si raccomanda di farsi aiutare da un'altra persona che
tenga ben ferme le porte dell'apparecchio.
Page 59

1. Aprire la porta. Svitare la cerniera cen-
trale (m2). Rimuovere il distanziatore in
plastica (m1).
2. Rimuovere il distanziatore (m6) e tra-
sferirlo sull'altro lato del perno della cerniera (m5).
3. Rimuovere la porta inferiore.
4. Rimuovere il perno di sinistra della co-
pertura della cerniera centrale (m3, m4)
e trasferirlo sull'altro lato.
5. Inserire il perno della cerniera centrale
(m5) nel foro di sinistra della porta inferiore.
6. Rimuovere la copertura (b1) usando un
utensile adatto. Svitare il perno della
cerniera inferiore (b2) e il distanziatore
(b3) e applicarli sul lato opposto.
7. Reinserire la copertura (b1) sul lato op-
posto.
Installazione
m1
m5
m3
59
m2
m6
m4
b1
8. Invertire gli elementi di aggancio delle
porte (d2,d3), spostarli sul lato opposto
dell'altra porta e fissare la vite (d4).
9. Reinserire i fermi (d5,d6) sul lato oppo-
sto delle porte.
10. Reinserire la porta inferiore sul perno
(b2) della cerniera inferiore.
11. Inserire la cerniera centrale (m2) nel foro
sinistro della porta inferiore.
d5
d6
b3
d2
d3
b2
d4
Page 60

Considerazioni ambientali
60
12. Svitare il perno della cerniera superiore
(t1) e fissarlo sul lato opposto.
13. Inserire la porta superiore nel perno del-
la cerniera superiore.
14. Reinserire la porta superiore sul perno
della cerniera centrale (m5) inclinando
leggermente le due porte.
15. Riavvitare la cerniera centrale (m2). Non
dimenticare il distanziatore di plastica
t1
(m1).
16. Rimuovere i tappini di copertura (h1).
Togliere la copertura (h2).
17. Svitare le maniglie (h3) e fissarle sul lato
opposto.
18. Reinserire la copertura (h2) e i tappini di
h3
copertura (h1).
Effettuare un controllo finale per verificare
che:
• Tutte le viti siano serrate.
• La guarnizione magnetica aderisca all'ap-
h1
h2
parecchio.
• La porta si apra e si chiuda correttamente.
Se la temperatura ambiente è bassa (ad esempio in inverno), è possibile che la guarnizione
non aderisca perfettamente. In tal caso, attendere che aderisca naturalmente.
Per chi preferisca non eseguire direttamente le operazioni sopra descritte, rivolgersi al
servizio post-vendita più vicino. L'intervento di inversione delle porte eseguito dai tecnici
del servizio post-vendita sarà a carico dell'utente.
CONSIDERAZIONI AMBIENTALI
Il simbolo sul prodotto o sulla confezione indica che il prodotto non deve essere
considerato come un normale rifiuto domestico, ma deve essere portato nel punto di
raccolta appropriato per il riciclaggio di apparecchiature elettriche ed elettroniche.
Provvedendo a smaltire questo prodotto in modo appropriato, si contribuisce a evitare
potenziali conseguenze negative per l’ambiente e per la salute, che potrebbero derivare da
uno smaltimento inadeguato del prodotto. Per informazioni più dettagliate sul riciclaggio
di questo prodotto, contattare l’ufficio comunale, il servizio locale di smaltimento rifiuti o
il negozio in cui è stato acquistato il prodotto.
Page 61

616263
Page 62

Page 63

Page 64

www.aeg-electrolux.com/shop
210620323-02-042010
 Loading...