

Page 1

SANTO 70298 DT
Istruzioni per l’uso
Benutzerinformation
Notice d’utilisation
User manual
Frigorifero-congelatore
Kühl-Gefrierkombination
Combiné réfrigérateur-
congélateur
Fridge freezer
www.electrolux.com
www.aeg.ch
2223 432-21-00-13102006 Con riserva di modifiche
Änderungen vorbehalten
Sous reserve de modifications
Subject to change without notice
Page 2

2
Gentile Cliente,
Grazie per aver scelto i nostri prodotti di alta qualità.
Con questa apparecchiatura sperimenterete la perfetta combinazione fra il
design funzionale e la tecnologia d'avanguardia.
Le nostre apparecchiature sono state progettate per avere le migliori pre-
stazioni e il massimo controllo raggiungendo i più alti standard di eccellenza.
Inoltre, e' parte integrante dei nostri prodotti l'attenzione per gli aspetti
ambientali e per il risparmio energetico.
Per assicurare prestazioni ottimali e un corretto utilizzo della vostra apparecchiatura, Vi invitiamo a leggere attentamente questo libretto istruzioni.
Vi permetterà di seguire tutte le fasi di utilizzo perfettamente e nel modo
più efficace.
Per consultare questo libretto ogni volta che lo desiderate, Vi consigliamo di
tenerlo in un luogo a portata di mano. Ricordatevi di consegnarlo ad eventuali futuri proprietari dell'apparecchiatura.
I seguenti simboli sono utilizzati nel presente manuale
Informazioni importanti relative alla sicurezza personale e alla prevenzione di
danni e all'apparecchiatura
Informazioni e suggerimenti generali
Informazioni ambientali
Page 3

3
Indice
Sicurezza. . . . . . . . . . . . . . . . . . . . . . . . . . . . . . . . . . . . . . . . . . . . . . . . 4
Smaltimento . . . . . . . . . . . . . . . . . . . . . . . . . . . . . . . . . . . . . . . . . . . . 6
Informazione sull’imballaggio dell’apparecchio . . . . . . . . . . . . . . . . . . . .6
Smaltimento di apparecchi vecchi . . . . . . . . . . . . . . . . . . . . . . . . . . . . . .6
Rimuovere la sicura del trasporto . . . . . . . . . . . . . . . . . . . . . . . . . . . .6
Fermi-ripiani . . . . . . . . . . . . . . . . . . . . . . . . . . . . . . . . . . . . . . . . . . . . . . . .7
Installazione. . . . . . . . . . . . . . . . . . . . . . . . . . . . . . . . . . . . . . . . . . . . .7
Luogo di installazione . . . . . . . . . . . . . . . . . . . . . . . . . . . . . . . . . . . . . . . . .7
Montaggio della maniglia . . . . . . . . . . . . . . . . . . . . . . . . . . . . . . . . . . . . . 8
L’apparecchio necessita d’aria . . . . . . . . . . . . . . . . . . . . . . . . . . . . . . . . . . 8
Distanziali posteriori . . . . . . . . . . . . . . . . . . . . . . . . . . . . . . . . . . . . . . . . . 8
Reversibilità della porta . . . . . . . . . . . . . . . . . . . . . . . . . . . . . . . . . . . . . . . 9
Collegamento elettrico . . . . . . . . . . . . . . . . . . . . . . . . . . . . . . . . . . .11
Prima della messa in servizio. . . . . . . . . . . . . . . . . . . . . . . . . . . . . . .11
Messa in servizio e regolazione della temperatura . . . . . . . . . . . . .11
Accessori interni . . . . . . . . . . . . . . . . . . . . . . . . . . . . . . . . . . . . . . . .12
Ripiani . . . . . . . . . . . . . . . . . . . . . . . . . . . . . . . . . . . . . . . . . . . . . . . . . . . . .12
Mensole . . . . . . . . . . . . . . . . . . . . . . . . . . . . . . . . . . . . . . . . . . . . . . . . . . .12
Portabottiglie . . . . . . . . . . . . . . . . . . . . . . . . . . . . . . . . . . . . . . . . . . . . . . .13
Refrigerazione dei cibi e delle bevande. . . . . . . . . . . . . . . . . . . . . . .13
Congelazione e conservazione . . . . . . . . . . . . . . . . . . . . . . . . . . . . .14
Cubetti ghiaccio . . . . . . . . . . . . . . . . . . . . . . . . . . . . . . . . . . . . . . . . .14
Calendario di congelazione . . . . . . . . . . . . . . . . . . . . . . . . . . . . . . . .15
Sbrinamento . . . . . . . . . . . . . . . . . . . . . . . . . . . . . . . . . . . . . . . . . . . .15
Spegnimento dell’apparecchio . . . . . . . . . . . . . . . . . . . . . . . . . . . . .16
Pulizia e cura . . . . . . . . . . . . . . . . . . . . . . . . . . . . . . . . . . . . . . . . . . .16
Consigli per il risparmio energetico . . . . . . . . . . . . . . . . . . . . . . . . .17
Che cosa fare, se... . . . . . . . . . . . . . . . . . . . . . . . . . . . . . . . . . . . . . .18
Interventi in caso di anomalie . . . . . . . . . . . . . . . . . . . . . . . . . . . . . . . . .18
Sostituzione della lampadina . . . . . . . . . . . . . . . . . . . . . . . . . . . . . . . . .19
Disposizioni, Norme, Direttive . . . . . . . . . . . . . . . . . . . . . . . . . . . . .20
Page 4

4
Sicurezza
La sicurezza dei nostri apparecchi é conforme ai regolamenti approvati della
tecnica ed alla legge di sicurezza degli apparecchi. Nonostante ciò, riteniamo
di doverVi facilitare la presa di confidenza con le seguenti avvertenze:
Impiego conforme alla scopo previsto
• L’apparecchio refrigerante é stato stabilito per l’uso domestico. È adatto per
raffreddare, congelare e conservare prodotti alimentari surgelati nonché
per la preparazione di gelati.
• Per motivi si sicurezza non é consentito in nessun caso apportare delle
modifiche o trasformazioni.
• Nel caso si voglia impiegare l’apparecchio refrigerante nell’ambito
imprenditoriale oppure per scopi differenti dal raffreddamento, congelamento di prodotti alimentari, si prega di osservare le disposizioni de legge
vigenti per il Vostro settore.
Prima della prima messa in servizio
• Verificare l’apparecchio su eventuali danni causati dal trasporto. Non collegare in nessun caso un apparecchio danneggiato! In caso di danni rivolgersi al fornitore..
Sostanza refrigerante
L’apparecchio contiene nel circuito refrigerante un gas naturale denominato Isobutano (R600a), avente una elevata tolleranza per l’ambiente, il quale
é tuttavia infiammabile.
• Osservare durante il trasporto e l’installazione dell’apparecchio che non
venga danneggiato alcun elemento delcircuito refrigerante.
• In caso di danneggiamenti al circuito refrigerante:
– evitare assolutamente fiamme libere e fonti incendianti;
– provvedere ad una buona aerazione del locale in cui si trova l’apparecchio.
Sicurezza dei bambini
• I pezzi di imballaggio (p.es. polistirolo) possono essere pericolosi per i bambini. Pericolo di soffocamento! Mantenere il metriale di imballaggio al di
fuori della portata dei bambini!
• Gli apparecchi che non vengono più utilizzati devono essere resi inutilizzabili prima dello smaltimento. Estrarre la spina di rete, spezzare il cavo di
rete, rimuovere oppure distruggere le eventuali chiusure lampo di bloccaggio. Mediante ciò si evita che si possano chiudere dentro dei bambini
che giocano (pericolo di soffocamento!) oppure che possano trovarsi in
Page 5

55
altre situazioni pericolose per la vita.
• Molto spesso i bambini non possono rendersi conto dei pericoli a cui sono
esposti durante il maneggio con gli apparecchi domestici. Pertanto è
necessario prendere degli idonei provvedimenti di salvaguardia eviatando
inoltre di lasciar giocare i bambini con tali apparecchi!!
Nel servizio quotidiano
• I contentitori di gas infiammabili oppure liquidi mediante l’effetto del freddo possono perdere la propria ermeticità. Pericolo di espolsione! Non
immagazzinare mai dei contenitori con sostanze infiammabili, come p.es.
bombole spray, accendini e cartucce di rifornimento, ecc. nell’apparecchio
refrigerante.
• Le bottiglie e le lattine non devono essere collocatenella cella di congelamento. Queste possono scoppiare non appena si congela il contenuto,
mentre i liquidi contenenti anidride carbonica possono addirittura esplodere! Non collocare mai della limonata, succhi, birra,vino, spumante, ecc.
Ad eccezione: I superalcoolici possono essere immagazzinati nella cella di
congelamento.
• Non ingoiare i gelati oppure i cubetti di ghiaccio appena estratti dalla cella di congelamento. Il gelato oppure ghiaccio molto freddo si può incollare alla lingua o alle labbra e causare quindi delle ferite.
• Non toccare i prodotti congelati con le mani bagnate. Le mani si potrebbero congelare sul prodotto.
• Non impiegare mai dei piccoli elettrodomestici (p.es. macchine elettriche
da gelato, mescolatori, ecc.) nell’apparecchio refrigerante.
• Prima di eseguire i lavori di pulizia, é necessario disinserire l’apparecchio,
estrarre la spina oppure disinserire rispett. svitare il fusibile dell’abitazione.
• Estrarre la spina di rete dalla presa tirando sempre dalla parte della spina,
mai dal cavo.
Nel caso di una anomalia
• Se dovessero verificarsi delle anomalie, si prega di leggere le istruzioni del
capitolo “ Che cosa fare, se...”. Nel caso non siano sufficienti le avvertenze
riportate, si prega di non eseguire ulteriori lavori autonomi di riparazione
• Gli apparecchi refrigeranti devono essere riparati esclusivamente da persone specializzate. Nel caso della necessità di una riparazione, si prega di
rivolgersi al proprio fornitore oppure presso il nostro servizio di assistenza.
76
Changing the light bulb
Warning! There is a risk of electric shocks! Before changing the light bulb,
switch off the appliance and unplug it, or pull the fuse or the circuit breaker.
Light bulb data: 220-240 V, max. 15 W
1. To switch off the appliance, turn the temperature regulator to position "0".
2. Unplug the mains plug.
3. To change the light bulb, undo the
screw.
4. Press the light bulb cover as shown
and slide it backwards.
5. Change the defective light bulb.
6. Refit the light bulb cover and the
screw.
7. Put the refrigerator back into operation.
Regulations, Standards, Guidelines
This appliance was designed for household use and was manufactured in
accordance with the appropriate standards. The necessary measures in
accordance with appliance safety legislation regulations (GSG), accident
prevention regulations for refrigeration appliances (VBG 20) and the regulations of the German Society of Electrical Engineers (VDE) were observed in
the manufacture of this appliance.
The refrigerant circuit has been checked for leaks.
This appliance is in accordance with the following EU guidelines:
– 73/23/EWG dated 19 February 1973 - low voltage guidelines.
– 89/336/EWG dated 3 May 1989
(including guideline change notice 92/31/EWG) - EMV guideline
D411
Page 6

Rimuovere la sicura del trasporto
• Rimuovere dall’interno dell’apparecchio tutti i nastri adesivi nonchè
i pezzi di imbottitura.
6
Smaltimento
Informazione sull’imballaggio dell’apparecchio
Tutti i materiali di produzione impiegati sono tollerabili perl’ambiente! Questi possono essere depositati senza pericoli oppure smaltiti nell’impianto
bruciatore di rifiuti urbani!
Riguardo i materiali di produzione: I materiali sintetici possono essere anche
riciclati e sono contrassegnati nella seguente maniera:
>PE< per politilene, p. es. nell’involucro esterno e nei sacchetti all’interno.
>PS< per polistirolo schiumoso, p.es. nei pezzi di imbottitura, in linea di
massima privi di propellenti.
I pezzi di cartone vengono realizzati con carta riciclata e devono essere
rimessi nella raccolta della carta vecchia.
Smaltimento di apparecchi vecchi
Per motivi di protezione dell’ambiente é necessario smaltire conformemente gli apparecchi vecchi.Ciò vale per il Vostro apparecchio finora usato e
dopo che ha terminato di svolgere il suo servizio ed anche per il Vostro
apparecchio nuovo.
Attenzione! Gli apparecchi vecchi che non servono più, devono essere resi
inutilizzabili prima dello smaltimento. Estrarre la spina di rete, spezzare il
cavo di rete, rimuovere oppure distruggere le eventuali chiusure lampo di
bloccaggio. Mediante ciò si evita che si possano chiudere dentro dei
bambini che giocano (pericolo di soffocamento!) oppure che possano
trovarsi in altre situazioni pericolose per la vita.
Avvertenze sullo smaltimento :
• L’apparecchio non deve essere smaltito insieme ai rifiuti urbani o ingom-
branti.
• Il circuito refrigerante, in particolare lo scambiatore di calore situato nel-
la parte inferiore dell’apparecchio, non deve essere danneggiato.
• Il simbolo sul prodotto o sulla confezione indica che il prodotto
non deve essere considerato come un normale rifiuto domestico, ma
deve essere portato nel punto di raccolta appropriato per il riciclaggio di apparecchiature elettriche ed elettroniche. Provvedendo a
smaltire questo prodotto in modo appropriato, si contribuisce a evitare potenziali conseguenze negative per l'ambiente e per la salute,
che potrebbero derivare da uno smaltimento inadeguato del prodotto. Per informazioni più dettagliate sul riciclaggio di questo prodotto, contattare l'ufficio comunale, il servizio locale di smaltimento rifiuti o il negozio in cui è stato acquistato il prodotto.
75
Interior lighting does not
work.
Light bulb is defective. Please look in the "Changing
the Light Bulb" section.
Heavy build up of frost, possibly also on the door seal.
Door seal is not air tight (possibly after changing over the
hinges).
Carefully warm the leaking
sections of the door seal with
a hair dryer (not hotter than
approx. 50 °C). At the same
time shape the warmed door
seal by hand such that it sits
correctly.
Unusual noises.
The appliance is touching the
wall or other objects.
Appliance is not level.
A component, e.g. a pipe, on
the rear of the appliance is
touching another part of the
appliance or the wall.
The compressor starts after a
period of time.
This is normal, no error has
occurred.
The compressor does not start
immediately after changing
the temperature setting.
If necessary, carefully bend
the component out of the
way.
Move the appliance slightly.
Readjust the feet.
See the "Cleaning and Care"
section.
Water on the floor or on storage shelves.
Water drain hole is blocked.
Malfunction Possible Cause Remedy
The food is too warm.
The appliance is near a heat
source.
Temperature is not properly
adjusted.
Please look in the "Initial Start
Up" section.
Turn the temperature regula-
tor to a colder setting tempo-
rarily.
Door was open for an extended period.
Please look in the "Installation
location" section.
A large quantity of warm
food was placed in the
appliance within the last 24
hours.
Open the door only as long as
necessary.
Appliance does not work.
Appliance is not switched on Switch on the appliance.
Mains plug is not plugged in
or is loose.
Insert mains plug.
Fuse has blown or is defective.
Check fuse, replace if neces-
sary.
Socket is defective.
Mains malfunctions are to be
corrected by an electrician.
Appliance cools too much. Temperature is set too cold.
Turn the temperature regula-
tor to a warmer setting tem-
porarily.
Page 7
7
Installazione
Luogo d’installazione
L’apparecchio deve essere collocato in un luogo ben aerato ed asciutto.
La temperatura ambientale ha un notevole effetto sul consumo di corren-
te.
Pertano l’apparecchio dovrebbe
– non essere esposto direttamente ai raggi solari;
– non essere messo accanto ad elementi di calore oppure ad un forno o altre
simili fonti di calore;
– essere messo in un luogo la cui temperatura ambientale corrisponda alla
classe climatica per la quale é stato concepito.
La classe climatica é riportata sulla targhetta matricola situata a sinistra nell’interno della cella refrigerante.
La seguente tabella mostra quali temperature ambiente sono state assegnate alle classi climatiche:
Classe climatica per temperature ambientali di
SN +10 fino +32 °C
N +16 fino +32 °C
ST +18 fino +38 °C
T +18 fino +43 °C
Nel caso sia inevitabile effettuare l’installazione accanto ad un fonte di calore, é necessario mantenere le seguenti distanze minime:
– dai forni elettrici 3 cm;
– dai forni a nafta e carbone 30 cm.
Nel caso non possano essere mantenute queste distanze, é necessario inserire una piastra di protezione contro il calore tra il forno e l’apparecchio
refrigerante.
Se l’apparecchio refrigerante è posto accanto ad un altro apparecchio refrigerante oppure congelante é necessario mantenere una distanza laterale di
5 cm, allo scopo di evitare che si possa formare della condensa sui lati esterni degli apparecchi.
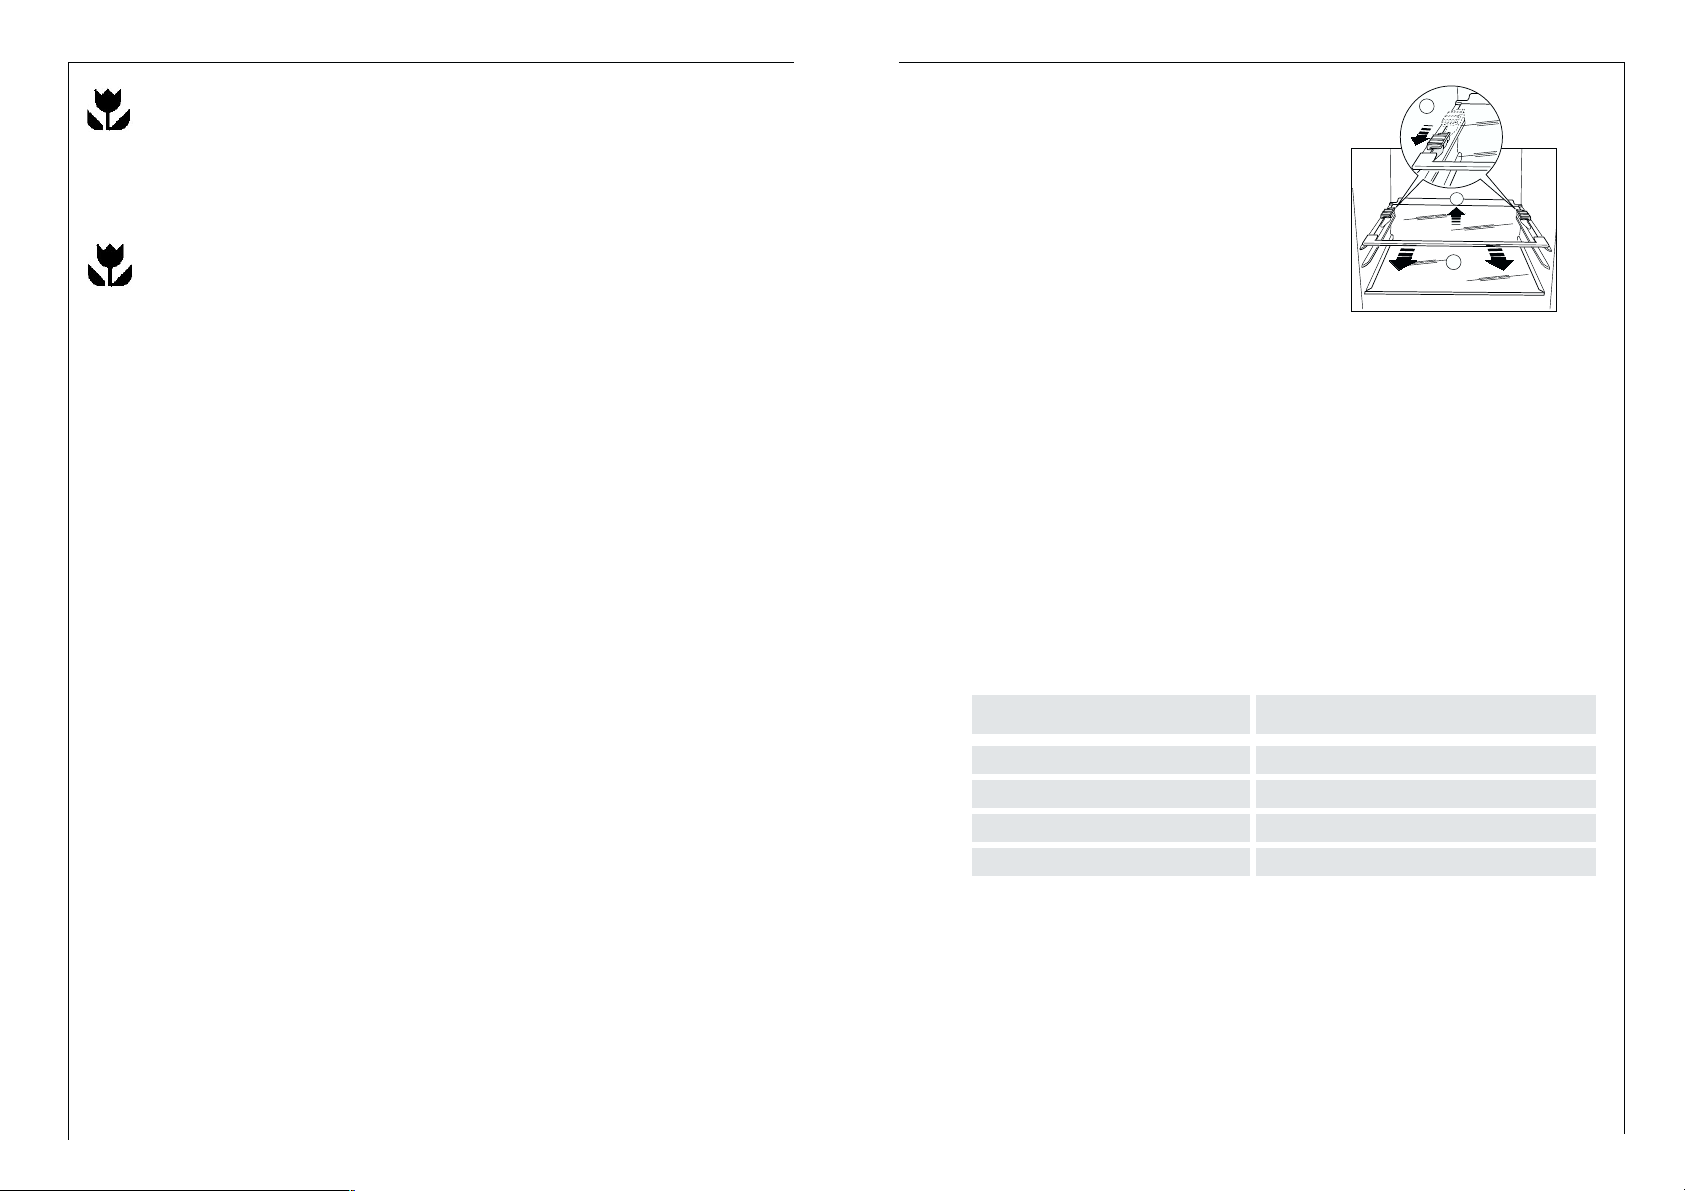
Fermi-Ripiani
La vostra apparecchiatura é dotata di
fermi-ripiani che consentono di bloccare i ripiani durante il trasporto.
Per rimuoverli operare come segue :
muovere i fermi-ripiani nel senso della
freccia , rialzare posteriormente il vetro
e spingerlo in avanti fino a quando non
si libera e togliere i fermi.
A
C
B
74
Accumulation of dust at the condenser increases energy consumption. For
this reason carefully clean the condenser at the back of the appliance once
a year with a soft brush or a vacuum cleaner.
6. Check the water drain hole on the rear wall of the fridge. Clear a blocked
drain hole with the aid of the green peg included with the appliance.
7. After everything is dry place appliance back into service.
Energy Saving Tips
• Do not install the appliance near cookers, radiators or other sources of
warmth. High ambient temperatures cause longer, more frequent operation of the compressor.
• Ensure sufficient air circulation and exhaust at the appliance base and at
the back wall of the appliance. Never cover air vent openings.
• Do not place warm foods into the appliance. Allow warm foods to cool
first.
• Only leave door open as long as necessary.
• Do not set temperature any colder than necessary.
• Put frozen food in the fridge to defrost. The cold in the frozen food will
then be used to cool the fridge.
• Keep the heat emitting condenser, the metall grille on the rear wall of
your appliance, always clean.
What to do if ...
Correcting Malfunctions
A malfunction may be caused by only a minor fault that you can rectify
yourself using the following instructions. Do not perform any other work on
the appliance if the following information does not provide assistance in
your specific case.
Warning! Repairs to refrigerators/freezers may only be performed by qualified service engineers. Improper repairs can give rise to significant hazards
for the user. If your appliance needs repairing, please contact your specialist dealer or our Customer Service.
Page 8

L’apparecchio refrigerante necessita di aria
L’aerazione avviene tramite le fessure
di passaggio dell’aria situate nello
zoccolo sotto, mentre lo scarico
avviene attraverso il pannello posteriore verso l’alto. Per far si che l’aria
possa circolare, non chiudere oppure
variare in nessun caso queste fessure
di aerazione.
Attenzione! Nel caso l’apparecchio
dovesse essere collocato p.es. sotto
un armadio, é necessario mantenere
una distanza minima di almeno 10
cm tra lo spigolo superiore ed il
mobile sopra collocato.
Distanziali posteriori
Montare i due distanziali posteriori
contenuti nel sacchetto della documentazione per garantire la regolare dispersione del calore che si forma
durante il funzionamento. Procedere
come da figura.
PR153
8
Montaggio della maniglia
1. Avvitate il supporto superiore della maniglia all'asta
della maniglia (1). Montate il supporto inferiore
della maniglia sulla parte
inferiore sinistra della porta (2).
2. Montate il supporto superiore della maniglia in alto
sulla porta (3) ed avvitate
l'asta con il supporto inferiore (4).
Ricordate!
Non stringete eccessivamente le viti (max. 2 Nm),
poiché potreste danneggiare le maniglie.
73
Cleaning and Care
Outside of the appliance
Important: Do not use cleaning agents for stainless steel or other aggressi-
ve or abrasive cleaning agents. The protective coat of lacquer on the stainless steel surface can be damaged by these.
The coat of lacquer protects against finger prints and therefore additional
cleaning agents and maintenance products are no longer required.
• Clean the appliance with a cloth and lukewarm water. Commercially avai-
lable dish washing detergents may also be used.
• After cleaning wipe with fresh water and rub dry.
For hygienic reasons the appliance interior, including interior accessories,
should be cleaned regularly.
Warning!
• The appliance may not be connected to the mains during cleaning. Dan-
ger of electrical shock! Before cleaning switch the appliance offand rem
ve the plug from the mains, or switch off or turn out the circuit breaker
or fuse.
• Never clean the appliance with a steam cleaner. Moisture could accumu-
late in electrical components, danger of electrical shock! Hot vapours can
lead to the damage of plastic parts.
• The appliance must be dry before it is placed back into service.
Attention!
• Ethereal oils and organic solvents can attack plastic parts, e.g.
– lemon juice or the juice from orange peals;
– butyric acid;
– cleansers which contain acetic acid.
Do not allow such substances to come into contact with appliance parts.
• Do not use any abrasive cleansers.
1. Remove frozen food and the food from the refrigerator. Wrap frozen food
in several layers of newspaper. Store it in a cool place, well covered.
2. Defrost the freezer compartment prior to cleaning (see "Defrosting" section).
3. Switch the appliance off and remove the plug from the mains, or switch off
or turn out the circuit breaker or fuse.
4. Clean the appliance and the interior accessories with a cloth and lukewarm
water. Commercially available dish washing detergents may also be used.
5. After cleaning wipe with fresh water and rub dry.
NP005
100 mm10 mm
10 mm
Page 9

9
Reversibilità della porta
La reversibilità della porta può essere cambiata da destra (condizioni di consegna) verso sinistra, nel caso il luogo di installazione ne richiedesse la
necessità.
Avvertimento! Durante la reversibilità, l’apparecchio non deve essere collegato alla rete elettrica. Estrarre innanzitutto la spina dalla rete.
Procedere come segue:
Per eseguire le operazioni seguenti,proponiamo di chiedere l'aiuto di un'altra persona che mantiene saldamente le porte dell'apparecchiatura durante l'operazione.
Aprire le porte, svitare le viti e
rimuovere la cerniera intermedia (H)
allontanandola gradualmente dal
corpo del frigorifero, inclinando leggermente tutte e due le porte. Far
attenzione a rimuovere anche il
distanziale di plastica inserito sotto
la cerniera.
Togliere la porta del congelatore
tirandola leggermente verso il basso.
Togliere la porta del frigorifero
tirandola leggermente verso l’alto.
Rimuovere il tappo superiore della
porta del congelatore e reinserirlo
sul lato opposto.
Rimuovere il tappo superiore della
porta del frigorifero e reinserirlo sul
lato opposto.
Svitare il perno della cerniera superiore(G) del frigorifero e riavvitarlo
sul lato opposto.
Rimuovere con un utensile il coperchietto (e) svitare il perno della cerniera inferiore (F) e riavvitarlo sul
lato opposto.
Reinserire il coperchietto (e) sul lato
opposto.
Inserire il perno della cerniera intermedia nel foro di sinistra della porta
del frigorifero.
Inserire la porta del frigorifero sul
perno della cerniera inferiore (f) .
H
G
72
Defrosting
Refrigerator
Frost is automatically eliminated
during normal use. The defrost water
drains out through a trough into a
special container at the back of the
appliance, where it evaporates.
We recommend that you peridically
clean the defrost-water drainage
outlet with the cleaner provided,
located in the center of the drainage
groove.
Freezer
The freezer compartment, will become progrssively covered with frost. This
should be removed with al plastic scraper. Whenever the tickness of the frost exceeds 4 mm complete defrosting should be carried out as follows:
1. pull out the plug from the wall socket or turn the thermostat knob to th “0”
setting.
2. remove any stored food, wrap it in several layers newspaper and put it in a
coll place.
3. leave the door open.
4. when defrosting is completed, dry the interior thoroughly
5. turn the thermostat knob to the required setting or raplace the plug in the
power socket.
Attention
Never use sharp metal tools to scrape off frost from the evaporator as you
could damage it.
Do not use a mechanical device or any artificial means to speed up the
thawing process other than those recommended by the manufacturer.
A temperature rise of the frozen food packs, during defrosting , may shorten their safe storage life.
Switching off the appliance
To switch off the appliance, turn the temperature regulator to position "0".
If the appliance is not going to be used for an extended period:
1. Remove all refrigerated and deep-frozen packages as well as ice trays.
2. Switch off the appliance .
3. Remove the mains plug or switch off or turn out the circuit breaker or fuse.
4. Defrost freezer compartment and clean thoroughly (see section: “Cleaning
and Care”).
5. Leave the door open to avoid the build up of odours.
D037
Page 10

10
Inserire la porta del congelatore
sul perno della cerniera superiore,
poi inclinando legegrmente le
porte inserire il perno della cerniera intermedia nel foro di sinistra della porta del congelatore.
Aprendo le porte,fissare la cerniera intermdia sul lato di sinistra
con due viti. Non dimenticare il
distanziale di plastica, inserito
sotto la cerniera intermedia (H).
Prestare attenzione affinché il
bordo delle porte sia parallelo al
bordo del top.
Svitate il supporto superiore
della maniglia dall'asta della
maniglia (1). Svitate il supporto
inferiore della maniglia dalla
porta (2).
Svitate il supporto superiore
della maniglia dalla porta (3) ed
avvitatelo in basso a destra sulla porta (4).
Avvitate il supporto con l'asta
girati a 180° alla porta (5) con il
supporto montato (6).
Rimettere l'apparecchiatura al
suo posto, livellarla e collegarla.
In caso non si voglia eseguire le
operazioni sopra elencate,contattare il servizio assistenza più
vicino. I tecnici esperti eseguiranno il montaggio con un
addebito.
Ricordate!
Non stringete eccessivamente
le viti (max. 2 Nm), poiché
potreste danneggiare la maniglia.
Ultimata la reversibilità delle porte, controllare che la guarnizione magnetica sia aderente al mobile. Se la temperatura ambiente è fredda (ad es. in
inverno), può succedere che la guarnizione non aderisca perfettamente al
mobile. In tal caso attendere il naturale rinvenimento della guarnizione stessa oppure accelerare tale processo riscaldando la parte interessata con un
normale asciugacapelli.
71
ble materials such as, for example, spray cans, fire extinguisher refill cartridges etc in the refrigerator/freezer.
• Bottles and cans must not be placed in the freezer. They can burst when
the contents freeze, high carbonate content drinks can even explode!
Never store lemonade, juices, beer, wine, sparkling wine etc. in the freezer. Exception: high alcohol content spirits can be stored in the freezer.
• All foods must be packed air tight prior to freezing, so that they do not
dry out or lose their flavour, and so that no flavour contamination of
other frozen goods occurs.
• Not open the door frequently or leave it open longer than absolutely
necessary.
• Unfrozen food must not touch items already frozen, otherwise the frozen
food could begin to defrost.
Caution! Do not touch frozen food with wet hands. Your hands could freeze to the food.
1. Place the food to be frozen on the freezer shelf.
Preparation of Ice Cubes
1. Fill the ice cube tray 3/4 full with cold water, place it in the freezer compartment and leave to freeze.
2. To loosen the frozen cubes, either bend the ice cube tray or hold it under
running water for a few seconds.
Important! Never try to free an ice tray that is frozen to the freezer compartment using pointed or sharp edged objects.
Freezing Calendar
• The symbols show different types of frozen goods.
• The numbers indicate storage times in months for the appropriate types
of frozen goods. Whether the upper or lower value of the indicated storage time is valid depends on the quality of the foods and pre-treating before freezing. The lower value applies to foods with high fat content.
Page 11

11
Messa in servizio e regolazione della temperatura
• Inserire la spina nella presa di corrente. Con porta aperta si accende la
lampada interna. La manopola per la regolazione della temperatura si trova a destra nel compartimento refrigerante.
Posizione „0“ significa: stop.
Posizione „1“ significa: Massima temperatura interna (minor freddo).
Posizione „6“ significa: Minima temperatura interna (massimo freddo).
La temperatura interna dipende dai seguenti fattori:
– Temperatura d’ambiente;
– Quantità e temperatura dei alimenti conservati;
– frequenza e durata di apertura delle porte.
Le temperature del frigorifero e del congelatore non vengono regolate sepa-
ratamente.
Prima della messa in servizio
• Pulire l’interno dell’apparecchio e tutti gli accessori prima di effettuare la
messa in servizio (vedi capitolo “Pulizia e cura”).
Collegamento elettrico
Per effettuare il collegamento eletrrico é necessario impiegare la spina con
contatto di protezionz installata conformemente alle prescrizioni vigenti. Il
fusibile elettrico deve corrispondere ad almeno 10 Ampère. Nel caso non sia
possibile accedere alla presa dopo l’installazione, é necessario prender un
idoneo provvedimento per garantire nell’installazione elettrica la separazione dalla rete dell’apparecchio (p.es. fusibile, interruttore LS, interruttore di
protezione contro correnti errate oppure simili con una ampiezza di apertura del contatto di almeno 3mm.
• Prima della messa in servizio, verificare che la tensione di collegamento ed
il tipo di corrente riportati sulla targa matricola corrispondono ai valori
della rete elettrica del luogo di installazione..
p.es..: AC 230 ... 240 V 50 Hz oppure
230 ... 240 V~ 50 Hz
(pertanto da 230 fino240 Volt corrente alternata, 50 Hertz)
La targa matricola si trova a sinistra nell’interno della cella refrigerante.
70
Fresh food refrigeration
To obtain the best performance:
• do not store warm food or evaporating liquide in the refrigeator
• do cover or wrap the food, particularly if it has a strong flavour.
• Position food so that air can circuiate freely round it.
Useful hints:
Meat (all types): wrap in polythene bags and place on the glass shelf above
the vegetable drawer(s)For safety, store in this way only one or two days
at the most.
Cooked foods, cold dishes, etc: these should be covered and may be placed
on any shelf.
Fruit and vegetables: these should be thoroughly cleaned and placed in
the special drawer(s) provided.
Butter and cheese: these should be placed in special airtight containers or
wapped in aluminium foil or polythene bags to exclude as much air as possible.
Milk bootles: these should have a cap and should be stored in the bottle
rack on the door.
Bananas, potatoes, onions and garlic, if not packed, must not be kept in
the refrigerator.
Freezing and storing frozen food
You can use your freezer for freezing fresh food yourself.
Important!
• The temperature in the freezer compartment must be –18 °C or colder
before freezing food.
• Please observe the freezing capacity given on the rating plate. The freezing capacity is the maximum quantity of fresh food that can be frozen
within a period of 24 hours. If you wish to freeze food several days in a
row, please observe a maximum capacity of only 2/3 to 3/4 of that on the
rating plate. The quality of the food is best preserved when it is frozen
right through to the core as quickly as possible.
• Allow warm food to cool down before freezing. The warmth will cause
increased ice formation and increase the power consumption.
• Please note the maximum storage times specified by the manufacturer.
• Thawed foods which have not been processed further (cooked into meals)
may not under any circumstances be frozen a second time.
• Containers with flammable gases or liquids can leak at low temperatures.
There is a risk of an explosion! Do not store any containers with flamma-
Page 12

12
Accessori interni
Posizionamento dei ripiani
• In ripiano intero sopra i cassetti
verdura/frutta deve rimanere sempre
in questa posizione per mantenere
più fresca nel tempo la verdura e
frutta.
I rimanenti ripiani sono regolabili in
altezza:
• Per far ciò tirare il ripiano in avanti finchè questo non si lascia tirare verso il basso o l’alto.
• L’inserimento in un’altra altezza avviene in senso contrario.
• Estrarre il semi-ripiano e spingerlo in un altro livello. In tal modo si guadagna dello spazio per poter collocare sulla superficie sottostante del prodotto da refrigerare piuttosto alto
Posizionamento delle mensole
• A secondo delle esigenze, gli scompartimenti di ripiano sulla porta possono essere estratti verso l’alto ed essere quindi inseriti in altri sostegni.
Se si vuole congelare velocemente gli alimenti si può selezionare la posizione “6”. Attenzione: in questo caso.la temperatura nel compartimento refrigerante può scendere a 0°C . Se ciò si verificasse rimettere la manopola sulla posizione intermedia.
Importante!
Con temperatura ambiente elevata (ad es. calde giornate estive) o con
manopola posizionata sulle posizioni di massimo freddo, il compressore può
funzionare in continuo.
In tal caso é necessario ruotare la manopola su una posizione di minor freddo (posizione”3” o”4”). In questo modo si regola il funzionamento del compressore e lo sbrinamento nello scompartimento refrigerante avviene di
nuovo automaticamente.
69
Bottle rack
Place bottles in the rack with the
bottleneck to the front.
Important: Only store unopened
bottles horizontally.
The bottle rack can be tilted for
storing opened bottles.
To do this pull the bottle rack
forward until it can be tilted
upwards, then slide the front
support into the next level up.
D338
Page 13

13
Refrigerazione dei cibi e delle bevande
Per utilizzare nel modo migliore lo scomparto refrigerante è necessario:
• non introdurre nella cella, vivande calde o liquidi in evaporazione;
• coprire o avvolgere gli alimenti, specie se contengono aromi;
• disporre gli alimenti in modo che l’aria possa circolare liberamente attorno ad essi.
Alcuni consigli pratici:
Carne (di tutti i tipi): va avvolta in sacchetti di plastica e posta sul vetro
sopra il cassetto verdura.
In questa posizione si potrà conservare per uno o due giorni al massimo.
Cibi cotti piatti freddi, ecc. devono essere ben coperti e possono essere
disposti su qualsiasi griglia.
Frutta e verdura: saranno messe, previa pulitura, nel/ nei cassetto/i previ-
sto/i a tale scopo.
Burro e formaggio devono essere conservati negli appositi contenitori
o avvolti in fogli di plastica o alluminio per evitare il contatto con l’aria.
Latte in bottiglia: ben chiuse poste nel portabottiglie.
Banane, patate, cipolla ed aglio, se non sono confezionati, non vanno
messi in frigorifero.
Portabottiglie
Mettere le bottiglie (con l’apertura verso il davanti ) nel ripiano
preposto.
Se il ripiano é situato orizzontalmente mettere solo bottiglie chiuse.
Questo ripiano portabottiglie ha la
possibilità di essere inclinato al
fine di favorire lo stoccaggio di
bottiglie già aperte.
Per ottenere questo risultato tirare il ripiano verso l’alto in modo
che possa girarsi verso l’alto ed
essere posizionato sul ripiano
superiore.
68
However, the exact setting should be chosen keeping in the mind that the
temperature inside the refrigerator depends on:
-the quantity of food stored
-how often the door is opened
The temperatures in the refrigerator compartment and freezer co partment
cannot be independently regulated.
If you want the freeze fresh food rapidly, select setting „6“, ensuring that the
temperature in the refrigerator compartment does not drop blow 0°C. You
should also promptly reset the temperature regulator to setting „3“ or „4“.
Important!
High ambient temperatures (e.g. on hot summer days) and a cold setting on
the temperature regulator (position"5" to "6") can cause the compressor to
run continuously.
If this happens, turn the temperature regulator back to a warmer setting
(position "3" to "4"). At this setting the compressor will be switched on and
off as usual and automatic defrosting recommenced.
Interior Accessories
Storage Shelves
The glass shelf above the fruit and
vegetable compartment should
always remain in position, to ensure
fruit and vegetables stay fresh longer.
The remaining storage shelves can be
adjusted to various heights:
Pull the storage shelf forward until it
can be tipped up or down and removed.
To insert at a different height use the same procedure in reverse.
Variable Inner Door
The door compartments can be pulled up and removed, and inserted at
other positions as needed.
D338
Page 14

14
Congelazione e conservazione
Il vostro congelatore é adatto sia per la conservazione i surgelati che per la
congelazione di cibi freschi.
Attenzione:
• La temperatura nello scomparto congelatore dev’essere di -18°C o inferiore prima di introdurre i cibi per la congelazione.
• Attenersi per la congelazione ai quantitativi indicati sulla targa matricola.
Il quantitativo per la congelazione é la quantità massima di cibi freschi
che possono essere congelati in 24 ore. Volendo effettuare la congelazione di cibi freschi per più giorni consecutivi, ridurre il quantitativo riportato sulla targa a 2/3 o 3/4.
• Lasciare raffreddare eventuali cibi caldi prima di congelarli. Il calore porta a una forte formazione di brina ed un elevato consumo energetico.
• Rispettare le date di scadenza indicato sulle confezioni dal produttore dei
surgelati.
• I cibi una volta scongelati non possono venir ricongelati previa cottura.
• I contentitori di gas infiammabili oppure liquidi mediante l’effetto del
freddo possono perdere la propria ermeticità. Pericolo di espolsione! Non
immagazzinare mai dei contenitori con sostanze infiammabili, come p.es.
bombole spray, accendini e cartucce di rifornimento, ecc. nell’apparecchio
refrigerante.
• Le bottiglie e le lattine non devono essere collocate nella cella di congelamento. Queste possono scoppiare non appena si congela il contenuto,
mentre i liquidi contenenti anidride carbonica possono addirittura esplodere! Non collocare mai della limonata, succhi, birra,vino, spumante, ecc.
Ad eccezione: I superalcoolici possono essere immagazzinati nella cella di
congelamento.
• Avvolgere ermeticamente gli alimenti prima della congelazione in modo
da evitare che si asciughino, perdano gli aromi o che i sapori si trasmettano agli altri cibi congelati.
Attenzione! Mai toccare i cibi congelati con le mani bagnate. La pelle
potrebbe rimanere attaccata.
1. Porre i cibi avvolti da congelare nel cassetto superiore.
2 Non aprire troppo frequentemente la porta dello scomparto e non lasciarla
aperta più del necessario.
Cubetti di ghiaccio
1. Riempire a 3/4 la bacinella ghiaccio con acqua fredda e riporla nel cassetto
congelatore.
2. Per togliere i cubetti pronti é sufficiente torcere la bacinella o metterla brevemente sotto l’acqua corrente.
Attenzione! Si raccomanda di non usare utensili appuntiti o a spigoli per
staccare la bacinella eventualmente rimasta attaccata.
67
Electrical connection
Before initial start-up, refer to the appliance rating plate to ascertain if supply voltage and current values correspond with those of the mains at the
installation location.
e.g.: AC 230 ... 240 V 50 Hz or
230 ... 240 V~ 50 Hz
(i.e. 230 to 240 volts alternating current, 50 Hertz)
The rating plate is inside the appliance on the left.
A correctly installed, earthed socket is required for the electrical supply. The
supply must have a fuse rating of at least 10 Amps.
If the socket is not accessible once the appliance is built in, the electrical
installation must include suitable means of isolating the appliance from the
mains (e.g. fuse, cut-out, current trip or similar with a minimum contact
separation of 3 mm).
Attention: The mains connection cable may only be replaced by a skilled
electrician. Please contact your dealer or our customer service department
for repairs.
Prior to Initial Start–Up
• Please clean the appliance interior and all accessories prior to initial start-
up (see section: “Cleaning and Care”).
Starting up and temperature regulation
• Insert the plug of the connection lead into the plug socket with protecti-
ve earth contact. When the refrigerator compartment door is opened, the
internal lighting is switched on. The temperature selector knob is located
on the RH side of the refrigerator compartment.
Setting „0“ means: Off.
Setting „1“ means: Hightest temperature, (warmest setting).
Setting „6“ (end-stop) means: Lowest temperature, (coldest setting).
Page 15

15
Sbrinamento
Frigorifero
Sulla parete posteriore dello
scomparto refrigerante, si forma
uno strato di brina durante il funzionamento del compressore, che
viene eliminato automaticamente durante le pause di funzionamento dello stesso.
L’acqua derivante dallo sbrinamento, tramite un apposito convogliatore
posto nella parte posteriore dello scomparto refrigerante, attraverso un foro
di scarico, viene raccolta in una bacinella posta sopra il compressore, da
dove evapora.
Congelatore
Nello scomparto congelatore si forma uno strato di brina, a causa dell’umidità che si sviluppa durante il funzionamento e all’apertura della porta. Questo deve essere eliminato periodicamente, utilizzando una paletta raschiabrina.
Uno strato molto spesso di brina nello scomparto congelatore comporta
un consumo maggiore di energia. Perciò é necessario eseguire lo sbrinamento completo ogniqualvolta si é formato uno strato di 4 mm circa o
almeno una volta l’anno. Inoltre é sempre consigliabile effettuare lo sbrinamento quando l’apparecchio é vuoto o quando il carico é minimo.
Per effettuare un sbrinamento completo procedere come segue:
1. Togliere i cibi congelati, avvolgerli in parecchi fogli di giornali e riporli in un
luogo fresco.
D037
Calendario di congelamento
• I simboli indicano diversi tipi di prodotti da congelare.
• Le cifre indicano il periodo di conservazione in mesi per ciascun tipo di
prodotto da congelare. Il periodo di conservazione dell’alimento congelato
varia tra il minimo ed il massimo indicato (es. 2-6 mesi) ed e’ in funzione del
cibo congelato. Per gli alimenti notevolmente grassi vale sempre la durata
inferiore.
66
- Opening the doors, fix the
middle hinge on the left side with
two screws. Do not forget the
plastic spacer that must be placed under the middle hinge (H).
Unscrew the top handle bracket
from the handle rod (1). Unscrew
the bottom handle bracket from
the door (2).
Unscrew the top handle bracket
from the door (3) and screw onto
the bottom right-hand side of
the door (4).
Turn the handle bracket with the
handle rod 180° and screw them
to the door (5) and the fitted
handle bracket (6).
Pay attention that the border of
the doors are parallel to the top
border.
Reposition, level the appliance
and connect it to the mains
socket.
In any case you do not want to
carry out the above mentioned
operations, contact the nearest
After Sales Service Force.. The
After Sales Service specialist
will carry out the reversibility
of the doors at your cost.
Attention:
After having reversed the opening direction of the doors check
that all the screws are properly
tightened and that the magnetic
seal adheres to the cabinet. If the
ambient temperature is cold (i.e.
in Winter), the gasket may not fit
perfectly to the cabinet. in that
case, wait for the natural fitting
of the gasket or accelerate this
process by heating up the part
involved with a normal hairdrier.
Page 16

16
2. Spegnere l’apparecchiatura e staccare la spina dalla presa di corrente oppure disinserire o svitare le valvole di sicurezza.
3. Lasciare aperta la porta dello scomparto congelatore.
4. Riportare la manopola del termostato nella posizione desiderata e reinserire la spina nella presa.
Avvertenza:
Non impiegare mai utensili metallici per asportare la brina.
Si raccomanda di non utilizzare riscaldatori elettrici o altri mezzi meccanici
o artificiali per accelerare il processo di sbrinamento, tranne quelli raccomndati in questo libretto.
Un innalzamento della temperatura dei surgelati durante lo sbrinamento
potrebbe ridurne il tempo di conservazione.
Spegnimento dell’apparecchio
Se l’apparecchiatura dovesse essere spenta per un lungo periodo:
1. Svuotare lo scomparto refrigerante e congelante cosi come le bacinelle
ghiaccio.
2. Spegnere l’apparecchiatura mettendo la manopola termostato sul”0”.
3. Togliere la spina dalla presa di corrente oppure disinserire la valvola di sicurezza.
4. Sbrinare lo scomparto congelante e pulire (vedi paragrafo “Pulizia e cura”).
5. Lasciare aperte le porte per evitare la formazione di odori sgradevoli.
Pulizia e cura
Per motivi d’igiene si dovrebbe.sempre pulire accuratamente e regolarmente l’interno dell’apparecchio, compresi gli accessori.
Avvertimento!
• Durante la pulizia, l’apparecchio non deve essere collegato alla rete elet-
trica. Pericolo di scosse di corrente! Prima di eseguire i lavori di pulizia, é
necessario disinserire l’apparecchio, estrarre la spina oppure disinserire
rispett. svitare il fusibile.
• Non pulire mai l’apparecchio con delle idropulitrici a vapore. L’umidità
potrebbe penetrare negli elementi di costruzione elettrici, pericolo di scosse di corrente! Il vapore bollente può causare dei dannii ai pezzi in materiale sintetico.
65
H
Rehingeing the door
The side at which the door opens can be changed from the right side (factory adjustment) to the left side, if the installation site requires.
Warning! When changing the side at which the door opens, the appliance
may not be connected to the mains. Remove plug from the mains beforehand.
Procced as follows:
To carry out the following operations, we suggest that this be made
with another person that will keep a
firm hold on the doors of the
appliance during the operations.
- Open the doors, unscrew and remove the middle hinge (H) pulling away
gradually from the refrigerator cabinet, tilting slightly the two doors. pay
attention to remove the plastic spacer inserted under the hinge.
- Take off the freezer door pulling
slightly downwards.
- Take off the refrigerator door pulling slightly upwards the top.
- Remove the upper plastic plug of
the freezer door and reinsert on the
opposite side.
- Remove the upper plastic plug of
the refrigerator door and reinsert on
the opposite side.
- Unscrew the upper hinge pivot (G)
of the refrigerator and rescrew it on
the opposite side.
- Remove with a tool the cover (e)
unscrew the lower hinge pivot (f)
and rescrew on the opposite side
- Refit the cover (e) on the opposite
side.
- Insert the middle hinge pivot into
hole on the left of the refrigerator
door.
- Insert the refrigerator door on the
lower hinge pivot (f) .
- Insert the freezer door on the upper
hinge pivot and tilt slightly the doors
and insert the middle hinge pivot
into the hole on the left side of the
freezer door.
G
Page 17

17
• L’apparecchio deve essere asciutto, ancor prima della nuova messa in ser-
vizio.
Attenzione!
• Oli essenziali e sostanze solventi organiche possono intaccare gli elemen-
ti in materiale sintetico, p.es.
– succhi di limone oppure bucce di arancia;;
– burro acido;
– sostanze detergenti contenenti acido di aceto.
Evitare il contatto degli elementi dell’apparecchio con simili sostanze.
• Non impiegare mai sostanze detergenti graffianti.
1. Togliere i cibi. Avvolgere con più fogli di giornali i surgelati. Riporre il tutto
in un luogo fresco.
2. Prima della pulizia sbrinare la cella congelante (vedi paragrafo “Sbrinamento”.
3. Spegnere l’apparecchio ed estrarre la spina oppure disinsrire rispett. svitare
il fusibile.
4. Pulire l’apparecchio e gli accessori interni con un panno morbido imbevuto
di acqua calda. Aggiungere eventualmente del comune detergente per il
lavaggio dei piatti.
5. Risciaquare e asciugare strofinando.
I depositi di polvere sul condensatore situato sul lato posteriore dell’appa-
recchio, riducono notevolmente la potenza di raffreddamento ed aumentano quindi il consumo energetico. Pertanto é necessario pulirlo accuratamente una volta l’anno con una spazzola oppure un aspirapolvere.
6. Controllare il foro di scarico dell’acqua di sbrinamento, posto nella parte
posteriore della cella refrigerante. Il foro intasato può essere liberato utilizzando il pulitore verde.
7. Una volta che il tutto si é asciugato bene si può rimettere in servizio l’apparecchiatura.
Consigli per il risparmio energetico
• Non installare l’apparecchiatura vicino a forni, elementi riscaldanti o altre
fonti di calore. Con temperature ambientali elevate il compressore entra
in funzione più spesso e più a lungo.
• Garantire una sufficiente aerazione in entrata e uscita. Non coprire mai le
aperture d’aerazione.
• Non collocare dei cibi caldi nell’apparecchiatura, lasciarli prima raffredda-
re.
64
Installation
Installation Location
The appliance should be set up in a well ventilated, dry room.
Energy use is affected by the ambient temperature. The appliance should
therefore
– not be exposed to direct sunlight;
– not be installed next to radiators, cookers or other sources of heat;
– only be installed at a location whose ambient temperature corresponds to
the climate classification, for which the appliance is designed.
The climate classification can be found on the serial plate, which is located
at the left on the inside of the appliance.
The following table shows which ambient temperature is correct for each
climate classification: each climate classification:
Climate classification for an ambient temperature of
SN +10 bis +32 °C
N +16 bis +32 °C
ST +18 bis +38 °C
T +18 bis +43 °C
If installation next to a source of heat is unavoidable, the following minimum
clearances must be maintained at the sides of the appliance:
– for electric cookers 3 cm;
– for oil and coal fired ranges 30 cm.
If these clearances cannot be maintained a heat insulating pad is required
between the cooker and the refrigeration appliance.
If the refrigeration appliance is installed next to another refrigerator or free-
zer a clearance of 5 cm at the sides is required, in order to prevent the formation of condensation on the outside of the appliance.
Your appliance needs air
For safety reasons, minimum ventilation must be as shown Fig.
Attention: keep ventilation openings clear of obstruction;
100 mm10 mm
NP005
10 mm
Page 18

18
Che cosa fare, se ...
Interventi in caso di anomalie
Probabilmente si tratta di un guasto di lieve entità che potrete eliminare da
soli seguendo le seguenti istruzioni. Non effettuare nessun’altra operazione
qualore le informazioni qui riportate non fossero di alcun aiuto per il caso
concreto.
Avvertenza! Le riparazioni del frigorifero devono essere eseguite unicamente da personale specializzato. Riparazioni improprie possono essere fonte di
gravi pericoli per l’utente. Qualora fosse necessaria una riparazione, siete
pregati di rivolgerVi al Vostro rivenditore autorizzato oppure al nostro servizio assistenza clienti
• Aprire la porta solamente per quanto sia necessario.
• Non regolare una temperatura più fredda di quanto sia necessario..
• Mettere i cibi da scongelare nel comparto refrigerante. Il freddo derivante dal scongelamento aiuta il raffreddamento del comparto refrigerante.
• Mantenere costantemente pulito il condensatore posto sul lato posteriore dell’apparecchiatura.
Cibi troppo caldi
L’apparecchiatura é installata
accanto a una fonte di calore
La temperatura non é correttamente regolata
Vedi paragrafo “Messa in funzione”
Regolare il termostato su una
posizione più fredda
La porta é rimasta aperta a
lungo
Vedi paragrafo “Installazione”
Nell’arco dell 24 ore sono state introdotte grandi quantità
di cibo
Aprire la porta solo per lo
stretto necessario
L’apparecchiatura fa troppo
freddo.
La temperatura é regolata su
un valore troppo freddo
Regolare la manopola su una
posizione più calda
Anomalia Possibile causa Intervento
L’apparecchiatura non funziona
L’apparecchiatura non é collegata.
Collegare l’apparecchiatura
La spina non é inserta e/o
allentata.
Inserire la spina nella presa
L’interruttore generale é disinserito oppure difettoso
Controllare l’interruttore
eventualmente sostituirlo
La presa di corrente é difettosa.
Difetti alla rete elettrica vengono ripristinati dal elettricista autorizzato.
63
Fitting the Door Handles
1. Screw the top handle
bracket to the handle rod
(1). Fit the bottom handle
bracket on the lower lefthand side of the door (2).
2. Fit the top handle bracket
on the top left-hand side
of the door (3) and screw
the handle rod to the bottom handle bracket (4).
Attention!
Do not overtighten the
screws (max. 2 Nm) as you
may damage the door
handles.
Rear spacers
In the bag with the documentation,
there are two spacers which must be
fitted.
Slacken the screws and insert the
spacer under the screw head, then
re-tighten the screws.
PR153
Page 19

19
Sostituzione della lampadina
Avvertimento! Pericolo di scosse elettriche! Prima di effettuare la sostituzione della lampadina, é necessario disinserire l’apparecchiatura ed estrarre
la spina oppure disinserire e/o svitare il fusibile.
Dati della lampadina: 220-240 V, max. 15 W, presa: E 14
1. Spegnere l’apparecchiatura mettendo la manopola sul ”0”.
2. Estrarre la spina dalla presa.
3. Svitare la vite di fissaggio della
plafoniera.
4. sfilare la parte mobile come indicato in figura.
5. Sostituire la lampadina difettosa.
6. Inserire la plafoniera e fissarla con la
vite.
7. Accendere l’apparecchio.
D411
Dopo un certo periodo il
compressore si aziona automaticamente
vedi paragrafo “Pulizia e cura”
Ciò é normale, non sussite
alcun distrubo
Dopo aver modificato la
regolazione della temperatura il compressore non interviene subito
Tracce d’acqua sul fondo dello
scmparto refrigerante
Il foro scarico d’acqua di sbrinamento é ostruito
Forte formazione di brina nell’apparecchiatura o sulla
guarnizione della controporta
La guarnizione della controporta non è più ermetica
(eventualmente dopo aver
effettuato la reversibilità della
porta)
Riscaldare con cautela i punti
non ermetici della guarnizione
con un asciugacapelli (non
superare i 50°C) rimettendo in
forma tirando la guarnizione
in modo che poggi perfettamente
Rumorosità insolita
L’apparecchiatura é a contatto con la parete oppure con
altri oggetti
L’apparecchiatura non é livellato
Un componente installato sul
retro dell’apparecchiatura p.es. un
tubo, tocca un altro componente
oppure la parete
Piegare eventualmente con
cautela
Allontanare leggermente l’apparecchiatura
Correggere con i piedini regolabili
L’illuminazione interna non
funziona
La lampadina é difettosa
Vedi paragrafo “Sostituzione
della lampadina”
Anomalia Possibile causa Intervento
62
The carton parts are made from recycled paper and should be disposed of
at a waste-paper recycling collection location.
Disposal of old Appliances
For environmental reasons, refrigeration appliances must be disposed of
properly. This applies to your old appliance, and - at the end of its service
life - for your new appliance as well.
Warning! Before disposing of old appliances make them inoperable. Remove plug from mains, sever the power cable, remove or destroy any snap or
latch closures. This eliminates the danger that playing children lock themselves into the appliance (danger of suffocation!) or place themselves into
other life-endangering situations.
Disposal:
• The appliance may not be disposed of with domestic waste or bulky refuse.
• The refrigerant circuit, especially the heat exchanger at the back of the
appliance, may not be damaged.
• The symbol on the product or on its packaging indicates that
this product may not be treated as household waste. Instead it shall
be handed over to the applicable collection point for the recycling
of electrical and electronic equipment. By ensuring this product is
disposed of correctly, you will help prevent potential negative consequences for the environment and human health, which could
otherwise be caused by inappropriate waste handling of this product. For more detailed information about recycling of this product,
please contact your local city office, your household waste disposal
service or the shop where you purchased the product.
Remove transport safeguard
The appliance and the interior fittings are protected for transport.
• Remove all adhesive tape and packing pieces from the interior of the
appliance.
Your appliance is equipped with shelf
retainers that make it possible to
secure the shelves during transportation.
To remove them proceed as follows:
Move the shelf retainers in the direc-
tion of the arrow, raise the shelf from
the rear and push it forward until it
is freed and remove the retainers.
A
C
B
Page 20

20
Disposizioni, Norme, Direttive.
L’apparecchiatura é stata concepita per l’impiego domestico ed é stata prodotta sotto l’osservanza delle norme vigenti per questi tipi di apparecchiature. Nella produzione sono stati inoltre presi i particolari provvedimenti
necessari in conformità alla legge sulla sicurezza degli apparecchi (GSG), le
prescrizione sulla prevenzione degli infortuni per impianti refrigeranti (VBG
20) e le disposizioni della cooperativa tedesca elettricisti (VDE).Il circuito
refrigerante é stato verificato sull’ermeticità.
Questa apparecchiatura è conforme alle seguenti direttive CEE:
– 73/23/CEE del 19.2.1973 - Direttiva sulle basse tensioni
– 89/336/CEE del 3.5.1989
(compresa successive modifiche del 92/31/CEE) - Direttiva EMV
61
Daily Operation
• Containers with flammable gases or liquids can leak at low temperatures.
There is a risk of an explosion! Do not store any containers with flammable materials such as, for example, spray cans, fire extinguisher refill cartridges etc in the refrigerator/freezer.
• Bottles and cans must not be placed in the freezer compartment. They can
burst when the contents freeze, high carbonate content drinks can even
explode! Never store lemonade, juices, beer, wine, sparkling wine etc. in
the freezer compartment. Exception: high alcohol content spirits can be
stored in the freezer compartment.
• Do not put ice creams or ice cubes in the mouth immediately after removal from the freezer compartment. Very cold ice can freeze to the lips or
tongue and cause injury.
• Do not touch frozen food with wet hands. Your hands could freeze to the
food.
• Do not operate any electrical appliances in the refrigerator/freezer (e.g.
electric ice cream makers, mixers etc.).
• Before cleaning the appliance, always switch off the appliance and unplug
it, or pull the house fuse or switch off the circuit breaker.
• When unplugging always pull the plug from the mains socket, do not pull
on the cable.
In case of malfunction
• If the a malfunction occurs on the appliance, please look first in the "What
to do if ..." section of these instructions. If the information given there
does not help, please do not perform any further repairs yourself.
• Applianeces may only be repaired by qualified service engineers. Improper
repairs can give rise to significant hazards. If your appliance needs repairing, please contact your specialist dealer or our Customer Service.
Disposal
Appliance Packaging Information
All materials are environmentally sound! They can be dumped or burned at
an incinerating plant without danger!
About the materials: The plastics can be recycled and are identified as follows:
>PE< for polyethylene, e.g. the outer covering and the bags in the interior.
>PS< for polystyrene foam, e.g. the pads, which are all free of chlorofluo-
rocarbon.
Page 21

21
Verehrter Kunde!
Vielen Dank, dass Sie sich für eines unserer Qualitätsprodukte entschieden
haben.
Dieses Gerät bietet Ihnen eine perfekte Synthese aus funktionellem Design
und wegweisender Spitzentechnologie.
Überzeugen Sie sich selbst von dem Entwicklungsvorsprung unserer Produkte, die bei Leistungsfähigkeit und Bedienung eine absolute Spitzenposition einnehmen.
Besonderer Wert wurde zudem auf so wichtige Aspekte wie Umweltfreundlichkeit und Energieersparnis gelegt, die integraler Bestandteil aller unserer
Produkte sind.
Lesen Sie dieses Bedienhandbuch aufmerksam durch, um Ihr Gerät optimal
und über lange Zeit zuverlässig nutzen und alle Bedienvorgänge korrekt und
Zeit sparend ausführen zu können.
Bewahren Sie das Handbuch zur späteren Bezugnahme an einem sicheren
Ort auf und händigen Sie es im Verkaufsfall dem zukünftigen Besitzer aus.
Wir wünschen Ihnen viel Freude mit Ihrem neuen Gerät.
Folgende Symbolen werden im Text verwendet:
wichtige Hinweise für Ihre Sicherheit oder für die Funktionsfähigkeit des Gerätes
Hinweise und praktische Tipps
Umweltinformationen
60
Safety
The safety aspects of our appliance comply with accepted technical standards and the German Appliance Safety Law. Nevertheless, we consider it
our obligation to make you aware of the following safety information:
Intended use
• The appliance is intended for use in the home. It is suitable for the cooling, freezing and storing of frozen food, as well as for making ice. If the
appliance is used for purposes other than those intended or used incorrectly, no liability can be accepted by the manufacturer for any damage
that may be caused.
• Alterations or changes to the appliance are not permitted for reasons of
safety.
• If you use the appliance in a commercial application or forpurposes other
than the cooling, freezing or frozen storage of foods,please observe all
valid legal regulations for your application.
Prior to initial start–up
• Check the appliance for transport damage. Under no circumstance should
a damaged appliance be plugged in! In the event of damage, please contact
the vendor.
Refrigerant
The refrigerant isobutane (R600a) is contained within the refrigerant circuit
of the appliance, a natural gas with a high level of environmental compatibility, which is nevertheless flammable.
• During transportation and installation of the appliance, be certain that
none of the components of the refrigerant circuit become damaged.
• If the refrigerant circuit should become damaged:
– avoid open flames and sources of ignition;
– thoroughly ventilate the room in which the appliance is situated.
Safety of children
• Packaging (e.g. wraps, polystyrene) can be dangerous for children. There is
a risk of suffocation! Keep packaging material away from children!
• Please make old appliances unusable prior to disposal. Pull out the mains
plug, cut off the mains cable, break or remove spring or boltcatches, if fitted. By doing this you ensure that children cannot lock themselves in the
appliance when playing (there is risk of suffocation!)or get themselves
into other dangerous situations.
• Often children cannot recognise the hazards present in household
appliances. It is therefore important that you ensure adequate supervision
and never let children play with the appliance!
Page 22

22
Inhalt
Sicherheit . . . . . . . . . . . . . . . . . . . . . . . . . . . . . . . . . . . . . . . . . . . . . 23
Entsorgung . . . . . . . . . . . . . . . . . . . . . . . . . . . . . . . . . . . . . . . . . . . . 24
Information zur Geräteverpackung . . . . . . . . . . . . . . . . . . . . . . . . . . . . .24
Entsorgung von Altgeräten . . . . . . . . . . . . . . . . . . . . . . . . . . . . . . . . . . .25
Transportschutz entfernen . . . . . . . . . . . . . . . . . . . . . . . . . . . . . . . .25
Türgriffe montieren . . . . . . . . . . . . . . . . . . . . . . . . . . . . . . . . . . . . . . . . . .26
Aufstellen . . . . . . . . . . . . . . . . . . . . . . . . . . . . . . . . . . . . . . . . . . . . . 26
Aufstellort . . . . . . . . . . . . . . . . . . . . . . . . . . . . . . . . . . . . . . . . . . . . . . . . . 26
Ihr Gerät braucht Luft . . . . . . . . . . . . . . . . . . . . . . . . . . . . . . . . . . . . . . .25
Abstandstücke . . . . . . . . . . . . . . . . . . . . . . . . . . . . . . . . . . . . . . . . . . . . . .27
Türanschlag wechseln . . . . . . . . . . . . . . . . . . . . . . . . . . . . . . . . . . . . . . . .28
Elektrischer Anschluß . . . . . . . . . . . . . . . . . . . . . . . . . . . . . . . . . . . .30
Vor Inbetriebnahme . . . . . . . . . . . . . . . . . . . . . . . . . . . . . . . . . . . . . .30
Inbetriebnahme und Temperaturregelung . . . . . . . . . . . . . . . . . . . .31
Innenausstattung . . . . . . . . . . . . . . . . . . . . . . . . . . . . . . . . . . . . . . . .31
Abstellflächen . . . . . . . . . . . . . . . . . . . . . . . . . . . . . . . . . . . . . . . . . . . . . .31
Variable Innentür . . . . . . . . . . . . . . . . . . . . . . . . . . . . . . . . . . . . . . . . . . . .32
Flaschenablage . . . . . . . . . . . . . . . . . . . . . . . . . . . . . . . . . . . . . . . . . . . . . .32
Richtig lagern . . . . . . . . . . . . . . . . . . . . . . . . . . . . . . . . . . . . . . . . . .33
Einfrieren und Tiefkühllagern . . . . . . . . . . . . . . . . . . . . . . . . . . . . . .33
Eiswürfel bereiten . . . . . . . . . . . . . . . . . . . . . . . . . . . . . . . . . . . . . . .34
Gefrierkalender . . . . . . . . . . . . . . . . . . . . . . . . . . . . . . . . . . . . . . . . .34
Abtauen . . . . . . . . . . . . . . . . . . . . . . . . . . . . . . . . . . . . . . . . . . . . . . .35
Gerät abschalten . . . . . . . . . . . . . . . . . . . . . . . . . . . . . . . . . . . . . . . .35
Reinigung und Pflege . . . . . . . . . . . . . . . . . . . . . . . . . . . . . . . . . . . .36
Tips zur Energie-Einsparung . . . . . . . . . . . . . . . . . . . . . . . . . . . . . . .37
Was tun, wenn . . . . . . . . . . . . . . . . . . . . . . . . . . . . . . . . . . . . . . . . . .37
Abhilfe bei Störungen . . . . . . . . . . . . . . . . . . . . . . . . . . . . . . . . . . . . . . . .37
Lampe auswechseln . . . . . . . . . . . . . . . . . . . . . . . . . . . . . . . . . . . . . . . . . .39
Bestimmungen, Normen, Richtlinien . . . . . . . . . . . . . . . . . . . . . . . .39
59
Contents
Safety . . . . . . . . . . . . . . . . . . . . . . . . . . . . . . . . . . . . . . . . . . . . . . . . .60
Disposal . . . . . . . . . . . . . . . . . . . . . . . . . . . . . . . . . . . . . . . . . . . . . . .61
Appliance Packaging Information . . . . . . . . . . . . . . . . . . . . . . . . . . . . . .61
Disposal of old Appliances . . . . . . . . . . . . . . . . . . . . . . . . . . . . . . . . . . . .62
Remove transport safeguard . . . . . . . . . . . . . . . . . . . . . . . . . . . . . . .62
Fitting the door handles . . . . . . . . . . . . . . . . . . . . . . . . . . . . . . . . . . . . . .63
Rear spacers . . . . . . . . . . . . . . . . . . . . . . . . . . . . . . . . . . . . . . . . . . . . . . . .63
Installation . . . . . . . . . . . . . . . . . . . . . . . . . . . . . . . . . . . . . . . . . . . . .64
Installation Location . . . . . . . . . . . . . . . . . . . . . . . . . . . . . . . . . . . . . . . . .64
Your appliance needs air . . . . . . . . . . . . . . . . . . . . . . . . . . . . . . . . . . . . .64
Rehingeing the door . . . . . . . . . . . . . . . . . . . . . . . . . . . . . . . . . . . . . . . . .65
Electrical Connection . . . . . . . . . . . . . . . . . . . . . . . . . . . . . . . . . . . . .67
Prior to Initial Start–Up . . . . . . . . . . . . . . . . . . . . . . . . . . . . . . . . . .67
Starting up and temperature regulation . . . . . . . . . . . . . . . . . . . . .67
Interior Accessories . . . . . . . . . . . . . . . . . . . . . . . . . . . . . . . . . . . . . .68
Storage shelves . . . . . . . . . . . . . . . . . . . . . . . . . . . . . . . . . . . . . . . . . . . .68
Variable Inner Door . . . . . . . . . . . . . . . . . . . . . . . . . . . . . . . . . . . . . . . . . .68
Bottle rack . . . . . . . . . . . . . . . . . . . . . . . . . . . . . . . . . . . . . . . . . . . . . . . . .69
Fresh food refrigeration . . . . . . . . . . . . . . . . . . . . . . . . . . . . . . . . . .70
Freezing and storing frozen food . . . . . . . . . . . . . . . . . . . . . . . . . . .70
Preparation of Ice Cubes . . . . . . . . . . . . . . . . . . . . . . . . . . . . . . . . . .71
Freezing Calender . . . . . . . . . . . . . . . . . . . . . . . . . . . . . . . . . . . . . . . .71
Defrosting . . . . . . . . . . . . . . . . . . . . . . . . . . . . . . . . . . . . . . . . . . . . .72
Switching off the appliance . . . . . . . . . . . . . . . . . . . . . . . . . . . . . . .72
Cleaning and Care . . . . . . . . . . . . . . . . . . . . . . . . . . . . . . . . . . . . . . .73
Energy Saving Tips . . . . . . . . . . . . . . . . . . . . . . . . . . . . . . . . . . . . . . .74
What to do if . . . . . . . . . . . . . . . . . . . . . . . . . . . . . . . . . . . . . . . . . . .74
Correcting Malfunctions . . . . . . . . . . . . . . . . . . . . . . . . . . . . . . . . . . . . . .74
Changing the light bulb . . . . . . . . . . . . . . . . . . . . . . . . . . . . . . . . . . . . . .76
Regulations, Standards, Guidelines . . . . . . . . . . . . . . . . . . . . . . . . .76
Page 23

23
Sicherheit
Die Sicherheit unserer Kältegeräte entspricht den anerkannten Regeln der
Technik und dem Gerätesicherheitsgesetz. Dennoch sehen wir uns veranlaßt, Sie mit folgenden Sicherheitshinweisen vertraut zu machen:
Bestimmungsgemäße Verwendung
• Das Kältegerät ist für die Verwendung im Haushalt bestimmt. Es eignet
sich zum Kühlen, Einfrieren und Tiefkühllagern von Lebens-mitteln sowie
zur Eisbereitung. Wird das Gerät zweckentfremdet oder falsch bedient,
kann vom Hersteller keine Haftung für eventuelle Schäden übernommen
werden.
• Umbauten oder Veränderungen am Kältegerät sind aus Sicherheitsgründen nicht zulässig.
• Sollten Sie das Kältegerät gewerblich oder für andere Zwecke als zum
Kühlen, Tiefkühllagern und Einfrieren von Lebensmitteln benutzen, beachten Sie bitte die für Ihren Bereich gültigen gesetzlichen Bestimmungen.
Vor der ersten Inbetriebnahme
• Überprüfen Sie das Kältegerät auf Transportschäden. Ein beschädigtes
Gerät auf keinen Fall anschließen! Wenden Sie sich im Schadensfall bitte
an den Lieferanten.
Kältemittel
Das Gerät enthält im Kältemittelkreislauf das Kältemittel Isobutan (R600a),
ein Naturgas mit hoher Umweltverträglichkeit, das jedoch brennbar ist.
• Achten Sie beim Transportieren und Aufstellen des Gerätes darauf, daß
keine Teile des Kältemittelkreislaufs beschädigt werden.
• Bei Beschädigung des Kältemittelkreislaufs:
– offenes Feuer und Zündquellen unbedingt vermeiden;
– den Raum, in dem das Gerät steht, gut durchlüften.
Sicherheit von Kindern
• Verpackungsteile (z. B. Folien, Styropor) können für Kinder gefährlich
sein. Erstickungsgefahr! Verpackungsmaterial von Kindern fernhalten!
• Ausgediente Altgeräte bitte vor der Entsorgung unbrauchbar machen.
Netzstecker ziehen, Netzkabel durchtrennen, eventuell vorhandene Schnapp- oder Riegelschlösser entfernen oder zerstören. Dadurch verhindern
Sie, daß sich spielende Kinder im Gerät einsperren (Erstickungsgefahr!)
oder in andere lebensgefährliche Situationen geraten.
• Kinder können Gefahren, die im Umgang mit Haushaltsgeräten liegen, oft
nicht erkennen. Sorgen Sie deshalb für die notwendige Aufsicht und lassen Sie Kinder nicht mit dem Gerät spielen!
Im Alltagsbetrieb
• Behälter mit brennbaren Gasen oder Flüssigkeiten können durch Käl-
58
Dear Customer
Thank you for choosing one of our high-quality products.
With this appliance you will experience the perfect combination of func-
tional design and cutting edge technology.
Convince yourself that our appliances are engineered to deliver the best
performance and control - indeed we are setting the highest standards of
excellence.
In addition to this you find environmental and energy saving aspects as an
integral part of our products.
To ensure optimal and regular performance of your appliance please read
this instruction manual carefully. It will enable you to navigate all processes
perfectly and most efficiently.
To refer to this manual any time you need to, we recommend you to keep
it in a safe place. And please pass it to any future owner of the appliance.
We wish you much joy with your new appliance.
The following symbols are used in this manual
Important information concerning your personal safety and information on
how to avoid damaging the appliance
General information and tips
Environmental information
 Loading...