

Page 1

SANTO 70260 DT
Dubbeldeurs-koelautomaat
Fridge freezer
Køleskab med frostboks
Gebruiksaanwijzing
Operating Instructions
Brugsanvisning
AEG Hausgeräte GmbH
Postfach 1036
D-90327 Nürnberg
http://www.aeg.hausgeraete.de
Wijzigingen voorbehouden
© Copyright by AEG Subject to change without notice
2223 033-51 04/05 Ret til ændringer uden varsel forbeholders
Page 2
18
Dear customer,
Before placing your appliance into operation please read these operating
instructions carefully. They contain important information for safe use, for
installation and for care of the appliance.
Please keep these operating instructions for future reference. Pass them on
to possible new owners of the appliance.
Notes which are important for your safety or for the proper functioning of
the appliance are stressed with a warning triangle and/or with signal words
(Warning!, Caution!, Attention!). Please observe the following carefully.
Supplementary information regarding operation and practical applications
of the appliance appear after this symbol.
Tips and notes concerning economical and environmentally sound use of
the appliance are marked with the flower.
The operating instructions contain instructions for the correction of possible malfunctions by the user in the section "What to do if ...". If these
instructions should not be sufficient, our customer service department is
always available to you.
Printed on paper manufactured with environmentally sound processes.
who thinks ecologically acts accordingly ...
39
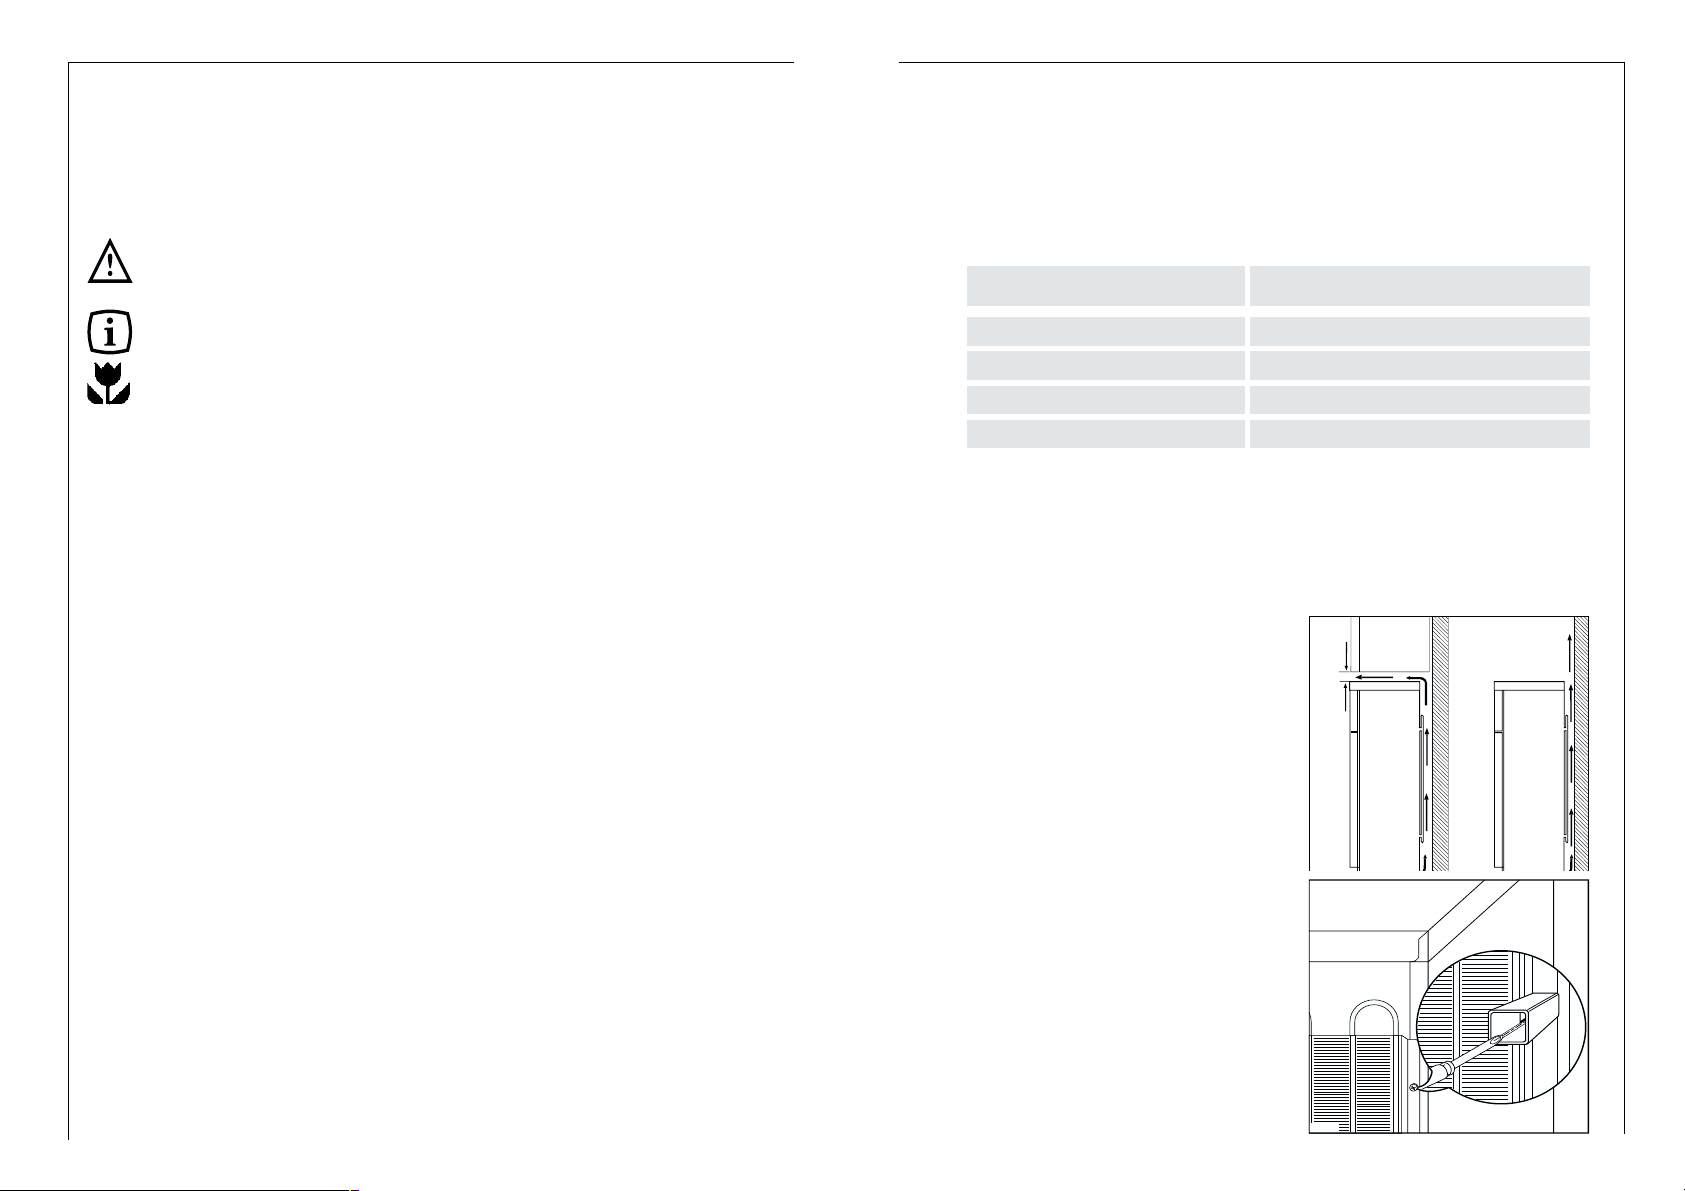
Skabet behøver luft
Der tilføres luft fortil under døren, og
der udluftes opad langs bagbeklædningen. For at sikre fri luftcirkulation
må der ikke dækkes eller spærres for
disse ventilationsåbninger.
Vigtigt! Hvis skabet opstilles under fx
et højtsiddende skab, skal der holdes
en afstand på mindst 10 cm mellem
den øverste kant på skabet og det
derover placerede skab eller lignende
Bagerste afstandsstykker
I posen med det skriftlige materiale
finder De to afstandsstykker, som
skal monteres på de to hjørner af
toppladen bag på skabet.
Dette gøres ved at løsne skruerne,
placere afstandsstykkerne under
skruehovederne, og til sidst skrue
skruerne fast igen.
PR153
Klimaklasse for omgivelsestemperaturen af
SN +10 til +32 °C
N +16 til +32 °C
ST +18 til +38 °C
T +18 til +43 °C
Hvis skabet skal opstilles ved siden af en varmekilde, skal følgende minimumsafstande overholdes til siderne:
– til elkomfur 3 cm;
Hvis denne afstand ikke kan overholdes, skal der indsættes en varmeisole-
ringsplade mellem komfur og køleskab.
– ikke stå ved radiatorer, ved komfur eller andre varmekilder;
– kun placeres et sted, hvis omgivelsestemperatur svarer til den klimaklasse,
som maskinen er konstrueret til.
Klimaklassen står på typeskiltet, som er anbragt til venstre inde i skabet.
Den efterfølgende tabel viser til hvilken klimaklasse omgivelsestemperatu-
ren er tildelt:
100 mm
mm
mm
Page 3
19
Contents
Safety . . . . . . . . . . . . . . . . . . . . . . . . . . . . . . . . . . . . . . . . . . . . . . . . .20
Disposal . . . . . . . . . . . . . . . . . . . . . . . . . . . . . . . . . . . . . . . . . . . . . . .21
Appliance Packaging Information . . . . . . . . . . . . . . . . . . . . . . . . . . . . . .21
Disposal of old Appliances . . . . . . . . . . . . . . . . . . . . . . . . . . . . . . . . . . . .22
Remove transport safeguard . . . . . . . . . . . . . . . . . . . . . . . . . . . . . . .22
Installation . . . . . . . . . . . . . . . . . . . . . . . . . . . . . . . . . . . . . . . . . . . . .22
Installation Location . . . . . . . . . . . . . . . . . . . . . . . . . . . . . . . . . . . . . . . . .22
Your appliance needs air . . . . . . . . . . . . . . . . . . . . . . . . . . . . . . . . . . . . .23
Rear spacers . . . . . . . . . . . . . . . . . . . . . . . . . . . . . . . . . . . . . . . . . . . . . . . .23
Rehingeing the door . . . . . . . . . . . . . . . . . . . . . . . . . . . . . . . . . . . . . . . . .24
Electrical Connection . . . . . . . . . . . . . . . . . . . . . . . . . . . . . . . . . . . . .25
Prior to Initial Start–Up . . . . . . . . . . . . . . . . . . . . . . . . . . . . . . . . . .25
Starting up and temperature regulation . . . . . . . . . . . . . . . . . . . . .26
Interior Accessories . . . . . . . . . . . . . . . . . . . . . . . . . . . . . . . . . . . . . .26
Storage shelves . . . . . . . . . . . . . . . . . . . . . . . . . . . . . . . . . . . . . . . . . . . .26
Variable Inner Door . . . . . . . . . . . . . . . . . . . . . . . . . . . . . . . . . . . . . . . . . .26
Fresh food refrigeration . . . . . . . . . . . . . . . . . . . . . . . . . . . . . . . . . .27
Freezing and storing frozen food . . . . . . . . . . . . . . . . . . . . . . . . . . .27
Preparation of Ice Cubes . . . . . . . . . . . . . . . . . . . . . . . . . . . . . . . . . .28
Freezing Calender . . . . . . . . . . . . . . . . . . . . . . . . . . . . . . . . . . . . . . .28
Defrosting . . . . . . . . . . . . . . . . . . . . . . . . . . . . . . . . . . . . . . . . . . . . .29
Switching off the appliance . . . . . . . . . . . . . . . . . . . . . . . . . . . . . . .29
Cleaning and Care . . . . . . . . . . . . . . . . . . . . . . . . . . . . . . . . . . . . . . .30
Energy Saving Tips . . . . . . . . . . . . . . . . . . . . . . . . . . . . . . . . . . . . . . .31
What to do if . . . . . . . . . . . . . . . . . . . . . . . . . . . . . . . . . . . . . . . . . . .32
Correcting Malfunctions . . . . . . . . . . . . . . . . . . . . . . . . . . . . . . . . . . . . . .32
Changing the light bulb . . . . . . . . . . . . . . . . . . . . . . . . . . . . . . . . . . . . . .33
Regulations, Standards, Guidelines . . . . . . . . . . . . . . . . . . . . . . . . .33
38
Advarsel! Udtjente apparater skal gøres ubrugelige inden kasseringen. Netstikket trækkes ud, netledningen skæres igennem, eventuelt forhåndenværende smæk- eller skydelåse fjernes og ødelægges. Derved forhindres, at
legende børn låser sig inde i apparatet (fare for kvælning!) eller kommer i
andre livsfarlige situationer.
Kasseringshenvisninger:
• Skabet må ikke kasseres med det normale affald eller storskrald.
• Kølemiddelkredsløbet, især varmeveksleren på bagsiden af skabet, må ikke
beskadiges.
• Symbolet på produktet eller på pakken angiver, at dette produkt ikke
må behandles som husholdningsaffald. Det skal i stedet overgives til en
affaldsstation for behandling af elektrisk og elektronisk udstyr.Ved at sørge for at dette produkt bliver bortskaffet på den rette måde, hjælper du
med til at forebygge eventuelle negative påvirkninger af miljøet og af
personers helbred, der ellers kunne forårsages af forkert bortskaffelse af
dette produkt. Kontakt det lokale kommunekontor, affaldsselskab eller
den forretning, hvor produkt er købt, for yderligere oplysninger om
genanvendelse af dette produkt.
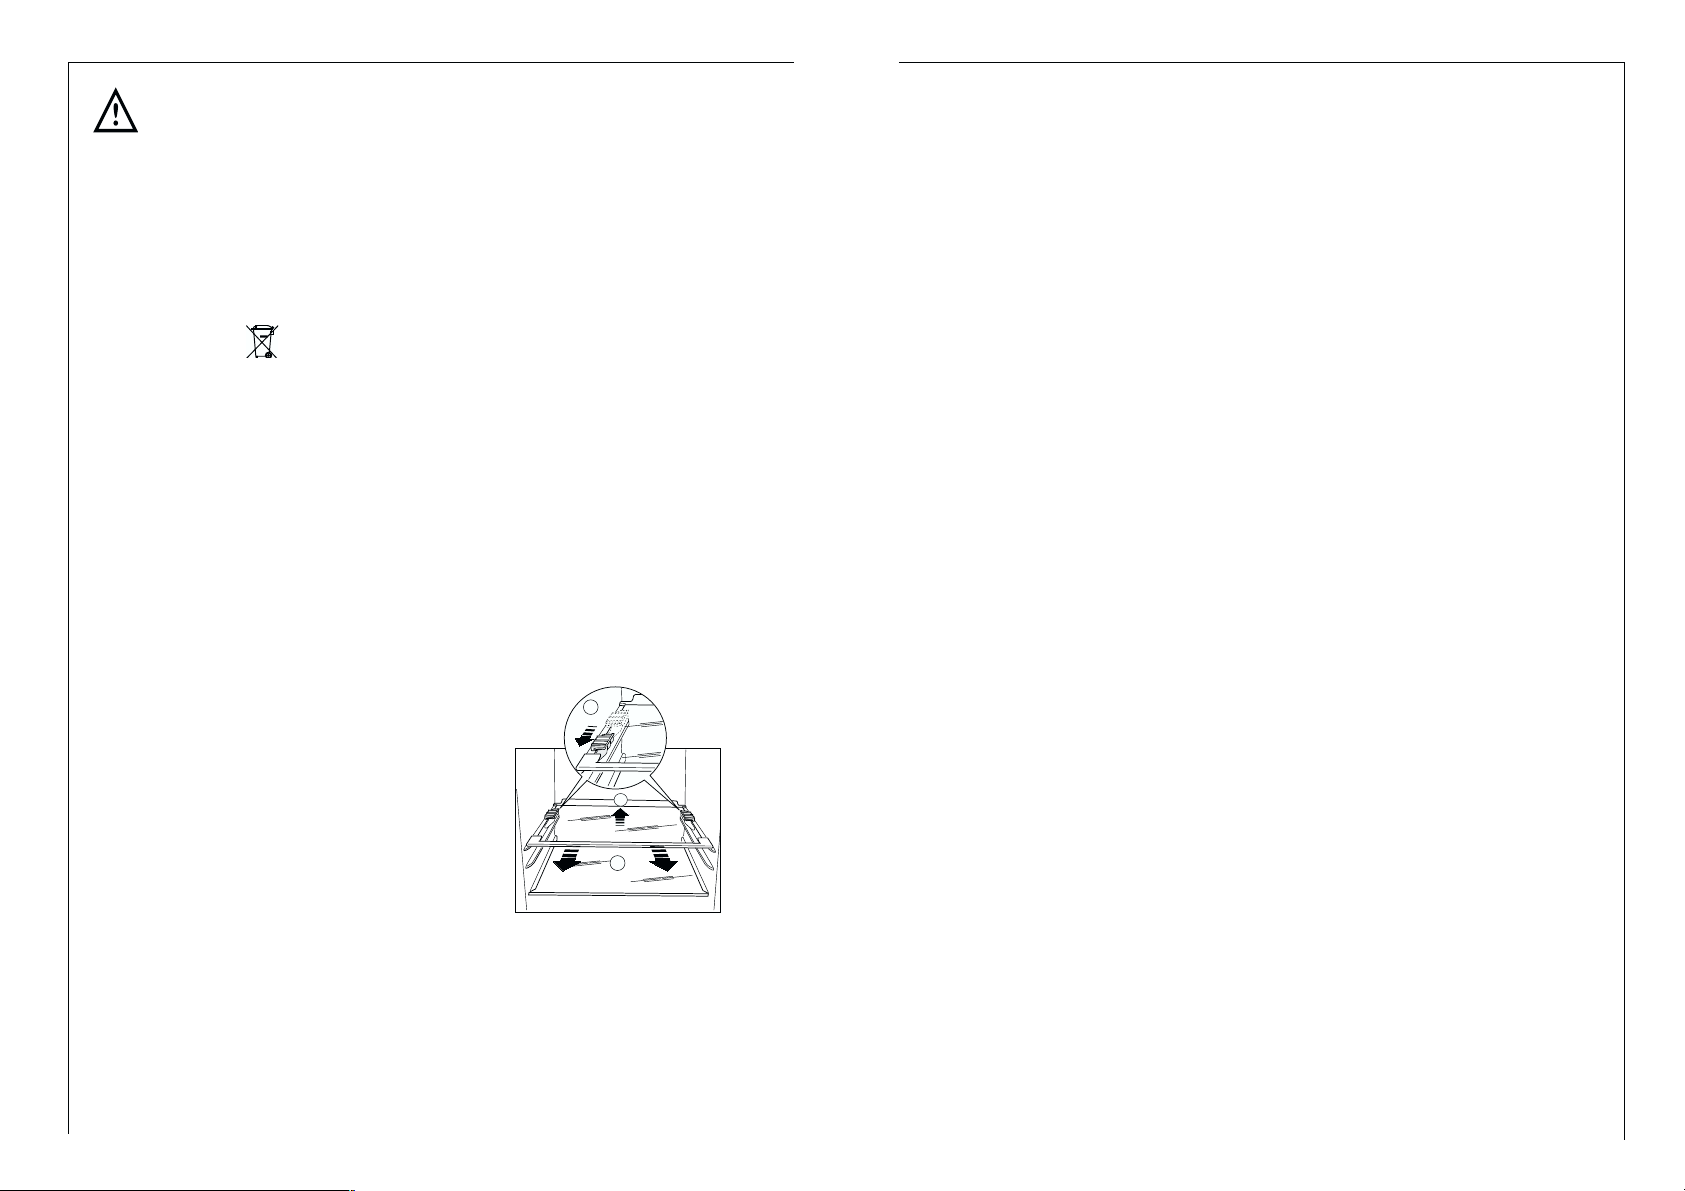
Fjernelse af transportsikring
Skabet såvel som dele af den indre indretning er sikret til transporten.
Fjern alt tape og polsterdele inde i skabet.
Hyldestop
Apparatet er udstyret med hyldestop,
som gør det muligt at blokere
hylderne i forbindelse med transport.
Flyt hyldestoppene i pilens retning.
Løft den bageste del af glashylden
og pres den fremad, indtil den
frigøres. Fjern herefter stoppene.
Opstilling
Opstillingssted
Skabet skal opstilles i et godt ventileret og tørt rum.
Omgivelsestemperaturen har indflydelse på elforbruget.
Derfor bør skabet
– ikke udsættes for direkte solindstråling;
A
C
B
Page 4
20
Safety
The safety aspects of our appliance comply with accepted technical standards and the German Appliance Safety Law. Nevertheless, we consider it
our obligation to make you aware of the following safety information:
Intended use
• The appliance is intended for use in the home. It is suitable for the cooling, freezing and storing of frozen food, as well as for making ice. If the
appliance is used for purposes other than those intended or used incorrectly, no liability can be accepted by the manufacturer for any damage
that may be caused.
• Alterations or changes to the appliance are not permitted for reasons of
safety.
• If you use the appliance in a commercial application or forpurposes other
than the cooling, freezing or frozen storage of foods,please observe all
valid legal regulations for your application.
Prior to initial start–up
• Check the appliance for transport damage. Under no circumstance should
a damaged appliance be plugged in! In the event of damage, please contact
the vendor.
Refrigerant
The refrigerant isobutane (R600a) is contained within the refrigerant circuit
of the appliance, a natural gas with a high level of environmental compatibility, which is nevertheless flammable.
• During transportation and installation of the appliance, be certain that
none of the components of the refrigerant circuit become damaged.
• If the refrigerant circuit should become damaged:
– avoid open flames and sources of ignition;
– thoroughly ventilate the room in which the appliance is situated.
Safety of children
• Packaging (e.g. wraps, polystyrene) can be dangerous for children. There is
a risk of suffocation! Keep packaging material away from children!
• Please make old appliances unusable prior to disposal. Pull out the mains
plug, cut off the mains cable, break or remove spring or boltcatches, if fitted. By doing this you ensure that children cannot lock themselves in the
appliance when playing (there is risk of suffocation!)or get themselves
into other dangerous situations.
• Often children cannot recognise the hazards present in household
appliances. It is therefore important that you ensure adequate supervision
and never let children play with the appliance!
37
Kassering
Information om apparatets emballering
Alle anvendte materialer er miljøvenlige! De kan uden videre kasseres eller
forbrændes i affaldsdestruktionsovne!
Om materialerne: Kunststofferne kan også genanvendes og de er markerede på følgende måde:
>PE< for polyætylen, f.eks. den ydre emballage og poserne indeni.
>PS< for skummet polystyren, f.eks. ved polsterdelene, principielt uden CFC.
Kartondelene fremstilles af genbrugspapir og bør også afleveres til genbrug
igen.
Kassering af gamle apparater
Af miljømæssige årsager skal skabet kasseres på en faglig korrekt måde. Dette gælder for Deres tidligere skab og – når det en skønne dag ikke mere kan
bruges – også for Deres nye skab.
bare stoffer som f.eks. spraydåser, gas til lightere etc. i skabet.
• Flasker og dåser må ikke komme i fryserummet. De kan revne, når indholdet fryser – ved kulsyreholdigt indhold endda eksplodere! Læg aldrig saftevand, juice, øl, vin, champagne osv. ind i fryserummet. Undtagelse: Snaps med højt spiritusindhold kan opbevares i fryserummet.
• Is og isterninger må ikke tages i munden med det samme, når de lige er
taget ud af fryserummet. Meget koldt is kan fryse fast til læber eller tunge og forårsage men.
• Rør ikke ved dybfrostvarer med våde hænder. Det er muligt, at hænderne
ellers fryser fast på dem.
• Anvend ingen elektriske apparater (f.eks. elektriske ismaskiner, røremaskiner etc.) i skabet.
• Inden rengøring skal skabet principielt frakobles og netstikket trækkes ud
eller sikringen frakobles hhv. drejes ud.
• Træk altid netstikket ud ved stikket, aldrig ved hjælp af ledningen.
Ved fejl
• Skulle en fejl forekomme i skabet, så se venligst først efter i "Afhjælpning
af fejl" i denne brugsanvisning. Hvis henvisningerne der ikke kan hjælpe
videre, foretag intet yderligere arbejde på egen hånd.
• Reparationer af skabet må kun foretages af en fagmand. Usagkyndige
reparationer kan medføre betydelig risiko for brugeren. Ved reparationer
bør De derfor kontakte Deres fagforhandler eller vor kundeservice.
Page 5

21
Daily Operation
• Containers with flammable gases or liquids can leak at low temperatures.
There is a risk of an explosion! Do not store any containers with flammable materials such as, for example, spray cans, fire extinguisher refill cartridges etc in the refrigerator/freezer.
• Bottles and cans must not be placed in the freezer compartment. They can
burst when the contents freeze, high carbonate content drinks can even
explode! Never store lemonade, juices, beer, wine, sparkling wine etc. in
the freezer compartment. Exception: high alcohol content spirits can be
stored in the freezer compartment.
• Do not put ice creams or ice cubes in the mouth immediately after removal from the freezer compartment. Very cold ice can freeze to the lips or
tongue and cause injury.
• Do not touch frozen food with wet hands. Your hands could freeze to the
food.
• Do not operate any electrical appliances in the refrigerator/freezer (e.g.
electric ice cream makers, mixers etc.).
• Before cleaning the appliance, always switch off the appliance and unplug
it, or pull the house fuse or switch off the circuit breaker.
• When unplugging always pull the plug from the mains socket, do not pull
on the cable.
In case of malfunction
• If the a malfunction occurs on the appliance, please look first in the "What
to do if ..." section of these instructions. If the information given there
does not help, please do not perform any further repairs yourself.
• Applianeces may only be repaired by qualified service engineers. Improper
repairs can give rise to significant hazards. If your appliance needs repairing, please contact your specialist dealer or our Customer Service.
Disposal
Appliance Packaging Information
All materials are environmentally sound! They can be dumped or burned at
an incinerating plant without danger!
About the materials: The plastics can be recycled and are identified as follows:
>PE< for polyethylene, e.g. the outer covering and the bags in the interior.
>PS< for polystyrene foam, e.g. the pads, which are all free of chlorofluo-
rocarbon.
The carton parts are made from recycled paper and should be disposed of
at a waste-paper recycling collection location.
36
Sikkerhed
Sikkerheden af vore skabe svarer til teknikkens anerkendte regler og
sikkerhedsloven for skabe. Alligevel føler vi os forpligtede til at gøre Dem
kendt med de efterfølgende sikkerhedshenvisninger:
Formålsbestemt anvendelse
• Skabet er beregnet til brug i normale husholdninger. Det er egnet til køling
af fødevarer. Hvis skabet anvendes til andet end det oprindelige formål
eller betjenes forkert, overtager fabrikanten ingen ansvar for eventuelle
skader.
• Ombygninger eller forandringer af skabet er af sikkerhedsgrunde ikke tilladte.
• Hvis De skulle anvende skabet industrielt eller til andre formål end køling
af fødevarer, bedes De iagttage de lokalt gældende lovlige bestemmelser.
Før ibrugtagning første gang
• Skabet skal kontrolleres for transportskader. Et beskadiget skab må under
ingen omstændigheder tilsluttes! Henvend Dem ved skadestilfælde venligst til leverandøren.
Kølemiddel
Apparatet indeholder kølemidlet Isobutan (R600a) i kølemiddelkredsløbet,
en naturgas, der ikke skader miljøet, men som kan brænde.
• Ved transport og opstilling af apparatet skal du være opmærksom på, at
der ikke beskadiges nogle dele i kølemiddelkredsløbet.
• Ved beskadigelse af kølemiddelkredsløbet:
– hold ild og antændingskilder væk;
– udluft rummet, hvor apparatet står, grundigt.
Sikkerhed af børn
• Emballagedele (f.eks. folier, styropor) kan være farlige for børn. Fare for
kvælning! Hold emballagedele borte fra børn !
• Udtjente apparater skal gøres ubrugelige inden kasseringen. Netstikket
trækkes ud, netledningen skæres igennem, eventuelt forhåndenværende
smæk- eller skydelåse fjernes og ødelægges. Derved forhindres, at legende børn låser sig inde i apparatet (fare for kvælning!) eller kommer i andre
livsfarlige situationer.
• Børn er ikke opmærksomme på faren i forbindelse med elektriske apparater. Hold dem derfor under opsyn og lad dem aldrig lege med skabet.
I den daglige brug
• Beholdere med brændbare gasser og væsker kan blive utætte ved kuldeindvirkning. Fare for eksplosion! Opbevar ingen beholdere med brænd-
Page 6

22
Disposal of old Appliances
For environmental reasons, refrigeration appliances must be disposed of
properly. This applies to your old appliance, and - at the end of its service
life - for your new appliance as well.
Warning! Before disposing of old appliances make them inoperable. Remove plug from mains, sever the power cable, remove or destroy any snap or
latch closures. This eliminates the danger that playing children lock themselves into the appliance (danger of suffocation!) or place themselves into
other life-endangering situations.
Disposal:
• The appliance may not be disposed of with domestic waste or bulky refuse.
• The refrigerant circuit, especially the heat exchanger at the back of the
appliance, may not be damaged.
• The symbol on the product or on its packaging indicates that
this product may not be treated as household waste. Instead it shall
be handed over to the applicable collection point for the recycling
of electrical and electronic equipment. By ensuring this product is
disposed of correctly, you will help prevent potential negative consequences for the environment and human health, which could
otherwise be caused by inappropriate waste handling of this product. For more detailed information about recycling of this product,
please contact your local city office, your household waste disposal
service or the shop where you purchased the product.
Remove transport safeguard
The appliance and the interior fittings are protected for transport.
• Remove all adhesive tape and packing pieces from the interior of the
appliance.
Your appliance is equipped with shelf
retainers that make it possible to
secure the shelves during transportation.
To remove them proceed as follows:
Move the shelf retainers in the direc-
tion of the arrow, raise the shelf from
the rear and push it forward until it
is freed and remove the retainers.
Installation
Installation Location
The appliance should be set up in a well ventilated, dry room.
Energy use is affected by the ambient temperature. The appliance should
therefore
35
Indhold
Sikkerhed . . . . . . . . . . . . . . . . . . . . . . . . . . . . . . . . . . . . . . . . . . . . .36
Kassering . . . . . . . . . . . . . . . . . . . . . . . . . . . . . . . . . . . . . . . . . . . . . .37
Information om apparatets emballering . . . . . . . . . . . . . . . . . . . . . . . .37
Kassering af gamle apparater . . . . . . . . . . . . . . . . . . . . . . . . . . . . . . . . .37
Fjernelse af transportsikring . . . . . . . . . . . . . . . . . . . . . . . . . . . . . . .38
Opstilling . . . . . . . . . . . . . . . . . . . . . . . . . . . . . . . . . . . . . . . . . . . . . .38
Opstillingssted . . . . . . . . . . . . . . . . . . . . . . . . . . . . . . . . . . . . . . . . . . . . .38
Skabet behøver luft . . . . . . . . . . . . . . . . . . . . . . . . . . . . . . . . . . . . . . . . .39
Bagerste afstandsstykker . . . . . . . . . . . . . . . . . . . . . . . . . . . . . . . . . . . . .39
Omhængsling af dørene . . . . . . . . . . . . . . . . . . . . . . . . . . . . . . . . . . . . . .40
Elektrisk tilslutning . . . . . . . . . . . . . . . . . . . . . . . . . . . . . . . . . . . . . .41
Inden brug . . . . . . . . . . . . . . . . . . . . . . . . . . . . . . . . . . . . . . . . . . . . .41
Ibrugtagning og termostat . . . . . . . . . . . . . . . . . . . . . . . . . . . . . . . .42
Indvendigt tilbehør . . . . . . . . . . . . . . . . . . . . . . . . . . . . . . . . . . . . . .43
Hylder . . . . . . . . . . . . . . . . . . . . . . . . . . . . . . . . . . . . . . . . . . . . . . . . . . . . .43
Variabel indvendig dør . . . . . . . . . . . . . . . . . . . . . . . . . . . . . . . . . . . . . . .43
Råd for køling . . . . . . . . . . . . . . . . . . . . . . . . . . . . . . . . . . . . . . . . . .43
Nedfrysning og dybfrostvarer . . . . . . . . . . . . . . . . . . . . . . . . . . . . . .44
Fremstilling af isterninger . . . . . . . . . . . . . . . . . . . . . . . . . . . . . . . . .45
Afrimning . . . . . . . . . . . . . . . . . . . . . . . . . . . . . . . . . . . . . . . . . . . . . .45
Rengøring og vedligeholdelse . . . . . . . . . . . . . . . . . . . . . . . . . . . . . .46
Slukning af skabet . . . . . . . . . . . . . . . . . . . . . . . . . . . . . . . . . . . . . . .47
Tips til energibesparelse . . . . . . . . . . . . . . . . . . . . . . . . . . . . . . . . . .48
Hvad skal man gøre, hvis ... . . . . . . . . . . . . . . . . . . . . . . . . . . . . . . .48
Afhjælpning ved fejl . . . . . . . . . . . . . . . . . . . . . . . . . . . . . . . . . . . . . . . . .48
Udskiftning af p
æ
re . . . . . . . . . . . . . . . . . . . . . . . . . . . . . . . . . . . . .49
Garanti . . . . . . . . . . . . . . . . . . . . . . . . . . . . . . . . . . . . . . . . . . . . . . . .50
Kundeservice . . . . . . . . . . . . . . . . . . . . . . . . . . . . . . . . . . . . . . . . . . .52
Bestemmelser, standarder, direktiver . . . . . . . . . . . . . . . . . . . . . . . .52
A
B
C
Page 7

23
Climate classification for an ambient temperature of
SN +10 bis +32 °C
N +16 bis +32 °C
ST +18 bis +38 °C
T +18 bis +43 °C
– not be exposed to direct sunlight;
– not be installed next to radiators, cookers or other sources of heat;
– only be installed at a location whose ambient temperature corresponds to
the climate classification, for which the appliance is designed.
The climate classification can be found on the serial plate, which is located
at the left on the inside of the appliance.
The following table shows which ambient temperature is correct for each
climate classification: each climate classification:
NP005
100 mm10 mm
10 mm
PR153
If installation next to a source of heat is unavoidable, the following
minimum clearances must be maintained at the sides of the appliance:
– for electric cookers 3 cm;
– for oil and coal fired ranges 30 cm.
If these clearances cannot be main-
tained a heat insulating pad is required between the cooker and the
refrigeration appliance.
If the refrigeration appliance is
installed next to another refrigerator
or freezer a clearance of 5 cm at the
sides is required, in order to prevent
the formation of condensation on
the outside of the appliance.
Your appliance needs air
For safety reasons, minimum ventilation must be as shown Fig.
Attention: keep ventilation openings clear of obstruction;
Rear spacers
In the bag with the documentation,
there are two spacers which must be
fitted.
Slacken the screws and insert the
spacer under the screw head, then
re-tighten the screws.
34
Kære kunde,
inden du tager det nye køleskab i brug, skal du læse denne brugsanvisning
grundigt. Den indeholder vigtige oplysninger om sikker brug, opstilling og
vedligeholdelse af apparatet.
Gem brugsanvisningen, så du kan slå op i den senere. Sørg for, at den
følger med apparatet, hvis det overdrages til andre.
Vha. en advarselstrekant og/eller vha. signaler (Advarsel!, Forsigtig!, Obs!)
gives der henvisninger, som er vigtige for din sikkerhed eller for apparatets
funktionsdygtighed. Disse skal overholdes.
Efter dette symbol får du supplerende oplysninger om betjening og prakti-
sk anvendelse af apparatet.
Tips og henvisninger vedr. økonomisk og miljørigtig brug af apparatet er
markeret med et trekløver.
For evt. fejl indeholder brugsanvisningen henvisninger om, hvad du selv kan
gøre for at afhjælpe, se afsnittet "Hvad skal man gøre, hvis ...". Hvis disse
henvisninger ikke er tilstrækkelige, står vores kundeservice altid til rådighed.
Trykt på miljøvenligt papir.
Den der tænker økologisk, handler også derefter...
Page 8

24
F
D
PR18
F
F
F
E
E
G
Rehingeing the door
The side at which the door opens can be changed from the right side (factory adjustment) to the left side, if the installation site requires.
Warning! When changing the side at which the door opens, the appliance
may not be connected to the mains. Remove plug from the mains beforehand.
Procced as follow:
1. Remove the clip-in ventilation grille
(D).
2. Remove the bottom hinge (E) by
unscrewing the fixing screws.
3. Slide the bottom door off the centre
hinge (H).
4. Remove the centre hinge and slide
the top door off pin (G); unscrew pin
(G) and refit it on the opposite side.
5. Remove the two plugs, to reveal the
holes for the hinge pivots, and
remount them on the other side.
6. Refit the top door and the centre
hinge (H) on the opposite side.
7. Refit the bottom door.
8. Using a 10 mm spanner, unscrew
the hinge pin (E) and reassemble it
on the opposite side of the hinge;
9. Refit bottom hinge (E) on the oppo-
site side, using the screws previously
removed.
10. Remove blanking cover (F) from ven-
tilation grille (D) by pushing it in the
direction of the arrow and refit it on
the opposite side.
11. Refit ventilation grille (D), clipping it
into place.
33
Changing the light bulb
Warning! There is a risk of electric shocks! Before changing the light bulb,
switch off the appliance and unplug it, or pull the fuse or the circuit breaker.
Light bulb data: 220-240 V, max. 15 W
1. To switch off the appliance, turn the temperature regulator to position "0".
2. Unplug the mains plug.
3. To change the light bulb, undo the
screw.
4. Press the light bulb cover as shown
and slide it backwards.
5. Change the defective light bulb.
6. Refit the light bulb cover and the
screw.
7. Put the refrigerator back into operation.
D411
Regulations, Standards, Guidelines
This appliance was designed for household use and was manufactured in
accordance with the appropriate standards. The necessary measures in
accordance with appliance safety legislation regulations (GSG), accident
prevention regulations for refrigeration appliances (VBG 20) and the regulations of the German Society of Electrical Engineers (VDE) were observed in
the manufacture of this appliance.
The refrigerant circuit has been checked for leaks.
This appliance is in accordance with the following EU guidelines:
– 73/23/EWG dated 19 February 1973 - low voltage guidelines.
– 89/336/EWG dated 3 May 1989
(including guideline change notice 92/31/EWG) - EMV guideline
H
Page 9

25
12. Dismantle the handles by sliding
the handle-cover, by unscrewing
its side and middle screws and
reassemble them on the opposite
side. Cover the holes left open
with the plugs contained in the
documentation pack.
Attention:
After having reversed the opening
direction of the doors check that all
the screws are properly tightened
and that the magnetic seal adheres
to the cabinet. If the ambient temperature is cold (i.e. in Winter), the
gasket may not fit perfectly to the
cabinet. in that case, wait for the
natural fitting of the gasket or accelerate this process by heating up the
part involved with a normal hairdrier.
Electrical connection
Before initial start-up, refer to the appliance rating plate to ascertain if supply voltage and current values correspond with those of the mains at the
installation location.
e.g.: AC 220 ... 240 V 50 Hz or
220 ... 240 V~ 50 Hz
(i.e. 220 to 240 volts alternating current, 50 Hertz)
The rating plate is inside the appliance on the left.
A correctly installed, earthed socket is required for the electrical supply. The
supply must have a fuse rating of at least 10 Amps.
If the socket is not accessible once the appliance is built in, the electrical
installation must include suitable means of isolating the appliance from the
mains (e.g. fuse, cut-out, current trip or similar with a minimum contact
separation of 3 mm).
Attention: The mains connection cable may only be replaced by a skilled
electrician. Please contact your dealer or our customer service department
for repairs.
Prior to Initial Start–Up
• Please clean the appliance interior and all accessories prior to initial start-
up (see section: “Cleaning and Care”).
1
2
32
Interior lighting does not
work.
Light bulb is defective. Please look in the "Changing
the Light Bulb" section.
Heavy build up of frost, possibly also on the door seal.
Door seal is not air tight (possibly after changing over the
hinges).
Carefully warm the leaking
sections of the door seal with
a hair dryer (not hotter than
approx. 50 °C). At the same
time shape the warmed door
seal by hand such that it sits
correctly.
Unusual noises.
The appliance is touching the
wall or other objects.
Appliance is not level.
A component, e.g. a pipe, on
the rear of the appliance is
touching another part of the
appliance or the wall.
The compressor starts after a
period of time.
This is normal, no error has
occurred.
The compressor does not start
immediately after changing
the temperature setting.
If necessary, carefully bend
the component out of the
way.
Move the appliance slightly.
Readjust the feet.
See the "Cleaning and Care"
section.
Water on the floor or on storage shelves.
Water drain hole is blocked.
Malfunction Possible Cause Remedy
The food is too warm.
The appliance is near a heat
source.
Temperature is not properly
adjusted.
Please look in the "Initial Start
Up" section.
Turn the temperature regula-
tor to a colder setting tempo-
rarily.
Door was open for an extended period.
Please look in the "Installation
location" section.
A large quantity of warm
food was placed in the
appliance within the last 24
hours.
Open the door only as long as
necessary.
Page 10

26
Starting up and temperature regulation
• Insert the plug of the connection lead into the plug socket with protective earth contact. When the refrigerator compartment door is opened, the
internal lighting is switched on. The temperature selector knob is located
on the RH side of the refrigerator compartment.
Setting „0“ means: Off.
Setting „1“ means: Hightest temperature, (warmest setting).
Setting „6“ (end-stop) means: Lowest temperature, (coldest setting).
However, the exact setting should be chosen keeping in the mind that the
temperature inside the refrigerator depends on:
-the quantity of food stored
-how often the door is opened
The temperatures in the refrigerator compartment and freezer co partment
cannot be independently regulated.
If you want the freeze fresh food rapidly, select setting „6“, ensuring that the
temperature in the refrigerator compartment does not drop blow 0°C. You
should also promptly reset the temperature regulator to setting „3“ or „4“.
Important!
High ambient temperatures (e.g. on hot summer days) and a cold setting on
the temperature regulator (position"5" to "6") can cause the compressor to
run continuously.
If this happens, turn the temperature regulator back to a warmer setting
(position "3" to "4"). At this setting the compressor will be switched on and
off as usual and automatic defrosting recommenced.
Interior Accessories
Storage Shelves
The glass shelf above the fruit and
vegetable compartment should
always remain in position, to ensure
fruit and vegetables stay fresh longer.
The remaining storage shelves can be
adjusted to various heights:
Pull the storage shelf forward until it
can be tipped up or down and removed. To insert at a different height
use the same procedure in reverse.
Variable Inner Door
The door compartments can be pulled up and removed, and inserted at
other positions as needed.
D338
31
Energy Saving Tips
• Do not install the appliance near cookers, radiators or other sources of
warmth. High ambient temperatures cause longer, more frequent operation of the compressor.
• Ensure sufficient air circulation and exhaust at the appliance base and at
the back wall of the appliance. Never cover air vent openings.
• Do not place warm foods into the appliance. Allow warm foods to cool
first.
• Only leave door open as long as necessary.
• Do not set temperature any colder than necessary.
• Put frozen food in the fridge to defrost. The cold in the frozen food will
then be used to cool the fridge.
• Keep the heat emitting condenser, the metall grille on the rear wall of
your appliance, always clean.
What to do if ...
Correcting Malfunctions
A malfunction may be caused by only a minor fault that you can rectify
yourself using the following instructions. Do not perform any other work on
the appliance if the following information does not provide assistance in
your specific case.
Warning! Repairs to refrigerators/freezers may only be performed by qualified service engineers. Improper repairs can give rise to significant hazards
for the user. If your appliance needs repairing, please contact your specialist dealer or our Customer Service.
Malfunction Possible Cause Remedy
Appliance does not work.
Appliance is not switched on Switch on the appliance.
Mains plug is not plugged in
or is loose.
Insert mains plug.
Fuse has blown or is defective.
Check fuse, replace if necessary.
Socket is defective.
Mains malfunctions are to be
corrected by an electrician.
Appliance cools too much. Temperature is set too cold.
Turn the temperature regulator to a warmer setting temporarily.
Page 11

27
Fresh food refrigeration
To obtain the best performance:
• do not store warm food or evaporating liquide in the refrigeator
• do cover or wrap the food, particularly if it has a strong flavour.
• Position food so that air can circuiate freely round it.
Useful hints:
Meat (all types): wrap in polythene bags and place on the glass shelf above
the vegetable drawer(s)For safety, store in this way only one or two days
at the most.
Cooked foods, cold dishes, etc: these should be covered and may be placed
on any shelf.
Fruit and vegetables: these should be thoroughly cleaned and placed in
the special drawer(s) provided.
Butter and cheese: these should be placed in special airtight containers or
wapped in aluminium foil or polythene bags to exclude as much air as possible.
Milk bootles: these should have a cap and should be stored in the bottle
rack on the door.
Bananas, potatoes, onions and garlic, if not packed, must not be kept in
the refrigerator.
Freezing and storing frozen food
You can use your freezer for freezing fresh food yourself.
Important!
• The temperature in the freezer compartment must be –18 °C or colder
before freezing food.
• Please observe the freezing capacity given on the rating plate. The freezing capacity is the maximum quantity of fresh food that can be frozen
within a period of 24 hours. If you wish to freeze food several days in a
row, please observe a maximum capacity of only 2/3 to 3/4 of that on the
rating plate. The quality of the food is best preserved when it is frozen
right through to the core as quickly as possible.
• Allow warm food to cool down before freezing. The warmth will cause
increased ice formation and increase the power consumption.
• Please note the maximum storage times specified by the manufacturer.
• Thawed foods which have not been processed further (cooked into meals)
may not under any circumstances be frozen a second time.
• Containers with flammable gases or liquids can leak at low temperatures.
There is a risk of an explosion! Do not store any containers with flamma-
30
5. Leave the door open to avoid the build up of odours.
Cleaning and Care
For hygienic reasons the appliance interior, including interior accessories,
should be cleaned regularly.
Warning!
• The appliance may not be connected to the mains during cleaning. Danger of electrical shock! Before cleaning switch the appliance offand rem
ve the plug from the mains, or switch off or turn out the circuit breaker
or fuse.
• Never clean the appliance with a steam cleaner. Moisture could accumulate in electrical components, danger of electrical shock! Hot vapours can
lead to the damage of plastic parts.
• The appliance must be dry before it is placed back into service.
Attention!
• Ethereal oils and organic solvents can attack plastic parts, e.g.
– lemon juice or the juice from orange peals;
– butyric acid;
– cleansers which contain acetic acid.
Do not allow such substances to come into contact with appliance parts.
• Do not use any abrasive cleansers.
1. Remove frozen food and the food from the refrigerator. Wrap frozen food
in several layers of newspaper. Store it in a cool place, well covered.
2. Defrost the freezer compartment prior to cleaning (see "Defrosting" section).
3. Switch the appliance off and remove the plug from the mains, or switch off
or turn out the circuit breaker or fuse.
4. Clean the appliance and the interior accessories with a cloth and lukewarm
water. Commercially available dish washing detergents may also be used.
5. After cleaning wipe with fresh water and rub dry.
Accumulation of dust at the condenser increases energy consumption. For
this reason carefully clean the condenser at the back of the appliance once
a year with a soft brush or a vacuum cleaner.
6. Check the water drain hole on the rear wall of the fridge. Clear a blocked
drain hole with the aid of the green peg included with the appliance.
7. After everything is dry place appliance back into service.
Page 12

28
ble materials such as, for example, spray cans, fire extinguisher refill cartridges etc in the refrigerator/freezer.
• Bottles and cans must not be placed in the freezer. They can burst when
the contents freeze, high carbonate content drinks can even explode!
Never store lemonade, juices, beer, wine, sparkling wine etc. in the freezer. Exception: high alcohol content spirits can be stored in the freezer.
• All foods must be packed air tight prior to freezing, so that they do not
dry out or lose their flavour, and so that no flavour contamination of
other frozen goods occurs.
• Not open the door frequently or leave it open longer than absolutely
necessary.
• Unfrozen food must not touch items already frozen, otherwise the frozen
food could begin to defrost.
Caution! Do not touch frozen food with wet hands. Your hands could freeze to the food.
1. Place the food to be frozen on the freezer shelf.
Preparation of Ice Cubes
1. Fill the ice cube tray 3/4 full with cold water, place it in the freezer compartment and leave to freeze.
2. To loosen the frozen cubes, either bend the ice cube tray or hold it under
running water for a few seconds.
Important! Never try to free an ice tray that is frozen to the freezer compartment using pointed or sharp edged objects.
Freezing Calendar
• The symbols show different types of frozen goods.
• The numbers indicate storage times in months for the appropriate types
of frozen goods. Whether the upper or lower value of the indicated storage time is valid depends on the quality of the foods and pre-treating before freezing. The lower value applies to foods with high fat content.
29
D037
Defrosting
Refrigerator
Frost is automatically eliminated
during normal use. The defrost water
drains out through a trough into a
special container at the back of the
appliance, where it evaporates.
We recommend that you peridically
clean the defrost-water drainage
outlet with the cleaner provided,
located in the center of the drainage
groove.
Freezer
The freezer compartment, will become progrssively covered with frost. This
should be removed with al plastic scraper. Whenever the tickness of the frost exceeds 4 mm complete defrosting should be carried out as follows:
1. pull out the plug from the wall socket or turn the thermostat knob to th “0”
setting.
2. remove any stored food, wrap it in several layers newspaper and put it in a
coll place.
3. leave the door open.
4. when defrosting is completed, dry the interior thoroughly
5. turn the thermostat knob to the required setting or raplace the plug in the
power socket.
Attention
Never use sharp metal tools to scrape off frost from the evaporator as you
could damage it.
Do not use a mechanical device or any artificial means to speed up the
thawing process other than those recommended by the manufacturer.
A temperature rise of the frozen food packs, during defrosting , may shorten their safe storage life.
Switching off the appliance
To switch off the appliance, turn the temperature regulator to position "0".
If the appliance is not going to be used for an extended period:
1. Remove all refrigerated and deep-frozen packages as well as ice trays.
2. Switch off the appliance .
3. Remove the mains plug or switch off or turn out the circuit breaker or fuse.
4. Defrost freezer compartment and clean thoroughly (see section: “Cleaning
and Care”).
 Loading...