

Page 1

S63600CMM1
EN FRIDGE FREEZER USER MANUAL 2
PT COMBINADO MANUAL DE INSTRUÇÕES 27
ES FRIGORÍFICO-CONGELADOR MANUAL DE INSTRUCCIONES 54
Page 2
www.aeg.com
2
CONTENTS
4 SAFETY INFORMATION
7 PRODUCT DESCRIPTION
8 CONTROL PANEL
11 DAILY USE
15 HELPFUL HINTS AND TIPS
17 CARE AND CLEANING
19 WHAT TO DO IF…
21 INSTALLATION
24 TECHNICAL DATA
25 NOISES
ENVIRONMENT CONCERNS
Recycle the materials with the symbol . Put the packaging in applicable containers to
recycle it.
Help protect the environment and human health and to recycle waste of electrical and
electronic appliances. Do not dispose appliances marked with the symbol
household waste. Return the product to your local recycling facility or contact your
municipal office.
with the
VISIT OUR WEBSITE FOR:
- Products
- Brochures
- User manuals
- Trouble shooter
- Service information
www.aeg.com
LEGEND
Warning - Important Safety information.
General information and tips
Environmental information
Subject to change without notice.
Page 3
FOR PERFECT RESULTS
Thank you for choosing this AEG product. We have created it to give you
impeccable performance for many years, with innovative technologies that help
make life simpler – features you might not find on ordinary appliances. Please spend
a few minutes reading to get the very best from it.
ACCESSORIES AND CONSUMABLES
In the AEG webshop, you’ll find everything you need to keep all your AEG
appliances looking spotless and working perfectly. Along with a wide range of
accessories designed and built to the high quality standards you would expect, from
specialist cookware to cutlery baskets, from bottle holders to delicate laundry bags…
ENGLISH
3
Visit the webshop at:
www.aeg.com/shop
CUSTOMER CARE AND SERVICE
We recommend the use of original spare parts.
When contacting Service, ensure that you have the following data available. The
information can be found on the rating plate.
Model
PNC
Serial Number
Page 4
www.aeg.com
4
SAFETY INFORMATION
In the interest of your safety and to ensure
the correct use, before installing and first
using the appliance, read this user manual
carefully, including its hints and warnings.
To avoid unnecessary mistakes and accidents, it is important to ensure that all
people using the appliance are thoroughly familiar with its operation and safety
features. Save these instructions and
make sure that they remain with the appliance if it is moved or sold, so that everyone using it through its life will be properly informed on appliance use and safety.
For the safety of life and property keep
the precautions of these user's instructions as the manufacturer is not responsible for damages caused by omission.
CHILDREN AND VULNERABLE
PEOPLE SAFETY
• This appliance is not intended for use
by persons (including children) with reduced physical, sensory or mental capabilities, or lack of experience and
knowledge, unless they have been given supervision or instruction concerning
use of the appliance by a person responsible for their safety.
Children should be supervised to ensure that they do not play with the appliance.
• Keep all packaging well away from children. There is risk of suffocation.
• If you are discarding the appliance pull
the plug out of the socket, cut the connection cable (as close to the appliance
as you can) and remove the door to
prevent playing children to suffer electric shock or to close themselves into it.
• If this appliance featuring magnetic
door seals is to replace an older appliance having a spring lock (latch) on the
door or lid, be sure to make that spring
lock unusable before you discard the
old appliance. This will prevent it from
becoming a death trap for a child.
GENERAL SAFETY
WARNING!
Keep ventilation openings, in the appliance enclosure or in the built-in structure,
clear of obstruction.
• The appliance is intended for keeping
foodstuff and/or beverages in a normal
household as explained in this instruction booklet.
• Do not use a mechanical device or any
artificial means to speed up the thawing process.
• Do not use other electrical appliances
(such as ice cream makers) inside of refrigerating appliances, unless they are
approved for this purpose by the manufacturer.
• Do not damage the refrigerant circuit.
• The refrigerant isobutane (R600a) is
contained within the refrigerant circuit
of the appliance, a natural gas with a
high level of environmental compatibility, which is nevertheless flammable.
During transportation and installation
of the appliance, be certain that none
of the components of the refrigerant
circuit become damaged.
If the refrigerant circuit should become
damaged:
– avoid open flames and sources of ig-
nition
– thoroughly ventilate the room in
which the appliance is situated
• It is dangerous to alter the specifications or modify this product in any way.
Any damage to the cord may cause a
short-circuit, fire and/or electric shock.
WARNING!
Any electrical component (power
cord, plug, compressor) must be
replaced by a certified service
agent or qualified service personnel to avoid hazard.
1.
Power cord must not be lengthened.
2.
Make sure that the power plug is
not squashed or damaged by the
back of the appliance. A squashed
or damaged power plug may overheat and cause a fire.
3.
Make sure that you can come to
the mains plug of the appliance.
Page 5

4.
Do not pull the mains cable.
5.
If the power plug socket is loose,
do not insert the power plug. There
is a risk of electric shock or fire.
6.
You must not operate the appliance without the lamp cover (if
foreseen) of interior lighting.
• This appliance is heavy. Care should be
taken when moving it.
• Do not remove nor touch items from
the freezer compartment if your hands
are damp/wet, as this could cause skin
abrasions or frost/freezer burns.
• Avoid prolonged exposure of the appliance to direct sunlight.
• Bulb lamps (if foreseen) used in this appliance are special purpose lamps selected for household appliances use
only. They are not suitable for household room illumination.
DAILY USE
• Do not put hot pot on the plastic parts
in the appliance.
• Do not store flammable gas and liquid
in the appliance, because they may explode.
• Do not place food products directly
against the air outlet on the rear wall. (If
the appliance is Frost Free)
• Frozen food must not be re-frozen once
it has been thawed out.
• Store pre-packed frozen food in accordance with the frozen food manufacturer's instructions.
• Appliance's manufacturers storage recommendations should be strictly adhered to. Refer to relevant instructions.
• Do not place carbonated or fizzy drinks
in the freezer compartment as it creates
pressure on the container, which may
cause it to explode, resulting in damage to the appliance.
• Ice lollies can cause frost burns if consumed straight from the appliance.
CARE AND CLEANING
• Before maintenance, switch off the appliance and disconnect the mains plug
from the mains socket.
• Do not clean the appliance with metal
objects.
ENGLISH
• Do not use sharp objects to remove
frost from the appliance. Use a plastic
scraper.
• Regularly examine the drain in the refrigerator for defrosted water. If necessary, clean the drain. If the drain is
blocked, water will collect in the bottom of the appliance.
INSTALLATION
For electrical connection carefully
follow the instructions given in
specific paragraphs.
• Unpack the appliance and check if
there are damages on it. Do not connect the appliance if it is damaged. Report possible damages immediately to
the place you bought it. In that case retain packing.
• It is advisable to wait at least four hours
before connecting the appliance to allow the oil to flow back in the compressor.
• Adequate air circulation should be
around the appliance, lacking this leads
to overheating. To achieve sufficient
ventilation follow the instructions relevant to installation.
• Wherever possible the back of the
product should be against a wall to
avoid touching or catching warm parts
(compressor, condenser) to prevent
possible burn.
• The appliance must not be located
close to radiators or cookers.
• Make sure that the mains plug is accessible after the installation of the appliance.
• Connect to potable water supply only
(If a water connection is foreseen).
SERVICE
• Any electrical work required to do the
servicing of the appliance should be
carried out by a qualified electrician or
competent person.
• Do not remove the LED light cover.
Contact the nearest After Sales Service
Force to replace the LED light board, if
it is necessary.
5
Page 6
www.aeg.com
6
• This product must be serviced by an authorized Service Centre, and only genuine spare parts must be used.
ENVIRONMENT PROTECTION
This appliance does not contain
gasses which could damage the
ozone layer, in either its refrigerant circuit or insulation materials.
The appliance shall not be discarded together with the urban refuse and rubbish. The insulation
foam contains flammable gases:
the appliance shall be disposed
according to the applicable regulations to obtain from your local
authorities. Avoid damaging the
cooling unit, especially at the rear
near the heat exchanger. The materials used on this appliance
marked by the symbol
cyclable.
are re-
Page 7
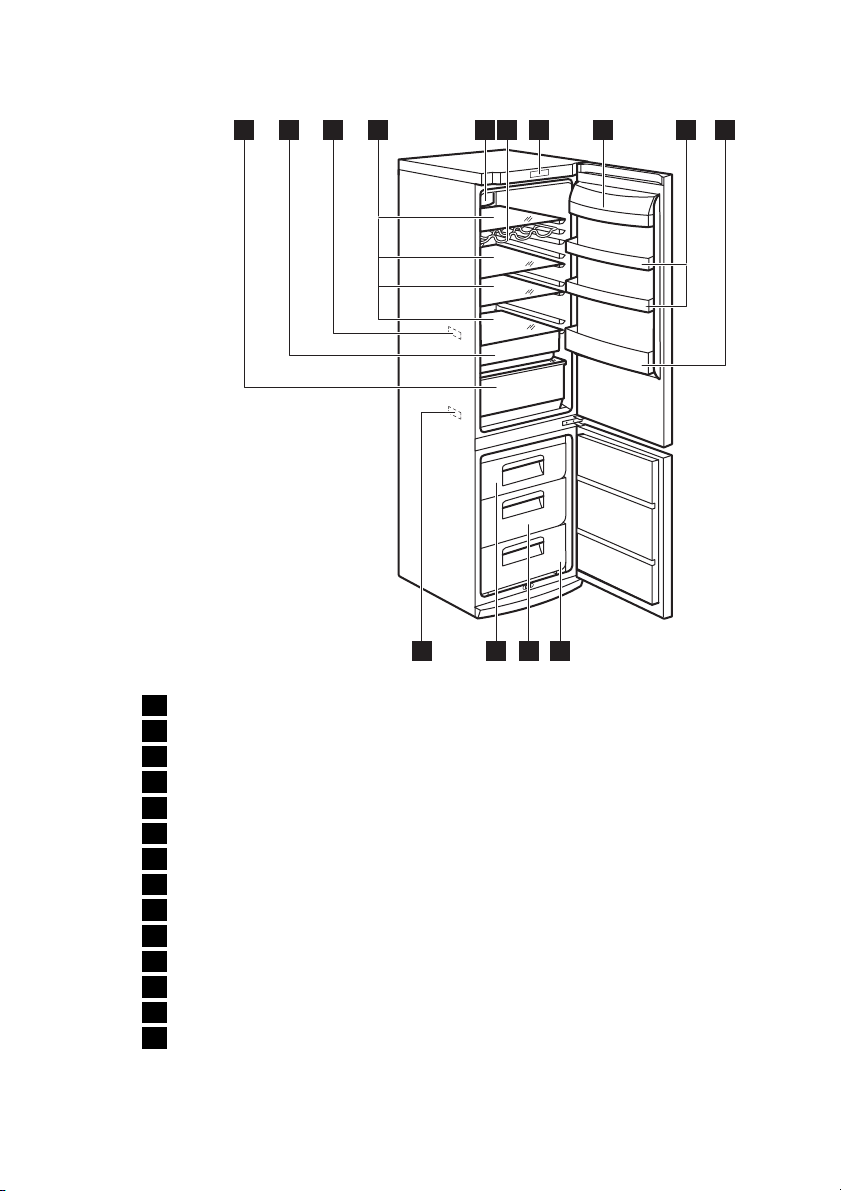
PRODUCT DESCRIPTION
ENGLISH
7
Maxibox drawer
1
Freshbox drawer
2
Temperature indicator
3
Glass shelves
4
DynamicAir cooling
5
Bottle rack
6
Control panel
7
Butter shelf
8
Door shelves
9
Bottle shelf
10
Freezer basket
11
Maxibox drawer
12
Frostmatic basket
13
Rating plate
14
2 3 8 9 1071
4 65
11121314
Page 8
www.aeg.com
8
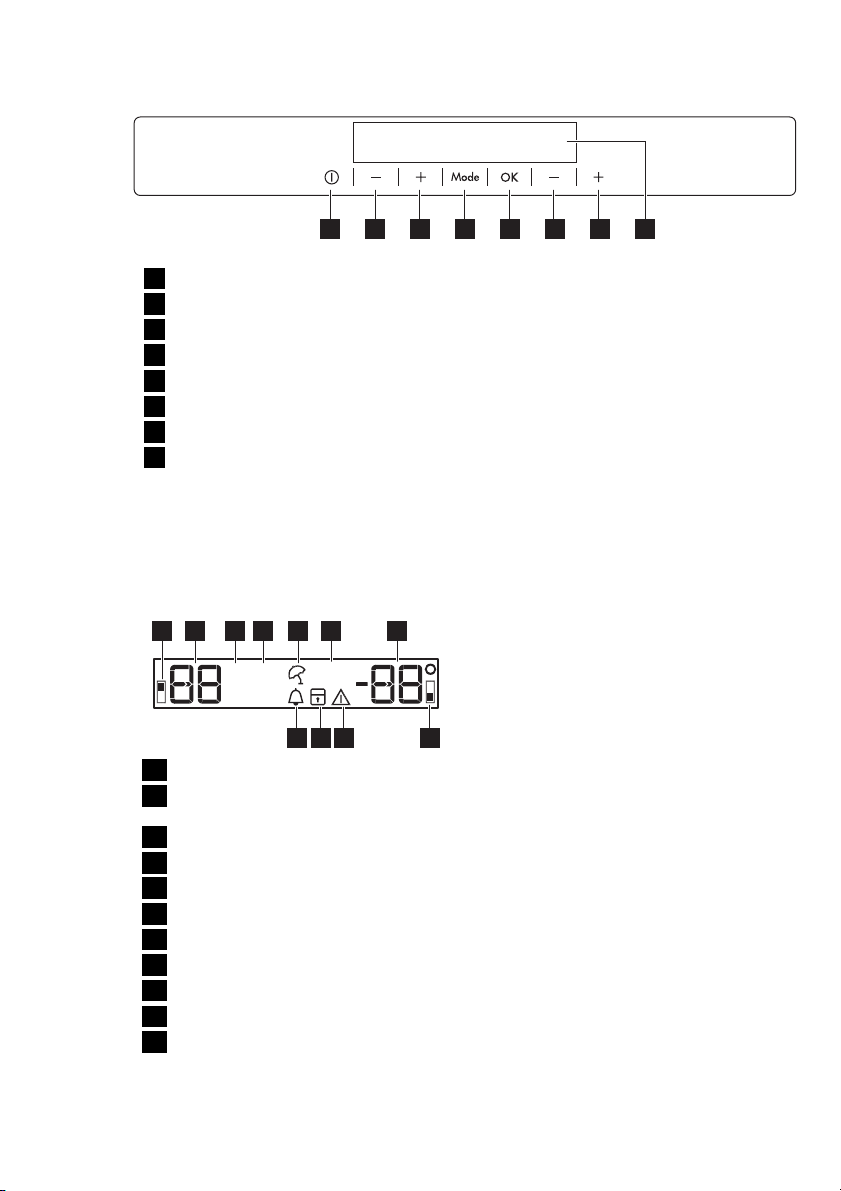
CONTROL PANEL
1 2 3 4 5 6 7 8
Appliance ON/OFF button
1
Fridge Temperature colder button
2
Fridge Temperature warmer button
3
Mode button
4
OK button
5
Freezer Temperature colder button
6
Freezer Temperature warmer button
7
Display
8
It is possible to change predefined sound
of buttons to a loudly one by pressing together Mode button and Temperature
colder button for some seconds. Change
is reversible.
DISPLAY
6 74321 5
COOL FROST
Off
min
Fridge compartment indicator
1
Fridge temperature indicator and tim-
2
er indicator
Fridge off indicator
3
COOLMATIC function
4
Holiday function
5
FROSTMATIC function
6
Freezer temperature indicator
7
Freezer compartment indicator
8
Alarm indicator
9
Child Lock function
10
Minute Minder function
11
MATICMATIC
11 10 89
1.
Connect the mains plug to the power
socket.
2.
Press the appliance ON/OFF button if
the display is off.
3.
The alarm buzzer could operate after
few seconds.
To reset the alarm refer to "High temperature alarm".
4.
If "dEMo" appears on the display, the
appliance is in demonstration mode.
Refer to "What to do if...".
5.
The temperature indicators show the
set default temperature.
To select a different set temperature refer
to "Temperature regulation".
SWITCHING OFF
To switch off the appliance do these
steps:
1.
Press the appliance ON/OFF button
for 5 seconds.
2.
The display switches off.
3.
To disconnect the appliance from the
power disconnect the mains plug
from the power socket.
SWITCHING OFF THE FRIDGE
To switch off the fridge:
1.
Press the Mode button until the cor-
responding icon appears.
The fridge Off indicator and the
fridge compartment indicator flash.
The fridge temperature indicator
shows dashes.
2.
Press the OK button to confirm.
3.
The fridge Off indicator is shown.
SWITCHING ON
To switch on the appliance do these
steps:
SWITCHING ON THE FRIDGE
To switch on the fridge:
Page 9
1.
Press the fridge temperature regulator.
Or:
1.
Press the Mode button until the corresponding icon appears.
The Fridge Off indicator flashes.
2.
Press the OK button to confirm.
3.
The fridge Off indicator goes off.
To select a different set temperature refer
to "Temperature regulation".
TEMPERATURE REGULATION
The set temperature of the fridge and of
the freezer may be adjusted by pressing
the temperature regulators.
Set default temperature:
• +5°C for the fridge
• -18°C for the freezer
The temperature indicators show the set
temperature.
The set temperature will be reached within 24 hours.
Fluctuations of some degrees around set
temperature are normal and does not
mean any fault in the appliance.
After a power failure the set temperature remains stored.
MINUTE MINDER FUNCTION
The Minute Minder function is to be used
to set an acoustic alarm at the preferred
time, useful for example when a recipe requires to cool down a mixture for a certain
lenght of time, or when a reminder is needed in order not to forget the bottles
placed in the freezer for fast cooling.
To switch on the function:
1.
Press the Mode button until the cor-
responding icon appears.
The Minute Minder indicator flashes.
The Timer shows the set value (30 mi-
nutes) for a few seconds.
2.
Press the Fridge Temperature button
to change the Timer set value from 1
to 90 minutes.
3.
Press the OK button to confirm.
The Minute Minder indicator is
shown.
The Timer start to flash (min).
ENGLISH
At the end of the countdown the Minute
Minder indicator flashes and an audible
alarm sounds:
1.
Remove any drinks contained in the
freezer compartment.
2.
Press OK button to switch off the
sound and terminate the function.
It is possible to deactivate the function at
any time during the countdown:
1.
Press the Mode button until the Mi-
nute Minder indicator flashes.
2.
Press the OK button to confirm.
3.
The Minute Minder indicator goes off.
It is possible to change the time during
the countdown and at the end by pressing the Fridge Temperature colder button
or the Fridge Temperature warmer button.
CHILD LOCK FUNCTION
To lock the buttons from unintentional
operation select the Child Lock function.
To switch on the function:
1.
Press the Mode button until the cor-
responding icon appears.
2.
The Child Lock indicator flashes.
3.
Press the OK button to confirm.
The Child Lock indicator is shown.
To switch off the function:
1.
Press the Mode button until the Child
Lock indicator flashes.
2.
Press the OK button to confirm.
3.
The Child Lock indicator goes off.
HIGH TEMPERATURE ALARM
An increase in the temperature in the
freezer compartment (for example due to
an earlier power failure) is indicated by:
• flashing the alarm and freezer tempera-
ture indicators
• sounding of buzzer.
To reset the alarm:
1.
Press any button.
2.
The buzzer switches off.
3.
The freezer temperature indicator
shows the highest temperature
reached for a few seconds. Then
show again the set temperature.
4.
The alarm indicator continue to flash
until the normal conditions are re-
stored.
9
Page 10
www.aeg.com
10
When the alarm has returned the alarm indicator goes off.
DOOR OPEN ALARM
An acoustic alarm will sound if the fridge
door is left open for a few minutes. The
door open alarm conditions are indicated
by:
• flashing Alarm indicator
• acoustic buzzer
When normal conditions are restored
(door closed), the alarm will stop.
COOLMATIC FUNCTION
If you need to insert a large amount of
warm food, for example after doing the
grocery shopping, we suggest activating
the COOLMATIC function to chill the
products more rapidly and to avoid warming the other food which is already in the
refrigerator.
To switch on the function:
1.
Press the Mode button until the corresponding icon appears.
The COOLMATIC indicator flashes.
2.
Press the OK button to confirm.
The COOLMATIC indicator is shown.
The COOLMATIC function shuts off automatically after approximately 6 hours.
To switch off the function before its automatic end:
1.
Press the Mode button until the
COOLMATIC indicator flashes.
2.
Press the OK button to confirm.
3.
The COOLMATIC indicator goes off.
The function switches off by selecting a different fridge set temperature.
The Holiday indicator flashes.
The fridge temperature indicator
shows the set temperature.
2.
Press the OK button to confirm.
The Holiday indicator is shown.
To switch off the function:
1.
Press the Mode button until the Holiday indicator flashes.
2.
Press the OK button to confirm.
3.
The Holiday indicator goes off.
The function switches off by selecting a different fridge set temperature.
FROSTMATIC FUNCTION
To switch on the function:
1.
Press the Mode button until the corresponding icon appears.
The FROSTMATIC indicator flashes.
2.
Press the OK button to confirm.
The FROSTMATIC indicator is shown.
This function stops automatically after 52
hours.
To switch off the function before its automatic end:
1.
Press the Mode button until the
FROSTMATIC indicator flashes.
2.
Press the OK button to confirm.
3.
The FROSTMATIC indicator goes off.
Place the fresh food to be frozen
in the FROSTMATIC basket.
The function switches off by selecting a different freezer set temperature.
HOLIDAY FUNCTION
This function allows you to keep the refrigerator closed and empty during a long
holiday period without the formation of a
bad smell.
The fridge compartment must be
empty with holiday function on.
To switch on the function:
1.
Press the Mode button until the corresponding icon appears.
Page 11
DAILY USE
ENGLISH
11
STORAGE OF FROZEN FOOD
When first starting-up or after a period
out of use, before putting the products in
the compartment let the appliance run at
least 2 hours on the higher settings.
In the event of accidental defrosting, for example due to a power
failure, if the power has been off
for longer than the value shown in
the technical characteristics chart
under "rising time", the defrosted
food must be consumed quickly
or cooked immediately and then
re-frozen (after cooling).
FREEZING FRESH FOOD
The freezer compartment is suitable for
freezing fresh food and storing frozen and
deep-frozen food for a long time.
To freeze fresh food activate the FROSTMATIC function at least 24 hours before
TEMPERATURE INDICATOR
Thermostat requires adjustment
Correct temperature
OK
placing the food to be frozen in the freezer compartment.
Place the fresh food to be frozen in the
FROSTMATIC compartment.
The maximum amount of food that can be
frozen in 24 hours is specified on the rat-
ing plate, a label located on the inside of
the appliance.
The freezing process lasts 24 hours: during this period do not add other food to
be frozen.
THAWING
Deep-frozen or frozen food, prior to being used, can be thawed in the refrigerator compartment or at room temperature,
depending on the time available for this
operation.
Small pieces may even be cooked still frozen, directly from the freezer: in this case,
cooking will take longer.
To assist you in controlling your appliance
correctly we have fitted a temperature indicator to your refrigerator.
The symbol at the side indicates the coldest area in the refrigerator.
The coldest area goes from the glass shelf
of the fruit and vegetable drawer to the
symbol or to the shelf positioned at the
same height of the symbol.
For proper storage of the food, ensure
that the temperature indicator is displaying the “OK” message.
If “OK” is not displayed adjust the temperature controller to a colder setting and
wait 12 hours before checking the temperature indicator again.
After putting fresh food into the appliance or after opening the door repeatedly
for a long period, it is normal for the
“OK” message to disappear.
Page 12
www.aeg.com
12
AIR COOLING
The ClimaTech technology let food cool
quickly and a more uniform temperature
in the compartment
This device allows for rapid cooling of
foods and a more uniform temperature in
the compartment.
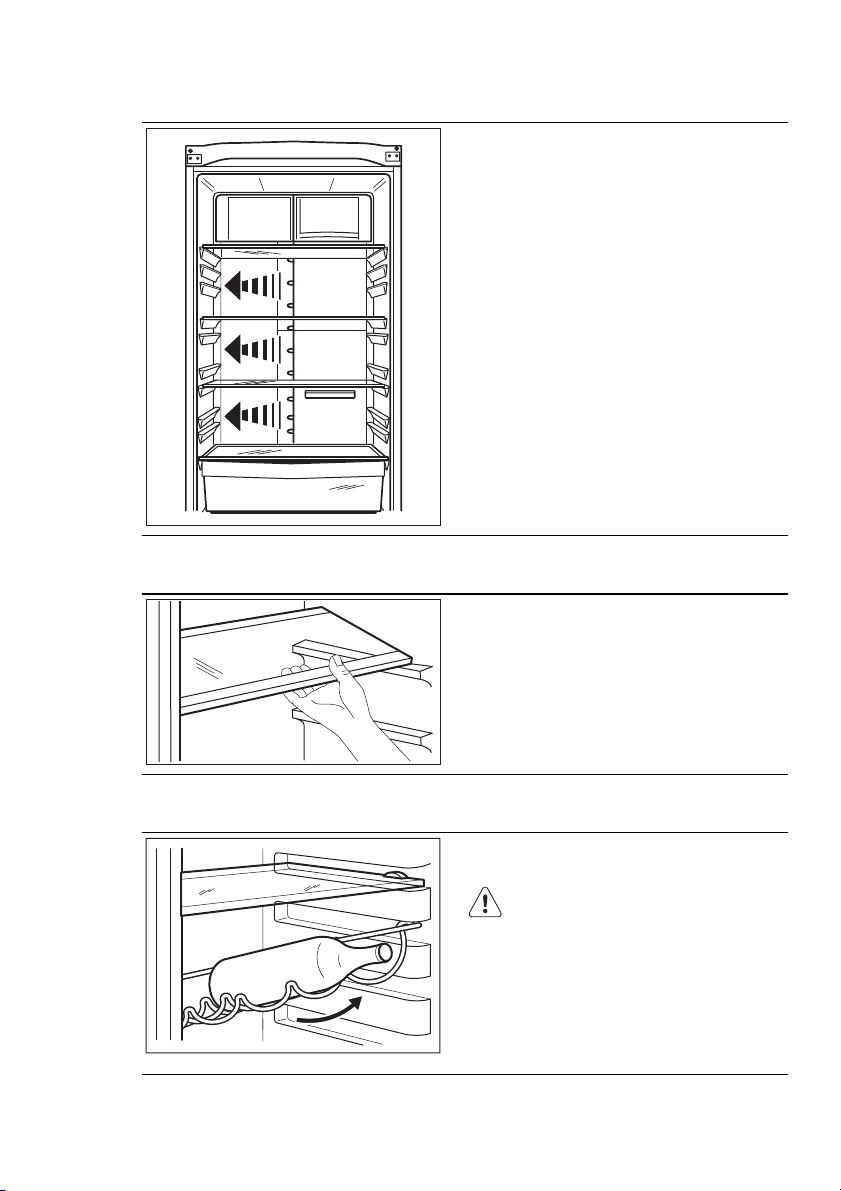
MOVABLE SHELVES
The walls of the refrigerator are equipped
with a series of runners so that the shelves
can be positioned as desired.
BOTTLE RACK
Place the bottles (with the opening facing
front) in the pre-positioned shelf.
If the shelf is positioned horizontally,
place only closed bottles.
This bottle holder shelf can be tilted in order to store previously opened bottles. To
obtain this result, pull the shelf up so it
can rotate upwards and be placed on the
next higher level.
Page 13
FRESHBOX DRAWER
The drawer is suitable for storing fresh
food like fish, meat, seafood, because the
temperature is lower here than in the rest
of the fridge
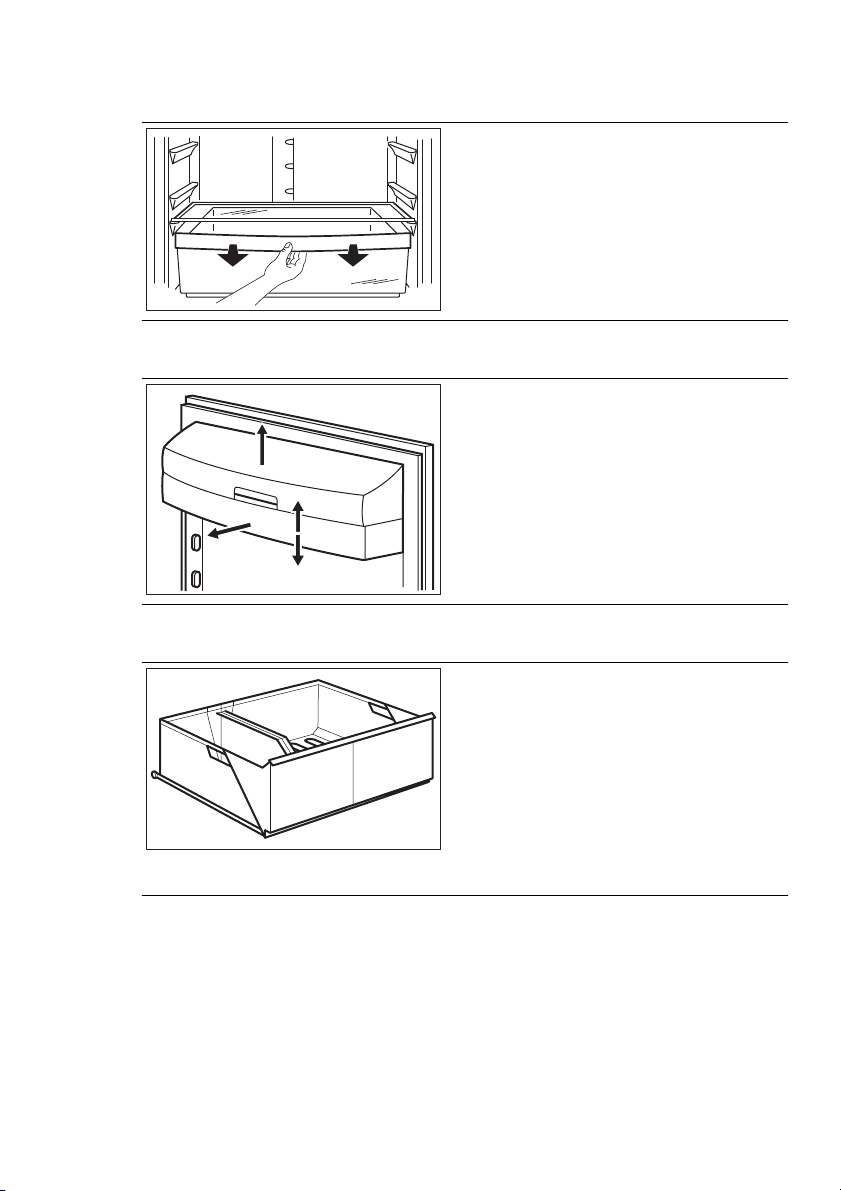
POSITIONING THE DOOR SHELVES
To permit storage of food packages of
various sizes, the door shelves can be
placed at different heights.
1
2
3
To make these adjustments proceed as
follows:
gradually pull the shelf in the direction of
the arrows until it comes free, then reposition as required.
ENGLISH
13
MAXIBOX DRAWER
The drawer is suitable for storing fruit and
vegetables.
There is a separator inside the drawer that
can be placed in different positions to allow for the subdivision best suited to personal needs.
There is a grille (if foreseen) on the bottom of the drawer to separate the fruit
and vegetables from any humidity that
may form on the bottom surface.
Remove all parts inside the drawer for
cleaning purposes.
Page 14
www.aeg.com
14
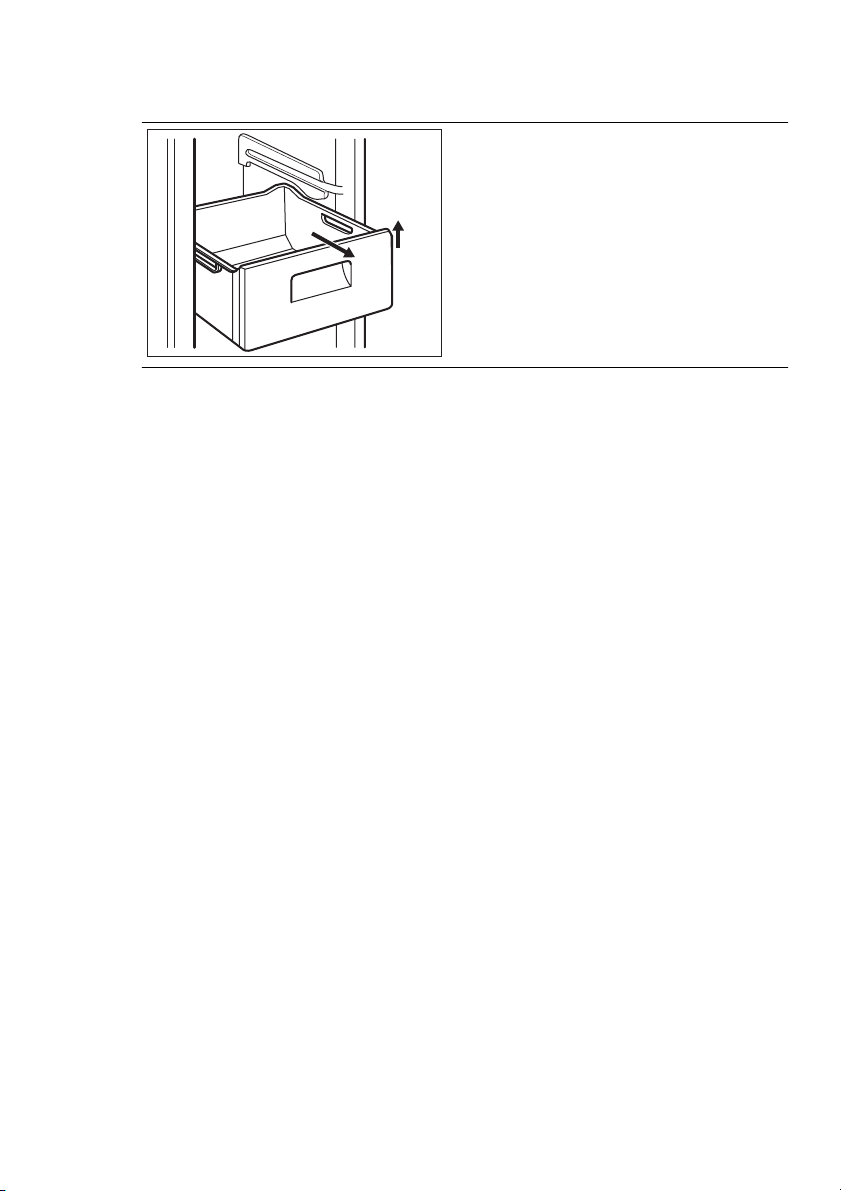
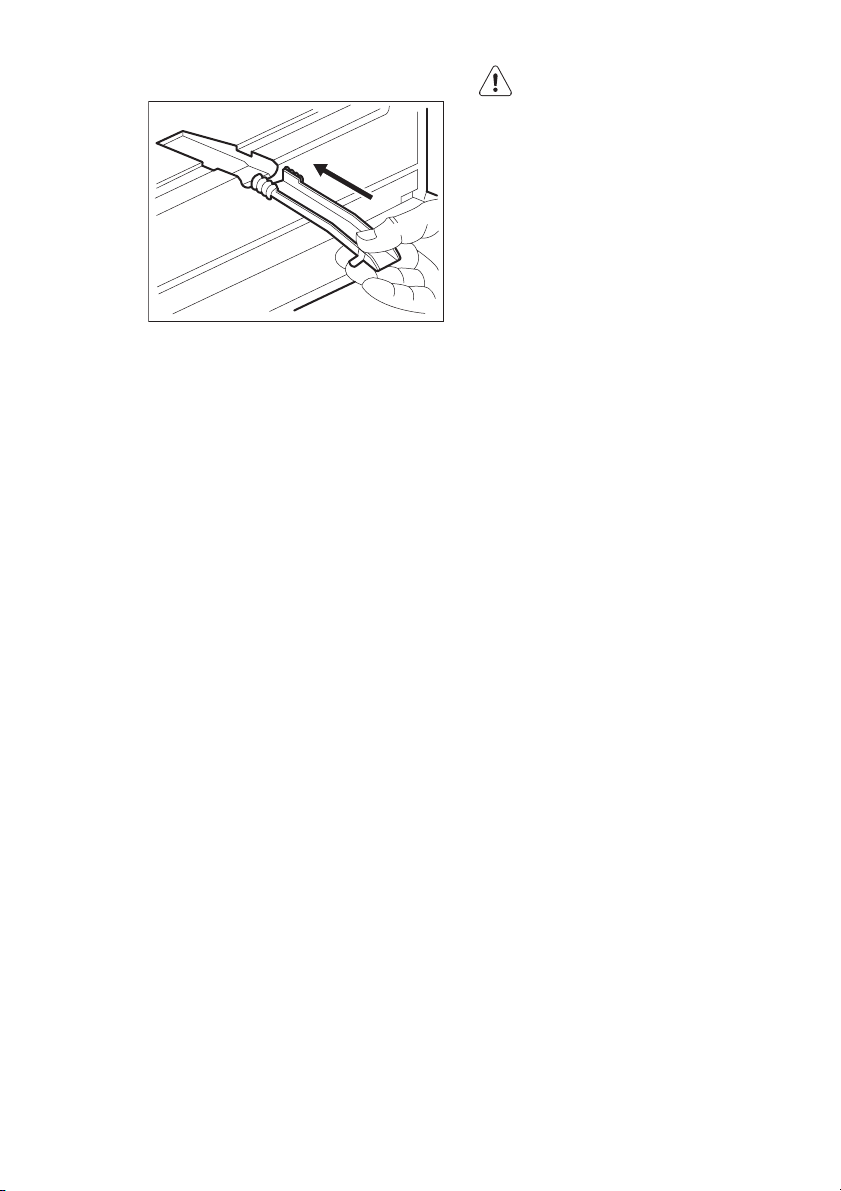
REMOVAL OF FREEZING BASKETS FROM THE FREEZER
The freezing baskets have a limit stop to
prevent their accidental removal or falling
out. At the time of its removal from the
freezer, pull the basket towards yourself
2
1
and, upon reaching the end point, remove the basket by tilting its front upwards.
At the time of putting it back, slightly lift
the front of the basket to insert it into the
freezer. Once you are over the end points,
push the baskets back in their position.
Page 15

HELPFUL HINTS AND TIPS
ENGLISH
15
NORMAL OPERATING
SOUNDS
• You may hear a faint gurgling and a
bubbling sound when the refrigerant is
pumped through the coils or tubing.
This is correct.
• When the compressor is on, the refrigerant is being pumped around and you
will hear a whirring sound and a pulsating noise from the compressor. This is
correct.
• The thermic dilatation might cause a
sudden cracking noise. It is natural, not
dangerous physical phenomenon. This
is correct.
HINTS FOR ENERGY SAVING
To obtain the best performance:
• do not open the door frequently or
leave it open longer than absolutely
necessary
• do not remove the cold accumulators
from the freezer basket.
HINTS FOR FRESH FOOD
REFRIGERATION
To obtain the best performance:
• do not store warm food or evaporating
liquids in the refrigerator
• do cover or wrap the food, particularly
if it has a strong flavour
• position food so that air can circulate
freely around it
HINTS FOR REFRIGERATION
Useful hints:
Meat (all types) : wrap in polythene bags
and place on the glass shelf above the
vegetable drawer.
For safety, store in this way only one or
two days at the most.
Cooked foods, cold dishes, etc..: these
should be covered and may be placed on
any shelf.
Fruit and vegetables: these should be
thoroughly cleaned and placed in the
special drawer(s) provided.
Butter and cheese: these should be
placed in special airtight containers or
wrapped in aluminium foil or polythene
bags to exclude as much air as possible.
Milk bottles: these should have a cap and
should be stored in the bottle rack on the
door.
Bananas, potatoes, onions and garlic, if
not packed, must not be kept in the refrigerator.
HINTS FOR FREEZING
To help you make the most of the freezing process, here are some important
hints:
• the maximum quantity of food which
can be frozen in 24 hrs. is shown on the
rating plate;
• the freezing process takes 24 hours. No
further food to be frozen should be
added during this period;
• only freeze top quality, fresh and thoroughly cleaned, foodstuffs;
• prepare food in small portions to enable it to be rapidly and completely frozen and to make it possible subsequently to thaw only the quantity required;
• wrap up the food in aluminium foil or
polythene and make sure that the packages are airtight;
• do not allow fresh, unfrozen food to
touch food which is already frozen, thus
avoiding a rise in temperature of the
latter;
• lean foods store better and longer than
fatty ones; salt reduces the storage life
of food;
• water ices, if consumed immediately after removal from the freezer compartment, can possibly cause the skin to be
freeze burnt;
• it is advisable to show the freezing in
date on each individual pack to enable
you to keep tab of the storage time.
HINTS FOR STORAGE OF
FROZEN FOOD
To obtain the best performance from this
appliance, you should:
Page 16

www.aeg.com
16
• make sure that the commercially frozen
foodstuffs were adequately stored by
the retailer;
• be sure that frozen foodstuffs are transferred from the foodstore to the freezer
in the shortest possible time;
• not open the door frequently or leave it
open longer than absolutely necessary;
• once defrosted, food deteriorates rapidly and cannot be refrozen;
• do not exceed the storage period indicated by the food manufacturer.
Page 17
CARE AND CLEANING
ENGLISH
17
CLEANING THE INTERIOR
Before using the appliance for the first
time, wash the interior and all internal accessories with lukewarm water and some
neutral soap so as to remove the typical
smell of a brand-new product, then dry
thoroughly.
Do not use detergents or abrasive
powders, as these will damage
the finish.
CAUTION!
Unplug the appliance before carrying out any maintenance operation.
This appliance contains hydrocarbons in its cooling unit; maintenance and recharging must therefore only be carried out by authorized technicians.
PERIODIC CLEANING
The equipment has to be cleaned regularly:
• clean the inside and accessories with
lukewarm water and some neutral soap.
• regularly check the door seals and wipe
clean to ensure they are clean and free
from debris.
• rinse and dry thoroughly.
Do not pull, move or damage any
pipes and/or cables inside the
cabinet.
Never use detergents, abrasive
powders, highly perfumed cleaning products or wax polishes to
clean the interior as this will damage the surface and leave a strong
odour.
Clean the condenser (black grill) and the
compressor at the back of the appliance
with a brush. This operation will improve
the performance of the appliance and
save electricity consumption.
Take care of not to damage the
cooling system.
Many proprietary kitchen surface cleaners
contain chemicals that can attack/damage
the plastics used in this appliance. For this
reason it is recommended that the outer
casing of this appliance is only cleaned
with warm water with a little washing-up
liquid added.
After cleaning, reconnect the equipment
to the mains supply.
DEFROSTING OF THE REFRIGERATOR
Frost is automatically eliminated from the
evaporator of the refrigerator compartment every time the motor compressor
stops, during normal use. The defrost water drains out through a trough into a special container at the back of the appliance, over the motor compressor, where
it evaporates.
It is important to periodically clean the
defrost water drain hole in the middle of
the refrigerator compartment channel to
prevent the water overflowing and dripping onto the food inside. Use the special
cleaner provided, which you will find already inserted into the drain hole.
Page 18
www.aeg.com
18
DEFROSTING THE FREEZER
A certain amount of frost will always form
on the freezer shelves and around the top
compartment.
Defrost the freezer when the frost layer
reaches a thickness of about 3-5 mm.
To remove the frost, follow the
instructions below:
• pull out the plug from the wall socket or
switch off the appliance
• remove any stored food, wrap it in several layers of newspaper and put it in a
cool place
• remove the freezer drawers
• put insulating material around the
drawers, e.g. blankets or newspapers.
Defrosting can be accelerated by placing
bowls with hot water (not boiling) inside
the freeze
• Loosen the drainage channel from its
resting position, push it in according to
the illustration and place it in the bottom freezer drawer where water can
collect
• carefully scrape off the ice when it starts
to thaw. Use a wood or a plastic scraper
• when all the ice has melted, clean and
wipe the cabinet dry, then put the
drainage channel back in place.
• switch on the cabinet and replace the
frozen foodstuff.
It is recommended to operate the appliance at the highest position of the
thermostatic control for some hours so
that it can reach the sufficient storing
temperature as soon as possible.
Never use sharp metal tools to
scrape off frost from the evaporator as you could damage it. Do
not use a mechanical device or
any artificial means to speed up
the thawing process other than
those recommended by the manufacturer. A temperature rise of
the frozen food packs, during defrosting, may shorten their safe
storage life.
Page 19
WHAT TO DO IF…
ENGLISH
19
CAUTION!
Before troubleshooting, disconnect the power supply.
Only a qualified electrician or
competent person must do the
troubleshooting that is not in this
manual.
There are some sounds during
normal use (compressor, refrigerant circulation).
Problem Possible cause Solution
The appliance is
noisy.
The appliance is not supported properly.
Check if the appliance
stands stable (all the four
feet should be on the floor).
The compressor operates continually.
The door is not closed cor-
The door has been
The product temperature
The Temperature regulator may be set incorrectly.
rectly.
opened too frequently.
is too high.
Set a warmer temperature.
Refer to "Closing the
door".
Do not keep the door open
longer than necessary.
Let the product temperature decrease to room temperature before storage.
The room temperature is
too high.
The FROSTMATIC func-
tion is switched on.
The COOLMATIC function
is switched on.
Water flows on the
rear plate of the refrigerator.
Water flows into the
refrigerator.
During the automatic defrosting process, frost defrosts on the rear plate.
The water outlet is clogged.
Products prevent that wa-
ter flows into the water
Decrease the room temperature.
Refer to "FROSTMATIC
function".
Refer to "COOLMATIC
function".
This is correct.
Clean the water outlet.
Make sure that products do
not touch the rear plate.
collector.
Water flows on the
ground.
The melting water outlet
does not flow in the evaporative tray above the
Attach the melting water
outlet to the evaporative
tray.
compressor.
There is too much
frost and ice.
The door is not closed cor-
The temperature in the re-
Products are not wrapped
properly.
rectly.
Wrap the products better.
Refer to "Closing the
door".
Set a higher temperature.
frigerator is too low.
Page 20
www.aeg.com
20
Problem Possible cause Solution
The temperature in
the appliance is too
The door is not closed correctly.
Refer to "Closing the
door".
high.
The product temperature
is too high.
Let the product temperature decrease to room temperature before storage.
Many products are stored
at the same time.
The temperature in
the refrigeration is
There is no cold air circulation in the appliance.
too high.
The temperature in
the freezer is too
Products are too near to
each other.
Store less products at the
same time.
Make sure that there is cold
air circulation in the appliance.
Store products so that
there is cold air circulation.
high.
The appliance does
not operate.
The mains plug is not con-
The appliance is switched
off.
nected to the mains sock-
Switch on the appliance.
Connect the mains plug to
the mains socket correctly.
et correctly.
The appliance has no
power. There is no voltage
in the mains socket.
Connect a different electrical appliance to the mains
socket. Contact a qualified
electrician.
The lamp does not
The lamp is in stand-by. Close and open the door.
work.
"dEMo" appears on
the display.
The appliance is in demonstration mode.
Keep pressed approximately 10 sec the OK button
since a long sound of buzzer is heard and the display
shut off for a short while:
appliance start works regularly.
As much as the advice does not lead to result, call the nearest brand-mark service.
CLOSING THE DOOR
1.
Clean the door gaskets.
2.
If necessary, adjust the door. Refer to
"Installation".
3.
If necessary, replace the defective
door gaskets. Contact the Service
Center.
Only service is allowed to replace the
lighting device. Contact your Service Center .
REPLACING THE LAMP
The appliance is equipped with a longlife
LED interior light.
Page 21
INSTALLATION
ENGLISH
21
WARNING!
Read the "Safety Information"
carefully for your safety and correct operation of the appliance
before installing the appliance.
POSITIONING
Install this appliance at a location where
the ambient temperature corresponds to
the climate class indicated on the rating
plate of the appliance:
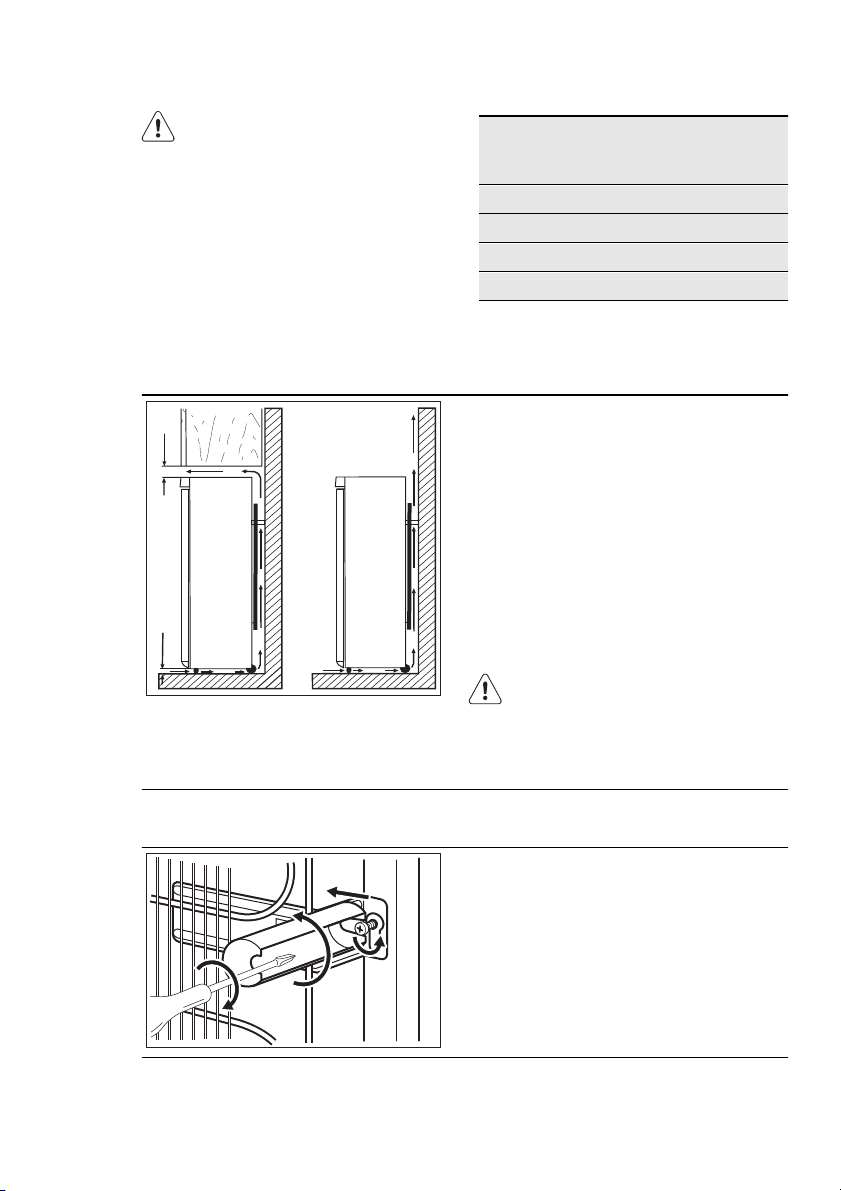
LOCATION
100 mm
min
A
20 mm
B
Cli-
Ambient temperature
mate
class
SN +10°C to + 32°C
N +16°C to + 32°C
ST +16°C to + 38°C
T +16°C to + 43°C
The appliance should be installed well
away from sources of heat such as radiators, boilers, direct sunlight etc. Ensure
that air can circulate freely around the
back of the cabinet. To ensure best performance, if the appliance is positioned
below an overhanging wall unit, the minimum distance between the top of the
cabinet and the wall unit must be at least
100 mm . Ideally, however, the appliance
should not be positioned below overhanging wall units. Accurate levelling is
ensured by one or more adjustable feet at
the base of the cabinet.
WARNING!
It must be possible to disconnect
the appliance from the mains
power supply; the plug must
therefore be easily accessible after installation.
REAR SPACERS
2
1
4
3
ELECTRICAL CONNECTION
Before plugging in, ensure that the voltage and frequency shown on the rating
You can find the two spacers in the bag
with documentation.
Do these steps to install the spacers:
1.
Release the screw.
2.
Engage the spacer below the screw.
3.
Turn the spacer to the right position.
4.
Tighten again the screws.
plate correspond to your domestic power
supply.
The appliance must be earthed. The power supply cable plug is provided with a
Page 22
www.aeg.com
22
contact for this purpose. If the domestic
power supply socket is not earthed, connect the appliance to a separate earth in
compliance with current regulations, consulting a qualified electrician.
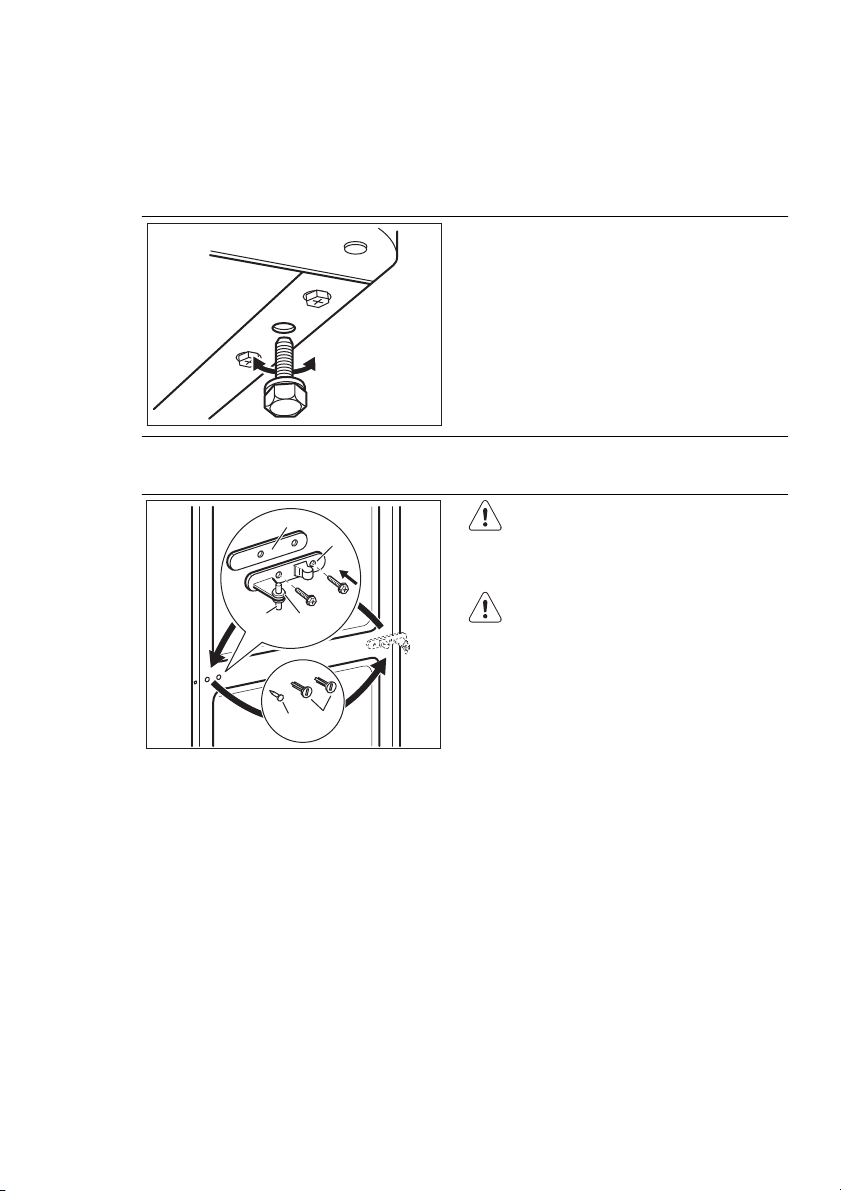
LEVELLING
DOOR REVERSIBILITY
The manufacturer declines all responsibility if the above safety precautions are not
observed.
This appliance complies with the E.E.C.
Directives.
When placing the appliance ensure that it
stands level. This can be achieved by two
adjustable feet at the bottom in front.
A
B
E
F
DC
WARNING!
Before carrying out any operations, remove the plug from the
power socket.
To carry out the following operations, we suggest that this be
made with another person that
will keep a firm hold on the doors
of the appliance during the operations.
• Open the doors. Unscrew the middle
hinge (B). Remove the plastic spacer (A)
• Remove the spacer (F) and move to the
other side of the hinge pivot (E).
• Remove the doors.
• Remove the left-hand cover pin of the
middle hinge (C, D) and move to the
other side.
• Fit the pin of the middle hinge (E) into
the left-hand hole of the lower door.
Page 23
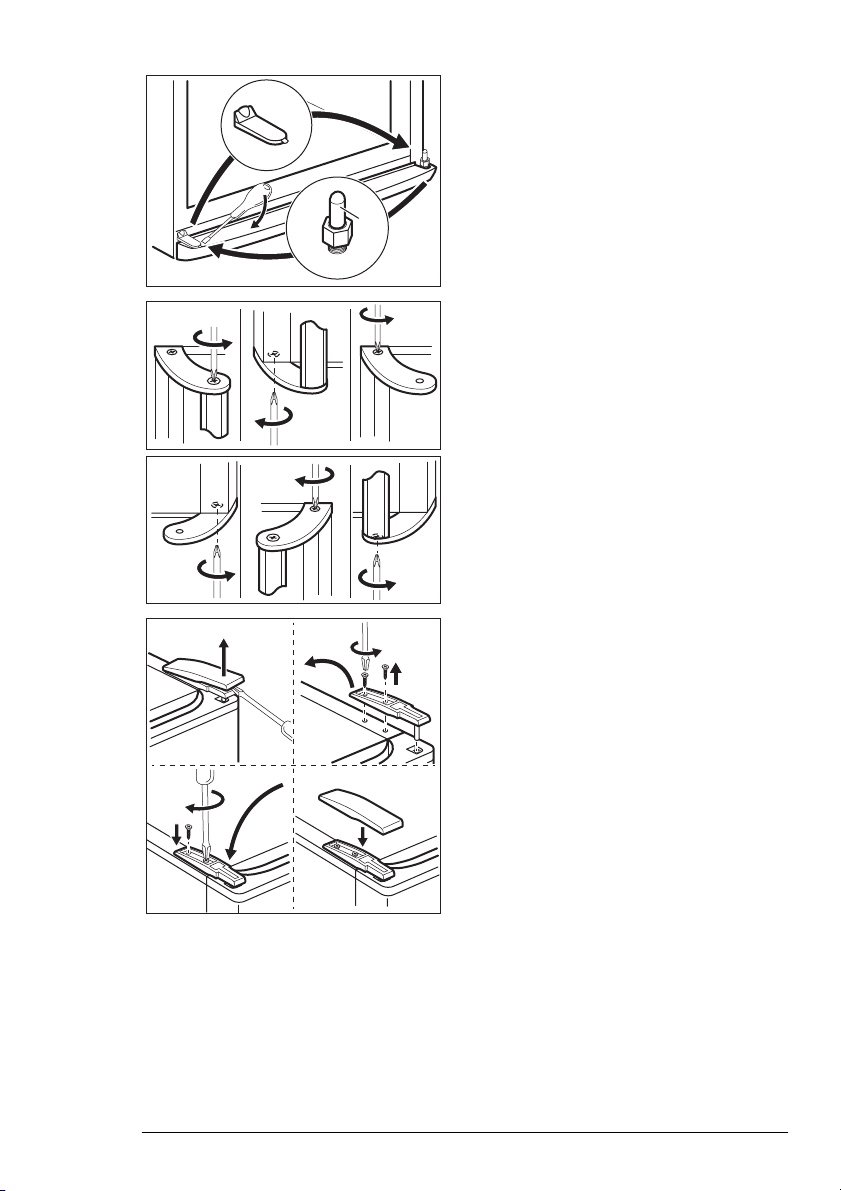
ENGLISH
• Remove using a tool the cover (A). Un-
A
screw the lower hinge pivot (B) and the
spacer (C) and place them on the opposite side.
• Re-insert the cover (A) on the opposite
side.
23
B
C
1
3
2
5
4
12
6
1
2
34
2
1
• Remove the handle. Unscrew the top
handle bracket from the handle rod 1).
Unscrew the bottom handle bracket
from the door (2)
• Remove the handle. Unscrew the top
handle bracket from the handle rod (1).
Unscrew the bottom handle bracket
from the door (2)
• Unscrew the top handle bracket from
the door (3).
• Re-screw the handle bracket on the
door (4). Turn the handle bracket with
the handle and screw them to the door
(5) and the fitted handle bracket (6).
• Remove using a tool the cover. (1).
• Unscrew the upper hinge pivot (2) and
place it on the opposite side.
• Re-screw the upper hinge.
• Fit the upper door on the upper door
pivot.
• Re-insert the upper door on the middle
hinge pivot (3 )slightly tilting both
doors.
• Re-screw the middle hinge. Do not forget the plastic spacer.
Do a final check to make sure that:
• All screws are tightened.
• The magnetic seal adheres to the cabinet.
• The door opens and closes correctly.
If the ambient temperature is cold (i.e. in
Winter), the gasket may not fit perfectly to
the cabinet. In that case, wait for the natural fitting of the gasket.
In case you do not want to carry out the
above mentioned operations, contact the
nearest After Sales Service Force. The After Sales Service specialist will carry out
the reversibility of the doors at your cost.
Page 24

www.aeg.com
24
TECHNICAL DATA
Dimension
Height 2010 mm
Width 595 mm
Depth 660 mm
Rising Time 18 h
Voltage 230 - 240 V
Frequency 50 Hz
The technical information are situated in
the rating plate on the internal left side of
the appliance and in the energy label.
Page 25
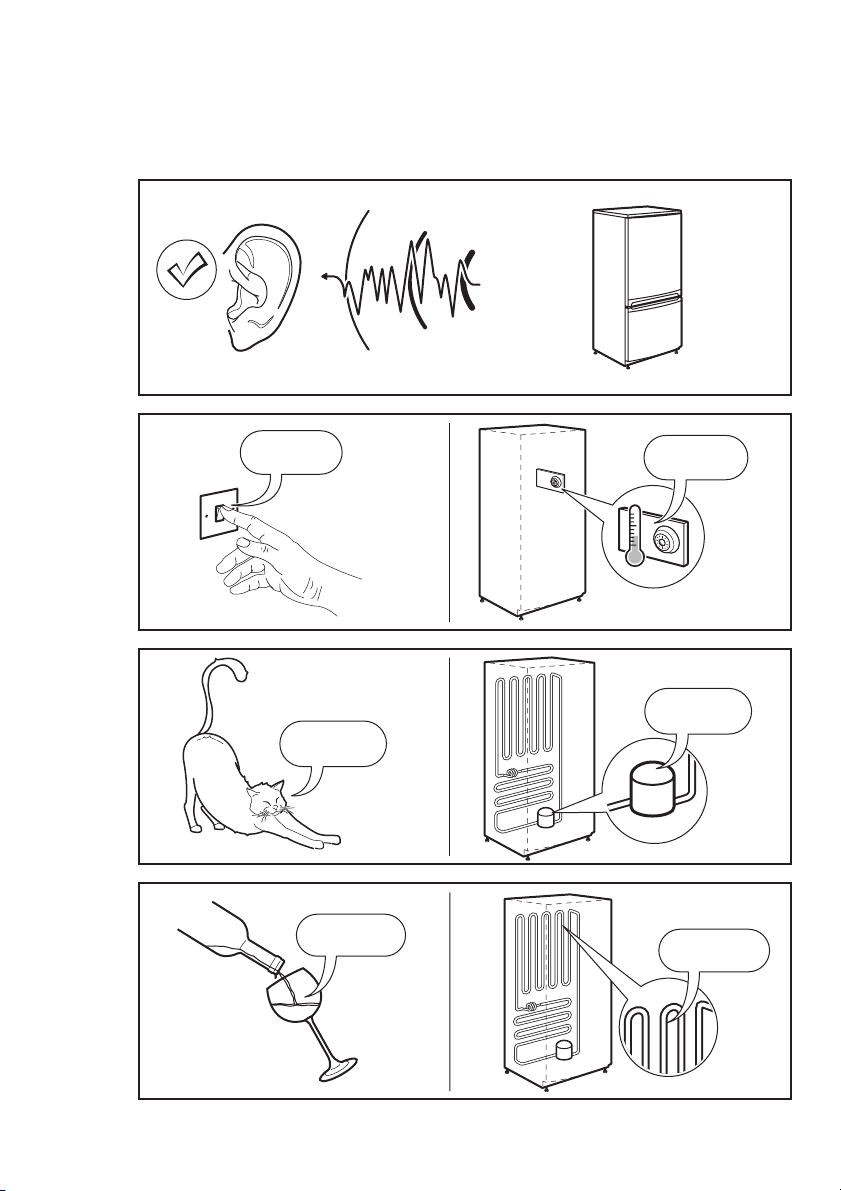
NOISES
There are some sounds during normal
running (compressor, refrigerant circulation).
SSSRRR!
HISSS!
ENGLISH
CLICK!
BRRR!
25
OK
CLICK!
BRRR!
CRACK!
BLUBB!
CLICK!
BRRR!
BLUBB!
BLUBB!
Page 26
www.aeg.com
26
HISSS!
HISSS!
SSSRRR!
CRACK!
SSSRRR!
CRACK!
Page 27

ÍNDICE
29 INFORMAÇÕES DE SEGURANÇA
32 DESCRIÇÃO DO PRODUTO
33 PAINEL DE CONTROLO
37 UTILIZAÇÃO DIÁRIA
41 SUGESTÕES E CONSELHOS ÚTEIS
43 MANUTENÇÃO E LIMPEZA
45 O QUE FAZER SE…
48 INSTALAÇÃO
51 DADOS TÉCNICOS
52 RUÍDOS
PREOCUPAÇÕES AMBIENTAIS
Recicle os materiais que apresentem o símbolo . Coloque a embalagem nos
contentores indicados para reciclagem.
Ajude a proteger o ambiente e a saúde pública através da reciclagem de aparelhos
eléctricos e electrónicos. Não elimine os aparelhos que tenham o símbolo
com os resíduos domésticos. Coloque o produto num ponto de recolha para reciclagem
local ou contacte as suas autoridades municipais.
PORTUGUÊS
juntamente
27
VISITE O NOSSO WEBSITE PARA:
- Produtos
- Brochuras
- Manuais do utilizador
- Resolução de problemas
- Informação de assistência
www.aeg.com
LEGENDA
Aviso – Informações de segurança importantes.
Informações gerais e conselhos úteis
Informações ambientais
Sujeito a alterações sem aviso prévio.
Page 28

www.aeg.com
28
PARA RESULTADOS PERFEITOS
Obrigado por escolher este produto AEG. Criámo-lo para lhe oferecer um
desempenho impecável durante vários anos, com tecnologias inovadoras que
tornam a sua vida mais fácil – funcionalidades que poderá não encontrar em
aparelhos convencionais. Continue a ler durante alguns minutos para tirar o máximo
partido do produto.
ACESSÓRIOS E CONSUMÍVEIS
Na loja web AEG, encontrará tudo aquilo de que necessita para manter os seus
aparelhos AEG imaculados e a funcionarem na perfeição. A par de uma vasta gama
de acessórios projectados e concebidos de acordo com os padrões de elevada
qualidade que esperaria, de utensílios de cozinha especializados a cestos de
talheres, de suportes para garrafas a delicados sacos para roupa...
Visite a loja online em
www.aeg.com/shop
APOIO AO CLIENTE E ASSISTÊNCIA
Recomendamos a utilização de peças originais.
Quando contactar a assistência técnica, certifique-se de que tem estes dados
consigo. Pode encontrar a informação na placa de classificação.
Modelo
PNC
Número de série
Page 29

INFORMAÇÕES DE SEGURANÇA
PORTUGUÊS
29
Para a sua própria segurança e para garantir uma utilização correcta, antes de
instalar e usar o aparelho pela primeira
vez, leia atentamente este manual do utilizador, incluindo as suas sugestões e advertências. Para evitar erros e acidentes
desnecessários, é importante que todas
as pessoas que utilizam o aparelho conheçam o seu funcionamento e as características de segurança. Guarde estas instruções e certifique-se de que elas acompanham o aparelho em caso de transferência ou venda, para que todos os que
venham a usá-lo estejam devidamente informados quanto à sua utilização e segurança.
Para sua segurança e da propriedade,
guarde as precauções destas instruções
de utilização, uma vez que o fabricante
não é responsável pelos danos causados
por omissão.
SEGURANÇA PARA CRIANÇAS
E PESSOAS VULNERÁVEIS
• Este aparelho não se destina a ser utilizado por pessoas (incluindo crianças)
com capacidades físicas, sensoriais ou
mentais reduzidas ou sem experiência
e conhecimento, excepto se lhes tiver
sido dada supervisão ou instrução relativa à utilização do aparelho por uma
pessoa responsável pela sua segurança.
As crianças devem ser vigiadas para assegurar que não brincam com o aparelho.
• Mantenha todas as embalagens fora do
alcance das crianças. Existe o risco de
asfixia.
• Se eliminar o aparelho retire a ficha da
tomada, corte o cabo eléctrico (o mais
perto do aparelho possível) e retire a
porta para evitar que crianças a brincar
sofram choques eléctricos ou se fechem dentro do aparelho.
• Se este aparelho, com vedantes de
porta magnéticos for substituir um aparelho mais velho com fecho de mola
(lingueta) na porta ou tampa, certifique-
-se de que o fecho de mola está desactivado antes de eliminar o velho aparelho. Tal irá evitar que se torne numa armadilha fatal para uma criança.
SEGURANÇA GERAL
ADVERTÊNCIA
Mantenha as aberturas de ventilação da
caixa do aparelho ou da estrutura integrada sem obstruções.
• O aparelho destina-se à conservação
de alimentos e/ou bebidas em ambiente doméstico normal, como explicado
neste manual de instruções.
• Não utilize um dispositivo mecânico ou
qualquer meio artificial para acelerar o
processo de descongelação.
• Não utilize outros aparelhos eléctricos
(como máquinas de fazer gelados) dentro dos aparelhos de refrigeração, a
não ser que sejam aprovados para este
fim pelo fabricante.
• Não danifique o circuito de refrigeração.
• O circuito de refrigeração do aparelho
contém isobutano (R600a), um gás natural com um alto nível de compatibilidade ambiental que é, no entanto, inflamável.
Durante o transporte e a instalação do
aparelho, certifique-se de que nenhum
dos componentes do circuito de refrigeração fica danificado.
Se o circuito de refrigeração for danificado:
– evite chamas vivas e fontes de igni-
ção
– ventile totalmente a divisão onde o
aparelho se encontra
• É perigoso alterar as especificações ou
modificar este produto de qualquer forma. Quaisquer danos no cabo poderão
provocar um curto-circuito, incêndio e/
ou choque eléctrico.
ADVERTÊNCIA
A substituição de qualquer componente eléctrico (cabo de alimentação, ficha, compressor) tem
de ser efectuada por um agente
de assistência certificado ou por
pessoal técnico qualificado, para
evitar perigo.
Page 30

www.aeg.com
30
1.
Não deve colocar extensões no cabo de alimentação.
2.
Certifique-se de que a ficha não está esmagada ou danificada pela
parte posterior do aparelho. Uma
ficha esmagada ou danificada pode sobreaquecer e causar um incêndio.
3.
Certifique-se de que consegue alcançar a ficha do aparelho.
4.
Não puxe o cabo de alimentação.
5.
Se a tomada estiver solta, não introduza a ficha. Existe o risco de
choque eléctrico ou incêndio.
6.
O aparelho não deve funcionar
sem a tampa da lâmpada (se prevista) da iluminação interior.
• Este aparelho é pesado. Tenha cuidado
quando o deslocar.
• Não retire nem toque nos itens do
compartimento do congelador se estiver com as mãos húmidas/molhadas,
pois pode sofrer abrasões na pele ou
queimaduras provocadas pelo gelo.
• Evite a exposição prolongada do aparelho à luz solar directa.
• As lâmpadas (se previstas) utilizadas
neste aparelho são lâmpadas especiais,
seleccionadas apenas para electrodomésticos. Não são adequadas para iluminação doméstica.
UTILIZAÇÃO DIÁRIA
• Não coloque panelas quentes nas partes de plástico do aparelho.
• Não guarde gases ou líquidos inflamáveis no aparelho, porque podem explodir.
• Não coloque alimentos directamente
em frente à saída de ar na parede traseira. (Se o aparelho for do tipo Frost
Free - sem gelo)
• Depois de descongelados, os alimentos não devem ser recongelados.
• Guarde alimentos congelados pré-embalados de acordo com as instruções
do fabricante do alimento congelado.
• As recomendações de armazenamento
dos fabricantes do aparelho devem ser
estritamente cumpridas. Consulte as
respectivas instruções.
• Não coloque bebidas gaseificadas dentro do congelador, uma vez que cria
pressão no recipiente, podendo fazer
com que expluda, provocando danos
no aparelho.
• Os gelados de gelo podem provocar
queimaduras de gelos se forem consumidos imediatamente depois de retirados do aparelho.
LIMPEZA E MANUTENÇÃO
• Antes da manutenção, desligue o aparelho e retire a ficha da tomada.
• Não limpe o aparelho com objectos de
metal.
• Não utilize objectos afiados para remover o gelo do aparelho. Utilize um raspador de plástico.
• Inspeccione regularmente o orifício de
descarga do frigorífico para presença
de água descongelada. Se necessário,
limpe o orifício de descarga. Se o orifício estiver bloqueado, a água irá acumular na parte inferior do aparelho.
INSTALAÇÃO
Para efectuar a ligação eléctrica,
siga atentamente as instruções
fornecidas nos parágrafos específicos.
• Desembale o aparelho e verifique se
existem danos. Não ligue o aparelho se
estiver danificado. Em caso de danos,
informe imediatamente o local onde o
adquiriu. Nese caso, guarde a embalagem.
• É recomendável aguardar pelo menos
duas horas antes de ligar o aparelho,
para permitir que o óleo regresse ao
compressor.
• Assegure uma circulação de ar adequada à volta do aparelho, caso contrário
pode provocar sobreaquecimento. Para
garantir uma ventilação suficiente, siga
as instruções relevantes para a instalação.
• Sempre que possível, a traseira do aparelho deve ficar virada para uma parede
para evitar toques nas partes quentes
(compressor, condensador) e possíveis
queimaduras.
• Não coloque o aparelho perto de radiadores ou fogões.
Page 31

• Certifique-se de que a ficha de alimentação fica acessível após a instalação
do aparelho.
• Ligue apenas a uma fonte de água potável (se a ligação de água estiver prevista).
ASSISTÊNCIA TÉCNICA
• Quaisquer trabalhos eléctricos necessários para a manutenção do aparelho
devem ser efectuados por um electricista qualificado ou pessoa competente.
• Não remova a cobertura da luz LED.
Contacte o serviço pós-venda mais próximo para a substituição da placa de luz
LED, caso esta seja necessária.
• A manutenção deste produto deve ser
efectuada por um centro de assistência
autorizado, o qual deverá utilizar apenas peças sobressalentes originais.
PROTECÇÃO AMBIENTAL
Este aparelho não contém gases
que possam danificar a camada
de ozono, tanto no circuito refrigerante como nos materiais de
isolamento. O aparelho não deverá ser eliminado juntamente com
o lixo doméstico. A espuma de
isolamento contém gases inflamáveis: o aparelho deverá ser eliminado de acordo com as normas
aplicáveis que pode obter junto
das autoridades locais. Evite danificar a unidade de arrefecimento,
especialmente na parte traseira,
perto do permutador de calor. Os
materiais utilizado neste aparelho
marcados pelo símbolo
cicláveis.
são re-
PORTUGUÊS
31
Page 32

www.aeg.com
32
DESCRIÇÃO DO PRODUTO
2 3 8 9 1071
Gaveta Maxibox
1
Gaveta Freshbox
2
Indicador de temperatura
3
Prateleiras de vidro
4
Arrefecimento DynamicAir
5
Prateleira para garrafas
6
Painel de comandos
7
Prateleira da manteiga
8
Prateleiras da porta
9
Prateleira para garrafas
10
Cesto do congelador
11
Gaveta Maxibox
12
Cesto Frostmatic
13
Placa de características
14
4 65
11121314
Page 33

PAINEL DE CONTROLO
1 2 3 4 5 6 7 8
PORTUGUÊS
33
Botão ON/OFF do aparelho
1
Botão de diminuição da temperatura
2
do frigorífico
Botão de aumento da temperatura
3
do frigorífico
Botão Mode
4
Botão OK
5
Botão de diminuição da temperatura
6
do congelador
Botão de aumento da temperatura
7
do congelador
Visor
8
É possível alterar o som predefinido dos
botões para outro mais facilmente audível
premindo simultaneamente o botão Mode e o botão de diminuição da temperatura durante alguns segundos. A alteração é reversível.
VISOR
6 74321 5
COOL FROST
Off
min
Indicador do compartimento do fri-
1
gorífico
Indicador do temporizador e indica-
2
dor de temperatura do frigorífico
Indicador de frigorífico desligado
3
Função COOLMATIC
4
Função Férias
5
Função FROSTMATIC
6
Indicador de temperatura do conge-
7
lador
Indicador do compartimento do con-
8
gelador
Indicador de alarme
9
MATICMATIC
11 10 89
Função Bloqueio de Segurança para
10
Crianças
Função Minute Minder
11
LIGAR
Para ligar o aparelho, efectue os passos
seguintes:
1.
Ligue a ficha do aparelho à tomada.
2.
Prima o botão ON/OFF se o visor estiver desligado.
3.
O alarme sonoro poderá funcionar
após alguns segundos.
Para reiniciar o alarme consulte "Alarme de temperatura elevada".
4.
Se o visor indicar "dEMo", o aparelho
está em modo de demonstração.
Consulte "O que fazer se...".
5.
Os indicadores de temperatura apresentam a temperatura predefinida re-
gulada.
Para seleccionar uma temperatura regulada diferente, consulte "Regulação da
temperatura".
DESLIGAR
Para desligar o aparelho, efectue os passos seguintes:
1.
Prima o botão ON/OFF do aparelho
durante 5 segundos.
2.
O visor desliga-se.
3.
Para desligar o aparelho da corrente,
desligue a ficha de alimentação eléc-
trica da tomada.
DESLIGAR O FRIGORÍFICO
Para desligar o frigorífico:
1.
Prima o botão Mode até aparecer o
ícone correspondente.
Page 34

www.aeg.com
34
O indicador de frigorífico desligado e
o indicador do compartimento do frigorífico piscam.
O indicador de temperatura do frigorífico apresenta travessões.
2.
Prima o botão OK para confirmar.
3.
É apresentado o indicador de frigorífico desligado.
LIGAR O FRIGORÍFICO
Para ligar o frigorífico:
1.
Prima o regulador de temperatura do
frigorífico.
Ou:
1.
Prima o botão Mode até aparecer o
ícone correspondente.
O indicador de Frigorífico Desligado
pisca.
2.
Prima o botão OK para confirmar.
3.
O indicador de Frigorífico Desligado
apaga-se.
Para seleccionar uma temperatura regulada diferente, consulte "Regulação da
temperatura".
REGULAÇÃO DA
TEMPERATURA
A temperatura regulada do frigorífico e
do congelador pode ser ajustada premindo os reguladores de temperatura.
Temperatura predefinida regulada:
• +5 °C para o frigorífico
• -18 °C para o congelador
Os indicadores de temperatura apresentam a temperatura regulada.
A temperatura regulada será alcançada
dentro de 24 horas.
As oscilações de alguns graus relativamente à temperatura regulada são normais e não significam que exista qualquer
avaria no aparelho.
Após uma falha de energia, a
temperatura regulada permanece
memorizada.
FUNÇÃO MINUTE MINDER
A função Minute Minder destina-se a ser
utilizada para regular um alarme acústico
para uma hora escolhida, sendo útil, por
exemplo, quando uma receita requer o
arrefecimento de uma mistura durante um
determinado período de tempo ou quando é necessário um aviso para não se esquecer das garrafas colocadas no congelador para arrefecimento rápido.
Para ligar a função:
1.
Prima o botão Mode até aparecer o
ícone correspondente.
O indicador Minute Minder fica intermitente.
O Temporizador apresenta o valor
definido (30 minutos) durante alguns
segundos.
2.
Prima o botão de Temperatura do
Frigorífico para alterar o valor definido do Temporizador de 1 para 90 minutos.
3.
Prima o botão OK para confirmar.
O indicador Minute Minder é apre-
sentado.
O Temporizador começa a piscar
(min).
No final da contagem decrescente, o indicador Minute Minder fica intermitente e é
emitido um alarme sonoro:
1.
Retire quaisquer bebidas do interior
do compartimento do congelador.
2.
Prima o botão OK para desligar o
som e terminar a função.
É possível desactivar a função a qualquer
altura, durante a contagem decrescente:
1.
Prima o botão Mode até o indicador
Minute Minder ficar intermitente.
2.
Prima o botão OK para confirmar.
3.
O indicador Minute Minder apaga-se.
É possível alterar a hora durante a contagem decrescente e no final, premindo o
botão de Diminuição da Temperatura do
Frigorífico e o botão de Aumento da
Temperatura do Frigorífico.
FUNÇÃO BLOQUEIO DE
SEGURANÇA PARA CRIANÇAS
Para evitar o funcionamento não intencional dos botões, seleccione a função Bloqueio de Segurança para Crianças.
Para ligar a função:
1.
Prima o botão Mode até aparecer o
ícone correspondente.
2.
O indicador Bloqueio de Segurança
para Crianças pisca.
3.
Prima o botão OK para confirmar.
Page 35

O indicador Bloqueio de Segurança
para Crianças é apresentado.
Para desligar a função:
1.
Prima o botão Mode até o indicador
Bloqueio de Segurança para Crianças
piscar.
2.
Prima o botão OK para confirmar.
3.
O indicador Bloqueio de Segurança
para Crianças apaga-se.
ALARME DE TEMPERATURA
ELEVADA
Um aumento da temperatura no compartimento do congelador (por exemplo, devido a uma falha de alimentação) é indicado por:
• intermitência do alarme e indicadores
de temperatura do congelador
• activação do alarme sonoro.
Para reiniciar o alarme:
1.
Prima qualquer botão.
2.
O alarme sonoro desliga-se.
3.
O indicador de temperatura do frigorífico apresenta a temperatura mais
elevada atingida durante alguns segundos. Em seguida, apresenta novamente a temperatura regulada.
4.
O indicador de alarme continua a piscar até o restabelecimento das condi-
ções normais.
Quando o alarme é restabelecido o indicador de alarme apaga-se.
ALARME DE PORTA ABERTA
Ouve-se um alarme acústico se a porta do
frigorífico permanecer aberta durante alguns minutos. As condições do alarme de
porta aberta são indicadas por:
• indicador de Alarme intermitente
• alarme acústico
Quando as condições normais são restabelecidas (porta fechada), o alarme pára.
FUNÇÃO COOLMATIC
Se necessitar de inserir uma grande quantidade de alimentos quentes, por exemplo, após fazer as compras, sugerimos
que active a função COOLMATIC para arrefecer os produtos mais rapidamente e
para evitar aquecer os outros alimentos
que já estejam no frigorífico.
PORTUGUÊS
Para ligar a função:
1.
Prima o botão Mode até aparecer o
ícone correspondente.
O indicador COOLMATIC fica intermitente.
2.
Prima o botão OK para confirmar.
O indicador COOLMATIC é apresen-
tado.
A função COOLMATIC termina automaticamente aproximadamente após 6 horas.
Para desligar a função antes do seu fim
automático:
1.
Prima o botão Mode até o indicador
COOLMATIC ficar intermitente.
2.
Prima o botão OK para confirmar.
3.
O indicador COOLMATIC apaga-se.
A função desliga-se seleccionando uma temperatura regulada do
frigorífico diferente.
35
FUNÇÃO FÉRIAS
Esta função permite manter o frigorífico
fechado e vazio durante um longo período de férias sem a formação de maus
odores.
O compartimento do frigorífico
deve estar vazio quando a função
férias estiver ligada.
Para ligar a função:
1.
Prima o botão Mode até aparecer o
ícone correspondente.
O indicador Férias pisca.
O indicador da temperatura do frigo-
rífico apresenta a temperatura regula-
da.
2.
Prima o botão OK para confirmar.
O indicador Férias é apresentado.
Para desligar a função:
1.
Prima o botão Mode até o indicador
Férias piscar.
2.
Prima o botão OK para confirmar.
3.
O indicador Férias apaga-se.
A função desliga-se seleccionando uma temperatura regulada do
frigorífico diferente.
FUNÇÃO FROSTMATIC
Para ligar a função:
Page 36

www.aeg.com
36
1.
Prima o botão Mode até aparecer o
ícone correspondente.
O indicador FROSTMATIC fica intermitente.
2.
Prima o botão OK para confirmar.
O indicador FROSTMATIC é apresen-
tado.
Esta função pára automaticamente após
52 horas.
Para desligar a função antes do seu fim
automático:
1.
Prima o botão Mode até o indicador
FROSTMATIC ficar intermitente.
2.
Prima o botão OK para confirmar.
3.
O indicador FROSTMATIC apaga-se.
Coloque os alimentos frescos a
congelar no cesto FROSTMATIC.
A função desliga-se seleccionando uma temperatura regulada do
congelador diferente.
Page 37

UTILIZAÇÃO DIÁRIA
PORTUGUÊS
37
ARMAZENAMENTO DE
ALIMENTOS CONGELADOS
Quando ligar pela primeira vez ou após
um período sem utilização, antes de colocar os produtos no compartimento, deixe
o aparelho em funcionamento durante no
mínimo 2 horas nas definições mais elevadas.
Em caso de descongelação acidental, por exemplo, devido a falta de electricidade, se a alimentação estiver desligada por mais
tempo que aquele mostrado na
tabela de características técnicas
em "tempo de reinício", os alimentos descongelados têm de
ser consumidos rapidamente ou
cozinhados imediatamente e depois, novamente congelados (depois de arrefecerem).
CONGELAÇÃO DE
ALIMENTOS FRESCOS
O compartimento do congelador é adequado para congelar alimentos frescos e
INDICADOR DE TEMPERATURA
armazenar alimentos congelados e ultracongelados por longos períodos.
Para congelar alimentos frescos, active a
função FROSTMATIC pelo menos 24 horas antes de colocar os alimentos a serem
congelados no compartimento do congelador.
Coloque os alimentos frescos a congelar
no compartimento FROSTMATIC.
A quantidade máxima de alimentos que
podem ser congelados em 24 horas está
indicada na placa de características, uma
etiqueta presente no interior do aparelho.
O processo de congelação demora 24 horas: durante este período, não introduza
novos alimentos para congelar.
DESCONGELAÇÃO
Os alimentos congelados, antes de serem
utilizados, podem ser descongelados no
compartimento do frigorífico ou à temperatura ambiente, dependendo do tempo
disponível para esta operação.
Os pedaços pequenos podem mesmo ser
cozinhados ainda congelados, directamente do congelador: neste caso, a confecção irá demorar mais.
O termóstato requer ajuste
Temperatura correcta
OK
Para ajudar a controlar o aparelho correctamente, instalámos um indicador de
temperatura no frigorífico.
O símbolo na parte lateral indica a área
mais fria do frigorífico.
A área mais fria vai desde a prateleira de
vidro da gaveta de fruta e legumes até ao
símbolo ou à prateleira que estiver colocada à altura do símbolo.
Para armazenar os alimentos correctamente, certifique-se de que o indicador
de temperatura apresenta “OK”.
Se não aparecer “OK”, ajuste o controlador da temperatura para uma regulação
mais fria e aguarde 12 horas até voltar a
verificar o estado do indicador de temperatura.
Após colocar alimentos frescos no aparelho ou após ter tido a porta aberta durante bastante tempo, é normal que a indicação “OK” desapareça.
Page 38

www.aeg.com
38
REFRIGERAÇÃO DO AR
A tecnologia ClimaTech permite uma rápida refrigeração dos alimentos e uma
temperatura mais uniforme no compartimento
Este dispositivo permite uma rápida refrigeração dos alimentos e uma temperatura mais uniforme no compartimento.
PRATELEIRAS MÓVEIS
As paredes do frigorífico têm várias calhas
que lhe permitem posicionar as prateleiras como preferir.
PRATELEIRA DE GARRAFAS
Coloque as garrafas (com a abertura voltada para a frente) na prateleira pré-posicionada.
Se a prateleira estiver posicionada horizontalmente, coloque apenas garrafas fechadas.
Esta prateleira de suporte de garrafas pode ser inclinada de forma a armazenar
garrafas já abertas. Para obter este resultado, puxe a prateleira para cima de forma a poder rodar para cima e ser colocada no próximo nível acima.
Page 39

GAVETA FRESHBOX
A gaveta é adequada para guardar alimentos frescos como peixe, carne e marisco, porque mantém uma temperatura
mais baixa do que no resto do frigorífico.
POSICIONAMENTO DAS PRATELEIRAS DA PORTA
Para permitir o armazenamento de embalagens de alimentos de várias dimensões,
as prateleiras da porta podem ser coloca-
1
2
3
das a diferentes alturas.
Para fazer estes ajustes, proceda do seguinte modo:
puxe gradualmente a prateleira na direcção das setas até se soltar e, de seguida,
reposicione conforme necessário.
PORTUGUÊS
39
GAVETA MAXIBOX
A gaveta é indicada para o armazenamento de fruta e vegetais.
No interior da gaveta existe um separador que pode ser colocado em diferentes
posições, por forma a permitir a divisão
ideal consoante as necessidades.
Existe uma grelha (se prevista) no fundo
da gaveta, destinada a separar a fruta e
os vegetais de qualquer humidade que se
possa formar no fundo.
Todas as peças do interior da gaveta podem ser removidas para limpeza.
Page 40

www.aeg.com
40
REMOÇÃO DOS CESTOS DE CONGELAÇÃO DO CONGELADOR
Os cestos de congelação têm um batente
limitador para evitar a sua remoção acidental ou queda. Quando retirar um cesto do congelador, puxe-o na sua direcção
2
1
e, ao atingir o batente, retire o cesto inclinando a parte dianteira para cima.
Para voltar a colocá-lo, levante ligeiramente a parte dianteira do cesto para o
introduzir no congelador. Assim que passar pelos batentes, empurre os cestos para a sua posição.
Page 41

SUGESTÕES E CONSELHOS ÚTEIS
PORTUGUÊS
41
RUÍDOS NORMAIS DE
FUNCIONAMENTO
• Pode ouvir um ruído de borbulhação
quando o refrigerante é bombeado pelas bobinas ou tubagem. Isto está correcto.
• Quando o compressor está ligado, o
refrigerante está a ser bombeado e irá
ouvir um ruído de zumbido e um ruído
pulsante proveniente do compressor.
Isto está correcto.
• A dilatação térmica pode causar um sú-
bito ruído de fissuração. É natural e não
um fenómeno físico perigoso. Isto está
correcto.
CONSELHOS PARA POUPAR
ENERGIA
Para obter o melhor desempenho:
• não abra a porta muitas vezes nem a
deixe aberta mais tempo do que o absolutamente necessário
• não remova os acumuladores de frio do
cesto do congelador.
CONSELHOS PARA A
REFRIGERAÇÃO DE
ALIMENTOS FRESCOS
Para obter o melhor desempenho:
• não guarde alimentos quentes ou líqui-
dos que se evaporam no frigorífico
• cubra ou embrulhe os alimentos, parti-
cularmente se tiverem um cheiro forte
• posicione os alimentos de modo a que
o ar possa circular livremente em redor
CONSELHOS PARA A
REFRIGERAÇÃO
Conselhos úteis:
Carne (todos os tipos) : embrulhe em sacos de politeno e coloque na prateleira
de vidro acima da gaveta de vegetais.
Por motivos de segurança, guarde desta
forma por um dia ou dois no máximo.
Alimentos cozinhados, pratos frios, etc:
estes devem estar cobertos e podem ser
colocados em qualquer prateleira.
Fruta e vegetais: estes devem ser minuciosamente limpos e colocados nas gavetas especiais fornecidas.
Manteiga e queijo: estes devem ser colocados em recipientes herméticos especiais ou embrulhados em folha de alumínio
ou sacos de politeno para excluir o máximo de ar possível.
Garrafas de leite: estas devem ter uma
tampa e devem ser armazenadas na prateleira de garrafas na porta.
Bananas, batatas, cebolas e alho, se não
estiverem embalados, não devem ser
guardados no frigorífico.
CONSELHOS PARA A
CONGELAÇÃO
Para o ajudar a tirar partido do processo
de congelação, eis alguns conselhos importantes:
• a quantidade máxima de alimentos que
pode ser congelada em 24h. está mostrada na placa de dados;
• O processo de congelamento demora
24 horas. Não devem ser adicionados
mais alimentos para congelação durante este período;
• congele apenas alimentos de alta qualidade, frescos e extremamente limpos;
• Prepare os alimentos em pequenas
quantidades para permitir que sejam
rápida e completamente congeladas e
para tornar possível subsequentemente
descongelar apenas a quantidade necessária;
• embrulhe os alimentos em folha de alumínio ou politeno e certifique-se de
que as embalagens são herméticas;
• Não permita que os alimentos frescos e
descongelados entrem em contacto
com os alimentos já congelados, evitando assim o aumento de temperatura
dos alimentos congelados;
• os alimentos sem gordura são melhores
para armazenar que os alimentos com
gordura; o sal reduz o tempo de armazenamento dos alimentos;
• a água congela. Se for consumida imediatamente após a remoção do compartimento do congelador, poderá causar queimaduras de gelo na pele;
Page 42

www.aeg.com
42
• é aconselhável que anote a data de
congelação em cada embalagem individual para permitir que saiba o tempo
de armazenamento.
CONSELHOS PARA O
ARMAZENAMENTO DE
ALIMENTOS CONGELADOS
Para obter o melhor desempenho deste
aparelho, siga estas indicações:
• certifique-se de que os alimentos congelados comercialmente foram armazenados adequadamente pelo vendedor;
• certifique-se de que os alimentos congelados são transferidos do supermercado para o congelador no tempo mais
curto possível;
• não abra a porta muitas vezes, nem a
deixe aberta mais tempo do que o necessário;
• uma vez descongelados, os alimentos
degradam-se rapidamente e não podem voltar a ser congelados;
• não exceda o período de armazenamento indicado pelo produtor dos alimentos.
Page 43

MANUTENÇÃO E LIMPEZA
PORTUGUÊS
43
LIMPEZA DO INTERIOR
Antes de utilizar o aparelho pela primeira
vez, limpe o interior e todos os acessórios
internos com água morna e sabão neutro
de modo a remover o cheiro típico de um
produto novo, de seguida seque minuciosamente.
Não utilize detergentes ou pós
abrasivos, pois estes danificam o
acabamento.
CUIDADO
Retire a ficha da tomada antes de
efectuar qualquer operação de
manutenção.
Este aparelho contém hidrocarbonetos na sua unidade de arrefecimento; a manutenção e a recarga
devem, por isso, ser efectuadas
exclusivamente por técnicos autorizados.
LIMPEZA PERIÓDICA
O equipamento tem de ser limpo regularmente:
• limpe o interior e os acessórios com
água morna e sabão neutro.
• verifique regularmente os vedantes de
porta e limpe-os para se certificar de
que estão limpos e sem resíduos.
• lave e seque minuciosamente.
Não puxe, desloque nem danifi-
que quaisquer tubos e/ou cabos
dentro do armário.
Nunca utilize detergentes, pós
abrasivos, produtos de limpeza
muito perfumados ou cera de polir para limpar o interior, pois isto
irá danificar a superfície e deixar
um odor forte.
Limpe o condensador (grelha preta) e o
compressor que está no fundo do aparelho, com uma escova. Esta operação irá
melhorar o desempenho do aparelho e
poupar consumo de electricidade.
Tenha cuidado para não danificar
o sistema de arrefecimento.
Muitos agentes de limpeza de superfícies
de cozinhas contêm químicos que podem
atacar/danificar os plásticos usados neste
aparelho. Por esta razão é aconselhável
que a estrutura exterior deste aparelho
seja limpa apenas com água morna com
um pouco de solução de limpeza adicionada.
Após a limpeza, volte a ligar o equipamento à tomada de alimentação.
DESCONGELAR O FRIGORÍFICO
O gelo é automaticamente eliminado do
evaporador do compartimento do frigorífico sempre que o compressor de motor
pára, durante a utilização normal. A água
resultante da descongelação é descarregada por um canal para um recipiente especial, colocado na parte traseira por cima do aparelho, sobre o compressor de
motor, onde evapora.
É importante limpar periodicamente o orifício de descarga da água resultante da
descongelação no centro do canal do
compartimento do frigorífico para evitar
que um fluxo excessivo de água pingue
sobre os alimentos. Utilize o agente de
limpeza fornecido, que irá encontrar já inserido no orifício de descarga.
Page 44

www.aeg.com
44
DESCONGELAÇÃO DO
CONGELADOR
Haverá sempre a formação de uma certa
quantidade de gelo nas prateleiras do
congelador e em redor do compartimento superior.
Descongele o congelador quando a camada de gelo atingir uma espessura de 3
a 5 mm.
Para remover o gelo, siga estas
instruções:
• retire a ficha da tomada ou desligue o
aparelho
• retire os alimentos armazenados, envolva-os em várias folhas de jornal e coloque-os num local fresco
• retire as gavetas do congelador
• coloque material isolante à volta das
gavetas, por exemplo, cobertores ou
jornais.
Pode acelerar a descongelação se colocar
tigelas com água quente (não a ferver) no
interior do congelador
• Solte o canal de drenagem da posição
de repouso, puxe-o de acordo com a
ilustração e coloque-o no fundo do
congelador onde a água pode acumular
• raspe com cuidado o gelo quando começar a descongelar. Utilize um raspador de madeira ou de plástico
• quando todo o gelo tiver derretido,
limpe e seque o congelador e volte a
colocar o canal de drenagem no respectivo local.
• ligue o aparelho e volte a colocar os alimentos congelados.
É recomendável deixar o aparelho a
funcionar durante algumas horas na posição mais alta do termóstato para que
a temperatura de armazenamento ade-
quada seja atingida o mais depressa
possível.
Nunca utilize objectos metálicos
afiados para raspar o gelo do evaporador, pois pode danificá-lo.
Não utilize um dispositivo mecânico ou qualquer meio artificial para
acelerar o processo de descongelação além dos recomendados
pelo fabricante. Um aumento da
temperatura das embalagens dos
alimentos congelados, durante a
descongelação, pode reduzir o
tempo de armazenamento seguro.
Page 45

O QUE FAZER SE…
PORTUGUÊS
45
CUIDADO
Antes da resolução de problemas,
retire a ficha da tomada.
A resolução de problemas que
não se encontram neste manual
só deve ser efectuada por um
electricista qualificado ou uma
pessoa competente.
Existem alguns ruídos durante a
utilização normal (compressor, circulação de refrigerante).
Problema Causa possível Solución
O aparelho faz baru-
lho.
O aparelho não está apoiado correctamente.
Verifique se o aparelho está
estável (os quatro pés devem estar no chão).
O compressor funciona continuamente.
O regulador da Temperatura pode estar mal defini-
Defina uma temperatura
mais quente.
do.
A porta não está fechada
correctamente.
A porta foi aberta dema-
siadas vezes.
Consulte a secção "Fechar
a porta".
Não mantenha a porta
aberta mais tempo do que
o necessário.
A temperatura do produto
está demasiado elevada.
Deixe que a temperatura
do produto diminua até à
temperatura ambiente antes de o guardar.
A temperatura ambiente
está demasiado elevada.
A função FROSTMATIC
está ligada.
A função COOLMATIC es-
tá ligada.
A água escorre na
placa traseira do frigorífico.
Durante o processo de
descongelação automática, o gelo é descongelado
Reduza a temperatura ambiente.
Consulte "Função FROSTMATIC".
Consulte "Função COOLMATIC".
Isto é normal.
na placa traseira.
A água escorre para
o frigorífico.
Os produtos evitam que a
A saída de água está obstruída.
água escorra para o colector de água.
Limpe a saída de água.
Certifique-se de que os
produtos não entram em
contacto com a placa traseira.
A água escorre para
o chão.
A saída de água descongelada não escorre para o
tabuleiro de evaporação
Encaixe a saída de água
descongelada no tabuleiro
de evaporação.
acima do compressor.
Page 46

www.aeg.com
46
Problema Causa possível Solución
Existe demasiado ge-
lo.
A porta não está fechada
A temperatura no frigorífi-
A temperatura no
aparelho está dema-
Os produtos não estão
embalados correctamente.
correctamente.
co está demasiado baixa.
A porta não está fechada
correctamente.
Embale os produtos correctamente.
Consulte a secção "Fechar
a porta".
Defina uma temperatura
mais elevada.
Consulte a secção "Fechar
a porta".
siado alta.
A temperatura do produto
está demasiado elevada.
Deixe que a temperatura
do produto diminua até à
temperatura ambiente antes de o guardar.
Guardou demasiados pro-
dutos ao mesmo tempo.
A temperatura no frigorífico está demasi-
Não há circulação de ar
frio no aparelho.
ado alta.
A temperatura no
congelador está demasiado elevada.
O aparelho não funciona.
Os produtos estão demasiado perto uns dos outros.
O aparelho está desligado.
A ficha de alimentação
eléctrica não está correctamente inserida na toma-
Guarde menos produtos ao
mesmo tempo.
Certifique-se de que existe
circulação de ar frio no aparelho.
Armazene os produtos de
forma a haver circulação de
ar frio.
Ligue a máquina.
Ligue a ficha de alimentação eléctrica correctamente
à tomada.
da.
O aparelho não tem ali-
mentação. Não existe tensão na tomada.
Ligue um aparelho eléctrico
diferente à tomada. Contacte um electricista qualificado.
A lâmpada não funciona.
"dEMo" aparece no
visor.
A lâmpada está no modo
de espera.
O aparelho está no modo
de demonstração.
Feche e abra a porta.
Mantenha o botão OK premido durante aproximadamente 10 segundos a partir
do momento em que ouvir
um sinal sonoro longo e o
visor se apagar por um breve momento: o aparelho
começa a funcionar normalmente.
Se estes conselhos não resultarem, contacte o serviço de assistência da marca mais
próximo.
Page 47

FECHAR A PORTA
1.
Limpe as juntas da porta.
2.
Se necessário, ajuste a porta. Consulte "Instalação".
3.
Se necessário, substitua as juntas da
porta defeituosas. Contacte o Centro
de Assistência Técnica.
SUBSTITUIR A LÂMPADA
O aparelho está equipado com uma luz
interior LED de longa duração.
Apenas a assistência está autorizada a
substituir o dispositivo de iluminação.
Contacte o seu centro de assistência.
PORTUGUÊS
47
Page 48

www.aeg.com
48
INSTALAÇÃO
ADVERTÊNCIA
Leia as "Informações de segurança" cuidadosamente para a sua
segurança e funcionamento correcto do aparelho antes de o instalar.
POSICIONAMENTO
Instale este aparelho num local com uma
temperatura ambiente que corresponde à
classe climática indicada na placa de dados do aparelho:
LOCALIZAÇÃO
100 mm
min
A
20 mm
B
Classe
Temperatura ambiente
climática
SN +10 °C a + 32 °C
N +16 °C a + 32 °C
ST +16 °C a + 38 °C
T +16 °C a + 43 °C
O aparelho deve ser instalado num local
afastado de fontes de calor, como radiadores, termoacumuladores, luz solar directa, etc. Certifique-se de que o ar pode
circular livremente atrás do aparelho. Para
garantir o melhor desempenho possível
se o aparelho estiver debaixo de uma unidade suspensa na parede, a distância mínima entre o topo do aparelho e a unidade de parede deve ser pelo menos 100
mm. Em todo o caso, deve-se evitar colocar o aparelho debaixo de uma unidade
suspensa na parede. O nivelamento preciso é garantido por um ou vários pés
ajustáveis na base do aparelho.
ADVERTÊNCIA
Deve ser possível desligar o aparelho da corrente eléctrica; a ficha
de alimentação eléctrica tem de
estar facilmente acessível após a
instalação.
ESPAÇADORES TRASEIROS
2
1
4
3
Pode encontrar os dois espaçadores no
saco da documentação.
Execute estes passos para instalar os espaçadores:
1.
Liberte o parafuso.
2.
Encaixe o espaçador debaixo do parafuso.
3.
Rode o espaçador para a posição correcta.
4.
Volte a apertar os parafusos.
Page 49

LIGAÇÃO ELÉCTRICA
Antes de ligar, certifique-se de que a tensão e a frequência indicadas na placa de
dados correspondem à fonte de alimentação doméstica.
O aparelho deve ter uma ligação à terra.
A ficha do cabo de alimentação é fornecida com um contacto para este objectivo.
Se a tomada da fonte de alimentação do-
NIVELAMENTO
REVERSIBILIDADE DA PORTA
PORTUGUÊS
méstica não estiver ligada à terra, ligue o
aparelho a uma ligação à terra separada,
em conformidade com as normas actuais,
consultando um electricista qualificado.
O fabricante declina toda a responsabilidade caso as precauções de segurança
acima não sejam cumpridas.
Este aparelho cumpre com as directivas.
E.E.C.
Quando instalar o aparelho, certifique-se
de que fica nivelado. Isto pode ser conseguido com os dois pés ajustáveis na base,
à frente.
49
A
B
E
F
DC
ADVERTÊNCIA
Antes de efectuar qualquer operação, retire a ficha da tomada.
Recomendamos que execute as
seguintes operações com a ajuda
de outra pessoa que irá segurar as
portas do aparelho durante as
operações.
• Abra as portas. Desaparafuse a dobradiça central (B). Retire o espaçador de
plástico (A)
• Retire o espaçador (F) e coloque-o no
outro lado da cavilha da dobradiça (E).
• Retire as portas.
• Retire o pino de cobertura esquerdo da
dobradiça central (C, D) e coloque no
lado oposto.
• Coloque o pino da dobradiça central
(E) no orifício esquerdo da porta inferior.
Page 50

www.aeg.com
50
• Retire a cobertura (A) com a ajuda de
A
uma ferramenta. Desaparafuse a cavilha
(B) da dobradiça inferior e o espaçador
(C) e coloque-os no lado oposto.
• Volte a introduzir a cobertura (A) no lado oposto.
B
C
1
3
2
5
4
6
• Retire a pega. Desaparafuse o suporte
da pega superior da haste da pega (1).
Desaparafuse o suporte da pega inferior da porta (2)
• Retire a pega. Desaparafuse o suporte
da pega superior da haste da pega (1).
Desaparafuse o suporte da pega inferior da porta (2)
• Desaparafuse o suporte da pega superior da porta (3).
• Aparafuse novamente o suporte da pega na porta (4). Rode o suporte da pega com a pega e aparafuse-os à porta
(5) e ao suporte da pega instalado (6).
Page 51

PORTUGUÊS
51
12
1
2
34
2
1
• Retire com a ajuda de uma ferramenta.
(1).
• Desaparafuse o pino da dobradiça superior (2) e coloque-o no lado oposto.
• Volte a apertar a dobradiça superior.
• Coloque a porta superior na cavilha da
porta superior.
• Volte a colocar a porta superior na cavilha da dobradiça central (3), inclinando
ligeiramente as duas portas.
• Volte a apertar a dobradiça central.
Não se esqueça do espaçador de plástico.
Faça uma verificação final para garantir
que:
• Todos os parafusos estão apertados.
• A junta magnética adere ao aparelho.
• A porta abre e fecha correctamente.
Se a temperatura ambiente for baixa (por
exemplo, no Inverno), a junta pode não se
moldar perfeitamente ao aparelho. Neste
caso, aguarde que a junta adira naturalmente.
Caso não queira executar as operações
acima mencionadas, contacte o Serviço
Pós-venda mais próximo. Os custos da inversão das portas pelo técnico do Serviço
Pós-venda serão suportados por si.
DADOS TÉCNICOS
Dimensão
Altura 2010 mm
Largura 595 mm
Profundidade 660 mm
Autonomia com corte de
energia
Voltagem 230 - 240 V
Frequência 50 Hz
As informações técnicas encontram-se na
placa de características, no lado esquerdo
do interior do aparelho, e na etiqueta de
energia.
18 h
Page 52

www.aeg.com
52
RUÍDOS
Existem alguns ruídos durante o funcionamento normal (compressor, circulação do
refrigerante).
SSSRRR!
HISSS!
CLICK!
BRRR!
OK
CLICK!
BRRR!
CRACK!
BLUBB!
CLICK!
BRRR!
BLUBB!
BLUBB!
Page 53

HISSS!
PORTUGUÊS
HISSS!
53
SSSRRR!
CRACK!
SSSRRR!
CRACK!
Page 54

www.aeg.com
54
ÍNDICE DE MATERIAS
56 INFORMACIÓN SOBRE SEGURIDAD
59 DESCRIPCIÓN DEL PRODUCTO
60 PANEL DE MANDOS
64 USO DIARIO
68 CONSEJOS ÚTILES
70 MANTENIMIENTO Y LIMPIEZA
72 QUÉ HACER SI…
75 INSTALACIÓN
78 DATOS TÉCNICOS
79 RUIDOS
ASPECTOS MEDIOAMBIENTALES
Recicle los materiales con el símbolo . Coloque el material de embalaje en los
contenedores adecuados para su reciclaje.
Ayude a proteger el medio ambiente y la salud pública, así como a reciclar residuos de
aparatos eléctricos y electrónicos. No deseche los aparatos marcados con el símbolo
junto con los residuos domésticos. Lleve el producto a su centro de reciclaje local o
póngase en contacto con su oficina municipal.
CONSULTE EN NUESTRO SITIO WEB:
- Productos
- Folletos
- Manuales del usuario
- Solución de problemas
- Información sobre servicios
www.aeg.com
NOTAS
Advertencia - Información importante sobre seguridad.
Datos y recomendaciones generales
Información medioambiental
Salvo modificaciones.
Page 55

PARA OBTENER RESULTADOS PERFECTOS
Gracias por escoger este producto AEG. Este artículo ha sido creado para ofrecer un
rendimiento impecable durante muchos años, con innovadoras tecnologías que
facilitarán su vida y prestaciones que probablemente no encuentre en
electrodomésticos corrientes. Por favor, dedique algunos minutos a la lectura para
disfrutar de todas sus ventajas.
ACCESORIOS Y CONSUMIBLES
En la página web de AEG, encontrará todo lo necesario para la perfecta limpieza y
funcionamiento de todos sus electrodomésticos AEG. Junto con una amplia gama
de accesorios diseñados y fabricados conforme a los elevados estándares de calidad
característicos de la marca, desde utensilios de cocina especializados a cestos de
cubiertos, desde portabotellas a bolsas para el lavado de prendas delicadas...
ESPAÑOL
55
Visite la tienda web en
www.aeg.com/shop
ATENCIÓN Y SERVICIO AL CLIENTE
Le recomendamos que utilice recambios originales.
Cuando se ponga en contacto con el servicio técnico, asegúrese de tener a
mano los siguientes datos. Puede encontrar la información en la placa de
características.
Modelo
PNC
Número de serie
Page 56

www.aeg.com
56
INFORMACIÓN SOBRE SEGURIDAD
Por su seguridad y para garantizar el funcionamiento correcto del aparato, antes
de instalarlo y utilizarlo por primera vez
lea atentamente este manual del usuario,
incluidos los consejos y advertencias. Para
evitar errores y accidentes, es importante
que todas las personas que utilicen el
aparato estén perfectamente al tanto de
su funcionamiento y de las características
de seguridad. Conserve estas instrucciones y no olvide mantenerlas junto al aparato en caso de su desplazamiento o venta para que quienes lo utilicen a lo largo
de su vida útil dispongan siempre de la
información adecuada sobre el uso y la
seguridad.
Por la seguridad de personas y bienes, siga las normas de seguridad indicadas en
estas instrucciones, ya que el fabricante
no se hace responsable de daños provocados por omisiones.
SEGURIDAD DE NIÑOS Y
PERSONAS VULNERABLES
• Este electrodoméstico no está diseñado para que lo usen personas (incluidos
niños) con discapacidad física, sensorial
o mental, o con experiencia y conocimiento insuficientes, a menos que una
persona responsable de su seguridad
les supervise o instruya en el uso del
electrodoméstico.
No permita que los niños jueguen con
el electrodoméstico.
• Mantenga los materiales de embalaje
alejados de los niños. Existe riesgo de
asfixia.
• Si va a desechar el aparato, extraiga el
enchufe de la toma, corte el cable de
conexión (tan cerca del aparato como
pueda) y retire la puerta para impedir
que los niños al jugar puedan sufrir
descargas eléctricas o quedar atrapados en su interior.
• Si este aparato, que cuenta con juntas
de puerta magnéticas, sustituirá a un
aparato más antiguo con cierre de
muelle (pestillo) en la puerta, cerciórese
de inutilizar el cierre de muelle antes de
desechar el aparato antiguo. Evitará así
que se convierta en una trampa mortal
para niños.
INSTRUCCIONES GENERALES
DE SEGURIDAD
ADVERTENCIA
Mantenga libres de obstrucciones las
aberturas de ventilación del alojamiento
del aparato o de la estructura empotrada
• El aparato está diseñado para conservar los alimentos y bebidas de una vivienda normal, como se explica en este
folleto de instrucciones.
• No utilice dispositivos mecánicos ni
medios artificiales para acelerar el proceso de descongelación.
• No utilice otros aparatos eléctricos (como máquinas para hacer helados) dentro de los aparatos de refrigeración, a
menos que el fabricante haya autorizado su utilización para estos fines.
• No dañe el circuito del refrigerante.
• El circuito del refrigerante del aparato
contiene isobutano (R600a). Se trata de
un gas natural con un alto nivel de
compatibilidad medioambiental, aunque es inflamable.
Durante el transporte y la instalación
del aparato, cerciórese de no provocar
daños en el circuito de refrigeración.
Si el circuito de refrigeración se daña:
– mantenga el aparato alejado de las
llamas y de cualquier fuente de encendido
– ventile bien la habitación en la que
se encuentra el aparato
• Es peligroso alterar las especificaciones
o modificar este producto en modo alguno. Cualquier daño en el cable de
alimentación puede provocar un cortocircuito, un incendio o una descarga
eléctrica.
ADVERTENCIA
Los componentes eléctricos (cable de alimentación, enchufe,
compresor) debe sustituirlos un
técnico autorizado o personal de
reparaciones profesional a fin de
evitar riesgos.
Page 57

1.
El cable de alimentación no se debe prolongar.
2.
Compruebe que la parte posterior
del aparato no aplaste ni dañe el
enchufe. Un enchufe aplastado o
dañado puede recalentarse y provocar un incendio.
3.
Cerciórese de que tiene acceso al
enchufe del aparato.
4.
No tire del cable de alimentación.
5.
Si la toma de red está floja, no introduzca el enchufe. Existe riesgo
de descarga eléctrica o incendio.
6.
No utilice el aparato sin la tapa de
la bombilla (si está provisto de ella)
de iluminación interior.
• Este aparato es pesado. Debe tener
precauciones durante su desplazamiento.
• No retire ni toque elementos del compartimento congelador con las manos
húmedas o mojadas, ya que podría sufrir abrasión de la piel o quemaduras
por congelación.
• Evite la exposición prolongada del aparato a la luz solar directa.
• Las bombillas que se utilizan en este
aparato (si está provisto de ellas) son
especiales, y se han seleccionado exclusivamente para uso en aparatos domésticos. No pueden utilizarse para la
iluminación de la vivienda.
USO DIARIO
• No coloque recipientes calientes sobre
las piezas plásticas del aparato.
• No almacene gas ni líquido inflamable
en el aparato, ya que podrían estallar.
• No coloque alimentos directamente
contra la salida de aire de la pared posterior. (Si el aparato es No Frost, es decir, no acumula escarcha.)
• Los alimentos que se descongelen no
deben volver a congelarse.
• Guarde los alimentos congelados, que
se adquieren ya envasados, siguiendo
las instrucciones del fabricante.
• Se deben seguir estrictamente las recomendaciones del fabricante del aparato
sobre el almacenamiento. Consulte las
instrucciones correspondientes.
• No coloque bebidas carbonatadas o
con gas en el congelador, ya que se
ESPAÑOL
genera presión en el recipiente, que
podría estallar y dañar el aparato.
• Si se consumen polos helados retirados
directamente del aparato, se pueden
sufrir quemaduras causadas por el hielo.
57
CUIDADO Y LIMPIEZA
• Antes de realizar tareas de mantenimiento, apague el aparato y desconecte el enchufe de la toma de red.
• No limpie el aparato con objetos metálicos.
• No utilice objetos afilados para eliminar
el hielo del aparato. Utilice un raspador
plástico.
• Inspeccione habitualmente el desagüe
del agua descongelada del frigorífico.
Si es necesario, limpie el desagüe. Si el
desagüe se bloquea, el agua se acumulará en la base del aparato.
INSTALACIÓN
Para realizar la conexión eléctrica,
siga atentamente las instrucciones
de los párrafos correspondientes.
• Desembale el aparato y compruebe
que no tiene daños. No conecte el aparato si está dañado. Informe de los posibles daños de inmediato a la tienda
donde lo adquirió. En ese caso, conserve el material de embalaje.
• Es recomendable esperar al menos dos
horas antes de conectar el aparato, para permitir que el aceite regrese al
compresor.
• El aparato debe contar con circulación
de aire adecuada alrededor, ya que de
lo contrario se produce recalentamiento. Para conseguir una ventilación suficiente, siga las instrucciones correspondientes a la instalación.
• Siempre que sea posible, la parte posterior del producto debe estar contra
una pared, para evitar que se toquen
las partes calientes (compresor, condensador) y se produzcan quemaduras.
• El aparato no debe colocarse cerca de
radiadores ni de hornillas de cocina.
• Asegúrese de que es posible acceder
al enchufe después de instalar el electrodoméstico.
Page 58

www.aeg.com
58
• Realice la conexión sólo a un suministro
de agua potable (si está prevista una
conexión de agua).
ASISTENCIA
• Las tareas de servicio o mantenimiento
del aparato deben dejarse en manos
de un electricista homologado.
• No retire la tapa del LED. Si es necesario sustituir el panel de luces LED, póngase en contacto con el centro de servicio técnico más cercano.
• El producto debe ser reparado por un
técnico de servicio autorizado, y sólo
con piezas de recambio originales.
PROTECCIÓN DEL MEDIO
AMBIENTE
Este aparato no contiene gases
perjudiciales para la capa de ozono, ni en el circuito de refrigerante ni en los materiales aislantes. El
aparato no se debe desechar junto con los residuos urbanos. La
espuma aislante contiene gases
inflamables: el aparato se debe
desechar de acuerdo con la normativa vigente, que puede solicitar a las autoridades locales. No
dañe la unidad de refrigeración,
en especial la parte trasera, cerca
del intercambiador de calor. Los
materiales de este aparato marca-
dos con el símbolo
bles.
son recicla-
Page 59

DESCRIPCIÓN DEL PRODUCTO
ESPAÑOL
59
2 3 8 9 1071
Cajón Maxibox
1
Cajón Freshbox
2
Indicador de temperatura
3
Estantes de cristal
4
Refrigeración DynamicAir
5
Estante botellero
6
Panel de control
7
Estante para mantequilla
8
Estantes de la puerta
9
Estante para botellas
10
Cesto para congelación
11
Cajón Maxibox
12
Cesto Frostmatic
13
Placa de características
14
4 65
11121314
Page 60

www.aeg.com
60
PANEL DE MANDOS
1 2 3 4 5 6 7 8
Tecla ON/OFF del aparato
1
Tecla de enfriamiento de temperatura
2
del frigorífico
Tecla de calentamiento de tempera-
3
tura del frigorífico
Tecla Mode
4
Tecla OK
5
Tecla de enfriamiento de temperatura
6
del congelador
Tecla de calentamiento de tempera-
7
tura del congelador
Pantalla
8
Se puede cambiar el sonido predefinido
de las teclas a otro más alto manteniendo
pulsadas al mismo tiempo la tecla Mode y
la de enfriamiento de temperatura durante unos segundos. El cambio es reversible.
PANTALLA
6 74321 5
COOL FROST
Off
min
Indicador del compartimento frigorífi-
1
co
Indicador de temperatura del frigorífi-
2
co e indicador del temporizador
Indicador de apagado del frigorífico
3
Función COOLMATIC
4
Función Vacaciones
5
Función FROSTMATIC
6
Indicador de temperatura del conge-
7
lador
Indicador del compartimento conge-
8
lador
Indicador de alarma
9
MATICMATIC
11 10 89
Función de bloqueo infantil
10
Función Minute Minder
11
ENCENDIDO
Para encender el aparato:
1.
Conecte el enchufe a la toma de corriente.
2.
Pulse la tecla ON/OFF del aparato si
la pantalla está apagada.
3.
Puede que oiga la señal acústica de
alarma tras unos segundos.
Para restaurar la alarma, consulte la
sección "Alarma de temperatura alta".
4.
Si "dEMo" aparece en la pantalla, el
aparato está en el modo de demostración. Consulte la sección "Qué hacer si..."
5.
Los indicadores de temperatura
muestran la temperatura predetermi-
nada programada.
Para programar otra temperatura, consulte la sección "Regulación de la temperatura".
APAGADO
Para apagar el aparato:
1.
Pulse la tecla ON/OFF del aparato
durante 5 segundos.
2.
La pantalla se apaga.
3.
Para desconectar el aparato de la co-
rriente, desconecte el enchufe de la
toma de corriente.
APAGADO DEL FRIGORÍFICO
Para apagar el frigorífico:
1.
Pulse la tecla Mode hasta que aparez-
ca el icono correspondiente.
Page 61

Parpadean el indicador de apagado
del frigorífico y el indicador del compartimento frigorífico.
El indicador de temperatura del frigorífico muestra guiones.
2.
Pulse la tecla OK para confirmar.
3.
Aparece el indicador Apagado del frigorífico.
ENCENDIDO DEL
FRIGORÍFICO
Para encender el frigorífico:
1.
Pulse el regulador de temperatura del
frigorífico.
O:
1.
Pulse la tecla Mode hasta que aparezca el icono correspondiente.
El indicador Apagado del frigorífico
parpadea.
2.
Pulse la tecla OK para confirmar.
3.
Se apaga el indicador Apagado del
frigorífico.
Para programar otra temperatura, consulte la sección "Regulación de la temperatura".
REGULACIÓN DE LA
TEMPERATURA
La temperatura programada en el frigorífico y el congelador puede ajustarse pulsando los reguladores de temperatura.
Ajuste de la temperatura predeterminada:
• +5°C para el frigorífico
• -18°C para el congelador
Los indicadores de temperatura muestran
la temperatura programada.
La temperatura programada se alcanza en
un plazo de 24 horas.
Puede haber fluctuaciones de algunos
grados sobre la temperatura programada,
pero eso no supone un fallo del aparato.
Después de un corte del suministro eléctrico, la temperatura ajustada se guarda.
FUNCIÓN MINUTE MINDER
La función Minute Minder se utiliza para
ajustar una alarma acústica a la hora deseada y es útil, por ejemplo, para recetas
que precisan el enfriamiento de una
ESPAÑOL
mezcla durante un tiempo determinado,
o cuando se necesita un recordatorio para
no olvidar que se han colocado botellas
en el congelador para que se enfríen rápidamente.
Para activar la función:
1.
Pulse la tecla Mode hasta que aparezca el icono correspondiente.
El indicador Minute Minder parpadea.
El temporizador muestra el tiempo
programado (30 minutos) durante
unos segundos.
2.
Pulse la tecla de temperatura del frigorífico para cambiar el valor del
temporizador entre 1 y 90 minutos.
3.
Pulse la tecla OK para confirmar.
Aparece el indicador Minute Minder .
El Temporizador empieza a parpa-
dear (min).
Al terminar la cuenta atrás, el indicador
Minute Minder parpadea y suena la alarma:
1.
Saque todas las bebidas del compar-
timento congelador.
2.
Pulse la tecla OK para apagar el soni-
do y desactivar la función.
La función se puede desactivar en cualquier momento durante la cuenta atrás:
1.
Pulse la tecla Mode hasta que parpa-
dee el indicador Minute Minder .
2.
Pulse la tecla OK para confirmar.
3.
El indicador Minute Minder se apaga.
El tiempo puede modificarse durante la
cuenta atrás y al finalizar, pulsando las
teclas de enfriamiento o calentamiento
de temperatura del frigorífico.
61
FUNCIÓN SEGURO CONTRA
LA MANIPULACIÓN POR
NIÑOS
Para bloquear los botones y evitar manipulaciones involuntarias, seleccione la
función de seguro para niños.
Para encender el horno:
1.
Pulse la tecla Mode hasta que aparez-
ca el icono correspondiente.
2.
El indicador de bloqueo para niños
parpadea.
3.
Pulse la tecla OK para confirmar.
Aparece el indicador de bloqueo pa-
ra niños.
Page 62

www.aeg.com
62
Para apagar la función:
1.
Pulse la tecla Mode hasta que el bloqueo para niños parpadee.
2.
Pulse la tecla OK para confirmar.
3.
El indicador de bloqueo para niños se
apaga.
ALARMA DE TEMPERATURA
ALTA
Un aumento de la temperatura del compartimento congelador (por ejemplo, por
falta de energía eléctrica) se indicará mediante:
• indicadores de temperatura del congelador y alarma intermitentes
• emisión de una señal acústica.
Para reiniciar la alarma:
1.
Pulse cualquier tecla.
2.
El avisador acústico se apaga.
3.
El indicador de temperatura del congelador muestra la temperatura más
alta alcanzada durante unos segundos. A continuación vuelve a mostrar
la temperatura programada.
4.
El indicador de alarma sigue parpadeando hasta que se restablecen las
condiciones normales.
Cuando la alarma vuelve, el indicador se
apaga.
ALARMA DE PUERTA ABIERTA
Si la puerta del frigorífico se queda abierta durante unos minutos, sonará una señal
acústica. Los indicadores de puerta abierta son los siguientes:
• indicador de alarma intermitente
• señal acústica
Una vez restablecidas las condiciones normales (puerta cerrada), la alarma acústica
se detendrá.
FUNCIÓN COOLMATIC
Si necesita introducir una gran cantidad
de alimentos calientes, por ejemplo, después de haber hecho la compra, se aconseja activar la función COOLMATIC para
enfriarlos más rápidamente y evitar que
suba la temperatura de los que ya se
guardan en el frigorífico.
Para activar la función:
1.
Pulse la tecla Mode hasta que aparezca el icono correspondiente.
El indicador COOLMATIC parpadea.
2.
Pulse la tecla OK para confirmar.
Aparece el indicador COOLMATIC.
La función COOLMATIC se desactiva automáticamente después de unas 6 horas.
Para apagar la función antes de que termine automáticamente:
1.
Pulse la tecla Mode hasta que parpa-
dee el indicador COOLMATIC.
2.
Pulse la tecla OK para confirmar.
3.
El indicador COOLMATIC se apaga.
La función se apaga seleccionando una temperatura programada
diferente.
FUNCIÓN VACACIONES
Esta función permite mantener el frigorífico vacío y cerrado durante periodos largos de tiempo sin que se formen malos
olores.
El compartimento del frigorífico
debe estar vacío mientras la función esté activada.
Para activar la función:
1.
Pulse la tecla Mode hasta que aparez-
ca el icono correspondiente.
El indicador Vacaciones parpadea.
El indicador de temperatura del frigo-
rífico muestra la temperatura progra-
mada.
2.
Pulse la tecla OK para confirmar.
Aparece el indicador Vacaciones.
Para desactivar la función:
1.
Pulse la tecla Mode hasta que parpa-
dee el indicador Vacaciones.
2.
Pulse la tecla OK para confirmar.
3.
El indicador Vacaciones se apaga.
La función se apaga seleccionando una temperatura programada
diferente.
FUNCIÓN FROSTMATIC
Para activar la función:
1.
Pulse la tecla Mode hasta que aparez-
ca el icono correspondiente.
El indicador FROSTMATIC parpadea.
Page 63

2.
Pulse la tecla OK para confirmar.
Aparece el indicador FROSTMATIC.
La función se detiene automáticamente
después de 52 horas.
Para apagar la función antes de que termine automáticamente:
1.
Pulse la tecla Mode hasta que parpa-
dee el indicador FROSTMATIC.
2.
Pulse la tecla OK para confirmar.
3.
El indicador FROSTMATIC se apaga.
Coloque los alimentos para congelar en el cesto FROSTMATIC.
La función se apaga seleccionando una temperatura programada
diferente para el congelador.
ESPAÑOL
63
Page 64

www.aeg.com
64
USO DIARIO
ALMACENAMIENTO DE
ALIMENTOS CONGELADOS
Al poner en marcha el aparato por primera vez o después de un periodo sin uso,
déjelo en marcha al menos durante 2 horas con un ajuste alto antes de colocar los
productos en el compartimento.
En caso de producirse una descongelación accidental, por ejemplo, por un corte del suministro
eléctrico, y si la interrupción ha sido más prolongada que el valor
indicado en el campo "tiempo de
elevación" de la tabla de características técnicas, será necesario
consumir cuanto antes los alimentos descongelados o cocinarlos
de inmediato y congelarlos de
nuevo (después de que se hayan
enfriado).
CONGELACIÓN DE
ALIMENTOS FRESCOS
El compartimento congelador es adecuado para congelar alimentos frescos y con-
INDICADOR DE TEMPERATURA
servar a largo plazo los alimentos congelados y ultracongelados.
Para congelar alimentos frescos, active la
función FROSTMATIC al menos 24 horas
antes de introducir los alimentos en el
compartimento congelador.
Coloque los alimentos que vaya a congelar en el compartimento FROSTMATIC.
La cantidad máxima de alimentos que
puede congelarse en 24 horas se indica
en la placa de datos técnicos, una etiqueta situada en el interior del aparato.
El proceso de congelación tarda 24 horas:
durante ese tiempo no deben añadirse
otros alimentos para congelar.
DESCONGELACIÓN
Los alimentos ultracongelados o congelados, antes de utilizarlos, se pueden descongelar en el compartimento frigorífico
o a temperatura ambiente, dependiendo
del tiempo de que se disponga.
Es posible incluso cocinar piezas pequeñas congeladas, tomadas directamente
del congelador; en tal caso, el tiempo de
cocción será más prolongado.
El termostato debe ajustarse
Temperatura correcta
OK
Para ayudarle a controlar correctamente
su aparato, hemos instalado un indicador
de temperatura en el frigorífico.
El símbolo lateral indica el área más fría
del frigorífico.
El área más fría va desde el estante de
cristal del cajón para frutas y verduras hasta el símbolo o hasta el estante situado a
la misma altura que el símbolo.
Para almacenar correctamente los alimentos, asegúrese de que el indicador de
temperatura muestra el mensaje “OK”.
Si no muestra “OK”, ajuste el controlador
de temperatura en más frío y espere 12
horas antes de volver a comprobar el indicador de temperatura.
Tras introducir alimentos frescos en el
aparato o abrir varias veces la puerta durante un periodo prolongado, es normal
que desaparezca el mensaje “OK”.
Page 65

ENFRIAMIENTO POR AIRE
ESTANTES MÓVILES
ESPAÑOL
La tecnología ClimaTech permite enfriar
los alimentos con rapidez y mantener una
temperatura más uniforme dentro del
compartimento.
Este dispositivo permite enfriar los alimentos con más rapidez y mantener una
temperatura más uniforme dentro del
compartimento.
Las paredes del frigorífico cuentan con
una serie de guías para colocar los estantes del modo que se prefiera.
65
ESTANTE BOTELLERO
Coloque las botellas (con la parte del tapón hacia fuera) en el estante botellero
provisto al efecto.
Si coloca el botellero en posición horizontal, úselo sólo para botellas cerradas.
El estante botellero puede inclinarse para
guardar botellas previamente abiertas.
Para inclinarlo, tire del estante hacia arriba de forma que pueda girarlo y colocarlo
en el nivel más alto siguiente.
Page 66

www.aeg.com
66
CAJÓN FRESHBOX
El cajón alcanza una temperatura más baja que en el resto del frigorífico y es idóneo para almacenar alimentos frescos como pescado, carne y marisco.
COLOCACIÓN DE LOS ESTANTES DE LA PUERTA
Para poder guardar alimentos de distintos
tamaños, los estantes de la puerta se pueden colocar a diferentes alturas.
1
2
3
Para cambiar la posición de los estantes:
mueva paulatinamente el estante en la dirección de las flechas hasta retirarlo del
soporte y colóquelo en la posición que
desee.
CAJÓN MAXIBOX
Este cajón es adecuado para guardar frutas y verduras.
Dentro del cajón hay un separador que se
puede colocar en diferentes posiciones
para dividir el espacio según las necesidades personales.
El fondo del cajón incorpora una rejilla (si
el aparato va equipado con ella) que permite mantener las frutas y verduras separadas de cualquier humedad que se pueda formar en la superficie inferior.
Retire todas las piezas del interior del cajón para su limpieza.
Page 67

EXTRACCIÓN DE LOS CESTOS DE CONGELADOS DEL
CONGELADOR
Los cestos de congelados llevan un tope
para impedir que se salgan de las guías o
se caigan. Para extraer un cesto del congelador, tire de él hacia fuera y, cuando
2
1
llegue al tope, retírelo tirando suavemente de su parte delantera hacia arriba.
Para volver a colocarlo en su lugar, levante ligeramente la parte delantera del cesto e insértelo en el congelador. Cuando
haya superado los topes, empuje los cestos hasta el fondo.
ESPAÑOL
67
Page 68

www.aeg.com
68
CONSEJOS ÚTILES
SONIDOS DE
FUNCIONAMIENTO NORMAL
• Es posible que oiga un gorgoteo o un
burbujeo cuando el refrigerante se
bombea por el serpentín o los tubos.
Esto es correcto.
• Cuando está en marcha, el compresor
bombea el refrigerante a través de todo el circuito y emite un zumbido o un
sonido intermitente. Esto es correcto.
• La dilatación térmica puede causar una
serie de crujidos repentinos. Se trata de
un fenómeno físico natural y no peligroso. Esto es correcto.
CONSEJOS PARA AHORRAR
ENERGÍA
Para obtener los mejores resultados:
• no abra la puerta con frecuencia ni la
deje abierta más tiempo del estrictamente necesario.
• no saque los acumuladores de frío del
cesto de congelación.
CONSEJOS PARA LA
REFRIGERACIÓN DE
ALIMENTOS FRESCOS
Para obtener los mejores resultados:
• no guarde en el frigorífico alimentos
calientes ni líquidos en evaporación;
• cubra o envuelva los alimentos, en es-
pecial si tienen sabores fuertes;
• coloque los alimentos de modo que el
aire pueda circular libremente entre
ellos.
CONSEJOS PARA LA
REFRIGERACIÓN
Consejos útiles:
Carne (de todo tipo): guárdela en bolsas
de plástico y colóquela en el estante de
vidrio, sobre el cajón de las verduras.
Por razones de seguridad, guárdela de
ese modo durante uno o dos días, como
máximo.
Alimentos cocinados, platos fríos, etc..:
los debe cubrir y puede colocarlos en
cualquiera de los estantes.
Frutas y verduras: se deben limpiar a conciencia y colocar en los cajones especiales
suministrados a tal efecto.
Mantequilla y queso: colóquelos en recipientes herméticos especiales o envueltos
en papel de aluminio o en bolsas de plástico, para excluir tanto aire como sea posible.
Botellas de leche: deben tener tapa y se
colocarán en el estante para botellas de
la puerta.
Los plátanos, las patatas, las cebollas y los
ajos, si no están empaquetados, no deben guardarse en el frigorífico.
CONSEJOS SOBRE LA
CONGELACIÓN
Estos consejos son importantes para poder aprovechar al máximo el proceso de
congelación:
• la cantidad máxima de alimentos que
puede congelarse en 24 horas se muestra en la placa de datos técnicos;
• el proceso de congelación requiere 24
horas. Durante ese periodo no deben
añadirse otros alimentos para congelación;
• congele sólo productos alimenticios de
máxima calidad, frescos y perfectamente limpios;
• prepare los alimentos en porciones pequeñas para que se congelen de manera rápida y total, así como para poder
descongelar posteriormente sólo las
cantidades necesarias;
• envuelva los alimentos en papel de aluminio o polietileno y compruebe que
los envoltorios quedan herméticamente
cerrados;
• no permita que alimentos frescos y sin
congelar entren en contacto con alimentos ya congelados, para evitar el
aumento de temperatura de los segundos;
• los alimentos magros se congelan mejor que los grasos; la sal reduce el tiempo de almacenamiento de los alimentos;
• el hielo, si se consume inmediatamente
después de retirarlo del compartimento
congelador, puede provocar quemaduras por congelación en la piel;
Page 69

• es recomendable etiquetar cada paquete con la fecha de congelación para
controlar el tiempo que permanecen almacenados.
CONSEJOS PARA EL
ALMACENAMIENTO DE
ALIMENTOS CONGELADOS
Para obtener el máximo rendimiento de
este aparato, deberá:
• comprobar que el comerciante ha mantenido los productos congelados correctamente almacenados;
• procurar que los alimentos congelados
pasen de la tienda al congelador en el
menor tiempo posible;
• evitar la apertura frecuente de la puerta
o dejarla abierta más del tiempo estrictamente necesario;
• los alimentos descongelados se deterioran con rapidez y no pueden congelarse de nuevo;
• no supere el tiempo de almacenamiento indicado por el fabricante de los alimentos.
ESPAÑOL
69
Page 70

www.aeg.com
70
MANTENIMIENTO Y LIMPIEZA
LIMPIEZA DE LAS PARTES
INTERNAS
Antes del empleo limpiar todas las partes
internas con agua tibia y jabón neutro, a
fin de eliminar el característico olor de
nuevo y secarlas luego cuidadosamente.
No utilice detergentes ni polvos
abrasivos, ya que podrían dañar el
acabado
PRECAUCIÓN
Antes de realizar tareas de mantenimiento, desenchufe el aparato.
Este equipo contiene hidrocarburos en la unidad de refrigeración;
por tanto, el mantenimiento y la
recarga deben estar a cargo exclusivamente de técnicos autorizados.
LIMPIEZA PERIÓDICA
El equipo debe limpiarse de manera habitual:
• Limpie el interior y los accesorios con
agua templada y un jabón neutro.
• Revise y limpie periódicamente las juntas de la puerta para mantenerlas limpias y sin restos.
• Aclare y seque a fondo.
No mueva, dañe ni tire de los con-
ductos o cables del interior del armario.
No utilice detergentes, polvos
abrasivos, productos de limpieza
perfumados ni cera para limpiar el
interior, ya que dañarán la superficie y dejarán un fuerte olor.
Limpie el condensador (rejilla negra) y el
compresor de la parte posterior del aparato con un cepillo. Esa operación mejorará el rendimiento del aparato y reducirá
el consumo eléctrico.
Tenga cuidado para no dañar el
sistema de refrigeración.
Muchas marcas de limpiadores de superficies de cocina contienen químicos que
pueden atacar o dañar los plásticos del
aparato. Por tal razón, se recomienda que
el exterior del aparato se limpie sólo con
agua templada a la que se añadirá un poco de líquido lavavajillas.
Después de la limpieza, vuelva a conectar
el aparato a la toma de red.
DESCONGELACIÓN DEL FRIGORÍFICO
La escarcha se elimina automáticamente
del evaporador del frigorífico cada vez
que se detiene el compresor, durante el
funcionamiento normal. El agua de la descongelación se descarga por un canal hacia un recipiente especial situado en la
parte posterior del aparato, sobre el motor compresor, desde donde se evapora.
Es importante limpiar periódicamente el
orificio de salida del agua de descongelación situado en la mitad del canal del
compartimento frigorífico para evitar que
el agua se desborde y caiga sobre los alimentos del interior. Utilice el limpiador
especial suministrado, que hallará ya colocado en el orificio de desagüe.
Page 71

DESCONGELACIÓN DEL
CONGELADOR
Siempre se forma un poco de escarcha en
los estantes del congelador y en torno al
compartimento superior.
Descongele el congelador sólo cuando la
capa de escarcha alcance un grosor de
unos 3 a 5 mm.
Para eliminar la escarcha, siga estos
pasos:
• retire el enchufe de la toma de corriente o apague el aparato
• retire los alimentos congelados, envuélvalos en varias hojas de papel de periódico y colóquelos en un sitio fresco
• retire los cajones del congelador
• coloque material aislante alrededor de
los cajones, por ejemplo, mantas o periódicos.
Para acelerar la descongelación puede
colocar recipientes con agua caliente (no
hirviendo) en el interior del congelador
• Afloje el canal de drenaje de su posición de reposo, empújelo como indica
la ilustración y colóquelo en el cajón inferior del congelador, donde se pueda
acumular el agua
• Quite el hielo raspándolo suavemente a
medida que se derrita. Utilice un raspador de madera o plástico
• Cuando se haya derretido todo el hielo,
limpie y seque el interior del armario
congelador y vuelva a colocar en su lugar el canal de desagüe.
• Conecte el armario y vuelva a introducir
los alimentos congelados.
Se recomienda hacer funcionar el aparato en la posición máxima del control
del termostato durante algunas horas,
para que pueda alcanzar la temperatura de almacenamiento adecuada en el
menor tiempo posible.
ESPAÑOL
No utilice herramientas metálicas
afiladas para raspar la escarcha
del evaporador, ya que podría dañarlo. No utilice dispositivos mecánicos ni medios artificiales para
acelerar el proceso de descongelación, excepto los recomendados
por el fabricante. El aumento de
la temperatura de los paquetes
de alimentos congelados durante
la descongelación puede acortar
su tiempo de almacenamiento.
71
Page 72

www.aeg.com
72
QUÉ HACER SI…
PRECAUCIÓN
Desenchufe el aparato antes de
realizar cualquier reparación.
Las medidas de resolución de
problemas que no se indican en
este manual deben dejarse en
manos de un electricista o profesional cualificado y competente.
Se oyen sonidos durante el funcionamiento normal (compresor,
circulación de refrigerante).
Problema Causa posible Solución
El aparato hace rui-
do.
El aparato no está bien
apoyado en el suelo.
Compruebe que los soportes del aparato descansan
sobre una superficie estable (las cuatro patas deben
estar bien apoyadas en el
suelo).
El compresor funciona continuamente.
Puede que el ajuste del regulador de temperatura
Seleccione una temperatura más alta.
sea incorrecto.
La puerta no está bien ce-
rrada.
La puerta se ha abierto
con excesiva frecuencia.
Consulte la sección "Cierre
de la puerta".
No mantenga abierta la
puerta más tiempo del necesario.
La temperatura de los ali-
mentos es demasiado alta.
Deje que la temperatura de
los alimentos descienda a
la temperatura ambiente
antes de guardarlos.
La temperatura ambiente
es demasiado alta.
La función FROSTMATIC
se activa.
La función COOLMATIC
se activa.
El agua fluye por la
placa posterior del
frigorífico.
Durante el proceso de
descongelación automática, el hielo se descongela
Reduzca la temperatura
ambiente.
Consulte la sección "Función FROSTMATIC".
Consulte la sección "Función COOLMATIC".
Esto es normal.
en la placa posterior.
El agua fluye al interior del frigorífico.
Los alimentos impiden
El agua fluye hacia el
suelo.
La salida de agua está
obstruida.
que el agua fluya al colector.
El agua de la descongelación no fluye hacia la bandeja de evaporación situa-
Limpie la salida de agua.
Asegúrese de que los alimentos no entran en contacto con la placa posterior.
Fije la salida de agua de
descongelación a la bandeja de evaporación.
da sobre el compresor.
Page 73

ESPAÑOL
Problema Causa posible Solución
Hay demasiada escar-
cha.
La puerta no está bien ce-
La temperatura del frigorí-
La temperatura del
aparato es demasia-
Los productos no están
bien envueltos.
rrada.
fico es demasiado baja.
La puerta no está bien ce-
rrada.
Envuelva mejor los productos.
Consulte la sección "Cierre
de la puerta".
Seleccione una temperatura más alta.
Consulte la sección "Cierre
de la puerta".
do alta.
La temperatura de los ali-
mentos es demasiado alta.
Deje que la temperatura de
los alimentos descienda a
la temperatura ambiente
antes de guardarlos.
Se han guardado muchos
alimentos al mismo tiem-
Guarde menos productos al
mismo tiempo.
po.
La temperatura del
frigorífico es demasiado alta.
La temperatura del
congelador es demasiado alta.
El aparato no funcio-
No hay circulación de aire
frío en el aparato.
Compruebe que el aire frío
circula libremente en el
aparato.
Los alimentos están demasiado juntos.
Disponga los alimentos de
modo que el aire frío pueda
circular entre ellos.
El aparato está apagado. Encienda el aparato.
na.
El aparato no está correc-
tamente enchufado a la
toma de corriente.
El aparato no recibe sumi-
nistro eléctrico. No hay
tensión en la toma de corriente.
La bombilla no funciona.
"dEMo" aparece en
la pantalla.
La bombilla está en espera.
El aparato está en modo
de demostración.
Enchufe el aparato correctamente a la toma de corriente.
Enchufe un aparato eléctrico diferente a la toma de
corriente. Llame a un electricista cualificado.
Cierre y abra la puerta.
Mantenga pulsada aproximadamente 10 s la tecla
OK pues se escucha un largo sonido del zumbador y
la pantalla se apaga brevemente: el aparato empieza
a funcionar con normalidad.
Si los consejos anteriores no ofrecen resultados, llame al centro de servicio técnico
más cercano.
2.
CIERRE DE LA PUERTA
1.
Limpie las juntas de la puerta.
Si es necesario, ajuste la puerta. Consulte "Instalación".
73
Page 74

www.aeg.com
74
3.
Si es necesario, cambie las juntas defectuosas. Póngase en contacto con
el servicio técnico.
CAMBIO DE LA BOMBILLA
El aparato está equipado con una luz LED
interior de larga duración.
El dispositivo de iluminación sólo debe
ser sustituido por el servicio técnico. Póngase en contacto con el servicio técnico.
Page 75

INSTALACIÓN
ESPAÑOL
75
ADVERTENCIA
Lea atentamente la "Información
sobre seguridad" para garantizar
su propia seguridad y el correcto
funcionamiento del electrodoméstico antes de instalar el electrodoméstico.
COLOCACIÓN
Instale el aparato en un punto en el que la
temperatura ambiente se corresponda
con la clase climática indicada en la placa
de datos técnicos del aparato:
UBICACIÓN
100 mm
min
A
20 mm
B
Clase
Temperatura ambiente
climática
SN +10°C a + 32°C
N +16°C a + 32°C
ST +16°C a + 38°C
T +16°C a + 43°C
Instale el aparato alejado de fuentes de
calor, como radiadores, calderas, luz solar
directa, etc. Asegúrese también de que el
aire pueda circular sin obstáculos por la
parte trasera del aparato. Para garantizar
un rendimiento óptimo, si el aparato se
coloca debajo de un mueble de cocina
instalado en la pared, deje una distancia
mínima de 100 mm entre la parte superior
del aparato y el mueble de pared. No
obstante, lo ideal sería que el aparato no
se colocara debajo de ningún mueble instalado en la pared. La base del aparato
está provista de una o varias patas ajustables para garantizar un nivelado correcto
del mismo.
ADVERTENCIA
Puede que en algún momento sea
necesario desenchufar el aparato
de la toma de corriente; por lo
tanto, el enchufe debe ser fácilmente accesible tras la instalación
del aparato.
Page 76

www.aeg.com
76
SEPARADORES TRASEROS
2
1
4
3
CONEXIÓN ELÉCTRICA
Antes de conectar el aparato, compruebe
que el voltaje y la frecuencia que aparecen en la placa de datos técnicos se corresponden con el suministro de la vivienda.
El aparato debe tener conexión a tierra. El
enchufe del cable de alimentación se suministra con un contacto para tal fin. Si la
NIVELACIÓN
Encontrará los dos separadores en la bolsa que contiene la documentación.
Siga estos pasos para colocar los separadores:
1.
Afloje el tornillo.
2.
Encaje el separador debajo del tornillo.
3.
Gire el separador a la posición derecha.
4.
Apriete de nuevo los tornillos.
toma de red de la vivienda carece de conexión a tierra, conecte el aparato a una
toma de tierra conforme con la normativa,
después de consultar a un electricista
profesional.
El fabricante rechaza toda responsabilidad si no se toman las precauciones antes
indicadas.
Este aparato es conforme con las directivas de la CEE.
Al colocar el aparato compruebe que
queda nivelado. Esto se puede conseguir
utilizando las dos patas ajustables de la
parte inferior delantera.
Page 77

CAMBIO DEL SENTIDO DE APERTURA DE LA PUERTA
ESPAÑOL
77
A
B
E
F
DC
A
ADVERTENCIA
Desenchufe siempre el electrodoméstico antes de llevar a cabo
cualquier operación.
Los procedimientos que se indican a continuación requieren la
ayuda de otra persona que sujete
bien las puertas del aparato durante todo el proceso.
• Abra la puerta. Desatornille la bisagra
intermedia (B). Retire el separador de
plástico (A).
• Extraiga el separador (F) y colóquelo en
el otro lado del pivote de la bisagra (E).
• Retire las puertas.
• Extraiga el pasador de la tapa izquierda
de la bisagra intermedia (C, D) y colóquelo en el otro lado.
• Introduzca el pasador de la bisagra intermedia (E) en el orificio izquierdo de
la puerta inferior.
• Utilice una herramienta para retirar la
cubierta (A). Desatornille el pivote de la
bisagra inferior (B) y el separador (C), y
colóquelos en el lado contrario.
• Vuelva a introducir la cubierta (A) en el
lado contrario.
B
C
1
3
2
5
4
6
• Retire la empuñadura. Desatornille la
abrazadera de la manilla superior de la
varilla (1). Desatornille la abrazadera de
la manilla inferior de la puerta (2).
• Retire la empuñadura. Desatornille la
abrazadera de la manilla superior de la
varilla (1). Desatornille la abrazadera de
la manilla inferior de la puerta (2).
• Desatornille la abrazadera de la manilla
superior de la puerta (3).
• vuelva a atornillar la abrazadera de la
manilla en la puerta (4). Gire la abrazadera de la manilla con la manilla y atorníllelas a la puerta (5) y a la abrazadera
de la manilla montada (6).
Page 78

www.aeg.com
78
12
1
2
34
2
1
• Utilice una herramienta para retirar la
tapa. (1).
• Desatornille el pivote de la bisagra superior (2) y colóquelo en el lado contrario.
• Vuelva a atornillar la bisagra superior.
• Encaje la puerta superior en el pivote
de la puerta superior.
• Vuelva a colocar la puerta superior en
el pivote de la bisagra intermedia (3) e
incline ligeramente las dos puertas.
• Vuelva a atornillar la bisagra intermedia. No olvide colocar el separador de
plástico.
Finalmente, compruebe que:
• Todos los tornillos están apretados.
• La junta magnética se adhiere al mueble.
• La puerta abre y cierra correctamente.
Es posible que la junta no encaje a la perfección en el mueble si la temperatura
ambiente es baja (es decir, en invierno).
En tal caso, espere hasta que la junta se
fije al mueble de forma natural.
Si prefiere no realizar los procedimientos
anteriores, póngase en contacto con el
centro de servicio técnico más próximo.
El personal del centro de servicio técnico
cambiará el sentido de apertura de las
puertas con gastos a su cargo.
DATOS TÉCNICOS
Medidas
Altura 2010 mm
Anchura 595 mm
Profundidad 660 mm
Tiempo de estabilización 18 h
Tensión 230 - 240 V
Frecuencia 50 Hz
La información técnica se encuentra en la
placa de características, situada en el lado
interior izquierdo del aparato, y en la etiqueta de consumo energético.
Page 79

RUIDOS
Durante el funcionamiento normal del
aparato suelen producirse ciertos ruidos
(compresor, circulación del refrigerante).
SSSRRR!
HISSS!
ESPAÑOL
CLICK!
BRRR!
79
OK
CLICK!
BRRR!
CRACK!
BLUBB!
CLICK!
BRRR!
BLUBB!
BLUBB!
Page 80

www.aeg.com
80
HISSS!
HISSS!
SSSRRR!
CRACK!
SSSRRR!
CRACK!
Page 81

ESPAÑOL
81
Page 82

www.aeg.com
82
Page 83

ESPAÑOL
83
Page 84

www.aeg.com/shop 280150122-A-522011
 Loading...