

Page 1

S 60362 KG
S 60362 KG8
Kühl-/Gefrierkombination
Refrigerator freezer combination
Gebrauchsanweisung
Instruction book
B/AE/NY13-1.(07.)
200371893
PERFEKT IN FORM UND FUNKTION
Page 2
2
Sehr geehrte Kundin, sehr geehrter Kunde,
bevor Sie Ihr neues Kältegerät in Betrieb nehmen, lesen Sie bitte diese
Gebrauchsanweisung aufmerksam durch. Sie enthält wichtige Informationen
zum sicheren Gebrauch, zum Aufstellen und zur Pflege des Gerätes.
Bewahren Sie bitte die Gebrauchsanweisung zum späteren Nachschlagen auf.
Geben Sie sie an eventuelle Nachbesitzer des Gerätes weiter.
Hinweis: Diese Gebrauchsanweisung ist für mehrere technisch vergleichbare
Modelle mit unterschiedlicher Ausstattung bestimmt. Beachten Sie bitte nur
die Hinweise, die Ihre Geräteausführung betreffen.
Mit dem Warndreieck und/oder durch Signalwörter (Warnung!, Vorsicht!,
Achtung!) sind Hinweise hervorgehoben, die für Ihre Sicherheit oder für die
Funktionsfähigkeit des Gerätes wichtig sind. Bitte unbedingt beachten.
1. Dieses Symbol und Nummern leiten Sie Schritt für Schritt beim Bedienen
des Gerätes.
2. .....
Nach diesem Zeichen erhalten Sie ergänzende Informationen zur Bedienung
und praktischen Anwendung des Gerätes.
Mit dem Kleeblatt sind Tips und Hinweise zum wirtschaftlichen und
umweltschonenden Einsatz des Gerätes gekennzeichnet.
Für evtl. auftretende Störungen enthält die Gebrauchsanweisung Hinweise
zur selbständigen Behebung, siehe Abschnitt “Abhilfe bei Störungen”. Sollten
diese Hinweise nicht ausreichen, haben Sie jederzeit zwei Anlaufstellen, bei
denen Ihnen weitergeholfen wird:
Wir sind für Sie da:
montags bis freitags
8.00 bis 20.00 Uhr
samstags
10.00 bis 14.00 Uhr.
Hier erhalten Sie Antwort auf jede Frage, die die Ausstattung und den Einsatz
Ihres Gerätes betrifft. Natürlich nehmen wir auch gerne Wünsche,
Anregungen und Kritik entgegen. Unser Ziel ist es, zum Nutzen unserer
Kunden unsere Produkte und Dienstleistungen weiter zu verbessern.
Bei technischen Problemen steht Ihnen unser WERKSKUNDENDIENST in Ihrer
Nähe jederzeit zur Verfügung (Adressen und Telefonnummern finden Sie im
Verzeichnis Garantiebedingungen/ Kundendienststellen).
Beachten Sie dazu den Abschnitt „Kundendienst“..
Gedruckt auf umweltschonend hergestelltem Papier.
– wer ökologisch denkt, handelt auch so ...
Page 3

3
Inhalt
Sicherheit. . . . . . . . . . . . . . . . . . . . . . . . . . . . . . . . . . . . . . . . . . . . . . . . . . . . . 5
Entsorgung . . . . . . . . . . . . . . . . . . . . . . . . . . . . . . . . . . . . . . . . . . . . . . . . . . . 7
Information zur Geräteverpackung . . . . . . . . . . . . . . . . . . . . . . . . . . . . . . . . 7
Entsorgung von Altgeräten . . . . . . . . . . . . . . . . . . . . . . . . . . . . . . . . . . . . . . 7
Gerät transportieren . . . . . . . . . . . . . . . . . . . . . . . . . . . . . . . . . . . . . . . . . . . 7
Transportschutz entfernen . . . . . . . . . . . . . . . . . . . . . . . . . . . . . . . . . . . . . . 8
Transportsicherung für Ablagen . . . . . . . . . . . . . . . . . . . . . . . . . . . . . . . . . 8
Aufstellen. . . . . . . . . . . . . . . . . . . . . . . . . . . . . . . . . . . . . . . . . . . . . . . . . . . . . 8
Aufstellort . . . . . . . . . . . . . . . . . . . . . . . . . . . . . . . . . . . . . . . . . . . . . . . . . . . . 8
Wandabstand . . . . . . . . . . . . . . . . . . . . . . . . . . . . . . . . . . . . . . . . . . . . . . . . . . 9
Das Kältegerät braucht Luft. . . . . . . . . . . . . . . . . . . . . . . . . . . . . . . . . . . . . . 9
Gerät ausrichten . . . . . . . . . . . . . . . . . . . . . . . . . . . . . . . . . . . . . . . . . . . . . . . 9
Elektrischer Anschluß . . . . . . . . . . . . . . . . . . . . . . . . . . . . . . . . . . . . . . . . . . . 9
Türanschlag wechseln . . . . . . . . . . . . . . . . . . . . . . . . . . . . . . . . . . . . . . . . . 11
Türgriffwechsel . . . . . . . . . . . . . . . . . . . . . . . . . . . . . . . . . . . . . . . . . . . . . . . 12
Gerätebeschreibung. . . . . . . . . . . . . . . . . . . . . . . . . . . . . . . . . . . . . . . . . . . 13
Geräteansicht. . . . . . . . . . . . . . . . . . . . . . . . . . . . . . . . . . . . . . . . . . . . . . . . . 13
Bedienfeld . . . . . . . . . . . . . . . . . . . . . . . . . . . . . . . . . . . . . . . . . . . . . . . . . . . 14
Kühlschrank . . . . . . . . . . . . . . . . . . . . . . . . . . . . . . . . . . . . . . . . . . . . . . . . . . 14
Gefrierschrank . . . . . . . . . . . . . . . . . . . . . . . . . . . . . . . . . . . . . . . . . . . . . . . . 14
Einschalten und Temperaturregelung. . . . . . . . . . . . . . . . . . . . . . . . . . . . 15
Kühlschrank . . . . . . . . . . . . . . . . . . . . . . . . . . . . . . . . . . . . . . . . . . . . . . . . . . 15
Gefrierschrank . . . . . . . . . . . . . . . . . . . . . . . . . . . . . . . . . . . . . . . . . . . . . . . . 15
Die Benutzeung des Kühlgeräts. . . . . . . . . . . . . . . . . . . . . . . . . . . . . . . . . 16
Innenausstattung. . . . . . . . . . . . . . . . . . . . . . . . . . . . . . . . . . . . . . . . . . . . . 16
Abstellflächen . . . . . . . . . . . . . . . . . . . . . . . . . . . . . . . . . . . . . . . . . . . . . . . . 16
Variable Innentür. . . . . . . . . . . . . . . . . . . . . . . . . . . . . . . . . . . . . . . . . . . . . . 16
Richtig lagern . . . . . . . . . . . . . . . . . . . . . . . . . . . . . . . . . . . . . . . . . . . . . . . . 17
Page 4

4
Inhalt
Öffnen der Gefrierraumtür. . . . . . . . . . . . . . . . . . . . . . . . . . . . . . . . . . . . . 17
Einfrieren. . . . . . . . . . . . . . . . . . . . . . . . . . . . . . . . . . . . . . . . . . . . . . . . . . . . 18
Tiefkühllagern . . . . . . . . . . . . . . . . . . . . . . . . . . . . . . . . . . . . . . . . . . . . . . . . 19
Eiswürfel bereiten . . . . . . . . . . . . . . . . . . . . . . . . . . . . . . . . . . . . . . . . . . . . 19
Abtauen . . . . . . . . . . . . . . . . . . . . . . . . . . . . . . . . . . . . . . . . . . . . . . . . . . . . . 19
Gefrierraum abtaunen. . . . . . . . . . . . . . . . . . . . . . . . . . . . . . . . . . . . . . . . . 20
Reinigung und Pflege . . . . . . . . . . . . . . . . . . . . . . . . . . . . . . . . . . . . . . . . . 21
Tips zur Energie-Einsparung . . . . . . . . . . . . . . . . . . . . . . . . . . . . . . . . . . . 22
Was tun, wenn ... . . . . . . . . . . . . . . . . . . . . . . . . . . . . . . . . . . . . . . . . . . . . . 23
Abhilfe bei Störungen. . . . . . . . . . . . . . . . . . . . . . . . . . . . . . . . . . . . . . . . . . 23
Lampe auswechseln. . . . . . . . . . . . . . . . . . . . . . . . . . . . . . . . . . . . . . . . . . . . 25
Bestimmungen, Normen, Richtlinien . . . . . . . . . . . . . . . . . . . . . . . . . . . . 25
Betriebsgeräusche . . . . . . . . . . . . . . . . . . . . . . . . . . . . . . . . . . . . . . . . . . . . 26
Fachbegriffe . . . . . . . . . . . . . . . . . . . . . . . . . . . . . . . . . . . . . . . . . . . . . . . . . 26
Lagerzeittabelle . . . . . . . . . . . . . . . . . . . . . . . . . . . . . . . . . . . . . . . . . . . . . . 27
Garantiebedingungen . . . . . . . . . . . . . . . . . . . . . . . . . . . . . . . . . . . . . . . . . 28
Kundendienst . . . . . . . . . . . . . . . . . . . . . . . . . . . . . . . . . . . . . . . . . . . . . . . . 30
Page 5
5
Sicherheit
Die Sicherheit unserer Kältegeräte entspricht den anerkannten Regeln der
Technik und dem Gerätesicherheitsgesetz. Dennoch sehen wir uns veranlaßt,
Sie mit folgenden Sicherheitshinweisen vertraut zu machen:
Bestimmungsgemäße Verwendung
Das Kältegerät ist für die Verwendung im Haushalt bestimmt. Es eignet
sich zum Kühlen, Einfrieren und Tiefkühllagern von Lebensmitteln sowie
zur Eisbereitung. Wird das Gerät zweckentfremdet oder falsch bedient,
kann vom Hersteller keine Haftung für eventuelle Schäden übernommen
werden.
Umbauten oder Veränderungen am Kältegerät sind aus Sicherheitsgründen nicht zulässig.
Sollten Sie das Kältegerät gewerblich oder für andere Zwecke als zum
Kühlen, Einfrieren und Tiefkühllagern von Lebensmitteln benutzen,
beachten Sie bitte die für Ihren Bereich gültigen gesetzlichen Bestimmungen.
Vor der ersten Inbetriebnahme
Überprüfen Sie das Kältegerät auf Transportschäden. Ein beschädigtes
Gerät auf keinen Fall anschließen! Wenden Sie sich im Schadensfall bitte
an den Lieferanten.
Überprüfen Sie beim Aufstellen des Gerätes, daß es nicht auf dem
Netzkabel steht.
Kältemittel
Das Gerät enthält im Kältemittelkreislauf das Kältemittel Isobutan (R600a),
ein Naturgas mit hoher Umweltverträglichkeit, das jedoch brennbar ist.
Warnung - Achten Sie beim Transportieren und Aufstellen des Gerätes
darauf, daß keine Teile des Kältemittelkreislaufs beschädigt werden.
Bei Beschädigung des Kältemittelkreislaufs:
- offenes Feuer und Zündquellen unbedingt vermeiden;
- den Raum, in dem das Gerät steht, gut durchlüften.
Sicherheit von Kindern
Verpackungsteile (z. B. Folien, Styropor) können für Kinder gefährlich sein.
Erstickungsgefahr! Verpackungsmaterial von Kindern fernhalten!
Ausgediente Altgeräte bitte vor der Entsorgung unbrauchbar machen.
Netzstecker ziehen, Netzkabel durchtrennen, eventuell vorhandene Schnappoder Riegelschlösser entfernen oder zerstören. Dadurch verhindern Sie, daß
sich spielende Kinder im Gerät einsperren (Erstickungsgefahr!) oder in
andere lebensgefährliche Situationen geraten.
Kinder können Gefahren, die im Umgang mit Haushaltsgeräten liegen, oft
nicht erkennen. Sorgen Sie deshalb für die notwendige Aufsicht und lassen
Sie Kinder nicht mit dem Gerät spielen:
Weisen Sie Kinder auf mögliche Gefahren hin und weisen Sie sie in den
korrekten Gebrauch des Gerätes ein.
Page 6

Sicherheit
6
Das Gerät darf von Kindern und Personen, deren physische, sensorische
oder geistige Fähigkeiten sowie Mangel an Erfahrung und Kenntnissen
einen sicheren Gebrauch des Gerätes ausschließen, nur unter Aufsicht
oder nach entsprechender Einweisung durch eine Person benutzt werden,
die sicherstellt, dass sie sich den Gefahren des Gebrauchs bewusst
sind.Kinder sind zu beaufsichtigen, sodass sie nicht am Gerät spielen
können.
Im Alltagsbetrieb
Behälter mit brennbaren Gasen oder Flüssigkeiten können durch Kälteeinwirkung undicht werden. Explosionsgefahr! Lagern Sie keine Behälter
mit brennbaren Stoffen, wie z.B. Spraydosen, FeuerzeugNachfüllkartuschen etc. im Kältegerät.
Flaschen und Dosen dürfen nicht in den Gefrierraum. Sie können springen,
wenn der Inhalt gefriert - bei kohlensäurehaltigem Inhalt sogar
explodieren! Legen Sie nie Limonaden, Säfte, Bier, Wein, Sekt usw. in den
Gefrierraum. Ausnahme: Hochprozentige Spirituosen können im
Gefrierraum gelagert werden.
Speiseeis und Eiswürfel nicht unmittelbar aus dem Gefrierraum in den
Mund nehmen. Sehr kaltes Eis kann an Lippen oder Zunge festfrieren und
Verletzungen verursachen: Weisen Sie Kinder auf diese Gafahr hin!
Tiefkühlgut nicht mit nassen Händen berühren. Die Hände könnten daran
festfrieren.
Warnung - Keine Elektrogeräte (z. B. elektrische Eismaschinen, Rührgeräte
etc.) im Kältegerät betreiben, die nicht vom Hersteller freigegeben wurden.
Warnung - Um die Funktion des Gerätes nicht zu beeinträchtigen, dürfen
die Lüftungsöffnungen der Geräteverkleidungen oder des Aufbaus von
Einbaumöbeln nicht abgedeckt oder zugestellt werden.
Warnung - Um den Abtauvorgang zu beschleunigen, keine mechanischen
oder künstlichen Hilfsmittel verwenden, als die vom Hersteller
empfohlenen.
Vor Reinigungsarbeiten das Gerät grundsätzlich abschalten und den
Netzstecker ziehen oder Sicherung in der Wohnung abschalten bzw.
herausdrehen.
Netzstecker immer am Stecker aus der Steckdose ziehen, nie am Kabel.
Vielfachstecker, Kupplungen und Verlängerungskabel dürfen nicht
verwendet werden.
Im Störungsfall
Sollte einmal eine Störung am Gerät auftreten, sehen Sie bitte zuerst in
dieser Gebrauchsanweisung unter “Was tun, wenn ...” nach. Falls die dort
aufgeführten Hinweise nicht weiterhelfen, führen Sie bitte keine weiteren
Arbeiten selbst aus.
Kältegeräte dürfen nur von Fachkräften repariert werden. Durch
unsachgemäße Reparaturen können erhebliche Gefahren entstehen.
Wenden Sie sich im Reparaturfall bitte an Ihren Fachhändler oder an
unseren Kundendienst.
Page 7
7
Entsorgung
Information zur Geräteverpackung
Entsorgen Sie das Verpackungsmaterial Ihres Gerätes sachgerecht. Alle
verwendeten Verpackungsmaterialien sind umweltverträglich und
wiederverwertbar.
Zu den Werkstoffen: Die Kunststoffe können auch wiederverwertet werden
und sind folgendermaßen gekennzeichnet:
>PE< für Polyäthylen, z. B. bei der äußeren Hülle und den Beuteln im Innern.
>PS< für geschäumtes Polystyrol, z. B. bei den Polsterteilen, grundsätzlich
FCKW-frei.
Entsorgung von Altgeräten
Das Symbol auf dem Produkt oder seiner Verpackung weist darauf hin,
dass dieses Produkt nicht als normaler Haushaltsabfall zu behandeln ist,
sondern an einem Sammelpunkt für das Recycling von elektrischen und
elektronischen Geräten abgegeben werden muss. Durch Ihren Beitrag zum
korrekten Entsorgen dieses Produkts schützen Sie die Umwelt und die
Gesundheit Ihrer Mitmenschen. Umwelt und Gesundheit werden durch
falsches Entsorgen gefährdet. Weitere Informationen über das Recycling
dieses Produkts erhalten Sie von Ihrem Rathaus, Ihrer Müllabfuhr oder dem
Geschäft, in dem Sie das Produkt gekauft haben.
Warnung! Ausgediente Altgeräte bitte vor der Entsorgung unbrauchbar
machen. Netzstecker ziehen, Netzkabel durchtrennen, eventuell vorhandene
Schnapp- oder Riegelschlösser entfernen oder zerstören. Dadurch verhindern
Sie, daß sich spielende Kinder im Gerät einsperren (Erstickungsgefahr!) oder
in andere lebensgefährliche Situationen geraten.
Entsorgungshinweise:
Das Gerät darf nicht mit dem Haus- oder Sperrmüll entsorgt werden.
Der Kältemittelkreislauf, insbesondere der Wärmetauscher an der
Geräterückseite, darf nicht beschädigt werden.
Auskunft über Abholtermine oder Sammelplätze erhalten Sie bei der
örtlichen Stadtreinigung oder der Gemeindeverwaltung.
Gerät transportieren
Um das Gerät zu transportieren sind zwei Personen erforderlich.
Das Gerät stehend und möglichst in Originalverpackung transportieren.
1. Um das Gerät an den endgültigen Standort zu schieben, vorsichtig oben an
die obere Tür drücken und das Gerät etwas nach hinten kippen. Das Gewicht
wird dadurch auf die hinteren Rollen verlagert, wodurch sich das Gerät leicht
schieben läßt.
Page 8
Transportschutz entfernen
Das Gerät sowie Teile der Innenausstattung sind für den Transport geschützt.
1. Alle Klebebänder sowie Polsterteile aus dem Geräteinnenraum entfernen.
Transportsicherung für Ablagen
Zum Entfernen der
Transportsicherung
A) Transportsicherung so weit wie
möglich nach vorne ziehen
B) Ablage hinten anheben
C) Ablage herausziehen und
Transportsicherung entfernen.
Eventuelle Kleberückstände
können Sie mit Reinigungs- oder
Waschbenzin entfernen.
Aufstellen
Aufstellort
Das Gerät soll in einem gut belüfteten und trockenen Raum stehen.
Die Umgebungstemperatur wirkt sich auf den Stromverbrauch und die
einwandfreie Funktion des Gerätes aus.
Daher sollte das Gerät
- nicht direkter Sonneneinstrahlung ausgesetzt sein;
- nicht an Heizkörpern, neben einem Herd oder sonstigen Wärmequellen
stehen;
- nur an einem Ort stehen, dessen Umgebungstemperatur der Klimaklasse
entspricht, für die das Gerät ausgelegt ist.
Die Klimaklasse finden Sie auf dem Typschild, das sich links im Innenraum des
Gerätes befindet.
Nachstehende Tabelle zeigt, welche Umgebungstemperatur welcher
Klimaklasse zugeordnet ist:
Klimaklasse für Umgebungstemperatur von
SN +10 bis +32 °C
N +16 bis +32 °C
ST +18 bis +38 °C
T +18 bis +43 °C
Ist die Aufstellung neben einer Wärmequelle unvermeidbar, sind folgende
seitliche Mindestabstände einzuhalten:
8
Page 9
- zu Elektroherden 3 cm;
- zu Öl- und Kohleherden 30 cm.
Können diese Abstände nicht eingehalten werden, ist eine Wärmeschutzplatte zwischen Herd und Kältegerät erforderlich.
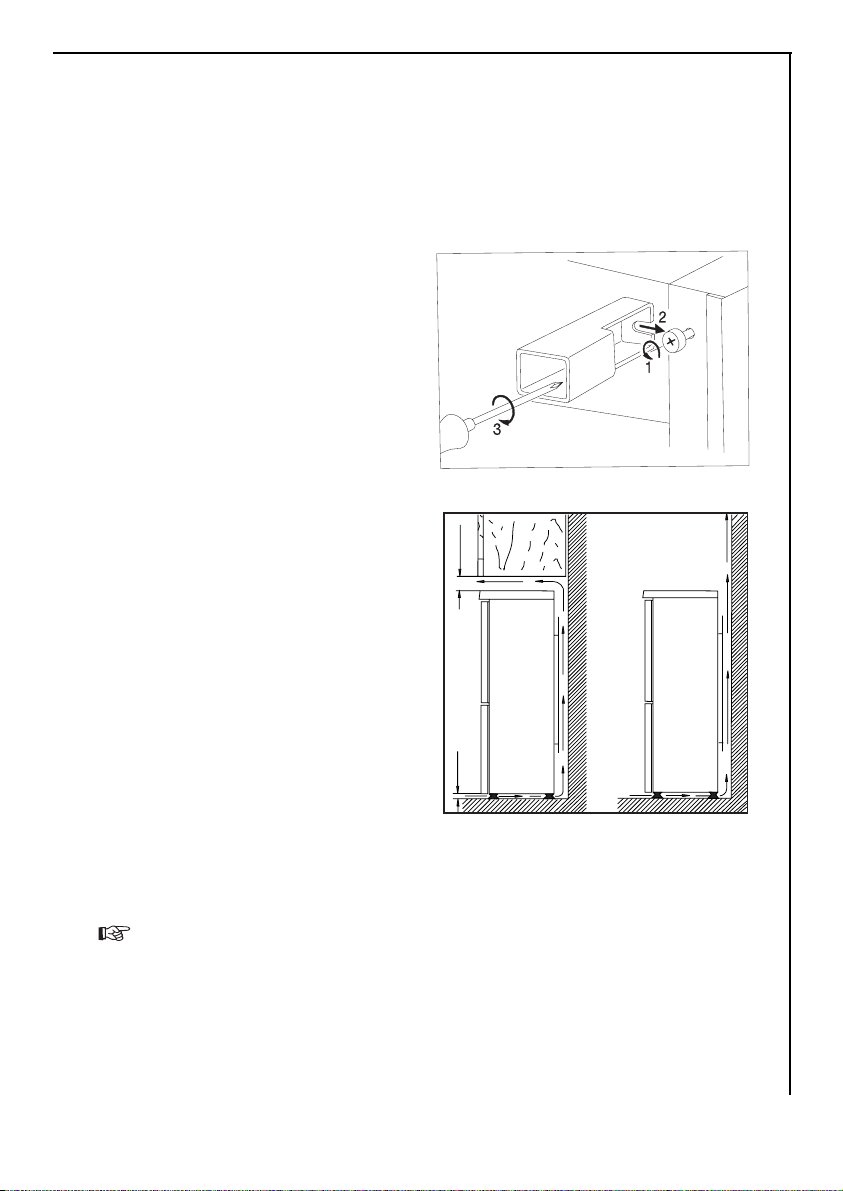
Wandabstand
DIm Beipack sind 2
Wandabstandstücke enthalten,
die an der Geräterückseite
montiert werden müssen.
Die Schrauben der
Gehäuseabdeckung etwas lösen.
Das Wandabstandstück unter
den Schraubenkopf schieben
und die Schraube wieder
festziehen.
Das Kältegerät braucht Luft
Die Luftzuführung erfolgt unter
der Tür durch die
Lüftungsschlitze im Sockel, die
Entlüftung entlang der
Rückwand nach oben. Damit
die Luft zirkulieren kann, diese
Lüftungsöffnungen niemals
abdecken oder verstellen.
Achtung! Falls das Gerät z. B.
unter einem Oberschrank
aufgestellt wird, muß ein
Abstand von mindestens
10 cm zwischen Oberkante
Gerät und dem darüber
angebrachten Möbel eingehalten werden.
Gerät ausrichten
1. Das Gerät muß einen waagerechten und festen Stand haben. Boden-
unebenheiten bitte ausgleichen durch Ein- oder Herausdrehen der beiden
Verstellfüße vorne.
Elektrischer Anschluß
Für den elektrischen Anschluß ist eine vorschriftsmäßig installierte
Schutzkontakt-Steckdose erforderlich. Die elektrische Absicherung muß
9
Aufstellen
100mm
A
15mm
min.
B
Page 10

10
Aufstellen
mindestens 10 Ampere betragen.
Ist die Steckdose nach dem Aufstellen des Geräts nicht mehr zugänglich, muß
eine geeignete Maßnahme in der Elektroinstallation sicherstellen, daß das
Gerät vom Netz getrennt werden kann (z. B. Sicherung, LS-Schalter,
Fehlerstrom-Schutzschalter oder dergleichen mit einer Kontaktöffnungsweite von mindestens 3 mm).
1. Vor Inbetriebnahme am Typschild des Gerätes überprüfen, ob
Anschlußspannung und Stromart mit den Werten des Stromnetzes am
Aufstellort übereinstimmen.
Z. B.: AC 220 ... 240 V 50 Hz oder
220 ... 240 V ~50 Hz
(d. h. 220 bis 240 Volt Wechselstrom, 50 Hertz)
Das Typschild befindet sich links im Innenraum des Gerätes.
Page 11
11
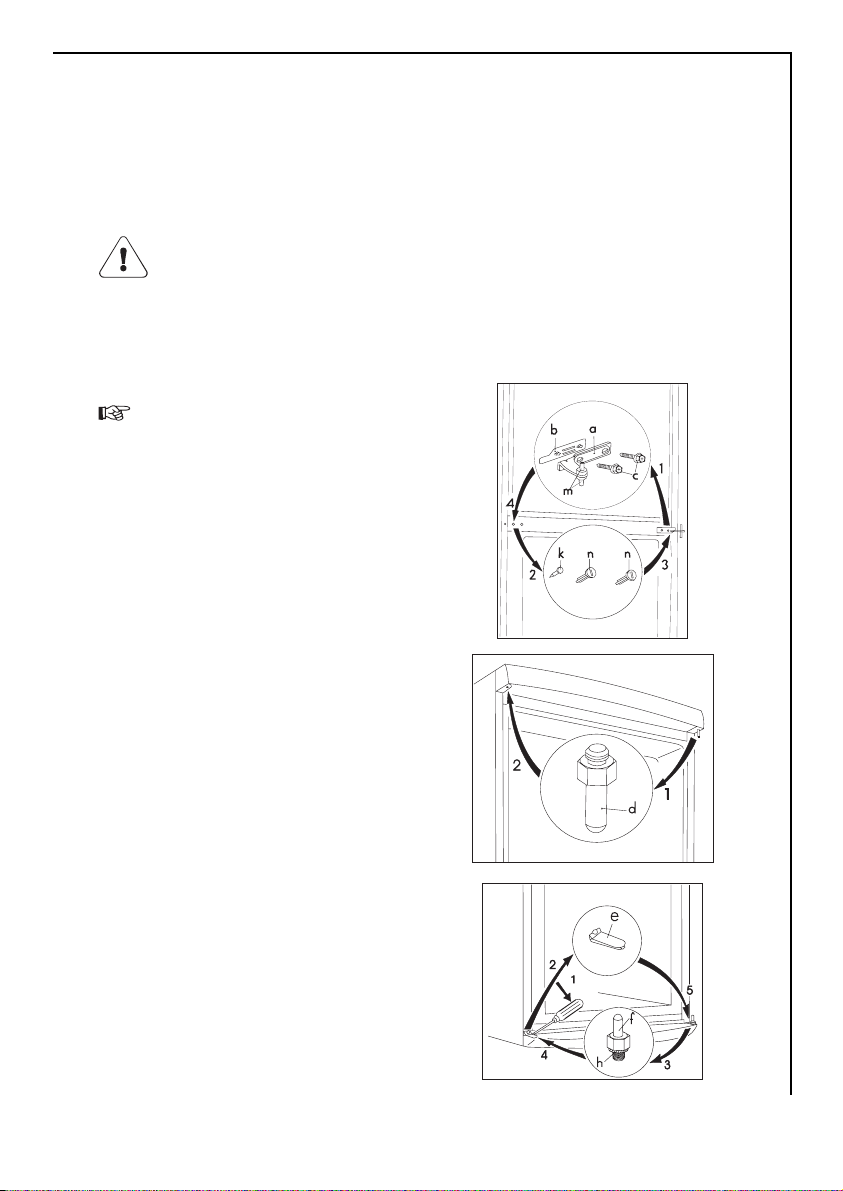
Türanschlag wechseln
Der Türanschlag kann von rechts (Lieferzustand) nach links gewechselt
werden, falls der Aufstellort dies erfordert.
Wenn Sie den Türanschlagwechsel von Fachleuten durchführen lassen wollen,
wenden Sie sich bitte an den Kundendienst.
Warnung! Während des Türanschlagwechsels darf das Gerät nicht am
Stromnetz angeschlossen sein. Vorher Netzstecker ziehen.
Gerät vorsichtig auf den Rücken legen, evtl. Verpackungsmaterial unterlegen.
Darauf achten, dass Rohrleitungen bzw. der Verflüssiger nicht verbogen oder
beschädigt werden, der Fußboden nicht verkratzt oder anderweitig
beschädigt wird.
1. Mittleres Scharnier (a) mit
Unterlage (b) abschrauben und
durch Anheben der beiden
Türen entfernen (Abb. 1)
2. Beide Türen abnehmen und
Blindstopfen auf den
Türoberseiten umsetzen.
3. Oberen Scharnierbolzen (d)
umsetzen (Abb. 2)
(Maulschlüssel SW 10).
4. Untere Abdeckung (e) und
Scharnierbolzen (f) mit
Unterlegscheibe (h) umsetzen
(Abb. 3).
5. Blindstopfen am Mittelsteg
umsetzen (2xn, k), mittleres
Scharnier (a) mit Unterlage (b)
um 180
o
drehen, beide Zapfen
(m) in die Türbuchsen einfügen
und beide Türen mit dem
mittleren Scharnier wieder
einsetzen (Abb. 1).
6. Mittleres Scharnier
festschrauben (c, Abb.1). Darauf
achten, dass die Türspalte
parallel sind. Die Einstellung
erfolgt durch leichtes
verschieben des mittleren
Scharnieres.
Page 12
12
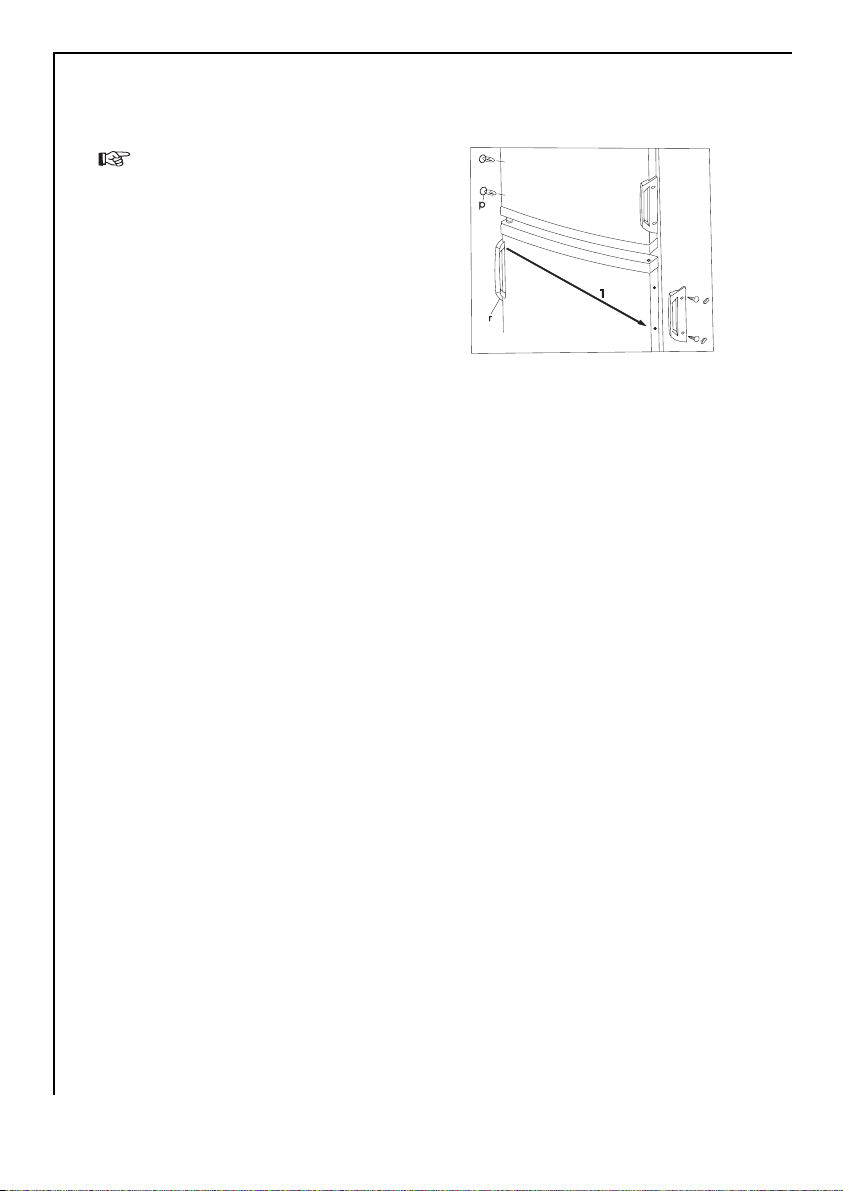
Türgriffwechsel
1. Abdeckungen an dem Türgriff
entfernen, Türgriff (r)
abschrauben und auf der
gegenüberliegenden Seite
anschrauben.
2. Die Blindstopfen vorher mit
einem Dorn von ca. 3 mm
Durchmesser durchstoßen.
3. Die offenen Bohrungen sind
mit neuen, im Beipack
enthaltenen Blindstopfen (p) zu
verschließen.
Darauf achten, dass alle
Distanzscheiben und Unterlagen bei Bedarf wieder an gleicher Stelle
eingesetzt sind.
Nach dem Türanschlagwechsel unbedingt überprüfen, dass die
Türdichtungen einwandfrei am Gehäuse anliegen und alle Schrauben
kraftschlüssig angezogen sind.
Page 13
13
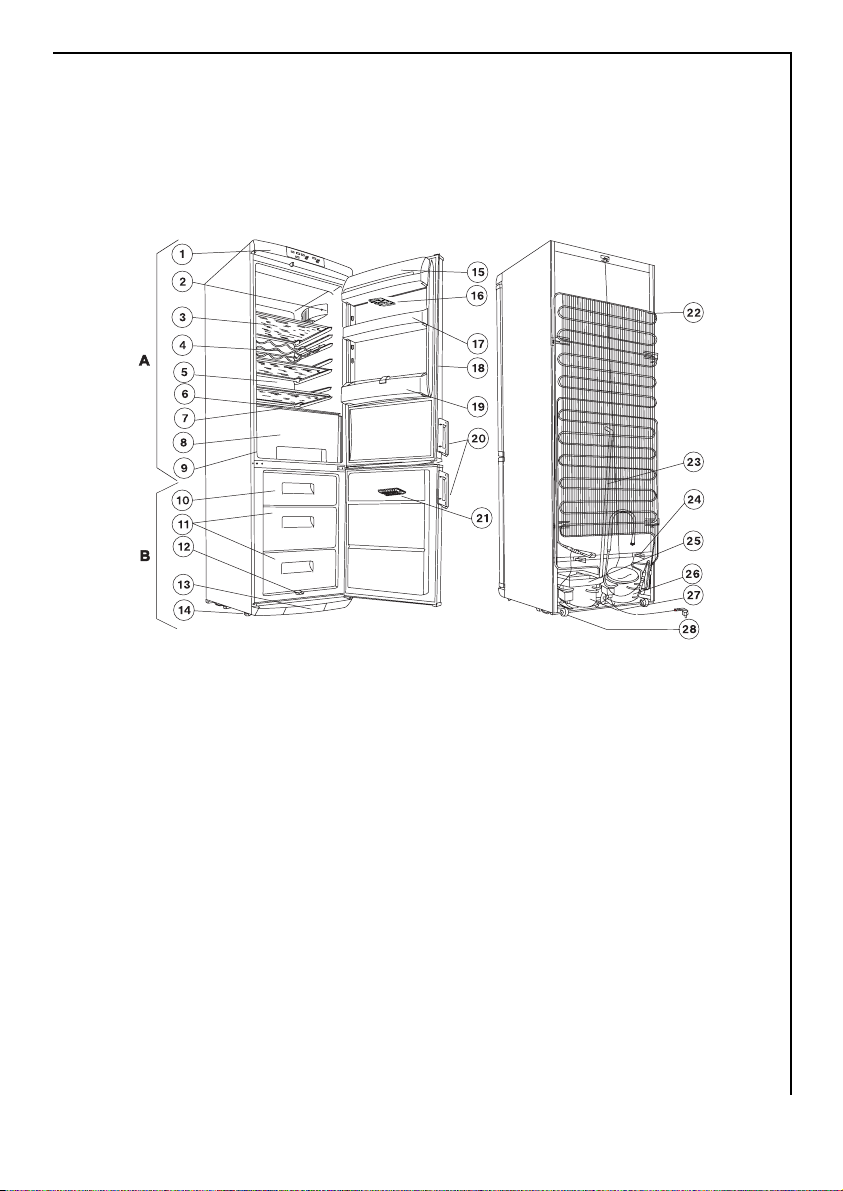
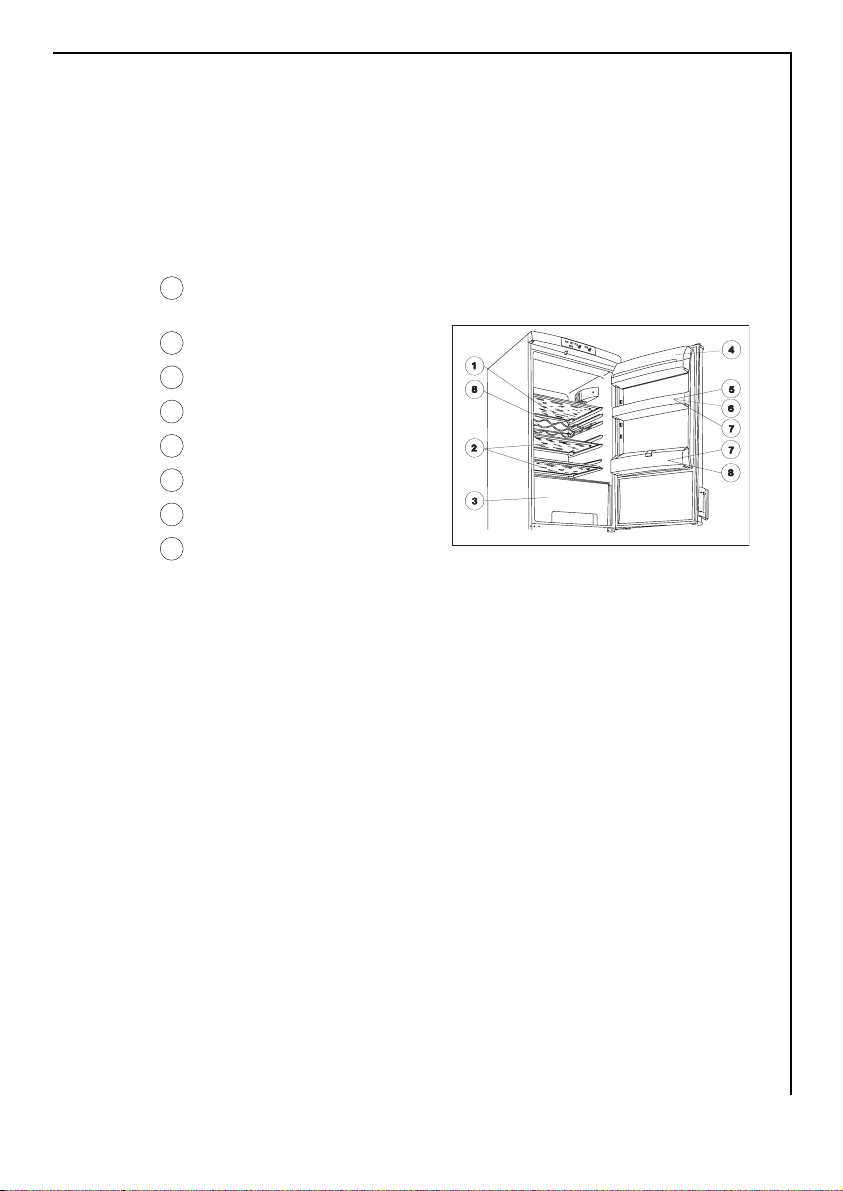
Gerätebeschreibung
Geräteansicht
(verschiedene Modelle)
A -Kühlgerät
B -Gefriergerät
1. Abdeckplatte mit Anzeigeschalter
2. Beleuchtungsarmatur
3. Glasregale
4. Drahtregal für Flaschenaufbewahrung
5. Kühlfläche
6. Schmelzwassersammler
7. Glasregal
8. Obstfächer
9. Datenschild
10. Lagerfach mit Korb
11. Lagerfach(fächer) mit Korb
12. Schmelzwasserabfluss
13. Untere Gitterblende
14. Verstellbare Füße
15. Deckel Butterfach
16. Eierbehälter
17. Türregal
18. Türdichtungsprofil
19. Flaschenregal
20. Türgriffe
21. Eisplatte
22. Kondensator
23. Schmelzwasserableitung
24. Distanzhalter
25. Verdampfertablett
26. Verdichter für Tiefkühlgerät
27. Verdichter für Kühlgerät
28. Rollen
Page 14
14
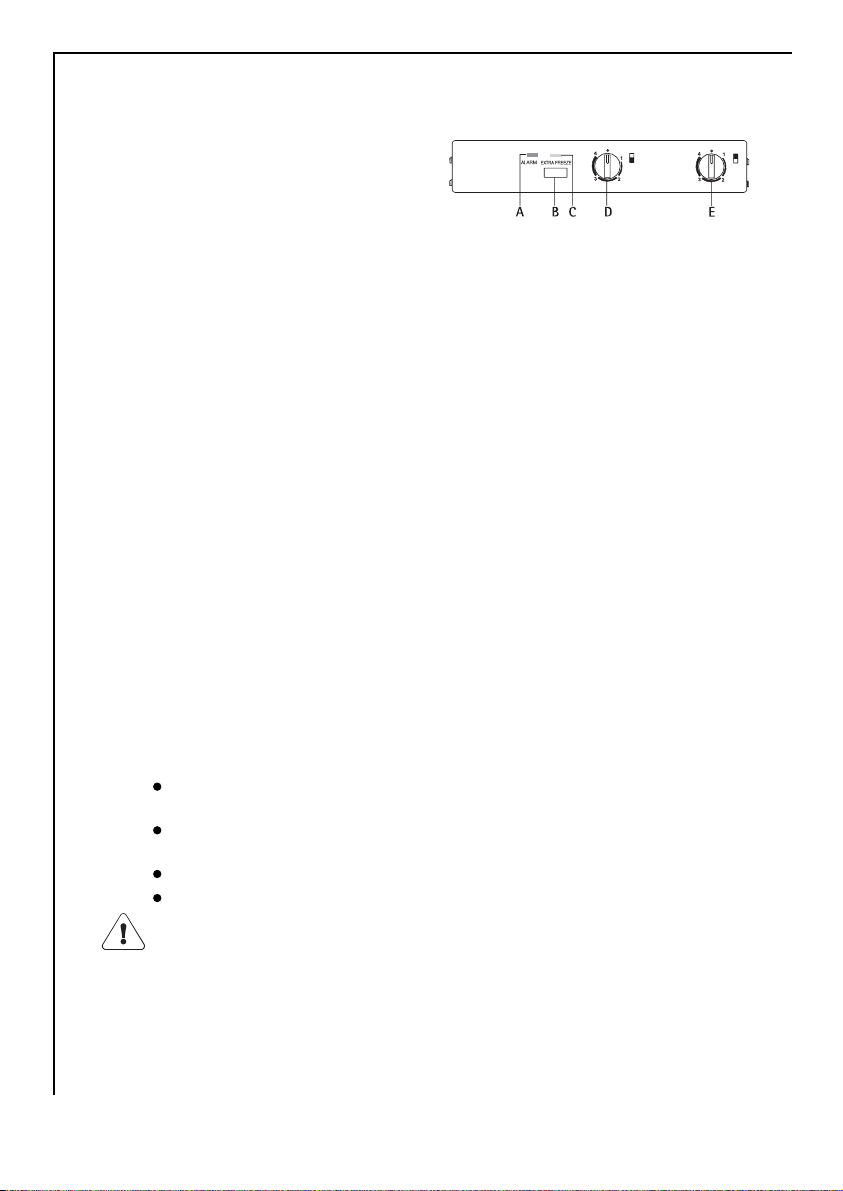
Bedienfeld
A. Alarmleuchte (rot)
B. Anzeigeleuchte für das
Schnellgefrieren (gelb)
C. Schnellgefrierschalter
D. Temperaturregler (Drehknopf für
den Gefrierschrank)
E. Temperaturregler (Drehknopf fürden Kühlschrank)
Kühlschrank
Der Thermostatdrehknopf ("E") dient als Ein-/Ausschalter.
Zum Starten des Kühlvorgangs müssen Sie den Thermostatdrehknopf ("E") im
Uhrzeigersinn drehen. Bei der Position "0" ist der Kühlschrank ausgeschaltet,
steht jedoch unter Netzspannung.
Gefrierschrank
Der Thermostatdrehknopf ("D") dient als Ein-/Ausschalter.
Zum Starten des Einfriervorgangs müssen Sie den Thermostatdrehknopf ("D")
im Uhrzeigersinn drehen. Bei der Position "0" ist der Gefrierschrank
ausgeschaltet, steht jedoch unter Netzspannung.
Der Temperaturregler ("D") kann dazu verwendet werden, stufenlos die mit
dem geringsten Energieverbrauch verbundene Lagertemperatur für Ihre
eingefrorenen Lebensmittel einzustellen.
Die optimalen Lagerbedingungen herrschen bei -18° C. Die gelbe
Anzeigeleuchte ("C") leuchtet auf, wenn der Schalter ("B") betätigt wurde.
Der Kühlschrank befindet sich dann im Dauerbetrieb.
Die rote Temperaturanzeigeleuchte ("A") leuchtet in den folgenden Fällen
auf:
Das Gerät wurde eingeschaltet, hat jedoch die Lagertemperatur noch nicht
erreicht
Die Mindestlagertemperatur kann nicht mehr aufrechterhalten werden
(Fehler)
Die einzufrierenden Lebensmittelmengen sind zu groß
Die Tür des Geräts steht zu lange offen
Wichtiger Hinweis: Wenn Sie den Schnellgefrierschalter betätigen oder den
Temperaturregler einstellen, kann es vorkommen, dass der Kühlmotor Ihres
Geräts nicht sofort anspringt, sondern erst nach einiger Zeit. Das bedeutet
nicht, dass an Ihrem Gerät ein Fehler vorliegt.
Page 15
15
Einschalten und Temperaturregelung
Kühlschrank
Stecken Sie den Stecker des Verbindungskabels in die Steckdose mit
Schutzerdungskontakt.
Drehen Sie den Drehknopf ("E").
Einstellung "0" bedeutet: Aus.
Einstellung "1" bedeutet: Höchste Temperatur (wärmste Einstellung).
Einstellung "4" (Endanschlag) bedeutet: Niedrigste Temperatur (kälteste
Einstellung).
Die genaue Einstellung sollte jedoch unter Berücksichtigung der Tatsache
gewählt werden, dass die Temperatur im Inneren des Kühlschranks von den
folgenden Faktoren abhängt:
- Menge der gelagerten Lebensmittel
- Häufigkeit, mit der die Tür geöffnet wird
- Umgebungstemperatur
Wichtig!
Hohe Umgebungstemperaturen (z. B. an heißen Sommertagen) können in
Verbindung mit einer kalten Einstellung am Temperaturregler (Position "4")
dazu führen, dass der Kompressor im Dauerbetrieb läuft.
Drehen Sie in einem solchen Fall den Temperaturregler auf eine wärmere
Einstellung zurück (Position "3" bis "4"). Bei dieser Einstellung wird der
Kompressor wie gewöhnlich ein- und ausgeschaltet, und das automatische
Abtauen beginnt wieder.
Gefrierschrank
Reinigen Sie das Innere des Geräts und das gesamte Zubehör, bevor Sie das
Gerät in Betrieb nehmen. Schließen Sie das Gerät an das Stromnetz an.
Drehen Sie den Temperaturregler ("D") in Richtung der Position "1". Die rote
Leuchte ("A") leuchtet auf.
Betätigen Sie den Schnellgefrierschalter ("B"). Die gelbe Anzeigeleuchte
("C") leuchtet auf, und die akustische Warnung wird ausgeschaltet.
Setzen Sie den Schnellgefrierschalter ("B") erst dann zurück, wenn die rote
Leuchte ("A") erloschen ist. Die gelbe Leuchte ("C") erlischt.
Drehen Sie den Drehknopf ("D").
Einstellung "0": Aus.
Einstellung "1": Höchste Temperatur (wärmste Einstellung).
Einstellung "4" (Endanschlag): Niedrigste Temperatur (kälteste Einstellung).
Page 16
16
Die genaue Einstellung sollte unter Berücksichtigung der Tatsache gewählt
werden, dass die Temperatur im Inneren des Geräts von den folgenden
Faktoren abhängt (siehe "Kühlschrank"):
Wichtig:
Kontrollieren Sie regelmäßig anhand der roten Temperaturanzeigeleuchte
("A"), dass die erforderliche Lagertemperatur aufrechterhalten wird
Die Benutzeung des Kühlgeräts
Für die richtige Kühlung ist eine Luftzirkulation im Inneren des Kühlgeräts
erforderlich. Daher sollten Sie den Spalt hinter den Gitterablagen nicht mit
Papier, Tabletts usw. abdecken.
Stellen Sie bitte keine warmen Speisen im Kühlgerät ab, lassen Sie die
Speisen erst auf Zimmertemperatur abkühlen. Damit kann eine
unerwünschte Reifbildung vermieden werden.
Die Speisen können den Geruch anderer Speisen übernehmen, daher
sollten Sie die Lebensmittel im geschlossenen Gefäß oder in Zellophan,
Alufolie, Fettpapier oder Plastikfolie verpackt in den Kühlschrank stellen.
In diesem Falle bleibt der ursprüngliche Feuchtigkeitsgehalt der
Lebensmittel erhalten, das eingelagerte Gemüse trocknet z.B. selbst nach
mehreren Tagen nicht aus.
Innenausstattung
Abstellflächen
1.Eine Abstellfläche aus Glas bitte unbedingt in die untersten Führungen über
die Obst- und Gemüseschalen einschieben. Sie muß immer in dieser Stellung
verbleiben, damit Obst und Gemüse länger frisch bleiben.
Die übrigen Abstellflächen sind
höhenverstellbar:
1.Dazu die Abstellfläche soweit nach
vorne ziehen, bis sie sich nach oben
oder unten abschwenken und
herausnehmen läßt.
2. Das Einsetzen in eine andere Höhe
bitte in umgekehrter Reihenfolge
vornehmen.
Variable Innentür
Je nach Erfordernis können die Türabstellfächer nach oben herausgenommen und in andere Aufnahmen umgesetzt werden.
Page 17
17
Richtig lagern
Im Kühlraum ergeben sich, physikalisch bedingt, unterschiedliche
Temperaturbereiche. Der kälteste Bereich befindet sich auf der untersten
Abstellfläche über den Obst- und Gemüseschalen. Wärmere Bereiche sind die
oberen Abstellflächen und die Abstellfächer an der Tür. An welcher Stelle im
Kühlraum geeignete Temperaturen für verschiedene Arten von Lebensmitteln
vorliegen, zeigt nebenstehendes Einordnungsbeispiel.
1 Desserts, Torten, fertige Speisen, Lebensmittel im Behälter, Milch-
produkte
2 Frisches Fleisch, Aufschnitt
3 Obst, Gemüse, Salat
4 Butter, Käse
5 Eier
6 Joghurt, Konserven
7 Kleine Flaschen, Getränke
8 Große Flaschen, Getränke
Lebensmittel sollen immer abgedeckt oder verpackt in den Kühlraum, um
Austrocknen und Geruchs- oder Geschmacksübertragung auf anderes
Kühlgut zu vermeiden.
Zum Verpacken eignen sich:
- Frischhaltebeutel und -folien aus Polyäthylen;
- Kunststoffbehälter mit Deckel;
- Spezielle Hauben aus Kunststoff mit Gummizug;
- Aluminiumfolie.
Öffnen der Gefrierraumtür
Wird die Gefrierraumtür des in Betrieb befindlichen Geräts geschlossen, so
läßt sie sich eventuell nicht sofort wieder öffnen, da zunächst ein Unterdruck
im Gefrierraum entsteht, der die Tür bis zum Druckausgleich geschlossen
hält. Nach einigen Minuten können Sie die Tür wieder öffnen.
Page 18
18
Einfrieren
Das Einfrieren von Lebensmitteln erfolgt immer nach den entsprechenden
Vorbereitungen in dem Gefrierraum und kann je nach Menge unterschiedlich
ablaufen:
Wenn Sie nicht mehr als 4 kg Ware einfrieren wollen.
Den Temperaturregler auf Position „3” stellen.
Legen Sie die einzufrierende Ware (max. 4 kg) in den Gefrierkorb ein.
Lassen Sie das Gerät in dieser Position 24 Std. arbeiten.
Nach 24 Std. können sie die von Ihnen gewünschte Temperatur einstellen
oder den Temperaturregler auf „3” belassen (genügt den alltäglichen
Kühlanforderungen). Die eingefrorenen Waren können Sie nun in die
Körbe umlagern.
Es ist nicht zweckmäßig den Temperaturregler in eine höhere Stellung (z.B.
auf „6”) zu stellen. Der Prozeß des Einfrierens könnte zwar dadurch
beschleunigt werden, die Temperatur im Kühlbereich würde aber auf Dauer
unter 0 °C sinken, was zum Einfrieren der im Kühlschrank gelagerten
Lebensmittel und Getränke führen würde.
Frieren Sie nie eine größere Menge frische Ware auf einmal ein, als es in
der Tabelle „Technische Daten” angegeben ist, sonst kann die Ware nicht
schnell genug bis zum Kern durchgefroren werden und so können nach
dem Auftauen Qualität- und Geschmacksverluste auftreten.
Während des Einfrierens sollten Sie die Eiszubereitung vermeiden, weil die
Gefrierleistung dadurch vermindert wird.
Page 19

19
Tiefkühllagern
Achtung! Vor Erstbeladung des Gefrierraums mit bereits gefrorenem
Tiefkühlgut muß die erforderliche Lagertemperatur von -18 °C erreicht sein.
Nur verpacktes Tiefkühlgut einlagern, damit es nicht austrocknet, nicht
den Geschmack verliert und keine Geschmacksübertragung auf anderes
Tiefkühlgut erfolgen kann.
Die Lagerzeit bzw. das Haltbarkeitsdatum von Tiefkühlprodukten beachten.
Eiswürfel bereiten
1. Eiswürfelschale zu 3/4 mit kaltem Wasser füllen, in das oberste Fach im
Gefrierraum stellen und gefrieren lassen.
2. Zum Herauslösen der fertigen Eiswürfel die Eiswürfelschale verwinden oder
kurz unter fließendes Wasser halten.
Achtung! Eine eventuell angefrorene Eiswürfelschale keinesfalls mit spitzen
oder scharfkantigen Gegenständen ablösen. Einen Löffelstiel oder
dergleichen verwenden.
Abtauen
Nach einer bestimmten Betriebszeit kann sich im Kühlraum des Gerätes eine
Reif- bzw. Eisschicht bilden.
Diese Reif- und Eisschicht wirkt isolierend, die Kälteabgabe wird dadurch
erschwert, was zur erhöhten Temperatur der Kühlräume führen kann und den
Stromverbrauch ansteigen läßt. Eine dicke Reif- und Eisschicht kann dazu
führen daß sich die Tür des Gefrierraumes schwer öffnen läßt.
Bei diesem Typ von Kühl- und Gefrierkombination besitzt der Kühlbereich
eine Abtauvollautomatik. Damit entfällt ein Abtauen des Kühlbereiches. Der
Temperaturregler unterbricht immer wieder den Motorkompressor - während
dieser Zeit wird der Kühlprozeß unterbrochen - die Innentemperatur steigt
über 0 °C und es erfolgt ein Abtauen. Steigt die Temperatur über +3 - +4 °C,
so aktiviert der Temperaturregler
wieder den Kühlprozeß.
Das Wasser sammelt sich im
Sammelbehälter, läuft durch den
Tauwasserablauf über die
Tauwasserabführung in die
Auffangschale (auf dem
Kompressor) auf der Rückseite des
Gerätes und verdunstet dort
durch die Wärme des Kompressors.
Kontrollieren und reinigen Sie
bitte den Tauwasserablauf
regelmäßig, sonst könnte im
Page 20

Falle einer Verstopfung das angesammelte Wasser in die Isolierung
gelangen und somit zu einer vorzeitigen Funktionsstörungen des Gerätes
führen.
Verwenden Sie beim Reinigen des Tauwasserablaufes das mitgelieferte und
auch in der Abb. dargestellte Reinigungsgerät. Bewahren Sie es am
Tauwasserablauf auf.
Ein typisches Beispiel für die Verstopfung der Tauwasserabführung besteht
darin, daß in Papier verpackte Lebensmittel mit der Rückwand des
Kühlbereiches in Berührung kommen und dort festfrieren. Beim
Herausnehmen des Lebensmittels kann das Papier reißen und in die
Tauwasser-abführung gelangen und dadurch eine Verstopfung verursachen.
Gehen Sie deshalb beim Einlegen von in Papier verpackte Lebensmittel aus
den eben genannten Gründen vorsichtig vor.
Bei voller Auslastung (z.B. bei Hitze) läuft der Kühlschrank
ununterbrochen, während dieser Zeit ist die Abtauvollautomatik
unwirksam.
Rückseite des Kühlschrankes nicht unüblich.
Der Gefrierbereich kann mit einer Abtauvollautomatik nicht versehen
werden, da das Gefriergut die Abtautemperatur nicht verträgt.
Hat sich eine Reif- bzw. Eisschicht in geringerem Maße gebildet, kann sie mit
einem Kunststoffschaber entfernt werden.
Gefrierraum abtauen
Hat sich eine dickere Reif- und Eisschicht gebildet, die nicht mehr mit dem
Kunststoffschaber entfernt werden kann, muß der Gefrierbereich abgetaut
werden. Die Häufigkeit des Abtauens hängt vom Gebrauch ab (i.d.R. 2-3 mal
jährlich).
Nehmen Sie Ihr Gefriergut während des Abtauvorganges aus dem
Gefrierbereich heraus, wickeln Sie es in mehrere Lagen Zeitungspapier ein
und lagern Sie es an einem kühlen Ort oder bewahren Sie es in einem
anderen Kühlschrank oder -truhe auf.
Ziehen Sie den Netzstecker aus der Steckdose, so wird sowohl der Kühl- als
auch der Gefrierbereich außer Betrieb gesetzt.
Lassen Sie die Türen geöffnet und reinigen Sie den Kühlbereich, wie es im
Abschnitt „Reinigung und Pflege" beschrieben ist. Bei der Reinigung des
Gefrierbereiches gehen Sie bitte wie folgt vor:
Das Tauwasser sammelt sich in
dem dafür vorgesehenen
Ausguß und kann wie in der
Abb. dargestellt entfernt
werden.
Die Abtaurinne entnehmen, um
180° drehen und wie in
Abbildunggezeigt, einsetzen.
20
Page 21

21
Das Tauwasser fließt in ein untergestelltes Gefäß (nicht im Lieferumfang).
Wischen Sie nach dem Abtauen alles gut trocken.
Stecken Sie den Netzstecker wieder in die Steckdose und legen Sie die
Lebensmittel zurück.
Abtaurinne wieder in die dafür vorgesehene Ablage einsetzen.
Es ist empfehlenswert, ein paar Stunden lang den Temperaturregler in der
höchsten Einstellung zu lassen, um die gewünschte Lagertemperatur zu
erreichen.
Reinigung und Pflege
Aus hygienischen Gründen sollte das Geräteinnere, einschließlich
Innenausstattung, regelmäßig gereinigt werden.
Warnung!
Das Gerät darf während der Reinigung nicht am Stromnetz angeschlossen
sein. Stromschlaggefahr! Vor Reinigungsarbeiten Gerät abschalten und
Netzstecker ziehen oder Sicherung abschalten bzw. herausdrehen.
Das Gerät nie mit Dampfreinigungsgeräten reinigen. Feuchtigkeit könnte
in elektrische Bauteile gelangen, Stromschlaggefahr! Heißer Dampf kann
zu Schäden an Kunststoffteilen führen.
Das Gerät muß trocken sein, bevor Sie es wieder in Betrieb nehmen.
Achtung!
Ätherische Öle und organische Lösungsmittel können Kunststoffteile
angreifen, z. B.
- Saft von Zitronen- oder Apfelsinenschalen;
- Buttersäure;
- Reinigungsmittel, die Essigsäure enthalten.
Solche Substanzen nicht mit den Geräteteilen in Kontakt bringen.
Keine scheuernden Reinigungsmittel verwenden.
Gerät vor dem Reinigen abtauen.
Gerät einschließlich Innenausstattung mit einem Lappen und lauwarmem
Wasser reinigen. Eventuell etwas handelsübliches Geschirrspülmittel
beigeben.
Anschließend mit klarem Wasser nachwischen und trockenreiben.
Staubablagerungen am Verflüssiger verringern die Kühlleistung und erhöhen
den Energieverbrauch. Deshalb einmal im Jahr den Verflüssiger an der
Geräterückseite mit einer weichen Bürste oder mit dem Staubsauger
vorsichtig reinigen.
Nachdem alles trocken ist, Gerät wieder in Betrieb nehmen.
Page 22

22
Tips zur Energie-Einsparung
Das Gerät nicht in der Nähe von Herden, Heizkörpern oder anderen
Wärmequellen aufstellen. Bei hoher Umgebungstemperatur läuft der
Kompressor häufiger und länger.
Ausreichende Be- und Entlüftung am Gerätesockel und an der Geräterückseite gewährleisten. Lüftungsöffnungen niemals abdecken.
Keine warmen Speisen in das Gerät stellen. Warme Speisen erst abkühlen
lassen.
Tür nur so lange wie nötig geöffnet lassen.
Die Temperatur nicht kälter als nötig einstellen.
Tiefkühlgut zum Auftauen in den Kühlraum legen. Die Kälte im Tiefkühlgut
wird so zur Kühlung im Kühlraum genutzt.
Den Verflüssiger an der Geräterückseite immer sauber halten.
Page 23

23
Was tun, wenn ...
Was tun, wenn ...
Abhilfe bei Störungen
Möglicherweise handelt es sich bei einer Störung nur um einen kleinen
Fehler, den Sie anhand nachfolgender Hinweise selbst beheben können.
Führen Sie keine weiteren Arbeiten selbst aus, wenn nachstehende
Informationen im konkreten Fall nicht weiterhelfen.
Warnung! Reparaturen am Kältegerät dürfen nur von Fachkräften
durchgeführt werden. Durch unsachgemäße Reparaturen können erhebliche
Gefahren für den Benutzer entstehen. Wenden Sie sich im Reparaturfall an
Ihren Fachhändler oder an unseren Kundendienst.
Störung
Gerät arbeitet nicht.
Die Kühl- bzw. Gefrierraumtemperatur ist nicht
ausreichend.
Gerät kühlt zu stark.
Mögliche Ursache
Gerät ist nicht eingeschaltet.
Netzstecker ist nicht
eingesteckt oder lose.
Sicherung hat ausgelöst
oder ist defekt.
Steckdose ist defekt.
Temperatur ist nicht
richtig eingestellt.
Tür war längere Zeit
geöffnet.
Innerhalb der letzten 24
Stunden wurden größere
Mengen warmer Lebensmittel eingelagert.
Das Gerät steht neben
einer Wärmequelle.
Temperatur ist zu kalt eingestellt.
Abhilfe
Gerät einschalten.
Netzstecker einstecken.
Sicherung überprüfen,
gegebenenfalls erneuern.
Störungen am Stromnetz
behebt Ihr Elektrofachmann.
Bitte im Abschnitt “Inbetriebnahme und Temperaturregelung” nachsehen.
Tür nur so lange wie nötig
geöffnet lassen.
Kältere Temperaturreglerstellung wählen bzw.
Schnellgefriertaste drükken.
Bitte im Abschnitt “Aufstellort” nachsehen.
Temperaturregler auf wärmere Einstellung drehen.
Page 24

24
Was tun, wenn ...
Störung
Innenbeleuchtung funktioniert nicht.
Starke Reifbildung im
Gerät, evtl. auch an der
Türdichtung.
Wasser am Kühlraumboden oder auf den Abstellflächen.
Ungewöhnliche Geräusche.
Mögliche Ursache
Lampe ist defekt.
Türdichtung ist undicht
(evtl. nach Türanschlagwechsel).
Tauwasser-Ablaufloch ist
verstopft.
Gerät steht nicht gerade.
Gerät hat Kontakt mit der
Wand oder mit anderen
Gegenständen.
Ein Teil, z. B. ein Rohr, an
der Geräterückseite
berührt ein anderes Geräteteil oder die Wand.
Abhilfe
Bitte in diesem Abschnitt
nachsehen unter „Lampe
auswechseln”.
An den undichten Stellen
Türdichtung vorsichtig mit
einem Haartrockner erwärmen (nicht wärmer als
ca. 50 °C). Gleichzeitig die
erwärmte Türdichtung von
Hand so in Form ziehen,
daß sie wieder einwandfrei
anliegt.
Tauwasser-Ablaufloch mit
Hilfe des Reinigungsstiftes
frei machen (siehe Abschnitt
”Reinigung und Pflege”).
Vordere Verstellfüße nachjustiesren.
Gerät etwas wegrücken.
Gegebenenfalls dieses Teil
vorsichtig wegbiegen.
Page 25

25
Lampe auswechseln
Ist die Glühlampe für die
Innenbeleuchtung ausgebrannt, so
können Sie das Auswechseln wie
nachfolgend beschrieben selbst
vornehmen:
Unterbrechen Sie die Stromzufuhr
zum Gerät.
Entfernen Sie die
Festigungsschraube der Abdeckung
(1).
Drücken Sie, wie auf der Abbildung zu sehen ist, die hinten befindliche Zunge
(2) und entfernen Sie die Abdeckung in Pfeilrichtung (3), die Lampe kann
danach ausgewechselt werden (Typ: T25 230-240 V, 15 W, Fassung E14).
Setzen Sie die Abdeckung nach dem Lampenwechsel wieder ein, bis sie
einrastet, drehen Sie die Schraube wieder ein und schließen Sie die
Stromzufuhr an. Durch das Fehlen der Beleuchtung wird der Betrieb des
Gerätes nicht beeinträchtigt.
Bestimmungen,Normen, Richtlinien
Das Kältegerät ist für den Haushalt bestimmt und wurde unter Beachtung der
für diese Geräte geltenden Normen hergestellt. Bei der Fertigung wurden
insbesondere die nach dem Gerätesicherheitsgesetz (GSG), der
Unfallverhütungsvorschrift für Kälteanlagen (VBG 20) und den Bestimmungen
des Verbandes Deutscher Elektrotechniker (VDE) notwendigen Maßnahmen
getroffen.
Der Kältekreislauf wurde auf Dichtheit geprüft.
Dieses Gerät entspricht den folgenden EG-Richtlinien:
- 73/23/EWG vom 19.2.1973 - Niederspannungsrichtlinie
- 89/336/EWG vom 3.5.1989
(einschließlich Änderungsrichtlinie 92/31/EWG) - EMV-Richtlinie
- 96/57 EEC - 96/09/03 (Energieeffizienzrichtlinie) und nachfolgende
Neufassungen
Page 26

26
Betriebsgeräusche
Folgende Geräusche sind charakteristisch für Kältegeräte:
Klicken
Immer wenn der Kompressor ein- oder ausschaltet, ist ein Klicken zu hören.
Summen
Sobald der Kompressor arbeitet, können Sie ihn summen hören.
Blubbern/Plätschern
Wenn Kältemittel in dünne Rohre einströmt, können Sie ein blubberndes
oder plätscherndes Geräusch hören. Auch nach dem Abschalten des
Kompressors ist dieses Geräusch noch kurze Zeit hörbar.
Fachbegriffe
Kältemittel
Flüssigkeiten, die zur Kälteerzeugung verwendet werden können, nennt
man Kältemittel. Sie haben einen verhältnismäßig niedrigen Siedepunkt, so
niedrig, daß die Wärme der im Kältegerät lagernden Lebensmittel das
Kältemittel zum Sieden bzw. Verdampfen bringen kann.
Kältemittelkreislauf
Geschlossenes Kreislaufsystem, in dem sich das Kältemittel befindet. Der
Kältemittelkreislauf besteht im wesentlichen aus Verdampfer, Kompressor,
Verflüssiger sowie aus Rohrleitungen.
Verdampfer
Im Verdampfer verdampft das Kältemittel. Wie alle Flüssigkeiten benötigt
Kältemittel zum Verdampfen Wärme. Diese Wärme wird dem
Geräteinnenraum entzogen, der dadurch abkühlt. Deshalb ist der Verdampfer im Geräteinnenraum angeordnet oder unmittelbar hinter der
Innenwand eingeschäumt und dadurch nicht sichtbar.
Kompressor
Der Kompressor sieht aus wie eine kleine Tonne. Er wird von einem
eingebauten Elektromotor angetrieben und ist hinten im Sockelbereich des
Gerätes untergebracht. Aufgabe des Kompressors ist es, dampfförmiges
Kältemittel aus dem Verdampfer abzuziehen, zu verdichten und zum
Verflüssiger weiterzuleiten.
Verflüssiger
Der Verflüssiger hat meist die Form eines Gitters. Im Verflüssiger wird das
vom Kompressor verdichtete Kältemittel verflüssigt. Dabei wird Wärme frei,
die über die Oberfläche des Verflüssigers an die Umgebungsluft abgegeben
wird. Der Verflüssiger ist deshalb außen, meist an der Geräterückseite
angebracht.
Page 27

27
Lebensmittel Lagerzeit in Tagen Art der Verpackung
1234567
Rohes Fleisch XXx x x Gefrierbeutel, luftdicht verpackt
Fleisch (gekocht) XXXx x x Frischhaltebox
Fleisch (gebraten) XXXx x Frischhaltebox
Hackfleisch (roh) X Frischhaltebox
Hackfleisch (gebraten) XXx x Frischhaltebox
Aufschnitt, Bockwurst XXx x Beutel, Klarsichtsfolie
Fisch (frisch) X x x Beutel, luftdicht verpackt
Fisch (gekocht) XXx x Frischhaltebox
Fisch (gebraten) XXx x x Frischhaltebox
Fischkonserve, angebrochen X x x Frischhaltebox
Hähnchenteile, frisch XXXx x x Beutel, luftdicht verpackt
Hähnchen, gebraten XXXx x x Frischhaltebox
Hühnerteile, frisch XXx x x Beutel, luftdicht verpackt
Huhn, gekocht XXx x x Frischhaltebox
Gänse-, Ententeile, frisch XXXx x x Beutel, luftdicht verpackt
Gans, Ente gebraten XXXXx x x Frischhaltebox
Butter, nicht angebrochen XXXXXXXin Originalverpackung
Butter, bereits angebrochen XXxxxxxin Originalverpackung
Milch (Tüte) XXXx x in Originalverpackung
Sahne XXx x in Becher
Saure Sahne o.ä. XXXXx x x in Becher
Hartkäse XXXXXXXAlufolie
Weichkäse XXXXx x x Beutel
Quark XXXXx x x Beutel
Eier XXXXXXX
Spinat, Sauerampfer XXx x Beutel
Erbsen, Bohnen XXXXx x x Beutel
Pilze XXx x x Beutel
Möhren, Spargel XXXXXXXBeutel
Grüne Paprika XXx x x Beutel
Tomate XXXXXXXBeutel
Kohlarten XXXXXx x Beutel
Schnell verderbliches Obst
(z.B. Erdbeere, Himbeere) XXXx x Beutel
Sonstiges Obst XXXXx x x Beutel
Angebrochene Obstkonserve XXXx x Frischhaltebox
Desserts, Torten XXx x Frischhaltebox
Lagerzeittabelle
Lagerung frischer Lebensmittel im Kühlraum
Page 28

28
Garantiebedingungen
Der Endabnehmer dieses Gerätes (Verbraucher) hat bei einem Kauf dieses
Gerätes von einem Unternehmer (Händler) in Deutschland im Rahmen der
Vorschriften über den Verbrauchsgüterkauf gesetzliche Rechte, die durch
diese Garantie nicht eingeschränkt werden. Diese Garantie räumt dem
Verbraucher also zusätzliche Rechte ein. Dies vorausgeschickt, leisten wir,
AEG Hausgeräte GmbH, gegenüber dem Verbraucher Garantie für dieses
Gerät für den Zeitraum von 24 Monaten ab Übergabe zu den folgenden
Bedingungen:
1. Mit dieser Garantie haften wir dafür, dass dieses neu hergestellte Gerät
im Zeitpunkt der Übergabe vom Händler an den Verbraucher die in
unserer Produktbeschreibung für dieses Gerät aufgeführten
Eigenschaften aufweist. Ein Mangel liegt nur dann vor, wenn der Wert
oder die Gebrauchstauglichkeit dieses Gerätes erheblich gemindert ist.
Zeigt sich der Mangel nach Ablauf von sechs (6) Monaten ab dem
Übergabezeitpunkt, so hat der Verbraucher nachzuweisen, dass das Gerät
bereits im Übergabezeitpunkt mangelhaft war. Nicht unter diese
Garantie fallen Schäden oder Mängel aus nicht vorschriftsmäßiger
Handhabung sowie Nichtbeachtung der Einbauvorschriften und
Gebrauchsanweisungen.
2. Dieses Gerät fällt nur dann unter diese Garantie, wenn es von einem
Unternehmer in einem der Mitgliedstaaten der Europäischen Union
gekauft wurde, es bei Auftreten des Mangels in Deutschland betrieben
wird und Garantieleistungen auch in Deutschland erbracht werden
können. Mängel müssen uns innerhalb von zwei (2) Monaten nach
dessen Kenntnis angezeigt werden.
3. Mängel dieses Gerätes werden wir innerhalb angemessener Frist nach
Mitteilung des Mangels unentgeltlich beseitigen; die zu diesem Zweck
erforderlichen Aufwendungen, insbesondere Transport-, Wege-, Arbeitsund Materialkosten werden von uns getragen. Über diese Nachbesserung
hinausgehende Ansprüche werden durch diese Garantie dem Verbraucher
nicht eingeräumt.
4. Bei Großgeräten (stationär betriebene Geräte) ist im Garantiefall unter der
für den Endabnehmer kostengünstigen Rufnummer 0180 322 66 22 *
die nächstgelegene Kundendienststelle zu benachrichtigen, von der Ort,
Art und Weise der Garantieleistungen festgelegt werden.
Nachbesserungsarbeiten werden, soweit möglich, am Aufstellungsort,
sonst in unserer Kundendienstwerkstatt durchgeführt.
5. Garantieleistungen bewirken weder eine Verlängerung noch einen
Neubeginn der Garantiezeit für dieses Gerät; ausgewechselte Teile gehen
in unser Eigentum über.
6. Mängelansprüche aus dieser Garantie verjähren in zwei (2) Jahren ab
dem Zeitpunkt der Übergabe des Gerätes vom Händler an den
Verbraucher, der durch Original-Kaufbeleg (Kassenzettel, Rechnung) zu
Page 29

29
belegen ist; wenn dieses Gerät gewerblich oder - bei Waschgeräten und
Wäschetrocknern - in Gemeinschaftsanlagen genutzt wird, beträgt die
Verjährungsfrist sechs (6) Monate.
AEG Hausgeräte GmbH
Markenvertrieb AEG
Muggenhofer Straße 135
90429 Nürnberg * Deutsche Telekom
EUR 0,09 / Minute
Page 30

30
Kundendienst
Im Kapitel "Abhilfe bei Störungen" sind die wichtigsten Fehlerquellen zusammengestellt, die Sie selbst beheben können.
Wenn Sie trotzdem für einen der aufgeführten Hinweise oder aufgrund von
Fehlbedienung den Kundendienst in Anspruch nehmen, so erfolgt der Besuch
des Kundendienst-Technikers auch während der Garantiezeit nicht kostenlos.
Wenn Sie für eine Störung keinen Hinweis in dieser Gebrauchsanweisung
finden, haben Sie zwei Möglichkeiten:
Haben Sie Fragen zu Bedienung und Gebrauch Ihres Kühlgerätes?
Dann wenden Sie sich an
AEG DIRECT INFO SERVICES 0180-5554555*,
unsere telefonische Beratung. Dort bekommen Sie Tips zum Umgang mit
Ihrem Kühlgerät und zur Nutzung der zahlreichen Funktionen.
Hat Ihr Gerät eine technische Störung?
Dann wenden Sie sich bitte an unseren Kundendienst. Unter der kostengünstigen Rufnummer 0180 322 66 22** erreichen Sie immer die
nächstgelegene Niederlassung unseres Werkskundendienstes oder einen
unserer Service-Partner.
Geben Sie dem Kundendienst die PNC-Nummer und die S-No (Seriennummer) an, die Sie auf dem Typschild finden.
Damit Sie die Nummern bei der Hand haben, empfehlen wir, sie hier
einzutragen
Modellbezeichnung
Erzeugnis-Nummer (PNC)
Serien-Nummer (S-No.)
Halten Sie weiterhin möglichst genau fest:
Wie äußert sich die Störung?
Unter welchen Umständen tritt die Störung auf?
*Eur 0.12 / Minute **Eur 0.09 / Minute
Page 31

31
Dear customer,
Before switching on your new appliance please read these operating
instructions carefully. They contain important information for safe use, for
installation and for care of the appliance. Please keep these operating
instructions for future reference. Pass them on to possible new owners of the
appliance.
These operating instructions are for use with several technically comparable
models with varying accessories. Please observe the notes which apply to
your model.
Notes which are important for your safety or for the proper functioning of
the appliance are stressed with a warning triangle and/or with signal words
(Warning!, Caution!, Important!). Please observe the following carefully.
1. This symbol guides you step by step in the operation of the appliance.
2. .....
Supplementary information regarding operation and practical applications of
the appliance appear after this symbol.
Tips and notes concerning economical and environmentally sound use of the
appliance are marked with the cloverleaf.
Explanations of the technical terminology used in the operating instructions
can be found at the end in the section "TechnicalTerminology". The operating
instructions contain instructions for the correction of possible malfunctions
by the user in the section "What to do if ...". If these instructions should not
be sufficient, contact your local Service Force Centre.
Printed on paper manufactured with environmentally sound processes
he who thinks ecologically acts accordingly...
Page 32

32
Contents
Important safety information..............................................................................................34
General safety precautions......................................................................................................34
Precautions for child safety....................................................................................................35
Safety precautions for installation.......................................................................................35
Safety precautions for isobutane..........................................................................................35
Installing the appliance..........................................................................................................36
Transportation, unpacking .......................................................................................................36
Cleaning.........................................................................................................................................36
Placement.....................................................................................................................................37
Change of door opening direction .....................................................................................39
Instructions for the User........................................................................................................41
Description of the appliance, main parts............................................................................41
Control panel............................................................................................................................42
Fridge compartment..................................................................................................................42
Freezer compartment................................................................................................................42
Starting up and temperature regulationl................................................................43
Fridge compartment..................................................................................................................43
Freezer compartment................................................................................................................43
How to use the refrigerator ..................................................................................................44
Interior Accessories..................................................................................................................44
Storage Shelves ...........................................................................................................................44
Storing in the refrigerator.....................................................................................................45
Storage time and temperature of foods.............................................................................45
How to use the freezer............................................................................................................46
Freezing..........................................................................................................................................46
Storing in the freezer..............................................................................................................47
How to make ice cubes.............................................................................................................47
Page 33

33
Some useful information and advice................................................................................48
Hints and ideas............................................................................................................................49
How to save energy....................................................................................................................49
The appliance and environment............................................................................................49
Maintenance ...............................................................................................................................50
Defrosting .....................................................................................................................................50
Regular cleaning........................................................................................................................52
Internal cleaning.........................................................................................................................52
External cleaning........................................................................................................................52
If something does not work..................................................................................................53
How to change the bulb ..........................................................................................................55
Electrical connection................................................................................................................55
Storage time chart (1) ............................................................................................................56
Time and method of storage of fresh foods in the refrigerator..................................56
Storage time chart (2) ............................................................................................................57
Storage time of deep-frozen and products.......................................................................57
Warranty and service...............................................................................................................57
Service and spare parts ............................................................................................................57
Declaration of guarantee terms .........................................................................................58
Page 34

34
Important safety information
General safety precautions
Keep these instructions and they should remain at the appliance when
moving away or changing owner.
This appliance is designed for storing food, domestic use according to
these instructions only.
Specialised companies that are qualified to do so by the manufacturer
must carry out service and repairs including repairing and changing the
power cord. Accessory parts supplied by them should be used only for
repairing. Otherwise the appliance can be damaged or can cause other
damage or injury.
The appliance is out of circuit only in that case if the plug is removed from
the socket. Before cleaning and maintenance always unplug it (do not get
it by the cable). If the socket is difficult to reach, switch off the appliance
by cutting off the current.
Power cord must not be lengthened.
Make sure that the power plug is not squashed or damaged by the back
of the fridge/freezer.
- A damaged power plug may overheat and cause a fire.
Do not place heavy articles or the fridge/freezer itself on the power
cord.
- There is a risk of a short circuit and fire.
Do not remove the power cord by pulling on its lead, particularly when
the fridge/freezer is being pulled out of its niche.
- Damage to the cord may cause a short-circuit, fire and/or electric shock.
- If the power cord is damaged, it must be replaced by a certified service
agent or qualified service personnel.
If the power plug socket is loose, do not insert the power plug.
- There is a risk of electric shock or fire.
Without the lamp cover of interior lighting you must not operate the
appliance.
When cleaning, defrosting, taking out frozen food or ice tray do not use
sharp, pointed or hard devices, as they can cause damage to the appliance.
Be careful not to allow liquids to the temperature control and lighting
box.
Ice and ice-cream can cause hurt if they are eaten immediately after
removal from the frozen food compartment.
After dissolving frozen food must not be refrozen, it must be used up as
soon as possible.
Store pre-packed frozen food in accordance with the frozen food
manufacturer's instructions.
You must not make defrosting faster with any electric heating appliance
or chemicals.
Page 35

35
Do not put hot pot to the plastic parts.
Do not store flammable gas and liquid in the appliance, because they may
explode.
Do not store carbonated drinks, bottled drinks and bottled fruits in the
frozen food compartment.
Check and clean the outlet of melting water coming during defrosting
regularly. If it is clogged the melting water gathered can cause earlier
failure.
Precautions for child safety
Do not allow children to play with the packaging of the appliance. Plastic
foil can cause suffocation.
Adults must handle the appliance. Do not allow children to play with it or
its controlling parts.
If you are discarding the appliance pull the plug out of the socket, cut the
connection cable (as close to the appliance as you can) and remove the
door to prevent playing children to suffer electric shock or to close
themselves into it.
This appliance is not intended for use by persons (including children) with
reduced physical, sensory or mental capabilities, or lack of experience and
knowledge, unless they have been given supervision or instruction
concerning use of the appliance by a person responsible for their safety.
Children should be supervised to ensure that they do not play with the
appliance.
Safety precautions for installation
Put the appliance to the wall to avoid touching or catching warm parts
(compressor, condenser) to prevent possible burn.
When moving the appliance take care of the plug not to be in the socket.
When placing the appliance take care not to stand it on the power cord.
Adequate air circulation should be around the appliance, lacking this leads
to overheating. To achieve sufficient ventilation follow the instructions
relevant to installation.
Safety precautions for isobutane
Warning
The refrigerant of the appliance is isobutane
(R 600a) that is inflammable and explosive to a greater extent.
Keep ventilation openings, in the appliance enclosure or in the built-in
structure, clear of obstruction.
Do not use mechanical devices or other means to accelerate the defrosting
process, other than those recommended by the manufacturer.
Do not damage the refrigerant circuit.
Do not use electrical appliances inside the food storage compartments of
the appliance, unless they are of the type recommended by the
manufacturer.
For the safety of life and property keep the precautions of these user's
instructions as the manufacturer is not responsible for damages caused by
omissio
n.
Page 36

36
Installing the appliance
Transportation, unpacking
It is recommended to deliver the appliance in original packaging, in vertical
position considering the protective warning on packaging.
After each transportation the appliance must not be switched on for approx.
2 hours.
Unpack the appliance and check if there are damages on it. Report possible
damages immediately to the place you bought it. In that case retain
packaging.
Cleaning
Remove every adhesive tape and everything else, which ensure the accessories
not to move in the appliance.
Wash the inside of the appliance using lukewarm water and mild detergent.
Use soft cloth.
After cleaning wipe out the inside of the appliance.
Page 37

37
Placement
The ambient temperature has an effect on the energy consumption and
proper operation of the appliance.
When placing, take into consideration that it is practical to operate the
appliance between ambient temperature limits according to the climate class
that is given in the chart below and can be found in the data label.
If the ambient temperature goes below the lower data the temperature of the
cooling compartment can go beyond the prescribed temperature.
If the ambient temperature goes beyond the upper data this means longer
operating time of the compressor, breakdown in the automatic defrosting
increasing temperature in the cooling compartment or increasing energy
consumption.
In the bag of the accessories there
are two spacers which must be
fitted in the two top corners.
Slacken the screws and insert the
spacer under the screw head, the retighten the screws.
When placing the appliance ensure
that it stands level.
This can be achieved by two
adjustable feet at the bottom in
front.
Do not stand the appliance on a sunny place or close to a radiator or cooker.
Class of climate Ambient temperature
SN +10…+32°C
N +16…+32°C
ST +18…+38°C
Page 38

38
If it is unavoidable because of
furnishing and the appliance has to
be stood near a cooker take these
minimum distances into
consideration:
In case of gas or electric cooker 3
cm must be left, when it is less
put a 0,5-1 cm non-flam
insulation between the two
appliances.
In case of oil or coal-fired stove
the distance must be 30 cms
since they give off more heat.
The refrigerator is designed to
operate when it is totally pushed to
the wall.
When placing the refrigerator keep
minimal distances recommended in
figure.
A: placing it under a wall-cupboard
B: placing it freely
Page 39

39
Change of door opening direction
Should the setting-up place or handling demand it, door-opening direction
can be refitted from right-handed to left-handed.
Appliances on the market are right-handed.
Following operations are to be done on the basis of figures and explanations:
1. To perform the operations listed below it is
recommended to ask another person for help
who safely can keep the doors while
performing the operations.
2. Disconnect the appliance from the electricity
supply.
3. Open the doors and dismount the double
door hinge (a,b) by removing the screws (2
pieces) (c). (fig. 2)
4. Take off the double door hinge (a,b,c) by
gradually removing it from the cabinet,
slightly tilting both doors. Do not forget to
remove the plastic spacer (b) under the hinge.
(fig. 2)
5. Take off the refrigerator door by pulling it
slightly downwards.
6. Take off the freezer door by pulling it slightly
upwards.
7. Unscrew the top door hinge pin (d) of the
refrigerator then screw it back on the other
side. (fig. 1)
8. Remove the insert of the plinth (e) by a
screwdriver. (fig. 4)
9. Unmount the lower hinge pin (f) and its
washer (h) and mount them on the other
side. (fig. 4)
10. Replace the insert of the plinth (e) on the
other side.
11. Remove the covering nails (3 pieces) (n,k) of
the double door holder on the left side and
put them to the other side. (fig. 2)
12. Remove the (t, z) plugs from both doors. (fig.
3)
13. Remove the (u, v) door closing devices by
unscrewing the (s) screw.
14. Replace the (u, v) door devices on the
opposite side of the other door after turning
them, then fix them by screwing the (s) screw.
Page 40

40
15. Replace the (t, z) plugs on the opposite side.
16. Fit the pin of the double door hinge (m) into
the left drill of the freezer door. (fig. 2)
17. Fit the freezer door to the lower door hinge
pin (f). (fig. 4)
18. Fit the refrigerator door to the upper door
hinge pin (d) then slightly tilting both doors
fit the pin of the double door hinge (m) into
the left drill of the refrigerator door.
19. Opening both doors fix the double door
hinge onto the left side using the screws (2
pieces) (c). Do not forget to replace the
plastic spacer (b) under the hinge. Be careful
that the door edges are parallel with the
edge of the mantle.
20. Put over the handles (r) on the other side and
put the plastic covering nails (p) supplied in
the plastic bag of this instruction book into
the holes set free. (fig. 5)
21. Put the appliance to its place, set it level, and
apply to voltage it.
In case you do not want to perform the procedures above, call the nearest
brand-mark service. Technicians will accomplish the refitting expertly for
charge.
Page 41

41
Instructions for the User
Description of the appliance, main parts
A -Refrigerator
B -Freezer
1. Top with indicating switch
2. Lighting box
3. Glass shelves
4. Bottle rack
5. Cooling surface
6. Defrost water drain
7. Glass shelf
8. Vegetable boxes
9. Data label
10. Freezing compartment
11. Storing compartment(s)
12. Defrost water outlet
13. Bottom plinth
14. Adjustable feet
15. Butter compartment lid
16. Egg tray
17. Door shelf
18. Door gasket
19. Bottle shelf
20. Handles
21. Ice tray
22. Condenser
23. Defrost water outlet tube
24. Spacer
25. Evaporator tray
26. Compressor of freezer
27. Compressor of refrigerator
28. Rollers
Page 42

42
Control panel
A Alarm light (red)
B Fast freezing light (yellow)
C Fast freezing knob
D Temperature regulator - knob
freezer
E Temperature regulator - knob fridge
Fridge compartment
The thermostat knob (E) is the switch.
To start the refrigerating turn the thermostat knob (E) clockwise. In its "0"
position the refrigerator is off, but under the mains voltage.
Freezer compartment
The thermostat knob (D) is the on/off switch.
To start the refrigerating turn the thermostat knob (C) clockwise. In its "0"
position the freezer is off, but under the mains voltage.
The temperature regulator (D), which can be used for continuously variable
setting of the most energy saving storage temperature for your frozen food.
The optimum storage conditions occur at -18°C. The yellow pilot light (B)
comes on when the knob (C) has been operated. The refrigerating unit then
operates continuously.
The red temperature pilot-lamp (A) comes on when:
the appliance has been started up but the storage temperature has not yet
been attained;
the minimum storage temperature is no longer being maintained (fault);
excessive amounts of fresh food are placed inside; or
if the appliance door is open for too long.
Important note: if you operate the fast-freeze switch or adjust the
temperature regulator, it may happen that your appliance's refrigeration
motor does not start immediately but only after some time. This does not
mean that your appliance has a fault.
Page 43

43
Starting up and temperature regulation
Fridge compartment
Insert the plug of the connection lead into the plug socket with protective
earth contact.
Turn the knob (E).
Setting "0" means: Off.
Setting "1" means: Highest temperature, (warmest setting).
Setting "4" (end-stop) means: Lowest temperature, (coldest setting).
However, the exact setting should be chosen keeping in the mind that the
temperature inside the refrigerator depends on:
- the quantity of food stored
- how often the door is opened
- ambient temperature
Important!
High ambient temperatures (e.g. on hot summer days) and a cold setting on
the temperature regulator (position "4") can cause the compressor to run
continuously.
If this happens, turn the temperature regulator back to a warmer setting
(position "3" to "4"). At this setting the compressor will be switched on and
off as usual and automatic defrosting recommenced.
Freezer compartment
Please clean the appliance interior and all accessories prior to starting the
appliance. Plug in the appliance at the mains supply.
Turn the temperature regulator (D) in the direction of "1". The red lamp (A)
comes on
Operate the fast-freeze knob (C). The yellow pilot lamp (B) comes on and
the audible warning stops.
Only when the red lamp (A) has gone out should you reset the fast-freeze
knob (C) the yellow light (B) goes out.
Turn the knob (D).
Setting "0": Off.
Setting "1": Highest temperature, (warmest setting).
Setting "4" (end-stop): Lowest temperature, (coldest setting).
The exact setting should be chosen keeping in mind that the temperature
inside the appliance depends on (see Fridge):
Important:
Regularly check on the red temperature pilot lamp (A) that the required
storage temperature is being maintained.
Page 44

44
How to ise the refrigerator
For adequate cooling developing interior air circulation is necessary. For this
reason you are asked not to cover the air circulation gaps behind the shelves
(e.g. with tray etc.).
Do not put hot food into the refrigerator. Allow it to reach room
temperature naturally. In this way the unnnecessary frost building up can
be avoided.
Foods can take over odours from each other. So it is essential to put foods
in closed dishes or wrap them in cellophane, aluminium foil, grease-proof
paper or cling film before placing them into the refrigerator. This way
foods will keep their moisture e.g. vegetables will not dry out after some
days.
Interior Accessories
Storage Shelves
Various glass storage shelves are
included with your appliance. The
height of the storage shelves can be
adjusted:
1. To do this pull the storage shelf for-
ward until it can be swivelled
upwards or downwards and
removed.
2. Please do the same in reverse to
insert the shelf at a different
height.
Page 45

45
Storing in the refrigerator
When placing the different kinds of food take into consideration the sketch
below in figure:
1 Confectionery, ready-cooked
foods, foods in
dishes, fresh meat, cold cuts,
drinks
2 Milk, dairy products, foods in
dishes
3 Fruits, vegetables, salads
4 Cheese, butter
5 Eggs
6 Yoghurt, sour cream
7 Small bottles, soft drinks
8 Big bottles, drinks
Storage time and temperature of foods
The storage time chart at the end of the instruction book gives information
about storage time.
The storage time can not be determined exactly in advance, as it depends on
the freshness and handling of the cooled food. That is why the storage time
made known is only informative.
If you do not want to use up deep-frozen foods bought immediately they can
be stored for about 1 day (until dissolving) in the refrigerator.
Page 46

46
How to use the freezer
Freezing
The appliance can be used to freeze fresh food of quantity specified on the
data label. Freezing different products should always be done after proper
preparing as follows.
Set the thermostat knob to a medium position.
Put the previously frozen food to another basket or baskets. Put the fresh
food into the upper basket, leaving enough space for airflow.
Run the appliance this way for 24 hours.
After 24 hours set the thermostat knob according to your choice or leave it
in a medium position, which is in general appropriate for everyday cooling
needs.
Setting the thermostat knob to a higher (e.g. maximum) position is not
recommended. Although doing so would make the freezing time shorter, on
the other hand the temperature of the fridge compartment may go
permanently below 0 °C, what yields
freezing the food and drinks stored
there.
Never freeze food in bigger
quantity than given in the
"Technical data" at the same time,
otherwise freezing will not be
thorough and after dissolving
various deterioration may take
place (losing taste and aroma,
lysing, etc.).
Page 47

47
Storing in the freezer
It is practical to replace frozen products into the basket(s)after freezing has
finished. Doing this you could make room in the freezing compartment for
another freezing. Intermediate freezing does not deteriorate foods already
stored.
In large quantities of food are to be stored, remove the baskets except the
lowermost one from appliance and place food on the shelves.
Do not forget to keep to the storage time given on the packaging of frozen
products if you buy them frozen.
It is safe to store quick-frozen, frozen foods only if they have not dissolved
even for a short time until placing them into the freezer. If the deep-frozen
food has already dissolved, refreezing is not recommended, it has to be used
up as soon as possible.
How to make ice cubes
To make ice cubes fill the enclosed ice cube tray with water and put it to the
frozen food compartment. Setting thermostatic control knob to maximum
position can shorten preparing time. After finishing do not forget to reset the
thermostatic control to the suitable position.
Ready ice cubes can be taken out of the tray under running water then twist
or hit it. If the ice tray freezes to the compartment, avoid using metal tools
or knife to take it out as the cooling system can be damaged.
Page 48

48
Some useful information and advice
1. The variable shelves are worth paying attention to, which increases the
usability of the fresh food compartment considerably. Rearranging the shelves
is also possible when the door is open at an angle of 90 .
2. After opening and closing the door of freezer vacuum will rise inside the
appliance because of the low temperature. So wait 2-3 minutes after closing
the door - if you want to open it again - while inner pressure equalises.
3. Take care of opening the freezer at a position of thermostatic control so that
the inside temperature can never be warmer than -18 C.
4. It is practical to make sure of faultless operation of the appliance daily so as
to notice possible failure in time and prevent deterioration of frozen foods.
5. Normal operating sounds:
A thermostat controls the compressor and you will hear a faint click when
thermostat cuts in and out.
You may hear faint gurgling or bubbling sound when the refrigerant is
pumped through the coils at the rear, to the cooling plate/evaporator.
When the compressor is on, the refrigerant is being pumped round and you
will hear a whirring sound or pulsating noise from the compressor.
The fridge evaporator (this part cool down the fridge section) is foamed
into the cabinet. The temperature
of this part changing during its
work, and parallel with this its
dimensions are slightly changing,
too. These changes might cause a
cracking noise, which is a natural,
harmless phenomenon.
6. Should you want to check the
temperature of food stored in the
refrigerator, set the thermostat knob
into a medium position, place a
glass of water centrally in the
cabinet, and put a proper
thermometer with an accuracy of
+/- 1 °C into it. If after 6 hours you
measure a value between +3 °C and +8°C, the refrigerator works properly. The
measuring shall be performed under steady-stated conditions (without
changing the load).
7. If the freezer temperature is measured using a thermometer, put it between
the products since this will reflect the real temperature in the frozen
products.
Page 49

49
Hints and ideas
In this chapter practical hints and ideas are given about how to use the
appliance to reach maximum energy saving and there is environmental
information about the appliance as well.
How to save energy
1. Avoid putting the appliance in a sunny place near anything that gives off
heat.
2. Be sure that the condenser and the compressor are well ventillated. Do not
cover the sections where ventilation is.
3. Wrap products in tightly closing dishes or cling film to avoid bulding up
unnecessary frost.
4. Do not leave the door open longer than necessary and avoid unnecessary
openings.
5. Put warm foods into the appliance only when they are at room temperature.
6. Keep the condenser clean.
The appliance and environment
This appliance does not contain gasses which could damage the ozone layer,
in either its refrigerant circuit or insulation materials. The appliance shall not
be discarded together with the urban refuse and rubbish. Avoid damaging the
cooling unit, especially at the rear near the heat exchanger. Information on
your local disposal sites may be obtained from your municipal authorities.
The materials used on this appliance marked with the sympol are
recyclable.
Page 50

50
Maintenance
Defrosting
Bleeding part of the moisture of cooling chambers in form of frost and ice
goes with the operation of the applince.
Thick frost and ice has an insulating effect, so it reduces cooling efficiency as
the temperetaure increases in the cooling chambers, they need more energy.
At this type of appliance defrosting the cooling surface of the refrigerator is
automatic without any external intervention. The termostatic control
interrupts the operation of compressor at regular intervals for more or less
time - during this cooling is interrupted - the temperature of the cooling
surface goes above 0°C due to interior heating load of the compartment, so
defrosting occurs. When the surface temperature of the cooling surface has
reached +3 - +4°C the thermostatic control restarts operation of the system.
Melting water flows through defrost water outlet leaded through the back
into the evaporator tray maintained on the top of compressor and evaporates
due to its warmth.
Check and clean the outlet of melting
water coming during defrosting
regularly - a label inside the
appliance warns you for this. If it is
clogged the melting water gathered
can cause earlier failure as it can go
to the insulating of the appliance.
Clean the melting water outlet with the
supplied pipe scraper that can be seen
in the figure. The pipe scraper has to be
stored in the outlet.
The most typical case of clogging up in
the melting water outlet when you put
food wrapped in some paper into the
appliance and this paper contacts back plate of the refrigerator and freezes
to it. If you remove the food right at this moment the paper will tear and it
can cause clogging up in the outlet by getting into it.
So you are asked to be careful - because of the above - when placing foods
wrapped in paper into the appliance.
In case of increased demand e. g. during heatwawes, the refrigerator
temporarily happens to operate constantly - during this the automatic
defrosting does not work.
Remaining small ice and frost stains on back plate of the refrigerator after
defrosting period is not abnormal.
The freezer cannot be equipped with automatic defrosting set since the deepfrozen and frozen foods do not endure melting temperature.
Page 51

51
When small frost and ice occurs scrape off and remove frost and ice coating
with the supplied plastic scraper.
When ice coating is so thick that it cannot be removed with the plastic
scraper, the cooling gill have to be defrosted. Frequency of defrosting
depends on usage (generally 2-3 times a year).
Take the frozen foods out of the appliance, and put them into a basket lined
with paper or cloth. Store them
in a possibly cool place or
replace them into another
refrigerator.
Pull out the mains plug from
the mains socket, so both parts
of the appliance are out of
operation.
Open the doors of both parts of
the appliance and clean the
refrigerator according to "Regular cleaning".
Maintain and clean the freezer as follows:
In order to lead the thaw water out remove the spout found at the middle
bottom of the appliance, turn and replace it according to the Fig. Put a
proper high bowl under the spout.
After the defrosting place the spout into its original position.
The bowl in figure is not a piece of accessories to the appliance!
Wipe the surfaces after defrosting and leading the water out.
Put the mains plug into the mains socket and put foods taken out back to
their places.
It is recommended to operate the appliance at the highest position of the
thermostatic control for some hours so that it can reach the sufficient
storing temperature as soon as possible..
Page 52

52
Regular cleaning
Clean the equipment regularly.
Don't use detergents, abrasive or strongly odorous cleaners, waxy
polishing agents or disinfectants or alkoholic products for cleaning the
equipment.
Before cleaning pull out the wall plug of the equipment from the outlet.
Internal cleaning
Clean the internal parts of the equipment and the accessories with warm
water and sodium bicarbonate (5 ml to 0.5 litre of water).
Rinse and dry everything thoroughly. Clean the door seal profile with clean
water.
External cleaning
Clean the external parts of the equipment with warm water and sodium
bicarbonate (5 ml to 0.5 litre of water).
It is recommended to remove the dust and dirt deposited on the back side of
the equipment and on the condenser once or twice a year, and to clean the
evaporation tray on top of the compressor.
After cleaning, reconnect the equipment to the mains supply.
Page 53

53
If something does not work
During operation of the appliance some smaller but annoying trouble can
often occur, which does not require calling a technician out. In the following
chart information is given about them to avoid unnecessary charges on
service.
We draw your attention that operation of appliance goes with certain sounds
(compressor- and circulating sound). This is not trouble, this goes together
with the operation of the appliance.
We draw it to your attention again that the appliance operates
discontinuously, so the stopping of compressor does not mean being nocurrent. That is why you must not touch the electrical parts of the appliance
before breaking the circuit.
Problem
It is too warm in the
refrigerator.
It is too warm in the
freezer.
Water flows at the
back plate in the
refrigerator.
Water flows into the
chamber.
Water flows onto the
floor.
There are too much
frost and ice.
Possible cause
Thermostatic control can be set
wrongly.
If products are not cold enough or
placed wrongly.
The door does not close tightly or it is
not shut properly.
Thermostatic control can be set
wrongly.
The door does not close tightly or it is
not shut properly.
Products in big quantity to be frozen
were put in.
Products to be frozen are placed too
closely to each other.
It is normal. During automatic
defrosting frost melts on the back
plate.
The outlet of the chamber can be
clogged up.
Products placed in can prevent water
from flowing into the collector.
The melting water outlet flows not
into the evaporative tray above the
compressor.
Products are not wrapped properly.
Doors are not shut properly or do not
close tightly.
The thermostatic control can be set
Solution
Set the thermostat knob to higher
position.
Place the products according to the
chapter „Storing in the refrigerator”.
Check if the door closes well and the
gasket is unhurt and clean.
Set the thermostat knob to higher
position.
Check if the door closes well and the
gasket is unhurt and clean.
Wait some hours and then check the
temperature again.
Place the products in a way so that
cold air could circulate among them.
Clean the outlet.
Replace the products so that they can
not touch the back plate directly.
Put the melting water outlet to the
evaporative tray.
Wrap the products better.
Check if the doors close well and the
gaskets are unhurt and clean.
Set the thermostat knob to a position
that gives higher temperature.
Page 54

54
Problem
The compressor
operates continually.
The appliance does
not work at all.
Neither cooling, nor
lighting works.
The appliance is
noisy.
Possible cause
The thermostatic control is set
wrongly.
Doors are not shut properly or do not
close tightly.
Products in big quantity to be frozen
were put in.
Too warm food was put in.
Plug is not connected to the mains
socket properly.
The fuse burnt out.
The thermostatic control is not on.
Electrical network broke down.
The appliance is not supported
properly.
Solution
Set the thermostat knob to a position
that gives higher temperature.
Check if the doors close well and the
gaskets are unhurt and clean.
Wait some hours and then check the
temperature again.
Put food at max. room temperature.
Check the connection.
Change the fuse.
Start the appliance according to
instructions in chapter 'Putting it into
use'.
Get an electrician to check it.
Check if the appliance stands stable
(all the four feet should be on the
floor).
Inasmuch as the advice does not lead to result, call the nearest brand-mark
service.
Page 55

55
How to change the bulb
Should the light fail to work you
can change it as below:
Break the circuit of the appliance.
Unscrew the screw holding the
cover (1), press the rear hook (2)
and at the same time slide the
cover in the direction indicated by
arrow (3). So the bulb can be
replaced. (Bulb type: 230-240 V,
15 W, E 14 thread)
After changing the bulb replace the cover, snap it in place, screw back the
screw and apply voltage to the appliance.
Electrical connection
This refrigerator is designed to operate on a 230 V AC (~) 50 Hz supply.
The plug must be put into a socket with protective contact. If there is no
such, it is recommended to get an electrician to fit an earthed socket in
compliance with standards near the refrigerator.
This appliance complies with the following E.E.C. Directives:
73/23 EEC of 19.02.73 (Low Voltage Directive) and subsequent
modifications,
89/336 EEC of 03.05.89 (Electromagnetic Compatibility Directive) and
subsequent modifications.
- 96/57 EEC - 96/09/03 (Energy Efficiency Directive) and its subsequent
amendments
Page 56

56
Storage time chart (1)
Time and method of storage of fresh foods in the
refrigerator
Notation:
X usual storage time
x possible storage time (concerns to really fresh product only)
Foods Storage time in days Method of packaging
12 34 56 7
Raw meat XX x x x cling film, airtight
Cooked meat XX Xx x x dish covered
Roasted meat XX Xx x dish covered
Raw minced meat X dish covered
Roasted minced meat XX x x dish covered
Cold cuts, Vienna sausage XX xx cling film, cellophane, grease-proof paper
Fresh fish X x x cling film, airtight
Cooked fish XX x x dish covered
Fried fish XX x x x dish covered
Tinned fish, open X x x dish covered
Fresh chicken XX Xx x x cling film, airtight
Fried chicken XX Xx x x dish covered
Fresh hen XX x x x cling film, airtight
Boiled hen XXx x x dish covered
Fresh duck, goose XX Xx x x cling film, airtight
Roasted duck, goose XX XX x x x dish covered
Butter unopened XX XXXX Xoriginal packaging
Butter opened XX x x x x x original packaging
Milk in a plastic bag XX Xx x original packaging
Cream XX x x plastic box
Sour cream XX XX x x x plastic box
Cheese (hard) XX XXXX Xaluminium foil
Cheese (soft) XX XX x x x cling film
Curds XX XX x x x cling film
Egg XX XXXX X
Spinach, sorrel XX x x cling film
Green peas, green beans XX XX x x x cling film
Mushroom XX x x x cling film
Carrot, roots XXXXXX Xcling film
Bell-pepper XXx x x cling film
Tomato XX XXXX Xcling film
Cabbage XX XX Xx x cling film
Quickly rotting fruits (strawberry,
raspberry, etc.) XX Xx x cling film
Other fruits XX XXx x x cling film
Tinned fruits opened XX Xx x dish covered
Cakes filled with cream XX x x dish covered
Page 57

57
Model
Product No.
Serial No.
Date of purchase:
The manufacturer reserves the right to make any changes in the products.
Warranty and service
Service and spare parts
If calling the service is unavoidable, announce the trouble at a brand-mark
service nearest to your place.
When announcing the appliance has to be identified according to its data
label.
The data label of the appliance is stuck to the wall of the interior beside the
vegetable box in the fresh food compartment in the bottom on the left side.
All necessary data are there which are needed to the service announcement
(type, model, serial number, etc.). Note here the data from the data label of
your appliance:
Foods In the fresh food In the **** frozen food
compartment +2 - +7°C compartment -18°C
Vegetables:
green beans, green peas, mixed vegetables, marrow, corn, etc. 1 da y 12 months
Ready-cooked foods:
vegetable dish, trimmings, with meat, etc. 1 day 12 months
Ready-cooked foods:
sirloin steaks, stew from knuckle of ham, meat from pig pudding, etc. 1 d ay 6 months
Foods from potatoes, pasta:
mashed potato, gnocchi, dumpling, pasta filled with jam, chips 1 day 12 months
Soups:
meat-broth, soup from green beans, soup from green peas, etc. 1 day 6 months
Fruits:
sour cherry, cherry, gooseberry, fruit cream, mashed maroon 1 day 12 months
Meat:
chicken, duck, goose 1 day 5 months
fillets, tuna fish 1 day 6 months
Popsicle, ice-cream 1 day 3 weeks
Storage time chart (2)
Storage time of deep-frozen and frozen products
Page 58

58
Declaration of guarantee terms
Our appliances are produced with the greatest of care. However, a defect may
still occur. Our consumer services department will repair this upon request,
either during or after the guarantee period. The service life of the appliance
will not, however, be reduced as a result.
This declaration of guarantee terms is based on European Union Directive
99/44/EC and the provisions of the Civil Code. The statutory rights that the
consumer has under this legislation are not affected by this declaration of
guarantee terms.
This declaration does not affect the vendor's statutory warranty to the end
user. The appliance is guaranteed within the context of and in adherence
with the following terms:
1. In accordance with provisions laid down in paragraphs 2 to 15, we will
remedy free of charge any defect that occurs within 24 months from the
date the appliance is delivered to the first end user. These guarantee terms
do not apply in the event of use for professional or equivalent purposes.
2. Performing the guarantee means that the appliance is returned to the
condition it was in before the defect occurred. Defective parts are replaced
or repaired. Parts replaced free of charge become our property.
3. So as to avoid more severe damage, the defect must be brought to our
attention immediately.
4. Applying the guarantee is subject to the consumer providing proof of
purchase showing the purchase and/or delivery date.
5. The guarantee will not apply if damage caused to delicate parts, such as glass
(vitreous ceramic), synthetic materials and rubber, is the result of
inappropriate use.
6. The guarantee cannot be called on for minor faults that do not affect the
value or the overall reliability of the appliance.
7. The statutory warranty does not apply when defects are caused by:
a chemical or electrochemical reaction caused by water,
abnormal environmental conditions in general,
unsuitable operating conditions,
contact with harsh substances.
8. The guarantee does not apply to defects due to transport which have
occurred outside of our responsibility. Nor will the guarantee cover those
caused by inadequate installation or assembly, lack of maintenance or failure
to respect the assembly instructions or directions for use.
9. Defects that result from repairs or measures carried out by people who are
not qualified or expert or defects that result from the addition of nonoriginal accessories or spare parts are not covered by the guarantee.
10. Appliances that are easy to transport may be delivered or sent to the
consumer services department. Home repairs are only anticipated for bulky
appliances or built-in appliances.
B/AE/NY13-1. (07)
Page 59

59
11. If the appliances are built-in, built-under, fixed or suspended in such a way
that removing and replacing them in the place where they are fitted takes
more than half an hour, the costs that result therefrom will be charged for.
Connected damage caused by these removal and replacement operations will
be the responsibility of the user.
12. If, during the guarantee period, repairing the same defect repeatedly is not
conclusive, or if the repair costs are considered disproportionate, in
agreement with the consumer, the defective appliance may be replaced with
another appliance of the same value.
In this event, we reserve the right to ask for a financial contribution
calculated according to the length of time it has been used.
13. A repair under guarantee does not mean that the normal guarantee period
will be extended nor that a new guarantee period begins.
14. We give a twelve month guarantee for repairs, limited to the same defect.
15. Except in the event where liability is legally imposed, this declaration of
guarantee terms excludes any compensation for damage outside the
appliance for which the consumer wishes to assert his rights. In the event of
legally admitted liability, compensation will not exceed the purchase price
paid for the appliance.
These guarantee terms are only valid for appliances purchased and used in
Belgium. For exported appliances, the user must first make sure that they
satisfy the technical conditions (e.g.: voltage, frequency, installation
instructions, type of gas, etc.) for the country concerned and that they can
withstand the local climatic and environmental conditions. For appliances
purchased abroad, the user must first ensure that they meet the
qualifications required in Belgium. Non-essential or requested adjustments
are not covered by the guarantee and are not possible in all cases.
Our consumer services department is always at your disposal, even after the
guarantee period has expired.
Address for our consumer services department:
ELECTROLUX HOME PRODUCTS BELGIUM
Bergensesteenweg, 719 - 1502 LEMBEEK
Tel. 02.3630444
Page 60

From the Electrolux Group. The world’s No.1 choice.
Die Electrolux-Gruppe ist der weltweit größte Hersteller von gas- und strombetriebenen Geräten für
die Küche, zum Reinigen und für Forst und Garten. Jedes Jahr verkauft die Electrolux-Gruppe in
über 150 Ländern der Erde über 55 Millionen Produkte (Kühlschränke, Herde, Waschmaschinen,
Staubsauger, Motorsägen und Rasenmäher) mit einem Wert von rund 14 Mrd. USD.
AEG Hausgeräte GmbH
Postfach 1036
D-90327 Nürnberg
Sie können Ersatzteile, Zubehör und Pflegemittel on-line bestellen bei
http://www.aeg-electrolux.be
© Copyright by AEG
Technische Änderungen vorbehalten
200371893 - 01 - 0907
2007. 09. 04.
Het symbool op het product of op de verpakking wijst erop dat dit product niet als huishoudafval mag worden
behandeld. Het moet echter naar een plaats worden gebracht waar elektrische en elektronische apparatuur
wordt gerecycled. Als u ervoor zorgt dat dit product op de correcte manier wordt verwijderd, voorkomt u
mogelijk voor mens en milieu negatieve gevolgen die zich zouden kunnen voordoen in geval van verkeerde
afvalbehandeling. Voor meer details in verband met het recyclen van dit product, neemt u het best contact op
met de gemeentelijke instanties, het bedrijf of de dienst belast met de verwijdering van huishoudafval of de
winkel waar u het product hebt gekocht.
 Loading...