

Page 1

Tisch-Kühlautomat
Automatic Refrigerator
Réfrigérateur automatique table-top
Frigorífico automático de mesa
Frigorifero automatico a tavolo
Tafelmodel koelkast
Gebrauchsanweisung
Operating Instructions
Mode d’emploi
Instrucciones
para el uso
Istruzioni per l’uso
Gebruiksaanwijzing
AUS
ERFAHRUNG
GUT
Page 2
D
_______________________
D
Inhalt
Bildseiten (bitte ausklappen) 4-5
Allgemeine Hinweise, Platzwahl 6
Ihr Kühlgerät braucht Luft 7
Arbeitsplatte abnehmen 7
Wechsel des Türanschlags 7
Wechsel des Türanschlages 7
Spannung und Stromart 7/8
Inbetriebnahme und Temperaturregelung 8
Richtig lagern 8
Eiswürfel bereiten 9
Einfrieren und Tiefkühllagern 9
Abtauen 9
Reinigung und Pflege 9/10
Störungen und Kundendienst 10
Tips zur zweckmäßigen Benutzung
und Energie-Einsparung 10/11
_______________________
GB
Contents
lllustration pages (please unfold) 4-5
General instructions, Choice of location 12
Your freezer needs air 12/13
Detaching the worktop 13
Rehingeing the door 13
Voltage and current 13/14
Starting up and temperature regulation,
Correct storage 15
Icemaking 15
Freezing fresh food and storing
frozen food 15
Defrosting 15/16
Cleaning and care 16
Faults and servicing 16
Hints on proper use and energy-saving 17
_______________________
F
Contenu
Pages avec figures
(que vous voudrez bien déplier) 4/5
Remarques générales, choix de l'emplacement 18
Votre réfrigérateur a besoin d'air 19
Démontage du plan de travail 19
Changement du côté d'ouverture de la porte 19
Tension et nature du courant 20
Mise en service et régulation de la température,
rangement correct 20/21
Préparation de glaçons 21
Congélation et stockage des denrées surgelées 21
Dégivrage 21/22
Nettoyage et entretien 22
Pannes et service après-vente 22/23
Conseils pour une utilisation judicieuse
et économiser de l'énergie 23
Seite
Page
Page
_______________________
E
Indice
llustraciones (por favor desplegarlas) 4-5
Indicaciones generales, emplazamiento 24
Su mueble frigorífico necesita aire 24/25
Retirar el tablero de la mesa de trabajo 25
Cambio del batiente de la puerta 25
Tensión y tipo de corriente 26
Puesta en servicio y regulación de la temperatura,
almacenamiento correcto 26/27
Preparar cubitos de hielo 27
Congelación y almacenamiento de
ultracongelados 27
Descongelación 28
Limpieza y cuidados 28
Perturbaciones y Servicio Postventa 29
Consejos para el uso adecuado y para
economizar energía 29
_______________________
I
Indice
Pagine illustrate (vi preghiamo di aprire) 4-5
Indicazioni generali, luogo di installazione 30
ll vostro apparecchio ha bisogno di aria 30/31
Smontaggio del piano di lavoro 31
Modifica della cernieratura della porta 31
Tensione e tipo di corrente 32
Avviamento in funzione e regolazione
della temperatura 32/33
Esatta conservazione 33
Preparazione di cubetti di ghiaccio 33
Congelazione e conservazione in
stato congelato 33/34
Sbrinamento 34
Difetti e servizio tecnico assistenza clienti 35
Consigli per l'utilizzazione appropriata e
l'economizzazione di energia 35/36
_______________________
NL
Inhoud
Afbeeldingen (uitklapbare pagina's) 4-5
Algemene aanwijzingen, opstelling 38
Uw koeltoestel heeft lucht nodig 37/38
Bovenblad verwijderen 38
Overzetten van het deurscharnier 38
Spanning en stroomsoort 38
In gebruik nemen en temperatuurregeling,
op de juiste wijze indelen 39
IJsblokjes maken 39
Invriezen en bewaren 40
Ontdooien 40
Reiniging en onderhoud 40/41
Storingen en klantenservice 41
Tips voor een doelmatig gebruik en het
besparen van energie 41/42
Página
Pagina
pagina
2
Page 3
105
3
570
550
A/B
3 4
200 cm
2
C
1
93-103
K
AEG36
1
AEG105
2
AEG97
4
B
A
C
A
AEG98
5
12
AEG96
3
A
AEG75
6
Page 4
AEG42
7
8
AEG43
130
AEG62
10
7
1
2
6
6
2
5
4
M
AEG46
3
11
AEG44
9
300
AEG47
12
Page 5

AEG48
13
5
AEG65
14
5
Page 6
GB
IMPORTANT!
If your new appliance has been bought to replace an
older model, please make the old appliance unusable at once: pull the plug out of the socket, cut the
connecting lead off, and dispose of the plug together
with the remaining lead in an environmentally friendly
manner.
Any snap catch or lock on your old appliance should
also be made unusable before you put the appliance
away or hand it over to be disposed of in an environmentally friendly manner .
In this way you can prevent children from locking
themselves in when playing and thus endangering
their lives.
Please make sure that the pipelines of your fridgefreezer are not damaged before collection for environment-friendly disposal.
Appliance packaging
information
All used materials are environmentally compatible!
They can be safely disposed of or burnt in a refuse
incinerator!
Regarding the materials: the plastics can also be
recycled and are marked as follows:
>PE< for polyethylene e.g. as used in the outer
wrapping and bags inside
>PS< for polystyrene foam e.g. as used in the
packing; this material is basically CFC-free
The cardboard parts are made of waste paper and
should be put back into the waste paper collection
system.
General instructions
You have just purchased a home refrigerator which
has been produced according to the standards
applicable to these appliances.
During manufacture, the necessary measures have
been taken as required by the Appliance Safety Act
(GSG), the Accident Prevention Regulations for
Refrigerating Installations (VBG 20), and the Specifications of the Institute of German Electrical Engineers (VDE).
The refrigeration circuit has been checked for
leakage.
This appliance complies with the following EC
Directives:
- 73/23/EEC of 19.02.1973 - Low-Voltage Directive
- 89/336/EEC of 03.05.1989 (including Amendment
Directive 92/31/EEC) - EMC (Electromagnetic
Compatibily) Directive.
Before starting up, we recommend you to read th
following Operating Instructions, since only by doing
so can you benefit from all the advantages offered by
your refrigerator. These Operating Instruction are
intended for several technically comparable models
with different equipment. Please only follow the
instructions corresponding to your appliance version.
Removing the adhesive tapes
The door is secured to the housing with adhesive
tapes. Remove any adhesive tape residues with a
suitable petroleum-based cleansing agent.
Choice of location
Your refrigerator should be installed in a well ventilated, dry room. Never install your refrigerator near a
heater or oven or in direct sunlight.
Do not install in a room whose temperature may fall
below +16°C or exceed +32°C for any length of
time.
Your refrigerator should be installed on a firm, level
surface. Correct any floor irregularities by twisting the
adjustable feet in or out.
Commercial use
Should you use your home refrigerator commercially
or for purposes other than refrigeration of food and
drinks, you must observe the legal requirements
applicable to your area.
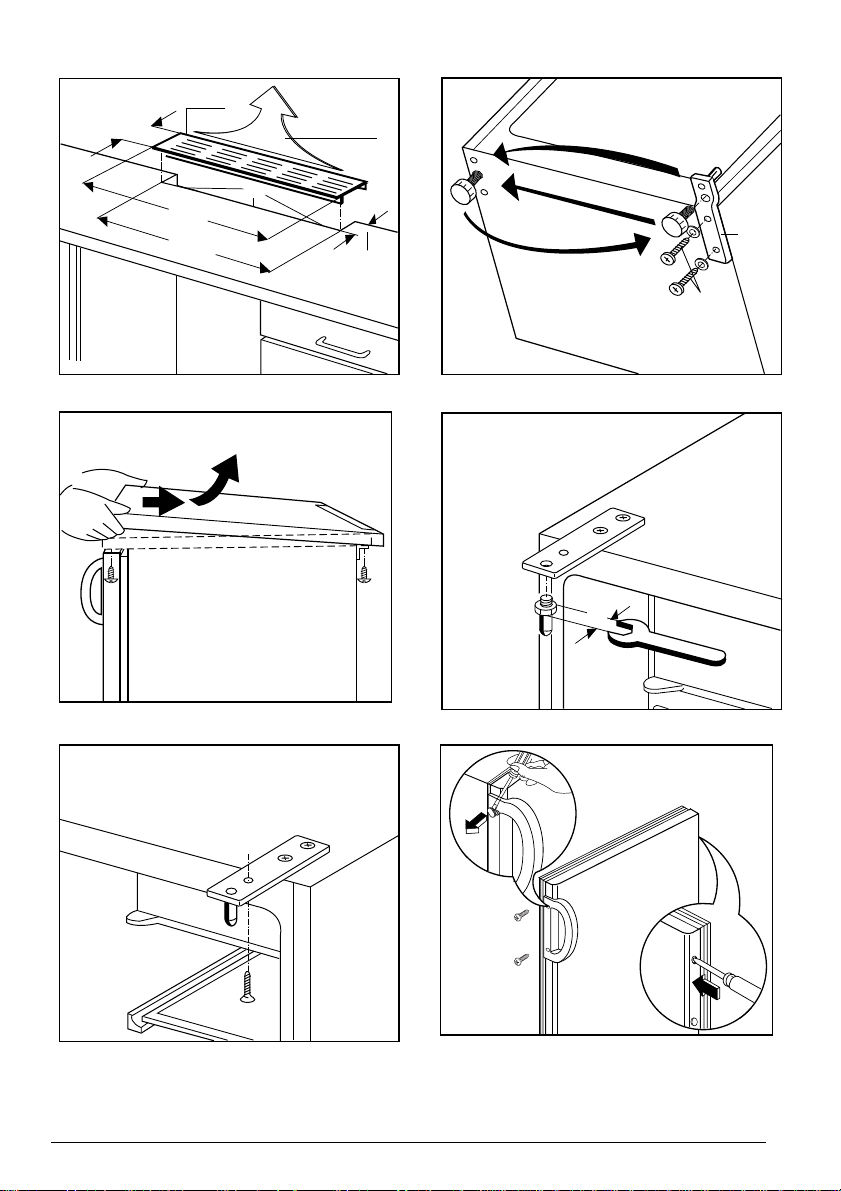
Your freezer needs air
Fig. 1
The refrigerating unit of your refrigerator is designed
for maintenance-free operation. What it should
never lack is good ventilation. Air is supplied under
the door through the ventilation slot between the
refrigerator and storage surface. Air is extracted
through the upper ventilation grille. Never obstruct
these openings by plinth screens or crockery.
If your refrigerator is installed under a continuous
worktop, an air outlet opening of at least 200 cm
and a ventilation grille (A/B) matching the worktop
design should be provided at the rear of the worktop
(Fig. 1). The cut surfaces of the worktop (C) should
be varnished to avoid swelling due to penetration of
moisture.
The appliance wall distance must be at least 30 mm
2
12
Page 7

and should be checked before the ventilation grille is
inserted.
Special accessories:
A = Ventilation grille, brown (E-No. 621 814 002)
B = Ventilation grille, white (E-No. 621 825 004)
Detaching the worktop
Fig. 2
After removal of the worktop of your refrigerator, the
appliance can be installed under a continuous
worktop. To do this, proceed as follows:
Unscrew the Phillips screws (A).
Unscrew the front screws (C).
Mounting under a continuous
worktop
Fig. 3
If installed under a continuous worktop, the appliance is fastened with a mounting screw (A) under
the panel.
Rehingeing the door
Figs. 4, 5, 6
Before you connect the appliance to the power
supply you should check whether the door should
close to the right (as delivered) or should better be
changed over to the left if the position and ease of
use require. If so:
1. Tilt the appliance slightly towards the rear and
prop it securely.
2. Unscrew the door hinge screws (K) and take the
door bearing (1) downwards out of its cavity
(Fig. 4).
3. Open the door a little way and take it out downwards.
4. Unscrew the upper pin (A) (Fig. 5) and screw it
into place on the opposite side.
5. Fit the door into the upper pin (A) and close it.
6. Insert the pin of the door bearing (1) into the left
hand cavity and screw the bearing firmly into
place with the screws (K).
7. Unscrew the handle. Refit it on the opposite side
after having pierced the plugs with a punch.
Cover the holes left open with the plugs contained in the documentation pack (Fig. 6).
GB
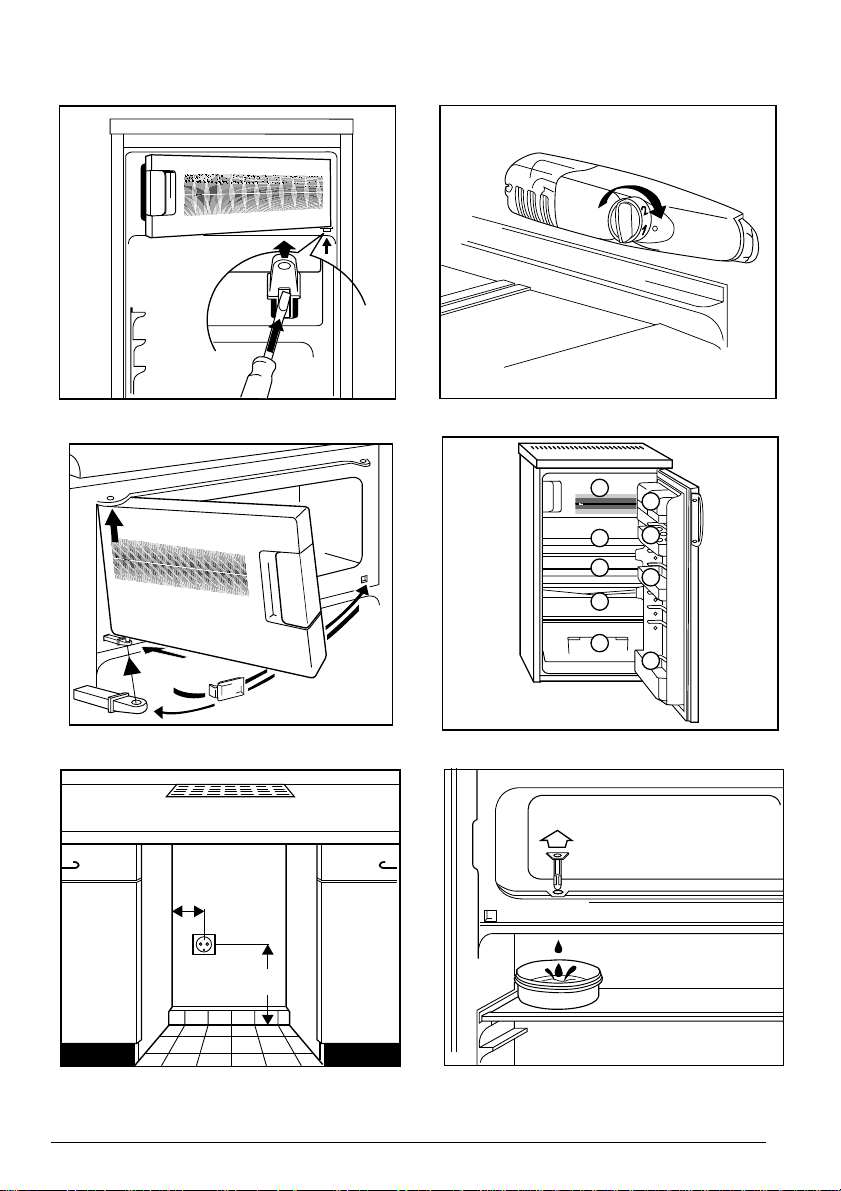
Changing over the freezer
compartment door
Figs. 7 and 8
1. Open the freezer compartment door a little way.
2. Using a small screwdriver, press the spring in the
opening of the lower door bearing slightly
upwards and take the door bearing out complete with the door (Fig. 7).
3. Turn the covering cap (M) round (Fig. 8).
4. Turn the freezer compartment door through
180° and fit the lower door bearing into the
lower bearing cavity of the freezer compartment
door.
5. Lift the freezer compartment door a little way
upwards, fit it into the upper door bearing, and
at the same time insert the lower door bearing
into the square hole. Small upwards and downwards adjustments of the freezer compartment
door will make fitting easier.
Cleaning before using for the
first time
Like all new appliances, your refrigerator will smell
"new". For this reason, the interior of the refrigerator
and all accessories should be cleaned before use
(see also "Cleaning and care").
Electrical connection
WARNING - THIS APPLIANCE MUST BE
EARTHED
Please ensure that the voltage and current indicated
on the rating plate agrees with the voltage of your
electricity supply.
220/240 volts ~ (i. e. 220/240 V AC).
If your appliance has been equipped with a mains
lead with a moulded-on type plug, you must comply
with the following regulations: The plug moulded on
to the cord incorporates a fuse. For replacement,
use a 13 amp BS 1362 fuse. Only ASTA approved
or certified fuses should be used. The fuse cover/
carrier must be replaced in the event of changing
the fuse. The plug must not be used if the fuse
cover/ carrier is lost. A replacement cover/carrier
must be obtained from an electrical goods retailer. If
the socket outlets in your home are not suitable for
the plug fitted to the appliance, then the plug must
be cut off and an appropriate one fitted. When
13
Page 8

GB
fitting the plug please note the following points:
Important
The wires in the mains lead are coloured in accordance with the following code:
Green and Yellow Earth
Blue Neutral
Brown Live
As the colours of the wires in the mains lead of this
appliance may not correspond with the coloured
markings identifying the terminals in your plug,
proceed as follows:
1. The wire which is coloured GREEN and YEL-
LOW must be connected to the EARTH terminal in your plug, which is marked with the letter
E or by the earth symbol or coloured
GREEN, or GREEN and YELLOW.
2. The wire which is coloured BROWN must be
connected to the LIVE terminal which is marked
with the letter L or coloured RED.
3. The wire which is coloured BLUE must be connected to the neutral terminal which is marked
with the letter N or coloured BLACK.
When wiring the plug, ensure that all strands of wire
are securely retained in each terminal. Do not forget
to tighten the mains lead clamp on the plug.
Warning! A cut-off plug inserted into a 13 amp
socket is a serious safety (shock) hazard.
Ensure that the cut-off plug is disposed of
safely.
Voltage 220/240 V AC
Fuse rating 13 amps
See rating plate for further information.
The rating plate is inside, on the left.
Plug socket
Fig. 9
The plug socket necessary for connection of your
appliance to the electricity supply should be positioned so that it is possible to pull out the appliance
plug.
If your appliance is installed under a continuous
worktop, the plug socket should be provided as
shown in Fig. 9.
A concealed protective contact plug socket requires
10 A/16 A fusing.
Starting up and temperature
regulation
Fig. 10
Insert the plug of the connection lead into the plug
socket with protective earth contact.
When the refrigerator compartment door is opened,
the internal lighting is switched on.
The temperature selector knob is located on the RH
side of the refrigerator compartment.
Setting "0" means: Off.
Turning clockwise in direction "1": Refrigerating
unit on, the latter then operating automatically .
Setting "1" means:
Highest temperature, warmest setting.
Setting "6" (end-stop) means:
Lowest temperature, coldest setting.
The temperatures in the refrigerator compartment
and freezer compartment cannot be independently
regulated.
At a low ambient temperature of around 16°C, setting "1" should be selected. At ambient temperatures
of around 25°C, select setting "2". If you require a
lower temperature, select setting "3" or "4". On this
setting, you can be sure that fresh food will be reliably
frozen and that a storage temperature of -18°C will
be maintained in the freezer compart- ment.
If you want to freeze fresh food rapidly, select setting "6", ensuring that the temperature in the refrigerator compartment does not drop below 0°C. You
should also promptly reset the temperature regulator
to setting "3" or "4".
A high room temperature (25°C to 32°C) together
with a very cold temperature setting "5" or "6" can
lead to the refrigerator unit running continuously,
under which circumstances the evaporator on the
rear wall of the refrigerator compartment can no
longer defrost automatically. In this event, set the
temperature slightly warmer, at "3" or "4", so that the
refrigerating unit is controlled and the defrosting cycle
switched in automatically .
The internal temperature is strongly affected by the
ambient temperature, loading, and frequent dooropening. If the setting is changed, the refrigerating
unit does not start immediately if automatic
defrosting is in progress.
14
Page 9
Correct storage
Fig. 11
1 =Butter and cheese
2 =Eggs, tubes, preserves
3 =Drinks
4 = Cheese storage, fruit, and vegetables
5 =Meat, salami, cold cuts, dairy produce
6 =Ready meals, pastries, preserves
7 =Frozen food storage/freezing fresh food, ice-
making
= This symbol means that deep-frozen
food can be kept for some months in this compartment. The length of storage time depends on the
type of food - see manufacturer's instructions.
However, small quantities of fresh foods can be
frozen (see: "Freezing and storage").
For safety reasons (such as the risk of an explosion!) it is not allowed to store containers holding
inflammable liquids or gases, e.g. aerosol cans or
cigarette-lighter refill cartridges, in the appliance.
Adjusting the heights of the
storage shelves and wire trays
Various glass or plastic storage shelves and wire
storage trays are included with your appliance different models have different combinations.
You should always place a glass or plastic shelf into
the first set of guides, above the fruit and vegetable
containers, and keep it in this position.
In order to arrange the internal space to suit your
individual requirements, you can adjust the heights
of the other shelves and wire trays to a number of
different positions to accommodate stored goods of
varioussizes.To do this, pull the shelf or tray slightly
forwards until it can be tilted upwards or downwards and taken out. To fit it at a different level,
reverse the procedure.
VARIO glass storage shelf
If, for instance, you intend to store bottles, cans, or
jars in an upright position, please push the front half
of the VARIO storage shelf underneath the rear half.
This will provide space for tall items to be stored on
the next shelf below it.
Icemaking
Fill the ice-tray 3/4 full with cold water, place it in the
freezer compartment, and allow it to freeze. The icecubes can be easily loosened by twisting the ice-tray
GB
or by holding it briefly under running water .
Never loosen the frozen-on ice-tray with sharp or
pointed objects, since you may damage the refrigerating circuit.
Freezing fresh food and
storing frozen food in the
freezer compartment
You can use the freezer compartment for freezing of
fresh food yourself. Please observe the following
instructions to be sure of obtaining the best results.
Do not freeze too large a quantity at any one time
(max. 2 kg per 24 h). The quality of the food is best
preserved when it is frozen right through to the core
as quickly as possible.
Packed food to be frozen should be placed on the
floor of the freezer compartment directly on the
refrigerating unit.
Take special care not to mix already frozen
foods with those not yet frozen (minimum
distance 4 cm)!
Tightly close the freezer compartment door.
The do’s and don’ts of storing
frozen food
Once the freezing process is completed, deepfrozen storage takes place in the temperature range
below -18 °C.
When storing frozen food, please note the maximum
storage times specified by the manufacturer. Make
sure that only packaged food is stored in the freezer,
since unpackaged food will soon dry out when
exposed to the extreme cold.
With the exception of spirits and drinks containing a
higher percentage of alcohol, beverages in glass
bottles, particularly soft drinks containing carbon
dioxide, juices, beer, wine, etc., should not be stored
in the freezer. When the contents freeze, the glass
bottles will crack or even burst.
Never handle deep-frozen food with wet hands.
Y our hands could easily become frozen to the food.
Defrosting
Fig. 12
The defrosting of the evaporator on the rear wall of
the refrigerator compartment is automatic, and the
water evaporates by itself. Frost accumulating in the
freezer compartment can be removed from time to
time with a plastic scraper - but never with a knife or
15
Page 10

GB
any other sharp or pointed object.
If under certain circumstances the refrigerator
evaporator ceases to defrost automaticalIy, please
read the instructions on continuous operation of the
refrigerating unit in the section: "Starting up and
setting the temperature".
The freezer compartment need not be defrosted
very frequently. You only need to unplug the
appliance (or remove the fuse) and leave the doors
ajar.
During defrosting, wrap the frozen food in several
layers of newspaper and store in a cool place.
Remove the stopper from the melt-water outlet
(Fig. 12) and place a bowl underneath it to catch
the melt-water.
You can accelerate the process by placing a
container of warm water inside the refrigerator and
keeping the door closed, but for safety reasons it is
not allowed to use any additional source of heat
such as a radiant or blower heater. When the layer
of frost has melted, dry all the internal surfaces
thoroughly.
Cleaning and care
Fig. 13
Your refrigerator should be cleaned at regular intervals. This is best done when it is empty or contains
little food.
It must never be connected to the mains supply
during cleaning - pull out the mains plug or remove
the fuse.
For safety reasons, the refrigerator must never be
cleaned with a steam-cleaner; moisture could penetrate into the electrical components and hot steam
could cause damage to the plastic parts.
Make sure that the drain opening of the gutter
(Fig. 13) on the back panel is always free. If it is
blocked, clear it with the aid of the green peg in the
pack of accessories included with the appliance.
Some organic solvents as well as essential oils (e g.
juice from lemon and orange peel, butyric acid)
attack the plastic parts. Do not forget that, even in
the refrigerator, food stored too long may spoil. To
prevent any odours from forming, the contents
should therefore be checked from time to time
(including accessories) and thoroughly cleaned with
lukewarm water to which a mild detergent can be
added. Finally , wash with clean water and wipe dry.
After cleaning, promptly restart your appliance.
When not in use
If your refrigerator is to remain unused for any length
of time, it must be disconnected (unplugged) from
the electricity supply. Remove all refrigerated and
deep-frozen packages as well as ice-trays, clean the
refrigerator compartment thoroughly, and leave the
door ajar to prevent any odours from forming.
Internal lighting
Fig. 14
If the bulb fails, you can easily replace it yourself.
1. Danger of electrocution! Pull the plug out of the
power socket or remove the fuse before changing the bulb.
2. Unscrew the light cover securing screw.
3. Press the light cover as shown in Fig. 14, and
slide it backwards.
4. Unscrew the failed bulb and replace it with a
new one of the same type.
Bulb type: 240 V, 15 W (never, in any circumstances, fit a bulb larger than 15 W).
5. Refit the light cover and tighten the securing
screw.
6. Put the refrigerator back into operation.
Faults and servicing
To maintain the safety of your appliance, you should
only have repairs, especially on live parts, performed
by a trained electrician. In the event of a fault, please
contact your retailer or the service centre direct.
Before approaching the service centre, check
whether the plug socket is energized (connect light
bulb where necessary). Power supply faults can be
rectified by your electrician.
If your refrigerator has a fault, please notify the
nearest service centre promptly. To avoid unnecessary journeys and costs, please quote
- the model designation,
- E-number and
- F-number of your refrigerator.
These data are indicated on the rating plate inside
your appliance on the LH side.
N. B.! Unjustified after-sales service calls must be
paid for even during the guarantee period.
16
Page 11

Minor repairs that you can
carry out yourself
– Spare parts:
Spare parts can be ordered from the service
centre. You can fit these yourself without any
special skill or training, e. g.
– internal equipment parts, such as
butter/cheese compartment,
egg holders,
door racks,
fruit and vegetable drawers,
storage racks.
Hints on proper use
Store your food, depending on type and sensitivity, in
the appropriate temperature zones. This will enable
you to achieve an optimum storage duration (see
illustration under "Correct storage"). Ensure good
packaging and coverage of food intended for
storage in the refrigerator to retain flavour, colour,
moisture, and freshness.
Clean the refrigerator compartment regularly to
ensure hygienic storage of food and to prevent undesirable odours from forming.
Note the storage duration of frozen food in the
freezer compartment to avoid quality impairment.
Never place hot food in your refrigerator for cooling.
GB
Hints on energy-saving
One or two additional hints on energy-saving are
given below:
- Do not install your refrigerator next to a radiator
or oven. Through high ambient temperature, the
temperature regulator switches on the refrigerating unit more frequently and for longer.
- Do not place any hot food in the refrigerator first allow the food to cool to room temperature.
- Do not open the door unnecessarily and close it
again as quickly as possible.
- Set the most energy-saving frozen food storage
temperature (see "Starting up and temperature
regulation").
- Ensure good ventilation.
- Keep the heat-emitting condenser (heat
exchanger), the metal grille on the rear wall of
your appliance, clean. Thoroughly clean it at
least once per year.
17
Page 12

AEG Hausgeräte GmbH
Postfach 1036
D-90327 Nürnberg
AUS
ERFAHRUNG
GUT
Copyright by AEG
H 271 271 300 - 0497/03 - 151
2222 619-61 ET 1 2 3 4 5 6 7 8 9 10 11 12 / 97
 Loading...