

Page 1

I N F O
USER MANUAL
W ATER PURIFIER
RO 400 DIRECT FLOW
822 90 16-13
Page 2

THANK YOU for choosing the RO 400 water purifier.
We are confident it will give you many years of trouble-free
service.
To achieve the best results when using your new water
purifier, we recommend that you read this user manual
carefully and keep it in a safe place for future reference.
To prevent mishaps and problems it is important that you
should read the "
Safety information" section, and that you
follow the "
Installation" instructions carefully. Everybody
using the water purifier should be familiar with how to
operate it and its safety features.
Take care of this manual and make sure that it accompanies
the water purifier if it is moved or sold, so the user will
always have access to the full instructions and the safety
information.
To help you identify warnings and other important
information we have used this symbol to gain your
attention:
While reading the manual you will find it useful to
open out this folded page so you can refer back to the
illustration "
General View of the Appliance".
2
RO 400 DIRECT FLOW
Page 3
3
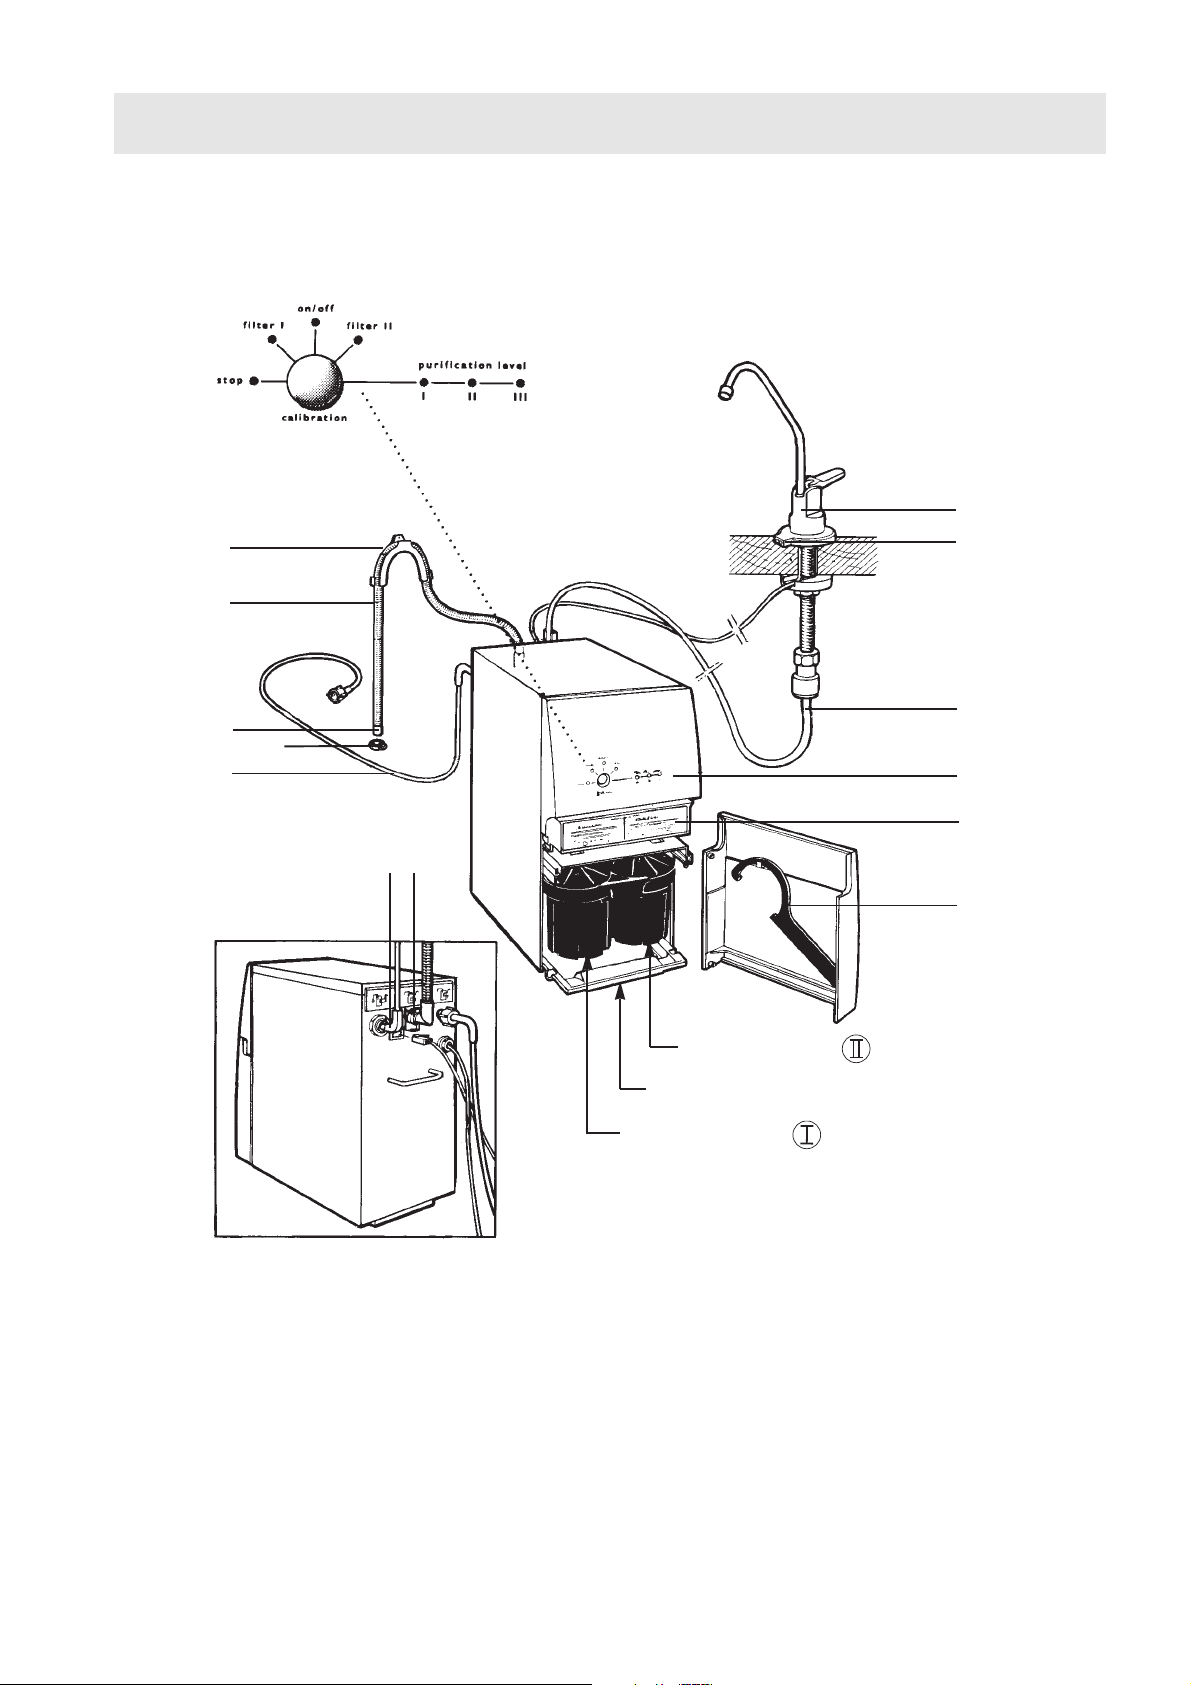
GENERAL VIEW OF THE APPLIANCE
Filter container
Base plate
Filter container
Control panel
7
8
4
4
1
6
3
9
10
5
2
11
Supplied with the RO 400:
1 Bracket for reject water hose*
2 Hose for discharge of reject water to
waste pipe
3 Connection piece, reject water hose*
4 Hose clip (x 2)*
5 Hose for feed water
* packed in a separate bag
6 Elbow for purified water hose*
7 Filter spanner
8 Self-adhesive information panel
9 Hose for purified water
10 Tap for purified water
11 Indicator lights
Page 4
4
YOUR NEW WATER PURIFIER
Unpacking
If the appliance has been damaged during transportation,
you should immediately notify the company responsible
for delivering it.
Take hold of the rear hand-grip and the front edge of
the RO 400 and carefully lift the appliance out. The
appliance can be damaged if it is lifted in any other way.
Check the water purifier for any signs of damage and
check that no accessories are missing. If you do discover
any damage, faults or that anything is missing, you should
report this to the seller immediately. Never leave packaging
material in a place where children may play with it.
Recycling of materials
The materials used in 80% of the plastic and rubber
components of this product and its packaging are
identified by symbols to assist the process of recycling
and disposal. The materials are marked according to
international standards. The cardboard parts of the
packaging are made from recycled paper and should
be deposited at a suitable recycling point.
Optional accessories and consumables
Filter inserts:
Filter (particle filter) Part no. 919 24 00-00
Filter (carbon filter) Part no. 919 24 00-01
Descaling/cleaning agent
for Water Purifiers Part no. 150 72 07-00
Preservative and Antifreeze
liquid for Water Purifiers Part no. 150 72 06-02
Disinfectant for
Water Purifiers Part no. 150 72 56-02
Water Extraction Device
for Water Purifiers Part no. 919 24 09-01
Connector for dishwashers
(level-control type only) Part no. 919 24 09-02
Accessories and consumables can be ordered from
your Electrolux dealer. When ordering, please quote
the relevant part number from the list above.
A BRIEF GLOSSARY
Reverse osmosis - The purification of water by forcing it under
pressure through a semipermeable membrane.
The membrane is impermeable to impurities,
but permeable to water. This is the principle
upon which the RO 400 is based. This form
of purification does not rely on chemicals.
Membrane - The membrane made of semipermeable
material used in the RO 400 to purify water
by reverse osmosis.
Filters - Used to separate out material before the water
reaches the membrane, prolonging the life of
the membrane:
grid (a coarse filter)
particle filter (Filter )
carbon filter (Filter )
Page 5

5
Unpacking........................................................4
Identification of materials ................................4
Optional accessories and consumables..........4
A brief glossary................................................4
Concerning the use of the RO 400..................7
Concerning installation and service ................7
Where to install the RO 400 ............................8
Apply the information panel ............................8
Electrical and plumbing connections ..............9
To fit the tap for purified water ........................9
Connecting the reject water hose..................10
Connecting the feed water hose....................10
Connecting up the appliance ........................11
The flushing procedure..................................12
Calibration ....................................................12
Moving the RO 400........................................12
To draw purified water ..................................13
Replacing the filters..................................14-15
Descaling ......................................................16
Disinfection....................................................17
To clean the grid............................................18
Preparing the RO 400 for storage ................18
Protecting the RO 400 against freezing
during storage................................................19
Points to remember ......................................19
Trouble-shooting table..............................22-23
To adjust the tap............................................24
Service and spare parts ................................25
CONTENTS
GENERAL VIEW OF THE APPLIANCE 3
YOUR NEW WATER PURIFIER 4
SAFETY INFORMATION 6-7
CONTENTS 5
INSTALLATION 8-12
USING THE RO 400 13
MAINTENANCE 14-19
REGULAR CARE OF THE RO 400 19
TECHNICAL DATA 20-21
IF THE RO 400 STOPS WORKING 22-24
SERVICE AND SPARE PARTS 25
Page 6

The RO 400 Direct Flow is a very safe appliance, but even so it is important that everyone using
it should be thoroughly familiar with the way it works and its safety features. To prevent mishaps
and problems you should read the "
Safety Information
" on these pages, and carefully follow the
instructions in the "
Installation
" section. Take care of this manual and make sure that it
accompanies the water purifier if it is moved or sold.
6
SAFETY INFORMATION
• Check that the water you intend to purify meets
the requirements listed under "
Requirements of
feed water
", in the section "Technical data".
• When the RO 400 is brand-new, the purified
water must not be consumed until after the
calibration and flushing procedures have been
completed.
• Calibration of the RO 400 should only be carried
out:
– the first time that the water purifier is used
– if the appliance is moved to a different place
(locality) where the water quality is different
– after the membrane has been replaced
• When the RO 400 is new or the membrane
contains the special products for storage or
descaling, it will have to be cleaned by following
the "
Flushing procedure" before the water from the
water purifier may be used again.
• The water produced by the appliance may only be
consumed if Purification Level indicator II or III
on the control panel was lit when it was being
purified. A green indicator light on the tap will
come on at the same time.
• If the feed water supply to the appliance is unfit for
consumption, have the purified water from the
appliance tested after installation. You should
subsequently have the purified water tested once a
year, or if any change in its taste or smell occurs, to
ensure that the water purifier is functioning well.
If the result is unsatisfactory, do not drink the
water. Contact your dealer.
• If any leakage arises, turn off the supply of water to
the appliance immediately and disconnect the
appliance from the electrical supply by removing
the electrical plug from the wall socket, or if
necessary, removing the relevant fuse (or switching
off a circuit breaker) at the electrical distribution
board (consumer unit).
• If the temperature in the room where the RO 400
is stored is likely to fall below 0 °C, the appliance
must be protected by following the "
Protection
against freezing
" procedure.
• Do not attempt to modify or otherwise alter the
RO 400 in any way. Doing so could result in
personal injury and/or damage to property which
would not be covered by any warranty.
• Once every month you should check that the
connections are all watertight. Leakages outside
the appliance cannot be detected by the appliance's
leakage protection system.
• If the water purifier is malfunctioning, it should be
isolated from the electrical supply by removing the
electrical plug from its socket. If this is not
possible, remove the relevant fuse or switch off the
circuit breaker at the electrical distribution board
(consumer unit).
• At the end of the appliance's useful life, disconnect
the electrical plug from the power supply, then cut
the electrical lead at the point where it enters the
appliance. Make quite sure that children will not
be able to play with the severed lead and plug.
To find out how best to dispose of the appliance,
contact your dealer or the local authority.
Page 7

Concerning the use of the RO 400
• The RO 400 is designed to produce the quantity
of water normally required for cooking, drinks,
washing dishes and general household duties.
• The appliance needs to remain connected to the
water and electrical supplies so that its automatic
flushing system can work. The appliance will carry
out flushing automatically every 12 hours
(approximately).
• The appliance must not be operated without the
filters (inside the filter containers) being in place
(except during the descaling or storage
procedures). Doing so can cause serious damage.
• If the tap is left on for longer than 20 minutes the
RO 400 will shut down automatically. The
appliance is designed to do this mainly to maximise
the service life of the membrane. To restart the
appliance, follow the instructions in the "
Trouble-
shooting table
".
• Depending on the incoming water quality it could
be a delay of up to 60 sec. before the RO 400
indicates that the optimum water purification level
has been reached. This is due to that the appliance
has not been used for some time, which means that
the membrane has not been under pressure. The
concentration of impurities tends to equalise on
both sides of the membrane.
• The top of the water purifier should not be used as
a place for storing anything.
• Do not use the water from the appliance in
aluminium saucepans etc., on account of the risk of
corrosion, which would also cause increased levels
of aluminium in foods cooked in the saucepan.
• The appliance will flush automatically after water is
drawn from it and also whenever the electrical
supply is reconnected. See "
To draw purified
water
".
Concerning installation and service
• The water purifier must be connected to an
earthed electrical supply. We recommend use of a
plug-in connection to a wall socket, since certain
procedures such as replacing filters and preparing
the appliance for storage if it will not be used for a
time require the power supply to be disconnected,
then reconnected. Using an electrical plug also
makes it easier to move the appliance.
• If the appliance is to have fixed wiring to the
electrical supply, this work must be carried out by a
qualified tradesman. Installation work which has
not been carried out properly can result in personal
injury and/or damage to property which are not
covered by any warranty.
• Any plumbing work required should be carried out
by a qualified tradesman. If you do any of the
installation work yourself, you must check the
regulations which apply to this and comply with
them.
• It is important that the water purifier should be
installed in the upright (standing) position.
• Make sure that hoses and leads do not get crushed
or otherwise damaged when the water purifier is
being moved, e.g. during installation or cleaning.
• The water purifier must not be plumbed in to
supply the entire dwelling with water, since this
could cause corrosion inside water pipes and other
plumbing fittings and hot water heaters. For the
same reason, no tap should be used for drawing
the water from the appliance other than the one
supplied or one recommended by your dealer.
7
SAFETY INFORMATION
Page 8
8
You should read the section entitled "
Safety Information
" before starting work on the actual
installation of the water purifier.
INSTALLATION
Where to install the RO 400
This water purifier can be installed in several different
ways. We will describe the most suitable of these. No
matter which method you choose, there are certain points
which you should be careful to observe:
• The RO 400 must be installed in the upright position.
• The area where it is installed must have access to a cold
water supply, a normal domestic waste pipe (drain) and an
electrical supply.
• It must be easy to inspect the control panel on the
appliance.
• There must be enough space for the front cover to be
opened and for good access to the filter containers.
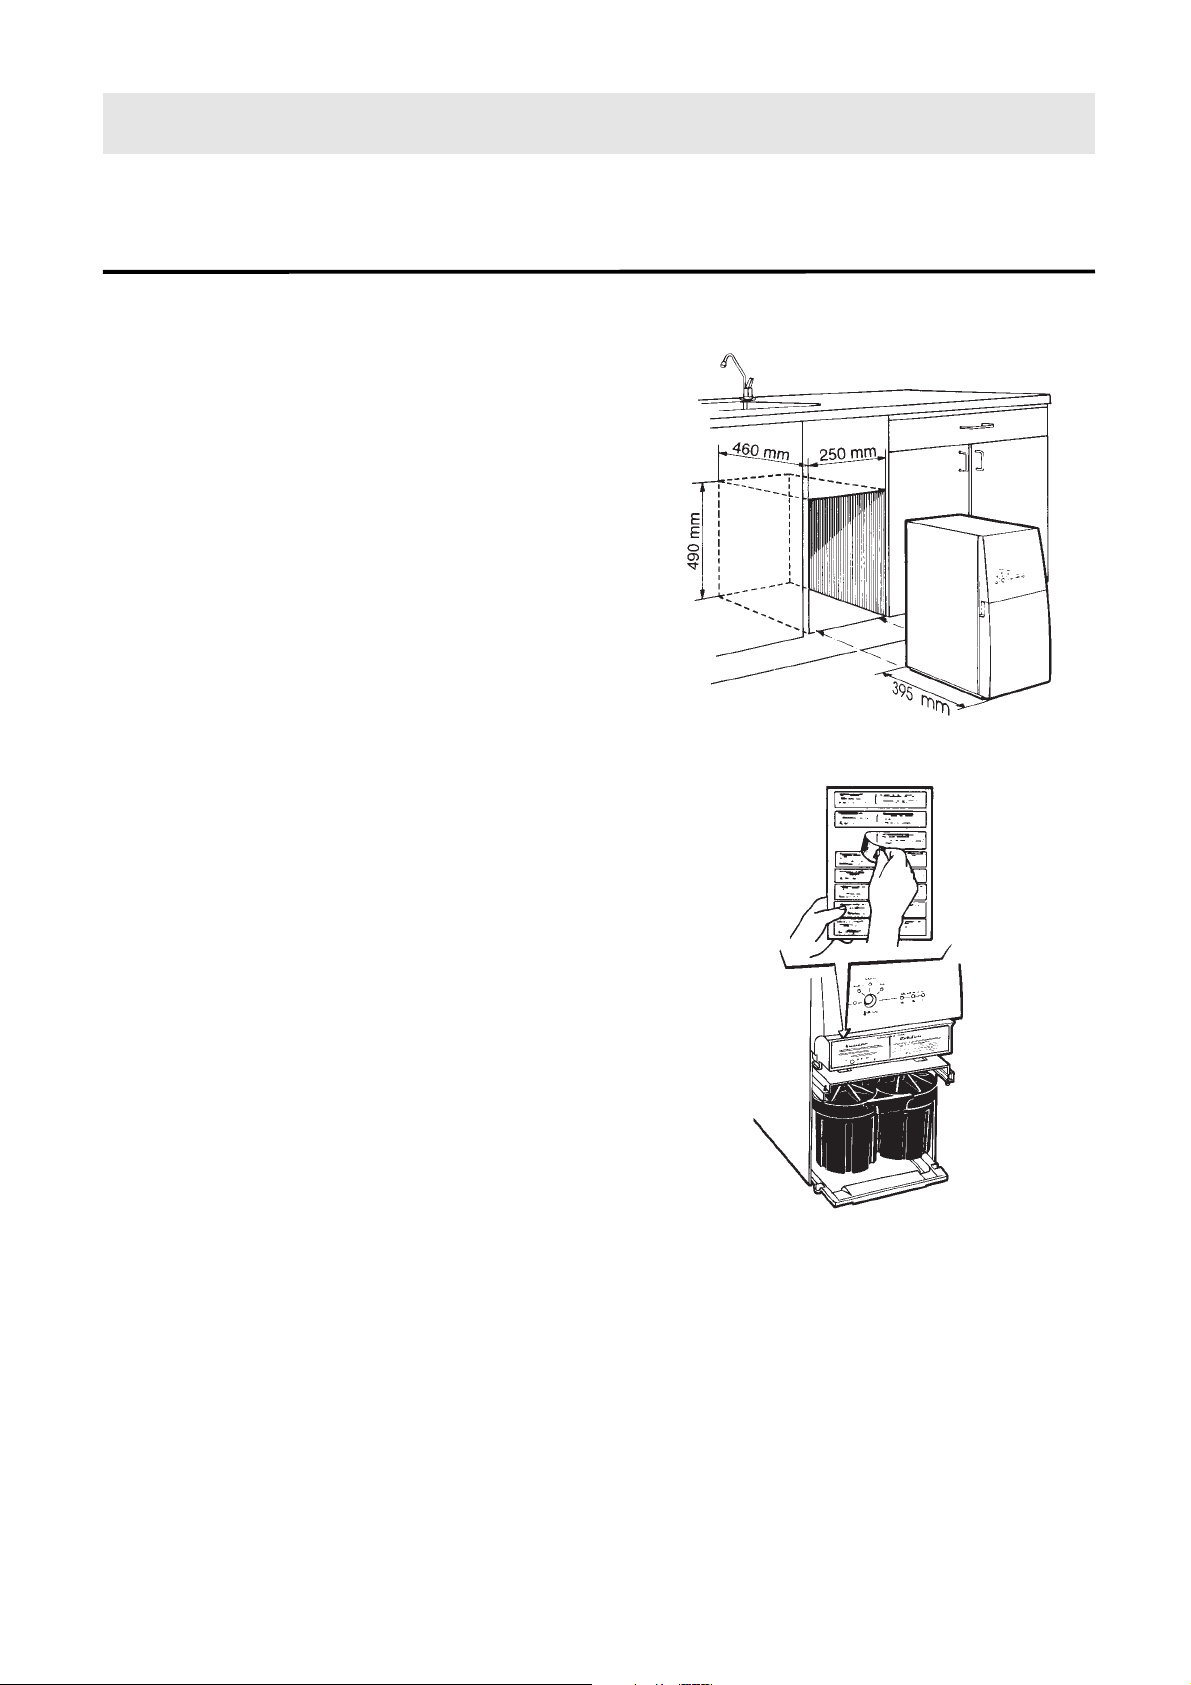
• When choosing the site, make sure there will be adequate
ventilation all around the appliance. There must be a gap of
20 mm between the sides of the RO 400 and any adjacent
fitments or walls. The connection points of the RO 400
allow you to route hoses and cables in any direction out
from the appliance. The dimensions required for the
installation site are shown in Fig.
A. When installing the
appliance, make quite sure that none of the service
connections get crushed or otherwise damaged.
Apply the information panel
In the box of accessories you will find a sheet of selfadhesive information panels in several languages. Select
the language required and apply the printed panel to the
part of the appliance shown in Fig.
B.
A
B
Page 9

9
Electrical and plumbing connections
The illustration reproduced in Fig. C is also to be found
on the rear of the appliance, to show how the various
connections should be made.
The RO 400 is connected to the cold water supply
(temperature range 2 - 40 °C) via a polyethylene feed hose
(3). The cold water pipe should have a valve easily
accessible for shutting off the supply, see Fig.
D. If the
appliance is being connected to new pipes or pipes which
have been out of use for some time, the water should be
allowed to run for a while before you connect the hose.
This will prevent the appliance intake filter (referred to here
as the "grid") from getting blocked by sand or rust. The
appliance has two outward water hoses. The purified water
is taken via the purified water hose (1) to a separate tap,
while the reject water is connected directly to a waste pipe
via the reject water hose (2).
The water purifier must be connected to an earthed
electrical supply (230 V, 50 Hz, 10 A). We recommend
use of a plug-in connection to a wall socket, since certain
procedures such as replacing filters and preparing the
appliance for storage if it will not be used for a time
require the power supply to be disconnected, then
reconnected. Using an electrical plug also makes it easier
to move the appliance.
To fit the tap for purified water
Avoid cutting the hose for purified water, even if it is too
long. If it must be cut, do so with a very sharp knife,
such as a Stanley knife, making sure that the cut is
straight and clean, and that the hose is not deformed by
cutting, see Fig.
E. It is important to observe these
points to ensure that the connection will be fully
watertight. Install the two hose inserts, one at each end
of the hose for purified water.
1 Mark the centre of the place where the purified water tap
is to be installed. Make sure that there is enough room
below the worktop for the hose supplying the tap to be
attached beneath this point.
2 Drill a 16 mm hole.
3 Remove the small section of protective tubing and install
the main tap pipe on the tap assembly.
Install the whole tap on the worktop/sink bench as
shown in Fig.
F1. The worktop or bench must be no
thicker than 35 mm. Screw the quick connector fitting
onto the main thread protruding from the bottom of the
tap assembly. Then press the end of the purified water
hose all the way home into this quick connector, as far as
the line marked on the hose (about 17 mm), see Fig.
F2.
INSTALLATION
F2
F1
E
C
D
1 2 3
Page 10

Connecting the reject water hose
The reject water hose (for discharge of water to a household waste pipe) can be extended up to 4 metres. The smallest
internal diameter is 13 mm. The bracket (supplied) should
be secured at a height of at least 50 mm and a maximum
of 500 mm above the top of the appliance.
Any of the following alternatives can be used for installing
the reject water hose:
• Connection to a waste pipe with a trap can be made if the
trap has an entry point of the type used for a dishwasher
discharge. If there is only one entry point and this is already
in use, the connector unit will need to be changed, and one
with two entry points used instead. The reject connector
from the water purifier should be after the drain, to prevent
water from splashing up into the sink when the water
purifier is in flushing mode. The reject water hose needs to
be routed in a curve up via the underside of the worktop or
sink bench. Fix the hose securely in place as shown in Fig.
A, using one of the hose clips and the bracket supplied.
Fit the connection piece supplied onto the straight end of
the appliance reject water hose by turning it anticlockwise.
• To discharge water from the reject water
hose straight into a sink, make sure the
bracket is fixed permanently to a surface
near the top edge of the sink, as illustrated.
• If the reject water is to be discharged into a
wall standpipe, observe the dimensions
shown here.
Connecting the feed water hose
Make sure that the black washers are in place when
securing the connectors at both ends of this hose. The
straight end of the hose is intended for connection to the
domestic plumbing. Check that the washer is in place,
then screw this end of the hose onto the shut-off valve on
the pipe supplying water to the appliance (see Fig.
B).
INSTALLATION
10
A
B
Page 11

Connecting up the appliance
Before moving the RO 400 into its permanent place,
connect the three hoses to the appliance as shown in Fig.
C.
Connect the purified water hose from the purified water
tap to the appliance. Press this end of the hose all the
way home, as far as the line marked on it (about 17
mm). Use the elbow (supplied) if space is restricted
behind the appliance.
Connect the end of the reject water hose (the one with
the bend) to the appliance, and secure it with one of the
hose clips supplied. Next screw the correct end of the
feed water hose onto the appliance. You can now turn
on the water supply by opening the valve, to check that
this coupling is fully watertight. Connect the wiring for
the indicator lights on the tap, then move the appliance
carefully into its permanent location.
Connect the electrical plug to the wall socket (Fig.
D).
The appliance will now start working (flushing). The
appliance carries out this flushing operation every time it
is reconnected to the power supply.
No water from the appliance should be consumed
until you have followed the full "
Flushing
procedure
", as described on the next page.
After installing and testing the appliance, turn on the
appliance's drinking water tap and check that all the
connections are watertight. If any coupling is leaking,
disconnect the electrical plug, then tighten the hose clip
or nut more. Connect the appliance to the power supply
again. When the appliance has been installed for one
week, tighten the connections for the reject water and
feed water hoses again.
A leakage as small as just a few drops of water is
enough to start the water purifier working (when
it is not needed).
Leakages outside the actual appliance cannot be
detected by its leakage protection system.
Unless specifically stated otherwise in these
instructions, the valve on the feed water supply
pipe should be left in the open position for the
protection system of the RO 400 to function.
11
INSTALLATION
C
D
Page 12

12
The flushing procedure
You have to work through the steps of the flushing
procedure when the RO 400:
• is brand-new and has never been used before
• is being brought back into use after having been
stored using the Preservative/Antifreeze liquid
• has been cleaned, to wash away the cleaning agent
• has been fitted with a new membrane
No water from the appliance should be
consumed until you have completed the full
"
Flushing procedure".
First check:
– that the drinking water tap is turned off
– that the water supply to the appliance is turned on
– that there are no leaks at all in the connections
between domestic water supply and appliance
– that the reject water and purified water hoses are
connected, with no leaks
– that the filter containers inside the appliance are
properly tightened
1 Remove the electrical plug from the wall socket.
2 Connect the electrical plug to the wall socket again. The
RO 400 will now switch automatically to flushing mode.
3 When it stops, pull out the electrical plug, then plug it back
in to make the appliance go through another flushing cycle.
4 Repeat step 3, so the appliance goes through a third
flushing cycle.
5 Turn on the purified water tap, and leave it running
for ten minutes. Then turn the tap off. The appliance
will switch automatically to flushing mode again.
... then, if the appliance is brand-new, or if the
membrane has just been replaced:
6 Follow the calibration procedure described below.
... otherwise:
6 Repeat step 5 above.
The RO 400 will now be ready for use!
Calibration
The water purifier needs to be calibrated specifically for
your water supply, to ensure the correct purification level.
Calibration should only be carried out when:
• the water purifier is new and has never been used before
• the quality of the water supply has changed for some
reason, such as if you move the appliance to a different
locality
• the membrane has just been replaced
The water produced by the appliance during
the calibration procedure must not be
consumed!
To calibrate the RO 400:
1 Turn on the tap for purified water. Leaving the tap
running, you must now – within 10 seconds – press the
calibration button (see Fig.
A) and then keep it pressed
inwards until the indicator lights for Purification Levels I
and II come on and then go out. Then release the button.
If any of the Purification Level lights I-III stay on (lit),
check the five points under the heading "First check:"
in the section "
The flushing procedure", then start the
calibration procedure again from the beginning.
2 Allow the appliance to go on producing purified water
for at least 10 minutes. The lights for Purification
Levels I and II will now flash once and the current
water quality level will be displayed when the light for
Purification Level III comes on and remains lit,
indicating the highest purification level.
If the lights for Purification Levels I, II and III flash
intermittently in sequence, this means that calibration has not been carried out properly. If so, start
again from step 1 of this "
Calibration procedure".
3 Turn off the tap for drinking water. The appliance will
switch to flushing mode, then stop automatically.
The RO 400 will now be ready for use!
Moving the RO 400
If you move the water purifier to a different location,
you must observe the following points:
• Close the valve on the cold water supply pipe.
• Disconnect the electrical plug from the socket.
• Always transport the appliance in its normal upright
position.
• To re-install it, follow the original installation
instructions.
• The appliance will only need to be recalibrated if the
water supply is of a different quality, or if the
membrane has been replaced.
If the appliance is to be stored without being used
for longer than 4 months, you should follow the
procedure for filling it with the special storage
product (preservative). See the section "
Preparing
the RO 400 for storage
".
INSTALLATION
A
Page 13

13
Once the RO 400 has been installed and calibrated according to the "
Installation
" instructions, it
is ready for use.
The RO 400 has an electronic control system which makes it easy for you to use. Normally you
will only need to remember a few points:
• To use the tap connected to the appliance only when you want to draw off water of good
quality, as indicated on the front panel.
• To replace Filters I and II once or twice a year, or when the indicators on the front panel show
they need replacing.
• To descale the water purifier at the intervals recommended.
USING THE RO 400
To draw purified water
The RO 400 produces purified water when the tap is
moved to either of the "On" positions shown in Fig.
B.
When the tap lever is moved to Position 1, the tap will stay
on (hands-free) at maximum flow until the lever is moved
back manually to the "Off" position.
The lever has to be pressed and held when Position 2 is
used (also maximum flow).
The indicator lights on the tap show the current water
quality:
• green light: optimum water purification level
• red light: unacceptable water purification level
If the RO 400 has not been used for a time, it may
take up to 60 seconds before the optimum water
purification level is reached, as shown by lights on the
tap and control panel.
The RO 400 has automatic features designed to
optimise the service life of the membrane:
• Just after you draw water each time, the appliance will
switch to flushing mode automatically, to clean the
membrane. The length of this flushing will vary (5 to 90
seconds) according to how long the tap was open.
• If the tap is left on for longer than 20 minutes, the
appliance will shut down automatically. To restart it,
follow the instructions in the "
Trouble-shooting table".
• The appliance will switch automatically to flushing mode
for a brief period once every 12 hours (approximately),
provided the water and power supplies are connected.
This periodic flushing takes place no matter when the
appliance was last used.
When using the RO 400, it is sensible to fill a jug with
drinking water while it is operating. Try to avoid starting it
working just to fill a single glass at a time. This helps save
water, because each time the appliance purifies water, a
certain amount is lost (via the reject water outlet) before the
optimum purification level is reached, and the RO 400 also
switches to flushing mode after it is used.
B
1 On
2 On
Off
Page 14

14
Replacing the filters
It is important to replace the filters (in the filter containers)
as soon as they need replacing, since their main function is
to protect the membrane. Check for any signs of leaks just
after you have replaced them and again after you have used
the appliance a few more times.
TO REPLACE FILTER
Replace filter when the pattern of indicator lights on
the control panel warns that this is needed.
1 Make sure that the tap for purified water is turned off and
that the appliance is not flushing.
2 Disconnect the electrical plug. Open the front cover (in front
of the two filter containers) as shown in the illustration.
3 Pull the filter containers outwards as far as they will come.
4 Use the filter spanner to undo the container marked .
Bear in mind that the container will be full of water and that
some water may spill!
5 Mop up any water inside the base of the appliance.
6 Remove the old filter.
7 Clean the filter container with water and a brush.
8 Put the new filter in place, with the label pointing
upwards. Make sure that the sealing ring is in place in the
grooves of the filter container.
9 Refit and tighten the container using the filter spanner.
Tighten the filter container so that the dot is somewhere
between the two outermost white lines.
10 Slide the filter containers back into the appliance.
11 Close the front cover and reconnect the electrical plug.
Flushing will take place automatically.
This completes the procedure for replacing filter ,
and the RO 400 is ready for use again.
TO REPLACE FILTER
Replace filter when the pattern of indicator lights on
the control panel warns that this is needed, and when you
notice a three-second delay before the motor starts up each
time you turn on the tap.
1-11 Work through the 11 steps in the instructions for
replacing filter , but remove container instead (on
the right), and replace the filter in that.
12 For filter you have to finish by resetting the appliance.
Make sure that the tap (purified water) is turned off and
the electrical supply is connected. Then press the
Calibration button on the control panel, and keep it
pressed inwards until the pattern of indicator lights for
filter has gone out (takes about five seconds).
This completes the procedure for replacing filter ,
and the RO 400 is ready for use again.
MAINTENANCE
Page 15

15
MAINTENANCE
Page 16

16
Descaling
In time, the substances which the appliance removes from
your drinking water tend to clog the membrane and will
eventually reduce the flow of pure water from the tap. To
prolong the service life of the membrane, it has to be
descaled periodically.
When you notice that the flow rate from the tap has
decreased, you need to follow the descaling procedure
below. The time schedule for how often you will need to
do this will depend on your particular water supply,
especially on its levels of calcium ("hardness", see table,
right), iron, manganese and possibly silicon, as well as of
microorganisms.
Even with regular descaling, the maximum flow of
purified water from the appliance will decrease gradually
on account of the normal properties of the membrane.
When you notice that the flow is about half of what it was
when the membrane was new, contact your dealer to have
the membrane replaced.
You can descale the appliance yourself. It takes about ten
hours, during which time you will not be able to use the
appliance.
You should descale your RO 400:
• when the flow of water from the tap has decreased
• at the intervals recommended in the table (right)
The correct descaling product for this appliance can be
ordered from your dealer. Please quote the part number
listed under "
Optional accessories and consumables".
The descaling product must be kept out of the reach
of children.
Wash your hands after using it.
1 Disconnect the electrical plug, then plug it back in
again to make the appliance switch to flushing mode.
2 Make sure that the tap for purified water is turned off
and that the appliance has finished flushing. Leave the
electrical supply to the appliance on.
3 Undo filter container as described under "
Replacing
the filters
", steps 3–7.
4 Measure 250 ml (corresponds to 200 grams) of the
descaling agent into the container. Fill the container
almost to the top with lukewarm water (20 – 40 °C).
Stir until the powder has dissolved, see Fig.
A.
5 Screw the container (containing the descaling solution)
back onto the appliance with the aid of the filter
spanner.
6 Turn on the tap for purified water and let the RO 400
operate for 45 seconds.
MAINTENANCE
FREQUENCY OF DESCALING
Calcium Ca
2+
&
magnesium Mg
2+
mg/l
- 50
50 - 100
100 - 140
Frequency of
descaling
every 6 months
every 3 months
every month
Hardness
°d
- 7
- 14
- 20
A
Conversion to hardness degrees
Hardness
1 grain (CaCO3) per U.S. gallon
6,82
5,72
7,14
4,00
1,00
1 grain (CaCO3) per U.K. gallon
1 °d (german)
1 °fr (french)
1 °r (russian)
Calcium: Ca
2+
mg/l
Page 17

17
MAINTENANCE
7 While the tap is still on (open), disconnect the
electrical plug,
see Fig. B. Then turn off the tap. Now
leave the water purifier like this for about 10 hours (e.g.
over night).
8 At the end of the 10 hours, undo the container. Discard
its contents and rinse it with water.
9 Put the filter back in the container and follow steps 8–11
as described under "
Replacing the filters" (except that you
put back the filter which has already been used).
10 Turn on the tap and let the water run for 10 minutes.
Then turn off the tap. The appliance will switch to flushing
mode for some time.
This completes the descaling procedure. The RO 400
is ready for normal use again.
Disinfection
If the water have a slight odour and the appliance has
not been used for a time (several days), there may be a
build-up of microorganisms on the membrane. If this is
the case, it is advisable to disinfect the water purifier
internally.
The correct disinfectant for this appliance can be ordered
from your dealer. Please quote the part number listed
under "
Optional accessories and consumables". Be sure to
observe the instructions on the packaging concerning
the correct quantity.
The disinfectant must be kept out of the reach of
children.
1 Disconnect the electrical plug, then plug it back in again
to make the appliance switch to flushing mode.
2 Undo filter container as described under "
Replacing
the filters
", steps 3–7.
3 Fill the container three-quarters full of lukewarm water,
and add 25 ml of the correct disinfectant, see Fig.
C.
4 Screw the container (containing the solution) back onto
the appliance with the aid of the filter spanner.
5 Turn on the tap for purified water and let the RO 400
operate for 45 seconds.
6 While the tap is still on (open), disconnect the
electrical plug,
see Fig. B. Then turn off the tap and leave
the water purifier like this for about 30 minutes.
7 Restart the RO 400 by reconnecting the electrical plug to
the wall socket, let it flush automatically.
8 Put the filter back in the container and follow steps 8–10
as described under "
Replacing the filters".
9 Refit the front cover.
10 Work through all the steps of the full "
Flushing
procedure
".
B
C
Page 18

18
To clean the grid
The grid (a coarse filter) is designed to intercept large particles
and is located inside the connection for the feed water on the
appliance. If the pattern of indicator lights on the control
panel shows that the intake pressure is too low, the reason may
be that the grid is clogged.
1 Turn off the tap for purified water. Disconnect the appliance
from the electrical supply.
2 Close the valve on the water supply pipe.
3 Undo the feed water hose connector on the back of the appliance.
4 Use suitable pliers to grip and remove the grid (Fig.
A).
5 Clean the grid and run water through it before putting it back
inside the connector.
6 Reconnect the feed water hose to the appliance.
7 Open the valve on the cold water supply pipe and check that
there are no leaks.
8 Connect the appliance to the electrical supply again. It will flush
automatically.
Preparing the RO 400 for storage
If the RO 400 is not going to be used for a period longer
than four months, it needs to be filled with a special product
to keep it in good condition.
The correct product ("Preservative and Antifreeze Liquid")
can be ordered from your dealer. Please quote the part
number listed under "
Optional accessories and consumables".
This product must be kept out of the reach of children.
1 Make sure the tap is turned off and the appliance has stopped
flushing.
2 Close the valve on the water supply pipe. Disconnect the
electrical plug and the hoses for feed water and reject water (but
not at their appliance ends). Study Fig.
B.
3 Undo both filter containers as described under "
Replacing the filters",
steps 3–6. Remove the two filter inserts and discard them (should not
be kept for re-use). Empty the water from the containers.
4 Put the empty filter containers back in their normal places and
tighten them. Make sure that each sealing ring is in place in the
groove on the top edge of each container.
5 Mix 2 litres of the "Preservative and Antifreeze Liquid" with 2
litres of water in a bucket.
6 Put the ends of the two hoses (feed and reject water) into the
mixture. Make sure that the end of the feed water hose remains
beneath the surface throughout, see Fig.
C.
7 Connect the electrical plug again. The RO 400 will now auto-
matically pump the mixture inside the appliance. After 40 seconds,
disconnect the electrical plug. Repeat this step two more times.
8 Any mixture left can be discarded down the drain.
You have now prepared the RO 400 for storage. It can be
left in this state for up to nine months.
When the RO 400 is to be brought back into use
you must:
•Work through all the steps of the full "Flushing
procedure
", to remove the preservative.
•Fit new filter inserts (both and ), see "
Replacing
the filters
".
MAINTENANCE
B
C
A
Page 19

19
REGULAR CARE OF THE RO 400
MAINTENANCE
Points to remember
• Check the indicator lights every day, in case there is some
state or function which needs attention.
• The everyday care of the RO 400 consists basically of
keeping it clean. The outside of the appliance should be
cleaned with a damp cloth only. Do not use a wet cloth
and do not pour water over it for cleaning. Do not use
any cleaning agents.
• Once a month check that all connections to the appliance
are properly secured and watertight. Wipe dry any
condensation which may have accumulated inside the
appliance base. Leakages outside the appliance cannot be
detected by the appliance's leakage protection system.
• The appliance needs to be descaled at regular intervals.
The frequency depends on the hardness of the water
supply and its microbial content.
• Be sure to replace the filters as soon as necessary. The life
of these filters is determined by (amongst other factors)
the levels of impurities in your water supply. If the water
supply has been classified as unfit for drinking, the water
from the appliance should be tested once per year.
• After replacing filters leave the discarded filter insert to
drain for a few minutes. These filters can be discarded in
your ordinary household refuse, since they do not
contain any substances which are hazardous to the
environment.
• The membrane should be replaced when the flow of
purified water has reduced to approximately half of what
it was originally, even though the appliance has been
descaled regularly. Contact your dealer for more
information.
Protecting the RO 400 against
freezing during storage
This procedure is similar to the one described on the
previous page, but the essential difference is that here
the water on the "clean" side of the membrane has to be
completely removed from the appliance. Failure to do
this can result in damage to the appliance if it is exposed
to temperatures below 0 °C. As its name suggests, the
Preservative and Antifreeze Liquid protects the water on
the other side of the membrane against freezing. For this
procedure you need both the Preservative and
Antifreeze Liquid and the special Water Extraction
Device. Both can be ordered from your dealer. Please
quote the part numbers listed under "Optional accessories
and consumables".
1 Follow steps 1–4 of the instructions: "
Preparing the
RO 400 for storage", but here, at step 2, you need to
disconnect the appliance ends of the hoses for feed water
and reject water. Bear in mind that they will contain water.
2 Disconnect the appliance end of the hose for purified water
by pressing the grey sleeve inwards and pulling the hose
outwards at the same time. Connect the Water Extraction
Device and the section of tubing supplied with it as shown
in Fig. D.
3 Fully open the valve on the water supply pipe. Check that
no water is leaking from the Water Extraction Device.
4 The Water Extraction Device will now empty all the
water from the "clean" side of the membrane. The time
this takes will depend on the pressure of your domestic
water supply. If it is 1-2 bar, you should leave the device
in place for at least 30 minutes. If the pressure is 3 bar or
higher it will take about 15 minutes. If the domestic
water pressure is low it is advisable to avoid using
showers, dishwashers or washing machines at the same
time, to empty the appliance as effectively as possible.
Disconnect the Water Extraction Device from the
RO 400.
5 Reconnect the appliance ends of the hoses for feed water
and reject water to the RO 400. Then disconnect their
other ends from the domestic plumbing, as illustrated in
Fig.
B. Now follow steps 5–8 of the instructions:
"Preparing the RO 400 for storage".
The RO 400 is now prepared for storage and protected
against freezing. It will withstand temperatures
down to -30°C.
Listed below are the things you need to remember in the regular care of your water purifier. The
points are listed in the order of frequency, starting with daily checks.
D
Page 20

20
Dimensions
Weight
Capacity (water temp. 15 °C)
Water efficiency
Electrical supply
Total power consumption
Operation period
Sound level when installed in under-sink cupboard
Environmental specifications
air temperature
relative humidity
Requirements of feed water to the RO 400:
Chemical requirements:
conductivity
/salt
/chloride
cloudiness
turbidity
pH
calcium: Ca
2+
magnesium: Mg
2+
/hardness: CaCO
3
iron: Fe
2+
iron: Fe
3+
manganese: Mn
COD-Mn: O
2
* higher values require an extra prefilter
Microbiological requirements
Heterotrophic bacteria (48 hour test count)
Coliform bacteria
E.coli
Water flow
Domestic water supply pressure
Water temperature
height 466 mm
depth 460 mm (395 mm without hand-grip and hoses)
width 225 mm
29 kg when supplied
33 kg when filled with water
3.1( ±0.4) litres/minute
approx. 80 % at constant flow
approx. 50 - 75 % including flushing
230 V, 50 Hz, 10 A, earthed socket
530 W
20 minutes
< 60 dB(A)
2 - 43 °C
25 – 95 %
<200 mS/m
<1500 mg/l
<900 mg/l
slight/ distinct*
< 1 FNU
4 - 10
<350 mg/l
<5 mg/l*
<0.30 mg/l *
<0.8 mg/l*
<10 mg/l
1000/ml
1000/100 ml
100/100 ml
>10 l/min
150 - 1000 kPa (1.5 - 10 bar)
2 - 40 °C
TECHNICAL DATA
<140 mg/l
}
Page 21

21
Examples of rejection for substances which may be present in water
INORGANIC SUBSTANCES
-turbidity
-colour
Cations/Metals
-sodium
-potassium
-calcium (hardness)
-aluminium
-iron
-manganese
Cations/Heavy metals
-copper
-lead
-zinc
-mercury
-cadmium
-chrome
-nickel
Anions
-fluoride
-chloride
-nitrate
-sulphate
ORGANIC SUBSTANCES
Hydrocarbons
-heptane, octane, decane etc.
-benzene, toluene, xylene, ethyl benzene etc.
- diesel oil
Polyaromatic hydrocarbons
-PAH
Chlorinated hydrocarbons
-Compounds which can form when water is chlorinated
Trihalomethanes
-trichloromethane
-bromodichloromethane, dibromochloromethane, tribromomethane
Pesticides
-PCB
MICROORGANISMS
-heterotrophic bacteria (48 hr test)
-coliform bacteria, E.coli
%
>99
>99
>96
>97
>99
>99
>99
>99
>99
>99
>99
>99
>99
>98
>99
>99
>98
>97
>97
>98
>99
>99
>99
>99
>60
>99
>99
>99
>99
TECHNICAL DATA
Notes:
The values for the inorganic substances were measured in a sample of water which was taken after two minutes’
operation at a flow of 4.4 litres per minute, 80 % recovery and a challenge water with a salt content of 800
mg per litre at a temperature of 20 °C. Test laboratory: VVL, Stockholm (Sweden).
The values for the organic substances were measured in a sample which was taken after two minutes’
operation at a flow of 2.8 litres per minute, 80 % recovery and a challenge water to which was added each
relevant substance to a concentration which is 100 times higher than the lowest detectable quantity at a
temperature of 10°C. Test laboratory: AnalyCen, Lidköping (Sweden).
Microbiological testing was carried out under a range of operating conditions with a challenge water
containing a very great number of microorganisms. The water samples were collected weekly after operating
times of 20 and 40 seconds and 1, 2, 6, 12 and 18 minutes. Test laboratory: SVELAB, Jönköping (Sweden).
Page 22

22
IF THE RO 400 STOPS WORKING
Trouble-shooting table
To protect both the user and the appliance itself from incorrect use, the RO 400 has built-in
warning (alarm) devices which cause it to stop working under certain conditions. The table below
lists these warnings and their probable causes.
The indicator lights have three statuses: Light off
Light on
Light flashing
Warning that filter blocked.
Warning of blockage in grid (i.e.
intake connection filter).
Warning of leakage/condensation
inside the base under the filter
containers.
The intake water pressure is too low,
i.e. less than 1.5 bar (150 kPa).
Warning that filter needs replacing.
Warning of reduced water quality.
Warning that the tap has been on for
more than 20 minutes without a
pause, and that the appliance has shut
down automatically as a result.
Warning that calibration has been
started, but not completed correctly
(probably because the tap has been
turned off before the full 10 minutes).
Warning of error in water quality
meter.
POSSIBLE CAUSE
• Check that there is nothing inside the filter
containers which could be blocking the flow.
• If necessary replace filter .
• Check the grid. See the section "To clean the grid"
• Check that all connections are watertight.
• If there is water inside the base, wipe it dry (tilt
appliance forward if necessary).
• A booster pump to increase the pressure to the
RO 400 can solve this problem.
• Check all the factors which can affect water
pressure (water supply, plumbing, grid,
extra/special filters).
• Replace filter . See "Replacing the filters".
• If the appliance is new and has never been
calibrated: calibrate the appliance.
• Restart the water purifier (by disconnecting then
reconnecting the electricity) so that the appliance
switches to flushing mode. Repeat this procedure
two or more times.
• Turn off the tap and leave the RO 400
undisturbed for at least 30 minutes.
• Restart the appliance by disconnecting and then
reconnecting the electricity.
After automatic flushing the RO 400 will be
ready for use again.
• Restart the appliance by disconnecting and then
reconnecting the electricity to start flushing mode.
Recalibrate the RO 400.
• Restart the appliance by disconnecting and then
reconnecting the electricity to start flushing mode.
Wait for two hours. Turn on the tap, wait for 2
minutes.
ACTION TO TAKESYMPTOMS
Page 23

23
IF THE RO 400 STOPS WORKING
SYMPTOMS POSSIBLE CAUSE ACTION TO TAKE
The membrane may be clogged
The hose for purified water is not
pressed all the way home at the
connection on the appliance. Or there
may be a leak at the connection of hose
to tap, or the hose for this tap may
have been shortened (cut) incorrectly.
The tap is leaking, which causes the
RO 400 to respond constantly to the
loss of pressure. The adjusting screw
in the tap may need adjustment, or
washers in the tap may be damaged.
If the temperature is higher than
30 °C, the flow rate will increase to a
level higher than the tap can handle.
The adjusting screw on the tap needs
adjusting.
Odour problems in the water from
the appliance may be caused by the
water purifier being left without
being used and with the electricity
disconnected, and on account of
microbial flora in the water.
• Descale the appliance. See "
Descaling".
• Check all connections.
• Check that both ends of the hose for purified
water are cut straight and clean, and not
deformed. Should be round, not oval in shape.
• Adjust the adjusting screw on the tap see "To
adjust the tap".
• Adjust the adjusting screw on the tap see "To
adjust the tap".
• Work through all the steps of the full "Flushing
procedure".
• Follow the "Disinfection" procedure.
Low water flow
The appliance starts
working on its own
(briefly, without tap
being turned on).
The flow of water
from the appliance is
uneven or jerky.
Odour
If the appliance has shut down automatically, it will have to be restarted by disconnecting then
reconnecting the electricity.
If a problem persists even after you have tried to trace it and correct it using the trouble-shooting table,
contact your dealer.
Page 24

IF THE RO 400 STOPS WORKING
To adjust the tap
1 Disconnect the electrical plug.
2 Pull the main tap pipe straight upwards as illustrated (Fig. A.)
3 Press and slide the tap lever across the top of the hole
for the main tap pipe (Fig. B).
4 Adjust the screw (Fig. C).
C1 If the flow from the tap is uneven or jerky
Turn the adjusting screw one half turn clockwise.
C2 If the appliance starts working on its own
Turn the adjusting screw one half turn anticlockwise.
5 Refit first the lever, then the main tap pipe. Check that
the seals/washers on the main tap pipe are in good
condition.
6 Reconnect the electrical plug and let the RO 400 flush
automatically.
7 Test the appliance. If the problem persists, adjust the
screw further.
24
A
B
C
Page 25

25
Service and spare parts
If a fault arises, first work through the trouble-shooting
table "
If the RO 400 stops working", and make quite sure
that it is not a problem which you can put right yourself.
If you have to call out a service engineer to remedy one of
the problems in this table, you risk having to pay for the
service call yourself. The same applies to faults caused by
use of the appliance for purposes other than those for which
it was intended.
If you have tried everything relevant described in the table,
and still cannot get your RO 400 to work, then it is time to
call service. Service using genuine spare parts is available via
your dealer.
Before calling service, it is a good idea to make a note of
some appliance details. Look for the data plate on the rear
of the appliance (similar to the one shown in Fig.
D), which
will have all the details you need for the RO 400. You can
record them here:
TYPE: . . . . . . . . . . . . . . . . . . . . . . . . . . . . . . .
MOD: . . . . . . . . . . . . . . . . . . . . . . . . . . . . . . .
PROD. NO.: . . . . . . . . . . . . . . . . . . . . . . . . . .
SER. NO.: . . . . . . . . . . . . . . . . . . . . . . . . . . . .
SERVICE AND SPARE PARTS
D
MADE IN SWEDEN
TYPE
MOD.
PROD. NO.
SER. NO.
230 V~ 530 W 50 Hz
D
WP01
RO 400
919xxxxxx
xxxxxxxx
10 A
M
500 W
Page 26

Electrolux Home Comfort Appliances • Product Division • Luxbacken 1 • S-105 45 Stockholm • Sweden • Tel +46-8-738 60 00
Electrolux Home Comfort Appliances • Torsvik Plant • Box 502 • S-562 28 Norrahammar • Sweden • Tel +46-36-31 80 00
97-05
m x
A
 Loading...