

Page 1
UP
.2
.2
5
.3
.4
.5
.1
5
.12
L
O
N
G
E
R
C
Y
C
L
E
S
HOLES FOR WIRES
MOUNTING HOLE
ANTICIP
LONG
POINTER
CAPTIVE
SCREW
CAPTIVE
SCREW
MOUNTING
HOLE
ATOR
INSTALLATION AND OPERATING INSTRUCTIONS
T10-1141SA
HEATING ONLY THERMOSTAT
52014
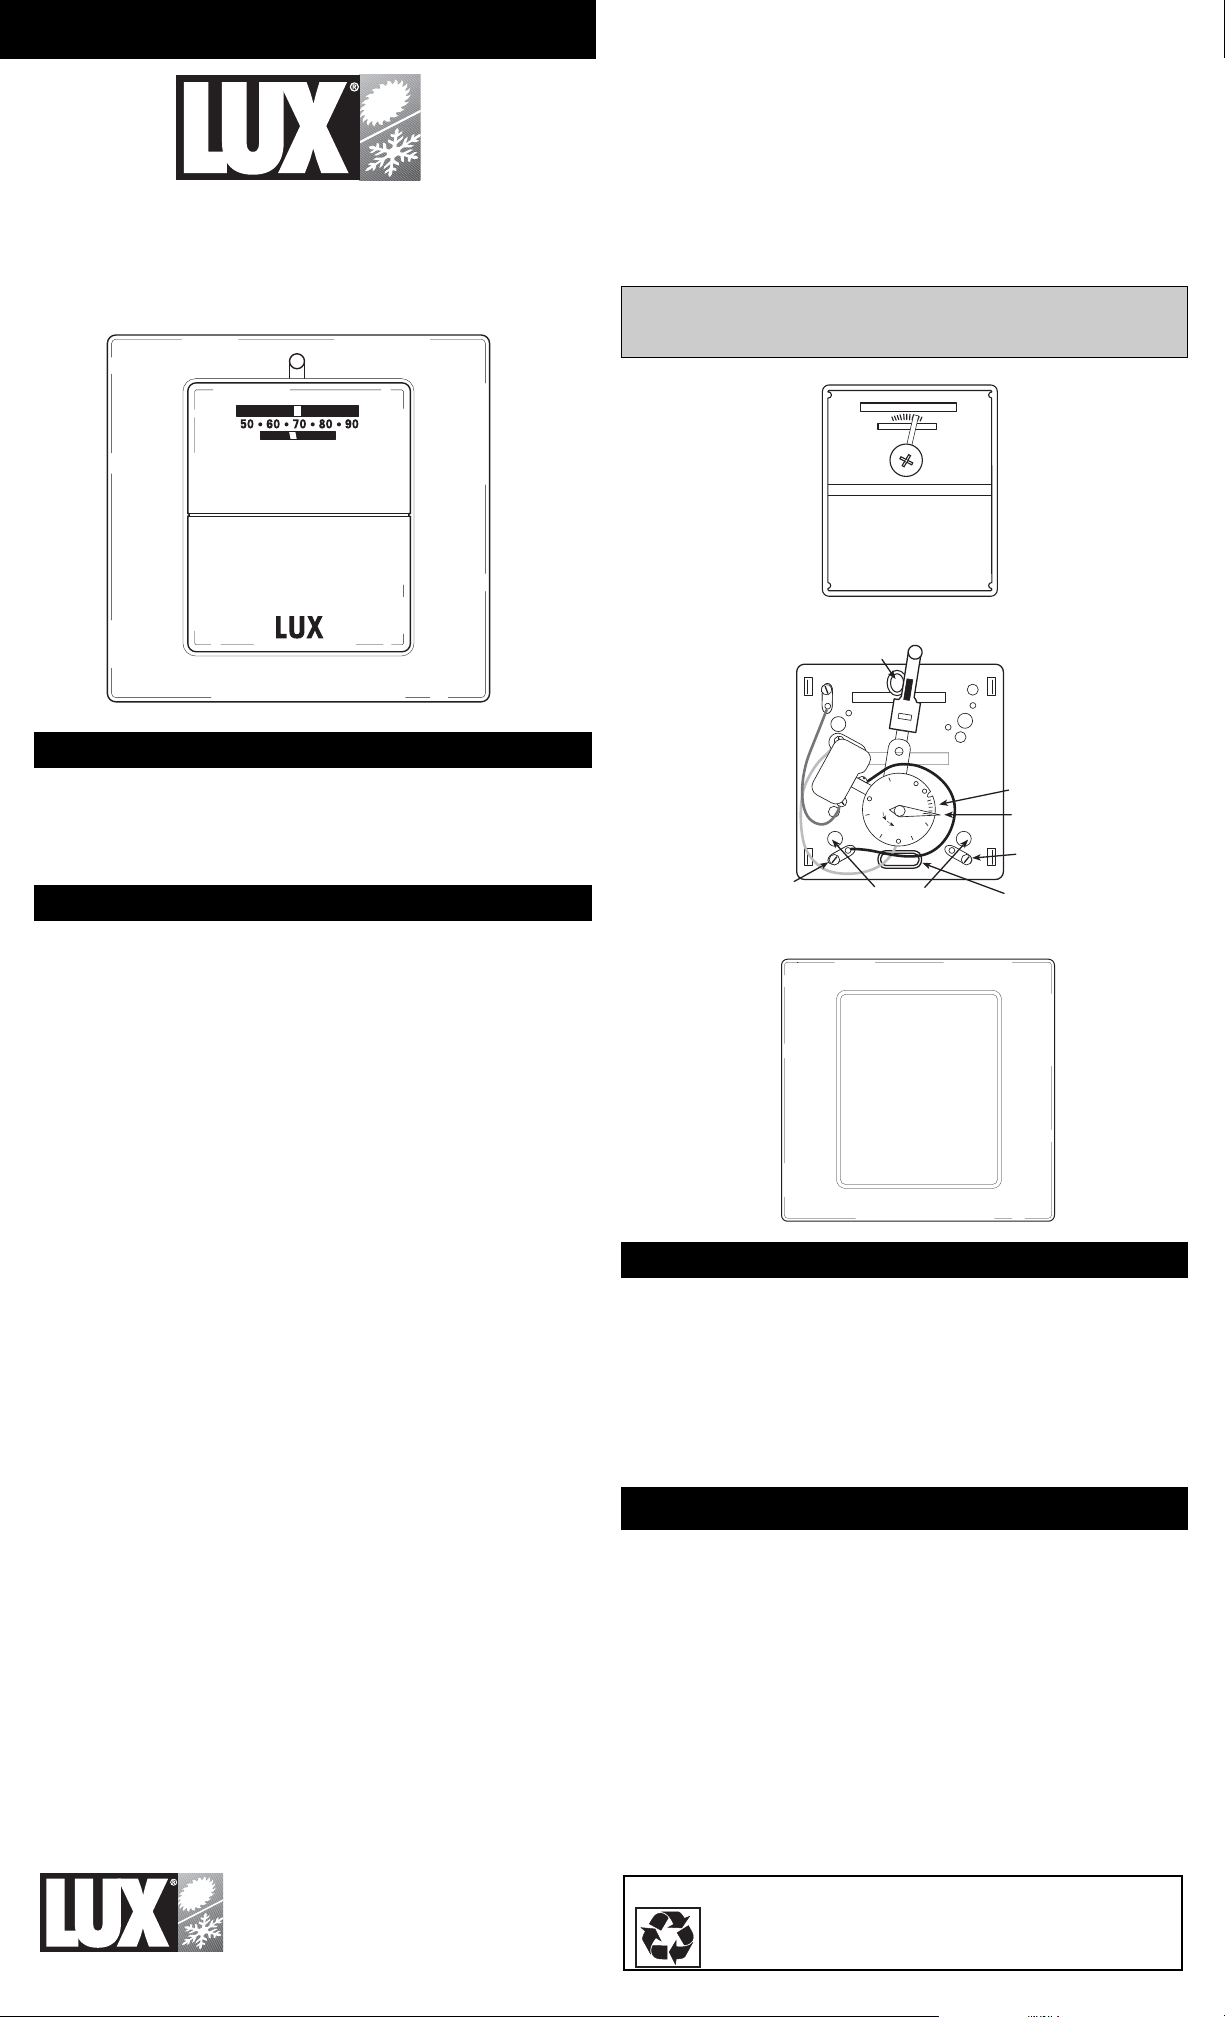
■■ Attach wires to terminal screws shown in Figure 2. (Either wire to either
terminal) Push excess wire back into wall opening.
■■ Find anticipator setting on old thermostat. Setting on new thermostat
should be the same. Do this by carefully sliding the long pointer on the
anticipator over the desired number. If old anticipator setting cannot be
determined, look on gas control on furnace, or set it at .6. During heating
season, furnace should operate about five times an hour. If adjustments are
necessary, move heat anticipator pointer slightly and recheck. NOTE: Set
pointer to 1.2 for millivolt systems.
■■ Attach front cover, Figure 1, to base.
■■ Turn electricity and gas back on and set pointer on top of thermostat to
desired temperature.
A thermostat can only control temperature near it. If you find that it
is uncomfortable some distance away from the thermostat, change
the setting in order to compensate for this.
FIGURE 1 FRONT COVER
SPECIFICATIONS
ELECTRICAL RATING .........................................24 Vac (30 Vac Maximum)
SWITCH ACTION.........................................................Open Contact Switch
ANTICIPATOR RATING............................................................0.15A to 1.2A
TEMPERATURE RANGE ...........................................................50°F to 90°F
INSTALLATION & OPERATION
1). THERMOSTAT LOCATION
For accurate temperature control and comfort, correct location is very important.
On new installations, the guidelines listed below should be followed as closely
as possible. When replacing an old thermostat, install the new one in the same
location unless these conditions suggest otherwise.
1. Locate the thermostat on an inside wall about five feet above the floor,
where it is easy to install and adjust. It should be in a room that is used
often, such as a family room.
2. Do not install it where there are unusual heating conditions, such as direct
sunlight, close to a lamp, radio, television, radiator, register, near a
fireplace, or other heat producing appliance. Also, check for hot water
pipes within the wall, or a stove on the other side of the wall.
3. Do not locate in unusual cooling conditions, such as on an outside wall, or one
separating an unheated room, or in drafts from stairwells, doors, or windows.
4. Do not locate in a damp or humid area. This can shorten thermostat life
due to corrosion.
5. Do not locate where air circulation is poor, such as in a corner, alcove, or
behind an open door.
6. Do not install until all construction work and painting have been completed.
2) TOOLS REQUIRED
Wirestripper or knife, drill with 3⁄16" bit, screwdriver, level and a pencil.
3) REMOVING OLD THERMOSTAT
Please read all instructions carefully. As you complete each step, check the
adjoining square ■■✓.
■■ Disconnect electricity and turn off gas to the heater.
■■ Remove cover from old thermostat.
■■ Loosen all screws.
■■ Disconnect wires from thermostat, making sure they do not fall back inside
the wall.
■■ Strip insulation
■■ Fill wall opening with non-combustible insulation to prevent drafts from
affecting thermostat.
4) INSTALLING NEW THERMOSTAT
■■ Place new decorative wall plate (if supplied), Figure 3, over wall opening.
Decorative wall plate can optionally be left off.
■■ Remove Front Cover of new thermostat by inserting a finger in the side of
the thermostat and gently prying away each corner. Place Base, Figure 2,
on wall plate over wall opening. Mark wall with pencil at mounting holes as
shown in Figure 2. Now lay wall plate and base to the side.
■■ Drill two holes with
■■ Insert plastic screw anchors into drilled holes, flush with wall surface.
■■ Bring wires through large hole in decorative wall plate and through Hole
For Wires in Base.
■■ Fasten Base loosely to wall using two mounting screws. Place a level
against the bottom of the Base, adjust until it is level and then tighten
mounting screws to secure the Base.
LUX PRODUCTS CORPORATION Mt. Laurel, New Jersey, 08054 USA
3
⁄8" from wire ends and clean off any corrosion.
3
⁄16" bit, 1" deep.
© COPYRIGHT 2006 LUX PRODUCTS CORPORATION. ALL RIGHTS RESERVED
FIGURE 2 BASE
FIGURE 3 DECORATIVE WALL PLATE
TECHNICAL ASSISTANCE
If you have any problems installing or using this thermostat, please
carefully and thoroughly review the instruction manual. If you require
assistance, please contact our Technical Assistance Department at 856234-8803 during regular business hours between 8:00AM and 4:30PM
Eastern Standard Time, Monday through Friday. You can also receive
technical assistance online anytime day or night at
http://www.luxproducts.com. Our web site offers you answers to the
most common technical questions, and also permits you to email your
questions to our technical support staff at your convenience.
WARRANTY
Limited Warranty: If this unit fails because of defects in materials or
workmanship within three years of date of original purchase, LUX
Products Corporation will, at its option, repair or replace it. This warranty
does not cover damage by accident, misuse, or failure to follow
installation instructions. Implied warranties are limited in duration to three
years from date of original purchase. Some states do not allow limitations
on how long an implied warranty lasts, so the above limitation may not
apply to you. Please return malfunctioning or defective units to the
participating retailer from which purchase was made, along with proof of
purchase. Please refer to "TECHNICAL ASSISTANCE" before returning
thermostat. Purchaser assumes all risks and liability for incidental and
consequential damage resulting from installation and use of this unit.
Some states do not allow the exclusion of incidental or consequential
damages, so the above exclusion may not apply to you. This warranty
gives you specific legal rights and you may also have other rights which
vary from state to state. Applicable in the U.S.A. only.
RECYCLING
NOTICE
This product does not contain mercury. However, this product may replace a unit which
contains mercury and should not be disposed of in the trash. Contact your local waste
management authority for proper disposal instructions for mercury in a sealed glass tube.
If you have any questions, please call (856) 234-8803
 Loading...