

Page 1

EchoplexDigital Pro Plus
User’s Manual
Page 2
C REDITS
MANUAL WRITTEN BY KIM FLINT AND WARREN SIROTA
LAYOUT & DESIGN BY WS DESIGNS
ECHOPLEX DIGITAL PRO PLUS IS A PRODUCT OF GIBSON GUITAR CORPORATION
LOOPIV SOFTWARE IS A PRODUCT OF AURISIS RESEARCH, LLC
®
LOOP
ECHOPLEX DIGITAL PRO PLUS AND LOOPIV SOFTWARE DESIGNED BY:
IS A REGISTERED TRADEMARK OF AURISIS RESEARCH, LLC
AURISIS RESEARCH, LLC – MATTHIAS GROB, KIM FLINT, ERIC OBERMÜHLNER
WITH MAJOR CONTRIBUTIONS FROM
BUTLER, MARK LEAS, KEITH MCMILLEN, TIM CANNING, ANDRE LAFOSSE,
DAVID TORN, CHRIS MUIR, WILLY STREHLER, LJUBO MAJSTOROVIC,
EBERHARD WEBER, DAVID KIRKDORFFER
SPECIAL THANKS TO THE STAFF OF GIBSON GUITAR CORPORATION, OUR BETA
TESTERS, AND ALL WHO HAVE CONTRIBUTED THEIR THOUGHTS AND IDEAS
THROUGHOUT THE HISTORY OF THE
: ANDY EWEN, CLAUDE VOIT, ANDY
ECHOPLEX.
i-2 Echoplex Digital Pro Plus User’s Manual
Page 3
C ONTACT INFORMATION
FOR MORE INFORMATION, CONTACT
IN EUROPE:
T
RACEELLIOTLIMITED
M
ALDON
E
SSEX
CM9 4GG
E
NGLAND
P
HONE
: +44 (0) 1621 851851
F
AX
: +44 (0) 1621 851932
E
MAIL
:
I
N THE
USA:
G
IBSONSTRINGS ANDACCESSORIES
1150 B
E
LGIN
OWESRD
, IL 60123
USA
P
HONE
: (847) 741-7315
T
OLLFREE
F
AX
: (847) 741-4644
EMAIL
:
SERVICE@TRACE-ELLIOT.COM
.
: (800) 544-2766
STRINGS@GIBSON.COM
HTTP
://
WWW.GIBSONECHOPLEX.COM
WARNINGS
RISK OF ELECTRIC SHOCK
CAUTION
DO NOT OPEN
Page 4

i-4 Echoplex Digital Pro Plus User’s Manual
Page 5

Introduction
Credits ...........................................................................i-2
Contact Info ...........................................................................i-3
Contents ..........................................................................ii-1
About This Manual................................................................iii-1
EchoplexDigital Pro Plus
U SER’S MANUAL
Contents
Typeface Conventions ............................................................................iii-1
Terminology ............................................................................................iii-2
Section I – User Guide
User Guide Introduction ................................................................I-i
Chapter 1 Quick Start ...............................................................1-1
Instant Gratification and Depth..............................................................1-1
Before Powering Up .................................................................................1-2
Level Adjustment .....................................................................................1-3
Start Looping! ...........................................................................................1-4
Chapter 2 Front, Back and Underfoot ........................................2-1
The Front Panel........................................................................................2-1
The EFC-7 Footpedal ...............................................................................2-6
The Back Panel .........................................................................................2-6
Stereo Operation ......................................................................................2-9
Chapter 3 MIDI..........................................................................3-1
Table of Contents ii-1
Page 6

Section II – Reference Guide
Reference Introduction .................................................................II-i
Reference Guide Introduction.................................................................II-i
Key to the Diagrams................................................................................II-ii
Chapter 4 Parameters ...............................................................4-1
8ths/Cycle.................................................................................................4-2
AutoRecord ...............................................................................................4-6
Channel.....................................................................................................4-7
ControlSource ..........................................................................................4-8
FeedBkCont ............................................................................................4-10
InsertMode .............................................................................................4-11
Loop/Delay (InterfaceMode) ................................................................4-15
LoopCopy................................................................................................4-29
LoopTrig ..................................................................................................4-31
MoreLoops..............................................................................................4-32
MuteMode ..............................................................................................4-33
OverdubMode ........................................................................................4-34
Overflow..................................................................................................4-35
Quantize..................................................................................................4-36
Presets .....................................................................................................4-39
RecordMode ...........................................................................................4-40
Reserved..................................................................................................4-42
RoundMode............................................................................................4-43
SamplerStyle...........................................................................................4-44
Source #...................................................................................................4-47
SwitchQuant...........................................................................................4-48
Sync .........................................................................................................4-57
Threshold................................................................................................4-59
Velocity....................................................................................................4-60
VolumeCont............................................................................................4-61
Chapter 5 Functions...................................................................5-1
Dump ........................................................................................................5-2
Feedback...................................................................................................5-4
GeneralReset.............................................................................................5-8
HalfSpeed..................................................................................................5-9
Insert .......................................................................................................5-10
Load.........................................................................................................5-18
LoopDivide .............................................................................................5-20
LoopTriggering .......................................................................................5-21
LoopWindowing.....................................................................................5-22
MultiIncrease..........................................................................................5-26
Multiply...................................................................................................5-28
Mute ........................................................................................................5-38
NextLoop ................................................................................................5-41
ii-2 Echoplex Digital Pro Plus User’s Manual
Page 7

Overdub ..................................................................................................5-43
PreviousLoop..........................................................................................5-46
Record .....................................................................................................5-47
Rehearse..................................................................................................5-53
Replace....................................................................................................5-54
Reset........................................................................................................5-55
Retrigger..................................................................................................5-56
Reverse....................................................................................................5-58
SamplePlay .............................................................................................5-62
StartPoint................................................................................................5-64
Substitute................................................................................................5-65
SUS Commands .....................................................................................5-69
SUSNextLoop .........................................................................................5-71
Undo........................................................................................................5-72
Chapter 6 Synchronization ........................................................6-1
AutoStartPoint ..........................................................................................6-2
BeatSync ...................................................................................................6-3
BrotherSync..............................................................................................6-7
Global/Local MIDI Clock ........................................................................6-9
MIDI Sync Indicators.............................................................................6-11
MuteQuantMIDIStartSong....................................................................6-12
QuantMIDIStartSong.............................................................................6-13
QuantStartPoint .....................................................................................6-14
ReAlign ....................................................................................................6-15
SongPositionPointer and Continue ......................................................6-22
StartSong, StopSong, Continue .............................................................6-23
StopSync .................................................................................................6-28
SyncStartPoint ........................................................................................6-29
SyncRecord .............................................................................................6-30
TempoSelect ...........................................................................................6-32
Chapter 7 MIDI Control..............................................................7-1
DirectMIDI................................................................................................7-2
MIDI Command List................................................................................7-3
MIDI DataWheel ......................................................................................7-7
MIDIpipe...................................................................................................7-8
MIDI VirtualButtons ..............................................................................7-10
Receiving MIDI Commands..................................................................7-11
SysEx........................................................................................................7-12
SUS MIDI Commands ...........................................................................7-13
Transmitting MIDI Commands ............................................................7-15
Chapter 8 Parameter Presets.....................................................8-1
Parameter Presets.....................................................................................8-2
Preset Editor .............................................................................................8-8
Chapter 9 User Interface ...........................................................9-1
Table of Contents ii-3
Page 8

DataWheel ................................................................................................9-2
Feedbk Indicator ......................................................................................9-4
Feedback Pedal Jack.................................................................................9-5
Feedback Knob.........................................................................................9-6
Footpedal Jack ..........................................................................................9-7
Input Indicator .........................................................................................9-8
Input Jack..................................................................................................9-9
Input Knob..............................................................................................9-10
Loop Display...........................................................................................9-11
Loops LED...............................................................................................9-12
LoopTime Display..................................................................................9-13
MIDI LED................................................................................................9-17
MIDI Ports ..............................................................................................9-18
Mix Knob.................................................................................................9-19
Multiple Display.....................................................................................9-20
Output Jack.............................................................................................9-21
Output Knob...........................................................................................9-22
Overdub Jack ..........................................................................................9-23
Parameter Button...................................................................................9-24
SmartButtons..........................................................................................9-26
Switches LED..........................................................................................9-28
Timing LED.............................................................................................9-29
Visual Tempo Guide...............................................................................9-30
Chapter 10 MIDI Sample Dump .................................................10-1
Introduction ...........................................................................................10-2
Sample Dump User Guide.....................................................................10-9
Other Device Implementations ..........................................................10-16
Sample Dump Trouble Shooting ........................................................10-20
Chapter 11 MIDI SysEx ..............................................................11-1
MIDI SysEx Detailed Reference ............................................................11-2
ii-4 Echoplex Digital Pro Plus User’s Manual
Page 9

I NTRODUCTION
About This Manual
T YPEFACE CONVENTIONS
User Interface elements like Buttons, Jacks, and Knobs are shown in
bold, since references to them are usually about actions that you might
take.
Function and Operation names are shown in a plain typeface.
Buttons generally either represent parameters or initiate actions, which
we usually call functions or operations.
We use different versions of the same typeface for the button (bold) and
the function (regular); e.g. "the Record button starts and ends Record
operations."
Parameter Names and Values
will be shown as italics.
EXAMPLES:
■ "Press the Overdub button."
■ "You can end the Record operation several ways:"
■ "When
when it’s silent."
MuteMode=Continuous
, the loop runs in the background even
Introduction iii-1
Page 10

T ERMINOLOGY
There are a few key terms that are used frequently in this manual. Here’s
a summary:
P
LAYMODE
This is the condition of the Echoplex Digital Pro Plus when you’re not
editing parameters or performing an operation like recording,
overdubbing, inserting, etc. None of the Row Indicator LEDs are lit in
this condition, and the current loop simply plays back over and over.
P
ARAMETEREDITMODE
This is the condition of the Echoplex Digital Pro Plus when you are
editing parameters. You reach this state by pressing the Parameter
button, and you will see one of the Row Indicator LEDs lit to indicate
which row is being edited.
O
THERMODES
These are the states that the Echoplex Digital Pro Plus is in after you’ve
pressed a button to initiate an action, but before you’ve ended the
action. The mode is the name of the button that you’ve pressed; e.g.
Record mode, Mute mode, Insert mode, etc.
L
OOP
, L
OOPLENGTH
A
loop
is the entire program that plays when the Echoplex is in Play
mode. The
iii-2 Echoplex Digital Pro Plus User’s Manual
length
, C
URRENTLOOP
of the loop is the number that is in the LoopTime
, C
YCLE
Page 11

Display while in Play mode (the length of the recorded material), which
will be less than the total length available for recording.
If the
MoreLoops
Reference section), then the Echoplex will hold several different loops.
In this case, one loop will be active at any given time, and we’ll call this
the
current loop.
current loop.
When you use Multiply or Insert, a new loop is built from a number of
blocks of material with identical lengths. We’ll call each of these
component blocks a
cycles as a
R
ESETTINGLOOPS
When you Reset a loop by holding down the Record button for half a
second you completely empty it. The time display will show just a
decimal point. This creates an
in
reset,
or the Reset
parameter is greater than one (see
The leftmost digit in the display is the number of the
cycle,
and continue to refer to the entire groups of
loop.
, E
MPTYLOOPS
state
empty
.
loop. We often refer to this as being
MoreLoops
in the
If you have set up multiple loops using the
can reset them all at once. This is called a GeneralReset and is done with
a long press of the Multiply button while in a loop that is already reset.
S
HORTPRESS
Most functions are accessed with a quick tap of the appropriate button.
This is usually referred to as a
L
ONGPRESS
In many situations, a
than simply pressing the button and releasing it immediately (resetting
a loop through a long press of the Record button is the most obvious
example). Although there are situations where you may want to press a
button for quite a long while, any press longer than half a second will
count as a long press.
Short Press.
Long Press
MoreLoops
of a button will have a different effect
parameter, you
Introduction iii-3
Page 12

I
MMEDIATEACTION
This is a term used in the Reference chapter to describe buttons that
initiate an operation as soon as you press them, in contrast to buttons
that set parameters.
Q
UANTIZE
When an action is Quantized it means it will waits until an appropriate
rhythmic moment before it executes. The
choose whether actions wait until the next Loop StartPoint, the next Cycle
StartPoint, or the next Cycle Subdivision point (or 8th).
R
OUNDED ANDUNROUNDED
Some functions, like Multiply and Insert, are designed to automatically
operate for an integer number of Cycles. If you end the operation
sometime in the middle of the Cycle, it will continue operating until the
end of the cycle time so that you end up with an even rhythm. This is
called Rounding, because it rounds off to the nearest integer number of
Cycles. The
operates while Rounding.
RoundMode
Quantize
parameter lets you determine how the Echoplex
parameters let you
It is possible for the user to force a Rounded action to end without
Rounding. This is referred to as an UnRounded operation. For example, an
UnRounded Multiply is a Multiply that is forced to end without reaching
the end of the cycle.
iii-4 Echoplex Digital Pro Plus User’s Manual
Page 13

S ECTION I
User Guide
U SER GUIDE INTRODUCTION
This section will help you get started using the Echoplex and provide
instruction on using some of the Echoplex’s most common features. For
greater detail and complete information about all Echoplex features,
please consult Section II, the Reference Guide.
This section contains the following chapters:
■ Chapter 1 - Quick Start
■ Chapter 2 - Front, Back, and Underfoot
■ Chapter 3 - MIDI
User Guide I-i
Page 14

I-ii Echoplex Digital Pro Plus User’s Manual
Page 15

CHAPTER 1
Quick Start
ongratulations! You’re in for more fun than you can possibly
imagine, playing music with the Echoplex Digital Pro Plus. This is
C
Maestro in the 1960s that relied on tape loops to create effects. It was
used extensively by the Jimi Hendrix, the Doors, and many others. Now,
the temperamental tape technology that terminated the triumph of the
original Echoplex has been replaced by high-fidelity, utterly consistent
digital technology. Not only does this result in increased sound quality,
but the flexibility afforded by programmable digital control also makes
possible a much wider range of performance options.
the spiritual successor to the original Echoplex, a device made by
I NSTANT GRATIFICATION AND DEPTH
One of the great things about the Echoplex Digital Pro is that it offers
both instant gratification and depth. Once you hook it up, it will
probably take you about 10 minutes to learn how to work the basic
functions and start making music. After that, you may be intoxicated
with power for an hour or two before you’re ready to come back and
learn more. The Echoplex Digital Pro will reward further study, because
there are layers of refinements that will allow you to create more
complex pieces with interesting variations. But, because you start
making cool music from day 1, you can learn to use these refinements at
your own pace, gradually adding to your bag of Echoplex tricks when
you have the time and energy. We’ve tried to make that process as
efficient for you as possible by providing you with a carefully-planned
front panel, footpedal, and manual.
Quick Start 1-1
Page 16

In the next few paragraphs, you’ll learn the basics of using your
Echoplex Digital Pro. After you’ve recovered from the shocking joy of
your first loops, browse through this manual at your leisure. You’ll
discover lots of new ideas that will keep you coming back time after
time.
BEFORE POWERING UP
Make the connections
The basic connections for using the Echoplex Digital Pro are quite
simple: power, audio in and out, and the optional footpedal. Follow
along with the steps below, and refer to
for more information.
1. Check that the Power Selector Switch on the back of the unit is set
properly for your power source—115V for US- and Japanese-style power
outlets, or 230V for European-style. If it is set incorrectly, change it to
the correct setting with a screwdriver.
Figures 2.1
and
2.3
in Chapter 2
2. Plug the Echoplex Digital Pro into a power source using the supplied
power cord.
3. If you own the optional EFC-7 footpedal, connect it to the Footpedal
jack on the back panel using a standard guitar cord with 1/4" phone
plugs on each end.
4. Connect an audio source to the Echoplex’s back-panel Audio Input
jack with a standard guitar cord, or plug a high-impedance microphone
directly into the jack. The Echoplex Digital Pro can accept microphonelevel, instrument-level, and line-level inputs (along with anything inbetween).
5. Connect the Echoplex’s Audio Output jack to an amplifier, mixer, or
preamp to let you hear what’s happening!
These are all the basic connections. See Chapter 2 for information on
additional possibilities.
1-2 Echoplex Digital Pro Plus User’s Manual
Page 17

Turn it On
Use the power switch at the right of the Echoplex Digital Pro to turn it
on. The display will briefly show the software version number and then
switch to the standard display (see the section titled “The Display” in
Chapter 2).
L EVEL ADJUSTMENT
Set the Levels
1. Turn the Output knob all the way off.
2. Turn the Feedback Knob all the way up. This is the best setting for
most uses of the Echoplex Digital Pro. See
Reference chapter for more information.
Feedback Knob
in the
3. The Mix knob lets you balance the volumes of your playing and loop
playback. Set it to the half-way point (straight up) to start with.
4. Set the Input knob so that the LED light labeled “Input” is dark when
you’re not playing anything, green when you play at normal levels, and
orange when you play at your loudest levels. This light will turn red if
you overload the Echoplex input. Fortunately, the Echoplex has a built in
limiter to protect you from causing ugly digital distortion in your loops.
However, if you are engaging the limiter the audio recorded in your loop
will still not be a perfect representation of what you played. If this
happens, turn down the Input level.
5. Play your instrument and adjust the Output knob until you reach a
pleasant listening volume.
6. The LED labeled “Feedbk” indicates the level of the audio recorded in
the current loop. This turns red to indicate digital distortion in the loop.
If you see this after Recording and Overdubbing a loop, your Input level
is set too high.
Quick Start 1-3
Page 18

START LOOPING!
Record
It’s easy to record your first loop.
1. Press the Record button.
2. Play a few notes.
3. Press the Record button.
Now you should be hearing your notes loop over and over again. If you
don’t like what you recorded, simply repeat the steps above once again.
The Record function starts instantaneously when you press the Record
button. You’ll probably find that you get the best timing results if you
press Record simultaneously with the first note or chord of your loop
(as opposed to trying to press it an instant before). To end recording,
press it exactly at the time when you want the loop to restart (right on
the downbeat, if you’re recording rhythmically). A few minutes of
practice will be all that you need to create great loops with no audio or
rhythmic glitches.
As you record, you’ll see the length of the current recording in the
display. Keep an eye on this, especially if you don’t have much memory
installed in your unit (see Appendix A,
maximum recording time is displayed when you first power on the
Echoplex Digital Pro Plus. If you exceed this time during recording, your
loop won’t be kept (with the default settings. See
Reference chapter for other options).
If your loop seems surprisingly loud or soft in relation to what you
played, adjust the Mix knob until you find the right balance.
If you want to record a new loop, simply repeat steps 1-3 above. If you
want to reset (completely clear) the loop, simply press and hold the
Record button for half a second.
For more information on recording, see
1-4 Echoplex Digital Pro Plus User’s Manual
Memory
Record
for more details). Your
Overflow
in the Reference chapter.
in the
Page 19

Mute
If you get sick of listening to your loop, you can silence it without
erasing it by pressing the Mute button. The light under the Mute
button on the front panel will turn red. Press the Mute button a second
time to hear your loop again.
Overdub
Undo
For more information, see
Now that you have a loop running, let’s start to have some fun by
overdubbing some additional sounds. It’s incredibly easy.
1. Press Overdub. The Overdub light turns red.
2. Play. Each time the loop restarts, you’ll hear whatever you played during
the last pass added to the mix.
3. When you’re done overdubbing, press Overdub again to stop (it’s a
good idea to not leave the Overdub function on when you’re not actually
playing).
For more information, see
If you don’t like what you’ve just overdubbed, you can press Undo to
erase it. If your loop length is short compared to the amount of memory
in your Echoplex, Undo can erase the layers of overdubs one by one.
However, this capability is limited by the amount of memory that you
have installed. If your loop length is longer than half your memory
capacity, for instance, you won’t be able to Undo at all.
Mute
and
Overdub
MuteMode
in the Reference chapter.
in the Reference chapter.
Undo also cancels a function that you may have started by accident.
After you press Record without meaning to, for instance, you can
recover your loop simply by pressing Undo instead of Record to end
the Record operation.
For more information, see
Undo
in the Reference chapter.
Quick Start 1-5
Page 20

Multiply
Multiply is like Overdub, except that Multiply lets you record longer
passages. For instance, you can use Multiply to overlay a 4-bar bass riff
over two repetitions of a 2-bar chord pattern. Or, if you have enough
memory, you can use Multiply to record a long solo over a repetitive
backing track. It’s a powerful function that adds a lot to your expressive
capabilities using the Echoplex Digital Pro.
Here’s a quick introduction to Multiply:
1. Record a simple, short loop.
2. Press Multiply and play over several repetitions of the loop.
3. Press Multiply again to end the recording.
Multiply doesn’t restart the loop the instant you press it the second
time—it always “rounds off” so that the original loop isn’t cut-off in the
middle.
Notice that the right-hand digit of the display counts the repetitions of
your first loop as the entire loop is played back. There are a number of
situations where we’ll need to distinguish between these, so we’ll
introduce some terminology:
KEY POINT: The first loop, the “atom” that you started with, is called a
Reverse
cycle.
We’ll
loop
reserve the term
several full cycles (never a fractional number of cycles, like 2-1/2). If
you’ve just recorded a single loop and not used Multiply or Insert, then
your loop will be exactly one cycle long.
Reverse is a great deal of fun. In the Echoplex, loops can be Reversed at
any time. You can easily and quickly create loops with some parts going
forwards and some parts going backwards. Before we can do Reverse
however, we will need to edit a Parameter value. This is a good
opportunity to learn how to do Parameter editing.
The parameter we wish to change is called
determines what function the Insert button will do. We are going to set
it to become the Reverse button.
to refer to the full loop, which can consist of
InsertMode.
This parameter
1-6 Echoplex Digital Pro Plus User’s Manual
Page 21

1. In the Parameter Matrix printed on the front panel of the Echoplex,
locate the
Switches, under the Insert button.
2. Press the Parameter button. You are now in the Parameter Editing
Mode. You should see “P1” in the Multiple Display, indicating we have
selected the first row of Parameters. The Timing LED is also lit to
indicate that the Timing Row of parameters is selected.
InsertMode
parameter. You should see it in the row labeled
3. We want the Switches Row, since that is where the
parameter is located. Press the Parameter button once more. You
should now see “P2” in the Multiple Display, and the Switches LED
will be lit to indicate we have now selected the Switches Row.
4. Press the Insert button to select the
LoopTIme Display will show the current value of this Parameter.
5. Continue tapping the Insert button to step through the possible values
for the
display show “rEV”.
5. Press the Parameter button to a few times to cycle back to Play Mode.
We’ve now programmed the Insert button to be the Reverse button, and
learned about Parameter Editing in the process. The InsertMode
parameter has some other interesting functions in it as well, like
HalfSpeed, Substitute, Replace, and of course, Insert. But we want to
play with Reverse first, so let’s do that!
1. Record a loop.
2. Press the Insert button.Your loop is playing backwards!
InsertMode
parameter. We want Reverse, so stop when you see the
InsertMode
InsertMode
Parameter. The
3. Now press Overdub, with your loop still in Reverse.Play something
interesting over your backwards part. Your Overdub will now be playing
in the loop forwards, while the original part is playing backwards.
4. Press Insert again. Your original part will be going forwards again, and
the Overdub you added is now Reversed.
You can go on like this, adding as many forwards and backwards parts
as you like!
See the
details on these features.
InsertMode
and Reverse sections of the Reference Guide for more
Quick Start 1-7
Page 22
Echoplex
Input Feedbk
Level Indicator Lights Display
Level Control Knobs
Digital Pro Plus
•••
MULTIPLE
LOOP
•
LOOPTIME
dir
loop
MixOutputInput
Feedback
FIGURE 2.1A:
The Echoplex Digital Pro Plus front panel, left half
Parameters Record Overdub Multiply Ins/Rev
Loops
MIDI
Switches
Timing
MoreLoops
Channel
RecordMode
Loop/Delay
AutoRecord LoopCopy SwitchQuant LoopTrig Velocity SamplerStyle
ControlSource
OverdubMode
Quantize
Source #
RoundMode
ths
/Cycle
8
VolumeCont
InsertMode
Sync
Mute
FeedBkCont
MuteMode
Threshold
Status Indicator LightsButtons
Undo NextLoop
Dump
Overflow
Reverse
Load
Presets
StartPoint
POWER
Row Indicator Lights Parameter Grid Power Switch
FIGURE 2.1B:
The Echoplex Digital Pro Plus front panel, right half
2-i Echoplex Digital Pro User’s Guide
Page 23

Front, Back and
In this chapter we’ll discuss the physical elements of the interface: the
front panel, optional EFC-7 footpedal, and back panel.
T HE FRONT PANEL
The front panel of the Echoplex Digital Pro contains a Power Switch,
Knobs that set critical levels, two multicolored Level Indicator Lights
to monitor levels, a 6-character Display that shows timing and other
information, and a row of eight multi-function Buttons for setting
parameters and operating the unit. It also contains four Row Indicator
Lights, controlled by the Parameter button, that determine which set
of functions or parameters correspond to the buttons. Each button has a
multi-colored Status Indicator Light.
CHAPTER 2
Underfoot
Level Control Knobs
The four
between the input signal and the looped or delayed signal, and the
feedback level. The
levels, and you’ll find more information in the entries for Input Knob,
Output Knob, Mix Knob, and Feedback Knob in the Reference
chapter.
Level Control Knobs
Quick Start
control the input and output levels, the mix
in Chapter 1 describes how to set these
Front, Back and Underfoot 2-1
Page 24

Level Indicator Lights
These multicolored lights monitor audio levels. The Input Indicator
monitors the levels that are received at the audio input jack on the back
panel, while the Feedbk Indicator monitors the volume of the
material that is recorded in the current loop.
When one of these lights is dark, it is measuring very little (or no) signal.
When it is green, the signal is healthy. Orange indicators are fine too,
with the signal at a good level. The orange color indicates that caution
should be displayed, however, because the levels are approaching the
red zone. Levels that cause the indicator lights to glow red will cause
distortion.
You can’t do much about controlling the level already in the loop, except
to lower the feedback, to Undo recent actions, or to reset the loop.
However, you can and should control the input level as follows:
KEY POINT: Set the Input Knob so that the loudest signals make the Input
Indicator Light turn orange. It should never turn red.
Display
The Echoplex display conveys some critical information in a compact
manner. It takes on different roles according to the context.
STARTUP DISPLAY
When you first power on the Echoplex, it will show the amount of time
available in the current loop. If
available, reflecting the amount of memory installed in the unit. The
Multiple display on the right will show how many loops are currently
setup with the
The following illustration shows the display immediately after bootup.
2-2 Echoplex Digital Pro Plus User’s Manual
MoreLoops
MoreLoops=1,
parameter.
it will show the total time
Page 25
FIGURE 2.2
The startup display shows
the time available and
number of loops setup.
PLAY MODE DISPLAY
Number of the
current loop
Total LoopTime
per Loop
•
LOOP
A typical display in Play Mode looks like this:
LOOPTIME
Current number of loops
(set with
MULTIPLE
MoreLoops
)
Number of the
current loop
•
LOOP
Flashes to indicate
AutoUndo
FIGURE 2.3:
Time display
Current Cycle
(from Multiply or Insert)
Loops
•••
LOOPTIME
Indicates Sync
Correction
The PlayMode display provides important information about current status and activity
When you are in a Record, Multiply, or Insert operation, the LoopTime
Display will keep track of how much time you’ve recorded so far. You
will see it counting the time as the operation progresses. Once
something has been recorded into a loop, the time display will show the
MULTIPLE
Flashes to indicate
Global MIDI StartPoint
Flashes to indicate
Loop StartPoint
MIDI
Switches
Timing
Flashes to indicate
Cycle StartPoint
Flashes to indicate
Sub-Cycle (8th note)
Front, Back and Underfoot 2-3
Page 26

length of the current loop. And, once you’ve reset a loop, the time
display will be blank until you record some material in the loop.
During Play Mode, the MIDI LED, Switches LED, Timing LED, and the
right dot of the Multiple Display flash to indicate the Tempo and
StartPoints of your loop. These are indicated in the figure above. See
Visual Tempo Guide
discussion of these LEDs and for how to reposition the loop beginning.
The left dot of the Multiple Display flashes during Sync operations
when
Sync
is on and an external clock is present. See the discussion of
Sync
in the Reference chapter for more information.
The Loop Display dot indicates AutoUndo, explained in the Undo
section of the Reference chapter.
The LoopTime Display is also used briefly to show other information
when appropriate. For example, it displays the value as you change
Feedback, it displays various command names that don’t have their own
LED when you execute those commands, and it shows the expected
LoopTime when an incoming MIDI clock is present for synchronization.
This feature allows you clearly see what is going on with the Echoplex as
you use it. See the LoopTime Display section in the Reference chapter
for more specific details.
and
StartPoint
in the Reference chapter for a deeper
Buttons and Row Indicator Lights
PLAY MODE AND THE ROW INDICATOR LIGHTS
The row of 8 buttons on the right side of the Echoplex Digital Pro Plus
control most operations. The leftmost button, labeled Parameters
alters the meaning of the other buttons. When none of the
Lights
to the left of the
functions, arranged in a 4x8 grid under the buttons) are lit, then all
buttons perform their primary functions: Record, Overdub,
Multiply, etc. This state is what we call Play Mode, and is probably
where you’ll spend the most time while performing. Pressing the
Parameter button several times selects each row in turn, lighting the
corresponding indicator light.
When a row indicator light is lit, then the buttons (other than
Parameters) take on the meanings written in that row of the grid. For
2-4 Echoplex Digital Pro Plus User’s Manual
Parameter Matrix
(the printed names of all the
Row Indicator
Page 27

instance, when the Loops light is on, the Record button no longer
performs the Record function; instead, it finds a convenient phone
booth and changes into the MoreLoops button, able to increase the
number of loops with a single push. When we refer to this in the text,
we’ll utilize both button names; for example, "Press the Record
(MoreLoops) button."
THE PERSISTENCE OF MEMORY
All changes to parameters are active as soon as you make them, and
they’re stored into permanent memory when you choose a different
parameter or press the Parameter button.
KEY POINT: If you shut off the Echoplex Digital Pro and restart it, all your saved
parameters will remain the same (although you will lose any music that
you have in your loops).
You can reset all parameters to their factory defaults by holding down
the Parameters button when you power up.
Status Indicator Lights
As you take the Echoplex through its paces, you’ll discover that the lights
directly under the front-panel buttons change. Here are the meanings of
these lights:
Unlit: The function is unavailable.
Green: The button is ready to perform its usual function.
Red: The button was the last pressed and its function is operating. The
button is the most likely candidate to end the function that it started.
While editing parameters, Red indicates the current parameter column
being edited.
Orange: The button is available, but will perform a function other
than its usual one—one that is especially appropriate to the current
activity or state of the Echoplex.
Front, Back and Underfoot 2-5
Page 28
T HE
EFC-7
FOOTPEDAL
The buttons on the optional EFC-7 footpedal perform exactly the same
function as the buttons on the Echoplex Digital Pro’s front panel.
Anytime that this manual refers to “the Record button,” either the
front-panel button or the footswitch can be used.
The only button missing on the footcontroller is the Parameters
button, which takes you out of Play mode and lets you edit parameters.
We felt that it would be inappropriate to put this button on the
footcontroller, as it might take you to an unexpected place if pressed
accidentally during a performance.
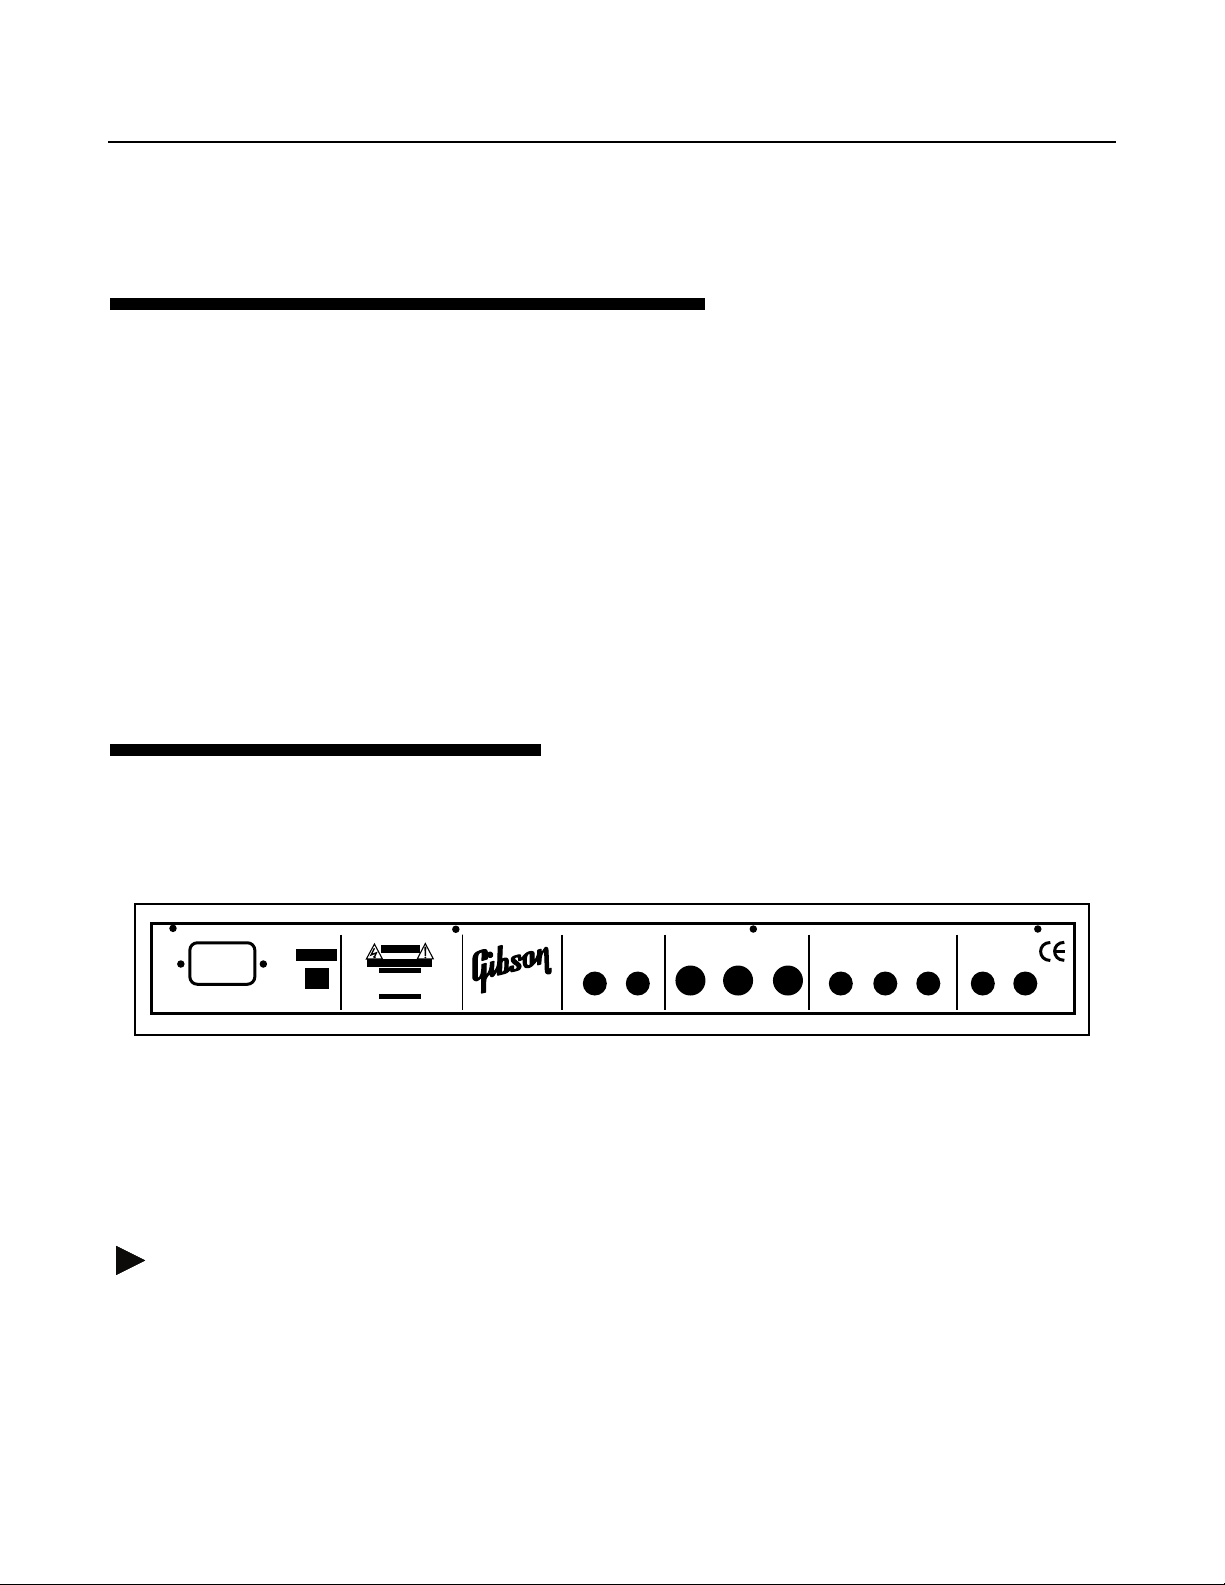
T HE BACK PANEL
CAUTION
RISK OF ELECTRIC SHOCK
DO NOT OPEN
ATTENTION
RISQUE DE CHOC ELECTRIQUE
NE PAS OUVRIR
WARNING - ATTENTION
THIS APPARATUS MUST BE EARTHED.
FOR CONTINUED PROTECTION
AGAINST RISK OF FIRE REPLACE ONLY
WITH SAME TYPE AND RATING OF FUSE
UTILISER UN FUSIBLE DE RECHANGE DE
MEME TYPE ET CALIBRE
WARNING
TO REDUCE THE RISK OF FIRE OR
ELECTRICAL SHOCK DO NOT EXPOSE
THIS EQUIPMENT TO RAIN OR MOISTURE
Made in the UK
Mains Input 100-240 V.A.C.
50-60 Hz. 130mA @ 115V
FIGURE 2.4
SERIAL No:-
Voltage
Selector
: The Echoplex Digital Pro back panel
The back panel contains all the jacks for connecting the Echoplex
Digital Pro to the rest of the world.
Audio Connections
The Echoplex Digital Pro can accept a wide range of audio signals as
input, and it outputs a line-level signal that can be attenuated by the
2-6 Echoplex Digital Pro Plus User’s Manual
Sync
Brother Beat In Out Thru FootPedal Overdub Feedback Output
MIDI
Foot Switches
Audio
Input
Page 29

Output knob (or MIDI Control Change messages). This makes it fit
easily into a number of audio configurations, such as:
■ Plug a guitar, keyboard, or microphone directly into the Echoplex and
plug the output into any amplifier or preamplifier. The Echoplex has a
high impedance input that works well with passive devices like electric
guitar or bass.
■ Put the Echoplex in the effects loop of your favorite amplifier or effects
device. Be careful about using distortion in the amp after the Echoplex.
When you build up a loop it will often sound muddy with distortion
after it, which you may or may not want.
■ Plug the final output of your favorite effects device directly into the
Echoplex and plug the Echoplex output into any amplifier or
preamplifier.
■ Connect the Echoplex to the Effects (Aux) Send and Return of your
mixer.
■ Connect a pair of Echoplexes to loop stereo signals. Refer to the "Stereo"
section later in this chapter.
MIDI Connections
The standard MIDI In, Out and Thru ports are described in detail under
the
MIDI Ports
functions are available to you. These are summarized at the start of
Chapter 3.
heading in the Reference chapter. A wide range of MIDI
Footswitch Jacks
FEEDBACK
1/4" jack that connects to the output of a passive volume pedal (one
that doesn’t require power) with a standard guitar cord. This connector
doesn’t work with all pedals, but it will work with many, including the
popular Boss FV-50L. Call Gibson if you are in doubt about whether a
particular pedal will work (or test it, if it’s convenient).
Front, Back and Underfoot 2-7
Page 30

OVERDUB
A 1/4" mono phone jack for attaching a momentary switch. This is
useful if you don’t own the EFC-7 footpedal or if you prefer to use a
different style of footswitch (one with a different feel, like a sustain
pedal modeled after a piano pedal). This would be especially
appropriate for if you like to play with
FOOTPEDAL
A 1/4" mono phone jack that connects to the optional EFC-7 footpedal
with a standard guitar cord. This jack also accepts a momentary switch
to execute the Record function.
If you are electrically and mechanically skilled, building your own pedal
is fairly easy. Contact customer support if you would like instructions on
how to do this.
Sync Jacks
OverdubMode=SUS.
These jacks are used to synchronize to external sync pulses or to
synchronize multiple Echoplexes. The BeatSync jack takes 1/4 mono
cord, while Brother Sync uses a 1/4" stereo cable. See the Reference
chapter entries for
BeatSync
and
Voltage Selector Switch
The Echoplex Digital Pro Plus can operate on US-style 115V power,
Japanese-style 100V power, and on European-style 230V power. All that’s
required is that the Voltage Selector Switch be set properly and the
proper power cord be attached to the Power Input Jack.
Power Input Jack
Use a power cord to connect this to a wall socket after checking that the
Voltage Selector Switch is set properly.
BrotherSync
for more information.
2-8 Echoplex Digital Pro Plus User’s Manual
Page 31

STEREO OPERATION
You can use a pair of Echoplex Digital Pro Pluses to loop stereo signals. A
BrotherSync connection will ensure that the two halves of the signal
maintain their phase relationships through loops of any length. A MIDI
connection provides simultaneous control over the process.
shows the way to create a seamless connection. The values of all
parameters in the MIDI row of the
identically in both units. Make sure
Controllers,
Out
on both units, unless you are using an external MIDI clock. In that
case set
and not
Sync=In
Audio In MIDI InBrotherSync Audio Out
on both units.
"Slave"
off.
The
Echoplex
Parameter grid
ControlSource
Sync
parameter should normally be set to
should be set
is set to
Figure 2.4
Notes
or
Stereo Audio Source
FIGURE 2.5:
Left
Right
Audio In MIDI Out
Footpedal
BrotherSync
"Master"
Echoplex
Audio Out
Using a pair of Echoplexes to loop or delay stereo signals
Left
Stereo Audio Amplifer
Right
Front, Back and Underfoot 2-9
Page 32

2-10 Echoplex Digital Pro Plus User’s Manual
Page 33

CHAPTER 3
MIDI
There are a number of different ways that MIDI interacts with the
Echoplex Digital Pro. The MIDI chapter in the Reference guide contains
extensive details on all MIDI features. The MIDI functions available are:
■ You can virtually control all front-panel buttons with NoteOn or
Continuous Control messages (see the
entries in the Reference chapter).
■ You can directly control many features that are difficult or complicated
to access from the front panel with NoteOn or Continuous Control
messages (see the
Reference chapter).
MIDI Command List
ControlSource
and
DirectMIDI
and
VirtualButtons
entries in the
■ MIDI NoteOn messages can be used to trigger loops (see the
and
LoopTriggering,
■ MIDI clocks can be used to synchronize the cycle time with drum
machines and sequencers (see the
Synchronization chapter in the Reference section).
■ MIDI Continuous Controllers can be used to control Volume and
Feedback levels (see the
Reference chapter).
■ MIDI Program Change messages can be used to select parameter
Presets. (see the Presets chapter in the Reference section.)
■ One Echoplex can control numerous others by connecting the MIDI Out
port of each one to the MIDI In port of the next, as in the figure below.
Be careful not to complete the circle and make a closed loop.
SamplerStyle
VolumeCont
entries in the Reference chapter).
Sync
parameter entry and the
and
FeedBkCont
entries in the
LoopTrig,
MIDI 3-1
Page 34

X
MIDI In MIDI Out
Echoplex 1
Figure 3.1
■ Loops can be dumped to sequencers and samplers, and loaded from
Connecting several Echoplexes together by MIDI
MIDI In MIDI Out
Echoplex 2
MIDI In MIDI Out
Echoplex 3
these devices, without any loss of sound quality (see the Sample Dump
chapter in the Reference section).
■ Parameters can be directly edited using MIDI SysEx.
■ Parameters and Presets can be uploaded and downloaded for saving on
a computer or other storage device, also using MIDI SysEx commands.
(see the SysEx chapter in the Reference section.)
3-2 Echoplex Digital Pro Plus User’s Manual
Page 35

S ECTION II
Reference Guide
R EFERENCE GUIDE INTRODUCTION
This section is a comprehensive reference for the Echoplex Digital Pro
Plus. You can find any function or button name, any knob, and any jack
by looking for its name in the upper outside corners of these pages.
This section is divided into the following chapters:
■ Chapter 4 - Parameters
■ Chapter 5 - Functions
■ Chapter 6 - Synchronization
■ Chapter 7 - MIDI Control
■ Chapter 8 - Parameter Presets
■ Chapter 9 - User Interface
■ Chapter 10 - MIDI Sample Dump
■ Chapter 11 - MIDI SysEx
Within each chapter the entries are listed alphabetically with their titles
at the top of the page, so it should be relatively easy to find what you are
looking for. If you have difficulty, consult the table of contents.
Reference II-i
Page 36

K EY TO THE DIAGRAMS
Some of the entries in this section contain diagrams portraying the way
various Echoplex functions behave. Here are some tips that will help you
to interpret them:
■ Musical material is represented as boxes filled with patterns, like this:
■ When musical material is mixed together, the patterns are shown
overlapping, like this:
+
=
The arrows have the following meanings:
II-ii Echoplex Digital Pro Plus User’s Manual
■ Button pushes are indicated by vertical lines with arrowheads at the
ends, labeled by the first letter of the button. The button abbreviations
are:
R Record button
O Overdub button
M Multiply button
I Insert button
Me Mute button
U Undo button
N NextLoop button
Press and release the button in one motion.
Page 37

Press the button and hold it down
Release the button
Reference II-iii
Page 38

II-iv Echoplex Digital Pro Plus User’s Manual
Page 39

C HAPTER 4
Parameters
Reference - Parameters 4-1
Page 40

8ths/Cycle
Default: 8
Parameter Row: Timing
Synchronization parameter that determines tempo based on
Loop time.
Values: 1-96, 128, 256
When synchronizing with MIDI,
8th-notes that make up each cycle. In order to use this feature, you must
have a device that generates or syncs to MIDI Clock messages. This
device will usually be a sequencer or drum machine. In this discussion,
we will refer to a device that generates MIDI clocks as a
When editing
them easy to select: 8,4,2,6,12,16,32,64,128,256, then it goes on with
1,2,3...96.
While editing
DataWheel, so you can use it to quickly change the value to what you
want.
Note that with the DataWheel feature, the top of the knob range ends
at 54 instead of 96. This was done because we found it was easier to set
the more typical values when the knob resolution was limited a little bit.
To reach the values between 54 and 96 you simply use the front panel
button to continue incrementing the number in the usual way.
A long-press while editing the
initial value of 8.
8ths/cycle
8ths/cycle
, the most important values come first to make
the Feedback Knob becomes the
8ths/cycle
8ths/cycle
determines the number of
clock source
parameter returns you to the
.
Example 4.1: Syncing to an external MIDI clock
1. Set
2. Set
3. Connect the MIDI Out port of a clock source to the Echoplex Digital
4-2 Echoplex Digital Pro Plus User’s Manual
8ths/Cycle=8.
(one measure) long.
Sync=In.
Pro’s MIDI In port using a standard MIDI cable.
This means that each cycle will be eight eighth-notes
Page 41

8ths/Cycle
Continued
4. Make sure that your clock source is set to transmit MIDI Clocks (this
setting is usually found under a “MIDI” or “Sync” menu or function
key).
5. Reset the current loop by holding down the Record button for several
seconds.
6. Load a rhythm pattern or sequence into your clock source, set it up to
loop indefinitely, and hit Play. At the beginning of each measure, you
will see the sync LED flash on the Echoplex display.
7. The next time you hit Record, the Echoplex will wait for the beginning
of the next measure before starting the Record process. You end the
Record operation by pressing the Record button a second time. Instead
of ending immediately, recording will continue until the next measure
boundary, as determined by the incoming MIDI clocks.
8. Once you’ve recorded your first cycle this way, the Echoplex continues to
monitor the clock source and maintain synchronization. However, once
the basic loop is recorded, the Echoplex will not change the timing or
playback speed of the loop to respond to changes in your clock rate.
Sequences with tempo changes in them, therefore, are not good choices
for sync sources for the Echoplex.
Another useful variation on the above theme is to reset the current loop
and briefly send MIDI clock to the Echoplex from your clock source. You
can easily do this by playing a single empty measure from a sequencer.
Once the Echoplex has received MIDI clock while in reset, it will know
to expect more. Press Record before restarting your clock source. Then,
the Echoplex will wait for the first clock pulse before recording,
displaying "ooo" in the display while it does so. This is a good way to get
the Echoplex and a sequencer to start simultaneously. Some sequencers
make this approach difficult, however, because they send out MIDI
clocks even when they’re not actively playing.
Example 4.2: Syncing a drum machine or sequencer to the
Echoplex
1. Set
8ths/Cycle=8.
(one measure) long.
This means that each cycle will be eight eighth-notes
Reference - Parameters 4-3
Page 42

8ths/Cycle
Continued
2. Set
3. Connect the MIDI In port of a sequencer or drum machine to the
4. Load a pattern or sequence into your drum machine or sequencer. Set
5. Set your drum machine or sequencer to sync to incoming MIDI Clocks.
6. Press Play on your drum machine or sequencer. It will wait for incoming
7. Record a loop one measure long (in 4/4 time) in the Echoplex. As soon
Sync=Out.
Echoplex Digital Pro’s MIDI Out port using a standard MIDI cable.
the clock parameter to
your MIDI and audio connections are working. Stop the device.
clocks before taking off.
as you press Record the second time, MIDI clocks will be transmitted.
Your drum machine or sequencer should play back in perfect sync.
If you want to sync to loops that have different lengths, set
appropriately. For instance, set
measure, or set
8ths/Cycle=16
Internal
and play back the material to verify that
8ths/Cycle
8ths/Cycle=6
to sync to 2 4-beat measures.
to sync to a 3/4 time
C HANGING TIME SIGNATURE IN
RHYTHM
When a loop is playing and the
the change of value is only activated at the first Loop StartPoint after you
come out of the Parameter Editing state. At that point you jump directly
to the new selected value. This means the value change occurs only
while back in the playing state, and only at a rhythmically sensible
point. This helps eliminate any confusion when working with a
synchronized sequencer and makes for much smoother transitions into
new time signatures.
Try changing
clock. You control the sequencer's tempo in relation to your loop!
4-4 Echoplex Digital Pro Plus User’s Manual
8ths/Cycle
with
8ths/Cycle
Sync = Out
or
Sync
parameters are edited,
and a sequencer slaving to the
Page 43

MIDI CLOCK LIMITS
There is a limit to how fast the Echoplex will transmit MIDI clocks—the
equivalent of about 400 beats per minute. If you create a loop that’s 1/2
a second long with
measures, or 8 beats. Since there are 120 1/2 seconds in a minute, each
with 8 beats, the effective timing would be 960 beats per second, which
isn’t very common in musical usage, and won’t be transmitted by the
Echoplex. The moral: short loops and high values of
mix.
8ths/Cycle=16,
8ths/Cycle
Continued
then that 1/2 second will represent 2
8ths/Cycle
don’t
In older versions of the Echoplex hardware the
was labeled
See Also: Sync, Quantize, Visual Tempo Guide, LoopDivide, MIDI Ports
8ths/Beat
.
8ths/Cycle
parameter
Reference - Parameters 4-5
Page 44

AutoRecord
Parameter Row: Loops
Starts recording whenever you enter an empty loop.
Values: Off, On
When this is on, the Echoplex Digital Pro will start recording every time
you enter an empty loop. This only applies when the number of loops is
more than one.
Example 4.3: AutoRecord
Default: Off
1. Set the number of loops to 2 with
2. Record a short loop in loop 1
3. Press the NextLoop button
4. Start playing right away—you’ll be recording
5. Press Record or NextLoop to end recording in Loop 2
See Also: MoreLoops, SwitchQuant, LoopTrig, NextLoop
MoreLoops
4-6 Echoplex Digital Pro Plus User’s Manual
Page 45

Default: 1
Parameter Row: MIDI
Determines the MIDI channel for all MIDI functions.
Values: 1-16
This sets the MIDI channel for controlling Echoplex operations with an
external MIDI controller or sequencer.
See also: Source #, ControlSource, MIDI Control Chapter
Channel
Reference - Parameters 4-7
Page 46

ControlSource
Default: Notes
Parameter Row: MIDI
Sets up MIDI control of Echoplex Digital Pro operations.
Values: Notes (not), Controllers (Ctr), Off (OFF)
This parameter controls how (and if) Echoplex Digital Pro operations
are transmitted and received over MIDI. It is useful primarily if you have
an interest in controlling the Echoplex Digital Pro from a sequencer or
from a programmable footcontroller. If you are controlling one or more
"slave" Echoplexes from a single "master," all the values for
ControlSource
Every button on the Echoplex Digital Pro front panel (and the
corresponding buttons on the footpedal) can generate either a Note On
or a Continuous Controller (with value 64) when it is pressed. When it is
released, the corresponding Note Off or Continuous Controller with
value 0 is sent. This allows a sequencer to capture and later recreate
almost any sequence of Echoplex moves, no matter how complex. The
fact that each button push and release pair generates a pair of MIDI
messages allows you to duplicate long presses of buttons that either
initiate special functions or reset parameters to their default values.
among the various units should be identical (and not
Off
).
When
notes (exactly which notes is controlled by the
When
a pair of Continuous Controllers. Each of these methods works equally
well—the only reason that you might be compelled to set this to
Controllers
commands into a sequence that is playing notes on all 16 MIDI
channels. You can usually choose a starting controller number (with
Source #) so that the Echoplex commands will be able to share a channel
with a stream of notes destined for a sound module without affecting
their sound.
You generally won’t know what state the Echoplex Digital Pro will be in
when you play back your control sequence. Because of this, there are
many cases where it’s not enough to simply record your button pushes.
Suppose, for instance, that you want to create a short sequence to
change the
4-8 Echoplex Digital Pro Plus User’s Manual
ControlSource=Notes,
ControlSource
is if you want to embed a track of Echoplex control
SamplerStyle
is set to
to
each button press will send out a pair of
Source #
Controllers,
One.
If you start from the normal playing
each button press will send out
parameter).
Page 47

Default: Notes
ControlSource
Continued
state, and also have
pushes of the Parameters button and two pushes of the NextLoop
(SamplerStyle) button to accomplish this. So you record exactly those
button pushes into a sequence. Fine. Then you play it back—Whoops!
You didn’t start from the same state as when you recorded the sequence,
and the sequence starts a Load operation, wiping out your current loop.
Ouch!
The moral of the story is that, when recording a control sequence, each
button that you press should start with a long press to reset it to its
default state.
SamplerStyle
set to its default value of
Run,
it takes 4
Example 4.6: Creating a Sequence to Set SamplerStyle to One
1. Connect the MIDI Out from the Echoplex Digital Pro to the MIDI In of
your sequencer.
2. Hit Record on your sequencer.
3. Hold down the Parameter button for a second or two. The Echoplex
Digital Pro will shift into Play mode if it didn’t start out there.
4. Press Parameter 4 times
5. Hold down the NextLoop button for a second or two. The
will change to
6. Press the NextLoop button once.
7. Press the Stop button on your sequencer to end recording.
Run
if it didn’t start out there.
See also: Source #, Channel, MIDI Control Chapter
SamplerStyle
Reference - Parameters 4-9
Page 48

FeedBkCont
Parameter Row: MIDI
Choose a MIDI Controller for Feedback
Values: 0-99
This function lets you pick which MIDI Continuous Controller will
control feedback. The feedback value can be controlled by MIDI, by the
Feedback Knob on the front panel, or by a volume pedal connected
to the Feedback Jack on the back panel.
See the explanation of the Feedback Knob in this chapter for the most
detailed explanation of feedback.
See also: Channel, Feedback, Feedback Knob, Feedback Jack
Default: 1
4-10 Echoplex Digital Pro Plus User’s Manual
Page 49

Default: Rehearse
Affects the behavior of the Insert button
Values: Rehearse (rhr), Replace (rPL), Substitute (Sub), HalfSpeed
(h.SP), Reverse (rEV), Insert (InS), Sustain (SUS)
InsertMode redefines the function of the Insert button so that different
functions can be available from the front panel according to your needs.
All of these functions are also available independently by MIDI.
I NSERTMODE=REHEARSE
InsertMode
Parameter Row: Switches
When used in Play mode, Rehearse has the same meaning as if
InsertMode=Insert
The effect of
Insert button. The cycle that you’ve just recorded will be played back
exactly once, regardless of the feedback setting. The underlying timing of
the cycle will continue and any new audio played is fed into the loop. If
you play something that you really like and want to keep for more
repetitions, press Insert again immediately after you’ve played it. One
cycle’s worth of material prior to that point will be kept as the loop, and
will repeat according to the feedback setting.
Rehearse is useful for practicing an idea before keeping it as the loop.
See Rehearse in the Functions section for more information.
, described fully under the
InsertMode=Rehearse
I NSERTMODE=INSERT
Insert
heading.
is felt when you end a Record with the
When used in Play mode, this causes you to go into Insert mode when
the Insert button is pressed, fully described under the
this chapter.
Reference - Parameters 4-11
Insert
heading in
Page 50

InsertMode
Continued
If
InsertMode=Insert,
recording and immediately inserts a second cycle (as it continues
recording); in other words, it puts you into Insert mode. The insertion
continues until memory runs out or you end it with Insert or an
alternate ending for the Insert operation. This is very useful for dividing a
longer loop into multiple cycles as you record it. This can allow you to
easily set a tempo for an external sequencer when using MIDI clock out,
for example.
See Insert in the Functions section for more information.
pressing Insert at the end of a Record ends the
I NSERTMODE=REPLACE
When
button. Each press and release of the Replace button during Play mode
will replace a segment of the loop with new material for as long as
Replace is held down. The overall loop length is not changed.
If
begin at the end of the current cycle, and will continue to the next cycle
point after Replace is released again.
When
during a Record, the Record ends as if you’d pressed the Record button
and the Replace function immediately begins as explained above.
See Replace in the Functions section for more details.
InsertMode=Replace,
Quantize=On
InsertMode=Replace
and Replace is pressed during a cycle, the function will
the Insert button becomes the Replace
and Insert is used as an alternate ending
I NSERTMODE=SUBSTITUTE
When
button during Play mode. Substitute has some similarity to the Replace
function. However, with Substitute the original loop playback continues
InsertMode=Substitute,
the Insert button becomes the Substitute
4-12 Echoplex Digital Pro Plus User’s Manual
Page 51

while you are playing the new material. On the next repetition, only the
new audio will remain in the loop and the old portion will be removed.
See Substitute in the Functions section for more details.
I NSERTMODE=HALFSPEED
InsertMode
Continued
When
HalfSpeed button during Play mode. Pressing HalfSpeed switches
the current loop an octave lower, to half speed. The Insert LED turns red
and the display says H.SP briefly. Press HalfSpeed again and the loop
returns to FullSpeed. The LED turns green and F.SP is displayed for a
moment.
See HalfSpeed in the Functions section for more details.
InsertMode=HalfSpeed,
I NSERTMODE=REVERSE
When used in Play mode, Reverse causes the current loop to be played
backwards.
When
during a Record, the Record ends and reversed playback starts
immediately.
InsertMode=Reverse
and Insert is used as an alternate ending
the Insert button becomes the
See Reverse in the Functions section for more details.
Reference - Parameters 4-13
Page 52

InsertMode
Continued
I NSERTMODE=SUSTAIN
InsertMode=Sustain
work. SUS turns Insert and Multiply into Unrounded functions with
Sustain action on the button. In other words, they start when the button
is pressed and end immediately when it is released, just like Record or
Overdub do when
ends it does so as if Record had been pressed as an alternate ending to
the Insert. This is what we call an Unrounded Multiply or Unrounded Insert,
because instead of rounding off to the next Cycle point it is ended
immediately and the loop time is redefined.
See SUS Commands in the Functions section for more details.
See also: Insert, Record, HalfSpeed, Reverse, Replace, Substitute, SUS Commands
changes the way the Insert and Multiply buttons
RecordMode
or
OverdubMode=SUS
. When the function
4-14 Echoplex Digital Pro Plus User’s Manual
Page 53

Default: Loop
Loop/Delay (InterfaceMode)
Parameter Row: Timing
Switch between loop and digital delay applications.
Values always available:
Loop (LOP), Delay (dEL), Expert (EXP), Stutter (Stu)
Values also available with a pedal inserted:
Out (Out), Input (In), Replace (rPL), Flip (FLI)
The
Loop/Delay
and Loop Output Volume are controlled during various states. The
parameter affects how you interact with and control the loop, and
different settings will be more or less useful to different players and
different styles of looping. We call these
parameter determines how feedback, Loop Input Volume,
InterfaceModes
.
Basically,
Knob on the front panel and the Feedback Pedal Jack on the back,
and determine when they are active and which parameters they control.
In some cases these settings end up affecting Insert in interesting ways
as well.
There were only three settings in previous versions of the Echoplex –
LoopMode, DelayMode
default setting and most people use it.
familiar style of operation to people accustomed to using delays.
OutMode
Pedal Jack, and is really just like
Volume controlled by the pedal while Feedback was controlled by the
Feedback Knob.
Now we have added several new options to allow new ways to interact
with the loop, for a total of eight. Four of the
at any time, and four require a pedal to be inserted in the Feedback
Pedal Jack. Those four are not visible in the parameter selection
unless the pedal is connected.
These
to find subtle new ways to interact with loops. For newer or less
experienced users, we recommend that you stay with
you feel ready to experiment with the other
InterfaceModes
was only available if a pedal was inserted in the Feedback
InterfaceModes
reroute the control signals from the Feedback
, and
OutMode. LoopMode
DelayMode
LoopMode
are really expert functions, for experienced users
has always been the
is there to give a
but with Loop Output
InterfaceModes
InterfaceModes
are available
LoopMode
.
until
Reference - Parameters 4-15
Page 54

Loop/Delay (InterfaceMode)
Continued
L OOPMODE (LOOP/DELAY=LOP)
LoopMode
most common way of using the Echoplex. This is the
recommend people to start with, and most people stay with it.
In
LoopMode
or not. Feedback is controlled by the front panel Feedback Knob if
there is no pedal inserted, or by a pedal in the Feedback Pedal Jack.
Loop Input Volume and Loop Output Volume are fixed all the way on or off
depending on the function, so these are being set for you according to
what you are doing.
The following table shows how Feedback, Loop Input Volume, and Loop
Output Volume are set in various states.
Table 4.x: LoopMode
State Feedback Loop Loop
is the default setting for the
the Feedback control is always active, whether Overdubbing
(Pedal/NoPedal) Input Output
Loop/Delay
parameter, and is the
InterfaceMode
we
Playing Pedal/Knob 0 100%
Overdubbing Pedal/Knob 100% 100%
Substituting 0 100% 100%
Recording NA 100% 0
Multiplying Pedal/Knob 100% 100%
Inserting 0 100% 0
Replacing 0 100% 0
Mute 100% 0 0
4-16 Echoplex Digital Pro Plus User’s Manual
Page 55

Loop/Delay (InterfaceMode)
D ELAYMODE (LOOP/DELAY=dEL)
Continued
DelayMode
familiar with that style of looping. In a traditional delay, the input to the
delay line is always open and Feedback is always being applied. When a
“Hold” button is pressed, the input to the delay is closed, and the
Feedback is set to 100%.
Therefore, when the Echoplex is in
traditional delay. You set (and reset) the delay time by a pair of presses
on the Record button. The Loop Input Volume is always open and
Feedback is controlled by the front panel Feedback Knob. You’ll
probably want to keep the Feedback Knob set fairly low when you use
the delay function.
In
DelayMode
■ The Overdub button becomes the Hold button. When you press
Overdub the Feedback is set to 100% for infinite repeats and the Loop
Input Volume is closed so that no new material is recorded into the delay.
This is different from the
available to control independently of whether Overdub is on or not.
■ Hold also works while Multiplying and while the loop is Muted.
operation is like a traditional delay, and is useful for people
DelayMode
, some actions have different effects than in
LoopMode
style, where Feedback is always
it acts much like a
LoopMode
.
■ Any pedal attached to the Feedback Jack will control the Loop Input
.
Volume to the delay rather than Feedback
volume swells into the delay line.
■ Feedback will only be controllable with the front-panel Feedback
Knob.
The following table shows how Feedback, Loop Input Volume, and Loop
Output Volume are set in various states.
This is useful as a way to do
Reference - Parameters 4-17
Page 56

Loop/Delay (InterfaceMode)
Continued
Table 4.x: DelayMode
State Feedback Loop Loop
(Pedal/NoPedal) Input Output
Playing Knob Pedal 100%
Overdub (hold) 100% 0 100%
Substituting 0 Pedal 100%
Recording NA Pedal 0
Multiplying Knob Pedal 100%
Multiplying (hold) Knob 0 100%
Inserting 0 Pedal 0
Replacing 0 Pedal 0
Mute 100% Pedal 0
Mute (hold) 100% 0 0
E XPERTMODE (LOOP/DELAY=EXP)
ExpertMode
FeedBack Knob for Feedback during Overdub, Multiply, and Substitute.
This allows you to have different Feedback settings between playing and
overdubbing. When there is no pedal connected to the Feedback
Pedal Jack, the Feedback during play is always set to maximum
(100%).
uses the pedal for Feedback during play and the front panel
The following table shows how Feedback, Loop Input Volume, and Loop
Output Volume are set in various states.
4-18 Echoplex Digital Pro Plus User’s Manual
Page 57

Table 4.x: ExpertMode
State Feedback Loop Loop
Playing Pedal/100% 0 100%
Overdubbing Knob 100% 100%
Substituting 0 100% 100%
Recording NA 100% 0
Multiplying Knob/100% 100% 100%
Inserting 0 100% 0
Loop/Delay (InterfaceMode)
Continued
(Pedal/NoPedal) Input Output
Replacing 0 100% 0
Mute 100% 0 0
SamplePlay 100% 0 Pedal
STUTTERMODE (LOOP/DELAY=Stu)
StutterMode
call a SingleCycleMultiply.
SingleCycleMultiply works as follows. When you have done a Multiply and
have several Cycles in a loop, pressing Insert will insert repetitions of
the next Cycle. As the inserts are made you can overdub a longer phrase
over the repetitions of the Cycle. The results will be inserted into the
loop when you press Insert again. If you press Undo instead, the loop
will return to its original form.
is just like
LoopMode,
except that Insert works as what we
Using Insert-Undo like this lets you alter the flow of a loop by having
one of the Cycles Stutter in a way similar to a skipping CD, and then
return to the original. This can make very interesting results when
working with very short Cycles, and that is why it is called
Reference - Parameters 4-19
StutterMode.
Page 58

Loop/Delay (InterfaceMode)
Continued
STUTTER AND LOOPCOPY
Stutters can be done into a new loop as a LoopCopy function when in
StutterMode.
SwitchQuant=On,
loop. Any new material you play will be overdubbed on this loop as it
stutters. And as before, you keep it with another press of Insert.
Pressing Undo sends you back to where you were in the previous loop.
Copying a stutter is a good way to preserve the original loop while
making stuttered variation out of a fragment from it.
MANAGING MEMORY IN STUTTERMODE
If you perform a very large number of repetitions of Insert and Undo
button presses to trigger and cancel the SingleCycleMultiply, you may
eventually notice bits of the loop being erased by the Undo presses as
well. This is a result of the way the Echoplex processes its memory. If
you're planning to do heavy Insert + Undo button combinations with
SingleCycleMultiply, you should be aware of this, and consider copying
your loop via NextLoop and LoopCopy before doing intensive Stutter
work, so you can return to the original loop fully intact if you wish.
With multiple loops set up in
pressing Next-Insert will do the stutter into a new
MoreLoops
, and
Another trick you can do to avoid the loss of the overdubs is to first fill a
bit of memory reserve by letting the loop repeat a few times without
AutoUndo. (Without the left green dot AutoUndo LED blinking.) You
can do this by reducing Feedback a little bit for a few repetitions, say to
120 – 125. That is small enough that the fading will not be obvious over a
couple of repetitions, but you will force the Echoplex to copy the loop a
few times into new memory. Obviously by doing this you lose some of
the older stuff in memory, which you will note if you later want to go
backwards with Undo. The reasons why this works are very
complicated, but suffice to say that you will not find bits of your loop
disappearing when doing heavy stuttering effects!
SUBSTITUTE AND STUTTERMODE
Substitute gains more advanced control in
Pedal inserted in the Feedback Pedal Jack for Feedback control, the
pedal controls the Feedback during normal use and the knob setting is
4-20 Echoplex Digital Pro Plus User’s Manual
StutterMode.
If you have a
Page 59

not used. However, during Substitute the FeedBack Knob becomes
active for Feedback control. This lets you have two different Feedback
settings between normal playing and Substituting. If you do not have a
pedal inserted, Substitute operates the way it normally does in
and has Feedback set to 0 while active. See the Substitute section to learn
more about this function.
The following table shows how Feedback, Loop Input Volume, and Loop
Output Volume are set in various states.
Table 4.x: StutterMode
Loop/Delay (InterfaceMode)
Continued
LoopMode
State Feedback Loop Loop
(Pedal/NoPedal) Input Output
Playing Pedal/Knob 0 100%
Overdubbing Pedal/Knob 100% 100%
Substituting Knob/0 100% 100%
Recording NA 100% 0
Multiplying Pedal/Knob 100% 100%
Inserting Pedal/Knob 100% 100%
Replacing 0 100% 0
Mute 100% 0 0
O UTMODE (LOOP/DELAY=Out)
The
Out
choice for the
pedal is plugged into the Feedback Pedal Jack. This state is identical
Loop/Delay
parameter is only available when a
Reference - Parameters 4-21
Page 60

Loop/Delay (InterfaceMode)
Continued
to normal
Output Volume, and Feedback will be controllable only from the front
panel FeedBack Knob.
The following table shows how Feedback, Loop Input Volume, and Loop
Output Volume are set in various states.
Table 4.x: OutMode
State Feedback Loop Loop
Playing Knob 0 Pedal
Overdubbing Knob 100% Pedal
Substituting 0 100% Pedal
Recording NA 100% 0
Multiplying Knob 100% Pedal
LoopMode,
(Pedal/NoPedal) Input Output
except that the pedal will now control the Loop
Inserting 0 100% 0
Replacing 0 100% 0
Mute 100% 0 0
I NPUTMODE (LOOP/DELAY=In)
The
In
choice for the
pedal is plugged into the Feedback Pedal Jack.
just like LoopMode except that the pedal controls the Loop Input Volume
in the states where the input is open. Feedback is only controlled by the
4-22 Echoplex Digital Pro Plus User’s Manual
Loop/Delay
parameter is only available when a
InputMode
behaves
Page 61

Loop/Delay (InterfaceMode)
Continued
front panel FeedBack Knob.
connected.
The following table shows how Feedback, Loop Input Volume, and Loop
Output Volume are set in various states.
Table 4.x: InputMode
State Feedback Loop Loop
Playing Knob 0 100%
Overdubbing Knob Pedal 100%
Substituting 0 Pedal 100%
Recording NA Pedal 0
Multiplying Knob Pedal 100%
InputMode
(Pedal/NoPedal) Input Output
does not exist without a Pedal
Inserting 0 Pedal 0
Replacing 0 Pedal 0
Mute 100% 0 0
R EPLACEMODE (LOOP/DELAY=rPL)
In
ReplaceMode
simultaneously. The result is similar to
the reduction for Feedback immediately instead of on the next loop pass.
ReplaceMode
control. If you have Overdub on, the pedal serves as a Replace function
the pedal controls Loop Output Volume and Feedback
LoopMode,
makes it easier to "sculpt" the loop using the Feedback
except that you hear
Reference - Parameters 4-23
Page 62

Loop/Delay (InterfaceMode)
Continued
with smooth level control. This allows you to add new material and
smoothly drop out the loop underneath you as it is Overdubbed,
allowing for a smooth real-time Replace.
The disadvantage of
position, the Loop Output Volume is also zero, so it is not possible to
create loops with only single repetitions.
interesting for any loops relying on reduced Feedback settings, since the
output is affected.
ReplaceMode
Pedal Jack.
The following table shows how Feedback, Loop Input Volume, and Loop
Output Volume are set in various states.
Table 4.x: ReplaceMode
State Feedback Loop Loop
Playing Pedal 0 Pedal
ReplaceMode
does not exist without a Pedal connected to the Feedback
is that if the pedal is in the toe-up
ReplaceMode
is also less
Input Output
Overdubbing Pedal 100% Pedal
Substituting Knob 100% 100%
Recording NA 100% 0
Multiplying Pedal 100% Pedal
Inserting 0 100% 0
Replacing 0 100% 0
Mute 100% 0 0
4-24 Echoplex Digital Pro Plus User’s Manual
Page 63

Loop/Delay (InterfaceMode)
F LIPMODE (LOOP/DELAY=FLI)
Continued
FlipMode
controls both Loop Input Volume and Feedback simultaneously. The
interesting thing is that Feedback on the pedal is reversed! When the
pedal is all the way in the toe-up position, the Loop Input level is zero
and the feedback is at 100%. When the pedal is all the way in the toedown position, the loop input is at 100%, but the feedback goes to 0.
In use this is like a Hold pedal, but with a more fluid action. You can also
think of the pedal as a “soft replace” since operating the pedal lets you
smoothly crossfade a replacement section into your loop.
is an unusual and interesting
USING FLIPMODE
To get the hang of
in the toe-up position most of the time, and turn the front panel
FeedBack Knob to zero. Set the loop time with a couple presses of
Record, and experiment with the pedal as you play new material.
To record an ordinary loop in
position and end Record with Overdub.
FlipMode
InterfaceMode,
, use loops of about 1 second, keep the pedal
FlipMode
, put the pedal in the toe-down
in that the pedal
In Overdub the Feedback is taken from the front panel FeedBack Knob
(which also operates in reverse!), so once you've made an interesting
loop by crossfading in Play, you can keep it by pressing Overdub. You
can then Overdub onto it using the pedal to control the Loop Input
Volume.
By setting the front panel FeedBack Knob you can make the Overdub
state into a simple delay, which can be used as a contrast to the unusual
crossfade effect.
Other functions interact with
FlipMode
as follows.
Reference - Parameters 4-25
Page 64

Loop/Delay (InterfaceMode)
Continued
■ Multiply allows you to continue to crossfade over repetitions of your
loop.
■ Insert does a SingleCycleMultiply (as described under
you can Overdub onto repeats of the next Cycle in the loop. (Remember
you can hit Undo to end the SingleCycleMultiply and not keep the
stutters in the loop).
■ Mute allows you to build up a crossfaded loop without hearing it and
then bring it in at once.
FlipMode
The following table shows how Feedback, Loop Input Volume, and Loop
Output Volume are set in various states.
Table 4.x: FlipMode
State Feedback Loop Loop
Playing Pedal Pedal 100%
StutterMode
does not exist without a Pedal connected.
(reversed) Input Output
), so
Overdubbing Knob Pedal 100%
Substituting 0 Pedal 100%
Recording NA Pedal 0
Multiplying Pedal Pedal 100%
Inserting Pedal Pedal 100%
Replacing 0 100% 0
Mute Pedal Pedal 0
4-26 Echoplex Digital Pro Plus User’s Manual
Page 65

Loop/Delay (InterfaceMode)
Continued
U SING THE INTERFACEMODES WITH A
STEREO ECHOPLEX SETUP
Many of the
Pedal Jack in order to be available at all, and use that pedal as a key
part of their functionality. This causes a problem with the traditional
Echoplex Stereo setup, where a pedal is only connected in the Master
side, and all value changes made with it are sent to the Slave Echoplex by
MIDI. With the alternate
not have a pedal inserted and it can not be set to the
requiring a pedal. The slave will only cycle through the first four
InterfaceModes
There are a few ways to work around this problem.
One way is to use a stereo volume pedal for the Feedback Pedal Jack.
Connect the two channels of the pedal to the two Echoplexes, and then
each will have a pedal inserted with the control coming from the same
place. Both can be set to all
appropriately. If you are really picky, you may find that your pedal is not
exact between channels, so you may find values are not set exactly the
same between the two Echoplexes. Fixing this will either mean finding a
pedal that is better matched, or soldering a wire between the two
potentiometer wipers inside your pedal to force them to have the same
voltage. (This makes the pedal useless as a true stereo volume pedal, so
make sure you understand what you are doing before attempting such a
modification.)
InterfaceModes
, while the master cycles through all 8.
require a pedal connected to the Feedback
InterfaceModes
InterfaceModes
, the slave in such a setup will
, and be controlled
InterfaceModes
A second approach is to use a single mono pedal connected to the
Feedback Pedal Jack of both units with a Y connector. For this to
work, the potentiometer in the pedal must be half the resistance of the
pedal requirement for a single Echoplex. This means it will have to be
approximately 10 KOhms or greater, but you may need to experiment a
bit to find a pedal that uses the full range of the pedal in the best way.
For some Echoplex units, values as low as 5 KOhm may work better.
Reference - Parameters 4-27
Page 66

Loop/Delay (InterfaceMode)
Continued
A third way which is less useful is to insert a dummy connector into the
Feedback Pedal Jack of the slave, without connecting it to anything.
Then you will be able to at least set the slave to any of the
and use some of their functionality, but on the slave you will not be able
to control some parameters that the pedal controls in some of the
InterfaceModes
sent by MIDI from the Master, so
Feedback will work fine. But Loop Input Volume and Loop Output Volume
will not be transmitted, so any
those will not work very well this way for Stereo.
. Any Feedback settings controlled by the pedal will be
InterfaceModes
InterfaceModes
that use the pedal for
that use the pedal for
See also: Feedback Knob, Feedback Pedal Jack, Overdub, Substitute, Replace, Record,
Multiply, Insert, Mute, Undo, LoopCopy
InterfaceModes
4-28 Echoplex Digital Pro Plus User’s Manual
Page 67

Default = off
LoopCopy
Parameter Row: Loops
Copies the current loop into the next, in several ways
Values: Off, Timing, Sound
When
copy function anytime you switch into a reset loop.
LoopCopy
is set to
Sound (Snd)
or
Timing (ti)
, The Echoplex will do a
C OPY THE AUDIO TO A NEW LOOP
If
LoopCopy=Sound
be automatically copied into every empty (reset) loop that you enter.
The sound copy occurs in real time, and works just like doing a Multiply
into the new loop. If you let it keep going, your previous loop will be
repeated into multiple cycles in the new loop, which will be counted in
the Multiple Display. Any new material that you play during this copy
will be overdubbed on top. When you want to complete the copy, press
the Multiply button to end. The copy will round off to the next cycle,
exactly as it does when using the Multiply function.
it will cause the audio content of the current loop to
C OPY THE TIME BASE TO A NEW LOOP
Similarly, if
automatically copied into every reset loop that you enter. This also
happens in real time, and works just like doing an Insert into the new
loop. If you let it continue you will see additional cycles counted in the
Multiple Display. Any new material that you play will be added to the
new loop. When you want to complete the copy, press Insert to end.
The copy will round off to the next cycle, exactly as it does when using
the Insert function.
LoopCopy=Timing
the length of the current loop will be
Reference - Parameters 4-29
Page 68

LoopCopy
Continued
T HE EFFECT OF AUTORECORD
If
AutoRecord=On
precedence, and the Echoplex will behave as if
and
LoopCopy
is not
Off, LoopCopy
O THER COPY METHODS
will take
AutoRecord=Off.
Another way to perform copies is to use Multiply, Insert, or Overdub
as alternate endings to a NextLoop press when
the discussion under the
explanation and examples.
See also: NextLoop, SwitchQuant, AutoRecord
SwitchQuant
SwitchQuant=On
heading in this chapter for a full
. See
4-30 Echoplex Digital Pro Plus User’s Manual
Page 69

Default: 84
LoopTrig
Parameter Row: Loops
Determines which MIDI note numbers will trigger loops.
Values: 0-127
When multiple loops are set up using the
incoming MIDI NoteOn messages can trigger any loop’s playback. This
function is called LoopTriggering, and is described in more detail in the
functions section.
The
LoopTrig
trigger Loop 1. The other loops are triggered by successive note
numbers; i.e., if Loop 1 is triggered by note 84, then Loop 2 will be
triggered by note 85, Loop 3 will be triggered by note 86, etc.
Note: The default value of 84 will be displayed in your sequencer either
as C5 or C6.
See also: Channel, LoopTriggering, SamplerStyle, Velocity, MoreLoops
parameter sets the value of the MIDI note number that will
MoreLoops
parameter,
Reference - Parameters 4-31
Page 70

MoreLoops
Parameter Row: Loops
Divides memory into multiple loops.
Values: 1-16
This function lets you divide the Echoplex Digital Pro’s memory into up
to 16 separate loops. You can switch among them with the NextLoop
button or with incoming MIDI messages.
The Echoplex Digital Pro’s memory will be divided evenly among the
loops; for instance, if you have 198 seconds of memory installed, then
setting
MoreLoops=4
will give you 4 loops of 49.5 seconds each.
Default: 1
Changing the number of loops with the
all existing loops since the memory must be reconfigured.
When you first turn on the Echoplex Digital Pro, the rightmost two
characters of the display (above the word “Multiple”) tell you how many
loops are set up.
If the number of loops is more than one, than the leftmost digit in the
display (above the word “Loop”) tells you which loop is current. On the
Loop Display the numbers above 9 are shown with letters, due to the
lack of a leading 1. So they go 1, 2, 3…9, A, b, C, d, E, F, G.
All recording and overdubbing operations affect the current loop only.
You can Reset all the loops at once by a long press of Record (to reset
the current loop) followed by a long press of Multiply. This is called a
GeneralReset. Both types of Reset are also available as DirectMIDI
commands.
See Also: LoopCopy, NextLoop, AutoRecord, LoopTrig, SamplerStyle, Velocity, Multiply,
SwitchQuant
MoreLoops
parameter will reset
4-32 Echoplex Digital Pro Plus User’s Manual
Page 71

Default: Continuous
MuteMode
Parameter Row: Switches
Determines how sound is restarted after it is muted.
Values: Continuous (Cnt), Start (StA)
MuteMode
press the Mute button to UnMute a loop. Whichever approach you
choose, the Undo button takes the opposite viewpoint, so you’ll always
have both ways to end a Mute readily available.
MuteMode=Start
When
restart the current loop at the beginning. This is probably the most
useful setting for solo playing.
When
Quantize.
current cycle.
Be aware that restarting the loop can move your StartPoint in relation to
external sequencers or other musicians. This could be a problem if you
wish to keep things tight with a sequencer, but it can also be very useful
if the band’s time has shifted and you need to line your loop up again
with everybody else.
MuteMode=Start
MuteMode=Start
determines where loop playback starts the second time you
, a second press of the Mute button will always
, the end of the Mute is affected by the setting of
If
Quantize=On,
then sound won’t restart until the end of the
MuteMode=Continuous
When the
when it is silenced by pressing Mute. Then, when you press Mute a
second time to allow audio output again, the loop will become audible
wherever it happens to be at that time. This is probably most useful if
you want to silence the loop for just a beat or two to play a fill, or have
your loop stay in time with other musicians even while it is not heard.
See Also: Mute, SamplePlay, Quantize
MuteMode=Continuous,
the loop continues counting even
Reference - Parameters 4-33
Page 72

OverdubMode
Parameter Row: Switches
Affects the behavior of the Overdub button
Values: Toggle (tog), Sustain (SUS)
Default: Toggle
When
Overdub function on and off. In other words, tap Overdub once to turn
it on, and tap it again to turn it off.
However, when
while you hold down the button—as soon as you release it, the
overdubbing stops. This is similar to using the long presses of the
Overdub button, except it is guaranteed to always operate in
fashion no matter how short or long you press it. There are many
situations when you’re likely to want to set
example:
■ You want to overdub extremely short excerpts from a sound source. If
OverdubMode=Toggle
difficult to do quickly. With
short fragments of sound into your loop.
■ You want to guard against inadvertently putting yourself into an
extended Overdub, so you decide to overdub only when your foot is
holding down the button.This is extremely useful if you are playing
without looking at the Echoplex. You will always know the state of
Overdub by whether you are pressing it or not.
OverdubMode
OverdubMode
is set to
you have to press Overdub twice, which can be
Toggle,
OverdubMode=Sustain
the Overdub button toggles the
is set to
Sustain,
you can only layer sounds
OverdubMode
Sustain
to
Sustain,
you can capture very
for
See Also: Overdub
4-34 Echoplex Digital Pro Plus User’s Manual
Page 73

Default: Stop
Parameter Row: Switches
Determines how Record handles memory overflows.
Values: Stop(StP), Play (PLY)
An overflow occurs when you attempt to use more memory than you
have during Record operations.
Overflow
See Also: Record
When
cause the Record operation to be immediately cancelled, and will reset
(erase) the current loop.
When
cause the cycle length to be set to the full time available to the current
loop. Everything that you’ve played from the start of the Record to the
instant just before the overflow will be looped, and everything that
you’ve played after that instant will be ignored.
If you’re trying to create rhythmic loops, neither of these options will
produce very satisfactory results: you’re best off avoiding overflows in
the first place.
Overflow=Stop,
Overflow=Play,
exceeding the memory capacity of your unit will
exceeding the memory capacity of your unit will
Reference - Parameters 4-35
Page 74

Quantize
Default: Off
Parameter Row: Timing
Defines whether certain functions are executed at the end of
the the current loop, current cycle, the current sub-cycle or
immediately.
Values: Off (OFF), Cycle (CYC), Sub-Cycle (8th), Loop (Lop).
Functions affected: Multiply, Insert, Reverse, Mute, Substitute,
HalfSpeed, Replace.
Quantize
executing. This is very useful for forcing functions to occur precisely in
rhythm. When
When
Quantize point, you will see “ooo” on the LoopTime Display to
indicate the Echoplex is waiting.
See the entries for the functions affected for detailed explanations and
examples.
forces a function to wait for a designated point before
Quantize=off
Quantize
is on and you press a function button prior to the
Q UANTIZE OPTIONS
The Quantize values mean the following:
QUANTIZE = LOOP
, all functions execute immediately.
When
before executing the function. This is meaningful if you have used
Multiply or Insert to add cycles to the loop. When you press a function in
the middle of the loop, it will wait until the Loop StartPoint to execute.
4-36 Echoplex Digital Pro Plus User’s Manual
Quantize=Loop
, the Echoplex waits until the entire loop completes
Page 75

QUANTIZE = CYCLE
Quantize
Continued
When
completes before executing the function. This is more meaningful if you
have used Multiply or Insert to add cycles to the loop, otherwise the Cycle
and the overall Loop are the same.
Quantize=Cycle
, the Echoplex waits until the current Cycle
QUANTIZE = SUB-CYCLE (8TH)
When
determined by the
close to instant feel for operating the Echoplex, while maintaining
precise overall rhythm. With the default value of
Cycles are equal to 8th notes. However,
the loop anyway you want.
This setting for
described in the Functions section of this chapter.
Quantize=8th,
8ths/Cycle
Quantize
functions are Quantized to the next Sub-Cycle as
parameter. This is very useful for giving a
8ths/Cycle=8,
8ths/Cycle
is essential for the concept of LoopDividing,
can be set to divide
SYNC AND QUANTIZED RECORDING
the Sub-
When an external clock is available for Sync, the Echoplex can force the
loop length to match so that the loops will be in perfect sync with the
clock. However, we don’t have to start recording at the downbeat
defined by this clock if we don’t want to. This is the feature called
SyncRecord. When
Record anytime to start recording, but Quantizes the ending of the
Record so that the loop length exactly matches the length defined by the
clock and
If you set
the start of the Record to the downbeat of the external clock. When you
press Record, you will see the “ooo” display. When the external
StartPoint is reached, Record will begin.
8ths/Cycle.
Quantize = Loop, Cycle, or Sub-Cycle,
Quantize=Off,
the SyncRecord function lets you press
the Echoplex will Quantize
Reference - Parameters 4-37
Page 76

Quantize
Continued
E SCAPING QUANTIZATION
If you use Quantize, you may find that sometimes you want to execute a
function Unquantized. You could do this by changing the
parameter to
again, but that is hardly convenient or economical.
Instead, the Echoplex allows you an easy way to break free of the
Quantization when you choose to. Anytime you have pressed a function
and gone into the Quantizing Mode with “ooo” on the display, all you
have to do is press the same function again and it will execute
immediately. If you like, you can think of this as “double-clicking” the
function.
Off,
executing your function, and then turning it back on
Quantize
See also: Multiply, Insert, Mute, Reverse, Substitute, HalfSpeed, SyncRecord, 8ths/Cycle,
LoopDivide, LoopTime Display.
4-38 Echoplex Digital Pro Plus User’s Manual
Page 77

Presets Editor
Enters the Preset Editor.
Pressing the Presets in the Parameter Matrix puts you into the Preset
Editor. More information is available in the Presets section.
See also: Parameter Presets, Preset Editor
Presets
Parameter Row: Switches
Reference - Parameters 4-39
Page 78

RecordMode
Parameter Row: Switches
Affects the behavior of the Record button.
Values: Toggle (tOG), Sustain (SUS), Safe (SAF)
RECORDMODE = TOGGLE
Default: Toggle
When
Record section. Press Record once to begin recording, and press it again
to stop.
RecordMode=Toggle,
the Record button works as described in the
RECORDMODE = SUSTAIN
However, when
you hold down the Record button—as soon as you release it, the
recording stops.
When
Echoplex front panel or EFC-7 Pedal, normally accomplished by a long
press of the Record button. This may not be a great loss for you, since a
short press of Record while you play nothing will create a short loop
with no contents. However, there are two consequences of this
approach:
■ A loop that is pseudo-cleared this way will not go into
enter it with NextLoop.
■ There is no way to do a GeneralReset of all loops in this situation, except
to enter a loop (with
power-up. The orange light under the Multiply button, signifying that a
long press of that button will execute GeneralReset and clear all loops,
does not go on unless the current loop is completely empty.
RecordMode=Sustain,
RecordMode=Sustain,
you lose the ability to Reset a loop from the
AutoRecord=Off
you can only record sounds while
AutoRecord
) that has not been recorded since
if you
If you are using MIDI, both Reset and GeneralReset are available
independently as DirectMIDI commands. So with MIDI, reset is not a
problem.
4-40 Echoplex Digital Pro Plus User’s Manual
Page 79

Also note that if you are using MIDI there is a DirectMIDI command for
independent sustain action Record. This command is called
SUSRecord and is located at
RECORDMODE = SAFE
RecordMode
Continued
Source# + 14.
RecordMode=Safe
Record the Feedback is always set to 100%. This will be true regardless of
the Feedback Knob or Feedback Pedal position. When the
feedback is changed the Echoplex starts to respond as normal.
This setting is useful for people who change Feedback but then tend to
forget to set it back to 100% before recording a new loop. This can be
frustrating if you recorded something perfectly and then a little while
later realize it is gone because you left the Feedback down.
RecordMode=Safe
The disadvantage is that if you want to start a loop with the Feedback
down, you can’t do it with
probably just continue to use
RecordMode=Safe
is just like
is meant to protect you from that.
is disabled when
RecordMode=Toggle
RecordMode=Safe.
RecordMode=Toggle.
Loop/Delay=DelayMode.
except that after a
In that case you would
Reference - Parameters 4-41
Page 80

Reserved
Now Presets
Parameter Row: Switches
This is now called Presets on current Echoplexes, and it
accesses the Preset Editor. If you have an older Echoplex with a
“Reserved” parameter, see the Preset section.
4-42 Echoplex Digital Pro Plus User’s Manual
Page 81

Default: Off
RoundMode
Parameter Row: Switches
Determines whether certain material will be recorded.
Values: Off (OFF), Round (rnd)
During Multiply and Insert operations, which always are active for an
exact number of cycles (unless ended with the Record button), this
parameter determines whether new material played after the second
press of the button but before the end of the current cycle will be
recorded. Diagrams under the
this chapter demonstrate the effects of this parameter explicitly.
See also: Overdub, Multiply, Insert
Multiply
and
Insert
headings elsewhere in
Reference - Parameters 4-43
Page 82

SamplerStyle
Default: Run
Parameter Row: Loops
Determines how multiple loops are triggered with MIDI or the
NextLoop button.
Values: Run, One, Attack
This is primarily useful when you are using multiple loops.
As you can read in the discussion of
On can trigger any loop. If
notes will control the volume at which the loop is played. There are four
different types of responses to one of these triggers, corresponding to
the values of this
RUN (run)
The loop will start and play continuously, just as if you had pressed
NextLoop to trigger it. The loop always begins where it was last left.
START (StA)
The loop will trigger from the StartPoint and play forever. This is true
whether the loop is entered with NextLoop or triggered by MIDI.
ONCE (OnE)
Velocity=On,
SamplerStyle
LoopTrig,
the velocities of the incoming
parameter, as follows:
an incoming MIDI Note
When triggered with MIDI, the loop will trigger from the beginning to
play just once, and then go into Mute mode.
When triggered with the NextLoop button the Echoplex plays the next
loop once and then returns to the previous loop automatically. This is
very helpful as a way to improvise the form of your music. You could
have the ‘A’ section looping in Loop 1, and at some point decide you
want the ‘B’ or ‘C’ section to drop in for one repetition before returning
to the main loop. With
on NextLoop and let the Echoplex take care of everything for you.
4-44 Echoplex Digital Pro Plus User’s Manual
SamplerStyle=One
you can do this with one press
Page 83

ATTACK (Att)
SamplerStyle
Continued
When
from the beginning play as long as the triggering note is held down; i.e.,
until a NoteOff or a different triggering note is received.
This type of action with
loops are triggered by MIDI. This gives a keyboard like “play as long as
you press” function, but it doesn’t make sense with NextLoop. So instead,
when the NextLoop button is pressed (or MIDI-NextLoopButton), it
operates the same as
where you last left it.
SamplerStyle=Attack,
SamplerStyle=Attack
SamplerStyle=run
a MIDI note will cause the loop will trigger
only makes sense when
. The loop starts in the same place
ALTERNATE FUNCTIONS WITH
NEXTLOOP AND SAMPLERSTYLE=ONE
When you have
change loops, there are a few differences in functionality while the new
loop is playing once:
SamplerStyle=One
and you are using NextLoop to
■ Undo: If you decide you want to stay in the new loop instead of
bouncing back, you just have to press Undo while it is playing the
single repetition. Instead of bouncing back to the first loop when it
reaches the end, it will keep repeating the new one.
■ Mute: If you press Mute during the second loop, it will Mute and stay
in that loop.
■ Insert: If you press Insert while the second loop is playing, it will
retrigger. You can retrigger it as much as you like, and when you let it go
to the end it will return to the first loop.
■ Multiply: Multiply is not available while the second loop is playing.
■ Overdub: If you turn on Overdub while the second loop is playing, it
will be assumed that you want to make some change to the new loop
and it will not switch back to the first one. If you have the
parameter on and press Overdub while you are still waiting for the first
Reference - Parameters 4-45
SwitchQuant
Page 84

SamplerStyle
Continued
■ NextLoop: NextLoop is interesting. If you press NextLoop again while
■ Record: If you press Record while the second loop is playing, you will
loop to finish, Overdub will be on when you go to the second loop.
Again, it will not return to the first loop after it is done, and the overdub
is kept.
the second loop is playing, you will go to a third loop. When the third
loop is finished playing once, it returns to the second loop. When the
second loop finishes playing one more time, it returns to the first loop!
So you can stack up a sequence of jumps and then return to the
beginning, all automatically! There is a limit to this, in that you can’t
NextLoop through the same loop several times and automatically jump
back to it that many times. It will stop the first time it returns to that
loop and ignore previous steps in the sequence.
record a new one. It will continue repeating instead of jumping back to
the first loop.
■ AutoRecord: If the loop you jump to with
AutoRecord=on
and
the previous loop when you tap Record to finish. If you press some
additional function during recording for an alternate ending (like
Multiply or Insert), it will go ahead and do that function and stay in
the second loop. There is a limitation with
If you use
loop at the end instead of jumping back through all of them.
■ LoopCopy and TimeCopy: If you have
a LoopCopy by pressing Multiply, Insert, or Overdub when using
SwitchQuantize
loop. When you finish the copy with a press of Multiply (or Insert) it
will jump back to the first loop. This is an interesting way to make
copies into a new loop and not necessarily listen to it repeat
immediately.
■ Similarly, if you press any additional function during the quantizing
period, it does not switch back to the previous loop. The Echoplex
assumes you want to elaborate on the B part.
AutoRecord
, you record the B part and immediately jump back to
to record several loops it will only jump back one
to change loops, the copy will be made into the new
SamplerStyle=Once
AutoRecord
LoopCopy
and several loops.
on or if you engage
is in reset
See also: LoopTrig, Velocity, NextLoop, SwitchQuant
4-46 Echoplex Digital Pro Plus User’s Manual
Page 85

Default: 36
Source #
Parameter Row: MIDI
Determines the starting note number, or controller number, for
MIDI control of Echoplex operations.
Values: 0-99
The
Source#
from which all the other MIDI commands are referenced. All buttons
and functions are assigned to notes or controllers based on this
parameter value. The table below shows all the MIDI commands
available and their offset from the Source# value.
parameter determines the base note or controller number
See also: ControlSource, Channel, MIDI Command List, DirectMIDI, MIDI VirtualButtons,
Receiving MIDI Commands, Transmitting MIDI Commands
Reference - Parameters 4-47
Page 86

SwitchQuant
Default: Off
Parameter Row: Loops
Lets you quantize loop switches. Makes it possible to jump to
specific loops, copy the current loop to another, or set up
specific functions to begin in a new loop.
Values: Off (OFF), Confirm (CnF), Cycle (CYC), ConfirmCycle
(CCY), Loop (LOP), ConfirmLoop (CLP)
The SwitchQuant parameter applies when you are using multiple loops.
(Multiple loops are set up in advance with the MoreLoops parameter.)
SwitchQuant determines when the switch to the next loop will occur
after the NextLoop button has been pressed. Loop switching can occur
immediately
button
(SwitchQuant = Cycle or Loop)
ConfirmCycle or ConfirmLoop).
(SwitchQuant = Off),
(SwitchQuant = Confirm)
, or a combination of these
after a confirming press of the Undo
, at the end of the current cycle or loop
(SwitchQuant =
Quantizing loop switches is useful for maintaining a tight rhythm when
you are working with multiple loops.
SwitchQuant=Cycle, Loop, Confirm, ConfirmCycle,
also very useful because they give you time to take additional actions
before the move to the next loop takes effect. For the sake of this
discussion, we’ll call the time interval between the pressing of the
NextLoop button and the end of the current loop the
SWITCHQUANTIZE OPTIONS
OFF (SWITCHQUANT = OFF)
When NextLoop is pressed the Echoplex immediately switches to the
next loop with no quantizing. For example, if you are currently on loop
2, pressing NextLoop will instantly put you in loop 3.
and
ConfirmLoop
quantize period
are
.
4-48 Echoplex Digital Pro Plus User’s Manual
Page 87

CONFIRM (SWITCHQUANT = CNF)
When NextLoop is pressed the Echoplex goes into the quantize period
but then waits indefinitely with the current loop playing until a
confirming action is made. During this waiting period you may
continue to press NextLoop to select different loops without actually
switching to them. The display shows the loop you will switch to when
the confirming action is made. The simplest type of confirm action is to
press the Undo button, which will send you immediately to the loop
you have selected. You can also confirm the loop switch with Record,
Overdub, Multiply, Insert, or Mute, which will switch you to the
selected loop and immediately execute that respective function.
CYCLE (SWITCHQUANT = CYC)
SwitchQuant
Continued
When NextLoop is pressed, the Echoplex will wait until the next Cycle
point to switch loops. During the quantize period you may select a
different loop to switch to by pressing NextLoop additional times. You
may also “arm” another function to execute in the new loop when the
switch occurs. For example, if you press Record during the waiting
period the Echoplex will wait until the current cycle of the current loop
ends, switch to the next loop, and immediately begin recording.
CONFIRMCYCLE (SWITCHQUANT = CCY)
ConfirmCycle is a combination of the Confirm and Cycle values. When
you press NextLoop, the Echoplex goes into an indefinite waiting
period while the current loop plays, just like with Confirm. After a
confirming action is done, the Echoplex additionally quantizes the loop
switch to the next Cycle point as it does when SwitchQuant=Cycle.
LOOP (SWITCHQUANT = LOP)
When NextLoop is pressed, the Echoplex will wait until the next Loop
point to switch loops. During the quantize period you may select a
Reference - Parameters 4-49
Page 88

SwitchQuant
Continued
different loop to switch to by pressing NextLoop additional times. You
may also “arm” another function to execute in the new loop when the
switch occurs. This value is useful when you have used Multiply or
Insert and wish to always quantize to the overall loop length.
CONFIRMLOOP (SWITCHQUANT = CLP)
Similar to ConfirmCycle. After a confirming action is done, the Echoplex
additionally quantizes the loop switch to the next loop StartPoint.
Example 4.x: Using Confirm Cycle (CCY)
1. Set
2. Set
3. Press NextLoop, it waits for you to do some action.
4. Press the function you want (Record, Overdub, Multiply, Insert,
5. The action will begin in the new loop after the next Cycle point of the
SwitchQuant=CCY
MoreLoops=2
etc...)
current loop.
and record two loops.
D ISPLAY DURING SWITCHQUANTIZING
With
SwitchQuanton,
front-panel LEDs under the Record, Overdub, Multiply, Insert,
Mute, and Undo buttons orange, while the LED under NextLoop will
be red. The orange color indicates that all of these buttons take on
interesting functions during the quantize period, as the explanations
and examples on the following pages will illustrate.
a press of the NextLoop button will turn the
During the quantize period the LoopTime Display changes to show
the destination loop. It will be displayed as “L 1”, “L 2”, etc. This is the
4-50 Echoplex Digital Pro Plus User’s Manual
Page 89

SwitchQuant
loop you will go to when the quantize period ends. If you continue
pressing NextLoop during this time, you will see the destination
increment.
BUTTONS ACTIVE DURING THE
QUANTIZE PERIOD
NextLoop
Continued
Pressing NextLoop during the quantize period increments the
destination loop without switching you there. This skips over the next
loop, allowing you to move to any other loop without activating the ones
in-between. The current destination loop is displayed in the LoopTime
display.
Example 4.16: Switching to a Loop Other Than the Next One
When
other, without passing through the intermediate loops. For instance, to
switch from Loop 1 to Loop 3, take the following steps:
1. Set
2. Set
3. Record something a few seconds long into Loop 1, then end recording.
4. Near the beginning of the loop, press NextLoop twice. Notice that the
display shows “L 3” in red, indicating that you are going to loop 3 next.
5. When your loop ends, note that you will be switched immediately into
Loop 3. If
recording as soon as you enter that loop.
SwitchQuant
MoreLoops
SwitchQuant=Loop
AutoRecord=On,
is on, you can move directly from any loop to any
to 3 or more
then the Echoplex Digital Pro will start
Reference - Parameters 4-51
Page 90

SwitchQuant
Continued
You can also switch to a loop other than the next one with MIDI
messages, whether
information.
Multiply/LoopCopy
Pressing Multiply during the quantize period will put you into
SoundCopy mode when you move to the next loop. This is an alternate
method of doing copies to the LoopCopy parameter. This SwitchQuant
method of copying gives you more direct control over copying instead of
the automated method using the LoopCopy parameter.
LoopCopy is essentially the same as multiplying your current loop into
the new one, so it all happens seamlessly in real-time. The audio from
the first loop will be copied to the new loop, and the Echoplex will
continue to add multiple cycles for as long as you let it run. You end the
copy by pressing the Multiply button again. The timing of this next
press of Multiply will determine how many cycles from the first loop
are kept. While the copy is happening, any new material that you play
will be added over the top of the new loop, just as with Multiply. This is a
great way to create a variation of your first loop into a new loop, and
then switch back and forth between them later.
SwitchQuant
is
On
or
Off.
See
LoopTrig
for more
Caution: LoopCopy erases the existing contents of the next loop!
Example 4.17: Copying the Current Loop Prior to Switching
When
to copy the current loop into the next one by pressing the Multiply
button. This can be handy when you want to create a single backing
track for several distinct loops, which you’ll later embellish differently
with overdubbing and other actions. To see this in action, take the
following steps:
1. Set
2. Tu rn
3. Record something a few seconds long into Loop 1, then end recording.
4-52 Echoplex Digital Pro Plus User’s Manual
SwitchQuant
MoreLoops
SwitchQuant On
to 2 or more
is on, you can take advantage of the quantize period
Page 91

SwitchQuant
Continued
4. Near the beginning of the loop, press NextLoop, then press Multiply.
5. When your current loop ends, you will be switched immediately into
Loop 2, and you will be in Multiply mode. You won’t hear the transition
as it will sound like your current loop continues to play.
6. Keep playing, as you layer more sounds on top of the sounds being
copied from Loop 1. When you press Multiply again, the Copying will
end and the new loop with the added overdubs will begin repeating.
Multiples of Loop 1 will be copied as long as Multiply is active. If Loop 1
contains multiple cycles, then you may not get all of them if you end the
Multiply function prematurely. Another example can clarify this.
Example 4.18: Copying a Portion of the Current Loop to the Next
Loop
1. Set
2. Set
3. Record a few seconds of chordal background in Loop 1.
4. Use Multiply to record a short solo that lasts for 4 cycles or so, then end
5. Press NextLoop, then press Multiply.
6. When you enter the next loop (after all 4 cycles of the current loop have
7. Listen to the truncated solo as it loops.
MoreLoops
SwitchQuant=Loop
the Multiply function.
completed), watch the Multiply counter in the right side of the display,
and press the Multiply button again when this counter reaches 2.
One final observation: you can achieve other effects by ending this
Multiply function with any of the “Alternate Endings” listed under
Multiply
in the Functions section.
to 2 or more.
.
Reference - Parameters 4-53
Page 92

SwitchQuant
Continued
Insert
Pressing Insert during the quantize period will execute a TimeCopy in
the new loop. This copies the timing (but not the audio contents) of the
current loop cycle into the next loop, in real-time. This is essentially the
same as putting you into Insert mode in the new loop, using the base
cycle time of the starting loop. You will see the cycle count incrementing
according to the cycle length of the starting loop, and any material you
play will be added to the new loop. When you are ready to end, press
Insert again and the Echoplex will round off to the next cycle point.
This technique gives you a seamless method to quickly create a new
loop based on the timing of an existing loop, so they maintain the same
rhythm. This is similar to using the more automated method with
LoopCopy=time
proceed whether the destination loop is in reset or not.
, except you can more directly control it and the copy will
Mute
Overdub
Caution: TimeCopy erases the existing contents of the next loop.
Pressing Mute during the quantize period will cause the Echoplex to
toggle Mute mode when it switches to the new loop.
Pressing Overdub during the quantize period has two possible results,
depending on whether the next loop is reset or not.
If the destination loop is reset, pressing Overdub will execute a
SimpleCopy. This function creates exactly one copy of the current loop in
the new loop, without doing any multiplying. It ends by itself when it
reaches the end of the loop, so you do not have to do anything. Overdub
is on automatically upon entering the new loop, so new material can be
immediately added while the copy occurs.
4-54 Echoplex Digital Pro Plus User’s Manual
Page 93

Record
SwitchQuant
Continued
If the destination loop has material in it already, pressing Overdub
during the quantize period will turn Overdub on when you switch to the
new loop.
Pressing Record during the quantize period will cause the Echoplex to
begin recording immediately as soon as it enters the next loop. This is
like having
recording when you move into an empty loop, and it always happens in
such a case automatically. In this case, pressing Record during the
quantize period lets you choose when to record in a new loop, and it will
work whether there is a loop recorded there already or not.
AutoRecord=on,
except that
AutoRecord
will only start
Caution: This erases the existing contents of the next loop.
SWITCHQUANT AS A QUANTIZE
ALTERNATE FOR THE CURRENT LOOP
ConfirmCycle and ConfirmLoop also give you an alternate method to
quantize actions in the current loop, similar to the way you might use
the standard Quantize parameter. After you press NextLoop to enter
the quantize period, continue pressing it until the current loop is
displayed as the destination. Now, any function you press will begin
according to the Confirm setting, regardless of the Quantize parameter
setting. This can be an easy way to have both quantized and
unquantized actions readily available to you without needing to change
parameter settings while you play. You can even start Overdub
quantized this way!
Example 4.x: Quantizing Overdub in the Current Loop
1. Set
MoreLoops
to 2 or more.
Reference - Parameters 4-55
Page 94

SwitchQuant
Continued
2. Set
3. Record a loop in loop number 1
4. Press NextLoop until next loop number 1 is displayed
5. In the middle of your current loop, press Overdub.
6. The Echoplex will show “ooo” to indicate it is quantizing the Overdub.
7. When the loop restarts, Overdub will come on.
See also: NextLoop, Quantize, LoopCopy, AutoRecord
SwitchQuant=CLP
and
Quantize=OFF
4-56 Echoplex Digital Pro Plus User’s Manual
Page 95

Default: Out
Sync
Parameter Row: Timing
Synchronizes the Echoplex Digital Pro with another Echoplex
Digital Pro, a MIDI sequencer, a pulse trigger device, or a
sound source.
Values: Off (OFF), Out, OutUserStart (OuS), In
OFF (OFF)
No synchronization signals are received or sent.
OUT (OUT)
MIDI: MIDI clocks are sent out the MIDI Out port when a loop is
recorded or a Tempo is preset. MIDI StartSong and StopSong messages
are sent automatically when you record your loops. If
and your loop is short, the effective tempo may be over 400 or so beats
per minute, in which case the clocks will be turned off. See
for a full discussion.
BeatSync: A pulse is sent out the BeatSync Jack a the start of every
cycle. These pulses can be used to trigger or affect another device that
accepts pulse inputs. It can also be listened to as a basic metronome.
BrotherSync: All Echoplexes using BrotherSync should set
OUT USER START (OUS)
MIDI: MIDI clocks are sent out the MIDI Out port when a loop is
recorded or a Tempo is preset. MIDI StartSong messages are not sent
automatically when you record your loops. StartSong and StopSong
commands must be sent manually by executing the various functions
available for sending them.
8ths/Cycle
8ths/Cycle
Sync=Out
is large
.
Reference - Parameters 4-57
Page 96

Sync
Continued
BeatSync: A pulse is sent out the BeatSync jack a the start of every
cycle. These pulses can be used to trigger or affect another device that
accepts pulse inputs. It can also be listened to as a basic metronome.
IN (IN)
BrotherSync: All Echoplexes using BrotherSync should set
MIDI: MIDI clocks are received at the MIDI In port. MIDI clock
received is piped from the MIDI In Port to MIDI Out by the MIDIpipe
function. MIDIclock is not sent based on recording a loop.
BeatSync: The Echoplex will receive impulses from a footswitch, a
other pulse trigger source, or an audio source. It "slaves" its cycle time
to that of the "master". This is described in detail in the
If a BeatSync pulse is received during Reset while
sent out at the corresponding tempo. The purpose of this is to receive a
Sync at the BeatSync of the Echoplex and send the Sync on to other
devices as MIDI clock.
BrotherSync:
an external sync source for all the units to follow. In general, all
Echoplexes using BrotherSync should set
Sync=In
should not be used for BrotherSync unless there is
Sync=Out
Sync=In,
.
Sync=Out
BeatSync
MIDI Clock is
entry.
.
If you are also using MIDI Clock from another device, note that if a MIDI
clock is received at the MIDI In Port, BrotherSync input is ignored
See also: 8ths/Cycle, MIDI, The Synchronization Section, BrotherSync, BeatSync,
ControlSource
4-58 Echoplex Digital Pro Plus User’s Manual
Page 97

Default: 0
Threshold
Parameter Row: Timing
Tells the Echoplex to wait until you play before starting to
record.
Values: 0-8
When a non-zero value for the
function waits until a large enough audio signal appears at the Input
jack before it actually starts recording. When
is disabled and Recording begins immediately.
Each successive number represents a 6dB increase in the volume
necessary to trigger recording, so
Pete Townshend-like moves.
The next example illustrates the use of
Example 4.19: Using Threshold
1. Set
2. Return to Play mode.
3. Press Record. The display will read "ooo" (this symbol means the
4. Begin playing. Recording will start with your first note.
Threshold
Echoplex is waiting for something).
to a medium value, like 3.
Threshold
1
parameter is set, the Record
Threshold=0,
is very sensitive, while 8requires
Threshold.
this waiting
See also: Record
5. Press Record to stop recording.
Reference - Parameters 4-59
Page 98

Velocity
Default: Off
Parameter Row: Loops
Determines the effect of MIDI velocity on loops triggered by
MIDI Note messages.
Values: Off (OFF), On (On)
If
Velocity=Off,
be played back at their full volume.
If
Velocity=On,
played back with their volume scaled according to the velocity portion
of the NoteOn messages: velocity 127 will play back a loop at full
volume, while velocity 1 will play it back so quietly that it may be
inaudible.
loops that are triggered by MIDI NoteOn messages will
loops that are triggered by MIDI NoteOn messages will be
See also: LoopTrig, LoopTriggering, SamplerStyle
4-60 Echoplex Digital Pro Plus User’s Manual
Page 99

Default: 7
VolumeCont
Parameter Row: MIDI
Determines which Continuous Controller will control the
output level.
Values: 1-99
Incoming MIDI Continuous Controller messages can be used to control
the Loop output level of the Echoplex Digital Pro. Only messages that
are on the MIDI channel specified by the
recognized. This only affects the volume of the loop output, not the
direct signal.
See also: Channel, FeedbkCont
Channel
parameter will be
Reference - Parameters 4-61
Page 100

4-62 Echoplex Digital Pro Plus User’s Manual
 Loading...