

Page 1
Dishwasher
User information
822 612 744-00-300605-01
GA 55 EEV 200
g
Page 2

Dear customer,
Please read this User Information carefully and keep
it to refer to at a later date.
Pass this User Information on to any subsequent
owner of the appliance.
The following symbols are used in the
text:
1 Safety instructions
Warning: Notes that concern your personal
safety.
Attention: Notes that show how to avoid
damage to the appliance.
3 Useful tips and hints
2 Environmental information
2
Page 3

Contents
Operating Instructions . . . . . . . . . . . . . . . . . . . . . . . . . . . . . . . . . . . . . . . . . . . . . . . . . . . . . . . . . . . . . 4
Safety . . . . . . . . . . . . . . . . . . . . . . . . . . . . . . . . . . . . . . . . . . . . . . . . . . . . . . . . . . . . . . . . . . . . . . . . . . . . . . . 4
Diagram of appliance . . . . . . . . . . . . . . . . . . . . . . . . . . . . . . . . . . . . . . . . . . . . . . . . . . . . . . . . . . . . . . . . . . 5
Control panel . . . . . . . . . . . . . . . . . . . . . . . . . . . . . . . . . . . . . . . . . . . . . . . . . . . . . . . . . . . . . . . . . . . . . . . . . 5
Prior to using for the first time. . . . . . . . . . . . . . . . . . . . . . . . . . . . . . . . . . . . . . . . . . . . . . . . . . . . . . . . . . . 7
Setting the water softener. . . . . . . . . . . . . . . . . . . . . . . . . . . . . . . . . . . . . . . . . . . . . . . . . . . . . . . . . . . . . . . . 7
Adding special salt . . . . . . . . . . . . . . . . . . . . . . . . . . . . . . . . . . . . . . . . . . . . . . . . . . . . . . . . . . . . . . . . . . . . . 9
Filling up with rinse aid . . . . . . . . . . . . . . . . . . . . . . . . . . . . . . . . . . . . . . . . . . . . . . . . . . . . . . . . . . . . . . . . . . 10
Activating/deactivating the acoustic signal . . . . . . . . . . . . . . . . . . . . . . . . . . . . . . . . . . . . . . . . . . . . . . . . . . 12
In daily use. . . . . . . . . . . . . . . . . . . . . . . . . . . . . . . . . . . . . . . . . . . . . . . . . . . . . . . . . . . . . . . . . . . . . . . . . . . 13
Loading cutlery and dishes. . . . . . . . . . . . . . . . . . . . . . . . . . . . . . . . . . . . . . . . . . . . . . . . . . . . . . . . . . . . . . . 13
Adjusting the height of the upper basket . . . . . . . . . . . . . . . . . . . . . . . . . . . . . . . . . . . . . . . . . . . . . . . . . . . . 17
Adding detergent . . . . . . . . . . . . . . . . . . . . . . . . . . . . . . . . . . . . . . . . . . . . . . . . . . . . . . . . . . . . . . . . . . . . . . 18
Using 3in1 detergents. . . . . . . . . . . . . . . . . . . . . . . . . . . . . . . . . . . . . . . . . . . . . . . . . . . . . . . . . . . . . . . . . . . 20
Selecting the dishwashing cycle (Cycle Table) . . . . . . . . . . . . . . . . . . . . . . . . . . . . . . . . . . . . . . . . . . . . . . . . 21
Starting a dishwashing cycle . . . . . . . . . . . . . . . . . . . . . . . . . . . . . . . . . . . . . . . . . . . . . . . . . . . . . . . . . . . . . 23
Additional functions . . . . . . . . . . . . . . . . . . . . . . . . . . . . . . . . . . . . . . . . . . . . . . . . . . . . . . . . . . . . . . . . . . 23
Setting the Delay Timer. . . . . . . . . . . . . . . . . . . . . . . . . . . . . . . . . . . . . . . . . . . . . . . . . . . . . . . . . . . . . . . . . . 24
Switching off the dishwasher . . . . . . . . . . . . . . . . . . . . . . . . . . . . . . . . . . . . . . . . . . . . . . . . . . . . . . . . . . . . . 24
Care and cleaning . . . . . . . . . . . . . . . . . . . . . . . . . . . . . . . . . . . . . . . . . . . . . . . . . . . . . . . . . . . . . . . . . . . . . 25
What to do if... . . . . . . . . . . . . . . . . . . . . . . . . . . . . . . . . . . . . . . . . . . . . . . . . . . . . . . . . . . . . . . . . . . . . . . . . 28
Remedying small malfunctions . . . . . . . . . . . . . . . . . . . . . . . . . . . . . . . . . . . . . . . . . . . . . . . . . . . . . . . . . . . . 28
If the dishwashing results are not satisfactory . . . . . . . . . . . . . . . . . . . . . . . . . . . . . . . . . . . . . . . . . . . . . . . . 29
Disposal . . . . . . . . . . . . . . . . . . . . . . . . . . . . . . . . . . . . . . . . . . . . . . . . . . . . . . . . . . . . . . . . . . . . . . . . . . . . . 30
Technical data . . . . . . . . . . . . . . . . . . . . . . . . . . . . . . . . . . . . . . . . . . . . . . . . . . . . . . . . . . . . . . . . . . . . . . . . 31
Notes for Test Institutes . . . . . . . . . . . . . . . . . . . . . . . . . . . . . . . . . . . . . . . . . . . . . . . . . . . . . . . . . . . . . . . . 32
Installation and connection instructions. . . . . . . . . . . . . . . . . . . . . . . . . . . . . . . . . . . . . . . . . . . . 33
Safety information for the installation. . . . . . . . . . . . . . . . . . . . . . . . . . . . . . . . . . . . . . . . . . . . . . . . . . . . . 33
General . . . . . . . . . . . . . . . . . . . . . . . . . . . . . . . . . . . . . . . . . . . . . . . . . . . . . . . . . . . . . . . . . . . . . . . . . . . . . 34
Water installation. . . . . . . . . . . . . . . . . . . . . . . . . . . . . . . . . . . . . . . . . . . . . . . . . . . . . . . . . . . . . . . . . . . . . . . 34
Building in . . . . . . . . . . . . . . . . . . . . . . . . . . . . . . . . . . . . . . . . . . . . . . . . . . . . . . . . . . . . . . . . . . . . . . . . . . . . 35
Electrical connection. . . . . . . . . . . . . . . . . . . . . . . . . . . . . . . . . . . . . . . . . . . . . . . . . . . . . . . . . . . . . . . . . . . . 36
Servicestellen. . . . . . . . . . . . . . . . . . . . . . . . . . . . . . . . . . . . . . . . . . . . . . . . . . . . . . . . . . . . . . . . . . . . . . . 37
Garantie . . . . . . . . . . . . . . . . . . . . . . . . . . . . . . . . . . . . . . . . . . . . . . . . . . . . . . . . . . . . . . . . . . . . . . . . . . . 37
Points de Service . . . . . . . . . . . . . . . . . . . . . . . . . . . . . . . . . . . . . . . . . . . . . . . . . . . . . . . . . . . . . . . . . . . . 37
Garantie . . . . . . . . . . . . . . . . . . . . . . . . . . . . . . . . . . . . . . . . . . . . . . . . . . . . . . . . . . . . . . . . . . . . . . . . . . . 37
Servizio dopo vendita . . . . . . . . . . . . . . . . . . . . . . . . . . . . . . . . . . . . . . . . . . . . . . . . . . . . . . . . . . . . . . . . 37
Garanzia. . . . . . . . . . . . . . . . . . . . . . . . . . . . . . . . . . . . . . . . . . . . . . . . . . . . . . . . . . . . . . . . . . . . . . . . . . . 38
Service. . . . . . . . . . . . . . . . . . . . . . . . . . . . . . . . . . . . . . . . . . . . . . . . . . . . . . . . . . . . . . . . . . . . . . . . . . . . . 39
3
Page 4

Operating Instructions
1 Safety
Prior to using for the first time
• Follow the ”Instructions for installation and con-
nection”.
Correct use
• The dishwasher is only intended for washing do-
mestic dishes.
• Additions or modifications to the dishwasher are
not permitted.
• Use only special salt, detergent and rinse aid suita-
ble for domestic dishwashers.
• Do not put any solvents in the dishwasher. This
could cause an explosion.
Child safety
• Keep packaging away from children. There is a risk
of suffocation.
• Children often do not recognise the hazards asso-
ciated with electrical appliances. Don’t allow children to use the dishwasher unsupervised.
• Make sure that children and pets don’t climb into
the dishwasher. Could endanger life!
• Dishwasher detergents can cause chemical burns
to the eyes, mouth and throat. Could endanger life!
Comply with the safety instructions of the dishwasher detergent manufacturer.
• The water in the dishwasher is not for drinking.
Risk of chemical burns.
General safety
• Repairs to the dishwasher are only to be carried
out by qualified service engineers.
• When the dishwasher is not being used, switch it
off and shut off the water tap.
• Never unplug the appliance by pulling on the ca-
ble. Always pull the plug.
• Ensure that the door of the dishwasher is always
closed when it is not being loaded or unloaded. In
this way you will avoid anybody tripping over the
open door and hurting themselves.
• Never sit or stand on the open door.
• If the dishwasher is located in a room where there
may be a frost, remove the connection hose from
the tap after each use of the dishwasher.
4
Page 5
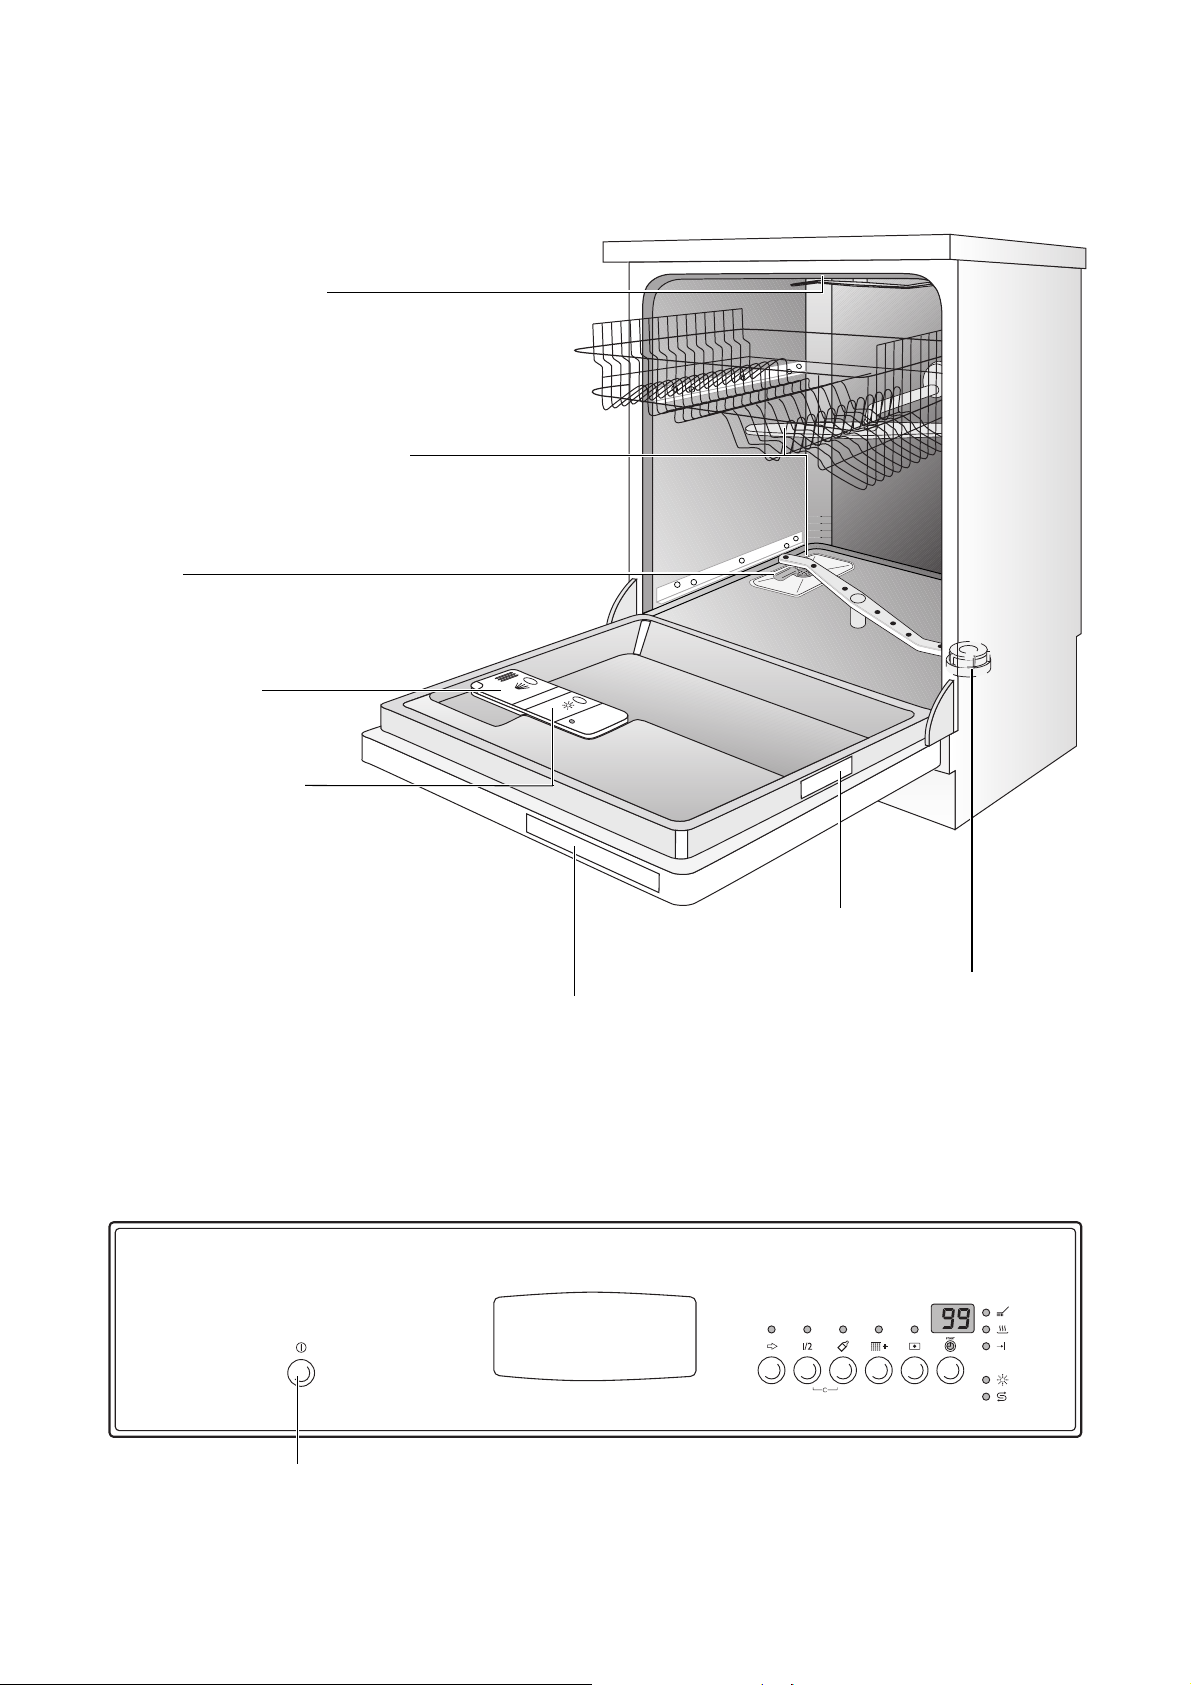
Diagram of appliance
Ceiling spray arm
Upper basket spray arm
and floor spray arm
Filters
Dispenser
for detergent
Dispenser
for rinse aid
Control panel
Programme overview
Rating plate
Dispenser
for special salt
ON/OFF button
The ON/OFF button is used to turn the dishwasher
on and off.
5
Page 6
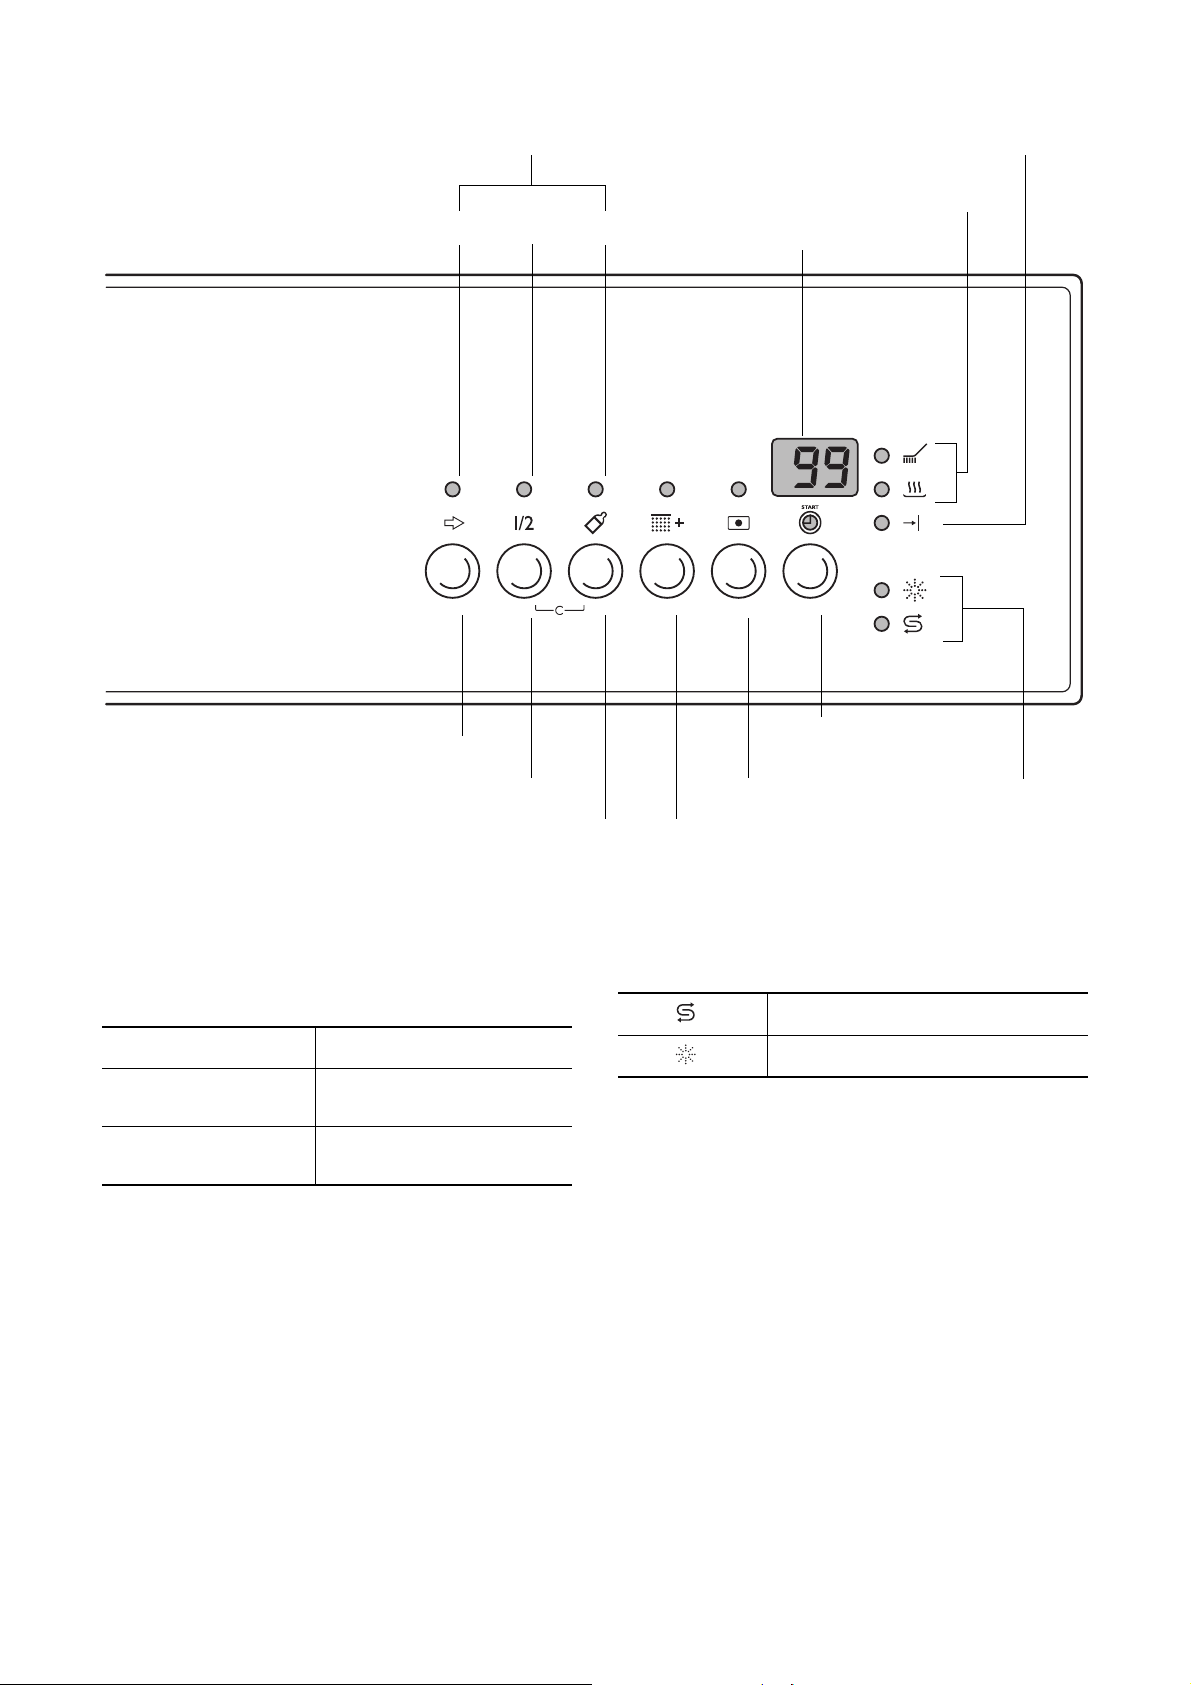
§
Function buttons
End of cycle indicator
Programme progress display
123
Cycle selection button
Halbe Ladung (Half Load)
Sanitize
Multi-display
Set
delay timer
3in1 function
Spülen + (Extra Rinse)
Control
indicators
The Programme selection button is used to select
the desired dishwashing cycle.
Function buttons: In addition to the pre-set function, the following functions can also be set using
these buttons:
Function button 1 Sets the water softener
Function button 2
Function button 3
Activates/deactivates rinse
aid inflow
Activates/deactivates the
acoustic signal
The multi-display can indicate:
– which cycle has been selected.
– the level of hardness to which the water softener is
set.
– whether the rinse aid inflow has been activated/de-
activated.
– whether the acoustic signal has been activated/de-
activated.
– the start delay that has been set.
– the estimated time remaining for the current dish-
washing cycle.
– what type of error has occurred with the dishwash-
er.
Programme progress display: The current stage of
the programme is always shown in the programme
progress display.
The control indicators have the following meanings:
1)
1)
1) These control indicators are never illuminated while a dishwashing cycle is running.
Refill with special salt
Refill with rinse aid
6
Page 7

Prior to using for the first time
3
If you wish to use 3 in 1 detergent:
– First read the section “Using 3in1 detergents”.
– Do not fill up with special salt or rinse aid.
If you do not use 3in1 detergent, before using for the
first time
1. Set the water softener
2. Fill up with special salt for water softeners
3. Fill up with rinse aid
Setting the water softener
3 To avoid scale deposits on the dishes and in
the dishwasher, the dishes must be washed
with soft water, i.e. water with a low lime content. The water softener must be set according
to the table to the water hardness in the area
where you live. Your local water company will
be able to give you information about the water hardness in your area.
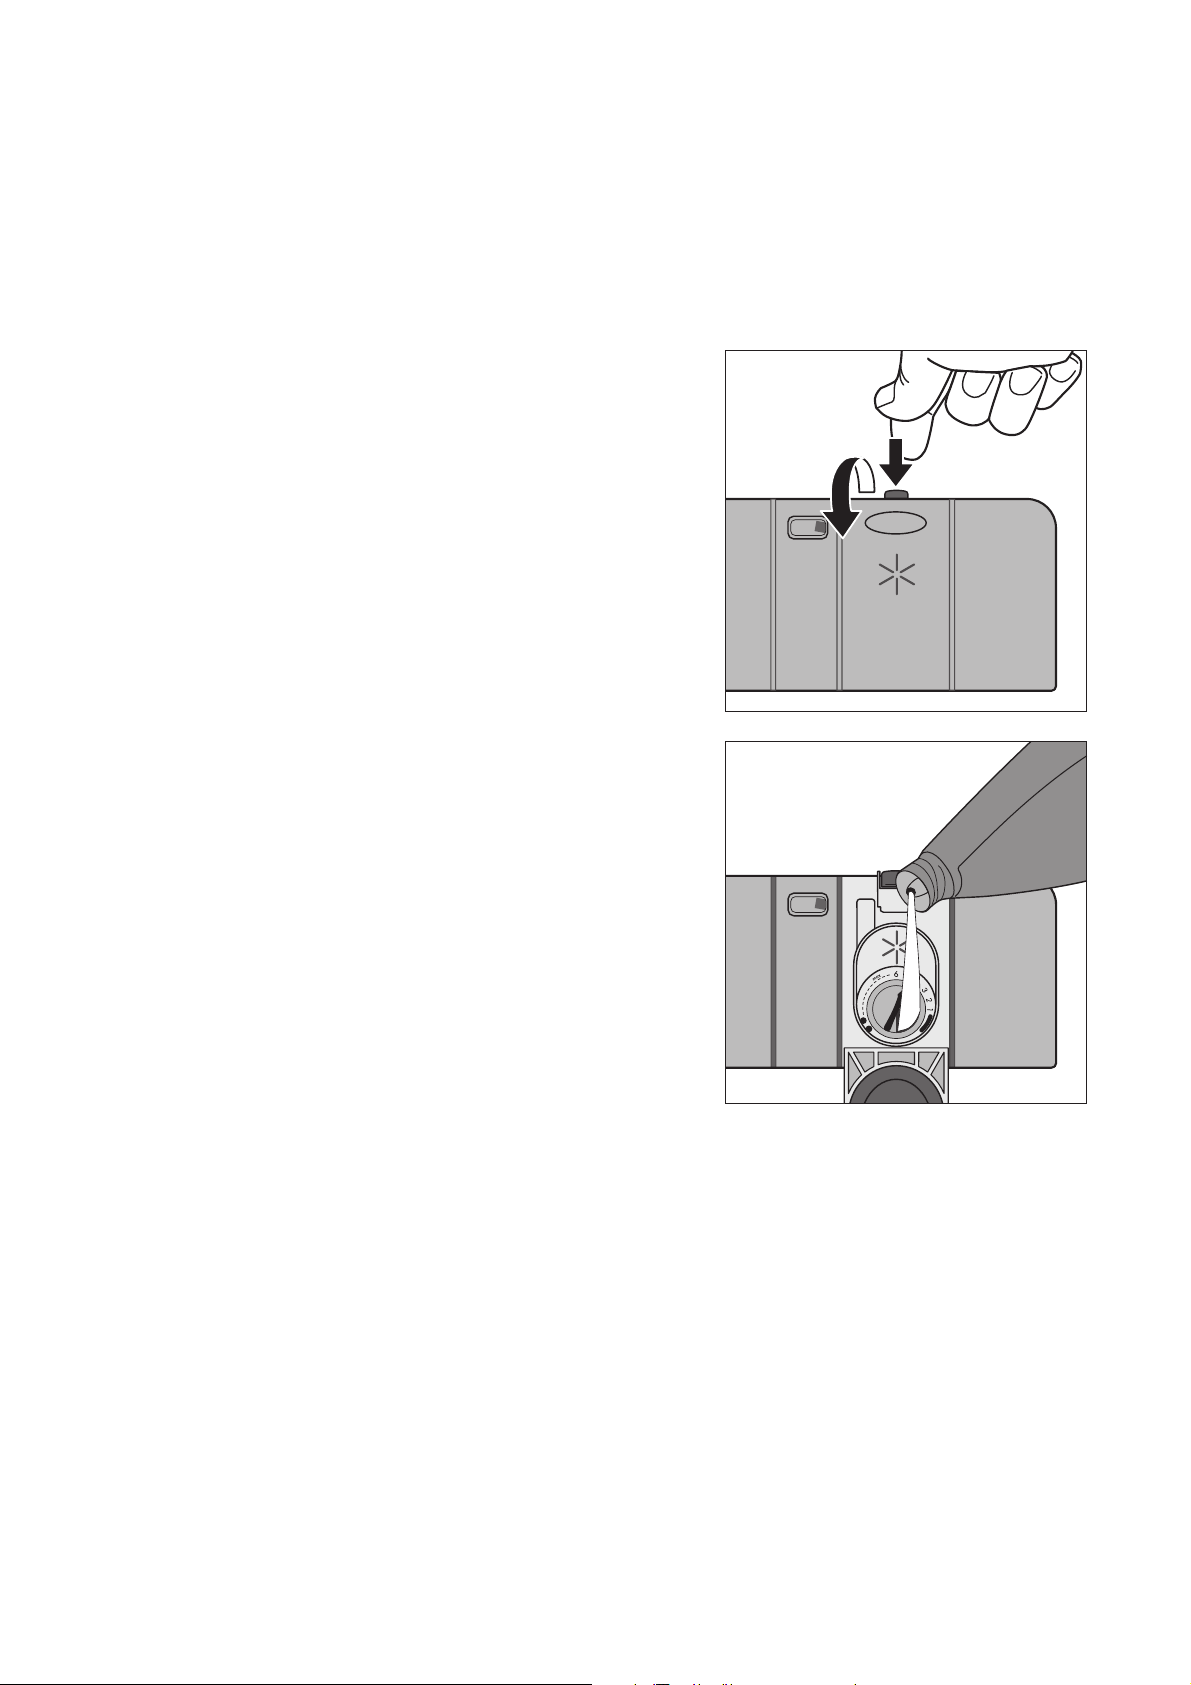
1. Press the ON/OFF button.
3 If indicators other than the cycle selection but-
ton are lit, a dishwashing cycle is activated.
The dishwashing cycle must be deselected:
Press function buttons 2 and 3 simultaneously
for approx. 2 seconds.
Two lines are displayed in the multi-display.
2. Press function buttons 2 and 3 simultaneously and
keep them pressed.
The LED indicators for function buttons 1 to 3 will
flash.
7
Page 8

3. Press function button 1.
The LED indicator for function button 1 will flash.
The multi-display will indicate the hardness setting.
4. Pressing function button 1 increases the hard-
ness setting by 1.
(Exception: hardness setting 1 follows hardness
setting 10).
5. When the hardness setting is correct, press the
ON/OFF button.
The hardness setting is now saved.
If the water softener is set electronically to “1”, this
switches off the control indicator for special salt.
Water hardness
1)
in °fh
)in °dh
90 - max. 125
76 - 89
65 - 75
51 - 64
40 - 50
33 - 39
26 - 32
19 - 25
07 - 18
51 - max. 70
43 - 50
37 - 42
29 - 36
23 - 28
19 - 22
15 - 18
11 - 14
4 - 10
2)
)
below 7 below 4
1) (°fh) French degree, measure of the hardness of water
2) (°dh) German degree, measure of the hardness of water
3) On this setting the length of the dishwashing cycle may be slightly longer.
*) factory setting
Adjusting the hardness set-
ting
3)
10
9
8
7
6
5*
4
3
2
1
no salt necessary
Indication on the multi-dis-
play
10L .
9L
8L
7L
6L
5L
4L
3L
2L
1L
8
Page 9
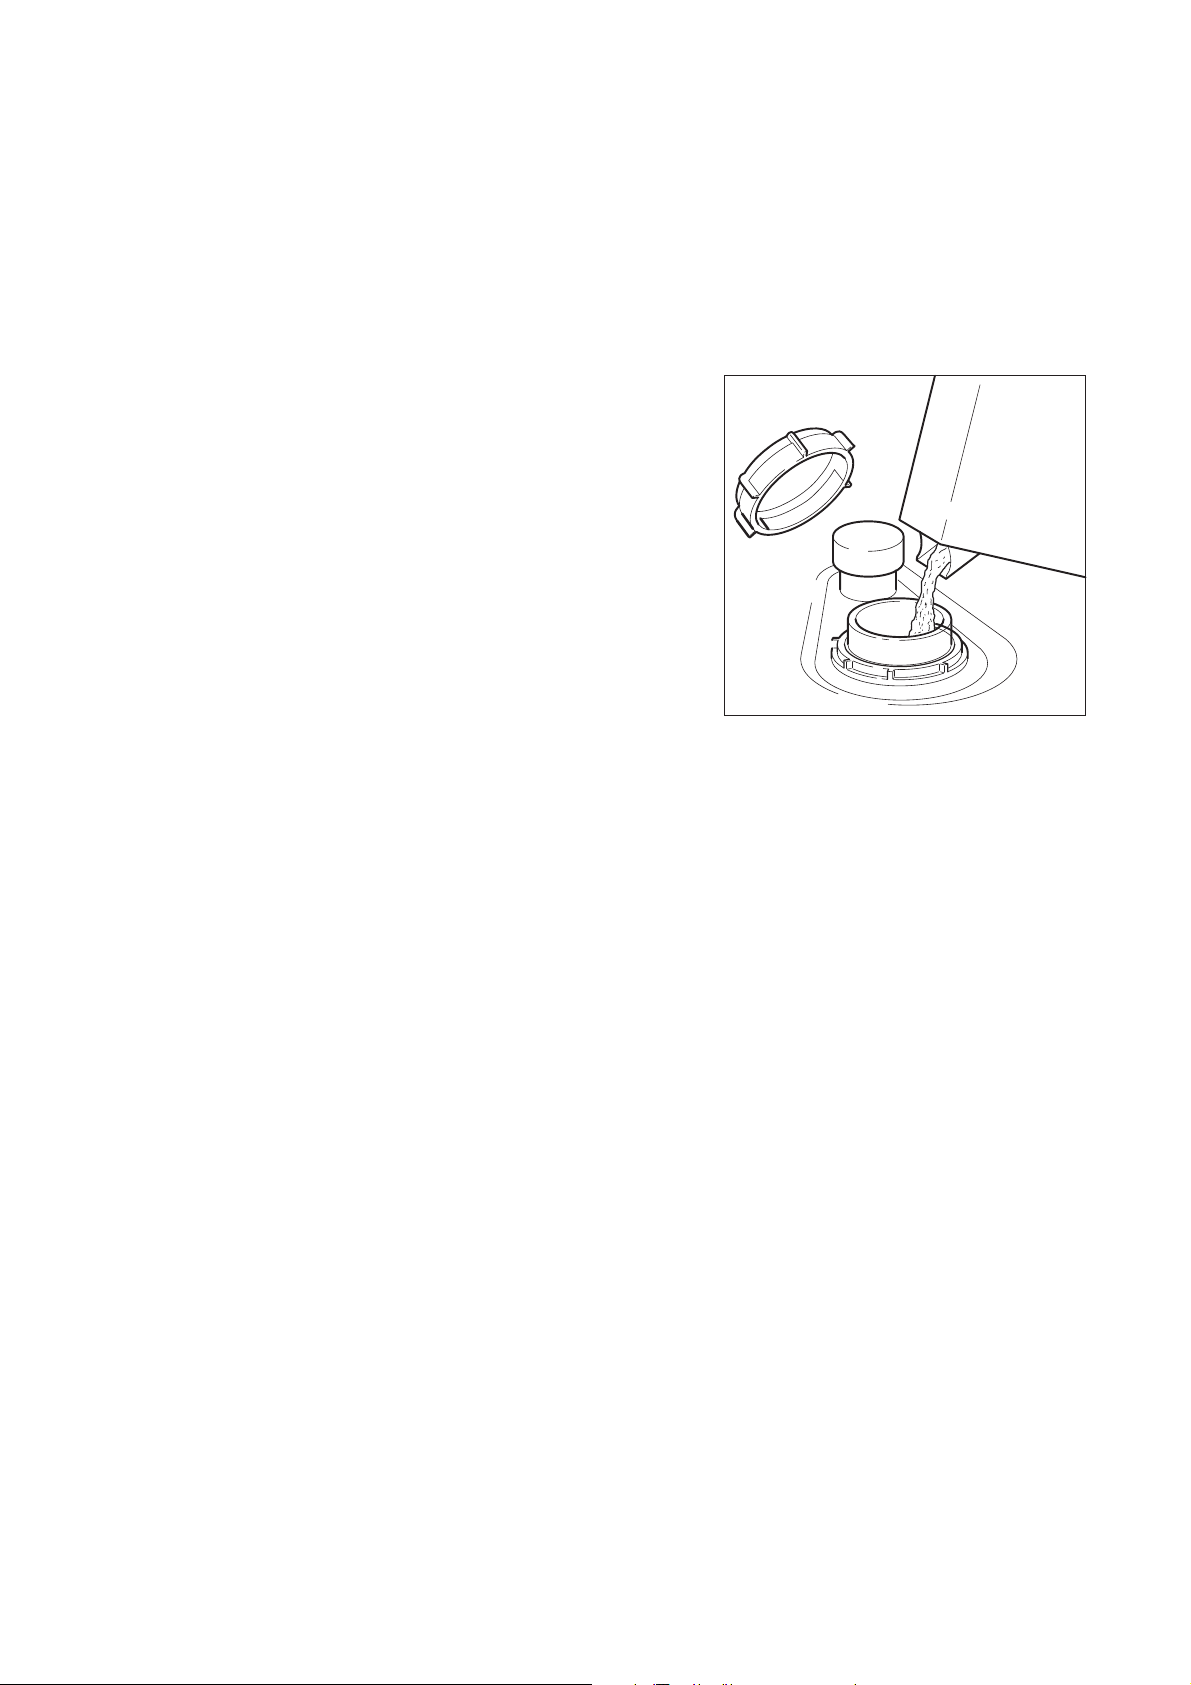
Adding special salt
To decalcify the water softener, it must be filled up
with special salt. Use only special salt suitable for
domestic dishwashers.
If you do not use 3 in1 detergent, fill up with special
salt:
– Before using the dishwasher for the first time.
– When the control indicator for special salt is illumi-
nated on the control panel.
1. Open the door and remove the lower basket.
2. Screw open the lid on the salt dispenser by turning
it anti-clockwise.
3. Only when using the dishwasher for the first
time:
Fill the salt dispenser with water.
4. Fill the dispenser with special salt; the capacity of
the dispenser is approx. 1.0-1.5 kg, depending on
the size of the grains. Do not overfill the dispenser.
3 If water overflows when filling up with special
salt, this is completely harmless.
5. Clean away any salt remnants from the dispenser
opening.
6. Screw the lid back on in a clockwise direction.
7. Run a dishwashing cycle after filling the salt
dispenser with special salt. This will wash away
salt water and salt crystals that have been spilt.
3 Depending on the size of the salt grains, it can
take several hours for the salt to dissolve in
the water and for the control indicator for special salt to go out.
9
Page 10
Filling up with rinse aid
With rinse aid the rinsing water drains away better
and so you get smear-free, gleaming dishes and
clear glasses.
If you do not use 3in1 detergent, fill up with rinse aid:
– Before using the dishwasher for the first time.
– When the control indicator for rinse aid is illuminat-
ed on the control panel.
Use only special rinse aid for dishwashers and no
other liquid detergents.
1. Open the door.
The rinse aid compartment is located on the inside
of the dishwasher door.
2. Press the release button on the rinse aid compart-
ment.
3. Open the cover.
4. Pour rinse aid in slowly right up to the broken
“max” line;
this corresponds to a volume of approx. 140 ml
when full.
5. Press the lid shut until it clicks into place.
6. Wipe up any spilt rinse aid with a cloth. Otherwise
there will be too much foam when rinsing.
10
Page 11

Setting the amount of rinse aid required
3 Only change the amount dispensed, if smears,
milky spots (reduce the amount) or dried on
water spots (increase the amount) can be seen
on glasses and dishes. (See section “If dishwashing results are not satisfactory”.) The
dosage can be set from 1-6. The dosage is
pre-set to “4” in the factory.
1. Open the dishwasher door.
2. Press the release button on the rinse aid compart-
ment.
3. Open the cover.
4. Set the dosage level.
5. Press the lid shut until it clicks into place.
6. If rinse aid has leaked out, wipe it away with a
cloth.
Activating/deactivating the inflow
of rinse aid
1. Press the ON/OFF button.
3 If indicators other than the cycle selection but-
ton are lit, a dishwashing cycle is activated.
The dishwashing cycle must be deselected:
Press function buttons 2 and 3 simultaneously
for approx. 2 seconds.
Two lines are displayed in the multi-display.
2. Press function buttons 2 and 3 simultaneously and
keep them pressed.
The LED indicators for function buttons 1 to 3 will
flash.
3. Press function button 2.
The LED indicator for function button 2 will flash.
The multi-display will indicate the current setting:
0d Inflow of rinse aid is deactivated
1d
4. Pressing function button 2 activates and deacti-
vates the rinse aid dispensing function.
5. Once the multi-display is indicating the required
setting, press the ON/OFF button. The setting is
now saved.
Inflow of rinse aid is activated (factory setting)
11
Page 12

Activating/deactivating the
acoustic signal
In addition to the optical display (e.g. indicating the
end of the cycle, errors) you can also choose to set
an acoustic signal.
1. Press the ON/OFF button.
3 If indicators other than the cycle selection but-
ton are lit, a dishwashing cycle is activated.
The dishwashing cycle must be deselected:
Press function buttons 2 and 3 simultaneously
for approx. 2 seconds.
Two lines are displayed in the multi-display.
2. Press function buttons 2 and 3 simultaneously and
keep them pressed.
The LED indicators for function buttons 1 to 3 will
flash.
3. Press function button 3.
The LED indicator for function button 3 will flash.
The multi-display will indicate the current setting:
0b Acoustic signal deactivated
1b
4. Pressing function button 3 will change the setting.
5. Once the multi-display is indicating the required
setting, press the ON/OFF button. The setting is
now saved.
Acoustic signal activated (ex-factory setting)
12
Page 13

In daily use
Loading cutlery and dishes
1 Sponges, cleaning cloths and any other ob-
jects that can absorb water must not be
washed in the dishwasher. Plastic and Tefloncoated dishes and pans tend to retain water
droplets. These dishes and pans therefore do
not dry as well as those made of china and
stainless steel.
For washing in the dishwasher, the following cutlery/dishes/pots and pans
are not suitable: are of limited suitability:
• Cutlery with wooden, horn, china or mother of pearl handles
• Plastic items that are not heat resistant
• Older cutlery with cement
that is sensitive to temperature
• Dishes or cutlery with glued parts
• Pewter or copper items
• Lead crystal glass
• Steel items that rust
• Wooden boards/platters
• Items made from synthetic materials
• Before loading the dishes, you should:
– Remove the worst of the food residues.
– Soak pans with burnt-on food residues.
• When loading the dishes and cutlery, please note:
– Dishes and cutlery must not impede the rotation
of the spray arms.
– Load bowls, cups, glasses, pans, etc. with the
opening downwards so that water cannot collect
in them
– Dishes and items of cutlery must not lie inside
one another or cover one another
– To avoid damage to glasses, they must not touch
one another
– Don’t put small items (e.g. lids) in the baskets for
the dishes, but in the cutlery basket, so that they
can’t fall through the holes.
• Only wash stoneware in the dishwasher if it is specifically
marked by the manufacturer as being dishwasher-safe.
• Glazed patterns may fade if washed very frequently in the
dishwasher.
• Silver and aluminium parts have a tendency to discolour during washing. Food remains, e.g. egg white, egg yolk and
mustard often cause discoloration and staining on silver.
Therefore always clean food residues from silver immediately,
if it is not to be washed straight after use.
• Glass can become dull after a large number of washes.
13
Page 14

Loading cutlery
1 Warning: Sharp knives and other items of cut-
lery with sharp edges must be laid in the cutlery rack or in the upper basket to avoid the
risk of injury.
To ensure that all items of cutlery in the cutlery basket can be reached by the water, you should:
1. Place the grid insert on the cutlery basket 2. Place forks and spoons in the cutlery basket's grid
insert with their handles pointing downwards.
For larger utensils, such as whisks, leave off one half
of the cutlery grid.
The cutlery basket consists of two parts that can be
taken apart.
1. To separate, push them horizontally in opposite di-
rections and pull apart.
2. To put together, do this in reverse.
14
Page 15

Pots, Pans, Large Plates
Load large and heavily soiled dishes in the lower
basket.
The plate rack running right to left at the front righthand side is most suitable for small flat plates with a
diameter of 170-210 mm.
A serving plate can be placed in front of the cutlery
basket.
To make it easier to load larger dishes, all rear plate
rests in the lower basket can be folded down.
Folding down the right plate rest makes a second
plate rest that is particularly suitable for deep plates
or bowls.
1. Lift the two plate racks slightly at the back and fold
them simultaneously inwards making them cross
over one another.
The left plate rest can be folded down and the width
can be adjusted.
1. To fold them down, lift the two plate racks slightly
at the back and fold them inwards making them
cross over one another.
2. To set the width, pull the right-hand plate rest up-
wards at the back until it disengages, then pull it
towards the back out of the front guide.
3. Insert the plate rest in the other guide and press it
down at the back until it snaps in.
15
Page 16

Cups, Glasses, Coffee Service
Load smaller, fragile crockery and long, sharp cutlery
in the upper basket.
Adjustable cup racks
• Arrange items of crockery on and under the folding
cup racks so that they are offset from each other
and water can reach all items.
• The cup racks can be folded up out of the way for
tall crockery items.
• The cup racks can also be fixed in an intermediate
position. Lay or hang glasses with stems in the
slots in the cup racks.
Glass holders
For glasses with stems and tall cylindrical glasses,
fold up the glass holder. ( Top picture)
To unload or when not needed, fold the glass holders
back to the right. (Middle picture)
Glasses can also be placed over the bars pointing
up. (Bottom picture)
16
Page 17

Adjusting the height of the upper basket
Maximum height of dishes in the
Upper basket Lower basket
with upper basket raised 19 cm 32 cm
with upper basket lowered 21 cm 30 cm
3 The height of the baskets can also be adjusted
when they are loaded.
Raising/lowering the upper basket
1. Pull out the upper basket completely.
2. Raise the upper basket as far as it will go and then
lower it vertically.
The upper basket will latch into the lower or the
upper position.
Maximum plate sizes,
upper basket in upper position
Maximum plate sizes,
upper basket in lower position
17
Page 18

Adding detergent
Detergents remove the dirt from dishes and cutlery.
The detergent must be added before the cycle starts.
1 Only use detergent intended for domestic
dishwashers.
The detergent compartment is located on the inside
of the door.
1. If the lid is closed:
Press the release button.
The lid will spring open.
2. Place the detergent in the detergent dispenser. The
markings indicate the dosing levels for powder detergents: “20/30” corresponds to approx.
20/30 ml of detergent.
Follow the manufacturer’s instructions with regard
to dosing and storage.
3. Close the lid and press until it locks into place.
3 In the case of very heavily soiled dishes, fill the
adjoining compartment (1) with additional detergent. This detergent comes into use during
the pre-wash cycle.
18
Page 19

Concentrated detergents
Today’s detergents for dishwashers are almost exclusively low-alkaline concentrated detergents with
natural enzymes in tablet or powder form.
2 Using 50°C dishwashing cycles in conjunction
with these concentrated detergents reduces
pollution and is good for your dishes, as these
dishwashing cycles are specially matched to
the dirt-dissolving properties of the enzymes
in concentrated detergents. It is for this reason
that using 50 °C dishwashing cycles in conjunction with concentrated detergents can
achieve the same cleaning results that can
otherwise only be achieved using 65 °C cycles.
Detergent tablets
3 Detergent tablets from different manufactur-
ers dissolve at different rates. For this reason,
some detergent tablets do not attain their full
cleaning power during short cycles. Therefore
please use dishwashing cycles with pre-wash
when using detergent tablets.
19
Page 20

Using 3in1 detergents
These products are detergents with a combined
cleaning, rinsing and salt function.
When the 3in1 function is activated,
– the addition of special salt and rinse aid from the
respective dispenser is prevented.
– If the salt and rinse aid dispensers are empty, this
is not indicated.
– The dishwashing cycles can be up to 30 minutes
longer.
3 If you want to use 3in1 detergents, check
whether these detergents are suitable for your
water hardness. (Follow the manufacturer’s instructions.)
If you want to use 3in1 products
1. Press the ON/OFF button.
2. Press the 3IN1 button.
The button indicator lights up: 3in1 function is selected.
Before the start of the dishwashing cycle put 3in1
detergent in the detergent dispenser.
3 As the rinse aid inflow is automatically
switched off when the 3in1 function is activated, it may come about because of the different
quality standards in the 3in1 detergent, that
the dishes do not dry sufficiently.
If this happens, proceed as follows (see section “Adding rinse aid”):
• Fill up the dispenser (if this is empty) with rinse aid.
• Set rinse aid dosage to “2” mechanically.
• Activate rinse aid inflow.
If you do not want to use 3in1 products
any more
If you want to stop using 3in1 products, please do
the following:
• Deactivate the 3in1 function.
• Fill up the dispensers for salt and rinse aid again.
• Switch the water softener to the highest setting
and perform up to three normal cycles without
loading any dishes.
• Then set the water softener to the water hardness
in your area.
If you want to use 4in1 products
When using "4 in 1" detergents that integrate also
anti- glass corrosion agent into "3 in 1" formula,
please follow the same indication as given for "3 in
1" detergents.
20
Page 21

Selecting the dishwashing cycle (Cycle Table)
Dishwashing-
cycle
Auto
(50° - 65°)
2)
P1
Gläser (Glass)
(45°)
P2
Intensiv
(70°)
P3
Normal
(65°)
P4
Eco
3)
(50°)
P5
Suitable
for:
Dinner service and
cookware
Dessert dishes and
coffee service, delicate glassware
Dinner service and
cookware
Dinner service and
cookware
Dinner service and
cookware, temperature-sensitive crockery
Programme
sequence
Type of
soiling
Pre-wash
Main wash
Intermediate rinse
Final rinse
normally soiled,
dried-on food remains
lightly soiled - •
• •
1 to 2x
2x
• •
• •
heavily soiled,
dried-on food remains, in
particular protein and
• •
2x
• •
starch
normally soiled • • • • •
normally soiled • • • • •
Consumption
values
Drying
Length (minutes)
90 - 115
71
110 - 120
85 - 95
130 - 160
1)
Energy (kWh)
1,0 - 1,5
0,9
1,75 - 1,95
1,10 - 1,20
0,95 - 1,05
Water (litres)
12 - 22
14
22 - 24
14 - 16
12 - 14
Kurz (Quick)
(60°)
4)
Dishes, excluding
saucepans
just used, lightly to normally soiled
- • - • -
30
8
0,8
P6
Vorspülen (Pre-
wash)
(cold)
5)
All types of dishes
P7
1) The consumption values were obtained under standardised conditions. They depend on how full the baskets for the dishes are.
Variations are therefore possible in practice.
2) When using this cycle the degree of water clouding determines the amount of soiling on the dishes. The length of the cycle and
water and energy consumption can vary greatly – depending upon the load and how dirty the dishes are. Depending upon the
soiling, the temperature of the water will be automatically adjusted to between 50°C and 65°C.
3) Test programme for Test Institutes
4) When using this cycle, only load the dishwasher half full.
5) This cycle does not need any detergent.
Used dishes that are being stored in the dishwasher and are to be
washed later.
• - - - -
7
4
< 0,1
21
Page 22

Selecting a programme
When your dishes look like this, select:
an intensive programme.
a normal or energy-saving programme.
a short programme (e.g. 30 minute programme).
22
Page 23

Starting a dishwashing
Additional functions
cycle
1. Check that the spray arms can turn freely.
2. Turn the water tap on fully.
3. Close the door.
4. Press the ON/OFF button.
5. Select the desired cycle. In addition, press the cy-
cle selection button repeatedly until the desired cycle is displayed in the multi-display (see cycle
table).
The selected cycle will begin after approximately 5
seconds.
The current stage of the cycle is always shown in the
cycle progress display. The multi-display shows the
remaining time expected for the cycle.
3 During the dishwashing cycle, the remaining
time shown in the multi-display may be adjusted according to the size of the load, degree of
soiling, etc.
Interrupting or aborting a dishwashing cycle
Only interrupt a dishwashing cycle that is in progress
if it is absolutely necessary.
Interrupting the dishwashing programme by opening the dishwasher door
1 Hot steam may escape when the door is
opened. There is a risk of scalding.
Halbe Ladung (Half Load)
Can be selected with the cycles: INTENSIVO, NORMAL
Select this additional function when there are only
half the number of dishes.
1.Within 5 seconds of selecting the cycle, press the
Halbe Ladung (Half Load) button..
Indicator Halbe La-
dung (Half Load) is lit:
Indicator Halbe La-
dung (Half Load) is not
lit:
When the cycle has finished, the Halbe Ladung (Half
Load) function is automatically switched off again
Additional function
switched on
Additional function
switched off
Sanitize
Can be selected with the cycles: AUTO, INTENSIVE,
NORMAL, QUICK
This additional function makes it possible to hygienically clean items such as plastic chopping boards or
jam jars.
1.Within 5 seconds of selecting the cycle, press the
Sanitize button.
Indicator Sanitize is lit:
Indicator Sanitize is
not lit:
When the cycle has finished, the Sanitize function is
automatically switched off again.
Additional function
switched on
Additional function
switched off
1. Open the door carefully. The dishwashing cycle will
stop.
2. Close the door. The cycle will continue.
Aborting the dishwashing cycle
1. Press function buttons 2 and 3 and keep them
pressed.
Two lines are displayed in the multi-display.
2. Release the function buttons. The dishwashing cycle has been cancelled.
3. If you want to start a new cycle, check whether
there is any detergent in the dispenser.
3 Turning off the dishwasher will only interrupt a
selected dishwashing cycle, not cancel it. The
cycle will recommence after turning the dishwasher back on again.
Spülen + (Extra Rinse)
Can be selected with the cycles: AUTO, GLASS, INTENSIVE, NORMAL, ECO, QUICK
If this additional function is selected, a second intermediate rinse is performed.
1.Within 5 seconds of selecting the cycle, press the
Spülen + (Extra Rinse) button.
Indicator Spülen +
(Extra Rinse) is lit:
Indicator Spülen +
(Extra Rinse) is not lit:
When the cycle has finished, the Spülen + (Extra
Rinse) function is automatically switched off again.
Additional function
switched on
Additional function
switched off
23
Page 24

Setting the Delay Timer
Removing the dishes
3 With the delay timer you can delay the start of
a dishwashing cycle for between 1 and 19
hours.
1. Press the Delay Timer button repeatedly until the
multi-display shows the desired time delay, for example 12h, if the cycle is to start in 12 hours. The
Delay Timer indicator is illuminated.
2. Select dishwashing cycle.
3. The time remaining to the start of the cycle is con-
tinuously displayed (e. g. 12h, 11h, 10h, … 1h etc.).
To change the time delay:
As long as the cycle has not yet started, you can still
change the setting by pressing the DELAY TIMER
button.
Cancelling the delay timer:
Press the Delay Timer button repeatedly until the
number of the selected cycle appears in the multidisplay. The selected dishwashing cycle will begin
immediately.
To change a dishwashing cycle
As long as the cycle has not yet started, you can still
change the dishwashing cycle. First abort the dishwashing cycle, then re-set the time delay, lastly select the new dishwashing cycle.
3 It is normal for the inner door and the dispens-
ers to be damp.
• Empty the lower basket first, then the upper basket. This way you avoid dripping water from the
upper basket onto dishes in the lower basket.
Switching off the dishwasher
Do not switch off the dishwasher until the multi-display indicates “0” for the remaining cycle time.
If the acoustic signal has been enabled, a continuous
tone will sound for approx. 15 seconds at the end of
the dishwashing cycle.
If the dishwasher is not switched off, then the acoustic signal is repeated after 3 minutes and after 6 minutes.
1. Press the ON/OFF button. All display indicators will
go out.
2. Turn off the water tap.
1 Carefully open the door. Hot steam may es-
cape.
• Hot dishes are sensitive to knocks. Therefore leave
the dishes to cool for about 15 minutes before removing them. You also get a better drying result.
• Dishes dry more quickly if you open the door for a
moment after the cycle has ended and then leave it
slightly open.
24
Page 25

Care and cleaning
1
Do not use furniture care products or aggressive cleaners.
• When necessary, clean the dishwasher’s controls
with a soft cloth and clean warm water.
• Occasionally check the internal dispensers, door
seal and water inlet filter (if fitted) for dirt and clean
them, if necessary.
Polished chromium steel surfaces
Remove light dirt with a clean, damp, soft cloth – microfibre cloths are particularly good.
1 When cleaning ensure that you do not go
against the direction of the stainless steel finish (the fine horizontal lines).
No circular movements!
Alulook surfaces
Remove light dirt with a clean, damp, soft cloth – microfibre cloths are particularly good.
Agents that scratch or scour are not suitable.
If required, use a commercially available cleaner for
chrome surfaces. Follow the manufacturer’s instructions when using this cleaner.
Cleaning the filters
3 The filters must be regularly checked and
cleaned. Dirty filters will affect the dishwashing
results.
Coarse filter (1)
The coarse filter must be checked after every dishwashing cycle.
1. Open the door and remove the lower basket.
2. Remove the coarse filter.
3. If necessary, rinse under running water and re-
place.
25
Page 26

Fine filter (2)
The fine filter must be cleaned occasionally.
1. Open the door and remove the lower basket.
2. Release the fine filter by turning to the right and re-
move.
3. Clean the fine filter thoroughly with a brush under
running water.
4. Place the fine filter in the holder and turn to the left
until you feel it click into place (arrow).
1 Do not press the handle downwards.
If the filter does not click into place, this can
lead to the spray arm nozzles becoming
blocked.
Under no circumstances may the dishwasher
be used without its filters.
Cleaning the spray arms
Regularly check the nozzles in the three spray arms
for blockages. If necessary, clean the nozzles with a
piece of fine wire or a fine needle and a strong water
jet.
1 Do not damage the nozzle openings.
Top spray arm
1. Undo the fixing screw (A) by turning anti-clock-
wise.
2. Pull the spray arm off the shaft.
3. Clean the spray arm and the fixing screw.
4. Fasten the spray arm with the fixing screw (A) turn-
ing clockwise.
26
Page 27

Middle spray arm
1. Remove the middle spray arm by turning it laterally.
The two-part spray arm bearing is held together by
a tension spring (B)
2. Clean spray arm nozzles.
3. To re-fit, press the middle spray arm upwards until
you feel it snap into place.
Lower spray arm
1. Undo the fixing screw (C) by turning anti-clock-
wise.
2. Pull the spray arm off the shaft.
3. Clean the spray arm and the fixing screw.
4. Fasten the spray arm with the fixing screw (C) turn-
ing clockwise.
27
Page 28

What to do if...
Remedying small malfunctions
If one of the following fault codes is displayed in the
multi-display during operation:
– Fault codeÅ10 (Problems with water inlet),
– Fault codeÅ20 (Problems with water drainage),
please have a look at the following table.
When the fault is remedied, press the cycle selection
button. The cycle will continue.
With other fault codes (“Å ” followed by a number):
– Abort the dishwashing cycle.
– Switch the appliance off and on again.
– Re-set the dishwashing cycle.
If the fault is displayed again, please contact the
Customer Care Department and inform them of the
fault code.
Malfunction Possible cause Remedy
The cycle indicator for the selected dishwashing cycle is flashing:
fault code Å10 is displayed in the
multi-display:
(Problems with water inlet)
The cycle indicator for the selected dishwashing cycle is flashing,
fault code Å20 is displayed in the
multi-display.
(Problems with water drainage)
Fault code Å30 is displayed in
the multi-display.
Water tap is blocked with limescale
or faulty.
The tap is turned off. Turn the tap on.
The filter (where present) in the
threaded hose fitting on the tap is
blocked.
Filters in the base of the dishwasher compartment are blocked.
Water inlet hose
has not been correctly positioned.
The sink outlet is blocked. Clean out sink outlet.
Water drain hose
has not been correctly positioned.
The anti-flood system has been
triggered.
Check the water tap and have it repaired if necessary.
Clean the filter in the threaded hose
fitting.
Press the button for the commenced
dishwashing cycle;
then abort the dishwashing cycle
(see section: Starting a dishwashing
cycle);
clean filters (see section: Cleaning
the filters).
Check the position of the hose.
Check the position of the hose.
First shut off the water tap, then
switch off the appliance and contact
the Customer Care Department.
The cycle is not starting.
28
The mains plug is not
plugged in.
A fuse in the house’s wiring system
is defective.
For dishwasher models with a start
delay timer:
A start time has been selected.
Plug in mains plug.
Replace fuse.
If the dishes are to be washed immediately, cancel the start delay timer.
Page 29

Malfunction Possible cause Remedy
Cycle is performed to the end
without any heating. Bad cleaning
and drying results
Rust spots are visible in the dishwashing compartment.
Technical fault
The dishwashing compartment is
made from rust-free stainless steel.
Rust spots in the dishwashing compartment are due to rust particles
from external sources (rust particles
from water pipes, pans, cutlery,
etc.). Remove such spots with a
commercially-available cleaning
product for stainless steel.
Contact customer service and inform them of the fault code. If no
code is displayed, call up the code
from the fault memory:
When the appliance is switched off,
press and hold function buttons 1
and 3.
Press and hold the ON/OFFbutton
until the indicators for function buttons 1 to 3 are flashing.
Press function button 1, fault code is
shown in the display.
Make a note of the fault code.
To finish, press the ON/OFF button.
Only wash cutlery, dishes and pans
that are suitable for dishwasher use.
A whistling noise can be heard
when washing dishes.
The whistling is not a cause for
concern.
If the dishwashing results
are not satisfactory
The dishes are still dirty.
• The wrong dishwashing cycle was selected.
• The dishes were loaded is such a way that the
dishwashing water did not reach all items. The
baskets for the dishes must not be overloaded.
• The filters in the base of the washing compartment
are dirty or incorrectly positioned.
• Good quality detergent was not used, or too little
was used.
• In the case of scale deposits on the dishes: The
special salt dispenser is empty or the water softening system has been incorrectly set.
• The drain hose is incorrectly positioned.
• Pollutants from the water in the dishwasher can
block the jets in the spray arms. You have the option of removing the spray arms from their fixture
for cleaning (see section “Care and Cleaning”).
Decalcify appliance with commercially available agents for cleaning
dishwashers.
If the noises can still be heard after
decalcifying the machine, use a different brand of detergent for washing cutlery and dishes.
The dishes do not dry and are not shining.
• Poor quality rinse aid was used.
• The rinse aid dispenser is empty.
There are smears, streaks, milky spots or
a shiny bluish coating on glasses and
dishes.
• Lower rinse aid dosage.
There are dried water drops on the glasses and dishes.
• Increase rinse aid dosage.
• The detergent may be the cause. Contact the de-
tergent manufacturer's customer advice centre.
Glass corrosion
• Contact the detergent manufacturer's customer
advice centre.
29
Page 30

Disposal
2
Packaging material
The packaging materials are environmentally
friendly and can be recycled. The plastic components are identified by markings, e.g. >PE<,
>PS<, etc. Please dispose of the packaging
materials in the appropriate container at the
community waste disposal facilities.
2 Old appliance
The symbol W on the product or on its pack-
aging indicates that this product may not be
treated as household waste. Instead it shall be
handed over to the applicable collection point
for the recycling of electrical and electronic
equipment. By ensuring this product is disposed of correctly, you will help prevent potential negative consequences for the
environment and human health, which could
otherwise be caused by inappropriate waste
handling of this product. For more detailed information about recycling of this product,
please contact your local city office, your
household waste disposal service or the shop
where you purchased the product.
1 Warning! When your appliance has finished
its working life, remove the plug from the
socket. Cut off the cable and plug and dispose
of them.
Break the door lock so that the door no longer
shuts. This prevents children from trapping
themselves inside and endangering their lives.
30
Page 31

Technical data
Capacity: 11 place settings including serving dishes
Permitted water pressure: 1-10 bar (=10-100 N/cm
Electrical connection: 230 V, 10 A, also see the rating plate on the right-hand side of the dishwash-
er’s interior door.
Total output 2250 W
Dishwashers that can be integrated and built-in
Dimensions: 759 x 546 x 570 (H x W x D in mm)
Max. weight: 55.3 kg
2
= 0.1-1.0 MPa)
5 This appliance conforms with the following EU
Directives:
– 73/23/EEC dated 19.02.1973 Low Voltage Direc-
tive
– 89/336/EEC dated 03.05.1989 EMC Directive in-
clusive of Amending Directive 92/31/EEC
– 93/68/EEC dated 22.07.1993 CE Marking Directive
31
Page 32

Notes for Test Institutes
Testing in accordance with EN 60704 must be car-
ried out with the appliance fully loaded and using the
test cycle (see "Cycle Table").
Tests in accordance with EN 50242 must be carried out when the salt dispenser in the water softener
and the rinse aid dispenser have been filled with salt
and rinse aid respectively, and using the test cycle
(see "Cycle Table").
Full load:
11 place settings incl. serving dishes
Amount of detergent required: 27.5 g in the dispenser for detergent
Rinse aid setting: 6
Measurement of noise
• The measurement is to be made immediately following a completed short cycle.
Sample loading arrangements:
Upper basket * Lower basket
* Upper basket in bottom (lowered) position
Cutlery basket
32
1 Soup spoon
2 Knife
3 Fork
4 Dessert spoon
5 Teaspoon
6 Serving spoon
Page 33

Installation and connection instructions
1 Safety information for the installation
• Only transport the dishwasher in an upright position, otherwise salt water may run out.
• Before using the dishwasher for the first time,
check for any damage caused in transport. Do not
under any circumstances connect an appliance
that is damaged. In the case of damage, please
contact your supplier.
• Never use the dishwasher if the mains cable, water
inlet or drain hose are damaged; or if the control
panel, work top or plinth area are damaged such
that the inside of the appliance is freely accessible.
• Always plug the mains plug into a correctly installed shockproof socket.
• Permanent connection: a permanent connection
must only be installed by a trained electrician.
• Prior to using the appliance for the first time, ensure that the rated voltage and type of supply on
the rating plate match that of the supply where the
appliance is to be installed. The fuse rating is also
to be found on the rating plate.
• Multi-way plugs / connectors and extension cables
must not be used. This could constitute a fire hazard through overheating.
• The dishwasher’s cable must only be replaced by
the Customer Care Department or a registered
electrician.
• A water inlet hose with safety valve must only be
replaced by the Customer Care Department.
33
Page 34

General
• The dishwasher is supplied ready to be connected
to the electrical supply, i.e. with electrical cable, installed drain hose and inlet hose with filter.
• The dishwasher may be built into recesses made
of flammable materials without additional measures being taken.
• Tap and socket are to be made available as per the
diagram opposite.
• The regulations of the local water board and
electricity company must be observed.
A = drain outlet
G = size of appliance
K = cold water supply
N = size of recess
W = hot water supply
E = socket
Water installation
Inlet
• Water pressure: 1–10 bar (flow pressure)
• On the construction side a regulating tap with G 3/
4” outlet is to be provided.
• The appliance has to be connected to the water
supply with the plastic pressure hose which has
been supplied together with the appliance (plastic
pressure hose combined with filter, EN61770,
10 bar).
• Installation of an IRG filter is recommended on the
construction side.
Drainage
• The flexible drain hose with an inner diameter of
22 mm is to be laid with no kinks.
• A return inhibitor is integrated into the machine’s
drainage and therefore connection fittings with
non-return valves are not necessary.
• The preferred connection is via the siphon of the
sink outlet next to the machine.
• The highest point of the drain hose is not to be
more than 600 mm above the floor.
34
Page 35

Building in
1. Stand the machine in front of the kitchen unit.
Place cable and hoses into the neighbouring unit.
2. Push the machine in, pull the cable and hoses
through and ensure that they do not become
kinked.
3. Line up the dishwasher and fix it on both sides in
the upper area of the tub casing.
Other fixing options: on the plinth.
Available as a special accessory (item no. 153 040201/3): additional bracket on the top.
35
Page 36

Electrical connection
Installation must be via a supply with a plug. The
plug must be accessible after the installation, or a
separation device with at least a 3 mm contact gap
must be provided in the permanent house wiring that
gives the appliance simultaneous all-pole separation
from the electrical supply in accordance with
NIN 2000.
Installation:
Install fuse, supply and socket in accordance with
the electrical schematic.
Wiring:
Heating element voltage 230 V
2.25 kW
36
Page 37

Servicestellen
Demonstration / Vente
5506 Mägenwil/Zürich
Industriestr. 10
9000 St. Gallen
Vonwilstrasse 15
4127 Birsfelden
Hauptstrasse 52
8604 Volketswil
Hölzliwisenstrasse 12
6032 Emmen
Buholzstrasse 1
7000 Chur
Comercialstrasse 19
3063 Ittigen/Bern
Ey 5
Ersatzteilverkauf
5506 Mägenwil
Industriestrasse 10
0848 848 023
8048 Zürich
Badenerstrase 587
044 405 81 11
Garantie
Nous octroyons sur chaque produit 2 ans de garantie à partir de la date de livraison ou de la mise en
service au consommateur (documenté au moyen
d’une facture, d’un bon de garantie ou d’un justificatif d’achat).
Notre garantie couvre les frais de mains d’œuvres et
de déplacement, ainsi que les pièces de rechange.
Les conditions de garantie ne sont pas valables en
cas d’intervention d’un tiers non autorisé, de l’emploi
de pièces de rechange non originales, d’erreurs de
maniement ou d’installation dues à l’inobservation
du mode d’emploi, et pour des dommages causés
par des influences extérieures ou de force majeure.
Fachberatung / Verkauf
8048 Zürich
Badenerstrasse 587
044 405 81 11
Garantie
Für jedes Produkt gewähren wir ab Verkauf bzw.
Lieferdatum an den Endverbraucher eine Garantie
von 2 Jahren. (Ausweis durch Garantieschein, Faktura oder Verkaufsbeleg).
Die Garantieleistung umfasst die Kosten für Material,
Arbeits- und Reisezeit.
Die Garantieleistung entfällt bei Nichtbeachtung der
Gebrauchsanweisung und Betriebsvorschriften, unsachgerechter Installation, sowie bei Beschädigung
durch äussere Einflüsse, höhere Gewalt, Eingriffe
Dritter und Verwendung von Nicht-Original Teilen.
Points de Service
1028 Préverenges
Le Trési 6
Servizio dopo vendita
6916 Grancia
Zona Industriale E
Vendita pezzi di ricambio
5506 Mägenwil
Industriestrasse 10
0848 848 023
Consulente (cucina) / Vendita
8048 Zürich
Badenerstrasse 587
044 405 81 11
Points de vente de rechange
5506 Mägenwil
Industriestrasse 10
0848 848 023
37
Page 38

Garanzia
Per ogni prodotto concediamo una garanzia di 2 anni
a partire dalla data di consegna o dalla sua messa in
funzione (fa stato la data della fattura, del certificato
di garanzia o dello scontrino d’acquisto).
Nella garanzia sono comprese le spese di manodopera, di viaggio e del materiale.
Dalla copertura sono esclusi il logoramento ed i danni causati da agenti esterni, intervento di terzi, utilizzo di ricambi non originali o dalla inosservanza delle
prescrizioni d’istallazione ed istruzioni per l’uso.
Ersatzteile, Zubehör und Pflegemittel
Schweiz: Sie können Ersatzteile, Zubehör und
Pflegemittel on-line bestellen bei http://www.electrolux.ch
Pièces détachées, accessoires et
produits d'entretien
Pour la Suisse : Vous pouvez commander des pièces
détachées, des accessoires et des produits d'entretien en ligne sur http://www.electrolux.ch
Ricambi, accessori e prodotti di
pulizia
Per la Svizzera: Ricambi, accessori e prodotti di
pulizia si possono ordinare direttamente sul sito internet http://www.electrolux.ch
38
Page 39

Service
In the event of technical faults, please first check
whether you can remedy the problem yourself with
the help of the operating instructions (section “What
to do if…”).
If you were not able to remedy the problem yourself,
please contact the Customer Care Department or
one of our service partners.
In order to be able to assist you quickly, we require
the following information:
– Model description
– Product number (PNC)
– Serial number (S No.)
(for numbers see rating plate)
– Typ e o f fau l t
– Any error messages displayed by the appliance
So that you have the necessary reference numbers
from your appliance at hand, we recommend that
you write them in here:
Model description: .....................................
PNC: .....................................
S No: .....................................
39
Page 40

822 612 744-00-120906-02 Subject to change without notice
The Electrolux Group. The world´s No.1 choice.
The Electrolux Group is the world´s largest producer of powered appliances for kitchen, cleaning and outdoor use. More than 55 million Electrolux Group products
(such as refrigerators, cookers, washing machines, vacuum cleaners, chain saws and lawn mowers) are sold each year to a value of approx. USD 14 billion in more
than 150 countries around the world.
 Loading...