

Page 1

FT 350 FRITESSE® PROFI
Friteuse
Deep Fryer
Friteuse
Friteuse
Fritéza
Gebrauchsanweisung
Operating instructions
Mode d’emploi
Gebruiksaanwijzing
Návod k pou¤ití
Page 2
Page 3

g
pen. Schütten Sie das Öl nie ins Spülbecken oder in den Abfluß.
Einzelteile der Friteuse reinigen.
3
Deckel(1), Fritierkorb(3), Fritierbehälter(5) und Gehäuse(6) können in der
Geschirrspülmachine oder per Handwäsche gereinigt werden. Der Dauerfilter im Deckel wird dabei automatisch
mitgereinigt. Es ist darauf zu achten,
daß der Deckel mit Dauerfilter nur im
trockenen Zustand eingebaut wird.
Das Bedienteil(2) mit dem Heizstab(4)
1
darf nie in Wasser getaucht oder unter
fließendes Wasser gehalten werden,
sondern nur mit einem leicht feuchten
Tuch abgewischt werden.
• Nach Zusammenbau der Friteuse neues
Öl oder vorgeschmolzenes Fett in den
Fritierbehälter(5) einfüllen.
Vermischen Sie nie neues Öl oder Fett
mit benutztem, sondern tauschen Sie
immer das gesamte Öl oder Fett aus.
Technische Daten
Netzspannung: 230V
Leistungsaufnahme: 2000W
Maximale Füllmenge: 3,5 Liter Öl
Dieses Gerät entspricht den folgenden
;
EG-Richtlinien:
• 73/23/EWG vom 19.2.1973 „Nieder-
spannungsrichtlinie“, einschließlich
Änderungsrichtlinie 93/68/EWG.
• 89/336/EWG vom 3.5.1989 „EMV-
Richtlinie“, einschließlich Änderungsrichtlinie 92/31/EWG.
Dear Customer,
g
Please read these operating instructions through carefully.
Above all please take note of the safety
instructions! Please k e e p t h e s e op e rating instructions for later reference. Pass
them on to any subsequent owner of
the appliance.
Safety or Readiness for Use
1
Information
3
Protecting the Environment
2
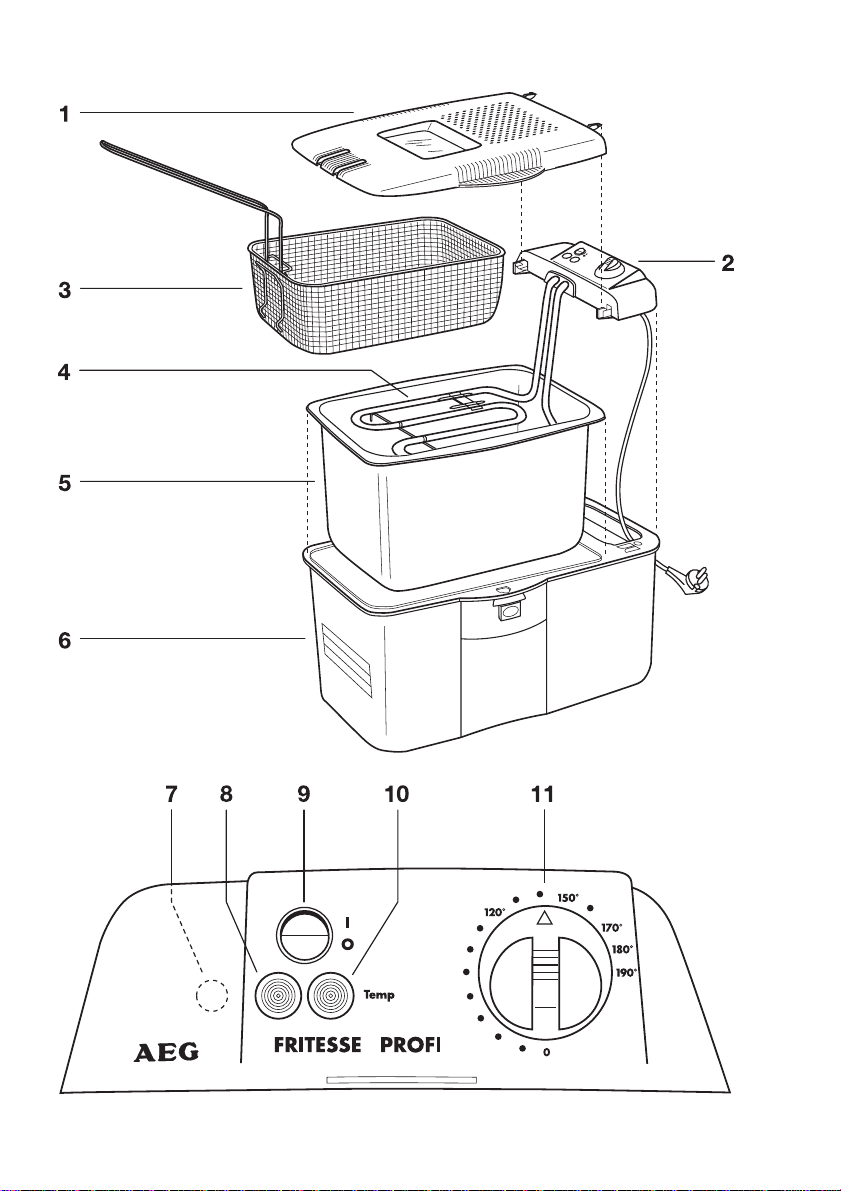
Description of the
appliance
Deep Fryer
1 Lid with long-life filter and viewing
window
2 Control section with mains cable
3 Basket (rust-free)
4 Heater element
5 Oil/fat container
6Housing
Control section
7 RESET knob for the thermal cut-out
(on the underside of the control sec-
tion)
8 Red pilot light (ON-/OFF Indicator)
9 ON/OFF Switch
10 Green pilot light for the oil tempera-
ture
11 Temperature regulator
Kundendienst
Für unsere Geräte gelten höchste Qualitätsansprüche. Sollte dennoch eine
Störung auftreten, für die Sie keinen
Hinweis in der Gebrauchsanweisung
finden, so wenden Sie sich an den
Fachhandel oder an den AEG-Kundendienst (Adressen stehen auf der vorletzten Seite).
6
Safety instructions
1
• The appliance may only be connected
to a mains supply of the same voltage
as that given on the identification
plate!
• The socket you use for the deep fryer
must be earthed and protected with a
fuse of at least 10 A.
Page 4

g
• Never use the flex to pull the plug out
of the socket but pull the actual plug.
• Never use the deep fryer if the housing
and/or the flex is damaged.
• Repairs to this appliance may only be
made by suitably qualified persons.
Improper repairs can give rise to significant hazards. If your appliance needs
repairing, please contact AEG Customer Service or your specialist dealer.
• If the appliance is used for purposes
other than those intended or used
incorrectly , no liability can be accepted
for any damage that may be caused.
Please note that the deep fryer is spe-
1
cially designed for frying and not for
cooking with other liquids.
• The deep fryer can only be switched on
if the control section(2) is properly
engaged in the retaining lugs on the
housing(6).
• Only switch on the deep fryer if there
is oil or molten fat in the oil/fat container(5). If an empty fryer is switched
on, the heater element(4) thermal cutout will trip (see THERMAL CUT-OUT).
• Ensure that the mains cable is fed
through the cable storage compartment, otherwise it may get trapped.
Only move the deep fryer when the oil
1
has cooled down (about 1 hour after
switching off the fryer) and the lid(1) is
locked. If the oil is hot there is a risk of
serious burns.
• Always unplug after use.
• Never submerge the control section(2)
– with the heater element(4) in water,
– hold under running water,
– or wash in a dishwasher ,
because the electrical components will
be damaged.
• Never use the deep fryer outdoors.
• If overheated, fat can easily self-ignite.
Dirty fat burns particularly easily.
If your oil or fat should happen to
catch fire – don’t panic! Unplug the
fryer immediately. If possible close the
lid(1) of the fryer. Extinguish the fire
by covering the fryer.
to extinguish a fat fire.
Never use water
Safety of children
Before switching on the deep fryer,
1
choose a place to stand the fryer that
is out of the reach of children.
• Never leave a deep fryer which is plugged into the mains, or still hot, unattended when children are around.
Disposal
2
Dispose of the packaging!
Dispose of the appliance packaging
correctly. All pac kagi ng materials are
environmentally sound and marked
with the symbol of the German recycling system ’Grüner Punkt’. The pakkaging can therefore be put out for
rubbish or burnt in a rubbish incinerator without causing a hazard to the
environment. The cardboard pakkaging elements are manufactured from
recycled paper and should be put in
the waste paper collection for recycling again.
Dispose of your old appliance!
As and when you cease to use your
appliance, please take it to a recycling
centre or to your specialist dealer who
will, for a small fee, dispose of it for
you.
Operating instructions
Before using for the first time.
• Wash the oil/fat container(5) and basket(3) with hot water and a little washing up liquid, do not use abrasive
cleaners. Dry both items well.
• Fill the oil/fat container(5) with 3.5
litres of vegetable oil. The oil level
be between the upper and lower
must
marks.
If you wish to fry with fat, the fat must
3
first be melted in a saucepan before
putting it in the oil/fat container(5).
Otherwise the thermal cut-out will trip
7
Page 5

g
because the fat will not be in contact
with the thermostat and the heater
element(4) will overheat.
Thermal cut-out
• If the thermal cut-out has been tripped, you must wait until the fryer has
cooled down.
• Then press the RESET knob(7) on the
underside of the control section(2).
• The deep fryer can now be used again.
Frying
The deep fryer must placed on a hori-
1
zontal, uncluttered surface and stand
squarely on all four rubber feet in
order to avoid it moving accidentally.
1. To open, press both the unlocking
knobs simultaneously. The lid opens
half way automatically.
2. Open the lid fully and remove the basket(3) from the oil/fat container(5).
3. Close the lid until it locks.
4. Switch the deep fryer on at the "On/
Off" switch (9). Set the temperature to
which the oil is to be heated using the
temperature regulator (11). Both pilot
lights are illuminated. The red pilot
light(8) is always illuminated as long as
the deep fryer is switched on. The
green pilot light(10) is extinguished as
soon as the desired temperature has
been reached.
5. Dry the food well and place in the basket(3).
6. To open, press both the unlocking
knobs simultaneously. The lid opens
half way automatically.
7. Open the lid fully and hang the bas-
ket(3) on the bracket on the oil/fat
container(5).
8. Close the lid until it locks.
9. Lift the basket(3) from the bracket
using the handle, and slowly lower it
into the oil until the food is completely
submerged.
10. When the food is cooked, switch off
the deep fryer at the "On/Off"
switch(9). The red pilot light(8) is extinguished.
11. With the lid still closed, hang the basket(3) on the bracket on the oil/fat
container(5) and allow the oil to drain
well.
12. After draining, press both unlocking
knobs simultaneously. The lid opens
half way automatically.
13. Open the lid fully, remove the basket(3).
After frying
1. Leave the deep fryer to cool (for at
least 1 hour).
2. Hang the basket(3) in the bracket on
the oil/fat container(5).
3. Fold the basket(3) handle inwards.
4. Close the lid of the deep fryer.
5. Roll up the mains cable and place in
the cable compartment under the control section(2).
8
Page 6

g
Tips for better frying
Never put salt or other seasoning on
1
the food as long as it is still in the basket(3) above the oil.
Frozen foods cool down the oil when
3
fried.
Therefore: remove ice from frozen
foods. Set the thermostat to 190 °C.
Submerge the basket(3) carefully in the
oil once the temperature set has been
reached. When lowering the basket
always keep a check on the oil for
foaming. If necessary, momentarily lift
the basket(3) back out of the oil.
If you fry a few slices of bread at
3
approx. 150 °C, any tainting of the fat
will disappear. When the fat ceases to
give off bubbles the bread can be
removed with a metal sieve. The taint
on the fat is reduced.
Cooking Table
FOOD FRYING TEMPE-
STARTERS
Canapés 1-3 min. 190
Prunes with bacon 2-3 min. 190
Prawn/fish croquettes 2-3 min. 180
Mussels 1-2 min. 160
Snails 2-5 min. 190
Oysters 1-2 min. 160
FISH
Filet of fish in
bread crumbs 3-4 min. 170
Sole 3-4 min. 180
Fish kebabs 3-4 min. 170
Trout 5-6 min. 170
MEAT
Beef kebabs 1-2 min. 190
Veal/pork kebabs 2-4 min. 180
Chops in breadcrumbs 5-6 min. 170
Legs of chicken 12-15 min. 165
Plain schnitzel 4-5 min. 170
Flat rissole 4-5 min. 170
Steak, neck
approx 250 gr. 8-10 min. 180
Sausages 4-6 min. 180
TIME RATURE
°C
°C
°C
°C
°C
°C
°C
°C
°C
°C
°C
°C
°C
°C
°C
°C
°C
°C
POTATOES
Chips, 1st fry 4-5 min. 160
Chips, 2nd fry 3 min. 190
Croquettes 2-3 min. 180
FROZEN FOODS
Chips 3-5 min. 190
Potato based dishes
e.g. croquettes 4-5 min. 190
Fish fingers 3-4 min. 190
Sea food 3-6 min. 190
FOOD IN BATTER
Vegetables 3-4 min. 180
Chicken pieces 10-15 min. 180
Prawns 3-4 min. 180
DESSERTS
Fruit in batter 5-6 min. 170
Doughnuts/pancakes 3-4 min. 180
Biscuits 3-6 min. 180
°C
°C
°C
°C
°C
°C
°C
°C
°C
°C
°C
°C
°C
9
Page 7

g
Cleaning and care
Unplug from the mains.
1
The fryer must be left to cool
1
down for 60 minutes after frying.
• After each use, wipe the housing and
lid with a soft, damp cloth to remove
splashes and spots of fat. Do not use
sharp objects or cleaners.
• The deep fryer should be fully cleaned
every time the oil is changed.
Changing the oil
Small food particles often fall to the
bottom of the oil/fat container(5)
when frying. Since the heater element(4) is above the base of the oil/fat
container(5), these particles do not get
stirred up the next time you use the
fryer; they remain at the bottom of the
container. It is sufficient to r emove any
food remnants (e.g. with a metal sieve)
after each use.
Heating oil to more than 180°C for
2
long periods reduces its quality. After
using 12 to 15 times or when the oil
foams unnaturally, change the oil as
follows:
Removing the oil/fat container(5)
1. Press both the unlocking knobs simultaneously. Lid opens half way automatically.
2. Open the lid fully, then tilt it slightly
until the hinge springs out of the
mounting on the control section(2).
3. Remove the lid.
4. Take out the basket(3).
5. Pull the control section(2) firmly
upwards and off the retaining lugs on
the housing(6).
6. Take the oil/fat container(5) out of the
housing.
Tip the used oil out of the oil/fat con-
2
tainer(5) into an appropriate container .
Never pour the oil into the sink or
down the drain.
Clean the individual parts of the deep
3
fryer.
The lid(1), basket(3), oil/fat container(5) and housing(6) can be washed
by hand or in the dishwasher. The longlife filter in the lid is automatically cleaned at the same time. It should be
ensured the lid with the long-life filter
is only reassembled when completely
dry.
The control section(2) with the heater
1
element(4) must never be submerged
in water or held under running water.
It should only be wiped with a damp
cloth.
• After assembling the deep fryer, f ill the
oil/fat container(5) with new oil or
melted fat.
Never mix new oil or fat with used,
always change all the oil or fat.
Technical data
Mains voltage: 230V
Power consumption: 2000W
Maximum capacity: 3.5 litres of oil
This appliance complies with the follo-
;
wing EC directives:
• 73/23/EEC of 19/2/1973 "Low
voltage directive", including the
modification directive 93/68/EEC.
• 89/336/EEC of 3/5/1989 "EMC direc-
tive", including the modification
directive 92/31/EEC.
Customer service
The highest quality requirements are
placed on our appliances. Should,
nevertheless, a malfunction occur on
which you can find no information in
the operating instructions, please contact your specialist dealer or AEG
Customer Service (addresses are on the
next to last page).
10
Page 8

AEG Kundendienst in Deutschland
AEG Kundendienst in Europa
Sollte dieses AEG Gerät wider Erwarten nicht
funktionieren, senden Sie es bitte an
folgende Adresse:
Beginnt die Postleitzahl Ihres Wohnortes
mit 2 - 3 - 4 - 5
AEG Kleingeräte-Zentralwerkstatt
Firma Elektro Stefan Irsen
Sachtlebenstraße 1, 41541 Dormagen
Beginnt die Postleitzahl Ihres Wohnortes
mit 0 - 1 - 6 - 7 - 8 - 9
AEG Kleingeräte-Zentralwerkstatt
Firma Trepesch GmbH
Steinstraße 500, 90419 Nürnberg
In Deutschland stehen wir Ihnen für Fragen,
Anregungen oder bei Problemen rund um unsere
Kleingeräte und
Raumpflegegeräte montags bis freitags
von 8 bis 18 Uhrzur Verfügung.
AEG Serviceline unter 01805-30 60 80*
Fax: 0911/ 3 23-49 19 30
E-Mail: service.kleingeraete@aeg-hausgeraete.de
*(Deutsche Telekom 0,12 Euro/min.)
Garantiebedingungen
Der Endabnehmer dieses Geräts (Verbraucher) hat bei einem
Kauf dieses Geräts von einem Unternehmer (Händler) in
Deutschland im Rahmen der Vorschriften über den Verbrauchsgüterkauf gesetzliche Rechte, die durch diese Garantie
nicht eingeschränkt werden. Diese Garantie räumt dem Verbraucher also zusätzliche Rechte ein. Dies vorausgeschickt, leisten wir, AEG Hausgeräte GmbH, gegenüber dem Verbraucher
Garantie für dieses Gerät für den Zeitraum von 24 Monaten ab Übergabe zu den folgenden Bedingungen:
1. Mit dieser Garantie haften wir dafür, dass dieses neu hergestellte Gerät im Zeitpunkt der Übergabe vom Händler an
den Verbraucher die in unserer Produktbeschreibung für
dieses Gerät aufgeführten Eigenschaften aufweist. Ein
Mangel liegt nur dann vor, wenn der Wert oder die
Gebrauchstauglichkeit dieses Geräts erheblich gemindert
ist. Zeigt sich der Mangel nach Ablauf von sechs (6) Monaten ab dem Übergabezeitpunkt, so hat der Verbraucher
nachzuweisen, dass das Gerät bereits im Übergabezeitpunkt mangelhaft war. Nicht unter diese Garantie fallen
Schäden oder Mängel aus nicht vorschriftsmäßiger Handhabung sowie Nichtbeachtung der Gebrauchsanweisungen.
2. Dieses Gerät fällt nur dann unter diese Garantie, wenn es
in einem der Mitgliedsstaaten der Europäischen Union
gekauft wurde, es bei Auftreten des Mangels in Deutschland betrieben wird und Garantieleistungen auch in
In diesen Ländern gelten die Garantiebedingungen der örtlichen
Vertriebsorganisationen. Diese können dort eingesehen werden.
In these countries our AEG sales organisations own guarantee
conditions are applicable. Please obtain further details direct.
Österreich, 4010 Linz, 0732 / 770101 - 30
Belgique/België, 1502 Lembeek, 02/363.04.44
Czech Republic, AEG Domaci spotebice, Praha 4, 1140 00
Danmark, 7000 Fredericia, 70 11 74 00
España, Madrid, 1-885-2700
France, 60307 Senlis, 03-44 62 24 24
Great Britain, Customer Servive 08706 055 055
Hellas, 18346 MOÓXATO, 01/4822646
Island, Reykjavik (Bræóurnir Ormsson hf), 91-3 88 20
Italia, 20394 Agrate Brianza (Milano), 39 / 68 99-8 39
Kroatien, 10000 Zagreb, 385 1 6323 333
Luxembourg, 1273 Luxembourg-Hamm, 4 24 31-433
Magyarország, 1142 Budapest, 36-1-252-773
Nederland, 2400 AC Alphen aan den Rijn, 0172-468 300
Norge, 0516 Oslo, 22 72 58 00
Poland, 02-034 Warszawa, 022 874 33 33
Portugal, 2635-445 Rio de Mouro, (01) 926 75 75
Romania, 713421 Bucaresti, 01-230-8730
Russia, 129090 Moscow, +7 095 956 2917, 937 7893
Slovakia, 81105 Bratislava, 07/4333 9757
Slovenija,
Tražaška 132, 1000 Ljubljana, 01 24 25 730
Schweiz/Svizzera, 5506 Mägenwil, 0848 848 348
Suomi, Porissa, puh. (02) 622 3300
Sverige, 10545 Stockholm, 08-738 60 00
Turkey, Tarlabasi cad no:35 Taksim/Istanbul-0, 262-7249420
Deutschland erbracht werden können. Mängel müssen uns
innerhalb von zwei (2) Monaten nach dessen Kenntnis
angezeigt werden.
3. Mängel dieses Geräts werden wir innerhalb angemessener
Frist nach Mitteilung des Mangels unentgeltlich beseitigen; die zu diesem Zweck erforderlichen Aufwendungen,
insbesondere Arbeits- und Materialkosten werden von uns
getragen. Über diese Nachbesserung hinausgehende
Ansprüche werden durch diese Garantie dem Verbraucher
nicht eingeräumt.
4. Im Garantiefall ist das Gerät vom Verbraucher an die für
seinen Wohnort zuständige AEG-Zentralwerkstatt zu versenden, wobei das Gerät gut zu verpacken ist und die vollständige Anschrift des Verbrauchers zusammen mit einer
kurzen Fehlerbeschreibung in das Paket zu legen ist. Zum
Nachweis des Garantie-Anspruchs ist der Sendung der Original-Kaufbeleg (Kassenzettel, Rechnung) beizufügen.
5. Garantieleistungen bewirken weder eine Verlängerung
noch einen Neubeginn der Garantiezeit für dieses Gerät;
ausgewechselte Teile gehen in unser Eigentum über.
6. Mängelansprüche aus dieser Garantie verjähren in zwei (2)
Jahren ab dem Zeitpunkt der Übergabe des Geräts vom
Händler an den Verbraucher, der durch den Original-Kaufbeleg (Kassenzettel, Rechnung) zu belegen ist; wenn dieses
Gerät gewerblich genutzt wird, beträgt die Verjährungsfrist sechs (6) Monate.
AEG Hausgeräte GmbH, D-90429 Nürnberg, Muggenhofer Straße 135 Änderungen vorbehalten
 Loading...