


ÖKO−FAVORIT 55750
Dishwasher
Instructions for use

Dear Customer
Please read these operating instructions carefully.
Please make sure you read the safety instructions on the first pages of these operating instructions! Keep the operating instructions for future reference. Pass them on to any future owners.
With the warning triangle and/or by means of key words (Caution!, Important!), informa− tion is emphasized which is important for your safety or the correct functioning of the ap− pliance. It is essential that this information is observed.
1.This symbol guides you step by step when operating the appliance.
2. . . .
3. . . .
Next to this symbol you receive additional in− formation and practical tips on using the ap− pliance.
Tips and information about the economical and environmentally friendly use of the ma− chine are marked with the clover.
These operating instructions contain information ab− out how to independently solve any problems which may arise. See "Remedying faults".
Please also take note of the contents of the «Service» section.
2
Content |
|
Safety Instructions . . . . . . . . . . . . . . . . . . . . . . . . . . . . . . . . . . . . . . . . . . . . . . . . . . . . . . . . . . |
4 |
Description of the Appliance . . . . . . . . . . . . . . . . . . . . . . . . . . . . . . . . . . . . . . . . . . . . . . . . . . |
6 |
Control Panel . . . . . . . . . . . . . . . . . . . . . . . . . . . . . . . . . . . . . . . . . . . . . . . . . . . . . . . . . . . . . . . . . . . |
6 |
General Hints & Tips . . . . . . . . . . . . . . . . . . . . . . . . . . . . . . . . . . . . . . . . . . . . . . . . . . . . . . . . . |
7 |
Prior to Using for the first Time . . . . . . . . . . . . . . . . . . . . . . . . . . . . . . . . . . . . . . . . . . . . . . . |
8 |
Filling with rinse . . . . . . . . . . . . . . . . . . . . . . . . . . . . . . . . . . . . . . . . . . . . . . . . . . . . . . . . . . . . . . . . |
8 |
Setting the rinse dosage . . . . . . . . . . . . . . . . . . . . . . . . . . . . . . . . . . . . . . . . . . . . . . . . . . . . . . . . . . . |
8 |
Filling the salt dispenser . . . . . . . . . . . . . . . . . . . . . . . . . . . . . . . . . . . . . . . . . . . . . . . . . . . . . . . . . . . |
8 |
Setting the Water Softener . . . . . . . . . . . . . . . . . . . . . . . . . . . . . . . . . . . . . . . . . . . . . . . . . . . . . . . . |
9 |
The first wash cycle . . . . . . . . . . . . . . . . . . . . . . . . . . . . . . . . . . . . . . . . . . . . . . . . . . . . . . . . . . . . . . |
9 |
Crockery Basket . . . . . . . . . . . . . . . . . . . . . . . . . . . . . . . . . . . . . . . . . . . . . . . . . . . . . . . . . . . . |
10 |
Cutlery basket . . . . . . . . . . . . . . . . . . . . . . . . . . . . . . . . . . . . . . . . . . . . . . . . . . . . . . . . . . . . . . . . . . . |
10 |
Lower basket . . . . . . . . . . . . . . . . . . . . . . . . . . . . . . . . . . . . . . . . . . . . . . . . . . . . . . . . . . . . . . . . . . . . |
11 |
Upper basket . . . . . . . . . . . . . . . . . . . . . . . . . . . . . . . . . . . . . . . . . . . . . . . . . . . . . . . . . . . . . . . . . . . |
13 |
Filling with detergent . . . . . . . . . . . . . . . . . . . . . . . . . . . . . . . . . . . . . . . . . . . . . . . . . . . . . . . . |
15 |
Selecting and starting the program . . . . . . . . . . . . . . . . . . . . . . . . . . . . . . . . . . . . . . . . . . . . |
15 |
Program display . . . . . . . . . . . . . . . . . . . . . . . . . . . . . . . . . . . . . . . . . . . . . . . . . . . . . . . . . . . . . . . . . |
16 |
Remaining running time . . . . . . . . . . . . . . . . . . . . . . . . . . . . . . . . . . . . . . . . . . . . . . . . . . . . . . . . . . |
16 |
End of the program . . . . . . . . . . . . . . . . . . . . . . . . . . . . . . . . . . . . . . . . . . . . . . . . . . . . . . . . . . . . . . |
16 |
Safety lock . . . . . . . . . . . . . . . . . . . . . . . . . . . . . . . . . . . . . . . . . . . . . . . . . . . . . . . . . . . . . . . . . . . . . |
16 |
Delay start . . . . . . . . . . . . . . . . . . . . . . . . . . . . . . . . . . . . . . . . . . . . . . . . . . . . . . . . . . . . . . . . . . . . . |
16 |
Correcting or Deleting the Program Selection / Pre−selected Start Time . . . . . . . . . . . . . . . . . . . . . . |
17 |
ECO button . . . . . . . . . . . . . . . . . . . . . . . . . . . . . . . . . . . . . . . . . . . . . . . . . . . . . . . . . . . . . . . . . . . . . |
17 |
Program Chart . . . . . . . . . . . . . . . . . . . . . . . . . . . . . . . . . . . . . . . . . . . . . . . . . . . . . . . . . . . . . . . . . . |
18 |
Mains power loss . . . . . . . . . . . . . . . . . . . . . . . . . . . . . . . . . . . . . . . . . . . . . . . . . . . . . . . . . . . . . . . . |
19 |
Error message . . . . . . . . . . . . . . . . . . . . . . . . . . . . . . . . . . . . . . . . . . . . . . . . . . . . . . . . . . . . . . . . . . . |
19 |
Unloading the crockery basket . . . . . . . . . . . . . . . . . . . . . . . . . . . . . . . . . . . . . . . . . . . . . . . . |
19 |
Cleaning and care . . . . . . . . . . . . . . . . . . . . . . . . . . . . . . . . . . . . . . . . . . . . . . . . . . . . . . . . . . . |
20 |
Internal Cleaning . . . . . . . . . . . . . . . . . . . . . . . . . . . . . . . . . . . . . . . . . . . . . . . . . . . . . . . . . . . . . . . . |
20 |
Re−filling the salt dispenser . . . . . . . . . . . . . . . . . . . . . . . . . . . . . . . . . . . . . . . . . . . . . . . . . . . . . . . . |
20 |
Refilling the rinse aid . . . . . . . . . . . . . . . . . . . . . . . . . . . . . . . . . . . . . . . . . . . . . . . . . . . . . . . . . . . . . |
20 |
Cleaning the large strainer . . . . . . . . . . . . . . . . . . . . . . . . . . . . . . . . . . . . . . . . . . . . . . . . . . . . . . . . . |
20 |
Cleaning the fine strainer . . . . . . . . . . . . . . . . . . . . . . . . . . . . . . . . . . . . . . . . . . . . . . . . . . . . . . . . . . |
21 |
Cleaning the spray arm nozzles . . . . . . . . . . . . . . . . . . . . . . . . . . . . . . . . . . . . . . . . . . . . . . . . . . . . . |
21 |
Cleaning the appliance . . . . . . . . . . . . . . . . . . . . . . . . . . . . . . . . . . . . . . . . . . . . . . . . . . . . . . . . . . . . |
22 |
Appliances with stainless steel outer surfaces . . . . . . . . . . . . . . . . . . . . . . . . . . . . . . . . . . . . . . . . . . |
22 |
Remedying faults . . . . . . . . . . . . . . . . . . . . . . . . . . . . . . . . . . . . . . . . . . . . . . . . . . . . . . . . . . . |
23 |
Service & Spare Parts . . . . . . . . . . . . . . . . . . . . . . . . . . . . . . . . . . . . . . . . . . . . . . . . . . . . . . . . |
25 |
Customer Care . . . . . . . . . . . . . . . . . . . . . . . . . . . . . . . . . . . . . . . . . . . . . . . . . . . . . . . . . . . . . . . . . . |
25 |
Technical Data . . . . . . . . . . . . . . . . . . . . . . . . . . . . . . . . . . . . . . . . . . . . . . . . . . . . . . . . . . . . . . |
26 |
Directives . . . . . . . . . . . . . . . . . . . . . . . . . . . . . . . . . . . . . . . . . . . . . . . . . . . . . . . . . . . . . . . . . . . . . . |
26 |
Installation Instructions UK . . . . . . . . . . . . . . . . . . . . . . . . . . . . . . . . . . . . . . . . . . . . . . . . . . . |
27 |
Water Supply Connections . . . . . . . . . . . . . . . . . . . . . . . . . . . . . . . . . . . . . . . . . . . . . . . . . . . . . . . . . |
27 |
Water outlet hose connection . . . . . . . . . . . . . . . . . . . . . . . . . . . . . . . . . . . . . . . . . . . . . . . . . . . . . . |
27 |
Electrical Connection . . . . . . . . . . . . . . . . . . . . . . . . . . . . . . . . . . . . . . . . . . . . . . . . . . . . . . . . . . . . . |
28 |
Assembly Instructions for the Side Rail Assembly Kit . . . . . . . . . . . . . . . . . . . . . . . . . . . . . . |
29 |
Installation . . . . . . . . . . . . . . . . . . . . . . . . . . . . . . . . . . . . . . . . . . . . . . . . . . . . . . . . . . . . . . . . . . . . . |
30 |
Technical Data . . . . . . . . . . . . . . . . . . . . . . . . . . . . . . . . . . . . . . . . . . . . . . . . . . . . . . . . . . . . . . . . . . |
30 |
Information for Test Institutes . . . . . . . . . . . . . . . . . . . . . . . . . . . . . . . . . . . . . . . . . . . . . . . . |
31 |
3
Safety Instructions
The safety aspects of this appliance comply with the accepted technical standards and the applicable safety regula− tions. Nevertheless, we consider it our obligation to make you aware of the following safety information:
Installation
•Any electrical work required to install this appliance should be carried out by a qualified electrician or competent person.
•Any plumbing work required to install this ap− pliance should be carried out by a qualified plumber or competent person.
•This appliance is heavy. Care should be taken when moving it.
•It is dangerous to alter the specifications or attempt to modify this product in any way.
•Care must be taken to ensure that the appliance does not stand on the electrical supply cable.
Child Safety
•This appliance is designed to be operated by adults. Children should not be allowed to tamper with the controls or play with the product.
•Keep all packaging well away from children.
•Keep all detergents in a safe place out of children’s reach.
•Keep children away from the appliance when the door is open, and take care when closing the door not to trap childrens fingers.
Before Use
•Check your dishwasher for any transport damage. Never connect a damaged appliance. If your ap− pliance is damaged contact your retailer.
•Before using your dishwasher for the first time, en− sure the voltage and current rating in your home is the same as indicated on the rating plate.
During use
•Items that are contaminated by petrol paint, steel or iron debris, corrosive, acidic or alkaline chemicals must not be washed in this dishwasher.
•Under no circumstances should you open the door whilst the appliance is in operation. Always turn off the appliance before opening the door.
•Only use detergent specifically designed for use in dishwashers.
•Long bladed knives stored in an upright position are a potential hazard.
•Long and/or sharp items of cutlery such as carving knives must be positioned horizontally in the upper basket.
•When finished loading or unloading close the door, as an open door can be a hazard.
•Isolate the appliance from the power supply and turn off the water supply after use.
•Care should be taken when cleaning the bottom door seal and hinge area as any exposed metal ed− ges may cut if care is not taken.
•This product should be serviced by an authorised Service Engineer, and only genuine spare parts should be used.
•Under no circumstances should you attempt to re− pair the machine yourself. Repairs carried out by in− experienced persons may cause injury or serious malfunctioning. Contact your local Service Force Centre.
•In the case of a fault, turn off the appliance, discon− nect the appliance from the water supply and con− tact your local Service Force Centre.
•Never sit or stand on the open door.
•If the power supply cable of your dishwasher is da− maged, it must be replaced by a cable available from your local Service Force Centre.
•The water protection system prevents any water da− maged providing:
−The dishwasher is connected to the mains sup− ply.
−The dishwasher is correctly installed.
4

Environmental Information
Packaging: All packing materials used are environmen− tally friendly and reusable. The cardboard parts are made from recycled paper, and the wood parts are un− treated. The plastics are marked as follows:
"PE" for polyethylene − e.g. packaging foil
"PS" for polystyrene
"POM" for polyoxymenthylene
Old appliances: When disposing of an old appliance, cut off the power supply cable and remove any door catches, to prevent young children being trapped in side.
Contact your local Council or Environmental Health Office to see if there are cycling facilities in your area.
Keep this instruction book for future reference and ensure it is passed on to any new owner.
5

Description of the Appliance
Dishwasher
Cover for spray arm
Centre spray arm
Coarse strainer Cutlery basket top
Fine strainer with micro−strainer Curtlery basket
Upper dish basket |
(height−adjustable) |
Setting switch for water softener |
Lower spray arm |
Water inlet valve: do not open, |
do not fill with water |
Salt container |
Lower basket |
Tank for rinse |
Dosage orifice for rinse |
Detergent container |
Rating plate |
Programme guide
Control Panel
Pre−rinse |
Dry |
|
Start time / Remaining time display |
Clean |
Rinse |
Programme end |
Programme sequence display |
|
|
||
|
|
Regenerating salt |
|
|
|
|
|
|
|
|
control lamp |
|
|
|
Clear rinse agen |
|
|
|
control lamp |
Half load Mains switch
Economy Stop
Program button Pre−rinse,
with control lamp Program button Quick,
with control lamp Program button Intensive, with control lamp
Program button Normal, with control lamp
Program button Gentle, with control lamp Delay start button
6
General Hints & Tips
To save energy:
•Do not prewash dishes under running water.
•Wait until the dishwasher is full before washing a load. If necessary use the rinse and hold button.
•If washing a reduced quantity of dishes up to maxi− mum of 50% of the capacity, use the half load but− ton (1/2).
•Always select a wash programme suitable for the type of crockery being washed and to the level of soiling (See Programme Chart).
•Follow the detergent dosage recommendations in this instruction book and the detergent manufac− turers instructions. Never over dose or under dose.
•Ensure the water softener is correctly set.
For best washing and drying results
•Before loading remove all scraps of food and soak very heavily soiled pots and pans.
•Arrange saucepans, cups and glasses etc. upside down.
•Tilt items with convex or concave surfaces so the water drains off easily.
•Avoid contact between the dishes as far as possible.
•Wait a few minutes before removing the dishes; in this way they will be cooler and the drying will be improved.
•Empty the lower basket first and then the upper basket; this will avoid water dripping from the up− per basket onto the dishes in the lower one.
•You will improve drying results by leaving the dish− washer door ajar for at least 15−30 minutes as soon as the programme finishes.
Items not suitable for dishwashers.
The following items should not be washed in the dishwasher (unless they are sold as dishwasher proof).
•Cutlery with wooden or horn handles or glued parts
•Bronze cutlery
•Saucepans with wooden handles
•Aluminium ware
•Crystal ware
•Leaded glass
•Plastic items
•Antique or fine decorated china
•Tin and copper items
•Artistic objects
•Wooden board
Crockery that may be suitable:
•Earthenware crockery can be washed in the dish− washer if the manufacturer has indicated that it is suitable.
•Some glazed finishes may fade after frequent ma− chine washing.
•Silver and aluminium parts tend to discolour during machine washing.
•Copper, pewter and brass tend to stain.
•A chemical reaction can occur between silver cut− lery and stainless steel cutlery. As a precaution do not wash together.
•Iron and cast iron objects can rust and stain other items.
•Certain types of decoration can discolour when washed in a dishwasher.
If in doubt check with the manufacturer of the item. When buying new dishes, ensure that they are dishwas− her proof.
For best results we recommend the use of Finish detergents, rinse aid and salt.
7
Prior to Using for the first Time
Do the following steps before using your dishwasher for the first time.
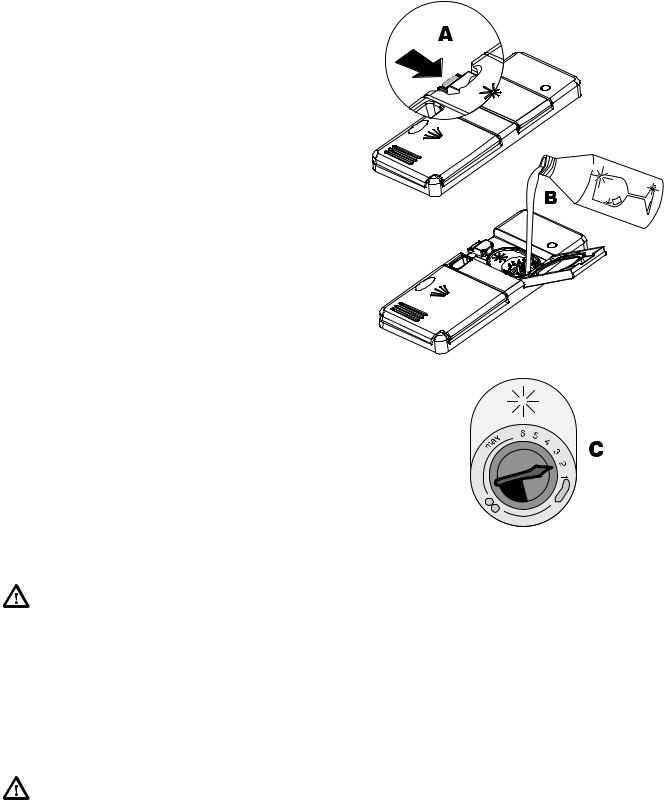
Fill with rins
1. Open the store tank by pressing the locking key if the pilot light of the rinse is on (A).
2. Pour in rinse up to the "max." marking (B). Do not fill up too much.
3. Close the store tank until it locks audibly.
4. Remove immediately any run out rinse otherwise foam development may occur.
The pilot light for the rinse switches off.
Setting the rinse dosage
1.Open the store tank by pressing the locking key (A).
2.Turn the dosage arrow (C) to the left by hand or by
a coin or screwdriver in order to increase the quan− tity. Setting ex works is step 2 (Perfect setting are steps 2 − 4).
3. Close the store tank.
Please follow chapter "Remedying faults " about it on page 24.
Filling the salt dispenser
Warning! Only use special salt for dishwashers. Other types of salt (e.g., cooking salt) often contain water−insoluble components which can block the water softener and may render it unserviceable.
Salt and detergent packages often look very similar. Detergent accidentally poured into the salt dispenser will damage the water softener. Each time you fill with special salt, ensure that you are really holding a salt package in your hand.
Never fill the salt dispenser with rinse aid or detergent!
8

Fill with salt as follows:
1.Open the cap (A) of the salt dispenser.
2.Fill the dispenser with water (B)
3.Fill with 1 kg of special salt (C). As a result, approx. 1 litre of water will be displaced.
4.Remove salt from around the opening of the dis− penser.
5.Close the salt dispenser by turning the cap until the stop is reached.
6.Immediately run the "Pre−rinse"program to wash away any salt residues.
The salt display will go out after 1 or 2 rinse cycles.
Do not remove the water feed valve, and do not fill with detergent for any reason.
Setting the Water Softener
The dishwasher is equipped with a water softener de− signed to remove minerals and salts from the water supply, which would have a detrimental or adverse ef− fect on the operation of the appliance.
The higher the content of these salts, the harder your water is.
The softener should be adjusted according to the hard− ness of the water in your area. Your local Water author− ity can advise you on the hardness of the water in your area.
Adjust the dosage as follows:
Turn the setting button using a coin or a screwdriver until the arrow on the knob points to the desired num− ber.
The arrow must point to a number and the po− sition must be engaged positively.
Clarke |
French degrees |
PPM (Parts |
Level |
||
degrees |
(°TH) |
per Million) |
|||
|
|||||
|
|
|
|
|
|
0 |
− 9 |
0 − 12,5 |
0 − 125 |
1 |
|
|
|
|
|
||
9 − 18 |
12,5 − 25 |
125 − 250 |
2 |
||
|
|
|
|
|
|
18 |
− 26 |
25 − 37,5 |
250 − 375 |
3 |
|
|
|
|
|
|
|
26 |
− 35 |
37,5 − 50 |
375 − 500 |
4 |
|
|
|
|
|
||
> 35 |
> 50 |
> 500 |
5 |
||
|
|
|
|
|
|
The first wash cycle
−When using for the first time, use the Intensive pro− gram.
A
B
C
4
3 5
2
1
9
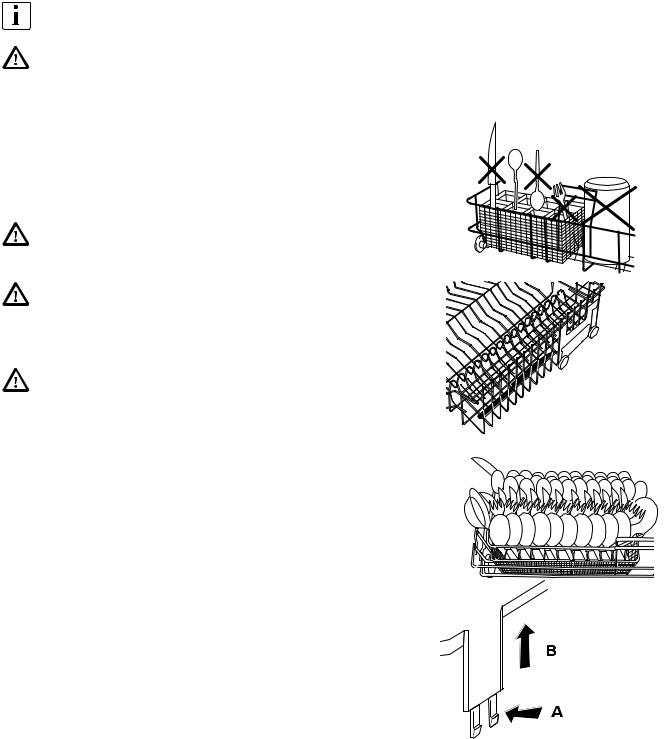
Crockery Basket
−Cutlery basket with top
−Lower basket
−Upper basket
The illustration gives you some tips for the op− timal loading of your dishwasher.
Before loading, remove any food scraps. Do not rinse with warm water or use a manual deter− gent.
Cutlery basket
Place cutlery in the cutlery basket with the handles downward.
Except for cutlery very narrow handles, which could penetrate through the cutlery basket and could block the spray arm.
Make sure that cutlery and tall articles near the basket handle do not prevent the lid of the de− tergent dispenser from opening.
Important:
Long bladed knives stored in an upright position are a potential hazard.
Long and / or sharp items of cutlery such as carving knives must be positioned horizon− tally in the upper basket.
Take care when loading or unloading sharp items such as knives.
Cutlery basket top
With the top fitted to the cutlery basket, the cutlery no longer touches. All parts are accessible for the water jet. In this way, cleaning and drying of the cutlery is im− proved.
Removing the cutlery basket top
−Press in the clips slightly (A) and remove the cutlery basket top upwards (B).
without cutlery basket top
with cutlery basket top
10
 Loading...