

Page 1

FAVORIT 99009
EN
DISHWASHER USER MANUAL
DE
GESCHIRRSPÜLER BENUTZERINFORMATION
27
2
Page 2

2
FOR PERFECT RESULTS
Thank you for choosing this AEG product. We have
created it to give you impeccable performance for many
years, with innovative technologies that help make life
simpler – features you might not find on ordinary
appliances. Please spend a few minutes reading to get the
very best from it.
ACCESSORIES AND CONSUMABLES
In the AEG webshop, you’ll find everything you need to
keep all your AEG appliances looking spotless and
working perfectly. Along with a wide range of accessories
designed and built to the high quality standards you
would expect, from specialist cookware to cutlery baskets,
from bottle holders to delicate laundry bags…
Visit the webshop at:
www.aeg-electrolux.com/shop
Page 3

CONTENTS
Contents
4 Safety information
7 Product description
8 Control panel
11 Use of the appliance
12 Setting the water softener
13 Use of dishwasher salt
14 Use of detergent and rinse aid
15 Multitab function
15 Loading cutlery and dishes
17 Washing programmes
19 Select and start a washing
programme
20 Care and cleaning
21 What to do if…
23 Technical data
24 Environment concerns
24 Installation
3
The following symbols are used in this user
manual:
Important information concerning your
personal safety and information on how to
avoid damaging the appliance.
General information and tips
Environmental information
Subject to change without notice
Page 4

4 Safety information
SAFETY INFORMATION
Before the installation and use, read this manual carefully:
• For your safety and the safety of your property.
• To help the environment.
• For the correct operation of the appliance.
Always keep these instructions with the appliance also if you move or give it to a different
person.
The manufacturer is not responsible if an incorrect installation and use causes damage.
Children and vulnerable persons safety
• Do not let persons, children included, with reduced physical sensory, reduced mental
functions or lack of experience and knowledge to use the appliance. They must have supervision or instruction for the operation of the appliance by a person who is responsible
for their safety.
• Keep all packaging away from children. There is the risk of suffocation or injury.
• Keep all detergents in a safe area. Do not let the children touch the detergents.
• Keep children and pets away from the appliance when the door is open.
General safety
• Do not change the specifications of this appliance. There is the risk of injury and damage
to the appliance.
• Obey the safety instructions from the detergent manufacturer to prevent burns to eyes,
mouth and throat.
• Do not drink the water from the appliance. Particles of detergent can stay in your appliance.
• Do not keep the appliance door open without supervision. This to prevent injury and to
fall on an open door.
• Do not sit or stand on the open door.
Use
• The appliance is only for domestic use. Do not use the appliance for other uses to prevent injury to persons and damage to property.
• Only use the appliance to clean accessories that are applicable for dishwashers.
• Do not put flammable products or items that are wet with flammable products in, near
or on the appliance. Risk of explosion or fire.
• Put the knives and all items with sharp points in the cutlery basket with their points
down. If not, put in a horizontal position in the upper basket or in the knife basket. (Not
all models have the knife basket).
• Use only specified products for dishwashers (detergent, salt, rinse aid).
• Types of salt that are not specified for dishwashers can cause damage to the water softener.
• Fill the appliance with salt before you start a washing programme. Remaining salt in the
appliance can cause corrosion or make a hole in the bottom of the appliance.
Page 5

Safety information
• Do not fill the rinse aid dispenser with other products than the rinse aid, (dishwasher
cleaning agent, liquid detergent). This can cause damage to the appliance.
• Make sure that the spray arms can move freely before you start a washing programme.
• The appliance can release hot steam if you open the door while a washing programme
operates. There is a risk of skin burns.
• Do not remove the dishes from the appliance until the washing programme is completed.
Care and cleaning
• Before you clean the appliance, deactivate it and disconnect the mains plug from the
mains socket.
• Do not use flammable products or products that can cause corrosion.
• Do not use the appliance without the filters. Make sure that the installation of the filters
is correct. An incorrect installation causes unsatisfactory washing results and damage to
the appliance.
• Do not use spray water or steam to clean the appliance. Risk of electrical shock and
damage to the appliance.
Installation
• Make sure that the appliance is not damaged. Do not install or connect a damaged appliance, contact the supplier.
• Remove all packaging before you install and use the appliance.
• Only a qualified person must do the electrical connection, the plumbing and the installation of the appliance. This to prevent the risks of structural damage or injury.
• Make sure that the mains plug is disconnected from the mains socket during installation.
• Do not drill into the sides of the appliance to prevent damage to hydraulic components
and electrical components.
5
Frost precautions
• Do not install the appliance where the temperature is less than 0 °C.
• The manufacturer is not responsible for frost damage.
Water connection
• Use new hoses to connect the appliance to the water supply. Do not use used hoses.
• Do not connect the appliance to new pipes or pipes not used for a long time. Let the
water flow for some minutes, then connect the inlet hose.
• Make sure not to squash or cause damage to the water hoses when you install the appliance.
• Make sure that the water couplings are tight to prevent a water leakage.
• The first time you use the appliance, make sure that the hoses do not have water leaks.
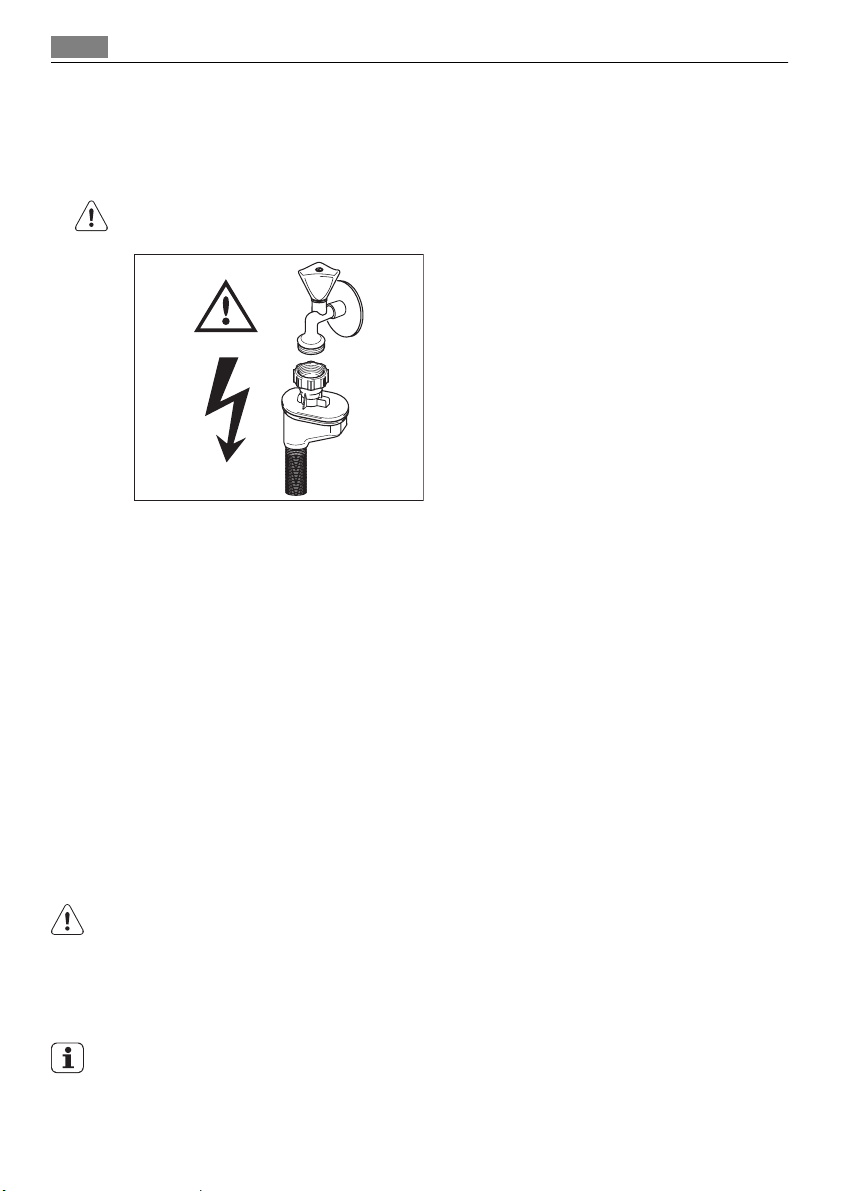
• The water inlet hose has a safety valve and a double sheath with an inner mains cable.
There is pressure in the water inlet hose only when the water flows. If there is a leak in
the water inlet hose, the safety valve interrupts the flow of water.
– Be careful when you connect the water inlet hose:
Page 6
6 Safety information
– Do not put the water inlet hose or the safety valve in water.
– If the water inlet hose or the safety valve are damaged, immediately disconnect the
mains plug from the mains socket.
– Contact the service centre to replace the water inlet hose with safety valve.
WARNING!
Dangerous voltage.
Electrical connection
• The appliance must be earthed.
• Make sure that the electrical information on the rating plate agrees with the power supply.
• Always use a correctly installed shockproof socket.
• Do not use multiple plugs and extension cables. There is a risk of fire.
• Do not replace or change the mains cable. Contact the service centre.
• Make sure not to squash or cause damage to the mains plug and cable behind the appliance.
• Make sure that there is access to the mains plug after the installation.
• Do not pull the mains cable to disconnect the appliance. Always pull the mains plug.
Internal lamp
This appliance has an internal lamp that comes on when you open the door and goes off
when the door is closed.
WARNING!
Visible led radiation, do not look directly into the beam.
The LED of the lamp is CLASS 2 and agrees with IEC 60825-1: 1993 + A1:1997 + A2:2001.
Emission wave length: 450 nm
Maximum emitted power: 548 μW
To replace the internal lamp, contact the service centre.
Disconnect the mains plug from the mains socket before the replacement of the internal
lamp.
Page 7
Product description
Service centre
• Only a qualified person can repair or work on the appliance. Contact the service centre.
• Use only original spare parts.
To discard the appliance
• To prevent the risk of injury or damage:
– Disconnect the mains plug from the mains socket.
– Cut off the mains cable and discard it.
– Remove the door catch. This prevents children or pets to be closed in the appliance.
There is a risk of suffocation.
– Discard the appliance at the local waste disposal centre.
WARNING!
The dishwasher detergents are dangerous and can cause corrosion !
• If an accident occurs with these detergents, contact immediately a physician.
• If the detergent gets into the mouth, contact immediately a physician.
• If the detergent gets into the eyes, contact immediately a physician and clean the eyes
with water.
• Keep dishwasher detergents in a safe area and out of children touch.
• Do not keep the appliance door open when there is detergent in the detergent dispenser.
• Fill the detergent dispenser only before you start a washing programme.
7
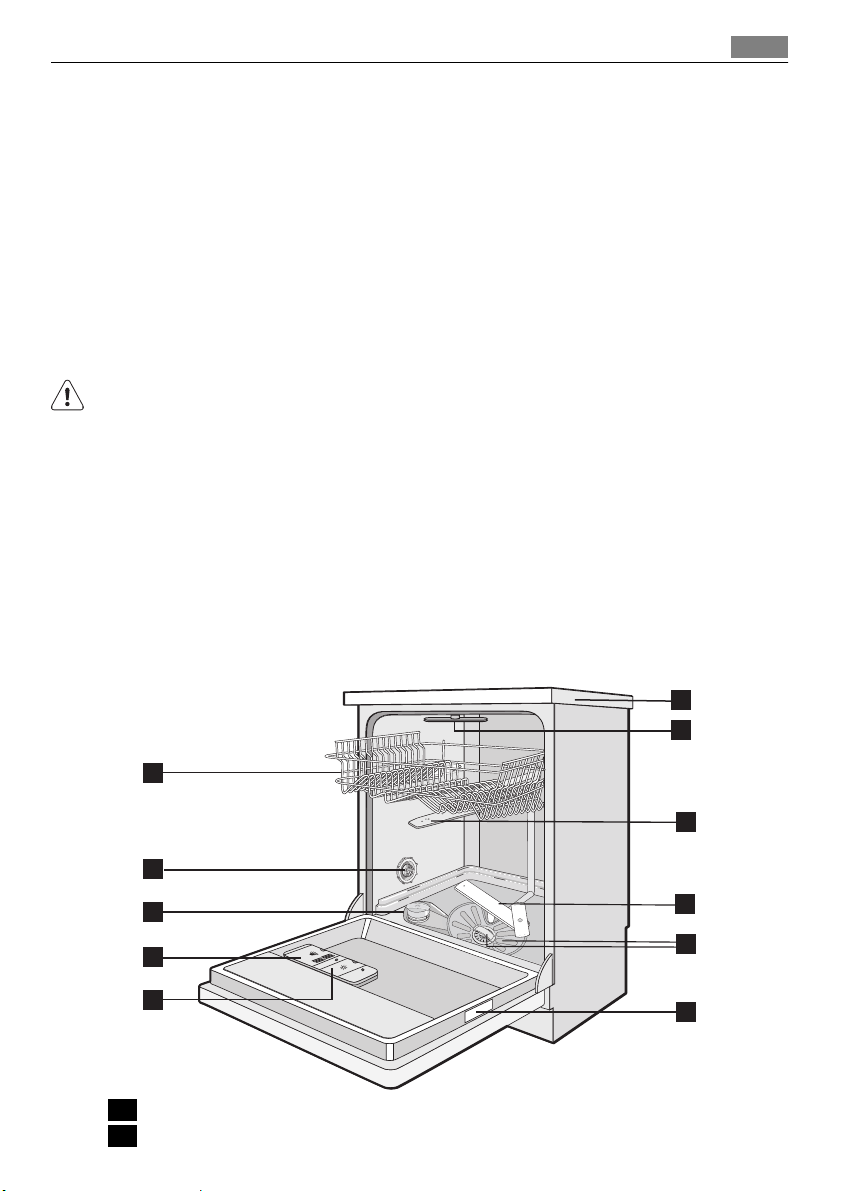
PRODUCT DESCRIPTION
1
2
3
4
5
1 Upper basket
2 Water hardness dial
11
10
9
8
7
6
Page 8
8 Control panel
3 Salt container
4 Detergent dispenser
5 Rinse aid dispenser
6 Rating plate
7 Filters
8 Lower spray arm
9 Upper spray arm
10 Top spray arm
11 Worktop
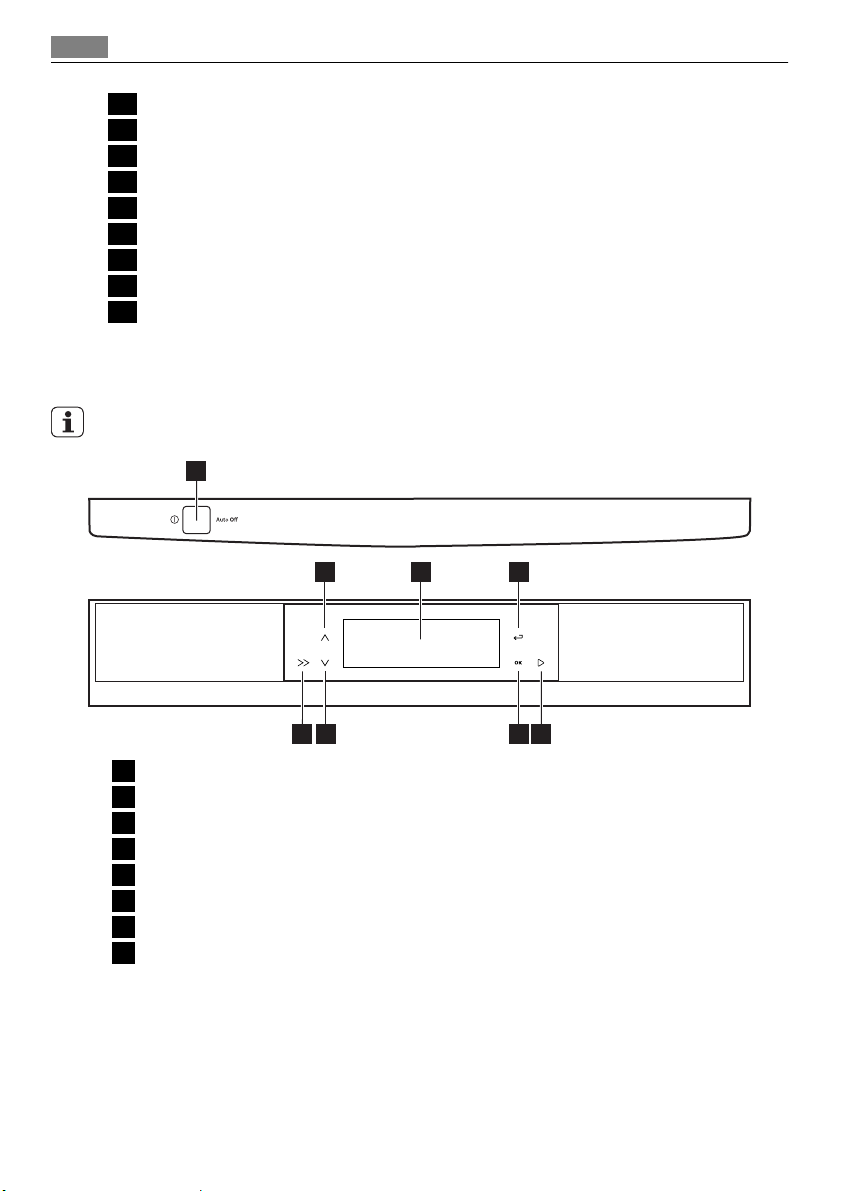
CONTROL PANEL
Messages in the display and acoustic signals help you to operate with the appliance.
1
2
7
8
3
4
6
5
1 On/off button
2 Menu touchpad (up)
3 Display
4 Return touchpad
5 Start touchpad
6 OK touchpad
7 Menu touchpad (down)
8 Display touchpad
On/off button
Press this button to activate or deactivate the appliance.
After ten minutes from the end of the washing programme, the Auto Off function automatically deactivates the appliance. This helps to decrease energy consumption.
Page 9
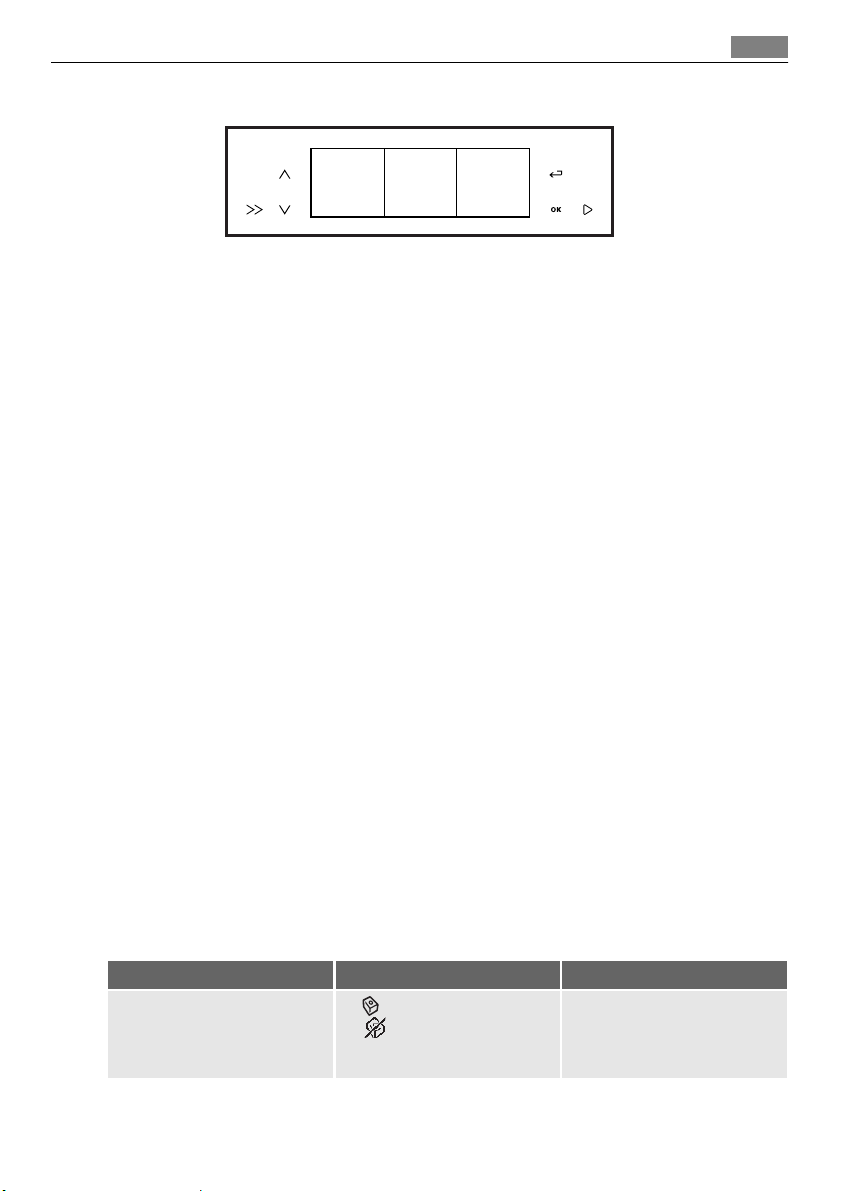
Display
Control panel 9
A
B
C
The display has three areas. To operate in an area, press the display touchpad until the edge
of the area comes on.
Programs area (A)
This area shows the menu with the washing programmes and the time of each programme.
To set the washing programme, refer to 'Washing programmes'.
1. Press the display touchpad to go to this area.
2. Press one of the menu touchpads. The display shows:
• The menu with the washing programmes
• The time of each programme
3. Press one of the menu touchpads to set a washing programme.
4. Press the OK touchpad. The display shows the three areas:
• Area (A) shows the washing programme and the time of the programme.
• Area (B) shows the end time of the washing programme.
End Time area (B)
You can delay the start of the washing programme from 1 to 24 hours.
1. Press the display touchpad to go to this area.
2. Press one of the menu touchpads to set the number of hours for the delay start.
• The upper part of the area shows the delay start.
• The lower part of the area shows the end time of the washing programme.
3. Press the OK touchpad.
4. Press the return touchpad to close the menu option and go back to area (A).
Options area (C)
1. Press the display touchpad to go to this area.
2. Press one of the menu touchpads to go through the menu option.
3. Press the OK touchpad to set a function or to open the submenu.
4. Press the return touchpad to close the menu option and go back to area (A).
Menu option
Multitab
Menu Submenu Description of the function
On
Off
If you use the combi detergent
tablets ('3 in 1', '4 in 1', '5 in 1'),
use the multitab function. Refer to 'Multitab function'.
Page 10

10 Control panel
Menu Submenu Description of the function
Extra hygiene
ProBoost
Settings Language english
Sound volume
Time You can set the time.
On
Off
On
Off
(Different languages are available).
On
Off
(5 levels are available).
This function gives better results for the hygiene. During
the rinsing phase, the temperature stays at 70 °C for 10 to 14
minutes.
This function increases the water pressure by 40%. This function gives better washing results when the dishes are very
dirty.
You can set the language of
the messages in the display.
You can adjust the volume of
all the acoustic signals.
Level 0 = volume off.
Factory setting: 5.
Brightness
(10 levels are available).
Contrast
(10 levels are available).
Reset settings You can go back to the factory
Water hardness
(10 levels are available).
Rinse aid
On
Off
Back To go back to the menu option.
Wash guide Program guide The display shows information
You can change the intensity
of the display.
Factory setting: 10.
You can change the contrast of
the display.
Factory setting: 6.
setting of the appliance.
You can adjust the level of the
water softener. Refer to 'Setting the water softener'.
Factory setting: 5.
You can activate the rinse aid
dispenser. This function is
available only when the multitab function is on.
about the washing programmes.
Page 11

Use of the appliance
Menu Submenu Description of the function
Option guide The display shows information
about the functions.
11
Demo mode
On
Off
Back To go back to the menu option.
Demo mode
1. Go to the menu option.
2. Go to Wash Guide .
3. Press the OK touchpad to open the submenu.
4. Go to Demo mode and activate the function.
5. Press the display touchpad.
• The display shows the three areas (A), (B) and (C).
• The top left corner of the display shows DEMO. The function is activated.
Deactivate the function to operate the appliance.
USE OF THE APPLIANCE
Activating the appliance for the first time
1. Activate the appliance.
2. The display shows the default language: Language English.
• Press the OK touchpad to confirm the default language
• Press one of the menu touchpads to set a different language and then press the OK
touchpad to confirm.
3. The display shows the time message.
4. Press one of the menu touchpads to set the time.
5. Press the OK touchpad.
6. The display goes to 'Programs' area.
You can simulate a washing
programme. Refer to Demo
mode .
Factory setting: Off .
Using the appliance
1. Be sure that the set level of the water softener agrees with the water hardness in your
area. If not, adjust the water softener.
2. Fill the salt container with dishwasher salt.
3. Fill the rinse aid dispenser with rinse aid.
4. Load cutlery and dishes into the appliance.
5. Set the correct washing programme for the type of load and soil.
6. Fill the detergent dispenser with the correct quantity of detergent.
Page 12
12 Setting the water softener
7. Start the washing programme.
If you use the combi detergent tablets ('3 in 1', '4 in 1', '5 in 1'), use the multitab function.
Refer to 'Multitab function'.
SETTING THE WATER SOFTENER
The water softener removes minerals and salts from the water supply. These minerals and
salts can cause damage to the appliance.
Adjust the level of the water softener if this does not agree with the water hardness in your
area.
Contact your local water authority to know the water hardness in your area.
Water hardness
German degrees
(°dH)
51 - 70 91 - 125 9,1 - 12,5 64 - 88
43 - 50 76 - 90 7,6 - 9,0 53 - 63
37 - 42 65 - 75 6,5 - 7,5 46 - 52
29 - 36 51 - 64 5,1 - 6,4 36 - 45
23 - 28 40 - 50 4,0 - 5,0 28 - 35
19 - 22 33 - 39 3,3 - 3,9 23 - 27
15 - 18 26 - 32 2,6 - 3,2 18 - 22 1 4
11 - 14 19 - 25 1,9 - 2,5 13 - 17 1 3
4 - 10 7 - 18 0,7 - 1,8 5 - 12 1 2
< 4 < 7 < 0,7 < 5
1) Factory position.
2) Do not use salt at this level.
French degrees
(TH°)
mmol/l Clarke de-
grees
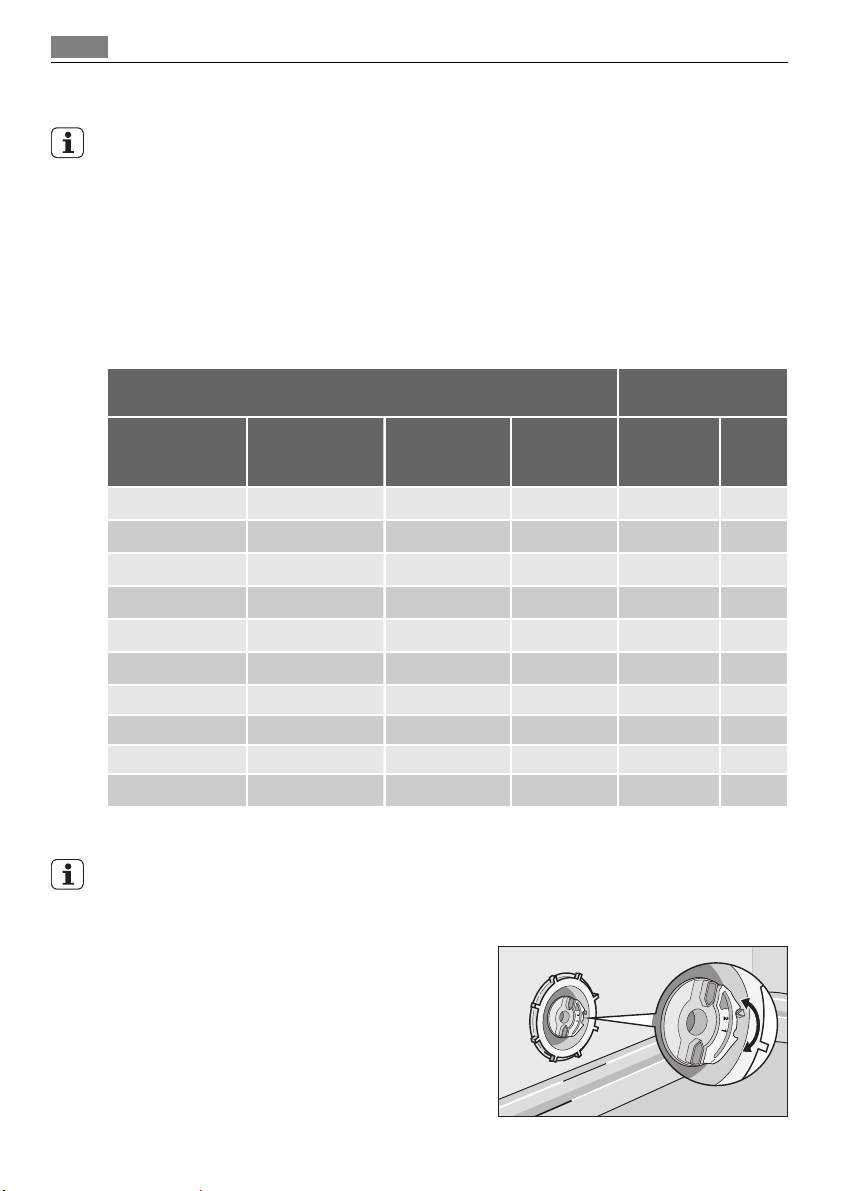
You must adjust the water softener manually and electronically.
Water hardness ad-
manually elec-
2
2
2
2
2
2
1
justment
1)
1)
1)
1)
1)
1)
2)
tronical-
ly
10
9
8
7
6
1)
5
2)
1
Manual adjustment
Turn the water hardness dial to the position 1 or 2
(refer to the table).
Page 13
Use of dishwasher salt 13
Electronic adjustment
1. Open the menu option.
2. Go to Settings .
3. Press the OK touchpad to open the submenu.
4. Go to Water hardness .
5. Press the OK touchpad.
6. Set the level of the water softener.
7. Press the OK touchpad.
8. Press the return touchpad to close the menu option.
USE OF DISHWASHER SALT
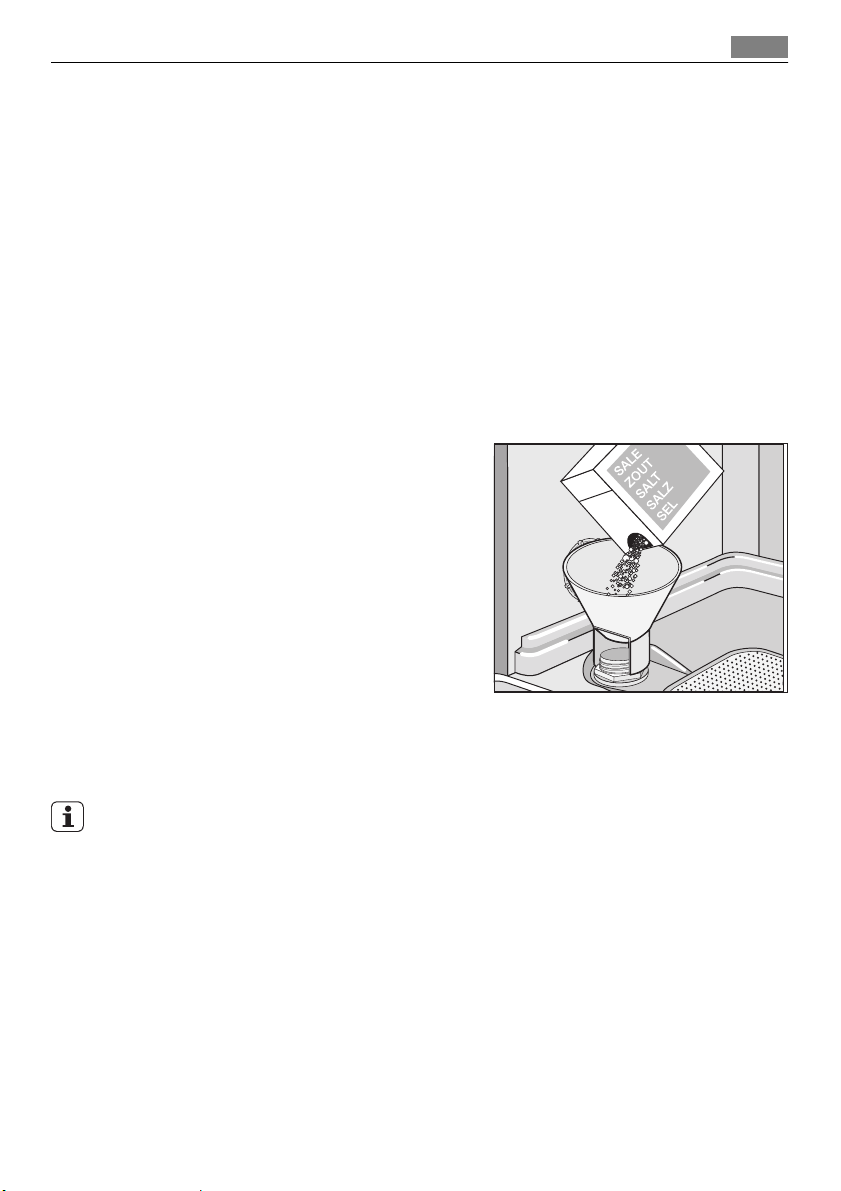
Filling the salt container
1. Turn the cap counterclockwise and open
the salt container.
2. Fill the salt container with 1 litre of water
(only for the first time you fill with salt).
3. Use the funnel to fill the salt container
with salt.
4. Remove the salt around the opening of
the salt container.
5. Turn the cap clockwise to close the salt
container.
When it is necessary to fill the salt container,
the display shows a message. The message
does not show while a washing programme operates.
After you fill the salt container, the display can continue to show the message for some
hours. This does not have an unwanted effect on the operation of the appliance
It is correct that water comes out from the salt container when you fill it with salt.
Page 14
20
30
M
A
X
1
2
3
4
+
-
14 Use of detergent and rinse aid
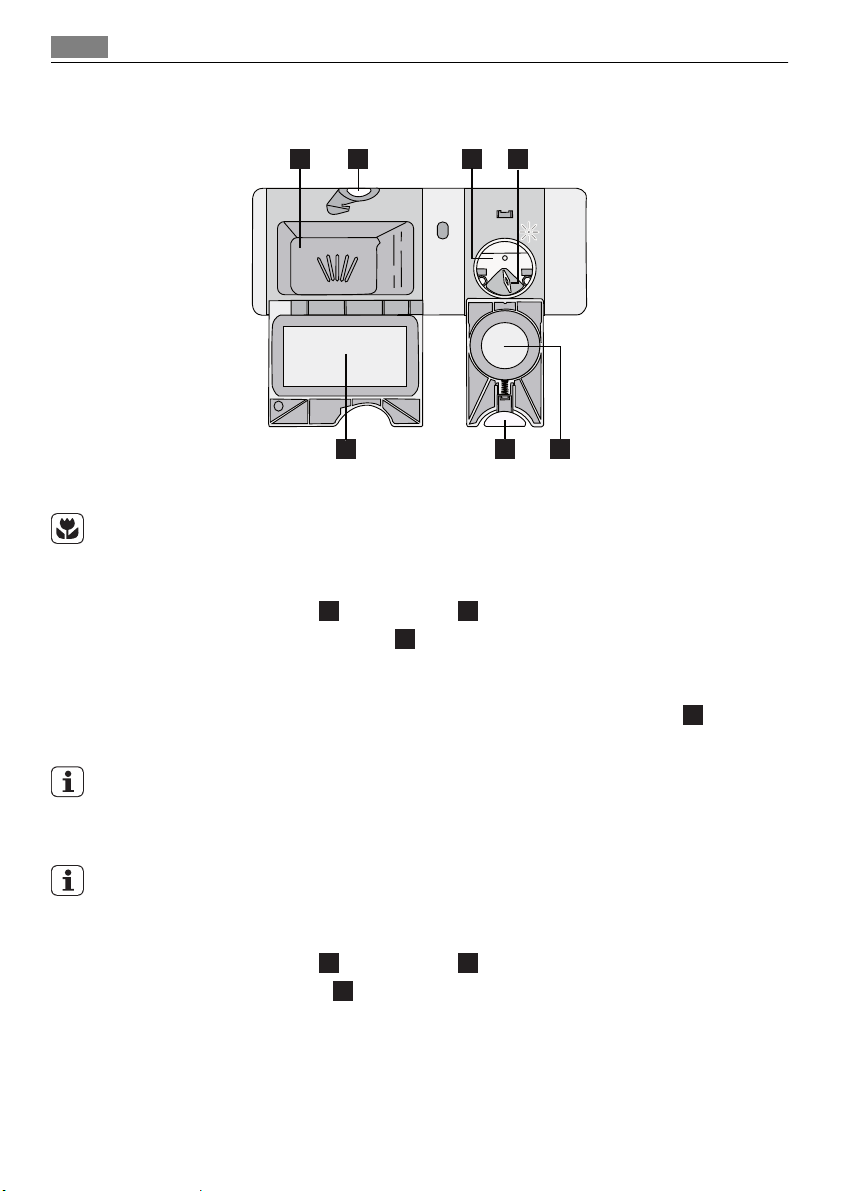
USE OF DETERGENT AND RINSE AID
1
2
7
3
4
6
5
Use of detergent
To help the environment, do not use more than the correct quantity of detergent.
Obey the instructions on the detergent packaging.
How to fill the detergent dispenser:
1.
Press the release button
2.
Put the detergent in the dispenser
3. If the washing programme has a prewash phase, put a small quantity of detergent on
the inner part of the appliance door.
4.
If you use the detergent tablets, put the tablet in the detergent dispenser
5. Close the detergent dispenser. Press the lid until it locks into position.
Use long washing programmes when you use the detergent tablets. These cannot fully dissolve with short washing programmes and can decrease the washing results.
to open the lid 7 of the detergent dispenser.
2
.
1
.
1
Use of rinse aid
Rinse aid makes it possible to dry the dishes without streaks and stains.
The rinse aid dispenser automatically adds rinse aid during the last rinsing phase.
Do these steps to fill the rinse aid dispenser:
1.
Press the release button
2.
Fill the rinse aid dispenser
3. Remove the spilled rinse aid with an absorbent cloth to prevent too much foam during
the washing programme.
4. Close the rinse aid dispenser. Press the lid until it locks into position.
When it is necessary to fill the rinse aid dispenser, the display shows a message. The message does not show while a washing programme operates.
to open the lid 5 of the rinse aid dispenser.
6
with rinse aid. The mark 'max' shows the maximum level.
3
Page 15
Multitab function
Adjust the rinse aid dosage
Factory set: position 3.
You can set the rinse aid dosage between position 1 (lowest dosage) and position 4 (highest
dosage).
Turn the rinse aid selector
to increase or decrease the dosage.
4
MULTITAB FUNCTION
The multitab function is for combi detergent tablets.
These tablets contain agents as detergent, rinse aid and dishwasher salt. Some types of tablets can contain other agents.
Be sure that these tablets are applicable for the water hardness in your area (refer to the
instructions on the packaging of the products).
The multitab function deactivates the flow of rinse aid and salt.
The multitab function deactivates the salt and the rinse aid messages.
The programme duration can increase if you use the multitab function.
Activate or deactivate the multitab function before the start of a washing programme. You
cannot activate or deactivate the function when a washing programme operates.
To activate the multitab function
1. Open the menu option.
2. Go to Multitab and activate the multitab function.
• When you activate the multitab function, it stays on until you deactivate it.
3. Press the OK touchpad.
4. Press the return touchpad to close the menu option.
To deactivate the multitab function and use separately detergent, salt and rinse aid
1. Open the menu option.
2. Go to Multitab and deactivate the multitab function.
3. Press the OK touchpad.
4. Press the return touchpad to close the menu option.
5. Fill the salt container and the rinse aid dispenser.
6. Adjust the water hardness to the highest level.
7. Start a washing programme without dishes.
8. When the washing programme is completed, adjust the water softener to the water
hardness in your area.
9. Adjust the quantity of rinse aid.
15
LOADING CUTLERY AND DISHES
Refer to the leaflet 'Examples of ProClean loads'.
Page 16
16 Loading cutlery and dishes
Hints and tips
• Do not put in the appliance items that can absorb water (sponges, household cloths).
• Remove the remaining food from the items.
• Make soft the remaining burned food on the items.
• Put hollow items (cups, glasses and pans) with the opening down.
• Make sure that water does not collect in containers or in bowls.
• Make sure that cutlery and dishes do not bond together.
• Make sure that the glasses do not touch other glasses.
• Put small items in the cutlery basket.
• Mix the spoons with other cutlery to prevent them to bond together.
• When you put the items in the baskets, make sure that the water can touch all surfaces.
• Put light items in the upper basket. Make sure that the items do not move.
• Water droplets can collect on plastic items and non-stick pans.
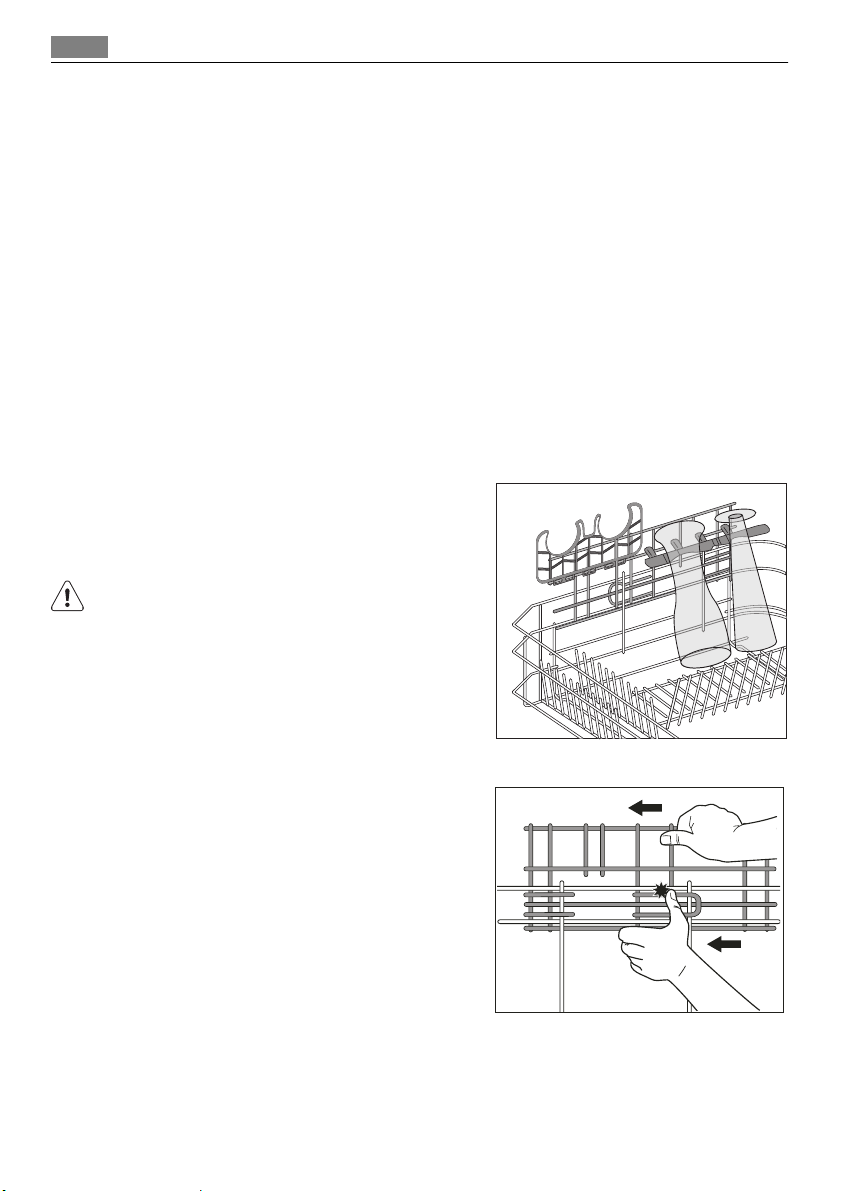
Beer glass holders
The beer glass holders prevent beer glasses to
move while a washing programme operates.
If you do not use the holders, fold them up or remove them. You can also remove the support.
WARNING!
Be careful when you disengage or engage the support.
To remove the holders and the support, do these steps:
1. Disengage the holders from the support
and remove them.
2. Push the support to the rear part of the
basket to disengage it.
Page 17
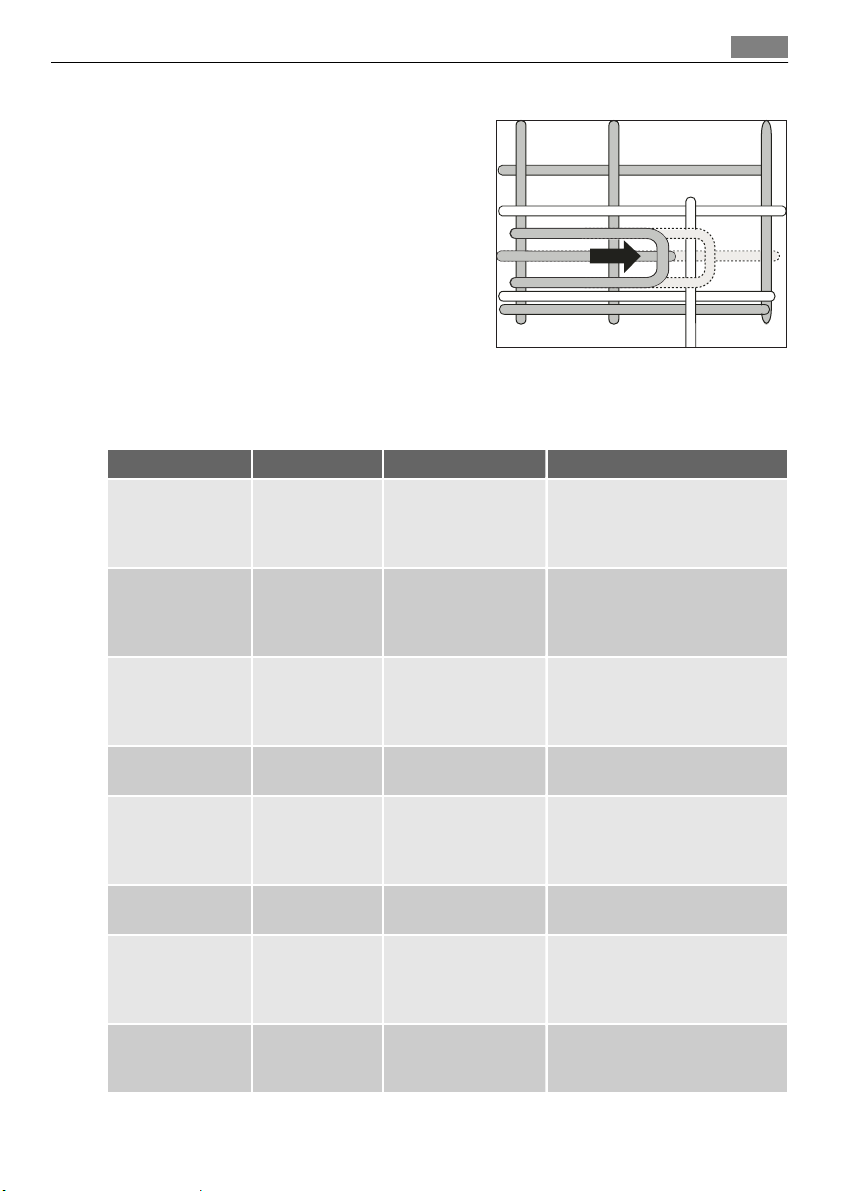
To engage the holders and the support, do these steps:
1. Push the support to the front part of the
basket to engage it.
2. Engage the holders on the support.
WASHING PROGRAMMES
Programme Type of soil Type of load Programme description
Automatic
1)
70° Pro Heavy soil Crockery, cutlery, pots
Extra silent
60° Quick
50° Energy
2)
3)
4)
50 Minutes Light soil Crockery and cutlery Wash 55 °C
5)
ProZone
45° Glass Normal or light
All Crockery, cutlery, pots
Normal soil Crockery and cutlery Prewash
Fresh soil Crockery and cutlery Wash 60 °C
Normal soil Crockery and cutlery Prewash
Mixed soil Crockery, cutlery, pots
soil
and pans
and pans
and pans
Delicate crockery and
glassware
Washing programmes 17
Prewash
Wash 45 °C or 70 °C
Rinses
Dry
Prewash
Wash 70 °C
Rinses
Dry
Wash 50 °C
Rinses
Dry
Rinse
Wash 50 °C
Rinses
Dry
Rinses
Prewash
Wash 70 °C
Rinses
Dry
Wash 45 °C
Rinses
Dry
Page 18

18 Washing programmes
Programme Type of soil Type of load Programme description
Prewash Use this programme to quickly rinse the
dishes. This prevents the remaining food
to bond on the dishes and bad odours to
come out from the appliance.
Do not use detergent with this programme.
1) The appliance senses the type of soil and the quantity of items in the baskets. It automatically adjusts the
temperature and quantity of the water, the energy consumption and the programme time.
2) This is the most silent washing programme. The pump works at a very low speed to decrease the level of noise.
Because of the low speed, the programme time is long.
3) With this programme you can wash a load with fresh soil. It gives good washing results in a short time.
4) This is the standard programme for test institutes. With this programme you have the most efficient use of
water and energy consumption for crockery and cutlery with normal soil. Refer to the supplied leaflet for test
information.
5) With this programme you can wash a load with mixed soil. Very heavy soil in the lower basket and normal soil in
the upper basket. The water pressure in the lower basket is three times higher than in the upper basket. The
temperature of the water in the lower basket is 25% higher than in the upper basket.
Functions
Programme Extra hygiene ProBoost
Automatic Yes, with effect Yes, without effect
70° Pro Yes, without effect Yes, with effect
Extra silent Yes, without effect Yes, without effect
60° quick Yes, with effect Yes, without effect
50° Energy Yes, with effect Yes, without effect
50 Minutes Yes, with effect Yes, without effect
ProZone Yes, without effect Yes, without effect
45° Glass Yes, without effect Yes, without effect
Prewash Yes, without effect Yes, without effect
Consumption values
Programme
1)
Energy (kWh) Water (litre)
Automatic 0,9 - 1,7 8 - 15
70° Pro 1,4 - 1,6 13 - 14
Extra silent 1,1 - 1,2 9 - 11
60° Quick 0,8 9
50° Energy 0,9 - 1,0 9 - 11
50 Minutes 1,0 - 1,1 10 - 11
ProZone 1,3 - 1,5 14 - 15
45° Glass 0,8 - 0,9 11 - 12
Prewash 0,1 4
1) The display shows the programme time.
Rinse
Page 19

Select and start a washing programme
The water pressure and temperature, the variations of the mains supply and the quantity of
dishes can change the consumption values.
SELECT AND START A WASHING PROGRAMME
Starting the washing programme
1. Close the appliance door.
2. Activate the appliance.
3. Set the washing programme and functions.
4. Press the start touchpad, the countdown of the delay start or the washing programme
starts automatically.
• The start of the appliance does not automatically occur if the salt container and the
rinse aid dispenser are empty. The related messages show in the display. Press again
the start touchpad, the countdown of the delay start or the washing programme
starts.
• When the countdown of the delay start is completed, the washing programme starts
automatically.
The opening of the appliance door interrupts the countdown of the delay start. When you
close the door, the countdown continues from the point of interruption.
Cancelling the delay start
1. Press the start touchpad.
2. Follow the indications in the display to cancel the delay start.
3. Press the start touchpad. The washing programme starts automatically.
19
Interruption of a washing programme
• Open the appliance door.
– The washing programme stops.
• Close the appliance door.
– The washing programme continues from the point of interruption.
Cancelling the washing programme
If the washing programme has not started, you can change the selection.
To change the selection while the washing programme operates, it is necessary to cancel
the programme.
1. Press the start touchpad.
2. Follow the indications in the display to cancel the washing programme.
Make sure that there is detergent in the detergent dispenser before you start a new washing programme.
End of the washing programme
When the washing programme is completed, an intermittent acoustic signal sounds and the
display shows a message.
Page 20

20 Care and cleaning
1. Deactivate the appliance.
2. Open the appliance door.
3. For better drying results, keep the appliance door ajar for some minutes.
Remove the items from the baskets
• Let the dishes become cold before you remove them from the appliance. Hot dishes can
be easily damaged.
• First remove the items from the lower basket, then from the upper basket.
• There can be water on the sides and on the door of the appliance. Stainless steel be-
comes cool more quickly than the dishes.
CARE AND CLEANING
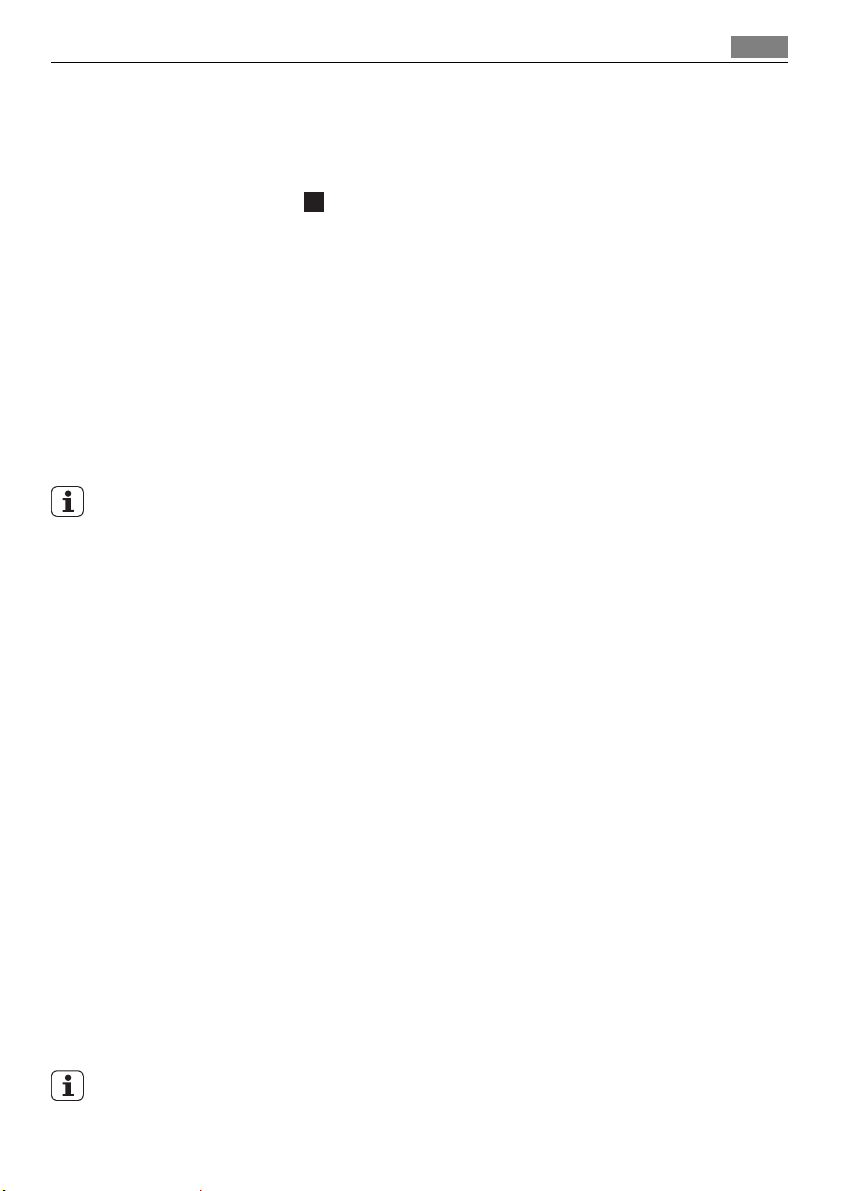
To remove and clean the filters
Dirty filters decrease the washing results.
Although the maintenance is very low with these filters, make a check at intervals and if
necessary, clean them.
1. Turn the filter (A) counterclockwise and
remove it out from filter (B).
2. Filter (A) has two parts. To disassemble the
filter, pull them apart.
3. Fully clean the parts with water.
4. Put the two parts of the filter (A) together
and push. Make sure that they assemble
correctly in each other.
5. Remove the filter (B).
6. Fully clean the filter (B) with water.
B
A
Page 21

What to do if… 21
7. Put the filter (B) to its initial position.
Make sure that it assembles correctly in
the two guides (C).
8. Put the filter (A) into position in filter (B).
Turn the filter (A) clockwise until it locks.
To clean the spray arms
Do not remove the spray arms.
If the holes in the spray arms become clogged, remove remaining parts of soil with a thin
pointed object.
To clean the external surfaces
Clean the external surfaces of the appliance and control panel with a moist soft cloth.
Only use neutral detergents.
Do not use abrasive products, abrasive cleaning pads or solvents (acetone).
WHAT TO DO IF…
C
The start of the appliance does not occur or it stops during operation.
Try to find a solution to the problem. Refer to the indications in the table.
With some malfunctions, the display shows a message and an intermittent acoustic signal operates.
WARNING!
Deactivate the appliance before you do the checks.
Malfunction Possible cause Possible solution
The appliance does not fill with
water.
The water pressure is too low. Contact your local water au-
The water tap is closed. Open the water tap.
The filter in the water inlet
The connection of the water
The water inlet hose is dam-
The water tap is blocked or
there is limescale on it.
hose is blocked.
inlet hose is not correct.
aged.
Clean the water tap.
thority.
Clean the filter.
Make sure that the connection
is correct.
Make sure that the water inlet
hose has no damages.
Page 22

22 What to do if…
Malfunction Possible cause Possible solution
The appliance does not drain
the water.
The connection of the water
The water drain hose is dam-
The anti-flood device operates. Close the water tap and con-
The start of the washing programme does not occur.
You did not press the start
The mains plug is not connec-
Blow out fuse in the house
The delay start is set. Cancel the delay start.
When the countdown is com-
There is a blockage in the sink
spigot.
drain hose is not correct.
aged.
The appliance door is open. A
message shows in the display.
touchpad.
ted in the mains socket.
fuse box.
Clean the sink spigot.
Make sure that the connection
is correct.
Make sure that the water drain
hose has no damages.
tact the service centre.
Close the appliance door.
Press the start touchpad.
Connect the mains plug.
Replace the fuse.
pleted, the washing programme starts automatically.
After the check, activate the appliance. The programme continues from the point of interruption.
If the malfunction occurs again, contact the service centre.
If the display shows other malfunction messages, contact the service centre.
The necessary information for the service centre is on the rating plate.
Record this information.
– Model (MOD.) ........................................................
– Product number (PNC) ..........................................
– Serial number (S.N.) ..............................................
The washing results and drying results are not satisfactory
Problem Possible cause Possible solution
The dishes are not clean. The washing programme was
not applicable for the type of
load and soil.
You did not put the items cor-
rectly in the baskets, water did
not touch all surfaces.
The spray arms could not turn
freely. Incorrect position of the
items in the baskets.
Make sure that the washing
programme is applicable for
the type of load and soil.
Put the items correctly in the
baskets.
Make sure that an incorrect position of the items do not cause
the blockage of the spray arms.
Page 23

Problem Possible cause Possible solution
The filters are dirty or not as-
The quantity of detergent was
Limescale particles on the
dishes.
Incorrect level of the water
The salt container cap is not
There are streaks, whitish
stains, or a bluish layer on
glasses and dishes.
Dry water drop stains on
glasses and dishes.
The detergent can be the
The dishes are wet. The washing programme was
The dishes are wet and matt. The rinse aid dispenser is emp-
The multitab function is on
sembled and installed correctly.
not sufficient or missing.
The salt container is empty. Fill the salt container with dish-
softener adjustment.
closed correctly.
The rinse aid quantity is too
high.
The rinse aid quantity is too
low.
cause.
without a drying phase or with
a decreased drying phase.
ty.
(this function automatically
deactivates the rinse aid dispenser).
Technical data 23
Make sure that the filters are
clean and correctly assembled
and installed.
Make sure that the quantity of
detergent is sufficient.
washer salt.
Adjust the water softener with
the correct level.
Make sure that the salt con-
tainer cap is closed correctly.
Decrease the rinse aid quantity.
Increase the rinse aid quantity.
Use a different brand of detergent.
For better drying results, keep
the door ajar for some minutes.
Fill the rinse aid dispenser with
rinse aid.
Activate the rinse aid dispenser.
Activating the rinse aid dispenser
1. Open the menu option.
2. Go to Settings .
3. Press the OK touchpad to open the submenu.
4. Go to Rinse aid and activate the rinse aid dispenser.
5. Press the OK touchpad.
6. Press the return touchpad to close the menu option.
TECHNICAL DATA
Dimensions Width 596 mm
Height 850 mm
Depth 625 mm
Page 24

24 Environment concerns
Water supply pressure Minimum 0,5 bar (0,05 MPa)
Maximum 8 bar (0,8 MPa)
Water supply
Capacity Place settings 12
1) Connect the water inlet hose to a water tap with a 3/4'' thread.
The rating plate on the inner edge of the appliance door shows the electrical connection
data.
If the hot water comes from alternative sources of energy, (e.g. solar panels, photovoltaic
panels and aeolian), use a hot water supply to decrease energy consumption.
1)
Cold water or hot water maximum 60 °C
ENVIRONMENT CONCERNS
The symbol on the product or on its packaging indicates that this product may not be
treated as household waste. Instead it should be taken to the appropriate collection point
for the recycling of electrical and electronic equipment. By ensuring this product is
disposed of correctly, you will help prevent potential negative consequences for the
environment and human health, which could otherwise be caused by inappropriate waste
handling of this product. For more detailed information about recycling of this product,
please contact your local council, your household waste disposal service or the shop where
you purchased the product.
Recycle the materials with the symbol
recycle it.
. Put the packaging in applicable containers to
INSTALLATION
Installation under a counter
Put the appliance adjacent to a water tap and a water drain.
Remove the appliance worktop to install it under a sink unit or a kitchen worktop.
Page 25

Make sure that the dimensions of the recess
agree with the dimensions in the picture.
How to remove the appliance worktop
1. Remove the rear screws (1).
2. Pull the worktop from the behind of the
appliance (2).
Installation 25
3. Lift the worktop and move it from the
front slots (3).
4. Use the adjustable feet to adjust the level
of the appliance.
5. Install the appliance under the kitchen
worktop. Do not squash or bend the water
hoses during the installation.
To adjust the level of the appliance
A correct level of the appliance lets the door to close and seal correctly.
With an incorrect appliance level, the door does catches on the sides of the cabinet.
Loosen or tighten the adjustable feet to make the appliance level.
Water drain connection
Connect the water drain hose to:
• The sink spigot and attach it under the work surface. This prevents that the waste water
from the sink goes back into the appliance.
Page 26

26 Installation
• A stand pipe with vent-hole. The internal di-
ameter must be minimum 4 cm.
Remove the sink plug when the appliance
drains the water to prevent that the water goes
back into the appliance.
The drain hose extension must not be longer
than 2 m. The internal diameter must not be
smaller than the diameter of the hose.
If you connect the water drain hose to a trap spigot under the sink, remove the plastic membrane
(A). If you do not remove the membrane, remaining food can cause a blockage in the drain hose
spigot
A safety device impedes the dirty water to go back
into the appliance. If, the spigot of the sink has a
'non-return valve', this can cause the appliance to
drain incorrectly. Remove the non-return valve.
max 85 cm
min 40 cm
max 400 cm
Page 27

FÜR PERFEKTE ERGEBNISSE
Danke, dass Sie sich für dieses AEG Produkt entschieden
haben. Wir haben es geschaffen, damit Sie viele Jahre von
seiner ausgezeichneten Leistung und den innovativen
Technologien, die Ihnen das Leben erleichtern, profitieren
können. Es ist mit Funktionen ausgestattet, die in
gewöhnlichen Geräten nicht vorhanden sind. Nehmen Sie
sich ein paar Minuten Zeit zum Lesen, um seine Vorzüge
kennen zu lernen.
ZUBEHÖR UND VERBRAUCHSMATERIALIEN
Im AEG Webshop finden Sie alles, was Sie für ein
makelloses Aussehen und perfektes Funktionieren Ihrer
AEG Geräte benötigen. Wir bieten auch ein
umfangreiches Zubehörsortiment, das Ihre höchsten
Qualitätsansprüche erfüllt, vom Profi-Kochgeschirr bis zu
Besteckkörben, von Flaschenhaltern bis hin zu
Wäschebeuteln für empfindliche Wäsche...
27
Besuchen Sie den Webshop unter
www.aeg-electrolux.com/shop
Page 28

28 Inhalt
INHALT
29 Sicherheitshinweise
33 Gerätebeschreibung
34 Bedienblende
37 Gebrauch des Gerätes
37 Einstellen des Wasserenthärters
39 Gebrauch von Salz für
Geschirrspüler
39 Verwendung von
Reinigungsmittel und Klarspüler
41 Funktion "Multitab"
41 Laden von Besteck und Geschirr
43 Spülprogramme
45 Auswählen und Starten eines
Spülprogramms
46 Reinigung und Pflege
47 Was tun, wenn …
50 Technische Daten
50 Umwelttipps
51 Montage
In dieser Benutzerinformation werden
folgende Symbole verwendet:
Wichtige Hinweise zur Sicherheit von
Personen und Informationen zur
Vermeidung von Geräteschäden
Allgemeine Hinweise und Ratschläge
Hinweise zum Umweltschutz
Änderungen vorbehalten
Page 29

Sicherheitshinweise
SICHERHEITSHINWEISE
Lesen Sie vor der Montage und Anwendung sorgfältig dieses Handbuch:
• Für Ihre Sicherheit und die Sicherheit Ihres Eigentums.
• Zum Schutz der Umwelt.
• Zur korrekten Bedienung des Geräts.
Bewahren Sie diese Bedienungsanleitung in der Nähe des Geräts auf, auch wenn Sie dieses
an einem anderen Ort aufstellen oder es an eine andere Person weitergeben.
Der Hersteller ist nicht dafür verantwortlich, wenn eine inkorrekte Montage und Verwendung Schäden verursacht.
Sicherheit von Kindern und schutzbedürftigen Personen
• Lassen Sie keine Personen (einschließlich Kinder) mit eingeschränkten physischen, sensorischen oder geistigen Fähigkeiten oder fehlenden Erfahrungen und Kenntnissen dieses
Gerät benutzen. Solche Personen müssen von einer Person beaufsichtigt oder bei der Bedienung des Geräts angeleitet werden, die für ihre Sicherheit verantwortlich ist.
• Halten Sie das Verpackungsmaterial von Kindern fern. Andernfalls besteht Erstickungsoder Verletzungsgefahr.
• Bewahren Sie alle Reinigungsmittel an einem sicheren Ort auf. Reinigungsmittel dürfen
nicht in die Hände von Kindern gelangen.
• Halten Sie Kinder und Haustiere vom geöffneten Gerät fern.
Allgemeine Sicherheitshinweise
• Nehmen Sie keine technischen Änderungen am Gerät vor. Hierdurch besteht Verletzungsgefahr und das Gerät kann beschädigt werden.
• Beachten Sie die Sicherheitsanweisungen des Reinigungsmittelherstellers, um Verätzungen an Augen, Mund oder im Hals zu vermeiden.
• Trinken Sie kein Wasser aus dem Gerät. Es können Reinigungsmittelrückstände im Gerät
zurückbleiben.
• Lassen Sie die Gerätetür nicht ohne Beaufsichtigung offen stehen. Damit werden Verletzungen und die von der geöffneten Tür ausgehende Stolpergefahr vermieden.
• Setzen oder stellen Sie sich nie auf die offene Tür.
29
Verwendung
• Dieses Gerät ist nur zur Verwendung im Haushalt bestimmt. Verwenden Sie dieses Gerät
nicht zu anderen Zwecken, um Verletzungen und Sachschäden zu vermeiden.
• Spülen Sie in diesem Gerät ausschließlich spülmaschinengeeignete Gegenstände.
• Laden Sie keine entflammbaren Produkte oder Gegenstände, die mit entflammbaren Produkten benetzt sind, in das Gerät und stellen Sie solche nicht in die Nähe oder auf das
Gerät. Es besteht Explosions- und Brandgefahr.
• Ordnen Sie Messer und andere spitze Gegenstände mit der Spitze nach unten in den Besteckkorb ein. Wenn dies nicht möglich ist, legen Sie sie horizontal in den Oberkorb oder
in den Messerkorb. (Nicht alle Modelle sind mit einem Messerkorb ausgestattet.)
Page 30

30 Sicherheitshinweise
• Verwenden Sie für Geschirrspüler ausschließlich dafür vorgesehene Produkte (Reinigungsmittel, Salz, Klarspülmittel).
• Die Verwendung von Salzarten, die nicht für Geschirrspüler vorgesehen sind, kann zur
Beschädigung des Wasserenthärters führen.
• Füllen Sie das Gerät mit Salz, bevor Sie ein Spülprogramm starten. Salzrückstände im Gerät können Korrosion oder ein Loch im Boden des Geräts verursachen.
• Füllen Sie nie andere Produkte als Klarspülmittel (Reinigungsmittel für Geschirrspüler,
Flüssigreiniger) in den Klarspülmittel-Dosierer. Dadurch kann das Gerät beschädigt werden.
• Vergewissern Sie sich, dass die Sprüharme sich ungehindert bewegen können, bevor Sie
ein Spülprogramm starten.
• Es kann heißer Dampf aus dem Gerät austreten, wenn Sie die Tür während des Ablaufs
eines Spülprogramms öffnen. Dabei besteht die Gefahr von Hautverbrennungen.
• Nehmen Sie kein Geschirr aus dem Gerät, bevor das Spülprogramm beendet ist.
Reinigung und Pflege
• Schalten Sie das Gerät vor Reinigungsarbeiten immer ab, und ziehen Sie den Netzstecker
aus der Steckdose.
• Verwenden Sie keine entflammbaren Produkte oder Produkte, die Korrosion verursachen.
• Benutzen Sie den Geschirrspüler nie ohne Filter. Vergewissern Sie sich, dass die Filter ordnungsgemäß eingesetzt sind. Falsch eingesetzte Filter führen zu nicht zufriedenstellenden Spülergebnissen und einer Beschädigung des Geräts.
• Reinigen Sie das Gerät nicht mit einem Wasser- oder Dampfstrahl. Andernfalls besteht
Stromschlaggefahr und das Gerät könnte beschädigt werden.
Installation
• Achten Sie darauf, dass das Gerät nicht beschädigt ist. Ein beschädigtes Gerät darf nicht
montiert oder an das Stromnetz angeschlossen werden. Wenden Sie sich in diesem Fall
an Ihren Händler.
• Entfernen Sie das gesamte Verpackungsmaterial, bevor Sie das Gerät montieren und verwenden.
• Der elektrische Anschluss, die Klempnerarbeiten und die Montage des Geräts dürfen nur
von einer qualifizierten Fachkraft ausgeführt werden. Auf diese Weise werden Gebäudeschäden oder Verletzungen vermieden.
• Achten Sie darauf, dass der Netzstecker während der Montage nicht an einer Netzsteckdose angeschlossen ist.
• Bohren Sie keine Löcher in das Gehäuse des Geräts. Dabei könnten hydraulische oder
elektrische Bauteile beschädigt werden.
Frostschutzmaßnahmen
• Stellen Sie das Gerät nicht an einem Ort auf, an dem die Temperatur unter 0 °C absinken
kann.
• Der Hersteller haftet nicht für Frostschäden.
Page 31

Sicherheitshinweise
Wasseranschluss
• Verwenden Sie zum Anschluss des Geräts an die Wasserversorgung neue Schläuche. Benutzen Sie keine gebrauchten Schläuche.
• Schließen Sie das Gerät nicht an neue oder lange nicht mehr benutzte Rohre an. Lassen
Sie zunächst das Wasser ein paar Minuten durch das Rohr fließen und schließen Sie erst
dann den Zulaufschlauch an.
• Achten Sie darauf, die Wasserschläuche bei der Geräteinstallation nicht zu quetschen
oder zu beschädigen.
• Vergewissern Sie sich, dass alle Wasseranschlüsse vollkommen dicht sind, damit kein
Wasser austreten kann.
• Prüfen Sie bei der ersten Verwendung des Gerätes, dass die Schläuche keine Risse aufweisen.
• Der Wasserzulaufschlauch verfügt über ein Sicherheitsventil und eine doppelte Ummantelung mit einem innenliegenden Netzkabel. Der Wasserzulaufschlauch steht nur während des Wasserzulaufs unter Druck. Wenn der Wasserzulaufschlauch eine undichte Stelle aufweist, unterbricht das Sicherheitsventil den Wasserzulauf.
– Gehen Sie beim Anschluss des Wasserzulaufschlauchs vorsichtig vor:
– Tauchen Sie den Wasserzulaufschlauch oder das Sicherheitsventil nicht in Wasser.
– Ziehen Sie sofort den Netzstecker aus der Steckdose, wenn der Wasserzulauf-
schlauch oder das Sicherheitsventil beschädigt ist.
– Wenden Sie sich für den Austausch des Wasserzulaufschlauchs mit Sicherheitsventil
an den Kundendienst.
WARNUNG!
Gefährliche Spannung.
31
Elektrischer Anschluss
• Das Gerät muss geerdet sein.
• Stellen Sie sicher, dass die elektrischen Daten auf dem Typenschild den Daten Ihrer
Stromversorgung entsprechen.
• Schließen Sie das Gerät nur an eine sachgemäß installierte Schutzkontaktsteckdose an.
• Verwenden Sie keine Mehrfachsteckdosen oder Verlängerungskabel. Es besteht Brandgefahr.
Page 32

32 Sicherheitshinweise
• Ersetzen oder wechseln Sie nicht selbst das Netzkabel. Wenden Sie sich hierzu an den
Kundendienst.
• Achten Sie darauf, den Netzstecker und das Netzkabel hinter dem Gerät nicht zu quetschen oder zu beschädigen.
• Stellen Sie sicher, dass der Netzstecker nach der Montage noch zugänglich ist.
• Ziehen Sie nicht am Netzkabel, wenn Sie das Gerät vom Stromnetz trennen möchten,
sondern ziehen Sie dazu immer direkt am Netzstecker.
Innenbeleuchtung
Die Innenbeleuchtung des Geschirrspülers wird automatisch beim Öffnen der Tür eingeschaltet und beim Schließen der Tür ausgeschaltet.
WARNUNG!
Sichtbare LED-Abstrahlung; vermeiden Sie es, direkt in das Licht der Lampe zu schauen.
Die LED-Leuchte ist der KLASSE 2 zuzuordnen in Übereinstimmung mit IEC 60825-1: 1993
+ A1:1997 + A2:2001.
Wellenlänge der Lichtstrahlen: 450 nm
Maximale Abgabeleistung: 548 μW
Für den Austausch der Innenbeleuchtung wenden Sie sich bitte an den Kundendienst.
Ziehen Sie vor dem Austausch der Innenbeleuchtung bitte den Netzstecker aus der Netzsteckdose.
Kundendienst
• Nur qualifizierte Fachkräfte dürfen an dem Gerät Reparaturarbeiten durchführen. Wenden Sie sich hierzu an den Kundendienst.
• Es dürfen nur Originalersatzteile verwendet werden.
Entsorgung des Geräts
• Um das Risiko von Verletzungen oder Sachschäden zu vermeiden:
– Ziehen Sie den Netzstecker aus der Netzsteckdose.
– Schneiden Sie das Netzkabel ab und entsorgen Sie es.
– Entfernen Sie den Türschnappverschluss, damit Kinder oder Haustiere nicht in dem
Gerät eingeschlossen werden können. Andernfalls besteht Erstickungsgefahr.
– Entsorgen Sie das Gerät bei Ihrer örtlichen Abfallentsorgungsstelle.
Page 33

Gerätebeschreibung
WARNUNG!
Die Geschirrspüler-Reinigungsmittel sind gefährlich und können Korrosion verursachen!
• Bei Unfällen mit diesen Reinigungsmitteln konsultieren Sie umgehend einen Arzt.
• Sollte Reinigungsmittel in den Mund gelangen, konsultieren Sie umgehend einen Arzt.
• Sollte das Reinigungsmittel in die Augen gelangen, konsultieren Sie umgehend einen
Arzt und spülen Sie die Augen mit Wasser aus.
• Bewahren Sie die Reinigungsmittel an einem sicheren Ort außerhalb der Reichweite von
Kindern auf.
• Lassen Sie die Gerätetür nicht offen stehen, solange sich Reinigungsmittel im Reinigungsmittelbehälter befindet.
• Füllen Sie das Gerät erst mit Reinigungsmittel, kurz bevor Sie ein Spülprogramm starten.
GERÄTEBESCHREIBUNG
1
33
11
10
9
2
3
4
5
1 Oberkorb
2 Wasserhärtestufen-Wähler
3 Salzbehälter
4 Reinigungsmittelbehälter
5 Klarspülmittel-Dosierer
6 Typenschild
7 Filter
8 Unterer Sprüharm
9 Oberer Sprüharm
10 Oberster Sprüharm
11 Arbeitsplatte
8
7
6
Page 34

34 Bedienblende
BEDIENBLENDE
Meldungen im Display und akustische Signaltöne helfen Ihnen bei der Bedienung des Geräts.
1
2
7
8
3
4
6
5
1 Ein-/Aus-Taste
2 Touchpad Menü (nach oben)
3 Display
4 Touchpad Zurück
5 Touchpad Start
6 Touchpad OK
7 Touchpad Menü (nach unten)
8 Touchpad Display
Ein-/Aus-Taste
Drücken Sie diese Taste, um das Gerät ein- und auszuschalten.
Zehn Minuten nach Ende des Spülprogramms schaltet die Funktion Auto Off das Gerät automatisch aus. Diese Funktion hilft bei der Senkung des Energieverbrauchs.
Display
A
B
C
Das Display hat drei Bereiche. Um einen Bereich zu bedienen, drücken Sie das Touchpad
Display bis der Rand des Bereiches erscheint.
Bereich Programme (A)
Dieser Bereich des Displays zeigt die Spülprogramme und die Dauer der einzelnen Programme an. So wählen Sie das Spülprogramm aus (siehe „Spülprogramme“):
1. Drücken Sie das Touchpad Display, um in diesen Bereich zu gelangen.
Page 35

Bedienblende 35
2. Drücken Sie eines der Menü-Touchpads. Im Display erscheinen:
• Das Menü mit den Spülprogrammen
• Die Zeitdauer eines jeden Programms
3. Drücken Sie eines dieser Menü-Touchpads, um ein Spülprogramm einzustellen.
4. Drücken Sie das Touchpad OK. Auf dem Display werden jetzt die drei Bereiche angezeigt:
• Bereich (A) zeigt das Spülprogramm und die Programmdauer.
• Bereich (B) zeigt den Endzeitpunkt des Spülprogramms.
Bereich Ende-Zeit (B)
Sie können den Start eines Spülprogramms um 1 bis 24 Stunden verzögern.
1. Drücken Sie das Touchpad Display, um in diesen Bereich zu gelangen.
2. Drücken Sie eines der Menü-Touchpads, um die Anzahl der Stunden für den verzögerten Programmstart einzustellen.
• Der obere Teil des Bereichs zeigt die Zeitvorwahl.
• Der untere Teil des Bereichs zeigt den Endzeitpunkt des Spülprogramms.
3. Drücken Sie das Touchpad OK.
4. Drücken Sie das Touchpad Zurück zum Schließen der Menüoption und zur Rückkehr
zum Bereich (A).
Bereich Optionen (C)
1. Drücken Sie das Touchpad Display, um in diesen Bereich zu gelangen.
2. Drücken Sie eines der Menü-Touchpads, um im Menü Optionen zu blättern.
3. Drücken Sie das Touchpad OK, um eine Funktion einzustellen oder ein Untermenü zu
öffnen.
4. Drücken Sie das Touchpad Zurück zum Schließen der Menüoption und zur Rückkehr
zum Bereich (A).
Menüoptionen
Multitab
Extra hygiene
ProBoost
Menü Untermenü Funktionsbeschreibung
Ein
Aus
Ein
Aus
Ein
Aus
Wenn Sie Kombi-Reinigungstabletten („3 in 1“, „4 in 1“, „5
in 1“) benutzen, verwenden Sie
die Funktion Multitab. Siehe
Abschnitt „Funktion Multitab“.
Diese Funktion sorgt für hygienischere Ergebnisse. Während
der Spülphase wird die Temperatur für 10 bis 14 Minuten auf
70 °C gehalten.
Diese Funktion erhöht den
Wasserdruck um 40 %. Diese
Funktion ergibt bessere Spülergebnisse, wenn das Geschirr
sehr schmutzig ist.
Page 36

36 Bedienblende
Menü Untermenü Funktionsbeschreibung
Einstellungen Sprache Deutsch
(Es sind verschiedene Sprachen
verfügbar.)
Lautstärke
Ein
Aus
(Es sind 5 Stufen verfügbar.)
Uhrzeit Sie können die Uhrzeit einstel-
Sie können die Sprache der
Meldungen im Display wählen.
Sie können die Lautstärke aller
Signaltöne einstellen.
Stufe 0 = stumm.
Werkseitige Einstellung: 5.
len.
Helligkeit
(Es sind 10 Stufen verfügbar.)
Kontrast
(Es sind 10 Stufen verfügbar.)
Werte zurücksetzen Sie können die Einstellungen
Wasserhärte
(Es sind 10 Stufen verfügbar.)
Klarspüler
Ein
Aus
Zurück Rückkehr zu den Menüoptio-
Erklärungen Programm Beschreibung Das Display zeigt Informatio-
Optionen Beschreibung Das Display zeigt Informatio-
Sie können die Helligkeit des
Displays ändern.
Werkseitige Einstellung: 10.
Sie können den Kontrast des
Displays einstellen.
Werkseitige Einstellung: 6.
auf die werkseitigen Einstellungen des Geräts zurücksetzen.
Sie können die Wasserenthärterstufe einstellen. Beachten
Sie den Abschnitt „Einstellen
des Wasserenthärters“.
Werkseitige Einstellung: 5.
Sie können den KlarspülmittelDosierer einschalten. Diese
Funktion steht nur bei eingeschalteter Multitab-Funktion
zur Verfügung.
nen.
nen über die Spülprogramme
an.
nen über die Funktionen an.
Demo Betrieb
Ein
Aus
Zurück Rückkehr zu den Menüoptio-
Sie können damit ein Spülprogramm simulieren. Siehe Demo
Betrieb .
Werkseitige Einstellung: Aus .
nen.
Page 37

Demo Betrieb
1. Wählen Sie die Menüoptionen.
2. Gehen Sie zu Erklärungen .
3. Drücken Sie das Touchpad OK, um das Untermenü zu öffnen.
4. Gehen Sie zu Demo Betrieb und aktivieren Sie die Funktion.
5. Drücken Sie das Touchpad Display.
• Das Display zeigt drei Bereiche (A), (B) und (C) an.
• In der oberen linken Ecke wird DEMO angezeigt. Die Funktion ist aktiviert.
Deaktivieren Sie die Funktion, um das Gerät zu benutzen.
GEBRAUCH DES GERÄTES
Erstes Einschalten des Geräts
1. Schalten Sie das Gerät ein.
2. Im Display wird die voreingestellte Sprache angezeigt: Language English.
• Drücken Sie das Touchpad OK zur Bestätigung der voreingestellten Sprache.
• Wählen Sie eine andere Sprache mit einer der Menü-Touchpads und drücken Sie zur
Bestätigung das Touchpad OK.
3. Im Display wird die eingestellte Uhrzeit angezeigt.
4. Stellen Sie die Uhrzeit mit einem der Menü-Touchpads ein.
5. Drücken Sie das Touchpad OK.
6. Das Display schaltet in den Bereich Programme um.
Gebrauch des Gerätes
37
Gebrauch des Gerätes
1. Prüfen Sie, ob die Einstellung des Wasserenthärters der Wasserhärte in Ihrem Gebiet
entspricht. Stellen Sie ihn bei Bedarf entsprechend ein.
2. Füllen Sie den Salzbehälter mit Geschirrspülsalz.
3. Füllen Sie den Klarspülmittel-Dosierer mit Klarspülmittel auf.
4. Laden Sie Besteck und Geschirr in den Geschirrspüler.
5. Stellen Sie je nach Spülgut und Verschmutzungsgrad das passende Spülprogramm ein.
6. Füllen Sie den Reinigungsmittelbehälter mit der passenden Menge an Reinigungsmittel.
7. Starten Sie das Spülprogramm.
Wenn Sie Kombi-Reinigungstabletten („3 in 1“, „4 in 1“, „5 in 1“) benutzen, verwenden Sie
die Funktion Multitab. Siehe Abschnitt „Funktion Multitab“.
EINSTELLEN DES WASSERENTHÄRTERS
Der Wasserenthärter hält die im Wasser enthaltenen Minerale und Salze zurück. Diese Minerale und Salze können das Gerät beschädigen.
Stellen Sie den Wasserenthärter ein, wenn die Einstellung nicht der Wasserhärte in Ihrem
Gebiet entspricht.
Page 38

38 Einstellen des Wasserenthärters
Wenden Sie sich an Ihr örtliches Wasserversorgungsunternehmen, um die Wasserhärte in
Ihrem Gebiet zu erfahren.
Wasserhärte
Deutscher Was-
serhärtegrad (dH°)
51 - 70 91 - 125 9,1 - 12,5 64 - 88
43 - 50 76 - 90 7,6 - 9,0 53 - 63
37 - 42 65 - 75 6,5 - 7,5 46 - 52
29 - 36 51 - 64 5,1 - 6,4 36 - 45
23 - 28 40 - 50 4,0 - 5,0 28 - 35
19 - 22 33 - 39 3,3 - 3,9 23 - 27
15 - 18 26 - 32 2,6 - 3,2 18 - 22 1 4
11 - 14 19 - 25 1,9 - 2,5 13 - 17 1 3
4 - 10 7 - 18 0,7 - 1,8 5 - 12 1 2
< 4 < 7 < 0,7 < 5
1) Werkseinstellung
2) Verwenden Sie kein Salz bei diesen Werten.
Französischer
Wasserhärtegrad
(°TH)
mmol/l Clarke-Werte manuell elekt-
Wasserhärteeinstel-
1)
2
1)
2
1)
2
1)
2
1)
2
1)
2
2)
1
Sie müssen den Wasserenthärter manuell und elektronisch einstellen.
lung
ronisch
10
9
8
7
6
1)
5
2)
1
Manuelle Einstellung
Drehen Sie den Wasserhärtestufen-Wähler auf die
Stufe 1 oder 2 (siehe Tabelle).
Elektronische Einstellung
1. Rufen Sie die Menüoptionen auf.
2. Gehen Sie zu Einstellungen .
3. Drücken Sie das Touchpad OK, um das Untermenü zu öffnen.
4. Gehen Sie zu Wasserhärte .
5. Drücken Sie das Touchpad OK.
6. Stellen Sie den Wasserenthärter ein.
7. Drücken Sie das Touchpad OK.
Page 39

20
30
M
A
X
1
2
3
4
+
-
Gebrauch von Salz für Geschirrspüler 39
8. Drücken Sie das Touchpad Zurück, um die Menüoptionen zu beenden.
GEBRAUCH VON SALZ FÜR GESCHIRRSPÜLER
Füllen des Salzbehälters
1. Drehen Sie den Deckel gegen dem Uhrzeigersinn und öffnen Sie den Salzbehälter.
2. Füllen Sie den Salzbehälter mit 1 Liter
Wasser (nur wenn Sie zum ersten Mal Salz
einfüllen).
3. Verwenden Sie den Trichter, um den Salzbehälter zu füllen.
4. Entfernen Sie das Salz, das sich um die
Öffnung des Salzbehälters herum angesammelt hat.
5. Drehen Sie den Deckel im Uhrzeigersinn,
um den Salzbehälter zu schließen.
Wenn das Füllen des Salzbehälters erforderlich ist, zeigt das Display eine Meldung an. Die
Meldung wird nicht angezeigt, während ein Spülprogramm läuft.
Nach dem Nachfüllen von Salz kann das Display die Meldung noch einige Stunden anzeigen. Dies hat jedoch keine unerwünschte Auswirkung auf den Gerätebetrieb.
Es ist normal, dass beim Befüllen mit Salz Wasser aus dem Salzbehälter überläuft.
VERWENDUNG VON REINIGUNGSMITTEL UND KLARSPÜLER
1
2
7
3
4
6
5
Page 40

40 Verwendung von Reinigungsmittel und Klarspüler
Gebrauch von Reinigungsmitteln
Um die Umwelt zu schützen, verwenden Sie nicht mehr als die korrekte Reinigermenge.
Beachten Sie die Empfehlungen des Reinigungsmittelsherstellers auf der Reinigerverpackung.
So füllen Sie den Reinigungsmittelbehälter:
1.
Drücken Sie zum Öffnen des Deckels
hälters.
2.
Füllen Sie das Reinigungsmittel in den Behälter.
3. Wenn das Spülprogramm einen Vorspülgang hat, schütten Sie eine kleine Menge Reinigungsmittel auf die Innenseite der Gerätetür.
4. Wenn Sie Geschirrspüler-Tabs verwenden, legen Sie diese in den Reinigungsmittelbehälter.
5. Schließen Sie den Reinigungsmittelbehälter, indem Sie auf den Deckel drücken, bis er
einrastet.
Wählen Sie lange Spülprogramme, wenn Sie Geschirrspüler-Tabs verwenden. Diese können
sich bei kurzen Spülprogrammen nicht vollständig auflösen und die Reinigung beeinträchtigen.
.
1
die Freigabetaste 7 des Reinigungsmittelbe-
2
.
1
Gebrauch von Klarspülmittel
Klarspülmittel ermöglichen das Trocknen des Geschirrs ohne Streifen und Flecken.
Der Klarspülmittel-Dosierer fügt während des letzten Spülgangs automatisch Klarspülmittel
hinzu.
Gehen Sie wie folgt vor, um den Klarspülmittel-Dosierer aufzufüllen:
1.
Drücken Sie den Entriegelungsknopf
Dosierers.
2.
Füllen Sie den Klarspülmittel-Dosierer
zeigt den maximalen Füllstand an.
3. Wischen Sie verschüttetes Klarspülmittel mit einem saugfähigen Tuch auf, um zu große
Schaumbildung während des Spülprogramms zu vermeiden.
4. Schließen Sie den Klarspülmittel-Dosierer. Drücken Sie dabei auf den Deckel, bis er einrastet.
Wenn das Füllen des Klarspülmittel-Dosierers erforderlich ist, zeigt das Display eine Meldung an. Die Meldung wird nicht angezeigt, während ein Spülprogramm läuft.
zum Öffnen des Deckels 5 des Klarspülmittel-
6
mit Klarspülmittel auf. Die Markierung „max“
3
Einstellung der Klarspülmitteldosierung
Werkseitige Einstellung: Stufe 3.
Sie können den Klarspülmittel-Dosierer auf die Stufen 1 (niedrigste Dosierung) bis 4 (höchste Dosierung) einstellen.
Drehen Sie den Klarspülmittelwähler
zur Erhöhung oder Verringerung der Dosierung.
4
Page 41

Funktion "Multitab"
FUNKTION "MULTITAB"
Die Funktion Multitab ermöglicht die Verwendung von Kombi-Reinigungstabletten.
Diese Tabletten enthalten das Reinigungsmittel, Klarspülmittel und Geschirrspülsalz. Einige
Tabletten-Sorten können auch andere Zusätze enthalten.
Vergewissern Sie sich, dass diese Tabletten für die Wasserhärte in Ihrer Region geeignet sind
(siehe hierzu die Anweisungen auf der Produktverpackung).
Die Funktion Multitab sperrt automatisch die Zufuhr von Klarspülmittel und Salz.
Die Funktion Multitab deaktiviert die Meldungen, dass die Klarspülmittel- und Salzbehälter
leer sind.
Die Programmdauer kann sich erhöhen, wenn Sie die Funktion Multitab verwenden.
Schalten Sie die Funktion Multitab vor dem Beginn eines Spülprogramms ein oder aus. Sie
können die Funktion Multitab nicht ein- oder ausschalten, wenn ein Spülprogramm angelaufen ist.
Schalten Sie die Funktion Multitab wie folgt ein:
1. Wählen Sie die Menüoptionen.
2. Wählen Sie Multitab und aktivieren Sie die Funktion Multitab.
• Wenn Sie die Funktion Multitab aktivieren, bleibt sie so lange aktiv, bis Sie sie wieder
deaktivieren.
3. Drücken Sie das Touchpad OK.
4. Drücken Sie das Touchpad Zurück, um die Menüoptionen zu beenden.
So deaktivieren Sie die Funktion Multitab für die separate Verwendung von Reinigungsmittel, Salz und
Klarspülmittel:
1. Wählen Sie die Menüoptionen.
2. Gehen Sie zu Multitab und deaktivieren Sie die Multitab-Funktion.
3. Drücken Sie das Touchpad OK.
4. Drücken Sie das Touchpad Zurück, um die Menüoptionen zu beenden.
5. Füllen Sie den Salzbehälter und den Klarspülmittel-Dosierer auf.
6. Stellen Sie den Wasserenthärter auf die höchste Stufe ein.
7. Starten Sie ein Spülprogramm ohne Geschirr.
8. Nach Ablauf des Spülprogramms, stellen Sie den Wasserenthärter auf die Wasserhärte
in Ihrer Region ein.
9. Stellen Sie die Menge des Klarspülmittels ein.
41
LADEN VON BESTECK UND GESCHIRR
Siehe Broschüre „Beispiele für ProClean-Beladungen“.
Hinweise und Tipps
• Spülen Sie in diesem Gerät keine Gegenstände, die Wasser aufnehmen können (Schwäm-
me, Geschirrtücher usw.).
Page 42

42 Laden von Besteck und Geschirr
• Entfernen Sie Speisereste vom Geschirr.
• Weichen Sie eingebrannte Essensreste ein.
• Ordnen Sie hohle Gefäße (z. B. Tassen, Gläser, Pfannen) mit der Öffnung nach unten ein.
• Achten Sie darauf, dass sich kein Wasser in Behältern oder Schüsseln sammeln kann.
• Stellen Sie sicher, dass das Geschirr und das Besteck nicht aneinander haften.
• Achten Sie darauf, dass die Gläser einander nicht berühren.
• Ordnen Sie kleine Gegenstände in den Besteckkorb ein.
• Mischen Sie Löffel mit anderem Besteck, so können sie nicht zusammenkleben.
• Achten Sie beim Einordnen des Spülguts darauf, dass das Wasser die Oberflächen aller
Geschirrteile erreicht.
• Ordnen Sie leichte Gegenstände in den Oberkorb ein. Achten Sie darauf, dass diese nicht
verrutschen können.
• Auf Kunststoffgegenständen und Geschirr mit Antihaftbeschichtung sammeln sich oft-
mals Wassertropfen.
Bierglashalter
Die Bierglashalter verhindern ein Verschieben der
Gläser während des laufenden Spülprogramms.
Wenn Sie die Bierglashalter nicht benutzen, klappen Sie sie nach oben oder entnehmen Sie sie. Sie
können auch den Träger entfernen.
WARNUNG!
Seien Sie beim Herausnehmen und beim Einsetzen
des Trägers vorsichtig.
So entfernen Sie die Halter und den Träger:
1. Lösen Sie die Halter vom Träger und entfernen Sie sie.
2. Drücken Sie den Träger in den hinteren
Teil des Korbs, um ihn zu lösen.
Page 43

So rasten Sie die Halter und den Träger ein:
1. Drücken Sie den Träger in den vorderen
Teil des Korbs, um ihn einzurasten.
2. Setzen Sie die Halter auf den Träger.
SPÜLPROGRAMME
Spülprogramme 43
Programm Verschmut-
zungsgrad
Automatik
1)
Alle Geschirr, Besteck,
70° Pro Stark ver-
schmutzt
Extra silent
2)
Normal verschmutzt
60° Quick
3)
Vor kurzem benutztes Geschirr
50° E-spar
4)
Normal verschmutzt
50 Minuten Leicht ver-
schmutzt
ProZone
5)
Unterschiedlicher Verschmutzungsgrad
45° Glas Normal/leicht
verschmutzt
Spülgut Programmbeschreibung
Vorspülen
Töpfe und Pfannen
Hauptspülgang 45 °C oder 70 °C
Spülgänge
Trocknen
Geschirr, Besteck,
Töpfe und Pfannen
Vorspülen
Hauptspülgang 70 °C
Spülgänge
Trocknen
Geschirr und Besteck Vorspülen
Hauptspülgang 50 °C
Spülgänge
Trocknen
Geschirr und Besteck Hauptspülgang 60 °C
Spülgang
Geschirr und Besteck Vorspülen
Hauptspülgang 50 °C
Spülgänge
Trocknen
Geschirr und Besteck Hauptspülgang 55 °C
Spülgänge
Geschirr, Besteck,
Töpfe und Pfannen
Vorspülen
Hauptspülgang 70 °C
Spülgänge
Trocknen
Empfindliches Geschirr und Gläser
Hauptspülgang 45 °C
Spülgänge
Trocknen
Page 44

44 Spülprogramme
Programm Verschmut-
Spülgut Programmbeschreibung
zungsgrad
Vorspülen Verwenden Sie dieses Programm zum
Spülgang
schnellen Abspülen des Geschirrs. Damit
wird vermieden, dass sich Essensreste am
Geschirr festsetzen und schlechte Gerüche aus dem Gerät entweichen.
Verwenden Sie für dieses Programm kein
Reinigungsmittel.
1) Das Gerät erkennt den Verschmutzungsgrad und die Anzahl der Geschirrteile in den Körben. Es stellt dann
automatisch die Wassertemperatur und -menge, den Energieverbrauch und die Programmlaufzeit ein.
2) Dies ist das leiseste Spülprogramm. Die Pumpe arbeitet mit einer sehr niedrigen Drehzahl, um das Geräusch zu
verringern. Auf Grund der niedrigen Drehzahl verlängert sich die Programmdauer.
3) Mit diesem Programm können Sie vor kurzem benutztes Geschirr spülen. Es liefert gute Spülergebnisse in kurzer
Zeit.
4) Dies ist das Standardprogramm für Prüfinstitute. Mit diesem Programm erhalten Sie den wirtschaftlichsten
Energie- und Wasserverbrauch für Geschirr und Besteck mit normaler Verschmutzung. Informationen zu den
Testdaten finden Sie in der mitgelieferten Broschüre.
5) Mit diesem Programm können Sie Geschirr mit unterschiedlichem Verschmutzungsgrad spülen. Ordnen Sie das
stark verschmutzte Geschirr in den Unterkorb und das normal verschmutzte Geschirr in den Oberkorb ein. Der
Wasserdruck ist im Unterkorb dreimal höher als im Oberkorb und die Wassertemperatur ist im Unterkorb 25 %
höher als im Oberkorb.
Funktionen
Programm Extra hygiene ProBoost
Automatik Ja, mit Auswirkung Ja, ohne Auswirkung
70° Pro Ja, ohne Auswirkung Ja, mit Auswirkung
Extra silent Ja, ohne Auswirkung Ja, ohne Auswirkung
60° Quick Ja, mit Auswirkung Ja, ohne Auswirkung
50° E-spar Ja, mit Auswirkung Ja, ohne Auswirkung
50 Minuten Ja, mit Auswirkung Ja, ohne Auswirkung
ProZone Ja, ohne Auswirkung Ja, ohne Auswirkung
45° Glas Ja, ohne Auswirkung Ja, ohne Auswirkung
Vorspülen Ja, ohne Auswirkung Ja, ohne Auswirkung
Verbrauchswerte
Programm
1)
Energie (kWh) Wasser (in Litern)
Automatik 0,9 - 1,7 8 - 15
70° Pro 1,4 - 1,6 13 - 14
Extra silent 1,1 - 1,2 9 - 11
60° Quick 0,8 9
50° E-spar 0,9 - 1,0 9 - 11
50 Minuten 1,0 - 1,1 10 - 11
ProZone 1,3 - 1,5 14 - 15
Page 45

Auswählen und Starten eines Spülprogramms 45
Programm
45° Glas 0,8 - 0,9 11 - 12
Vorspülen 0,1 4
1) Das Display zeigt die Programmdauer an.
Druck und Temperatur des Wassers, die Schwankungen in der Stromversorgung und die Geschirrmenge können diese Werte verändern.
1)
Energie (kWh) Wasser (in Litern)
AUSWÄHLEN UND STARTEN EINES SPÜLPROGRAMMS
Start eines Spülprogramms
1. Schließen Sie die Gerätetür.
2. Schalten Sie das Gerät ein.
3. Wählen Sie ein Spülprogramm und die Funktionen.
4. Drücken Sie das Touchpad Start und der Ablauf der Zeitvorwahl oder das Spülprogramm beginnt automatisch.
• Der Start des Geräts erfolgt nicht automatisch, wenn der Salzbehälter oder der Klar-
spülmittel-Dosierer leer sind. Die zugehörigen Meldungen werden im Display angezeigt. Drücken Sie nochmals das Touchpad Start und der Ablauf der Zeitvorwahl oder
das Spülprogramm beginnt.
• Nach Ablauf der Zeitvorwahl startet das Spülprogramm automatisch.
Das Öffnen der Tür unterbricht den Ablauf der Zeitvorwahl. Wenn Sie die Tür wieder schließen, läuft die Zeitvorwahl ab dem Zeitpunkt der Unterbrechung weiter.
Abbruch der Zeitvorwahl
1. Drücken Sie das Touchpad Start.
2. Folgen Sie den Angaben im Display, um die Zeitvorwahl abzubrechen.
3. Drücken Sie das Touchpad Start. Das Spülprogramm startet automatisch.
Unterbrechung eines Spülprogramms
• Öffnen Sie die Tür des Gerätes.
– Das Spülprogramm stoppt.
• Schließen Sie die Gerätetür.
– Das Spülprogramm wird an der Stelle fortgesetzt, an der es unterbrochen wurde.
Abbrechen des Spülprogramms
Wenn das Spülprogramm noch nicht gestartet ist, können Sie die Auswahl ändern.
Um die Auswahl bei laufendem Spülprogramm zu ändern, müssen Sie das Programm zuerst
beenden.
1. Drücken Sie das Touchpad Start.
2. Folgen Sie den Angaben im Display, um das Spülprogramm abzubrechen.
Page 46

46 Reinigung und Pflege
Bevor Sie ein neues Spülprogramm starten, kontrollieren Sie, ob der Reinigungsmittelbehälter gefüllt ist.
Ende des Spülprogramms
Wenn das Spülprogramm beendet ist, ertönt ein unterbrochener Signalton und das Display
zeigt eine Meldung an.
1. Schalten Sie das Gerät aus.
2. Öffnen Sie die Tür des Geräts.
3. Öffnen Sie für bessere Trocknungsergebnisse für einige Minuten die Tür einen Spaltbreit.
Entnehmen des Spülguts
• Lassen Sie das Geschirr abkühlen, bevor Sie es aus dem Geschirrspüler entnehmen. Hei-
ßes Geschirr ist stoßempfindlich.
• Entladen Sie zuerst den Unter- und dann den Oberkorb.
• An den Innenseiten und an der Gerätetür kann sich Wasser niederschlagen, da sich Edel-
stahl schneller abkühlt als das Geschirr.
REINIGUNG UND PFLEGE
Entfernen und Reinigen der Filter
Verschmutzte Filter beeinträchtigen das Spülergebnis.
Obwohl die Filter wartungsarm sind, müssen sie in regelmäßigen Abständen überprüft und,
falls nötig, gereinigt werden.
1. Drehen Sie den Filter (A) gegen den Uhrzeigersinn, um ihn zu entfernen und ziehen Sie ihn aus dem Filter (B).
B
A
Page 47

2. Filter (A) besteht aus zwei Teilen. Ziehen
Sie diese auseinander, um sie zu zerlegen.
3. Reinigen Sie die einzelnen Teile unter
fließendem Wasser.
4. Setzen Sie die beiden Teile des Filters (A)
ineinander und drücken Sie diese zusammen. Vergewissern Sie sich, dass sie korrekt ineinander sitzen.
5. Nehmen Sie den Filter (B) heraus.
6. Reinigen Sie den Filter (B) unter fließendem Wasser.
7. Setzen Sie den Filter (B) wieder in die ursprüngliche Position ein. Vergewissern Sie
sich, dass er korrekt in den beiden Führungen (C) sitzt.
8. Setzen Sie den Filter (A) in den Filter (B)
ein. Drehen Sie den Filter (A) im Uhrzeigersinn, bis er einrastet.
Was tun, wenn … 47
C
Reinigen der Sprüharme
Bauen Sie die Sprüharme nicht aus.
Falls die Löcher in den Sprüharmen verstopft sind, reinigen Sie sie mit einem Cocktailspieß.
Reinigen der Außenseiten
Reinigen Sie die Außenseiten und das Bedienfeld des Gerätes mit einem weichen, feuchten
Tuch.
Verwenden Sie ausschließlich Neutralreiniger.
Benutzen Sie keine Scheuermittel, Metallschwämmchen oder Lösungsmittel (Azeton usw.).
WAS TUN, WENN …
Das Gerät startet nicht oder stoppt während des Betriebs.
Versuchen Sie für das Problem eine Lösung zu finden. Hinweise finden Sie in der folgenden
Tabelle.
Bei manchen Fehlfunktionen zeigt das Display eine Meldung an und ein unterbrochenes
Signal ertönt.
WARNUNG!
Schalten Sie das Gerät aus, bevor Sie die Überprüfungen vornehmen.
Page 48

48 Was tun, wenn …
Störung Mögliche Ursachen Mögliche Abhilfe
Es läuft kein Wasser in das Gerät.
Der Wasserdruck ist zu niedrig. Wenden Sie sich an Ihren loka-
Der Wasserhahn ist geschlos-
Der Filter im Wasserzulauf-
Der Wasserzulaufschlauch ist
Der Wasserzulaufschlauch ist
Das Gerät pumpt das Wasser
nicht ab.
Der Wasserablaufschlauch ist
Der Ablaufschlauch ist beschä-
Die Aquasafe-Einrichtung ist
ausgelöst.
Das Spülprogramm startet
nicht.
Sie haben nicht das Touchpad
Der Netzstecker steckt nicht
Die Sicherung im Haussiche-
Die Zeitvorwahl ist eingestellt. Brechen Sie die Zeitvorwahl ab.
Nach Ablauf der Zeitvorwahl
Der Wasserhahn ist blockiert
oder durch Kalkablagerungen
verstopft.
sen.
schlauch ist verstopft.
nicht richtig angeschlossen.
beschädigt.
Der Siphon ist verstopft. Reinigen Sie den Siphon.
nicht richtig angeschlossen.
digt.
Drehen Sie den Wasserhahn zu
Die Gerätetür ist offen. Eine
Meldung wird im Display angezeigt.
Start gedrückt.
richtig in der Steckdose.
rungskasten ist durchgebrannt.
Reinigen Sie den Wasserhahn.
len Wasserversorger.
Drehen Sie den Wasserhahn
auf.
Reinigen Sie den Filter.
Vergewissern Sie sich, dass die
Schlauchverbindung in Ordnung ist.
Stellen Sie sicher, dass der
Wasserzulaufschlauch nicht
beschädigt ist.
Vergewissern Sie sich, dass die
Schlauchverbindung in Ordnung ist.
Stellen Sie sicher, dass der
Wasserablaufschlauch keine
Beschädigungen aufweist.
und wenden Sie sich an den
Kundendienst.
Schließen Sie die Gerätetür.
Drücken Sie das Touchpad
Start.
Stecken Sie den Netzstecker
richtig in die Steckdose.
Wechseln Sie die Sicherung
aus.
startet das Spülprogramm automatisch.
Schalten Sie das Gerät wieder ein, nachdem Sie es überprüft haben. Das Programm wird an
der Stelle fortgesetzt, an der es unterbrochen wurde.
Tritt die Störung erneut auf, wenden Sie sich an den Kundendienst.
Page 49

Was tun, wenn … 49
Wenn das Display andere Fehlermeldungen anzeigt, wenden Sie sich an den Kundendienst.
Die vom Kundendienst benötigten Daten finden Sie auf dem Typenschild.
Notieren Sie folgende Daten:
– Modell (MOD.) ........................................................
– Produktnummer (PNC) ........................................
– Seriennummer (S.N.) ........................................
Die Spül- und Trocknungsergebnisse sind nicht zufriedenstellend
Problem Mögliche Ursache Mögliche Abhilfe
Das Geschirr ist nicht sauber. Das ausgewählte Spülpro-
Sie haben Teile des Spülguts
Die Sprüharme konnten sich
Die Filter sind verschmutzt,
Die Reinigungsmittelmenge
Kalkablagerungen auf dem Geschirr.
Inkorrekte Härtegradeinstel-
Die Verschlusskappe des Salz-
Schlieren, Streifen, weißliche
Flecken oder blauschimmernder
Belag auf Gläsern und Geschirr.
Flecken von getrockneten Wassertropfen auf Gläsern und Geschirr.
Die Ursache kann auch beim
gramm ist für das Spülgut und
den Verschmutzungsgrad nicht
geeignet.
nicht richtig in die Körbe gestellt, so dass das Wasser nicht
alle Oberflächen berührte.
nicht frei drehen. Inkorrekte
Position der Teile in den Körben.
nicht richtig montiert oder
nicht korrekt eingesetzt.
war nicht ausreichend oder es
wurde kein Reinigungsmittel
verwendet.
Der Salzbehälter ist leer. Füllen Sie den Salzbehälter mit
lung des Wasserenthärters.
behälters ist nicht richtig geschlossen.
Die Klarspülmitteldosierung ist
zu hoch.
Die Klarspülmitteldosierung ist
zu niedrig.
Reinigungsmittel liegen.
Stellen Sie sicher, dass für das
Spülgut und den Verschmutzungsgrad das geeignete Spülprogramm ausgewählt wird.
Stellen Sie die Teile richtig in
die Körbe.
Stellen Sie sicher, dass die
Sprüharme nicht durch eine inkorrekte Position der Teile blockiert werden.
Kontrollieren Sie, ob die Filter
sauber, richtig montiert und
korrekt eingesetzt sind.
Stellen Sie sicher, dass die Reinigungsmittelmenge ausreichend ist.
Geschirrspülsalz.
Stellen Sie den Wasserenthärter
auf den korrekten Härtegrad
ein.
Stellen Sie sicher, dass der Salzbehälter richtig geschlossen ist.
Klarspülmitteldosierung verringern.
Klarspülmitteldosierung erhöhen.
Verwenden Sie eine andere Reinigungsmittelmarke.
Page 50

50 Technische Daten
Problem Mögliche Ursache Mögliche Abhilfe
Das Geschirr ist nass. Im Spülprogramm war keine
Das Geschirr ist nass und
glanzlos.
Die Funktion Multitab ist ein-
oder eine verkürzte Trocknungsphase vorgesehen.
Der Klarspülmittel-Dosierer ist
leer.
geschaltet (diese Funktion
deaktiviert automatisch den
Klarspülmittel-Dosierer).
Aktivieren des Klarspülmittel-Dosierers
1. Wählen Sie die Menüoptionen.
2. Gehen Sie zu Einstellungen .
3. Drücken Sie das Touchpad OK, um das Untermenü zu öffnen.
4. Gehen Sie zu Klarspüler und aktivieren Sie den Klarspülmittel-Dosierer.
5. Drücken Sie das Touchpad OK.
6. Drücken Sie das Touchpad Zurück, um die Menüoptionen zu beenden.
TECHNISCHE DATEN
Öffnen Sie für bessere Trocknungsergebnisse für einige Minuten die Tür einen Spaltbreit.
Füllen Sie den KlarspülmittelDosierer mit Klarspülmittel auf.
Aktivieren Sie den Klarspülmittel-Dosierer.
Abmessungen Breite 596 mm
Höhe 850 mm
Tiefe 625 mm
Wasserdruck Min. 0,5 bar (0,05 MPa)
Max. 8 bar (0,8 MPa)
Wasserversorgung
Fassungsvermögen Gedecke 12
1) Den Zulaufschlauch an einen Wasserhahn mit einem 3/4"-Außengewinde anschließen.
1)
Kalt- oder Warmwasser maximal 60 °C
Das Typenschild am inneren Rand der Gerätetür zeigt die elektrischen Anschlussdaten.
Wenn Sie Heißwasser mithilfe umweltfreundlicher, alternativer Energiequellen (z. B. Solaroder Photovoltaikanlagen oder Windkraft) aufbereiten, können Sie durch den Anschluss des
Geräts an die Heißwasserversorgung Energie sparen.
UMWELTTIPPS
Das Symbol auf dem Produkt oder seiner Verpackung weist darauf hin, dass dieses
Produkt nicht als normaler Haushaltsabfall zu behandeln ist, sondern an einem
Sammelpunkt für das Recycling von elektrischen und elektronischen Geräten abgegeben
Page 51

Montage 51
werden muss. Durch Ihren Beitrag zum korrekten Entsorgen dieses Produkts schützen Sie
die Umwelt und die Gesundheit Ihrer Mitmenschen. Umwelt und Gesundheit werden durch
falsches Entsorgen gefährdet. Weitere Informationen über das Recycling dieses Produkts
erhalten Sie von Ihrem Rathaus, Ihrer Müllabfuhr oder dem Geschäft, in dem Sie das
Produkt gekauft haben.
Recyceln Sie die Materialien mit dem Symbol
sprechenden Recyclingbehältern.
. Entsorgen Sie die Verpackung in den ent-
MONTAGE
Installation als Einbaugeschirrspüler
Installieren Sie das Gerät in der Nähe eines Wasserhahns und eines Wasserablaufs.
Entfernen Sie die obere Abdeckung des Geräts, wenn Sie es unter einem Spülbecken oder
einer Küchenarbeitsplatte installieren möchten.
Achten Sie darauf, dass die Einbaunische die in
der Abbildung gezeigten Abmessungen aufweist.
Entfernen der Arbeitsplatte des Geräts
1. Lösen Sie die hinteren Schrauben (1).
2. Ziehen Sie die Arbeitsplatte hinter dem
Gerät (2) vor.
Page 52

525354
3. Heben Sie die Arbeitsplatte an und ziehen
Sie sie aus den vorderen Schlitzen (3) heraus.
4. Richten Sie das Gerät mit den Stellfüßen
aus.
5. Installieren Sie das Gerät unter der Arbeitsplatte. Quetschen oder biegen Sie die
Wasserschläuche nicht während der Montage.
Nivellieren des Geräts
Die Tür eines waagerecht ausgerichteten Geräts lässt sich dicht und sicher schließen.
Ist das Gerät nicht waagrecht ausgerichtet, bleibt die Tür an den Seiten des Schranks hängen.
Lockern oder ziehen Sie die Stellfüße an, um das Gerät zu nivellieren.
Anschluss des Ablaufschlauchs
Schließen Sie den Wasserablaufschlauch an Folgendes an:
• Den Siphon der Spüle und befestigen Sie ihn an der Unterseite der Arbeitsplatte. Dadurch
wird verhindert, dass Abwasser aus dem Siphon in das Gerät zurückfließen kann.
• Ein Standrohr mit Entlüftungsöffnung. Der
Innendurchmesser muss mindestens 4 cm
betragen.
Nehmen Sie den Spülbeckenstöpsel aus dem
Becken, während das Gerät das Wasser abpumpt, um zu verhindern, dass das Wasser wieder in das Gerät zurückfließt.
Ein Verlängerungsschlauch für den Ablaufschlauch darf nicht länger als 2 m und sein Innendurchmesser darf nicht kleiner als der
Durchmesser des Ablaufschlauchs sein.
Wenn der Ablaufschlauch an einen Siphon unter
einem Spülbecken angeschlossen wird, muss die
Kunststoffmembran (A) entfernt werden. Falls Sie
die Kunststoffmembrane nicht entfernen, kann
der Siphon durch Speisereste verstopfen.
Eine Sicherheitsvorrichtung verhindert, dass das
Schmutzwasser in das Gerät zurückfließt. Falls der
Siphon Ihrer Spüle ein Rückschlagventil hat, kann
dieses den korrekten Wasserablauf Ihres Gerätes
beeinträchtigen. Entfernen Sie das Rückschlagventil.
max 85 cm
min 40 cm
max 400 cm
Page 53

Page 54

Page 55

55
Page 56

www.aeg-electrolux.com/shop 117939871-A-392010
 Loading...